Chapter 11 Designing and Developing Resources: …eduscapes.com/treehouses/TN11multimedia.pdfChapter...
54
Chapter 11 - Designing and Developing Resources: Multimedia Materials 385 Chapter 11 Designing and Developing Resources: Multimedia Materials How can I combine text, graphics, video, au- dio, and animation into one project? Is multimedia easy enough for my elementary students to use? I've seen some really ugly multimedia materi- als, how can I create something that looks pro- fessional? Multimedia is a fun and easy way to incorporate text, audio, and video materials into informational and instructional proj- ects. After completing this chapter, you’ll be able to: • Define multimedia and describe its features. • Describe and develop different types of student interac- tions using multimedia. • Describe different levels of student and teacher multime- dia development. • Apply design guidelines to multimedia projects. • Create multimedia materials in various subject areas. Multimedia provides educators with the tools to bring learn- ing alive for students of all ages. Multimedia is changing our approach to the design, development, and implementation of instructional materials. No longer is an instructor faced with just chalk and a chalkboard. The classroom of today may con- tain an interactive presentation station, in addition to a wide area network that can convey audio, video, and data to students on- and off-site. This electronic classroom can provide a stimu- lating environment for teaching and learning; however, it can also cause frustration for instructors with little or no experience using advanced technology in their classrooms. An Introduction to Multimedia Just a decade ago the term “multimedia” was used to describe any combination of media such as a slide-tape program or a Treehouse Tip Multimedia brings all the technologies together.
Transcript of Chapter 11 Designing and Developing Resources: …eduscapes.com/treehouses/TN11multimedia.pdfChapter...

Chapter 11 - Designing and Developing Resources: Multimedia Materials 385
Chapter 11
Designing and Developing Resources:Multimedia Materials
How can I combine text, graphics, video, au-dio, and animation into one project?
Is multimedia easy enough for my elementary students to use?
I've seen some really ugly multimedia materi-als, how can I create something that looks pro-fessional?
Multimedia is a fun and easy way to incorporate text, audio, and video materials into informational and instructional proj-ects. After completing this chapter, you’ll be able to:
• Definemultimediaanddescribeitsfeatures.• Describeanddevelopdifferenttypesofstudentinterac-
tions using multimedia.• Describedifferentlevelsofstudentandteachermultime-
dia development.• Applydesignguidelinestomultimediaprojects.• Createmultimediamaterialsinvarioussubjectareas.
Multimedia provides educators with the tools to bring learn-ing alive for students of all ages. Multimedia is changing our approach to the design, development, and implementation of instructional materials. No longer is an instructor faced with just chalk and a chalkboard. The classroom of today may con-tain an interactive presentation station, in addition to a wide area network that can convey audio, video, and data to students on- and off-site. This electronic classroom can provide a stimu-lating environment for teaching and learning; however, it can also cause frustration for instructors with little or no experience using advanced technology in their classrooms.
An Introduction to MultimediaJust a decade ago the term “multimedia” was used to describe any combination of media such as a slide-tape program or a
Treehouse Tip
Multimedia brings all the technologies together.

Building Treehouses for Learning: Technology in Today's Classrooms386kit containing a videotape, transparencies, and an instructor’s guide. In general, multiple delivery systems were required. These systems ran simultaneously in a sequential, linear fash-ion. Synchronizing a slide with an audiotape was the closest a developer could get to an integrated system.
With advancements in computer systems, video, network-ing, and related technologies, computer-based multimedia came on the scene and introduced more complex systems that could access, manage, combine, and control multiple media.
Multimedia DefinedMultimediacanbedefinedasaccesstotext(words&numbers),aural(soundeffects,music,&speech),andvisual(stillimages,movies,&animation)elementsaspartoftheteaching/learningprocess. Multimedia combines, synthesizes, and synchronizes various media components into a single, integrated presenta-tion of information. These elements are usually controlled by a computer system. For example, a Macromedia Flash project, Microsoft PowerPoint presentation, or Knowledge Adventure HyperStudio stack can be used to control and present sounds, video clips, animation, and many other text, aural, and visual elements.Theseelementsmaybestoredonaharddrive,CD,DVD,oranyothermediaformat.Theycanalsobesharedoverthe Internet.
The term hypermedia is sometimes applied when a user ac-tivelyexploresmultimediamaterialsinanon-sequentialand/ornonlinear manner. Users are not required to follow a predeter-mined organizational scheme when searching for text-, aural-, or visual-based information in a hypermedia environment. ManypopularCD-ROMandwebsitesaredevelopedwiththishypermedia environment in mind. For example, the multimedia Microsoft Encarta provides articles you can read, but you can also listen to audio clips, examine photographs, and even see video clips and animations. For example, the article in Figure 11-1a shows an animation of how a pump works and Figure 11-1bshowsavideoclipfromtheCivilRightsmovement.
A variety of software types may be used in the develop-ment of multimedia. Integrated packages such as AppleWorks and some graphics packages have slide show options for lim-ited multimedia projects. Presentation tools such as Microsoft PowerPoint can be used for multimedia projects that require both linear and nonlinear access. These tools allow users to add sounds, animations, and video to text and graphics. Fig-ure 11-1c-f shows a nonlinear student project that includes four sections: radio history, how radio works, building a radio, and radio today. The presenter clicks on the topic they will be presenting and the software links to one of the four separate
Treehouse Tip
Multimedia is access to: text aural visual elements
Treehouse Tip
Hypermedia is nonlinear information access.
Chapter 11 - Designing and Developing Resources: Multimedia Materials 387
Figure 11-1a-f. Multimedia examples: (a-b) Microsoft Encyclopedia, and (c-f) PowerPoint project.

Building Treehouses for Learning: Technology in Today's Classrooms388multimedia presentations. Multimedia features can be found throughout the project including audio and video clips from early radio broadcasts, animations showing how a radio works, still photos showing the steps in creating and testing a radio, and audio clips from live radio broadcasts from in third-world countries. Students created their own multimedia elements, as well as copied and gave credit for materials they found on the Internet.
For projects that require a high level of nonlinear access and user interaction, there are many multimedia options. Author-ing tools can be used to create multimedia productions without high-level programming skills. General purpose languages are often used to develop special routines that can’t be handled by authoring systems.
Software for authoring multimedia is available for all com-puter formats. Some packages allow for the development of sequenced, linear presentations, while others provide resources for creating hypermedia environments. At the low end, Hy-perStudio is an easy-to-use authoring tool for teachers and students of all ages. Tools such as Macromedia Flash are useful tools for higher-end development. Figure 11-2 shows a Think-Quest student web project that incorporates Flash animation to explain the functions and processes of the circulatory system. Multimedia elements can easily be built into web pages using tools such as Macromedia Dreamweaver and Microsoft Front-Page.
Hypermedia environments can be organized in a number of ways. For example, some systems contain a “mainline” of infor-mation that is organized in a chronological or alphabetical man-ner.Othersystemsaredevelopedashierarchiesorwebs.Forex-ample, a history resource may allow users to access information alphabetically, numerically or chronologically. They may also be able to access information by political issue, by geographic loca-
Treehouse Tip
Multimedia Options audio video animations still images drawings charts and graphs photographs
Figure 11-2a,b. Student project on Blood with Flash animations. - http://library.thinkquest.org/C0115080/

Chapter 11 - Designing and Developing Resources: Multimedia Materials 389tion, or by subject. While one user may access the information resource to locate still images of clothing for a fashion history project, another student may use the same resource for a project dealing with political issues in a presidential campaign. Each user may access graphics, sounds, as well as, still and motion video segments related to his or her particular area of interest.
Multimedia in the Teaching/Learning ProcessMultimedia offers instructors and students new ways to en-hancetheteaching/learningprocess.Multimediaisimportantin education because it holds great promise for improving the quality of education. It provides teachers and students with the tools to access multiple images and sounds. Teachers can “break free” from the constraints of textbooks and the chalk-board.ClassescanexperienceaspeechbyMartinLutherKing,Jr. and learn about his background. In real-time or slow motion, students can examine the phases in mitosis or the development of an unborn child. Students can control animated sequences of a bridge collapsing during an earthquake and compare that to actual footage of a bridge movement during the San Francisco earthquake.
Youcanenrichtheteaching/learningprocessbyactivelyinvolvingstudentsinthecreationofmultimediaprojects.Dur-ing the past two decades, dozens of new tools have been de-veloped for the production and delivery of text-, audio-, and visual-basedmaterials.Let'sexploreasingleprojectdevelopedin HyperStudio and see how each of these elements was inte-grated. A fourth grade class developed a project on composting using worms. The project begins with an animation and a worm poem. The teacher developed the background for the project and the students helped with the animation.
Audio can play an important role in multimedia projects. Students can record their voices using a microphone, use noises fromsoundeffectCDs,orincorporateoriginalmusic.Theentireclassreadtheirwormpoemaloudforthefirstslideofthismul-timediaproject(seeFigure11-3a).
Visualelementsarealsoanimportantpartofamultimediaproject.Videodigitizingcards,digitalcameras,scanners,andgraphics software can all be used for manipulating and incorpo-rating a variety of pictures, diagrams, graphics, and other visual elements.Figure11-3bshowsapicturethatwastakenwithadigital camera. The class used a digital camera to record their experiences creating and maintaining a worm bin for compost-ing.Figure11-3cshowsaslidethatcontainsQuickTimemoviestaken from a videotape.
Text also plays an important role in the projects. As a group, theclassidentifiedthestepsintheprocess,thensmallgroups
Treehouse Tip
HyperStudio is a popular multimedia tool for K-12 students.
Treehouse Tip
Students love multimedia development. It's motivat-ing and fun!
Building Treehouses for Learning: Technology in Today's Classrooms390
worked together on each section. Some students made their slidesinteractive.Forexample,inFigure11-3duserscanclickon different parts of the worm and a word will appear on the screen.
The composting project is a good example of a project that incorporates a variety of multimedia elements and more impor-tantly gets students actively involved in the learning process.
Studentsdon'thavetobeinvolvedinallaspectsoftheproj-ect for it to be a success. For example, with only one computer in your classroom, you may have students do some of their workoffthecomputer.Figure11-3e,fshowsaprojectthatasked
Figure 11-3. HyperStudio projects: (a-d) Worms project and (e-f) Ramona project.

Chapter 11 - Designing and Developing Resources: Multimedia Materials 391studentstowriteanadvertisementforaRamonabook.Thestu-dent posters were then scanned and placed on a slide. Students then recorded their voices reading the advertisement.
Figure 11-4 shows a variety of student projects. After return-ingfromafieldtriptoSeaWorld,thestudentsinFigure11-4a,bdeveloped a project about their adventure. They narrated the project and included pictures from the trip as well as pictures from the website.
Start with projects that will be appealing to students. For example, Figure 11-4c shows a project where each student wrote aboutafamousperson.Ratherthanatraditionalbiographyreport, students each created a card for their class HyperStu-diostack.It'salsofunforstudentstodevelopprojectsforotherclasses. Figure 11-4d shows a slide from a quiz that one class made for another class. They emailed the stack to their cooperat-ing school.
Planning for MultimediaLet'sfocusonthedevelopmentofamultimediaprojectthatincorporates sound, video clips, scanned images, text, and many other media elements. The project could be built in HyperStu-dio, PowerPoint, AppleWorks or another tool. For example,
Figure 11-4a,b,c,d. Student Projects.

Building Treehouses for Learning: Technology in Today's Classrooms392
Figure 11-5. HyperStudio project.
you could create a project that reviews safety guidelines for yourChemistrylab,exploresdifferenttypesoffolkliterature,orteachesrhythminamusicclass.Eachprojectcontainsaspecificobjective, body of content, and set of instructional strategies. Likeallinformationalandinstructionalmaterials,multimediarequires careful planning to be successful. Unlike most other formats, multimedia focuses on multiple channels of commu-nication. This requires the planner to consider the relationship among different senses. For instance, will an animation distract from the text on the page? Will sound reinforce or irritate the user? Should the user have control over the movie segment or should it disappear after it has been played? These types of questions are always in the mind of a multimedia designer. Figure 11-5 shows a card from a HyperStudio stack focusing on saving world treasures including natural and human-made sites. It includes text, graphics, sounds, and video clips.
The addition of the hypermedia element to a multimedia project adds even more complexity. Where should navigation be placed on the screen for easy use? Will all the parts of a graphic be labeled, or should the words appear when the graphic is clicked? Will students be able to choose the number and com-plexity of practice problems? Multimedia planning involves thinking about the content to be presented, as well as, how the user will interact with the information.
Whetheryouplanyourprojectonpaperorinyourhead,it'simportant that you have a clear idea about what your project is to accomplish. Ask yourself: What exactly is my topic? What is the purpose of the project? You should also ask yourself about your students. Who will use the project? What are they like as learners? What are they likely to do and think as they work their way through the project? How can I meet individual needs and
Treehouse Tip
Multimedia development begins with a plan.

Chapter 11 - Designing and Developing Resources: Multimedia Materials 393interests? Your students will help determine the type of and amount of information you provide, as well as the format of your content presentation.
Ask yourself about outcomes. What do you want the stu-dents to learn? What information and explanations will be provided?Dothestudentsknowenoughaboutthecomputer,multimedialearning,andthecontenttobesuccessful?Doesthecontent and instructional approach lend itself to this type of me-diaformat?Inotherwords,ifyou'reintroducinganewtopic,isthere enough help provided in the program so that students get the examples and explanations they need to learn the content? If the project is intended to help students practice, is the feedback and remediation effective for all ability levels? If you want to provideaflexibleenvironmentforexplorationanddiscovery,is the program designed so that all students get the information they need to answer their questions or accomplish their goals?
Finally, ask yourself about structure and organization. Will the project be self-explanatory? Will the student or the com-puter have control over the learning environment? Why? What willthefinishedproductlooklike?Howwillthetext,pictures,and sounds be presented? How will you ensure consistency of presentation to help the user feel comfortable in the multimedia environment?
As you can see, multimedia planning is much more com-plicatedthandevelopingaworksheetortransparency.Ontheother hand, the same basic skills apply. Focus on meeting the needs of your students by applying instructional strategies that you know will be effective with these learners.
Tips for Preproduction PlanningPlanningonpaperwillhelpyouthinkabouthowyourfinalproject will look. If you have a good plan, your time at the com-puter will be more productive. You can spend your time actual-ly entering words, drawing pictures, and digitizing video rather than deciding what should go where. Some people like to draw rectangles that represent what will appear on the computer screen. They sometimes use dotted lines or arrows to show how userscanmovebetweenscreens.Or,useindexcardsorpost-itnotes. Then, arrange the slides in any order.
You don’t need to plan every detail of your project. How-ever, sometimes it helps to get your ideas down on paper. Think about who will be using your project. Will they need directions? Will they know where to click? Where will your words go? What about your pictures? Where will you put your buttons for moving from screen to screen? Your project will look more pro-fessional if you plan your words, pictures, and other elements so they match in size and color from screen to screen.
Treehouse Tip
Encourage each student to use their own planning strategy.

Building Treehouses for Learning: Technology in Today's Classrooms394Multimedia BasicsForthepurposeofthefollowingexample,we'llfocusonthedevelopment of a multimedia project that might be created in a program like Microsoft PowerPointorKnowledgeAdventure'sHyperStudio. Most of these multimedia software packages use similar terminology.
A document is called a slide show or a stack. A slide or stack is a collection of cards or pages. A single show may contain as few as one slide or many slides. Think of a slide show as a merry-go-round without a beginning or end. When you reach the last slide of the slide show, going to the next card returns youtothefirstslide(SeeFigure11-6).
The slide isthebasicunit(SeeFigure11-7).It'scalledacardin HyperStudio. Everything you see on the screen is part of the slide.Slidescanbemadetofillallorpartofthescreen.Al-though slides are arranged in a linear fashion, they can be ran-domly accessed or located by the user through the use of action settings. In other words, you can put an action on a button, text area, or graphic that will move to another card, or play a sound, movie clip, or animation.
Each card contains a master slidethatcanbefilledwithacolororpaintedgraphicalongwithtext.Onslidesyoucanaddobjects such as buttons, text areas, and graphics. A button is an object that responds to user input. For example, a button can be created that plays music, shows a word, runs a video clip, ormovesbetweenslides.InFigure11-7arrowbuttonstaketheuser forward or backward through the slide show. A text area or field is an area for entering, editing, storing, and displaying text information. Think of it as a mini word processing docu-ment. You can change the color, font, size, and style of the text. You can even add action to the text area. For example, you could play a recorded sound when a word is clicked. Graphics can also be added to slides. These graphic elements can also contain actions. For example, when you click on the graphic, a movie clipcouldplay.InFigure11-7whentheuserclicksonthegraph-ic, it plays a video clip.
Slide 1
Figure 11-6. Slides in a slide show.
Slide 2 Slide 3 Slide 4

Chapter 11 - Designing and Developing Resources: Multimedia Materials 395
Designing a Slide ShowSlide shows can be organized in many ways, however most projects contain the same basic elements. Most shows begin with an introductory slide or slides that gain the attention of users. Help slides provide assistance for users throughout the program. Students make choices about their activities on menu slides. Information slides present the content of the show, while interactive slides provide opportunities for students to answer questions,getfeedback,simulateproblems/solutions,orsimplyexploreideas.Referenceorcreditslidesprovideinformationabout the show such as authorship and materials used.
Introductory SlidesIntroductory slides are used to gain the attention of the user. This might include an animated sequence that leads to a main menu or a single slide that presents title information. The pur-poseoftheintroductoryslidesistograbtheuser'sattention.Think of it as the springboard activity in a lesson. What can you do to interest your students in the show?
Your introduction might include a graphic that represents the topic of the presentation as shown in Figure 11-8. It could also provide an oral or text overview of the purpose of the project. The introduction can also direct attention toward the main menu or help options. In many respects, this is the most importantpartoftheshow.Ifyoudon'tgaintheinterestofyouraudience here, they may not be motivated to fully explore your program. Tell the users why they should be interested in your information. What will they learn? Inform them of the objective
Treehouse Tip
Basic Terminology slide show or stack slide or card master slide button textareaorfield graphics
Figure 11-7. A sample slide.

Building Treehouses for Learning: Technology in Today's Classrooms396
of the slide show. You may also wish to help them recall things they already know that might be applied to this lesson.
Use multimedia features in your introduction. If your project is on Edgar Allen Poe, start with some spooky mood music or a few lines from The Raven.ACivilWarprojectmightstartwithsome military band music or the oral reading of a diary excerpt. Make it dynamic, make it emotional, use different channels of communication to motivate your students.
Help SlidesSome students have lots of experience with computers, while others may be apprehensive and unskilled in using multimedia environments. An effective learning environment should be comfortable for your students. If they feel lost or frustrated in your program, they may not be able to concentrate on the con-tent.Asaresult,it'swisetoincludehelpslidesforthoseuserswho need extra assistance. You may wish to include the basics ononeslideasshowninFigure11-9a.It'susefultoincludegraphics of the buttons that will be used in the program as part of your explanation. Some developers like to create an animated audiotouroftheirentireslideshow(seeFigure11-9b)
In addition to explaining the basic navigation of the slide show,youmayalsowanttoshowhowtousespecificslides(SeeFigure11-9c).Ifyourprojectinvolveslotsofterminology,con-sider a help glossary as shown in Figure 11-9d. The easier your project is to use, the less outside assistance students will need in the classroom.
Examine the icons in Figure 11-10. What do they mean to you? Someone who has used multimedia packages before will probably recognize an arrow as meaning "to continue to the next screen", but what about novice users? Again, the printer icon may be familiar to some users and not others. When you start developing your own icons, this becomes an even bigger issue. When you click on the picture of the southeastern US icon, what
Figure 11-8a,b. Title slides.
Treehouse Tip
Project Elementsintroductory slideshelp slidesinformational slidesinteractive slidesreference/credit slides

Chapter 11 - Designing and Developing Resources: Multimedia Materials 397
happens?IsthataninkwelloraHershey'skiss?Whatdoesthisbutton do? More explanation will be needed in some programs than others depending on the complexity of your navigation and options.
Credits and Reference SlidesJust as you have acknowledgments, reference lists, and bibliog-raphies at the end of a book, you should also provide these in a multimedia project. Many developers put a button near the beginning of the project where this card or series of slides can beaccessed.You'llwanttogivecredittotheprojectauthorsand illustrators. In addition, you need to cite those books, video clips,CDs,DVDs,sounds,graphics,quotes,andotherresourcesyou used in developing your materials. See Figure 11-11 as an example of rolling credits at the end of a project.
Menu SlidesYour students will need help moving around in your project. This movement is called navigation. The organization of your projectiscriticaltothesuccessofyourlesson.Ifyouaren'twell-organized, your users may get "lost in hyperspace." In
Treehouse Tip
Students often assume that people will know how to use their materials. En-courage them to provide good directions and help for users.
Figure 11-9a,b,c,d. Sample help slides.

Building Treehouses for Learning: Technology in Today's Classrooms398
Figure 11-10. Icons.otherwords,ifyourprojectdoesn'tprovidestudentswithawaytofindoutwheretheyareinthematerialsandhowtomove around, they may become confused and lose their train of thought.
Unless you plan a linear project where all students will go through the same slides in the same order, you need a plan for navigation. Many multimedia developers use menu systems. A menu is simply a list of choices. They provide users with a way to branch to various parts of the project. In other words, the student is presented with a set of options from which to choose. Thediscrete,butassociated,categoriesreflectthestructureofthe content of the project. The menu options are often words such as democratic, bureaucratic, or totalitarian. The student would click on the government system they wish to explore.
Menusdon'thavetobewordsonthescreen.Forexample,the user could click on a state from a graphic showing the Unit-ed States, select a part of a volcano, or click on an instrument from an orchestra.
Figure 11-12 shows two different plans for the same topic.
Treehouse Tip
Students should cite all the resources they use.
Figure 11-11. Rolling credits.

Chapter 11 - Designing and Developing Resources: Multimedia Materials 399
Dinosaurs
Theropods Sauropods
Stegosaurs Ceratopsians Ornithopods Ankylosaurs
Saurischians Ornithischians
Dinosaurs
Triassic CretaceousJurassic
Figure 11-12. Dinosaur stack planning.

Building Treehouses for Learning: Technology in Today's Classrooms400The diagram on the top shows a main menu where students can choose to learn about birdlike or lizard-like dinosaurs. The second diagram shows how the project could be organized by timeperiod:Triassic,Jurassic,andCretaceous.Whendesigningthe structure of your project, consider your objective. Also think about ease of learning. Which is more important to your objec-tive, the grouping of dinosaurs or the time periods? Would there be a way to do both? For example, organize your menu by type, but provide a timeline on each slide showing when the particu-lar creature lived.
Many students and teachers use the tool Kidspiration or Inspiration for planning the organization of their hypermedia materials. You might even start with one of the templates pro-vided(seeFigure11-13a,b).The Inspiration website and other associatedwebsites(seeFigure13c,d)containlotsofexamplesfor planning multimedia projects.
There are many ways to present menu information. For example, people can click on words or pictures. Figure 11-14 showstwooptionsforaprojectonthehumanhand.Thefirstmenu directs users to click on a part of the hand. A transparent button covers each part of the hand. When an area is clicked, it willtakethestudenttoaspecificslidewithinformationaboutthat bone.
The second menu uses the illustration as a guide, but asks students to select a word rather than an element of the picture. You could even add some sound. For instance if the user clicked on the carpal visual or word, the system could say "You clicked oncarpal.It'sanotherwordforthewristbones."Thecomputerwould then move to the carpal slide.
Figure 11-15 provides six examples of menu slides. Figure 11-15a shows a tree menu. Notice that no written directions are provided. The system provides oral directions to click on any green button to explore trees. If the order of choices is impor-tant, you may consider providing a starting point for students. Forexample,youcouldtelluserstobeginwiththefirstoptionand work their way down. Figures 11-15b,c provides some writ-ten directions for students. Notice that Figures 11-15d,e include a graphic with each option. The next example uses the notebook metaphorandtabsforchoices(seeFigure1-15f).
Visualmenusarealsohelpful.Figure11-15g,hshowstwoex-amples.UserscanclickonthemapofIndianatofindoutabouta particular state park.
Visualmapsdon'thavetobegeographic.Diagrams,charts,and webs can all help a user maintain orientation in a project. While navigating through the project, users may return to the map to "get their bearings." For instance, the subject of geneal-ogy can overwhelm users. Four family maps are used to guide users through each of the four families in the genealogy project
Treehouse Tip
Show students lots of examples to give them ideas about different ways to organize their informa-tion.

Chapter 11 - Designing and Developing Resources: Multimedia Materials 401
Figure 11-13a,b,c,d. Kidspiration and Inspiration planning.http://www.inspiration.com http://www.strategictransitions.com/multimedia.htm
The Human HandIn this section, you'll learn about the parts of the hand.
Click on any part of the hand to learn more about it!
In this section, you'll learn about the parts of the human hand.
Click on one of the parts below to begin your exploration.
Carpals
Metacarpals
Phalanges
Figure 11-14. Human hand menus.
The Human Hand

Building Treehouses for Learning: Technology in Today's Classrooms402
Figure 11-15a,b,c,d,e,f,g,h. Example menus.

Chapter 11 - Designing and Developing Resources: Multimedia Materials 403(seeFigure11-15h).Themainmapandeachofthefourfamilymaps lead to nuclear families then to individual family pages. Anecdotal pages can be accessed from individual pages.
Menus are important, but they can also be overwhelming. It'seasytoprovidetoomanychoicesforstudents.Ifpossible,limitstudentoptionstoseven.Thismaybedifficultforalargeproject, but users can easily become overwhelmed by too many choices on one page. If more than ten choices are provided, make certain that users are given guidance for making selec-tions.Forexample,youmightsay"Ifthisisyourfirsttimethroughtheproject,Isuggestthatyoustartwith'GeneralInfo'."
Designing InteractionMultimedia environments allow students to explore informa-tion, discover relationships, practice skills, synthesize ideas, and formulate solutions by presenting text, graphics, still and motion pictures, and sounds on the screen. Hypermedia is the interactive aspect of the multimedia environment. In other words, students can selectively study the information that is necessary for their task. Text and pictures are linked rather than presented in a linear fashion. For example, if a student is read-ing about frogs, he or she could click on the word amphibian foradefinitionandpicturesrelatedtothatcategoryofcreature.A geography student could click on a country and zoom into a state,city,andevenaparticularstreetandbuildings.Languagearts students could click on different parts of a poem to learn about how the poetry form is constructed.
This type of learning environment is easy to use and is flexibleenoughtoaddressdifferentlearningstylesandlevelsof complexity. For example, you could design an instructional project that lets the learner select the number and complexity of practice problems. Multimedia environments can provide multiple examples, glossaries, diagrams, and other tools to help particular types of learners.
For most students, this type of learning resource is motivat-ing because it provides more control over the learning environ-ment.Ontheotherhand,thisapproachhasbeencriticizedbyothers who believe students don’t always make wise decisions abouttheirownlearning.LambandMyers(1990)haveadvocat-ed the use of a mentor system that is designed to give a student some control of the learning environment without letting the student get in over his or her head.
When designing interactive environments, think about the purposeoftheproject.There'snotarightorwrongwaytodevelop projects. However, before you choose a format for your project,considerthegoal.Doyouwanttoinformorinstruct?Will the slide show be used to gather information, explore ideas,
Treehouse Tip
Encourage students to use visuals on their main menu.
Treehouse Tip
Interaction is what makes multimedia different from a desktop presentation.

Building Treehouses for Learning: Technology in Today's Classrooms404
Treehouse Tip
Remember to consider the purpose of the proj-ect.
or learn a concept? Each of these goals requires a different type of planning.
A primary consideration is learner control. Will the student or computer be directing the learning environment? If students are selecting topics and exploring information, then it makes sense to provide a series of menus or "hot words" that can be used by students to move around the slide show. However, if the project is intended to provide instruction related to a par-ticular skill, then more computer control may be needed. For example, if students are learning Spanish verb forms, the system may give the students a pretest and use the results to present only those onscreen lessons the student needs.
Planning Interactive SlidesAlthough planning is important on all slides, it is even more important when developing an instructional resource. How will information and questions be presented? Where will a student enter answers? Where will the learner receive feedback? How will the student proceed from one slide to the next? The answers to these and other questions result in an overall project design.
You must keep in mind that students will be expected to use the tutorial without assistance. Therefore, you must provide students with adequate directions and instructions so they can complete your lesson without "human" assistance. For example, youcan'tassumethatstudentswillknow"whattodo"inyourproject.Inadditiontoprovidinglearnerswithdirections,you'llalso need to inform them of the objective of the lesson. In the case of a test, quiz, or practice problem, students will be reading text and examining graphics, entering or clicking a response, self-checking answers, and using buttons to proceed from one screen to another. Although this may seem simple, students will need detailed explanations of their duties in the program or they may become lost or confused.
In addition to providing adequate instructions, you must also design screens that are easy for the learner to follow and use throughout the lesson. Functional areas are used to provide learners with a consistent learning environment. In other words, students should be concentrating on achieving the objectives ofthelessonratherthantryingtofigureoutwheretheyareand what to do next. Functional areas involve dividing the screenintoanumberofspecificareasthatareusedconsistentlythroughouttheinstruction.Consistencyintheseareashelpstudents to maintain their orientation within the lesson and re-duces the effort needed to "decide what to do next." Functional areas also ease the transition between slides, allowing the stu-dents to concentrate on the content rather than on the technical aspects of the computer program. Finally, a consistent learning

Chapter 11 - Designing and Developing Resources: Multimedia Materials 405environment may eliminate some of the anxiety students experi-ence when learning a new concept.
Many authors and researchers interested in screen design have written about the importance of establishing effective screens within lessons. Most of these experts agree that the proper use of functional areas provides clarity, consistency, andcontinuitywithinacomputer-basedlesson.We'lldiscussthe following screen areas including orientation, information, directions, student involvement, special message, and student options and navigation. Although not written in stone, these functional areas are a good place to start our discussion.
Orientation Area. An orientation area answers the question, "where am I?" For example, it may provide the learner with in-formation about where he or she is in a lesson. This might take theformofanamesuchas"Lesson5:BeginningFractions"orsimply a section title such as "Arachnids." The functional area for orientation may be located across the top or bottom of the screen. If your lesson is simple, the page title may be enough. However if your lesson involves many sections, you may want alesson,section,andslideindicator.Figure11-16showsaslidedemonstrating the use of an orientation area. It reminds the stu-dent that they are in the chronology section of the Edgar A. Poe project and the dates that are highlighted.
Information Area. The information area may include text, graphics, sounds, as well as still and motion video. Use this areatoprovideusefulexplanations,definitions,examplesandnonexamples, models, diagrams, and any other information students might need in their learning. This area will generally cover a majority of the screen. For example the text might be ontheleftwiththegraphicontheright.You'llwanttoselectconsistent fonts and type styles throughout the program. Use a
Treehouse Tip
Functional Areasorientationinformationdirectionsstudent involvementspecial messagenavigation/options
Figure 11-16. Orientation Area.

Building Treehouses for Learning: Technology in Today's Classrooms406standardwayofpresentinginformationsostudentsdon'thavetofigureoutwhattoexamine.
The area designated for information presentation will shrink or grow depending on the amount of content needed on a given slide. If it appears your information area is too full, consider chunking the content and placing it on multiple slides. A greater number of easy-to-read screens is preferred to a smaller num-berofclutteredscreens.Figure11-17ashowsalargeinforma-tionareawithlotsofwhitespace.Figure11-17bshowstextandgraphics side by side.
Directions Area. The directions area is generally right be-low the information area and provides information for what to do next. Will students click on something? Will they make a choicefromtheoptions?Developersoftenputthedirectionsina different color or type style than the rest of the information on the slide. Figure 11-18a shows a directions area. Notice that the directions area is below the information text and is in another color and italics. If you have lots of directions, you may need a directions slide as shown in Figure 11-18b.
Student Involvement Area. The next functional area is the student involvement area. This includes both student response
Treehouse Tip
Consistency is comforting.
Figure 11-17a,b. Information Area.
Figure 11-18a,b. Directions Areas.

Chapter 11 - Designing and Developing Resources: Multimedia Materials 407and feedback sections. This area answers that question, "Where doIanswerandamIcorrect?"forthestudent.Learnersmaybeanswering multiple choice or constructed response questions, matching items, or they may be clicking on graphics in response to questions. This area is normally placed next to the informa-tionpresentationarea.Iffeedbackisprovidedtoastudent'sresponse,itisnormallyplacednearthestudent'sresponse.Active participation is an important element of effective instruc-tion. Therefore, the development and use of your student par-ticipation area is critical in developing an effective lesson. The instructions you provide students within this area must be clear and precise. A student response and feedback area is illustrated in Figure 11-19a,b,c,d. In Figure 11-19a, notice that the student is given a question and provided options. In addition, a feedback area adjacent to the response area provides knowledge of results and informative feedback. Figure 11-19b shows how a student enters the word in the box and clicks on the left to check their answer against the correct answer. In Figure 11-19c, students click on the correct type of book. When the incorrect answer is selected, a box shows informative feedback, but when the correct answer is selected, an animation is played along with a short song. Figure 11-19d shows how you can have multiple
Treehouse Tip
If users aren't involved in each screen, they'll often skip over information.
Figure 11-19a, b, c, d. Student Involvement Areas.

Building Treehouses for Learning: Technology in Today's Classrooms408problems on one screen. The activity involves clicking on points in a grid to show hidden graphics.
Becarefulabouttheformoftheanswer.Doyouwantlearn-ers to recall or recognize the answer? Is spelling important? Also, think about the format of the question. Are students used to answering questions in rows or columns? Examine Figure 11-20a. Students see visuals and a problem, then select one of three answers. This is good practice, but at some point you may want students to answer questions without the visual cues and type the answer rather than make a choice from three options. Match the interaction to the objective.
Special Message Area. The special message area answers the question,"What'shappening?"Inotherwords,itisusedtopro-vide information to students who have done something unex-pected or who need to provide the computer with information. For example, the system may provide a dialog box to enter the student'sname,remindstudentswheretoclickonthescreen,or direct them to make a particular selection. HyperStudio can launch other applications. A dialog box may appear asking a student to select a document. If the student enters a letter in-stead of a number in a practice problem, a message may appear, "Pleaseanswerwithanumbersuchas1776."Or,ifthestudenthas clicked in an area by accident, the computer may produce a beep,aflash,orboth.
Toattractthestudent'sattention,itisimportanttohighlightthefunctionalareaforthespecialmessage.Otherwise,thestu-dent may miss the message. This message area should be near the student response and feedback area because the learner is used to looking in this area for computer-generated feedback. Criticalmessagesmaybepresentedindialogboxesinthecenterof the screen. In this case, the student must respond before the system continues. See Figure 11-20b for an example of a special message.
Figure 11-20a,b. Student Involvement Area and Special Message Area.
Treehouse Tip
Provide useful feedback. Try your project out on some students and see what they think.
Treehouse Tip
Match questions to ob-jectives.

Chapter 11 - Designing and Developing Resources: Multimedia Materials 409Student Option and Navigation Area.Thefinalfunctional
area is the student option or navigation area. This area answers the question "What are my options"? The navigation may be as simple as arrow buttons for movement forward and backward within a project, or as complicated as a "mini-map" of options. Otherbuttonsmaybeusedforquittingtheprogram,returningto a main menu, printing, getting help, or going to a glossary. The area may be set up menu style with options listed down the screen, or as a series of buttons across the bottom of the screen. The placement of the student options area depends on the purpose of the buttons. If students will be using the but-tons regularly, they should be easily accessible in a standard, central location. If they will be used infrequently, they can be smaller and placed in the corner of the screen. See Figure 11-21 for an example that includes two navigation areas. The naviga-tion on the right side of the screen will take students to different sections. The navigation across the bottom will move the user betweenspecificslides.
Putting the "Multi" in MultimediaThere are many audio, video, and graphic elements that can be added to a multimedia project. These features can add interest tothematerialsyouandyourstudentsproduce.Remembertheimportance of focusing on the multiple intelligences of your learners.Letthemexpressthemselvesthroughpictures,providemusical examples, and involve students in developing materials that demonstrate their understanding of concepts discussed in class.Let'sexploresomeoftheoptions.
Figure 11-21. Navigation Area.
Treehouse Tip
Students love to add sound. It's an easy multi-media feature to integrate.

Building Treehouses for Learning: Technology in Today's Classrooms410
Digitized Audio IdeasDigitizedaudioinvolvesrecordingsoundontothecomputer.Songs, sound effects, short melodies, and verbal feedback are justafewofthepossibilities.Sounddoesn'ttakemuchspaceonyour hard drive, so use it whenever you want to gain attention, provide feedback, or just add an audio element to go with text orgraphics.It'snicetotelllearnerswhat'shappening.Forex-ample when a menu item is clicked, the computer might tell the userwheretheyaregoing(seeFigure11-22).Figures11-23a,bshowastudentproject.Aftergoingonafieldtrip,studentsreturned with still pictures, video, and lots of information. They developeda"virtualfieldtrip"toahistoricsiteinSouthernIndiana. Each slide is narrated. Also consider oral histories and audio-rich electronic scrapbooks. Ask friends, family members orcommunityleaderstotalkabouttheirmemories(seeFigure11-23c,d)
Besidesvoices,youcanalsoaddsoundeffectsandmusic.For example, you might include beeps and boings on correct orincorrectanswers.Figure11-23eusesamusicclipplayingAmerica the Beautiful as an introduction to an American His-torylectureandFigure11-23fusesbackgroundmusic.Youcanfindfindlotsof"musicsamples"ontheweb.
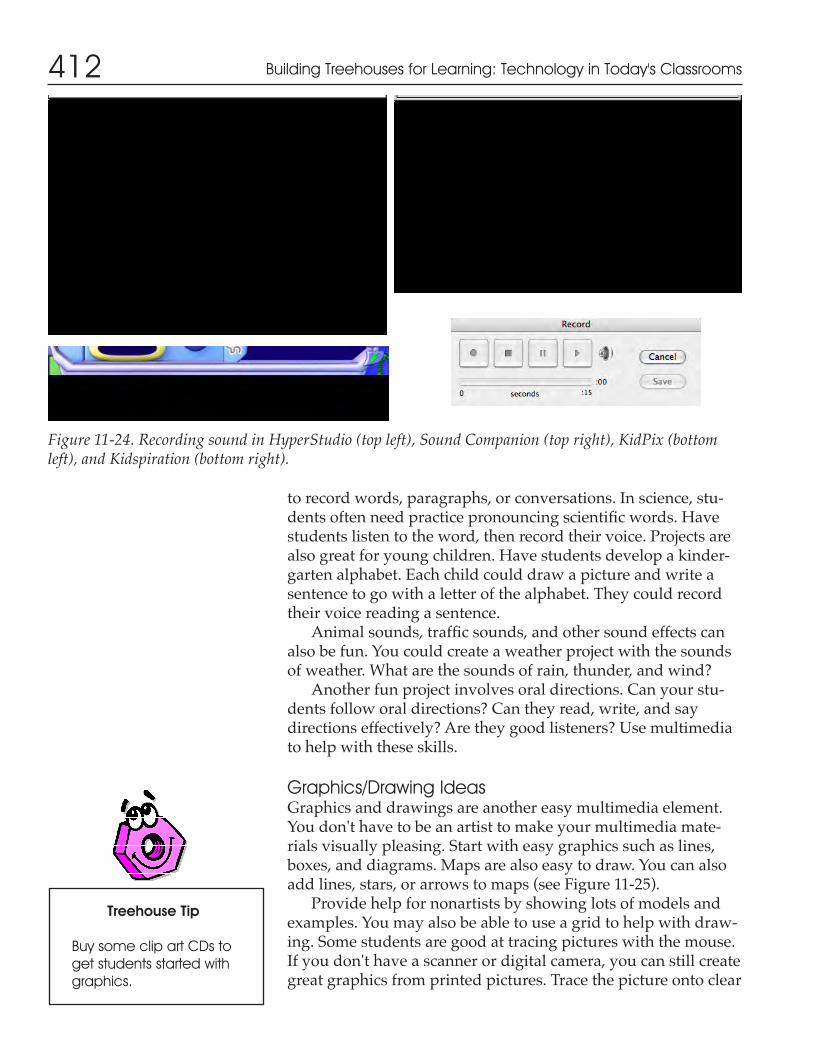
Sound is easy to add. Figure 11-24 shows the recording screen for HyperStudio, Kidspiration, and KidPix Deluxe. If you can use a tape recorder, you can record your voice on the computer. Figure 11-24 also shows a screen from the software package Sound Companion that allows users to edit sounds. Make certain you teach good microphone skills. Students often wantto"eat"themicrophone,whenitwillworkbestat6ormoreinchesawayfromthemouth.Resisttheurgetooverusesounds.Forexample,don'tusesoundsoneveryscreentransi-tion. It can get really annoying!
There are lots of multimedia projects that could incorporate sound. If you teach a language, ask students to use multimedia
Figure 11-22. Audio on buttons.

Chapter 11 - Designing and Developing Resources: Multimedia Materials 411
Figure 11-23a,b. Virtual field trip with narration.
Figure 11-23e,f. Music is added to a multimedia project.
Figure 11-23c,d. Oral history and electronic scrapbook projects.
Building Treehouses for Learning: Technology in Today's Classrooms412
to record words, paragraphs, or conversations. In science, stu-dentsoftenneedpracticepronouncingscientificwords.Havestudents listen to the word, then record their voice. Projects are also great for young children. Have students develop a kinder-garten alphabet. Each child could draw a picture and write a sentence to go with a letter of the alphabet. They could record their voice reading a sentence.
Animalsounds,trafficsounds,andothersoundeffectscanalso be fun. You could create a weather project with the sounds of weather. What are the sounds of rain, thunder, and wind?
Anotherfunprojectinvolvesoraldirections.Canyourstu-dentsfolloworaldirections?Cantheyread,write,andsaydirections effectively? Are they good listeners? Use multimedia to help with these skills.
Graphics/Drawing IdeasGraphics and drawings are another easy multimedia element. Youdon'thavetobeanartisttomakeyourmultimediamate-rials visually pleasing. Start with easy graphics such as lines, boxes, and diagrams. Maps are also easy to draw. You can also addlines,stars,orarrowstomaps(seeFigure11-25).
Provide help for nonartists by showing lots of models and examples. You may also be able to use a grid to help with draw-ing. Some students are good at tracing pictures with the mouse. Ifyoudon'thaveascannerordigitalcamera,youcanstillcreategreat graphics from printed pictures. Trace the picture onto clear
Treehouse Tip
Buy some clip art CDs to get students started with graphics.
Figure 11-24. Recording sound in HyperStudio (top left), Sound Companion (top right), KidPix (bottom left), and Kidspiration (bottom right).

Chapter 11 - Designing and Developing Resources: Multimedia Materials 413
plastic acetate with a felt marker. Tape the plastic to the com-puter screen and trace the picture into the program.
Usewebsites,clipartbooks,andCDs.Besuretoreadthecopyright notice that comes with the website tools. For example, DiscoverySchoolClipArtGalleryletsteachersandstudentsuse their clipart in school projects. However if you search using Google Images, you need to check each image to get the proper permisson because each picture comes from a different website (seeFigure11-26).Manysoftwarepackagescomewithclipartthatcanbeusedwithotherprograms.It'seasytofind,add,andmodify. Students can label the parts of a diagram that you paste intoamultimediaproject.Thepicturesdon'thavetobeincolor.Sometimes simple black and write drawings are exactly what youneed.Or,youcanalwaysusethecomputer'spainttoolstoadd color later.
Scanners and digital cameras are also great tools for non-artists.Ratherthandrawinganllustrationfromscratch,scanapicture.Forexample,scaninapictureofabutterflyandaskstudentstotransformitintoamoth.Howarebutterfliesandmoths alike and different? There are many software packages that students can use to modify their pictures. Younger learn-ers can use software such as KidPix and AppleWork.Olderstudents may like using Adobe PhotoElements or PhotoShop. Try some of the speciality software packages to enhance your graphics.Forexample,youcanfindsoftwarethatwill"morph"images. Your students could morph themselves into an animal they are studying. Police departments use software for drawing composite pictures of faces. You can use a commercial version of this software called Faces to create composite drawings of characters in novels.
Scan head and shoulder pictures of your students. Ask them to create an abstract self-portrait that exaggerates one of their features! What feature will they choose? Ask them to write about their picture.
Figure 11-25. Simple drawings and maps.
Internet Connection
Awesome Clipart for Kidswww.awesomeclipartforkids.com/
Discovery School Clipartschool.discovery.com/cli-part/
Dittoditto.com/
Google Imagesimages.google.com
Yahoo Gallerygallery.yahoo.com

Building Treehouses for Learning: Technology in Today's Classrooms414
Figure 11-26a,b,c Clip art resources and samples.
http://school.discovery.com/ http://images.google.com
Figure 11-27a,b. Give credit for copied pictures.
lungs
heart

Chapter 11 - Designing and Developing Resources: Multimedia Materials 415
Figure 11-28a,b,c,d. Student drawings.
Whether you scan pictures from books or capture them fromCDs,makesureyougivecredittotheoriginalartist!Forexample,Figure11-27ashowsapicturethatwascopiedfromWikipedia. The student who developed this project included a completecitationontheircreditsslide.Figure11-27bshowsastudent project on medicine that uses a photo from the Yahoo Gallerywebsite(gallery.yahoo.com).Noticethatacitationwasincluded when the picture was copied.
Many students love to develop graphics as part of their multimedia projects. However, be careful. Encourage students tobeginwithinformationinthecontentarea.Requirethemtorelatethepicturestotheconceptsbeingtaughtinclass.Oth-erwise,they'llhaveagreattimewiththemultimedia,butnotaccomplish the academic goal.
Figure 11-28a shows a student name poem that was illustrat-ed in KidPix and Figures 11-28b shows a student science project that uses clipart in PowerPoint. Figures 11-28c,d show how you candrawaroundthesilhouetteofastudent'sheadandhandforthe menu slides of an autobiography.
Treehouse Tip
Give credit for the images students use.

Building Treehouses for Learning: Technology in Today's Classrooms416Digitized Video Stills IdeasDigitizedvideostillsmaycomefrommanysources.Digitalcameras,andphotosonCDsarejustafewofthepossibilities(seeFigure11-29).Digitalcamerastakegreatstillimages(seeFigure11-30a).Anotherwaytogetstillpicturesisbyfreez-ing a still image from your video camera. Some software lets you view a video and make still pictures. The results are great. Figure11-30bshowsastillpicturetakenoffavideo.Theinex-pensive "eyeball-type" or "web" camera can take still and motion pictures from live video.
When using still cameras or video "on location", make cer-tain you take the powercord and extra batteries. Keep a log of your pictures. Most cameras take their best pictures outdoors at about 5-10 feet from the camera. In addition, bright colors turn out the best.
Figure 11-29. Still video pictures. Lion is from video, school is from videotape, waterfall is from photo CD.
Figure 11-30a,b. Digital camera photo and picture taken from a video.

Chapter 11 - Designing and Developing Resources: Multimedia Materials 417Ifyoutakephotographsonastandard35mmcameraordis-
posable camera, you can send in your pictures and have them placedonaCDforintegrationintomultimediaprojects.Inad-ditiontopicturesyoutakeyourself,youcanalsopurchaseCDsfilledwithphotographsorgetasubscriptiononanonlinephotocollectionservicesuchasclipart.com(Figure11-31).
Another source of digital photographs is the Internet. Figure 11-32showspicturestakenfromtheInternetformultimediaprojects. Again, make certain you cite sources when you use im-ages you have not produced yourself. There are endless uses for digitized pictures. A few ideas are provided to get you started thinking about classroom applications.
Portfolios.It’shardtoincorporate3-dimensionalproductsinto a student’s portfolio. With the digital camera, you can take pictures of models, dioramas, displays, and mobiles, then paste them into a word processing package or hypermedia project. Students can then describe their project and print out a black and white or full color paper copy.
Before/After Projects. Students often participate in projects
Figure 11-32a,b. Pictures from the Internet.
Figure 11-31a,b. Picture from photo clip art.

Building Treehouses for Learning: Technology in Today's Classrooms418that show changes over time. For example, your students might workonacommunityclean-upproject.Beforeandafterpicturescould be taken showing the positive impact of the clean-up project.
Seasonal Projects.Recordthechangingseasonswiththedigitalcamera(seeFigure11-33a).Exploretheplantsandani-malsofdifferentseasons.Figure11-33bshowsaprojectonthedifferent types of mushrooms in a locate park. Go on-location to a local river or nature area and take pictures during four dif-ferent parts of the year highlighting the changing vegetation and wildlife. Add these changes to a class project that is built throughout the year. Write about the area and incorporate pic-turesasshowninFigure11-34a.
Growth Projects. How many times have you seen those DixieCupswithbeansgrowingonthewindowsill?Youcanadd fun to this project by having students take pictures of their projects each day as they grow.
Sequence Projects. Students often need to demonstrate the steps in a process. Students could then create games asking students to arrange the pictures in the correct order on paper or within a hypermedia project.
Correct/Incorrect Projects. Physical education teachers are always looking for ways to incorporate technology into their classes. Have students take pictures of correct and incorrect methods for particular physical activities such as holding a softball bat or golf club, starting a dance, or shooting a basket-ball. Students could incorporate these into their own procedures manuals.
Illustrate Reports. Use the digital camera to illustrate mul-timedia reports. For example, a report on recycling could be brought to life with pictures of items that can and can’t be recycled. A multimedia project on architecture would be much more meaningful with photographs of homes in the community
Figure 11-33a,b. Seasons project.
Treehouse Tip
Don't keep the digital camera locked up. Keep it out so you can use it for that teachable moment.

Chapter 11 - Designing and Developing Resources: Multimedia Materials 419
representing various styles. Include real artifacts in your project onNativeAmericans(seeFigure11-34b.).
Creative Writing Projects. “Pictures can speak a thousand words,” and are great for story starters. Ask students to take pic-tures of various places and objects. Then have them write stories abouttheplaceorobject.Or,takepicturesofstudentsshowingvarious emotions and use those as story starters.
What’s Next? Projects. Use pictures as starting points for group discussions, interactive stories, or consequences activities. Forexample,thefirstslidecouldshowabeercansittingintheseat of a car. Ask students to write about the consequences on thesecondslide.Or,takepicturesofincorrectproceduresandask students to discuss what might happen as a result.
Community Map Projects.Createmapsofthecommunityand with photographs of important landmarks and buildings.
Math Projects. Take a series of pictures and create real-world math problems.
Careers Projects. Ask students to spend a day with an adult in a career of interest. Take pictures throughout the day and ask studentstocreateaprojecttitled:ADayinthelifeofanArchi-tect,Baker,orLawyer.
Illustration Projects. Ask students to illustrate their favorite book with pictures they take with the digital camera. How do they visualize the setting? Who do the characters look like? It’s fun to compare student’s ideas of what book characters and set-tings would look like.
Picture Background Projects. Use still video images as back-grounds for writing projects. For example, a wooded landscape mightbeanicebackgroundforapoem.Awallofgraffitiwouldwork for an article about the inner city.
Modified Picture Projects.Considerpastingdigitalpicturesinto a paint program and modifying them. Students could create interesting abstract, self-portraits using this technique.
Treehouse Tip
Give the camera to the students. Let them go wild!
Figure 11-34a,b. Water project and Native American project.

Building Treehouses for Learning: Technology in Today's Classrooms420Audio/Tutorial Projects.Createandnarrateaseriesofpic-
tures in a hypermedia project. Then ask students to provide step-by-step audio for each stage of the process.
CD/Picture Projects.AddaCDmusicbackgroundtoaseriesofslidespastedintoahypermediaprogram.Besuretocitetheaudio segments that are used.
Illustrate It Projects.Ratherthanjustaskingstudentstowrite about it, they can take pictures. For example, they could take pictures of the proper hand motions for bike safety.
Digitized Video IdeasDigitalizedvideosareeasytomakeandintegrateintoyourmul-timedia projects. To create your own movies, use a digital video camera. If you have older home movies on videotape, you can buy a box to convert the analog video to digital video. You can alsofindclipartDVDswithlotsofpreproduceddigitalmovies.These movies may be in a number of formats including Quick-TimeandWindowMediafiles.Figure11-35ashowsananimalproject that incorporates a clip art video. When the project opens, the video begins to play with a musical background.
Think about those things you teach that require motion. For example,stepsinaprocessorprocedures.Createashortclipforeach step in changing a tire or conducting a science experiment. Demonstratethecorrectandincorrectwaytopassabasketball.Use video to show close-up activities that would not work well inagroupsetting.Forexample,ifyou'reteachinganartskillsuch as sculpture or origami, a digitized video would work well.Videosarealsousefulforstudentproducedprojects.Forexample, students could create a tour of the city and incorporate videoelements.Figure11-35bshowsastudentprojectonthestepsinbuildingaLegoRobot.Userscanreadabouteachstepin the process, then watch a short video clip.
Figure 11-35a,b. Quicktime movie.
Internet Connection
Video Clips Online
QuickTime High Definitionwww.apple.com/quicktime/guide/hd/
Nature Starters for Kidstipt3.utoledo.edu/starters/

Chapter 11 - Designing and Developing Resources: Multimedia Materials 421
It'seasytomakeuseofexistingvideo.Forexample,studentsmight have video of themselves for use in an autobiographical project(seeFigure11-36).Figure11-37showsaprojectonadver-tising. It includes short video clips from television commercials.
Whencreatingmovies,considerveryshortsegments.Videotakeslotsofroomontheharddrive,soyoucan'tuseverymuchatatime.Ifyouhavealongvideo,justuseaDVD.Whenshoot-ing video, use camera effects very slowly. Quick movements will appear jaggy on the video. Also limit the objects in the frame.Getasmanycloseupsaspossible.Remembertheimagewon'tbeverylargeonthescreen.
Animation IdeasAnimation can be a fun way to add interest to your multimedia program. In some cases, animation is built into the program. You can also use stand-alone animation makers that will create a filethatcanbeaddedtoanotherprogram.Figure11-38showsavolcano project. The animation came from KidPix.
Figure 11-36. QuickTime movie. Figure 11-37. QuickTime movie.
Figure 11-39. HyperStudio AnimationFigure 11-38. Animations.
Treehouse Tip
Animation is easy and fun in HyperStudio.

Building Treehouses for Learning: Technology in Today's Classrooms422Macromedia'sFlash has become a popular way to create
animations. Many websites use these animations. For example, an animation from the Brainpopwebsite(brainpop.com)couldbe incorporated into a multimedia project.
Most multimedia software has the ability to create single and multiple screen animation. In other words, you could create a seriesofslidesandplaythemquicklytoproduceanimation.Or,you could move an object around a single screen as shown in Figure11-39.Ahurdlerrunsacrossthescreen.
If you make animation, make sure users know how to make it operate. Will it run automatically when the slide is opened or willauserneedtoclickabutton?Canlearnersplaytheanima-tion over and over again? Also consider the audio. Will you try to match sound to the animation?
CD-Audio IdeasManymultimediapackagescanplaysoundsfromCD-Audios.Ratherthanhavingtodigitizetheaudioandstoreitonyourcomputer'sharddrive,yousimplyaccesstheCDbyselectingaudio clips to play. For example, Figure 11-40 shows a project onShelSilverstein.TheprojectaccessesanaudioCDthatplayssome of his poetry.
TherearelotsofaudioCDsthatcanbeintegratedintoyourmultimedia projects. For example, a government class might use aCDthatcontainsfamousspeeches,amusicteachermightuseajazzCD,andahistoryteachermightuseCivilWarmusicasabackground for a lecture on the topic. Foreign language teach-ers can integrate speech and music from their language. Sound effectsareanothergreatapplicationofaudioCDs.
Types of Multimedia ProjectsYoudon'tneedexpensivesoftwaretodevelopmultimediaprojects. The project in Figure 11-41 incorporates short videos demonstrating tying a knot. This project could have been done
Figure 11-40. CD-Audio. Figure 11-41. Short videos.

Chapter 11 - Designing and Developing Resources: Multimedia Materials 423in many different software packages including PowerPoint, Appleworks, Keynote, HyperStudio, and others. As a mat-ter of fact, you probably already own some multimedia tools. Multimedia involves text, visual, and sounds elements. You might start with projects that simply involve combining text and graphics. Then, create slide shows that might move between screens. Figure 11-42 shows the development of a slide show on thepartsofaflower.Youdon'thavetohaveneworfancysoft-ware. This slide show was being developed in PowerPoint and usesclipartfromDiscoverySchool's Clipart Gallery.
Anotheroptionischildren'screativitysoftwaresuchasKidWorks, KidPix, and The Amazing Writing Machine. Stu-dents can draw pictures, add clipart, and record sounds. Figure 11-43showshowstudentsuseImage and Media Blender from Tech4Learningtocreatetheirproject.Theirwebsitecontainsmanystudent-producedsamples(tech4learning.com)aswellasgreat, copyright free images you can use in projects.
Figure 11-42a,b. Web-based clipart and PowerPoint.
Figure 11-43a,b,c. Tech4Learning software and resources.
Treehouse Tip
Use the software that you have. Explore the fea-tures. You'll be amazed at what you already have available.

Building Treehouses for Learning: Technology in Today's Classrooms424
Building the TreehouseTry It!
Exploring Multimedia Elements
Explore multimedia CDs and DVDs as well as teacher and student produced multi-media projects that contain various multimedia elements. Did these elements attract or distract from the project? Why? Would you use the same or different techniques? Why?
What elements would be useful in your subject area and grade level? Brainstorm a project that would include at least two of the following areas:
Digitizedaudio(i.e.,voice,music,soundeffects) Audio clip art Graphics created with a paint or draw program Graphics clip art Scanned images Digitalcamerastills Videocapturedstills Digitizedvideoclips Animation CD-audio
Relate the multimedia elements above to the multiple intelligences. If you were de-veloping a multimedia project for students to use or create, how would your aware-ness of the multiple intelligences impact your assignment?

Chapter 11 - Designing and Developing Resources: Multimedia Materials 425Levels of Multimedia Development and UseBeforeyoubeginwithprojectdevelopment,considertheobjec-tive of each project carefully. Is multimedia an effective way to communicateinformationorteachtheconcept?Doyouhavethe time to develop the project? How will students use the materials? How can you get students actively involved with the resources? There are many levels of classroom multimedia de-velopment and use. You may develop the entire project yourself,
Figure 11-44a,b,c,d,e,f. Teacher produced materials.

Building Treehouses for Learning: Technology in Today's Classrooms426
Figure 11-45a,b,c,d. Teacher produced materials.
then let students use your program. Figure 11-44 shows exam-ples of teacher-produced materials. These early learning practice materials are designed with small children in mind. Notice that students are actively involved with the software through point-ing and clicking on objects, numbers, and words. In all of the examples, the directions are read aloud to the child. In addition, the shapes project uses video clips to introduce each concept.
Figure 11-45 contains projects for many grade levels and con-tent areas. In the dinosaur example, students review the charac-teristics of certain dinosaurs. The foreign language quiz includes lots of pictures and sounds. Figure 11-45c,d shows a biopoem tutorial that includes audio examples at each step.
Considercreatingmultimediaworksheets.Figure11-46a,bshows a Microsoft Word document containing a videoclip from thePBSkidswebsitefortheprogram"BetweentheLions"(pb-skids.org/lions/).StudentswatchthevideoclipontheletterW,then add to the information on the page.
Another multimedia development option is to create the project yourself and ask students to add to the project. For ex-ample, you could start the project and direct students to expand

Chapter 11 - Designing and Developing Resources: Multimedia Materials 427
Figure 11-46a,b,c,d,e,f. Teachers start, students add to the project.
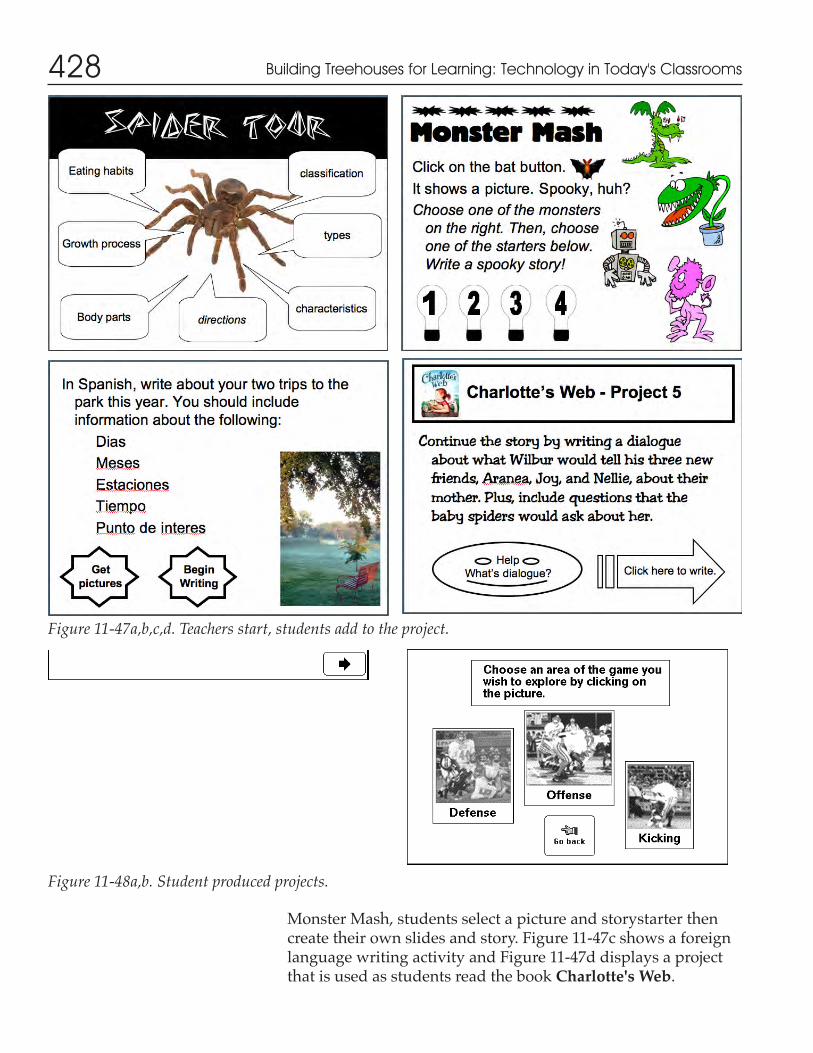
the project similar to the way you might use a "story starter." You could give students a template or outline complete with buttonsandfieldsandaskstudentsto"fillitin."Figure11-46c-f shows an ant project. Students read a story about ants, learn about the characteristics of ants, then write a story or poem. Fig-ure11-47showsotherexamplesofactivestudentinvolvement.ThetourofaspidermenuinFigure11-47awasdevelopedbyateacher. Her students created each of the sections of the tour. In
Building Treehouses for Learning: Technology in Today's Classrooms428
Monster Mash, students select a picture and storystarter then createtheirownslidesandstory.Figure11-47cshowsaforeignlanguagewritingactivityandFigure11-47ddisplaysaprojectthat is used as students read the book Charlotte's Web.
Figure 11-48a,b. Student produced projects.
Figure 11-47a,b,c,d. Teachers start, students add to the project.

Chapter 11 - Designing and Developing Resources: Multimedia Materials 429Finally, you could have students develop the entire project
themselves, and let others use their product. Figure 11-48 shows a student project on odors and one on football.
Let'sexploresomesubjectareaswhereyoumightdevelopmultimedia projects or ask students to use multimedia as a com-munication tool.
Multimedia Across Subject AreasMultimedia projects are popular in all content areas from kin-dergartenthroughhighereducation.Let'sexploreprojecttopics.
Language Arts IdeasLanguageartsisagreatplacetointegratemultimediaprojects.Start with projects that you might traditionally do on paper or throughoralreports(seeFigure11-49).Forexample,studentscan create multimedia projects on their favorite book, author, or genre of literature. Use multimedia as a tool for publishing all kinds of writing from poetry to short stories. Figure 11-50 shows a fun story about a pig named Pinkie who goes on an adven-ture. Have students develop nonlinear stories in an adventure story format. Historical interviews are another interesting writ-ing project. Get students writing with story starters, pictures, or other writing prompts.
Another fun activity is for students to write alternative endings for their favorite stories including scanned pictures ofcharactersandsettings.Theymayevenfindreallifepeopleandplacestheythinkreflectthecharactersandsettingsofbook.Students can then use video and digital cameras to record their ideas.
Figure 11-49. Multimedia book report.
Treehouse Tip
Students who aren't ex-cited about writing might get reeled in using multi-media!

Building Treehouses for Learning: Technology in Today's Classrooms430
Building the TreehouseTry It!
Exploring Levels of Involvement
Evaluate examples of the following types of projects. Why do you think the teacher chose this approach? Could the teacher have used a different level of development? Brainstorm some suggestions.
Teacher produces, student uses
Teacher starts, student expands
Students create, others use
Select a topic area. Brainstorm ideas for projects in each of the following areas:
Teacher produces, student uses
Teacher starts, student expands
Students create, others use
The teacher and students in a class play very different roles depending on the level of involvement of the multimedia project. Describe the role of the teacher, student, and computer at each level. Compare and contrast the levels. Describe why you would choose a particular level for a specific type of learning.

Chapter 11 - Designing and Developing Resources: Multimedia Materials 431
Math IdeasMultimedia is a great way for students to explore and express mathematical ideas. Get students involved in applying math concepts. For example they might calculate calories, animal reproduction, or energy conservation statistics. Multimedia can be used to create and solve story problems. Figure 11-51a shows agraphthat'spartofamathpracticeproject.Havestudentsdevelop math problems for each other using their favorite topic asthetheme.Considerinterdisciplinarymathapplications.Figure 11-51 shows a project related to travel, social studies, and mathematics. You could develop lots of scenarios for students to explore.Developanendangeredspeciespark.Howlongwillittake the animals to reproduce? How much will it cost? Ask stu-dents to take digital pictures of various architectural styles and explorethegeometricfiguresfoundinthedesigns.
Science IdeasScience is one of the easiest subjects for identifying multimedia projects. Teachers and students can develop projects on almost
Treehouse Tip
Get students to visualize and write about math!
Figure 11-50a,b. Multimedia story.
Figure 11-51a,b. Multimedia applications in mathematics.

Building Treehouses for Learning: Technology in Today's Classrooms432
Figure 11-52a,b. Multimedia in science.
Figure 11-53a,b. Field trip multimedia stack.anytopicfromlifesciencetophysicalscience.Considerproj-ects where students can demonstrate their understanding of sequences and processes. Figure 11-52a shows a student project on the water cycle. Along with the pictures, the student narrates the process.
Multimedia is also a great way for students to show their understanding of terminology. For example, in small groups, students could build projects that explore a particular human body system and describe its function, importance, and interre-lationship with other body systems.
Use multimedia to record student experimentation. For ex-ample, students could document plant growth through written logsanddigitalpictures(seeFigure11-52b).
Social Studies IdeasMultimedia is a tool for students to communicate their ideas in theareaofsocialstudies.Amultimediaprojectisagreatreflec-tionactivityafterafieldtrip.Figure11-53showsaprojectdevel-oped after a trip to White Sands, New Mexico.

Chapter 11 - Designing and Developing Resources: Multimedia Materials 433
Multimedia timelines, charts, graphs, historical photos, news video clips, and still photographs can all be used in projects that focus attention on important social issues and ideas. Stu-dents can trace the history of a person, place, or thing through pictures and words. Multimedia is a great tool for documenting interviews or news ideas. Many schools use multimedia in their morning "announcements" or news programs. HyperStudio can even send live video through the computer so students can design informational screens along with live video shots. In a government class, you might use a hypermedia tool to conduct a straw poll.
Use multimedia as an alternative to traditional written reports.Figure11-54ashowsadebateontheissueoftunafish-ing. To develop the hypermedia debate, the class had to explore issues related to science and social studies.
Multimedia is a great way for students to explore and share ideas about states, countries, careers, and communities. Figure 11-54showsasampleprojectonSouthDakota.
Foreign Language IdeasStudents studying a language need skills in the structure of the language as well as the culture of the language. As a result, text, audio, and visual elements are all important in the teaching of a second language. Multimedia tools can be used to record audio and video projects. Student can interview each other and devel-op a multimedia project from their audio and video tapes. They can also record their voices as labels for pictures in multimedia projects.
Another project involves having students practice writing or conversing in the language using visual prompts such as photo-graphsorscenesfromDVDs.Figure11-55showsaprojectthatasks students to write about a picture.
Treehouse Tip
Incorporate timelines, charts, and diagrams into social studies projects.
Figure 11-54a,b. Social studies projects.
Treehouse Tip
Students can record their voices as many times as they like to practice a lan-guage using multimedia software.

Building Treehouses for Learning: Technology in Today's Classrooms434
Physical Education IdeasMotor skills such as basketball and tennis require lots of prac-tice. To learn these skills, students need numerous examples and nonexamples of concepts related to the sport or activity. For example, to learn a golf swing, they need to see alternative handgripsandpracticetheonethatworksthebest.Figure11-56showsaslidefromagolfproject.It'sfuntoletstudentsdeveloptheir own skill projects that they can share with others.
ConclusionAsyouexploretheuseofmultimediaprojects,beflexible.Rath-er than converting your old, boring term paper assignment to an equally worthless multimedia project, develop a new project that requires students to think about their topic, explore new ar-eas,andcreatemeaningfulprojects.Figure11-57showsaproject
Figure 11-55. Foreign Language.
Figure 11-56. Golf project. Figure 11-57. Field trip.

Chapter 11 - Designing and Developing Resources: Multimedia Materials 435
Building the TreehouseTry It!
Multimedia projects are great activities for all grade levels and content areas. Ex-plore projects in your content area. Brainstorm possible topics for multimedia proj-ects.
Select a grade level and topic. Develop a plan for a multimedia project. Get students involved with production by expanding a project you start or developing a project from scratch.
Describethestudentsandtheircharacteristics.Howwillthisimpacttheproject?Describethetopic,content,andspecificobjectives.Howdoesthemultimediaprojectfit
with the needs of your students and curriculum?Highlight the preliminary activities leading up to the assignment. Where in the lesson
or unit would this take place?Describetheassignmentthatyouwouldgivestudents.Whatwillthestudentsbecreat-
ing? Why? Will they actually be creating something unique or simply copying infor-mation? Where will they get the content? Is a multimedia project an effective way to learn or communicate this content? Why?
Describeyourclassroommanagementstrategy.Willallstudentshavecomputers?Howwill they get to the special equipment such as the scanner or video camera? Will they be working individually or in small groups?
Discussthemethodsusedforassessingstudentprojects.Willstudentsreceiveacheck-list for evaluation? How will they be graded?
You may wish to develop a model project for students or produce a product that stu-dents will use in their learning. Plan a multimedia project that you will produce.
Sketchtheslides.Besuretoincludeintroductory,help,credits,menu,informational,and instructional slides.
Discussthemultimediaelementsthatwillbeusedintheproject.Whywerethesemul-timedia elements selected?
Exploring Subject Area Multimedia Projects

Building Treehouses for Learning: Technology in Today's Classrooms436
Figure 11-58a,b. Cave adventure.
basedonamiddleschoolfieldtrip.InFigure11-58,apotentiallyboringscienceprojectoncavesbecameanexcitingfictionalfieldtriptoMammothCave.Itincludedastorysegmentandnarra-tion,alongwithscientificinformation.
WebQuests have become a popular way to get students involved with inquiry-based projects using Internet resources. Many of these projects use multimedia as a tool for sharing what students have learned in the project. Figure 11-59a is based on a WebQuest called "Paper or Plastic." Students in the class hold a debate about whether we should choose to carry our gro-ceries in paper or plastic bags. This PowerPoint project follows the implications of each choice.
The project shown in Figure 11-59b is also based on a Web-Quest.Titled"Outhouses,CornCobs,andCatalogs,"studentsused video cameras, digital cameras, and audio recorders as a part of oral history projects. They asked older people what it was like to live on the prairie in the early 1900s. The project was shared with the senior citizens who participated in the inter-views.
Figure 11-59a,b. Multimedia projects based on WebQuests.

Chapter 11 - Designing and Developing Resources: Multimedia Materials 437
Incorporate multimedia projects across your curriculum. Ratherthanstartingwiththetechnology,considerstartingwithabook.Forexample,Figure11-60showsscreensfromaprojectbasedonthechildren'sbook"BrownBear,BrownBear,WhatDoYouSee?"byBillMartin.Inthiscase,theteachercreatedatem-plate containing the pictures. Students could choose the slide they wished to complete. The student then wrote the top and bottom sentence based on the predictable book. This activity can also be done with pictures students draw or take with a digital camera. This class also completed a project based on the book "PolarBear,PolarBear,WhatDoYouHear?".
Multimedia projects are only limited by your imagination! Use multimedia tools to promote imagination and creativity in your students!
Figure 11-60a,b. Multimedia project based on a book.

Building Treehouses for Learning: Technology in Today's Classrooms438
Building the TreehouseTry It!
Creating Multimedia
Develop a multimedia project in a program such as PowerPoint or HyperStudio. Your project should contain text, graphics, still pictures, movies, and sound. The project should contain at least ten slides.
Use the criteria below to evaluate your project:Planning
Was the role of each team member described?Wastheobjectiveoftheprojectidentifiedandmet?Was the audience, content, purpose, and use of the project described?Was the storyboard or sketch complete?
Project Didthebuttons/actionsallworkproperly?Didaneffectivetransitionoccurbetweenslides?Was navigation apparent so users don’t get lost in hyperspace?Was a consistent layout and style used throughout the presentation?Were the fonts and type styles consistent, attractive, and effective?Didthesameobjectsremainin“registration”betweenslides?Were the slides organized in a logical sequence?Was the content illustrated with examples?Was the information in the project current and accurate?Didtheprojectlookprofessional?
Graphics Were the draw tools used in the project?Scanned Images Was a scanned picture used in the project?
Was the image clear and in focus?Digital Video Stills or Motion
Were the digital pictures clear and focused?Were the pictures relevant and contribute to the project in a positive way?Werethepictureseffectivelyplacedontheslide/page?
Digital Audio As a group, incorporate sound into your project. At least one sound recording should be created using the microphone. At least one sound should use existing sounds such as a beep or click. Was the sound clear and without distortion? Was sound used in a meaningful way in the project?