Centra 7 Version 7.5 Participant Getting Started Essentials · Use the following instructions to...
12
Transcript of Centra 7 Version 7.5 Participant Getting Started Essentials · Use the following instructions to...


Revision 7.5.2 Original May 23, 2005 Latest August 15, 2005 P/N 188896

Table of Contents Getting Started .............................................................................................................................................................. 1
Introduction ....................................................................................................................................................................................................1 Attending an Event........................................................................................................................................................................................1
Attending from an email message............................................................................................................................................................1 Attending From My Schedule page .........................................................................................................................................................1 Accessing Public Events.............................................................................................................................................................................1 Registered Users Only Events...................................................................................................................................................................1
Using Public Navigation Bar .......................................................................................................................................................................1 Centra Connectivity Tips .............................................................................................................................................................................2 Connecting a Headset ...................................................................................................................................................................................3
Participant Reference ................................................................................................................................................... 4 Entering a Session.......................................................................................................................................................................................4
Running the Audio Wizard .........................................................................................................................................................................4 During the Session......................................................................................................................................................................................5
Speaking..........................................................................................................................................................................................................5 Adjusting Audio During a Session ............................................................................................................................................................5 Sending Text Chat .........................................................................................................................................................................................5 Markup Tools .................................................................................................................................................................................................5 Participant Tips ..............................................................................................................................................................................................5
Planning .......................................................................................................................................................................................................5 Changing the View.....................................................................................................................................................................................5
Creating a Centra eMeeting .........................................................................................................................................................................6 Seat Availability ..........................................................................................................................................................................................6 Meeting Options .........................................................................................................................................................................................6 Audio Options.............................................................................................................................................................................................6 Attendees .....................................................................................................................................................................................................7
Where to Get More Information ................................................................................................................................ 7

Getting Started
Introduction Online Help, is accessible from the Centra Home page. The Centra Symposium, Conference, and eMeeting Participant Tutorials, are accessible from the Centra Welcome page and the Centra Home page. Note: The Centra server may not have all the listed features enabled. Contact the System Administrator for assistance.
Attending an Event There are several ways to attend a Centra Event: From a link in an email message From the My Schedule page From the Public Events page.
Attending from an email message 1. Click the link in your email message. 2. Type in your Email address and click Attend
Or Type your Login and Password. Note: If you encounter errors or cannot access a page, contact your System Administrator.
1
3. If necessary, type a First name, Last name, Display name, and optionally Password. Click Attend.
Attending From My Schedule page Before attending a session, click System Check to check if the system can successfully support a session. 1. Click the My Schedule link to access your Centra
Home page and locate the session that you want to attend. Note: A login and password are required to access the My Schedule page.
2. If Download link appears, click this link. 3. Select Automatic Download 4. Click Proceed. 5. Click Attend. If the client is:
Installed, access the session. Not installed, a prompt appears to download
the client. Note: When using Netscape, accept the Netscape plugin (if needed). The client will automatically install. Click Yes in the Security dialog box.
Accessing Public Events The Public Events page enables users to access public events. When this page is selected as the domain home page (the default in a new installation), users need only the domain URL to access a list of public events. The Public Events page contains the following features: The public navigation bar Search Field Public events list
Attending Public Events Participants can attend an event by clicking the Attend link.
Registered Users Only Events Some events restrict attendance to registered users. Although the event appears in the Public Event List that is shown to users who have not logged in, users can attend this event only by providing the user name and password of a registered account.
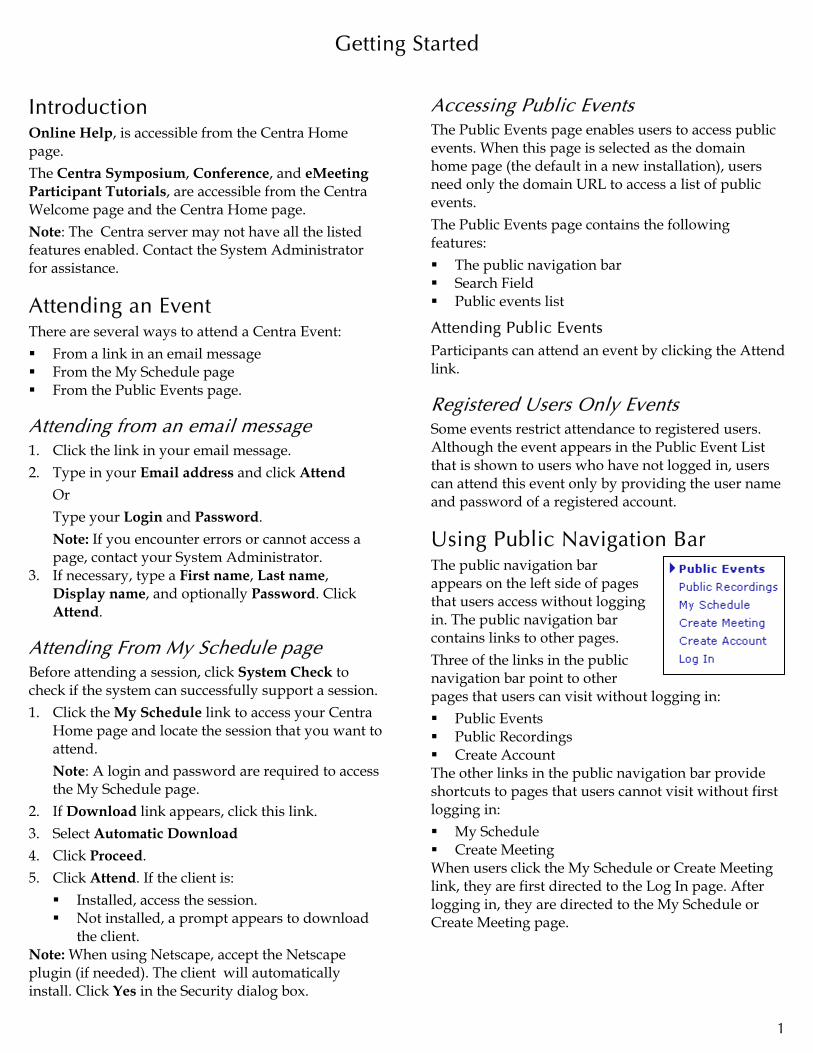
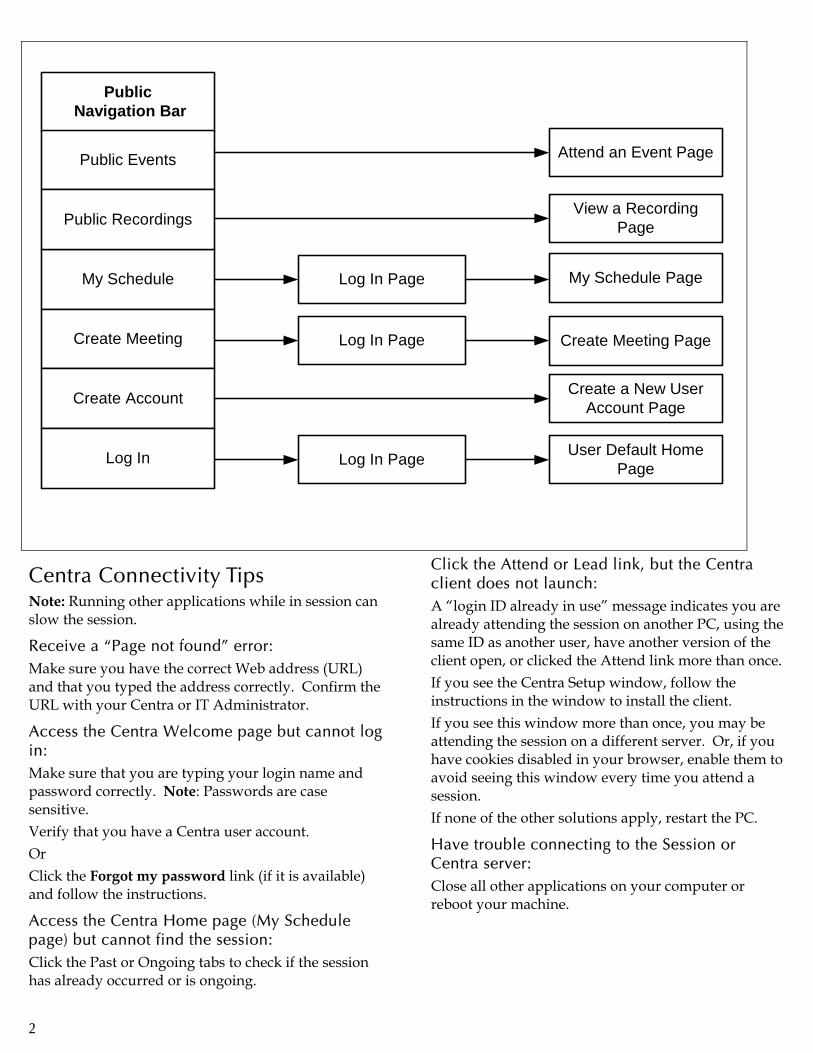
Using Public Navigation Bar The public navigation bar appears on the left side of pages that users access without logging in. The public navigation bar contains links to other pages. Three of the links in the public navigation bar point to other pages that users can visit without logging in: Public Events Public Recordings Create Account
The other links in the public navigation bar provide shortcuts to pages that users cannot visit without first logging in: My Schedule Create Meeting
When users click the My Schedule or Create Meeting link, they are first directed to the Log In page. After logging in, they are directed to the My Schedule or Create Meeting page.
Log In Page
Log In Page
Log In Page
View a RecordingPage
My Schedule Page
Create Meeting Page
Create a New UserAccount Page
User Default HomePage
Public Navigation Bar
Public Events
My Schedule
Public Recordings
Create Meeting
Create Account
Log In
Attend an Event Page
Centra Connectivity Tips Note: Running other applications while in session can slow the session.
Receive a “Page not found” error: Make sure you have the correct Web address (URL) and that you typed the address correctly. Confirm the URL with your Centra or IT Administrator.
Access the Centra Welcome page but cannot log in: Make sure that you are typing your login name and password correctly. Note: Passwords are case sensitive. Verify that you have a Centra user account. Or Click the Forgot my password link (if it is available) and follow the instructions.
Access the Centra Home page (My Schedule page) but cannot find the session: Click the Past or Ongoing tabs to check if the session has already occurred or is ongoing.
Click the Attend or Lead link, but the Centra client does not launch: A “login ID already in use” message indicates you are already attending the session on another PC, using the same ID as another user, have another version of the client open, or clicked the Attend link more than once. If you see the Centra Setup window, follow the instructions in the window to install the client. If you see this window more than once, you may be attending the session on a different server. Or, if you have cookies disabled in your browser, enable them to avoid seeing this window every time you attend a session. If none of the other solutions apply, restart the PC.
Have trouble connecting to the Session or Centra server: Close all other applications on your computer or reboot your machine.
2
3
Connecting a Headset Using audio in a Centra session requires a headset/microphone or a separate microphone and speakers. 1. Locate the icons for microphone and speaker on
the plugs of your headset. 2. Match the icons on the plugs to the jacks on your
computer. The microphone jack may have the word
"mic," or a picture of a microphone.
The speaker jack may have the word "out," or a picture of a speaker.
3. Plug the headset/microphone or a separate microphone and speakers to the computer.
4. Make sure the volume control on your computer is turned up.
5. In session, test your audio with the Centra Audio Wizard.
If you continue to have problems Contact your Centra or IT Administrator or Centra Technical Support.

Participant Reference
Entering a Session
When entering a session, the Audio Wizard starts automatically. It is important to hear the Leader and others. Use the Centra Audio Wizard if there are problems with the audio.
Running the Audio Wizard In the Centra window, click Tools in the main menu and choose Audio Wizard. 1. Adjust the Playback volume using the slider to a comfortable level. When done, click Next. 2. Specify Speakers or Headset. Click Next. 3. Speak into the microphone. Optimal speaking levels are green in color, moving towards red. 4. Adjust the Recording volume to a suitable level using the slider. When done, click Next. 5. Click Finish.
4
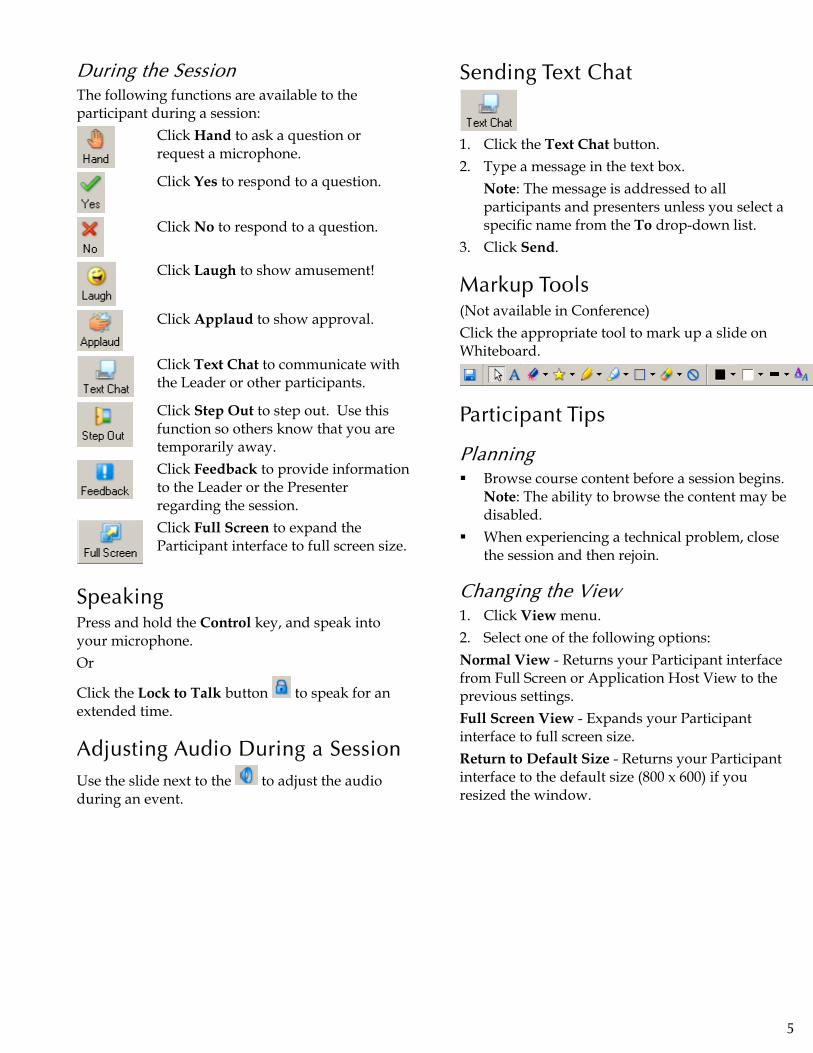
During the Session The following functions are available to the participant during a session:
Click Hand to ask a question or request a microphone.
Click Yes to respond to a question.
Click No to respond to a question.
Click Laugh to show amusement!
Click Applaud to show approval.
Click Text Chat to communicate with the Leader or other participants.
Click Step Out to step out. Use this function so others know that you are temporarily away.
Click Feedback to provide information to the Leader or the Presenter regarding the session.
Click Full Screen to expand the Participant interface to full screen size.
Speaking Press and hold the Control key, and speak into your microphone. Or
Click the Lock to Talk button to speak for an extended time.
Adjusting Audio During a Session Use the slide next to the to adjust the audio during an event.
Sending Text Chat
1. Click the Text Chat button. 2. Type a message in the text box.
Note: The message is addressed to all participants and presenters unless you select a specific name from the To drop-down list.
3. Click Send.
Markup Tools (Not available in Conference)
Click the appropriate tool to mark up a slide on Whiteboard.
Participant Tips
Planning Browse course content before a session begins.
Note: The ability to browse the content may be disabled.
When experiencing a technical problem, close the session and then rejoin.
Changing the View 1. Click View menu. 2. Select one of the following options: Normal View - Returns your Participant interface from Full Screen or Application Host View to the previous settings. Full Screen View - Expands your Participant interface to full screen size. Return to Default Size - Returns your Participant interface to the default size (800 x 600) if you resized the window.
5

Creating a Centra eMeeting A meeting is a quick way to collaborate with a group of people. Any user can schedule a meeting. The individual who creates the meeting is automatically the Leader and controls who is invited. It is not possible to attach a Subject and Agenda to a meeting, but it is possible to import content while in session. Meetings do not appear on the public Event List unless Public is specified during the creation process. The Create Meeting page is separated into the following sections: Schedule Seat Availability Meeting Options Audio Options Attendees
Use the following instructions to quickly create a meeting: Click Create Meeting on the My Schedule page or other Centra pages.
Schedule Note: Using the Start Now option immediately begins the meeting. Otherwise, the other sections allow specifying options to customize the meeting. 1. Type the name (up to 60 characters) of the
meeting in the Name field. 2. Select the Day from the calendar drop-down
menu. Today’s date is shown by default. 3. Select the Time from the drop-down menu, and
a time zone, if necessary. 4. Select a Duration.
Select specific hours and minutes (available in 15 minute increments) from the drop-down menus to schedule the meeting at a specific time.
Select Ongoing if the meeting needs to be available all the time.
5. Select a Cost Center, if applicable. 6. Type a Description (Optional) To start the meeting immediately and not set additional options, click Start Now. Otherwise, continue. If Start Now is selected, the eMeeting Leader interface opens.
Seat Availability 1. Select the number of people who can attend
from the Seats Reserved list. Note: The Event Manager sets the limit and it cannot be exceeded. The total number includes the meeting leader.
2. Click Seat Availability to verify how many seats are available for the specified time.
Meeting Options 1. Choose the following meeting options:
Public event (The event appears on the public event list and allows users to self-enroll)
Record meeting (Permits recording the meeting for participants who would like to review the content or for individuals who were not able to participate.)
Live video (Permits live video to run) Include live video in recording (Permits
adding the video to the recording for playback)
Allow users to attend without an invitation. (This allows guest users to attend.)
2. Password-protect the meeting by typing (up to 50 characters) a meeting password.
Audio Options 1. Select one of the following the Audio Options:
Select Voice Over Internet (VOIP). Choose one the following Audio Quality options:
SC3 Bandwidth for 28.8/56Kbs modems (700 bps) to (2000 bps) less than 1 KB/sec
ISAC Bandwidth for (3000 bps) or better 3 KB/sec
IPMVWD Bandwidth for (8500 bps) to (13000 bps) 13 KB/sec
Select Telephone. Type the phone numbers used to join the teleconference Type the access code in the Access Code field. Type Host code if necessary. Type the Conference Call Instructions. These instructions will be included with the notification email.
6
Click Unselect All to exclude all the currently checked users.
If the default teleconference information is part of your User Profile, the information appears by default. Change it if necessary. If the Centra domain has email enabled, update
the Subject, and enter a message. While participating in the event, Participants can view the teleconference information. 6. Click Send Email to send the email.
Or Cancel Email to cancel the email; the user is still invited. Note: If the Centra Server is set to add calendar attachments, the email automatically includes a calendar attachment. The recipient double-clicks the calendar attachment and saves it; a new calendar item is automatically created in the recipient’s calendar. Contact your Centra System Administrator to enable/disable this feature.
If the Telephone option is selected, users have the option of using VOIP during the event.
Attendees 1. Type the email address of each Participant in
the Email Address area. 2. Click Done to send the meeting invitation
Or Click Edit Attendees
Edit Attendees Centra emails use the BCC field for all email addresses so that attendees do not learn the email addresses of other attendees. Centra Administrators do not receive their password in the email.
1. Click Edit Attendees. The Edit Attendees: Meeting Topic (Meeting ID) page opens. The Meeting Topic is the topic of the meeting and Meeting ID is the ID of the meeting.
2. Click the Invite Attendees tab. When the Edit Attendees: Meeting Topic page re-opens, the last column on the right updates to “Invited” to indicate the user(s) or groups have been invited. When a Group is invited, all users in the group are also marked as Invited.
3. Locate the name of the user or group of users to enroll.
4. Click Invite associated with the user or group. 5. Enroll multiple users or groups by performing
the following: If a Group is invited to a meeting, the invitation cannot be removed for specific individuals in that group without removing the invitations for the entire group.
Select the users and/or groups by selecting the checkbox next to their logins and then click Invite Selected.
Click Select All to select all users and groups on the page. The meeting now appears on your My Schedule
page.The users or groups are immediately invited to the meeting. Inviting a group invites all the individual users in that group.
Where to Get More Information For information about Centra training, Documentation, and Knowledge objects, please see Getting Information about Centra 7.
7

Corporate Headquarters
430 Bedford Street
Lexington, MA 02420
781.861.7000
www.centra.com
© 2004 Centra Software, Inc. All rightsreserved. Centra is a registered trademark of Centra Software, Inc. All other trademarksare the property of their respective owners. NASDAQ: CTRA