CECH Virtual Lab Guidecech.uc.edu/.../docs/VirtualLabs/Windows7_VLab_Setup_And_UserGuide.pdfCECH...
16
CECH Virtual Lab Guide Windows 7/Vista Edition Introduction: This guide is a step-by-step walkthrough of installing, configuring, and using the VMware Horizon View Client to access the University of Cincinnati’s Virtual Lab services for the Windows 7/Vista operating system. Requirements: University of Cincinnati Central Login Credentials (UC 6+2) Internet Access Windows 7 or Vista Quick Links: Installation of VMware Horizon View Client Configuration of the VMware Horizon View Client Using VMware View with CECH Virtual Labs Troubleshoot/Tips and Tricks FAQ
Transcript of CECH Virtual Lab Guidecech.uc.edu/.../docs/VirtualLabs/Windows7_VLab_Setup_And_UserGuide.pdfCECH...

CECH Virtual Lab Guide Windows 7/Vista Edition
Introduction: This guide is a step-by-step walkthrough of installing, configuring, and using the
VMware Horizon View Client to access the University of Cincinnati’s Virtual Lab services
for the Windows 7/Vista operating system.
Requirements:
University of Cincinnati Central Login Credentials (UC 6+2)
Internet Access
Windows 7 or Vista
Quick Links:
Installation of VMware Horizon View Client
Configuration of the VMware Horizon View Client
Using VMware View with CECH Virtual Labs
Troubleshoot/Tips and Tricks FAQ

Installing the VMware Horizon View Client
Download the latest VMware Horizon View Client from the CECH Virtual Labs
Page. Click the link for either 64-bit or 32-bit Windows depending on your computer’s
operating system. If are unsure of which version to download, you need follow the
instructions at Identify a 32-bit or 64-bit operating system .
http://cech.uc.edu/itservices/cech-guides/Virtual_Labs.html

When prompted by your browser to Run or Save the file, choose Run.
The installation wizard will pop up in a new window; click Next.
Review the License Agreement and then select the first option accept the License
Agreement and click Next as shown below.

Review the installation settings. The defaults do not need to be changed. Click Next.
Enter https://ucvlabs.uc.edu into the Default View Connection Server field and click
Next.

Make sure the “Set default option to login as current user” is unchecked and click Next.
Choose where you would like to place the shortcut to VMware View Client and click
next.

Click Install to start the installation.
When the installation is complete, click Finish.
You may be prompted to restart your computer, click Yes to restart.

Configuring and Connecting to the CECH Virtual Labs
NOTE: If you are off campus and have trouble connecting, try to connect to the UC
VPN before connecting the Virtual Labs.
Launch the VMware Horizon View Client by double clicking on the shortcut created on
your desktop or start menu.
Verify that the Connection Server listed is ucvlabs.uc.edu and click Connect.
Click Continue if prompted by the following security warning.
Enter your UC Central Login User Name and Password (same as Blackboard and Email)
and click Login. Domain will be UCLABS.

In the next screen, you may see different options depending on what Virtual Labs you
have access to. All UC students, faculty, and staff are granted access to the “Virtual Lab
Pilot” run by UCIT. In addition, CECH students, faculty, and staff will also see “CECH
Vlabs”. The “CECH Vlabs” are geared towards CECH classes and are equipped with the
same software that can be found at CECH computer lab classrooms.
NOTE: If you do not see the CECH Vlabs option, but are enrolled in a CECH course,
please contact the CECH Technology Support Services department at 513-556-2217.
Click the virtual lab you would like to access and then click Connect.
Your virtual Desktop will then load. You may begin working with the virtual lab now.

Using the CECH Virtual Labs
Once you are connected, using Virtual Labs is much like using any other Windows
based lab computer. All of the programs installed in the Virtual Labs are accessible by
double clicking the desktop icon or opening through the Start menu.
The most significant difference is HOW YOU SAVE FILES.
IMPORTANT! You MUST SAVE ALL FILES AND WORK to either UCFilespace or an external
USB Drive.
ANYTHING SAVED TO THE VIRTUAL WORKSTATION (such as the virtual Desktop) WILL
BE LOST AFTER YOU LOG OFF OR GET DISCONNECTED.
Saving files to UCFilespace
Just like all other UC lab computers, UCFilespace is automatically mapped for you
to the “i: Drive”. You can access the “i: Drive” by opening the start menu and clicking
Computer. There is also an Icon on the desktop that will open directly into UCFilespace.

When saving from a program, choose “Save As” and browse to the “i: Drive” under
“Computer”.
TIP: It is advised to do a “Save As” when creating a new document or file before you
begin your work.
Saving to a USB Drive Alternatively, you can also save your work to an external USB Hard Drive or Flash
Drive. To do so, you must manually connect the USB Drive from your computer to the
Virtual Machine by following these steps:
1. Insert the Flash Drive into the computer you are working from.
2. From the banner at the top of the screen, click Connect USB Device and select
the USB drive.
3. In a few moments, the drive will be installed and a new window will open to the
flash drive.
4. The drive will be given a drive letter and can now be accessed from “Computer”
or “Save As” feature in programs.
5. When you are finished, disconnect the flash drive by deselecting it from the
banner drop down before you log off.

TIP: Other USB devices will also appear and can be connected, such as a USB Headset
or Webcam.
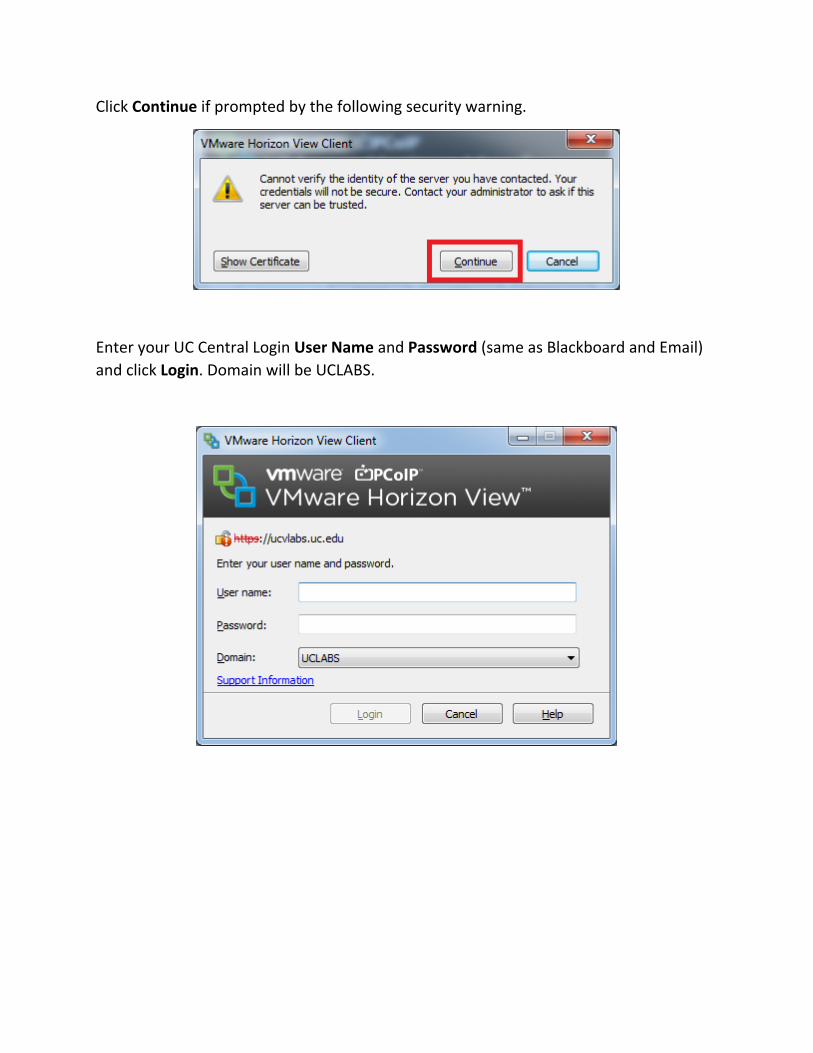
Using the Universal Printer When printing from Virtual Labs, you can choose to send prints to any of the Card
Swipe Enabled printers around campus.
From the Print Menu, Choose Universal Printer.
In a moment, the Universal Printing window will open.

Select the Location and the Printer that you would like to print to and click Print.
Swipe your card and choose your print.
NOTE: Currently CECH Computer Lab Printers are not connected to this system,
however the CECH Library printer is.
Logging off Virtual Labs
When you are finished using virtual labs, make sure you have saved all of your
work to UCFilespace or an external USB Drive. Open the Start menu and click “Log Off”.
IMPORTANT: Closing the view client by clicking the “X” will disconnect the session, but
may cause your username to get locked into the virtual machine causing you to be
unable to log back in without contacting support.

Troubleshooting/Tips and Tricks FAQ
I get a message that says “The View Connection Server authentication failed. Unknown user name
or bad Password.
Check to see if your user name and password is correct.
Make sure caps lock is not on.
Check your password at https://uc.edu/pss. If that does not work, choose
“Forgot Password” from that site to reset your password.
When connecting from off campus, I get a connection timed out or just a black screen.
Off campus connections can sometimes be troublesome. If this happens, first
connect to the UC VPN before connecting to the Virtual Labs. This will create a more
stable, but slower connection.
No Icons show up on my desktop. How do I access the programs?
It may take a moment or two for the Icons to appear. If they do not there are a
couple of quick fixes:
Log off the machine and log into the view client again.
Right click on the “Blue Circle” Icon in the notification bar (bottom right of
the screen) and choose refresh. The Icons should appear in a moment.
I click an icon and the program doesn’t open right away.
Some programs, such as Adobe Photoshop are very large programs and may take
a moment to load in the virtual environment.

When I open a program, I get this error message.
Just click okay and try again. This a known bug in one of our vendors software
that pops up on occasion. It should be resolved in an update in the near future.