CC900TE -...
23
DIAMOND PRODUCTS CC900TE Owner•s Manual •English•Spanish Optional Slide-In-Legs Optional Folding Saw Stand
Transcript of CC900TE -...

DIAMOND PRODUCTS
CC900TE Owner•s Manual •English•Spanish
Optional Slide-In-Legs
Optional Folding Saw Stand
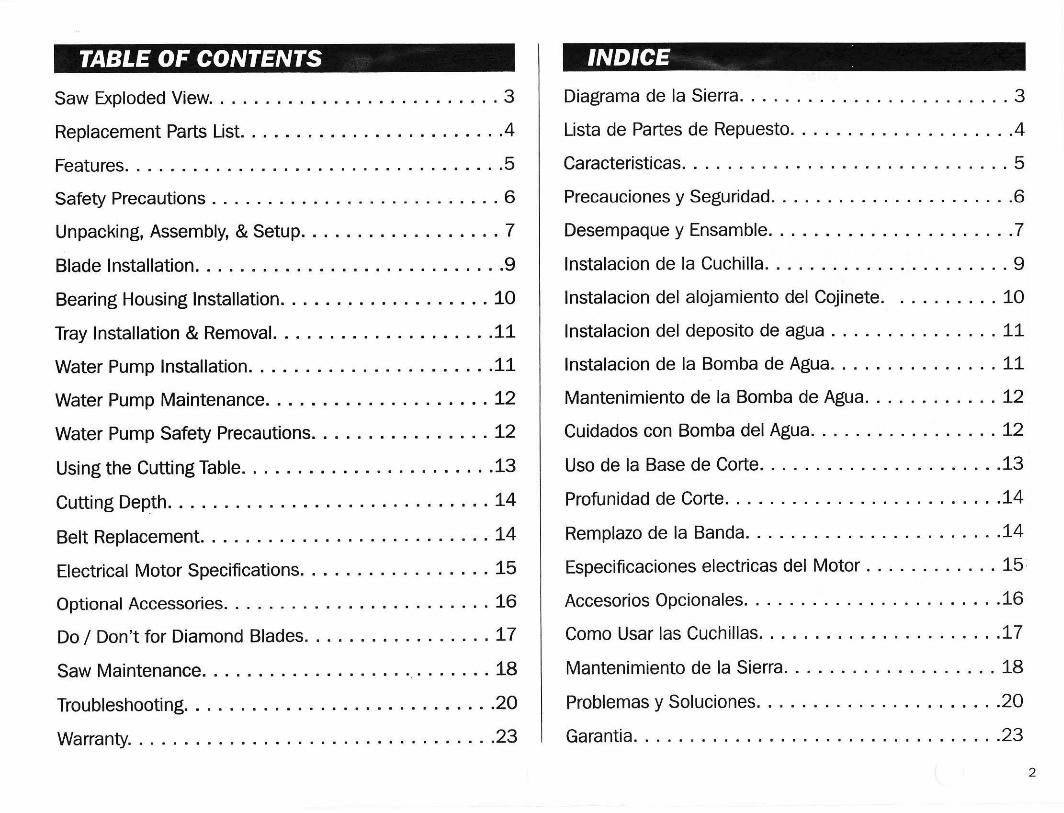
TABLE OF CONTENTS INDICE
Saw Exploded View ................. .. . . . .. . . 3 Diagrama de la Sierra . . . . ... .. ....... . . ... ... 3
Replacement Parts List. .. .. . ........ . ...... . . . 4 Lista de Partes de Repuesto . . . . ................ 4
Features .. ..... . . .... .............. . ... . .. 5 Caracteristicas ...................... . . ... .. 5
Safety Precautions . . . . . . . . . . . . . . . . . . . ... . ... 6 Precauciones y Seguridad .. .................... 6
Unpacking, Assembly, & Setup ..... .. ........ . .. 7 Desempaque y Ensamble ..... . . . . . . . .......... 7
Blade Installation . .... . ............... . .. .. .. 9 lnstalacion de la Cuchilla .. . .. ... . ...... . .... . . 9
Bearing Housing Installation .. ... ............ . . 10 lnstalacion del alojamiento del Cojinete. . . . . . .. .. 10
Tray Installation & Removal. .. ... ... .... . . ... . . 11 lnstalacion del deposito de agua ............... 11
Water Pump Installation ........... . .......... 11 lnstalacion de la Bomba de Agua .. .......... . .. 11
Water Pump Maintenance .................. .. 12 Mantenimiento de la Bomba de Agua .. .. . . . . . . .. 12
Water Pump Safety Precautions ................ 12 Cuidados con Bomba del Agua .......... . .. . .. . 12
Using the Cutting Table .. . ........... . .... .. .. 13 Uso de la Base de Corte . ........... . . ... .... . 13
Cutting Depth . ...... . ........ . ... . ... . .... 14 Profunidad de Corte . . . .......... . ........... 14
Belt Replacement. . . . . . . . . ... .. .. . . . ....... 14 Remplazo de la Banda ............. . ... . ... . . 14
Electrical Motor Specifications. . . . . . . . . . . . . .... 15 Especificaciones electricas del Motor . . . . . .... . .. 15 -
Optional Accessories. . . . . . . . . . . . .. ... ..... . . 16 Accesorios Opcionales. . . . . . . . . . . . . . . . . . ..... 16
Do I Don't for Diamond Blades. . . . . . . . . . . . . . . . . 17 Como Usar las Cuchillas ..... . ....... . ... .. ... 17
Saw Maintenance . ... . . .. .... .. ..... _ . . .... . 18 Mantenimiento de la Sierra ....... . .. . . . .... . . 18
Troubleshooting .... . ....... ... ....... . . . . .. 20 Problemas y Soluciones .... . . . ..... . ........ . 20
Warranty .. . . . . . . . .... . . . . . .. .. ... . ... . ... 23 Garantia . . . ........... ... . . ..... . ... .. . .. 23
2
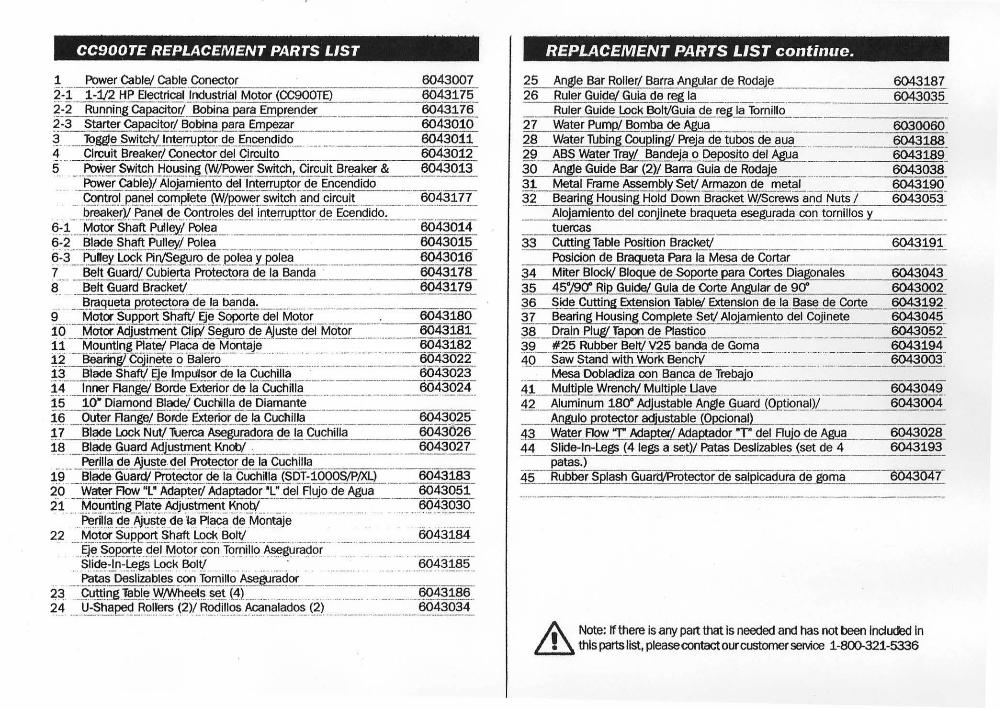
CC900TE REPLACEMENT PARTS LIST
1 Power Cable/ Cable Conector 6043007 ~::r1:112 HP 8ectrical -lndustrial Motor (CC900TE) 6043175 ~:2 Running Capacitor/_ Bobina para Em~_~der . 6043176 2-3 Starter Capacitor/ Bobina para Empezar ·-·-- 6043010 3 ··- loggle Switch/ lnterruptor de Encendido ·---- - - 6043011 4._. __ Clrcuit Breaker/ Conector def Circulto 6043012 5 Power Switch Housing (W/Power Switch, Circuit Breaker & 6043013 . . . . Power Cable)/ Al9jamiento del lnterr~tor de Encendido ··--·------
. Control_ panel com{>!ete _ (WfI!!JJJer switch .and circuit -· 6043177 ·-· breaker)/ Panel de Controles del .interr_upttor de. Ecendido. --···-·--·--
6-1._. Motor Shaft Putleyj_ Polea _ _ ------·- ---·--·- 6043014 6-2 •. Blade_Shaft Pull~/ Polea --·-···---·-·-·------·- 6043015 ~-.~.-~ .~.~ _Lock Pin/S~~ro ~~ .pol~~Y polea ··--·· 6043016 7 Belt Guard/ Cubierta Protectora de la Banda · 6043178 8·-·· Belt Guard iirackeV-·---·-··· 6043179
.. -·-~_@g_ueta protectora de la ~n~~-- · -· .. -·· _ 9 Motor Support Shaft/ Eje Soporte def Motor 6043180 10 ...... Motor Adj}Jstment Clip/ S~uro. de Ajuste del Motor ·------ 6043181 11 Mountlng Plate/ Placa de Montaje 6043182
12 . Bea~(2gj_!nete o .Balero·-··· ····-· -···-····· .. ··-------····-·--6043022 p __ . Blade Shaft/ .§~~pulsor de la C!:Jchilla. ___ ·-·--·--·· 6043023 14 ... _ Inner Flang~Borde Exterior.de la Cuchma. ·-··-·--···- - -·--·--~43024 .. 15 10• Diamond Blade/ Cuchitla de Diamante ~§ __ Q....trt.er Flange/ Bold~. ~~~2.~ . .de .la Cuchill~----···------
6060_ 4
433~
2265
!J Blade Lock Nut/ Tuerca Aseguradora .. de_la Cuchilla ----~ u ~§ ._.Blade Guard A~Jus~ent Knob/ .. ~-·-·------·--- 6043027 .. ... J>erllla de ~ust~..:..~~!J>rotector de la Cuchilla.
19 Blade Guard/ Protector de la Cuchilla (SDT-1000S/P/XL) 6043183 20·-~water Flow "L" Ada-pter/ Adaptador "L" .. defFlu}odeAgua ::g~~ 21 . ... Mountlng Plate Adjustment Knob/ ·-··-·· ····-······ -- -·-····-
. ~~ill.~ .~ei_(\j~?!~.de 1a Pl~ d~ .Montaje . ... . -·····-22 .. Motor SuppoJt Shaft. Lock Bolt/·-··-·----··---··· ..... -------·-·-····---6043184
.. E.J~--~P~El.9,~1 ... ~otCJ.r ~n .T°-r.~illc.>.~gt,ira~or. . S.1.i~.El:!n.:~~ .~~ Bo.I~ . _ ......... ... . ·-· _·
Patas Deslizables coo Tomillo Asegurador ~~ .. [email protected]~~.'#./.W!'l~~!!.$.8t (~), .•. ··-· ·-·· .... .. .. . ... ........ ..§9431!3.§... 24 ... U-Shaped Rollers .(2)/ Rodillas Acanalados .(2) ·--·· ·--····-- ···-· · 6043034
REPLACEMENT PARTS LIST continue.
25 Angle Bar Roller/ Barra ~ar de Rod~e __ _ 6043187 --------· 26 Ruler Guide/ Guia de r~ ______ _ 6043035 --------Ruler Guide LDck Bolt,'Guia de ~ la TornillQ
27 Water Pump/ Bomba de Agua . 6030060 28 Water Tubing Coupling/ Preja de tubos de aua 6043188 29 ABS water Tray/ Bandeja o Deposn:o del ~a 6043189 30 Angle Guide Bar (2)/ Barra Guia de Rodaje ·-·-·-··- · ___ 6043 __ 0_3_8 31 Metal Frame Assem..e!}'. Set/ Arrnazon de metal _____ 6043 __ 1_90_ 32 Bearing Housing Hold Down Bracket W/Screws. and Nuts / 6043053-
Alojamiento d~jJnete br~ueta eseg_urada con tornillos y_ tuercas
6043191 33 Cutting Table Positlon Bracket/ -----Posicion de Bragueta Para la Mesa de Cortar
34 Miter BlocW Blogue de Soporte para Cortes Dlagonales 6043043 35 45°/90° Rip Gulde/ Gula de Corte Angular de 90" 6043002 36 Side Cutting Extension Table/ Extension de la Ba_se_ d_e_ Co_ rt_e _ _ _ 6043 __ 1_9_2 37 Bearing Housing Complete Set:' Al_g@mlento del CoJ,_·in_e_te ____ 6043 __ 04_5_ 38 Drain Plug,' Tapon de Ptastico ·- ·---·-·--·--·-·-- 6043052 39 #25 Rubber Belt/ V25 banda de Goma 6043194 ~0 Saw Stand with Work Benctv' 6043003-
Mesa Oobladlza oon BanCc!~e Trebajo __ _ 1!_ .. Multlple Wrench/ Multiple llave ·-·-·---·-· 42 Aluminum 180° Adjustable Angle Guard (Qptional)/
Angulo protector adjustable (Opcional)
6043049 604300,f
43 Water Flow 'T' Adapter/ Adaptador ·r· del Aujo de Agua 6043028
45
44 Slide-In-Legs (4 legs a set)/ Patas Desllzables (set d_e_ 4 ___ 6043 _ _ 1_93_ patas.) ___ -·
Rubber Splash Guard/Protector de salplcadura deg~·
-----------··-·----·-··--···-----
~ Note: ff there is any part that Is needed and has not been Included In ~ this parts list, please contact our customer service 1-800-321-5336
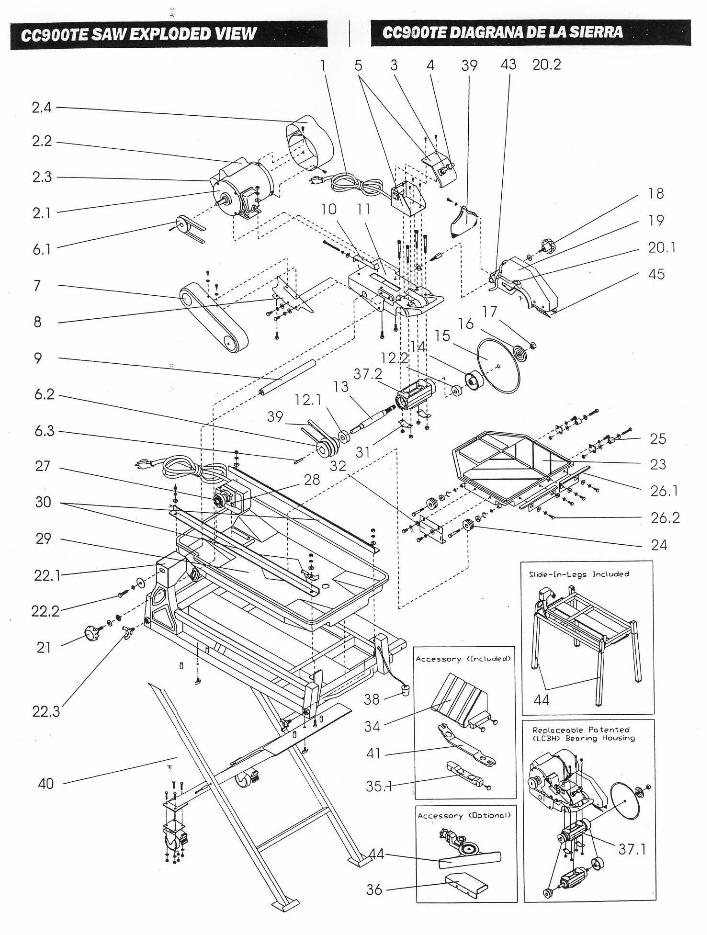
CC9001E SAW EXPLODED VIEW
2.4
2.2
2.3
2.1~·
6.1
7
8
9
6.2
6.3
27
29
' '..,. .. "
' ... __ .. : ... -::-.. --........ ' ---,- -......... ,-
CC9001E DIAGRANA DE U SIERRA
l 5 3 4 39 43 20.2
I 18
10 19
20. l
45 ~ ....
24
36

FEATURES 1. Powerful 1-½ H.P. motor makes cuts easier and quicker. 2. Automatic thermal overload protection protects your saw from power surges
and the motor from overheating. 3. High fiber plastic water tray withstands even the toughest punishment and
is extremely easy to remove and install. 4. Saw includes a sturdy, durable steel frame for support and stability.
CC900TE wet tile saw is designed to be installed with 4 sliding legs or folding stand with working bench for easier operating the saw.
5. Adjustable guide rails permit user to align saw during installation. 6. Cutting alignment not affected by water tray maintenance. 7. The cutting table can be secured in place by locking the spring lock on the
L-shaped transport retention. 8. Blade capacity from 6" to 10" provides a variety of blade usages. 9 The CC900TE Rip cut up to 20" in length and diagonal cut up to 14" tiles.
1
8
7
4
CARACTERISTICAS . 1. El poderoso motor de 1-1/2 hp hace los cortes rapidos y sencillos. 2. La proteccion automatica term ica protege su sierra del aumento de tension
en el fluido electrico, y al motor del sobrecalentamiento. 3. El deposito plastico del agua de alta calidad con soportes, nivela el riguroso
manejo y es extremadamente sencillo de transportar e instalar. El deposito opcional de acero inoxidable para uso prolongado y maxima duracion.
4. La sierra incluye una fuerte armazon de acero para soporte y estabilidad. CC900TE.
5. Los rieles guias ajustables permiten alinear la sierra durante la instalacion. 6. El alineaminto de carte no es afectado por el mantenimiento del deposito
del agua. 7. La base de carte puede ser asegurada en su lugar con solo atornillar la
perilla en la retencion de transporte con forma "L." 8. Con la capacidad de 6 a 10 pulgadas, provee una amplia variedad en el
uso de sierras. 9. Con un carte maximo de 20" de longitud y corte diagonal en mas de 14"
pulgadas en las lozas CC900TE.
2
3
-------- 5 & 6
Slide In Legs (Included)
5

• •
•
•
•
•
•
•
•
SAFETY PRECAUTIONS Never use the machine improperly or work in an unsafe manner. Always wear safety goggles, dust mask, and ear protection when operating the saw (to comply with ANSI-Z87.1). Always remain alert when the saw is in use. Inattention on the part of the operator may lead to serious injury. Before you start working, familiarize yourself with the work site and its surroundings. Take notice of circumstances which may impede working or traffic, observe soil conditions (good bearing or not), and take measures to ensure safety (i.e. the shielding of roadworks from public traffic}. Take measures to ensure that the machine is in a safe and trouble-free condition prior to usage. Use the machine only when all protective devices (i.e. guards, noise absorbers, emergency-off devices) are operating in the intended locations. A visual check of the machine must be made at least once a shift to ensure that visible damages or faults are recognized. Any changes (including changes in the performance or behavior of the machine) must be reported to the supervisor. If necessary, stop the machine at once and secure it. In the case of a malfunction stop the machine immediately and secure it. Fix the problem as soon as possible. For starting and stopping the machine follow the operating instructions and observe indicator lights. Before switching the machine on make sure that the running machine will be of no danger to anyone.
I
•
•
•
•
•
•
•
•
•
. PRECAUCIONES Y SEGURIDAD Nunca use la maquina de una manera impropia o trabaje de una manera insegura. Siempre use gafas de seguridad, mascarilla para el polvo, y proteccion para las oidos cuando se encuentre operando la sierra (cumpliendo con ANSl-287 .1). Permanezca siempre alerta cuando la sierra este en uso. La falta de atencion por parte def operador podria conducir a daiios serios. Antes de empezar a trabajar, familiarizese usted mismo con el lugar de trabajo y sus alrededores, tomando en cuenta las circunstancias que pudieran impedir el trabajo o la circulacion libre. Observe la condiciones def terreno (buen apoyo o no), y tome medidas para garantizar la seguridad por ejemplo el correcto aislamiento de los accesos al trabajo de la circulacion publica. Torno medidas para garantizar que la maquina este en condiciones seguras, y fibre de problemas antes de usarla. Use la maquina solamente cuando todos los dispositivos de proteccion esten operando en la forma indicada, par ejemplo: cubiertas, silenciadores, y dispositivos de desactivacion. Una revision visual debera hacerse al menos una vez cada turno para asegurar que los daiios visibles o fallas sean localizadas. Cualquier cambio debera ser reportado al supervisor, incluyendo cambios en le rendimiento o comportamiento de la maquina; si es necesario apaguela y asegurela. En caso de malfuncionamiento apague la maquina inmediatamente y asegurela. Arregle el problema lo mas pronto posible. Para prender y apagar la maquina siga las instrucciones de operacion, y observe la luces indicadoras. Antes de encender la maquina este seguro de que la misma no sera de ningun riesgo para alguien.
6

UNPACKING, ASSEMBLY, & SETUP
Open the container, carefully lift the saw by the saw frame handles and place it on a flat, level working area. Be certain that you have the following items before you discard the container.
• Saw • Universal Wrench • 45°/90° Rip Guide • Saw Blade • Plastic/Metal Water Tray • Miter Block • Drain Plug • Water Pump • Owner's Manual
Proceed with the following sections, to assemble the rest of the saw.
Motor Assembly
1. Remove the cutting head (5) and saw frame (6) from box. The cutting head support shaft (1) and shaft support bolt (3) are attached to the rear support post (4).
2. Slide cutting head support shaft (1) into bottom of cutting head support shaft chamber(4). Once cutting head (5) is in place, attach the mounting plate adjustment knob (2) to secure cutting head (5) in place.
3. Use handles to lift cutting head (5) . 4. From the right side of the cutting head, insert the lock bolt into cutting head
support shaft and then tighten bolt to secure the cutting head in place.
DESEMPAQUE Y ENSAMBLE .
Abra el empaque cuidadosamenta y levante la sierra usando las asas del armazon depositandola en terreno piano y nivelado en el area de trabajo. Asegurese de que usted cuenta con los siguientes componentes antes de desechar el empaque:
• Sierra • Llave Universal • Guia de Corte de 45°/90° • Cuchilla de la Sierra • Deposito para el Agua de Metal o Plastico • Tapon de Drenado • Bloque de Soporte para Cortes • Manual de Propoetario • Bomba de agua
Proceda con las siguientes secciones, para ensamblar el resto de la sierra.
Ensamble del Motor
1. Saque la cabeza cortadora (5) y el armazon de la sierra (6) de la caja. Eje soporte de la cabeza cortadora (1) y el tomillo del eje soporte se encuentran localizados dentro de la cabeza de carte (5).
2. Use las asas para levantar la cabeza cortadora (5). 3. Deslize la cabeza cortadora en el eje coporte (1) dentro del paste de
soporte trasero. Una vez que la cabeza cortadora (5) esta en su lugar, coloque la perilla de ajuste en la placa de montaje (2) para asegurar la cabeza cortadora (5) en su lugar.
4. Por el lado izquierdo introduzca el tornillo de la cabeza cortadora (3) dentro del paste de soporte trasero (4) y apriete las tomillos.
~ 5.
6.
7

SAW STAND ASSEMBLY
Slide-In Legs 1. Slide each of the four legs into the leg housing at the four comers of the
saw frame. 2. After sliding the leg in as far as possible, lock the leg in place with the
screw located on the leg housing.
Folding Stand 1. Attach each wheel to the frame with four (4) screws (:t/4" x 1-3/4").
washers, and nuts as shown below. 2. Slide the smaller leg of the frame inside the larger leg of the frame. Next
secure each side with a (3/8" x 1"-2") screw and bolt. 3. Make sure all screws and bolts are tightened as shown. 4. After the saw stand is completely assembled, place the saw on top of the
saw stand and secure the frame by screwing two (2) knobs into the
, ENSAMBLAJE DEL SOPORTE DE LA SIERRA
Soporte Deslizable 1. Deslize cada uno de las soportes dentro del alojamiento en las cuatro
esquinas de la armazon de la sierra. 2. Despues deslize el soporte dentro del alojamiento lo mas posible, y asegure
los soportes en su lugar con los tornillos localizados en el elojamiento de los soportes.
Soporte Plegadizo 1. lnstale cada rueda al armazon con las cuatro tomillos (:t/4" x 1-3/4"),
rondanas y tuercas tal coma se indica abajo. 2 . Deslize el soporte mas corto de la armazon dentro del soporte largo.
Enseguida asegure cada lado con un tornillo y tuerca de 3/8" x 1"-2". 3 . Asegurese que todos los tomillos esten bien apretados y colocados coma
se indica. 4 . Despues que el armazon de la sierra esta completamente ensamblada,
Ponga la maquina encima del soporte plegadizo y asegure la base este apretando los (2) tornillos.
8

BLADE INSTALLATION .
1. Carefully raise the cutting head to its highest position and secure it into place by tightening the cutting head adjustment knob on the rear support.
2. Raise the blade guard to the highest position and tighten the blade guard adjustment knob.
3. Remove the blade shaft nut and outer flange. 4. Place the blade onto the shaft making sure that the directional arrows are
pointing in the direction of rotation. 5. After making sure that the blade is firmly placed against the inner flange,
secure it into place with the outer flange and blade shaft nut. With one hand, depress the spring loaded blade shaft lock and tighten the blade shaft nut with your free hand. Make certain the nut if firmly tightened with the wrench provided, but do not over-tighten!
6. Lower the blade guard and tighten the adjustment knob. 7. Slightly loosen the rear support adjustment knob, lower the cutting head so
that the blade is ¼ " below the surface of the cutting table, and then tighten the adjustment knob firmly to hold the cutting head in place.
Warning: Setting the blade too low may damage the cutting table and If set too high, the blade may grab the material being cut, causing damage and possibly Injury.
INSTALACION DE LA CUCHILLA 1. Levante cuidadosamente la cabeza cortadora a su posicion mas elevada y
asegurela en su lugar apretando fuertemente la perilla de ajuste en el soporte trasero.
2. Levante la cubierta protectora a su posicion mas elevada y apriete la perilla de ajuste.
3. Quite la tuerca del eje impulsor para poder quitar el reten exterior. 4. Coloque la cuchilla cortadora en el eje impulsor asegurandose que la
flechas indicadoras marquen la direccion de rotacion correcta. 5. Despues de asegurarse que la cuchilla este firmemente colocada cont ra el
reten interior y asegurela en su lugar colocando el reten exterior y apretando la tuerca en el eje impulsor. Con una mano baje el seguro de retenida y apriete la tuerca del eje impulsor con su mano libre, y asegurese que la tuerca este completamente apretada con la llave incluida en el set, pero no apriete demasiado.
6. Baje la cubierta protectora y apriete la perilla de ajuste. 7. Afloje cuidadosamente la perilla de ajuste del soporte trasero, baje la
cabeza cortadora haste que la cuchilla este a ¼" bajo la superficie de la base de carte, y apriete la perilla de ajuste firmemente para retener la cabeza de carte en su lugar.
Precauclon: Montar la cuchilla muy bajo podria danar la base de corte y sl la instalaclon es muy elevada, la cuchilla podria arrebatar el material a cortar causando dano y posibles herldas.
9

BEARING HOUSING INSTALLATION
To remove the bearing housing: 1. Remove the 3 screws on the belt guard. 2. Remove the belt guard. 3. Loosen (but do not remove) the adjustment screw behind the mounting
plate and the 4 screws on the motor base to remove the belt. 4. Remove the blade lock nut and remove the blade (if there is one present) . 5. Remove the 4 screws on the mounting plate closest to the cutting head
handle to remove the bearing housing (including the attached pulley and inner flange) .
To Install the new bearing housing: 1. Be sure that you have completed the instructions above to remove the old
bearing housing. 2. Open the box and carefully place the flat portion of the new bearing housing
face-down on a towel situated on a flat surface. 3. Secure the cutting head in a completely horizontal position. 4. Slide the new bearing housing with the flat portion facing upwards onto the
4 screws located below the mounting plate. Be careful not to damage the Inner flange. Lock the bearing housing into place by using brackets and nuts.
5. Pull the motor towards you, place the belt on the pulleys, and tighten the motor position adjustment screw. Be sure to leave some slack on the belt.
6. Align the belt by adjusting the motor pulley after loosening the hex screw. Warning: Do not adjust the bearing housing pulley. After aligning the belt, tighten the hex screw.
7. Replace the belt guard and lock into place using 3 screws.
INSTALACION DEL ALOJAMIENTO DEL COJINETE
Para quitar el alojamiento del cojinete: 1. Retire las tres tornillos en la cubierta de la banda. 2. Quite la cubierta de la banda. 3. Afloje (pero no quite) las tronillos de ajuste det ras de la placa de montaje y
los cuatro tornillos en la base del motor para quitar la banda. 4. Quite la tuerca de seguro y retire la cuchilla de corte (si hay alguna presente) . 5. Quite las cuatro tornillos en la placa de montaje mas cercano a la asa para
quitar el alojamiento del cojinete (incluyendo la polea adjunta y el reten interno).
Para lnstalar el nuevo alojamiento del cojlnete: 1. Asegurese de haber completado todas las instruciones arriba mencionadas
para quitar el viejo alojamiento del coj inete. 2. Abra la caja y cuidadosamente coloque la parte plana del nuevo alojamiento
del cojinete con la cara hacia abajo sobre una toalla en una superficie plana. 3. Asegure la cabeza cortadora en una posicion completamente horizontal. 4 . Deslize el nuevo alojamiento del cojinete con la parte plana vuelta hacia
arriba sobre los cuatro tornillos situados bajo la placa de montaje. Tenga cludado de no daiiar el reten Interior. Asegure el alojamiento del cojinete dentro de su lugar usando los soportes y tuercas.
5. Jale el motor hacia usted, coloque la banda en las poleas, y apriete el tomillo de ajuste de posicion del motor. Este seguro de dejar poco juego en la banda.
6. Alinie la banda ajustando la polea del motor despues de aflojar el tornillo de dado. Precaucion: No ajuste la polea del alojamiento del cojinete. Despues de alinear la banda, apriete el tomillo de dado.
7. Coloque la cubierta de la banda y asegurela dentro de su lugar usando los tres tomillos.
10

TRAY INSTALLATION & REMOVAL 1. Remove drain plug and drain all water in the tray. 2. Lift water tray protection bracket and slide tray horizontally out from its
supporting metal frame. 3. Thoroughly rinse water tray. 4 . Slide water tray back into its supporting metal frame and fasten protection
brackets. 5. Reinstall drain plug back into the drain hole before fill ing the tray with water.
WATER PUMP INSTALLATION 1. Remove the water pump from the box and check that it is not damaged. 2. Place pump in the middle-rear of the water tray along its side so that the
water outlet is positioned horizontally. Connect the water hose from blade guard to the pump and plug the power cord into the 3-prong receptacle.
3. Fill the water tray so that the water intake is fully immersed.
REMOVER E INSTAI.AR EL DEPOSITO DEL AGUA
1. Quite el tapon y desague toda el agua de la bandeja. 2. Levante el soporte de proteccion de la bandeja del agua y deslize
horizontalmente hacia afuera de su armazon del soporte de metal. 3. Enjuague completamente la bandeja del agua. 4 . Deslize la bandeja nuevamente a su soporte del armazon de metal y
asegure con las soportes de proteccion. 5 . Vuelva a colocar el tapon en su lugar antes de llenar nuevamente la
bandeja con agua.
INSTALACION DE LA BOMBA DE AGUA 1. Saque la bomba de agua de su empaque y revisela que no tenga ningun
dano. 2 . Coloque la bomba en la parte central de atras de la bandeja de agua, en su
costado tanto que la salida de agua este en posicion horizontal. Conecte la manguera del agua de la cubierta de la cuchilla a la bomba y conecte el cable en conector de 3 puntas.
3 . Llene la bandeja con agua asi para que la entrada de agua este completamente hundida.
11

WATER PUMP MAINTENANCE When the machine has not been used for a long period of time, hard packed dirt may build up inside the pump and block the pump wheel. If the machine is activated with the immersion pump blocked, the electric motor of the pump will be damaged within a few minutes! Please follow the steps below to clean the pump before operating the saw.
1. Unscrew the pump filter. 2. Remove the immersion pump from the water container. 3. Clean the immersion pump. 4. Loosen the fixing screws of the pump lid. 5. Take the lid off the pump (be careful not to damage the gasket inside with a
sharp object!) 6. Clean the pump lid. 7. Remove all dirt and incrustations from the pump wheel. 8. Check whether the pump wheel can be easily turned. 9 . Then assemble the immersion pump correctly and check whether it works
properly.
WATER PUMP SAFETY PRECAUTIONS • Never operate pump without water in the tray. Fill the water tray so that the
water intake is fully immersed. • Be sure to connect the plug to a properly grounded receptacle to reduce
the risk of electric shock. • Disconnect pump before handling pump or attempting to unclog or service
the pump in any way. • Be sure to support pump during installation to prevent pump failure or
damage.
'
MANTENIMIENTO DE LA BOMBA DE AGUA Cuando la maquina no ha sido usada por largo periodo de t iempo, quizas la bomba y el rodete podrian estar atascados con residuos secos. Si la maquina es encendida con la bomba de immersion atascada, el motor electrico de la bomba podria danarse en pocos minutos! Por favor siga la indicaciones paso a paso para limpiar la bomba antes de usar la sierra.
1. Desatornille el filtro de la bomba. 2. Quite la bomba de hundimiento de la bandeja del agua. 3. Limpie la bomba de hundimiento. 4. Afloje el tornillo de fijacion de la tapadera de la bomba. 5. Retire la tapadera de la bomba (tenga cuidado) no dane el empaque de
adentro con herramienta afilada. 6. Limpie la tapa de la bomba. 7. Quite toda la suciedad y residuos del rodete de la bomba. 8. Compruebe que el rodete puede girar libremente. 9. Ensamble la bomba de hundimiento correctamente y comprube que todo
trabaje apropiadamente.
PRECAUCIONES DE SEGURIDAD CON lA BOMBA DEL AGUA
• Nunca use la bomba sin agua en la bandeja. Llene la bandeja de agua de manera que el agujero de absorsion quede completamente hundido.
• Asegurese de conectar el enchufe a un toma corriente conectado a tierra en forma apropriada para reducir el riesgo de choque electrico.
• Desconecte la bomba antes de manejarla la o tratar de desmontarla o dar servicio a la bomba en cualquier forma.
• Asegurese de sostener la bomba durante la instalacion para prevenir danos o fallas.
12

USING THE CUTTING TABLE
Features: • Cutting table marked in inches and centimeters for precision cuts. • Rubber-matted cutting table supports the material being cut in place, while
resisting vibrations for smoother cuts with less chipping. • 14" length cutting table provides more support during larger cutting jobs
than the standard 11" cutting tables.
To use the 45°190° rip guide, follow the steps below: 1. Set the rip guide by positioning it on the desired dimension and tighten the
threaded knob. Make sure that the rip guide is firmly tightened to avoid slippage. The rip guide can be used for 45°/90° rip cuts from both the left and right side. (Note the straight slits on the bottom of the rip guide.)
2. After the rip guide is positioned for the desired cut, place material flat against the rip guide and the measurement rail.
3. Simply line up the material being cut with the appropriate pre-marked lines on top of the cutting table.
4. Now you are ready to make your cut.
To make miter cuts, follow the steps below: 1. For miter cuts, place the lip of the miter block on the measurement rail,
with the threaded knobs facing you. 2. Tighten the threaded knobs to secure the miter block in place. 3. Place material onto miter block and you are ready to cut.
USO DE LA BASE DE CORTE
Caracteristicas: • Base de carte marcado en pulgadas y centimetros para cortes precisos. • La cubierta de goma de la base de carte ayuda a mantener el material en
su lugar mientras, es cortado resistiendo vibraciones para cortes mas suaves con menos astillas.
• Base de carte de 14" provee mas apoyo durante las trabajos de cortes largos, masque las bases de carte estandard en 11".
Para usar la guia de corte de 45°190° siga los pasos slgulentes: 1. lnstale la guia de carte colocando en la medida deseada despues apriete la
perilla atomillable. Asegurese que la guia de carte esta firmemente apretada para evitar que el material se resbale. La guia de carte puede ser usada para cortes de 45°/90° y cortes par las 2 lados derecho e izquierdo
2. Despues de que la guia de carte este instalada para el carte deseado, ponga el material completamente piano contra la guia de carte y el riel de medida.
3. Simplemente alinie el material a cortar con las lineas premarcadas en la cubierta de goma de la base de carte.
4. Ahora ya usted esta listo para realizar su carte.
Para hacer cortes en diagonal, continue con los slgulentes pasos: 1. Para cortes diagonales, coloque el borde del soporte diagonal en el riel de
medicion, con las perillas atornillables de frente a usted. 2 . Apriete las perillas atornillables para asegurar el soporte de carte diagonal
en su lugar. 3. Coloque el material a cortar encima del soporte de carte diagonal y usted
esta listo para realizar el carte.
13

CUTTING DEPTH . The recommended cutting depth is 1/411 below the cutting table surface. To adjust the cutting depth, loosen the mounting plate adjustment knob so that the blade is 1/4" below the top of the cutting table's surface.
Warning: Setting the blade too low may damage the cutting table and if set too high, the blade may grab the material being cut, causing damage and possibly injury.
Blade Diameter Cutting Depth 6" 1~a14• 7" 2-1/4" 8" 2-3/4 • 9" 3-1/4"
10: ., ~;:W4r ..
BELT REPLACEMENT
1. Turn off the saw before proceeding any further. 2. Loosen and remove the belt guard screws and take off the belt guard. 3. Loosen the 4 nuts {front & back) on the mounting plate. 4. Gently loosen the motor adjustment clip on the very rear of the motor
mounting plate. 5. Carefully nudge the motor slightly forward, so there is a little slack in the
belt. 6. Take off the old belt and replace with new belt. 7. To reassemble, follow steps in reverse order.
PROFUNDIDAD DE CORTE La profundidad recomendada de corte es de 1/4" bajo la superficie de la base de corte. Para ajustar la profundidad de carte, afloje la perilla de ajuste de la placa de montaje asi para que la cuchilla se encuentre a 1/4" bajo la superficie superior de la base de carte.
Precaucion: Montar la cuchi lla muy bajo podria danar la base de corte y si la instalacion es muy elevada la cuchil la podria arrebatar el material a cortarse, causando danos y posibles heridas.
Diametro De La Cuchilla Profunidad De Corte 6" 1-3/4" 7" 2-1/4 II
8" 2-3/4 II
911 3-1/4 II 1011 3-3/4 II
REMPLAZO DE LA BANDA
1. Apague la sierra antes de continuar. 2. Afloje y quite las tornillos de la cubierta de la banda y retire la cubierta. 3. Afloje las 4 tuercas (de atras y enfrente) en la placa de montaje. 4 . Afloje suavemente el pasador de ajuste del motor localizado en la parte
mas atras de la placa de montaje de motor. 5. Con cuidado empuje ligeramente hacia adelante, ahi notara una pequena
disminucion de la tension en la banda. 6. Retire la banda usada e instale la nueva. 7. Para reemplazar, siga los pasos en orden inverso.
14

ELECTRICAL MOTOR SPECIFICATION Features: • Horsepower 1-1/2H.P.
• Volts 115 V
• Amps 15 Amps
• Motor RPM 3450 RPM
• Cycle 60
• Phase 1
• Class E
Recommendations: • It is recommended that a 15 AMP CIRCUIT be used while operating this
saw. This will prevent possible power interruption or loss. • Always plug saw as close as possible to the power source while operating.
This will allow you to receive optimum electricity.
Gnlen
l,-W-tring Bo-x ~, 1---tlt
Block
White
Warning To avoid permanent motor damage you must use the correct extension cord. Never use more than one extension cord at a time. Follow the chart below for proper size:
LENGTH OF CORD
WIRE 1½ HP GAUGE 115V No. 12 25' No. 10 50' No.8 75' No.6 -
ESPECIFICACIONES DEL MOTOR Caracteristicas: • Caballaje 1-1/2H.P. • Voltios 115 V • Amperios 15 Amps • Motor RPM 3450 RPM • Ciclos 60
• Fase 1
• Clase E
Recomendaclones: • Es recomendado que un circuito de 15 amps sea usado mientras la sierra
esta en operacion. Esto evitara la interrupcion o perdida de potencia. • Siempre conecte la sierra lo mas cerca posible a la fuente de poder
mientras la sierra este en operaicon. Esto le permetira recivir la cantidad requerida de electricidad.
Norge,
Blanco
Sborecaryo
Advertencla Para evitar dano permanente al motor use el cable correcto de extension. Nunca use mas de una extension a la vez. Siga las indicaciones proporcionadas abajo:
LARGO DEL CABLE
GROSOR 1½HP
DE CABLE 115V No. 12 25' No. 10 50' No.8 75' No.6 -
15

OPTIONAL ACCESSORIES ACCESORIOS OPCIONALES .
Angle Guide Guia de Corte en Angular
Miter Block Soporte de Corte Diagonal
45° /90°Rip Guide 0 0
Guia de Corte 45/90
Side Extension Table Extencion de la base de corte
16

DO'S & DON'TS FOR BLADES WET CUT BLADES
DO'S • Inspect blades daily for cracks or uneven wear. • Always use appropriate blade for material being cut. • Inspect arbor shaft for uneven wear before mounting blade. • Always use blades with the correct arbor shaft size. • Ensure that blade is mounted in the correct direction. • Secure the blade to the arbor with a wrench. • Use proper safety equipment when operating the saw. • Periodically check the blade for cracks or bond fatigue. • Always have a continuous flow of water on both sides of blade.
DON'TS • Do not operate the saw without safety guards in position. • Do not operate the saw with blades larger than 10". • Do not cut dry with blades marked "Use Wet". • Do not exceed manufacturer's recommended maximum RPM. • Do not force blade into material let blade cut at its own speed.
DRY CUT BLADES
DO'S • In addition to the following, always follow wet recommendations. • Use appropriate blade for material being cut. • Inspect segment blades for segment cracking or loss. • Do not use damaged blades. • Use proper safety equipment when operating the saw.
DON'TS • In addition to the following, always follow wet recommendations. • Do not make long cuts with dry blades--allow them to air cool periodically. • Do not use the edge or side of blade to cut or grind. • Do not attempt to cut a radius or curve. • Do not cut too deep or too fast into the material. • Do not cut any material not recommended by blade manufacturer.
COMO USAR LAS CUCHILLAS CUCHILLAS DE CORTE HUMEDO
QUE HACER • Revise las cuchillas diariamente por grietas o desgaste disparejo. • Siempre use la cuchilla apropiada para el material que se va a cortar. • Revise el eje por desgaste disparejo antes de instalar la cuchilla. • Use siempre cuchilla con la medida necesaria para el eje. • Asegure se que la cuchilla este montada en la direccion correcta. • Asegure la cuchilla al eje con una llave. • Use el equipo de seguridad apropiado cuando se encuentre operando la sierra. • Periodicamente revise la cuchi lla por grietas o abolladuras. • Siempre tenga un constante flujo de agua en ambos lados de la cuchilla.
QUE NO HACER • No haga uso de la sierra sin las cubiertas de seguridad. • No use la sierra con cuchillas mas largas de 10". • No haga cortes en seco cuando la cuchilla esta disenada para uso humedo. • No exeda el maxima de RPM recomendadas por el fabricante. • No force la cuchilla cuando este realizando el corte deje que la cuchilla
avance por si misma.
CUCHILLAS DE CORTE EN SECO
QUE HACER • Ademas de lo siguiente siemple siga las recomendaciones de carte humedo. • Use la cuchilla apropiada para el material a cortar. • Revise la cuchilla con mucho cuidado buscando grietas o quebraduras. • No use cuchillas danadas. • Use el equipo de seguridad adecuado cuando use la sierra.
QUE NO HACER • Ademas de lo siguiente siempre siga las recomendaciones de carte
humedo. • No haga cortes largos con cuchillas para corte seco. Permita el
enfriamiento con aire periodicamente. • No use el filo o los costados de la cuchi lla para cortar o esmerilar. • No trate de cortar en circulo o curvas. • No haga cortes muy profundos o rapidos en el material. • No corte cualquier material que no sea recomendado por el fabricante de la
cuchilla.
17

SAW MAINTENANCE . GENERAL RULES 1. Always clean the machine before maintenance/repair. 2. 'Before cleaning/maintenance/repair, the machine must be switched off with
the main power key. 3. Clean the machine by following the steps below:
a. Please do not use aggressive cleaners (i.e. containing solvents) . Do not use high-pressure water jets, aggressive detergents or solutions and liquids with a temperature exceeding 86"FI Use a fluff-free cloth only.
b. Use a cloth which may be lightly moistened only for removing dust and dirt. Hard packed dirt can be removed with a soft brush.
c. For the sake of safety, no water/cleaning liquid/Vapor may penetrate into the electric motor, connectors/plugs, switches, etc. Therefore cover all apertures, holes in the housing, connectors or plugs, etc. or seal them with adhesive tape!
d. Use a soft, low-pressure water Jet and a brush to rinse dirt and incrustations away. Be particularly careful when near hazardous parts of the machine (e.g. switch, motor). Clean the motor and switches only by wiping with a moist cloth.
e. Do not "rinse" the bearings of the drive elements to prevent them from running dry. The ball bearings of the machine are permanently lubricated.
f. After cleaning, remove all covers and adhesive tape! All screws/nuts which you may have loosened must be tightened again!
g. After wet cleaning, try the machine on a power outlet which is equipped with a power breaker (i.e. fault current circuit breaker). If the fault current circuit breaker cuts the power supply, the machine must be inspected by an authorized dealer prior to usel
MANTENIMIENTO DE LA SIERRA REGLAS GENERALES 1. Siempre limpie la maquina antes de darle mantenimiento o reparala. 2. Antes de limpiar, darle mantenimiento o reparar, la maquina debera
apagarse con el interruptor principal. 3. Limpie la maquina siguiendo los pasos a continuacion:
a. Por favor no use limpiadores agresivos P.E. tiner. No use agua a alta presion detergentes fuertes, o soluciones solventes exediendo la temperatura de 86°FI use trapo suave para limpiar.
b. Use un trapo humedo para limpiar el polvo y suciedad, la suciedad estancada puede ser removida con un cepillo suave.
c. Por razon de seguridad, no debe penetrar agua, liquido limpiador o vapor dentro del motor electrico, conectores, tomacorrientes interruptores por consiguiente cubra todas las aperturas hoyos en el alojamiento conector o tomacorriente con cinta hadesiva.
d. Use un trapo suave y humedo y un cepillo para retirar residuos e incurstaciones. Sea particularmente cuidadoso cuando partes riesgosas se encuentren cerca de las partes del icadas de la maquina p.e. interruptores y motor. Limpie los interruptores y el motor solo con un trapo humedo y suave.
e. No enjuage los cojinetes de las partes movibles para prevenir que se usen en seco. Los cojlnetes de la maquina estan perrnanentemente lubricados.
f. Despues de la limpieza, remueva todas las cubiertas y la cinta hadhesiva, todos los tornillos y tuercas que usted aflojo deberan ser apretados nuevamentel
g. Despues de la limpieza humeda conecte la maquina a un toma correinte equipado con un interruptor de corriente p.e. corta corriente en caso de fallas. Si el interruptor corta la corriente, la maquina debera ser inspeccionada por un distribuidor autorizado antes de su uso!
18

SAW MAINTENANCE Maintenance Interval
After every use of the machine
After wet cleaning and before using the machine again
Before not using the machine for a prolonged period of time
After not using the machine for a prolonged period of time
Ambient temperature below 32°F {operation in winter)
What to do for maintenance and care
- Remove dirty water from container. - Remove dirt and mud from the bottom of the container. - Rinse the immersion pump with fresh water to prevent water pump clogging from residual dirt.
Connect the machine to an electric power outlet equipped with a "Fl" safety power breaker. If the safety power breaker cuts off the electrical power supply, do not try to operate the machine but have it checked by an authorized dealer first.
Clean and lubricate all movable parts.
-Check that the legs are safely fixed. -Check that all screw joints and nuts are fixed. - Check that the roller table is in its guides and that it easily moves to and fro. -With the saw blade removed, switch on the motor for an instant and switch it off again. If the motor does not run, have the machine inspected by a qualified electrician. -Check that the immersion pump works properly. Turn on the cooling water tap and switch the machine on. If the pump does not give any water or only a little, switch the machine off at once. Clean the pump, or replace if necessary.
- To prevent the water in the pump and cooling system from freezing, remove the water after using the machine or when there will be a long break. Make sure that the cooling system is entirely drained so that there is no water left inside the pump and water hose!
MANTENIMIENTO DE LA SIERRA Periodo de mantenimiento
Despues de cada uso de la sierra
Despues de limpiar y antes de usar la maquina nuevamente
Antes de no usar la maquina por un periodo prolongadro de tiempo
Despues de un prolongado periodo de tiempo sin uso
Temperatura ambiente trabajando a 32 F" {El uso en invierno)
Como cuidar y mantener la sierra
- Vacie el agua sucia del deposito. -Quite la suciedad y los residuos del deposito. - Enjuage la bomba de hundimiento con agua limpia para prevenir que se atasque con residuos y basura.
Conecte la maquina a un toma corrientes equipado con un interruptor de seguridad. Si el interruptor corta la corriente. No trate de usar la maquina primero tendra que ser revisada por un distribuidor autorizado.
Limpie y lubrique todas las partes moviles.
- Revise que los soportes estan seguramente fijos. - Revise que todos los tomillos y tuercas esten arreglados. - Revise que la base de rodetes esta en sus guias y se puede mover libremente. - Con la cuchilla de la sierra desmontada, encienda el motor por un instante y vuelvala a apagar. Si el motor no trabaja, la maquina debera ser revisada por un electricista calificado. - Revise que la bomba de hundimiento trabaje de manera correcta encienda el proveeder de agua y encienda la maquina. Si la bomba no provee la sificiente agua o nada. Apague la maquina. LJmpie la bomba a reemplacela si es necesario.
- Para prevenir que el agua en la bomba o en el sistema de enfriamiento no se congele. No deje agua en el deposito despues de cada uso o cuando se dejara sin uso por un tiempo prolongado. Asegureze que el deposito y el sistema de enfriamiento esta completamente vacio y que no hay agua en la bomba ni en las mangueras.
19

TROUBLESHOOTING · PROBLEMAS Y SOLUCIONES .
Problem Possible Cause Solution Problemas Posible causa Solucion
Machine does - Power cord not properly -Check that the machine is La maquina no - Cable conector no esta - Revise la maquina si esta not run when fixed/plugged in properly connected to the trabaja cuando fijo o conectado en la correctamente conectado a switched on power supply es activada forma correcta tomacorriente
- Power cord defective - Have the power cord - Cable conector - Revise el cable conetor y checked, replace if necessary defectuoso re-emplacelo si es necesario
- Main power switch - Have the main power switch - lnterruptor principal de - Revise el interruptor defective checked and replace if fectuoso principal y si es necesario
necessary by a qualified debera ser cambiado por un electrician electricista calificado
- Loose electrical - Have the whole electric - Perdida de coneccion - El sistema electrico debera connection inside the system of the machine electrica dentro el ser revisado completamente electric system checked by a qualified sistema electrico por un electricista calificado
electrician - Motor defectuso - Revise el motor y re--Motor defective - Have the motor checked emplacelo si es necesario
and replaced if necessary by a qualified technician Desativacion - Demasiada pression es - Ejerza menos presion
continua del aplicada mientras esta cuando realize el carte Motor stops - Too much pressure - Exert less pressure when motor real izando el corte (power cut out) exerted while cutting cutting - Especificacion - Utilize la cu chi Ila de sierra
-Incorrect specification - Use a saw blade which incorrecta de la cuchi lla que corresponde al material
for saw blade corresponds to the material de la sierra a cortar being cut - La sierra tiene sistema - El sistema electrico de la
- Saw has a defective - Have the electric system of electrico defectuoso sierra debera ser revisado
electric system the saw checked by a por un tecnico cal ificado qualified technician
Pobre - Cable conector o - Use cable conector o
Poor machine - Power cord/extension - Use a power cord/extension rendimiento o extension demasiado extension de la medida
performance cable too long or cable cable of the rated length, use poco poder largo o el cable ha sido indicada use la bovina con el little power still wound up inside a cable drum with cable fully danado dentro de la cable completamente
cable drum extended bovina extendido - Power network is - Observe the electrical - Linea de corriente es -Observe los requerimientos insufficient ratings of the machine and insuficiente electricos de la maquina y
connect it only to a power conectela a la linea de network which complies with corriente que cumpla con los these ratings requerimientos
- Drive motor no longer - Have the motor checked by - El motor no trabaja a la - Haga que el motor sea runs at rated speed a qualified electrician and velocidad de corte revisado por un electricista (r.p.m.) have it replaced if necessary requerida calificado y remplazelo de ser
necesario
20

TROUBLESHOOTING . PROBLEMAS Y SOLUCIONES .
Problem Possible Cause Solution Problemas Posible Causa Solucion
Insufficient flow - The pump draws air - Fill the container with water lnsuficiente flujo - La bomba arrastra ai re - Llene el deposito con agua of cooling water - Filter clogged - Clean the filter of the pump de liquido - Filtro tapado - Limpie el filtro de la bomba or no cooling - Pump wheel of the - Disassemble the immersion enfriafor o nada - La rueda de la bomba - Desarme la bomba de water at all immersion pump blocked pump and clean it de liquido de imersion esta tapada imersion y limpiela
by dirt con residuos
Irregular run of - Poor tension in the - Return the saw blade to the Funcionamiento - Pobre resistencia en el - Regrese la cuchilla al the saw blade blade material manufacturer irregular de la material de la cuchilla fabricante
cuchilla de la Saw blade - Saw blade is damaged - Have the saw blade sierra wobbles when or bent aligned/flattened running - Clean the receiving flange Balanceo de la - La cuchilla esta danada - La cuchilla debera ser
- Solder the diamond cuchilla cuando o doblada enderezada y alineada segments of the old blade esta en uso - Lim pie el borde receptor onto another saw blade or - Sol de las segmentos de use a new blade diamante de la cuchilla vieja
- Flange of the saw blade - Replace the saw blade en otra buena o use una is damaged flange cuchilla nueva - Shaft of the motor is - Replace the electric motor - Borde de la cuchilla de - Reem place el borde de la bent la navaja esta danado cuchilla
- Eje del motor esta - Reem place el motor Diamond - Overheating of the saw - Have the diamond segment doblado electrico segment blade; cooling water not soldered on the blade again; becomes loose . sufficient ensure optimum flow of Los segmentos - Sobrecalentamiento de -Saide las segmentos de
cooling water de diamante se la cuchilla e insuficiente diamante en la cuchilla aflojan liquido enfriador nuevamente y asegure
Excessive wear - Wrongtype of saw blade - Use harder saw blades liquido enfriador suficiente - Shaft of motor causes - Have bearings of the motor wobbling or the motor replaced Degaste excesivo - Tipo equivocado de - Use una cuchilla mas fuerte - Overheating - Ensure optimum flow of cuchilla
cooling water - El eje del motor causa - Rem place las valeros del balanceo motor o el motor completo
Cracks in or - Saw blade too hard - Use a softer blade - Sobrecalentamiento - Asegure flujo de liquido near the - Fixed flange is worn out - Have the fixed flange enfriador suficiente diamond replace segment. - Motor shaft bearing - Replace the bearing of the Cuarteaduras - Cuchilla de la sierra - Use una cuchilla mas suave
motor shaft en, o cerca de demasiado dura las segmentos - Los bordes de ajuste - Remplace las bordes de de diamante estan desgastados ajuste
- Baleros del eje del motor -Remplace las baleros del 21 eje del motor

Problem Possible Cause Solution Problemas Posible Causa Solucion
Saw blade is - Saw blade type is - Use appropriate type of saw Cuchilla - El tipo de cuchilla es - Use el tipo apropiado de blunt unsuitable for the blade desafilada inhapropiado para el cuchilla
material being cut material a cortarse - Saw blade type is - El tipo de cuchilla es unsuitable for the inhapropiado para el machine performance rendimiento de la maquina - Saw blade too hard - Cuchilla demasiado - Diamond segments are -Sharpen the diamond saw dura blunt blade - Segmentos de - Afi le la cuchilla
diamante desafilados Appearance of - Poor tension in the - Return the saw blade to the cut is not blade material manufacturer Apariencia def - Poca resistencia en el - Regrese la cuchilla al optimal - Too much load placed - Use a suitable saw blade corte no es material de la cuchilla fabricante
on the saw blade buena - Demasiada presion en - Use la cuchil la requerida - Diamond segments are - Sharpen the saw blade la cuchilla blunt - Los segmentos de -Afile la cuchi lla de la
diamante desafilados maquina The center hole - The saw blade has - The arbor of the saw blade in the saw blade slipped on the motor must be fitted with an El centro de la - La cuchilla se ha - El eje de la cuchilla debera has become shaft when running appropriate adaptor ring cuchilla se ha resbalado en el eje del ser ajustado con un anillo wider due to - Check the receiving flange desgastado motor mientras funciona adaptador apropiado wear and have it replaced if - Revise el borde receptor y
necessary cambielo si es necesario
Saw blade -Saw blade overheating - Ensure an optimum flow of La cuchilla - Sobrecalentemiento de - Asegure la maxima cantidad shows blooming due to a lack of cooling cooling water muestra colores la cuchilla debido a la de liquido enfriador colors water brillantes falta de liquido enfriador
- Lateral friction when - The material feed is too - Rozamiento lateral - La alimentacion del cutting high; proceed more slowly cuando corta material es muy rapida
Grinding marks - Material is not being continue mas despacio
- Ensure that the direction of on the saw fed parallel to the saw feed is absolutely parallel to Marcas de - El material no esta - Asegurese de que la blade blade the saw blade esmerilado en la siendo alimentado direccion de alimentacion es
- Adjust the roller table/have cuchilla paralelamente a la paralela a la cuchilla it adjusted cuchilla -Ajuste la base de rodi llos o
- Poor tension in the - Have the saw blade mande ajustarla blade material tensioned - Poca resistencia en el - Use la cuchilla adecuada - Too much load on the - The material feed is too material de la cuchilla saw blade high, proceed more slowly - Demasiada presion en - El material esta siendo
la cuchilla alimentado muy rapido continue mas despacio
22

WARRANTY . This product is covered by a one year warranty from the date of purchase. If the product is defective in workmanship or material, Diamond Products will repair and/or replace it free of charge upon returning the product to distributor/dealer in its original packaging. This warranty does not cover normal wear or damage resulting from operator abuse. Diamond Productsobligations under this warranty shall be limited to the repair and/or replacement of the product. SawMaster shall not be liable for consequential damages resulting from the improper use of the product. This warranty is void if the product or any of its components are modified, altered, or in any way changed. Selected components such as motor /engines are excluded from this warranty and are subject to the manufacturer's warranty. This warranty is in lieu of al warranties expressed or implied.
ADDITIONAL HELP Please call us if for any reason you are having difficulty that cannot be resolved with the troubleshooting guide included in the back of this manual. We would like to help.
Give us a call at
1-800-321-5336 or e-mail us at
To better service our customers as expediently as possible, please make sure that you have the manufacturing serial number at hand before contacting us.
SAFETY PRECAUTIONS:
Saw blade should be inspected daily for excessive wear, core cracks, and arbor damage. Replace any blade that shows signs of damage.
1 To mount blade, clean arbor and outer flanges, tightening nut securely. 1 Do NOT place any portion of body in line with blade while it is rotating. 1 Wet cutting blades must be used with water. 1 To reduce risk of electrical shock, refer servicing to qualified professional.
HEALTH WARNING :
Some dust are created by power sanding, sawing, grinding, drilling, and cause other construction activities contains chemicals known to cause cancer, birth defects or other reproductive harm. Some examples of these chemicals are:
Lead from lead based paints, Crystalline silica from bricks and cement and other masonry products, Arsenic and chromium from chemically-treated lumber.
Your risk from these exposures varies, depending on how often you do this type of work. To reduce your exposure to these chemicals: work in a well ventilated are, and work with approves safety equipment, such as those dust masks that are specially designed to filter out microscopic particles.
DIAMOND PRODUCTS
333 Prospect Street • Elyria, OHIO 44035 • USA 23