CAST IRON FRAMED RING BURNERS - online.ahm.co.nzonline.ahm.co.nz/==37a18tYKpi-LaSRqPOAL-g==/...
7
CAST IRON FRAMED RING BURNERS ASSEMBLY AND OPERATING INSTRUCTIONS • Improper installation, adjustment, alteration, service or maintenance can cause property damage, injury or death. Read the installation, operating and maintenance instructions thoroughly before installing or servicing this appliance. • WARNING: Accessible parts may be very hot. Keep young children away at all times. • Do not move the appliance during use. • DO NOT modify this appliance. • Installer to leave instructions with the consumer and consumer to retain them for future reference. AGA approval No: 7799 Australian Gas Association WARNING: FOR OUTDOOR USE ONLY CM1089R (40-1a) Triple Burner CM1090R (50-1a) Quad Burner CM1089R, 90R-2014-09-05 V2 1089R, 1090R.indd 1 5/09/14 1:31 pm
Transcript of CAST IRON FRAMED RING BURNERS - online.ahm.co.nzonline.ahm.co.nz/==37a18tYKpi-LaSRqPOAL-g==/...
CAST IRON FRAMED RING BURNERSASSEMBLY AND OPERATING INSTRUCTIONS
• Improper installation, adjustment, alteration, service or maintenance can cause property damage, injury or death. Read the installation, operating and maintenance instructions thoroughly before installing or servicing this appliance.
• WARNING: Accessible parts may be very hot. Keep young children away at all times.• Do not move the appliance during use. • DO NOT modify this appliance.• Installer to leave instructions with the consumer and consumer to retain them for future
reference.
AGAapproval
No: 7799Australian Gas Association
WARNING: FOR OUTDOOR USE ONLY
CM1089R (40-1a) Triple Burner
CM1090R (50-1a) Quad Burner
CM1089R, 90R-2014-09-05 V2
1089R, 1090R.indd 1 5/09/14 1:31 pm
1 IMPORTANT. Read these instructions for use carefully.2 Check for gas leaks with soapy water3 Gas appliances must only be used in well ventilated areas
1 IMPORTANT. Read these instructions for use carefully.2 Check for gas leaks with soapy water3 Gas appliances must only be used in well ventilated areas
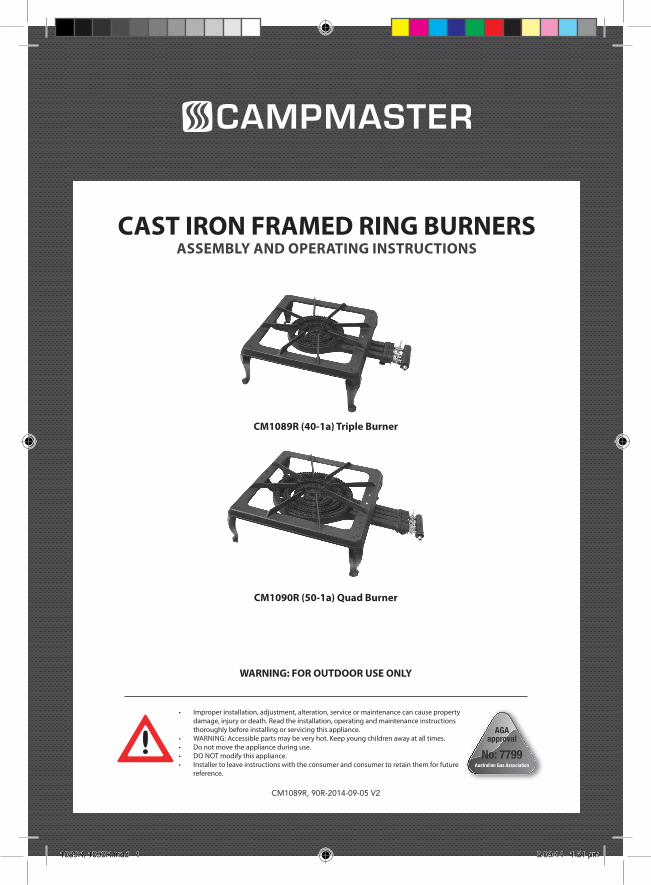
SAFE APPLIANCE LOCATIONSThis appliance shall only be used in an above ground open-air situation with natural ventilation, without stagnant areas, where gas leakage and products of combustion are rapidly dispersed by wind and natural convection.
Any enclosure in which the appliance is used shall comply with one of the following:
• An enclosure with walls on all sides, but at least one permanent opening at ground level and no overhead cover (see Example 1).
• Within a partial enclosure that includes an overhead cover and no more than two walls (see Example 2 & 3).
Within a partial enclosure that includes an overhead cover and more than two walls,
the following will apply:
• At least 25% of the total wall area is completely open, and
• At least 30% of the remaining wall area is open and unrestricted (see Example 4 & 5).
In the case of balconies, at least 20% of the total wall area shall be and remain open and unrestricted.
The following figures are diagrammatical representations of outdoor areas. Rectangular areas have been used in these figures - the same principles apply to any other shaped area.
Open side at least25% of total wall area
Open side at least25% of total wall area 30 percent or more in total
of the remaining wall areais open and unrestricted
30 percent or more in totalof the remaining wall areais open and unrestricted
Figure F4 - Outdoor Area - Example 4
Figure F5 - Outdoor Area - Example 5
Both ends open
Figure F1 - Outdoor Area - Example 1
Figure F2 - Outdoor Area - Example 2
Figure F3 - Outdoor Area - Example 3
INSTRUCTIONS FOR RING BURNERS
WARNING• This appliance shall only be used with LPG cylinders complying with AS2030.1
(or equivalent). IT MAY BE HAZARDOUS TO ATTEMPT TO FIT OTHER TYPES OF GAS CONTAINERS.
• Make yourself familiar with the smell of unburned gas. If there is a leak on your appliance (smell of gas), immediately attempt to turn off the cylinder valve. Remove the appliance to a well-ventilated location away from any ignition source. Never attempt to light a cooker if you can smell gas. Always use soapy water to check for gas leaks, never use a match or naked flame.
• ONLY USE IN WELL VENTILATED AREAS. CARBON MONOXIDE HAZARD - THIS APPLIANCE CAN PRODUCE CARBON MONOXIDE WHICH HAS NO ODOUR. USING IT IN AN ENCLOSED SPACE (EG. CARAVAN, TENT, CAR, MOBILE HOME) MAY CAUSE DEATH.
• Caution: Accessible parts may be very hot. Keep young children away. Never reach across the ring burner when cooking. Never allow children to operate the ring burner.
• Always store the gas cylinder outside in a well ventilated area, away from heat sources and out of reach of children. Any indoor storage shall comply with AS/NZS1596.
• This appliance must be used on a non combustible surface.
• The following minimum distances to combustible materials must be maintained: Rear: 800mm, Sides: 800mm, Top: 1200mm.
• Do not modify this appliance.
• Gas cylinders shall be changed in a well-ventilated location, preferably outside away from people and any sources of ignition, such as naked flames, pilot flames, electric heaters/equipment.
• Only use the hose assembly as supplied with this appliance for connection to the cylinder – DO NOT USE ADAPTORS.
• This appliance must only be serviced by an authorised person.
• Do not use or store any flammable liquid or material in the area surrounding the burner.
• Do not operate this product if under the influence of alcohol or drugs. Read warning labels on prescriptions to determine if your judgment/reflexes might be impaired.
1089R, 1090R.indd 2-3 5/09/14 1:31 pm

1 IMPORTANT. Read these instructions for use carefully.2 Check for gas leaks with soapy water3 Gas appliances must only be used in well ventilated areas
1 IMPORTANT. Read these instructions for use carefully.2 Check for gas leaks with soapy water3 Gas appliances must only be used in well ventilated areas
PARTS
LEGS
TRIPLE BURNER
QUAD BURNER
BRACKET (FOR QUAD BURNER ONLY)
HOSE & REGULATOR
TRIPLE RING BURNER SPACERS
QUAD RING BURNER SPACERS
QUAD RING BURNER MANIFOLD
TRIPLE RING BURNER MANIFOLD
STOVE BASE
ASSEMBLYTRIPLE AND QUAD BURNERS1. Attach the four legs to the stove base (use
supplied screws, flat washers and nuts).
2. Attach the burner to the stove base (using supplied screws, spacers, flat washer and nuts). Once the burner is sitting straight in the frame, tighten in place. Spacers must be installed between the stove base, and the burner / burner bracket.
3. Attach the gas manifold to the burner using the 2 bolts.
NOTE: Assembly steps 4-6 only apply to models without fixed aeration discs4. Check the distance between the aeration
discs and the front of the burner.
5. If the settings differ to those stated in the technical information section of this manual, adjust the aeration discs to the correct settings. Then remove the manifold and tighten the nuts (where supplied) against the front of the discs to lock the settings.
* Due to regulatory requirements, a small cluster of 14 ports on the Quad ring burner have not been drilled. This is not a fault and it will not effect cooking performance.
Aeration Disc
Nut (where supplied)
1089R, 1090R.indd 4-5 5/09/14 1:31 pm

1 IMPORTANT. Read these instructions for use carefully.2 Check for gas leaks with soapy water3 Gas appliances must only be used in well ventilated areas
1 IMPORTANT. Read these instructions for use carefully.2 Check for gas leaks with soapy water3 Gas appliances must only be used in well ventilated areas
OPERATION1. This ring burner is designed to be used and operated on LPG Gas usually found in a
gas cylinder (like the type used in gas barbecues).
2. This cooker will not operate at the unregulated gas pressure coming from an LPG cylinder. An approved LPG hose & regulator assembly is required, use only – Progaz or Campmaster branded models 700A or 700B, or Keygas branded model GR-107.
3. Locate the burner and gas cylinder on a horizontal surface. Avoid twisting or kinking the flexible hose and do not move the appliance during operation.
4. The surfaces of the cooker become very hot during use. To prevent damage to the flexible hose, ensure the hose does not come into contact with any part of the burner. Locate the LPG cylinder & hose clear of the burner and radiant heat. During use, do not touch any area forward of the controls.
5. If the burner is not operating normally, check to see if anything is obstructing the gas flow. DO NOT use this appliance if it is leaking, damaged or does not operate properly.
GAS CONNECTION1. All ring burners must be connected to the hose and regulator assembly supplied.
Under no circumstances should the cooker be connected by way of plastic hose with or without hose clips. Only use the following hose and regulator assemblies with this cooker: Progaz or Campmaster branded models 700A or 700B, or Keygas branded model GR-107.
2. Before each use, always check all gas connections and joints with soapy water to make sure no leaks are present. Check hoses for cracks and wear and replace the damaged hose & regulator assembly.
6. Attach the manifold to the burner and check the aeration setting again. NOTE: Your burner may be fitted with springs to hold the disc setting. In this case the lock nut is not supplied.
7. Connect the hose and regulator assembly to the manifold inlet. NOTE: This connection must be made using a spanner to support the inlet fitting and a second spanner to tighten the hose connection. Then it must be leak tested using soapy water.
LEAK TESTING1. Connect the supplied hose and regulator to the manifold inlet using a spanners as
described in the assembly instructions above. Be careful not to cross thread the nut.
2. Connect the regulator to the gas cylinder and tighten the connection. Tighten the regulator wing nut or hand wheel fitting by hand, or regulator hex fitting with a spanner.
3. Check the gas valves are in the closed position.
4. Mix soap and water to make a soapy solution.
5. Open the cylinder valve, then apply the soapy solution to all gas connections thoroughly. If bubbles appear at a leaky connection, turn off the gas at the cylinder,
tighten the connection, then re-check for leaks using the soapy solution.
DO NOT use this appliance unless all connections are gas tight.
GENERAL INFORMATION• To ensure maximum life from your appliance it should always be stored in a dry place,
out of direct sunlight.
• To check if gas cylinder contains gas, disconnect from the cooker, then hold upright and shake from side to side. If you can feel or hear liquid movement from within the cylinder, it contains gas.
• Clean the cooker periodically using warm soapy water, but do not allow water to enter the burner.
• Do not obstruct the primary air inlet located at the front of the burner. Remove packaging before operating this appliance.
1089R, 1090R.indd 6-7 5/09/14 1:31 pm

1 IMPORTANT. Read these instructions for use carefully.2 Check for gas leaks with soapy water3 Gas appliances must only be used in well ventilated areas
1 IMPORTANT. Read these instructions for use carefully.2 Check for gas leaks with soapy water3 Gas appliances must only be used in well ventilated areas
Gas valve levers in the OFF position.
Gas valve levers in the high flame position.
LIGHTING INSTRUCTIONSTO LIGHT WITHOUT POT IN POSITION1. Turn on the gas supply at the cylinder.
2. Using a long match or gas lighter, locate flame next to the inner burner ring and ensure hands are clear of the burner.
3. Slowly rotate the corresponding gas valve lever to high flame position.
4. If burner ring does not ignite, close the gas valve lever, then wait for gas to dissipate before re-attempting to light the burner.
5. Once lit, observe the burner ring to check all ports are alight.
6. To light all burner rings, follow the steps above and light each ring individually. Light the inner ring first, then work your way outwards.
TO LIGHT WITH FULL WIDTH POT IN POSITION1. Follow steps 1 to 5 above, but during
step 2, light the outer burner ring.
2. To light all other rings, open the gas valves in sequence, progressively
towards the inner burner ring.
TO TURN OFF THE APPLIANCE1. Turn the gas cylinder valve off, then wait
for the flame to go out.
2. Turn all the appliance control valves off.
IMPORTANT! CHECKING THE FLAMENOTE: Adjustments below are only avaliable for models without fixed aeration discs.
BAD FLAME
YELLOW OR ORANGE IRREGULAR FLAMESIf your burner is producing a bad �ame check the aeration disc setting. Never allow the burner to operate with a bad �ame.
AERATION DISCS Adjust the aeration discs until you achieve a good �ame as shown below.
AERATION DISCS
GOOD FLAME
BRIGHT BLUE FLAMES
1089R, 1090R.indd 8-9 5/09/14 1:31 pm

1 IMPORTANT. Read these instructions for use carefully.2 Check for gas leaks with soapy water3 Gas appliances must only be used in well ventilated areas
1 IMPORTANT. Read these instructions for use carefully.2 Check for gas leaks with soapy water3 Gas appliances must only be used in well ventilated areas
TECHNICAL INFORMATION
TRIPLE BURNERCODE: CM1089R GAS TYPE: Universal LPG
INLET PRESSURE: 2.75kPa
INJECTOR SIZE: Inner ring 0.45mm Middle ring 0.90mm Outer ring 1.2mm
GAS CONSUMPTION: 26.4Mj/h
AERATION DISC SETTINGS: All Discs 4.5mm open
QUAD BURNERCODE: CM1090R GAS TYPE: Universal LPG
INLET PRESSURE: 2.75kPa
INJECTOR SIZE: Inner ring 0.5mm Second ring 0.9mm Third ring 1.2mm Outer ring 1.5mm
GAS CONSUMPTION: 56.0Mj/h
AERATION DISC SETTINGS: Inner ring 5mm open Second ring 7mm open Third ring 7mm open Outer ring 7mm open
1 YEAR EXPRESS WARRANTYAmalgamated Hardware Merchants Limited (“AHM”) warrants that this product will be free from material defects in workmanship and materials for a period of 1 year from the date of purchase (“Warranty Period”). If a material defect occurs during the Warranty Period, and AHM verifies such material defect and your claim, AHM will choose to either repair the product, replace the product, or provide you with a refund of the purchase price of the product (“AHM’s Express Warranty”). Any repaired or replaced product will be covered by AHM’s Express Warranty for the remainder of the original Warranty Period only.
AHM’s Express Warranty will not apply if the defect in the product is caused or contributed to by misuse of the product, failure to maintain the product, neglect or accident, ordinary wear and tear (including rust, corrosion, and normal fading, weathering, staining, discolouration, scratching or chipping), exposure to heat, failure to use or install the product in accordance with any instructions or manuals, or any modification, repair or tampering with the product by anyone other than AHM.
To claim under AHM’s Express Warranty, you must take the product (and proof of purchase) to the store where it was purchased. You must provide any additional information requested in relation to your claim. For online purchases, contact the online supplier to arrange the return of the product. You will bear any costs incurred in making a claim, including any costs of returning the product to the store, and of having the product returned to you (if applicable).
ADDITIONAL GUARANTEES UNDER CONSUMER LAWS The New Zealand Consumer Guarantees Act 1993 and the Australian Competition and Consumer Act 2010 (including the Australian Consumer Law 2011), as well as other laws in those jurisdictions (“Consumer Law”) give you other legal rights. For products sold in New Zealand, these rights cannot be modified or excluded by any contract, except in those circumstances expressly contemplated by New Zealand Consumer Law. For products sold in Australia, our goods come with guarantees that cannot be excluded under the Australian Consumer Law. You are entitled to a replacement or refund for a major failure and for compensation for any other reasonably foreseeable loss or damage. You are also entitled to have the goods repaired or replaced if the goods fail to be of acceptable quality and the failure does not amount to a major failure.
AHM’s Express Warranty is in addition to any other rights and remedies you have under the applicable Consumer Law. Except as otherwise provided by AHM’s Express Warranty, all warranties, terms, conditions, guarantees or similar, other than those which cannot be excluded under applicable Consumer Law, are expressly excluded by AHM to the extent legally permitted.
AHM NZ 8 Hautu Drive, Wiri, Auckland, New Zealand 2104Phone: +64 9 251 1300Email: [email protected]: +64 9 251 1301www.ahm.co.nz
AHM AUSUnit 4, 126-130 Compton Road, Woodridge, Queensland, Australia 4114Phone: +61 7 3208 1233Email: [email protected] Fax: +61 7 3208 1933www.ahmaustralia.com.au
CM1089R, 90R-2014-09-05 V2
1089R, 1090R.indd 10-11 5/09/14 1:31 pm
1089R, 1090R.indd 12 5/09/14 1:31 pm