Cascading Style Sheets (CSS)agu.yolasite.com/resources/Internet_Application/CSS.pdf · 162...
33
6 Cascading Style Sheets ™ (CSS) Objectives • To take control of the appearance of a Web site by creating style sheets. • To use a style sheet to give all the pages of a Web site the same look and feel. • To use the class attribute to apply styles. • To specify the precise font, size, color and other properties of displayed text. • To specify element backgrounds and colors. • To understand the box model and how to control the margins, borders and padding. • To use style sheets to separate presentation from content. Fashions fade, style is eternal. Yves Saint Laurent A style does not go out of style as long as it adapts itself to its period. When there is an incompatibility between the style and a certain state of mind, it is never the style that triumphs. Coco Chanel How liberating to work in the margins, outside a central perception. Don DeLillo I’ve gradually risen from lower-class background to lower- class foreground. Marvin Cohen iw3htp2.book Page 161 Wednesday, July 18, 2001 9:01 AM
Transcript of Cascading Style Sheets (CSS)agu.yolasite.com/resources/Internet_Application/CSS.pdf · 162...

6 Cascading Style Sheets™
(CSS)
Objectives• To take control of the appearance of a Web site by
creating style sheets.
• To use a style sheet to give all the pages of a Web site
the same look and feel.
• To use the class attribute to apply styles.
• To specify the precise font, size, color and other
properties of displayed text.
• To specify element backgrounds and colors.
• To understand the box model and how to control the
margins, borders and padding.
• To use style sheets to separate presentation from
content.
Fashions fade, style is eternal.
Yves Saint Laurent
A style does not go out of style as long as it adapts itself to
its period. When there is an incompatibility between the style
and a certain state of mind, it is never the style that triumphs.
Coco Chanel
How liberating to work in the margins, outside a central
perception.
Don DeLillo
I’ve gradually risen from lower-class background to lower-
class foreground.
Marvin Cohen
iw3htp2.book Page 161 Wednesday, July 18, 2001 9:01 AM
162 Cascading Style Sheets™ (CSS) Chapter 6
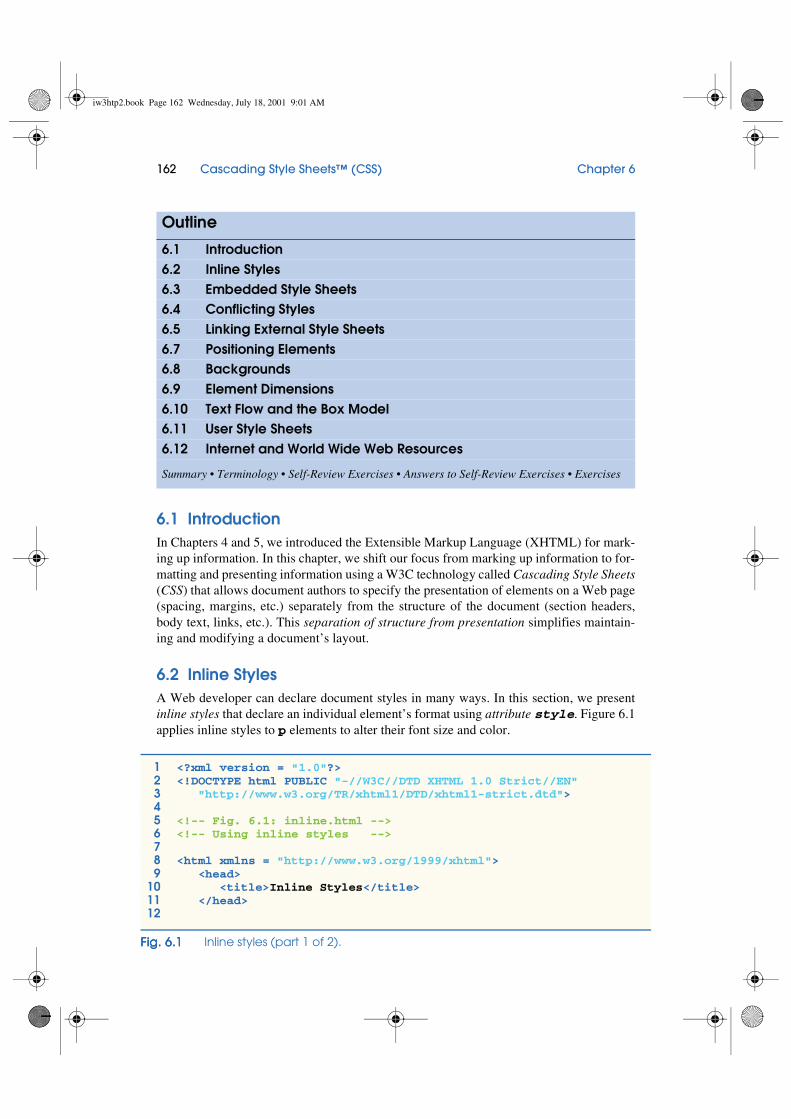
6.1 Introduction
In Chapters 4 and 5, we introduced the Extensible Markup Language (XHTML) for mark-
ing up information. In this chapter, we shift our focus from marking up information to for-
matting and presenting information using a W3C technology called Cascading Style Sheets
(CSS) that allows document authors to specify the presentation of elements on a Web page
(spacing, margins, etc.) separately from the structure of the document (section headers,
body text, links, etc.). This separation of structure from presentation simplifies maintain-
ing and modifying a document’s layout.
6.2 Inline Styles
A Web developer can declare document styles in many ways. In this section, we present
inline styles that declare an individual element’s format using attribute style. Figure 6.1
applies inline styles to p elements to alter their font size and color.
Outline
6.1 Introduction
6.2 Inline Styles
6.3 Embedded Style Sheets
6.4 Conflicting Styles
6.5 Linking External Style Sheets
6.7 Positioning Elements
6.8 Backgrounds
6.9 Element Dimensions
6.10 Text Flow and the Box Model
6.11 User Style Sheets
6.12 Internet and World Wide Web Resources
Summary • Terminology • Self-Review Exercises • Answers to Self-Review Exercises • Exercises
1 <?xml version = "1.0"?>
2 <!DOCTYPE html PUBLIC "-//W3C//DTD XHTML 1.0 Strict//EN"
3 "http://www.w3.org/TR/xhtml1/DTD/xhtml1-strict.dtd">
45 <!-- Fig. 6.1: inline.html -->
6 <!-- Using inline styles -->
78 <html xmlns = "http://www.w3.org/1999/xhtml">
9 <head>
10 <title>Inline Styles</title>
11 </head>
12
Fig. 6.1Fig. 6.1Fig. 6.1Fig. 6.1 Inline styles (part 1 of 2).
iw3htp2.book Page 162 Wednesday, July 18, 2001 9:01 AM

Chapter 6 Cascading Style Sheets™ (CSS) 163
The first inline style declaration appears in line 20. Attribute style specifies the style
for an element. Each CSS property (the font-size property in this case) is followed by
a colon and a value. On line 20, we declare the p element to have 20-point text size. Line
21 uses element em to “emphasize” text, which most browsers do by making the font italic.
Line 24 specifies the two properties, font-size and color, separated by a semi-
colon. In this line, we set the text’s color to blue, using the hexadecimal code #0000ff.
Color names may be used in place of hexadecimal codes, as we demonstrate in the next
example. We provide a list of hexadecimal color codes and color names in Appendix E.
[Note: Inline styles override any other styles applied using the techniques we discuss later
in this chapter.]
6.3 Embedded Style Sheets
In this section, we present a second technique for using style sheets called embedded style
sheets. Embedded style sheets enable a Web-page author to embed an entire CSS docu-
13 <body>
1415 <p>This text does not have any style applied to it.</p>
1617 <!-- The style attribute allows you to declare -->
18 <!-- inline styles. Separate multiple styles -->
19 <!-- with a semicolon. -->
20 <p style = "font-size: 20pt">This text has the
21 <em>font-size</em> style applied to it, making it 20pt.
22 </p>
2324 <p style = "font-size: 20pt; color: #0000ff">
25 This text has the <em>font-size</em> and
26 <em>color</em> styles applied to it, making it
27 20pt. and blue.</p>
2829 </body>
30 </html>
Fig. 6.1Fig. 6.1Fig. 6.1Fig. 6.1 Inline styles (part 2 of 2).
iw3htp2.book Page 163 Wednesday, July 18, 2001 9:01 AM

164 Cascading Style Sheets™ (CSS) Chapter 6
ment in an XHTML document’s head section. Figure 6.2 creates an embedded style
sheet containing four styles.
1 <?xml version = "1.0"?>
2 <!DOCTYPE html PUBLIC "-//W3C//DTD XHTML 1.0 Strict//EN"
3 "http://www.w3.org/TR/xhtml1/DTD/xhtml1-strict.dtd">
45 <!-- Fig. 6.2: declared.html -->
6 <!-- Declaring a style sheet in the header section. -->
78 <html xmlns = "http://www.w3.org/1999/xhtml">
9 <head>
10 <title>Style Sheets</title>
1112 <!-- this begins the style sheet section -->
13 <style type = "text/css">
1415 em { background-color: #8000ff;
16 color: white }
1718 h1 { font-family: arial, sans-serif }
1920 p { font-size: 14pt }
2122 .special { color: blue }
2324 </style>
25 </head>
2627 <body>
2829 <!-- this class attribute applies the .blue style -->
30 <h1 class = "special">Deitel & Associates, Inc.</h1>
3132 <p>Deitel & Associates, Inc. is an internationally
33 recognized corporate training and publishing organization
34 specializing in programming languages, Internet/World
35 Wide Web technology and object technology education.
36 Deitel & Associates, Inc. is a member of the World Wide
37 Web Consortium. The company provides courses on Java,
38 C++, Visual Basic, C, Internet and World Wide Web
39 programming, and Object Technology.</p>
4041 <h1>Clients</h1>
42 <p class = "special"> The company's clients include many
43 <em>Fortune 1000 companies</em>, government agencies,
44 branches of the military and business organizations.
45 Through its publishing partnership with Prentice Hall,
46 Deitel & Associates, Inc. publishes leading-edge
47 programming textbooks, professional books, interactive
48 CD-ROM-based multimedia Cyber Classrooms, satellite
49 courses and World Wide Web courses.</p>
Fig. 6.2Fig. 6.2Fig. 6.2Fig. 6.2 Declaring styles in the head of a document (part 1 of 2).
iw3htp2.book Page 164 Wednesday, July 18, 2001 9:01 AM

Chapter 6 Cascading Style Sheets™ (CSS) 165
The style element (lines 13–24) defines the embedded style sheet. Styles placed in
the head apply to matching elements in the entire document, not just to a single element.
The type attribute specifies the Multipurpose Internet Mail Extension (MIME) type that
describes a file’s content. CSS documents use the MIME type text/css. Other MIME
types include image/gif (for GIF images) and text/javascript (for the JavaScript
scripting language, which we discuss in Chapters 7–12).
The body of the style sheet (lines 15–22) declares the CSS rules for the style sheet. We
declare rules for em (lines 15–16), h1 (line 18) and p (line 20) elements. When the browser
renders this document, it applies the properties defined in these rules to each element to
which the rule applies. For example, the rule on lines 15–16 will be applied to all em ele-
ments. The body of each rule is enclosed in curly braces ({ and }). We declare a style class
named special in line 22. Class declarations are preceded with a period and are applied
to elements only of that class. We discuss how to apply a style class momentarily.
CSS rules in embedded style sheets use the same syntax as inline styles; the property
name is followed by a colon (:) and the value of that property. Multiple properties are sep-
arated by semicolons (;). In this example, the color property specifies the color of text
in an element line and property background-color specifies the background color of
the element.
5051 </body>
52 </html>
Fig. 6.2Fig. 6.2Fig. 6.2Fig. 6.2 Declaring styles in the head of a document (part 2 of 2).
iw3htp2.book Page 165 Wednesday, July 18, 2001 9:01 AM
166 Cascading Style Sheets™ (CSS) Chapter 6
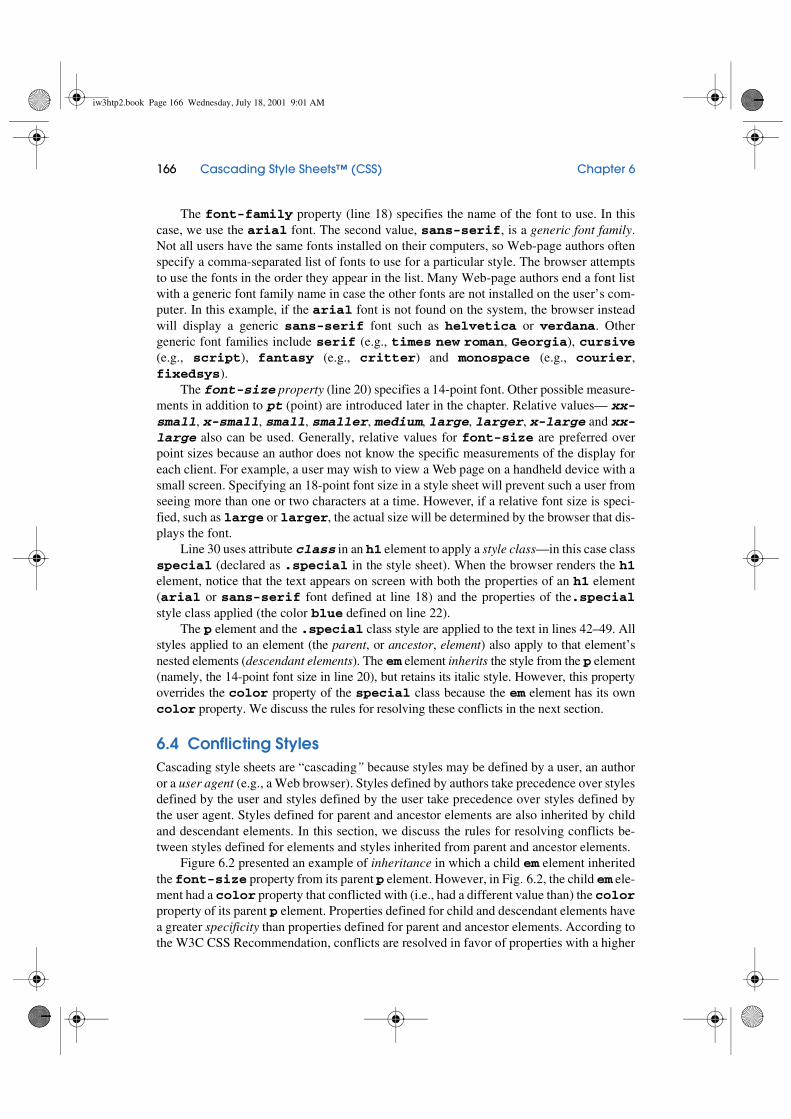
The font-family property (line 18) specifies the name of the font to use. In this
case, we use the arial font. The second value, sans-serif, is a generic font family.
Not all users have the same fonts installed on their computers, so Web-page authors often
specify a comma-separated list of fonts to use for a particular style. The browser attempts
to use the fonts in the order they appear in the list. Many Web-page authors end a font list
with a generic font family name in case the other fonts are not installed on the user’s com-
puter. In this example, if the arial font is not found on the system, the browser instead
will display a generic sans-serif font such as helvetica or verdana. Other
generic font families include serif (e.g., times new roman, Georgia), cursive
(e.g., script), fantasy (e.g., critter) and monospace (e.g., courier,
fixedsys).
The font-size property (line 20) specifies a 14-point font. Other possible measure-
ments in addition to pt (point) are introduced later in the chapter. Relative values— xx-
small, x-small, small, smaller, medium, large, larger, x-large and xx-
large also can be used. Generally, relative values for font-size are preferred over
point sizes because an author does not know the specific measurements of the display for
each client. For example, a user may wish to view a Web page on a handheld device with a
small screen. Specifying an 18-point font size in a style sheet will prevent such a user from
seeing more than one or two characters at a time. However, if a relative font size is speci-
fied, such as large or larger, the actual size will be determined by the browser that dis-
plays the font.
Line 30 uses attribute class in an h1 element to apply a style class—in this case class
special (declared as .special in the style sheet). When the browser renders the h1
element, notice that the text appears on screen with both the properties of an h1 element
(arial or sans-serif font defined at line 18) and the properties of the.special
style class applied (the color blue defined on line 22).
The p element and the .special class style are applied to the text in lines 42–49. All
styles applied to an element (the parent, or ancestor, element) also apply to that element’s
nested elements (descendant elements). The em element inherits the style from the p element
(namely, the 14-point font size in line 20), but retains its italic style. However, this property
overrides the color property of the special class because the em element has its own
color property. We discuss the rules for resolving these conflicts in the next section.
6.4 Conflicting Styles
Cascading style sheets are “cascading” because styles may be defined by a user, an author
or a user agent (e.g., a Web browser). Styles defined by authors take precedence over styles
defined by the user and styles defined by the user take precedence over styles defined by
the user agent. Styles defined for parent and ancestor elements are also inherited by child
and descendant elements. In this section, we discuss the rules for resolving conflicts be-
tween styles defined for elements and styles inherited from parent and ancestor elements.
Figure 6.2 presented an example of inheritance in which a child em element inherited
the font-size property from its parent p element. However, in Fig. 6.2, the child em ele-
ment had a color property that conflicted with (i.e., had a different value than) the color
property of its parent p element. Properties defined for child and descendant elements have
a greater specificity than properties defined for parent and ancestor elements. According to
the W3C CSS Recommendation, conflicts are resolved in favor of properties with a higher
iw3htp2.book Page 166 Wednesday, July 18, 2001 9:01 AM

Chapter 6 Cascading Style Sheets™ (CSS) 167
specificity. In other words, the styles defined for the child (or descendant) are more specific
than the styles for that child’s parent (or ancestor) element; therefore, the child’s styles take
precedence. Figure 6.3 illustrates examples of inheritance and specificity.
1 <?xml version = "1.0"?>
2 <!DOCTYPE html PUBLIC "-//W3C//DTD XHTML 1.0 Strict//EN"
3 "http://www.w3.org/TR/xhtml1/DTD/xhtml1-strict.dtd">
45 <!-- Fig 6.3: advanced.html -->
6 <!-- More advanced style sheets -->
78 <html xmlns = "http://www.w3.org/1999/xhtml">
9 <head>
10 <title>More Styles</title>
11
12 <style type = "text/css">
1314 a.nodec { text-decoration: none }
1516 a:hover { text-decoration: underline;
17 color: red;
18 background-color: #ccffcc }
1920 li em { color: red;
21 font-weight: bold }
2223 ul { margin-left: 75px }
2425 ul ul { text-decoration: underline;
26 margin-left: 15px }
2728 </style>
29 </head>
3031 <body>
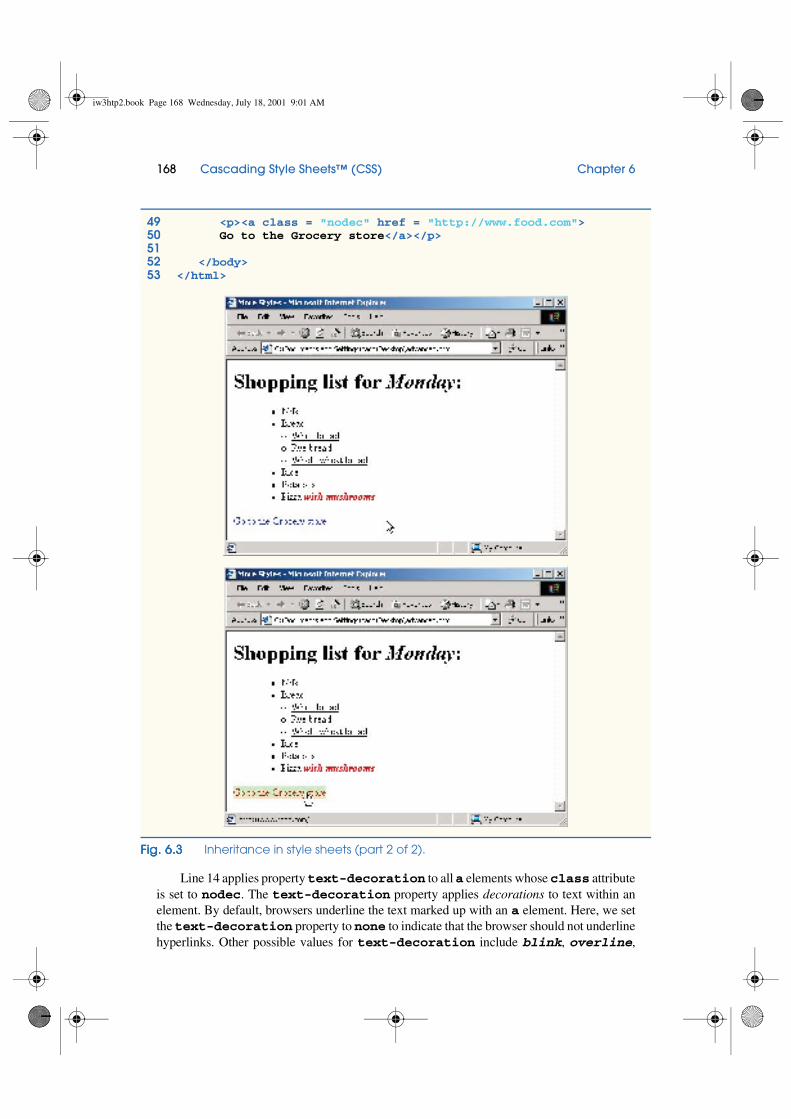
3233 <h1>Shopping list for <em>Monday</em>:</h1>
3435 <ul>
36 <li>Milk</li>
37 <li>Bread
38 <ul>
39 <li>White bread</li>
40 <li>Rye bread</li>
41 <li>Whole wheat bread</li>
42 </ul>
43 </li>
44 <li>Rice</li>
45 <li>Potatoes</li>
46 <li>Pizza <em>with mushrooms</em></li>
47 </ul>
48
Fig. 6.3Fig. 6.3Fig. 6.3Fig. 6.3 Inheritance in style sheets (part 1 of 2).
iw3htp2.book Page 167 Wednesday, July 18, 2001 9:01 AM
168 Cascading Style Sheets™ (CSS) Chapter 6
Line 14 applies property text-decoration to all a elements whose class attribute
is set to nodec. The text-decoration property applies decorations to text within an
element. By default, browsers underline the text marked up with an a element. Here, we set
the text-decoration property to none to indicate that the browser should not underline
hyperlinks. Other possible values for text-decoration include blink, overline,
49 <p><a class = "nodec" href = "http://www.food.com">
50 Go to the Grocery store</a></p>
5152 </body>
53 </html>
Fig. 6.3Fig. 6.3Fig. 6.3Fig. 6.3 Inheritance in style sheets (part 2 of 2).
iw3htp2.book Page 168 Wednesday, July 18, 2001 9:01 AM

Chapter 6 Cascading Style Sheets™ (CSS) 169
line-through and underline. The .nodec appended to a is an extension of class
styles; this style will apply only to a elements that specify nodec as their class.
Lines 16–18 specify a style for hover, which is a pseudoclass. Pseudoclasses give the
author access to content not specifically declared in the document. The hover pseudoclass
is activated dynamically when the user moves the mouse cursor over an element.
Portability Tip 6.1
To ensure that your style sheets work in various Web browsers, test your style sheets on all
client Web browsers that will render documents using your styles. 6.1
Lines 20–21 declare a style for all em elements that are descendants of li elements.
In the screen output of Fig. 6.3, notice that Monday (which line 33 contains in an em ele-
ment) does not appear in bold red, because the em element is not in an li element. How-
ever, the em element containing with mushrooms (line 46) is in an li element;
therefore, it is formatted in bold red.
The syntax for applying rules to multiple elements is similar. For example, to apply the
rule in lines 20–21 to all li and em elements, you would separate the elements with
commas, as follows:
li, em { color: red;
font-weight: bold }
Lines 25–26 specify that all nested lists (ul elements that are descendants of ul ele-
ments) be underlined and have a left-hand margin of 15 pixels. A pixel is a relative-length
measurement—it varies in size, based on screen resolution. Other relative lengths are em
(the so-called “M-height” of the font, which is usually set to the height of an uppercase M),
ex (the so-called “x-height” of the font, which is usually set to the height of a lowercase x)
and percentages (e.g., margin-left: 10%). To set an element to display text at 150%
of its default text size, the author could use the syntax
font-size: 1.5em
Other units of measurement available in CSS are absolute-length measurements—i.e., units
that do not vary in size based on the system. These units are in (inches), cm (centimeters),
mm (millimeters), pt (points; 1 pt=1/72 in) and pc (picas—1 pc = 12 pt).
Good Programming Practice 6.1
Whenever possible, use relative-length measurements. If you use absolute-length measure-
ments, your document may not be readable on some client browsers (e.g., wireless phones). 6.1
In Fig. 6.3, the entire list is indented because of the 75-pixel left-hand margin for top-
level ul elements. However, the nested list is indented only 15 pixels more (not another 75
pixels) because the child ul element’s margin-left property overrides the parent ul
element’s margin-left property.
6.5 Linking External Style Sheets
Style sheets are a convenient way to create a document with a uniform theme. With external
style sheets (i.e., separate documents that contain only CSS rules), Web-page authors can
provide a uniform look and feel to an entire Web site. Different pages on a site can all use
the same style sheet. Then, when changes to the style are required, the Web-page author
needs to modify only a single CSS file to make style changes across the entire Web site.
iw3htp2.book Page 169 Wednesday, July 18, 2001 9:01 AM

170 Cascading Style Sheets™ (CSS) Chapter 6
Figure 6.4 presents an external style sheet and Fig. 6.5 contains an XHTML document that
references the style sheet.
1 /* Fig. 6.4: styles.css */
2 /* An external stylesheet */
34 a { text-decoration: none }
56 a:hover { text-decoration: underline;
7 color: red;
8 background-color: #ccffcc }
910 li em { color: red;
11 font-weight: bold;
12 background-color: #ffffff }
1314 ul { margin-left: 2cm }
1516 ul ul { text-decoration: underline;
17 margin-left: .5cm }
Fig. 6.4Fig. 6.4Fig. 6.4Fig. 6.4 External style sheet (styles.css).
1 <?xml version = "1.0"?>
2 <!DOCTYPE html PUBLIC "-//W3C//DTD XHTML 1.0 Strict//EN"
3 "http://www.w3.org/TR/xhtml1/DTD/xhtml1-strict.dtd">
45 <!-- Fig. 6.5: external.html -->
6 <!-- Linking external style sheets -->
78 <html xmlns = "http://www.w3.org/1999/xhtml">
9 <head>
10 <title>Linking External Style Sheets</title>
11 <link rel = "stylesheet" type = "text/css"
12 href = "styles.css" />
13 </head>
1415 <body>
1617 <h1>Shopping list for <em>Monday</em>:</h1>
18 <ul>
19 <li>Milk</li>
20 <li>Bread
21 <ul>
22 <li>White bread</li>
23 <li>Rye bread</li>
24 <li>Whole wheat bread</li>
25 </ul>
26 </li>
27 <li>Rice</li>
28 <li>Potatoes</li>
Fig. 6.5Fig. 6.5Fig. 6.5Fig. 6.5 Linking an external style sheet (part 1 of 2).
iw3htp2.book Page 170 Wednesday, July 18, 2001 9:01 AM

Chapter 6 Cascading Style Sheets™ (CSS) 171
Lines 11–12 (Fig. 6.5) show a link element, which uses the rel attribute to specify
a relationship between the current document and another document. In this case, we declare
the linked document to be a stylesheet for this document. The type attribute specifies
29 <li>Pizza <em>with mushrooms</em></li>
30 </ul>
3132 <p>
33 <a href = "http://www.food.com">Go to the Grocery store</a>
34 </p>
3536 </body>
37 </html>
Fig. 6.5Fig. 6.5Fig. 6.5Fig. 6.5 Linking an external style sheet (part 2 of 2).
iw3htp2.book Page 171 Wednesday, July 18, 2001 9:01 AM

172 Cascading Style Sheets™ (CSS) Chapter 6
the MIME type as text/css. The href attribute provides the URL for the document
containing the style sheet .
Software Engineering Observation 6.1
Style sheets are reusable. Creating them once and reusing them reduces programming effort.6.1
Software Engineering Observation 6.2
The link element can be placed only in the head element. The user can specify next and
previous, which allow the user to link a whole series of documents. This feature allows
browsers to print a large collection of related documents at once. (In Internet Explorer, se-
lect Print all linked documents in the Print... submenu of the File menu.) 6.2
6.6 W3C CSS Validation Service
The W3C provides a validation service (jigsaw.w3.org/css-validator) that val-
idates external CSS documents to ensure that they conform to the W3C CSS Recommen-
dation. Like XHTML validation, CSS validation ensures that style sheets are syntactically
correct. The validator provides the option of either entering the CSS document’s URL,
pasting the CSS document’s contents into a text area or uploading a CSS document from
disk. Figure 6.6 illustrates uploading a CSS document from a disk.
Fig. 6.6Fig. 6.6Fig. 6.6Fig. 6.6 Validating a CSS document. (Courtesy of World Wide Web Consortium (W3C).)
iw3htp2.book Page 172 Wednesday, July 18, 2001 9:01 AM
Chapter 6 Cascading Style Sheets™ (CSS) 173
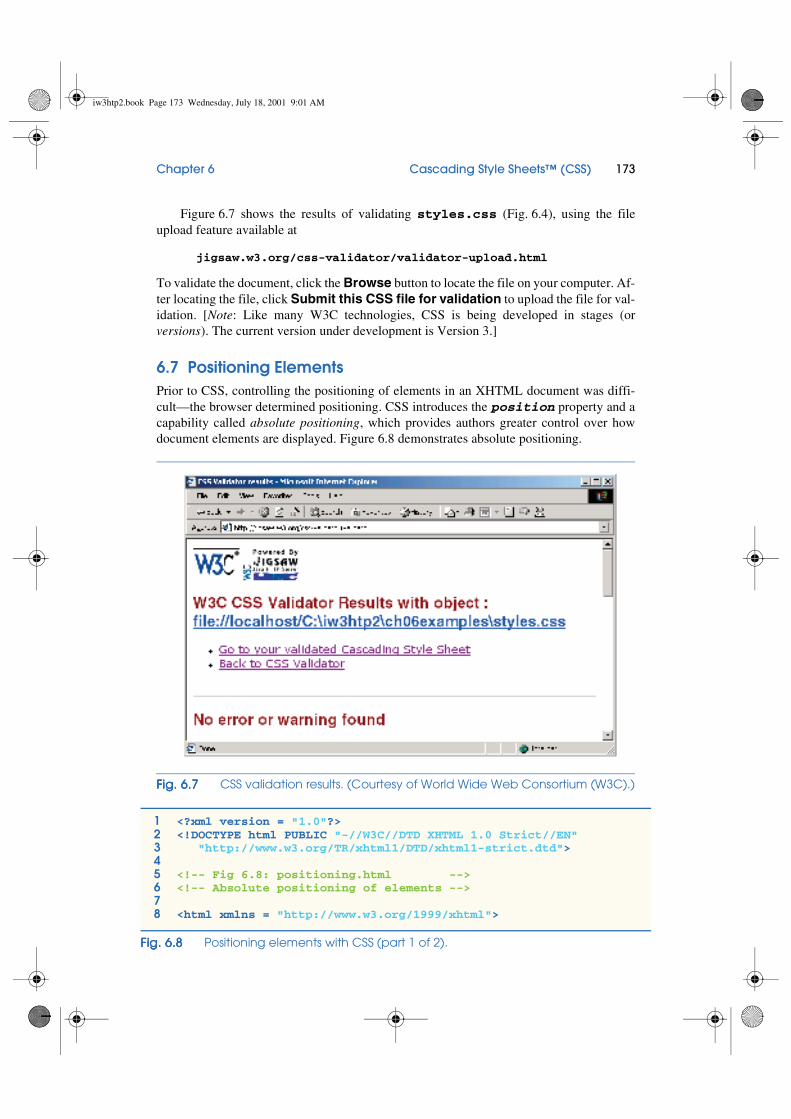
Figure 6.7 shows the results of validating styles.css (Fig. 6.4), using the file
upload feature available at
jigsaw.w3.org/css-validator/validator-upload.html
To validate the document, click the Browse button to locate the file on your computer. Af-
ter locating the file, click Submit this CSS file for validation to upload the file for val-
idation. [Note: Like many W3C technologies, CSS is being developed in stages (or
versions). The current version under development is Version 3.]
6.7 Positioning Elements
Prior to CSS, controlling the positioning of elements in an XHTML document was diffi-
cult—the browser determined positioning. CSS introduces the position property and a
capability called absolute positioning, which provides authors greater control over how
document elements are displayed. Figure 6.8 demonstrates absolute positioning.
Fig. 6.7Fig. 6.7Fig. 6.7Fig. 6.7 CSS validation results. (Courtesy of World Wide Web Consortium (W3C).)
1 <?xml version = "1.0"?>
2 <!DOCTYPE html PUBLIC "-//W3C//DTD XHTML 1.0 Strict//EN"
3 "http://www.w3.org/TR/xhtml1/DTD/xhtml1-strict.dtd">
45 <!-- Fig 6.8: positioning.html -->
6 <!-- Absolute positioning of elements -->
78 <html xmlns = "http://www.w3.org/1999/xhtml">
Fig. 6.8Fig. 6.8Fig. 6.8Fig. 6.8 Positioning elements with CSS (part 1 of 2).
iw3htp2.book Page 173 Wednesday, July 18, 2001 9:01 AM

174 Cascading Style Sheets™ (CSS) Chapter 6
Lines 15–17 position the first img element (i.gif) on the page. Specifying an ele-
ment’s position as absolute removes the element from the normal flow of elements
on the page, instead positioning the element according to the distance from the top, left,
right or bottom margins of its containing block (i.e., an element such as body or p).
Here, we position the element to be 0 pixels away from both the top and left margins
of the body element.
The z-index attribute allows you to layer overlapping elements properly. Elements
that have higher z-index values are displayed in front of elements with lower z-index
values. In this example, i.gif has the lowest z-index (1), so it displays in the back-
ground. The img element at lines 20–22 (circle.gif) has a z-index of 2, so it dis-
plays in front of i.gif. The p element at lines 18–19 (Positioned Text) has a z-
index of 3, so it displays in front of the other two. If you do not specify a z-index or if
elements have the same z-index value, the elements are placed from background to fore-
ground in the order they are encountered in the document.
Absolute positioning is not the only way to specify page layout. Figure 6.9 demon-
strates relative positioning in which elements are positioned relative to other elements.
9 <head>
10 <title>Absolute Positioning</title>
11 </head>
1213 <body>
1415 <p><img src = "i.gif" style = "position: absolute;
16 top: 0px; left: 0px; z-index: 1"
17 alt = "First positioned image" /></p>
18 <p style = "position: absolute; top: 50px; left: 50px;
19 z-index: 3; font-size: 20pt;">Positioned Text</p>
20 <p><img src = "circle.gif" style = "position: absolute;
21 top: 25px; left: 100px; z-index: 2" alt =
22 "Second positioned image" /></p>
2324 </body>
25 </html>
Fig. 6.8Fig. 6.8Fig. 6.8Fig. 6.8 Positioning elements with CSS (part 2 of 2).
iw3htp2.book Page 174 Wednesday, July 18, 2001 9:01 AM

Chapter 6 Cascading Style Sheets™ (CSS) 175
Setting the position property to relative, as in class super (lines 21–22), lays
out the element on the page and offsets the element by the specified top, bottom, left or
right values. Unlike absolute positioning, relative positioning keeps elements in the gen-
eral flow of elements on the page, so positioning is relative to other elements in the flow.
1 <?xml version = "1.0"?>
2 <!DOCTYPE html PUBLIC "-//W3C//DTD XHTML 1.0 Strict//EN"
3 "http://www.w3.org/TR/xhtml1/DTD/xhtml1-strict.dtd">
45 <!-- Fig. 6.9: positioning2.html -->
6 <!-- Relative positioning of elements -->
78 <html xmlns = "http://www.w3.org/1999/xhtml">
9 <head>
10 <title>Relative Positioning</title>
1112 <style type = "text/css">
1314 p { font-size: 1.3em;
15 font-family: verdana, arial, sans-serif }
1617 span { color: red;
18 font-size: .6em;
19 height: 1em }
2021 .super { position: relative;
22 top: -1ex }
2324 .sub { position: relative;
25 bottom: -1ex }
2627 .shiftleft { position: relative;
28 left: -1ex }
2930 .shiftright { position: relative;
31 right: -1ex }
3233 </style>
34 </head>
3536 <body>
3738 <p>The text at the end of this sentence
39 <span class = "super">is in superscript</span>.</p>
4041 <p>The text at the end of this sentence
42 <span class = "sub">is in subscript</span>.</p>
4344 <p>The text at the end of this sentence
45 <span class = "shiftleft">is shifted left</span>.</p>
46
Fig. 6.9Fig. 6.9Fig. 6.9Fig. 6.9 Relative positioning of elements (part 1 of 2).
iw3htp2.book Page 175 Wednesday, July 18, 2001 9:01 AM

176 Cascading Style Sheets™ (CSS) Chapter 6
We introduce the span element in line 39. Element span is a grouping element—it
does not apply any inherent formatting to its contents. Its primary purpose is to apply CSS
rules or id attributes to a block of text. Element span is an inline-level element—it is dis-
played inline with other text and with no line breaks. Lines 17–19 define the CSS rule for
span. A similar element is the div element, which also applies no inherent styles but is
displayed on its own line, with margins above and below (a block-level element).
Common Programming Error 6.1
Because relative positioning keeps elements in the flow of text in your documents, be careful
to avoid unintentionally overlapping text. 6.1
6.8 Backgrounds
CSS also provides control over the element backgrounds. In previous examples, we intro-
duced the background-color property. CSS also can add background images to doc-
uments. Figure 6.10 add a corporate logo to the bottom-right corner of the document. This
logo stays fixed in the corner, even when the user scrolls up or down the screen.
47 <p>The text at the end of this sentence
48 <span class = "shiftright">is shifted right</span>.</p>
4950 </body>
51 </html>
Fig. 6.9Fig. 6.9Fig. 6.9Fig. 6.9 Relative positioning of elements (part 2 of 2).
1 <?xml version = "1.0"?>
2 <!DOCTYPE html PUBLIC "-//W3C//DTD XHTML 1.0 Strict//EN"
3 "http://www.w3.org/TR/xhtml1/DTD/xhtml1-strict.dtd">
45 <!-- Fig. 6.10: background.html -->
6 <!-- Adding background images and indentation -->
78 <html xmlns = "http://www.w3 .org/1999/xhtml">
Fig. 6.10Fig. 6.10Fig. 6.10Fig. 6.10 Adding a background image with CSS (part 1 of 2).
iw3htp2.book Page 176 Wednesday, July 18, 2001 9:01 AM

Chapter 6 Cascading Style Sheets™ (CSS) 177
9 <head>
10 <title>Background Images</title>
1112 <style type = "text/css">
1314 body { background-image: url(logo.gif);
15 background-position: bottom right;
16 background-repeat: no-repeat;
17 background-attachment: fixed; }
1819 p { font-size: 18pt;
20 color: #aa5588;
21 text-indent: 1em;
22 font-family: arial, sans-serif; }
2324 .dark { font-weight: bold; }
2526 </style>
27 </head>
2829 <body>
3031 <p>
32 This example uses the background-image,
33 background-position and background-attachment
34 styles to place the <span class = "dark">Deitel
35 & Associates, Inc.</span> logo in the bottom,
36 right corner of the page. Notice how the logo
37 stays in the proper position when you resize the
38 browser window.
39 </p>
4041 </body>
42 </html>
Fig. 6.10Fig. 6.10Fig. 6.10Fig. 6.10 Adding a background image with CSS (part 2 of 2).
iw3htp2.book Page 177 Wednesday, July 18, 2001 9:01 AM

178 Cascading Style Sheets™ (CSS) Chapter 6
The background-image property (line 14) specifies the image URL for the image
logo.gif in the format url(fileLocation). The Web-page author can set the back-
ground-color in case the image is not found.
The background-position property (line 15) places the image on the page. The
keywords top, bottom, center, left and right are used individually or in combi-
nation for vertical and horizontal positioning. Image can be positioned using lengths by
specifying the horizontal length followed by the vertical length. For example, to position
the image as vertically centered (positioned at 50% of the distance across the screen) and
30 pixels from the top, use
background-position: 50% 30px;
The background-repeat property (line 16) controls the tiling of the background
image. Tiling places multiple copies of the image next to each other to fill the background.
Here, we set the tiling to no-repeat to display only one copy of the background image.
The background-repeat property can be set to repeat (the default) to tile the image
vertically and horizontally, repeat-x to tile the image only horizontally or repeat-y
to tile the image only vertically.
The final property setting, background-attachment: fixed (line 17), fixes the
image in the position specified by background-position. Scrolling the browser
window will not move the image from its position. The default value, scroll, moves the
image as the user scrolls through the document.
Line 21 indents the first line of text in the element by the specified amount, in this case
1em. An author might use this property to create a Web page that reads more like a novel,
in which the first line of every paragraph is indented.
Line 24 uses the font-weight property to specify the “boldness” of text. Possible
values are bold, normal (the default), bolder (bolder than bold text) and lighter
(lighter than normal text). Boldness also can be specified with multiples of 100, from 100
to 900 (e.g., 100, 200, …, 900). Text specified as normal is equivalent to 400, and
bold text is equivalent to 700. However, many systems do not have fonts can scale this
finely, so using the values from 100 to 900 might not display the desired effect.
Another CSS property that formats text is the font-style property, which allows
the developer to set text to none, italic or oblique (oblique will default to
italic if the system does not support oblique text).
6.9 Element Dimensions
In addition to positioning elements, CSS rules can specify the actual dimensions of each
page element. Figure 6.11 demonstrates how to set the dimensions of elements.
1 <?xml version = "1.0"?>
2 <!DOCTYPE html PUBLIC "-//W3C//DTD XHTML 1.0 Strict//EN"
3 "http://www.w3.org/TR/xhtml1/DTD/xhtml1-strict.dtd">
45 <!-- Fig. 6.11: width.html -->
6 <!-- Setting box dimensions and aligning text -->
7
Fig. 6.11Fig. 6.11Fig. 6.11Fig. 6.11 Setting box dimensions and aligning text (part 1 of 2).
iw3htp2.book Page 178 Wednesday, July 18, 2001 9:01 AM

Chapter 6 Cascading Style Sheets™ (CSS) 179
8 <html xmlns = "http://www.w3.org/1999/xhtml">
9 <head>
10 <title>Box Dimensions</title>
11
12 <style type = "text/css">
1314 div { background-color: #ffccff;
15 margin-bottom: .5em }
16 </style>
1718 </head>
1920 <body>
2122 <div style = "width: 20%">Here is some
23 text that goes in a box which is
24 set to stretch across twenty percent
25 of the width of the screen.</div>
2627 <div style = "width: 80%; text-align: center">
28 Here is some CENTERED text that goes in a box
29 which is set to stretch across eighty percent of
30 the width of the screen.</div>
3132 <div style = "width: 20%; height: 30%; overflow: scroll">
33 This box is only twenty percent of
34 the width and thirty percent of the height.
35 What do we do if it overflows? Set the
36 overflow property to scroll!</div>
3738 </body>
39 </html>
Fig. 6.11Fig. 6.11Fig. 6.11Fig. 6.11 Setting box dimensions and aligning text (part 2 of 2).
iw3htp2.book Page 179 Wednesday, July 18, 2001 9:01 AM

180 Cascading Style Sheets™ (CSS) Chapter 6
The inline style in line 22 illustrates how to set the width of an element on screen;
here, we indicate that the div element should occupy 20% of the screen width. Most ele-
ments are left-aligned by default; however, this alignment can be altered to position the ele-
ment elsewhere. The height of an element can be set similarly, using the height property.
The height and width values also can be specified relative and absolute lengths. For
example
width: 10em
sets the element’s width to be equal to 10 times the font size. Line 27 sets text in the element
to be center aligned; some other values for the text-align property are left and
right.
One problem with setting both dimensions of an element is that the content inside the
element can exceed the set boundaries, in which case the element is simply made large
enough for all the content to fit. However, in line 32, we set the overflow property to
scroll, a setting that adds scrollbars if the text overflows the boundaries.
6.10 Text Flow and the Box Model
A browser normally places text and elements on screen in the order in which they appear
in the XHTML document. However, as we have seen with absolute positioning, it is possi-
ble to remove elements from the normal flow of text. Floating allows you to move an ele-
ment to one side of the screen; other content in the document then flows around the floated
element. In addition, each block-level element has a box drawn around it, known as the box
model. The properties of this box can be adjusted to control the amount of padding inside
the element and the margins outside the element (Fig. 6.12).
In addition to text, whole elements can be floated to the left or right of content. This
means that any nearby text will wrap around the floated element. For example, in lines 30–
32 we float a div element to the right side of the screen. As you can see from the sample
screen capture, the text from lines 34–41 flows cleanly to the left and underneath the div
element.
The second property on line 30, margin, specifies the distance between the edge of
the element and any other element on the page. When the browser renders elements using
the box model, the content of each element is surrounded by padding, a border and a
margin (Fig. 6.13).
Margins for individual sides of an element can be specified by using margin-top,
margin-right, margin-left and margin-bottom.
Lines 43–45 specify a div element that floats at the right side of the content. Property
padding for the div element is set to .5em. Padding is the distance between the content
inside an element and the element’s border. Like the margin, the padding can be set for
each side of the box, with padding-top, padding-right, padding-left and
padding-bottom.
A portion of lines 54–55 show that you can interrupt the flow of text around a
floated element by setting the clear property to the same direction as that in which the
element is floated—right or left. Setting the clear property to all interrupts the
flow on both sides of the document.
iw3htp2.book Page 180 Wednesday, July 18, 2001 9:01 AM

Chapter 6 Cascading Style Sheets™ (CSS) 181
1 <?xml version = "1.0"?>
2 <!DOCTYPE html PUBLIC "-//W3C//DTD XHTML 1.0 Strict//EN"
3 "http://www.w3.org/TR/xhtml1/DTD/xhtml1-strict.dtd">
45 <!-- Fig. 6.12: floating.html -->
6 <!-- Floating elements and element boxes -->
78 <html xmlns = "http://www.w3.org/1999/xhtml">
9 <head>
10 <title>Flowing Text Around Floating Elements</title>
1112 <style type = "text/css">
1314 div { background-color: #ffccff;
15 margin-bottom: .5em;
16 font-size: 1.5em;
17 width: 50% }
1819 p { text-align: justify; }
2021 </style>
2223 </head>
2425 <body>
2627 <div style = "text-align: center">
28 Deitel & Associates, Inc.</div>
2930 <div style = "float: right; margin: .5em;
31 text-align: right">
32 Corporate Training and Publishing</div>
3334 <p>Deitel & Associates, Inc. is an internationally
35 recognized corporate training and publishing organization
36 specializing in programming languages, Internet/World
37 Wide Web technology and object technology education.
38 Deitel & Associates, Inc. is a member of the World Wide
39 Web Consortium. The company provides courses on Java,
40 C++, Visual Basic, C, Internet and World Wide Web
41 programming, and Object Technology.</p>
4243 <div style = "float: right; padding: .5em;
44 text-align: right">
45 Leading-edge Programming Textbooks</div>
4647 <p>The company's clients include many Fortune 1000
48 companies, government agencies, branches of the military
49 and business organizations. Through its publishing
50 partnership with Prentice Hall, Deitel & Associates,
51 Inc. publishes leading-edge programming textbooks,
52 professional books, interactive CD-ROM-based multimedia
53 Cyber Classrooms, satellite courses and World Wide Web
Fig. 6.12Fig. 6.12Fig. 6.12Fig. 6.12 Floating elements, aligning text and setting box dimensions (part 1 of 2).
iw3htp2.book Page 181 Wednesday, July 18, 2001 9:01 AM

182 Cascading Style Sheets™ (CSS) Chapter 6
Another property of every block-level element on screen is the border, which lies
between the padding space and the margin space and has numerous properties for adjusting
its appearance as shown in Fig. 6.14.
54 courses.<span style = "clear: right"> Here is some
55 unflowing text. Here is some unflowing text.</span></p>
5657 </body>
58 </html>
Fig. 6.13Fig. 6.13Fig. 6.13Fig. 6.13 Box model for block-level elements.
Fig. 6.12Fig. 6.12Fig. 6.12Fig. 6.12 Floating elements, aligning text and setting box dimensions (part 2 of 2).
Content
Margin
Border
Padding
iw3htp2.book Page 182 Wednesday, July 18, 2001 9:01 AM

Chapter 6 Cascading Style Sheets™ (CSS) 183
1 <?xml version = "1.0"?>
2 <!DOCTYPE html PUBLIC "-//W3C//DTD XHTML 1.0 Strict//EN"
3 "http://www.w3.org/TR/xhtml1/DTD/xhtml1-strict.dtd">
45 <!-- Fig. 6.14: borders.html -->
6 <!-- Setting borders of an element -->
78 <html xmlns = "http://www.w3.org/1999/xhtml">
9 <head>
10 <title>Borders</title>
1112 <style type = "text/css">
1314 body { background-color: #ccffcc }
1516 div { text-align: center;
17 margin-bottom: 1em;
18 padding: .5em }
1920 .thick { border-width: thick }
21
22 .medium { border-width: medium }
2324 .thin { border-width: thin }
2526 .groove { border-style: groove }
2728 .inset { border-style: inset }
2930 .outset { border-style: outset }
3132 .red { border-color: red }
3334 .blue { border-color: blue }
3536 </style>
37 </head>
3839 <body>
4041 <div class = "thick groove">This text has a border</div>
42 <div class = "medium groove">This text has a border</div>
43 <div class = "thin groove">This text has a border</div>
4445 <p class = "thin red inset">A thin red line...</p>
46 <p class = "medium blue outset">
47 And a thicker blue line</p>
4849 </body>
50 </html>
Fig. 6.14Fig. 6.14Fig. 6.14Fig. 6.14 Applying borders to elements (part 1 of 2).
iw3htp2.book Page 183 Wednesday, July 18, 2001 9:01 AM

184 Cascading Style Sheets™ (CSS) Chapter 6
In this example, we set three properties—border-width, border-color and
border-style. The border-width property may be set to any of the CSS lengths or
to the predefined values of thin, medium or thick. The border-color property sets
the color. (This property has different meanings for different borders.)
As with padding and margins, each of the border properties may be set for indi-
vidual sides of the box (e.g., border-top-style or border-left-color). A
developer can assign more than one class to an XHTML element by using the class
attribute as shown in line 41.
The border-styles are none, hidden, dotted, dashed, solid, double,
groove, ridge, inset and outset. Borders groove and ridge have opposite
effects, as do inset and outset. Figure 6.15 illustrates these border styles.
1 <?xml version = "1.0"?>
2 <!DOCTYPE html PUBLIC "-//W3C//DTD XHTML 1.0 Strict//EN"
3 "http://www.w3.org/TR/xhtml1/DTD/xhtml1-strict.dtd">
45 <!-- Fig. 6.15: borders2.html -->
6 <!-- Various border-styles -->
78 <html xmlns = "http://www.w3.org/1999/xhtml">
9 <head>
10 <title>Borders</title>
1112 <style type = "text/css">
1314 body { background-color: #ccffcc }
Fig. 6.15Fig. 6.15Fig. 6.15Fig. 6.15 Various border-styles (part 1 of 2).
Fig. 6.14Fig. 6.14Fig. 6.14Fig. 6.14 Applying borders to elements (part 2 of 2).
iw3htp2.book Page 184 Wednesday, July 18, 2001 9:01 AM

Chapter 6 Cascading Style Sheets™ (CSS) 185
6.11 User Style Sheets
Users can define their own user style sheets to format pages based on their preferences. For
example, people with visual impairments may want to increase the page’s text size. A Web-
page author needs to be careful because they may inadvertently override user preferences
with defined styles. This section discusses possible conflicts between author styles and user
styles.
1516 div { text-align: center;
17 margin-bottom: .3em;
18 width: 50%;
19 position: relative;
20 left: 25%;
21 padding: .3em }
22 </style>
23 </head>
2425 <body>
2627 <div style = "border-style: solid">Solid border</div>
28 <div style = "border-style: double">Double border</div>
29 <div style = "border-style: groove">Groove border</div>
30 <div style = "border-style: ridge">Ridge border</div>
31 <div style = "border-style: inset">Inset border</div>
32 <div style = "border-style: outset">Outset border</div>
3334 </body>
35 </html>
Fig. 6.15Fig. 6.15Fig. 6.15Fig. 6.15 Various border-styles (part 2 of 2).
iw3htp2.book Page 185 Wednesday, July 18, 2001 9:01 AM

186 Cascading Style Sheets™ (CSS) Chapter 6
Figure 6.16 contains an author style. The font-size is set to 9pt for all <p> tags
that have class note applied to them.
User style sheets are external style sheets. Figure 6.17 shows a user style sheet that
sets the body’s font-size to 20pt, color to yellow and background-color
to #000080.
User style sheets are not linked to a document; rather, they are set in the browser’s
options. To add a user style sheet in Internet Explorer 5.5, select Internet Options...,
located in the Tools menu. In the Internet Options dialog (Fig. 6.18) that appears, click
Accessibility..., Check the Format documents using my style sheet check box
and type the location of the user style sheet. Internet Explorer 5.5 applies the user style
sheet to any document it loads.
1 <?xml version = "1.0"?>
2 <!DOCTYPE html PUBLIC "-//W3C//DTD XHTML 1.0 Strict//EN"
3 "http://www.w3.org/TR/xhtml1/DTD/xhtml1-strict.dtd">
45 <!-- Fig. 6.16: user_absolute.html -->
6 <!-- User styles -->
78 <html xmlns = "http://www.w3.org/1999/xhtml">
9 <head>
10 <title>User Styles</title>
1112 <style type = "text/css">
1314 .note { font-size: 9pt }
1516 </style>
17 </head>
1819 <body>
2021 <p>Thanks for visiting my Web site. I hope you enjoy it.
22 </p><p class = "note">Please Note: This site will be
23 moving soon. Please check periodically for updates.</p>
2425 </body>
26 </html>
Fig. 6.16Fig. 6.16Fig. 6.16Fig. 6.16 Modifying text size with the pt measurement.
iw3htp2.book Page 186 Wednesday, July 18, 2001 9:01 AM

Chapter 6 Cascading Style Sheets™ (CSS) 187
The Web page from Fig. 6.16 is displayed in Fig. 6.19, with the user style sheet from
Fig. 6.17 applied.
1 /* Fig. 6.17: userstyles.css */
2 /* A user stylesheet */
34 body { font-size: 20pt;
5 color: yellow;
6 background-color: #000080 }
Fig. 6.17Fig. 6.17Fig. 6.17Fig. 6.17 User style sheet.
Fig. 6.18Fig. 6.18Fig. 6.18Fig. 6.18 Adding a user style sheet in Internet Explorer 5.5.
Fig. 6.19Fig. 6.19Fig. 6.19Fig. 6.19 Web page with user styles applied.
iw3htp2.book Page 187 Wednesday, July 18, 2001 9:01 AM

188 Cascading Style Sheets™ (CSS) Chapter 6
In this example if users define their own font-size in a user style sheet, the author
style has a higher precedence and overrides the user style. The 9pt font specified in the
author style sheet overrides the 20pt font specified in the user style sheet. This small font
may make pages difficult to read, especially for individuals with visual impairments. A
developer can avoid this problem by using relative measurements (such as em or ex)
instead of absolute measurements such as pt. Figure 6.20 changes the font-size prop-
erty to use a relative measurement (line 14), which does not override the user style set in
Fig. 6.17. Instead, the font size displayed is relative to that specified in the user style sheet.
In this case, text enclosed in the <p> tag displays as 20pt and <p> tags that have class
note applied to them are displayed in 15pt (.75 times 20pt).
1 <?xml version = "1.0"?>
2 <!DOCTYPE html PUBLIC "-//W3C//DTD XHTML 1.0 Strict//EN"
3 "http://www.w3.org/TR/xhtml1/DTD/xhtml1-strict.dtd">
45 <!-- Fig. 6.20: user_relative.html -->
6 <!-- User styles -->
78 <html xmlns = "http://www.w3.org/1999/xhtml">
9 <head>
10 <title>User Styles</title>
1112 <style type = "text/css">
1314 .note { font-size: .75em }
1516 </style>
17 </head>
1819 <body>
2021 <p>Thanks for visiting my Web site. I hope you enjoy it.
22 </p><p class = "note">Please Note: This site will be
23 moving soon. Please check periodically for updates.</p>
2425 </body>
26 </html>
Fig. 6.20Fig. 6.20Fig. 6.20Fig. 6.20 Modifying text size with the em measurement.
iw3htp2.book Page 188 Wednesday, July 18, 2001 9:01 AM

Chapter 6 Cascading Style Sheets™ (CSS) 189
Fig. 6.21 displays the Web page from Fig. 6.20 with the user style sheet from Fig. 6.16
applied. Notice that the second line of text displayed is larger than the same line of text in
Fig. 6.19.
6.12 Internet and World Wide Web Resources
www.w3.org/TR/REC-CSS2
The W3C Cascading Style Sheets, Level 2 specification contains a list of all the CSS properties. The
specification also provides helpful examples detailing the use of many of the properties.
www.webreview.com/style
This site has several charts of CSS properties, including a list containing which browsers support what
attributes and to what extent.
tech.irt.org/articles/css.htm
This site contains articles dealing with CSS.
msdn.microsoft.com/workshop/author/css/site1014.asp
This site contains samples of some CSS features.
www.web-weaving.net
This site contains many CSS articles.
SUMMARY
• The inline style allows a developer to declare a style for an individual element by using the style
attribute in that element’s opening XHTML tag.
• Each CSS property is followed by a colon and the value of the attribute.
• The color property sets text color. Color names and hexadecimal codes may be used as the value.
• Styles that are placed in the <style> tag apply to the entire document.
• style element attribute type specifies the MIME type (the specific encoding format) of the
style sheet. Style sheets use text/css.
• Each rule body begins and ends with a curly brace ({ and }).
• Style class declarations are preceded by a period and are applied to elements of that specific class.
• The CSS rules in a style sheet use the same format as inline styles: The property is followed by a
colon (:) and the value of that property. Multiple properties are separated by semicolons (;).
• The background-color attribute specifies the background color of the element.
Fig. 6.21Fig. 6.21Fig. 6.21Fig. 6.21 Using relative measurements in author styles.
iw3htp2.book Page 189 Wednesday, July 18, 2001 9:01 AM

190 Cascading Style Sheets™ (CSS) Chapter 6
• The font-family attribute names a specific font that should be displayed. Generic font fami-
lies allow authors to specify a type of font instead of a specific font, in case a browser does not
support a specific font. The font-size property specifies the size used to render the font.
• The class attribute applies a style class to an element.
• Pseudoclasses provide the author access to content not specifically declared in the document. The
hover pseudoclass is activated when the user moves the mouse cursor over an element.
• The text-decoration property applies decorations to text within an element, such as
underline, overline, line-through and blink.
• To apply rules to multiple elements, separate the elements with commas in the style sheet.
• A pixel is a relative-length measurement: It varies in size based on screen resolution. Other relative
lengths are em, ex and percentages.
• The other units of measurement available in CSS are absolute-length measurements—i.e., units
that do not vary in size. These units can be in (inches), cm (centimeters), mm (millimeters), pt
(points; 1 pt=1/72 in) and pc (picas; 1 pc = 12 pt).
• External linking can create a uniform look for a Web site; separate pages can all use the same
styles. Modifying a single file makes changes to styles across an entire Web site.
• link’s rel attribute specifies a relationship between two documents.
• The CSS position property allows absolute positioning, which provides greater control over
where on a page elements reside. Specifying an element’s position as absolute removes it
from the normal flow of elements on the page and positions it according to distance from the top,
left, right or bottom margins of its parent element.
• The z-index property allows a developer to layer overlapping elements. Elements that have
higher z-index values are displayed in front of elements with lower z-index values.
• Unlike absolute positioning, relative positioning keeps elements in the general flow on the page
and offsets them by the specified top, left, right or bottom values.
• Property background-image specifies the URL of the image, in the format url(fileLoca-
tion). The property background-position places the image on the page using the values
top, bottom, center, left and right individually or in combination for vertical and hori-
zontal positioning. You can also position by using lengths.
• The background-repeat property controls the tiling of the background image. Setting the tiling
to no-repeat displays one copy of the background image on screen. The background-re-
peat property can be set to repeat (the default) to tile the image vertically and horizontally, to
repeat-x to tile the image only horizontally or to repeat-y to tile the image only vertically.
• The property setting background-attachment: fixed fixes the image in the position spec-
ified by background-position. Scrolling the browser window will not move the image from
its set position. The default value, scroll, moves the image as the user scrolls the window.
• The text-indent property indents the first line of text in the element by the specified amount.
• The font-weight property specifies the “boldness” of text. Values besides bold and normal
(the default) are bolder (bolder than bold text) and lighter (lighter than normal text). The
value also may be justified using multiples of 100, from 100 to 900 (i.e., 100, 200, …, 900). Text
specified as normal is equivalent to 400, and bold text is equivalent to 700.
• The font-style property allows the developer to set text to none, italic or oblique
(oblique will default to italic if the system does not have a separate font file for oblique text,
which is normally the case).
• span is a generic grouping element; it does not apply any inherent formatting to its contents. Its
main use is to apply styles or id attributes to a block of text. Element span is displayed inline
iw3htp2.book Page 190 Wednesday, July 18, 2001 9:01 AM

Chapter 6 Cascading Style Sheets™ (CSS) 191
(an inline element) with other text and with no line breaks. A similar element is the div element,
which also applies no inherent styles, but is displayed on a separate line, with margins above and
below (a block-level element).
• The dimensions of elements on a page can be set with CSS by using the height and width prop-
erties.
• Text within an element can be centered using text-align; other values for the text-
align property are left and right.
• One problem with setting both dimensions of an element is that the content inside the element
might sometimes exceed the set boundaries, in which case the element must be made large enough
for all the content to fit. However, a developer can set the overflow property to scroll; this
setting adds scroll bars if the text overflows the boundaries set for it.
• Browsers normally place text and elements on screen in the order in which they appear in the
XHTML file. Elements can be removed from the normal flow of text. Floating allows you to move
an element to one side of the screen; other content in the document will then flow around the float-
ed element.
• Each block-level element has a box drawn around it, known as the box model. The properties of
this box are easily adjusted.
• The margin property determines the distance between the element’s edge and any outside text.
• CSS uses a box model to render elements on screen. The content of each element is surrounded by
padding, a border and margins.
• Margins for individual sides of an element can be specified by using margin-top, margin-
right, margin-left and margin-bottom.
• The padding is the distance between the content inside an element and the edge of the element.
Padding can be set for each side of the box by using padding-top, padding-right, pad-
ding-left and padding-bottom.
• A developer can interrupt the flow of text around a floated element by setting the clear prop-
erty to the same direction in which the element is floated—right or left. Setting the clear
property to all interrupts the flow on both sides of the document.
• A property of every block-level element on screen is its border. The border lies between the pad-
ding space and the margin space and has numerous properties with which to adjust its appearance.
• The border-width property may be set to any of the CSS lengths or to the predefined values
of thin, medium or thick.
• The border-styles available are none, hidden, dotted, dashed, solid, double,
groove, ridge, inset and outset.
• The border-color property sets the color used for the border.
• The class attribute allows more than one class to be assigned to an XHTML element.
TERMINOLOGY
absolute positioning background-repeat
absolute-length measurement blink
arial font block-level element
background border
background-attachment border-color
background-color border-style
background-image border-width
background-position box model
iw3htp2.book Page 191 Wednesday, July 18, 2001 9:01 AM

192 Cascading Style Sheets™ (CSS) Chapter 6
SELF-REVIEW EXERCISES
6.1 Assume that the size of the base font on a system is 12 points.
a) How big is 36-point font in ems?
b) How big is 8-point font in ems?
c) How big is 24-point font in picas?
d) How big is 12-point font in inches?
e) How big is 1-inch font in picas?
6.2 Fill in the blanks in the following statements:
a) Using the element allows authors to use external style sheets in their pages.
Cascading Style Sheets (CSS) outset border-style
class attribute overflow property
clear property value overline text decoration
cm (centimeter) padding
colon (:) parent element
color pc (pica)
CSS rule pseudoclass
cursive generic font family pt (point)
dashed border-style rel attribute (link)
dotted border-style relative positioning
double border-style relative-length measurement
em (size of font) repeat
embedded style sheet ridge border-style
ex (x-height of font) right
floated element sans-serif generic font family
font-style property scroll
generic font family separation of structure from content
groove border style serif generic font family
hidden border style small relative font size
href attribute smaller relative font size
in (inch) solid border-style
inline style span element
inline-level element style
inset border-style style attribute
large relative font size style class
larger relative font size style in header section of the document
left text flow
line-through text decoration text/css MIME type
link element text-align
linking to an external style sheet text-decoration property
margin text-indent
margin-bottom property thick border width
margin-left property thin border width
margin-right property user style sheet
margin-top property x-large relative font size
medium relative border width x-small relative font size
medium relative font size xx-large relative font size
mm (millimeter) xx-small relative font size
monospace z-index
none border-style
iw3htp2.book Page 192 Wednesday, July 18, 2001 9:01 AM

Chapter 6 Cascading Style Sheets™ (CSS) 193
b) To apply a CSS rule to more than one element at a time, separate the element names with
a .
c) Pixels are a(n) -length measurement unit.
d) The hover is activated when the user moves the mouse cursor
over the specified element.
e) Setting the overflow property to provides a mechanism for containing in-
ner content without compromising specified box dimensions.
f) While is a generic inline element that applies no inherent formatting,
is a generic block-level element that applies no inherent formatting.
g) Setting the background-repeat property to tiles the specified
background-image only vertically.
h) If you float an element, you can stop the flowing text by using property .
i) The property allows you to indent the first line of text in an element.
j) Three components of the box model are the , and .
ANSWERS TO SELF-REVIEW EXERCISES
6.1 a) 3 ems. b) 0.75 ems. c) 2 picas. d) 1/6 inch. e) 6 picas.
6.2 a) link. b) comma. c) relative. d) pseudoclass. e) scroll. f) span, div. g) y-repeat.
h) clear. i) text-indent. j) padding, border, margin.
EXERCISES
6.3 Write a CSS rule that makes all text 1.5 times larger than the base font of the system and col-
ors the text red.
6.4 Write a CSS rule that removes the underline from all links inside list items (li) and shifts
them left by 3 ems.
6.5 Write a CSS rule that places a background image halfway down the page, tiling it horizon-
tally. The image should remain in place when the user scrolls up or down.
6.6 Write a CSS rule that gives all h1 and h2 elements a padding of 0.5 ems, a grooved border
style and a margin of 0.5 ems.
6.7 Write a CSS rule that changes the color of all elements containing attribute class =
"greenMove" to green and shifts them down 25 pixels and right 15 pixels.
6.8 Write an XHTML document that shows the results of a color survey. The document should
contain a form with radio buttons that allows users to vote for their favorite color. One of the colors
should be selected as a default. The document should also contain a table showing various colors and
the corresponding percentage of votes for each color. (Each row should be displayed in the color to
which it is referring.) Use attributes to format width, border and cell spacing for the table.
6.9 Add an embedded style sheet to the XHTML document of Fig. 4.5. This style sheet should
contain a rule that displays h1 elements in blue. In addition, create a rule that displays all links in blue
without underlining them. When the mouse hovers over a link, change the link’s background color to
yellow.
6.10 Modify the style sheet of Fig. 6.4 by changing a:hover to a:hver and margin-left
to margin left. Validate the style sheet using the CSS Validator. What happens?
iw3htp2.book Page 193 Wednesday, July 18, 2001 9:01 AM


![CSS - yangliang.github.io · Cascading Style Sheets • Õý Cascading • ]4¤MÎ](https://static.fdocuments.us/doc/165x107/5dd08106d6be591ccb614e7f/css-cascading-style-sheets-a-cascading-a-4m.jpg)