Carleton University COMP 4905 – Honours Project Cross ...ldnel/recent... · create a fully...
36
Carleton University COMP 4905 – Honours Project Cross-Platform Ordino Name: Adam Ward Supervisor: Dr. L.D. Nel Date: October 24 th , 2017
Transcript of Carleton University COMP 4905 – Honours Project Cross ...ldnel/recent... · create a fully...

Carleton University COMP 4905 – Honours Project
Cross-Platform Ordino
Name: Adam Ward Supervisor: Dr. L.D. Nel
Date: October 24th, 2017

Contents
1. Introduction .......................................................................................................................................... 3
2. Project Motivation ................................................................................................................................ 4
3. Technologies Taught in COMP 2406 ..................................................................................................... 5
4. Making of the Application ..................................................................................................................... 6
4.1. Creating the backend ......................................................................................................................... 6
4.2. Building as an Electron application .................................................................................................. 17
5. Comparison of Ember.js and Express.js .............................................................................................. 21
6. Developing a Desktop Application with Ember.js and Electron.js instead of Java ............................. 23
7. Further Experimentation to be done with Electron.js ........................................................................ 26
8. Conclusion ........................................................................................................................................... 27
Appendix A: Setup and Execution Instructions ......................................................................................... A - i
Dependencies........................................................................................................................................ A - i
Setup ..................................................................................................................................................... A - i
Running the Application........................................................................................................................ A - i
Running tests ........................................................................................................................................ A - i
Appendix B: The Electron Main.js file ....................................................................................................... B - i

List of Figures Fig. 1: Example Handlebars template ........................................................................................................... 5
Fig. 2: Example Ember router definition ....................................................................................................... 7
Fig. 3: Example Ember application file tree .................................................................................................. 8
Fig. 4: Successful creation of an account .................................................................................................... 10
Fig. 5: Account creation confirmation e-mail ............................................................................................. 10
Fig. 6: Category data model definition........................................................................................................ 11
Fig. 7: Modal dialog for creating (and editing) course work ....................................................................... 12
Fig. 8: List of existing course work displayed in the ordered-list component ............................................ 12
Fig. 9: WorkFlow making use of the filtered-list component ..................................................................... 13
Fig. 10: Course list making use of the filtered-list component ................................................................... 13
Fig. 11: TimeTable making use of week-schedule component ................................................................... 14
Fig. 12: Rendered course report ................................................................................................................. 15
Fig. 13: No Internet connection error message .......................................................................................... 16
Fig. 14: Application loading substate template .......................................................................................... 17
Fig. 15: Loading substate displayed when a route is busy loading data ..................................................... 17
Fig. 16: Ordino running as an Electron application on Windows ................................................................ 19
Fig. 17: Environmental configuration to run as web application or Electron desktop application ............ 19
Fig. 18: Application successfully installed on Microsoft Windows ............................................................. 20
Fig. 19: Modal with links for downloading the Windows installers ............................................................ 21

1 - Ward
Abstract
In COMP 3004, some peers and I created a student organization application called Ordino for
Android devices. That application had two shortcomings. First, anyone without an android phone would
not be able to use it. Second, the data was stored locally and could only be accessed on that device. To
solve these problems, I created a cross-platform desktop version of the application that allows users to
access their data on multiple devices. I accomplished this using the Electron.js framework, with Ember.js
as the backend, and the Firebase real-time cloud database service to store data. Using Ember.js instead
of Express.js simplified the development of the web application. Through Electron.js, the application is
operating system agnostic and was easier to develop and deploy than a typical Java application.

2 - Ward
Acknowledgements
I acknowledge that I did not use any copyrighted material to make my application. However, my
application makes use of numerous Ember addons which provide helpers and components. These
addons are released under an MIT license. To help with styling the application I used Bootstrap. Some
addons, such as ember-electron, provide blueprints which I used to set up initial configurations before
tweaking them to meet my needs. All other code, I hereby acknowledge, as being written solely by
myself.

3 - Ward
1. Introduction
Prior to the creation of Node.js, which I will refer to as Node from here on, JavaScript was solely
used as the predominant client-side scripting language [Nel, 2014]. Node has enabled JavaScript to be
used for developing highly scalable, asynchronous web servers [Nel, 2014]. Node has also unified the
use of JavaScript on the client-side and server-side. The popularity of Node has grown since its release,
with many large companies, such as Walmart [O’Dell, 2012] and Netflix [Xiao, 2014], converting their
high traffic websites to Node web applications. Due to its popularity, numerous frameworks have been
developed to ease the creation of Node web applications. Each of these Node frameworks have their
own set of features and design methodologies. The COMP 2406 Fundamentals of Web Applications
course at Carleton University teaches how to create Node web applications, including using one
framework, Express.js.
While on a co-op work term, I was introduced to the Ember.js framework which I will refer to as
Ember from here on. Ember is viewed as being a little snobby or opinionated, since there is usually only
a single way to accomplish some piece of functionality [Erdi, 2017]. This is due to all the common idioms
and best practices that developers are forced to use. However, it is rapidly gaining popularity because of
how much the framework simplifies making a web application [Erdi, 2017]. Since there is usually only a
single way to implement something, following the best practices becomes second nature which
increases developer productivity [Erdi, 2017]. The slogan for Ember is “A framework for creating
ambitious web applications” [Anon., 2017b]. With a lot of design and implementation decisions already
made for the developer, it allows the developer to focus on building up the application functionality and
focus on business logic [Erdi, 2017]. Many popular websites, such as Groupon [Druta, 2017] and
DockYard [Dupuis, 2017], are Ember web applications.
Node was originally created for developing web servers. A few years ago, a framework was
created to allow Node to be used in the development of desktop applications [Anon., 2017a]. This
framework is presently named Electron.js which I will refer to as Electron from here on. Electron is
developed by GitHub as the framework for their hackable text editor, Atom [Anon., 2017a]. Node is used
to make the backend of the application, while Chromium is used to create the frontend application
window [Anon., 2017a]. Since Node servers and Chromium can run on any operating system, Electron
allows for the development of an operating system agnostic application from a single code base [Anon.,
2017a]. In addition to Atom, Electron has been used to develop the Slack [Betts, 2016] and Microsoft
Visual Studio Code [Bright, 2015] applications.

4 - Ward
Since the creation of Node, JSON or NoSQL databases have become increasingly popular as the
values returned by queries are already in JSON form. This unifies the data format used on the client-side,
the server-side, and the web application’s database. Firebase is a mobile application and web
application platform that provides many services, such as a real-time database. The Firebase real-time
database stores and retrieves data records as JSON objects [Anon., 2017d]. Through data
synchronization, any changes to data are updated across all connected clients so that the current data is
always being displayed [Anon., 2017d].
Ember, Electron, and Firebase are intriguing tools on their own, but I was curious on how well
they would work together to create a complex, real-time cloud data, desktop application. In this report, I
start by stating my motivation for undertaking this project. I then give a recap of the technologies we
used in COMP 2406. I then go over the development of my project application, including the challenges I
faced integrating Ember, Electron, and Firebase together. I follow this by comparing developing the
Ember portion of the application to the technologies used in COMP 2406 and comparing developing an
Ember and Electron desktop application to a conventional approach, such as using Java. I finish the
report by suggesting further investigating that should be done with Electron and giving my conclusions.
2. Project Motivation
One of the hardest challenges of succeeding in school is staying organized and efficiently
balancing all of your courses. In COMP 3004, a group of peers and I created a student organization
application called Ordino for Android devices. That application had two shortcomings. First, anyone
without an Android phone would not be able to use it. Second, the data was stored locally and could
only be accessed on that device. Additionally, the data could not be backed-up and then restored on a
new device. For this project, I set out to create a cross-platform desktop version of that application so
that it could be installed on more devices and be connected to a cloud database so that a user could
access their data on multiple devices simply by installing the application and logging in.
To accomplish this cross-platform cloud application, I wanted to use the Electron framework. I
became intrigued by Electron when I learned it was used to develop Atom and Slack, two applications
that I use regularly. As such, I was interested to find out how developing an Electron desktop application
compared to my experiences developing a desktop application using a conventional language, such as
Java. Furthermore, I wanted to use Ember as the backend Node framework of the desktop application
and store data in the cloud using Firebase’s real-time database service. Through preliminary research, I

5 - Ward
found no existing application that integrated Electron, Ember, and Firebase together into the
application. All three technologies are very powerful on their own and if they could be used together, I
believed that they could produce many complex applications. Thus, I decided on this project with the
main goal of determining if Electron, Ember, and Firebase could be seamlessly integrated together to
create a fully functioning and deployable desktop application. To demonstrate this, I decided I would be
creating a cross-platform, desktop application version of Ordino.
3. Technologies Taught in COMP 2406
When I was enrolled in the COMP 2406 Fundamentals of Web Applications course, we were
taught how to create web applications using Node. We learned how to use one Node framework named
Express.js, which I will refer to as Express from here on. The development stack also included the
Handlebars template engine and the MongoDB database. Express is a Node framework for creating
minimalist web servers [Anon., 2017c]. This means that there are few features available in a newly
created Express application, but there are many modules and middleware available as a developer
needs them [Anon., 2017c]. With no unnecessary features within an Express application, they are able
to achieve fast performance. This makes Express a viable replacement for Apache as a static file server.
In COMP 2406 we learned about dynamic page creation. Template engines can be integrated into
Express. When I was enrolled in COMP 2406, we were given the choice of using Handlebars or Jade as
the template engine for assignments. I chose to use Handlebars. Handlebars templates are written in
HTML with embedded Handlebars expressions to display dynamic values. There are special Handlebars
expressions called block expressions to help simplify tasks such as iterating. In addition to expressions,
helpers can be used to perform operations while rendering the template. Figure 1 shows a simple
example of a Handlebars template.
{{#each users}} <!-- block expression that displays the enclosed content for each item in users -->
<div class='user-info'>
<div class='name'>{{name}}</div> <!-- expressions are between {{ }} -->
<div class='age'>{{age}}</div>
<div class='sum'>{{sum 1 2}}</div> <!-- helper named sum that adds 2 numbers -->
</div>
{{/each}}
Fig. 1: Example Handlebars template

6 - Ward
MongoDB is the database we learned about in COMP 2406 and is an example of a JSON or NoSQL
database. MongoDB stores data as JSON-like objects so fields can vary between documents [Anon.,
2017e]. This is very different from SQL databases where all objects of the same type (in the same table)
have the exact same columns and each column for a row must have a value. The data is easily mapped
to and from JSON objects, making it easy to use in Node applications as there is a common data format.
With MongoDB, object fields can be indexed to improve the performance of queries [Anon. 2017e].
MongoDB is not a cloud database like the Firebase real-time database service, so the user data is stored
locally on the host computer.
Using Express, Handlebars, and MongoDB allows for the creation of fast, minimal servers, with
dynamic page creation, and data storage on the host machine. There are similarities and differences
between these technologies and the technologies I used the develop my application. Express and Ember
in particular are quite different Node frameworks, but they do have some common elements. These
similarities and differences will become clear in the following sections of the report.
4. Making of the Application
As mentioned in section 2, my goal for this project was to determine if Electron, Ember, and
Firebase could be seamlessly integrated together to create a cross-platform, cloud, desktop application.
This was to be demonstrated by creating a cross-platform, desktop application version of Ordino, a
student organization application I had developed for Android devices during a past school project.
Typically, Electron applications are composed of a Node server as the backend of the application while
Chromium is used to create the frontend application window [Anon., 2017a]. As such, I split this section
into two parts. The first part discusses the making of the backend of the application using Ember and
Firebase. The second part goes over the Electron specific tasks for launching the frontend window of the
application and the tasks involved in deploying the application.
4.1. Creating the backend
The backend of an Electron application is typically a Node server, but it can just be a single HTML
file. For the backend of my application, I decided to use the popular Node framework, Ember. As
mentioned in section 1, Ember is a strongly opinionated, yet very powerful framework for creating
complex web applications. This is achieved by forcing developers to use best practices and common
idioms. The most basic building blocks that are part of a typical Ember application are routes,
controllers, components, templates, and helpers.

7 - Ward
A router defines all valid routes that can be navigated to within the application. Each defined
route is responsible for rendering the appropriate template, loading model data, and setting up the
application state for the current route. There can be nested routes defined in the router where the
parent route is setup before the child route. A route can have a specific path name or use a slug to
define dynamic path segments. In Figure 2, the router defines a nested route where the song route is a
child route of the songs route. The song_id slug is used as the dynamic path segment for the song route.
An example URL path to the song route would be /songs/1.
Router.map(function () {
this.route('songs', function () {
this.route('song', { path: ':song_id' });
});
});
Fig. 2: Example Ember router definition
Each route can have an associated controller, but can exist without one. However, a controller
must be associated with only one route. Controllers only receive the data model that the route
generated and can process it to produce properties to be rendered in the route’s template. One of the
main uses of controllers is to provide actions to the route template which can be thought of as user
interface event handlers. If the model data does not need to be processed or no actions are needed,
there is no need for a controller; the model data can be referenced directly in the route’s template.
Ember applications automatically come with the Handlebars template engine integrated. Each
route can have an associated template, but like controllers, can exist without one. However, a template
must be associated with only one route. There is no error if there is no template for a route, either
nothing will be displayed, or the parent route’s template is displayed if a parent route exists. Associated
routes, controllers, and templates must share the exact same filename and be in the appropriate folder.
The files that are associated with a child route must be in a folder with the same name as the parent
route. Ember instantiates routes and controllers automatically at runtime and thus, expects the
corresponding files to be in a specific place. Figure 3 shows an example Ember application file tree
where song is a child route of the songs route.
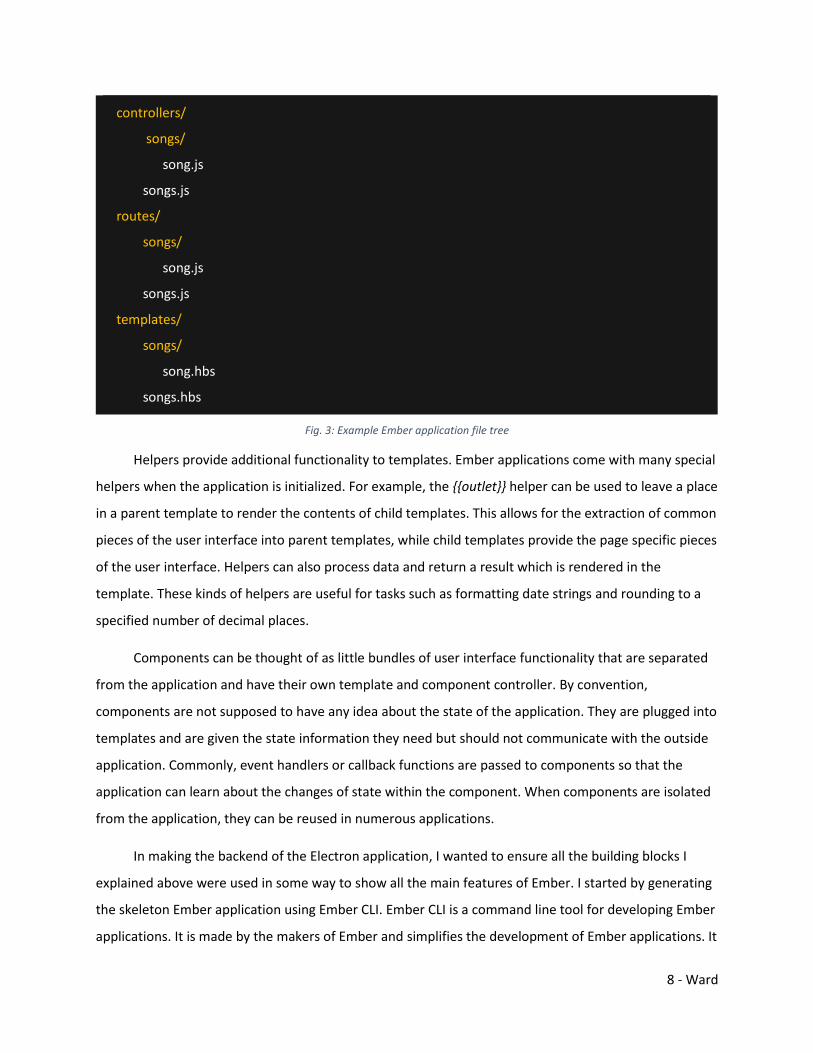
8 - Ward
controllers/
songs/
song.js
songs.js
routes/
songs/
song.js
songs.js
templates/
songs/
song.hbs
songs.hbs
Fig. 3: Example Ember application file tree
Helpers provide additional functionality to templates. Ember applications come with many special
helpers when the application is initialized. For example, the {{outlet}} helper can be used to leave a place
in a parent template to render the contents of child templates. This allows for the extraction of common
pieces of the user interface into parent templates, while child templates provide the page specific pieces
of the user interface. Helpers can also process data and return a result which is rendered in the
template. These kinds of helpers are useful for tasks such as formatting date strings and rounding to a
specified number of decimal places.
Components can be thought of as little bundles of user interface functionality that are separated
from the application and have their own template and component controller. By convention,
components are not supposed to have any idea about the state of the application. They are plugged into
templates and are given the state information they need but should not communicate with the outside
application. Commonly, event handlers or callback functions are passed to components so that the
application can learn about the changes of state within the component. When components are isolated
from the application, they can be reused in numerous applications.
In making the backend of the Electron application, I wanted to ensure all the building blocks I
explained above were used in some way to show all the main features of Ember. I started by generating
the skeleton Ember application using Ember CLI. Ember CLI is a command line tool for developing Ember
applications. It is made by the makers of Ember and simplifies the development of Ember applications. It

9 - Ward
is the predominant tool for developing Ember applications [Erdi, 2017], even being a prerequisite to the
introduction tutorial on the Ember website. Ember CLI can be used to generate application pieces, such
as routes and controllers, and ensures they are placed in the correct folder. It also aids in dependency
installation by adding new dependencies to the package.json file and automatically integrating Ember
addon dependencies into the application. The tool can be used to launch the web application from the
command line and it automatically hot-swaps code changes into the web application as they happen.
The first piece of functionality I decided to add to my application was integrating Firebase with
the application for account authentication and storing user data. Firebase can be integrated with many
development platforms, including web applications. The Firebase SDK is available as a single,
compressed JavaScript file. Although it is possible to load in a JavaScript module into the global
application namespace, this is not a common practice when developing Ember applications. Addons are
the standard way to plugin functionality into Ember applications. Through research, I came across an
open-source Ember addon named emberfire. Emberfire is an adapter for integrating Firebase with
Ember. The adapter handles the mapping of the application’s data records to and from the Firebase
real-time database service. Emberfire also provides all the Firebase SDK functions, including the ones
needed for authentication management. As hoped, the integration of Firebase with Ember went
seamlessly. In the Ember application’s environment.js configuration file, a Firebase entry had to be
added with the Firebase project URL, ID, and API key included.
Ember Data is the library Ember ships with for managing data persistence. An adapter is needed
to create a proxy for storing and retrieving data. Emberfire provides such an adapter to handle the
storage and retrieval of data for the configured Firebase project. To use this adapter in my Ember
application, I needed to create a data adapter for the application that extended the adapter provided by
emberfire. Emberfire ensures the Ember Data records are kept in sync with the Firebase real-time
database service, ensuring the displayed data is the same across all connected clients. Without
refreshing the current page, the displayed data is automatically updated when a change to the data is
made on another connected client as long as there is an Internet connection.
With the ability to communicate with Firebase, I began to implement the user authentication
functionality. I started to create the sign up, sign in, and password reset pages. To accomplish this, I had
my first exposure to Ember services which allow objects to be easily accessed from various parts of the
application. A service is registered with a given name and then can be injected as a property based on
the name of the service. A service can be injected in any route or controller and even in components,
10 - Ward
although this breaks the standard of components not being able to communicate with the application.
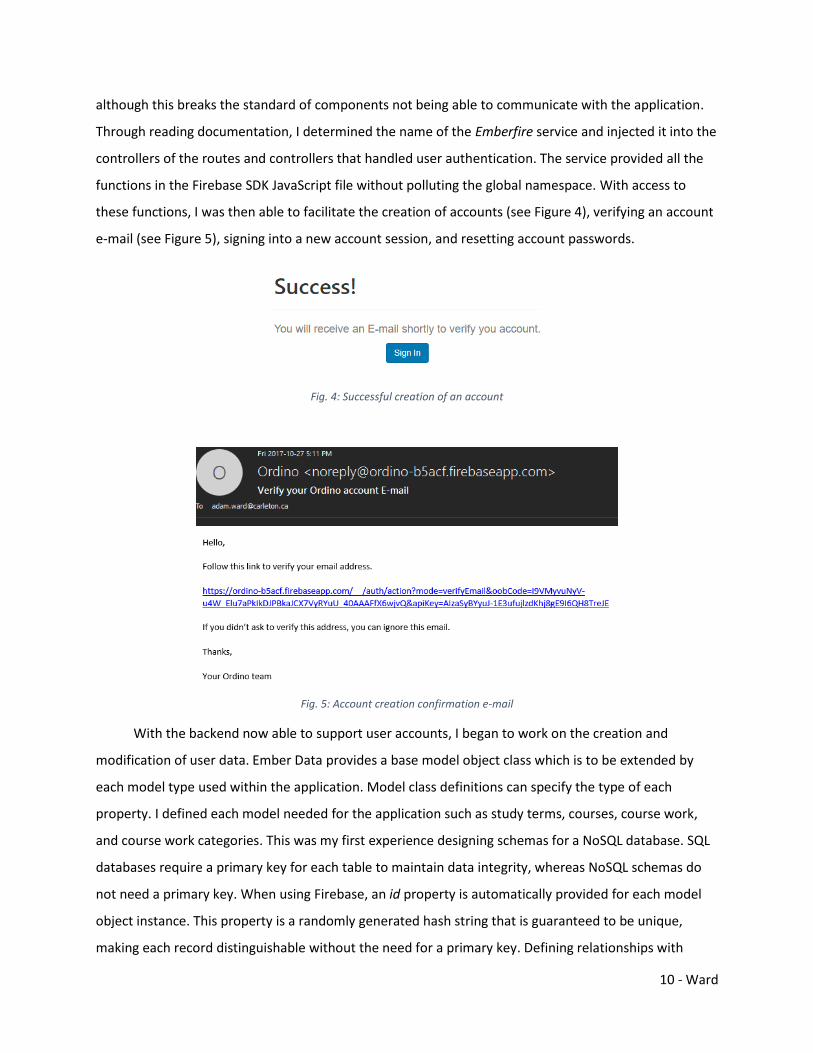
Through reading documentation, I determined the name of the Emberfire service and injected it into the
controllers of the routes and controllers that handled user authentication. The service provided all the
functions in the Firebase SDK JavaScript file without polluting the global namespace. With access to
these functions, I was then able to facilitate the creation of accounts (see Figure 4), verifying an account
e-mail (see Figure 5), signing into a new account session, and resetting account passwords.
Fig. 4: Successful creation of an account
Fig. 5: Account creation confirmation e-mail
With the backend now able to support user accounts, I began to work on the creation and
modification of user data. Ember Data provides a base model object class which is to be extended by
each model type used within the application. Model class definitions can specify the type of each
property. I defined each model needed for the application such as study terms, courses, course work,
and course work categories. This was my first experience designing schemas for a NoSQL database. SQL
databases require a primary key for each table to maintain data integrity, whereas NoSQL schemas do
not need a primary key. When using Firebase, an id property is automatically provided for each model
object instance. This property is a randomly generated hash string that is guaranteed to be unique,
making each record distinguishable without the need for a primary key. Defining relationships with

11 - Ward
Ember Data was also different than defining relationships in SQL. In SQL, composition relationships are
implicit and defined using foreign keys. Ember Data models can explicitly specify relationships within the
model definition. One-to-one relationships are defined using the belongsTo method and one-to-many
relationships are setup using the hasMany method. I had to decide whether I wanted to take a
compositional approach where my relationships were defined by storing all members as an array within
the container type, or storing the ID of the container type as a property of the member type. I decided
on the latter approach because Firebase documentation recommends keeping each model type
separate [Anon., 2017f]. Instead of returning one large chunk of data which may return data that is not
needed, it forces the developer to query for only the relevant data that is used in the given area of the
application. With the ability to communicate with Firebase and my schemas defined, I was then able to
store all the different types of user data objects used in the application. Figure 6 shows an example of a
data model definition for category objects in my application.
export default DS.Model.extend({
'uid': DS.attr('string'),
'label': DS.attr('string'),
'icon': DS.attr('string'),
'index': DS.attr('number')
});
Fig. 6: Category data model definition
I began implementing the pages for creating and listing data model instances. This gave me my
first experience implementing components. For each model type, I implemented a modal dialog
component for the user to enter in data for creating new instances of the model type. Abstracting the
modal dialogs into components had a couple of advantages. First, I was easily able to reuse the modals
for creating new model instances and editing existing instances, across multiple application pages.
Second, it is hard to do acceptance testing of a Firebase application to test the user interface, but it is
easy to write Ember integration tests for a single rendered component. Figure 7 shows a screen capture
of the modal dialog used for creating and editing course work model objects. In addition to modal
dialogs, I created a common ordered-list component to allow users to assign an order to their model
instances, such as terms and course work. To make it work with every single type of model object, the
component sorts the items based on their index property, and the consumer of the component must
supply a renderer to produce the view displayed for each list item. Each renderer is itself also a

12 - Ward
component, being supplied with the item for a given index and producing the view for that item. Figure
8 shows the ordered-list component being used to display all the course work for a given course.
Fig. 7: Modal dialog for creating (and editing) course work
Fig. 8: List of existing course work displayed in the ordered-list component
There are three main application features that process and make use of the user’s data. The first
feature is named WorkFlow. WorkFlow lists all upcoming deadlines for the current study term, sorted by
deadline, and grouped by date. There is also a series of filters to narrow in on which work items are
displayed, such as the course the work item belongs to, the category the work item is in, and the date
range of deadlines to show. To accomplish this, I created a filtered-list component. Like the ordered-list
component, a renderer can be provided to customize how each list item is displayed. The filtered-list
component also takes a list of filter objects. Each filter object includes the filter value to watch, the user

13 - Ward
interface component linked to the filter that the user can enter the filter value into, and a validator
function to test whether an item passes the filter. Only the items that pass all the set filters are
displayed. The filtering is dynamic meaning that whenever a filter value is changed, all items are
automatically tested against the new current filter values. I also used the filtered-list component in the
course list page. Since the component is generic, it was easy to group the courses by term instead of a
date and supply a different list of filters. Figure 9 shows the filtered-list component being used in the
WorkFlow feature and Figure 10 shows the filtered-list component being used in the course list page.
Fig. 9: WorkFlow making use of the filtered-list component
Fig. 10: Course list making use of the filtered-list component
The second main feature is TimeTable. TimeTable displays the user’s weekly class schedule. I again
decided to extract the weekly schedule implementation into a component to ease the testing. I decided
to layout the week-schedule component as a table, each column corresponding to a day and each cell
corresponding to one hour. Creating the table layout was logical to figure out using a flexbox approach.
To have an accurate scale, I allotted two pixels per minute, making each cell 120 pixels in height. The
hard part was determining how to overlay the class time bubbles over the underlying table. The way I
decided to accomplish this was setting an absolute position for each bubble. I calculated the number of

14 - Ward
minutes from midnight and multiplied that by the allotted two pixels per minute to get the top position
of the class time bubble. I then calculated the minutes between the start and end time of the class,
multiplying that by the two pixels per minute to get the total height of the class time bubble. The
template highlights the right and left side of the column corresponding to the current day. When the
TimeTable page is first opened, the route controller scrolls to the top of the current hour. This allows the
user to easily see where they are in the current week and which classes they have soon. Figure 11 shows
the TimeTable feature using the week-schedule component.
Fig. 11: TimeTable making use of week-schedule component
The final main application feature is the course report. As a student, I am always keeping track of
how I am doing in all of my courses. With the click of a button, the course report renders a one-page
summary of how the user is doing in a particular course. The report gives various statistics to inform the
user how they are currently doing and how close they are to obtaining their desired final grade. Some
example statistics are their current average, guaranteed minimum final grade, and maximum possible
final grade. The user can enter a desired grade and see what average they need over the remaining
evaluations to earn that desired grade. Since most reports have visual aids, I decided to place a
doughnut chart in my report. The chart shows the percent of the total marks the user has already
earned, the percent of total marks that have been lost, and the percent of total marks remaining. I used
Chart.js, a popular JavaScript chart library, to create the doughnut chart. Much like emberfire, an open-
source Ember addon had been created that wraps the library. The addon allows for the use of the
various kinds of charts Chart.js supports as components in Ember applications. To compute all the report
statistics, I decided to create a utility function. The function takes an array of course work model objects

15 - Ward
as a parameter. It processes the weight and grade of each course work object and then returns a JSON
object with all the computed statistics that the report uses. Figure 12 shows a rendered course report
with the user’s required grade computed, among other related statistics.
Fig. 12: Rendered course report
Towards the end of developing the application, I noticed a major issue. When the Internet
connection was lost, the application kept functioning normally. The user could still navigate between
pages, and change their model data. This was a problem because without an Internet connection, there
was no synchronization of data with the cloud database. The user could make changes, thinking that it
was being saved, and then realize that it was not saved when they regained their Internet connection
and refreshed the page. I found an NPM module named is-online that tries to connect with a few
websites to determine if the client can access the Internet. With this module, I could easily check the
connection status on the initial application launch, but this still did not solve my problem of handling the
loss of the Internet connection in the middle of using the application. I decided to poll the Internet
connection status every so often. Since I knew that knowing the Internet connection status could be
useful in many areas of the application, I decided to extract this into an Ember service. Up until this
point, I had used Ember services but never created one. Creating a service is not any more difficult than
creating a route or controller. On initialization of the service, a loop is launched that checks the Internet
connection every fifteen seconds. The service has a property named isOnline that indicates whether the
client is connected to the Internet or not. In the root application template, I ensure that if there is no
Internet connection, an error message is displayed instead of application content as shown in Figure 13.

16 - Ward
Fig. 13: No Internet connection error message
While creating the service, I came across many Ember addons that indicate if the client has a local
connection, but none of these indicate if the client has an Internet connection. I decided that the service
I created would be great to extract into an Ember addon to aid other developers with the same problem
I had. There are a few differences between developing Ember applications and Ember addons. First, the
development code for modules, such as services, is written in the addon directory instead of the app
directory. The modules are then exported from the app folder. Second, a dummy application can be
created in the test folder. The dummy application is launched by the ember serve command so that the
addon components can be tested in an application context. With the skeleton addon created, I moved
my service into the addon. The environment.js file of an Ember application can be used to configure
services. I decided to allow users of the addon service to be able to configure the interval between
Internet connection checks using the environment.js file. I also allowed users to configure the is-online
module specific options. I named this addon ember-online-status and published it to NPM1. I was able to
install the addon from the command line into my Ember application and integrate the service.
For the sake of providing easy access to the web application functionality, I used Firebase’s free
hosting service to host the Ember portion of the application. Github easily integrates with an open
source continuous integration tool named Travis CI. Whenever a git push is made to the master branch
of the Github repository, a Travis build is triggered. The Travis configuration I implemented runs all the
tests I wrote for the application. If all those tests pass, the tests coverage results are published and a
production build of the web application is deployed to the Firebase hosting service. Up until this point, I
had only tested the Ember web application locally on my computer. When I initially accessed the web
application from the remote host, there was a delay while loading the application during the initial
connection. During this delay, a blank screen was displayed with no indication of what was going on. To
fix this potentially confusing problem, I learned about substates in Ember. There are two kinds of
substates which are loading and error. The Ember router will transition into the loading substate while
1 https://www.npmjs.com/package/ember-online-status

17 - Ward
the given route is still in the process of loading, possibly from a large data query. When in the loading
substate, the provided template is displayed if one was provided. For example, if the current route was
courses.course, where courses is the parent route of the course route, Ember would first check if a
template existed in the application with the path templates/courses/course/loading.hbs. If a file with
that path did not exist, then Ember would next check if a file with the path
templates/courses/loading.hbs existed. Additionally, a top-level application loading template can be
created with path templates/application-loading.hbs that would be displayed whenever the loading
substate is not handled by any route on the current route’s path. With the above knowledge, I created
an application loading template that is rendered when the application is initially accessed and informs
the user that the application is busy loading (see Figure 14). I also created a loading template that is
rendered when data is being loaded by a route (see Figure 15).
Fig. 14: Application loading substate template
Fig. 15: Loading substate displayed when a route is busy loading data
4.2. Building as an Electron application
With all the pages created for the Ember web application, the backend of the application was
complete. I was now left with the task of building the Electron desktop application using the Ember
backend. Electron builds an executable for the current operating system. The executable launches a
Chromium window that displays the pages rendered by the backend Node server. The pages are
displayed the exact same way as they are in a web browser.
An Electron application can be created using as little as three files. A standard package.json is
needed that includes a main property which specifies the path to the main script for launching the
Electron application. The main script creates the desktop application window and processes window

18 - Ward
related events such as maximizing, minimizing, and closing. This is where a developer can specify their
application window size which I made full screen by default. The location of the content that needs to be
loaded by the Chromium window is specified in the main script. This can be the path to a single HTML
file or a web application URL. In my case, I needed to configure Electron to point to my Ember web
application. There is an addon named ember-electron that aids in the initialization of Electron desktop
applications with an Ember backend. Addons can define blueprints which can be used to insert code and
default configurations into existing files, or generate new files in an Ember application. These blueprints
are simply executed using Ember CLI’s generate command. The ember-electron blueprint creates a
main.js file to be used as the Electron main script, handling the launching of the Electron application
window and the loading of the Ember backend. The blueprint also adds all the necessary dependencies
needed to build the Electron application.
Using the default setup, I was able to build and run the Electron application, but the Ember
backend would not function properly. I determined that the source of the problem was that the Ember
portion of the application could not communicate with Firebase. After scouring through both Firebase
and Electron documentation, I realized why this communication was not working. The main.js file
created by the ember-electron blueprint creates a custom protocol named serve and uses dist as the
hostname for the backend server. Firebase blocks communication with all hosts that are not on an
approved host list. Unfortunately, I could not simply add serve://dist to this list, as Firebase only
recognizes hosts that use either the HTTP or HTTPS protocols. With Electron and Ember being relatively
young technologies, research did not provide any solutions to this problem. I was only able to solve the
problem after learning how Ember CLI builds a web application for deployment. I was under the
impression that Ember web applications were launched the same as Node scripts, listening for requests
on a specified port, just like Express web applications. By looking at the compiled web application, I
realized that Ember compiles all the application code, including templates, into one JavaScript file. There
is then a single index.html file that the compiled script is injected into. As a result, Ember applications
are single-page web applications. While navigating through the various routes of the application, only
the content for the current route is rendered. Opening this one index.html file allowed me to use all of
the application features normally. This gave me the idea of statically serving the compiled Ember web
application. Using the connect and serve-static modules, I launched a static file server on port 4200 and
set the URL to load in the Electron window to http://localhost:4200. See Appendix B for the full Electron
main.js file for the application.

19 - Ward
Fig. 16: Ordino running as an Electron application on Windows
With the static file server running using an HTTP protocol, the Electron application was able to
communicate with Firebase. The Electron application was then able to launch and run as expected (see
Figure 16). The only problem left was that the application could no longer be launched as an Ember web
application, accessible by a web browser. It is much faster to launch the application as an Ember
application, saving a lot of time while testing changes. Additionally, Electron applications, such as Slack,
often host the application on a web server separately so that the application can be used as a web
application or a desktop application. As it turns out, this was only a matter of using a conditional
statement in the environment.js configuration file for the URL type of the application, as exemplified in
Figure 17. Electron requires a hash type URL where the URL is anchored with a #, whereas when run as a
web application the URL does not need to be anchored by a #.
locationType: process.env.EMBER_CLI_ELECTRON ? 'hash' : 'auto'
Fig. 17: Environmental configuration to run as web application or Electron desktop application
In addition to providing the initial Electron configuration blueprint, ember-electron adds
commands to Ember CLI for packaging executables. Executing the ember electron:package command
packages an executable for the current platform and architecture. The process of compiling and
packaging an Electron application is unified by electron-forge. The electron-forge-config.js file can be
modified to specify the executable icon, executable name, and executable file description, among other
settings. Running the package command creates the executable, and including all necessary DLLs and
resources to run the application on any system of the same platform without the prerequisites that are

20 - Ward
needed for development, such as Node and Google Chrome. Using Advanced Installer, I was able to
produce 64-bit and 32-bit Windows installers for the packaged application. I was then able to
successfully install the application on my computer (see Figure 18) and run the Electron application
without any problems.
Fig. 18: Application successfully installed on Microsoft Windows
I wanted to make these installers available from only the Ember web application as it would be
redundant to download the installers from the Electron application. I set out to find a way to distinguish
accessing the application from a web browser versus an Electron window. The Electron window adds the
version of Electron being used to the global JavaScript window object. The Electron version then can be
accessed as window.process.versions.electron from any part of the Ember portion of the application. By
checking to see if this version value was set, I was able to provide download links for the packaged
installers only when the application was accessed from a web browser. These installers can be
downloaded from https://ordino-b5acf.firebaseapp.com by clicking on the download icon and selecting
a download link from the modal dialog, as shown in Figure 19.

21 - Ward
Fig. 19: Modal with links for downloading the Windows installers
5. Comparison of Ember.js and Express.js
There are a number of similarities and differences between the Ember and Express Node
frameworks. The similarities are vastly outnumbered by the differences. Changing a web application
from one framework to the other would certainly require a full re-write. The similarities are the more
general attributes of any framework. The differences come from the two frameworks having two
completely different design philosophies.
All Node applications have the ability to import modules to reuse existing functionality. There are
already many open-source modules available in the NPM repository that can be used. There are,
however, framework specific modules that tie in with the respective framework’s design philosophy.
Both Ember and Express have their own special kind of modules. For example, Ember addons are the
common format for distributing Ember specific libraries [Erdi, 2017]. They easily allow helpers, services,
components, and mixins to be shared across many Ember applications. In contrast, Express has its own
special type of modules called middleware [Anon., 2017c]. Middleware are functions that are given
access to the request and response objects [Anon., 2017c]. They can execute some code or alter the
request or response objects in some way [Anon., 2017c]. Both addons and middleware allow for
plugging functionality into an existing application while not violating the philosophy of the respective
framework. Ember addons make it easier to create complex Ember web applications by allowing the
developer to incorporate existing solutions to a problem so that they can focus on the application
functionality and business logic. When creating an Express application, a developer only needs to install
the middleware they require. As such, middleware reinforces the Express philosophy of creating
minimalist, fast web servers that are not bloated by unnecessary code.

22 - Ward
Both the Express and Ember frameworks can integrate a templating engine. While Ember
applications come with a default templating engine, Express applications do not. The developer can add
the templating engine of their choice when using Express, if desired. This again matches the Express
philosophy of creating minimalist web servers, by leaving it to the developer to plugin a template engine
if they need one. When creating an Ember application, Handlebars is included as the default templating
engine. It is possible to swap the templating engine used by Ember to a different one, such as Jade, but a
developer then loses the Ember specific template helpers. This follows the Ember philosophy as
including the Handlebars template engine by default is one design decision a developer does not need
to make. Additionally, the specialized template helpers aid in creating complex applications.
There are many differences between the process of developing an Express web application and
an Ember web application. Firstly, Express is much more liberal in how a web application can be
developed as routes can all be defined in the main JavaScript file or defined in separate files [Anon.,
2017c]. Additionally, a route method can be defined on a per GET or POST request basis, or can create
chained route handlers that handle all request types for a given path [Anon., 2017c]. Whereas, in Ember,
each route has its own file that must have a specific name, and be in a specific folder, which makes
developing an Ember application much stricter. Express also leaves a lot of decisions for the developer
to handle. For example, query parameters must be parsed from all requests sent to an Express web
application. In contrast, query parameters are handled much differently in Ember as the developer can
specify the names of all expected query parameters in a route’s controller. The framework then handles
the parsing of the query parameters and automatically assigns them to variables of the same name.
These query parameter values can be accessed like any other controller property. Any changes to the
corresponding query parameter property results in the query parameter being automatically updated in
the URL. This is exemplified in the WorkFlow and course list features of my application where the
current values of the set filters are part of the page URL as query parameters.
Overall, I found it much easier to develop a web application with Ember than Express. Express
would be a great alternative to Apache as a static file server or for small text based websites. However,
it falls short when wanting to make a complex web application. A lot of tasks, such as dealing with query
parameters, required more complicated, messy solutions in Express, but were incredibly easy and
concise in Ember. With so many setup and design decisions made for you, Ember makes it a lot easier to
quickly add functionality to your web application. Once I got used to the structure of Ember applications
and all the common idioms, they became second nature and I was able to quickly add functionality to

23 - Ward
the application. My thoughts became strictly about implementing functionality as I did not have to be
concerned about the design of the application. Additionally, there was never a point where I felt
restricted by the decisions Ember has forced upon developers.
Finally, deploying a web application is much easier with Ember. Express servers must be launched
and actively listening to a port for requests to come in. There are cloud platforms for hosting these kinds
of Node applications, but they are more expensive than hosting services that serve static files. When a
production build of an Ember web application is done, there is a single index.html file which injects in
content from the packaged JavaScript files as needed. Thus, the output of an Ember build can be
statically served. There are many attractive features and advantages that are driving Ember’s growing
popularity. Although Express still has its place as a framework for developing fast, little web servers, it
cannot compete with frameworks such as Ember for creating high-end, complex web applications.
6. Developing a Desktop Application with Ember.js and Electron.js
instead of Java
During three of my four co-op work terms, I had a software engineering position, each one using
Java as the main programming language. As such, I noticed many differences between developing a
desktop application using Ember and Electron versus a traditional language, such as Java. Both ways
have their advantages and disadvantages which will be discussed in this section.
One of the first disadvantages I noticed about using Electron is that the documentation is not very
comprehensive. Much of my total time during my honours project went towards trying to determine
what was the purpose of certain configuration properties in the default Electron setup provided by the
ember-electron blueprint and what were acceptable values for those configuration properties. The
available documentation was sparse and explanations were not always clear. Often the answer to a
problem was found by reading through forum posts made by people having similar problems. When I
could not find any such forum post, I either had to settle for an acceptable but lesser solution, or keep
attempting solutions based on educated guesses until one worked. Often the solutions to Electron
related problems were not difficult to implement, but were extremely hard to figure out. Java has
extensive documentation, making it much easier to learn about a new interface and acceptable
configurations. Since more developers are using Java, most general problems have already been
experienced by another developer. Research then quickly yields the solution to a problem or you learn

24 - Ward
something is not possible without spending a lot of time on it. In comparison to the Java documentation,
the Electron documentation does not reveal the desired information as nicely.
Conversely, Ember’s documentation is incredibly well written. Parameter explanations for
functions are well written and the return value of a function is clear. I found the Ember documentation
to be better than the Java documentation since most functions have an example usage code snippet
below the function documentation. The Ember community is also very involved with many bloggers
posting tutorials on how to solve advanced issues that are beyond the scope of the guides and tutorials
published on the Ember website. Since more time was spent developing the Ember backend for this
cross-platform cloud, desktop application rather than configuring the Electron frontend, I prefer learning
about new interfaces and configuration through documentation when developing an Ember and
Electron application over a Java application.
Although, the quality of a developed piece of software is much more important than how quickly
it was developed. Faster development leaves more time to complete more customer features,
thoroughly test the software, and fix outstanding bugs. Development seemed much quicker using Ember
and Electron. Any changes made to an Ember application are automatically deployed, even if new files
are created. This is also the case when Ember is being used as the backend of an Electron application.
Not having to rebuild and restart your application every time you make a change saves a lot of time.
Some Java IDE’s, such as Eclipse, do hot swap changes, but do not do this after a large refactoring, when
a new file is created, or when the change is made to an executing thread. In these cases, the application
must be terminated and restarted again. From experience, I know rebuilding an application can take
many minutes for even the smallest changes. The speed of deployment made testing changes to my
Ember and Electron application much quicker and led to much more efficient development.
User interface development was also much easier with Ember and Electron. The automatic
deployment of changes made it much easier to make little tweaks to the CSS styles of the application
and see the effect immediately on the user interface. Additionally, the Google Chrome browser window
used to access the Ember web application, in addition to the Chromium window launched by Electron,
provide a developer tools panel which aided the development of many aspects of the application. The
Inspector tool allowed me to look at the classes and styles given to HTML elements of the user interface.
This was especially useful when classes were dynamically assigned at runtime and CSS properties were
dynamically calculated. The tool also enabled me to tweak an element’s style without making changes
to my application’s stylesheets. When there is an issue with a Java user interface, there is no way to

25 - Ward
inspect which values, such as weights and height, an element has been given. The problem can only be
found by reading through the code and mentally detecting the problem.
Debugging is essential when developing any piece of software. This is handled very well whether
developing an application using Ember and Electron or Java. Popular Java IDEs, such as Eclipse and
Intellij Idea, allow you to set breakpoints at a particular line of code, pausing the execution of the
program. It is also possible to set breakpoints that pause whenever an exception is thrown or the value
of a particular variable changes. A developer can then find the root cause of the issues by viewing the
call stack, looking at the present values of variables, stepping over statements, and entering functions,
among other things. A developer does not need an IDE to debug an Ember or Electron application since
all popular browsers have developer tools for debugging. Placing a debugger; statement in JavaScript
code acts as a breakpoint, pausing the execution of the application. A developer can then inspect the
call stack, the current values of variables, and walk through the code like they could in a Java IDE. Ember
also has a special {{debugger}} template helper which will pause rendering of the template so that the
values in the template context can be viewed. The Electron application window also has the same
developer tools panel, pausing execution when these breakpoints in the backend server are hit. A slight
advantage of working with the Google Chrome developer tools, is a developer’s project is not
handcuffed to a specific IDE. Ember applications can be developed by a team of developers, each using
the text editor of their choice.
One can see that there are many attractive advantages for developing desktop applications using
Ember and Electron. However, the two technologies by no means are a perfect solution. A major
disadvantage of using Electron is that the framework is not stable yet. I would occasionally get
intermittent crashes that I could not reproduce. Additionally, a new version of ember-electron that was
released in the middle of the development of my application updated the dependency versions of many
of the Electron packages. After this, I was not able to package the application anymore. I had to
determine what versions the Electron dependencies had been when I started the project and force
those exact versions be used in my package.json. One ill timed failure can cause customers to
completely lose confidence in a product which is why this instability may keep many software
development teams from using Electron until it becomes more stable. In contrast to this issue, Java is
incredibly stable at this point and has been thoroughly tested on many platforms.
Ultimately, there are advantages and disadvantages for developing a desktop application using
Ember and Electron or Java. I found that developing an application with Ember and Electron was much

26 - Ward
faster than using Java, especially when implementing the user interface. As revolutionary as Electron is,
it is not as mature as Java. In the software engineering industry, stability is of great importance as users
want software that always works as expected. Electron needs to become more stable and better
documented to become more appealing to a larger number of developers. Additionally, there are
existing issues that need to be fixed so that projects like mine are not forced to use specific versions of
Electron and Electron dependencies. Ember, on the other hand, is well documented and already
incredibly popular in the web development industry. Once Electron is more stable, Ember would be a
great backend Node framework for creating complex desktop applications.
7. Further Experimentation to be done with Electron.js
Although this project dove into many of the working pieces of Electron, there is still much
experimenting that can be done to find more limitations and novelties of the framework. First, it would
be interesting to experiment with the type of content that can be served by Electron in the Chromium
window. Second, it would be interesting to see an Electron desktop application build and run on
multiple different platforms. Finally, it would be interesting to experiment with adding in desktop
application specific functionality, such as menu bars and context menus.
The application I created statically serves the compiled Ember web application production build
files. It would be interesting to have a live Node server in the backend, serving content as requests come
in. It would also be interesting to figure out if displaying static files is limited to HTML files. Since
Electron uses a Chromium window to display the content provided by the backend, anything that can be
displayed in a Google Chrome web browser should, in theory, be possible to display in the Chromium
window provided by Electron. Thus, maybe it would be possible to display other file types, such as PDFs
and image files, without needing them to be embedded in a webpage.
For this project, I developed and tested the application on a computer running the Microsoft
Windows operating system. I was even able to setup a build server that packaged the application as a
Windows executable and created MSI installers. Since Electron is meant to create an operating system
agnostic desktop application, further experimenting should be done to see how well an application can
be built, packaged, deployed, and executed on Linux and Mac platforms. Through research, I found
many Windows specific configurations that were needed for electron-forge to build the executable for
Windows. It would be interesting to see how much more effort is needed to build the executables for

27 - Ward
Linux and Mac, to confirm that the Electron framework can produce a fully deployable operating system
agnostic desktop application.
There are many major differences between web applications and traditional desktop applications.
First, most desktop applications have a menu bar, with various menu options that provide some
functionality. Second, desktop applications that deal with text often have a spell checker. Next, users
often expect a right-click to produce a context menu in any application. Finally, desktop applications can
often make use of platform specific features such as a notification service. All the above differences are
missing from the Electron desktop application I created for this project. Essentially, the Electron
application is just displaying the web application from within a Chromium window instead of a web
browser. I did, however, prove that it is possible to distinguish accessing the backend Node framework
from a web browser versus the Electron window by only providing download links for the MSI installers
when the application is accessed from a web browser. Open source Ember addons already exist to
address all the missing pieces I mentioned above. It would be good to spend more time experimenting
with adding in desktop application specific components, such as menus, spell checkers, and file system
support, to make an Electron desktop application indistinguishable from a traditional desktop
application. These components may, however, prove to eliminate the ability to simultaneously develop
a web application and desktop application as I did for this project.
8. Conclusion
By developing this application, I achieved my goal of showing that it is possible to create an
Electron cross-platform desktop application using Ember as the backend and the Firebase real-time
database service to persist data. I showed that it is possible to deploy an Ember and Electron desktop
application in the same way as a traditional desktop application. The Ember and Electron application is
packaged as 32-bit and 64-bit executables and deployed by Windows installers.
The philosophies that define the Ember framework made developing an Ember web application
completely different from developing an Express web application. The common idioms and best
practices that developers are forced to use enabled quick development. Additionally, with the design of
the application already decided, Ember allows developers to focus solely on solving the complex
problems of their application. The same level of complexity would be hard to achieve using the Express
framework. Ultimately, the process of developing a web application was much easier using Ember and
will likely eliminate the use of Express from any of my future projects.

28 - Ward
As I hoped, Ember, Electron, and Firebase work well together and developing with these
technologies has many noteworthy advantages. Specialized developer tools and immediate feedback of
code changes leads to very efficient development. The use of Electron could also allow more economical
development since the web application and desktop application can be developed simultaneously from
the same code base. This means that a company may only need one development team per product,
saving money on developer salaries and lowering management overhead costs. Code quality could also
be improved with only one code base, since there would be no need for extra code to integrate a
common backend data store with multiple different programming languages, ensuring each
implementation maintains data integrity. Since Electron applications are also operating system agnostic,
there would also be no need for any platform specific code. However, before companies have the same
level of trust in Electron as they already do in mature languages, such as Java, and make the switch, the
framework needs to be further stabilized.
This project shows that the software development industry is still evolving, with new methods for
developing software still being introduced. I obtained promising results by developing a fully functioning
and deployable desktop application using Electron and Ember. Ember is a technology which is
traditionally used for web application development which suggests that one day, there may be less
separation between web application and desktop application development. With a smaller gap between
the two industries, software quality could be improved and produced at a quicker rate. Powerful web
frameworks, such as Ember, could then serve additional purposes such as aiding in the development of
complex desktop applications. As revolutionary as the Ember and Electron frameworks are, they could
still be improved upon and further stabilized. However, since these frameworks are less than a decade
old, what they already are capable of is very impressive and there is still plenty of time for them to get
even better.

References
Anon. (2017a) About Electron, Electron
Anon. (2017b) A framework for creating ambitious web applications, Ember.js
Anon. (2017c) Express/Node introduction, MDN Web Docs
Anon. (2017d) Firebase Realtime Database, Firebase
Anon. (2017e) What is MongoDB?, MongoDB
Anon. (2017f) Structure Your Database, Firebase
Betts, P. (2016) Building Hybrid Applications with Electron, The Slack Engineering Blog
Bright, P. (2015) Microsoft’s new Code editor is built on Google’s Chromium, Ars Technica
Druta, O. (2014) Building With Ember.js at Groupon, Medium
Dupuis, M. (2017) Why DockYard Builds with Ember.js, DockYard
Erdi, B. (2017) Rock and Roll with Ember.js, pp. 1-2, 260
Nel, L.D. (2014) Lecture notes, COMP 2406, Carleton University
O’Dell, J. (2012) Why Walmart is using Node.js, VentureBeat
Xiao, Y. (2014) Node.js in Flames, Medium

List of Abbreviations
CI – Continuous Integration
CLI – Command Line Interface
HTML – HyperText Markup Language
HTTP – HyperText Transfer Protocol
HTTPS – HyperText Transfer Protocol Secure
IDE – Integrated Development Environment
JSON – JavaScript Object Notation
NPM – Node Package Manager
SQL – Structured Query Language
A - i - Ward
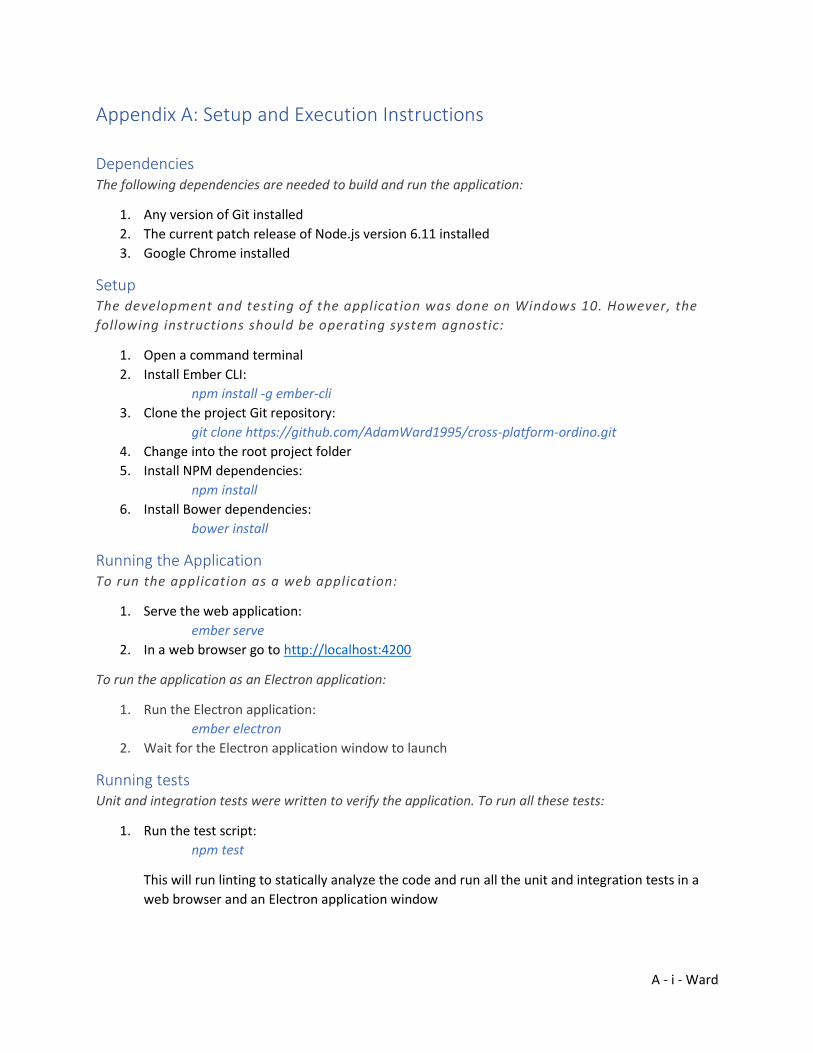
Appendix A: Setup and Execution Instructions
Dependencies The following dependencies are needed to build and run the application:
1. Any version of Git installed
2. The current patch release of Node.js version 6.11 installed
3. Google Chrome installed
Setup The development and testing of the application was done on Windows 10. However, the
following instructions should be operating system agnostic:
1. Open a command terminal
2. Install Ember CLI:
npm install -g ember-cli
3. Clone the project Git repository:
git clone https://github.com/AdamWard1995/cross-platform-ordino.git
4. Change into the root project folder
5. Install NPM dependencies:
npm install
6. Install Bower dependencies:
bower install
Running the Application To run the application as a web application:
1. Serve the web application:
ember serve
2. In a web browser go to http://localhost:4200
To run the application as an Electron application:
1. Run the Electron application:
ember electron
2. Wait for the Electron application window to launch
Running tests Unit and integration tests were written to verify the application. To run all these tests:
1. Run the test script:
npm test
This will run linting to statically analyze the code and run all the unit and integration tests in a
web browser and an Electron application window

B - i - Ward
Appendix B: The Electron Main.js file const { app, BrowserWindow } = require('electron'); const { dirname, join, resolve } = require('path'); const connect = require('connect'); // connect server const serveStatic = require('serve-static'); // serve static files let mainWindow = null; let server = null; app.on('window-all-closed', () => { if (process.platform !== 'darwin') { app.quit(); } }); app.on('ready', () => { mainWindow = new BrowserWindow({ show: false, icon: '../public/icon.ico' }); mainWindow.maximize(); mainWindow.show(); if (!server) { server = connect() .use(serveStatic(join(__dirname || resolve(dirname('')), '..', 'ember'))).listen(4200); } const emberAppLocation = 'http://localhost:4200/'; // Load the statically served ember application mainWindow.loadURL(emberAppLocation); mainWindow.webContents.on('did-fail-load', () => { mainWindow.loadURL(emberAppLocation); }); mainWindow.webContents.on('crashed', () => { }); mainWindow.on('unresponsive', () => { }); mainWindow.on('responsive', () => { });

B - ii - Ward
mainWindow.on('closed', () => { mainWindow = null; }); }); process.on('uncaughtException', (err) => { });