CAFÉ ELITE - Crem Internationaldownload2.creminternational.com/Coffee Queen/05_Inst… · ·...
56
TM_EN Part No.: 1740056_02 CAFÉ ELITE TECHNICAL MANUAL
Transcript of CAFÉ ELITE - Crem Internationaldownload2.creminternational.com/Coffee Queen/05_Inst… · ·...

TM_ENPart No.: 1740056_02
CAFÉ ELITETECHNICAL MANUAL

CAFÉ ELITE
2
CONTENT
CONTENT ........................................................................................................................................................ 2
GENERAL ........................................................................................................................................................... 4Introduction ..............................................................................................................................................................4Warnings ....................................................................................................................................................................4Precautions ................................................................................................................................................................4Intended use ..............................................................................................................................................................4Facts & weight ...........................................................................................................................................................5
OVERVIEW OF COMPONENTS ........................................................................................................ 6Front exterior ...........................................................................................................................................................6Front interior of Elite II ..........................................................................................................................................7Front interior of Elite III .........................................................................................................................................8Front interior of Elite IV .........................................................................................................................................9Membrane switch navigation .............................................................................................................................. 10Technical service card .......................................................................................................................................... 11
INSTALLATION AND START-UP ..................................................................................................... 12Positioning............................................................................................................................................................... 12Machine startup procedure ................................................................................................................................ 12Fill ingredient canisters ........................................................................................................................................ 13
OPERATION ................................................................................................................................................. 14Dispensing drinks in a cup .................................................................................................................................. 14Dispensing drinks in a jug .................................................................................................................................... 15
CLEANING PROGRAM ......................................................................................................................... 16Automatic rinsing of the mixing bowl .............................................................................................................. 16Automatic cleaning of dispenser valves ........................................................................................................... 17
CLEANING AND CARE ........................................................................................................................ 18Disassemble mixing system ................................................................................................................................ 18Wash these parts .................................................................................................................................................. 19Reassemble mixing system ................................................................................................................................ 19Failure message ...................................................................................................................................................... 20Storage / Transport ............................................................................................................................................... 20Exterior cleaning ................................................................................................................................................... 21
WARNING MESSAGE SHOWN ON DISPLAY ...................................................................... 22
PROGRAMMING ....................................................................................................................................... 23Activate programming with smart card ........................................................................................................... 23Buttons function .................................................................................................................................................... 23Main menu .............................................................................................................................................................. 24Clean machine ....................................................................................................................................................... 25Counters ................................................................................................................................................................. 26

CAFÉ ELITE
3
CONTENT
Beverage setup, Strength and Volume ............................................................................................................... 28Beverage setup, Drink Settings and Enable Beverages .................................................................................. 29Beverage setup, Water and Recipe Bank .......................................................................................................... 30Jug setup .................................................................................................................................................................. 31Calibration .............................................................................................................................................................. 32Machine settings .................................................................................................................................................... 33Language setup and set time & day ................................................................................................................... 34Hardware Test ....................................................................................................................................................... 35Factory Reset ......................................................................................................................................................... 37Expert settings ....................................................................................................................................................... 37Time schedule ........................................................................................................................................................ 38
DIMENSION SKETCH ............................................................................................................................. 39
EXPLODED VIEW ...................................................................................................................................... 40Door ........................................................................................................................................................................ 40Machine 1 ................................................................................................................................................................ 42Machine 2 ................................................................................................................................................................ 44Tank .......................................................................................................................................................................... 46Mixing system and outlet .................................................................................................................................... 48Canister ................................................................................................................................................................... 50
CIRCUIT DIAGRAM ................................................................................................................................. 52High Current .......................................................................................................................................................... 52High Current 3-phase .......................................................................................................................................... 53IO-Board Outputs ................................................................................................................................................ 54Ucmerisc and IO-pay board ............................................................................................................................... 55
IMPORTANT!INFO.
CAUTION!INFO.
More INFO. INFO.
Some important information may appear in textboxes seen below
Note

CAFÉ ELITE
4
GENERAL
Read the user guide before using the machine. This guide contains important instructions for
proper and safe use of the vending machine.
Always keep this guide close at hand for future reference.
Introduction
Thank you for choosing a Café Elite vending machine. We hope you enjoy it !
Never immerse the machine, plug or mains cable in water because there is a danger of electric shock.
The appliance is not intended for use by persons (including children) with reduced physical, sensory or mental capabilities, or lack of experience and knowledge, unless they have been given supervision or instruction concerning the use of the appliance by a person responsible for their safety.
Children should be supervised to ensure they do not play with the appliance.
Do not use the machine if the mains cable, plug is damaged or the machine has fallen down.
If the mains cable is damaged it must be replaced by the manufacturer, service agent or similarly qualified persons in order to avoid a hazard.
Only plug the machine into a properly installed earthed safety socket whose line voltage matches the technical data for the machine.
Do not use the machine outdoors so it can be exposed to weather (rain, snow, frost). It will cause material damage to the machine.
Do not try to open the machine or repair it in any way. To avoid danger only have the machine repaired in a technical workshop, Service Centre or by a qualified person.
Remove the mains cable from the socket when the machine is not in use for longer periods. To do this, pull the plug not the cable.
This appliance must be placed in a horizontal position which is resistant to any water that may leak.
Place the machine out of the reach of children. Position the mains cable so that people cannot
trip over it. Keep it away from sharp edges and heat sources.
The new hose-sets supplied with this appliance are to be used, old hose-sets must not be re-used.
This appliance is not suitable for installation in an area where a water jet could be used.
This appliance must not be cleaned by a water jet.
This appliance is intended to be used in household and similar applications such as:
- Staff kitchen areas in shops. - Offices and other commercial working
environments. - On agricultural estates. - By clients in hotels, motels and other
residential type environments. - Bed and breakfast type environments.
For the optimal performance of the machine these parameters shall not be exceeded:
- Maximum permissible inlet water pressure : 800KPa (8Bar)
- Minimum permissible inlet water pressure: 200KPa (2Bar)
- Maximum working temperature: 40°ºC - Minimum working temperature: 10°ºC
Warnings
Precautions
Intended use

CAFÉ ELITE
5
GENERALFacts & weight
MODEL/NAME CAFÉ ELITE II CAFÉ ELITE III CAFÉ ELITE IV
Built-in grinder None None None
Function for selecting jug Yes Yes Yes
Drink options 8 8 8
Ingredient canister 2 3 4
Bean hopper None None None
Brewing mechanism None None None
Cleaning function by smart card Yes Yes Yes
Electronic temperature control Yes Yes Yes
Adjustable coffee strength Yes Yes Yes
Illumination of cup during brewing None None None
Base cabinet: large grounds container None None None
Energy saving mode Yes Yes Yes
Height, Width, Depth 735, 310, 515mm 735, 310, 515mm 735, 310, 515mm
Tank volume 5Litres 5Litres 5Litres
Power supply220-230VAC
50/60Hz/2200W
220-230VAC
50/60Hz/2200W
220-230VAC
50/60Hz/2200W
Cold water connection½” External
thread½” External
thread½” External
thread
Water purification filter None None None
MODEL/NAME WEIGHT
Café Elite II 30kg
Café Elite III 30kg
Café Elite IV 30kg

CAFÉ ELITE
6
COFFEE
WHITE COFFEE
ESPRESSO
CAPPUCCINO
HOT CHOCOLATE
MILK CHOCOLATE
MOCHACINO
HOT WATER
OVERVIEW OF COMPONENTSFront exterior
Smart Card Reader
Drink Buttons
Display
Key Switch (Enable Jug Mode)
Strength Adjustment
Door Lock
Outlet Hot Drinks
Drip Tray Insert
Drip Tray

CAFÉ ELITE
7
OVERVIEW OF COMPONENTSFront interior of Elite II
Ingredient Canisters
Mixing System
Service lid(for emptying water tank)
Power Switch
Outlet Hot Drinks
Ingredient canisters
DETAIL INGREDIENTS WIDTH DEPTH HEIGHT CAPACITY CUPS/UNIT
Canister Coffee 137mm 335mm 225mm 5.4L ~675 cups
Canister Topping 137mm 335mm 225mm 5.4L ~540 cups

CAFÉ ELITE
8
OVERVIEW OF COMPONENTSFront interior of Elite III
Ingredient Canisters
Mixing System
Service Lid(For emptying water tank)
Ingredient canisters
Power Switch
Outlet Hot Drinks
DETAIL INGREDIENTS WIDTH DEPTH HEIGHT CAPACITY CUPS/UNIT
Canister Coffee 137mm 335mm 225mm 5.4 L ~675 cups
Canister Chocolate 67mm 335mm 225mm 2.7 L ~135 cups
Canister Topping 67mm 335mm 225mm 2.7 L ~270 cups

CAFÉ ELITE
9
OVERVIEW OF COMPONENTSFront interior of Elite IV
Ingredient Canisters
Mixing System
Service lid(for emptying water tank)
Power Switch
Outlet Hot Drinks
Ingredient canisters
DETAIL INGREDIENTS WIDTH DEPTH HEIGHT CAPACITY CUPS/UNIT
Canister Coffee 67mm 335mm 225mm 2.7 L ~338 cups
Canister Espresso 67mm 335mm 225mm 2.7 L ~600 cups
Canister Chocolate 67mm 335mm 225mm 2.7 L ~135 cups
Canister Topping 67mm 335mm 225mm 2.7 L ~270 cups

CAFÉ ELITE
10
OVERVIEW OF COMPONENTSMembrane switch navigation
Button functions
Press the MINUS button if you want to decrease a value or go back in the menu.
Press the BACK button if you want to leave the submenu and go back in the menu.
Press the ENTER button to select a menu function, confirm a set value or a setting. Confirm the new setting by pressing the E-button.
Press the STOP button if you want to return to the start menu.To activate Energy Saving Mode press and hold the STOP button for 5 seconds. Display will show Energy Saving Mode.To return to normal mode press and hold the STOP button for 5 seconds while the machine is in energy saving mode.
Press the PLUS button if you want to increase a value or go forward in the menu.
the machine switches off the front display and decreases the temperature in the water tank to 65ºC. ENERGY SAVING MODE
E
EE

CAFÉ ELITE
11
COFFEE
WHITE COFFEE
ESPRESSO
CAPPUCCINO
HOT CHOCOLATE
MILK CHOCOLATE
OVERVIEW OF COMPONENTSTechnical service card
Insert the technical service card with the chip facing towards the back of the machine. (See fig.A)
Technical service card is used for example cleaning of the machine and change different settings.
The smart card is supplied by your dealer.
The display will show the Service Menu, Clean Machine and you can now browse forwards through the menu.
To use the machine again remove the technical service card and store it in a safe place.
Service MenuClean Machine
A

CAFÉ ELITE
12
INSTALLATION AND START-UP
Positioning
Machine startup procedure
minimum 10cm
Place the machine on a flat horizontal surface that will support the weight of the machine.
Connect the electrical plug to a separate grounded wall socket.
Make sure air is able to circulate behind the machine (minimum 10cm).
Note
Connect the water to the top cabinet on the machine.
Connect the supplied water hose to the cold water connection using a ½’’ R-connection. When pushing the machine into position make sure there is no interference to the hose to ensure proper water flow.
If the inlet hose is new, flush the system with water first to remove copper shavings. These can damage the inlet valve.
The new tube set supplied with the appliance must be used. Old tubes may not be re-used. Connection to a closable valve is recommended.
Min. water pressure; 2 bar (200kPa). Max. water pressure: 8 bar (800kPa). Open the water tap.
Connect the mains cable to the machine (A) and insert the plug to a earthed wall socket. Switch on the power switch on the rear of the machine. See figure.
The display indicates Low Water LevelPress Enter Key Press the E button.
The water tank will now automatically fill with 5 litres of water. The element will not be powered until the water reaches the level sensor.
Set temperature is 85º Celsius. Once the water heating is complete “Low temp” text will disappear from the display. (The display text
will start to rotate between these two screens COFFEE QUEEN and AT YOUR SERVICE )
A

CAFÉ ELITE
13
INSTALLATION AND START-UP
Fill ingredient canisters
Open the door.
Reassembly canisters. When placing the ingredient canisters, Ensure
that the openings of the canister chutes point down toward the mixing bowl (B).
01 02
B B
Remove the ingredient canisters to avoid spilling in the machine and fill with ingredients . When filling the ingredients, keep the opening of the canister chute upwards (A).
03
A

CAFÉ ELITE
14
OPERATIONDispensing drinks in a cup
Place a cup under the outlet for hot drinks. (See fig. A)
The strength of the drink is set to default. If you would like to increase or decrease the strength then follow the steps in the section below.
Stronger drink, Press the button
or
Weaker drink, Press the button
Choose drink.
The display shows: Please wait... and the cup light goes on.
Wait until the cup light switches off and the text Please wait...
has disappeared from the display before removing the cup.
COFFEE
WHITE
COFFEE
ESPRESSO
CAPPUCCINO
HOT CHOCOLATE
MILK
CHOCOLATE
MOCHACINO
HOT WATER
EE
A

CAFÉ ELITE
15
OPERATIONDispensing drinks in a jug
Turn key switch to enable jug mode. (See fig. A)
Place a jug under the outlet for hot drinks.
The strength of the drink is set to default. If you would like to increase or decrease the strength then follow the steps in the section below.
Stronger drink, Press the button
or
Weaker drink, Press the button
Choose drink.
Wait until the cup light switches off and the message Please wait...
has disappeared from the display before removing the jug.
You can abort the jug process by pressing STOP button any time during the process, it will finish the drink in process before complete stop.
Turn back the key switch to its original position to exit jug mode.
EE
Key Switch
A

CAFÉ ELITE
16
COFFEE
WHITE COFFEE
ESPRESSO
CAPPUCCINO
HOT CHOCOLATE
MILK CHOCOLATE
EE
CLEANING PROGRAM
Repeat the cleaning procedures 2-3 times to get a better cleaning effect.Note
A
Daily cleaning
Automatic rinsing of the mixing bowl
Cleaning means rinsing with water and rotating the whipper.
Cleaning of the mixing bowl should be performed once per day.
Put a container that holds at least 0.5 litres under the outlet for hot drinks.
Insert smart card in the card reader (A).
Move through the menu until the display shows Service MenuClean Machine
Press the E button.
Move through the menu until the display shows Service MenuClean Mixer
Press the E button.
The machine will now clean the mixing bowls for 5 seconds.
Remove smart card.

CAFÉ ELITE
17
COFFEE
WHITE COFFEE
ESPRESSO
CAPPUCCINO
HOT CHOCOLATE
MILK CHOCOLATE
Repeat the cleaning procedures 2-3 times to get a better cleaning effect.Note
Put a container under outlet for hot drinks.
Insert smart card in the card reader (A).
Move through the menu until the display shows Service MenuClean Machine
Press the E
button.
Move through the menu until the display shows Service MenuClean Valves
Press the E button.
Dispenser valves will now start to open and close with 3 pulses/second for a max of 6 seconds. Repeat the procedure 2 - 3 times.
Remove smart card.
CLEANING PROGRAMDaily cleaning
Automatic cleaning of dispenser valves
EE
A
Cleaning entails that the valves “knock” off any lime scale and other particles that may get stuck in the cylinders and flushing them with water.

CAFÉ ELITE
18
Weekly cleaning
CLEANING AND CARE
Disassemble mixing system
Turn the mounting plate lever anticlockwise.
Loosen or take out canisters and pull out the outlet hose.
Loosen the mixing bowl by pulling it straight out.
Loose the whipper by pulling it straight out.
Loosen the mounting plate. Turn the lever anticlockwise, until it stops.
Reassembling mixing systemSee the next page
Pull the mounting plate straight out.
05
04
01
03
06
02

CAFÉ ELITE
19
Weekly cleaning
CLEANING AND CARE
Reassemble mixing system
The flat side of the whipper shaft must correspond with the marked arrow on the whipper.
To fit the whipper push onto the shaft until a click sound can be heard. It is only possible to assemble the whipper in one way.
Fix the mixing bowl and condensation trap. Push-fit the mixing bowl and fix with lever.
Connect the outlet hose.
Ensure that all water hoses have been connected and fitted.
Check all seals (red) before reassembly of parts.
All parts must be dry before reassembly.
0201
03
04
A
Wash these parts
Mixing bowl Condensation trap Mounting plate Whipper Clean with a moist cloth and wipe dry.
Note

CAFÉ ELITE
20
Failure message
Storage / Transport
CLEANING AND CARE
Display shows Water Level Low
Press Enter Check if water tap is open.
Then press the E button.
Display shows normal, but no drink is coming. Possible cause of failure: Mechanical stop in the ingredients canisters or mixer unit.
Action: Try to find the cause of failure. Clean the mixer system and try again.
Turn off the switch, pull out the electric plug and close incoming water tube.
Long machine storage at temperatures below 0ºC can cause damage of the machine.
Empty all the water in the machine by opening the service lid between the mixer bowls. Pull out the hose, remove the plug and let all water pour out. Reassemble the plug and lid.
Failure messages which can mostly be corrected without any help from service company
Preparation for transportation or long term storage
Water Level LowPress Enter

CAFÉ ELITE
21
Exterior cleaning
CLEANING AND CARE
Cleaning the outside Use a soft rag and liquid cleaning agent to prevent scratches.
To be washed as needed Drip tray and drip tray insert should be washed by hand in ordinary dishwater. Do not wash in a dish washing machine!
The machine must not be covered with or immersed in water.Note

CAFÉ ELITE
22
WARNING MESSAGE SHOWN ON DISPLAY
Message on display Indication
Not Available
Heating Water Please Wait...
Low Water Level Press Enter Key
Filling Water Please Wait...
Temperature
Energy Saving Mode
Warning Low Temperature
Low TemperatureBlocked
Empty Drip Tray
Overcurrent
Error:Water Supply
Error:Water Level Pins
Bev. Disabled
Please Wait
Door Open
Error:Temp.Sensor
Error:Check Heater
Drink can not be selected as pot.
Low temperature in the water tank, the machine is heating up (blocked).
Low water level in water tank. Press enter key to start filling up the water tank.
The machine is filling water.
Shows actual temperature in water tank
The machine is in energy saving mode.
Temperature is low, it is still possible to dispense drink.
Temperature is low, the machine is blocked.
The drip tray is full of water.
Overcurrent, some component is using to much current, try to locate the component and replace it.
The water has not reached the correct level in the water tank.Check the water tap, restart the machine.
Check the level sensor, cable failure, level pins connected incor-rect, too much scale or residue on the level pins.
The drink has been disabled
Shows when drink is dispensing
The door is open, Close door to proceed.
Tempsensor damaged, faults in cables
Solid state defect, heater defect. Output on 1/0 boardvv is defect.

CAFÉ ELITE
23
PROGRAMMING
Activate programming with smart card
Buttons function
Insert the technical service card in the card reader(A).
Display shows Service MenuClean Machine
ACOFFEE
WHITE COFFEE
Press this button if you wish to leave the submenu and return to the main menu.
Press the ENTER button if you want to enter a menu, alter the value or a setting.
Alter a value by pressing the or button.
Confirm the new setting by pressing the E-button.
Press this button if you wish to increase a value or step forward in the menu.
Press this button if you want to reduce a value or go back in the menu.
Press the STOP button if you wish to return to the service menu.
E
Values displayed in this section as ### is fixed values for display.Values displayed in this section as <XXX> can be changed.
Note

CAFÉ ELITE
24
PROGRAMMING
Overview
Service MenuClean Machine
Service MenuCounters
Service MenuBeverage Setup
Service MenuJug Setup
Service MenuCalibration
Service MenuMachine Settings
Service MenuLanguage Setup
Service MenuSet Time/Day
Service MenuHardware Test
Service MenuFactory Reset
Service MenuExpert Settings
Service MenuTime Schedule
Display shows
Press
Main menu

CAFÉ ELITE
25
PROGRAMMING
Perform cleaning of the machine.
Service MenuClean Machine
Service MenuClean Machine
Select CleaningMixer System
Select CleaningClean Valves
Machine starts cleaning mixer system. The display will show ”Mixer System” during cleaning.
Machine starts cleaning valves. The display will show ”Clean Valves” during cleaning.
Press E
Press E
Press E
Press Press
Clean machine

CAFÉ ELITE
26
PROGRAMMING
Service MenuCounters
Service MenuCounters
CountersBeverages
Beverage CountersPer Beverage
Beverage CounterTotal Served
Beverage CounterMaster Total
Beverage CounterClear Counters
Drink 1Served xxx
Total BeveragesServed xxx
Master TotalServed xxx
Hold Enter toClear Counters
Change ESCAPEto Back
Drink 2Served xxx
Press E
Continue through the menu to browse through the counter for all the drinks.
Press E
Press E
Press E
Press E
Hold ENTER key for 3 seconds
E
Press
Press
Press
Press
Press
Counters
See the counter of each drink or total counters for all drinks. It’s also possible to reset the drink counters.

CAFÉ ELITE
27
Press E
Press E
Press E
CountersClean Counter
CountersWater Filter
PROGRAMMING
Clean CounterTotal xxx
Water FilterReset Water Filter
Reset? NO/YESMonths Left 6
Water FilterInterval <X>
Step forwards in the menu press
Water Filter: Confirm with ENTER
Set interval value: Confirm with ENTER
E
E
Press
Press
Press
See the number of times cleaning has been performed or reset the clean counter.
Counters
Service MenuCounters

CAFÉ ELITE
28
PROGRAMMING
Change strength and volume of the different drinks.
Beverage SetupStrength
Beverage SetupStrength
Beverage SetupVolume
Drink 1Strength # #%<±X>
Drink 1Volume # #%<±X>
Drink 2Strength # #%<±X>
Drink 2Volume # #%<±X>
EE
E
E
E
E
E
Change drink strength value.Confirm with ENTER
Change drink volume value.Confirm with ENTER
Change drink strength value.Confirm with ENTER
Change drink volume value.Confirm with ENTER
Continue through the menu to browser through the strength setup for all the drinks
Continue through the menu to browser through the strength setup for all the drinks
Press
Press
Press
Press
Press
Press
Press
Press
Press
Press
Press
Press
Press
Beverage setup, Strength and Volume

CAFÉ ELITE
29
Change drink settings and disable drinks.
PROGRAMMING
Beverage SetupDrink Settings
Beverage SetupDrink Settings
Beverage SetupEnable Beverage
Drink 1
Drink 2
Drink 1Ingredient ##%<±X>
Drink 2Ingredient ##%<±X>
Drink 1Enable Bev <on/off>
Drink 2Enable Bev <on/off>
EE
E
Change drink ingredient value.Confirm with ENTER
Change drink ingredient value.Confirm with ENTER
Enable or disable drink with ON/OFF settings.Confirm with ENTER
Enable or disable drink with ON/OFF settings.Confirm with ENTER
Continue through the menu to browser through the strength setup for all the drinks
Continue through the menu to browser through the strength setup for all the drinks
Press E
Press E
Press E
Press
Press
Press
Press
Press
Press
Press
Press
Press
Press
Drink settings are only available for mixed drinks
Beverage setup, Drink Settings and Enable Beverages

CAFÉ ELITE
30
PROGRAMMING
Beverage SetupRecipe Bank
Beverage SetupWater <On/Off>
Beverage SetupWater <On/Off>
Key#ZZ R#XXX<Drink 1 name>
Key#ZZ R#XXX<Drink 2 name>
EE
E
E
Choose which drink key (key #ZZ) that should be related to which recipe (R#YYY) in the recipe bank. Confirm with ENTER
Choose which drink key (key #ZZ) that should be related to which recipe (R#YYY) in the recipe bank. Confirm with ENTER
Enable or disable water with ON/OFF settings.Confirm with ENTER
Continue through the menu to browser through the strength setup for all the drinks
Turn the water ON/OFF and enter recipe bank.
Press
Press
Press
Press
Press
Press
Press
Press
Beverage setup, Water and Recipe Bank

CAFÉ ELITE
31
Change the number of cups for standard jug.
Service MenuJug Setup
Service MenuJug Setup
Jug SetupDefault Cups <X>
Jug SetupMax Cups
PROGRAMMING
EE
E
Choose the amount of cups to be used as standard when you enter jug mode.Confirm with ENTER
Choose the maximum allowed amount of cups to be used when brewing into a jug, Value set here rules the maximum allowed cups in “Defaut cups“ choice above.Confirm with ENTER
Press
Press
Press Press
Press
Press
Jug setup

CAFÉ ELITE
32
Change calibration settings of the machine.
Service MenuCalibration
Service MenuCalibration
Boiler 0CTemp: ## Cal:<±XX>
CalibrationValves
CalibrationBoiler Temp
Select ValveHWater M1
Select ValveHWater M2
Select ValveHWater
HWater-M1 ###mlVerify Valve
HWater-M1 ###mlCalibration Valve
HWater-M1Verify: ###ml
HWater-M1Volume:<xxx>ml
Press E
Press
E
Press
E
Press
E
Press
E
Press
E
PROGRAMMING
Water will dispense from the outlet valve nr 1
Water will dispense from the outlet valve nr 1. Measure the actual volume in a measurement cup and enter actual water volume.Confirm with ENTER and go back to “Verify Valve“ to verify volume.
set offset temperature for tank water temperature.Confirm with ENTER
Press
Press Press
Press
Calibration

CAFÉ ELITE
33
Change different machine settings.
Service MenuMachine Settings
Service MenuMachine Settings
PROGRAMMING
Machine SettingsHeater Temp
Machine SettingsWarning Temp <XX>
Machine SettingsFanldleSpeed <On/Off>
Machine SettingsFan Run Time
Machine SettingsUse Driptray<On/Off>
Machine SettingsStandby Mode<A/B>
Machine SettingsDry Soldout
Set Heater Temp Heater
Fan Run Time<XX:XX>
Heater Idle Temp <XX>ºC
Heater Prio Temp <XX>ºC
Press
E
Press
E Confirm with ENTER
Confirm with ENTER
Set warning temperatureConfirm with ENTER
Set fan idle speed On/Off Confirm with ENTER
Set use trip dray On/OffConfirm with ENTER
Set standby mode A/BConfirm with ENTER
Set fan run timeConfirm with ENTER
E
E
E
E
E
EE
Press
Press Press
Press
Press
Press
Press
Press
Press
Press Press
Press
Press
Press
Machine settings

CAFÉ ELITE
34
Set languageConfirm with ENTER
Set timeConfirm with ENTER
Set weekdayConfirm with ENTER
E
E
E
Change language or update time/day.
Service MenuLanguage Setup
Service MenuLanguage Setup
Service MenuSet Time/Day
PROGRAMMING
Language SetupUser Language
Set Time/DaySet Time
Set Time/DaySet Weekday
User Language<Active language>
Set Time<XX:XX>
Set Weekday<Active>
Press
E
Press
E
Press
E
Press
E
Press
E
Press
Press
Press
Press
Press
Press
Language setup and set time & day

CAFÉ ELITE
35
Test different components in the machine.
Service MenuHardware Test
Service MenuHardware Test
PROGRAMMING
Hardware TestHWater - M1 0
Hardware TestHWater - M2 0
Hardware TestBrewlamp 0
Hardware TestHWater 0
Hardware TestCanister 1 0
Hardware TestCanister 2 0
Hardware TestCanister 3 0
Press
E E
E
E
E
E
E
E
Pressing ENTER will open/close outlet valve 10 = valve closed; 1= valve open
Pressing ENTER will open/close outlet valve 20 = valve closed; 1= valve open
Pressing ENTER will turn the brew lamp on and off0 = lamp off; 1= lamp on
Pressing ENTER will open/close outlet valve 20 = valve closed; 1= valve open
Pressing ENTER will start/stop canister motor 10 = motor off; 1= motor on
Pressing ENTER will start/stop canister motor 10 = motor off; 1= motor on
Pressing ENTER will start/stop canister motor 10 = motor off; 1= motor on
Press
Press
Press
Press
Press
Press
Press
Press
Press
Press
Press
Press
Press
Press
Hardware Test

CAFÉ ELITE
36
Hardware TestCanister 4 0
Hardware TestFan 0
Hardware TestHeater 0
Hardware TestLevelSens 0
Hardware TestMix Motor1 0
Hardware TestMix Motor2 0
Hardware TestTray Sensor 0
PROGRAMMING
E
E
E
E
E
Pressing ENTER will start/stop canister motor 10 = motor off; 1= motor on
Pressing ENTER will start/stop the fan0 = fan stopped; 200= fan at full speed
Shows current temperature in boilerHeater XX0C
Show status of level sensors signal0= Tank empty1= Level low triggerd3= Tank full
Pressing ENTER will will start/stop mixer motor 10 = motor off; 200= motor at full speed
Pressing ENTER will will start/stop mixer motor 10 = motor off; 200= motor at full speed
Connecting the springs together for the drip tray sensor to change value0= Drip tray not full1= Drip tray full
Press
Press
Press
Press
Press
Press
Press
Press
Press
Press
Press

CAFÉ ELITE
37
Test expert settings of the machine.
PROGRAMMING
Service MenuExpert Settings
Service MenuExpert Settings
Expert SettingsHeater<On/Off>
Expert SettingsOpen Inlet Valve
Expert SettingsOpen Valves
Open ValvesValves<Closed/Open>
Open Inlet ValveHWater In <0/1>
Press
E
Press
E
Press
E
Press ENTER will open/close all the valves
Press ENTER will turn on the heater for 10 seconds
Press ENTER will turn on/off the inlet valve0= inlet valve off;1= inlet valve open
Press
Press
Expert settings
How to perform a factory reset of the machine.
Factory Reset
Service MenuFactory Reset
Service MenuFactory Reset
Reset and HoldENTER to Reset
Press
EPress ans hold ENTER for 3 secondsMachine will go back to factory settings and reboot
Press
Press

CAFÉ ELITE
38
Continue through the menu to browse through all the settings for each week day
How to setup a schedule for energy mode and cleaning.
Service MenuTime Schedule
Service MenuTime Schedule
Scheduled TasksEnergy Mode
Scheduled TasksClean Mixer
Clean Mixer0All<XX:XX XX:XX >
Energy Mode 0Mon<XX:XX XX:XX >
Energy Mode 1Tue<XX:XX XX:XX >
Clean Mixer 1All<XX:XX XX:XX >
PROGRAMMING
Press
Press
Press
Press
PressPress
Press
E
EE
Time schedule

CAFÉ ELITE
39
DIMENSION SKETCH
Café Elite
A
B C
Model A B C
Café Elite II 735mm 310mm 515mm
Café Elite III 735mm 310mm 515mm
Café Elite IV 735mm 310mm 515mm

CAFÉ ELITE
40
EXPLODED VIEWDoor
Drawing
01
02
03 04
16
13
14
08
09
10
11
0506
15
07
12

CAFÉ ELITE
41
EXPLODED VIEWDoor
Spare parts list
POS. PCS Part No. Description
01 1 1202551 Key switch
02 1 1665009 Left overlay
03 1 1665002 Middle printing film
04 1 1665001 Membrane switch
05 1 710028 LED complete
06 1 180115 Guide pin, door
07 1 710556 PCB UC and display 2x16 complete
08 1 1604119 Battery CR 1220 3V
09 4 1604113 Spacer for UC merisc
10 1 1604117 PCB display board UC-meric
11 1 1604122 Display 2x16
12 1 1602697 Card reader
13 1 1605401 Grommet
14 1 1660009 Smart card red
15 1 260067 Drip tray insert
16 1 1264007 Drip tray
CAFÉ ELITE
42
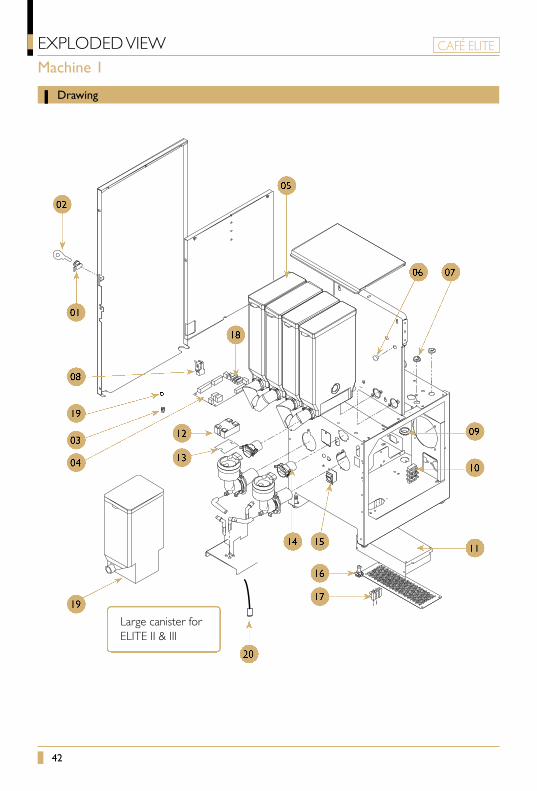
EXPLODED VIEWMachine 1
Drawing
01
02
19
08
05
18
06 07
09
10
11
17
20
16
1514
13
1203
04
19
Large canister for ELITE II & III

CAFÉ ELITE
43
Spare parts list
EXPLODED VIEWMachine 1
POS. PCS Part No. Description
01 1 120250 Key lock
02 1 120251 Key for Lock of Door
03 1 1206121 Non return valve holder
04 1 1604111 PCB main board IO-TE
05 4 1205626 Canister W67 H335
06 1 1505076 Rubber plug,10mm
07 2 120465 Rubber TPG 20.5
08 1 160841 Door microswitch
09 1 160536 Rubber TRP 30.0
10 1 1602414 Terminal block
11 1 1031652 Power supply 150W
12 1 1604203 Solid state 25A
13 1 1206581 Seal solid state
14 2 1604836 Hose adapter for mixing system
15 1 160801-04 Rocker switch
16 1 1206706 Bulkhead adaptor
17 1 1205500 Spring level sensor
18 1 1604384 Fuse 5 AT
19 1 1205630 Canister W137 H335 Complete
20 1 1608710 LED Diod

CAFÉ ELITE
44
EXPLODED VIEWMachine 2
Drawing
02
03
10
11
04
05
14
17
16
15
12
13
09
08
07
01
06
Pos 16 & 17 for machines produced after 20130501

CAFÉ ELITE
45
Spare parts list
EXPLODED VIEWMachine 2
POS. PCS Part No. Description
01 1 1561015 Over flow pipe
02 3 1206290 Outlet valve deltrol 24VDC
03 4 1604612 Motor gear 145RPM
04 4 1604614 Drive shaft 16mm
05 1 1604351 Fuse assembly
06 1 1604179 Fan holder
07 1 1505042 Inlet hose with connect
08 1 160565 Power cord Europe 16A/230V
09 1 160570 Main socket
10 1 220220 High limit switch
11 1 1263501 Water tank 5L complete
12 1 1206371 Single valve 2.5L 24VDC
13 1 1403401 Inlet valve plug
14 1 1604171 Fan 24VDC
15 1 1604174 Fan connection tube
16 1 1604151 Centrifugal Fan 24V 0.24A RBH7530B2
17 1 1561055 Air Flow Tube Cafe Elite

CAFÉ ELITE
46
Drawing
EXPLODED VIEWTank
2214
21
1918
23 15
07
08
09
10
12
13
16
24
33
17
3231
27
25
28
30
29
26
06
20
11
03
01
04
05
02

CAFÉ ELITE
47
EXPLODED VIEW
POS. PCS Part No. Description
01 1 1401101 Nut M3 SS A2
02 1 1461008 Spring washer M3
03 1 1364026 Sensor short 60mm
04 1 1205301 Sensor long 90 mm
05 1 1605362 Double seal level sensor
06 1 1666013 Harness water level sensor
07 1 1660057 Valve coil 24V DC black
08 1 1660058 Valve metal plunger and spring
09 1 1501193 valve silicone plunger
10 1 1660060 Valve upper body
11 1 1206452 O-ring adjustment screw
12 1 1206451 Valve body o-ring
13 1 1660062 Valve lower body
14 1 260851 SS clamp holder left
15 1 260852 SS clamp holder right
16 1 220220 High limit switch
17 1 1561014 Inlet pipe tank
18 1 250433 Tank washer
19 1 1402003 Screw M4 x 16mm
20 1 260144 Tank lid fixture
21 1 1206507 Fiber washer
22 1 1561012 Seal gasket tank
23 1 1206505 Gasket for Hl switch ber 16.8x12.4
24 1 1601311 Element 2200W/230V with SS nuts
25 1 1605363 Silicone plug
26 1 1561015 Overflow pipe
27 2 160538_03 Plug for water outlet
28 3 1561010 Seal for outlet valve
29 1 150501 Tube silicone 8-12mm
30 1 1206290 Outlet valve black 24V
31 1 1604135 NTC thermistor
32 1 1605361 Seal for NTC
33 1 1201295 Insulation 5L tanks (black 15mm)
Spare parts list
Tank

CAFÉ ELITE
48
EXPLODED VIEWMixing system and outlet
0912
14
14
03
08 07 06 05 04 02 01
11
10
Drawing
13

CAFÉ ELITE
49
Spare parts list
EXPLODED VIEWMixing system and outlet
POS. PCS Part No. Description
01 1 1604591 Motor whipper 24V DC
02 1 1206701 Motor whipper plate
03 1 1206706 Bulkhead adaptor black
04 1 1604804 Slinger disc
05 1 1206702 Mounting plate
06 1 120638 O-ring
07 1 120655-02 Whipper shaft gasket
08 1 1206703 Whipper
09 1 1206704 Mixing bowl black
10 1 1206707 Steam trap black
11 1 7001111 Whipper motor complete
12 1 1206705 Outlet elbow mixer bowl
13 3 1201411 Angle of outlet
14 2 1031501 Elbow tube

CAFÉ ELITE
50
EXPLODED VIEWCanister
Drawing
01
02
03
04
05
09
10
06
08
07

CAFÉ ELITE
51
Spare parts list
EXPLODED VIEWCanister
POS. PCS Part No. Description
01 2 1204953 Lid for canister W67
02 3 1204715 Auger
03 3 1204776 Auger holder
04 3 1204777 Auger nut
05 2 1204722 Canister base W67
06 3 120633 Outlet
07 3 1204775 Plastic nut for auger
08 3 1204746 Agitator
09 1 120489 Canister W64 pipe destra 7cm L/H
10 1 120493 Canister W64 pipe destra 7cm R/H

CAFÉ ELITE
52
CIRCUIT DIAGRAMHigh Current

CAFÉ ELITE
53
CIRCUIT DIAGRAMHigh Current 3-phase

CAFÉ ELITE
54
CIRCUIT DIAGRAMIO-Board Outputs
HO
T W
ATER
M
IXER
2

CAFÉ ELITE
55
CIRCUIT DIAGRAMUcmerisc and IO-pay board

Your Dealer
FOR SERVICEPlease contact your dealer
www.creminternational.com
For the warranty to be valid the conditions for maintenance must have been followed according to our instructions, proper precaution has been made and warranty claim been issued without delay.
The affected equipment may not be used during awaiting service if there is any risk that the damage or defect would worsen.
The warranty will not cover consumption supplies such as glassware, normal maintenance such as cleaning of filters, contaminations in water, lime, incorrect voltages, pressure or adjustment of water amounts.
The warranty will not cover damages of defects caused by incorrect handling and operation of the appliance.