CA SiteMinder® - CA Support Online - CA Technologies SiteMinder r6 0 SP6-ENU...CA Technologies...
83
Upgrade Guide r6.0 SP6/r6.x QMR6 CA SiteMinder®
Transcript of CA SiteMinder® - CA Support Online - CA Technologies SiteMinder r6 0 SP6-ENU...CA Technologies...
Upgrade Guide r6.0 SP6/r6.x QMR6
CA SiteMinder®

This documentation, which includes embedded help systems and electronically distributed materials, (hereinafter referred to as the “Documentation”) is for your informational purposes only and is subject to change or withdrawal by CA at any time.
This Documentation may not be copied, transferred, reproduced, disclosed, modified or duplicated, in whole or in part, without the prior written consent of CA. This Documentation is confidential and proprietary information of CA and may not be disclosed by you or used for any purpose other than as may be permitted in (i) a separate agreement between you and CA governing your use of the CA software to which the Documentation relates; or (ii) a separate confidentiality agreement between you and CA.
Notwithstanding the foregoing, if you are a licensed user of the software product(s) addressed in the Documentation, you may print or otherwise make available a reasonable number of copies of the Documentation for internal use by you and your employees in connection with that software, provided that all CA copyright notices and legends are affixed to each reproduced copy.
The right to print or otherwise make available copies of the Documentation is limited to the period during which the applicable license for such software remains in full force and effect. Should the license terminate for any reason, it is your responsibility to certify in writing to CA that all copies and partial copies of the Documentation have been returned to CA or destroyed.
TO THE EXTENT PERMITTED BY APPLICABLE LAW, CA PROVIDES THIS DOCUMENTATION “AS IS” WITHOUT WARRANTY OF ANY KIND, INCLUDING WITHOUT LIMITATION, ANY IMPLIED WARRANTIES OF MERCHANTABILITY, FITNESS FOR A PARTICULAR PURPOSE, OR NONINFRINGEMENT. IN NO EVENT WILL CA BE LIABLE TO YOU OR ANY THIRD PARTY FOR ANY LOSS OR DAMAGE, DIRECT OR INDIRECT, FROM THE USE OF THIS DOCUMENTATION, INCLUDING WITHOUT LIMITATION, LOST PROFITS, LOST INVESTMENT, BUSINESS INTERRUPTION, GOODWILL, OR LOST DATA, EVEN IF CA IS EXPRESSLY ADVISED IN ADVANCE OF THE POSSIBILITY OF SUCH LOSS OR DAMAGE.
The use of any software product referenced in the Documentation is governed by the applicable license agreement and such license agreement is not modified in any way by the terms of this notice.
The manufacturer of this Documentation is CA.
Provided with “Restricted Rights.” Use, duplication or disclosure by the United States Government is subject to the restrictions set forth in FAR Sections 12.212, 52.227-14, and 52.227-19(c)(1) - (2) and DFARS Section 252.227-7014(b)(3), as applicable, or their successors.
Copyright © 2011 CA. All rights reserved. All trademarks, trade names, service marks, and logos referenced herein belong to their respective companies.
CA Technologies Product References
This document references the following CA Technologies products:
■ CA Audit iRecorder for SiteMinder®
■ CA Identity Manager
■ CA SiteMinder®
■ CA SiteMinder® Advanced Password Services
■ CA Security Command Center
Contact CA Technologies
Contact CA Support
For your convenience, CA Technologies provides one site where you can access the information you need for your Home Office, Small Business, and Enterprise CA Technologies products. At http://ca.com/support, you can access the following:
■ Online and telephone contact information for technical assistance and customer services
■ Information about user communities and forums
■ Product and documentation downloads
■ CA Support policies and guidelines
■ Other helpful resources appropriate for your product
Provide Feedback
If you have comments or questions about CA Technologies product documentation, you can send a message to [email protected].
If you would like to provide feedback about CA Technologies product documentation, complete our short customer survey, which is available on the CA Support website at http://ca.com/docs.

Contents 5
Contents
Chapter 1: Planning Migration and Upgrades 7
How to Distinguish Between Migration and Upgrade .................................................... 7
How to Plan a Migration Strategy .................................................................... 8
Analyze Your SiteMinder Environment ............................................................ 8
Manage Key Stores to Maintain Single Sign-on .................................................... 10
Plan a Recovery Strategy....................................................................... 10
Identify Which SiteMinder Components are Compatible ............................................ 11
Determine the Upgrade Path ................................................................... 12
How to Upgrade Sites that Do Not Require Single Sign–on or Failover ................................ 12
5.x to 6.x Upgrade Considerations................................................................... 12
Stage 1 ...................................................................................... 13
Stage 2 ...................................................................................... 14
Stage 3 ...................................................................................... 14
Stage 4 ...................................................................................... 14
Stage 5 ...................................................................................... 14
Upgrade 5.x to a 6.x Policy Server Clustered Environment .............................................. 14
Mixed SiteMinder Environments .................................................................... 16
Use Mixed-Mode Support ...................................................................... 17
Limitations of 5.x and 6.x Mixed Environment ..................................................... 18
6.x Policy Servers and 5.x Audit Log Databases .................................................... 22
Use Forms, SSL, and NTLM Credential Collectors in a Mixed Environment ............................. 22
Common SiteMinder Environments ................................................................. 22
Single Policy Store, Multiple Policy Servers and Web Agents ......................................... 22
Clustered Environment ........................................................................ 23
Shared User Directory Environment ............................................................. 24
Chapter 2: Upgrade Procedures from 5.x 27
Before You Upgrade from 5.x ....................................................................... 27
Back Up Your SiteMinder Environment .............................................................. 28
Maintain Session Stores for Single Sign-on in a Mixed Environment ...................................... 28
Maintain Key Stores for Single Sign-on During Upgrade ................................................. 28
Netegrity SNMP Agent Compatibility MIB Overview ................................................... 31
Enable and Disable Modes for the Netegrity SNMP Agent ........................................... 32
How to Upgrade a 5.x Policy Server and 5.x Web Agent ................................................ 33
Step 1: Upgrade the 5.x Policy Server to 6.x........................................................... 33
Important Upgrade Considerations .............................................................. 33
6 Upgrade Guide
Before You Upgrade the Policy Server ........................................................... 34
Upgrade a 5.x Policy Server on Windows ......................................................... 39
Upgrade a 5.x Policy Server on UNIX Systems ..................................................... 39
Policy Server Configuration Wizard .............................................................. 43
Upgrade a 5.x Policy Store ..................................................................... 43
Upgrade a SiteMinderAudit Log Database ........................................................ 56
Upgrade a 5.x Sample Users Database ........................................................... 57
Access the Policy Server User Interface .......................................................... 58
What to Do After Migrating the Policy Store ...................................................... 58
Step 2: Upgrade a 5.x Web Agent to 6.x .............................................................. 60
Before You Upgrade 5.x Web Agents ............................................................ 61
Upgrade a 5.x Web Agent to 6.x on a Windows System ............................................. 63
Upgrade a 5.x Web Agent to 6.x on a UNIX System ................................................. 63
Upgrade Reports ................................................................................. 63
Chapter 3: Upgrade Procedures from 6.0 65
Before You Upgrade from 6.x ....................................................................... 65
Important Considerations .......................................................................... 65
How to Upgrade the Policy Server and Web Agent ..................................................... 66
Step 1: Upgrade the Policy Server to 6.0 SP6 .......................................................... 66
Before You Upgrade the Policy Server ........................................................... 66
Upgrade a 6.x Policy Server to 6.0 SP6 on Windows ................................................ 68
Upgrade a 6.x Policy Server to 6.0 SP6 on UNIX Systems ............................................ 69
Upgrade a 6.x Policy Store ..................................................................... 70
How to Migrate a 6.x Policy Store ............................................................... 71
Step 2: Upgrade a 6.x QMRx Web Agent to 6.x QMR6 .................................................. 73
Before You Upgrade 6.x Web Agents ............................................................ 73
Upgrade a 6.x QMRx Web Agent to 6.x QMR6 ..................................................... 74
Upgrade a Session Server to 6.0 SP5 ................................................................. 74
Upgrade a SiteMinder Audit Store for a CA Security Command Center Integration .......................... 75
Appendix A: Troubleshooting 77
Remove 5.x SiteMinder Files and Directories After Uninstalling 6.x ....................................... 77
Index 79
Chapter 1: Planning Migration and Upgrades 7
Chapter 1: Planning Migration and Upgrades
This section contains the following topics:
How to Distinguish Between Migration and Upgrade (see page 7) How to Plan a Migration Strategy (see page 8) 5.x to 6.x Upgrade Considerations (see page 12) Upgrade 5.x to a 6.x Policy Server Clustered Environment (see page 14) Mixed SiteMinder Environments (see page 16) Common SiteMinder Environments (see page 22)
How to Distinguish Between Migration and Upgrade
There are differences between an upgrade and a migration of a SiteMinder environment. An upgrade consists of a series of steps that you perform on a single SiteMinder component, such as Policy Server or Web Agent. During an upgrade, you take each component offline, perform the upgrade, and bring the component online. Each component is unavailable to the others during an upgrade.
A migration is a sequence of upgrades that you perform over an extended period, while maintaining overall system availability. The key to migration is proper planning. To minimize problems, develop a migration plan before starting a migration.
Consider the following:
■ List the order in which you plan to upgrade each SiteMinder component.
■ Identify the host systems where you plan to upgrade or install SiteMinder components.
■ Identify the directory servers and databases functioning as SiteMinder data stores.
■ Determine if SiteMinder r6.0 SP6 supports the operating systems, directory servers, and databases in your environment.
Note: For more information, see the SiteMinder Platform Support Matrix.
■ Implement a recovery plan that lets you return to your original configuration if the upgrade fails. You cannot revert a migration or an upgrade. We recommend creating a back–up of the entire environment before beginning a migration.
■ Decide where to store exported policy store data files for safekeeping. Avoid overwriting or misplacing these files.
■ Decide where to import old policy store data.

How to Plan a Migration Strategy
8 Upgrade Guide
■ Create a non–production environment where you can perform a test migration. Performing a test migration lets you become familiar with the processes associated with the migration and troubleshoot issues that can compromise mission–critical resources in a production environment.
■ Develop a strategy to test the performance of each SiteMinder component.
How to Plan a Migration Strategy
In a complex SiteMinder environment, migrating to r6.0 SP6 can involve many upgrades before the migration is complete. Implementing a migration strategy is critical so that upgrades are completed efficiently, without exposing sensitive resources to security risks or down–time.
Consider the following when planning a migration strategy:
■ Site analysis
– What is the current state of your SiteMinder environment and when is the best time to upgrade each site in your environment?
– Does SiteMinder r6.0 SP6 support the operating systems, directory servers, and databases in your SiteMinder environment?
■ Recovery plan
Have you created a back–up of your SiteMinder environment in case there are upgrade problems?
■ Upgrade plan
Have you determined the order in which to upgrade components?
Analyze Your SiteMinder Environment
Analyze your SiteMinder environment to determine the complexity of your upgrade. Do this by answering the following questions:
Question Recommendation
How many Policy Server and Agents are in your environment?
Use the Policy Server audit logs to determine the number.
What are the versions of the Policy Server and Agents?
Use the Policy Server audit logs to determine the versions.
Which Policy Servers are communicating with which
Web Agents?
Use the Policy Server audit logs to determine this
information.
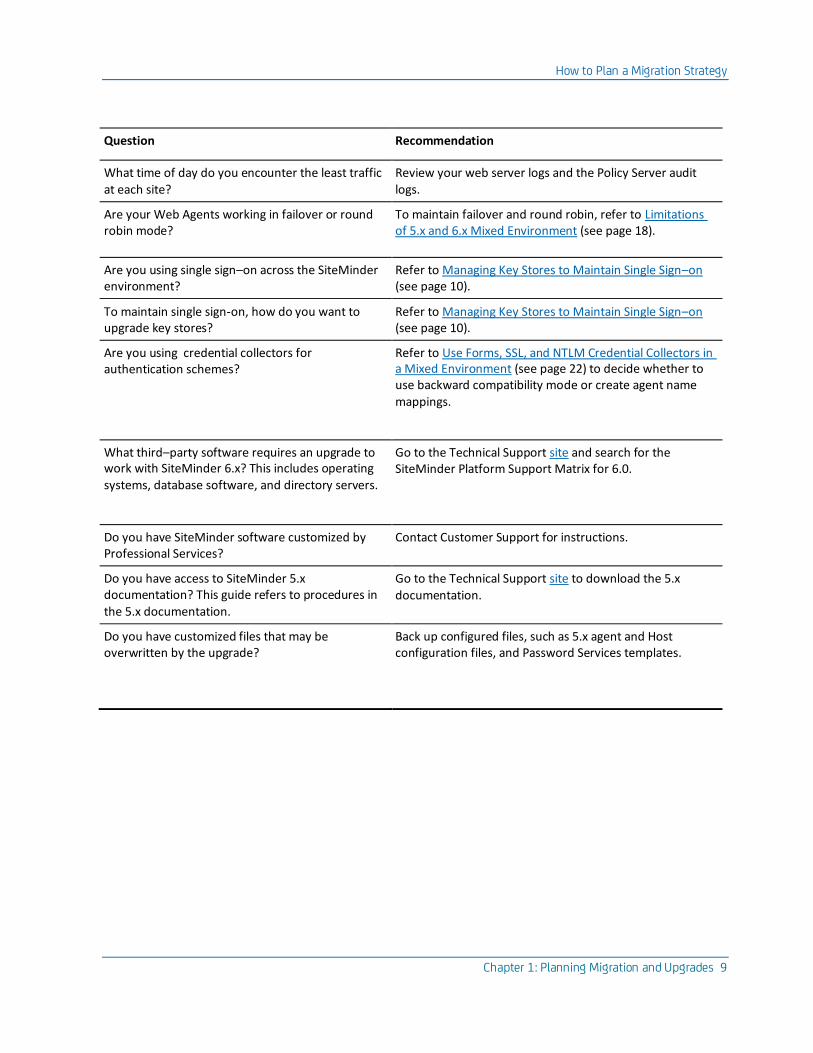
How to Plan a Migration Strategy
Chapter 1: Planning Migration and Upgrades 9
Question Recommendation
What time of day do you encounter the least traffic at each site?
Review your web server logs and the Policy Server audit logs.
Are your Web Agents working in failover or round robin mode?
To maintain failover and round robin, refer to Limitations of 5.x and 6.x Mixed Environment (see page 18).
Are you using single sign–on across the SiteMinder environment?
Refer to Managing Key Stores to Maintain Single Sign–on (see page 10).
To maintain single sign-on, how do you want to upgrade key stores?
Refer to Managing Key Stores to Maintain Single Sign–on (see page 10).
Are you using credential collectors for authentication schemes?
Refer to Use Forms, SSL, and NTLM Credential Collectors in a Mixed Environment (see page 22) to decide whether to use backward compatibility mode or create agent name
mappings.
What third–party software requires an upgrade to work with SiteMinder 6.x? This includes operating
systems, database software, and directory servers.
Go to the Technical Support site and search for the SiteMinder Platform Support Matrix for 6.0.
Do you have SiteMinder software customized by Professional Services?
Contact Customer Support for instructions.
Do you have access to SiteMinder 5.x documentation? This guide refers to procedures in
the 5.x documentation.
Go to the Technical Support site to download the 5.x
documentation.
Do you have customized files that may be overwritten by the upgrade?
Back up configured files, such as 5.x agent and Host configuration files, and Password Services templates.
How to Plan a Migration Strategy
10 Upgrade Guide
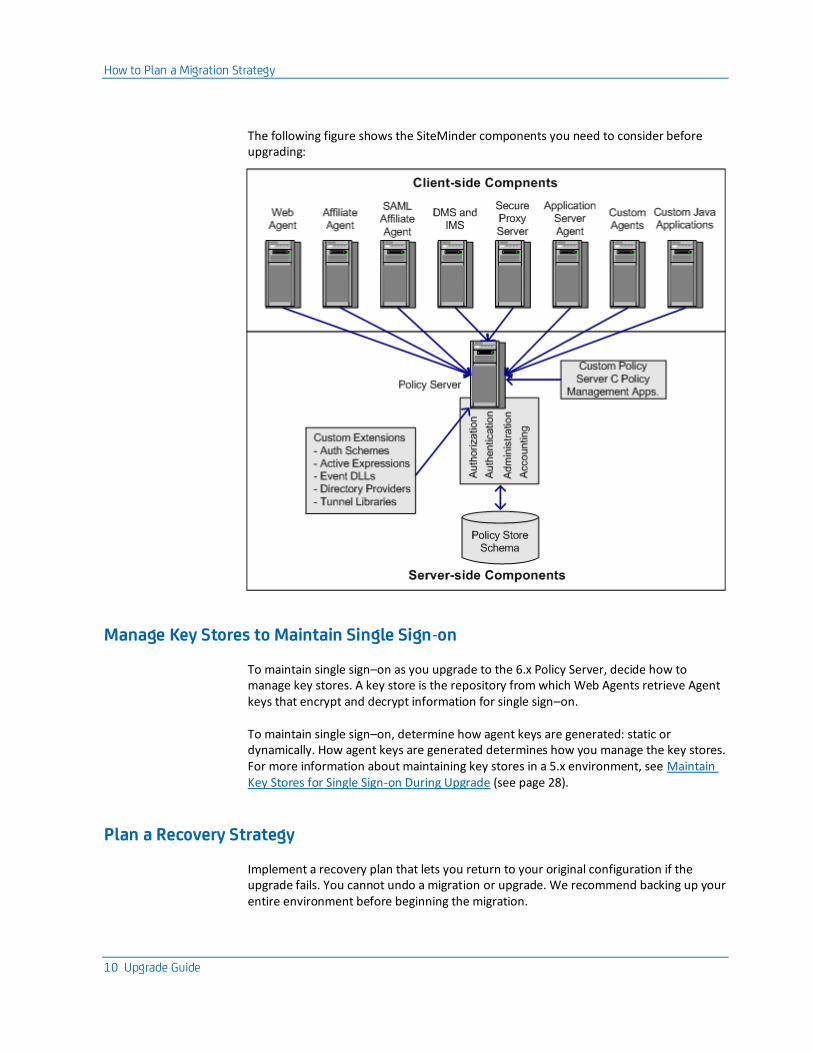
The following figure shows the SiteMinder components you need to consider before upgrading:
Manage Key Stores to Maintain Single Sign-on
To maintain single sign–on as you upgrade to the 6.x Policy Server, decide how to manage key stores. A key store is the repository from which Web Agents retrieve Agent keys that encrypt and decrypt information for single sign–on.
To maintain single sign–on, determine how agent keys are generated: static or dynamically. How agent keys are generated determines how you manage the key stores. For more information about maintaining key stores in a 5.x environment, see Maintain Key Stores for Single Sign-on During Upgrade (see page 28).
Plan a Recovery Strategy
Implement a recovery plan that lets you return to your original configuration if the upgrade fails. You cannot undo a migration or upgrade. We recommend backing up your entire environment before beginning the migration.
How to Plan a Migration Strategy
Chapter 1: Planning Migration and Upgrades 11
Important! The most complete recovery plan is to back up the entire image of each system—Policy Servers and Web Agents. We strongly recommend this method.
If you do not want to back up the entire image of each system, do the following:
■ Back up all Web Agent and Policy Server binaries. Most of these files are in the bin subdirectory where you installed the Policy Server and Web Agent.
■ Back up the Web Agent configuration file (WebAgent.conf).
If you intend to manage Agents centrally from a 6.x Policy Server, supply the Agent configuration file to the Policy Server administrator. The Administrator needs this file to create an Agent Configuration Object, which defines the Agent configuration at the Policy Server.
Note: For information about centrally managing Web Agents, see the Policy Design Guide.
■ Export the policy store in clear–text to a file using the smobjexport tool.
By exporting the store in clear–text you have a record of encrypted information, such as shared secrets. Also, having this information in a stand–alone file can be useful for future troubleshooting.
Note: If the 6.x Policy Server uses the same encryption key as the 5.x Policy Server, you do not need to export the data stores in clear–text. Using clear–text is necessary only if the 5.x and 6.x Policy Servers use different encryption keys.
For 5.x policy stores, use the appropriate 5.x version of smobjexport. Do not use the 6.x version of smobjexport to export an old policy store—it only works on 6.x policy stores.
If your key store resides in the policy store, be sure to use the -k option with smobjexport because, by default, keys are not included in the export.
For more information about using 5.x smobjexport, see the Policy Server Installation Guide for 5.x.
■ Copy the 5.x installation scripts, hot fixes, and service packs so you can re–install if necessary. If you do not have copies, download them from the Technical Support site.
Identify Which SiteMinder Components are Compatible
Determine if SiteMinder r6.0 SP6 is compatible with the operating systems, directory servers, and databases implemented in your existing SiteMinder environment.
Note: For more information, go to the Technical Support site and search for the SiteMinder Platform Support Matrix for 6.0.
5.x to 6.x Upgrade Considerations
12 Upgrade Guide
Determine the Upgrade Path
This guide details the paths for upgrading a SiteMinder environment to r6.0 SP6. An upgrade to r6.0 SP6 is supported from the following versions:
■ r5.5 SP4
■ r6.0 base and higher
The component versions in this guide include the following:
■ Policy Server and policy store upgrades from r5.x and r6.x. In this guide:
– 5.x is r5.5 SP4 CR latest.
– 6.x is r6.0, r6.0 SP1, r6.0 SP2, r6.0 SP3, r6.0 SP4, and r6.0 SP5.
■ Web Agent upgrades from r5.x and r6.x. In this guide:
– 5.x is 5.5 QMR8 latest hotfix.
– 6.x is r6.0, r6.x QMR1, r6.x QMR2, r6.x QMR3, r6.x QMR4, and r6.x QMR5.
Note: Web Agents acting as a forms or SSL credential collector must be upgraded last.
How to Upgrade Sites that Do Not Require Single Sign–on or Failover
For upgrades from 5.x, you only have to follow the upgrade paths in the previous section if you want to maintain single sign–on or failover. If single sign–on or failover is not a requirement, you can do the following:
1. Install an r6.0 SP6 Policy Server—a new installation, not an upgrade.
2. Configure an r6.0 SP6 policy store.
3. Export the 5.x policy store and import it into the r6.0 SP6 policy store.
4. Uninstall SiteMinder 5.x.
Note: This process is most efficient if many 5.x sites share a policy store. However, if each site has an independent policy store, export each 5.x policy store and import it to a single r6.0 SP6 policy store when you upgrade.
5.x to 6.x Upgrade Considerations
Be aware of the following before upgrading:
■ 5.x Policy Servers can not communicate with 6.x policy stores.
■ 6.x Policy Servers can use 5.x policy stores.
■ 5.x and 6.x Policy Servers can share the same 5.x key store.
5.x to 6.x Upgrade Considerations
Chapter 1: Planning Migration and Upgrades 13
■ 5.x Web Agents can communicate with 5.x and 6.x Policy Servers.
■ To avoid possible policy store corruption, ensure that the server on which the policy store will reside is configured to store objects in UTF-8 form. For more information on configuring your server to store objects in UTF-8 form, see the documentation for that server.
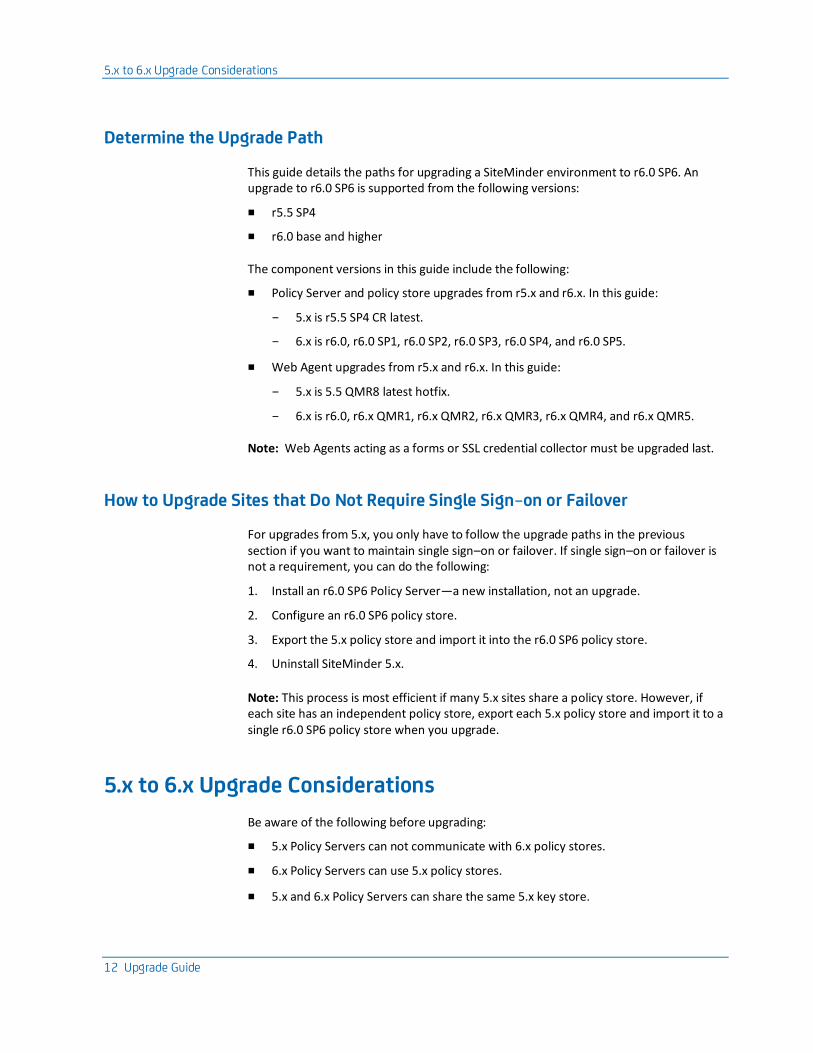
The following figure illustrates the general steps for upgrading a 5.x SiteMinder environment to 6.x.
5.x Policy
Server
5.x Policy
and Key
Store
5.x Policy
Server
Web browser
5.x Web
Agent
5.x Web
Agent
Internet
Stage 1
5.x Policy
Server6.x Policy
Server
Web browser
5.x Web
Agent
5.x Web
Agent
Internet
Stage 2
5.x Policy
Server6.x Policy
Server
Web browser
6.x Web
Agent5.x Web
Agent
Internet
Stage 3
6.x Policy
Server6.x Policy
Server
Web browser
6.x Web
Agent
5.x Web
Agent
Internet
Stage 4
5.x Policy
and Key
Store
5.x Policy
and Key
Store
5.x Policy
and Key
Store
6.x Policy
Server6.x Policy
Server
Web browser
6.x Web
Agent5.x Web
Agent
Internet
Stage 5
6.x Policy
and Key
Store
Stage 1
As noted in stage 1, all Web Agents and Policy Servers are at SiteMinder 5.x.

Upgrade 5.x to a 6.x Policy Server Clustered Environment
14 Upgrade Guide
Stage 2
1. In stage 2, using the mixed-mode, upgrade the first 5.x Policy Server to 6.x.
2. While in mixed-mode, point the 6.x Policy Server at the 5.x policy store.
3. Point the 5.x Web Agent at the 6.x Policy Server.
Stage 3
1. In stage 3, upgrade the first 5.x Web Agent to 6.x.
2. Point the 6.x Web Agent to the 6.x Policy Server.
Stage 4
1. In stage 4, while in mixed-mode, upgrade the remaining 5.x Policy Servers to 6.x.
2. Upgrade the 5.x policy stores to 6.x.
Stage 5
In stage 5, upgrade the remaining 5.x Web Agents to 6.x.
More information:
Use Mixed-Mode Support (see page 17) Before You Upgrade from 5.x (see page 27)
Upgrade 5.x to a 6.x Policy Server Clustered Environment
SiteMinder 6.x introduces the concept of Policy Server clusters to provide for increased availability and ease of configuration. Once clusters are defined, an Agent can transparently fail over from one cluster of Policy Servers to another, when pre-configured failover criteria are met. Dynamic Agent to Policy Server load balancing provides for maximum system throughput, at the same time allowing for Policy Server clusters to be assembled from a heterogeneous mix of system hardware. After upgrading from 5.x to 6.x, the Policy Server supports both non-clustered and clustered environments.

Upgrade 5.x to a 6.x Policy Server Clustered Environment
Chapter 1: Planning Migration and Upgrades 15
The following are general instructions on how to migrate from a non-clustered 5.x Policy Server set up to a 6.x clustered deployment. The following figure illustrates these instructions:
5.x
Policy
Server
#1
5.x
W eb Agent
Group
5.x
W eb Agent
Group
5.x
Policy
Server
#2
5.x
Policy
Server
Backup
#1
5.x
Policy
Server
#3
5.x
Policy
Server
#4
5.x
Policy
Server
Backup
#2
6.x
Policy
Server
#1
6.x
W eb Agent
Group
6.x
W eb Agent
Group
6.x
Policy
Server
#2
6.x
Policy
Server
Backup
#1
6.x
Policy
Server
#3
6.x
Policy
Server
#4
6.x
Policy
Server
Backup
#2
Cluster #1 Cluster #2
NY LA NY LA
SecondaryPrim ary
Connection
Prim ary
Connection
M onitor
M onitor
M onitor M onitor
M onitor M onitor
M onitor M onitor
1. Define clusters based on:
a. Capacity planning by using your existing throughput (transactions per seconds) requirements. For example, if you require a Policy Server environment that can handle 200 transactions per second, you need two Policy Servers that can maintain 100 transactions per second each. For more information about Policy Server performance, see the "SiteMinder Performance Planning and Tuning" white paper available at the Technical Support site.
b. Proximity to Agents and have the primary cluster closest to the corresponding group of Agents. For example, as noted in the latter figure, you could have Agent groups in two separate geographical locations; one could be in New York and the other in Los Angeles. Then, you need to have Policy Server Cluster #1 closest to the New York Agent group and Cluster #2 near the one in Los Angeles.
2. Define redundancy (number of Policy Servers in a cluster) requirements by:
a. Making sure that the cluster can hold the planned load with network and system failures.
b. Having at least one backup policy server in a cluster. For example, as noted in the latter figure, if you have 2 Policy Servers, you need a third one to handle the load if one of the others fail.
3. Define backup clusters by:
a. Planning for primary cluster failure. Make sure that the planned load works when the primary cluster fails or becomes unresponsive.
b. Defining at least one backup cluster. Make sure that at least one backup cluster is defined to maintain the load if the primary cluster fails.
Mixed SiteMinder Environments
16 Upgrade Guide
4. Upgrade and migrate the 5.x environment to 6.x.
5. Create the Policy Server clusters in the 6.x environment by following the instructions in the Policy Server Management guide.
6. Configure the OneView Monitor as a centralized monitor for other Policy Servers in a cluster, as noted in the latter figure. In 5.x, each Policy Server had one OneView Monitor; in 6.x, you can have one centralized OneView Monitor per Policy Server cluster.
Note: For more information, see the "Clustering Policy Servers" chapter in the Policy Server Management guide.
More information:
Upgrade a 5.x Policy Store (see page 43)
Mixed SiteMinder Environments
As you migrate to SiteMinder 6.x, your site can contain a combination of SiteMinder components at different versions. In addition, you do not have to upgrade all your sites to 6.x but leave some at SiteMinder 5.x.
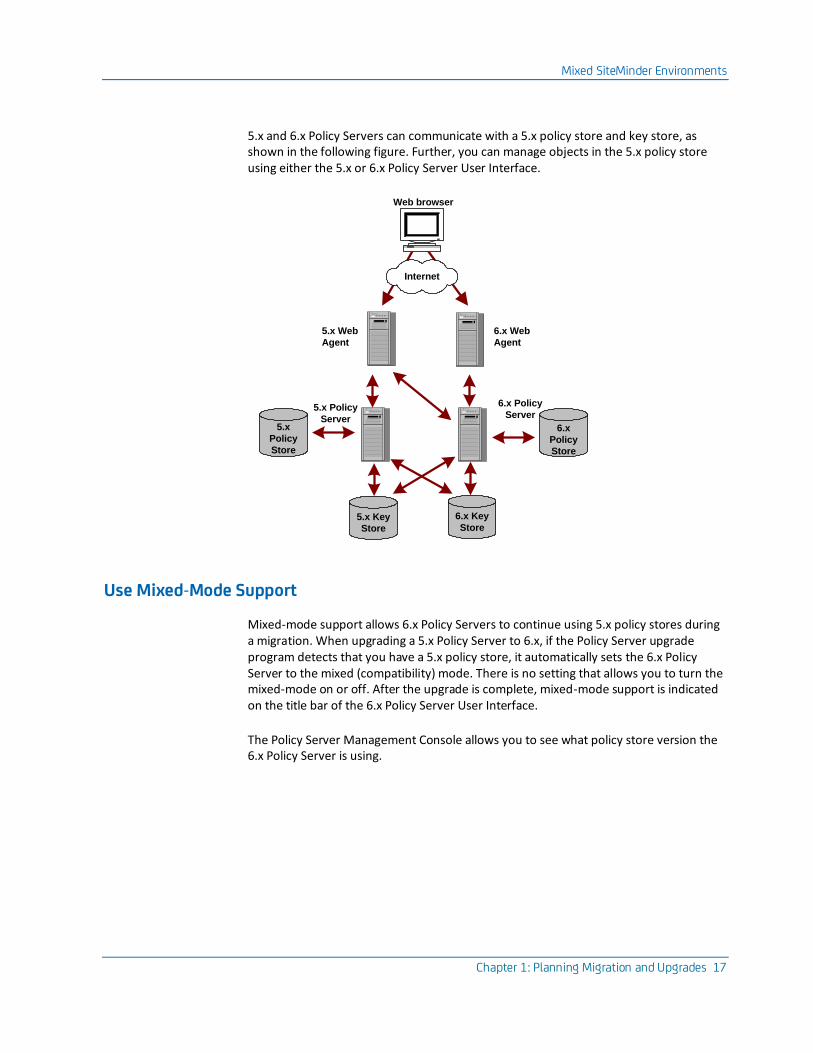
If your environment has a mix of 5.x and 6.x components, 6.x Policy Servers can use 5.x or 6.x policy stores, as illustrated in the following figure. Regardless of whether you have a mix of Policy Server versions, users can access resources and have the same experience using 5.x or 6.x Agents. Also, a mixed environment supports single sign–on.
Mixed SiteMinder Environments
Chapter 1: Planning Migration and Upgrades 17
5.x and 6.x Policy Servers can communicate with a 5.x policy store and key store, as shown in the following figure. Further, you can manage objects in the 5.x policy store using either the 5.x or 6.x Policy Server User Interface.
5.x Policy
Server5.x
Policy
Store
5.x Key
Store
6.x Policy
Server
6.x Key
Store
6.x
Policy
Store
Web browser
6.x Web
Agent
5.x Web
Agent
Internet
Use Mixed-Mode Support
Mixed-mode support allows 6.x Policy Servers to continue using 5.x policy stores during a migration. When upgrading a 5.x Policy Server to 6.x, if the Policy Server upgrade program detects that you have a 5.x policy store, it automatically sets the 6.x Policy Server to the mixed (compatibility) mode. There is no setting that allows you to turn the mixed-mode on or off. After the upgrade is complete, mixed-mode support is indicated on the title bar of the 6.x Policy Server User Interface.
The Policy Server Management Console allows you to see what policy store version the 6.x Policy Server is using.

Mixed SiteMinder Environments
18 Upgrade Guide
To check the policy store version
1. Start the Policy Server Management Console.
Important! If you are accessing this graphical user interface on Windows Server 2008, open the shortcut with Administrator permissions, even if you are logged into the system as an Administrator. For more information, see the release notes for your SiteMinder component.
2. Click the Data tab.
3. Select Help, About.
The policy store version is listed on the About dialog box.
Note: The policy store's version numbers do not match the Policy Server version. For example, the 5.5 Policy Server's policy store version is 6 and the 6.x Policy Server's version is 7.
Limitations of 5.x and 6.x Mixed Environment
If your SiteMinder environment has a mix of 5.x and 6.x components, a 6.x Policy Server can communicate with a 5.x policy store, but a 5.x Policy Server cannot connect to a 6.x policy store.
In addition, certain SiteMinder 5.x and 6.x features work in a mixed environment and others do not. The following tables show how a mixed 5.x and 6.x environment affects these features.
Feature Description How the feature is affected by mixed-mode
Microsoft Passport Authentication Scheme
The 5.5 Policy Server allowed you to create a Passport Authentication
Scheme.
The 6.x Policy Server allows you to create a Passport Authentication
Scheme.
SAML 1.0 producer support SAML 1.0 producer support is available in mixed mode.
Mixed SiteMinder Environments
Chapter 1: Planning Migration and Upgrades 19
Feature Description How the feature is affected by mixed-mode
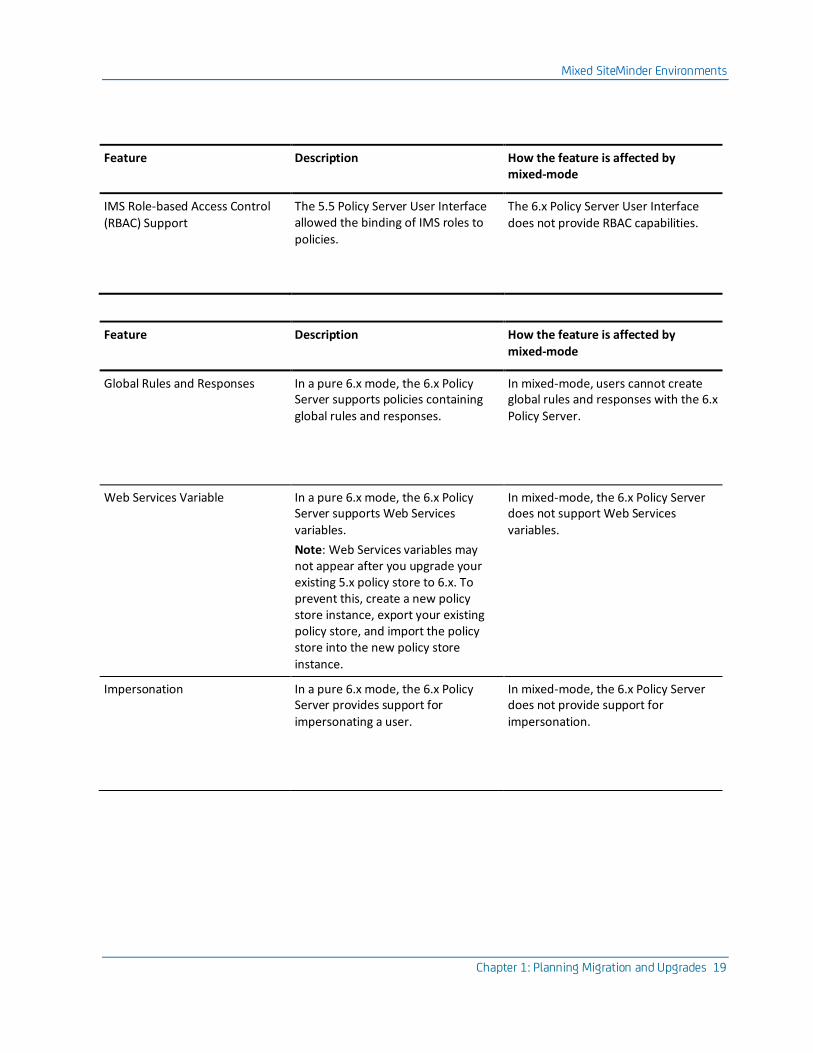
IMS Role-based Access Control
(RBAC) Support
The 5.5 Policy Server User Interface allowed the binding of IMS roles to
policies.
The 6.x Policy Server User Interface
does not provide RBAC capabilities.
Feature Description How the feature is affected by mixed-mode
Global Rules and Responses In a pure 6.x mode, the 6.x Policy Server supports policies containing
global rules and responses.
In mixed-mode, users cannot create global rules and responses with the 6.x
Policy Server.
Web Services Variable In a pure 6.x mode, the 6.x Policy Server supports Web Services
variables.
Note: Web Services variables may not appear after you upgrade your existing 5.x policy store to 6.x. To prevent this, create a new policy store instance, export your existing policy store, and import the policy store into the new policy store instance.
In mixed-mode, the 6.x Policy Server does not support Web Services
variables.
Impersonation In a pure 6.x mode, the 6.x Policy Server provides support for
impersonating a user.
In mixed-mode, the 6.x Policy Server does not provide support for
impersonation.

Mixed SiteMinder Environments
20 Upgrade Guide
Feature Description How the feature is affected by mixed-mode
SAML-compliant SAML Artifact In a pure 6.x mode, the 6.x Policy Server utilizes a SAML-compliant artifact for SAML 1.0 producer
functionality.
In mixed-mode, the 6.x Policy Server requires 6.x Web Agents, but can be used with 5.x QMR 4 (or higher) SAML Affiliate Agents and 6.x SAML Affiliate Agents to obtain SAML 1.0 producer
support.
SAML 1.1 and SAML 2.0 Support In a pure 6.x mode, the 6.x Policy Server provides support for a number
of SAML 1.1 and SAML 2.0 profiles.
In mixed mode, the 6.x Policy Server does not support SAML 1.1 and SAML 2.0 profiles, including the SAML 1.1 and 2.0 assertion generators and
authentication schemes.
SiteMinder Federation Security Services Components
In a pure 6.x mode, the 6.x Policy Server provides support for all of the Federation Security Services features listed in the Federation Security
Services Guide.
In mixed mode, the 6.x Policy Server only supports the SAML 1.0
producer/artifact profile.
Feature Description How the feature is affected by mixed-mode
Policy Evaluation Performance for Large Policies
The runtime performance of the Policy Server is improved in policy evaluation for very large policies.
The 6.x Policy Server provides more effective policy evaluation in pure mode than in mixed.
Mixed SiteMinder Environments
Chapter 1: Planning Migration and Upgrades 21
Feature Description How the feature is affected by mixed-mode
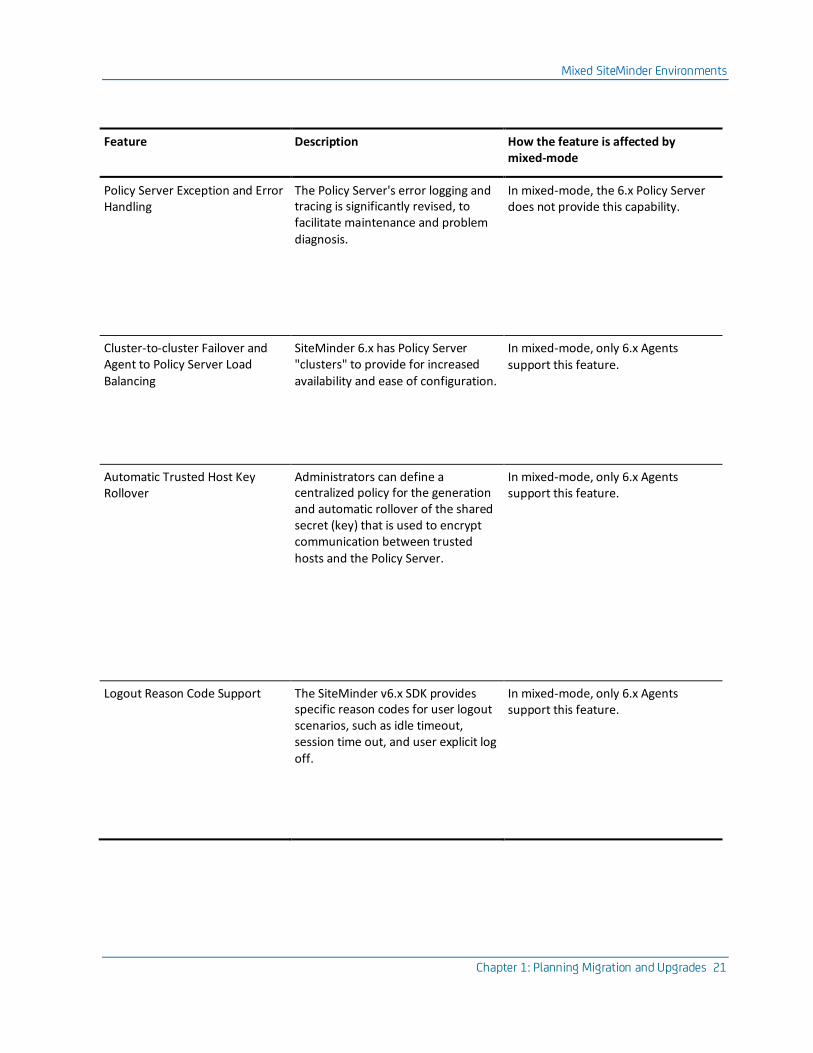
Policy Server Exception and Error Handling
The Policy Server's error logging and tracing is significantly revised, to facilitate maintenance and problem
diagnosis.
In mixed-mode, the 6.x Policy Server does not provide this capability.
Cluster-to-cluster Failover and Agent to Policy Server Load
Balancing
SiteMinder 6.x has Policy Server "clusters" to provide for increased
availability and ease of configuration.
In mixed-mode, only 6.x Agents support this feature.
Automatic Trusted Host Key Rollover
Administrators can define a centralized policy for the generation and automatic rollover of the shared secret (key) that is used to encrypt communication between trusted
hosts and the Policy Server.
In mixed-mode, only 6.x Agents support this feature.
Logout Reason Code Support The SiteMinder v6.x SDK provides specific reason codes for user logout scenarios, such as idle timeout, session time out, and user explicit log off.
In mixed-mode, only 6.x Agents support this feature.

Common SiteMinder Environments
22 Upgrade Guide
6.x Policy Servers and 5.x Audit Log Databases
If a 6.x Policy Server is running in mixed–mode and using a 5.x policy store, it cannot write data to a 5.5 SiteMinder audit log database. To configure audit logging, configure the 6.x Policy Server to use a separate 6.x audit log database.
Consider the following:
■ If SiteMinder r6.0 SP6 supports the version of Microsoft SQL Server (SQL Server) or Oracle that is functioning as the 5.5 audit log database, upgrade the audit log database to r6.0 SP6.
■ If SiteMinder r6.0 SP6 does not support the version of SQL Server Oracle that is functioning as the 5.5 audit log database, configure a new r6.0 SP6 audit log database.
Note: For more information about supported databases, go to the Technical Support site and search for the SiteMinder Platform Support Matrix for 6.0. For more information about configuring an r6.0 SP6 audit log database, see the Policy Server Installation Guide.
More information:
Upgrade a SiteMinderAudit Log Database (see page 56)
Use Forms, SSL, and NTLM Credential Collectors in a Mixed Environment
For more information about configuring credential collectors, see the Web Agent Guide.
Common SiteMinder Environments
There are several common SiteMinder environments to consider before upgrading to r6.0 SP6. See if your site matches one of the following:
■ Single Policy Store, Multiple Policy Servers and Web Agents (see page 22)
■ Clustered Environment (see page 23)
■ Shared User Directory Environment (see page 24)
Single Policy Store, Multiple Policy Servers and Web Agents
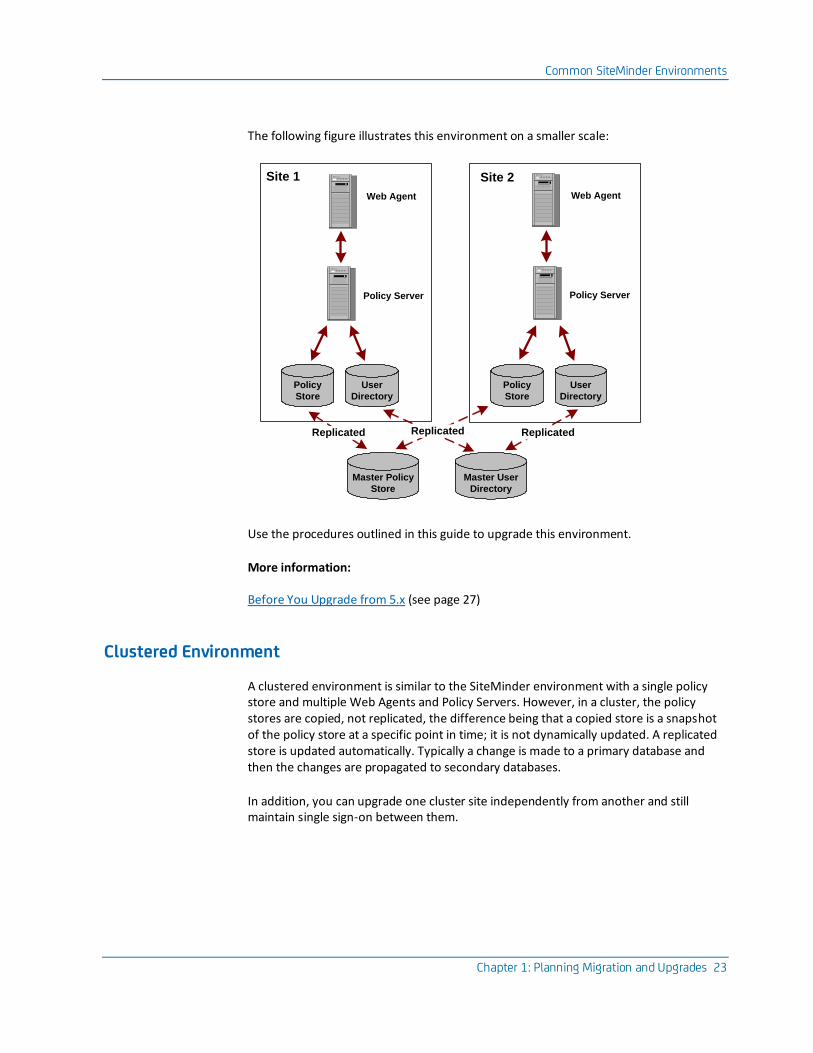
This SiteMinder environment contains a single policy store used by 20 to 100 Policy Servers located across the world. For performance reasons, the policy store and user directories are automatically replicated so that each Policy Server communicates with the closest replicated version. Each Policy Server communicates with 50 to 300 Web Agents.
Common SiteMinder Environments
Chapter 1: Planning Migration and Upgrades 23
The following figure illustrates this environment on a smaller scale:
Web Agent
Policy Server
User
Directory
Site 1
Policy
Store
Policy Server
User
Directory
Policy
Store
Master Policy
Store
Replicated
Master User
Directory
Replicated Replicated
Web Agent
Site 2
Use the procedures outlined in this guide to upgrade this environment.
More information:
Before You Upgrade from 5.x (see page 27)
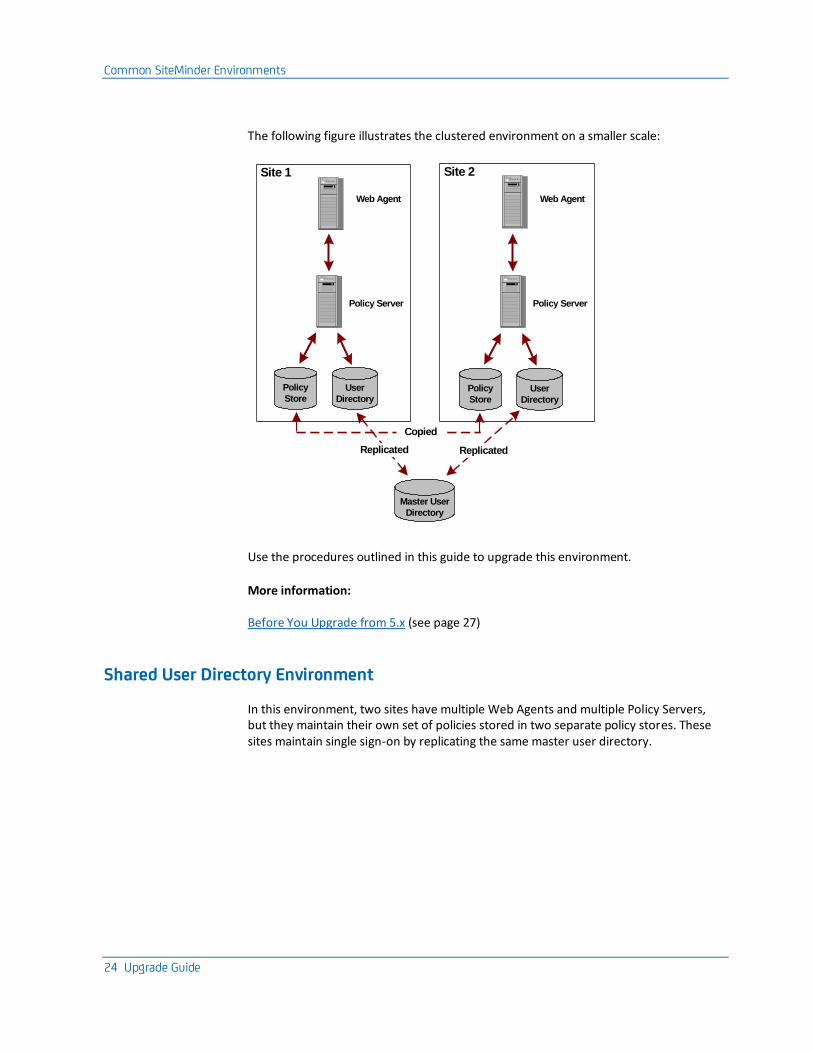
Clustered Environment
A clustered environment is similar to the SiteMinder environment with a single policy store and multiple Web Agents and Policy Servers. However, in a cluster, the policy stores are copied, not replicated, the difference being that a copied store is a snapshot of the policy store at a specific point in time; it is not dynamically updated. A replicated store is updated automatically. Typically a change is made to a primary database and then the changes are propagated to secondary databases.
In addition, you can upgrade one cluster site independently from another and still maintain single sign-on between them.
Common SiteMinder Environments
24 Upgrade Guide
The following figure illustrates the clustered environment on a smaller scale:
Master User
Directory
Web Agent
Policy Server
Site 2
Web Agent
Policy Server
User
Directory
Site 1
Policy
Store
Replicated
Copied
Replicated
User
Directory
Policy
Store
Use the procedures outlined in this guide to upgrade this environment.
More information:
Before You Upgrade from 5.x (see page 27)
Shared User Directory Environment
In this environment, two sites have multiple Web Agents and multiple Policy Servers, but they maintain their own set of policies stored in two separate policy stores. These sites maintain single sign-on by replicating the same master user directory.
Common SiteMinder Environments
Chapter 1: Planning Migration and Upgrades 25
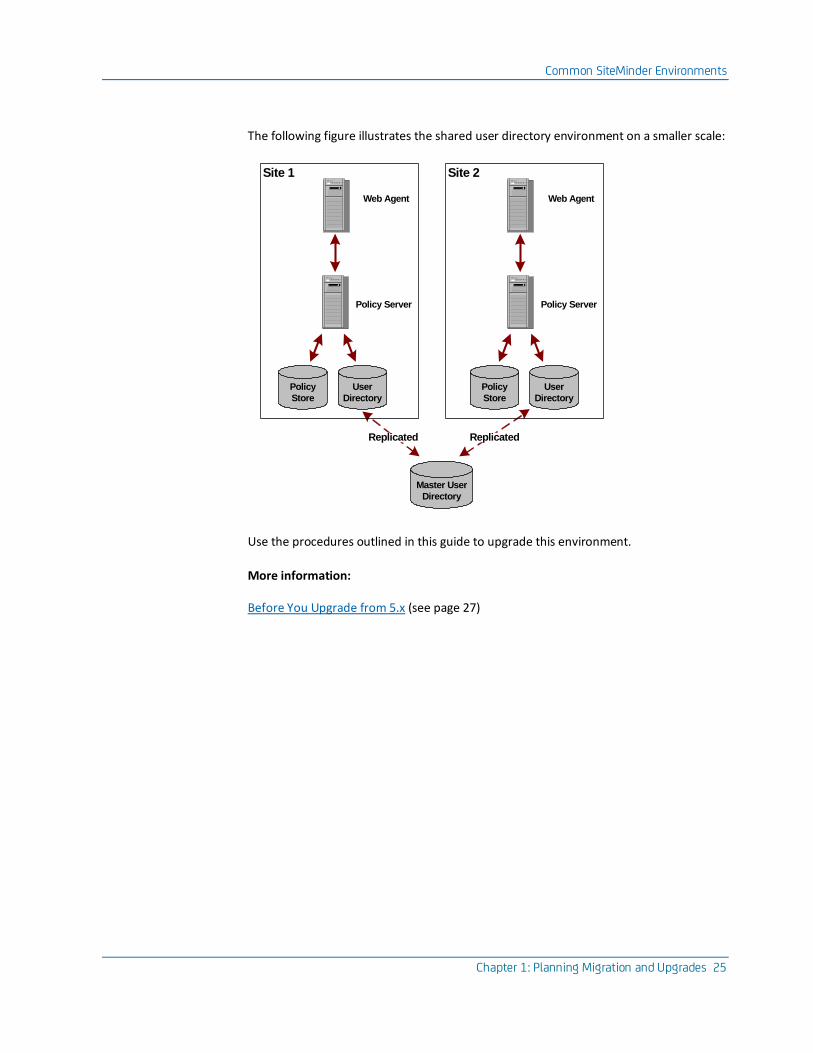
The following figure illustrates the shared user directory environment on a smaller scale:
Master User
Directory
Web Agent
Policy Server
Site 2
Web Agent
Policy Server
User
Directory
Site 1
Policy
Store
Replicated Replicated
User
Directory
Policy
Store
Use the procedures outlined in this guide to upgrade this environment.
More information:
Before You Upgrade from 5.x (see page 27)


Chapter 2: Upgrade Procedures from 5.x 27
Chapter 2: Upgrade Procedures from 5.x
This section contains the following topics:
Before You Upgrade from 5.x (see page 27) Back Up Your SiteMinder Environment (see page 28) Maintain Session Stores for Single Sign-on in a Mixed Environment (see page 28) Maintain Key Stores for Single Sign-on During Upgrade (see page 28) Netegrity SNMP Agent Compatibility MIB Overview (see page 31) How to Upgrade a 5.x Policy Server and 5.x Web Agent (see page 33) Step 1: Upgrade the 5.x Policy Server to 6.x (see page 33) Step 2: Upgrade a 5.x Web Agent to 6.x (see page 60) Upgrade Reports (see page 63)
Before You Upgrade from 5.x
To upgrade a SiteMinder deployment with multiple Policy Servers and Web Agents, remove one of the Policy Servers and Web Agents from the SiteMinder environment. While those components are being upgraded, the remaining Policy Servers and Web Agents can continue to protect your resources. Continue removing and upgrading SiteMinder components until you are ready to switch to the r6.0 SP6 Policy Server deployment.
This chapter includes upgrade procedures for the following:
■ Policy Server upgrades from SiteMinder 5.x to r6.0 SP6
In this guide, 5.x is 5.5 SP4 CR latest.
■ Web Agent upgrades from SiteMinder 5.x to r6.x QMR6
In this guide, 5.x is 5.5 QMR8 latest hotfix.
The upgrade documentation references the 5.5 SP4 installation guides and release notes to perform specific tasks. We recommend locating the 5.5 SP4 SiteMinder documentation before beginning.
Important! We recommend reading Planning Migration and Upgrades before following the procedures in this section.
Back Up Your SiteMinder Environment
28 Upgrade Guide
Back Up Your SiteMinder Environment
It is best practice to establish a recovery strategy in case your upgrade fails and you must return to your original configuration.
Important! The most complete recovery plan is to back up each machine’s entire image: Policy Servers and Web Agents. We strongly recommend this method. If you do not want to backup the entire image of each system, you should plan a recovery strategy before upgrading.
More information:
Plan a Recovery Strategy (see page 10)
Maintain Session Stores for Single Sign-on in a Mixed Environment
You can share a common session store between a 5.5 and r6.0 SP6 Policy Server to maintain single sign-on (SSO) if:
■ The session store remains at 5.5.
■ All Policy Servers point to the 5.5 session store.
Note: This configuration is not recommended in a 6.x Federation environment. Some of the advanced Federation 6.x features are not supported with this configuration.
Maintain Key Stores for Single Sign-on During Upgrade
You are not required to upgrade to a 6.x key store. 5.x key stores are compatible with 6.x Policy Servers, and you can configure the 6.x Policy Server to use a 5.x key store to maintain single sign-on as you upgrade to 6.x. As a result, you can either:
■ Maintain the 5.x key stores for single sign-on during the upgrade
Note: If the Policy Server is configured to allow Agent key generation, you cannot use a 5.x key store with a 6.x policy store because the Policy Server does not start. The policy store must remain at 5.x. To determine if the Policy Server is configured to allow Agent key generation, open the Keys tab in the Policy Server Management Console. If the Enable Agent Key Generation check box is selected, the Policy Server is configured to allow Agent key generation.
■ Create a new 6.x key store that contains the 5.x key data for single sign-on during the upgrade

Maintain Key Stores for Single Sign-on During Upgrade
Chapter 2: Upgrade Procedures from 5.x 29
To maintain 5.x key stores for single sign-on during the upgrade
1. Open the 6.x Policy Server Management Console.
Important! If you are accessing this graphical user interface on Windows Server 2008, open the shortcut with Administrator permissions, even if you are logged into the system as an Administrator. For more information, see the release notes for your SiteMinder component.
2. Select the Data tab of the Console and configure the 6.x Policy Server to use the 5.x key store.
The 5.x key store referenced by the 6.x Policy Server can be located in the 5.x policy store or in a separate key store.
3. Clear the Use Policy Store database check box so the 6.x Policy Server does not try to use its own policy store as the key store.
4. Select the Keys tab and clear the Enable Agent Key Generation check box.
The following figure illustrates how to use 5.x key and policy stores with a 6.x Policy Server to maintain single sign-on.
5.x
Policy Server
OR
5.xPolicy Store/
Key Store
5.xPolicy Store
5.xKey Store
6.x
Policy Server
The 6.x Policy Server can point to an independent 5.x keystore or one that is shared with a 5.x policy store.
Note: For more information about static and dynamic keys and configuring Policy Servers to use specific key stores, see the Policy Server Management guide.

Maintain Key Stores for Single Sign-on During Upgrade
30 Upgrade Guide
To create a new 6.x static key store that contains the 5.x key data
1. Export the 5.x key store using the smobjexport tool.
The 5.x key store that you export can be located in the 5.x policy store or in a separate key store.
2. Import the 5.x key store to a 6.x key store or enter the same key value for the 5.x and 6.x Policy Servers.
Enter static keys using the Manage Keys option in the 6.x Policy Server User Interface.
3. Open the 6.x Policy Server Management Console, select the Data tab, and configure the 6.x Policy Server to use the new 6.x key store.
Important! If you are accessing this graphical user interface on Windows Server 2008, open the shortcut with Administrator permissions, even if you are logged into the system as an Administrator. For more information, see the release notes for your SiteMinder component.
The 6.x key store can be an independent store or with the policy store.
The following figure illustrates how to upgrade static keys to maintain single sign-on.
To create a new 6.x dynamic key store that contains the 5.x key data
1. Export the 5.x key store using the smobjexport tool.
The 5.x key store that you export can be located in the 5.x policy store or in a separate key store.
2. Import the 5.x key store to a 6.x key store or enter the same key value for the 5.x and 6.x Policy Servers.
Enter dynamic keys using the Manage Keys option in the 6.x Policy Server User Interface.

Netegrity SNMP Agent Compatibility MIB Overview
Chapter 2: Upgrade Procedures from 5.x 31
3. Open the 6.x Policy Server Management Console, select the Data tab, and configure the 6.x Policy Server to use the new 6.x key store.
Important! If you are accessing this graphical user interface on Windows Server 2008, open the shortcut with Administrator permissions, even if you are logged into the system as an Administrator. For more information, see the release notes for your SiteMinder component.
The 6.x key store can be an independent store or with the policy store.
The following figure illustrates how to upgrade dynamic keys to maintain single sign-on.
Important! To maintain single sign–on in this type of environment, each time the 5.x keys are generated, manually import the 5.x keys into the 6.x key store or single sign–on fails.
Note: For more information about static and dynamic keys and configuring Policy Servers to use specific key stores, see the Policy Server Management guide.
Netegrity SNMP Agent Compatibility MIB Overview
For backward compatibility purposes, the r6.0 SP6 Policy Server has a 5.x compatible MIB for the Netegrity SNMP Agent. If you have existing SNMP applications that rely on the 5.x Policy Server's MIB structure, we recommend that you use the 5.x compatible MIB.

Netegrity SNMP Agent Compatibility MIB Overview
32 Upgrade Guide
Enable and Disable Modes for the Netegrity SNMP Agent
By default, the Netegrity SNMP Agent runs in mixed-mode to support 5.x and r6.0 SP6 MIB OIDs.
To specify the mode on Windows systems
Add the -m <value> to the OPTIONS line of the C:\<WINNT>\javaservice.ini file.
mixed
Supports 5.x and r6.0 SP6 MIB OIDs.
compat
Supports 5.x MIB OIDs only.
normal
Supports r6.0 SP6 MIB OIDs only.
An example entry is:
OPTIONS = -v v2 -m normal
To specify the mode on UNIX systems
Add the -m <value> to the list of command line parameters of the java program in the /etc/snmp/conf/RunSubagent.sh file.
mixed
Supports 5.x and r6.0 SP6 MIB OIDs
compat
Supports 5.x MIB OIDs only
normal
Supports r6.0 SP6 MIB OIDs only
An example entry is:
nohup $JAVA_HOME/bin/java -mx200M com.netegrity.snmp.gen.netegrity -v v2 -m normal

How to Upgrade a 5.x Policy Server and 5.x Web Agent
Chapter 2: Upgrade Procedures from 5.x 33
How to Upgrade a 5.x Policy Server and 5.x Web Agent
To upgrade a 5.x Policy Server to 6.x and 5.x Web Agent to 6.x while maintaining single sign-on and failover, follow these steps in the order listed:
Step 1: Upgrade the 5.x Policy Server to 6.x (see page 33)
Step 2: Upgrade a 5.x Web Agent to 6.x (see page 60)
The following figure illustrates the upgrade path:
5.xPolicy Server
25.x
Web Agent
1
6.x
Web Agent
6.x
Policy Server
Step 1: Upgrade the 5.x Policy Server to 6.x
The SiteMinder 6.x Policy Server can communicate with a 5.x Web Agent. Therefore, you can upgrade your Policy Server to 6.x before upgrading your Web Agent and still protect resources.
Important Upgrade Considerations
Be aware of the following before upgrading:
■ 5.x Policy Servers cannot communicate with 6.x policy stores.
■ 6.x Policy Servers can use 5.x policy stores.
■ 5.x Web Agents can communicate with 5.x and 6.x Policy Servers
■ To avoid possible policy store corruption, be sure that the server on which the policy store resides is configured to store objects in UTF-8 form. For more information about configuring your server to store objects in UTF-8 form, see the documentation for that server.
Step 1: Upgrade the 5.x Policy Server to 6.x
34 Upgrade Guide
More information:
Upgrade a 5.x Policy Store (see page 43)
Before You Upgrade the Policy Server
Before you upgrade a Policy Server:
■ Determine if SiteMinder r6.0 SP6 supports the operating systems, directory servers, and databases in your environment.
Note: For more information, see the SiteMinder Platform Support Matrix.
■ Back up the 5.x Policy Store and Key Store.
■ Use a Supported Version of ServletExec.
■ Use a supported JRE for the Policy Server.
■ (Linux) Be sure that the required Linux libraries are installed to the Policy Server host system. For more information, see Required Linux Libraries.
■ Review Upgrades and Microsoft Visual Studio.
■ Review Policy Store Object Migration Issue when Importing Agent Settings.
■ Record Service Names for OCI Namespace User Directories.
■ Remove the Policy Server being Upgraded from the Environment.
■ Stop the SNMP and Operating System Master Agents.
Note: This section is only necessary if your 5.x Policy Server is configured for SNMP support.
■ Install the Documentation.
Back Up the 5.x Policy Store and Key Store
Preserve the policy store and key store by exporting it in clear-text to an .smdif file using the 5.x version of smobjexport. By exporting the store in clear-text you have a record of encrypted information, such as shared secrets.
Note: If the r6.0 SP6 Policy Server uses the same encryption key as the 5.x Policy Server, do not export the data stores in clear-text. Using clear-text is necessary only if the 5.x and r6.0 SP6 Policy Servers use different encryption keys.
Step 1: Upgrade the 5.x Policy Server to 6.x
Chapter 2: Upgrade Procedures from 5.x 35
Also, having this information in a stand-alone file may be useful for future troubleshooting. Further, if your key store resides in the policy store, ensure you use the -k option with smobjexport since, by default, keys are not included in the export.
To preserve your policy store, enter the following command:
smobjexport -ofile_name -dadmin_name -wadmin_pw -k -c -v -t
filename
Defines the 5.x smdif file name.
admin_name
Defines the SiteMinder administrator’s user name.
admin_pw
Defines the SiteMinder administrator’s password.
-k
Exports Agent keys stored in the policy store. By default, keys are not included in the export.
-c
(Optional) Exports sensitive data as clear-text. Using clear-text is necessary only if the 5.x and r6.0 SP6 Policy Servers use different encryption keys.
-v
Enables verbose mode.
-t
Enables low level tracing mode to troubleshoot the import process.
If an argument contain spaces, use double quotes around the entire argument. For example, if the name of the SiteMinder administrator is SM Admin, the argument is -d"SM Admin".
Example: smobjexport -o5xpstore.smdif -d"SM Admin" -wpassword -k -c -v -t
Note: For more information on using the 5.x version of smobjexport, see the Netegrity Policy Server Installation Guide for 5.x.
Use a Supported Version of ServletExec
If you are using SiteMinder components that require ServletExec, be sure that a supported version is installed. A supported version of ServletExec, including the required license file, is included with the Policy Server installation kit.
Note: For more information about the required version of ServletExec, see the SiteMinder Platform Support Matrix for 6.0.

Step 1: Upgrade the 5.x Policy Server to 6.x
36 Upgrade Guide
Use a Supported JRE for the Policy Server
Be sure that you have the required JRE version installed before upgrading the Policy Server to r6.0 SP6.
JRE requirements are located in the SiteMinder Platform Support Matrix for 6.0, which is located on the Technical Support site. You can download the required JRE version from the Sun Developer Network (SDN).
To locate the support matrix on the Support site
1. Click Technical Support.
2. Click Support By Product.
3. Select CA SiteMinder from the Select a Product Page list.
4. Scroll to Product Status and click Platform Support Matrices.
Required Linux Libraries
If you are installing or upgrading a Linux version of this component, the following is required on the host system:
compat–libstdc++–33.3.2.3–patch_version.i386.rpm
Install this rpm to be sure that you have the appropriate 32-bit C run–time library for your operating system.
Upgrades and Microsoft Visual Studio
Valid on Windows
SiteMinder r6.0 SP6 components are compiled using Microsoft Visual Studio® 2005 (VC 8). Consider the following:
■ Previous versions of SiteMinder were compiled using Microsoft Visual Studio 2003 (VC 7). Although we expect that all custom code compiled with Microsoft Visual Studio 2003 (VC 7) to continue to work, we recommend testing all custom code with SiteMinder r6.0 SP6.
■ If you are using layered products, we recommend referring to the respective Platform Support Matrix to determine if the product is certified with SiteMinder r6.0 SP6. Examples of layered products include the following:
– Application server agents
– ERP agents
– Advanced Password Services
– The Secure Proxy Server
– Identity Manager

Step 1: Upgrade the 5.x Policy Server to 6.x
Chapter 2: Upgrade Procedures from 5.x 37
Policy Store Object Migration Issue When Importing Agent Settings
In 5.x, the Policy Server incorrectly allowed a Web Agent, which was part of a Web Agent group, to define a realm with the same resource filter as the group. In r6.0 SP6, the Policy Server validates realm/resource filters and does not allow them to be duplicated. Thus, if the 5.x policy store has a Web Agent that is part of a Web Agent group with a duplicate realm/resource filter, the migration fails when you import the 5.x policy store's .smdif file into the r6.0 SP6 policy store using smobjimport.
To resolve this problem before a migration, use the 5.x Policy Server User Interface to make sure that the Web Agent is not part of a Web Agent group with the same realm/resource filter. Then, using the 5.x version of smobjexport, export the policy store into a 5.x .smdif file and import the file into the r6.0 SP6 policy store.
Record Service Names for OCI Namespace User Directories
At 5.x, Oracle policy and user stores could connect to the Policy Server using an ODBC or Oracle Call Interface (OCI) connection. In r6.0 SP6, OCI is no longer supported so these stores can only connect to the Policy Server using an ODBC data source with the Oracle wire protocol driver. However, the r6.0 SP6 Policy Server can use a 5.x OCI namespace user directory if the Policy Server is running in mixed mode, or if you upgrade an existing 5.x policy store.
The Policy Server communicates with a user directory defined in the 5.x policy store by transparently mapping the OCI namespace to ODBC. To establish this communication, create an ODBC data source on the r6.0 SP6 Policy Server’s machine.
To create this data source, locate the Oracle service name for the OCI namespace user directory, which is listed in the 5.x Policy Server User Interface. You can access this name by selecting the user directory’s properties.
More information:
Upgrade a 5.x Oracle Policy Store (see page 48) Configure a Policy Server to Use a 5.x OCI NameSpace User Directory (see page 49)
Rename Trace Configuration Files
The smtracedefault.txt file defines the trace data collected by the Policy Server. If you customize the smtracedefault.txt file, then install this service pack on an existing Policy Server, the smtracedefault.txt file may be overwritten.
Rename or back up the file before installing this service pack to insure that the installation does not overwrite it.

Step 1: Upgrade the 5.x Policy Server to 6.x
38 Upgrade Guide
Remove the Policy Server Being Upgraded from Your Environment
To prevent Web Agents from contacting a Policy Server being upgraded, remove the Policy Server from your SiteMinder environment.
Note: More information on removing the Policy Server from the environment exists in the Policy Server Installation Guide for 5.x.
In addition, before running the Policy Server upgrade program, shut down all instances of the Policy Server Management Console.
Stop the Netegrity SNMP and Operating System Master Agents
This is only necessary if your 5.x Policy Server is configured for SNMP support.
Windows
Stop the Netegrity SNMP agent and SNMP Service, which is the OS master agent, using the Services dialog from the Control Panel. Also, set them to start up manually and not automatically on a system reboot.
UNIX systems
The Netegrity SNMP agent can only be stopped by stopping the Sun Solstice Enterprise Master agent (snmpdx) daemon.
To stop this daemon
1. Login as super user (root)
2. Enter cd /etc/rc3.d
3. Enter sh SXXsnmpdx (S76snmpdx) stop
After the upgrade is complete restart all of these services again.
User Authorization Cache Size is Enabled After Upgrade
After upgrading a 5.x Policy Server to r6.0 SP6, the user Authorization cache size is enabled and set to 10 even if the 5.x Policy Server had it set to zero.
You can locate this cache size on the Settings tab of the Policy Server Management Console.

Step 1: Upgrade the 5.x Policy Server to 6.x
Chapter 2: Upgrade Procedures from 5.x 39
Install the Documentation
Install the documentation. For r6.0 SP6, you must install the documentation separately because it is not installed by default with the Policy Server.
We recommend that you install the documentation before the Policy Server so you can specify where you want it installed.
Note: More information on installing the documentation exists in the Policy Server Installation Guide.
Upgrade a 5.x Policy Server on Windows
SiteMinder r6.0 SP6 does not support the versions of Windows that SiteMinder 5.x supported. You cannot upgrade a 5.x Policy Server to r6.0 SP6.
Consider the following:
■ An r6.0 SP6 Policy Server can communicate with a 5.x policy store. If you install a new r6.0 SP6 Policy Server, you can use the Policy Server Management Console to point it to an existing 5.x policy store.
Note: For more information about using the Policy Server Management Console, see the Policy Server Management Guide.
■ A 5.x Policy Server cannot communicate with an r6.0 SP6 policy store.
Upgrade a 5.x Policy Server on UNIX Systems
Be sure that you understand the concepts in the following sections before starting the upgrade:
■ Step 1: Upgrade the 5.x Policy Server to 6.x (see page 33).
■ Use Mixed–Mode Support (see page 17). Mixed–mode support lets 6.x Policy Servers continue to use 5.x policy stores during a migration.
Note: During the upgrade, the installer prompts you to select the SiteMinder components you want configured. By default, all options are selected. If you leave policy store selected, the installer prompts you for new configuration information. If you do not select any of the options, the installer only upgrades binary files or executables, as necessary.
To upgrade a Policy Server on UNIX systems
1. Disconnect any failover or load balancing connections between the Web Agent and Policy Server.
2. Exit all applications that are running.

Step 1: Upgrade the 5.x Policy Server to 6.x
40 Upgrade Guide
3. Stop the Policy Server using the stop-all command located in the root of the SiteMinder installation directory.
4. Stop all instances of the Policy Server Management Console.
5. Download the Policy Server installation kit from the Technical Support site and save the following to a temporary location:
nete-ps-6.0-sp6-sol.bin
If necessary, add executable permissions to the executable by running the following command:
chmod +x nete-ps-6.0-sp6-sol.bin
After installation, you can find the installation log files in siteminder_home/install_config_info.
The file names are:
■ CA_SiteMinder_Policy_Server_v6.0_SP6_InstallLog.log
■ nete-ps-details.log
The nete-ps-details.log file lets you determine the status of the policy store after the Policy Server installer has automatically configured it.
6. In a UNIX shell, enter the following command:
sh ./nete-ps-6.0-sp6-sol.bin -i console
Note: The -i console part of the command lets you run the installation from a console instead of a GUI.
Setup verifies the following prerequisites:
■ You are logged into an account with local administrator privileges.
■ You have the appropriate operating system and web server listed on the SiteMinder Platform Support Matrix for 6.0. To access this matrix go to the Technical Support site and search for the SiteMinder Platform Matrix for 6.0.
■ The computer has necessary free disk space and the required JDK or JRE installed. These requirements are listed in the SiteMinder Platform Matrix for 6.0, which is located on the Technical Support site.
■ The system has the required/recommended patches installed.
7. Read the introduction and press Enter.
The installer runs smpatchcheck to verify that you have the required/recommended UNIX operating system patches installed. If patches are not detected, the installer stops and tells you which patches are required.
8. Enter the JRE directory.
9. The installer displays the License Agreement. Press Enter to read the complete agreement.

Step 1: Upgrade the 5.x Policy Server to 6.x
Chapter 2: Upgrade Procedures from 5.x 41
10. If you agree with License Agreement terms and enter y to continue the installation.
11. Read the Installation Notes for important information about installing SiteMinder and press Enter to continue.
12. Enter your name and press Enter.
13. Enter your company name and press Enter.
14. Specify the directory that is one above the SiteMinder installation directory where the 5.x Policy Server is installed.
For example, if your Policy Server is installed in /export/netegrity/siteminder, specify /export/netegrity.
15. Enter Y to confirm Policy Server installation location.
16. Enter the full path to the web browser on this system, including the executable. The installer uses this information to make the SiteMinder documentation available from Policy Server User Interface.
17. Enter 1 if you want the smprofile.ksh added to the .profile file.
18. A Policy Server is already installed prompt appears to confirm that you want to upgrade the 5.x Policy Server to 6.x. If you want to continue with the upgrade, enter 1.
During the upgrade, the upgrade program backs up the siteminder.conf file, which is located in siteminder_home/config.
19. In the Choose Features section, enter the numbers (separated by commas) of the Policy Server features you want.
Note: To select none of the features, enter a , (comma).
OneView Monitor
The installer configures the OneView Monitor to work on the Web Server you specify later in this procedure.
Note: A supported version of ServletExec and a supported JDK are required to use the OneView Monitor.
Web Server
The installer configures the Policy Server User Interface and, if selected, the OneView Monitor to work on this web server.
SNMP
The installer configures SNMP to work with the Policy Server.
Note: For more information about SNMP support, see the Policy Server Installation Guide for 6.x.
Step 1: Upgrade the 5.x Policy Server to 6.x
42 Upgrade Guide
Policy Store
The installer configures a Sun Java System Directory Enterprise Edition (formerly Sun ONE/iPlanet), ADAM, or AD LDS policy store.
– If SiteMinder r6.0 SP6 supports the directory server or database functioning as the policy store, clear the check box and upgrade the policy store manually after upgrading the Policy Server.
Note: For more information about upgrading a policy store, see Upgrading a 5.x Policy Store.
– If SiteMinder r6.0 SP6 does not support the directory server or database functioning as the policy store, you are required to migrate the 5.x policy store into a r6.0 SP6 policy store. The installer can automatically configure a Sun Java System Directory Server Enterprise Edition (formerly Sun ONE/iPlanet), ADAM, or AD LDS policy store. Otherwise, you are required to configure the policy store manually after upgrading the Policy Server.
Note: For more information about configuring a policy store automatically or manually, see the Policy Server Installation Guide. For more information about migrating a policy store, see How to Migrate a 5.x Policy Store.
20. If you chose to have the OneView Monitor GUI configured, enter the JDK directory.
21. If you chose to have the OneView Monitor GUI configured, enter the ServletExec installation directory.
Example: /usr/local/NewAtlanta/ServletExecAS
a. Enter a free port number.
b. If you have multiple ServletExec instances, select the se-hostname-server you want to configure for the OneView Monitor GUI and press Enter.
22. Enter the path to the root folder of a supported web server and press Enter.
23. Specify which web server you want to configure with the Policy Server and press Enter.
Note: Consider the following:
– Be sure that the web server instance is stopped.
– If you have multiple web servers, only specify one. We recommend configuring one web server at a time. Use the Policy Server Configuration Wizard to configure additional web servers after upgrading the Policy Server.
24. (Optional) If you are prompted for policy store information, see the Policy Server Installation Guide for more information about using the installer to configure a policy store automatically.
25. Access the Policy Server User Interface after upgrading the Policy Server. Clear the web browser cache to be sure that the upgraded version of the Policy Server User Interface appears.
Step 1: Upgrade the 5.x Policy Server to 6.x
Chapter 2: Upgrade Procedures from 5.x 43
More information:
Upgrade a 5.x Policy Store (see page 43) Upgrade a SQL Server Database Policy and Key Store (see page 53) Upgrade a 5.x Oracle Policy Store (see page 48) Access the Policy Server User Interface (see page 58)
Policy Server Configuration Wizard
The Policy Server Configuration Wizard lets you configure the following SiteMinder components:
■ The OneView Monitor GUI
■ The Policy Server User Interface
■ A Sun Java System Directory Server Enterprise Edition, ADAM, or AD LDS policy store.
Note: For more information about using the Policy Server Configuration Wizard, see the Policy Server Installation Guide for 6.x.
Upgrade a 5.x Policy Store
Follow one of the following paths to upgrade a 5.x policy store to r6.0 SP6:
■ If SiteMinder r6.0 SP6 continues to support the directory server or database functioning as the 5.x policy store, you can upgrade the policy store. Upgrading the policy store includes extending the policy store schema and importing the policy store objects that r6.0 SP6 requires.
■ If the SiteMinder r6.0 SP6 does not support the directory server or database functioning as the 5.x policy store, a new r6.0 SP6 is required. The 5.x policy store data must be migrated to the new store. For more information, see How to Migrate a 5.x Policy Store.
Note: To determine if SiteMinder r6.0 SP6 continues to support your 5.x policy store, go to the Technical Support site and search for the SiteMinder Platform Matrix for 6.0.
Consider the following:
■ If you have custom components in your SiteMinder deployment, contact your Professional Services representative for more information about upgrading these components.
■ (Optional) After you upgrade or migrate your policy stores, you can configure the Policy Server to manage r6.0 SP6 Web Agents centrally.

Step 1: Upgrade the 5.x Policy Server to 6.x
44 Upgrade Guide
Upgrade an Active Directory Policy and Key Store
Important! Before running a SiteMinder utility or executable on Windows Server 2008, open the command line window with Administrator permissions. Open the command line window this way, even if your account has Administrator privileges. For more information, see the release notes for your SiteMinder component.
To upgrade an Active Directory policy and key store
1. Create the r6.0 SP6 policy and key store schema with the following smldapsetup commands.
Note: For more information about using the smldapsetup tool, see the Policy Server Installation Guide.
a. smldapsetup ldgen -hhost_IP -pport -duser_dn -wuser_pw -rpolicy_store_root -ssl1/0 -ccert -ffilename -u
-hhost_IP
Specifies the IP Address of the directory server host system.
-pport
Specifies the port on which the directory server is listening.
-duser_dn
Specifies the distinguished name of a directory server user with privileges to create LDAP schema in the directory server.
-wuser_pw
Specifies the password for the directory server user specified by -d.
-rpolicy_store_root
Specifies the DN location of the SiteMinder data in the directory server.
-ssl1/0
(Optional) Specifies an SSL connection.
Limits: 0=no | 1=yes
Default: 0
-ccert
(Only required if the ssl value is 1) Specifies the path to the directory where the SSL client certificate database file, cert7.db, exists.
-ffile_name
Specifies the name of the schema (LDIF) file you are creating.
-u
Creates the r6.0 SP6 upgrade schema file.
Step 1: Upgrade the 5.x Policy Server to 6.x
Chapter 2: Upgrade Procedures from 5.x 45
b. smldapsetup ldmod -hhost_IP -pport -duser_dn -wuser_pw -rpolicy_store_root -ssl1/0 -ccert -ffile_name
2. Import the required r6.0 SP6 policy store objects by entering the following command:
smobjimport -isiteminder_home\db\smdif\
sm_upgrade_55_to_60sp6.smdif -dadmin_name -wadmin_pw -v -f
siteminder_home
Specifies the Policy Server installation path.
-dadmin_name
Specifies the name of the SiteMinder administrator with super user privileges.
-wadmin_pw
Specifies the password for the SiteMinder super user.
-v
Outputs error, warning, and comment messages in verbose format. Verbose format lets you monitor the status of the import.
-f
Overwrites duplicate policy store objects with the r6.0 SP6 policy store objects.
Note: If an argument contains spaces, use double quotes around the entire argument.
Example:
smobjimport -i“C:\Program Files\CA\SiteMinder\db\
smdif\sm_ps_upgrade_55_to_60sp6.smdif” -d"SM Admin" -wPassword -v -f
Important! If you do not complete this step, the required SiteMinder objects are not added to the policy store. As a result, you cannot use the Policy Server User Interface to configure policies.
Upgrade a CA eTrust Directory Policy Store
SiteMinder r6.0 SP6 does not support the versions of CA eTrust Directory (CA Directory) that SiteMinder 5.x supported. Migrate the policy store data to a supported policy store.
More information:
How to Migrate a 5.x Policy Store (see page 54)
Upgrade an IBM Secureway/Directory Server Policy Store
SiteMinder r6.0 SP6 does not support the versions of IBM Secureway/Directory Server that SiteMinder 5.x supported. Migrate the policy store data to a supported policy store.
Step 1: Upgrade the 5.x Policy Server to 6.x
46 Upgrade Guide
More information:
How to Migrate a 5.x Policy Store (see page 54)
Upgrade a Novell Directory Server Policy and Key Store
SiteMinder r6.0 SP6 does not support the versions of Novell Directory Server (NDS) that SiteMinder 5.x supported. Migrate the policy store data to a supported policy store.
More information:
How to Migrate a 5.x Policy Store (see page 54)
Upgrade an Oracle Internet Directory Policy Store
SiteMinder r6.0 SP6 does not support the versions of Oracle Internet Directory (OID) that SiteMinder 5.x supported. Migrate the policy store data to a supported policy store.
More information:
How to Migrate a 5.x Policy Store (see page 54)
Upgrade an Oracle Policy Store
The following sections detail how to upgrade an Oracle policy store.
Before You Upgrade an 5.x Oracle Policy Store
Consider the following before you upgrade an Oracle policy store:
■ Determine if SiteMinder r6.0 SP6 supports the version of Oracle that is functioning as the 5.x policy store.
Note: For more information, go to the Technical Support site and search for the SiteMinder Platform Matrix for 6.0.
■ If SiteMinder r6.0 SP6 supports the current version, you can upgrade the existing policy store. For more information, see Upgrade a 5.x Oracle Policy Store.
Note: In 5.x, Oracle policy and user stores could connect to the Policy Server using an ODBC or Oracle Call Interface (OCI) connection. SiteMinder r6.0 SP6 no longer supports OCI, so these stores can only connect to the Policy Server using an ODBC data source with the Oracle wire protocol driver.
However, an r6.0 SP6 Policy Server can communicate with a user directory defined in the 5.x policy store by transparently mapping the OCI namespace to ODBC. To establish this communication, create an ODBC data source on the r6.0 SP6 Policy Server host system. To create this data source, locate the Oracle service name for the OCI namespace user directory, which is listed in the 5.x Policy Server User Interface. You can access this name by selecting the user directory’s properties.

Step 1: Upgrade the 5.x Policy Server to 6.x
Chapter 2: Upgrade Procedures from 5.x 47
■ If SiteMinder r6.0 SP6 does not support the current version, see Migrate a 5.x Oracle Policy Store.
More information:
Upgrade a 5.x Oracle Policy Store (see page 48) Migrate a 5.x Oracle Policy Store (see page 47) Configure a Policy Server to Use a 5.x OCI NameSpace User Directory (see page 49)
Migrate a 5.x Oracle Policy Store
Important! Before running a SiteMinder utility or executable on Windows Server 2008, open the command line window with Administrator permissions. Open the command line window this way, even if your account has Administrator privileges. For more information, see the release notes for your SiteMinder component.
To migrate a 5.x Oracle policy store
1. Export the 5.x policy store using the 5.x version of smobjexport.
Consider the following:
– If your key store resides in the policy store, be sure to use the -k option when exporting the policy store. By default, policy store keys are not included in an export.
– If the r6.0 SP6 Policy Server uses the same encryption key that is stored in the 5.x policy store, you do not need to export the policy store data in clear–text. Exporting sensitive data in clear–text is necessary only if the 5.x and 6.x Policy Servers use different encryption keys.
2. Configure a new Oracle database as an r6.0 SP6 policy store.
Note: For more information about configuring an Oracle database as a policy store, see the Policy Server Installation Guide.
3. Import the 5.x policy store data using the r6.0 SP6 version of smobjimport.
Important! If your 5.x policies defined user directories with the OCI namespace, see Modify the 5.x smdif File With an OCI Namespace User Directory (see page 48) before importing the policy store data.
Consider the following:
– If you exported sensitive data in clear–text, be sure to import the policy store data using the -c option.
– If you exported agent keys, be sure to use the -k option when importing the policy store. By default, policy store keys are not included in an import.
Note: For more information about using smobjimport, see the Policy Server Installation Guide.
Step 1: Upgrade the 5.x Policy Server to 6.x
48 Upgrade Guide
4. (Optional) If the 5.x policy store data you imported contains sensitive data in clear–text, use the smreg utility to encrypt the SiteMinder super user password.
Note: For more information about using the smreg utility, see the Policy Server Installation Guide.
5. (Optional) Delete the SiteMinder data from the 5.x policy store using the sm_oracle_ps_delete script.
Note: For more information about using this script, see the 5.x version of the Policy Server Installation Guide.
Modify the 5.x .smdif File With an OCI Namespace User Directory
If the 5.x Oracle policy store had 5.x policies that defined user directories with the OCI namespace, do the following to the 5.x policy store’s .smdif file before importing the file into the 6.x policy store:
1. Open the .smdif file in a text editor.
2. Replace every OCI: reference with ODBC: and save the file.
Important! If you do not make these changes to the 5.x .smdif file, the 6.x policy store cannot import the .smdif file since OCI is not supported by the 6.x Policy Server.
After importing the 5.x policy store’s .smdif file into the 6.x policy store, the 6.x Policy Server uses the OCI namespace user directory as an ODBC user directory.
Upgrade a 5.x Oracle Policy Store
To upgrade a 5.x Oracle Policy Store
1. Be sure that the Oracle database instance that is to function as the r6.0 SP6 policy store is accessible from the Policy Server host system. Test the communication using tnsping or sqlplus.
2. Logging in to Oracle with sqlplus or another Oracle utility as the user who administers the Policy Server database information.
3. Importing the following upgrade script:
$NETE_PS_ROOT/db/sm_oracle_ps_upgrade_55_to_60.sql
Note: If you are using sqlplus, run the schema using an @ sign.
Example: @$NETE_PS_ROOT/db/sm_oracle_ps_upgrade_55_to_60.sql
4. From a command prompt on the Policy Server host system, navigate to siteminder_home\bin.
5. Run the following command:
Step 1: Upgrade the 5.x Policy Server to 6.x
Chapter 2: Upgrade Procedures from 5.x 49
smobjimport -isiteminder_home\db\smdif\sm_upgrade_55_to_60sp5.smdif
-dsm_admin -wadmin_pswd -v -f
Important! Before running a SiteMinder utility or executable on Windows Server 2008, open the command line window with Administrator permissions. Open the command line window this way, even if your account has Administrator privileges. For more information, see the release notes for your SiteMinder component.
-v
Outputs error, warning, and comment messages in verbose format. Verbose format lets you monitor the status of the import.
-f
Overwrites duplicate policy store objects with objects from 6.x.
Important! The upgrade file adds 6.x features to the 5.x policy store. Once you import this file, a 5.x Policy Server can no longer read the policy store.
This step creates default objects required by SiteMinder. The objects are automatically saved in their appropriate locations in the policy store and key store.
If you do not complete this step, required SiteMinder objects are not added to your policy and key store. As a result, you cannot use the Policy Server User Interface to configure policies.
Important! After upgrading the 5.x policy store to 6.x, be aware that an OCI namespace user directory is listed as LDAP in the NameSpace field of the SiteMinder User Directory dialog. This is a software limitation. Do not modify the existing settings for this user directory in any way, as it could break the Policy Server connection to this directory. The directory is listed for reference purposes only.
Configure a Policy Server to Use a 5.x OCI NameSpace User Directory
If the Policy Server is running in mixed mode, or if you upgrade an existing 5.x policy store, the r6.0 SP6 Policy Server can use a 5.x OCI namespace user directory
To have a 5.x OCI namespace user directory work with a r6.0 SP6 Policy Server, configure an Oracle data source using the SiteMinder Oracle Wire Protocol driver on the Policy Server host system. When configuring the data source, be sure that the data source name matches the Oracle service name of the OCI namespace user directory.
Create a Windows Oracle Data Source For a 5.x OCI Namespace
To create a Windows Oracle data source for a 5.x OCI namespace
1. Select Programs, Administrative Tools, Data Sources (ODBC) to access the ODBC Data Source Administrator.
2. Click the System DSN tab and click Add. The Create New Data Source dialog box appears.
3. Scroll down and select SiteMinder Oracle Wire Protocol and click Finish.
Step 1: Upgrade the 5.x Policy Server to 6.x
50 Upgrade Guide
4. Under the General tab:
a. In the Data Source Name field, enter the Oracle service name of the OCI namespace user directory that was listed in the 5.x Policy Server User Interface. You find this information by selecting the properties of the user directory.
b. (Optional) In the Description field, enter a description of the Oracle wire protocol data source.
c. In the Host field, enter the name of the Oracle database host system.
d. In the Port Number field, enter the port number on which the Oracle database is listening.
e. In the SID field, enter the service name of the Oracle instance that you want to connect, which you specified in the tnsnames.ora file. The SID is the system identifier for the database instance.
f. Test the connection with the database by clicking Test Connect.
5. Click OK to save the selections and exit the ODBC Oracle Wire Protocol Driver Setup.
The configuration is complete.
The 5.x OCI namespace user directory is visible using the r6.0 SP6 Policy Server User Interface, however, you cannot perform directory lookups unless you set up the data source.
Create a UNIX Oracle Data Source For a 5.x OCI Namespace
To create a UNIX Oracle data source for a 5.x OCI namespace
Edit the $NETE_PS_ROOT/db/system_odbc.ini file by replacing the nete_serverid value for SID with the value that is appropriate for your Oracle instance. The SID is the system identifier for the database instance. If no system_odbc.ini file exists, copy and rename oraclewire.ini to system_odbc.ini.
The modified text for the user directory’s data source should appear as follows:
[OCI_User_Directory_Data_Source]
Driver=nete_ps_root/odbc/lib/NSora24.so
Description=DataDirect 6 SP3 Oracle Wire Protocol
LogonID=uid
Password=pwd
HostName=nete_servername
PortNumber=1521
SID=nete_serverid
CatalogOptions=0
ProcedureRetResults=0
EnableDescribeParam=0
EnableStaticCursorsForLongData=0
ApplicationUsingThreads=1
Step 1: Upgrade the 5.x Policy Server to 6.x
Chapter 2: Upgrade Procedures from 5.x 51
OCI_User_Directory_Data_Source
Defines the Oracle service name of the OCI namespace user directory.
nete_ps_root
Defines an explicit path rather than one with an environment variable.
uid
Defines the user name of the database account that has full access rights to the database.
pwd
Defines the password for the user.
nete_servername
Defines the name of the Oracle database host system.
nete_serverid
Defines the SID or, in this example, instance1.
Upgrade a Sun Java Microsystems Policy and Key Store
The version of the Sun Java Microsystems directory server that is functioning as the 5.x policy store determines if you can upgrade the policy store or if a policy store migration is required.
Note: For a list of supported Sun Java Microsystems LDAP directory servers, go to the Technical Support site and search for the SiteMinder Platform Matrix for 6.0.
■ If SiteMinder r6.0 SP6 supports the directory server, use the following procedure to upgrade the policy store.
■ If SiteMinder r6.0 SP6 does not support the directory server, see How to Migrate a 5.x Policy Store.
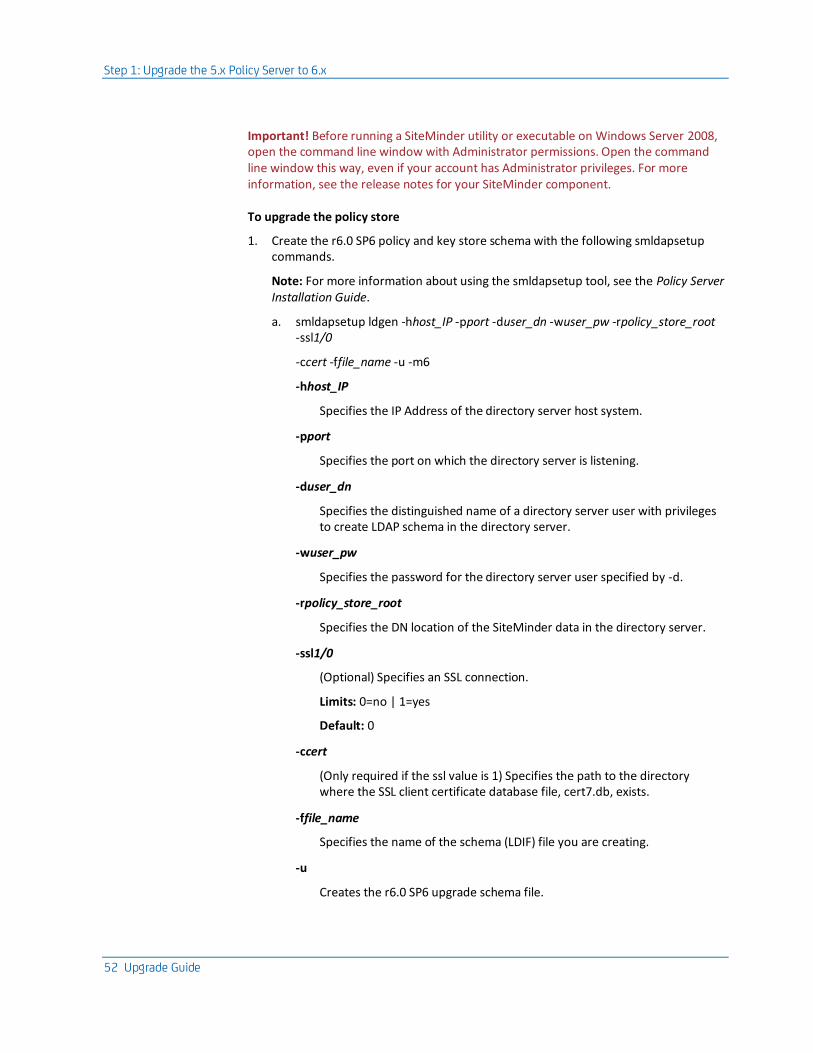
Step 1: Upgrade the 5.x Policy Server to 6.x
52 Upgrade Guide
Important! Before running a SiteMinder utility or executable on Windows Server 2008, open the command line window with Administrator permissions. Open the command line window this way, even if your account has Administrator privileges. For more information, see the release notes for your SiteMinder component.
To upgrade the policy store
1. Create the r6.0 SP6 policy and key store schema with the following smldapsetup commands.
Note: For more information about using the smldapsetup tool, see the Policy Server Installation Guide.
a. smldapsetup ldgen -hhost_IP -pport -duser_dn -wuser_pw -rpolicy_store_root -ssl1/0
-ccert -ffile_name -u -m6
-hhost_IP
Specifies the IP Address of the directory server host system.
-pport
Specifies the port on which the directory server is listening.
-duser_dn
Specifies the distinguished name of a directory server user with privileges to create LDAP schema in the directory server.
-wuser_pw
Specifies the password for the directory server user specified by -d.
-rpolicy_store_root
Specifies the DN location of the SiteMinder data in the directory server.
-ssl1/0
(Optional) Specifies an SSL connection.
Limits: 0=no | 1=yes
Default: 0
-ccert
(Only required if the ssl value is 1) Specifies the path to the directory where the SSL client certificate database file, cert7.db, exists.
-ffile_name
Specifies the name of the schema (LDIF) file you are creating.
-u
Creates the r6.0 SP6 upgrade schema file.

Step 1: Upgrade the 5.x Policy Server to 6.x
Chapter 2: Upgrade Procedures from 5.x 53
-m6
Specifies that a Sun Java Microsystems directory server is being upgraded.
b. smldapsetup ldmod -hhost_IP -pport -duser_dn -wuser_pw -rpolicy_store_root
-ssl1/0 -ccert -ffile_name
2. Import the required r6.0 SP6 policy store objects by entering the following command:
smobjimport -isiteminder_home\db\smdif\
sm_upgrade_55_to_60sp6.smdif -dadmin_name -wadmin_pw -v -f
siteminder_home
Specifies the Policy Server installation path.
-dadmin_name
Specifies the name of the SiteMinder administrator with super user privileges.
-wadmin_pw
Specifies the password for the SiteMinder super user.
-v
Outputs error, warning, and comment messages in verbose format. Verbose format lets you monitor the status of the import.
-f
Overwrites duplicate policy store objects with the r6.0 SP6 policy store objects.
Note: If an argument contains spaces, use double quotes around the entire argument.
Example:
smobjimport -i“C:\Program Files\CA\SiteMinder\db\
smdif\sm_ps_upgrade_55_to_60sp6.smdif” -d"SM Admin" -wPassword -v -f
Important! If you do not complete this step, the required SiteMinder objects are not added to the policy store. As a result, you cannot use the Policy Server User Interface to configure policies.
Upgrade a SQL Server Database Policy and Key Store
SiteMinder r6.0 SP6 does not support the versions of Microsoft SQL Server that SiteMinder 5.x supported. Migrate the policy store data to a supported policy store.
More information:
How to Migrate a 5.x Policy Store (see page 54)

Step 1: Upgrade the 5.x Policy Server to 6.x
54 Upgrade Guide
How to Migrate a 5.x Policy Store
Complete the following procedures to migrate a 5.x policy store to a r6.0 SP6 policy store:
1. Export the 5.x policy store data.
2. Configure an r6.0 SP6 policy store.
3. Import the 5.x policy store data into the r6.0 SP6 policy store.
4. (Optional) Encrypt the SiteMinder super user password.
5. (Optional) Delete SiteMinder data from the old policy store.
Export the 5.x Policy Store Data
Export the 5.x policy store data as detailed in Back Up the 5.x Policy Store and Key Store (see page 34).
Consider the following:
■ If your key store resides in the policy store, be sure to use the -k option when exporting the policy store. By default, policy store keys are not included in an export.
■ If the r6.0 SP6 Policy Server uses the same encryption key that is stored in the 5.x policy store, you do not need to export the policy store data in clear–text. Exporting sensitive data in clear–text is necessary only if the 5.x and 6.x Policy Servers use different encryption keys.
More information:
Back Up the 5.x Policy Store and Key Store (see page 34)
Configure an r6.0 SP6 Policy Store
Configure an r6.0 SP6 policy store in a supported directory server or database.
■ If you are using a supported version of Sun Java System Directory Server Enterprise Edition (formerly Sun ONE/iPlanet), ADAM, or AD LDS, you can use the Policy Store Configuration Wizard to configure the policy store automatically.
■ If you are using any other supported directory server or database, configure the policy store manually.
Note: For more information about configuring a policy store, see the Policy Server Installation Guide.

Step 1: Upgrade the 5.x Policy Server to 6.x
Chapter 2: Upgrade Procedures from 5.x 55
Import the 5.x Policy Store Data
Import the 5.x policy store data into the r6.0 SP6 policy store and key store using the r6.0 SP6 version of smobjimport.
Important! Before running a SiteMinder utility or executable on Windows Server 2008, open the command line window with Administrator permissions. Open the command line window this way, even if your account has Administrator privileges. For more information, see the release notes for your SiteMinder component.
Enter the following command:
smobjimport -ifile_name -dadmin_name -wadmin_password -k -c -v -t
file_name
Specifies the name of the 5.x smdif file.
admin_name
Specifies the name of the SiteMinder administrator account.
admin_password
Specifies the password of the SiteMinder administrator account.
-k
Imports agent keys into the policy store. By default, keys are not included in a policy store import.
-c
(Optional) Imports sensitive data as clear–text. Using clear–text is necessary only if the 5.x and 6.x Policy Servers use different encryption keys.
If you used this option when exporting the policy store data, be sure to use this option when importing the data.
-v
Enables verbose mode.
-t
Enables low level tracing mode to troubleshoot the import.
Consider the following:
■ If an argument contains spaces, surround the entire argument with double–quotes.
Example: smobjimport -ipstore.smdif -d"SM Admin" -wpassword -k -c -t -v
■ The smobjimport utility only imports the first line of a SiteMinder object description from the Description field in the Policy Server User Interface. If a description is more than one line, the utility truncates it.

Step 1: Upgrade the 5.x Policy Server to 6.x
56 Upgrade Guide
Encrypt the SiteMinder Super User Password
If the policy store data you imported into the r6.0 SP6 policy store contains sensitive data in clear–text, use the smreg utility to encrypt the SiteMinder super user password.
Important! Before running a SiteMinder utility or executable on Windows Server 2008, open the command line window with Administrator permissions. Open the command line window this way, even if your account has Administrator privileges. For more information, see the release notes for your SiteMinder component.
Note: For more information about using the smreg utility, see the Policy Server Installation Guide.
Delete SiteMinder Data from an Old Policy Store
If you want to remove the 5.x policy store and key store data from the 5.x policy store, do one of the following:
■ Use the 5.x version of smldapsetup to remove SiteMinder data from an LDAP policy store.
■ Use the 5.x version of the Microsoft SQL Server or Oracle scripts to remove SiteMinder data from an ODBC policy store.
Note: For more information about deleting policy store data, see the 5.x version of the Policy Server Installation Guide.
Upgrade a SiteMinderAudit Log Database
Consider the following:
■ SiteMinder r6.0 SP6 does not support the versions of SQL Server that SiteMinder 5.x supported. You cannot upgrade a 5.x SiteMinder audit store. Configure a new audit store.
Note: For more information about configuring an audit store, see the Policy Server Installation Guide.
■ The version of Oracle that is functioning as the 5.x SiteMinder audit store determines if you can upgrade it. If SiteMinder r6.0 SP6 supports the version, use the following procedure to upgrade the audit store. Otherwise, configure a new audit store.
Note: For a list of supported Oracle databases, go to the Technical Support site and search for the SiteMinder Platform Matrix for 6.0.

Step 1: Upgrade the 5.x Policy Server to 6.x
Chapter 2: Upgrade Procedures from 5.x 57
To upgrade an Oracle audit store
1. Be sure that the 5.x Oracle audit log database instance is accessible from the Policy Server host system. Test the communication using tnsping or sqlplus.
2. Log in to Oracle with sqlplus or another Oracle utility as the user who administers the audit log database.
3. Import the following script:
$NETE_PS_ROOT/db/sql/sm_oracle_logs_upgrade_55_to_60.sql
Consider the following:
– If you are using sqlplus, run the schema using an @ sign.
Example: @$NETE_PS_ROOT/db/sql/sm_oracle_logs_upgrade_55_to_60.sql
– Environment variables may not function in the SQL utility for Oracle. If you have problems when using the utility, specify an explicit path for $NETE_PS_ROOT, instead of specifying the environment variable.
Upgrade a 5.x Sample Users Database
SiteMinder r6.0 SP6 does not support the versions of Microsoft SQL Server that SiteMinder 5.x supported. A 5.x sample users database cannot be upgraded. If you are using a sample users database in your environment, configure a new sample users database.
Note: For more information about configuring a sample users database, see the Policy Server Installation Guide.
Step 1: Upgrade the 5.x Policy Server to 6.x
58 Upgrade Guide
Access the Policy Server User Interface
Once you have installed the Policy Server and migrated your policy store, access the user interface through a browser. Verify that the browser supports SiteMinder by entering the following URL: http://www.netegrity.com/UItest
Note: The URL for the browser test is case-sensitive.
To access the Policy Server User Interface
1. To make sure the upgraded version of the Policy Server User Interface appears, clear your Web browser’s cache.
2. Start your browser and enter http://<hostname>.<domain>:<portnumber>/siteminder in the URL field.
The <hostname> defines the name of the machine on which the Policy Server is installed, such as mymachine; <domain> defines the cookie domain of the host machine, such as .myorg.org; and <portnumber> defines the Web server’s port number. For example:
http://mymachine.myorg.org:81/siteminder
The system displays your browser with the administrator login page.
3. Click Administer SiteMinder.
4. Enter SiteMinder as the user name and enter the password you entered during the installation.
The Policy Server User Interface opens.
What to Do After Migrating the Policy Store
After you have migrated your policy store, do the following:
1. (Optional) If you intend to manage 6.x Web Agents centrally, configure the necessary Policy Server objects to communicate with Web Agents once they are upgraded. Set up these Policy Server objects before upgrading Web Agents. These objects should already be configured if you are upgrading a 5.x Policy Server and 5.x Web Agent. For a list of objects, see Ensure the Agent Objects are Configured at the Policy Server (see page 59).
2. Go to Step 2: Upgrade a 5.x Web Agent to 6.x (see page 60).

Step 1: Upgrade the 5.x Policy Server to 6.x
Chapter 2: Upgrade Procedures from 5.x 59
Ensure the Agent Objects are Configured at the Policy Server
If you intend to manage 6.x Web Agents centrally from the Policy Server, you must configure the following objects before in the Policy Server User Interface before you install the Web Agent:
Note: These objects should already be configured if you are upgrading a 5.x Policy Server and 5.x Web Agent.
■ A SiteMinder Administrator that has the right to register trusted hosts.
A trusted host is a client computer where one or more SiteMinder Web Agents are installed. The term trusted host refers to the physical system. There must be an administrator with the privilege to register trusted hosts.
Note: To configure an administrator, see the Policy Design guide.
■ Agent identity
An Agent identity establishes a mapping between the name and the IP address of the web server instance hosting a Web Agent. You define an Agent identity from the Agents object in the Policy Server User interface. You assign it a name and specify the Agent type as a Web Agent.
The name you assign for the Agent is the same name you specify in the DefaultAgentName parameter for the Agent Configuration Object that you must also define to centrally manage an Agent.
■ Host Configuration Object
This object defines the communication between the trusted host and the Policy Server after the initial connection between the two is made.
A trusted host is a client computer where one or more SiteMinder Web Agents can be installed. The term trusted host refers to the physical system.
Do not confuse this object with the trusted host’s configuration file, SmHost.conf, which is installed at the trusted host after a successful host registration. The settings in the SmHost.conf file enable the host to connect to a Policy Server for the first connection only. Subsequent connections are governed by the Host Configuration Object.
Note: For more information on this object, see the Policy Design guide.
■ Agent Configuration Object
This object includes the parameters that define the Web Agent configuration. There are a few required parameters you must set for basic operation described below.

Step 2: Upgrade a 5.x Web Agent to 6.x
60 Upgrade Guide
Note: To read more about this object, see the Policy Design guide.
■ For all Agents--the Agent Configuration Object must include a value for the DefaultAgentName. This entry should match an entry you defined in the Agents object.
The DefaultAgentName identifies the Agent identity that the Web Agent uses when it detects an IP address on its Web server that does not have an Agent identity assigned to it.
■ For Domino Web Agents--the Agent Configuration Object must include values for the following parameters:
DominoDefaultUser- if the user is not in the Domino Directory, and they have been authenticated by SiteMinder against another user directory, this is the name by which the Domino Web Agent identifies that user to the Domino server. This value can be encrypted.
DominoSuperUser - ensures that all users successfully logged into SiteMinder will be logged into Domino as the Domino SuperUser. This value can be encrypted.
■ For IIS Web Agents
The Agent Configuration Object must include values for the DefaultUserName and DefaultPassword parameters.
The DefaultUserName and DefaultPassword identify an existing NT user account that has sufficient privileges to access resources on an IIS Web server protected by SiteMinder. When users want to access resources on an IIS Web server protected by SiteMinder, they may not have the necessary server access privileges. The Web Agent must use this NT user account, which is assigned by an NT administrator, to act as a proxy user account for users granted access by SiteMinder.
Note: If you plan to use the NTLM authentication scheme, or enable the Windows User Security Context feature, do not specify values for these IIS Web Agent parameters.
For instructions about configuring Agents at the Policy Server, see the Policy Design guide. For Agent parameter descriptions, see the Web Agent Guide.
Step 2: Upgrade a 5.x Web Agent to 6.x
SiteMinder 5.x Web Agents can communicate with SiteMinder 6.x Policy Servers. Therefore, you can upgrade a Policy Server to r6.0 SP6 before upgrading Web Agents.
Note: The Web Agent must be at 5.5 QMR8 latest hotfix before upgrading to r6.0 SP6.

Step 2: Upgrade a 5.x Web Agent to 6.x
Chapter 2: Upgrade Procedures from 5.x 61
Before You Upgrade 5.x Web Agents
Before you upgrade Web Agents, review the following topics:
■ Save the 5.x Web Agent Configuration Settings (see page 61)
■ Be sure that the Policy Server is Installed and Configured (see page 61)
■ Identify the Required Administrator and Policy Server Object Names (see page 61)
■ Install a Servlet Engine for Registration Services (optional) (see page 62)
■ Identify the Web Agent Requirements (see page 62)
■ Upgrade Agent Credential Collectors (see page 62)
■ Identify the 5.x Option Pack Files that Remain After the Upgrade to 6.x (see page 62)
Save the 5.x Web Agent Configuration Settings
When you install a r6.0 SP6 Sun Java System Directory Server (Sun ONE/iPlanet), Apache, or Domino Web Agent, a backup of the 5.x WebAgent.conf is automatically saved under the name WebAgent.conf. <yyyy-mm-dd-hh-mm-ss>.bak, such as WebAgent.conf.2003-11-8-12-39-11.bak. The variable, <yyyy-mm-dd-hh-mm-ss>, equals year, month, day, hour, minute, and second when the file was backed up.
For 5.x IIS Web Agents, when you install a r6.0 SP6 IIS Web Agent, the installation program backs up the WebAgent.conf file in the same format (WebAgent.conf. <yyyy-mm-dd-hh-mm-ss>.bak) as other Agent types. The file is located in the <agent_install_dir>\Bin\IIS directory.
Ensure the Policy Server is Installed and Configured
Before you install the Web Agent, install the Policy Server and ensure it can connect to the system on the network where you plan to install the Web Agent. Also, make sure the Policy Server is running before registering trusted hosts. You can start the Policy Server on the Status tab of the Policy Server Management Console.
To centrally manage Agents from the Policy Server, the Policy Server must also be configured with the a few specific objects. A list of required objects exists in Ensure the Agent Objects are Configured at the Policy Server (see page 59).
Identify the Required Administrator and Policy Server Object Names
Before installing the Web Agent, you need the following information from the Policy Server administrator.
■ Name of the SiteMinder Administrator allowed to register hosts.
■ Name of the Host Configuration Object.
■ Name of the Agent Configuration Object

Step 2: Upgrade a 5.x Web Agent to 6.x
62 Upgrade Guide
r6.x QMR6 Web Agents are configured the same way as 5.x Agents. Web Agents upgraded from 5.x use the same configuration objects and WebAgent.conf (for local configuration) as 5.x.
Install a Servlet Engine for Registration Services (optional)
If you want the Agent to provide registration services, install a supported servlet engine.
For supported servlet engines, see the SiteMinder Platform Matrix for 6.0 on the Technical Support site.
Identify the Web Agent Requirements
For more information about patches and other Web Agent requirements, see the Web Agent Installation Guide.
Upgrade Agent Credential Collectors
If the 5.x Agents you are upgrading are forms or SSL credential collectors (FCC or SCC) and FCCCompatMode is set to NO, there are no issues with upgrading them first or last.
When upgrading your entire SiteMinder environment to 6.x, you must disable 5.x Web Agents from supporting 4.x Agents by setting FCCCompatMode to NO and configure them as documented in the Web Agent Guide. For more information, see the "Configuring Credential Collectors in a Mixed Environment" section in the "Advanced Authentication Scheme Configuration" chapter of the Web Agent Guide.
Identify the 5.x Option Pack Files that Remain After the Upgrade to 6.x
After upgrading the Option Pack from 5.x to 6.x, the following 6.x Option Pack files remain:
■ nete-wa-etopt-filelist.txt
■ nete-wa-etopt-uninstall
■ nete_wa-etopt_env.sh
Note: These files only exist on UNIX systems and do not apply to Windows.
These files are superseded by similar files with opack in the file name instead of etopt. You can delete these files as long as they are not being used.

Upgrade Reports
Chapter 2: Upgrade Procedures from 5.x 63
Upgrade a 5.x Web Agent to 6.x on a Windows System
For instructions on upgrading a 5.x Web Agent to 6.x on a Windows system, see the Web Agent Installation Guide.
Before upgrading, make sure you have followed the instructions in Step 2: Upgrade a 5.x Web Agent to 6.x (see page 60).
Upgrade a 5.x Web Agent to 6.x on a UNIX System
For instructions on upgrading a 5.x Web Agent to 6.x on a UNIX system, see the Web Agent Installation Guide.
Before upgrading, make sure you have followed the instructions in Step 2: Upgrade a 5.x Web Agent to 6.x (see page 60).
Upgrade Reports
In previous versions of SiteMinder 5.x, the Policy Server installed Crystal Reports to function as a Reports Server. In 6.x, the Policy Server does not install Crystal Reports. However, the Policy Server continues to install reports files (.rpt) that are compatible with Crystal Reports 9.0.
You can manage SiteMinder reports after configuring Crystal Reports to read reporting data from the SiteMinder audit log store. The Policy Server continues to generate audit logs and stores the required reporting information in a SQL Server or Oracle database.
The reports files only work on a Windows system.

Chapter 3: Upgrade Procedures from 6.0 65
Chapter 3: Upgrade Procedures from 6.0
This section contains the following topics:
Before You Upgrade from 6.x (see page 65) Important Considerations (see page 65) How to Upgrade the Policy Server and Web Agent (see page 66) Step 1: Upgrade the Policy Server to 6.0 SP6 (see page 66) Step 2: Upgrade a 6.x QMRx Web Agent to 6.x QMR6 (see page 73) Upgrade a Session Server to 6.0 SP5 (see page 74) Upgrade a SiteMinder Audit Store for a CA Security Command Center Integration (see page 75)
Before You Upgrade from 6.x
To upgrade a SiteMinder deployment with multiple Policy Servers and Web Agents, remove one of the Policy Servers and Web Agents from the SiteMinder environment. While those components are being upgraded, the remaining Policy Servers and Web Agents can continue to protect your resources. Continue removing and upgrading SiteMinder components until you are ready to switch to the r6.0 SP6 Policy Server deployment.
This chapter includes upgrade procedures for the following:
■ Policy Server upgrades from SiteMinder 6.0 SP1, 6.0 SP2, 6.0 SP3, 6.0 SP4, and 6.0 SP5 to r6.0 SP6.
■ Web Agent upgrades from SiteMinder 6.0, 6.x QMR1, 6.x QMR2, 6.x QMR3, 6.x QMR4, and 6.x QMR5 to 6.0 QMR6.
Important Considerations
To avoid possible policy store corruption, ensure that the server on which the policy store will reside is configured to store objects in UTF-8 form. For more information on configuring your server to store objects in UTF-8 form, see the documentation for that server.

How to Upgrade the Policy Server and Web Agent
66 Upgrade Guide
How to Upgrade the Policy Server and Web Agent
To upgrade the Policy Server and Web Agents, follow these steps in the order listed:
Step 1: Upgrade the Policy Server to 6.0 SP6 (see page 66)
Step 2: Upgrade a 6.x QMR x Web Agent to 6.x QMR6 (see page 73)
The following figure illustrates the upgrade path.
Step 1: Upgrade the Policy Server to 6.0 SP6
The SiteMinder 6.x Policy Server can communicate with a 6.x Web Agent. Therefore, you can upgrade your Policy Server to r6.0 SP6 before upgrading your Web Agent and still protect resources.
Before You Upgrade the Policy Server
Before you upgrade a Policy Server:
■ Determine if SiteMinder r6.0 SP6 supports the operating systems, directory servers, and databases in your environment.
Note: For more information, go to the Technical Support site and search for the SiteMinder Platform Matrix for 6.0.
■ Use a Supported Version of ServletExec.
■ Use a Supported JRE for the Policy Server.
■ (Linux) Be sure that the required Linux libraries are installed to the Policy Server host system. For more information, see Required Linux Libraries.
■ Remove the Policy Server being Upgraded from Your Environment.
Step 1: Upgrade the Policy Server to 6.0 SP6
Chapter 3: Upgrade Procedures from 6.0 67
■ Review Upgrades and Microsoft Visual Studio.
■ Install the Documentation.
Use a Supported Version of ServletExec
If you are using SiteMinder components that require ServletExec, be sure that a supported version is installed. A supported version of ServletExec, including the required license file, is included with the Policy Server installation kit.
Note: For more information about the required version of ServletExec, see the SiteMinder Platform Support Matrix for 6.0.
Use a Supported JRE for the Policy Server
Be sure that you have the required JRE version installed before upgrading the Policy Server to r6.0 SP6.
JRE requirements are located in the SiteMinder Platform Support Matrix for 6.0, which is located on the Technical Support site. You can download the required JRE version from the Sun Developer Network (SDN).
To locate the support matrix on the Support site
1. Click Technical Support.
2. Click Support By Product.
3. Select CA SiteMinder from the Select a Product Page list.
4. Scroll to Product Status and click Platform Support Matrices.
Required Linux Libraries
If you are installing or upgrading a Linux version of this component, the following is required on the host system:
compat–libstdc++–33.3.2.3–patch_version.i386.rpm
Install this rpm to be sure that you have the appropriate 32-bit C run–time library for your operating system.
Remove the Policy Server Being Upgraded from Your Environment
To prevent Web Agents from contacting a Policy Server being upgraded, remove the Policy Server from your SiteMinder environment.
In addition, before running the Policy Server upgrade program, shut down all instances of the Policy Server Management Console.

Step 1: Upgrade the Policy Server to 6.0 SP6
68 Upgrade Guide
Upgrades and Microsoft Visual Studio
Valid on Windows
SiteMinder r6.0 SP6 components are compiled using Microsoft Visual Studio® 2005 (VC 8). Consider the following:
■ Previous versions of SiteMinder were compiled using Microsoft Visual Studio 2003 (VC 7). Although we expect that all custom code compiled with Microsoft Visual Studio 2003 (VC 7) to continue to work, we recommend testing all custom code with SiteMinder r6.0 SP6.
■ If you are using layered products, we recommend referring to the respective Platform Support Matrix to determine if the product is certified with SiteMinder r6.0 SP6. Examples of layered products include the following:
– Application server agents
– ERP agents
– Advanced Password Services
– The Secure Proxy Server
– Identity Manager
Install the Documentation
SiteMinder documentation is not installed with the Policy Server. We recommend that you install the documentation before upgrading the Policy Server.
Upgrade a 6.x Policy Server to 6.0 SP6 on Windows
Be sure that you have reviewed the concepts in Step 1: Upgrade the Policy Server to 6.0 SP6 (see page 66) before upgrading the Policy Server.
To upgrade a Policy Server on Windows
1. Disconnect any failover or load balancing connections between the Web Agent and Policy Server.
2. Exit all applications that are running.
Step 1: Upgrade the Policy Server to 6.0 SP6
Chapter 3: Upgrade Procedures from 6.0 69
3. Stop the Policy Server using the Status tab of the Policy Server Management Console.
4. Upgrade the Policy Server using the Policy Server installer.
Note: For more information about using the Policy Server installer, see the Policy Server Installation Guide.
Important! If you are upgrading the Policy Server on Windows Server 2008, run the executable file with Administrator permissions, even if you are logged into the system as an Administrator. For more information, see the release notes for your SiteMinder component.
Upgrade a 6.x Policy Server to 6.0 SP6 on UNIX Systems
Be sure that you understand the concepts in Step 1: Upgrade the Policy Server to 6.0 SP6 (see page 66) before upgrading the Policy Server.
To upgrade a Policy Server on UNIX systems
1. Disconnect any failover or load balancing connections between the Web Agent and Policy Server.
2. Exit all applications that are running.
3. Stop the Policy Server using the stop-all command located in the siteminder_home directory.
siteminder_home
Specifies the Policy Server installation path.
4. Upgrade the Policy Server using the Policy Server installer.
Note: For more information about using the Policy Server installer, see the Policy Server Installation Guide.

Step 1: Upgrade the Policy Server to 6.0 SP6
70 Upgrade Guide
Upgrade a 6.x Policy Store
Follow one of the following paths to upgrade a 6.x policy store to r6.0 SP6:
■ If SiteMinder r6.0 SP6 continues to support the directory server or database functioning as the 6.x policy store, you can upgrade the policy store. SiteMinder r6.0 SP6 does not require a policy store schema change. You only have to import the new r6.0 SP6 policy store objects.
■ If the SiteMinder r6.0 SP6 does not support the directory server or database functioning as the 6.x policy store, a new r6.0 SP6 policy store is required. The 6.x policy store data must be migrated to the new store. For more information, see How to Migrate a 6.x Policy Store.
Note: To determine if r6.0 SP6 continues to support your 6.x policy store, go to the Technical Support site and search for the SiteMinder Platform Matrix for 6.0.
Important! Before running a SiteMinder utility or executable on Windows Server 2008, open the command line window with Administrator permissions. Open the command line window this way, even if your account has Administrator privileges. For more information, see the release notes for your SiteMinder component.
To upgrade a 6.x policy store to r6.0 SP6, run one of the following commands
■ For 6.0 to 6.0 SP6
smobjimport -isiteminder_home\db\smdif\sm_upgrade_60_to_60sp6.smdif
-dadmin_name -wadmin_pw -v -f
siteminder_home
Specifies the Policy Server installation path.
admin_name
Specifies the SiteMinder administrator name.
admin_pw
Specifies the SiteMinder administrator password.
■ For 6.0 SP1 to 6.0 SP6
smobjimport -isiteminder_home\db\smdif\sm_upgrade_60sp1_to_60sp6.smdif
-dadmin_name -wadmin_pw -v -f
■ For 6.0 SP2 to 6.0 SP6
smobjimport -isiteminder_home\db\smdif\sm_upgrade_60sp2_to_60sp6.smdif
-dadmin_name -wadmin_pw -v -f
Step 1: Upgrade the Policy Server to 6.0 SP6
Chapter 3: Upgrade Procedures from 6.0 71
■ For 6.0 SP3 to 6.0 SP6
smobjimport -isiteminder_home\db\smdif\sm_upgrade_60sp3_to_60sp6.smdif
-dadmin_name -wadmin_pw -v -f
■ For 6.0 SP4 to 6.0 SP6
smobjimport -isiteminder_home\db\smdif\sm_upgrade_60sp4_to_60sp6.smdif
-dadmin_name -wadmin_pw -v -f
■ For 6.0 SP5 to 6.0 SP6
smobjimport -isiteminder_home\db\smdif\sm_upgrade_60sp5_to_60sp6.smdif
-dadmin_name -wadmin_pw -v -f
How to Migrate a 6.x Policy Store
Complete the following procedures to migrate a 6.x policy store:
1. Export the 6.x policy store data.
2. Configure an r6.0 SP6 policy store.
3. Import the 6.x policy store data into the r6.0 SP6 policy store.
4. (Optional) Encrypt the SiteMinder super user password.
5. (Optional) Delete SiteMinder data from the old policy store.
Export the Policy Store Data
Export the 6.x policy store data using the respective version of the smobjexport tool.
For example, if the current policy store version is r6.0 SP1, then export the policy store data using the r6.0 SP1 version of the smobjexport tool.
Consider the following:
■ If your key store resides in the policy store, be sure to use the -k option when exporting the policy store. By default, policy store keys are not included in an export.
■ If the r6.0 SP6 Policy Server uses the same encryption key that is stored in the 6.x policy store, you do not need to export the policy store data in clear–text. Exporting sensitive data in clear–text is necessary only if the 6.x and r6.0 SP6 Policy Servers use different encryption keys.
Note: For more information about using the smobjexport tool, see the respective version of the Policy Server Installation Guide.
Step 1: Upgrade the Policy Server to 6.0 SP6
72 Upgrade Guide
Configure a Policy Store
Configure an r6.0 SP6 policy store.
■ If you are using a supported version of Sun Java System Directory Server Enterprise Edition (formerly Sun ONE/iPlanet), ADAM, or AD LDS, you can use the Policy Store Configuration Wizard to configure the policy store automatically.
■ If you are using any other supported directory server or database, configure the policy store manually.
Note: For more information about configuring a policy store, see the Policy Server Installation Guide.
Import the Policy Store Data
Import the 6.x policy store data into the r6.0 SP6 policy store using the r6.0 SP6 version of the smobjimport tool.
Consider the following:
■ If you exported sensitive data in clear–text, be sure to import the policy store data using the -c option.
■ If you exported agent keys, be sure to use the -k option when importing the policy store. By default, policy store keys are not included in an import.
Note: For more information about using the smobjimport tool, see the Policy Server Installation Guide.
Encrypt the SiteMinder Super User Password
If the policy store data you imported into the r6.0 SP6 policy store contains sensitive data in clear–text, use the smreg utility to encrypt the SiteMinder super user password.
Important! Before running a SiteMinder utility or executable on Windows Server 2008, open the command line window with Administrator permissions. Open the command line window this way, even if your account has Administrator privileges. For more information, see the release notes for your SiteMinder component.
Note: For more information about using the smreg utility, see the Policy Server Installation Guide.
Step 2: Upgrade a 6.x QMRx Web Agent to 6.x QMR6
Chapter 3: Upgrade Procedures from 6.0 73
Delete SiteMinder Data from an Old Policy Store
If you want to remove the 6.x policy store and key store data from the 6.x policy store, do one of the following:
■ Use the 6.x version of smldapsetup to remove SiteMinder data from an LDAP policy store.
■ Use the 6.x version of the Microsoft SQL Server or Oracle scripts to remove SiteMinder data from an ODBC policy store.
Note: For more information about deleting policy store data, see the respective version of the Policy Server Installation Guide.
Step 2: Upgrade a 6.x QMRx Web Agent to 6.x QMR6
SiteMinder 6.x Web Agents can communicate with r6.0 SP6 Policy Servers Therefore, you can upgrade your Policy Server to r6.0 SP6 before upgrading your Web Agent and still protect resources.
Before You Upgrade 6.x Web Agents
Before you upgrade Web Agents:
■ Ensure the Policy Server is Configured
■ Identify the Required Administrator and Policy Server Object Names
■ Identify the Web Agent Requirements
Ensure the Policy Server is Configured
Before you install the Web Agent, make sure that the Policy Server can connect to the system on the network where you plan to install the Web Agent. Also, make sure the Policy Server is running before registering trusted hosts. You can start the Policy Server on the Status tab of the Policy Server Management Console.
To centrally manage Agents from the Policy Server, the Policy Server must also be configured with the a few specific administrator and Policy Server object names.
Note: For a list other required objects, see the Policy Server Installation Guide.

Upgrade a Session Server to 6.0 SP5
74 Upgrade Guide
Identify the Required Administrator and Policy Server Object Names
Before upgrading the Web Agent, you need the following information from the Policy Server administrator.
■ Name of the SiteMinder Administrator allowed to register hosts.
■ Name of the Host Configuration Object.
■ Name of the Agent Configuration Object.
Identify the Web Agent Requirements
For more information about patches and other Web Agent requirements, see the Web Agent Installation Guide.
Upgrade a 6.x QMRx Web Agent to 6.x QMR6
For more information about upgrading a Web Agent to 6.x QMR6 on a Windows or UNIX system, see the Web Agent Installation Guide.
Upgrade a Session Server to 6.0 SP5
Consider the following:
■ If the current session server version is r6.0 SP5, there is no session server upgrade to r6.0 SP6.
■ If the current session server version is previous to r6.0 SP5, you can upgrade it to r6.0 SP5.
To upgrade the session server
Import one of the following schema scripts into an existing session store database:
sm_mssql_ss_upgrade_60_to_60sp5.sql
Upgrades a SQL Server session store to 6.0 SP5. This script adds a new Expiry Data table to the session store.
sm_oracle_ss_upgrade_60_to_60sp5.sql
Upgrades an Oracle session store to 6.0 SP5. This script adds a new Expiry Data table to the session store.
Note: These scripts are located in siteminder_home\db\SQL. For more information about importing schema into a session store database, see Policy Server Installation Guide.
Upgrade a SiteMinder Audit Store for a CA Security Command Center Integration
Chapter 3: Upgrade Procedures from 6.0 75
Upgrade a SiteMinder Audit Store for a CA Security Command Center Integration
If you use the iRecorder for CA SiteMinder, CA Security Command Center (SCC) can read security–related logging data from a SiteMinder SQL Server or Oracle audit store. This integration requires that you upgrade the 6.x schema in the SiteMinder audit log database. Importing this script is only required if you are integrating SiteMinder with SCC.
Note: For more information about the iRecorder, see the eTrust Audit iRecorder Reference Guide. The SiteMinder/CA SCC integration does not work with DB2 logging databases.
To upgrade the audit log database
Import one of the following schema scripts into an existing SiteMinder audit log database:
sm_mssql_logs_eaudit_upgrade.sql
Upgrades a SQL Server audit log database for the CA SCC integration.
sm_oracle_logs_eaudit_upgrade.sql
Upgrades an Oracle audit log database for the CA SCC integration.
Note: These scripts are located in siteminder_home\db\SQL. For more information about importing a schema script into an audit log database, see the Policy Server Installation Guide.


Appendix A: Troubleshooting 77
Appendix A: Troubleshooting
The following details common problems you may experience during an upgrade and the proposed solutions.
Remove 5.x SiteMinder Files and Directories After Uninstalling 6.x
Symptom:
On Windows and UNIX systems, if you uninstall a 6.x SiteMinder component—Policy Server, Web Agent, or Affiliate Agent—that was previously upgraded from 5.x, there may still be 5.x files, directories, uninstallation scripts, and Windows registry keys remaining.
Solution:
To remove these remaining 5.x items, run the 5.x uninstallation program/script.


Index 79
Index
A
accessing Policy Server using browser • 58
Active Directory, upgrading to 6.0 • 44 affiliate agents, compatibility • 8 Agent
migration issue, 5.x • 37 Agent Configuration Object
definition • 59 Domino requirements • 59 IIS requirements • 59 installation requirement • 59
Agent keys dynamic • 10, 28 static • 10, 28
audit log database in mixed-mode • 22
automatic key rollover in mixed-mode • 18
B
backing up files for recovery • 10, 28 hot fixes for recovery • 10 recovery plan • 10, 28 SiteMinder environment
before upgrade • 28, 34 Web Agent configuration • 10
C
CA eTrust Directory policy store, upgrading • 45
changing Super User password
using smreg • 45 checking
policy store version using Policy Server Management • 17 cluster failover
in mixed-mode • 18 clustered
SiteMinder environment • 23 common
SiteMinder environments • 22
configuring 6.0 Policy Server
to use 5.x OCI user namespace directory • 49 policy store in NDS • 46
considerations for 5.x upgrade • 12
creating new Oracle policy store • 47 policy stores • 43
credential collector upgrading • 62 upgrading last • 12
credential collectors in mixed-mode • 22
D
data source configuring for Oracle • 49 configuring for Oracle,UNIX • 50
databases, supported versions • 43, 70 description
mixed environment • 16 determining upgrade path • 12 disabling
SNMP Agent • 32 documentation
installing • 39, 68 dynamic keys, maintaining single sign-on • 10, 28
E
enabling SNMP Agent • 32
environment mixed
definition • 17 eTrust Directory
policy store, upgrading • 45 exception and error handling
in mixed-mode • 18 exporting
policy store • 10
F
failover mode, upgrade issues • 8
80 Upgrade Guide
FCC upgrading • 62
Federation Security Services support in mixed-mode • 18
G
global rules and responses in mixed-mode • 18
H
Hardware Keys installing
Windows • 39 setting at installation
Windows • 39 Host Configuration Object
definition • 59 installation requirement • 59
hot fixes, backing up for recovery • 10
I
IBM Directory Server policy store, upgrading • 51
IBM Directory Server policy, upgrading to 6.0 • 45
impersonation in mixed-mode • 18
importing data 6.0 policy store • 46, 48, 53
installation scripts, copying • 10 installing
documentation • 39, 68 iPlanet, upgrading to 6.0 • 51
J
JDK version required • 39
JRE version required • 36, 39
K
keep track OCI user directories
settings • 37 key store
creating • 28 described • 10
managing • 10 upgrading • 51
L
LDAP Directory Servers, supported versions • 43, 70 policy store, upgrading • 44, 51
LDAP Directory setting up policy store using smobjimport • 45
logout reason code support in mixed-mode • 18
logs database upgrading • 56
M
maintaining single sign-on dynamic keys • 10, 28 static keys • 10, 28
managing key stores • 10 Microsoft Passport Authentication Scheme
in mixed-mode • 18 migrating
policy store • 58 migration
described • 7 issues • 8 planning strategy • 8
mixed environment definition • 17 description • 16 limitations • 18
Mixed-mode audit log database • 22 definition • 17
mixed-mode, affecting automatic key rollover • 18 cluster failover • 18 credential collectors • 22 exception and error handling • 18 Federation Security Services support • 18 global rules and responses • 18 impersonation • 18 logout reason code support • 18 Microsoft Passport Authentication Scheme • 18 policy evaluation • 18 RBAC support • 18 SAML 1.0 producer support • 18 SAML 1.1 support • 18
Index 81
SAML 2.0 support • 18 SAML-compliant SAML artifact • 18 Web services variable • 18
modifying 5.x .smdif file
OCI namespace user directory • 48 monitoring
Policy Server cluster • 14
N
NDS configuring policy store • 46 upgrading policy store • 46
Neterity SNMP Agent stopping before upgrade • 38
Novell Directory Server see also NDS • 46 Novell, importing upgrade .smdif file • 46
O
OCI namespace user directory configuring
6.0 Policy Server • 49 modifying
5.x .smdif file • 48 OCI user directories
keep track settings • 37 OID LDAP
policy store, upgrading • 51 Option Pack files
remaining after 5.x upgrade • 62 Oracle data source
creating in Windows • 49 Oracle policy store
creating new instance • 47 Oracle policy store 5.x
upgrading existing instance • 48 Oracle wire protocol driver
manually configuring UNIX • 50 Oracle, importing upgrade .smdif file • 48
P
Passport Authentication Scheme in mixed-mode • 18
planning strategy migration • 8 recovery • 10
policy evaluation in mixed-mode • 18
Policy Server 5.x, upgrading • 33, 39 6.x, upgrading • 66, 68, 69 accessing using browser • 58 checking configuration • 59, 61, 73 SiteMinder component compatibility • 11 testing browser support • 58 upgrade path • 12
Policy Server cluster monitoring • 14
Policy Server Configuration Wizard using • 43
policy store 5.x Active Directory LDAP, upgrading • 44 5.x NDS, upgrading • 46 after migration • 58 configuring an Oracle data source • 49 creating • 43 exporting in cleartext • 10 NDS, configuring • 46
policy store version checking • 17
preserving data, using regedit tool • 10 registry settings • 10
R
RBAC support in mixed-mode • 18
recovery plan copying installation scripts • 10 files, backing up • 10, 28 hot fixes, backing up • 10 strategy • 8, 10
regedit tool • 10 registering trusted hosts
administrator rights • 59 Registration Services
requirements for Web Agent • 62 Registry Conversion Tool • 10 registry settings, preserving • 10 removing
5.x SiteMinder files after uninstalling 6.0 • 77 Reports Server, upgrading • 63
82 Upgrade Guide
S
SAML 1.0 producer support in mixed-mode • 18
SAML 1.1 support in mixed-mode • 18
SAML 2.0 support in mixed-mode • 18
SAML-compliant SAML artifact in mixed-mode • 18
sample users database upgrading • 57
saving Web Agent configuration • 61 SCC
upgrading • 62 Session Server, upgrading • 74, 75 shared user directory environment • 24 site analysis
implementing upgrades • 8 SiteMinder environment issues • 8
SiteMinder compatible components • 11 mixed environment limitations • 18
SiteMinder Administrator for registering hosts • 59
SiteMinder environment back up
before upgrade • 28, 34 SiteMinder environments
clustered • 23 common • 22
SiteMinder mixed-mode definition • 17
sm_mssql_ss_upgrade_60_to_60SP3.sql description • 74
sm_oracle_ss_upgrade_60_to_60SP3.sql description • 74
smobjexport tool key store, exporting • 28 policy store, exporting • 10
smobjimport importing 6.0 policy store objects (Novell) • 46 importing 6.0 policy store objects (Oracle) • 48 importing 6.0 policy store objects (SQL Server) •
53 setting up LDAP Directory as policy store • 45 upgrading Active Directory to 6.0 • 44 upgrading iPlanet to 6.0 • 51
smreg
changing Super User password • 45 SNMP Agent • 38
disabling • 32 enabling • 32
SNMP compatibility MIB description • 31
SNMP MIB, compatibility description • 31
SQL Server, importing upgrade .smdif file • 53 static keys, maintaining single sign-on • 10, 28 stopping
Neterity SNMP Agent • 38 strategy, upgrading SiteMinder • 8 Super User password
changing using smreg • 45 system_odbc.ini
editing for an Oracle database, UNIX • 50 system_odbc.ini, UNIX
Oracle • 50
T
tool regedit • 10 Registry Conversion • 10 smobjexport • 10, 28
trusted host definition • 59
U
upgrade considerations, 5.x • 12, 27, 33 considerations, 6.x • 65 described • 7 issues • 8 path • 12 plan • 8 Policy Server, upgrade path • 12 Web Agent, determining path • 12
upgrade .smdif file, importing policy store objects (Novell) • 46
upgrade .smdif file, importing policy store objects (Oracle) • 48
upgrade .smdif file, importing policy store objects (SQL) Serve • 53
upgrading 5.x NDS policy store • 46 5.x Web Agents • 33 5.x Active Directory LDAP policy store • 44
Index 83
5.x Policy and Key Store in 5.x iPlanet LDAP Server • 51
5.x Policy and Key Store in IBM Directory Server • 51
5.x Policy and Key Store in OID • 51 5.x Policy Server
UNIX • 39 Windows • 39
5.x Policy Server and 5.x Web Agent • 33 5.x policy store in CA eTrust Directory • 45 5.x Web Agents • 60 6.x Web Agents • 66 6.x Policy Server
UNIX • 69 Windows • 68
6.x Policy Server and 6.x Web Agent • 66 6.x Web Agents • 73 existing 5.x Oracle policy store • 48 FCC • 62 IBM Directory Server policy and key store
to 6.0 • 45 logs database • 56 Reports Server • 63 sample users database • 57 SCC • 62 Session Server • 74, 75 single sign-on • 10 SQL server database policy and key store • 53 strategy • 8 Web Agent, considerations • 61, 73 without single sign-on or failover • 12
using Policy Server Configuration Wizard • 43
W
Web Agent 5.x, upgrading • 33, 60 6.x, upgrading • 66, 73 configuration, backing up • 10 considerations, upgrade • 61, 73 upgrade path • 12 upgrading credential collector • 12
Web services variable in mixed-mode • 18
wire protocol driver, Oracle manually configuring
UNIX • 50