BullDog Rear Ends 214 PRODUCT GUIDE CT-1 Mod
6
BullDog Rear Ends 2014 PRODUCT GUIDE CT-1 Mod The CT-1 MOD is the complete hub to hub package for spec modifieds. Package includes the race proven CT-1 quick change, steel tubes, GN 5x5 hubs with steel drive flanges, 11.75" rotors and solid axles. MOD-4.86 BullDog CT-1 4.86 Rear with Complete Modified Package MOD-4.12 BullDog CT-1 4.12 Rear with Complete Modified Package The C T- 1 MOD Standard Features Include: ▪ Front Seal Plate ▪ O-Ringed Aluminum Gear Cover ▪ 100% Magnesium Castings ▪ Breather Assembly ▪ Bell to tube thru bolts ▪ Magnetic drain plug ▪ Correct length Thru Bolts for your application ▪ I0 AN Port for fill can ▪ Heat Treated Lower Shaft ▪ Three side bell studs per side allow for easy removal without complete disassembly ▪ 5 qts BullDog Blood Oil Did you know Consider using steel Smart Tube style tubes in place of 2.5" GN. The hub uses an inverted drive flange requiring shorter axles- Smart Tube style is lighter, stronger and cheaper! BullDog was the first in the industry to offer an O-ringed Gear Cover. It was unveiled at the 2008 PRI Show. 2.5” GN 5 on 5 Tube to Axle conversion Tube Length Axle Length 22" 28.5" 23" 29.5" 24" 30.5" 25" 31.5" 26" 32.5" 27" 33.5" 29" 35.5" A 60" centered Rear utilizes two 24" tubes. A rear with 2" offset would use a 22" and 26" for its tube lengths. SPLINE’s tip
Transcript of BullDog Rear Ends 214 PRODUCT GUIDE CT-1 Mod

BullDog Rear Ends 2014 PRODUCT GUIDE
CT-1 Mod
The CT-1 MOD is the complete hub to hub package for spec modifieds. Package includes the race proven CT-1 quick change, steel tubes, GN 5x5 hubs with steel drive flanges, 11.75" rotors and solid axles.
MOD-4.86BullDog CT-14.86 Rear with Complete Modified Package
MOD-4.12BullDog CT-14.12 Rear with Complete Modified Package
The CT-1 MOD
Standard Features Include:▪ Front Seal Plate▪ O-Ringed Aluminum Gear Cover▪ 100% Magnesium Castings▪ Breather Assembly▪ Bell to tube thru bolts
▪ Magnetic drain plug▪ Correct length Thru Bolts for your
application▪ I0 AN Port for fill can▪ Heat Treated Lower Shaft
▪ Three side bell studs per side allowfor easy removal without completedisassembly
▪ 5 qts BullDog Blood Oil
Did you know
Consider using steel Smart Tube style tubes in place of 2.5" GN. The hub uses an inverted drive flange requiring shorter
axles- Smart Tube style is lighter, stronger and
cheaper!
BullDog was the first in the industry to offer an O-ringed Gear Cover. It was unveiled at the 2008 PRI Show.
2.5” GN 5 on 5 Tube to Axle conversionTube Length Axle Length
22" 28.5"23" 29.5"24" 30.5"25" 31.5"26" 32.5"27" 33.5"29" 35.5"
A 60" centered Rear utilizes two 24" tubes. A rear with 2" offset would use a 22" and 26" for its tube lengths.
SPLINE’s tip
BullDog Rear Ends 2014 PRODUCT GUIDE
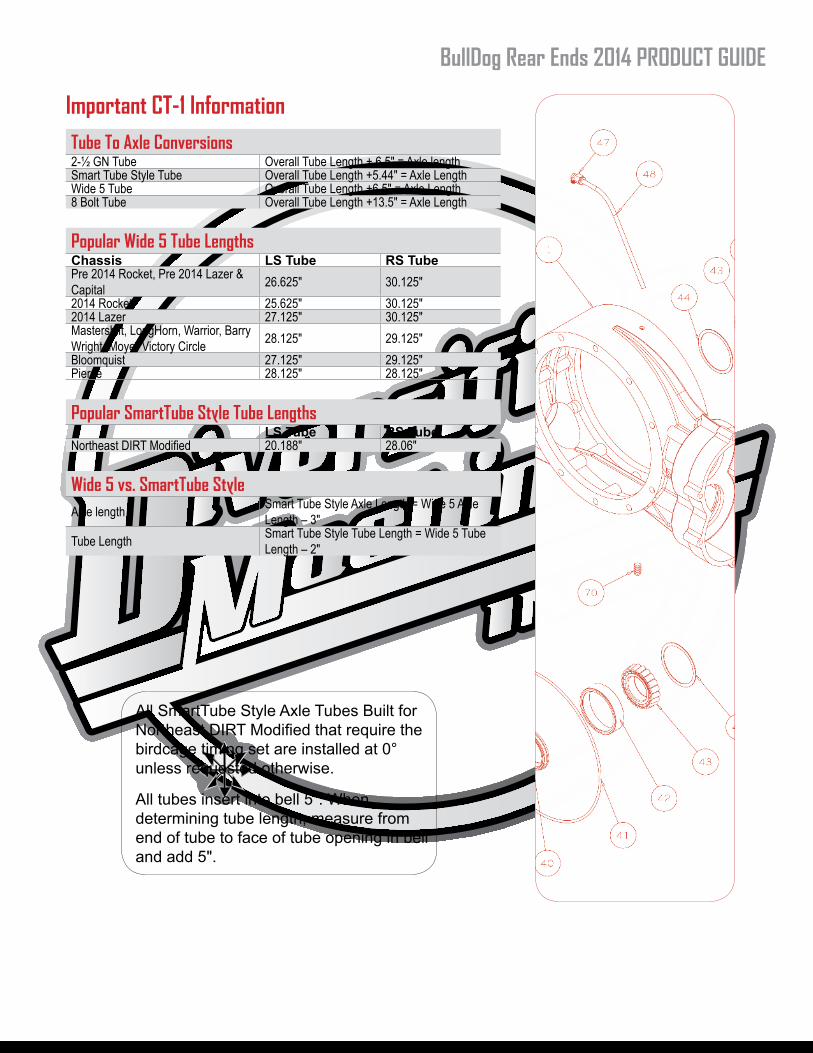
Important CT-1 InformationTube To Axle Conversions2-½ GN Tube Overall Tube Length + 6.5" = Axle lengthSmart Tube Style Tube Overall Tube Length +5.44" = Axle LengthWide 5 Tube Overall Tube Length +6.5" = Axle Length8 Bolt Tube Overall Tube Length +13.5" = Axle Length
Popular Wide 5 Tube LengthsChassis LS Tube RS TubePre 2014 Rocket, Pre 2014 Lazer & Capital 26.625" 30.125"2014 Rocket 25.625" 30.125"2014 Lazer 27.125" 30.125"Mastersbilt, LongHorn, Warrior, Barry Wright, Moyer Victory Circle 28.125" 29.125"Bloomquist 27.125" 29.125"Pierce 28.125" 28.125"
Popular SmartTube Style Tube LengthsLS Tube RS Tube
Northeast DIRT Modified 20.188" 28.06"
Wide 5 vs. SmartTube StyleAxle length Smart Tube Style Axle Length = Wide 5 Axle
Length – 3"Tube Length Smart Tube Style Tube Length = Wide 5 Tube
Length – 2"
All SmartTube Style Axle Tubes Built for Northeast DIRT Modified that require the birdcage timing set are installed at 0° unless requested otherwise.
All tubes insert into bell 5". When determining tube length, measure from end of tube to face of tube opening in bell and add 5".

BullDog Rear Ends 2014 PRODUCT GUIDE
Important CT-1 Information9” Ring Gear and EDM Ring GearThe 9" Ring Gear option is recommended for applications below 500 hp. EDM ring gears decrease weight and increase flex. Ring gear bolts should be replaced and torqued to 60ft. lbs. using blue threadlocker every 500 laps when using an EDM ring gear. EDM ring gears are not recommended in high horsepower (800+) applications.
Angular Contact Pinion PackAngular contact pinion packs are available in place of standard issue Timken® tapered roller bearings. Angular contact pinion packs offer a 33% reduction in drag when NEW. After 2 races tapered rollers are just as free and offer superior strength. Angular contact pinion bearings require frequent inspection. Check play by grabbing pinion shaft, if play is present the bearing pack needs to be replaced. Timken® tapered roller bearings are perfect for this application and virtually bullet proof. Angular contact bearings WILL need to be replaced sometime. Choose the pinion bearing that’s best for you.
REM® and REM® BLACKBullDog offers ring and pinion with REM® treatment. REM® Isotropic Superfinish Process (ISP) offers many advantages over other “Super Finishing” techniques. REM® removes the microscopic peaks created during the machining process. The treatment provides a more uniformed surface reducing friction. REM® BLACK is the newest offering from REM®. The treatment allows oil to adhere to the surface at a molecular level. REM® BLACK features a dull black finish. Regular REM® features a mirror-like finish.
Loaded Pinion RemovalHeat area around the pinion until the pinion is able to freely be removed. DO NOT concentrate heat around the pinion nose bearing.

BullDog Rear Ends 2014 PRODUCT GUIDE
Important CT-1 InformationLoaded Pinion InstallationHeat area around the pinion until the pinion freely drops in to the center.DO NOT concentrate heat around the pinion nose bearing support.
Closed Tube Rear Set-UpAfter installing pinion allow rear to return to room temperature. (70° F)Adjust pinion nut until 25 in/lbs rotational preload is achieved without spool. Lubricate Posi retainer O-ring and install Posi-Lock retainer on pinion nut using finger pressure only. Rotate retainer if needed to align locking splines. Attach right sidebell to center using three installed studs. Torque to 35 ft./lbs. Rotate right side down and install loaded spool with check bearings and recommended starting shims. (Left .024" Right- .055") Install left side bell and torque three studs to 35ft/lbs. Verify pinion backlash to be .004-.008 minimum when checked on 10 spline tooth of pinion, using dial indicator. Adjust spool shims accordingly until desired amount of pinion backlash is achieved. Once desired amount of pinion backlash is achieved, verify rotation pinion preload to be 35 in/lbs. with spool installed. Once set-up is complete, remove side bells. Install side bell o-rings and install spool seals utilizing red loctite. Remove spool checking bearings carefully while maintaining shim stacks. Install spool bearings using press. Re-install right side bell, bell and tube spool seal. Drop Spool into center. Lube left spool seal and install bell with ring gear back stop in place. Torque side bells to 35 ft/lbs. Tighten ring gear backstop against ring gear and back off ⅛ turn. Jam ring gear backstop nut. If yOu dON’T KNOw - CALL!!!!

BullDog Rear Ends 2014 PRODUCT GUIDE
9” Ring Gear and EDM Ring GearThe 9" Ring Gear option is recommended for applications below 500 hp. EDM ring gears decrease weight and increase flex. Ring gear bolts should be replaced and torqued to 60ft. lbs. using blue threadlocker every 500 laps when using an EDM ring gear. EDM ring gears are not recommended in high horsepower (800+) applications.
REM® and REM® BLACKBullDog offers ring and pinion with REM® treatment. REM® Isotropic Superfinish Process (ISP) offers many advantages over other “Super Finishing” techniques. REM® removes the microscopic peaks created during the machining process. The treatment provides a more uniformed surface reducing friction. REM® BLACK is the newest offering from REM®. The treatment allows oil to adhere to the surface at a molecular level. REM® BLACK features a dull black finish. Regular REM® features a mirror-like finish.
Important XR-1 & XR-2 Information
Important Specs Side Bell Nuts- 30 ft./lbs.Threaded Ring Gear- 60 ft./lbs. w/ Red threadlockerPinion Retainer Bolts- 25 ft./lbs.XR-2 Snout Locking Ring- 70 ft./lbs.XR-2 Front Spacer Plate Bolts- 35 ft./lbs.Pinion Backlash- .004-.008Rotational Pinion Preload (No axle) – 25 in/lbs. @ 70° FRotational Pinion Preload (Complete Assembly) – 48 in/lbs. @ 70° FStarting Recommendations for Shims Left- .024" Right - .055"
XR-1 Dimensions: XR-2 Dimensions:

BullDog Rear Ends 2014 PRODUCT GUIDE
Important XR-1 & XR-2 InformationLoaded Pinion RemovalHeat area around the pinion until the pinion is able to freely be removed.DO NOT concentrate heat around the pinion nose bearing.
Loaded Pinion InstallationHeat area around the pinion until the pinion is able to freely drop into center.DO NOT concentrate heat around the pinion nose bearing support.
Open Tube Rear Set-UpAfter installing pinion allow rear to return to room temperature. (70° F) Adjust pinion nut until 25 in./lbs. rotational preload is achieved without the spool. Lubricate posi-retainer o-ring and install posi-lock retainer on pinion nut using finger pressure only. Rotate retainer if needed to align locking splines. Install axle with starting shim recommendations.(Pg.31) Install sidebell and tighten four nuts to 30 ft/lbs. Verify pinion backlash to be .004"-.008" minimum when checked on 10 spline tooth of pinion using dial indicator. Adjust spool shims accordingly until desired amount of pinion backlash is achieved. Once desired amount of pinion backlash is achieved verify rotation pinion preload to be 45in/lbs. Once set-up is complete remove side bell. Install side bell seal, o-rings and axle seals. Re-install side bell with ring gear back stop in place. Torque side bell nuts to 30 ft. /lbs. Tighten ring gear backstop against ring gear and back off ⅛ turn. Jam ring back stop nut. IF YOU DON’T KNOW - CALL!!!!
Swivel CouplersDMI style swivel couplers must be serviced every 6-8 races. Disassemble, clean thoroughly, inspect and replace worn components. Pack liberally with Bel-Ray Assembly Lube (Part# GR-600) and install in coupler, insert seal and install snap ring ensuring engagement.
WP Style couplers are built standard without o-rings on the lower shaft.This enables the coupler to run in gear lube. Disassemble and inspect every 12 nights. Disassemble, clean thoroughly, inspect and replace worn components. Re-assemble with a light coat of grease, install seal and snap ring ensuring engagement. Zip tie end of seal to driveshaft.