Buckets Lids Mylar bags - Giltweaselgiltweasel.com/stuff/storing_food_in_buckets.pdf · food grade...
18
The issue of “How do I store food in buckets?” seems to have a regular appearance here so I decided to document my process this last weekend. I’ll start with what you need to have on hand and various sources of for these items. Then we’ll move on to packaging and storing for the long term. What you need and where to get it (and where to get it) I’m going to assume you know what food stuff to get and where to get it. Others may want to comment on what they store and where they purchase (or acquire) it. Buckets – There are various sources and ideals about buckets. Many people secure used food grade bucket from their local grocery or bakery. You will want to wash those bucket out with soap and water. I tend to buy new buckets from Lowe’s just because I don’t want to wash them out. You can also find these buckets at Wal-mart or any home improvement store. You can purchase these buckets online at places like U.S. Plastic , but the shipping may be cost prohibitive. Lids – There are several different types of lids. There are simple lids that just snap on. There are also Gamma seal lids that are air tight and easy to remove. I use lids with gaskets and the little tabs that need to be cut to remove the lid (like to the tamper evidence quality of these lids). I purchase these lids at U.S. Plastic online for about $1.60 each. Generally, I’ll buy a bunch to have around. I bought 30 in the last order and shipping was about $10. Mylar bags – Whether you have new or used buckets, food grade or not food grade buckets, it’s a wise idea to store your food in something that will be a barrier between the food and the bucket. You can purchase Mylar bags in various dimensions and thicknesses. I have purchased large (30” x 20”) 5 mil bags from Sorbient Systems online. Most recently, I purchased smaller bags (14” x 14”) 7 mil bags from the LDS church online . I am not an LDS member, but they don’t care. The price was good in my opinion (250 bags for $90) with shipping about $10 because 250 of these bags are heavy. Oxygen Absorbers – You need to take as much Oxygen out of the bags as possible. It kills any beasties who may be in certain foods and helps the food last longer (as far as I can tell). You can get Oxygen absorbers all different places online. I’ve bought from Sorbient System and the LDS church. The prices were comparable. Sorbient Systems sells various sizes and LDS church sells in one size but packaged in 100 count bags. I think the LDS price was around $12 for a 100 count bag Permanent Marker – you need a felt tip permanent marker to write on the Mylar bags and the buckets. Iron – This is a standard clothes iron that you likely already own. Scrap wood – A scrap pieces of lumber (or any hard work surface that will not be hurt by high heat) is needed to seal the Mylar bags.
Transcript of Buckets Lids Mylar bags - Giltweaselgiltweasel.com/stuff/storing_food_in_buckets.pdf · food grade...

The issue of “How do I store food in buckets?” seems to have a regular appearance here so I decided to document my process this last weekend. I’ll start with what you need to have on hand and various sources of for these items. Then we’ll move on to packaging and storing for the long term. What you need and where to get it (and where to get it) I’m going to assume you know what food stuff to get and where to get it. Others may want to comment on what they store and where they purchase (or acquire) it. Buckets – There are various sources and ideals about buckets. Many people secure used food grade bucket from their local grocery or bakery. You will want to wash those bucket out with soap and water. I tend to buy new buckets from Lowe’s just because I don’t want to wash them out. You can also find these buckets at Wal-mart or any home improvement store. You can purchase these buckets online at places like U.S. Plastic, but the shipping may be cost prohibitive. Lids – There are several different types of lids. There are simple lids that just snap on. There are also Gamma seal lids that are air tight and easy to remove. I use lids with gaskets and the little tabs that need to be cut to remove the lid (like to the tamper evidence quality of these lids). I purchase these lids at U.S. Plastic online for about $1.60 each. Generally, I’ll buy a bunch to have around. I bought 30 in the last order and shipping was about $10. Mylar bags – Whether you have new or used buckets, food grade or not food grade buckets, it’s a wise idea to store your food in something that will be a barrier between the food and the bucket. You can purchase Mylar bags in various dimensions and thicknesses. I have purchased large (30” x 20”) 5 mil bags from Sorbient Systems online. Most recently, I purchased smaller bags (14” x 14”) 7 mil bags from the LDS church online. I am not an LDS member, but they don’t care. The price was good in my opinion (250 bags for $90) with shipping about $10 because 250 of these bags are heavy. Oxygen Absorbers – You need to take as much Oxygen out of the bags as possible. It kills any beasties who may be in certain foods and helps the food last longer (as far as I can tell). You can get Oxygen absorbers all different places online. I’ve bought from Sorbient System and the LDS church. The prices were comparable. Sorbient Systems sells various sizes and LDS church sells in one size but packaged in 100 count bags. I think the LDS price was around $12 for a 100 count bag Permanent Marker – you need a felt tip permanent marker to write on the Mylar bags and the buckets. Iron – This is a standard clothes iron that you likely already own. Scrap wood – A scrap pieces of lumber (or any hard work surface that will not be hurt by high heat) is needed to seal the Mylar bags.

Desiccant (Optional) – Some folks us desiccant and some don’t. YMMV. I’ve used it in the past, but I didn’t use it on this round of storage. Dry Ice (Optional) – Some folks use dry ice to remove oxygen. I have never tried it and do not cover this below. Bucket lid opener (Optional) – Depending the bucket lid you use, you may want have a opener. Here’s a view of a typical Sunday afternoon with bulk food and buckets.

This picture shows the bucket lids I like to use. They are from U.S. Plastics and have a nice gasket seal. The gasket gives you an extra layer of protection in case your Mylar bag fails or was not properly sealed. Some people squirt a bead of silicone to seal their buckets if the lid does not have a gasket.

This picture shows a stack to 250 7mil Mylar bags. They are approximately 14” x14” (I included the Diet Coke can for scale.) Not shown in this picture – I also have some 30” x 20” bags that can be used to store a lot of the same item in a single bucket. In this exercise I use the big bags to store spaghetti.

Here are oxygen absorbers I got from the LDS Church (the glass container was not included). The came sealed in a plastic bag. When you open them, you need to put them in an airtight container (duh) while waiting to use them. You’ll know they are working because they let off heat.
How to store food - With Small Bags This is my first time using the smaller Mylar bags. They are very handy in size. The first thing I do is write on the empty bag. I record some of the same information I write on the bucket later. This includes:
• What food is inside • Where I bought the food (in case there’s a recall, etc.) • The date I stored it • The initials of who stored it ( plan on pre-placing certain buckets a family and
friends houses) • What else I put in the bag – for instance, I put 4 Oxygen absorbers in this bag of
rice.

Place the bag in a clean bucket and have someone hold one side of the bag against the edge of the bucket. Either pour or scoop the material inside the bag. Since we used a clean bucket, take the part you spilled and put it in the bag. Fill the bag as shown to about 4 or 5 inches from the top.

Shake the bag to settle the material. Carefully fold the excess Mylar over so that you can lay the bag on your work surface. Carefully unfold the flap that we just made and lay it on a your scrap wood. Using an iron on the “Wool” setting (very hot) I iron one half of the Mylar bag. At this point, pick the bag up and insert the Oxygen absorbers through the opening. Then I fold the back up trying to squeeze any excess air in the bag out. Then put the flap back on the board and iron the rest of the bag.

When the bag is completely sealed it will look like this. The bag does not hurt, stain, stink or do anything else bad to the iron, so feel free to use the family iron. Please be careful in handling the sealed edge of the bag because it’s hot (sorry – had to say it).

I generally fit 4 or 5 of these bags in each bucket depending on how much material I put in each bag. This picture shows the full bucket.

How to store food - With Large Bags There are a few differences when using the large bags. This picture shows how the empty bag looks when inserted into the 5 gallon bucket. As you can tell, there is plenty of Mylar material left over for sealing the bag.

This picture shows 18 pounds of Spaghetti Pasta from Sam’s Club. These easily fit into the bag and bucket.

The process and philosophy for sealing the large bags is a little different than the small bags. This picture shows the board I use and the bag after it’s been flattened out by its seams. Put your Oxygen absorbers at this point because we won’t be opening the bag again until you need the food.

Different folks do different things here. I place the edge of the Mylar bag on the board, squeeze out as much air as possible, and wrap it one turn then put the board down on the top of the bucket. Do not wrap too many times because you want the board to be directly behind the layer of bag you’re trying to seal.

Here is the seal on the bag. You’ll notice that the seal is not next to the food stuff like we sealed the smaller bags. Since the large bags likely hold more food then you’ll need if opened, we want to seal the bag close to the outside edge. That means, when you open this bag later, you will need to cut the sealed portion of the bag away. You may then reseal the bag further down if needed.

Use a rubber mallet to seat the bucket lid. If you don’t have a rubber mallet, you can use a regular hammer and a board. Place the board on top of the bucket and start hammering.

Results I hate breaking the seals on buckets until I really need what’s inside. Therefore, I write a short story on the outside of the bucket. The notes include:
• What food is inside • How much by weight (so I can visually inventory) • What its stored in (i.e. one big bag, multiple smaller bags or original packaging) • Where I bought the food (in case there’s a recall, etc.) • The date I stored it • The initials of who stored it (I plan on pre-placing certain buckets at family and
friend’s houses)
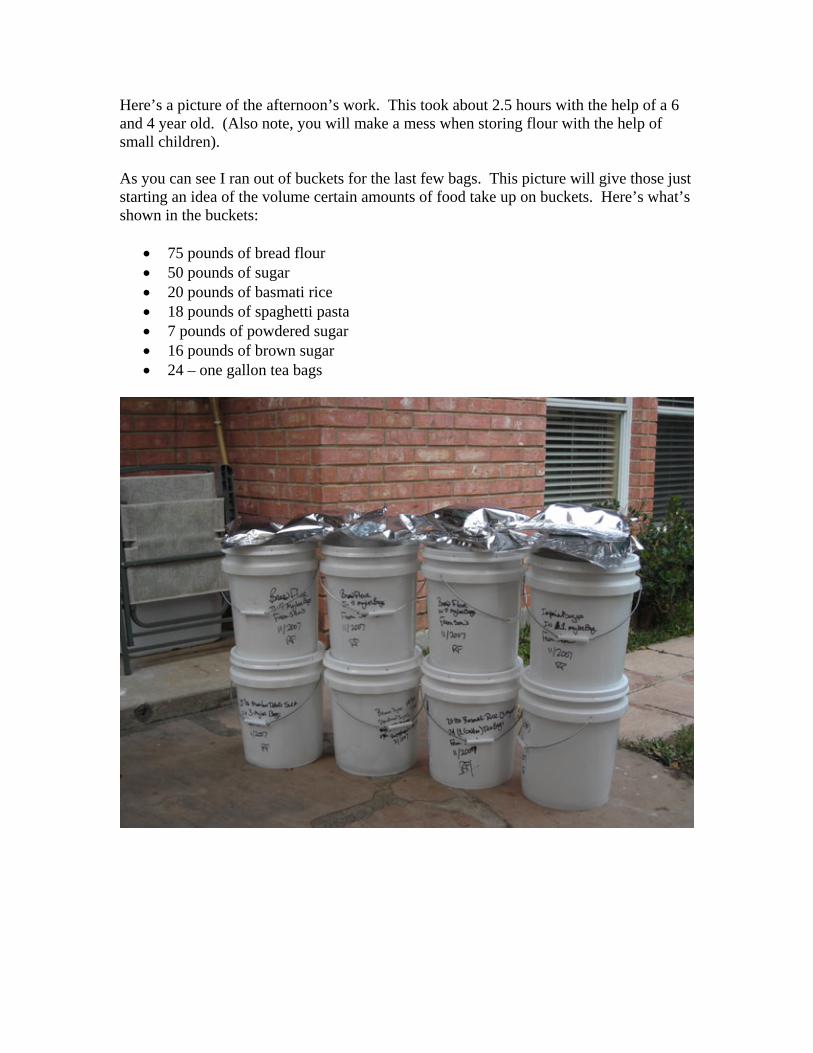
Here’s a picture of the afternoon’s work. This took about 2.5 hours with the help of a 6 and 4 year old. (Also note, you will make a mess when storing flour with the help of small children). As you can see I ran out of buckets for the last few bags. This picture will give those just starting an idea of the volume certain amounts of food take up on buckets. Here’s what’s shown in the buckets:
• 75 pounds of bread flour • 50 pounds of sugar • 20 pounds of basmati rice • 18 pounds of spaghetti pasta • 7 pounds of powdered sugar • 16 pounds of brown sugar • 24 – one gallon tea bags

Storing the buckets As with most items we keep, these buckets like a cool dry place. I’ve read not to stack them over three buckets high. These lids that I use are pretty tough but I’ll only stack higher than three buckets if the contents are very light. I hope this helps clarify this process for a lot of folks just getting started. Seeing pictures generally helps me a little better than the written word alone.