Bucket Crusher (GBC) - genesisattachments.com · 2 Genesis GBC Bucket Crusher 2018 Genesis...
51
Bucket Crusher (GBC) SAFETY & OPERATOR’S MANUAL
-
Upload
vuongquynh -
Category
Documents
-
view
214 -
download
0
Transcript of Bucket Crusher (GBC) - genesisattachments.com · 2 Genesis GBC Bucket Crusher 2018 Genesis...

Bucket Crusher (GBC)SAFETY & OPERATOR’S MANUAL

© 2018 Genesis Attachments, LLCGenesis GBC Bucket Crusher2
CONTACT INFORMATION
View and download all manuals: genesisattachments.com/products/manualsPatents: genesisattachments.com/products/patents
Asia Pacific Representative Office
24 Upper Serangoon View #12-28 Singapore 534205
Phone: +65 9673 9730
E-mail:[email protected]
Europe/Africa/Middle EastGenesis GmbH
Teramostrasse 2387700 Memmingen, Germany
Phone: +49 83 31 9 25 98 0Fax: +49 83 31 9 25 98 80
genesis-europe.com
E-mail:[email protected]
Central America & Colombia
Cra 13A #89-38 / Ofi 613Bogota, Colombia
Phone: +57 1 610 8160 / 795 8747
E-mail: [email protected]
World HeadquartersGenesis Attachments
1000 Genesis DriveSuperior, WI 54880 USA
Toll Free: 888-SHEAR-IT(888-743-2748)
Phone: 715.395.5252
E-mail:[email protected]

© 2018 Genesis Attachments, LLC Genesis GBC Bucket Crusher 3
PREFACETo ensure years of safe, dependable service, only trained and authorized persons should operate and service your Genesis attachment. It is the responsibility of the product’s owner to ensure the operator is trained in the safe operation of the product and has this manual available for review. It is the responsibility of the operator and maintenance personnel to read, fully understand and follow all operational and safety-related instructions in this manual. The attachment should not be operated until you have read and fully understand these instructions. Always use good safety practices to protect yourself and those around you.
ImportantThis operator’s manual must accompany the attachment at all times and be readily available to the operator.
Manual ReplacementShould this manual become damaged or lost or if additional copies are required, immediately con-tact any authorized Genesis dealer or the Genesis Service Department at 888-743-2748 or 715-395-5252 for a replacement.
Registration FormThe Warranty Registration Form must be filled out by the dealer or customer and returned to Gen-esis indicating the date the attachment went into service.
Possible VariationsGenesis cannot anticipate every possible circumstance that might involve a potential hazard, as the owner’s requirements and equipment may vary. Therefore, the warnings in this publication and on the product may not be all-inclusive, and you must satisfy yourself that the procedure, applica-tion, work method or operating technique is safe for you and others before operating.
Public NoticeGenesis reserves the right to make changes and improvements to its products and technical litera-ture at any time without public notice or obligation. Genesis also reserves the right to discontinue manufacturing any product at its discretion at any time.
WarrantyAll work or repairs to be considered for warranty reimbursement must be pre-authorized by the Genesis Service Department. Any alterations, modifications or repairs performed before authoriza-tion by the Genesis Service Department will render all warranty reimbursement consideration null and void without exception. See page 48 for Warranty Claim Procedures.
Improper operation or improperly performed maintenance may render any warranty null and void.

CONTACT INFORMATION 2PREFACE 3
Important 3Manual Replacement 3Registration Form 3Possible Variations 3Public Notice 3Warranty 3
SAFETY STATEMENTS 6GENERAL SAFETY PRECAUTIONS 7
Read Manual Prior to Operation 7Read and Understand All Safety Statements 7Know Your Equipment 7Protect Against Flying Debris 7Lower or Support Raised Equipment 7Do Not Modify Excavator or Attachment 8Safely Maintain and Repair Equipment 8Safely Operate Equipment 8
OPERATIONAL SAFETY 9Use Care with Hydraulic Fluid Pressure 9Know Where Utilities Are 10Name Plate 11PPE, Caution and Warning Decals 12
SPECIFICATIONS 15Screw Torque 16Sound Power Level 16
TRANSPORTING 17OPERATION 18
General 20Hydraulic Connections 21Hydraulic Scheme 22Hose Connection Specifications 22Main Panel SAE Connections 23Hydraulic Fluids 24Crushing 25
MAINTENANCE 27Maintenance Intervals 28Replacing Wear Plates 29Jaw Wear 31Replacing Top/Moving Jaw Plate 31Replacing Bottom/Fixed Jaw Plate 34Close Side Setting 35Check Belt Tension 38Adjust Belt Tension – Replacement 39Replace Toggle Plate 42Replace Toggle Seat 44
© 2018 Genesis Attachments, LLCGenesis GBC Bucket Crusher4
TABLE OF CONTENTS

TROUBLESHOOTING 46Crusher Operation Failure 46Bucket Crusher Vibration 46Hydraulic Failure 47
WARRANTY 48Claim Procedure 48
PARTS ORDER POLICY AND PROCEDURE 49Parts Orders Should Include 49Placing Orders 49Part Numbers 49Shipping 49Invoices 49Returns 49Return Goods Authorization 49
PARTS ORDER FORM 50CONTACT INFORMATION 51
© 2018 Genesis Attachments, LLC Genesis GBC Bucket Crusher 5
TABLE OF CONTENTS
© 2018 Genesis Attachments, LLCGenesis GBC Bucket Crusher6
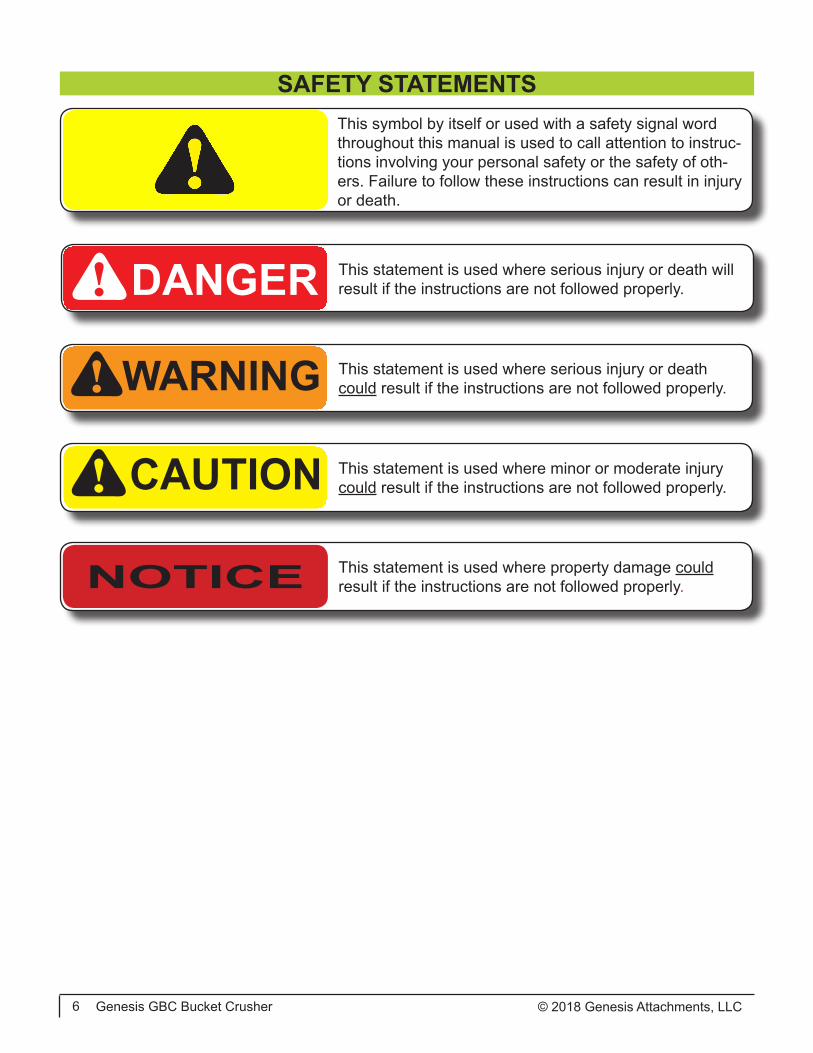
SAFETY STATEMENTSThis symbol by itself or used with a safety signal word throughout this manual is used to call attention to instruc-tions involving your personal safety or the safety of oth-ers. Failure to follow these instructions can result in injury or death.
This statement is used where serious injury or death could result if the instructions are not followed properly.! WARNING
This statement is used where minor or moderate injury could result if the instructions are not followed properly.! CAUTION
This statement is used where property damage could result if the instructions are not followed properly.NOTICE
! DANGER This statement is used where serious injury or death will result if the instructions are not followed properly.

Read Manual Prior to OperationImproper installation, operation or maintenance of this equipment could result in serious injury or death. Operators and maintenance personnel should read this manual, as well as all manuals related to this equipment and the excavator thoroughly before beginning installation, operation or maintenance. FOLLOW ALL SAFETY INSTRUCTIONS IN THIS MANUAL AND THE EXCAVA-TOR MANUAL(S).
Read and Understand All Safety StatementsRead all safety decals and safety statements in all manuals prior to operating or working on this equipment. Know and obey all OSHA regulations, local laws and other professional guidelines for your operation. Know and follow good work practices when assembling, maintaining, repairing, mounting, removing or operating this equipment.
Know Your EquipmentKnow your equipment’s capabilities, dimensions and operations before operating. Visually inspect your equipment before you start, and never operate equipment that is not in proper working order with all safety devices intact. Check all hardware to ensure it is tight. Make certain all guards, lock-ing pins, latches and connection devices are properly installed and secured. Remove and replace any damaged, fatigued or excessively worn parts. Make certain all safety decals are in place and legible. Keep decals clean and replace if they become worn or hard to read.
Protect Against Flying DebrisAlways wear proper personal protective equipment when driving pins in or out, or when any op-eration causes dust, flying debris or any other hazardous material. The GBC Bucket Crusher may cause severe injuries. Never stand within operating range.
Lower or Support Raised EquipmentDo not work under raised booms without supporting them. Do not use support material made of concrete blocks, logs, buckets, barrels or any other material that could suddenly collapse or shift positions. Make sure support material is solid and not decayed, warped, twisted or tapered. Lower booms and attachments to the ground before leaving the cab.
GENERAL SAFETY PRECAUTIONS
! WARNING Serious injury or death could result if warnings or instructions regarding safe operation are not followed.
© 2018 Genesis Attachments, LLC Genesis GBC Bucket Crusher 7

Do Not Modify Excavator or AttachmentModifications may weaken the integrity and impair the function, safety, life and performance of the attachment. When making repairs, use only the manufacturer’s genuine parts, following main-tenance instructions. Other parts may be substandard in fit and quality. Never modify any ROPS (Roll Over Protective Structure) or FOPS (Falling Object Protective Structure) equipment or de-vice. Any modifications must be authorized in writing by the manufacturer.
Safely Maintain and Repair Equipment• Do not wear loose clothing or any accessories that can catch in moving parts. If you have
long hair, cover or secure it so it does not become entangled in the equipment.• Work on a level surface in a well-lit area.• Use properly grounded electrical outlets and tools.• Use the correct tools for the job. Make sure they are in good condition for the task required.• Wear proper protective equipment.
Safely Operate EquipmentDo not operate equipment until you are completely trained by a qualified operator in how to use the controls and know its capabilities, dimensions and all safety requirements. See your excavator manual for these instructions.
• Keep all step plates, grab bars, pedals and controls free of dirt, grease, debris and oil.• Never allow people or animals to be around the equipment when it is operating.• Do not allow riders on the attachment or excavator.• Do not operate equipment from anywhere other than the correct operator’s position.• Never leave equipment unattended with the engine running or the attachment in a raised
position.• Do not alter or remove any safety feature from the excavator or attachment.• Know your work site safety rules as well as traffic rules and flow. When in doubt on any
safety issue, contact your supervisor or safety coordinator for an explanation.• Incorrect use of the machine and/or improper maintenance carry risks that can cause seri-
ous injury or death.
GENERAL SAFETY PRECAUTIONS
© 2018 Genesis Attachments, LLCGenesis GBC Bucket Crusher8

© 2018 Genesis Attachments, LLC Genesis GBC Bucket Crusher 9
Use Care with Hydraulic Fluid PressureHydraulic fluid under pressure can penetrate the skin and cause serious injury or death.Hydraulic leaks under pressure may not be visible.
3 Keep unprotected body parts, such as face, eyes and arms as far away as possible from a suspected leak. Flesh injected with hydraulic fluid may develop gangrene or other permanent injuries.
3 If injured by injected fluid see a doctor immediately.
3 Wear safety glasses and protective clothing and use a piece of cardboard or wood when searching for hydraulic leaks.
Do Not Use Your Hands!See illustration below.
3 Hydraulic oil becomes hot during operation. Do not let hydraulic oil or com-ponents contact skin, as it could cause severe burns. Allow hydraulic com-ponents to cool before working on them. Use appropriate protective clothing and safety equipment. If burned, seek immediate medical attention.
! WARNING Serious injury or death could result if warnings or instruc-tions regarding hydraulic fluid pressure are not followed properly.
OPERATIONAL SAFETY

© 2018 Genesis Attachments, LLCGenesis GBC Bucket Crusher10
Know Where Utilities AreObserve overhead electrical and other utility lines. Be sure equipment will clear them. When dig-ging, call your local utilities for location of buried utility lines, gas, water and sewer, as well as any other hazard you may encounter.
The use of dust suppression, dust collection and personal protective equipment is recommended during the operation of any attachment that may cause high dust levels.
! WARNING Exposure to respirable crystalline silica dust along with other hazardous dusts may cause serious or fatal respira-tory disease.
OPERATIONAL SAFETY

© 2018 Genesis Attachments, LLC Genesis GBC Bucket Crusher 11
This equipment is to be fitted on earthmoving machinery/excavators. It is made of a metal main-frame containing two jaws, one fixed and one moving. The moving jaw is hinged at the jawstock, which is connected to an eccentric shaft and a flywheel. The off-center position of the shaft on the flywheel and the “up-thrust” toggle position causes the quattro movement, so that it closes against the fixed jaw and at the same time generates a vertical pendulum motion, assisting the uniform crushing of the material.
The desired grain size can be achieved by setting the close side. Removing or adding shims changes the jaw plate gap. See page 35.
The bucket crusher consists of a mainframe, wear plates, jawstock, moveable and fixed jaw plates, eccentric shaft, toggle plate, flywheel, tension rod block, hydraulic and lubrication system, guards and dust suppression system. The mainframe is a solid Hardox steel structure and the fly-wheel, jawstock, toggle seat, toggle plate, bearing houses, countershaft box and counterbalance weight are made of casting.
Name PlateThe name/type plate contains the following information and is located on the connection panel.
• Serial No.• Type• Year• Capacity• Oil• Weight
When contacting Genesis for assistance, be sure to have your GBC serial number available.
Check if your excavator is sized to operate with the bucket crusher. See page 15.NOTICE
OPERATIONAL SAFETY

© 2018 Genesis Attachments, LLCGenesis GBC Bucket Crusher12
PPE, Caution and Warning DecalsThe GBC has been designed and built to be operated in a safe and effective manner. PPE, cau-tion and warning decals required for use are clearly positioned and securely attached. Should any of these decals become damaged or removed, replace as soon as possible.
OPERATIONAL SAFETY
© 2018 Genesis Attachments, LLC Genesis GBC Bucket Crusher 13
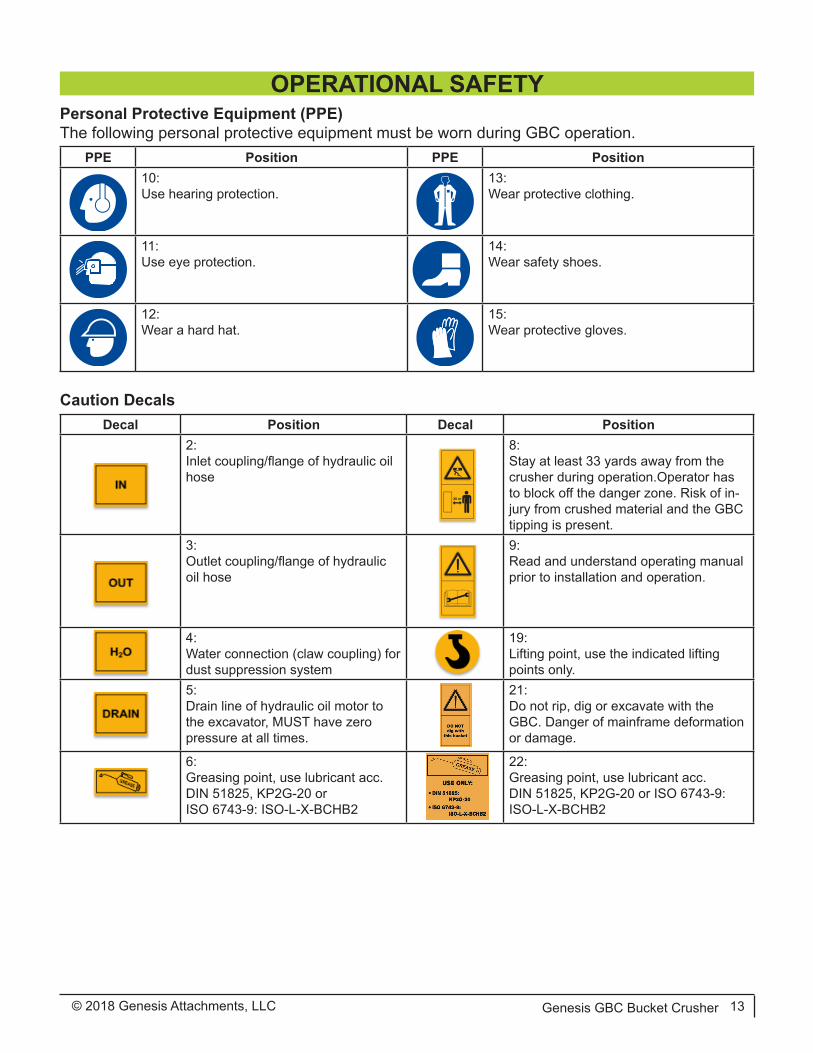
Personal Protective Equipment (PPE)The following personal protective equipment must be worn during GBC operation.
PPE Position PPE Position10: Use hearing protection.
13: Wear protective clothing.
11: Use eye protection.
14: Wear safety shoes.
12: Wear a hard hat.
15: Wear protective gloves.
Caution DecalsDecal Position Decal Position
2: Inlet coupling/flange of hydraulic oil hose
8: Stay at least 33 yards away from the crusher during operation.Operator has to block off the danger zone. Risk of in-jury from crushed material and the GBC tipping is present.
3: Outlet coupling/flange of hydraulic oil hose
9: Read and understand operating manual prior to installation and operation.
4: Water connection (claw coupling) for dust suppression system
19: Lifting point, use the indicated lifting points only.
5: Drain line of hydraulic oil motor to the excavator, MUST have zero pressure at all times.
21: Do not rip, dig or excavate with the GBC. Danger of mainframe deformation or damage.
6: Greasing point, use lubricant acc. DIN 51825, KP2G-20 or ISO 6743-9: ISO-L-X-BCHB2
22: Greasing point, use lubricant acc. DIN 51825, KP2G-20 or ISO 6743-9: ISO-L-X-BCHB2
OPERATIONAL SAFETY

© 2018 Genesis Attachments, LLCGenesis GBC Bucket Crusher14
OPERATIONAL SAFETYWarning Decals
Decal Position Decal PositionOn magnet: Magnetic field (when fitted), Strong magnetic fields have a harmful ef-fect on pacemakers that may cause death. Minimum safety distance of 2.2 yd.
23: Hot surface, burn danger. Wear pro-tective gloves. Turn off bucket crusher and cool down machine.
16: Important information for the hydraulic oil
17: Correct drain line installation and connection

© 2018 Genesis Attachments, LLC Genesis GBC Bucket Crusher 15
Description Unit GBC 650 GBC 750 GBC 950 GBC 1250Excavator class lbs ≥ 22,050 ≥ 39,700 ≥ 52,950 ≥ 77,160Bucket crusher length in 76 87 93 101Bucket crusher width in 43 48 57 72Bucket crusher height in 51 54 55 61Bucket crusher weight lbs 3,750 6,180 8,720 12,610Bucket crusher capacity ISO 7451:2007 Vr [y3] 0.67 1.0 1.3 2.17Bucket crusher speed rpm 350 350 350 350Close side setting min. – max. in 0.40 – 4.00 0.48 – 4.00 0.48 – 4.75 0.48 – 4.75Bucket opening height in 20 20 21 22Bucket opening width in 26 30 37 49Hydraulic oil type DIN 51524 HLP, automatic transmission Type A, API CD engine oilHydraulic oil pressure psi 3190 3190 3190 3190Hydraulic oil volume max. gpm > 27 > 39 > 53 > 77Hydraulic oil drain max. psi 217 217 217 217Hydraulic motor power cc 80 80 90 150Grease type DIN 51825
ISO 6743-9KP2G-20
ISO-L-X-BCHB2For detailed information on attachment classifications, follow the excavator manufacturer’s guidelines.
Always consult and obey your machine’s lifting capability guidelines to ensure safe operation of the crusher.NOTICE
SPECIFICATIONS

© 2018 Genesis Attachments, LLCGenesis GBC Bucket Crusher16
Screw TorqueThe data below refer to DIN 267 metric thread. Use a suitable torque wrench.
Screw Hexagon Thread 8.8 10.9Size
ClassSize [in]
Coarse [n/1"]
Fine [n/1"]
Coarse [ft lb]
Fine [ft lb]
Coarse [ft lb]
Fine [ft lb]
M8 0.5 20.3 25.4 18.4 19.9 25.8 28.0M10 0.7 16.9 20.3 36.9 39.1 51.6 54.6M12 0.7 14.5 16.9 62.7 65.6 87.8 92.2M14 0.9 12.7 16.9 99.6 109.2 140.1 153.4M16 0.9 12.7 16.9 156.4 166.7 219.8 234.6M18 1.1 10.2 12.7 213.9 228.7 296.5 321.6M20 1.2 10.2 12.7 304.6 321.6 427.8 452.9M22 1.3 10.2 12.7 419.0 440.3 588.6 619.6M24 1.4 8.5 12.7 526.6 576.1 740.6 809.9M27 1.6 8.5 12.7 774.5 840.1 1089.4 1181.6M30 1.8 7.3 12.7 1054.0 1172.8 1481.8 1649.3M33 2.0 7.3 12.7 1431.7 1575.5 2012.9 2215.8M36 2.2 6.4 8.5 1841.8 1956.1 2589.7 2751.2
Sound Power LevelThe testing was done at a quarry in Austria. The surface can be described as hardened gravel and can be seen as an acoustically reflecting plane. There were no obstacles in the direction of sound propagation.
The measurements were carried out according to ISO 3746. A hemispheric measurement surface with a radius of 8.5 yd and a reference point of 27 yd has been chosen. Due to the need for an excavator to power the units, five measuring points were used to ensure a proper determination of the different sound sources.
The excavator qualifies as an auxiliary system that cannot be removed or quieted in terms of the ISO 3744. The influence of the excavator will be mathematically corrected.
The material was picked up, brought to the center of the measurement setup, processed and taken away from the center.
Testing standards:
• ISO 3744 Acoustics – Determination of sound power levels and sound energy levels of noise sources using sound pressure – Engineering methods for an essentially free field over a reflecting plane (ISO 3744:2010); 01.03.2011
• ISO 3746 Acoustics – Determination of sound power levels and sound energy levels of noise sources using sound pressure – Survey methods for an essentially free field over a reflecting plane (ISO 3746:2010); 01.03.2011
To summarize, the maximum sound power level of the bucket crusher is LW,A 110.5 dB(A).
SPECIFICATIONS

TRANSPORTING
© 2018 Genesis Attachments, LLC Genesis GBC Bucket Crusher 17
Check if your excavator is sized to operate with the bucket crusher. See page 15.NOTICE
Given the bucket crusher’s weight and size, it must be handled and transported only by skilled personnel. If the operator does not have a complete view of the bucket crusher to be moved, a second person can assist on the ground but out of the earthmoving vehicle’s range of action.
The bucket crusher is equipped with lifting points for the insertion of lifting hooks. Make sure the hooks are firmly secured prior to lifting.
Whenever the bucket crusher must be transported, it must be anchored to the loading truck using slings attached to the anchor points. Secure the load restraint tightly, but without damaging the GBC, to prevent the bucket crusher from falling off the pallet/skid. Close and secure all guards and covers. Transport carefully and do not tilt the GBC to avoid damage.
Lifting Points
Transport Lashing Front Transport Lashing Rear
If the GBC needs to be stored for more than two months, grease the central greasing point to protect it from dampness, store in a dry place at temperatures between 23°F and 86°F, and protect from dirt, dust and humidity.

© 2018 Genesis Attachments, LLCGenesis GBC Bucket Crusher18
OPERATIONCheck if your excavator is sized to operate with the bucket crusher. See page 15.NOTICE
The bucket crusher is designed and used for crushing natural rock, reinforced concrete (maximum size of the reinforcement is the adjusted close side setting minus 0.78 in.), building debris, bitu-men and similar materials.
Check for and remove metal before crushing.
The reduction rate of the material to be crushed versus the bucket opening length has to be maxi-mum 1:6. For example, if the close side setting is adjusted 0.78 in., the maximum length of the material to be crushed is 4.68 in.
For continuous crushing of materials with average hardness, the size of the debris should be less than 30% the bucket opening length. Grinding hard materials such as granitic porphyry is individu-ally possible but with less than 70% of the bucket opening length.
Never grind flammable materials, explosives, products that create flammable powders, or toxic or harmful substances. The use of bucket crushers is forbidden in potentially explosive environ-ments.
In addition, • Never break material using the bucket mainframe as a hammer.• Never use the bucket to move material.• Never use the bucket for excavation operations.• Never use the bucket with large metallic materials.• Never use the bucket crusher for non-crushable materials such as humid or damp materi-
als, wood, etc.• Never use the bucket crusher in temperatures above 140°F or less than 14°F.

© 2018 Genesis Attachments, LLC Genesis GBC Bucket Crusher 19
OPERATIONFailure to follow operating guidelines can result in major problems with the mainframe, toggle, bearings, shaft and jaws. Continuous improper use can damage the entire GBC structure.
• DO NOT compress material with the bucket crusher.
• DO NOT use the bucket crush-er to break stones or larger material.
• DO NOT use the bucket crusher as an excavator bucket. The bucket crusher is designed for crushing, NOT digging. Structural damage will occur.
• DO NOT distribute material side-ways or in reverse.
• DO NOT lean the excavator on the bucket crusher. Structural damage will occur.
• DO NOT use the bucket crusher to prop up and move or turn the exca-vator in any direction.
• DO NOT push/hit the bucket crush-er on the ground.
• DO NOT use the bucket crusher to rip objects from the ground or to rip material from hard stones/rocks.
• DO NOT use the bucket crusher to clear or level the site.
• DANGER of ripping.
Do not fill with oversized material as it may block and damage the bucket crusher.NOTICE

© 2018 Genesis Attachments, LLCGenesis GBC Bucket Crusher20
OPERATIONGeneralDuring operation, the operator must stay on board the excavator, in the position recommended by the manufacturer.
Before installing the bucket crusher, ensure all parts are in good condition and were not damaged during transportation. It is especially important to check that hoses are intact and hydraulic con-nections are firmly attached.
While being assembled, the bucket crusher should be laid firmly on the ground with the excava-tor’s engine shut off and its parking brakes applied.
The bucket crusher must be installed in a space large enough to allow the necessary operations to be carried out in a safe environment.
The GBC is supplied without a quick coupler system. The customer must fit it with suitable cou-plings that comply with current safety standards. Refer to the manufacturer’s operation manual.
People and animals must stand at least 33 yards away from the excavator and GBC when in op-eration.
Check all screws and nuts for damage and tightness before using the GBC.
All operations must be performed with the excavator and GBC off, the parking brakes applied (if attached to an excavator) and the GBC resting on the ground. AL-WAYS wear appropriate PPE. Use only Genesis spare parts.
! WARNING
If the air temperature reaches 14°F, increase the bucket crusher temperature by:
• Carrying out working cycles with the machine empty for 20 minutes
• Begin with a light job for 10 minutes
NOTICE
• When the quick coupler system is mounted or dis-mounted, there is a risk of loosening debris. Always wear PPE.
• If the quick coupler system is manual, the help of another person will be required.
• Do not use your fingers to find the center of the holes. If sudden, uncontrolled movements occur, your fingers could be severed.
! WARNING
OPERATION
© 2018 Genesis Attachments, LLC Genesis GBC Bucket Crusher 21
Hydraulic ConnectionsThe hydraulic connectors provided are equivalent to those supplied for the standard buckets of the excavator on which the fitting is mounted. For a detailed connections explanation, refer to the excavator operation manual.
The hydraulic system is connected by joining the two hydraulic connectors provided in the bucket crusher to the corresponding couplings provided on the excavator. The GBC is supplied without hydraulic hoses to the excavator. The customer must fit it with suitable hydraulic hoses and cou-plings that comply with current safety standards.
The bucket crusher is operated using the hydraulic circuit. Connecting points of the hydraulic hoses are provided. The inlet hose will support a working pressure of maximum 3,625 psi. The return hose must withstand a pressure of 725 psi. For excavators with different input, it is possible to invert the hose’s connectors. Remove the hose from the fitting below the housing and place it on the connector housing below.
For hydraulic connection details, refer to the hydraulic scheme. See page 22.
Verify the hydraulic hoses are in compliance with BS EN ISO 4413.
Do not use the bucket crusher without verifying the fitting delivery pressure and the hose assem-bly delivery pressure are as required.
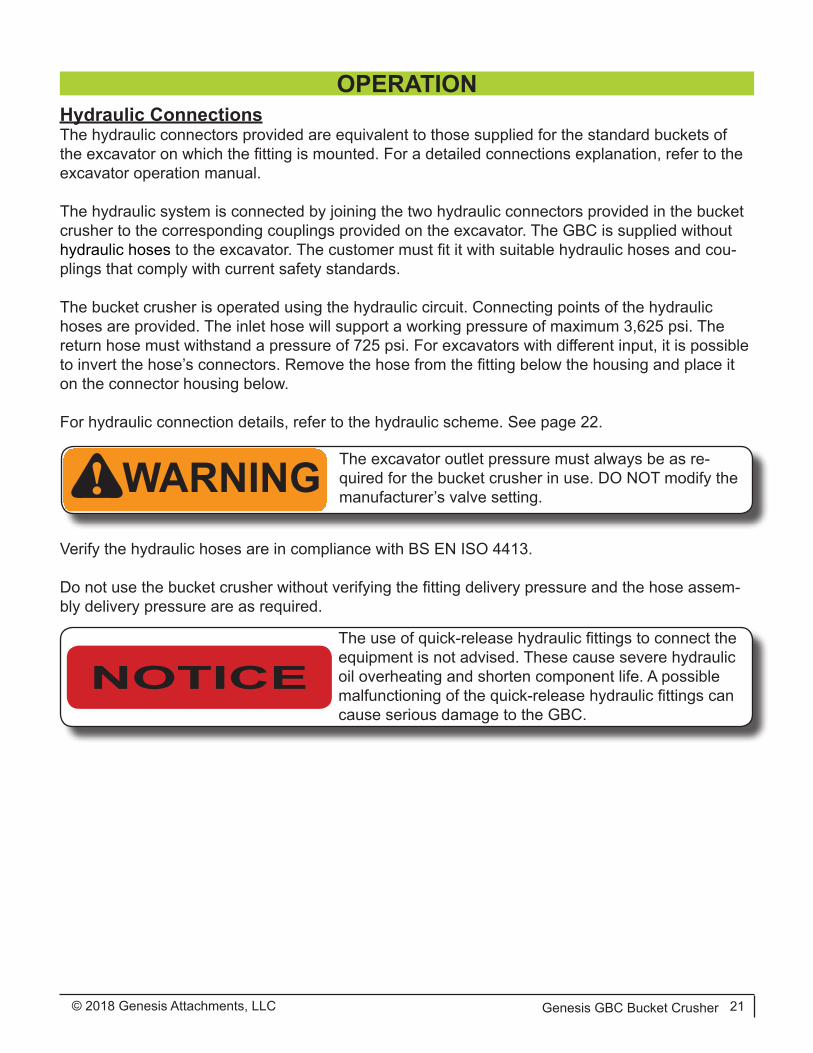
! WARNING The excavator outlet pressure must always be as re-quired for the bucket crusher in use. DO NOT modify the manufacturer’s valve setting.
The use of quick-release hydraulic fittings to connect the equipment is not advised. These cause severe hydraulic oil overheating and shorten component life. A possible malfunctioning of the quick-release hydraulic fittings can cause serious damage to the GBC.
NOTICE
OPERATION
© 2018 Genesis Attachments, LLCGenesis GBC Bucket Crusher22
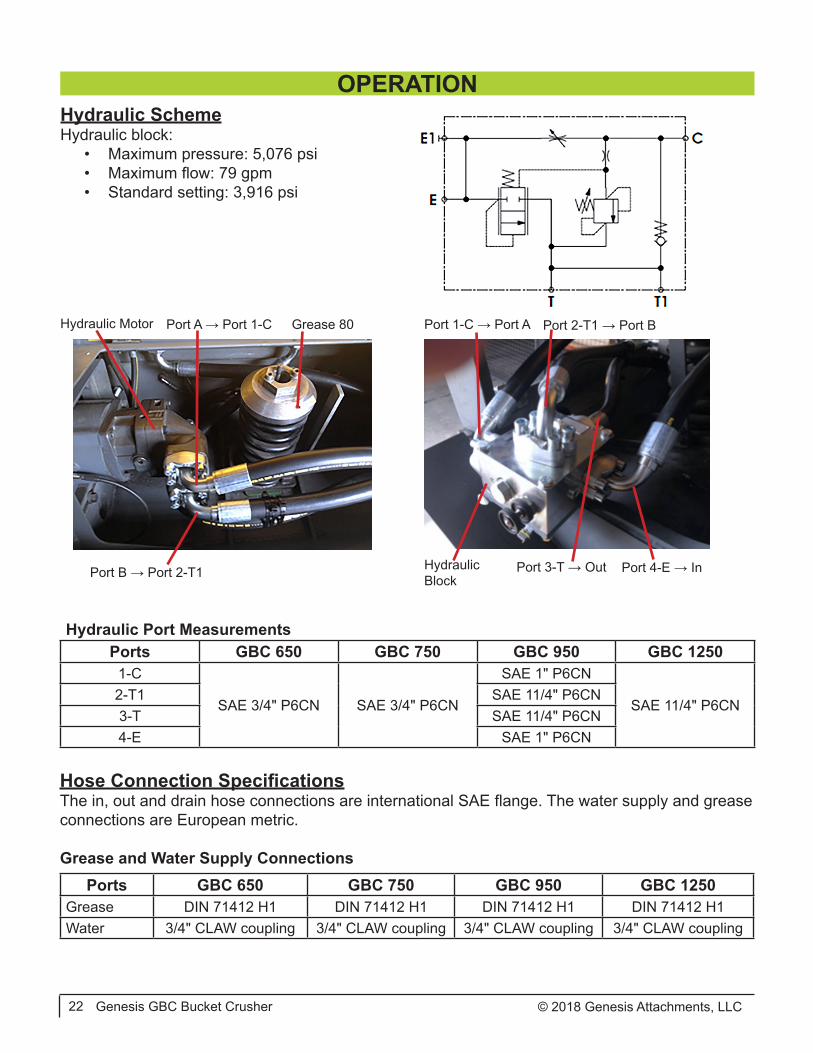
Hydraulic SchemeHydraulic block:
• Maximum pressure: 5,076 psi• Maximum flow: 79 gpm• Standard setting: 3,916 psi
Hydraulic Motor
Port B → Port 2-T1
Port A → Port 1-C Grease 80 Port 1-C → Port A
HydraulicBlock
Port 2-T1 → Port B
Port 3-T → Out Port 4-E → In
Hydraulic Port MeasurementsPorts GBC 650 GBC 750 GBC 950 GBC 1250
1-C
SAE 3/4" P6CN SAE 3/4" P6CN
SAE 1" P6CN
SAE 11/4" P6CN2-T1 SAE 11/4" P6CN3-T SAE 11/4" P6CN4-E SAE 1" P6CN
Hose Connection SpecificationsThe in, out and drain hose connections are international SAE flange. The water supply and grease connections are European metric.
Grease and Water Supply ConnectionsPorts GBC 650 GBC 750 GBC 950 GBC 1250
Grease DIN 71412 H1 DIN 71412 H1 DIN 71412 H1 DIN 71412 H1Water 3/4" CLAW coupling 3/4" CLAW coupling 3/4" CLAW coupling 3/4" CLAW coupling

OPERATIONThe information below is valid for the bucket crusher serial numbers indicated.
GBC 650 GBC 750 GBC 950 GBC 1250Serial Number > CC0650150022 > CC0750140049 > CC0950140064 > CC1250150037
© 2018 Genesis Attachments, LLC Genesis GBC Bucket Crusher 23
In
Drain
Out
M103/4”, 6000 psi flangeISO 6162 (SAE J518c)
M81/2”, 3000 psi flangeISO 6162 (SAE J518c)
M103/4”, 6000 psi flangeISO 6162 (SAE J518c)
Main Panel SAE ConnectionsGBC 650 & 750
In
Drain
Out
M121”, 6000 psi flangeISO 6162 (SAE J518c)
M81/2”, 3000 psi flangeISO 6162 (SAE J518c)
M121”, 6000 psi flangeISO 6162 (SAE J518c)
GBC 950
GBC 1250
In
Drain
Out
M141 1/4”, 6000 psi flangeISO 6162 (SAE J518c)
M81/2”, 3000 psi flangeISO 6162 (SAE J518c)
M141 1/4”, 6000 psi flangeISO 6162 (SAE J518c)

OPERATION
© 2018 Genesis Attachments, LLCGenesis GBC Bucket Crusher24
Hydraulic FluidsRatings and performance data are based on operating with good quality, contaminate-free petro-leum-based fluids.
Hydraulic fluid type HLP (DIN 51524), automatic transmission fluid type A, or API CD engine oils can be used.
The following temperatures should not be exceeded: Main circuit 158°F; Drain circuit: 194°F.
NOTE: The temperature should be measured at the utilized drain port. Continuous operation may require case flushing in order to meet the viscosity and temperature limitations.
ViscosityThe ideal operating range is 0.023 to 0.046 sq in/s [cSt]. At operating temperature, the viscosity of the drain fluid should be kept above 8 mm²/s [cSt]. At start-up, the viscosity should not exceed 1.55 sq in/s [cSt].
FiltrationTo obtain the highest service life, the fluid cleanliness should meet or exceed ISO code 20/18/13 (ISO 4406).
Refer to your excavator operating manual for oil specifications.NOTICE
Hydraulic motor drain line installation: To eliminate any back pressure, the hydraulic motor drain line must be an independent return line piped directly back to the excava-tor hydraulic oil tank.
NOTICE

OPERATION
© 2018 Genesis Attachments, LLC Genesis GBC Bucket Crusher 25
CrushingComplete the connection process. Start the bucket crusher slowly and gradually. The rotation control is on the table control in the cab. It ensures the jaw rotation is in the counterclockwise di-rection as seen when viewed from the side of the transmission.
Let the engine run for a few minutes. In low temperatures, let the engine run about 10 minutes so the oil temperature increases to about 104°F before starting work.
Stop the GBC rotation, make the filling phase and operate command again, slowly and gradually, with the established 350 rpm.
Turn the crushing bucket slowly so the discharge opening faces downward to facilitate the exit of the crushed material.
When the material inside the GBC is crushed, repeat the loading operation.
The reduction rate of the material to be crushed versus the bucket opening length has to be maximum 1:6. For example, if the jaw opening setting is adjusted 0.78 in., the maximum length of the material to be crushed is 4.75 in.
Simultaneously lift the GBC to vertical posi-tion and turn it on.
! WARNING Always consult and obey your machine’s lifting capability guidelines to ensure safe operation of the crusher.

OPERATION
© 2018 Genesis Attachments, LLCGenesis GBC Bucket Crusher26
For continuous crushing of materials with average hardness, the debris size should be less than 30% the bucket opening length. Crushing hard material such as granitic porphyry is individually possible but with less than 70 % of the bucket opening length.
If the bucket crusher stops,• Stop the jaw movement• Position the bucket crusher so the loading open-
ing is facing down• Unload the material inside the GBC• Move the jaw slowly
If necessary, jiggle the bucket crusher slowly.
! CAUTION Never stop the bucket crusher in a vertical position while crushing material.
Never remove blocked material from inside the bucket crusher by hand or by putting yourself inside the bucket. Due to tensions on the mechanical structure, a sudden release may occur, resulting in serious injuries. Always stand a safe distance from the GBC and use tools.
! WARNING

MAINTENANCE
© 2018 Genesis Attachments, LLC Genesis GBC Bucket Crusher 27
These maintenance instructions are intended for day-to-day maintenance to keep the crusher in good running order and do not cover major repairs or replacements where specialist expertise is required. Only trained personnel should perform maintenance.
The crusher should be completely emptied of material. Ensure the area surrounding the mainte-nance site is clear of any obstructions.
When performing maintenance, always observe the rules provided in the safety section of this manual. In addition to several other factors, the reliability and life of the crusher depends upon regular and proper maintenance. Breakdowns caused by insufficient or improper maintenance will cause high repair costs and long downtime. When the crusher is operated in extreme or very dusty conditions for long periods of time, maintenance must be performed more often.
The crusher has been designed to facilitate easy routine maintenance; however, removing guards may be necessary. Replace guards once maintenance is complete and before re-starting the machine.
Any operation requiring direct handling by the opera-tor (inspection, maintenance) must be performed with the excavator off and its parking brakes applied with the bucket crusher laid firmly on the ground. Let the hydrau-lic oil cool (approx. 2 hours). ALWAYS wear appropriate PPE. Use only Genesis spare parts.
! WARNING Securely support any machine elements that must be raised for maintenance work.
Remove any buildup of grease, oil or debris.NOTICE
! WARNING
Repair all defects. Even minor defects could affect per-formance when the machine is in operation.NOTICE

MAINTENANCE
© 2018 Genesis Attachments, LLCGenesis GBC Bucket Crusher28
Maintenance IntervalsFor operational safety, inspect and maintain the bucket crusher and follow these maintenance interval guidelines.Inspection and maintenance work < 0 hrs < 8 hrs < 40 hrs < 80 hrsCheck jaws and wear hard plates for wear xCheck structure and component (damage, detachments, cuts, abrasions, softening)
x
Check hydraulic motor and block (bubbles, leaks) xCheck hydraulic fitting fixation from crusher and excavator (displace-ment, cracks, rust)
x
Check hydraulic hose from crusher and excavator (hardening, bend-ing, rigidity, flattening, torsion, breaking, burn marks, leaks)
x
Check jaw bolts for damage and tightness xCheck toggle plate, toggle seat and front lip for wear xLubricate Grease 40 - central greasing point (see page 23). Use grease gun with 5–6 pump strokes (10 g).
x
Check all welds (cracks) xCheck bolt assembly (tightness, damage) xCheck split pin condition (tightness, damage) xCheck hydraulic hose inside crusher (hardening, bending, rigidity, flattening, torsion, breaking, burn marks, leaks)
x
Check hydraulic fluid from excavator (level, contamination) xLubricate Grease 80 (see page 22). Use grease gun. 5–6 pump strokes (10 g).
x
Check belt tension (see page 38) x
• Use hydraulic fluids according to DIN 51524: Type HLP, automatic transmission Type A or API CD engine oil only.
• Use lubrication grease according to DIN 51825: Class KP2G-20 only.
NOTICE
Should the bucket crusher break down, contact the manufacturer or any authorized service personnel. The bucket crusher itself and its functionality may not be modified in any way. More frequent lubrications should be made in tropical, very damp, dusty environments, as well as in environments full of impurities and subject to sudden temperature changes.
! WARNING

Replacing Wear PlatesInspect wear plates regularly for wear and check all wear bolts for tightness.
The bucket crusher mainframe is reinforced with wear plates, which are fastened by screws. Replace worn wear plates.
The following instruction describes the replacement of wear plates on the right side of the bucket crusher. The same procedures are followed when changing the wear plates on the left side. Gen-esis recommends changing both wear plates at the same time.
1. Remove Guards - Place the GBC firmly on the ground, isolated from the excavator and hydraulic lines. Pre-pare the wear plates.
Open the guard. Unscrew the M12 guard screws and remove the guard. Store it in a safe place.
2. Remove Nuts - Unscrew the M12 nuts.
MAINTENANCE
© 2018 Genesis Attachments, LLC Genesis GBC Bucket Crusher 29
ALL maintenance must be performed with the excava-tor and GBC off, the parking brakes applied (if attached to an excavator) and the bucket crusher resting on the ground. ALWAYS wear appropriate PPE. Use only Gen-esis spare parts.
! WARNING

MAINTENANCE3. Remove Screws - Unscrew the M12 screws.
4. Replace the worn wear plates using the CSK M12 x 45 screws to secure the new wear plate into position.
5. Replace the Nuts and Guards - Use the M12 nuts and secure with the screws. Using new col-lar nuts and washers is recommended.
© 2018 Genesis Attachments, LLCGenesis GBC Bucket Crusher30

MAINTENANCE
© 2018 Genesis Attachments, LLC Genesis GBC Bucket Crusher 31
Jaw WearThe jaw plates are casting parts that are designed to be rotated 180°. Their position can be re-versed in order to ensure uniform wear.
When the teeth are worn about 50% of their original height, rotate front to back.
DO NOT wear the jaw below the bottom of the grooves. Any wear below this level will result in the support block and jaw base being worn.
Continued crushing with heavily worn jaws in-creases crushing forces. This may limit the minimum closed side setting on hard materials.
After fitting the jaws, operate the crusher for 15 min-utes. Stop the crusher and check the bolt tightness. Continue to check the nuts at the beginning of each shift.
Replacing Top/Moving Jaw PlateRotate or invert the jaw position in an equipped workshop. Use only Genesis spare parts.
Support the jaw before removing nuts to avoid damage or injury.
1. Remove Guards - Place the GBC firmly on the ground, isolated from the excavator and hydraulic lines.
Remove the jaw guard plate from the front side.
2. Remove the collar nuts from the rear side.
50%
50%

MAINTENANCE
© 2018 Genesis Attachments, LLCGenesis GBC Bucket Crusher32
3. Remove the collar nuts from the front side.
Support the jaw before opening all nuts so the jaw stays in position.
4. Remove all plough bolts.
5. Replace or reposition the jaw plate and secure in the correct position.
Unscrew the screws very carefully when removing the top jaw, since it may fall down and cause damage or injury. Secure it while removing the nuts, washers and bolts.
! WARNING

MAINTENANCE
© 2018 Genesis Attachments, LLC Genesis GBC Bucket Crusher 33
6. Insert new plough bolts.
7. Attach new collar nuts on the front and rear sides. Torque to 1,106 ft/lb.
8. Replace the jaw guard plate.

MAINTENANCE
© 2018 Genesis Attachments, LLCGenesis GBC Bucket Crusher34
Replacing Bottom/Fixed Jaw Plate1. Turn up the bucket crusher carefully and remove the
bottom collar nuts.
2. Remove the plough bolts.
3. Replace or reposition the jaw plate and secure in the correct position.
4. Insert new plough bolts. Attach new collar nuts on the front and rear sides. Torque to 1,106 ft/lb.
MAINTENANCE
© 2018 Genesis Attachments, LLC Genesis GBC Bucket Crusher 35
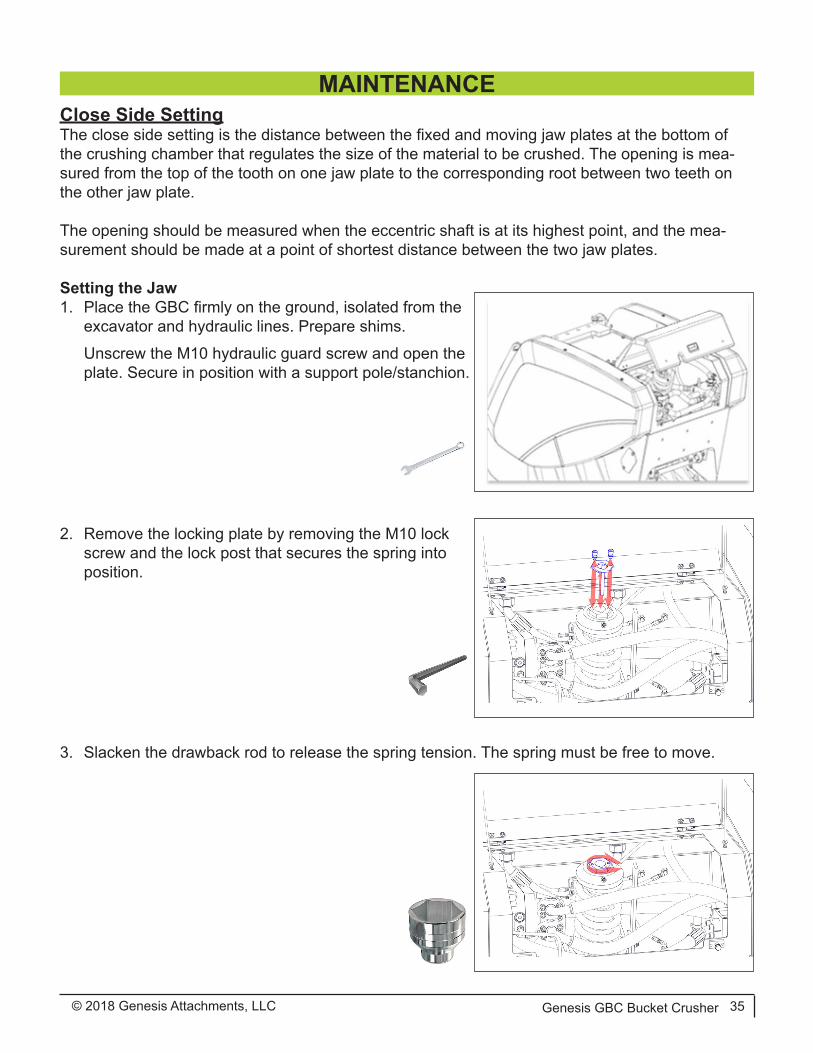
Close Side SettingThe close side setting is the distance between the fixed and moving jaw plates at the bottom of the crushing chamber that regulates the size of the material to be crushed. The opening is mea-sured from the top of the tooth on one jaw plate to the corresponding root between two teeth on the other jaw plate.
The opening should be measured when the eccentric shaft is at its highest point, and the mea-surement should be made at a point of shortest distance between the two jaw plates.
Setting the Jaw1. Place the GBC firmly on the ground, isolated from the
excavator and hydraulic lines. Prepare shims.
Unscrew the M10 hydraulic guard screw and open the plate. Secure in position with a support pole/stanchion.
2. Remove the locking plate by removing the M10 lock screw and the lock post that secures the spring into position.
3. Slacken the drawback rod to release the spring tension. The spring must be free to move.
MAINTENANCE
© 2018 Genesis Attachments, LLCGenesis GBC Bucket Crusher36
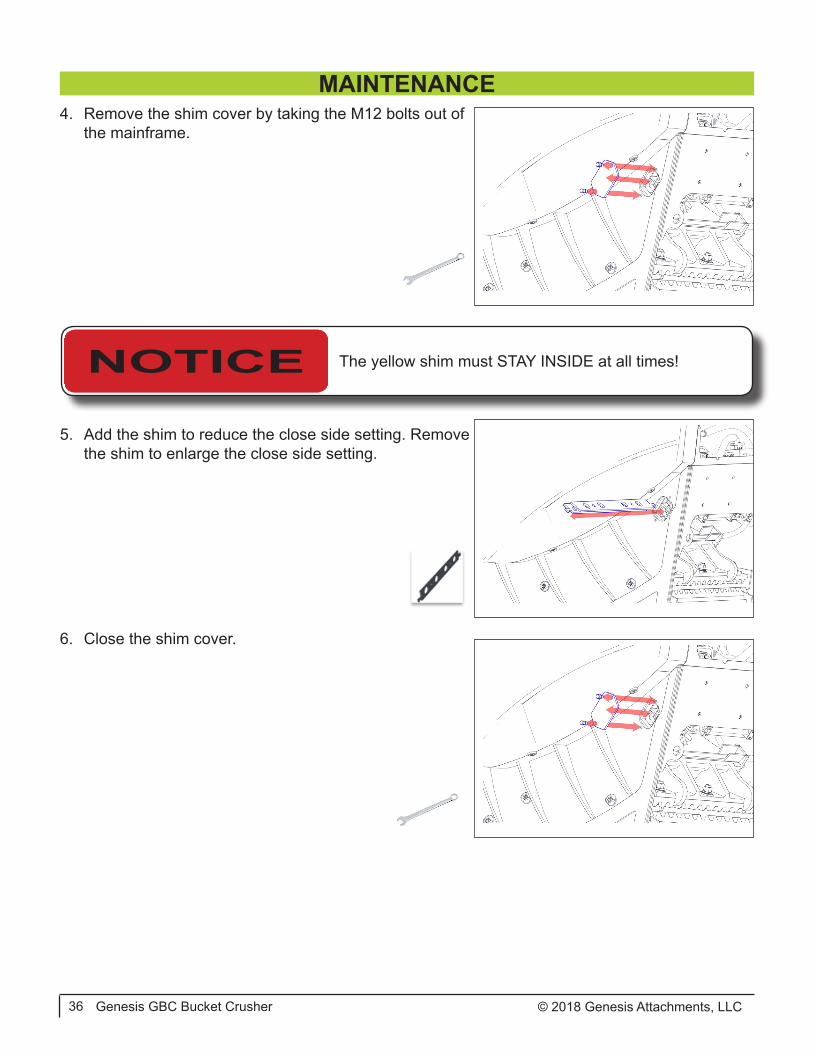
4. Remove the shim cover by taking the M12 bolts out of the mainframe.
5. Add the shim to reduce the close side setting. Remove the shim to enlarge the close side setting.
6. Close the shim cover.
NOTICE The yellow shim must STAY INSIDE at all times!

MAINTENANCE
© 2018 Genesis Attachments, LLC Genesis GBC Bucket Crusher 37
7. Tighten the drawback nut to the correct setting posi-tion.
8. Set the spring length as indicated.
Replace the M10 lock screw and the lock post that secure the spring into position.
9. Replace the M10 hydraulic guard screws and close the guard.
10.63 inGBC 650: 7.87 in

MAINTENANCE
© 2018 Genesis Attachments, LLCGenesis GBC Bucket Crusher38
Check Belt TensionBefore adjusting or checking the belt tension, the operator must position the crushing bucket so the upper side of the belt is horizontal relative to the bearing plane.
The belt should bend 10 mm when correct tensioning is achieved. To check tensioning of the belt, apply a perpendicular load of 55 lb on the center line between the axis of the two pulleys.
! WARNINGThe operation must be performed with the excavator and GBC off, the parking brakes applied (if attached to an excavator) and the bucket crusher resting on the ground. ALWAYS wear appropriate PPE. Use only Genesis spare parts.
1. Remove Guards - Place the GBC firmly on the ground, isolated from the excavator and hydraulic lines. Pre-pare the wear plates.
Open the guard. Unscrew the M12 guard screws and remove the guard. Store it in a safe place.
2. Apply a load of 55 lb in the center of the axis of the flywheel and drive wheel.
3. Inspect the belt tension. Optimum displacement is 0.40 in. If less, loosen belt tension. If more, tighten belt tension.

MAINTENANCE
© 2018 Genesis Attachments, LLC Genesis GBC Bucket Crusher 39
4. Put the guards in position and secure with the M12 screws.
NEVER overtighten the belts. This may lead to reduced bearing and belt life. A uniform tension should be maintained. In motion the slack side should have a slight sag.
ALWAYS check the belt tension for the first few days after installation. New belts have a slight amount of stretch and will require tensioning.
ALWAYS maintain a well-ventilated area around the drive. The guards should provide adequate air circulation and personnel protection.
DO NOT allow grease, oil or chemicals to come into contact with the belts. This can lead to pre-mature belt failure.
ALWAYS carry out maintenance inspections on a periodic basis. Check for areas such as belt ten-sion, disproportionate stretching, belt softening or swelling and unequal stretching from belt to belt.
Adjust Belt Tension – ReplacementThe V-belt must be the same type, size and number as the originally fitted belt.
Before fitting the new belt, check that the pulley grooves are free from score marks or sharp edg-es. Also, check the grooves for wear. Ensure the pulley is tight on its shaft.
If belt replacement is necessary due to premature failure, investigate the cause and rectify before fitting the new belt.
1. Remove Guards - Place the GBC firmly on the ground, isolated from the excavator and hydraulic lines. Prepare the belt.
Open the guard. Unscrew the M12 guard screws and remove the guard. Store it in a safe place.

MAINTENANCE
© 2018 Genesis Attachments, LLCGenesis GBC Bucket Crusher40
2. Unscrew the M10 hydraulic guard screw and open the plate. Secure in position with a support pole/stanchion.
3. Loosen the four M16 screws
4. Loosen the M16 setscrew so the counter-shaft box is free to move.
5. Remove the worn belt from the pulley and flywheel. Replace with the new belt.

MAINTENANCE
© 2018 Genesis Attachments, LLC Genesis GBC Bucket Crusher 41
6. Tighten the M16 setscrew to the correct set-ting and secure. Optimum displacement is 0.40 in.
7. Tighten and secure the four M16 screws.
8. Replace the M10 hydraulic guard screws. Put the guards in position and secure wth the M12 screws.
If the belt starts to slip on the motor pulley or flywheel when the GBC is operating, the setting is not correct. Repeat the steps. Slowly rotate the belt and ensure that it operates the flywheel.
! WARNINGDuring the belt rotation monitoring phase, the operator must be 33 yards minimum from the bucket crusher.When the adjustments are complete, the guards must be secured before using the GBC.

MAINTENANCE
© 2018 Genesis Attachments, LLCGenesis GBC Bucket Crusher42
Replace Toggle PlateThe toggle plate is a wear and tear part. If it breaks, replace it with a Genesis spare part.
1. Place the GBC firmly on the ground, isolated from the excavator and hydraulic lines. Pre-pare shims.
Unscrew the M10 hydraulic guard screw and open the plate. Secure in position with a sup-port pole/stanchion
2. Remove the locking plate by removing the M10 lock screw and the lock post that se-cures the spring into position.
3. Slacken the drawback rod to release the spring ten-sion. The spring must be free to move.
4. Replace the toggle plate and secure in the correct position.

MAINTENANCE
© 2018 Genesis Attachments, LLC Genesis GBC Bucket Crusher 43
5. Tighten the drawback nut to the correct setting.
6. Set the spring length as indicated.
Replace the M10 lock screw and the lock post that secure the spring into position.
7. Replace the guard and M10 hydraulic screws.
10.63 inGBC 650: 7.87 in

MAINTENANCE
© 2018 Genesis Attachments, LLCGenesis GBC Bucket Crusher44
Replace Toggle SeatThe toggle seat is a wear and tear part. If it breaks, replace with a Genesis spare part.
1. Place the GBC firmly on the ground, isolated from the excavator and hydraulic lines. Prepare shims.
Unscrew the M10 hydraulic guard screw and open the plate. Secure in position with a support pole/stanchion
2. Remove the locking plate by removing the M10 lock screw and the lock post that se-cures the spring into position.
3. Slacken the drawback rod to release the spring tension. The spring must be free to move.
4. Remove the stop plate on both sides. Remove the M12 cap screws.

MAINTENANCE
© 2018 Genesis Attachments, LLC Genesis GBC Bucket Crusher 45
5. Replace the toggle seat and secure in the correct position.
6. Replace the stop plate on both sides. Tighten the M12 capscrews.
7. Tighten the drawback nut to the correct setting.
8. Set the spring length as shown. Replace the M10 lock screw and the lock post that secure the spring into position. Replace the guard and M10 hydraulic guard screws.
10.63 inGBC 650: 7.87 in

TROUBLESHOOTING
! WARNINGAll troubleshooting must be performed with the machine off, the parking brakes applied (if attached to an excava-tor) and the bucket crusher resting on the ground. ALWAYS wear appropriate PPE. Use Genesis spare parts.
Crusher Operation FailureInspect Possible Cause Solutions
Check all wear and tear parts such as wear plates, jaws, toggle plate, toggle seat, flywheel and counterbalance weight, jawstock, bearing houses and shaft
Damage has occurredReplace with genuine spare parts or have an authorized specialist perform the repair.
Check belt and belt tensionBelt tension is not correct.
Adjust tension or replace belt.Belt is torn up or not properly tensioned.
Check bucket opening for material blocking jaws
Jaws are blocked by material inside the bucket opening.
Completely remove blocked mate-rial from the jaws of the bucket crusher. If necessary, jiggle the bucket crusher carefully. Make sure no non-crushable material has been used.
Check hydraulic connections for proper connection
Hydraulic connections are inter-changed. Correct connection.
Check gate valve Gate valve is closed. Open it.
Bucket Crusher VibrationInspect Possible Cause Solutions
Check quick change coupling mounted on the bucket crusher for loose bolts and screws
Bolts and screws are loose.
Tighten bolts and screws if nec-essary. Refer to the operation manual for the quick change coupling system.
Check bearings for damage Bearings are damaged. Replace the bearings with genu-ine spare parts and grease them
Check position of flywheel The markings on the flywheel and shaft do not match.
Contact Genesis or your local Genesis dealer.
© 2018 Genesis Attachments, LLCGenesis GBC Bucket Crusher46

TROUBLESHOOTINGHydraulic Failure
Inspect Possible Cause Solutions
Check hydraulic oil pressure Hydraulic oil pressure and/or oil volume is not correct.
Refer to the specification data. Check oil supply from the exca-vator and follow the operation manual of the device in question.
Check hydraulic oil temperature Hydraulic oil temperature is too high (<194 °F).
Check oil supply from the exca-vator and follow the operation manual of the device in question.
Check for oil leaks Oil is leaking.
Control hydraulic system and all hydraulic system components. If connectors are leaking, re-tighten or have them repaired by a hydraulic specialist. Follow the operation manual for the device in question. For hydraulic mo-tor and hydraulic block, replace with genuine spare parts or have them repaired by a hydraulic specialist.
Check hydraulic pumps Excavator has only one function-ing hydraulic pump.
Ensure no other operations are performed during crushing activ-ity.
Check if drain line between crush-er and excavator is connected Drain line is not connected. Connect the drain line. Check
hydraulic motor for cracks.
© 2018 Genesis Attachments, LLC Genesis GBC Bucket Crusher 47

© 2018 Genesis Attachments, LLCGenesis GBC Bucket Crusher48
WARRANTYClaim ProcedureNotify the Genesis Service Department of the potential warranty claim prior to making the repair. Digital pictures are very helpful for diagnosing problems and recommending repairs.
Contact the Genesis Service Department before making alterations, changes or repairs to any component that is going to be considered for warranty. Not doing so will void all Genesis warranty consideration.
The Genesis Service Department will issue an authorization number to track the repair costs, out-going parts, and/or defective parts returning to the factory.
Replacement parts must be ordered using a purchase order number. Shipping is standard ground. Overnight shipping is available by request, and Genesis will not cover the shipping charge.
When the repair is complete, submit an invoice to the Genesis Service Department within 30 days. Include itemized internal labor reporting, parts lists and invoices for outside contractors. Reference the authorization number on all invoices.
When returning parts for warranty consideration, include a copy of any related Genesis paperwork along with any other necessary documentation to ensure proper processing and credit. The Gen-esis Service Department will provide the necessary forms.
Your account will be credited when the warranty claim is accepted.
Please direct any questions to the Genesis Service Department: 715-395-5252
© 2018 Genesis Attachments, LLC Genesis GBC Bucket Crusher 49
PARTS ORDER POLICY AND PROCEDUREParts Orders Should Include
• Purchase order number• Model and serial number of attachment• Part number and quantity needed• Shipping and billing address• Method of shipment or required delivery date
Placing OrdersOrders may be placed by phone, e-mail or fax. To fax an order, use the form on the following page. Contact information is located at the front of this manual.
Part NumbersPart numbers are listed in a separate Parts Manual or, if included, the Parts section of this manu-al. Contact the Genesis Parts Department with questions regarding part numbers, availability and pricing.
ShippingAll orders will be shipped best way surface unless an alternate shipping method is requested. Shipping charges are not included in the purchase price of parts.
InvoicesAll invoices are due upon receipt. Any accounts with invoices open beyond 60 days are subject to review and may be placed on C.O.D. status without further notice.
ReturnsUnused Genesis parts may be returned with proper documentation. Return shipping is the respon-sibility of the purchaser. Credit will be issued upon return, less a 20% restocking fee. Documen-tation is required for credit of returned parts. Contact the Genesis Parts Department at 715-395-5252 for a RGA (Return Goods Authorization) number and form.
Return Goods AuthorizationAll parts returned to Genesis for warranty consideration must be returned with a completed RGA (Return Goods Authorization) provided by the Genesis Parts Department. The form needs to be completed in its entirety, including any additional information requested by the Parts or Service Department. Return freight is the responsibility of the shipper and will be credited upon claim ap-proval. A determination to accept or deny the claim will be made based on the information avail-able to Genesis. Warranty on purchased parts other than wear components is 6 months. There is no warranty period on wear parts or components.

© 2018 Genesis Attachments, LLCGenesis GBC Bucket Crusher50
PARTS ORDER FORM
Customer:
Phone:
Shipping Address:
Purchase Order:
Model:
Date:
Contact:
E-mail:
Billing Address:
Shipping Method:
Serial Number:
Quantity Part Number Description Price
E-mail to the Genesis Parts Department: [email protected] assistance, call 715-395-5252

Asia Pacific Representative Office
24 Upper Serangoon View #12-28 Singapore 534205
Phone: +65 9673 9730
E-mail:[email protected]
Europe/Africa/Middle EastGenesis GmbH
Teramostrasse 2387700 Memmingen, Germany
Phone: +49 83 31 9 25 98 0Fax: +49 83 31 9 25 98 80
genesis-europe.com
E-mail:[email protected]
Central America & Colombia, The Caribbean
Cra 13A #89-38 / Ofi 613Bogota, Colombia
Phone: +57 1 610 8160 / 795 8747
E-mail:[email protected]
World HeadquartersGenesis Attachments
1000 Genesis DriveSuperior, WI 54880 USA
Toll Free: 888-SHEAR-IT(888-743-2748)
Phone: 715.395.5252
E-mail:[email protected]
CONTACT INFORMATION
View and download all manuals: genesisattachments.com/products/manualsPatents: genesisattachments.com/products/patents
Rev. A - 5-30-18