BodTrak Instrument Manual
62
26197-18 BODTrak™ INSTRUMENT MANUAL © Hach Company, 1995 - 1998. All rights reserved. Printed in the U.S.A. ar/lr 12-8-95 1ed Rev. 5, 7/98
-
Upload
nurulain-mohd-shokri -
Category
Documents
-
view
199 -
download
21
description
BodTrak Instrument Manual.pdf
Transcript of BodTrak Instrument Manual
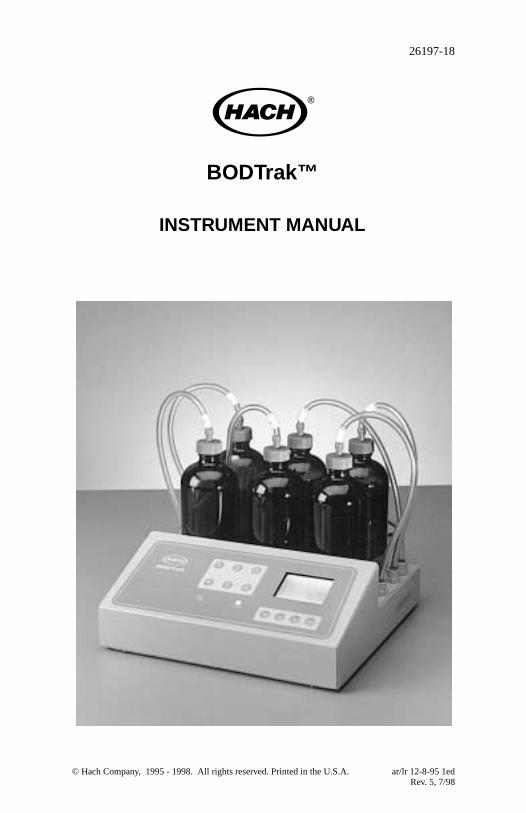
26197-18
BODTrak™
INSTRUMENT MANUAL
© Hach Company, 1995 - 1998. All rights reserved. Printed in the U.S.A. ar/lr 12-8-95 1edRev. 5, 7/98

ii

CERTIFICATION
Hach Company certifies this instrument was tested thoroughly, inspected and found to meet its published specifications when it was shipped from the factory.
The Model BODTrak has been tested and is certified as indicated to the following instrumentation standards:
FCC Part 15, Sub-Part B, Class A Limits: Supporting test records by Intellistor, certified compliance by Hach Company
Canadian Interference-Causing Equipment Regulation, ICES-003, Class A: Supporting test records by Intellistor, certified compliance by Hach Company
EN 55011/CISPR 11(EMI) “B” Limits per 89/336/EEC EMC: Supporting test records by Intellistor, certified compliance by Hach Company
EN 50082-1 (Immunity) per 89/336/EEC EMC: Supporting test records by Hach Company, certified compliance by Hach Company. Standards include:
IEC 801-2 and EN 61000-4-2 (ESD)
IEC 801-3 and EN V50140 (RF & EM Field)
IEC 801-4 and EN 61000-4-4 (Fast Transient)
EN 61000-4-5 (Surge)
RADIO FREQUENCY INTERFERENCE“This digital apparatus does not exceed the Class A Limits for radio noise emissions from digital apparatus set out in the Radio Interference Regulations of the Canadian Department of Communications.”
“Le présent appareil numérique n'émet pas de bruits radioélectriques dépassant les limites applicables aux appareils numériques de la class A prescrites dans le Règlement sur le brouillage radioeléctrique édicté par le ministère des Communications du Canada.”
iii

This device complies with Part 15 of the FCC Rules. Operation is subject to the following two conditions:
(1) This device may not cause harmful interference, and (2) this device must accept any interference received, including interference that may cause undesired operation.
WARNING Changes or modifications to this unit not expressly approved by
the party responsible for compliance could void the user's authority to operate the equipment.
Note: This equipment has been tested and found to comply with the limits for a Class A digital device, pursuant to Part 15 of the FCC Rules. These limits are designed to provide reasonable protection against harmful interference when the equipment is operated in a commercial environment. This equipment generates, uses, and can radiate radio frequency energy and, if not installed and used in accordance with the instruction manual, may cause harmful interference to radio communications. Operation of this equipment in a residential area is likely to cause harmful interference, in which case the user will be required to correct the interference at his own expense. Shielded cables must be used with this unit to ensure compliance with the Class A FCC limits. Because this instrument operates on and generates radio frequency energy, interference to radio and television reception may occur. If such interference does occur, the operator should take the necessary steps to correct the interference. The following techniques of reducing the interference problems are easily applied.
• Disconnect power from the BODTrak instrument to verify the instrument is the source of the interference.
• If the BODTrak is plugged into the same outlet as the device with which it is interfering, try another outlet.
• Move the BODTrak away from the device receiving the interference.
• Reposition the receiving antenna for the device receiving the interference.
• Try combinations of the above.
iv

TABLE OF CONTENTS
CERTIFICATION ....................................................................iii
SPECIFICATIONS .................................................................vii
SAFETY .................................................................................... ix
OPERATION ............................................................................. 1
SECTION 1 INTRODUCTION ................................................ 31.1 Before Operating the BODTrak Instrument ................... 31.2 Unpacking the BODTrak Instrument ............................. 31.3 Applying Power.............................................................. 41.4 The BOD Test ................................................................ 4
SECTION 2 INSTRUMENT OPERATION ............................ 72.1 Principles of Operation................................................... 7
2.1.1 Oxygen Transfer to Sample ................................... 72.1.2 Pressure Sensor Function ....................................... 72.1.3 Removing Carbon Dioxide .................................... 7
2.2 Key Functions................................................................. 82.3 Setting the Clock .......................................................... 102.4 RS232 Interface............................................................ 11
2.4.1 Hardware Configuration....................................... 112.4.2 Commands............................................................ 122.4.3 Downloading and Printing Test Results............... 16
SECTION 3 THE BOD TEST ................................................ 193.1 BODTrak Test Procedure ............................................. 193.2 Interpreting Test Results .............................................. 26
3.2.1 Bottle Leak ........................................................... 263.2.2 Time Lag .............................................................. 273.2.3 High Oxygen Demand.......................................... 273.2.4 Nitrification .......................................................... 27
3.3 Accuracy Check ........................................................... 28
SECTION 4 SPECIAL CONSIDERATIONS ....................... 314.1 Range and Volume Selection ....................................... 314.2 Sample Dilutions .......................................................... 31
4.2.1 When Oxygen Demand Exceeds 700 mg/L ......... 314.2.2 Preparing Several Identical Samples.................... 32
4.3 Sample Seeding ............................................................ 32
v
TABLE OF CONTENTS, continued
4.3.1 Determining BOD of Seed ................................... 324.3.2 Determining BOD of Sample............................... 334.3.3 Variations in Initial Bacterial Populations ........... 33
4.4 Sample Temperature..................................................... 344.4.1 Other BOD Test Temperatures ............................ 34
4.5 Industrial Wastes .......................................................... 344.5.1 Chlorine................................................................ 344.5.2 Other Toxic Materials .......................................... 354.5.3 Seed Acclimatization ........................................... 35
4.6 pH Effect ...................................................................... 364.7 Supersaturation............................................................. 36
SECTION 5 MAINTENANCE ............................................... 375.1 Cleaning the BODTrak Instrument .............................. 37
5.1.1 Sample Bottles ..................................................... 375.1.2 Stir Bars and Seal Cups........................................ 37
SECTION 6 TROUBLESHOOTING..................................... 396.1 Adjusting the Calibration ............................................. 39
GENERAL INFORMATION................................................. 41PARTS & ACCESSORIES ....................................................... 43HOW TO ORDER .................................................................... 45REPAIR SERVICE ................................................................... 47WARRANTY ............................................................................ 48INDEX ...................................................................................... 49
vi

vii
SPECIFICATIONS
Range: Selectable, 0-35, 0-70, 0-350, and 0-700 mg/L
Dimensions: 33 x 30.5 x 12.7 cm (13 x 12 x 5 inches)
External Power Supply: Input–115/230 VAC, 50/60 HzOutput–20.5 VRMSUL, CSA, and TUV approved
Capacity: Six 473-mL bottles
Shipping weight: 9 pounds
Operating temperature: 20 °C (68 °F)
Storage temperature: Below 40 °C (104 °F)

viii
SAFETY
Before attempting to unpack, set up, or operate this instrument, please read this entire manual. Pay particular attention to all warnings, cautions and notes. Failure to do so could result in serious injury to the operator or damage to the equipment.
Use of Hazard InformationIf multiple hazards exist, the signal word corresponding to the greatest hazard shall be used.
DANGERIndicates an imminently hazardous situation which, if not avoided will result in death or serious injury.
WARNINGIndicates a potentially hazardous situation that could result in death or serious injury or serious damage to equipment.
CAUTIONIndicates a potentially hazardous situation that may result in minor or moderate injury.
NOTEInformation that requires special emphasis.
SHALLThis word is understood to be mandatory.
SHOULDThis word is understood to be advisory.
ix

x

WARNINGHandling chemical samples, standards, and reagents can be dangerous. Review the necessary Material Safety Data Sheets and become familiar with all safety procedures before handling any chemicals.
ADVERTÊNCIAA manipulação de amostras, padrões e reagentes químicos pode ser perigosa. Reveja as necessárias Fichas Técnicas de Segurança do Material e familiarizese com os procedimentos de segurança antes de manipular quaisquer substãncias químicas.
ADVERTENCIALa manipulación de muestras químicas, patrones y reactivos puede ser peligrosa. Antes de manipular cualquier productor químico, conviene leer las Fichas Técnicas de Seguridad y familiarizarse con los procedimientos de sugeridad.
ATTENTIONLa manipulation des échantillons chimiques, étalons et réactifs peut être dangereuse. Lire les fiches de données de sécurité des produits nécessaires et se familiariser avec toutes les procédures de sécurité avant de manipuler tout produit chimique.
WARNUNGDa das Arbeiten mit chemikalischen Proben, Standards, Reagenzien und Abfällen mit Gefahren verbunden ist, empfiehlt die Hach Company dem Benutzer dieser Produkte dringend, sich vor der Arbeit mit sicheren Verfahrensweisen und dem richtigen Gebrauch der Chemikalien oder Biogefahrgut vertraut zu machen und alle entsprechenden Materialsicherheitsdatenblätter aufmerksam zu lesen.
1
OPERATION

2
SECTION 1 INTRODUCTION
1.1 Before Operating the BODTrak InstrumentRead this entire manual before attempting to unpack, set up, or operate the BODTrak instrument. Read all labels and tags attached to the instrument, and pay particular attention to information requiring special emphasis labeled NOTE and WARNING.
Hach Company certifies that this instrument was thoroughly tested and inspected and found to meet its published specifications when it was shipped from the factory.
1.2 Unpacking the BODTrak InstrumentWhen removing the BODTrak instrument and accessories from the shipping containers, inspect each item for damage that may have occurred during shipment. The BODTrak shipping container includes the following items:
• The BODTrak instrument
• Six Seal Cups
The BODTrak accessory shipping container includes the following items:
• Six amber sample bottles
• Six magnetic stir bars
• Polyethylene funnel
• Power supply – switchable between 115V or 230V
• Stopcock grease
• One package Nutrient Buffer Solution Pillows
• One package Lithium Hydroxide Powder Pillows
• Power cords, 115 and 230 V
If any items are missing or damaged, please contact the Hach
3
4
Customer Service Department in Loveland, Colorado. Do not return the instrument without prior authorization. In the United States, call 1-800-227-4224. Outside the United States, contact your nearest Hach dealer.
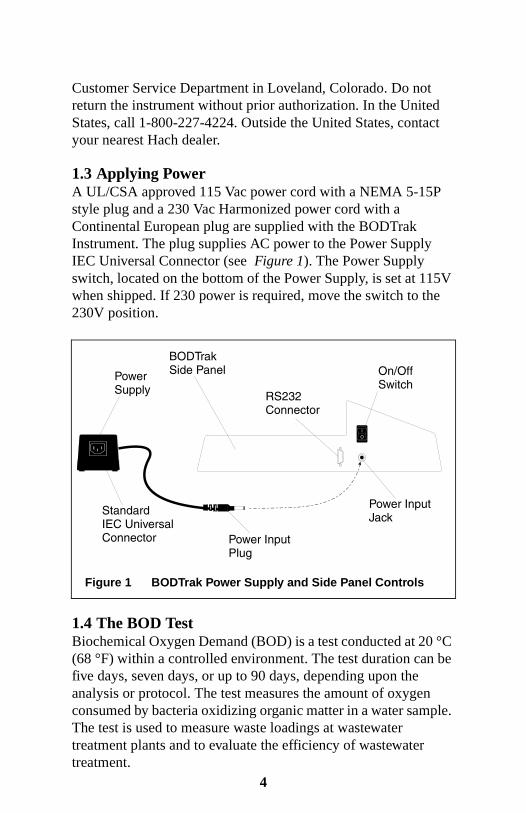
1.3 Applying PowerA UL/CSA approved 115 Vac power cord with a NEMA 5-15P style plug and a 230 Vac Harmonized power cord with a Continental European plug are supplied with the BODTrak Instrument. The plug supplies AC power to the Power Supply IEC Universal Connector (see Figure 1). The Power Supply switch, located on the bottom of the Power Supply, is set at 115V when shipped. If 230 power is required, move the switch to the 230V position.
1.4 The BOD TestBiochemical Oxygen Demand (BOD) is a test conducted at 20 °C (68 °F) within a controlled environment. The test duration can be five days, seven days, or up to 90 days, depending upon the analysis or protocol. The test measures the amount of oxygen consumed by bacteria oxidizing organic matter in a water sample. The test is used to measure waste loadings at wastewater treatment plants and to evaluate the efficiency of wastewater treatment.
Figure 1 BODTrak Power Supply and Side Panel Controls

BOD test results help determine general oxygen uptake patterns. This allows operators to estimate plant operating efficiency and determine proper treatment procedures.
The BODTrak method is an easy and direct method of measuring BOD. It makes complex chemical analysis unnecessary because the BODTrak instrument takes a physical measurement of the oxygen consumed by a test sample.
Advantages to using the BODTrak method over the dilution method are listed below:
• Minimal sample preparation time.
• Reduced total testing time (titrations and dilutions are unnecessary).
• The BODTrak test is easy to monitor.
• The sample is stirred constantly and maintained under natural conditions. The BODTrak has an initial head space containing 21% oxygen above the water sample. Continuous stirring replenishes dissolved oxygen to the sample. This makes the BODTrak results similar to occurrences found in a natural environment. The dilution method supplies no additional oxygen to the sample; this causes a higher percentage of oxygen depletion, sometimes as much as 89 percent.
• The BOD rate can be observed daily without disturbing the sample. Pressure changes within the closed BODTrak system are displayed graphically in milligrams per liter (mg/L) on an LCD. The system supplies 480 evenly spaced data points over the selected period (5.25, 7, or 10.5 days).
NOTE: You can either manually stop the test at 5.0 or 10.0 days, or scroll back (using the arrow keys) to 5.0 or 10.0 days on the display to see the final BOD value. If downloading, you can also disregard the last data points to collect exactly 5.0 or 10.0 days (i.e., disregard the last 23 points when doing the 5.25 day test).
5

• The BODTrak method continuously removes carbon dioxide (CO2) from the system so that the pressure difference observed is proportional to the amount of oxygen used.
• Bubbles formed by degassing can cause errors when samples are warmed to the experimental temperature. The BODTrak compensates for this occurrence by starting the test after the equilibrium temperature has been reached.
6

SECTION 2 INSTRUMENT OPERATION
2.1 Principles of Operation2.1.1 Oxygen Transfer to SampleA measured water sample is placed in each of the six amber sample bottles. The bottles are placed on the instrument and connected by caps and tubing to the instrument’s pressure sensors.
Bacteria in the sample uses oxygen (O2) to oxidize organic matter within the sample bottles. The air in the bottle above the sample contains 21% oxygen and replenishes the oxygen used by the bacteria. During the test period, stir bars continually rotate within each bottle. Stirring helps transfer oxygen from the air to the sample and helps simulate natural conditions.
2.1.2 Pressure Sensor FunctionThe BODTrak is sealed to prevent external atmospheric pressure changes from affecting the BOD reading. Pressure sensors monitor air pressure within the sample bottles, and when the air pressure drops, the pressure change is converted to mg/L BOD.
2.1.3 Removing Carbon Dioxide Carbon dioxide (CO2) is produced when microorganisms oxidize organic matter within the sample. The CO2 must be removed from the system so the measured pressure difference is proportional only to the amount of O2 used. Lithium hydroxide crystals, placed in the seal cup of each sample bottle before testing, remove the carbon dioxide.
Do not substitute any other compound for lithium hydroxide. Other materials could absorb moisture, or less CO2, throughout the test.
7

2.2 Key FunctionsThe BODTrak control panel (see Figure 2) includes the channel selector, located centrally on the panel; the display screen, to the right of the channel selector; and the control keys, located below the display screen.
Channel Selection KeysData for any of the six bottles can be displayed by pressing the corresponding channel selector key. The channel keys are numbered one through six and are located in the center of the instrument control panel.
Scrolling KeysThe display shows a graph of BOD values on the vertical axis and time in days on the horizontal axis. During operation the display shows the test start date, the run status, and the channel number.
Pressing the < (left) and > (right) scrolling keys (the centrally located control keys) scrolls through the stored data for the selected channel. The cursor moves along the BOD curve to show the approximate coordinates of the current data point. The
Figure 2 BODTrak Control Panel
8

elapsed time and BOD value of the data point are shown in the lower right of the display.
The cursor is automatically placed at the most recently collected data point whenever a channel is displayed.
The ON KeyTo start a test, follow the procedure in section 3.1 BODTrak Test Procedure and proceed as follows:
1. Connect the tube cap for the measurement channel to the bottle being tested, and firmly tighten the cap.
2. Simultaneously press and hold the < (left) and the > (right) scroll keys. The time menu will appear. Press CHANNEL 6 to activate the test length parameter.
3. Use the scroll keys to choose a 5-, 7-, or 10-day test. The test length is shown at the bottom of the screen.
4. Press the OFF key to save the selection and exit the menu.
5. Hold down the ON key. A menu for selecting a BOD scale is displayed.
6. Press the < (left) or > (right) key to select the desired scale. This also initializes the current channel, clears any previously stored BOD data, and records the current time as the start time. For details regarding scale selection, see section 3.1 BODTrak Test Procedure.
NOTE: To leave the menu screen without starting a test, press the OFF key.
7. Press and hold the ON key to start a test. An empty graph for the selected channel is displayed. The status annunciator in the lower right of the display will show DLY for the first hour of the test, during which no data are taken. This allows the instrument, bottles, and sample to equilibrate to the incubation temperature. After the first hour the annunciator shows RUN, indicating that the channel is actively collecting data.
9
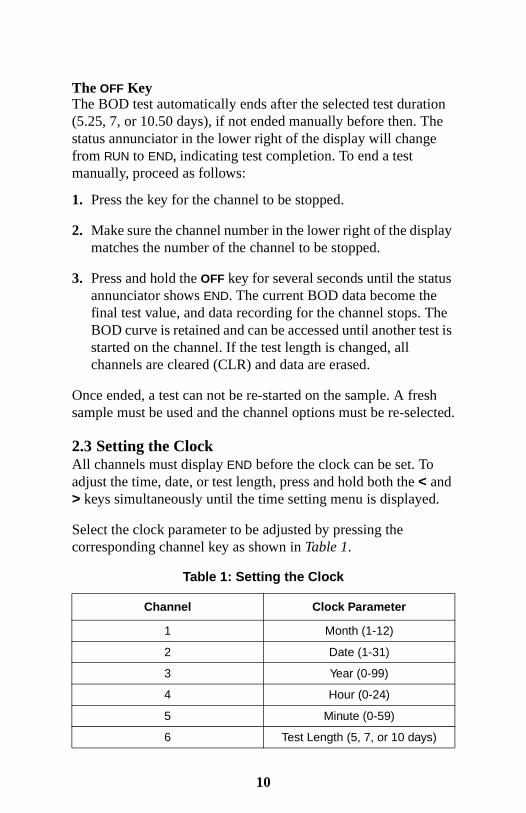
The OFF KeyThe BOD test automatically ends after the selected test duration (5.25, 7, or 10.50 days), if not ended manually before then. The status annunciator in the lower right of the display will change from RUN to END, indicating test completion. To end a test manually, proceed as follows:
1. Press the key for the channel to be stopped.
2. Make sure the channel number in the lower right of the display matches the number of the channel to be stopped.
3. Press and hold the OFF key for several seconds until the status annunciator shows END. The current BOD data become the final test value, and data recording for the channel stops. The BOD curve is retained and can be accessed until another test is started on the channel. If the test length is changed, all channels are cleared (CLR) and data are erased.
Once ended, a test can not be re-started on the sample. A fresh sample must be used and the channel options must be re-selected.
2.3 Setting the ClockAll channels must display END before the clock can be set. To adjust the time, date, or test length, press and hold both the < and > keys simultaneously until the time setting menu is displayed.
Select the clock parameter to be adjusted by pressing the corresponding channel key as shown in Table 1.
Table 1: Setting the Clock
Channel Clock Parameter
1 Month (1-12)
2 Date (1-31)
3 Year (0-99)
4 Hour (0-24)
5 Minute (0-59)
6 Test Length (5, 7, or 10 days)
10

Use the < (left) and > (right) keys to adjust the selected parameter to the desired value.
Repeat the procedure for each parameter to be adjusted. When all time adjustments are complete, press the OFF key to return to the normal operation mode.
2.4 RS232 InterfaceComputer commands sent over the RS232 interface simulate pressing the front panel keys. Request stored data with commands from Table 4 on page 14. The instrument then sends the requested information to the computer. For commands to send data to the Epson LQ-570+ printer see section 2.4.3 Downloading and Printing Test Results.
2.4.1 Hardware ConfigurationAll RS232 connections are made through the Serial I/O port located on the left side of the instrument panel (see Figure 1 on page 4). Connect the 9-pin D connector of a computer interface cable to the Serial I/O port on the instrument. Connect the opposite end of this straight through cable to the computer Serial I/O port (Com 1 or Com 2).
A command line may need to be added to the AUTOEXEC.BAT file of your communication software to set up the connection. If so, add the following command:
MODE COMn, 9600,N,8,1
Where n is the port number 1 or 2.
The BODTrak instrument is wired as Data Communication Equipment (DCE) and operates at 9600 baud with 8 data bits, no parity, and one stop bit. The pinouts of the necessary cables are shown in Table 3 and Table 3. The receiving device (computer or printer) must be able to continuously receive at 9600 baud or characters may be lost during long transmissions.
NOTE: Use of the specified cable or an equivalent shielded cable is mandatory for meeting Radio Frequency Emissions requirements.
11

Pins 1, 6, and 8 are internally connected to pin 4, so all control outputs are active whenever the host asserts its DTR output.
2.4.2 CommandsBODTrak operation is controlled by applying computer commands which send instructions to the instrument at any time during a test. The commands consist of a string of two or more
Table 2: Wiring Cable from BODTrak to Computer
BODTrak 9-pinConnector, Socket
Computer 9-pinConnector, Socket
Pin Signal Name Pin Signal Name
1 DCD 1 DCD
2 TXD 2 RXD
3 RXD 3 TXD
4 DSR 4 DTR
5 GND 5 GND
6 DTR 6 DSR
7 Not Used 7 RTS
8 RTS 8 CTS
9 Not Used 9 RI
Table 3: Wiring Cable from BODTrak to Serial Printer*
* Epson LQ-570+ (Cat. No. 48236-00)
BODTrak 9-pinConnector, Socket
Printer 25-pinConnector, Plug
Pin Signal Name Pin Signal Name
2 TXD 3 RXD
3 RXD 2 TXD
5 GND 7 GND
12

ASCII characters followed by a carriage return. Each command (such as selecting a channel) performs a single action as soon as the instrument receives it. The instrument then sends a carriage return and line feed to indicate completion.
Query commands, such as Sx, GC, and GA respond with additional characters before the final carriage return and line feed.
General Conventions:
• Commands preceded by “S” set conditions and are often followed by a single numeric parameter.
• Commands preceded by “G” are query conditions.
• Spaces within commands are ignored.
• All commands end with a carriage return.
• Commands are case sensitive, except for the S or G that precede them.
• The instrument sends a carriage return, then line feed to indicate it is ready for a new command.
13

Command SummaryTable 4 summarizes the RS232 commands. Notations x, xx*, or xxx denote the maximum number of places for a numeric parameter.
* The notation xx indicates that a single digit value may be entered as x or 0x (i.e., 7 or 07).
Table 4: Command Summary
Command Function
GT Initializes all date/time registers to their current values and returns the current values. Execute this command before changing any date or time values.
SYxx Sets the current year to the 1 or 2 digit value xx.
SMxx Sets the current month to the 1 or 2 digit value xx.
SDxx Sets the current date to the 1 or 2 digit value xx.
Shxx Sets the current hour to the 1 or 2 digit value xx.
Smxx Sets the current minute to the 1 or 2 digit value xx.
SLxx
Resets all channels to CLR state by changing the test length. Functions only when all channels are in the END state. SL10 and SL7 result in a 10- or a 7-day test length respectively. Any other number results in a 5-day test period.
GL Returns test length.
STStores the current time register values.Send this command to store the time registers after they have been set to their desired values.
SxMakes channel x current. The data for channel x is displayed.
14

S#xxx
Sets dilution concentration. Functions only when the display shows the ON screen. For example, sending the S#700, S#350, or S#70 parameter sets a 0-700, 0-350, or 0-70 mg/L test range respectively. Any other number results in a 0-35 mg/L test range.
S< Simulates pressing the OFF key.
S>Simulates pressing the ON key. (The instrument responds very quickly to this command.)
GC Returns the calibration value of the current channel.
GA
Starts the transfer of test data for the current sample bottle. The data transmission starts immediately after receiving the carriage return, which ends the command. Once started, the data stream can not be interrupted.
S$
Sets the analyzer to demo mode, where simulated BOD data are generated over several minutes and filled into each channel as it is activated.
To initiate the demo mode, set all channels to END. Once all 6 channels read END, type S$. Activate each channel as desired. For example, to start a 0-35 mg/L test on channel 1, type: S1; ENTER; S>; ENTER; S#35; ENTER; S>; ENTER. Repeat and modify as necessary for each channel and test range. (Keystrokes are separated by a ; (semi-colon)).Note: The test length parameter must be adjusted before entering the demo mode.
Table 4: Command Summary (cont.)
Command Function
15
2.4.3 Downloading and Printing Test Results
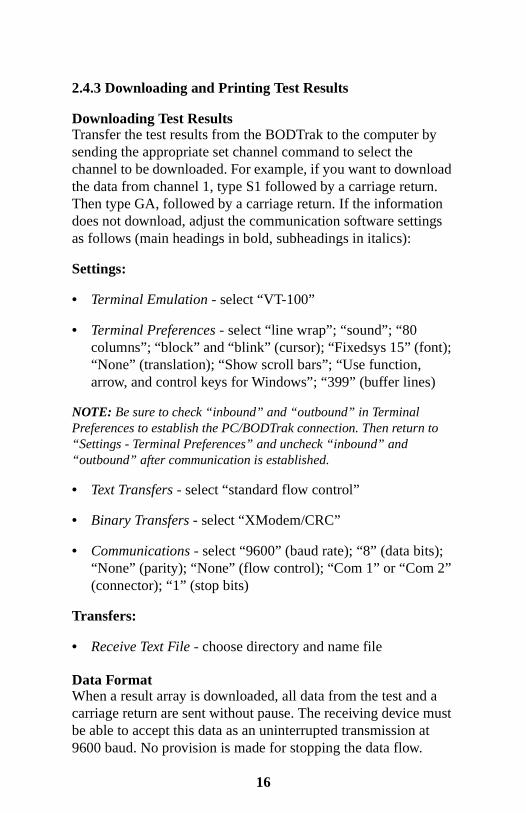
Downloading Test ResultsTransfer the test results from the BODTrak to the computer by sending the appropriate set channel command to select the channel to be downloaded. For example, if you want to download the data from channel 1, type S1 followed by a carriage return. Then type GA, followed by a carriage return. If the information does not download, adjust the communication software settings as follows (main headings in bold, subheadings in italics):
Settings:
• Terminal Emulation - select “VT-100”
• Terminal Preferences - select “line wrap”; “sound”; “80 columns”; “block” and “blink” (cursor); “Fixedsys 15” (font); “None” (translation); “Show scroll bars”; “Use function, arrow, and control keys for Windows”; “399” (buffer lines)
NOTE: Be sure to check “inbound” and “outbound” in Terminal Preferences to establish the PC/BODTrak connection. Then return to “Settings - Terminal Preferences” and uncheck “inbound” and “outbound” after communication is established.
• Text Transfers - select “standard flow control”
• Binary Transfers - select “XModem/CRC”
• Communications - select “9600” (baud rate); “8” (data bits); “None” (parity); “None” (flow control); “Com 1” or “Com 2” (connector); “1” (stop bits)
Transfers:
• Receive Text File - choose directory and name file
Data FormatWhen a result array is downloaded, all data from the test and a carriage return are sent without pause. The receiving device must be able to accept this data as an uninterrupted transmission at 9600 baud. No provision is made for stopping the data flow.
16
17
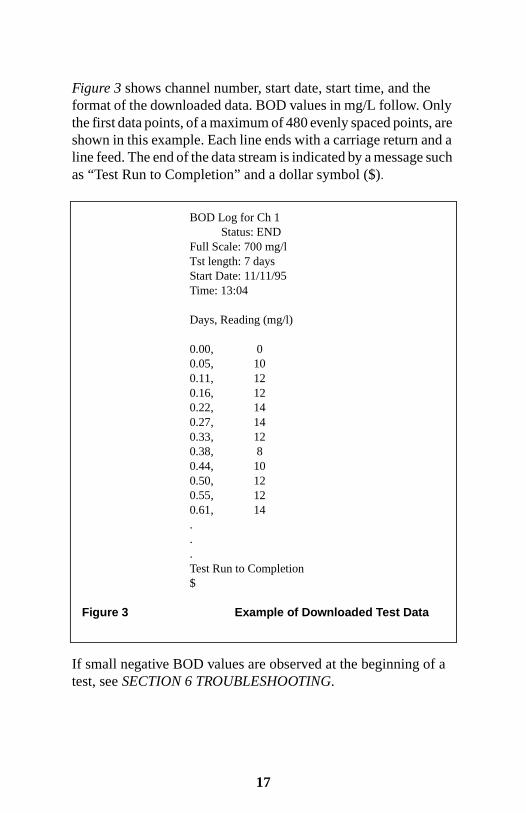
Figure 3 shows channel number, start date, start time, and the format of the downloaded data. BOD values in mg/L follow. Only the first data points, of a maximum of 480 evenly spaced points, are shown in this example. Each line ends with a carriage return and a line feed. The end of the data stream is indicated by a message such as “Test Run to Completion” and a dollar symbol ($).
If small negative BOD values are observed at the beginning of a test, see SECTION 6 TROUBLESHOOTING.
BOD Log for Ch 1Status: END
Full Scale: 700 mg/lTst length: 7 daysStart Date: 11/11/95Time: 13:04
Days, Reading (mg/l)
0.00, 00.05, 100.11, 120.16, 120.22, 140.27, 140.33, 120.38, 80.44, 100.50, 120.55, 120.61, 14...Test Run to Completion$
Figure 3 Example of Downloaded Test Data

Printing Test ResultsTransfer the test results from the BODTrak to the Epson LQ-570+ printer by pressing and holding the appropriate channel number for several seconds. The instrument will send a copy of the graphical display as well as a truncated data stream (127 data points). This can be done at any time during a test.
18
SECTION 3 THE BOD TEST
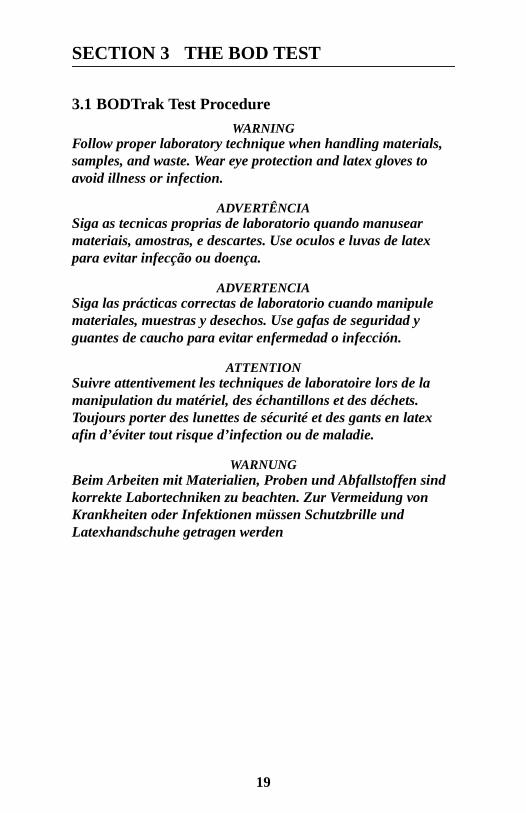
3.1 BODTrak Test Procedure
WARNINGFollow proper laboratory technique when handling materials, samples, and waste. Wear eye protection and latex gloves to avoid illness or infection.
ADVERTÊNCIASiga as tecnicas proprias de laboratorio quando manusear materiais, amostras, e descartes. Use oculos e luvas de latex para evitar infecção ou doença.
ADVERTENCIASiga las prácticas correctas de laboratorio cuando manipule materiales, muestras y desechos. Use gafas de seguridad y guantes de caucho para evitar enfermedad o infección.
ATTENTIONSuivre attentivement les techniques de laboratoire lors de la manipulation du matériel, des échantillons et des déchets. Toujours porter des lunettes de sécurité et des gants en latex afin d’éviter tout risque d’infection ou de maladie.
WARNUNGBeim Arbeiten mit Materialien, Proben und Abfallstoffen sind korrekte Labortechniken zu beachten. Zur Vermeidung von Krankheiten oder Infektionen müssen Schutzbrille und Latexhandschuhe getragen werden
19

BODTrak Test Procedure, continued
1. Heat or cool the sample to within 2 °C of its incubation temperature (typically 20 °C, 68 °F).
2. Using a clean graduated cylinder, pour the correct sample volume into a BODTrak sample bottle (see Table 5). See section 4.2 Sample Dilutions for more information on BOD range selection.
3. Place a 3.8-cm (1½-inch) magnetic stir bar in each sample bottle.
Table 5: Selection of Sample Volume
BOD Range (mg/L) Required Volume (mL)
0–35 420
0–70 355
0–350 160
0–700 95
20

BODTrak Test Procedure, continued
4. Add the contents of one BOD Nutrient Buffer Pillow to each bottle for optimum bacteria growth.
Note: Step 4 is optional. If simulation of original sample characteristics is required, do not add the BOD Nutrient Buffer.
5. Apply Stopcock Grease to the seal lip of each bottle and to the top of each seal cup.
6. Place a seal cup in the neck of each bottle.
21

BODTrak Test Procedure, continued
CAUTION Lithium Hydroxide is strongly alkaline and irritating to the skin and
eyes. Practice safe laboratory techniques.
PRECAUÇÃOO hidróxido de lítio é fortemente alcalino, caústico e irrita a pele e os
olhos. Use praticas seguras de laboratorio.
PRECAUCIONEl hidróxido de litio es fuertemente alcalino, cáustico e irrita la piel y
los ojos. Favor observar prácticas de laboratorio apropiadas.
PRUDENCEL’hydrate de lithium est fortement alcalin, caustique, irritant pour la
peau et les yeux. Suivre les techniques de laboratoire propres.
VORSICHTLithiumhydrat ist eine starke Lauge, ätzt und irritiert die Haut und die
Augen. Bitte sichere und korrekte Labortechniken beachten.
7. Using the funnel, add the contents of one Lithium Hydroxide Powder Pillow to each seal cup. Do not allow lithium hydroxide particles to fall into the sample. If this occurs, discard the sample and prepare a fresh one.
8. Place the bottles on the chassis of the BODTrak. Connect the appropriate tube to the sample bottle and firmly tighten the cap. Each tube is tagged with the channel number, and the channel number setup will be reflected on the control panel.
9. Place the instrument in the incubator.
Note: The American Public Health Association (APHA) recommends a solution incubation temperature of 20 ± 1 °C (68 ± 1 °F) for the BOD test. Adjust your incubator to the appropriate temperature setting for each sample volume. This temperature value varies with incubator circulation.
22

BODTrak Test Procedure, continued
10. Start the instrument (connect the electrical plug and turn the instrument on). See Figure 1 on page 4.
11. Make sure all stir bars are rotating. If a stir bar slides to the side of the bottle, lift the bottle off the unit and gently replace. Do not start the channel until the stir bar is rotating properly.
12. To select a test duration, simultaneously press and hold the < (left) and the > (right) arrow keys until the time menu appears. Press the CHANNEL 6 key to activate the test length parameter. Use the arrow keys to choose a 5-, 7-, or 10-day test (test length is shown on the last line of the screen). Press OFF to save selections and exit the menu.
23

BODTrak Test Procedure, continued
13. To start a test, press the channel number corresponding to the bottle.
Note: Each channel (1–6) must be started individually.
14. Press the ON key. A menu for selecting the BOD range will be displayed.
15. For 0–350 mg/L range, press the > (right) key. For 0–700 mg/L press the > key a second time.
For 0–35 mg/L range, press the < (left) key. For 0–70 mg/L press the < key a second time.
24

BODTrak Test Procedure, continued
16. Press and hold the ON key to start a test. A graph will be displayed. To cancel a test, press OFF.
Note: Repeat steps 13 to 16 for each channel used.
Note: The BODTrak automatically stops each channel after the selected time has passed. A channel can be manually stopped by depressing the OFF key for several seconds. The display status will change from RUN to END.
17. Read the BOD results directly from the BODTrak display by pressing the key corresponding to each sample.
Note: See section 2.4.3 Downloading and Printing Test Results for information on transferring data to a computer or printer.
18. Use a brush and hot soapy water to clean all bottles, stir bars, and seal cups. Rinse thoroughly with distilled water.
Note: See section 5.1 Cleaning the BODTrak Instrument for more cleaning instructions.
25

3.2 Interpreting Test ResultsIf the test proceeds correctly, the display should produce a curve similar to Curve A in Figure 4.
If such a curve does not occur, one or more of the following problems may have occurred: bottle leak, time lag, high oxygen demand, or nitrification. These potential problems are discussed in detail in the next four sections.
3.2.1 Bottle Leak A leak between the bottle cap and seal cup may cause readings similar to those plotted as Curve B in Figure 4, or may cause no response from the system. If such a response to BOD changes occurs, check for dirt inside the bottle cap and under the seal cup.
Figure 4 Example of BOD Curves
26

3.2.2 Time LagTests that begin with insufficient bacteria during the incubation period produce data similar to that of Curve H in Figure 4. For sample processing when insufficient bacteria are present, seed the sample as described in section 4.3 Sample Seeding.
Bacteria acclimation also produces conditions that could generate Curve H in Figure 4. This sometimes occurs when running standards, even though seed has been added.
3.2.3 High Oxygen DemandSamples that are over range (for example, a BOD over 350 mg/L when a 160-mL sample is taken) will produce results as shown in Curve K in Figure 4. Dilute the sample according to section 4.2 Sample Dilutions, or use a higher BOD range and a different sample volume as directed in Table 5.
When the BOD range of a sample is unknown, use the results from the Chemical Oxygen Demand (COD) test, or the results from a series of BOD tests using the same sample but different volumes, or dilution ratios to select an appropriate BOD range. Generally, effluent normally is in the 0-70 mg/L range while influent is in the 0-700 mg/L range. When the BOD of the sample is greater than 700 mg/L, prepare a sample dilution (see section 4.2 Sample Dilutions).
3.2.4 NitrificationThe condition shown by Curve AN in Figure 4 is an example of nitrification. Biological oxidation of organic nitrogen usually occurs after five days with normal domestic waste because it takes that long for the nitrifying bacteria to develop; however, an abnormally high uptake of oxygen (especially when testing final effluent) is evidence of nitrifying bacteria adding appreciably to the oxygen demand.
Control nitrification problems with Hach Nitrification Inhibitor (Cat. No. 2533-35). Dispense the inhibitor powder into an empty sample bottle and then add the sample. When using the Hach Dispenser cap (Cat No. 459-01), dispense two shots (approximately 0.16 grams) into the empty bottle.
27

3.3 Accuracy CheckTo check test accuracy and proper performance of the BODTrak instrument, test a standard BOD sample and evaluate it for one or more of the chemical, physical, or biological effects described in 3.2 Interpreting Test Results.
WARNINGFollow proper laboratory technique when handling materials, samples, and waste. Wear eye protection and latex gloves to avoid illness or infection.
ADVERTÊNCIASiga as tecnicas proprias de laboratorio quando manusear materiais, amostras, e descartes. Use oculos e luvas de latex para evitar infecção ou doença.
ADVERTENCIASiga las prácticas correctas de laboratorio cuando manipule materiales, muestras y desechos. Use gafas de seguridad y guantes de caucho para evitar enfermedad o infección.
ATTENTIONSuivre attentivement les techniques de laboratoire lors de la manipulation du matériel, des échantillons et des déchets. Toujours porter des lunettes de sécurité et des gants en latex afin d’éviter tout risque d’infection ou de maladie.
WARNUNGBeim Arbeiten mit Materialien, Proben und Abfallstoffen sind korrekte Labortechniken zu beachten. Zur Vermeidung von Krankheiten oder Infektionen müssen Schutzbrille und Latexhandschuhe getragen werden
Use a mixture of 150 mg/L each of glucose and glutamic acid as the BOD standard. A prepared BOD standard solution, 3000 mg/L each of glucose and glutamic acid, is available as the Voluette® Ampule Standard for the Manometric Method (Cat. No. 14866-10). A 1:20 dilution of this standard (to 150 mg/L) is incorporated in the following procedure. Follow this procedure to analyze the 3000 mg/L prepared standard sample:
28

1. Shake 3 L of distilled water in a partly filled container for one minute to saturate the water with oxygen.
2. Add the contents of one BOD Nutrient Buffer Pillow (Cat. No. 14861-98) for 3 L, and invert several times to mix.
3. Snap the neck off a Voluette Ampule Standard for BOD (Cat. No. 14866-10) and pipet 7 mL of standard into a sample bottle.
4. Add 133 mL of the nutrient buffer solution, prepared in step 2, and 15 mL seed. A 10% by volume of seed in solution will result (see section 4.3 Sample Seeding).
5. Follow the general procedure for the BOD test using the 0-350 mg/L BOD range and a 5-day test period.
6. Also perform a full strength BOD test on the pure seed to determine its BOD while determining the BOD of the standard. Follow the same procedure used to determine the BOD of a sample. See the iconed procedure, section 3.1 BODTrak Test Procedure for details.
7. To determine the BOD result, see section 4.3.2 Determining BOD of Sample. The corrected BOD of the standard solution should be 198 ±30.5 mg/L.
29

30

SECTION 4 SPECIAL CONSIDERATIONS
4.1 Range and Volume SelectionBecause the BODTrak instrument can measure various waste substances, a variety of total oxygen demand test results can be obtained. The instrument provides four direct-reading ranges (0-35, 0-70, 0-350, and 0-700 mg/L). Use Table 5 on page 20 to select the volume and range corresponding to the expected sample BOD. For example, when using a sample with an expected BOD of 35 mg/L or less, use a 420-mL volume.
For best results, analyze samples immediately after collection. If this is not possible, preserve samples at low temperature (4 °C) for no longer than 24 hours.
4.2 Sample DilutionsIf the sample’s BOD is unknown, you can generally assume that effluent is normally in the 0-70 mg/L range while influent is usually in the 0-700 mg/L range.
If a sample does not contain sufficient nutrients for optimum bacteria growth, add the contents of one BOD Nutrient Buffer Pillow to each bottle. Do not add the BOD Nutrient Buffer Pillow if close simulation of original sample characteristics is required.
4.2.1 When Oxygen Demand Exceeds 700 mg/LWhen the O2 demand of a sample exceeds 700 mg/L, dilute the sample with high-quality dilution water. Make the dilution water with distilled water that does not contain organic matter or traces of toxic substances such as chlorine, copper, and mercury.
Demineralizers can release undetected organic matter that will create an objectionable oxygen demand. The most practical way to consistently produce water of low organic content is by distillation from alkaline permanganate. (For example, add 2 g KMnO4 and 4 g NaOH for every liter of water.)
After distillation, place 3 L of distilled water in a jug and bring the water temperature to 20 °C. Add the contents of one BOD Nutrient Buffer Pillow for 3 L to ensure sufficient nutrient concentration for diluted samples. Cap the jug and shake it vigorously for one minute to saturate the water with oxygen. Do not store the solution.
31

4.2.2 Preparing Several Identical SamplesPerform a single dilution for all samples when several identical samples are needed. After the dilution, multiply the reading by the dilution factor.
Example:Prepare a 1:5 dilution by multiplying the original sample volume by 5 and adding dilution water until the new volume is obtained. If the sample volume is 200 mL:
5 x 200 = 1000 mL
Dilute the 200-mL sample to 1000 mL using the dilution water. Multiply the reading corresponding to the diluted sample by 5.
After sample dilution, refer to Table 5 on page 20 to select volume and range.
4.3 Sample Seeding4.3.1 Determining BOD of SeedCertain types of BOD samples do not contain sufficient bacteria to oxidize the organic matter present in the sample. Many industrial discharges are of this type. Some sewage treatment plant effluents are chlorinated to the extent that they are essentially sterile, making it impossible to perform a direct BOD test. To test such samples, seed each bottle with water known to contain an abundant bacterial population (e.g., Polyseed® Inoculum, Cat. No. 24712-00, or domestic sewage).
The BOD of the seed must be known in order to determine the BOD of the sample. To determine the BOD of the seed, follow the same procedure used to determine the BOD of the sample. Run a BOD test on the pure seed and sample at the same time. See section 4.5.3 Seed Acclimatization for more information.
32

4.3.2 Determining BOD of SampleAfter determining the BOD of the seed, apply the following formula to determine the sample’s BOD.
Example:A seeded sample is 10% seed and 90% sample (by volume).
The observed BOD is 60 mg/L, and the pure seed BOD is 150 mg/L.
4.3.3 Variations in Initial Bacterial PopulationsMicrobic counts of domestic sewage fluctuate by the hour, so bacteria counts should be reported within a specified range. Domestic sewage typically contains between 104 and 106 cells per mL. Variations in initial bacterial populations will have a minimal effect on the BOD test if the bacteria count in the sample exceeds 103 cells per mL.
Low seed concentrations are more critical than those that are too high. They delay the start of oxidation and cause low BOD results. Use the trial and error method to determine the optimum concentration of seed for a specific waste material. Adding 10% of Polyseed Solution or raw domestic sewage seed to each BOD sample is usually sufficient for the manometric method.
Try various concentrations of seed and determine the respective BODs of the waste sample as well as of the seed itself. Choose the seed concentration yielding the highest corrected waste sample BOD. This seed percentage can range from 2 to 30%, depending on the waste material tested.
BOD sample BOD observed( ) Decimal fraction of seed used x BOD seed( )–Decimal fraction of sample used
------------------------------------------------------------------------------------------------------------------------------------------------------------------------=
BOD sample 60 mg/L( ) 0.10 x 150 mg/L( )–0.90
--------------------------------------------------------------------------------= 50 mg/L=
33
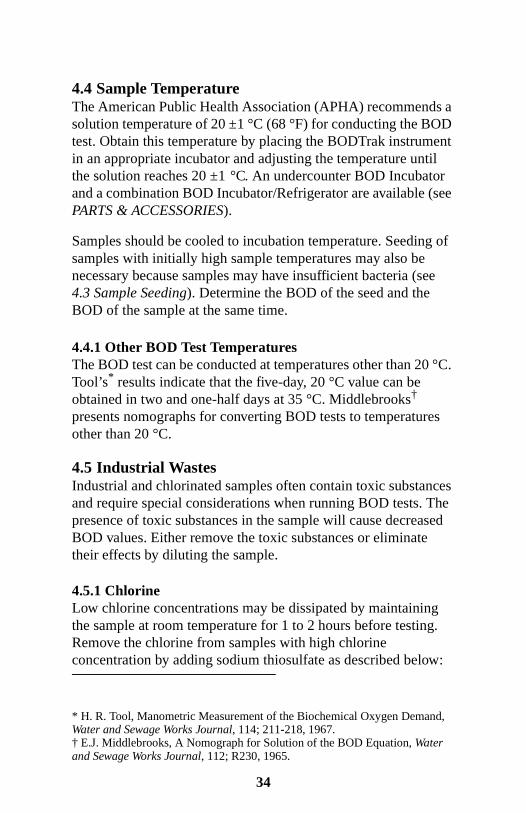
4.4 Sample TemperatureThe American Public Health Association (APHA) recommends a solution temperature of 20 ±1 °C (68 °F) for conducting the BOD test. Obtain this temperature by placing the BODTrak instrument in an appropriate incubator and adjusting the temperature until the solution reaches 20 ±1 °C. An undercounter BOD Incubator and a combination BOD Incubator/Refrigerator are available (see PARTS & ACCESSORIES).
Samples should be cooled to incubation temperature. Seeding of samples with initially high sample temperatures may also be necessary because samples may have insufficient bacteria (see 4.3 Sample Seeding). Determine the BOD of the seed and the BOD of the sample at the same time.
4.4.1 Other BOD Test TemperaturesThe BOD test can be conducted at temperatures other than 20 °C. Tool’s* results indicate that the five-day, 20 °C value can be obtained in two and one-half days at 35 °C. Middlebrooks† presents nomographs for converting BOD tests to temperatures other than 20 °C.
4.5 Industrial WastesIndustrial and chlorinated samples often contain toxic substances and require special considerations when running BOD tests. The presence of toxic substances in the sample will cause decreased BOD values. Either remove the toxic substances or eliminate their effects by diluting the sample.
4.5.1 ChlorineLow chlorine concentrations may be dissipated by maintaining the sample at room temperature for 1 to 2 hours before testing. Remove the chlorine from samples with high chlorine concentration by adding sodium thiosulfate as described below:
* H. R. Tool, Manometric Measurement of the Biochemical Oxygen Demand, Water and Sewage Works Journal, 114; 211-218, 1967.† E.J. Middlebrooks, A Nomograph for Solution of the BOD Equation, Water and Sewage Works Journal, 112; R230, 1965.
34

1. Add 10 mL of 0.02 N Sulfuric Acid Standard Solution and 10 mL of 100 mg/L Potassium Iodide Solution to a 100-mL portion of sample in a 250-mL erlenmeyer flask.
2. Add three droppers of Starch Indicator Solution and swirlto mix.
3. Titrate from dark blue to colorless with 0.025 N Sodium Thiosulfate Standard Solution.
4. Calculate the amount of Sodium Thiosulfate Standard Solution necessary to dechlorinate the remaining sample:
5. Add the required amount of 0.025 N Sodium Thiosulfate Standard Solution to the sample and mix thoroughly. Wait 10 to 20 minutes before running the BOD test.
4.5.2 Other Toxic MaterialsDetermine the concentrations of other toxic materials such as phenols, heavy metals, and cyanides.
NOTE: To determine the concentrations of these and other materials, see the Hach “Water Analysis Handbook.”
Dilute the sample with distilled water to eliminate the effect of these materials. The correct BOD is obtained when two successive dilutions result in the same sample BOD value.
4.5.3 Seed AcclimatizationDomestic sewage or Polyseed Inoculum can provide seed for most samples. Polyseed Inoculum is ideally suited for domestic and industrial wastewater because it provides a constant seed source and is free of nitrifying microorganisms.
Pour the contents of one polyseed capsule into dilution water to rehydrate (refer to the procedure packaged with the Polyseed). Aerate and stir for 1 hour. Use enough of this solution so that it makes up 10 to 30% of the overall sample volume. The exact percentage of seed must be determined for each sample type.
mL of Sodium Thiosulfate mL used( ) mL sample to be dechlorinated( )100
-------------------------------------------------------------------------------------------------------------------=
35

For more information, Standard Methods for the Examination of Water and Wastewater, 18th edition emphasizes the importance of selecting the proper seed for specific wastes.
If the waste sample to be tested contains toxic materials such as phenol, formaldehyde, or other microbic inhibitory agents, use acclimated seed. Acclimate the seed in any non-metal or stainless steel gallon container fitted with an aeration system. Proceed as follows:
1. Aerate domestic sewage for about 24 hours. Allow one hour settling time for heavier materials to settle.
2. After the one hour settling, siphon and discard the top two-thirds of the volume.
3. Refill the container to the original volume with domestic sewage containing 10% of the waste material in question.
4. Repeat steps 1-3, increasing the addition of waste material by 10%. Stop the procedure when 100% waste material has been reached.
4.6 pH EffectLow BOD test results occur when the pH of a test waste material exceeds the 6-8 range. The operator may maintain this pH to simulate original sample conditions or may adjust the pH to approach neutrality (buffered at pH 7). Neutralize samples containing caustic alkalinity or acidity by using 1.0 N (or weaker) sulfuric acid or sodium hydroxide, respectively.
4.7 SupersaturationReduce supersaturated cold samples (containing more than 9 mg/L dissolved oxygen at 20 °C) to saturation. To do so, first bring the sample temperature to about 20 °C. Then partly fill a sample bottle with sample and shake vigorously for two minutes, or aerate with filtered compressed air for two hours.
36

37

38

SECTION 5 MAINTENANCE
5.1 Cleaning the BODTrak InstrumentUse the following methods to clean the BODTrak instrument after each test to assure accuracy of future BOD tests.
5.1.1 Sample Bottles
1. After each test, empty the sample bottles and rinse them several times with hot water.
2. Use a brush and hot soapy water to remove deposits.
3. Residues create a BOD, so be sure to remove all detergents by rinsing the bottles several times with tap water and finally with distilled or demineralized water.
5.1.2 Stir Bars and Seal Cups
1. Rinse the stir bars several times with hot soapy water.
2. Use a brush to remove deposits.
3. Rinse several times with tap water and finally with distilled or demineralized water to remove all detergent.
4. Wash the seal cups in hot soapy water to remove alkali residue.
5. Rinse thoroughly and dry.
37

38
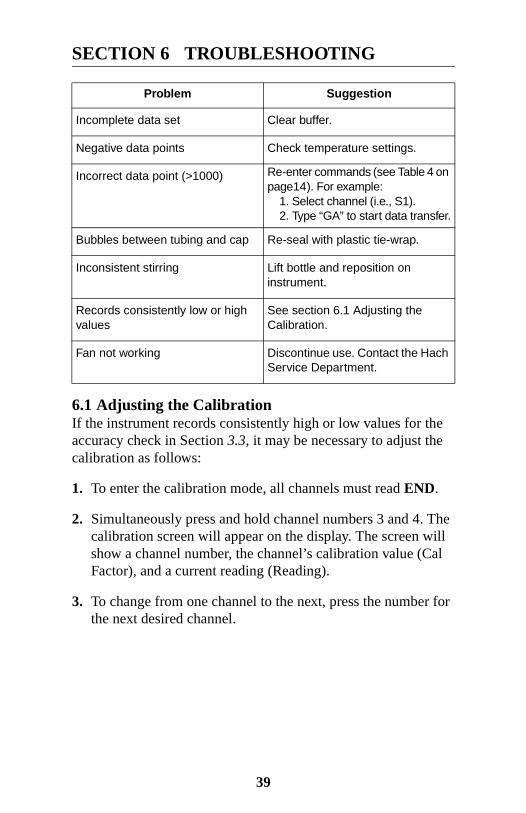
SECTION 6 TROUBLESHOOTING
39
6.1 Adjusting the CalibrationIf the instrument records consistently high or low values for the accuracy check in Section 3.3, it may be necessary to adjust the calibration as follows:
1. To enter the calibration mode, all channels must read END.
2. Simultaneously press and hold channel numbers 3 and 4. The calibration screen will appear on the display. The screen will show a channel number, the channel’s calibration value (Cal Factor), and a current reading (Reading).
3. To change from one channel to the next, press the number for the next desired channel.
Problem Suggestion
Incomplete data set Clear buffer.
Negative data points Check temperature settings.
Incorrect data point (>1000) Re-enter commands (see Table 4 on page14). For example:
1. Select channel (i.e., S1).2. Type “GA” to start data transfer.
Bubbles between tubing and cap Re-seal with plastic tie-wrap.
Inconsistent stirring Lift bottle and reposition on instrument.
Records consistently low or high values
See section 6.1 Adjusting the Calibration.
Fan not working Discontinue use. Contact the Hach Service Department.
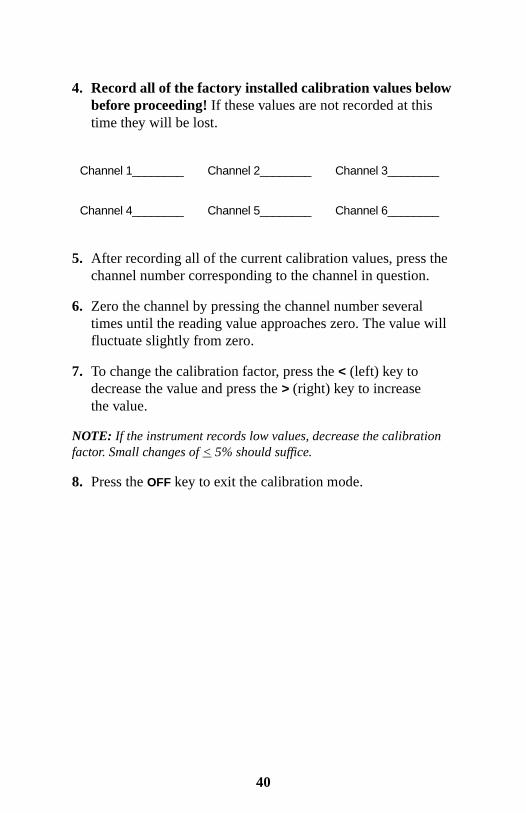
4. Record all of the factory installed calibration values below before proceeding! If these values are not recorded at this time they will be lost.
5. After recording all of the current calibration values, press the channel number corresponding to the channel in question.
6. Zero the channel by pressing the channel number several times until the reading value approaches zero. The value will fluctuate slightly from zero.
7. To change the calibration factor, press the < (left) key to decrease the value and press the > (right) key to increase the value.
NOTE: If the instrument records low values, decrease the calibration factor. Small changes of < 5% should suffice.
8. Press the OFF key to exit the calibration mode.
Channel 1________ Channel 2________ Channel 3________
Channel 4________ Channel 5________ Channel 6________
40

GENERAL INFORMATION
41
At Hach Company, customer service is an important part of every product we make. With that in mind, we have compiled the following information for your convenience.

42

PARTS & ACCESSORIES
APPARATUSDescription Cat. No.BODTrak Instrument, 115/230Vac............................................ 26197-00
Bottle, BOD, amber, 6/pkg.......................................................... 7144-21
Bottle, polyethylene, with spigot, 4 L ....................................... 14868-17
Brush, cylinder, size 2, .................................................................. 687-00
Buret, straight stopcock, Teflon plug, 25 mL............................ 14681-40
Clamp, buret, double ..................................................................... 328-00
Computer cable ......................................................................... 49672-00
Cylinders, graduated10 mL......................................................................................... 508-3825 mL......................................................................................... 508-4050 mL......................................................................................... 508-41100 mL....................................................................................... 508-42250 mL....................................................................................... 508-46500 mL....................................................................................... 580-491000 mL..................................................................................... 508-53
Dispenser cap for 35 g bottle (to be used with Nitrification Inhibitor)..................................... 459-01
Flask, erlenmeyer, 500 mL............................................................ 505-49
Flask, volumetric, 1000 mL .......................................................... 547-53
Funnel, analytical, 65 mm ........................................................... 1083-97
Incubator, undercounter, Model 205, 120V .............................. 26162-00
Incubator, undercounter, Model 205, 240V .............................. 26162-02
Incubator/Refrigerator, Model 207, 120V................................. 26198-00
Incubator/Refrigerator, Model 207, 240V................................. 26198-02
IncuTrol/2, Temperature Regulator, 115V .................................. 2597-00
IncuTrol/2, Temperature Regulator, 220V .................................. 2597-02
Manual, BODTrak Instrument .................................................. 26197-18
Pipet filler .................................................................................. 12189-00
Pipet, serological, glass1.0 mL........................................................................................ 532-3510 mL......................................................................................... 532-38
Power cord, 18/3 SVT 7.5’, 10A-125 Vacfor North American 115 Vac use ........................................... 18010-00Power Cord, 8’, with Continental European plug for 230 Vac use ...................................................................... 46836-00
Power Supply ............................................................................ 26249-00
43

PARTS & ACCESSORIES, continued
Sampler, sewage ............................................................................ 427-00
Seal Cup .................................................................................... 10977-52
Software, Data Capture Package ............................................... 49665-00
Stir Bar, magnetic ..................................................................... 10764-16
Support Stand, buret ...................................................................... 329-00
Thermometer, -20 to 110 °C.......................................................... 566-01
Water Still, 240V....................................................................... 14867-00
REAGENTSDescription Cat. No.BOD Nutrient Buffer Pillows,
for preparing 3 L, 25/pkg....................................................... 14861-98
BOD Nutrient Buffer Pillows, for preparing 300 mL, 50/pkg................................................ 14160-66
Buffer Solution, phosphate type, pH 7.2, 1000 mL ...................... 431-53Calcium Chloride Solution ........................................................ 428-16Ferric Chloride Solution ............................................................ 429-16Magnesium Sulfate Solution...................................................... 430-16
Chromic Acid Cleaning Solution, 500 mL.................................. 1233-49
Grease, Stopcock, tube, 75g .......................................................... 562-75
Lithium Hydroxide, Powder Pillows, 100/pkg.......................... 14163-69
Nitrification Inhibitor, 35 g ......................................................... 2533-35
Polyseed Inoculum, pkg/50 ....................................................... 24712-00
Potassium Iodide Solution, 100 g/L, 500 mL............................ 12289-49
Potassium Permanganate, 454 g.................................................... 168-01
Sodium Hydroxide ACS Pellets, 500 g ......................................... 187-34
Sodium Hydroxide Standard Solution, 1.0 N, 900 mL ............... 1045-53
Sodium Sulfite Anhydrous, ACS, 454 g ....................................... 195-01
Sodium Thiosulfate Standard Solution, 0.025 N, 1000 mL .......... 352-53
Starch Indicator Solution, dropping bottle, 100 mL MDB ........... 349-32
Sulfuric Acid, ACS500 mL....................................................................................... 979-490.02 N Standard Solution, 1000 mL .......................................... 203-531.0 N Standard Solution, 1000 mL .......................................... 1270-53
Voluette Ampule Standard for BOD, 3000 mg/L for manometric, 10-mL/ampule, 16 ampules ................................................... 14866-10
44

HOW TO ORDER
45
By Phone:6:00 a.m. to 5:00 p.m. MSTMonday through Friday800-227-HACH (800-227-4224)
By Mail:Hach CompanyP.O. Box 389Loveland, Colorado 80539 U.S.A.
By Telex:160840 (Hach Loveland)
By FAX:970-669-2932 (Hach Loveland)
Information Required
• Hach account number (if available)
• Billing address
• Shipping address
• Your name and phone number
• Purchase order number
• Catalog number
• Brief description or model number
• Quantity

HOW TO ORDER, continued
46
Call or write for free quotations.
Outside the United StatesHach maintains a network of dealers and distributors throughout the world.
In Europe, Mediterranean Africa, and the Middle East, customers can contact their local distributor or obtain help from:
Hach Europe, S.A./N.V.Chaussée de Namur, 1B-5150 Floriffoux (Namur), BelgiumTelephone: (32) (8l)44.71.71FAX: (32) (81)44.13.00
In Canada:
Hach Sales and Service Canada Ltd.1313 Border Street, Unit 34Winnipeg, Manitoba R3H 0X4Telephone: (204) 632-5598FAX: (204) 694-5134
In other areas, obtain assistance from a nearby Hach Distributor or:
Hach Company World HeadquartersP.O. Box 389Loveland, Colorado, U.S.A. 80539-0389Telephone: (970) 669-3050FAX: (970) 669-2932

REPAIR SERVICE
47
Authorization must be obtained from Hach Company before sending any item for repair. Please contact the Hach Service Center serving your location.
In the United States:Hach Company100 Dayton Ave.Ames, Iowa 50010800-227-4224 (USA only)Phone: (515) 232-2533FAX: (515) 232-1276
In Canada:Hach Sales & Service Canada Ltd.1313 Border Street, Unit 34Winnipeg, Manitoba R3H 0X4800-665-7635 (Canada only)Telephone: (204) 632-5598FAX: (204) 694-5134
In Latin America, the Caribbean, the Far East, the Indian Subcontinent, Africa (except Mediterranean Africa) or Pacific Basin:Hach Company World Headquarters, P.O. Box 389 Loveland, Colorado 80539 U.S.A.Telephone (970) 669-3050FAX: (970) 669-2932
In Europe, the Middle East, or in Mediterranean Africa:Hach Europe, S.A./N.V.Chaussée de Namur, 1B-5150 Floriffoux (Namur), BelgiumTelephone: (32) (8l) 44.71.71FAX: (32) (81) 44.13.00

WARRANTY
48
Hach warrants this instrument against defective materials and workmanship for twelve months from the date of shipment. This warranty does not apply to limited life components such as batteries or sensing membrane modules. Hach's terms and conditions of sale are printed on the back of the invoice.
CLAIMSWe take extreme care to fill and pack orders properly. If errors or damages do occur, report shipping damage to the carrier immediately and contact the Hach Customer Service Department in Loveland, Colorado as soon as possible (always within two weeks of receipt).
The toll-free number is 800-227-4224.
RETURN OF ITEMSAuthorization must be obtained from Hach Company before returning items for any reason. For credit or replacement, call toll-free 800-227-4224.
HACH COMPANY HACH EUROPEWORLD HEADQUARTERS Chaussée de Namur, 1P.O. Box 389 B-5150 FloriffouxLoveland, Colorado 80539 (Namur), BelgiumTelephone: (970) 669-3050 Telephone: (32) (81) 44.71.71FAX: (970) 669-2932 FAX: (32) (81) 44.13.00Telex: 160840
FOR TECHNICAL ASSISTANCE, PRICE INFORMATION AND ORDERINGIn the U.S.A. - Call 800-227-4224 toll-free for more information.Outside the U.S.A. - Contact the Hach office or distributor serving you.

INDEX
Aaccuracy check 28air pressure 7alkaline permanganate 31
Bbacteria 4, 27, 31baud 11Biochemical Oxygen Demand
(BOD) 4BOD 4BOD curves 26BOD data 9BOD range 24, 27BOD results 25BOD sample 28BOD scale 9BOD standard 28BOD test 19, 29bottle cap 26bottle leak 26
Ccable 11calibration 15, 39carbon dioxide 6, 7certification iiichannel command 16channel number 10, 24channel options 10channel selector 8Chemical Oxygen Demand
(COD) 27cleaning 25CLR 10COD 27command summary 14commands 12communication software 11computer 16computer commands 11, 12computer interface 11control keys 8
control panel 8current time 14cursor 9curve 26
Ddata bits 11data flow 16data format 16data transmission 15date 14degassing 6demo mode 15dilution 27, 28, 32dilution factor 32dilution water 31display screen 8displaying data 8distillation 31distilled water 29, 31downloading data 16
Eeffluent 27, 31end a test 10Epson LQ-570+ printer 11
Gglucose 28glutamic acid 28graphical display 18
Hhour 14
Iidentical samples 32incubation 9, 27interface 11
Lleak 26lithium hydroxide 7, 22
49
INDEX, continued
Mmanually stop test 10minute 14month 14
Nnatural conditions 5nitrification 27nitrogen 27nutrient buffer solution 29nutrients 31
OOFF key 10ON key 9oxidation 27oxygen 4, 7, 27, 29, 31
Pparity 11pinouts 11power cord 4power supply 4preserve samples 31principles of operation 7printing test results 16
Qquery commands 13
Rrange 24, 31RS232 11
Ssample dilution 27, 32sample volume 20scale 9scrolling keys 8seal cup 26seed 27, 29Serial I/O 11Serial I/O cable 11software 11
specifications vii, 3standard sample 28start time 9status annunciator 9, 10stir bars 23stirring 5stored data 11
Ttest data 15test duration 10, 23test length 23test procedure 19test results 26time 14time setting menu 10total oxygen demand 31
Vvolume 31
Wwastewater 4water 29, 31
Yyear 14
50