BNC020 OnlineInstructionManual - Braun · 8. Device Version: This shows the current paired alarm...
12
BNC020 Functional, Smartphone compatible alarm clock
Transcript of BNC020 OnlineInstructionManual - Braun · 8. Device Version: This shows the current paired alarm...

BNC020
Functional, Smartphone compatible alarm clock

A B C D E
1 2
3
5 6 7
4
8 9

10
11
12
14
13
CR2032
Display symbolsA. TimeB. Alarm iconC. Alarm daysD. Alarm timeE. Bluetooth® active icon
Function keys1. Setting switch2. Battery door3. Reset4. Pair5. DC jack6. USB slot 2.1A7. USB slot 1A
8. Alarm on/off9. Snooze10. +11. -12. Scroll13. Adaptor14. CR2032 Battery
Features• Supports iOS version 7.1 or above, Android version 6.0 or above• Remote customisation via Bluetooth 4.0 connectivity• Automatic time and date synchronisation (including DST changes)• Sets multiple alarms / repeat alarms for desired days of the week• 5 alarm tone patterns with a shuffle option• 3 alarm volumes• 4 levels of display brightness• Customisable alarm sound duration• Customisable snooze length• The Braun connected clock runs independently even without Bluetooth connection• 12/24-hour display• Intuitive, user-friendly interface• Ability to pair with multiple Braun connected clocks
Before you start using the clock, please make sure to read the instruction manual carefully.Following and respecting the instructions in this manual will prevent damage to your alarm clock and loss of your statutory rights arising from defects due to incorrect use.
Battery installation1. Open the battery compartment.2. Take out the button cell battery and remove the plastic strip,3. Insert the CR2032 battery in polarity (+) and (-) as indicated.4. Close the battery compartment.5. Plug in the power adapter.
Standalone Alarm Clock operationOnce the power adaptor is plugged in, the alarm clock will turn on. The default time is set to 2:00am and the default unit alarm time is set to 12:00am.
Setting the clock time1. Move the slider to the ‘time’ position at the back of the alarm clock.2. Press the ‘+’ or ‘-’ key to adjust the clock time.3. Press and hold the ‘+’ or ‘-’ key to adjust the clock time at a faster speed.4. Press the scroll key to switch between 12-hour and 24-hour time format.5. Move the slider back to the ‘brightness’ position to confirm the time.

Setting the alarm time1. Move the slider to the ‘alarm’ position at the back of the alarm clock. 2. Press the ‘+’ or ‘-’ key to adjust the alarm time.3. Press and hold the ‘+’ or ‘-’ key to adjust the alarm time at a faster speed.4. To create a new alarm, press the scroll key until “-:--” is displayed. Then use the ‘+’ or ‘-’ key to adjust the new alarm time. Once the number of alarms added reaches fi ve, no further new alarms can be added. 5. Move the slider back to ‘brightness’ position to confi rm the alarms.6. Press and hold the alarm on/off touch-button for ~1 second to activate a displayed alarm. Press and hold the alarm on/off touch-button for over 2 second to deactivate a displayed alarm.7. When the slider is on ‘brightness’, press the ‘+’ or ‘-’ key to adjust the display brightness. There are 4 backlight levels. 8. When the unit alarm is sounding, press the touch-snooze button to stop the alarm and enter the snooze mode. The alarm will sound again after 5 minutes. This will repeat 3 times.9. The alarm duration is 3 minutes.
Using the BNC020 Alarm Clock via the Braun Time app
Pairing the BNC020 Alarm Clock1. Access the App Store or Google Play and search for ‘Braun Time’.
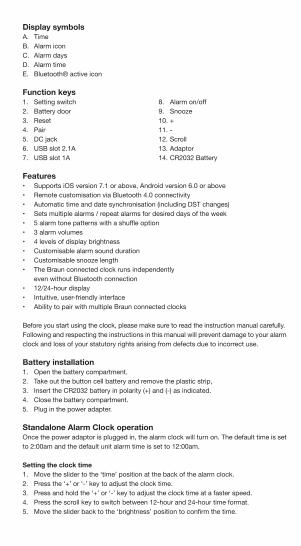
2. Select and install the ‘Braun Time’ application on to your device.3. Before running the ‘Braun Time’ App, make sure the Bluetooth is turned ON on your device.4. Tap the App icon and the ‘Nearby Braun Clocks’ screen will appear. 5. Tap ‘Pair a Clock’ to search for nearby Braun clocks. (Image 1)
6. Press and hold the [pair] button on the back of the alarm clock for 5 seconds. The Bluetooth icon will start to blink and an audible ‘beep’ can be heard. (Image 2)7. The ‘BNC020 Alarm Clock’ will be displayed once the App and is ready for pairing. Tap ‘BNC020 Alarm Clock’ to start the pairing process. (Image 3)8. If ‘None Found’ is still displayed, please restart your mobile device.
Image 1 Image 2 Image 3

9. After the connection is made, the following information will be synchronized:a. Current time and dateb. Alarms settingc. Backlight confi guration
10. One ‘BNC020 Alarm Clock’ can pair to one device.11. One device can pair with up to fi ve ‘BNC020 Alarm Clocks’.
Renaming the BNC020 Alarm Clock1. Tap ‘BNC020 Alarm Clock’ at the ‘Name’ section to edit the alarm clock name.2. Input the new name and tap ‘Save’ to confi rm.
Setting an alarm time1. Tap ‘Add New Alarm’ to create a new alarm, or tap an existing alarm to modify it. (Image 4)2. The alarm setting screen will appear. Various elements can be edited and adjust on this screen, which include (Image 5):
a. Time: Tap or scroll to adjust the time for this alarm.b. Day of the week: Tap to select which day/days of the week to enable the alarm.
• If no days are selected, the alarm will activate as soon as the time matches the alarm time. • If multiple days are selected, the alarm will activate on specifi c days when the time matches the alarm time.
c. Sound pattern: Tap to select which tone pattern is applied to this alarm. Five tone patterns plus one ‘shuffl e’ pattern are available.d. Alarm volume level: Tap to select the alarm sound volume level (three options: Low, Med and High).
3. Complete the alarm setting. (Image 6)a. Tap ‘Cancel’ to cancel the current alarm setting and go back to main screen.b. Tap ‘Save’ to save the alarm settings and set the alarm.c. To delete an alarm, tap ‘Delete Alarm’ within the alarm settings.d. An alarm can be turned on / off by sliding the switch on the main screen right or left.
4. The number of snoozes can be altered via ‘Maximum Snoozes’ on the main screen. The ‘Snooze Duration’ can also be altered here also for App alarms. (Image 7) 5. The duration of snoozes can be altered via ‘Snooze Duration’ on the main screen. (Image 7)
Image 4 Image 5 Image 6

Further alarm settingsYou can edit and adjust the following items on the App via the main screen. (Image 8) (Image 9)1. Snooze Enabled: Tap or slide the slider button to enable/disable the snooze function (Image 8). If the ‘Snooze Enabled’ is ON, you will have two further options:
a. Maximum Snoozes (Image 10): The maximum number of times the snooze function will repeat. This can be set to a value of 1 – 9, or unlimited.
b. Snooze Duration (Image 11): The time interval between the snooze function activating. This can be set to a value of 1 – 15 minutes. 2. Alarm Sound Duration (Image 12): The alarm duration. This can be set to a value of 1-15 minutes. 3. Backlight: Select the LCD brightness. This has 4 diff erent level options.
4. 24-Hour Time: Select 12 or 24 hour format by using the slider button.5. Auto DST update: This will adjust Daylight Saving Time (DST) automatically based on your device time zone setting. The alarm clock will automatically adjust to be one hour ahead of Standard Time in summer time and will be back to the normal Standard Time when back to winter time.6. Name: This show the current alarm clock name.
Image 7 Image 8 Image 9
Image 10 Image 11 Image 12

7. Get Instructional Manual: Tap to show the online manual.8. Device Version: This shows the current paired alarm clock hardware fi rmware version.
Deleting the BNC020 Alarm Clock1. To delete / disconnect the BNC020 Alarm Clock record, tap ‘Edit’ in the ‘Nearby Braun Clocks’ section to edit the paired clock list. (Image 13)2. Press the button to delete the BNC020 Alarm Clock records on the device. (Image 14) (Image 15)
Resetting the BNC020 Alarm Clock1. If the BNC020 Alarm Clock is not working properly, press the ‘reset’ button on the back of the clock to resume default setting.2. If the ‘Braun Time’ application is not working properly, please restart your mobile device. 3. After resetting the BNC020 Alarm Clock and restarting your mobile device, all the data will be deleted. Press and hold the [pair] button to re-pair the BNC020 Alarm Clock.
Scroll for alarm list display1. You can press the ‘scroll’ button on the side of the BNC020 Alarm Clock to check the alarm list when the slider is set to ‘brightness’ position.2. The display will automatically revert back to show the soonest upcoming alarm once the ‘scroll’ button is not pressed for 5 seconds.
Stop or snooze the alarm1. Stop the alarm via the App.2. When the clock alarm is sounding, enter the App on the ‘Nearby Braun Clocks’ page where two icons will be visible; ‘Turn Off ’ and ‘Snooze’. (Image 16)3. Tap ‘Turn Off ’ to turn off the alarm.4. Tap ‘Snooze’ to stop the alarm and enter the snooze mode.5. Stop the alarm during lockscreen.6. For the iOS versions, when the clock alarm is sounding, a notifi cation will pop up on the lock-screen. Swipe left on the notifi cation and tap ‘View’. This will bring up the ‘Snooze’ and ‘Turn Off ’ options.7. For the iOS versions with 3D touch, when the clock is sounding a notifi cation will pop up on the lock-screen. Press and hold down on the notifi cation to activate the 3D touch feature. (Image 17) This will bring up the ‘Snooze’ and ‘Turn Off ’ options.
Image 13 Image 14 Image 15

8. For the Android version, a notifi cation icon will appear at the top of the status bar. Slide down the status bar to show the notifi cation to show the ‘Snooze’ and ‘Turn Off ’ options. (Image 18)
Taking care of your BNC020 Alarm ClockZeon Ltd shall not be liable for any damage occurring as a result of non-following of these instructions. Likewise, Zeon Ltd takes no responsibility for any incorrect readings and for any consequences which may result from them.Please take particular note of the safety advice!Please keep this instruction manual for future reference.
• The unit should not be exposed to dripping or splashing.• Do not expose the unit and battery to humid, rain, sand or excessive heat caused by heating equipment.• No objects fi led with liquids, should be placed on the unit.• No naked fl ame sources, should be placed on the unit.• Do not cover the unit. Adequate space with a small gap between the buzzer holes and surrounding surfaces.• To clean the BNC020 Alarm Clock, use a soft dry cloth. Do not use any cleaning agents containing alcohol, ammonia, benzene or abrasives as these may harm the housing.• The adaptor should be installed near the equipment and should be easily accessible.• The normal function of the product may be disturbed by strong Electro-Magnetic Interference. If so, simply reset the product to resume normal operation by following the instruction manual. In case the function does not resume, please use the product in another location.
Image 16 Image 17 Image 18

SpecificationModel: BNC020Bluetooth version: 4.0Battery: CR2032 (backup battery)Rated input power: DC 4.75V – 5.3V 4000mAOperation temperature: 0°C to 40°CFrequency: 2402 – 2480MHzTransmit Power: 0dBmUse in Member States: United States, Japan, Austria, Belgium, Denmark, Finland, France, Germany, Greece, Ireland, Italy, Luxembourg, Netherlands, Portugal. Spain, Swede, and the United Kingdom
Guarantee2 year guarantee against material and workmanship defects (except battery). The guarantee is valid in those countries where the alarm clock is officially being sold.
Broken or cracked lens screen are not covered under the Guarantee.
Braun helpline
Should you have a problem with your product, please check your local service center at:
www.braun-clocks.comwww.braun-watches.com
or contact +44 208 208 1833 Braun is a registered trademark of Braun GmbH, Kronberg, Germany used under license by Zeon Ltd
The Bluetooth® Trademark usageThe Bluetooth® word mark and logos are registered trademarks owned by the Bluetooth SIG, Inc. and any use of such marks by Zeon Ltd is under license. Other trademarks and trade names are those of their respective owners.
Apple and the Apple logo are trademarks of Apple Inc., registered in the U.S. and other countries. App Store is a service mark of Apple Inc., registered in the U.S. and other countries.
Google Play and the Google Play logo are trademarks of Google Inc.

EU Declaration of ConformityHereby, Zeon Ltd declares that this radio equipment type BNC020 is in compliance with Directive 2014/53/EU. The full text of the EU declaration of conformity is available on request via our Zeon Ltd Customer Service.
WARNING! This product is covered by the Waste Electrical and Electronic Equipment (WEEE) directive and the battery used in this item is covered by the Battery directive. It should not be discarded with normal household waste but taken to your local collection centre for recycling. Use this unit and mobile phone only in environments with ambient temperatures between 0°C and 40°C.
Japan Radio Law StatementThis product contains the certified module by Japan Radio Law.
The certification number is
US - FCC StatementThis device complies with Part 15 of the FCC rules. Operation is subject to the following two conditions: (1) This device may not cause harmful interference, and (2) This device must accept any interference received, including interference that may cause undesired operation. Warning: Changes or modifications to this unit not expressly approved by the party responsible for compliance could void the user’s authority to operate the equipment. NOTE: This equipment has been tested and found to comply with the limits for a Class B digital device, pursuant to Part 15 of the FCC Rules. These limits are designed to provide reasonable protection against harmful interference in a residential installation. This equipment generates, uses and can radiate radio frequency energy and, if not installed and used in accordance with the instructions, may cause harmful interference to radio communications. However, there is no guarantee that interference will not occur in a particular installation. If this equipment does cause harmful interference to radio or television reception, which can be determined by turning the equipment off and on, the user is encouraged to try to correct the interference by one or more of the following measures: • Reorient or relocate the receiving antenna. • Increase the separation between the equipment and the receiver. • Connect the equipment into an outlet on a circuit different from that to which the receiver is connected. • Consult the dealer or an experienced radio/TV technician for help.