Dual Alarm Clock with Wireless Alarm Monitoring Receiver
20
KA1000 Dual Alarm Clock with Wireless Alarm Monitoring Receiver INSTRUCTION MANUAL 1st Edition
Transcript of Dual Alarm Clock with Wireless Alarm Monitoring Receiver

KA1000Dual Alarm Clock withWireless Alarm Monitoring Receiver
INSTRUCTION MANUAL1st Edition
KA1000 / 1st Edition / July 2006Krown Manufacturing, Inc., 3408 Indale Road, Fort Worth, TX 76116Voice: (817) 738-2485, TTY/VP: (817) 738-8993, Fax: (817) 738-1970E-mail: [email protected], Web site: www.KrownMfg.com
CONTENTSImportant Safety Instructions .........................................................................................3CONSUMER INFORMATION ..................................................................................4INTRODUCTION .......................................................................................................6KA1000 ALARM CLOCK ..........................................................................................7 INSTALLATION .........................................................................................................8a. Dual Alarm Clock ......................................................................................................8b. DoorKnock / DoorBell ...............................................................................................8REGISTER TRANSMITTERS TO THE CLOCK ..................................................9Change system security code .........................................................................................9Setup clock alarms and real time ...................................................................................9Security timer (SCT) ....................................................................................................10Select mode, test, and reading lamp .............................................................................10Using LED indicators ..................................................................................................11Battery ..........................................................................................................................11ACCESSORIES .........................................................................................................12Extended receiver KA1000EX ....................................................................................12DoorKnock transmitter KA1000DK / DoorBell transmitter KA1000DB ...................13Telephone ringer transmitter KA1000TR ...................................................................13Tactile telephone signaler pager KA1000PG ...............................................................13Baby room call signaler KA1000NR ...........................................................................13Alarm monitor transmitter KA300TX .........................................................................13Weather alert transmitter KWA300TX ........................................................................14Alarm monitor receiver with strobe and siren KA300RX ...........................................14Alarm monitor bed shaker receiver KBS300RX .........................................................14TESTING AND TROUBLESHOOTING ................................................................15How to replace Transmitter’s battery ...........................................................................16SPECIFICATIONS ....................................................................................................17WARRANTY ..............................................................................................................18
- 3 -
When using your KA1000, you should always follow these basic safety precautions to reduce the risk of fire, electric shock, and injury to person, including the following:
1. Read and understand all instructions before installing the KA1000.2. Unplug the unit from the adaptor and the telephone cord before installing a back-up battery. Do not dispose the
batteries in a fire; follow your local code for properly disposing batteries.3. Do not open the cabinet of the unit except for the battery cover. You may be exposed to a dangerous voltage and
cause electric shock. Opening this product automatically voids any and all manufacturer’s warranties. If you think that the unit is damaged or is in need of repair, please contact Krown Manufacturing, Inc.
4. Avoid using this unit during thunderstorms; there maybe a chance of electric shock from lightning.5. Unplug the unit from the wall outlet before cleaning. Using only a damp cloth to clean the outside of the unit. If
the unit comes in contact with any liquid source, unplug the power and the telephone cords from the back panel before touching the unit. If the unit is damaged, contact Krown Manufacturing, Inc.
6. Do not use this product near a bathtub, washbasin, kitchen sink or laundry tub, in wet basement, near a swim-ming pool or anywhere else there is water.
7. KA1000 is designed to work with only the power source indicated on the back of the unit. If you are not sure about your house power source, please consult with your electric company and contact your Krown local dealer to obtain or exchange a correct voltage unit to use.
8. Turning the volume to maximum may subject you to a dangerous sound levels. 9. Do not place anything on the power cord. Install the KA1000 where no one will step or strip on the cord.10. Do not overload wall outlet or extension cord as this can increase the risk of fire and electrical shock.11. Never push any object through the slots in the KA1000. They can touch the dangerous voltage points or short
out parts that could result in risk of fire or electrical shock. Never spill any liquid of any kind on the clock. 12. Place the clock on a stable surface. Serious damage and/or injury may result if the KA1000 falls.13. Do not cover the slots and openings on this clock. You should never place the KA1000 near or over a radiator
or heat register. This clock should not be placed in a built-in installation unless proper ventilation is provided.14. Unplug the KA1000 from the wall outlet and contact Krown Manufacturer, Inc. if any of the following conditions occur: a. When the power cord is damaged or frayed. b. If liquid has been spilled into the telephone. c. If the telephone exposed to the rain or water. d. If the unit does not operate normally when following the user manual, adjust only controls that are covered by the operating manual. Improper adjustment of other controls may result in damage. e. If the product has been dropped or appears damaged. f. If the unit exhibits a distinct change in performance. 15. The socket - outlet shall be installed near the equipment and shall be easily accessible.16. KA1000 was designed for in-house use only. The best location to get the alarm clock is in your bedroom.
This device complies with Part 15 of the FCC Rules. Operation is subject to the following two conditions: (1) Thisdevice may not cause harmful interference, and (2) This device must accept any interference received, includinginterference that may cause undesired operation.
Warning: Changes or modifications to this unit not expressly approved by the party responsible for compliance could void the user’s authority to operate the equipment.
Note: This equipment has been tested and found to comply with the limits for a Class B digital device, pursuant to Part 15 of the FCC Rules. These limits are designed to provide reasonable protection against harmful interference in a residential installation. This equipment generates, uses and can radiate radio frequency energy and, if not installed and used in accordance with the instructions, may cause harmful interference to radio communications.
However, there is no guarantee that interference will not occur in a particular installation. If this equipment does cause harmful interference to radio or television reception, which can be determined by turning the equipment off and on, the user is encouraged to try to correct the interference by one or more of the following measures:
Reorient or relocate the receiving antenna. Increase the separation between the equipment and receiver. Connect the equipment into an outlet on a circuit different from that to which the receiver is connected. Consult the dealer or an experienced radio/TV technician for help.
Additional safety notes for Canadian usersThe following items are included as part of the CS-03 Requirements. The standard connecting arrangement for the equipment is CA11A. This product meets the applicable Industry Canada technical specifications.
IMPORTANT SAFETY INSTRUCTION
- 4 -
Notice: the Canadian Department of communications label identifies certified equipment. This certification means that the equipment meets certain telecommunications network protective operational and safety requirements. The Department does not guarantee that the equipment will operate to the user’s satisfaction. Before installing this equip-ment, the users should ensure that it is permissible to be connected to the facilities of the local telecommunications company. In some cases, the company’s inside wiring associated with a single line individual service may be ex-tended by means of a certified connector assembly (telephone extended cord) The customer should be aware that compliance with the above conditions may not prevent degradation of service in some situations. Repairs to certified equipment should be made by an authorized Canadian maintenance facility designated by the supplier. Any repairs or alteration made by the user to this equipment or equipment malfunctions, may give the telecommunications company cause to request the user to disconnect the equipment. Users should ensure for their own protection that the electrical ground connections of the power utility, telephone lines, and internal metallic water pipe system, if present, are con-nected together. This precaution may be particularly important in rural areas.
Caution: Users should not attempt to make such connections themselves, but should contact the appropriate electric inspection authority, or electrician, as soon as possible.Notice: The Ringer Equivalent Number is an indication of the maximum number of terminals allowed to connect to a telephone interface. The termination on an interface may consist of any combination of devices subject only to the requirement that the sum of the Ringer Equivalent Number of all the devices not exceed five.
SAVE THESE INSTRUCTIONS
Safety Instructions for Batteries
Caution: Risk of explosion if battery is replaced by an incorrect type. Dispose of used batteries according to the instructions.
1. Use only with the approved battery pack in your Alarm Clock. For base unit 8.4V 170mAh, NiMH rechargeable battery GPI International Ltd.: 17R8H
2. Do not dispose of the battery in a fire as it may explode. Check with local codes for possible special disposal instructions.
3. Do not open or mutilate the battery. Released electrolyte is corrosive and may cause damage to the eyes and skin. It may be toxic if swallowed.
4. Exercise care in handling batteries in order not to short the battery with conducting materials such as rings, bracelets and keys. The battery or conducting material may overheat and cause burns.
5. Charge the battery (ies) provided with or identified for use with this product only in accordance with the instruc-tions and limitations specified in this manual.
6. Observe proper polarity orientation between the battery pack and the battery charger.
CONSUMER INFORMATION
a) This equipment complies with Part 68 of the FCC rules and the requirements adopted by the ACTA. On the bottom of this equipment is a label that contains, among other information, a product identifier in the format US:AAAEQ##TXXXX. If requested, this number must be provided to the telephone company.
b) An applicable certification jacks Universal Service Order Codes (USOC) for the equip-ment is provided (i.e., RJ11C) in the packaging with each piece of approved terminal equipment.
c) A plug and jack used to connect this equipment to the premises wiring and telephone network must comply with the applicable FCC Part 68 rules and requirements adopted by the ACTA. A compliant telephone cord and modular plug is provided with this prod-uct. It is designed to connect to a compatible modular jack that is also compliant. See installation instructions for details.
- 5 -
d) The REN is used to determine the number of devices that may be connected to a tele-phone line. Excessive RENs on a telephone line may result in the devices not ringing in response to an incoming call. In most but not all areas, the sum of RENs should not exceed five (5.0). To be certain of the number of devices that may be connected to a line, as determined by the total RENs, contact the local telephone company. [For products approved after July 23, 2001, the REN for this product is part of the product identifier that has the format US:AAAEQ##TXXXX. The digits represented by ## are the REN without a decimal point (e.g., 03 is a REN of 0.3). For earlier products, the REN is separately shown on the label.]
e) If this equipment KA1000 causes harm to the telephone network, the telephone com-pany will notify you in advance that temporary discontinuance of service may be re-quired. But if advance notice isn’t practical, the telephone company will notify the customer as soon as possible. Also, you will be advised of your right to file a complaint with the FCC if you believe it is necessary.
f) The telephone company may make changes in its facilities, equipment, operations or procedures that could affect the operation of the equipment. If this happens the tele-phone company will provide advance notice in order for you to make necessary modi-fications to maintain uninterrupted service.
g) Should you experience trouble with this equipment, please contact:
Krown Manufacturing Inc. 3408 Indale road, Fort Worth, Texas 76116. Phone number: 817-738-2485
For repair or warranty information. If the equipment is causing harm to the telephone network, the telephone company may request that you disconnect the equipment until the problem is resolved.
h) Please follow instructions for repairing if any (e.g. battery replacement section); other-wise do not alternate or repair any parts of device except specified.
i) Connection to party line service is subject to state tariffs. Contact the state public utility commission, public service commission or corporation commission for information.
j) NOTICE: If your home has specially wired alarm equipment connected to the tele-phone line, ensure the installation of this KA1000 does not disable your alarm equip-ment. If you have questions about what will disable alarm equipment, consult your telephone company or a qualified installer.
NOTICE: According to telephone company reports, AC electrical surges, typically re-sulting from lightning strikes, are very destructive to telephone equipment connected to AC power sources. To minimize damage from these types of surges, a surge arrestor is recommended.
- 6 -
Volume Control
Dimmer/Test Switch
Thank you for your purchase of dual alarm clock KA1000- the best design in alarm and monitoring systems but easy and simple to set up and use. The alarm clock will trigger either the bed shaker, table lamp, or sound to absolutely wake you up every morning. You could select a combination of sound and light or shaker and light to fit your lifestyle.
It is created with other features as well to help protect life and organize your house better. The telephone ringer, door knock, doorbell, baby room call, alarm monitor, weather alert, security timer, etc are few to list. Even you do not have a telephone in your bedroom you will not miss any phone calls. The KA1000 has a built-in telephone ringer for your conve-nient. It also alerts you when some one knocks on your door or when a baby room signaler is activated. It will make life easier for you to show the cause on the display of the clock, to ensure there is no confusion.
It also works with all transmitters from the alarm monitor system made by Krown Mfg. You can link all alarm sensors, Fire, Smoke, Carbon mono oxide detectors in your house to be one wireless monitoring system in your bedroom clock. It will give you what causes the alarm, and help you make a decision of what to do before you leave your bed. It helps to organize. It is the best choice to make because it was designed with you- the person who will use it- in mind.
Please read the entire installation section before using your clock. Read the accessories section to find more selections you can purchase with this clock and create a system that works for you. Keep this manual for future references. You must save your sales receipt as proof of purchase if you need to use warranty services.
If you have any questions about your KA1000, please contact your authorized dealer or our customer service department at (817) 738-2485 or e-mail at [email protected]. You can visit our Web site for more information: www.krownmfg.com
INTRODUCTION

- 7 -
KA1000 DUAL ALARM CLOCK
ALARM
SENSORBATTERY
ALA1
AM
PM
ALA2
SCT
SCT
SCT
ALA1
ALA2
SnoozeTime
Hour
Min.
ONOF
F
MODE
SOUND
BOTH
PHONE
LINE
SHAKER
SHAKER
RESET
Night lamp
Snooze button
Hour
Minutes
Alarm 1/2/Security
Battery Low NotificationSensor Notification
Security Notification
Alarm NotificationBed Shaker
Time button
Security timer button
Alarm 1 button
Alarm 2 button
AM/PM
Volume Control
Dimmer/Test Switch
Bed Shaker Strength
Lamp ON/OFF Switch
Power Cord
Wall plug
External Lamp Plug
Sound/Shaker Mode Switch
Reset button
Bed Shaker plug
Phone jack
Code Dip Switch
Door clip or door hanger
Doorbell button(test button)
ON/OFF Switch
ON LED
Checklist 1. KA1000 Alarm Clock2. KA1000DK Doorknock Transmitter or KA1000DB Doorbell Transmitter3. Bed Shaker4. 6-ft modular cord
1
23
- 8 -
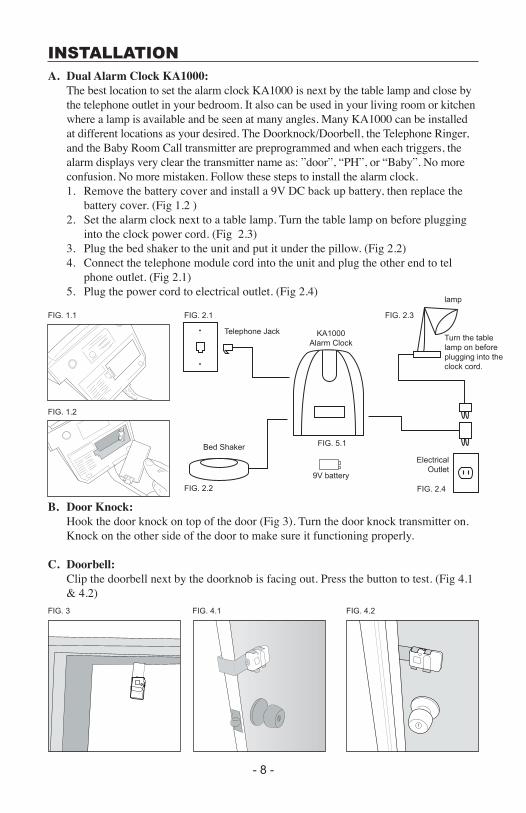
INSTALLATIONA. Dual Alarm Clock KA1000: The best location to set the alarm clock KA1000 is next by the table lamp and close by
the telephone outlet in your bedroom. It also can be used in your living room or kitchen where a lamp is available and be seen at many angles. Many KA1000 can be installed at different locations as your desired. The Doorknock/Doorbell, the Telephone Ringer, and the Baby Room Call transmitter are preprogrammed and when each triggers, the alarm displays very clear the transmitter name as: ”door”, “PH”, or “Baby”. No more confusion. No more mistaken. Follow these steps to install the alarm clock.
1. Remove the battery cover and install a 9V DC back up battery, then replace the battery cover. (Fig 1.2 ) 2. Set the alarm clock next to a table lamp. Turn the table lamp on before plugging into the clock power cord. (Fig 2.3) 3. Plug the bed shaker to the unit and put it under the pillow. (Fig 2.2) 4. Connect the telephone module cord into the unit and plug the other end to tel phone outlet. (Fig 2.1) 5. Plug the power cord to electrical outlet. (Fig 2.4)
B. Door Knock: Hook the door knock on top of the door (Fig 3). Turn the door knock transmitter on.
Knock on the other side of the door to make sure it functioning properly.
C. Doorbell: Clip the doorbell next by the doorknob is facing out. Press the button to test. (Fig 4.1
& 4.2)
Telephone Jack KA1000Alarm Clock
Bed Shaker
ElectricalOutlet
lamp
Turn the table lamp on before plugging into the clock cord.
9V battery
FIG. 4.2FIG. 4.1FIG. 3
FIG. 5.1
FIG. 1.1
FIG. 1.2
FIG. 2.1
FIG. 2.2
FIG. 2.3
FIG. 2.4
- 9 -
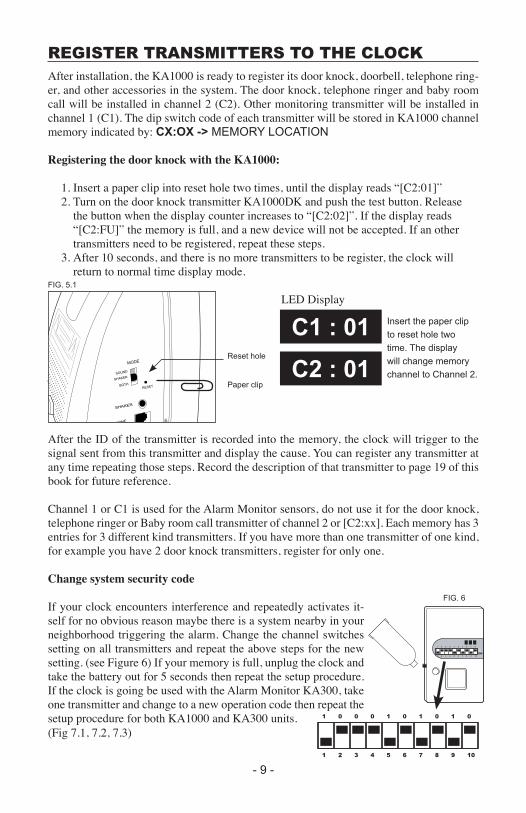
After installation, the KA1000 is ready to register its door knock, doorbell, telephone ring-er, and other accessories in the system. The door knock, telephone ringer and baby room call will be installed in channel 2 (C2). Other monitoring transmitter will be installed in channel 1 (C1). The dip switch code of each transmitter will be stored in KA1000 channel memory indicated by: CX:OX -> MEMORY LOCATION
Registering the door knock with the KA1000:
1. Insert a paper clip into reset hole two times, until the display reads “[C2:01]” 2. Turn on the door knock transmitter KA1000DK and push the test button. Release the button when the display counter increases to “[C2:02]”. If the display reads “[C2:FU]” the memory is full, and a new device will not be accepted. If an other transmitters need to be registered, repeat these steps. 3. After 10 seconds, and there is no more transmitters to be register, the clock will return to normal time display mode.
LED Display
After the ID of the transmitter is recorded into the memory, the clock will trigger to the signal sent from this transmitter and display the cause. You can register any transmitter at any time repeating those steps. Record the description of that transmitter to page 19 of this book for future reference.
Channel 1 or C1 is used for the Alarm Monitor sensors, do not use it for the door knock, telephone ringer or Baby room call transmitter of channel 2 or [C2:xx]. Each memory has 3 entries for 3 different kind transmitters. If you have more than one transmitter of one kind, for example you have 2 door knock transmitters, register for only one.
Change system security code
If your clock encounters interference and repeatedly activates it-self for no obvious reason maybe there is a system nearby in your neighborhood triggering the alarm. Change the channel switches setting on all transmitters and repeat the above steps for the new setting. (see Figure 6) If your memory is full, unplug the clock and take the battery out for 5 seconds then repeat the setup procedure. If the clock is going be used with the Alarm Monitor KA300, take one transmitter and change to a new operation code then repeat the setup procedure for both KA1000 and KA300 units. (Fig 7.1, 7.2, 7.3)
REGISTER TRANSMITTERS TO THE CLOCK
FIG. 6
MODE
SOUND
BOTH
PHONE
LINE
SHAKER
SHAKER
RESET
Reset hole
Paper clip
FIG. 5.1
C1 : 01
C2 : 01
Insert the paper clip
to reset hole two
time. The display
will change memory
channel to Channel 2.
- 10 -
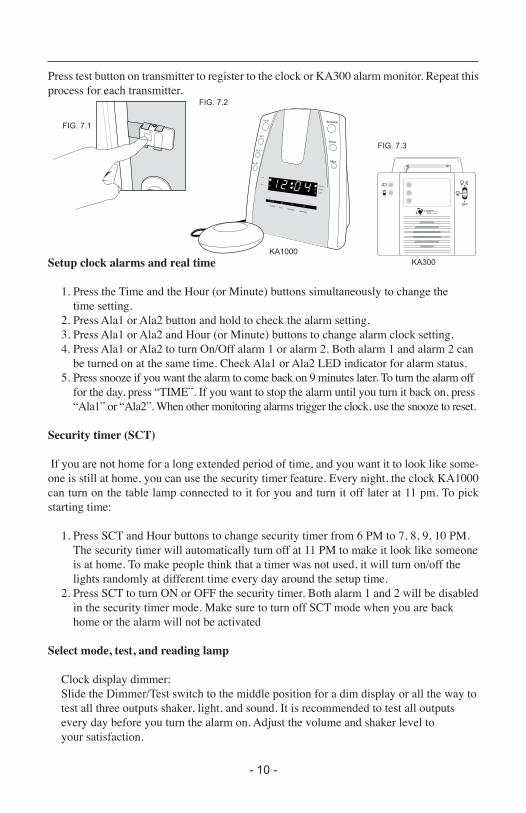
Press test button on transmitter to register to the clock or KA300 alarm monitor. Repeat this process for each transmitter.
Setup clock alarms and real time
1. Press the Time and the Hour (or Minute) buttons simultaneously to change the time setting. 2. Press Ala1 or Ala2 button and hold to check the alarm setting. 3. Press Ala1 or Ala2 and Hour (or Minute) buttons to change alarm clock setting. 4. Press Ala1 or Ala2 to turn On/Off alarm 1 or alarm 2. Both alarm 1 and alarm 2 can be turned on at the same time. Check Ala1 or Ala2 LED indicator for alarm status. 5. Press snooze if you want the alarm to come back on 9 minutes later. To turn the alarm off for the day, press “TIME”. If you want to stop the alarm until you turn it back on, press “Ala1” or “Ala2”. When other monitoring alarms trigger the clock, use the snooze to reset.
Security timer (SCT)
If you are not home for a long extended period of time, and you want it to look like some-one is still at home, you can use the security timer feature. Every night, the clock KA1000 can turn on the table lamp connected to it for you and turn it off later at 11 pm. To pick starting time:
1. Press SCT and Hour buttons to change security timer from 6 PM to 7, 8, 9, 10 PM. The security timer will automatically turn off at 11 PM to make it look like someone is at home. To make people think that a timer was not used, it will turn on/off the lights randomly at different time every day around the setup time. 2. Press SCT to turn ON or OFF the security timer. Both alarm 1 and 2 will be disabled in the security timer mode. Make sure to turn off SCT mode when you are back home or the alarm will not be activated
Select mode, test, and reading lamp
Clock display dimmer: Slide the Dimmer/Test switch to the middle position for a dim display or all the way to test all three outputs shaker, light, and sound. It is recommended to test all outputs every day before you turn the alarm on. Adjust the volume and shaker level to your satisfaction.
ALARM
SENSORBATTERY
ALA1
AM
PM
ALA2
SCT
SCT
SCT
ALA1
ALA2
SnoozeTime
Hour
Min.
FIG. 7.3
FIG. 7.2
FIG. 7.1
KA1000KA300
- 11 -
Mode selector:
You can choose shaker or sound and combine it with light when the alarm is triggered. Choose shaker and light for a silent alarm. It will wake just you, and not the other. You may turn on all three sound, light and shaker for a certainly wake up.
Reading lamp or night light:
Built-in night light or reading lamp (if table lamp is installed) will be turned On/Off from the light switch.
Using LED indicators
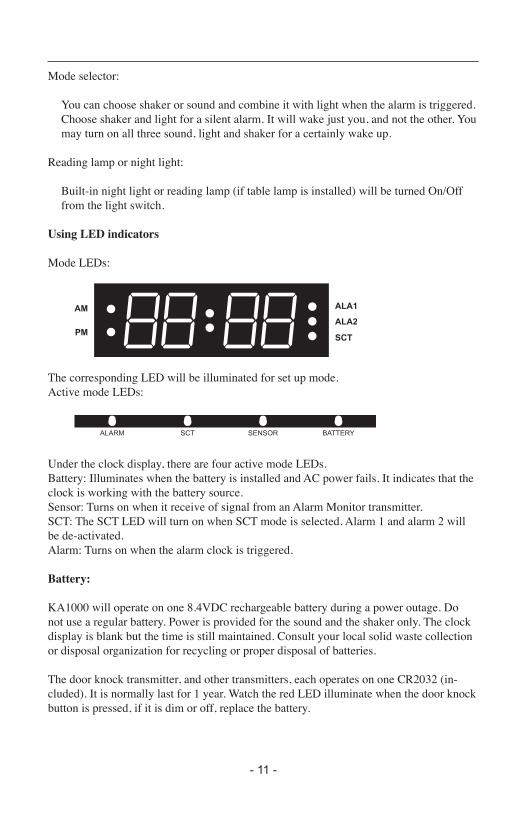
Mode LEDs:
The corresponding LED will be illuminated for set up mode. Active mode LEDs:
Under the clock display, there are four active mode LEDs. Battery: Illuminates when the battery is installed and AC power fails. It indicates that the clock is working with the battery source. Sensor: Turns on when it receive of signal from an Alarm Monitor transmitter.SCT: The SCT LED will turn on when SCT mode is selected. Alarm 1 and alarm 2 will be de-activated. Alarm: Turns on when the alarm clock is triggered.
Battery:
KA1000 will operate on one 8.4VDC rechargeable battery during a power outage. Do not use a regular battery. Power is provided for the sound and the shaker only. The clock display is blank but the time is still maintained. Consult your local solid waste collection or disposal organization for recycling or proper disposal of batteries. The door knock transmitter, and other transmitters, each operates on one CR2032 (in-cluded). It is normally last for 1 year. Watch the red LED illuminate when the door knock button is pressed, if it is dim or off, replace the battery.
ALARM SCT SENSOR BATTERY
- 12 -
The dual alarm clock system is designed to work in correspondence with other wireless receivers and work with all KA300 transmitters (sold separately). Select from the following to complete your system.
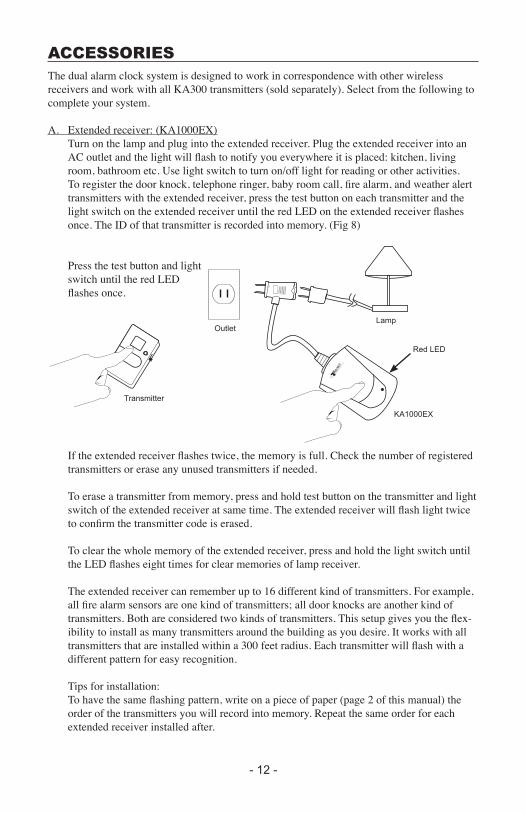
A. Extended receiver: (KA1000EX) Turn on the lamp and plug into the extended receiver. Plug the extended receiver into an
AC outlet and the light will flash to notify you everywhere it is placed: kitchen, living room, bathroom etc. Use light switch to turn on/off light for reading or other activities. To register the door knock, telephone ringer, baby room call, fire alarm, and weather alert transmitters with the extended receiver, press the test button on each transmitter and the light switch on the extended receiver until the red LED on the extended receiver flashes once. The ID of that transmitter is recorded into memory. (Fig 8)
Press the test button and light switch until the red LED flashes once.
If the extended receiver flashes twice, the memory is full. Check the number of registered transmitters or erase any unused transmitters if needed.
To erase a transmitter from memory, press and hold test button on the transmitter and light switch of the extended receiver at same time. The extended receiver will flash light twice to confirm the transmitter code is erased.
To clear the whole memory of the extended receiver, press and hold the light switch until the LED flashes eight times for clear memories of lamp receiver.
The extended receiver can remember up to 16 different kind of transmitters. For example, all fire alarm sensors are one kind of transmitters; all door knocks are another kind of transmitters. Both are considered two kinds of transmitters. This setup gives you the flex-ibility to install as many transmitters around the building as you desire. It works with all transmitters that are installed within a 300 feet radius. Each transmitter will flash with a different pattern for easy recognition.
Tips for installation: To have the same flashing pattern, write on a piece of paper (page 2 of this manual) the order of the transmitters you will record into memory. Repeat the same order for each extended receiver installed after.
ACCESSORIES
Red LED
KA1000EX
Transmitter
LampOutlet
- 13 -
Note: * Turn on the table lamp from the light switch on the extended receiver. Leave the switch on the lamp in the ON position or it will not flash the light. * The alarm function of the alarm clock KA1000 will not trigger the extended receiver. * The extended receiver is on stand-alone unit and receives signals directly from a transmitter. It does not need a KA1000 clock to operate. * If you use any transmitter with fire alarm, smoke alarm or weather alert radio, you must test those transmitters every month to make sure that it is functioning properly. * Press the light switch once to reset any alarms triggered. * The LED on the extended receiver will flash to indicate the battery is low on the corresponding transmitter. Press the light switch to reset the low battery indicator.
B. Door knock transmitter (KA1000DK) and Doorbell Transmitter (KA1000DB): Hook the door knock KA1000DK on top of the door (the hook is included). Turn on the
power switch and knock on the door to test the operation. The battery is designed to last for 1 year. If the red LED is weak or turns off, replace with CR2032 battery. Each door knock needs to be registered to the clock KA1000 or the extended receiver KA1000EX.
Clip the doorbell (KA1000DB) next to the doorknob facing out. Press on doorbell button to test..
C. Telephone ringer transmitter (KA1000TR): Turn on the Telephone Ringer Transmitter then register with your clock KA1000 or
extended receiver KA1000EX (refer to the above sections for how to register a transmitter with KA1000 and KA1000EX.) Plug the telephone ringer transmitter into the telephone outlet and turn on. Press the test button on the transmitter. If the red LED lights up and the signal received by the clock or extended receiver, the system operates perfectly.
D. Tactile telephone ringer pager (KA1000PG): This product is designed for a deaf blind user. The others also enjoy a silent notification
from the tactile pager when the telephone rings. The package called TRS100 comes with a pager, a telephone ring signaler, rechargeable battery, and charger. Plug the telephone transmitter KA1000TR to the telephone outlet. Turn it on. Charge the KA1000PG for at least 8 hours. Turn on the pager. Press test the button on the transmitter, the pager will vibrate to ensure the system works. Always charge the pager every night.
E. Nursery Room Call Transmitter (KA1000NR): Place this transmitter near your baby and adjust the sensitivity to the baby sound. It will
send the signal to the clock or extended receiver when the baby cries.
F. Fire/Smoke/Carbon Mono Oxide Alarm transmitter (KA300TX-1) KA1000 system will give you the opportunity to link all alarm systems in your house together by using the
wireless transmitter KA300TX-1. Select a channel for a different sensor and record it on the KA300RX-1 receiver label. Make sure that they have the same house code. In-stall this transmitter on a fire, smoke, or carbon monoxide alarm and turn it on. The vibration of the loud siren will activate the transmitter. The clock KA1000 will display the channel when the alarm is activated. You must test the system every month to make sure the system is working properly. The battery is designed to work continuously for
1 year. Use the CR2032 lithium battery to replace.Press on test button of fire alarm to test the system
KA300TXTurn on after install on the alarm device
- 14 -
Note: * Do not block the smoke chamber on smoke detector. Install the transmitter on the siren side. * Test the system by pressing the test button on the fire alarm to make sure that the fire alarm and the transmitter work. Do not press test button on the transmitter to test the system.
G. Weather Alert Transmitter (KWA300TX): Choose the event you want to alert on the weather radio (WR300). For example, setup the
radio to turn on the siren when a tornado is coming or when your local evacuation signal generated. Choose a channel by setting the jumper on the transmitter and register it with the clock or the KA300RX. Plug this weather alert transmitter to a weather alert radio and turn it on. Test the operation of the transmitter by pressing the test button. Check the clock and KA300 to make sure the correct channel is displayed.
Note: If the alert device does not have 3.5mm direct output for an external audio, use the KA300TX and install it on top of the siren. H. Alarm Monitor Receiver (KA300RX): The KA300 wireless alarm monitor system is designed to link all of the alarms in your
house together. It works with the KA1000 dual alarm clock with bed shaker and table lamp. The KA300RX receiver comes with very strong flash light 177Cd and 95dB loud siren. Install the KA300RX in the hallway, living room or kitchen. It activates when any alarm detector triggers the transmitters. The channel LED on the KA300RX also turns on to show the activated detector. Each LED comes with different colors for easily distin-guishing the channel. Backup battery and adaptor are included. The KA300 kit includes two receivers: KA300RX, KBS300RX, one transmitter: KA300TX, bed shaker, adaptor, charger, and batteries. Purchasing extra transmitters is recommended for a household with more than one detector installed. There is no limit to how many detector-transmitters or receivers you install. Transmitter register is needed at installation.
I. Alarm Monitor bed shaker receiver (KBS300RX): If the clock is not needed in the bedroom and you would like to have a silent alarm (no
hearing party in your household) when a fire or an emergency alarm is activated, this bed shaker will be the best choice. It is included when you purchase the KA300 kit. The alarm channel will be shown by the same LED color as the KA300RX when the sensor triggers the alarm. A rechargeable battery will keep the bed shaker working in power outage. It is perfect for your extra bed. Transmitter registration is needed at installation. There is a built-in time condition filter to prevent a nuisance alarm.
J. Signal Repeater (KA300SR): To extend the working area for up to 300 feet from the receiver to a transmitter, use this
repeater and install at center of the distance between the transmitter and receiver. Support for all transmitter of KA300 or KA1000 system. No registration for transmitter is needed, and an adaptor is included.

- 15 -
Testing:Testing the KA1000 every night before you go to bed is recommended to guaranty it will wake you up in the morning. Slide the test switch to the “Test” position and watch for the system send out a signal to the shaker, speaker, and lamp. Check for any loose connections, or problems with the light bulb before contacting the manufacturer.
Troubleshooting:If any question arises during the installation and testing, follow through the troubleshooting section below. Contact your Krown representative or authorized dealer if you should have any questions that this troubleshooting guide does not answer.
1. The table lamp does not turn on when the alarm is triggered: Turn on the table lamp before plugging into the clock power cord. Turn the light on/off manually by the light switch located in the back of the clock. Check the light bulb if the light is still not working. Replace with a new bulb if needed.
2. The night light will not on: Open the night light cover and check the bulb. If the bulb is broken replace it with 9V, 0.1A. Do not replace with a bigger bulb. The excess heat can melt the housing and void the warranty.
3. The shaker does not work: Plug the shaker firmly to the jack. Switch the test/dimmer switch to test. The shaker will vibrate for 1 second before it switches to light and sound test. Check the switch mode to make sure that you choose shaker and light mode. 4 The extended receiver will not flash when the telephone ring: The extended receiver needs to recognize the telephone ringer you use in the system. Press the telephone ringer transmitter test button and the light switch on the extended receiver at a same time. The LED on the extended receiver flashes once. Release the buttons. Press the test button again to see if the extended receiver responds. If not, repeat the process to register the telephone ringer transmitter.
5. The clock will not receive the signal from alarm transmitter: The transmitter from the alarm monitor needs to be registered with the new clock. This process is for protecting the system from interference with a neighboring system. Register all transmitters in the system with the clock to activate the monitoring features. It is not necessary to register a transmitter in a same channel. Only register one transmitter with your clock.
6. After power a black out, the clock stops receiving signal from the door knock: a. The back up battery is dead, replace the battery. b. The clock does not have the battery back up installed. The memory was erased when power was lost. Install back-up battery and register the door knock transmitter to the clock again.
TEST AND TROUBLESHOOTING

- 16 -
7. How to match the flash pattern for all extended receiver (KA1000EX): Write on a cheat sheet the order of transmitters you are going to register on the first extended receiver (page 19 of this manual). Apply the same order when registering the second extended receiver. There are 16 different patterns for 16 entries. 8. The clock responds to channel one with fire alarm detector but not for the CO detector:’ Register the transmitter on the CO detector with the clock. Press the test button on the CO detector after registering the transmitter with the clock to check on the operation of the system.
9. After a vacation the alarm does not work: When the security mode is on, the alarm mode will be disabled. Turn the SCT mode off to make the alarm mode to return to normal setting.
10. The clocks memory is full. How to register a new transmitter into the system: Erase the memory. First unplug the AC power cord from the electrical outlet. Uninstall battery from the compartment for at least 5 seconds. Connect the battery and plug the clock into an AC source. The clock now is ready for a new set up. All transmitters in the system must be registered to the clock after the memory is erased. You may use the cheat sheet in page 19 to register the transmitters.
11. The clock activates the door knock or telephone ringer but there is no one at the door or the telephone did not ring:
Your neighbor may also be using the KA1000. Change the security code on the transmitter and register with the clock again. (Please read change system security code section page 9) 12. How to register a new transmitter to the extended receiver (KA1000EX): Press and hold the light switch when pressing the test button on the transmitter until the red LED on the extended receiver flash one time.
13. How to clear the memory for the extended receiver (KA1000EX): Press and hold the light switch until it flashes 8 times all memory is now clear. You must register all transmitters with the clock again.
14. The newly purchased extended receiver did not response to any transmitter: Plug the extended receiver to AC outlet. Press and hold light switch until it flashes 8 times. (To clear all memory it may have) Register all transmitters to the receiver again. Press the test button on the transmitter to test the operation.
15. The quake-alert transmitter did not work with clock or extended receiver: The weather alert transmitter KWA300TX does not have vibration sensor installed. It is designed for the alert device output for external siren device. To use with quake alert, you must use alarm transmitter KA300TX attached on the siren of the quake alert. Do not forget to register the new transmitter with the clock and extended receiver. Press test button after registering to test the operation.
16. Replace transmitter’s battery:
Click to pop outthe battery
Use philip screw
open lip

- 17 -
Working Frequency . . . . . . . . . . . . . . . . . . . . . . . . . . . . . . . . . . . . . . . . . . . . . . .433MhzMemories . . . . . . . . . . . . . . . . . . . . . . . . . . . . . . . . . . . . . . . . . . . . . . . . . . . . . . . . . . . 6 Channel one for alarm monitor transmitter . . . . . . . . . . . . . . . . . . . . . . . . . . . . 3 Channel two for KA1000 transmitter . . . . . . . . . . . . . . . . . . . . . . . . . . . . . . . . . 3
SIZEKA1000 . . . . . . . . . . . . . . . . . . . . . . . . . . . . . . . . . . . . . . . . . . . . . . . . . .17.5X14X11cmBed shaker . . . . . . . . . . . . . . . . . . . . . . . . . . . . . . . . . . . . . . . . . . . . . . . . 83mm diameterDoor knock transmitter KA1000DK . . . . . . . . . . . . . . . . . . . . . . . . . . . 65X40X17.5mmDoorbell Transmitter KA1000DB . . . . . . . . . . . . . . . . . . . . . . . . . . . . 65X40X17.5mm
WEIGHTKA1000 . . . . . . . . . . . . . . . . . . . . . . . . . . . . . . . . . . . . . . . . . . . . . . . . . . . . . . . . 0.77KgBed shaker . . . . . . . . . . . . . . . . . . . . . . . . . . . . . . . . . . . . . . . . . . . . . . . . . . . . . . . . 110gDoor knock transmitter KA1000DK . . . . . . . . . . . . . . . . . . . . . . . . . . . . . . . . . . . . . 45gDoorbell Transmitter KA1000DB . . . . . . . . . . . . . . . . . . . . . . . . . . . . . . . . . . . . . . 45g
OPERATION VOLTAGEKA1000 . . . . . . . . . . . . . . . . . . . . . . . . . . . . . . . . . . . . . . . . . . . . . . . . . . . . . . . 120VACDoor knock transmitter KA1000DK . . . . . . . . . . . . . . . . . . . . . . . . . . . . . . . . . . . 3VDCDoorbell Transmitter KA1000DB . . . . . . . . . . . . . . . . . . . . . . . . . . . . . . . . . . . . 3VDC
BATTERYKA1000 . . . . . . . . . . . . . . . . . . . . . . . . . . . . . . . . . . . . . . . . . . . . 8.4VDC RechargeableDoor knock transmitter KA1000DK . . . . . . . . . . . . . . . . . . . . . . . . . . . . . . . . . .CR2032Doorbell Transmitter KA1000DB . . . . . . . . . . . . . . . . . . . . . . . . . . . . . . . . . . .CR2032
Load for AC plug . . . . . . . . . . . . . . . . . . . . . . . . . . . . . . . . . . . . . . . . . . . . .120VAC 2ASiren . . . . . . . . . . . . . . . . . . . . . . . . . . . . . . . . . . . . . . . . . . . . . . . . . . . . . . . . . . . 95dB
APPROVALFCC part 15, part 68ETL listed.
SPECIFICATION

- 18 -
Krown Manufacturing, Inc. warrants that the Dual Alarm Clock KA1000 sold by Krown Manufacturing, Inc. is free from defects in materials and workmanship under normal use and service for one year. This warranty is applicable only to the original purchaser of the Alarm Clock when accompanied by a sale receipt stating the date of purchase and the name of the company from which purchased. This warranty is in lieu and excludes all other warranties, expressed or implied, including any implied warranty of merchantabil-ity or fitness and of any obligation on the part of Krown Manufacturing, Inc. If the Alarm Clock shall prove the defective, then Krown Manufacturing, Inc shall either replace or repair the Alarm Clock at no cost to the original purchaser within one year of the date of purchase. During the one-year period you may return the Alarm Clock to Krown Manu-facturing, Inc. at the following address:
Krown Manufacturing, Inc. 3408 Indale Rd. Fort Worth, TX 76116
Shipping charges are at the customer’s expense. Please include a check or money order make out to Krown Manufacturing in the amount of $15.00 to cover for the Shipping and Handling. This warranty does not extend to any Alarm Clock sold by Krown Manufactur-ing, Inc., which has been subjected to misuse, neglect, accident, improper application, improper installation, or any use in violation of the instruction furnished by Krown Manufacturing, Inc. This warranty does not extend to or apply to any Alarm Clock, which has been repaired or altered by any persons who have not been expressly approved by Krown Manufacturing, Inc.
Krown Manufacturing, Inc. shall not be liable for any special or consequential dam-ages or for loss or expense directly or indirectly arising from use of the product or any inability to use them either separately or in combination with other equipment or product accessories or from any other cause. This warranty is only applicable to a product purchased through Krown Manufacturing, Compu-TTY, or a Krown dealer. Other than state herein, there is no other warranty whether by the sample or model, by description or quantity, whether expressed or implied, and there are no implied warranties of fitness for a particular purpose or of merchantability.
WARRANTY
- 19 -
Record the security code or dip switch with channel jumper of all installed transmitters to this sheet. Use these codes to setup the new transmitters or register them to KA1000 and KA1000EX. You will achieve the same flash pattern if you register the transmitter in the same order.
Number Description ________________ _______________________________________________ ________________ _______________________________________________ ________________ _______________________________________________ ________________ _______________________________________________ ________________ _______________________________________________ ________________ _______________________________________________ ________________ _______________________________________________ ________________ _______________________________________________ ________________ _______________________________________________ ________________ _______________________________________________ ________________ _______________________________________________ ________________ _______________________________________________ ________________ _______________________________________________ ________________ _______________________________________________ ________________ _______________________________________________ ________________ _______________________________________________
REGISTERED TRANSMITTERS

3408 Indale Road, Fort Worth, TX 76116
Voice: . . . . . . . . . . . .817.738.2485 TTY/VP: . . . . . . . . . .817.738.8993 Fax: . . . . . . . . . . . . .817.738.1970 E-Mail: . . . [email protected] Web site: . . www.KrownMfg.com