Bluetooth® Operating Instructions GB Audio...
42
MEX-M70BT 4-489-404- 12(1) Bluetooth® Audio System Owner’s Record The model and serial numbers are located on the bottom of the unit. Record the serial number in the space provided below. Refer to these numbers whenever you call upon your Sony dealer regarding this product. Model No. MEX-M70BT Serial No. Operating Instructions GB Mode d’emploi FR Manual de instrucciones ES To switch the FM/AM tuning step, see page 8. To cancel the demonstration (DEMO) display, see page 19. Pour commuter l’intervalle de syntonisation FM/AM, reportez- vous à la page 8. Pour annuler l’affichage de démonstration (DEMO), reportez- vous à la page 21. Para cambiar el paso de sintonización de FM/AM, consulte la página 8. Para cancelar la pantalla de demostración (DEMO), consulte la página 20.
Transcript of Bluetooth® Operating Instructions GB Audio...
MEX-M70BT
4-489-404-12(1)
Bluetooth® Audio System
Owner’s RecordThe model and serial numbers are located on the bottom of the unit.Record the serial number in the space provided below.Refer to these numbers whenever you call upon your Sony dealer regarding this product.
Model No. MEX-M70BT
Serial No.
Operating Instructions GB
Mode d’emploi FR
Manual de instrucciones ES
To switch the FM/AM tuning step, see page 8.
To cancel the demonstration (DEMO) display, see page 19.
Pour commuter l’intervalle de syntonisation FM/AM, reportez-vous à la page 8.
Pour annuler l’affichage de démonstration (DEMO), reportez-vous à la page 21.
Para cambiar el paso de sintonización de FM/AM, consulte la página 8.
Para cancelar la pantalla de demostración (DEMO), consulte la página 20.
2GB
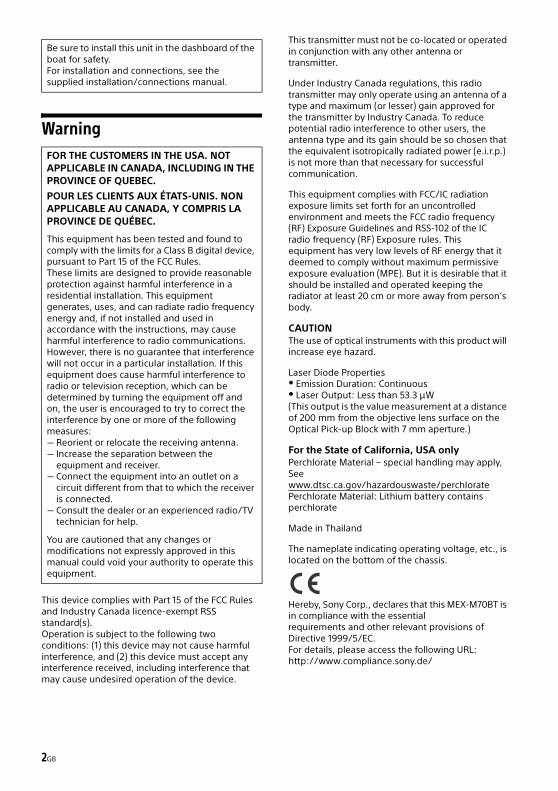
Warning
This device complies with Part 15 of the FCC Rules and Industry Canada licence-exempt RSS standard(s).Operation is subject to the following two conditions: (1) this device may not cause harmful interference, and (2) this device must accept any interference received, including interference that may cause undesired operation of the device.
This transmitter must not be co-located or operated in conjunction with any other antenna or transmitter.
Under Industry Canada regulations, this radio transmitter may only operate using an antenna of a type and maximum (or lesser) gain approved for the transmitter by Industry Canada. To reduce potential radio interference to other users, the antenna type and its gain should be so chosen that the equivalent isotropically radiated power (e.i.r.p.) is not more than that necessary for successful communication.
This equipment complies with FCC/IC radiation exposure limits set forth for an uncontrolled environment and meets the FCC radio frequency (RF) Exposure Guidelines and RSS-102 of the IC radio frequency (RF) Exposure rules. This equipment has very low levels of RF energy that it deemed to comply without maximum permissive exposure evaluation (MPE). But it is desirable that it should be installed and operated keeping the radiator at least 20 cm or more away from person’s body.
CAUTIONThe use of optical instruments with this product will increase eye hazard.
Laser Diode Properties Emission Duration: Continuous Laser Output: Less than 53.3 μW(This output is the value measurement at a distance of 200 mm from the objective lens surface on the Optical Pick-up Block with 7 mm aperture.)
For the State of California, USA onlyPerchlorate Material – special handling may apply, Seewww.dtsc.ca.gov/hazardouswaste/perchloratePerchlorate Material: Lithium battery contains perchlorate
Made in Thailand
The nameplate indicating operating voltage, etc., is located on the bottom of the chassis.
Hereby, Sony Corp., declares that this MEX-M70BT is in compliance with the essentialrequirements and other relevant provisions of Directive 1999/5/EC.For details, please access the following URL:http://www.compliance.sony.de/
Be sure to install this unit in the dashboard of the boat for safety.For installation and connections, see the supplied installation/connections manual.
FOR THE CUSTOMERS IN THE USA. NOT APPLICABLE IN CANADA, INCLUDING IN THE PROVINCE OF QUEBEC.
POUR LES CLIENTS AUX ÉTATS-UNIS. NON APPLICABLE AU CANADA, Y COMPRIS LA PROVINCE DE QUÉBEC.
This equipment has been tested and found to comply with the limits for a Class B digital device, pursuant to Part 15 of the FCC Rules.These limits are designed to provide reasonable protection against harmful interference in a residential installation. This equipment generates, uses, and can radiate radio frequency energy and, if not installed and used in accordance with the instructions, may cause harmful interference to radio communications.However, there is no guarantee that interference will not occur in a particular installation. If this equipment does cause harmful interference to radio or television reception, which can be determined by turning the equipment off and on, the user is encouraged to try to correct the interference by one or more of the following measures: Reorient or relocate the receiving antenna. Increase the separation between the
equipment and receiver. Connect the equipment into an outlet on a
circuit different from that to which the receiver is connected.
Consult the dealer or an experienced radio/TV technician for help.
You are cautioned that any changes or modifications not expressly approved in this manual could void your authority to operate this equipment.
3GB
Notice for customers: the following information is only applicable to equipment sold in countries applying EU DirectivesManufacturer: Sony Corporation, 1-7-1 Konan Minato-ku Tokyo, 108-0075 JapanFor EU product compliance: Sony Deutschland GmbH, Hedelfinger Strasse 61, 70327 Stuttgart, Germany
Disposal of waste batteries and electrical and electronic equipment (applicable in the European Union and other European countries with separate collection systems)
This symbol on the product, the battery or on the packaging indicates that the product and the battery shall not be treated as household waste. On certain batteries this symbol might be used in combination with a chemical symbol. The chemical symbols for mercury (Hg) or lead (Pb) are added if the battery contains more than 0.0005% mercury or 0.004% lead. By ensuring these products and batteries are disposed of correctly, you will help prevent potentially negative consequences for the environment and human health which could otherwise be caused by inappropriate waste handling. The recycling of the materials will help to conserve natural resources.In case of products that for safety, performance or data integrity reasons require a permanent connection with an incorporated battery, this battery should be replaced by qualified service staff only. To ensure that the battery and the electrical and electronic equipment will be treated properly, hand over these products at end-of-life to the applicable collection point for the recycling of electrical and electronic equipment. For all other batteries, please view the section on how to remove the battery from the product safely. Hand the battery over to the applicable collection point for the recycling of waste batteries. For more detailed information about recycling of this product or battery, please contact your local Civic Office, your household waste disposal service or the shop where you purchased the product or battery.
Note on the lithium batteryDo not expose the battery to excessive heat such as direct sunlight, fire or the like.
Note on the waterproof cover of the unitUnder the environment of potential water splash, Sony highly recommends to protect the unit with Waterproof Car Stereo Cover (not supplied).While an iPod or USB device is connected, the Waterproof Car Stereo Cover cannot be fully closed. Avoid splashing water on the unit.
Warning if your boat’s ignition has no ACC positionBe sure to set the AUTO OFF function (page 19). The unit will shut off completely and automatically in the set time after the unit is turned off, which prevents battery drain. If you do not set the AUTO OFF function, press and hold OFF until the display disappears each time you turn the ignition off.

4GB
CautionIN NO EVENT SHALL SONY BE LIABLE FOR ANY INCIDENTAL, INDIRECT OR CONSEQUENTIAL DAMAGES OR OTHER DAMAGES INCLUDING, WITHOUT LIMITATION, LOSS OF PROFITS, LOSS OF REVENUE, LOSS OF DATA, LOSS OF USE OF THE PRODUCT OR ANY ASSOCIATED EQUIPMENT, DOWNTIME, AND PURCHASER’S TIME RELATED TO OR ARISING OUT OF THE USE OF THIS PRODUCT, ITS HARDWARE AND/OR ITS SOFTWARE.
IMPORTANT NOTICE!Safe and efficient useChanges or modifications to this unit not expressly approved by Sony may void the user’s authority to operate the equipment.Please check for exceptions, due to national requirement or limitations, in usage of BLUETOOTH equipment before using this product.
DrivingCheck the laws and regulations on the use of cellular phones and handsfree equipment in the areas where you drive.Always give full attention to driving and stop the boat in a safe place before making or answering a call if driving conditions so require.
Connecting to other devicesWhen connecting to any other device, please read its user guide for detailed safety instructions.
Radio frequency exposureRF signals may affect improperly installed or inadequately shielded electronic systems in boats, such as electronic fuel injection systems, electronic antiskid (antilock) braking systems, electronic speed control systems or air bag systems. For installation or service of this device, please consult with the manufacturer or its representative of your boat. Faulty installation or service may be dangerous and may invalidate any warranty that may apply to this device.Consult with the manufacturer of your boat to ensure that the use of your cellular phone in the boat will not affect its electronic system.Check regularly that all wireless device equipment in the boat is mounted and operating properly.
Emergency callsThis BLUETOOTH boat handsfree and the electronic device connected to the handsfree operate using radio signals, cellular, and landline networks as well as user-programmed function, which cannot guarantee connection under all conditions.Therefore do not rely solely upon any electronic device for essential communications (such as medical emergencies).
Remember, in order to make or receive calls, the handsfree and the electronic device connected to the handsfree must be switched on in a service area with adequate cellular signal strength.Emergency calls may not be possible on all cellular phone networks or when certain network services and/or phone features are in use.Check with your local service provider.
Notes on BLUETOOTH function
5GB
Table of ContentsWarning. . . . . . . . . . . . . . . . . . . . . . . . . . . . . . . . . . . 2Guide to Parts and Controls . . . . . . . . . . . . . . . . . . 6
Getting StartedDetaching the Front Panel. . . . . . . . . . . . . . . . . . . . 8Switching the FM/AM Tuning Step. . . . . . . . . . . . . 8Setting the Clock . . . . . . . . . . . . . . . . . . . . . . . . . . . 8Preparing a BLUETOOTH Device . . . . . . . . . . . . . . . 8Connecting an iPod/USB Device. . . . . . . . . . . . . . 10Connecting Other Portable Audio Device . . . . . . 10
Listening to the Radio/SiriusXMListening to the Radio . . . . . . . . . . . . . . . . . . . . . . . 11Using Radio Data System (RDS) . . . . . . . . . . . . . . . 11Listening to the SiriusXM Radio . . . . . . . . . . . . . . . 12
PlaybackPlaying a Disc . . . . . . . . . . . . . . . . . . . . . . . . . . . . . . 13Playing an iPod/USB Device . . . . . . . . . . . . . . . . . . 13Playing a BLUETOOTH Device . . . . . . . . . . . . . . . . . 13Searching and Playing Tracks . . . . . . . . . . . . . . . . 14
Listening to Pandora®Preparing for Pandora® . . . . . . . . . . . . . . . . . . . . . . 15Streaming Pandora®. . . . . . . . . . . . . . . . . . . . . . . . . 15Available Operations in the Pandora® . . . . . . . . . . 15
Handsfree CallingReceiving a Call . . . . . . . . . . . . . . . . . . . . . . . . . . . 16Making a Call . . . . . . . . . . . . . . . . . . . . . . . . . . . . . 16Available Operations during Call . . . . . . . . . . . . . . 17
Useful FunctionsApp Remote with iPhone/Android Phone. . . . . . . 17
SettingsCanceling the DEMO Mode . . . . . . . . . . . . . . . . . . 19Basic Setting Operation . . . . . . . . . . . . . . . . . . . . . 19GENERAL Setup . . . . . . . . . . . . . . . . . . . . . . . . . . . 19SOUND Setup . . . . . . . . . . . . . . . . . . . . . . . . . . . . . 19
EQ10 PRESET. . . . . . . . . . . . . . . . . . . . . . . . . . . 20EQ10 SETTING . . . . . . . . . . . . . . . . . . . . . . . . . . 20POSITION (listening position) . . . . . . . . . . . . . 20RB ENH (rear bass enhancer). . . . . . . . . . . . . . 20SW DIREC (subwoofer direct connection) . . . 20
DISPLAY Setup . . . . . . . . . . . . . . . . . . . . . . . . . . . . . 21BT (BLUETOOTH) Setup . . . . . . . . . . . . . . . . . . . . . . 21
BT INIT (BLUETOOTH initialize) . . . . . . . . . . . . . 21APP REM (App Remote) Setup . . . . . . . . . . . . . . . . 21
Additional InformationPrecautions . . . . . . . . . . . . . . . . . . . . . . . . . . . . . . . 22Maintenance . . . . . . . . . . . . . . . . . . . . . . . . . . . . . . 24Specifications. . . . . . . . . . . . . . . . . . . . . . . . . . . . . . 24Troubleshooting . . . . . . . . . . . . . . . . . . . . . . . . . . . 26
6GB
Guide to Parts and Controls
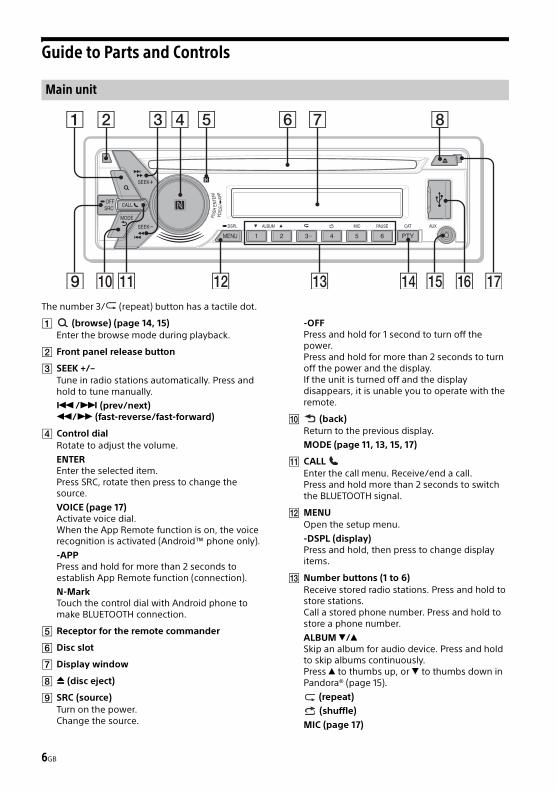
The number 3/ (repeat) button has a tactile dot.
(browse) (page 14, 15)Enter the browse mode during playback.
Front panel release button
SEEK +/–Tune in radio stations automatically. Press and hold to tune manually.
/ (prev/next) / (fast-reverse/fast-forward)
Control dialRotate to adjust the volume.
ENTEREnter the selected item.Press SRC, rotate then press to change the source.
VOICE (page 17)Activate voice dial.When the App Remote function is on, the voice recognition is activated (Android™ phone only).
-APPPress and hold for more than 2 seconds to establish App Remote function (connection).
N-MarkTouch the control dial with Android phone to make BLUETOOTH connection.
Receptor for the remote commander
Disc slot
Display window
(disc eject)
SRC (source)Turn on the power.Change the source.
-OFFPress and hold for 1 second to turn off the power.Press and hold for more than 2 seconds to turn off the power and the display.If the unit is turned off and the display disappears, it is unable you to operate with the remote.
(back)Return to the previous display.
MODE (page 11, 13, 15, 17)
CALL Enter the call menu. Receive/end a call.Press and hold more than 2 seconds to switch the BLUETOOTH signal.
MENUOpen the setup menu.
-DSPL (display)Press and hold, then press to change display items.
Number buttons (1 to 6)Receive stored radio stations. Press and hold to store stations.Call a stored phone number. Press and hold to store a phone number.
ALBUM /Skip an album for audio device. Press and hold to skip albums continuously.Press to thumbs up, or to thumbs down in Pandora® (page 15).
(repeat)
(shuffle)
MIC (page 17)
Main unit
7GB
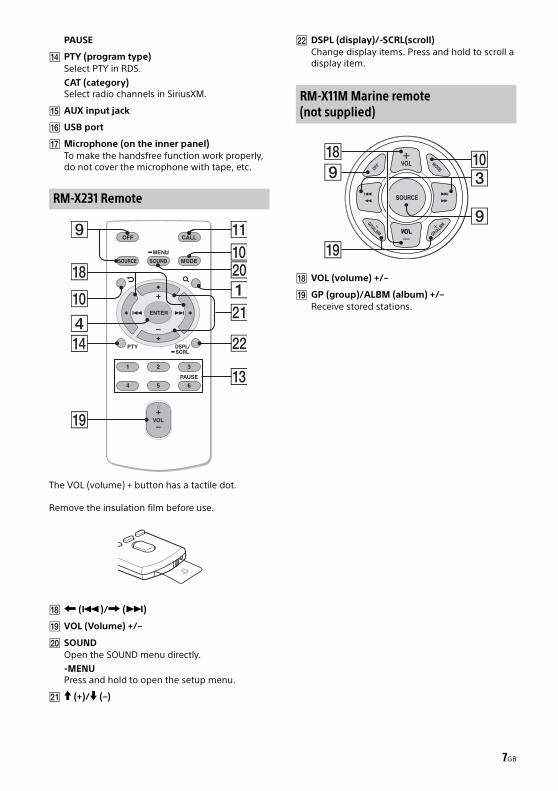
PAUSE
PTY (program type)Select PTY in RDS.
CAT (category)Select radio channels in SiriusXM.
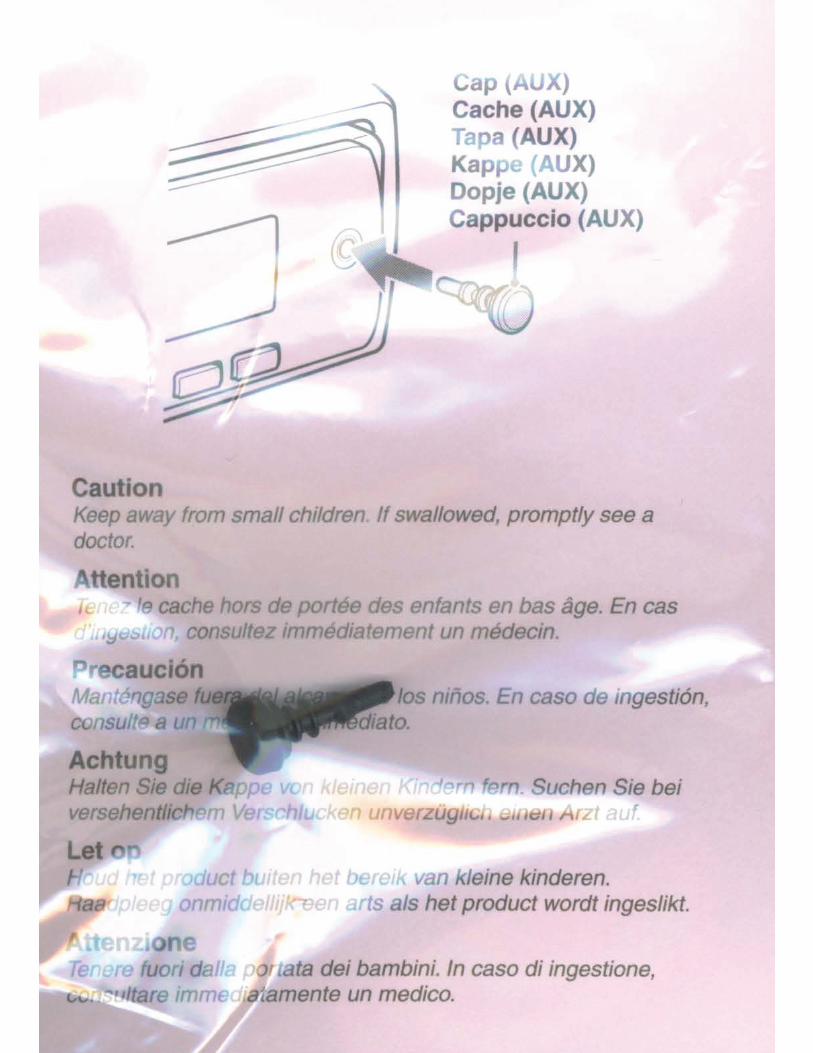
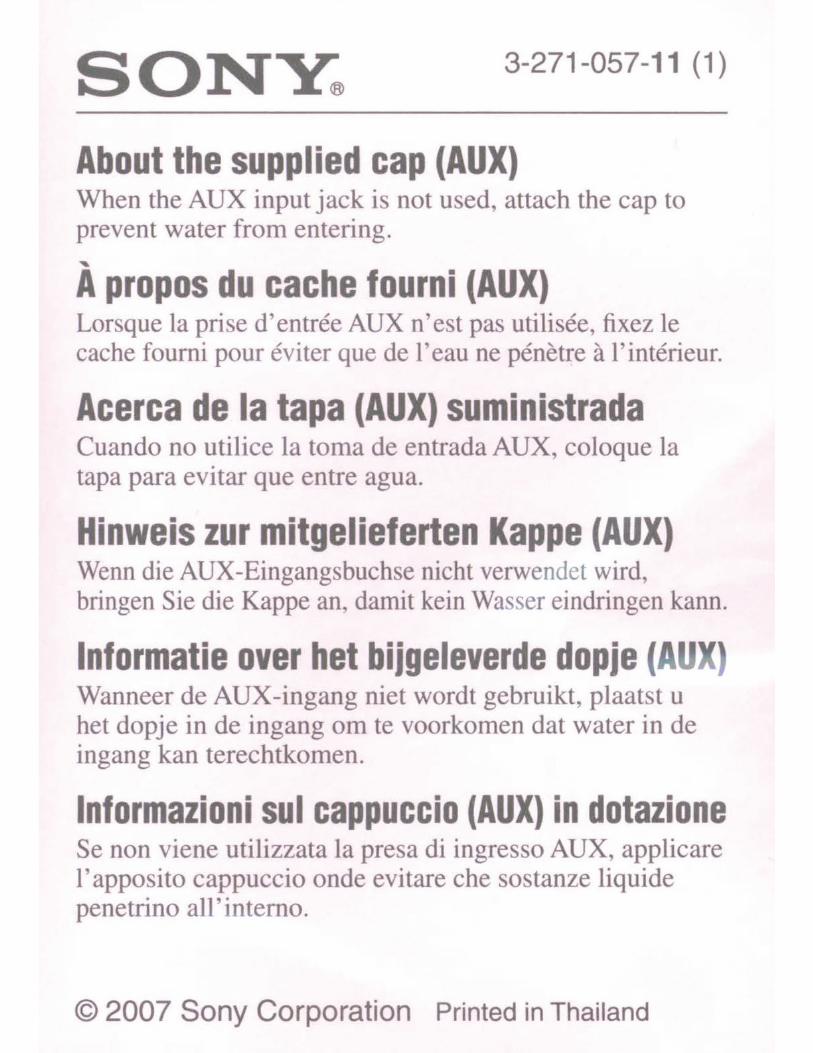
AUX input jack
USB port
Microphone (on the inner panel)To make the handsfree function work properly, do not cover the microphone with tape, etc.
The VOL (volume) + button has a tactile dot.
Remove the insulation film before use.
()/ ()
VOL (Volume) +/–
SOUNDOpen the SOUND menu directly.
-MENUPress and hold to open the setup menu.
(+)/ (–)
DSPL (display)/-SCRL(scroll)Change display items. Press and hold to scroll a display item.
VOL (volume) +/–
GP (group)/ALBM (album) +/–Receive stored stations.
RM-X231 Remote
RM-X11M Marine remote (not supplied)
8GB
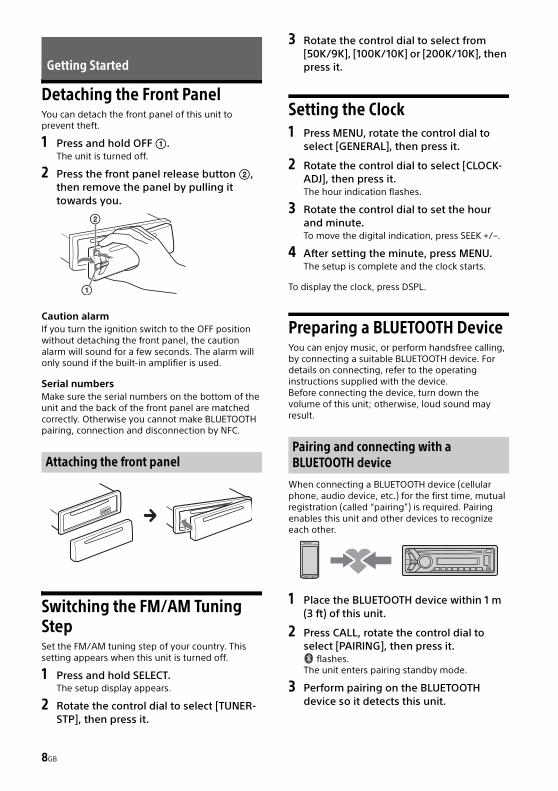
Detaching the Front PanelYou can detach the front panel of this unit to prevent theft.
1 Press and hold OFF .The unit is turned off.
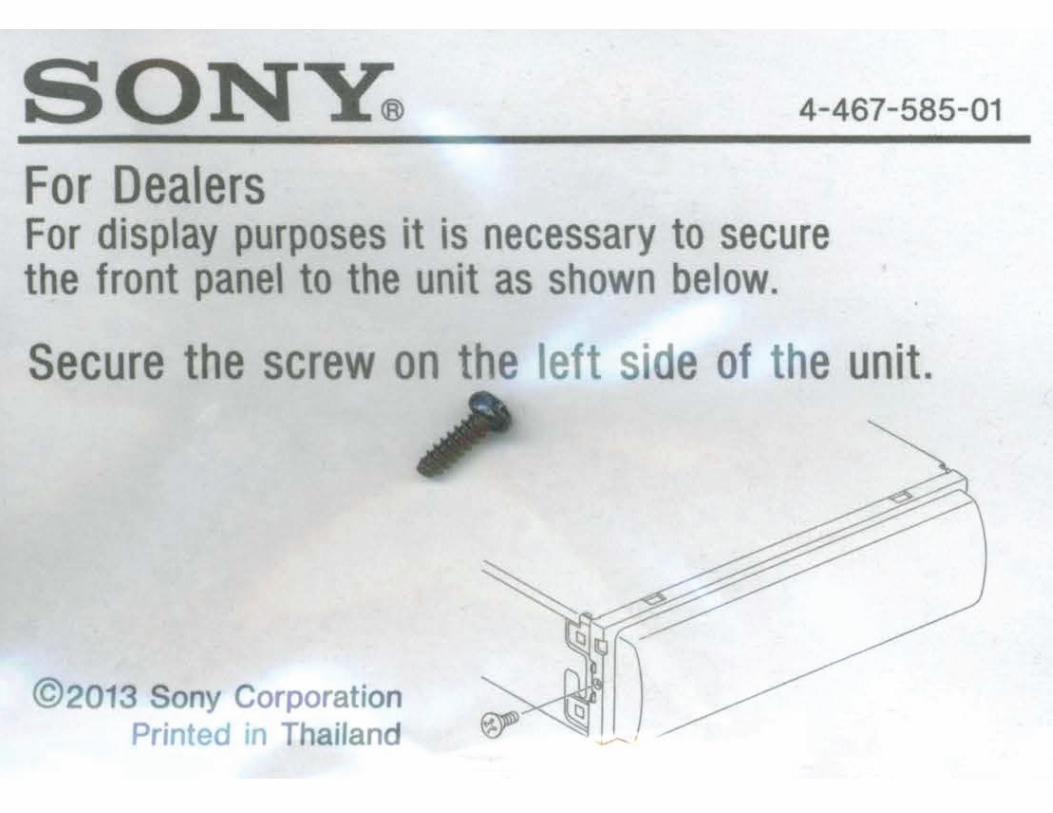
2 Press the front panel release button , then remove the panel by pulling it towards you.
Caution alarmIf you turn the ignition switch to the OFF position without detaching the front panel, the caution alarm will sound for a few seconds. The alarm will only sound if the built-in amplifier is used.
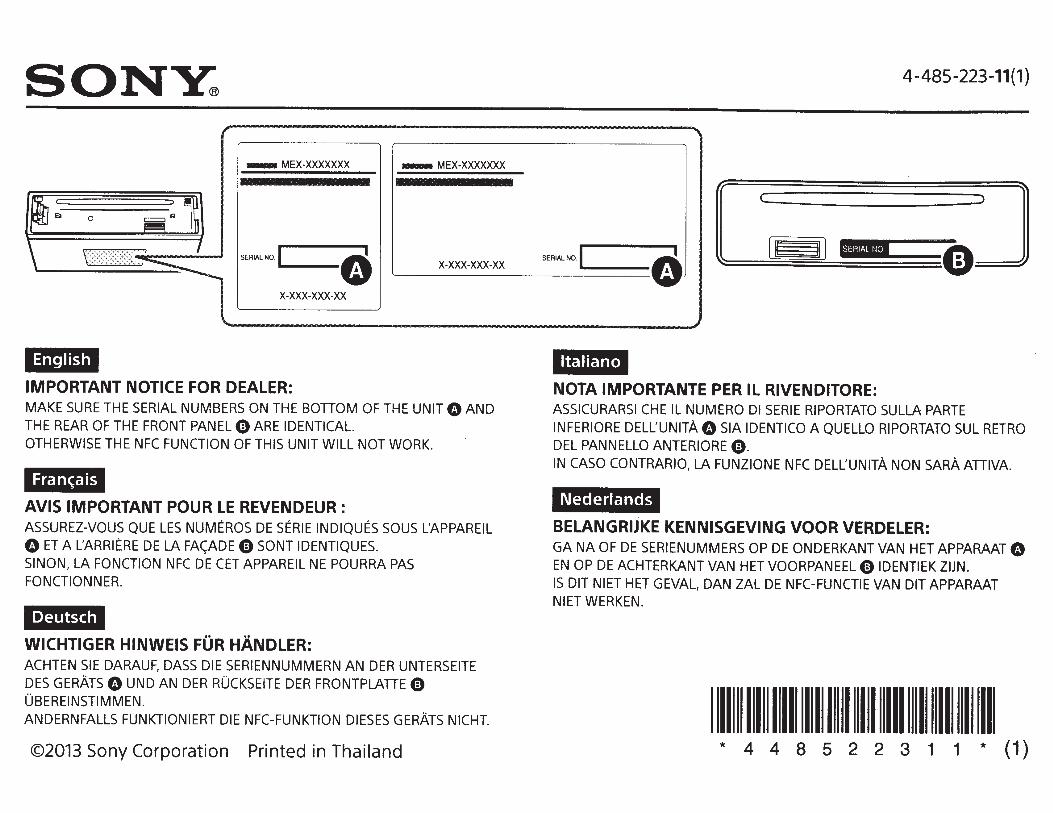
Serial numbersMake sure the serial numbers on the bottom of the unit and the back of the front panel are matched correctly. Otherwise you cannot make BLUETOOTH pairing, connection and disconnection by NFC.
Switching the FM/AM Tuning StepSet the FM/AM tuning step of your country. This setting appears when this unit is turned off.
1 Press and hold SELECT.The setup display appears.
2 Rotate the control dial to select [TUNER-STP], then press it.
3 Rotate the control dial to select from [50K/9K], [100K/10K] or [200K/10K], then press it.
Setting the Clock1 Press MENU, rotate the control dial to
select [GENERAL], then press it.
2 Rotate the control dial to select [CLOCK-ADJ], then press it.The hour indication flashes.
3 Rotate the control dial to set the hour and minute.To move the digital indication, press SEEK +/–.
4 After setting the minute, press MENU.The setup is complete and the clock starts.
To display the clock, press DSPL.
Preparing a BLUETOOTH DeviceYou can enjoy music, or perform handsfree calling, by connecting a suitable BLUETOOTH device. For details on connecting, refer to the operating instructions supplied with the device.Before connecting the device, turn down the volume of this unit; otherwise, loud sound may result.
When connecting a BLUETOOTH device (cellular phone, audio device, etc.) for the first time, mutual registration (called “pairing”) is required. Pairing enables this unit and other devices to recognize each other.
1 Place the BLUETOOTH device within 1 m (3 ft) of this unit.
2 Press CALL, rotate the control dial to select [PAIRING], then press it.
flashes.The unit enters pairing standby mode.
3 Perform pairing on the BLUETOOTH device so it detects this unit.
Getting Started
Attaching the front panelPairing and connecting with a BLUETOOTH device
9GB
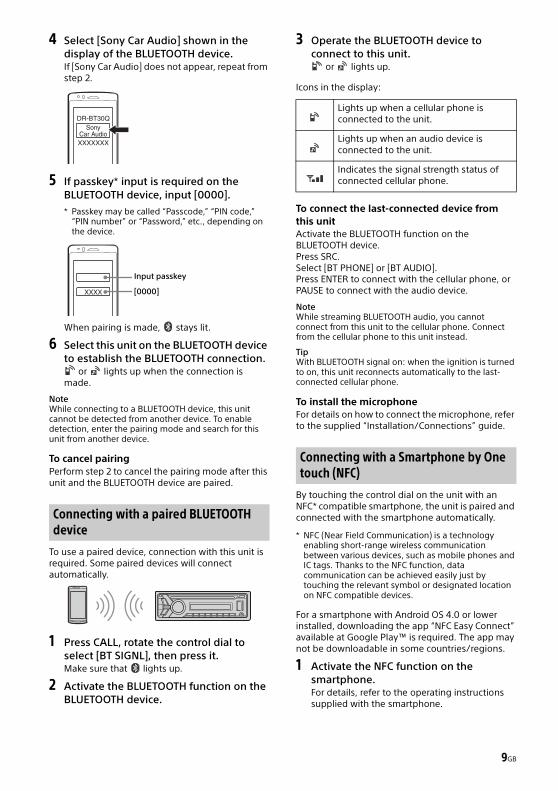
4 Select [Sony Car Audio] shown in the display of the BLUETOOTH device.If [Sony Car Audio] does not appear, repeat from step 2.
5 If passkey* input is required on the BLUETOOTH device, input [0000].
* Passkey may be called “Passcode,” “PIN code,” “PIN number” or “Password,” etc., depending on the device.
When pairing is made, stays lit.
6 Select this unit on the BLUETOOTH device to establish the BLUETOOTH connection.
or lights up when the connection is made.
NoteWhile connecting to a BLUETOOTH device, this unit cannot be detected from another device. To enable detection, enter the pairing mode and search for this unit from another device.
To cancel pairingPerform step 2 to cancel the pairing mode after this unit and the BLUETOOTH device are paired.
To use a paired device, connection with this unit is required. Some paired devices will connect automatically.
1 Press CALL, rotate the control dial to select [BT SIGNL], then press it.Make sure that lights up.
2 Activate the BLUETOOTH function on the BLUETOOTH device.
3 Operate the BLUETOOTH device to connect to this unit.
or lights up.
Icons in the display:
To connect the last-connected device from this unitActivate the BLUETOOTH function on the BLUETOOTH device.Press SRC.Select [BT PHONE] or [BT AUDIO].Press ENTER to connect with the cellular phone, or PAUSE to connect with the audio device.
NoteWhile streaming BLUETOOTH audio, you cannot connect from this unit to the cellular phone. Connect from the cellular phone to this unit instead.
TipWith BLUETOOTH signal on: when the ignition is turned to on, this unit reconnects automatically to the last-connected cellular phone.
To install the microphoneFor details on how to connect the microphone, refer to the supplied “Installation/Connections” guide.
By touching the control dial on the unit with an NFC* compatible smartphone, the unit is paired and connected with the smartphone automatically.
* NFC (Near Field Communication) is a technology enabling short-range wireless communication between various devices, such as mobile phones and IC tags. Thanks to the NFC function, data communication can be achieved easily just by touching the relevant symbol or designated location on NFC compatible devices.
For a smartphone with Android OS 4.0 or lower installed, downloading the app “NFC Easy Connect” available at Google Play™ is required. The app may not be downloadable in some countries/regions.
1 Activate the NFC function on the smartphone.For details, refer to the operating instructions supplied with the smartphone.
Connecting with a paired BLUETOOTH device
[0000]
Input passkey
Lights up when a cellular phone is connected to the unit.
Lights up when an audio device is connected to the unit.
Indicates the signal strength status of connected cellular phone.
Connecting with a Smartphone by One touch (NFC)
10GB
2 Touch the N-Mark part of the unit with the N-Mark part of the smartphone.
Make sure that lights up on the display of the unit.
To disconnect by One touchTouch the N-Mark part of the unit with the N-Mark part of the smartphone again.
Notes When making the connection, handle the
smartphone carefully to prevent scratches. One touch connection is not possible when the unit is
already connected to another NFC compatible device. In this case, disconnect the other device, and make connection with the smartphone again.
When an iPhone/iPod with iOS5 or later installed is connected to the USB port, the unit is paired and connected with the iPhone/iPod automatically.To enable BLUETOOTH Auto Pairing, make sure [AUTO PAIRING] in BT setup is set to [ON] (page 21).
1 Activate the BLUETOOTH function on the iPhone/iPod.
2 Connect an iPhone/iPod to the USB port.
Make sure that lights up on the display of the unit.
NoteBLUETOOTH Auto Pairing is not possible if the unit is already connected to another BLUETOOTH device. In this case, disconnect the other device, then connect the iPhone/iPod again.
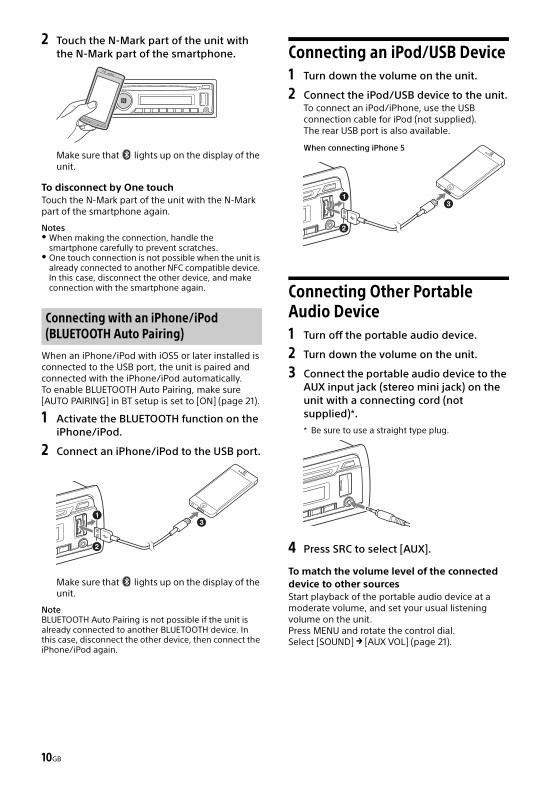
Connecting an iPod/USB Device1 Turn down the volume on the unit.
2 Connect the iPod/USB device to the unit.To connect an iPod/iPhone, use the USB connection cable for iPod (not supplied).The rear USB port is also available.
Connecting Other Portable Audio Device1 Turn off the portable audio device.
2 Turn down the volume on the unit.
3 Connect the portable audio device to the AUX input jack (stereo mini jack) on the unit with a connecting cord (not supplied)*.
* Be sure to use a straight type plug.
4 Press SRC to select [AUX].
To match the volume level of the connected device to other sourcesStart playback of the portable audio device at a moderate volume, and set your usual listening volume on the unit.Press MENU and rotate the control dial.Select [SOUND] [AUX VOL] (page 21).
Connecting with an iPhone/iPod (BLUETOOTH Auto Pairing)
When connecting iPhone 5
11GB
Listening to the RadioTuning step setting is required (page 8).To listen to the radio, press SRC to select [TUNER].
1 Press MODE to change the band (FM1, FM2, FM3, AM1 or AM2).
2 Press MENU, rotate the control dial to select [GENERAL], then press it.
3 Rotate the control dial to select [BTM], then press it.The unit stores stations in order of frequency on the number buttons.
1 Press MODE to change the band (FM1, FM2, FM3, AM1 or AM2).
2 Perform tuning.To tune manuallyPress and hold SEEK +/– to locate the approximate frequency, then press SEEK +/– repeatedly to fine adjust to the desired frequency.
To tune automaticallyPress SEEK +/–.Scanning stops when the unit receives a station. Repeat this procedure until the desired station is received.
1 While receiving the station that you want to store, press and hold a number button (1 to 6) until [MEM] appears.
1 Select the band, then press a number button (1 to 6).
Using Radio Data System (RDS)
Use PTY to display or search for a desired program type.
1 Press PTY during FM reception.
2 Rotate the control dial until the desired program type appears, then press it.The unit starts to search for a station broadcasting the selected program type.
Type of programs (tuner step: 200 kHz/10 kHz)
Type of programs (tuner step: 100 kHz/10 kHz, 50 kHz/9 kHz)
The CT data from the RDS transmission sets the clock.
1 Set [CT-ON] in GENERAL setup (page 19).
Listening to the Radio/SiriusXM
Storing automatically (BTM)
Tuning
Storing manually
Receiving the stored stations
Selecting program types (PTY)
NEWS (News), INFORM (Information), SPORTS (Sports), TALK (Talk), ROCK (Rock), CLS ROCK (Classic Rock), ADLT HIT (Adult Hits), SOFT RCK (Soft Rock), TOP 40 (Top 40), COUNTRY (Country), OLDIES (Oldies), SOFT (Soft), NOSTALGA (Nostalgia), JAZZ (Jazz), CLASSICL (Classical), R AND B (Rhythm and Blues), SOFT R B (Soft Rhythm and Blues), LANGUAGE (Foreign Language), REL MUSC (Religious Music), REL TALK (Religious Talk), PERSNLTY (Personality), PUBLIC (Public), COLLEGE (College), WEATHER (Weather)
NEWS (News), AFFAIRS (Current Affairs), INFO (Information), SPORT (Sports), EDUCATE (Education), DRAMA (Drama), CULTURE (Culture), SCIENCE (Science), VARIED (Varied), POP M (Pop Music), ROCK M (Rock Music), EASY M (M.O.R. Music), LIGHT M (Light classical), CLASSICS (Serious classical), OTHER M (Other Music), WEATHER (Weather), FINANCE (Finance), CHILDREN (Children’s program), SOCIAL A (Social Affairs), RELIGION (Religion), PHONE IN (Phone In), TRAVEL (Travel), LEISURE (Leisure), JAZZ (Jazz Music), COUNTRY (Country Music), NATION M (National Music), OLDIES (Oldies Music), FOLK M (Folk Music), DOCUMENT (Documentary)
Setting clock time (CT)
12GB
Listening to the SiriusXM RadioTo listen to the SiriusXM, press SRC to select [SIRIUSXM].
Everything worth listening to is on SiriusXM, getting over 130 channels, including the most commercial-free music, plus the best sports, news, talk and entertainment. A SiriusXM Vehicle Tuner (sold separately) and Subscription are required. For more information, visit www.siriusxm.com
To listen to SiriusXM Satellite Radio, a subscription is required. Activate the SiriusXM Vehicle Tuner using one of the two methods below: Online: Go to www.siriusxm.com/activatenow Phone: Call 1-866-635-2349
For SiriusXM activation, the Radio ID is required.
To display the SiriusXM Radio ID1 During playback, press (browse) to enter the
browse mode.
2 Rotate the control dial to select the channel [0], then press it.
1 Press (browse).
2 Rotate the control dial to select the desired channel, then press it.
To select channels from categories1 Press CAT.
2 Rotate the control dial to select the desired category, then press it.
To store channels
1 While receiving the channel that you want to store, press and hold a number button (1 to 6) until [MEM] appears.
To receive the stored channel, press MODE to select [SX1], [SX2] or [SX3], then press a number button (1 to 6).
To set a parental controlSome SiriusXM channels contain content that is not suitable for children. You can enable a parental control passcode for these channels.
1 Press MENU and rotate the control dial.
2 Select [GENERAL] [PARENTAL] [LOCK SEL] [LOCK-ON].
3 Enter the passcode, then press ENTER.The initial passcode is [0000].
To unlock the channels, select [OFF].
To change the passcode1 Press MENU and rotate the control dial.
2 Select [GENERAL] [PARENTAL] [CODE EDIT].
3 Enter the current passcode on the current passcode input display, then press ENTER.The initial passcode is [0000].
4 Enter your new 4-digit passcode on the new passcode input display, then press ENTER.
To change display itemsPress and hold, then press DSPL to change as follows:Channel Number (Default) Channel Name Artist Name Song Title Content Info Category Name Clock
Preparing for the SiriusXM Vehicle Tuner
Selecting channels for SiriusXM
13GB
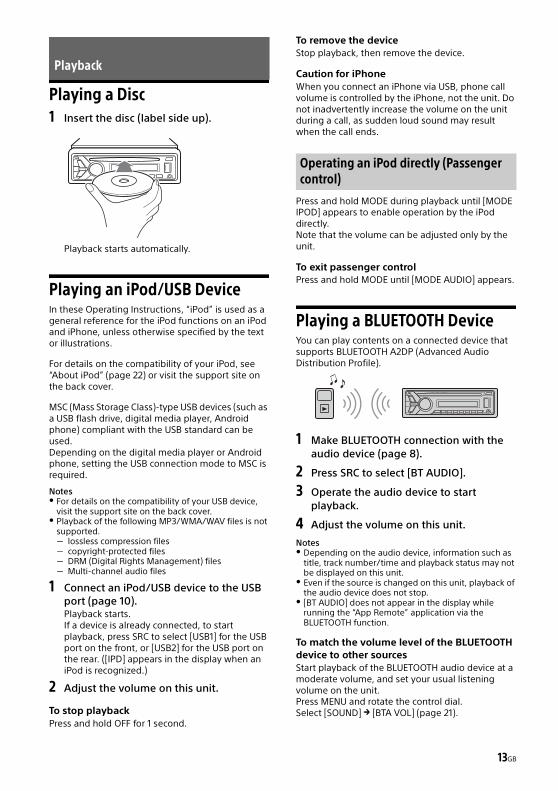
Playing a Disc1 Insert the disc (label side up).
Playback starts automatically.
Playing an iPod/USB DeviceIn these Operating Instructions, “iPod” is used as a general reference for the iPod functions on an iPod and iPhone, unless otherwise specified by the text or illustrations.
For details on the compatibility of your iPod, see “About iPod” (page 22) or visit the support site on the back cover.
MSC (Mass Storage Class)-type USB devices (such as a USB flash drive, digital media player, Android phone) compliant with the USB standard can be used.Depending on the digital media player or Android phone, setting the USB connection mode to MSC is required.
Notes For details on the compatibility of your USB device,
visit the support site on the back cover. Playback of the following MP3/WMA/WAV files is not
supported. lossless compression files copyright-protected files DRM (Digital Rights Management) files Multi-channel audio files
1 Connect an iPod/USB device to the USB port (page 10).Playback starts.If a device is already connected, to start playback, press SRC to select [USB1] for the USB port on the front, or [USB2] for the USB port on the rear. ([IPD] appears in the display when an iPod is recognized.)
2 Adjust the volume on this unit.
To stop playbackPress and hold OFF for 1 second.
To remove the deviceStop playback, then remove the device.
Caution for iPhoneWhen you connect an iPhone via USB, phone call volume is controlled by the iPhone, not the unit. Do not inadvertently increase the volume on the unit during a call, as sudden loud sound may result when the call ends.
Press and hold MODE during playback until [MODE IPOD] appears to enable operation by the iPod directly.Note that the volume can be adjusted only by the unit.
To exit passenger controlPress and hold MODE until [MODE AUDIO] appears.
Playing a BLUETOOTH DeviceYou can play contents on a connected device that supports BLUETOOTH A2DP (Advanced Audio Distribution Profile).
1 Make BLUETOOTH connection with the audio device (page 8).
2 Press SRC to select [BT AUDIO].
3 Operate the audio device to start playback.
4 Adjust the volume on this unit.
Notes Depending on the audio device, information such as
title, track number/time and playback status may not be displayed on this unit.
Even if the source is changed on this unit, playback of the audio device does not stop.
[BT AUDIO] does not appear in the display while running the “App Remote” application via the BLUETOOTH function.
To match the volume level of the BLUETOOTH device to other sourcesStart playback of the BLUETOOTH audio device at a moderate volume, and set your usual listening volume on the unit.Press MENU and rotate the control dial.Select [SOUND] [BTA VOL] (page 21).
Playback
Operating an iPod directly (Passenger control)
14GB
Searching and Playing Tracks
1 During playback, press (repeat) for Repeat play, or (shuffle) for Shuffle play.
2 Press (repeat) or (shuffle) repeatedly to select the desired play mode.Playback in selected play mode may take time to start.
Available play modes differ depending on the selected sound source.
1 During CD, USB or BT audio device*1 playback, press (browse)*2 to display the list of search categories.When the track list appears, press (back) repeatedly to display the desired search category.
*1 Available only for audio devices supporting AVRCP (Audio Video Remote Control Profile) 1.4 or above.
*2 During USB playback, press (browse) for more than 2 seconds to directly return to the beginning of the category list.
2 Rotate the control dial to select the desired search category, then press it to confirm.
3 Repeat step 2 to search the desired track.Playback starts.
To exit the Quick-BrowZer modePress (browse).
1 Press (browse).
2 Press SEEK +.
3 Rotate the control dial to select the item.The list is jumped in steps of 10% of the total number of items.
4 Press ENTER to return to the Quick-BrowZer mode.The selected item appears.
5 Rotate the control dial to select the desired item, then press it.Playback starts.
Repeat play and shuffle play
Searching a track by name (Quick-BrowZer™)
Searching by skipping items (Jump mode)
15GB
Pandora® is available to stream music through your iPhone, Android™ and BlackBerry® phones. You can control Pandora® on a USB-connected iPhone or BLUETOOTH connected Android/BlackBerry phone from this unit.The Pandora® service is not available in some countries/regions.
Preparing for Pandora®1 To check for compatible devices, visit the
support site on the back cover.
2 Download the latest version of the Pandora® application from your smartphone’s app store. A list of compatible devices can be found atwww.pandora.com/everywhere/mobile
For Android phone onlyYou cannot control Pandora® via the BLUETOOTH function while running the “App Remote” application via BLUETOOTH.
Streaming Pandora®1 Connect this unit with the mobile device.
iPhone via USB (page 10) Android/BlackBerry phone via BLUETOOTH
function (page 8)
2 Press SRC to select [PANDORA USB] or [BT PANDORA].
3 Launch Pandora® application on the mobile device.
4 Press PAUSE to start playback.
If the device number appearsMake sure that the same numbers are displayed (e.g., 123456) in this unit and the mobile device, then press ENTER on this unit and select [Yes] on the mobile device.
When activating the BLUETOOTH functionYou can adjust the volume level.Press MENU and rotate the control dial. Select [SOUND] [BTA VOL] (page 21).
Available Operations in the Pandora®
“Thumbs Up” or “Thumbs Down” feedback allows you to personalize stations.
Thumbs UpDuring playback, press .
Thumbs DownDuring playback, press .
The station list allows you to easily select a desired station.
1 During playback, press (browse).
2 Press SEEK + to select the sorting order [BY DATE] or [A TO Z].
3 Rotate the control dial to select the desired station, then press it.Playback starts.
The track or artist currently being played can be bookmarked and stored in your Pandora® account.
1 During playback, press and hold MODE until [BOOKMARK] appears.
2 Rotate the control dial to select [TRK] (track) or [ART] (artist), then press it.
Listening to Pandora®
“Thumbs” feedback
Using the station list
Bookmarking
16GB
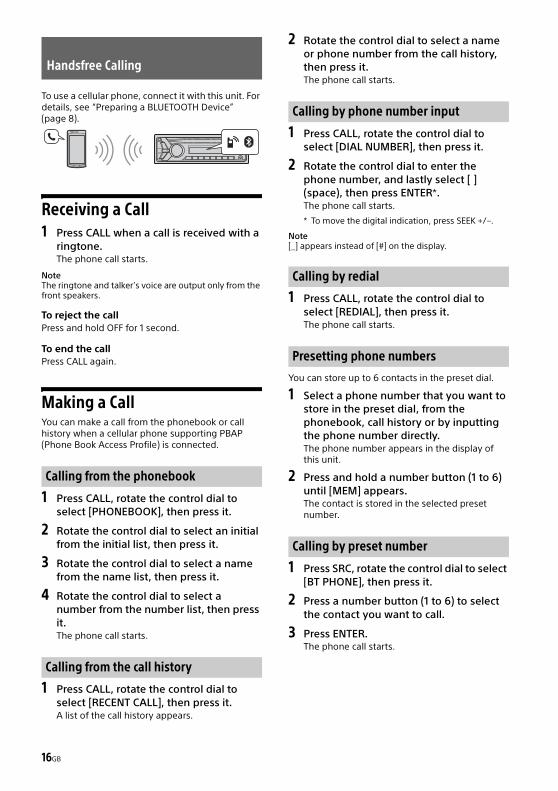
To use a cellular phone, connect it with this unit. For details, see “Preparing a BLUETOOTH Device” (page 8).
Receiving a Call1 Press CALL when a call is received with a
ringtone.The phone call starts.
NoteThe ringtone and talker’s voice are output only from the front speakers.
To reject the callPress and hold OFF for 1 second.
To end the callPress CALL again.
Making a CallYou can make a call from the phonebook or call history when a cellular phone supporting PBAP (Phone Book Access Profile) is connected.
1 Press CALL, rotate the control dial to select [PHONEBOOK], then press it.
2 Rotate the control dial to select an initial from the initial list, then press it.
3 Rotate the control dial to select a name from the name list, then press it.
4 Rotate the control dial to select a number from the number list, then press it.The phone call starts.
1 Press CALL, rotate the control dial to select [RECENT CALL], then press it.A list of the call history appears.
2 Rotate the control dial to select a name or phone number from the call history, then press it.The phone call starts.
1 Press CALL, rotate the control dial to select [DIAL NUMBER], then press it.
2 Rotate the control dial to enter the phone number, and lastly select [ ] (space), then press ENTER*.The phone call starts.
* To move the digital indication, press SEEK +/–.
Note[_] appears instead of [#] on the display.
1 Press CALL, rotate the control dial to select [REDIAL], then press it.The phone call starts.
You can store up to 6 contacts in the preset dial.
1 Select a phone number that you want to store in the preset dial, from the phonebook, call history or by inputting the phone number directly.The phone number appears in the display of this unit.
2 Press and hold a number button (1 to 6) until [MEM] appears.The contact is stored in the selected preset number.
1 Press SRC, rotate the control dial to select [BT PHONE], then press it.
2 Press a number button (1 to 6) to select the contact you want to call.
3 Press ENTER.The phone call starts.
Handsfree Calling
Calling from the phonebook
Calling from the call history
Calling by phone number input
Calling by redial
Presetting phone numbers
Calling by preset number
17GB
You can make a call by saying the voice tag stored in a connected cellular phone that has a voice dialing function.
1 Press CALL, rotate the control dial to select [VOICE DIAL], then press it.Alternatively, press ENTER while the App Remote function is off.
2 Say the voice tag stored on the cellular phone.Your voice is recognized, and the call is made.
To cancel voice dialingPress ENTER.
Available Operations during CallTo preset the volume of the ringtone and talker’s voiceYou can preset the volume level of the ringtone and talker’s voice.
Adjusting the ringtone volume:Rotate the control dial while receiving a call.
Adjusting the talker’s voice volume:Rotate the control dial during a call.
To adjust the volume for the other party (Mic gain adjustment)Press MIC.Adjustable volume levels: [MIC-LOW], [MIC-MID], [MIC-HI].
To reduce echo and noise (Echo Canceler/Noise Canceler Mode)Press and hold MIC.Settable mode: [EC/NC-1], [EC/NC-2].
To transfer a callIn order to activate/deactivate the appropriate device (this unit/cellular phone), press MODE or use your cellular phone.
NoteDepending on the cellular phone, handsfree connection may be cut off when call transfer is attempted.
To check the status of SMS/email* flashes when a new SMS/email is received, and
stays lit when there are unread messages.
* Available only for a cellular phone supporting MAP (Message Access Profile).
App Remote with iPhone/Android PhoneDownloading the “App Remote” application is required from the App Store for iPhone or from Google Play for Android phone.Using the “App Remote” application, the following features are available: Operate the unit to launch and control
compatible applications on iPhone/Android phone.
Operate iPhone/Android phone with simple finger gestures to control the source of the unit.
Launch an application/audio source or search the keyword on the application by saying a word or phrase into the microphone (Android phone only).
Read out incoming text messages, SMS, email, Twitter, Facebook, Calendar, etc., automatically, and the text messages, SMS and email can be replied (Android phone only).
Adjust the sound settings (EQ10, Balance/Fader, Listening Position) of the unit via iPhone/Android phone.
Notes For your safety, follow your local traffic laws and
regulations, and do not operate the application while driving.
Available operations differ depending on the applications. For details on available applications, visit the support site on the back cover.
App Remote ver. 2.0 via USB is compatible with iOS 5/iOS 6 installed iPhones.
App Remote ver. 2.0 via BLUETOOTH is compatible with Android devices with Android 2.2, 2.3, 3.*, 4.0, 4.1 or 4.2 installed.
Voice recognition function does not work depending on your smartphone. In that case, go to [Settings] – select [Voice Recognition].
SMS/E-mail/Notification reading is available for Android devices with TTS engine installed.
The “Smart Connect” application, provided by Sony Mobile Communications, is necessary for Twitter/Facebook/Calendar, etc., notification read out.
Calling by voice tagsUseful Functions
18GB
1 Connect iPhone to the USB port or Android phone with the BLUETOOTH function.
2 Launch the “App Remote” application.
3 Press and hold APP on the unit for more than 2 seconds.Connection to iPhone/Android phone starts.For details on the operations on iPhone/Android phone, see the help of the application.
If the device number appearsMake sure that the same numbers are displayed (e.g., 123456) in this unit and the mobile device, then press ENTER on this unit and select [Yes] on the mobile device.
To terminate connectionPress and hold APP.
Selecting the source or applicationYou can operate the unit to select the desired source or application on your smartphone.
1 Rotate the control dial to select the desired source or application, then press it.
To select another source or application, press SRC then rotate the control dial to select the desired source or application.
Announcement of various information by voice guide (Android phone only)When SMS/E-mail, Twitter/Facebook/Calendar notifications, etc., are received, they are automatically announced through the boat speakers.
For details on settings, refer to the help of the application.
Activating voice recognition (Android phone only)By registering applications, you can control an application by voice command. For details, refer to the help of the application.
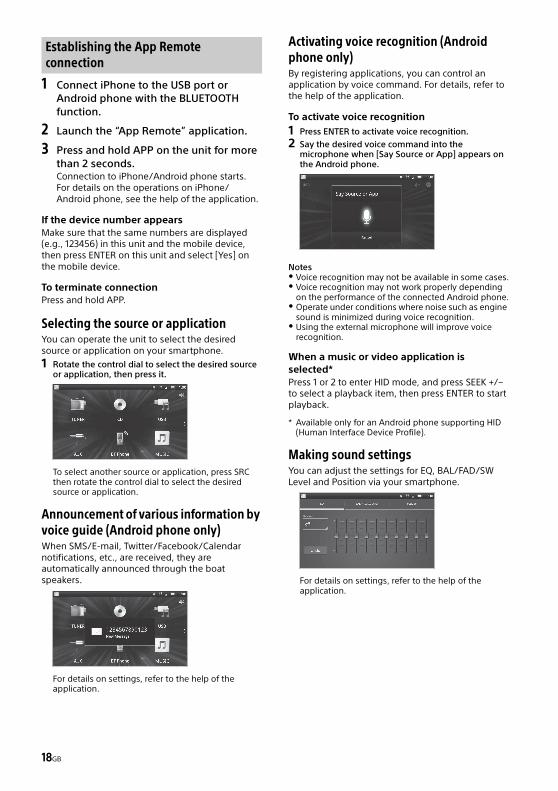
To activate voice recognition1 Press ENTER to activate voice recognition.
2 Say the desired voice command into the microphone when [Say Source or App] appears on the Android phone.
Notes Voice recognition may not be available in some cases. Voice recognition may not work properly depending
on the performance of the connected Android phone. Operate under conditions where noise such as engine
sound is minimized during voice recognition. Using the external microphone will improve voice
recognition.
When a music or video application is selected*Press 1 or 2 to enter HID mode, and press SEEK +/– to select a playback item, then press ENTER to start playback.
* Available only for an Android phone supporting HID (Human Interface Device Profile).
Making sound settingsYou can adjust the settings for EQ, BAL/FAD/SW Level and Position via your smartphone.
For details on settings, refer to the help of the application.
Establishing the App Remote connection
19GB
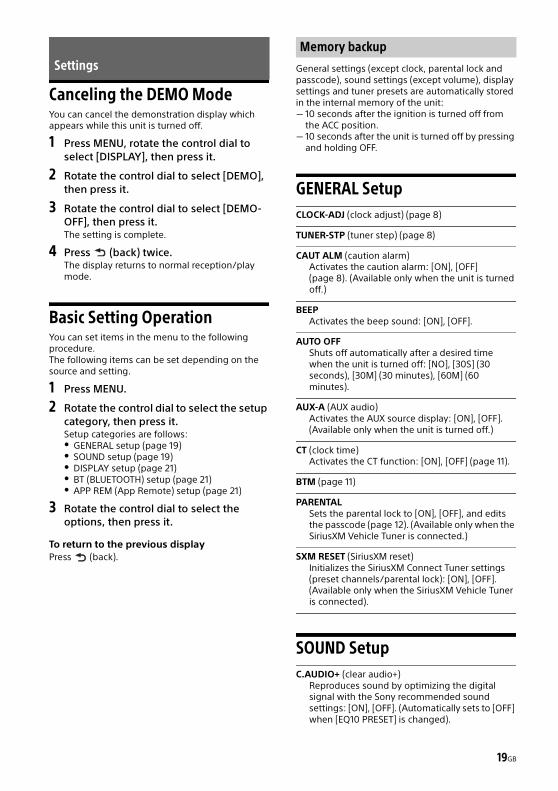
Canceling the DEMO ModeYou can cancel the demonstration display which appears while this unit is turned off.
1 Press MENU, rotate the control dial to select [DISPLAY], then press it.
2 Rotate the control dial to select [DEMO], then press it.
3 Rotate the control dial to select [DEMO-OFF], then press it.The setting is complete.
4 Press (back) twice.The display returns to normal reception/play mode.
Basic Setting OperationYou can set items in the menu to the following procedure.The following items can be set depending on the source and setting.
1 Press MENU.
2 Rotate the control dial to select the setup category, then press it.Setup categories are follows: GENERAL setup (page 19) SOUND setup (page 19) DISPLAY setup (page 21) BT (BLUETOOTH) setup (page 21) APP REM (App Remote) setup (page 21)
3 Rotate the control dial to select the options, then press it.
To return to the previous displayPress (back).
General settings (except clock, parental lock and passcode), sound settings (except volume), display settings and tuner presets are automatically stored in the internal memory of the unit: 10 seconds after the ignition is turned off from
the ACC position. 10 seconds after the unit is turned off by pressing
and holding OFF.
GENERAL SetupCLOCK-ADJ (clock adjust) (page 8)
TUNER-STP (tuner step) (page 8)
CAUT ALM (caution alarm)Activates the caution alarm: [ON], [OFF] (page 8). (Available only when the unit is turned off.)
BEEPActivates the beep sound: [ON], [OFF].
AUTO OFFShuts off automatically after a desired time when the unit is turned off: [NO], [30S] (30 seconds), [30M] (30 minutes), [60M] (60 minutes).
AUX-A (AUX audio)Activates the AUX source display: [ON], [OFF]. (Available only when the unit is turned off.)
CT (clock time)Activates the CT function: [ON], [OFF] (page 11).
BTM (page 11)
PARENTALSets the parental lock to [ON], [OFF], and edits the passcode (page 12). (Available only when the SiriusXM Vehicle Tuner is connected.)
SXM RESET (SiriusXM reset)Initializes the SiriusXM Connect Tuner settings (preset channels/parental lock): [ON], [OFF]. (Available only when the SiriusXM Vehicle Tuner is connected).
SOUND SetupC.AUDIO+ (clear audio+)
Reproduces sound by optimizing the digital signal with the Sony recommended sound settings: [ON], [OFF]. (Automatically sets to [OFF] when [EQ10 PRESET] is changed).
SettingsMemory backup
20GB
EQ10 PRESETSelects an equalizer curve from 10 equalizer curves or off: [R AND B], [ROCK], [POP], [DANCE], [HIP-HOP], [ELECTRONICA], [JAZZ], [SOUL], [COUNTRY], [CUSTOM], [OFF].The equalizer curve setting can be memorized for each source.
EQ10 SETTINGSets [CUSTOM] of EQ10.BASESelects a preset equalizer curve as a basis for further customizing: [BAND1] 32 Hz, [BAND2] 63 Hz, [BAND3] 125 Hz, [BAND4] 250 Hz, [BAND5] 500 Hz, [BAND6] 1 kHz, [BAND7] 2 kHz, [BAND8] 4 kHz, [BAND9] 8 kHz, [BAND10] 16 kHz.The volume level is adjustable in 1 dB steps, from -6 dB to +6 dB.
POSITION (listening position)SET F/R POS (set front/rear position)Simulates a natural sound field by delaying the sound output from front/rear speaker to suit your position.FRONT L: Front leftFRONT R: Front rightFRONT: Center frontALL: In the center of your boatCUSTOM: Position set by App RemoteOFF: No position setADJ POSITION* (adjust position)Fine-tunes the listening position setting.Adjustable range: [+3] – [CENTER] – [-3].SET SW POS* (set subwoofer position)NEAR: NearNORMAL: NormalFAR: Far
BALANCEAdjusts the sound balance: [RIGHT-15] – [CENTER] – [LEFT-15].
FADERAdjusts the relative level: [FRONT-15] – [CENTER] – [REAR-15].
DSEE (digital sound enhancement engine)Improves digitally compressed sound by restoring high frequencies lost in the compression process.This setting can be memorized for each source other than the tuner.Selects the DSEE mode: [ON], [OFF].
LOUDNESSReinforces bass and treble for clear sound at low volume levels: [ON], [OFF].
AAV (advanced auto volume)Adjust the playback volume level of all playback sources to the optimum level: [ON], [OFF].
RB ENH (rear bass enhancer)Rear Bass Enhancer enhances the bass sound by applying a low pass filter setting to the rear speakers. This function allows the rear speakers to work as a subwoofer if one is not connected. (Available only when [SW DIREC] is set to [OFF].)RBE MODE (rear bass enhancer mode)Selects the rear bass enhancer mode: [1], [2], [3], [OFF].LPF FREQ (low pass filter frequency)Selects the subwoofer cut-off frequency: [50Hz], [60Hz], [80Hz], [100Hz], [120Hz].LPF SLOP (low pass filter slope)Selects the LPF slope: [1], [2], [3].
SW DIREC (subwoofer direct connection)You can use the subwoofer without a power amplifier when it is connected to the rear speaker cord. (Available only when [RBE MODE] is set to [OFF].)Be sure to connect a 4 - 8 ohm subwoofer to either of the rear speaker cords. Do not connect a speaker to the other rear speaker cord.SW MODE (subwoofer mode) Selects the subwoofer mode: [1], [2], [3], [OFF].SW PHASE (subwoofer phase) Selects the subwoofer phase: [NORM], [REV].SW POS* (subwoofer position)Selects the subwoofer position: [NEAR], [NORMAL], [FAR].LPF FREQ (low pass filter frequency) Selects the subwoofer cut-off frequency: [50Hz], [60Hz], [80Hz], [100Hz], [120Hz].LPF SLOP (low pass filter slope) Selects the LPF slope: [1], [2], [3].
S.WOOFER (subwoofer)SW LEVEL (subwoofer level)Adjusts the subwoofer volume level: [+10 dB] – [0 dB] – [-10 dB].([ATT] is displayed at the lowest setting.)SW PHASE (subwoofer phase)Selects the subwoofer phase: [NORM], [REV].SW POS* (subwoofer position)Selects the subwoofer position: [NEAR], [NORMAL], [FAR].LPF FREQ (low pass filter frequency)Selects the subwoofer cut-off frequency: [50Hz], [60Hz], [80Hz], [100Hz], [120Hz].LPF SLOP (low pass filter slope)Selects the LPF slope: [1], [2], [3].
HPF (high pass filter)HPF FREQ (high pass filter frequency)Selects the front/rear speaker cut-off frequency: [OFF], [50Hz], [60Hz], [80Hz], [100Hz], [120Hz].HPF SLOP (high pass filter slope)Selects the HPF slope (effective only when [HPF FREQ] is set to other than [OFF]): [1], [2], [3].
21GB
AUX VOL (AUX volume level)Adjusts the volume level for each connected auxiliary device: [+18 dB] – [0 dB] – [-8 dB].This setting negates the need to adjust the volume level between sources.
BTA VOL (BLUETOOTH audio volume level)Adjusts the volume level for each connected BLUETOOTH device: [+6 dB] – [0 dB] – [-6 dB].This setting negates the need to adjust the volume level between sources.
* Does not appear when [SET F/R POS] is set to [OFF].
DISPLAY SetupDEMO (demonstration)
Activates the demonstration: [ON], [OFF].
DIMMERChanges the display brightness.AT (auto)Dims the display automatically when you turn lights on. (Available only when the illumination control lead is connected.)ONDims the display.OFFDeactivates the dimmer.
ILLUM (Illumination)Changes the illumination color: [1], [2].
AUTO SCR (auto scroll)Scrolls long items automatically: [ON], [OFF].
BT (BLUETOOTH) SetupThis setup menu can be also opened by pressing CALL.
PAIRING (page 8)
PHONEBOOK (page 16)
REDIAL (page 16)
RECENT CALL (page 16)
VOICE DIAL (page 17)
DIAL NUMBER (page 16)
RINGTONESelects whether this unit or the connected cellular phone outputs the ringtone: [1] (this unit), [2] (cellular phone).
AUTO ANS (auto answer)Sets this unit to answer an incoming call automatically: [OFF], [1] (about 3 seconds), [2] (about 10 seconds).
AUTO PAIRINGStart BLUETOOTH pairing automatically when iOS device version 5.0 or later is connected via USB: [ON], [OFF].
BT SIGNL (BLUETOOTH signal) (page 9)Activates the BLUETOOTH function: [ON], [OFF].
BT INIT (BLUETOOTH initialize)Initializes all the BLUETOOTH related settings (pairing information, preset number, device information, etc.).When disposing the unit, initialize all the settings.
APP REM (App Remote) SetupEstablish and terminate App Remote function (connection).
22GB
Precautions Cool off the unit beforehand if your boat has been
moored in direct sunlight. Do not leave the front panel or audio devices
brought in inside the boat, or it may cause malfunction due to high temperature in direct sunlight.
Power antenna (aerial) extends automatically.
Moisture condensationShould moisture condensation occur inside the unit, remove the disc and wait for about an hour for it to dry out; otherwise the unit will not operate properly.
To maintain high sound qualityDo not splash liquid onto the unit or discs.
Do not expose discs to direct sunlight or heat sources such as hot air ducts, nor leave it in a boat moored in direct sunlight.
Before playing, wipe the discs with a cleaning cloth from the center out. Do not use solvents such as benzine, thinner, commercially available cleaners.
This unit is designed to play back discs that conform to the Compact Disc (CD) standard. DualDiscs and some of the music discs encoded with copyright protection technologies do not conform to the Compact Disc (CD) standard, therefore, these discs may not be playable by this unit.
Discs that this unit CANNOT playDiscs with labels, stickers, or sticky tape or
paper attached. Doing so may cause a malfunction, or may ruin the disc.
Discs with non-standard shapes (e.g., heart, square, star). Attempting to do so may damage the unit.
8 cm (3 1/4 in) discs.
Notes on CD-R/CD-RW discs The maximum number of: (CD-R/CD-RW only) folders (albums): 150 (including root folder) files (tracks) and folders: 300 (may less than
300 if folder/file names contain many characters)
displayable characters for a folder/file name: 32 (Joliet)/64 (Romeo)
If the multi-session disc begins with a CD-DA session, it is recognized as a CD-DA disc, and other sessions are not played back.
Discs that this unit CANNOT play CD-R/CD-RW of poor recording quality. CD-R/CD-RW recorded with an incompatible
recording device. CD-R/CD-RW which is finalized incorrectly. CD-R/CD-RW other than those recorded in
music CD format or MP3 format conforming to ISO9660 Level 1/Level 2, Joliet/Romeo or multi-session.
You can connect to the following iPod models. Update your iPod devices to the latest software before use.
Compatible iPhone/iPod models
Additional Information
Notes on discs
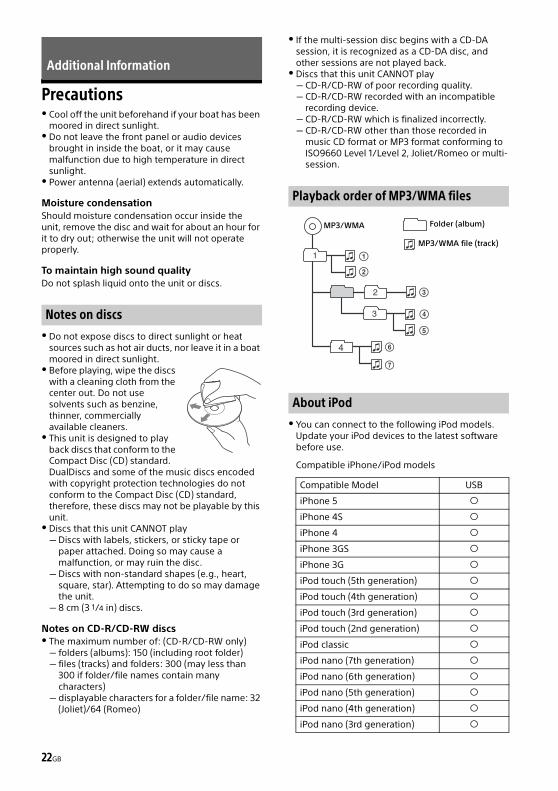
Playback order of MP3/WMA files
About iPod
Compatible Model USB
iPhone 5
iPhone 4S
iPhone 4
iPhone 3GS
iPhone 3G
iPod touch (5th generation)
iPod touch (4th generation)
iPod touch (3rd generation)
iPod touch (2nd generation)
iPod classic
iPod nano (7th generation)
iPod nano (6th generation)
iPod nano (5th generation)
iPod nano (4th generation)
iPod nano (3rd generation)
MP3/WMA Folder (album)
MP3/WMA file (track)
23GB
“Made for iPod” and “Made for iPhone” mean that an electronic accessory has been designed to connect specifically to iPod or iPhone, respectively, and has been certified by the developer to meet Apple performance standards. Apple is not responsible for the operation of this device or its compliance with safety and regulatory standards. Please note that the use of this accessory with iPod or iPhone may affect wireless performance.
What is BLUETOOTH technology? BLUETOOTH wireless technology is a short-range
wireless technology that enables wireless data communication between digital devices, such as a cellular phone and a headset. BLUETOOTH wireless technology operates within a range of about 10 m (33 ft). Connecting two devices is common, but some devices can be connected to multiple devices at the same time.
You do not need to use a cable for connection since BLUETOOTH technology is a wireless technology, neither is it necessary for the devices to face one another, such is the case with infrared technology. For example, you can use such a device in a bag or pocket.
BLUETOOTH technology is an international standard supported by millions of companies all over the world, and employed by various companies worldwide.
On BLUETOOTH communication BLUETOOTH wireless technology operates within
a range of about 10 m (33 ft).Maximum communication range may vary depending on obstacles (person, metal, wall, etc.) or electromagnetic environment.
The following conditions may affect the sensitivity of BLUETOOTH communication. There is an obstacle such as a person, metal, or
wall between this unit and BLUETOOTH device.A device using 2.4 GHz frequency, such as a
wireless LAN device, cordless telephone, or microwave oven, is in use near this unit.
Because BLUETOOTH devices and wireless LAN (IEEE802.11b/g) use the same frequency, microwave interference may occur and result in communication speed deterioration, noise, or invalid connection if this unit is used near a wireless LAN device. In such as case, perform the following.Use this unit at least 10 m (33 ft) away from the
wireless LAN device. If this unit is used within 10 m (33 ft) of a
wireless LAN device, turn off the wireless LAN device.
Install this unit and BLUETOOTH device as near to each other as possible.
Microwaves emitting from a BLUETOOTH device may affect the operation of electronic medical devices. Turn off this unit and other BLUETOOTH devices in the following locations, as it may cause an accident.where inflammable gas is present, in a hospital,
train, airplane, or petrol station near automatic doors or a fire alarm
This unit supports security capabilities that comply with the BLUETOOTH standard to provide a secure connection when the BLUETOOTH wireless technology is used, but security may not be enough depending on the setting. Be careful when communicating using BLUETOOTH wireless technology.
We do not take any responsibility for the leakage of information during BLUETOOTH communication.
Connection with all BLUETOOTH devices cannot be guaranteed.A device featuring BLUETOOTH function is
required to conform to the BLUETOOTH standard specified by BLUETOOTH SIG, and be authenticated.
Even if the connected device conforms to the above mentioned BLUETOOTH standard, some devices may not be connected or work correctly, depending on the features or specifications of the device.
While talking on the phone hands free, noise may occur, depending on the device or communication environment.
Depending on the device to be connected, it may require some time to start communication.
Others Using the BLUETOOTH device may not function on
cellular phones, depending on radio wave conditions and location where the equipment is being used.
If you experience discomfort after using the BLUETOOTH device, stop using the BLUETOOTH device immediately. Should any problem persist, consult your nearest Sony dealer.
If you have any questions or problems concerning your unit that are not covered in this manual, consult your nearest Sony dealer.
About BLUETOOTH function
24GB
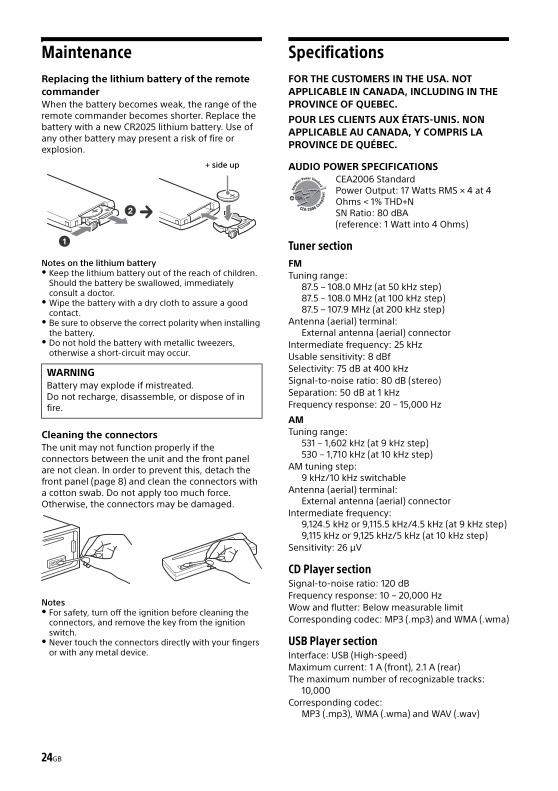
MaintenanceReplacing the lithium battery of the remote commanderWhen the battery becomes weak, the range of the remote commander becomes shorter. Replace the battery with a new CR2025 lithium battery. Use of any other battery may present a risk of fire or explosion.
Notes on the lithium battery Keep the lithium battery out of the reach of children.
Should the battery be swallowed, immediately consult a doctor.
Wipe the battery with a dry cloth to assure a good contact.
Be sure to observe the correct polarity when installing the battery.
Do not hold the battery with metallic tweezers, otherwise a short-circuit may occur.
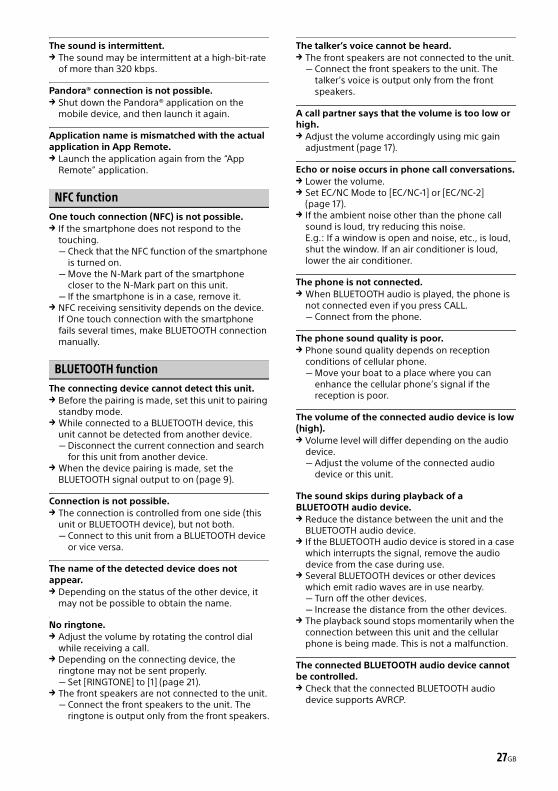
Cleaning the connectorsThe unit may not function properly if the connectors between the unit and the front panel are not clean. In order to prevent this, detach the front panel (page 8) and clean the connectors with a cotton swab. Do not apply too much force. Otherwise, the connectors may be damaged.
Notes For safety, turn off the ignition before cleaning the
connectors, and remove the key from the ignition switch.
Never touch the connectors directly with your fingers or with any metal device.
SpecificationsFOR THE CUSTOMERS IN THE USA. NOT APPLICABLE IN CANADA, INCLUDING IN THE PROVINCE OF QUEBEC.
POUR LES CLIENTS AUX ÉTATS-UNIS. NON APPLICABLE AU CANADA, Y COMPRIS LA PROVINCE DE QUÉBEC.
AUDIO POWER SPECIFICATIONSCEA2006 StandardPower Output: 17 Watts RMS × 4 at 4Ohms < 1% THD+NSN Ratio: 80 dBA (reference: 1 Watt into 4 Ohms)
Tuner sectionFMTuning range:
87.5 – 108.0 MHz (at 50 kHz step)87.5 – 108.0 MHz (at 100 kHz step)87.5 – 107.9 MHz (at 200 kHz step)
Antenna (aerial) terminal: External antenna (aerial) connector
Intermediate frequency: 25 kHzUsable sensitivity: 8 dBfSelectivity: 75 dB at 400 kHzSignal-to-noise ratio: 80 dB (stereo)Separation: 50 dB at 1 kHzFrequency response: 20 – 15,000 Hz
AMTuning range:
531 – 1,602 kHz (at 9 kHz step)530 – 1,710 kHz (at 10 kHz step)
AM tuning step: 9 kHz/10 kHz switchable
Antenna (aerial) terminal: External antenna (aerial) connector
Intermediate frequency: 9,124.5 kHz or 9,115.5 kHz/4.5 kHz (at 9 kHz step)9,115 kHz or 9,125 kHz/5 kHz (at 10 kHz step)
Sensitivity: 26 μV
CD Player sectionSignal-to-noise ratio: 120 dBFrequency response: 10 – 20,000 HzWow and flutter: Below measurable limitCorresponding codec: MP3 (.mp3) and WMA (.wma)
USB Player sectionInterface: USB (High-speed)Maximum current: 1 A (front), 2.1 A (rear)The maximum number of recognizable tracks:
10,000Corresponding codec:
MP3 (.mp3), WMA (.wma) and WAV (.wav)
WARNINGBattery may explode if mistreated.Do not recharge, disassemble, or dispose of in fire.
+ side up

25GB
Wireless CommunicationCommunication System:
BLUETOOTH Standard version 3.1Output:
BLUETOOTH Standard Power Class 2 (Max. +4 dBm)
Maximum communication range: Line of sight approx. 10 m (33 ft)*1
Frequency band: 2.4 GHz band (2.4000 – 2.4835 GHz)
Modulation method: FHSSCompatible BLUETOOTH Profiles*2:
A2DP (Advanced Audio Distribution Profile) 1.3AVRCP (Audio Video Remote Control Profile) 1.5HFP (Handsfree Profile) 1.6PBAP (Phone Book Access Profile)SPP (Serial Port Profile)MAP (Message Access Profile)HID (Human Interface Device Profile)
*1 The actual range will vary depending on factors such as obstacles between devices, magnetic fields around a microwave oven, static electricity, reception sensitivity, antenna (aerial)’s performance, operating system, software application, etc.
*2 BLUETOOTH standard profiles indicate the purpose of BLUETOOTH communication between devices.
Power amplifier sectionOutput: Speaker outputsSpeaker impedance: 4 – 8 ohmsMaximum power output: 55 W × 4 (at 4 ohms)
GeneralOutputs:
Audio outputs terminal (front, rear, sub)Power antenna (aerial)/Power amplifier control
terminal (REM OUT)Inputs:
SiriusXM input terminalRemote controller input terminalAntenna (aerial) input terminalMIC input terminalAUX input jack (stereo mini jack)USB port: front, rear
Power requirements: 12 V DC boat battery (negative ground (earth))
Dimensions: Approx. 178 mm × 50 mm × 177 mm (7 1/8 in × 2 in × 7 in) (w/h/d)
Mounting dimensions: Approx. 182 mm × 53 mm × 160 mm (7 1/4 in × 2 1/8 in × 6 5/16 in) (w/h/d)
Mass: Approx. 1.2 kg (2 lb 11 oz)Package contents:
Main unit (1)Remote commander (1): RM-X231Microphone (1)Parts for installation and connections (1 set)
Optional accessories/equipment*:SiriusXM Vehicle Tuner: SXV100
Marine remote commander: RM-X11M
* Accessories/equipment other than the marine remote commander RM-X11M are not waterproof. Do not subject them to water.
Your dealer may not handle some of the above listed accessories. Please ask the dealer for detailed information.
Design and specifications are subject to change without notice.
SiriusXM Connect Vehicle Tuner and Subscription sold separately.www.siriusxm.comSirius, XM and all related marks and logos are trademarks of Sirius XM Radio Inc. All rights reserved.
The Bluetooth® word mark and logos are registered trademarks owned by Bluetooth SIG, Inc. and any use of such marks by Sony Corporation is under license. Other trademarks and trade names are those of their respective owners.
The N-Mark is a trademark or registered trademark of NFC Forum, Inc. in the United States and in other countries.
Windows Media is either a registered trademark or trademark of Microsoft Corporation in the United States and/or other countries.
This product is protected by certain intellectual property rights of Microsoft Corporation. Use or distribution of such technology outside of this product is prohibited without a license from Microsoft or an authorized Microsoft subsidiary.
iPhone, iPod, iPod classic, iPod nano, and iPod touch are trademarks of Apple Inc., registered in the U.S. and other countries. App Store is a service mark of Apple Inc.
MPEG Layer-3 audio coding technology and patents licensed from Fraunhofer IIS and Thomson.
Pandora, the Pandora logo, and the Pandora trade dress are trademarks or registered trademarks of Pandora Media, Inc., used with permission.
Google, Google Play and Android are trademarks of Google Inc.
BlackBerry® is the property of Research In Motion Limited and is registered and/or used in the U.S. and countries around the world. Used under license from Research In Motion Limited.
Copyrights

26GB
TroubleshootingThe following checklist will help you remedy problems you may encounter with your unit.Before going through the checklist below, check the connection and operating procedures.For details on using the fuse and removing the unit from the dashboard, refer to the installation/connections manual supplied with this unit.If the problem is not solved, visit the support site on the back cover.
GeneralNo power is being supplied to the unit. If the unit is turned off and the display
disappears, the unit cannot be operated with the remote commander. Turn on the unit.
No sound. The position of the fader control [FADER] is not
set for a 2-speaker system.
No beep sound. An optional power amplifier is connected and
you are not using the built-in amplifier.
The contents of the memory have been erased. The power supply lead or battery has been
disconnected or not connected properly.
Stored stations and correct time are erased.The fuse has blown.Makes a noise when the position of the ignition is switched. The leads are not matched correctly with the
boat’s accessory power connector.
During playback or reception, the demonstration mode starts. If no operation is performed for 5 minutes with
[DEMO-ON] set, the demonstration mode starts. Set [DEMO-OFF] (page 21).
The display disappears from/does not appear in the display window. The dimmer is set to [DIM-ON] (page 21). The display disappears if you press and hold OFF. Press OFF on the unit until the display appears.
The connectors are dirty (page 24).
The operation buttons do not function.The disc will not eject. Press PTY/CAT and (back)/MODE for more
than 2 seconds to reset the unit.The contents stored in memory are erased.For your safety, do not reset the unit while you are driving.
Radio receptionStations cannot be received.The sound is hampered by noises. The connection is not correct. If your boat has built-in radio antenna (aerial)
in the rear/side glass, connect an REM OUT lead (blue/white striped) or accessory power supply lead (red) to the power supply lead of a boat’s antenna (aerial) booster.
Check the connection of the boat antenna (aerial).
If the auto antenna (aerial) will not extend, check the connection of the power antenna (aerial) control lead.
The tuning step setting has been erased. Set the tuning step again (page 8).
Preset tuning is not possible. The broadcast signal is too weak.
RDSPTY displays [- - - - - - - -]. The current station is not an RDS station. RDS data has not been received. The station does not specify the program type.
CD playbackThe disc does not play back. Defective or dirty disc. The CD-R/CD-RW is not for audio use (page 22).
MP3/WMA files cannot be played back. The disc is incompatible with the MP3/WMA
format and version. For details on playable discs and formats, visit the support site.
MP3/WMA files take longer to play back than others. The following discs take a longer time to start
playback.A disc recorded with a complicated tree
structure.A disc recorded in Multi Session.A disc to which data can be added.
The sound skips. Defective or dirty disc.
USB playbackYou cannot play back items via a USB hub. This unit cannot recognize USB devices via a USB
hub.
A USB device takes longer to play back. The USB device contains files with a complicated
tree structure.
27GB
The sound is intermittent. The sound may be intermittent at a high-bit-rate
of more than 320 kbps.
Pandora® connection is not possible. Shut down the Pandora® application on the
mobile device, and then launch it again.
Application name is mismatched with the actual application in App Remote. Launch the application again from the “App
Remote” application.
NFC functionOne touch connection (NFC) is not possible. If the smartphone does not respond to the
touching. Check that the NFC function of the smartphone
is turned on.Move the N-Mark part of the smartphone
closer to the N-Mark part on this unit. If the smartphone is in a case, remove it.
NFC receiving sensitivity depends on the device.If One touch connection with the smartphone fails several times, make BLUETOOTH connection manually.
BLUETOOTH functionThe connecting device cannot detect this unit. Before the pairing is made, set this unit to pairing
standby mode. While connected to a BLUETOOTH device, this
unit cannot be detected from another device.Disconnect the current connection and search
for this unit from another device. When the device pairing is made, set the
BLUETOOTH signal output to on (page 9).
Connection is not possible. The connection is controlled from one side (this
unit or BLUETOOTH device), but not both. Connect to this unit from a BLUETOOTH device
or vice versa.
The name of the detected device does not appear. Depending on the status of the other device, it
may not be possible to obtain the name.
No ringtone. Adjust the volume by rotating the control dial
while receiving a call. Depending on the connecting device, the
ringtone may not be sent properly. Set [RINGTONE] to [1] (page 21).
The front speakers are not connected to the unit. Connect the front speakers to the unit. The
ringtone is output only from the front speakers.
The talker’s voice cannot be heard. The front speakers are not connected to the unit. Connect the front speakers to the unit. The
talker’s voice is output only from the front speakers.
A call partner says that the volume is too low or high. Adjust the volume accordingly using mic gain
adjustment (page 17).
Echo or noise occurs in phone call conversations. Lower the volume. Set EC/NC Mode to [EC/NC-1] or [EC/NC-2]
(page 17). If the ambient noise other than the phone call
sound is loud, try reducing this noise.E.g.: If a window is open and noise, etc., is loud, shut the window. If an air conditioner is loud, lower the air conditioner.
The phone is not connected. When BLUETOOTH audio is played, the phone is
not connected even if you press CALL. Connect from the phone.
The phone sound quality is poor. Phone sound quality depends on reception
conditions of cellular phone. Move your boat to a place where you can
enhance the cellular phone’s signal if the reception is poor.
The volume of the connected audio device is low (high). Volume level will differ depending on the audio
device.Adjust the volume of the connected audio
device or this unit.
The sound skips during playback of a BLUETOOTH audio device. Reduce the distance between the unit and the
BLUETOOTH audio device. If the BLUETOOTH audio device is stored in a case
which interrupts the signal, remove the audio device from the case during use.
Several BLUETOOTH devices or other devices which emit radio waves are in use nearby. Turn off the other devices. Increase the distance from the other devices.
The playback sound stops momentarily when the connection between this unit and the cellular phone is being made. This is not a malfunction.
The connected BLUETOOTH audio device cannot be controlled. Check that the connected BLUETOOTH audio
device supports AVRCP.
28GB
Some functions do not work. Check if the connecting device supports the
functions in question.
A call is answered unintentionally. The connecting phone is set to answer a call
automatically.
Pairing failed due to time out. Depending on the connecting device, the time
limit for pairing may be short. Try completing the pairing within the time.
BLUETOOTH function cannot operate. Turn off the unit by pressing OFF for more than 2
seconds, then turn the unit on again.
No sound is output from the boat speakers during handsfree call. If the sound is output from the cellular phone, set
the cellular phone to output the sound from the boat speakers.
Pandora® connection is not possible. Shut down the Pandora® application on the
mobile device, and then launch again.
Application name is mismatched with the actual application in App Remote. Launch the application again from the “App
Remote” application.
While running the “App Remote” application via BLUETOOTH, the display automatically switches to [BT AUDIO]. The “App Remote” application or BLUETOOTH
function has failed. Run the application again.
Error displays/Messages
ERROR The disc is dirty or inserted upside down. Clean or insert the disc correctly.
A blank disc has been inserted. The disc cannot play due to a problem. Insert another disc.
USB device was not automatically recognized. Connect it again.
Press to remove the disc.
HUB NO SUPRT (hubs not supported) USB hub is not supported on this unit.
IPD STOP (iPod stop) When repeat play is not set, playback of the last
track in album finished.The music application in the iPod/iPhone is terminated. Press PAUSE to start playback again.
NO DEV (no device) [USB] is selected as source without a USB device
connected. A USB device or a USB cable has been disconnected during playback. Be sure to connect a USB device and USB cable.
NO MUSIC The disc or USB device does not contain a music
file. Insert a music CD. Connect a USB device with a music file in it.
OVERLOAD USB device is overloaded.Disconnect the USB device, then change the
source by pressing SRC. The USB device has a fault, or an unsupported
device is connected.
PUSH EJT (push eject) The disc cannot be ejected. Press (eject).
READ The unit is reading all track and album
information on the disc.Wait until reading is complete and playback
starts automatically. Depending on the disc structure, it may take more than a minute.
USB NO SUPRT (USB not supported) The connected USB device is not supported. For details on the compatibility of your USB
device, visit the support site.
[ ] or [ ] During reverse or fast-forward, you have reached
the beginning or the end of the disc and you cannot go any further.
[ ] The character cannot be displayed.
For BLUETOOTH function:
BT BUSY (BLUETOOTH busy) The phonebook and the call history of the cellular
phone are not accessible from this unit.Wait for a while, and then try again.
ERROR BT Initialize failed. Phonebook access failed. Phonebook content was changed while
accessing the cellular phone.Access the phonebook in the cellular phone
again.
29GB
MEM FAILURE (memory failure) This unit failed to store the contact in the preset
dial.Make sure that the number you intend to store
is correct (page 16).
MEMORY BUSY This unit is storing data.Wait until storing has finished.
NO DEV (no device) BLUETOOTH audio source is selected without a
BLUETOOTH audio device connected. A BLUETOOTH audio device has been disconnected during a call. Be sure to connect a BLUETOOTH audio device.
BLUETOOTH phone source is selected without a cellular phone connected. A cellular phone has been disconnected during a call. Be sure to connect a cellular phone.
P EMPTY (preset number empty) The preset dial is empty.
UNKNOWN Name or phone number cannot be displayed
when browsing phonebook or call history.
WITHHELD Phone number is hidden by caller.
For App Remote operation:
APP -------- (application) Connection with the application is not made. Establish iPhone connection again.
APP DISCNCT (application disconnected) App Remote connection is not made. Establish the App Remote connection
(page 18).
APP MENU (application menu) Button operation cannot be performed while a
menu on iPhone/Android phone is open. Exit the menu on iPhone/Android phone.
APP NO DEV (application no device) The device with the application installed is not
connected. Connect the device, then establish iPhone
connection.
APP SOUND (application sound) Button operation cannot be performed while a
sound menu on iPhone/Android phone is open. Exit the sound menu on iPhone/Android
phone.
OPEN APP (open application) The “App Remote” application is not running. Launch the iPhone’s application.
For Pandora® operation:
CANNOT SKIP Skipping tracks on Pandora® is not allowed.Wait until the commercial ends. Pandora® limits the number of skips allowed on
their service. Wait until the next track begins, or select another station on the list.
ERROR “Thumbs” feedback failed. Try “Thumbs Up/Down” again.
Bookmarking failed. Try bookmarking again.
NO STATION There is no station on your Pandora® account. Create the station on the mobile device.
NOT ALLOWED “Thumbs” feedback is not allowed.Wait until the commercial ends. Some functions, such as Shared Station, do not
permit feedback. Wait until the next track begins, or select another station on the list.
Bookmark is not allowed.Wait until the commercial ends. Select another track or station, then try it again.
OPEN APP (open application)When connecting via the USB port. Pandora® does not launch. Launch the Pandora® application on the
iPhone.
OPEN APP (open application), PRESS PAUSEWhen connecting via the BLUETOOTH function. Pandora® does not launch. Launch the Pandora® application on the mobile
device, then press PAUSE.
PAN NO SUPRT (Pandora® not supported) The connected device is not supported. For details of compatible devices, visit the
support site.
PAN RESTRICT (Pandora® licensing restriction) Pandora® is not available outside your country.
PLEASE LOGIN, PANDORA APP (Pandora® application) Not logged into your Pandora® account.Disconnect the device, and log into your
Pandora® account, then connect the device again.
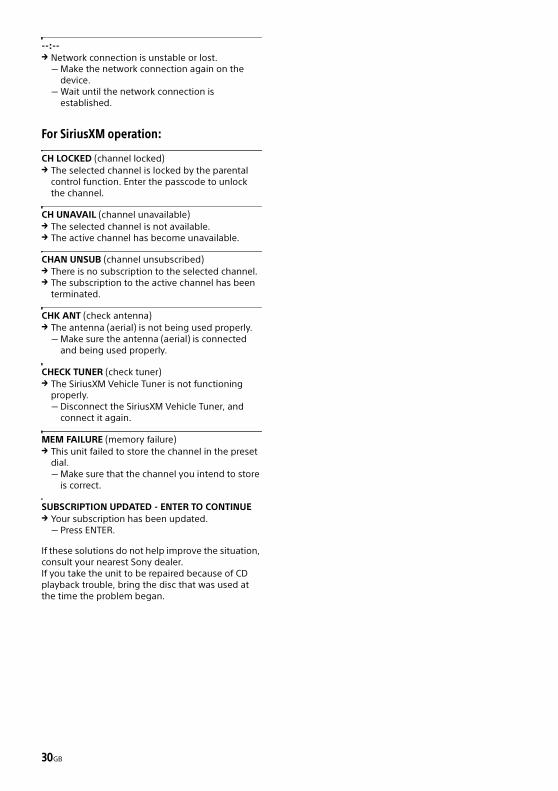
30GB
--:-- Network connection is unstable or lost.Make the network connection again on the
device.Wait until the network connection is
established.
For SiriusXM operation:
CH LOCKED (channel locked) The selected channel is locked by the parental
control function. Enter the passcode to unlock the channel.
CH UNAVAIL (channel unavailable) The selected channel is not available. The active channel has become unavailable.
CHAN UNSUB (channel unsubscribed) There is no subscription to the selected channel. The subscription to the active channel has been
terminated.
CHK ANT (check antenna) The antenna (aerial) is not being used properly.Make sure the antenna (aerial) is connected
and being used properly.
CHECK TUNER (check tuner) The SiriusXM Vehicle Tuner is not functioning
properly.Disconnect the SiriusXM Vehicle Tuner, and
connect it again.
MEM FAILURE (memory failure) This unit failed to store the channel in the preset
dial.Make sure that the channel you intend to store
is correct.
SUBSCRIPTION UPDATED - ENTER TO CONTINUE Your subscription has been updated. Press ENTER.
If these solutions do not help improve the situation, consult your nearest Sony dealer.If you take the unit to be repaired because of CD playback trouble, bring the disc that was used at the time the problem began.
Sony Corp. tímto prohlašuje, že MEX-M70BT splňuje základní požadavky a další příslušná ustanovení Směrnice 1999/5/CE.Podrobnosti lze získat na následující URL: http://www.compliance.sony.de/
Undertegnede, Sony Corp. erklærer herved, at følgende udstyr MEX-M70BT overholder de væsentlige krav og øvrige relevante krav i Direktiv 1999/5/EF.For yderligere information gå ind på følgende hjemmeside: http://www.compliance.sony.de/
Hiermit erklärt Sony Corp., dass sich dieser MEX-M70BT in Übereinstimmung mit den grundlegenden Anforderungen und den anderen relevanten Vorschriften der Richtlinie 1999/5/EG befindet.Weitere Informationen erhältlich unter: http://www.compliance.sony.de/
Sony Corp. teatab käesolevaga, et MEX-M70BT on kooskõlas oluliste ja vastavate direktiivi 1999/5/EÜ nõuetega.Üksikasjalikumaks infoks vaadake URL: http://www.compliance.sony.de/
Hereby, Sony Corp., declares that this MEX-M70BT is in compliance with the essential requirements and other relevant provisions of Directive 1999/5/EC.For details, please access the following URL: http://www.compliance.sony.de/
Por medio de la presente, Sony Corp. declara que el MEX-M70BT cumple con los requisitos esenciales y cualesquiera otras disposiciones aplicables o exigibles de la Directiva 1999/5/CE.Para mayor información, por favor consulte el siguiente URL: http://www.compliance.sony.de/
Par la présente, Sony Corp. déclare que l’appareil MEX-M70BT est conforme aux exigences essentielles et aux autres dispositions pertinentes de la directive 1999/5/CE.Pour toute information complémentaire, veuillez consultez l’URL suivante : http://www.compliance.sony.de/
Con la presente Sony Corp. dichiara che questo MEX-M70BT è conforme ai requisiti essenziali ed alle altre disposizioni pertinenti stabilite dalla direttiva 1999/5/CE.Per ulteriori dettagli, si prega di consultare il seguente URL: http://www.compliance.sony.de/
Niniejszym firma Sony Corp. deklaruje, że urządzenie MEX-M70BT jest zgodne z podstawowymi wymaganiami oraz z odpowiednimi postanowieniami Dyrektwy 1999/5/EC.Szczegółowe informacje można znaleźć pod następującym adresem URL: http://www.compliance.sony.de/
Ar šo Sony Corp. paziņo, ka MEX-M70BT atbilst Direktīvas 1999/5/EK būtiskajām prasībām un citiem ar to saistītajiem noteikumiem.Plašāka informācija ir pieejama šajā URL: http://www.compliance.sony.de/
Sony Corp. pareiškia, kad šis MEX-M70BT atitinka esminius 1999/5/EB direktyvos reikalavimus ir kitas nuostatas.Susipažinti visu atitikties deklaracijos turiniu Jūs galite interneto tinklalapyje: http://www.compliance.sony.de/
Česky
Dansk
Deutsch
Eesti
English
Español
Français
Italiano
Język polski
Latviski
Lietuviškai
Ezennel a Sony Corp. kijelenti, hogy a MEX-M70BT megfelel a vonatkozó alapvetõ követelményeknek és az 1999/5/EC irányelv egyéb elõírásainak.További információkat a következő weboldalon találhat: http://www.compliance.sony.de/
Hierbij verklaart Sony Corp. dat het toestel MEX-M70BT in overeenstemming is met de essentiële eisen en de andere relevante bepalingen van richtlijn 1999/5/EG.Nadere informatie kunt u vinden op: http://www.compliance.sony.de/
Herved erklærer Sony Corp. at dette MEX-M70BT er i overensstemmelse med vesentlige krav og andre relevante bestemmelser som fremgår av direktiv 1999/5/EC.Gå til denne URL-en for mer informasjon: http://www.compliance.sony.de/
A Sony Corp. declara que este MEX-M70BT está conforme com os requisitos essenciais e outras provisões da Directiva 1999/5/CE.Para mais informações, por favor consulte a seguinte URL: http://www.compliance.sony.de/
Sony Corp. potvrdzuje, že MEX-M70BT spĺňa základné požiadavky a ostatné nariadenia smernice 1999/5/EC.Podrobnosti získate nasledovnej webovej adrese: http://www.compliance.sony.de/
Sony izjavlja, da je MEX-M70BT v skladu z bistvenimi zahtevami in ostalimi zadevnimi ukrepi Direktive 1999/5/ES.Za podrobnosti glejte stran URL: http://www.compliance.sony.de/
Sony Corp. vakuuttaa täten että MEX-M70BT tyyppinen laite on direktiivin 1999/5/EY oleellisten vaatimusten ja sitä koskevien direktiivin muiden ehtojen mukainen.Halutessasi lisätietoja käy osoitteessa: http://www.compliance.sony.de/
Härmed intygar Sony Corp. att denna MEX-M70BT står I överensstämmelse med de väsentliga egenskapskrav och övriga relevanta bestämmelser som framgår av direktiv 1999/5/EG.För ytterligare information gå in på följande hemsida: http://www.compliance.sony.de/
İşbu Belge ile Sony Corp. MEX-M70BT’in 1999/5/EC Yönetmeliğinin temel gereklilikleri ve ilgili maddeleri ile uyumlu olduğunu belgeler.Detaylı bilgi için, lütfen belirtilen web sitesini ziyaret ediniz: http://www.compliance.sony.de/
Με την παρούσα η Sony Corp. Δηλώνει ότι MEX-M70BT συμμορφώνεται προς της ουσιώδεις απαιτήσεις και της λοιπές σχετικές διατάξεις της οδηγίας 1999/5/EK.Για λεπτομέρειες παρακαλούμε όπως ελέγξετε την ακόλουθη σελίδα του διαδικτύου: http://www.compliance.sony.de/
С настоящото Sony Corp. декларира, че този апарат MEX-M70BT отговаря на съществените изисквания и останалите условия на директива 1999/5/EO.Подробности могат да бъдат намерени на следния URL: http://www.compliance.sony.de/
Ovime Sony Corp. izjavljuje da je MEX-M70BT u skladu s osnovnim zahtjevima i ostalim relevantnim odredbama direktive 1999/5/EZ. Dodatne informacije potražite na sljedećoj internet adresi: http://www.compliance.sony.de/
Magyarul
Nederlands
Norsk
Português
Slovensky
Slovenščina
Suomi
Svenska
Türkçe
Ελληνικά
Български
Hrvatski
http://www.sony.net/
©2014 Sony Corporation Printed in Thailand
If you have any questions/problemsregarding this product, try the following:
1 Read Troubleshooting in these Operating Instructions.
2 Please contact (U.S.A. only); Call 1-800-222-7669 URL http://www.SONY.com
http://esupport.sony.comhttp://www.sony.com/caraudio
Site d’assistanceSi vous avez des questions ou si vous souhaitez consulter les toutes dernières informations techniques sur ce produit, rendez-vous sur le site Web suivant :
Support siteIf you have any questions or for the latest support information on this product, please visit the web site below:
Sitio Web de soporte técnico en líneaPara resolver cualquier duda u obtener la información más reciente sobre el soporte técnico de este producto, visite el siguiente sitio Web:
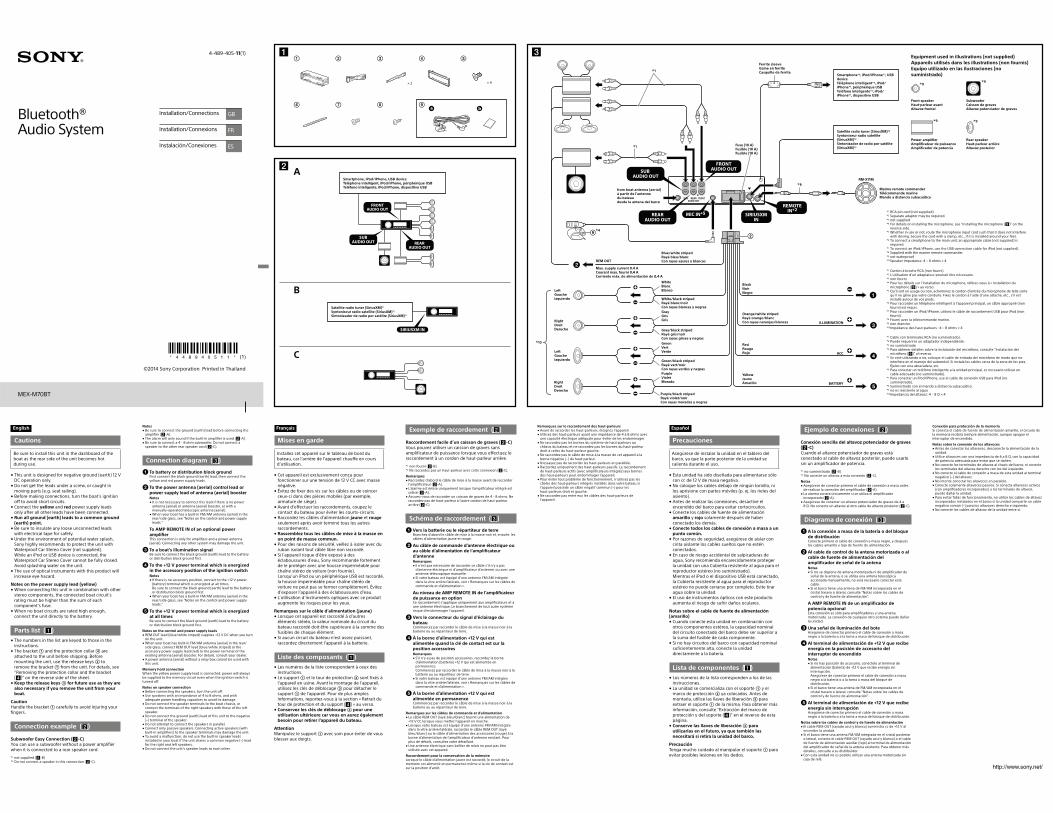
Français
Mises en garde
Installez cet appareil sur le tableau de bord du bateau, car l’arrière de l’appareil chauffe en cours d’utilisation.
Cet appareil est exclusivement conçu pour fonctionner sur une tension de 12 V CC avec masse négative.Évitez de fixer des vis sur les câbles ou de coincer ceux-ci dans des pièces mobiles (par exemple, armature de siège).Avant d’effectuer les raccordements, coupez le contact du bateau pour éviter les courts-circuits.Raccordez les câbles d’alimentation jaune et rouge seulement après avoir terminé tous les autres raccordements.Rassemblez tous les câbles de mise à la masse en
un point de masse commun.
Pour des raisons de sécurité, veillez à isoler avec du ruban isolant tout câble libre non raccordé.Si l’appareil risque d’être exposé à des éclaboussures d’eau, Sony recommande fortement de le protéger avec une housse imperméable pour chaîne stéréo de voiture (non fournie). Lorsqu’un iPod ou un périphérique USB est raccordé, la housse imperméable pour chaîne stéréo de voiture ne peut pas se fermer complètement. Évitez d’exposer l’appareil à des éclaboussures d’eau.L’utilisation d’instruments optiques avec ce produit augmente les risques pour les yeux.
Remarques sur le câble d’alimentation (jaune)
Lorsque cet appareil est raccordé à d’autres éléments stéréo, la valeur nominale du circuit du bateau raccordé doit être supérieure à la somme des fusibles de chaque élément.Si aucun circuit du bateau n’est assez puissant, raccordez directement l’appareil à la batterie.
Liste des composants ( )
Les numéros de la liste correspondent à ceux des instructions.Le support et le tour de protection sont fixés à l’appareil en usine. Avant le montage de l’appareil, utilisez les clés de déblocage pour détacher le support de l’appareil. Pour de plus amples informations, reportez-vous à la section « Retrait du tour de protection et du support ( ) » au verso.Conservez les clés de déblocage pour une
utilisation ultérieure car vous en aurez également
besoin pour retirer l’appareil du bateau.
Attention
Manipulez le support avec soin pour éviter de vous blesser aux doigts.
English
Cautions
Be sure to install this unit in the dashboard of the boat as the rear side of the unit becomes hot during use.
This unit is designed for negative ground (earth) 12 V DC operation only.Do not get the leads under a screw, or caught in moving parts (e.g. seat railing).Before making connections, turn the boat’s ignition off to avoid short circuits.Connect the yellow and red power supply leads only after all other leads have been connected.Run all ground (earth) leads to a common ground
(earth) point.
Be sure to insulate any loose unconnected leads with electrical tape for safety.Under the environment of potential water splash, Sony highly recommends to protect the unit with Waterproof Car Stereo Cover (not supplied). While an iPod or USB device is connected, the Waterproof Car Stereo Cover cannot be fully closed. Avoid splashing water on the unit.The use of optical instruments with this product will increase eye hazard.
Notes on the power supply lead (yellow)
When connecting this unit in combination with other stereo components, the connected boat circuit’s rating must be higher than the sum of each component’s fuse.When no boat circuits are rated high enough, connect the unit directly to the battery.
Parts list ( )
The numbers in the list are keyed to those in the instructions.The bracket and the protection collar are attached to the unit before shipping. Before mounting the unit, use the release keys to remove the bracket from the unit. For details, see “Removing the protection collar and the bracket ( )” on the reverse side of the sheet.Keep the release keys for future use as they are
also necessary if you remove the unit from your
boat.
Caution
Handle the bracket carefully to avoid injuring your fingers.
Connection example ( )
Subwoofer Easy Connection ( -C)
You can use a subwoofer without a power amplifier when it is connected to a rear speaker cord.
*1 not supplied ( -B)*2 Do not connect a speaker in this connection ( -C).
Exemple de raccordement ( )
Raccordement facile d’un caisson de graves ( -C)
Vous pouvez utiliser un caisson de graves sans amplificateur de puissance lorsque vous effectuez le raccordement à un cordon de haut-parleur arrière.
*1 non fourni ( -B)*2 Ne raccordez pas un haut-parleur avec cette connexion ( -C).
Remarques
Raccordez d’abord le câble de mise à la masse avant de raccorder l’amplificateur ( -A).L’alarme est émise uniquement lorsque l’amplificateur intégré est utilisé ( -A).Assurez-vous de raccorder un caisson de graves de 4 - 8 ohms. Ne raccordez pas de haut-parleur à l’autre cordon de haut-parleur arrière ( -C).
Schéma de raccordement ( )
Vers la batterie ou le répartiteur de terreBranchez d’abord le câble de mise à la masse noir et, ensuite, les câbles d’alimentation jaune et rouge.
Au câble de commande d’antenne électrique ou
au câble d’alimentation de l’amplificateur
d’antenne
Remarques
Il n’est pas nécessaire de raccorder ce câble s’il n’y a pas d’antenne électrique ni d’amplificateur d’antenne, ou avec une antenne télescopique manuelle.Si votre bateau est équipé d’une antenne FM/AM intégrée dans la vitre arrière/latérale, voir « Remarques sur les câbles de commande et d’alimentation ».
Au niveau de AMP REMOTE IN de l’amplificateur
de puissance en optionCe raccordement s’applique uniquement aux amplificateurs et à une antenne électrique. Le branchement de tout autre système risque d’endommager l’appareil.
Vers le connecteur du signal d’éclairage du
bateauCommencez par raccorder le câble de mise à la masse noir à la batterie ou au répartiteur de terre.
À la borne d’alimentation +12 V qui est
alimentée quand la clé de contact est sur la
position accessoires
Remarques
S’il n’y a pas de position accessoires, raccordez la borne d’alimentation (batterie) +12 V qui est alimentée en permanence. Commencez par raccorder le câble de mise à la masse noir à la batterie ou au répartiteur de terre.Si votre bateau est équipé d’une antenne FM/AM intégrée dans la vitre arrière/latérale, voir « Remarques sur les câbles de commande et d’alimentation ».
À la borne d’alimentation +12 V qui est
alimentée en permanenceCommencez par raccorder le câble de mise à la masse noir à la batterie ou au répartiteur de terre.
Remarques sur les câbles de commande et d’alimentation
Le câble REM OUT (rayé bleu/blanc) fournit une alimentation de +12 V CC lorsque vous mettez l’appareil en marche.Lorsque votre bateau est équipé d’une antenne FM/AM intégrée dans la vitre arrière/latérale, raccordez le câble REM OUT (rayé bleu/blanc) ou le câble d’alimentation des accessoires (rouge) à la borne d’alimentation de l’amplificateur d’antenne existant. Pour plus de détails, consultez votre détaillant.Une antenne électrique sans boîtier de relais ne peut pas être utilisée avec cet appareil.
Raccordement pour la conservation de la mémoire
Lorsque le câble d’alimentation jaune est raccordé, le circuit de la mémoire est alimenté en permanence même si la clé de contact est sur la position d’arrêt.
Notes
Be sure to connect the ground (earth) lead before connecting the amplifier ( -A).The alarm will only sound if the built-in amplifier is used ( -A).Be sure to connect a 4 - 8 ohm subwoofer. Do not connect a speaker to the other rear speaker cord ( -C).
Connection diagram ( )
To battery or distribution block groundFirst connect the black ground (earth) lead, then connect the yellow and red power supply leads.
To the power antenna (aerial) control lead or
power supply lead of antenna (aerial) booster
Notes
It is not necessary to connect this lead if there is no power antenna (aerial) or antenna (aerial) booster, or with a manually-operated telescopic antenna (aerial).When your boat has a built-in FM/AM antenna (aerial) in the rear/side glass, see “Notes on the control and power supply leads.”
To AMP REMOTE IN of an optional power
amplifierThis connection is only for amplifiers and a power antenna (aerial). Connecting any other system may damage the unit.
To a boat’s illumination signalBe sure to connect the black ground (earth) lead to the battery or distribution block ground first.
To the +12 V power terminal which is energized
in the accessory position of the ignition switch
Notes
If there is no accessory position, connect to the +12 V power (battery) terminal which is energized at all times. Be sure to connect the black ground (earth) lead to the battery or distribution block ground first.When your boat has a built-in FM/AM antenna (aerial) in the rear/side glass, see “Notes on the control and power supply leads.”
To the +12 V power terminal which is energized
at all timesBe sure to connect the black ground (earth) lead to the battery or distribution block ground first.
Notes on the control and power supply leads
REM OUT lead (blue/white striped) supplies +12 V DC when you turn on the unit.When your boat has built-in FM/AM antenna (aerial) in the rear/side glass, connect REM OUT lead (blue/white striped) or the accessory power supply lead (red) to the power terminal of the existing antenna (aerial) booster. For details, consult your dealer.A power antenna (aerial) without a relay box cannot be used with this unit.
Memory hold connection
When the yellow power supply lead is connected, power will always be supplied to the memory circuit even when the ignition switch is turned off.
Notes on speaker connection
Before connecting the speakers, turn the unit off.Use speakers with an impedance of 4 to 8 ohms, and with adequate power handling capacities to avoid its damage.Do not connect the speaker terminals to the boat chassis, or connect the terminals of the right speakers with those of the left speaker.Do not connect the ground (earth) lead of this unit to the negative (–) terminal of the speaker.Do not attempt to connect the speakers in parallel.Connect only passive speakers. Connecting active speakers (with built-in amplifiers) to the speaker terminals may damage the unit.To avoid a malfunction, do not use the built-in speaker leads installed in your boat if the unit shares a common negative (–) lead for the right and left speakers.Do not connect the unit’s speaker leads to each other.
Remarques sur le raccordement des haut-parleurs
Avant de raccorder les haut-parleurs, éteignez l'appareil.Utilisez des haut-parleurs ayant une impédance de 4 à 8 ohms avec une capacité électrique adéquate pour éviter de les endommager.Ne raccordez pas les bornes du système de haut-parleurs au châssis du bateau et ne raccordez pas les bornes du haut-parleur droit à celles du haut-parleur gauche.Ne raccordez pas le câble de mise à la masse de cet appareil à la borne négative (–) du haut-parleur.N’essayez pas de raccorder les haut-parleurs en parallèle.Raccordez uniquement des haut-parleurs passifs. Le raccordement de haut-parleurs actifs (avec amplificateurs intégrés) aux bornes des haut-parleurs peut endommager l’appareil.Pour éviter tout problème de fonctionnement, n’utilisez pas les câbles des haut-parleurs intégrés installés dans votre bateau si l’appareil possède un câble négatif commun (–) pour les haut-parleurs droit et gauche.Ne raccordez pas entre eux les câbles des haut-parleurs de l’appareil.
Español
Precauciones
Asegúrese de instalar la unidad en el tablero del barco, ya que la parte posterior de la unidad se calienta durante el uso.
Esta unidad ha sido diseñada para alimentarse sólo con cc de 12 V de masa negativa.No coloque los cables debajo de ningún tornillo, ni los aprisione con partes móviles (p. ej. los rieles del asiento).Antes de realizar las conexiones, desactive el encendido del barco para evitar cortocircuitos.Conecte los cables de fuente de alimentación amarillo y rojo solamente después de haber conectado los demás.Conecte todos los cables de conexión a masa a un
punto común.
Por razones de seguridad, asegúrese de aislar con cinta aislante los cables sueltos que no estén conectados.En caso de riesgo accidental de salpicaduras de agua, Sony recomienda encarecidamente proteger la unidad con una Cubierta resistente al agua para el reproductor estéreo (no suministrado). Mientras el iPod o el dispositivo USB está conectado, la Cubierta resistente al agua para el reproductor estéreo no puede cerrarse por completo. Evite tirar agua sobre la unidad.El uso de instrumentos ópticos con este producto aumenta el riesgo de sufrir daños oculares.
Notas sobre el cable de fuente de alimentación
(amarillo)
Cuando conecte esta unidad en combinación con otros componentes estéreo, la capacidad nominal del circuito conectado del barco debe ser superior a la suma del fusible de cada componente.Si no hay circuitos del barco con capacidad nominal suficientemente alta, conecte la unidad directamente a la batería.
Lista de componentes ( )
Los números de la lista corresponden a los de las instrucciones. La unidad se comercializa con el soporte y el marco de protección ya colocados. Antes de montarla, utilice las llaves de liberación para extraer el soporte de la misma. Para obtener más información, consulte “Extracción del marco de protección y del soporte ( )” en el reverso de esta página.Conserve las llaves de liberación para
utilizarlas en el futuro, ya que también las
necesitará si retira la unidad del barco.
Precaución
Tenga mucho cuidado al manipular el soporte para evitar posibles lesiones en los dedos.
Ejemplo de conexiones ( )
Conexión sencilla del altavoz potenciador de graves
( -C)
Cuando el altavoz potenciador de graves está conectado al cable de altavoz posterior, puede usarlo sin un amplificador de potencia.
*1 no suministrado ( -B)*2 No conecte un altavoz a esta conexión ( -C).
Notas
Asegúrese de conectar primero el cable de conexión a masa antes de realizar la conexión del amplificador ( -A).La alarma sonará únicamente si se utiliza el amplificador incorporado ( -A).Asegúrese de conectar un altavoz potenciador de graves de 4 a 8 Ω. No conecte un altavoz al otro cable de altavoz posterior ( -C).
Diagrama de conexión ( )
A la conexión a masa de la batería o del bloque
de distribuciónConecte primero el cable de conexión a masa negro, y después los cables amarillo y rojo de fuente de alimentación.
Al cable de control de la antena motorizada o al
cable de fuente de alimentación del
amplificador de señal de la antena
Notas
Si no se dispone de antena motorizada ni de amplificador de señal de la antena, o se utiliza una antena telescópica accionada manualmente, no será necesario conectar este cable.Si el barco tiene una antena de FM/AM incorporada en el cristal trasero o lateral, consulte “Notas sobre los cables de control y de fuente de alimentación”.
A AMP REMOTE IN de un amplificador de
potencia opcionalEsta conexión es sólo para amplificadores y una antena motorizada. La conexión de cualquier otro sistema puede dañar la unidad.
Una señal de iluminación del boteAsegúrese de conectar primero el cable de conexión a masa negro a la batería o a la toma a masa del bloque de distribución.
Al terminal de alimentación de +12 V que recibe
energía en la posición de accesorio del
interruptor de encendido
Notas
Si no hay posición de accesorio, conéctelo al terminal de alimentación (batería) de +12 V que recibe energía sin interrupción. Asegúrese de conectar primero el cable de conexión a masa negro a la batería o a la toma a masa del bloque de distribución.Si el barco tiene una antena de FM/AM incorporada en el cristal trasero o lateral, consulte “Notas sobre los cables de control y de fuente de alimentación”.
Al terminal de alimentación de +12 V que recibe
energía sin interrupciónAsegúrese de conectar primero el cable de conexión a masa negro a la batería o a la toma a masa del bloque de distribución.
Notas sobre los cables de control y de fuente de alimentación
El cable REM OUT (rayado azul y blanco) suministra cc de +12 V al encender la unidad.Si el barco tiene una antena FM/AM integrada en el cristal posterior o lateral, conecte el cable REM OUT (rayado azul y blanco) o el cable de fuente de alimentación auxiliar (rojo) al terminal de alimentación del amplificador de señal de la antena existente. Para obtener más detalles, consulte a su distribuidor.Con esta unidad no es posible utilizar una antena motorizada sin caja de relé.
Conexión para protección de la memoria
Si conecta el cable de fuente de alimentación amarillo, el circuito de la memoria recibirá siempre alimentación, aunque apague el interruptor de encendido.
Notas sobre la conexión de los altavoces
Antes de conectar los altavoces, desconecte la alimentación de la unidad.Utilice altavoces con una impedancia de 4 a 8 Ω, con la capacidad de potencia adecuada para evitar que se dañen.No conecte los terminales de altavoz al chasis del barco, ni conecte los terminales del altavoz derecho con los del izquierdo.No conecte el cable de conexión a masa de esta unidad al terminal negativo (–) del altavoz.No intente conectar los altavoces en paralelo.Conecte solamente altavoces pasivos. Si conecta altavoces activos (con amplificadores incorporados) a los terminales de altavoz, puede dañar la unidad.Para evitar fallas de funcionamiento, no utilice los cables de altavoz incorporados instalados en el barco si la unidad comparte un cable negativo común (–) para los altavoces derecho e izquierdo.No conecte los cables de altavoz de la unidad entre sí.
× 2 × 4
A
*2
B
C
Satellite radio tuner (SiriusXM)*1
Syntoniseur radio satellite (SiriusXM)*1
Sintonizador de radio por satélite (SiriusXM)*1
Equipment used in illustrations (not supplied)
Appareils utilisés dans les illustrations (non fournis)
Equipo utilizado en las ilustraciones (no
suministrado)
Front speaker
Haut-parleur avant
Altavoz frontal
Subwoofer
Caisson de graves
Altavoz potenciador de graves
Power amplifier
Amplificateur de puissance
Amplificador de potencia
Rear speaker
Haut-parleur arrière
Altavoz posterior
*1 RCA pin cord (not supplied).*2 Separate adaptor may be required.*3 not supplied*4 For details on installing the microphone, see “Installing the microphone ( )” on the
reverse side.*5 Whether in use or not, route the microphone input cord such that it does not interfere
with driving. Secure the cord with a clamp, etc., if it is installed around your feet.*6 To connect a smartphone to the main unit, an appropriate cable (not supplied) is
required.*7 To connect an iPod/iPhone, use the USB connection cable for iPod (not supplied).*8 Supplied with the marine remote commander.*9 not waterproof *10 Speaker impedance: 4 – 8 ohms × 4
*1 Cable con terminales RCA (no suministrado).*2 Puede requerirse un adaptador independiente.*3 no suministrado*4 Para obtener detalles sobre la instalación del micrófono, consulte “Instalación del
micrófono ( )” al reverso.*5 Se esté utilizando o no, coloque el cable de entrada del micrófono de modo que no
interfiera en el manejo del automóvil. Si instala los cables cerca de la zona de los pies, fíjelos con una abrazadera, etc.
*6 Para conectar un teléfono inteligente a la unidad principal, es necesario utilizar un cable adecuado (no suministrado).
*7 Para conectar un iPod/iPhone, use el cable de conexión USB para iPod (no suministrado).
*8 Suministrado con el mando a distancia subacuático.*9 no es resistente al agua*10 Impedancia del altavoz: 4 – 8 Ω × 4
*1 Cordon à broche RCA (non fourni).*2 L’utilisation d’un adaptateur pourrait être nécessaire.*3 non fourni*4 Pour les détails sur l’installation du microphone, référez-vous à « Installation du
microphone ( ) » au verso.*5 Qu’il soit en usage ou non, acheminez le cordon d’entrée du microphone de telle sorte
qu’il ne gêne pas votre conduite. Fixez le cordon à l’aide d’une attache, etc., s’il est installé autour de vos pieds.
*6 Pour raccorder un téléphone intelligent à l’appareil principal, un câble approprié (non fourni) est requis.
*7 Pour raccorder un iPod/iPhone, utilisez le câble de raccordement USB pour iPod (non fourni).
*8 Fourni avec la télécommande marine.*9 non étanche*10 Impédance des haut-parleurs : 4 – 8 ohms × 4
Smartphone, iPod/iPhone, USB device
Téléphone intelligent, iPod/iPhone, périphérique USB
Teléfono inteligente, iPod/iPhone, dispositivo USB
*9
*9 *9
*9
*1
*1
REM OUT
Max. supply current 0.4 A
Courant max. fourni 0,4 A
Corriente máx. de alimentación de 0,4 A
Fuse (10 A)
Fusible (10 A)
Fusible (10 A)
RM-X11M
Blue/white striped
Rayé bleu/blanc
Con rayas azules y blancas
ACC
BATTERY
White
Blanc
Blanco
Green
Vert
Verde
Purple
Violet
Morado
White/black striped
Rayé blanc/noir
Con rayas blancas y negras
Gray/black striped
Rayé gris/noir
Con rayas grises y negras
Green/black striped
Rayé vert/noir
Con rayas verdes y negras
Gray
Gris
Gris
Left
Gauche
Izquierdo
Right
Droit
Derecho
Left
Gauche
Izquierdo
Right
Droit
DerechoPurple/black striped
Rayé violet/noir
Con rayas moradas y negras
from boat antenna (aerial)
à partir de l’antenne
du bateau
desde la antena del barco
Satellite radio tuner (SiriusXM)*3
Syntoniseur radio satellite
(SiriusXM)*3
Sintonizador de radio por satélite
(SiriusXM)*3
ILLUMINATION
Red
Rouge
Rojo
Yellow
Jaune
Amarillo
Orange/white striped
Rayé orange/blanc
Con rayas naranjas/blancas
Black
Noir
Negro
*4
Ferrite sleeve
Gaine en ferrite
Casquillo de ferritaSmartphone*6, iPod/iPhone*7, USB
device
Téléphone intelligent*6, iPod/
iPhone*7, périphérique USB
Teléfono inteligente*6, iPod/
iPhone*7, dispositivo USB
*8
Marine remote commander
Télécommande marine
Mando a distancia subacuático
*10
MEX-M70BT
4-489-405-11(1)
©2014 Sony Corporation Printed in Thailand
Bluetooth®Audio System
Installation/Connections GB
Installation/Connexions FR
Instalación/Conexiones ES
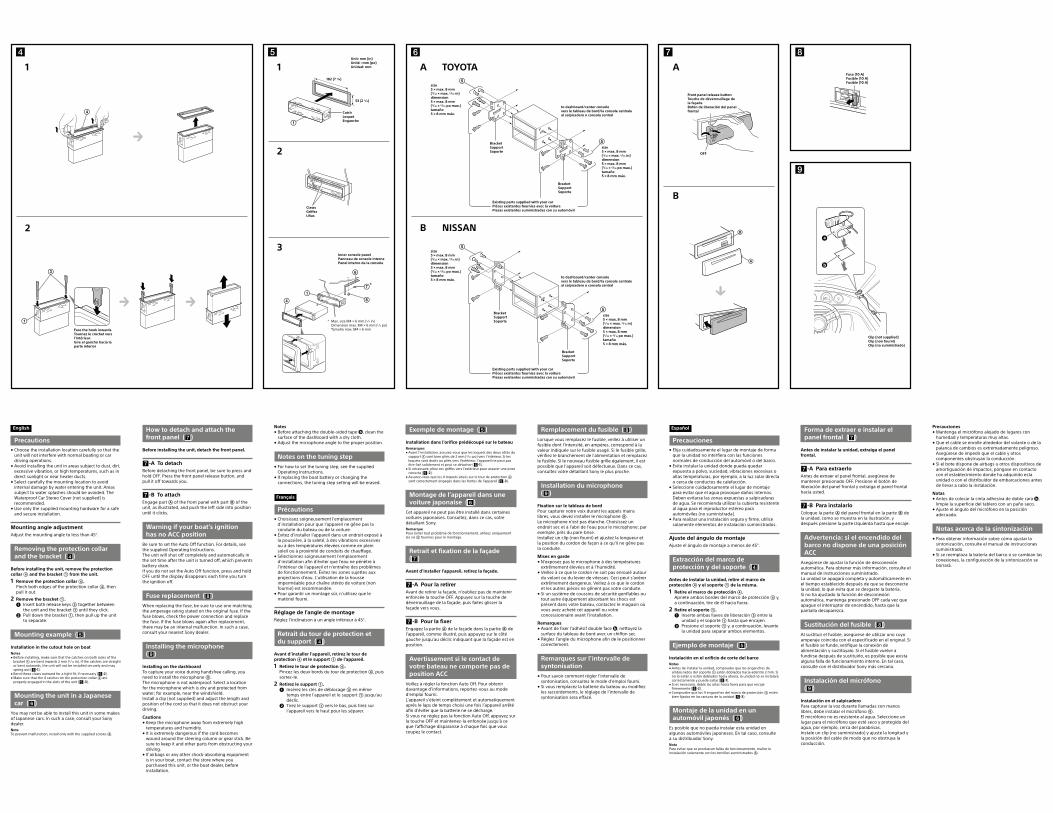
Notes
Before attaching the double-sided tape , clean the surface of the dashboard with a dry cloth.Adjust the microphone angle to the proper position.
Notes on the tuning step
For how to set the tuning step, see the supplied Operating Instructions.If replacing the boat battery or changing the connections, the tuning step setting will be erased.
Français
Précautions
Choisissez soigneusement l’emplacement d’installation pour que l’appareil ne gêne pas la conduite du bateau ou de la voiture.Évitez d’installer l’appareil dans un endroit exposé à la poussière, à la saleté, à des vibrations excessives ou à des températures élevées comme en plein soleil ou à proximité de conduits de chauffage.Sélectionnez soigneusement l’emplacement d’installation afin d’éviter que l’eau ne pénètre à l’intérieur de l’appareil et n’entraîne des problèmes de fonctionnement. Évitez les zones sujettes aux projections d’eau. L’utilisation de la housse imperméable pour chaîne stéréo de voiture (non fournie) est recommandée.Pour garantir un montage sûr, n’utilisez que le matériel fourni.
Réglage de l’angle de montage
Réglez l’inclinaison à un angle inférieur à 45°.
Retrait du tour de protection et
du support ( )
Avant d’installer l’appareil, retirez le tour de
protection et le support de l’appareil.
1 Retirez le tour de protection .
Pincez les deux bords du tour de protection , puis sortez-le.
2 Retirez le support .
Insérez les clés de déblocage en même temps entre l’appareil et le support jusqu’au déclic.
Tirez le support vers le bas, puis tirez sur l’appareil vers le haut pour les séparer.
Español
Precauciones
Elija cuidadosamente el lugar de montaje de forma que la unidad no interfiera con las funciones normales de conducción del automóvil o del barco.Evite instalar la unidad donde pueda quedar expuesta a polvo, suciedad, vibraciones excesivas o altas temperaturas, por ejemplo, a la luz solar directa o cerca de conductos de calefacción.Seleccione cuidadosamente el lugar de montaje para evitar que el agua provoque daños internos. Deben evitarse las zonas expuestas a salpicaduras de agua. Se recomienda utilizar la cubierta resistente al agua para el reproductor estéreo para automóviles (no suministrada).Para realizar una instalación segura y firme, utilice solamente elementos de instalación suministrados.
Ajuste del ángulo de montaje
Ajuste el ángulo de montaje a menos de 45°.
Extracción del marco de
protección y del soporte ( )
Antes de instalar la unidad, retire el marco de
protección y el soporte de la misma.
1 Retire el marco de protección .
Apriete ambos bordes del marco de protección y, a continuación, tire de él hacia fuera.
2 Retire el soporte .
Inserte ambas llaves de liberación entre la unidad y el soporte hasta que encajen.
Presione el soporte y, a continuación, levante la unidad para separar ambos elementos.
Ejemplo de montaje ( )
Instalación en el orificio de corte del barco
Notas
Antes de instalar la unidad, compruebe que los enganches de ambos lados del soporte estén doblados hacia adentro 2 mm. Si no lo están o están doblados hacia afuera, la unidad no se instalará correctamente y puede saltar ( -1).Si es necesario, doble las uñas hacia fuera para que encaje firmemente ( -2).Compruebe que los 4 enganches del marco de protección estén bien fijados en las ranuras de la unidad ( -3).
Montaje de la unidad en un
automóvil japonés ( )
Es posible que no pueda instalar esta unidad en algunos automóviles japoneses. En tal caso, consulte a su distribuidor Sony.Nota
Para evitar que se produzcan fallas de funcionamiento, realice la instalación solamente con los tornillos suministrados .
Precauciones
Mantenga el micrófono alejado de lugares con humedad y temperaturas muy altas.Que el cable se enrolle alrededor del volante o de la palanca de cambios es extremadamente peligroso. Asegúrese de impedir que el cable y otros componentes obstruyan la conducción.Si el bote dispone de airbags u otros dispositivos de amortiguación de impactos, póngase en contacto con el establecimiento donde ha adquirido esta unidad o con el distribuidor de embarcaciones antes de llevar a cabo la instalación.
Notas
Antes de colocar la cinta adhesiva de doble cara , limpie la superficie del tablero con un paño seco.Ajuste el ángulo del micrófono en la posición adecuada.
Notas acerca de la sintonización
Para obtener información sobre cómo ajustar la sintonización, consulte el manual de instrucciones suministrado.Si se reemplaza la batería del barco o se cambian las conexiones, la configuración de la sintonización se borrará.
How to detach and attach the
front panel ( )
Before installing the unit, detach the front panel.
-A To detach
Before detaching the front panel, be sure to press and hold OFF. Press the front panel release button, and pull it off towards you.
-B To attach
Engage part of the front panel with part of the unit, as illustrated, and push the left side into position until it clicks.
Warning if your boat’s ignition
has no ACC position
Be sure to set the Auto Off function. For details, see the supplied Operating Instructions.The unit will shut off completely and automatically in the set time after the unit is turned off, which prevents battery drain.If you do not set the Auto Off function, press and hold OFF until the display disappears each time you turn the ignition off.
Fuse replacement ( )
When replacing the fuse, be sure to use one matching the amperage rating stated on the original fuse. If the fuse blows, check the power connection and replace the fuse. If the fuse blows again after replacement, there may be an internal malfunction. In such a case, consult your nearest Sony dealer.
Installing the microphone
( )
Installing on the dashboard
To capture your voice during handsfree calling, you need to install the microphone .The microphone is not waterproof. Select a location for the microphone which is dry and protected from water; for example, near the windshield.Install a clip (not supplied) and adjust the length and position of the cord so that it does not obstruct your driving.
Cautions
Keep the microphone away from extremely high temperatures and humidity.It is extremely dangerous if the cord becomes wound around the steering column or gear stick. Be sure to keep it and other parts from obstructing your driving.If airbags or any other shock-absorbing equipment is in your boat, contact the store where you purchased this unit, or the boat dealer, before installation.
Remplacement du fusible ( )
Lorsque vous remplacez le fusible, veillez à utiliser un fusible dont l’intensité, en ampères, correspond à la valeur indiquée sur le fusible usagé. Si le fusible grille, vérifiez le branchement de l’alimentation et remplacez le fusible. Si le nouveau fusible grille également, il est possible que l’appareil soit défectueux. Dans ce cas, consultez votre détaillant Sony le plus proche.
Installation du microphone
( )
Fixation sur le tableau de bord
Pour capturer votre voix durant les appels mains libres, vous devez installer le microphone .Le microphone n’est pas étanche. Choisissez un endroit sec et à l’abri de l’eau pour le microphone; par exemple, près du pare-brise.Installez un clip (non fourni) et ajustez la longueur et la position du cordon de façon à ce qu’il ne gêne pas la conduite.
Mises en garde
N’exposez pas le microphone à des températures extrêmement élevées et à l’humidité.Veillez à ce que le cordon ne soit pas enroulé autour du volant ou du levier de vitesses. Ceci peut s’avérer extrêmement dangereux. Veillez à ce que le cordon et les autres pièces ne gênent pas votre conduite.Si un système de coussins de sécurité gonflables ou tout autre équipement absorbant les chocs est présent dans votre bateau, contactez le magasin où vous avez acheté cet appareil ou votre concessionnaire avant l’installation.
Remarques
Avant de fixer l’adhésif double face , nettoyez la surface du tableau de bord avec un chiffon sec.Réglez l’angle du microphone afin de le positionner correctement.
Remarques sur l’intervalle de
syntonisation
Pour savoir comment régler l’intervalle de syntonisation, consultez le mode d’emploi fourni.Si vous remplacez la batterie du bateau ou modifiez les raccordements, le réglage de l’intervalle de syntonisation sera effacé.
Forma de extraer e instalar el
panel frontal ( )
Antes de instalar la unidad, extraiga el panel
frontal.
-A Para extraerlo
Antes de extraer el panel frontal, asegúrese de mantener presionado OFF. Presione el botón de liberación del panel frontal y extraiga el panel frontal hacia usted.
-B Para instalarlo
Coloque la parte del panel frontal en la parte de la unidad, como se muestra en la ilustración, y después presione la parte izquierda hasta que encaje.
Advertencia: si el encendido del
barco no dispone de una posición
ACC
Asegúrese de ajustar la función de desconexión automática. Para obtener más información, consulte el manual de instrucciones suministrado.La unidad se apagará completa y automáticamente en el tiempo establecido después de que se desconecte la unidad, lo que evita que se desgaste la batería.Si no ha ajustado la función de desconexión automática, mantenga presionado OFF cada vez que apague el interruptor de encendido, hasta que la pantalla desaparezca.
Sustitución del fusible ( )
Al sustituir el fusible, asegúrese de utilizar uno cuyo amperaje coincida con el especificado en el original. Si el fusible se funde, verifique la conexión de alimentación y sustitúyalo. Si el fusible vuelve a fundirse después de sustituirlo, es posible que exista alguna falla de funcionamiento interno. En tal caso, consulte con el distribuidor Sony más cercano.
Instalación del micrófono
( )
Instalación en el salpicadero
Para capturar la voz durante llamadas con manos libres, debe instalar el micrófono .El micrófono no es resistente al agua. Seleccione un lugar para el micrófono que esté seco y protegido del agua, por ejemplo, cerca del parabrisas.Instale un clip (no suministrado) y ajuste la longitud y la posición del cable de modo que no obstruya la conducción.
Exemple de montage ( )
Installation dans l’orifice prédécoupé sur le bateau
Remarques
Avant l’installation, assurez-vous que les loquets des deux côtés du support sont bien pliés de 2 mm (3/32 po) vers l’intérieur. Si les loquets sont droits ou pliés vers l’extérieur, l’appareil ne peut pas être fixé solidement et peut se détacher ( -1).Si nécessaire, pliez ces griffes vers l’extérieur pour assurer une prise correcte ( -2).Assurez-vous que les 4 loquets situés sur le tour de protection sont correctement engagés dans les fentes de l’appareil ( -3).
Montage de l’appareil dans une
voiture japonaise ( )
Cet appareil ne peut pas être installé dans certaines voitures japonaises. Consultez, dans ce cas, votre détaillant Sony.Remarque
Pour éviter tout problème de fonctionnement, utilisez uniquement les vis fournies pour le montage.
Retrait et fixation de la façade
( )
Avant d’installer l’appareil, retirez la façade.
-A Pour la retirer
Avant de retirer la façade, n’oubliez pas de maintenir enfoncée la touche OFF. Appuyez sur la touche de déverrouillage de la façade, puis faites glisser la façade vers vous.
-B Pour la fixer
Engagez la partie de la façade dans la partie de l’appareil, comme illustré, puis appuyez sur le côté gauche jusqu’au déclic indiquant que la façade est en position.
Avertissement si le contact de
votre bateau ne comporte pas de
position ACC
Veillez à régler la fonction Auto Off. Pour obtenir davantage d’informations, reportez-vous au mode d’emploi fourni.L’appareil s’éteint complètement et automatiquement après le laps de temps choisi une fois l’appareil arrêté afin d’éviter que la batterie ne se décharge.Si vous ne réglez pas la fonction Auto Off, appuyez sur la touche OFF et maintenez-la enfoncée jusqu’à ce que l’affichage disparaisse à chaque fois que vous coupez le contact.
English
Precautions
Choose the installation location carefully so that the unit will not interfere with normal boating or car driving operations.Avoid installing the unit in areas subject to dust, dirt, excessive vibration, or high temperatures, such as in direct sunlight or near heater ducts.Select carefully the mounting location to avoid internal damage by water entering the unit. Areas subject to water splashes should be avoided. The Waterproof Car Stereo Cover (not supplied) is recommended.Use only the supplied mounting hardware for a safe and secure installation.
Mounting angle adjustment
Adjust the mounting angle to less than 45°.
Removing the protection collar
and the bracket ( )
Before installing the unit, remove the protection
collar and the bracket from the unit.
1 Remove the protection collar .
Pinch both edges of the protection collar , then pull it out.
2 Remove the bracket .
Insert both release keys together between the unit and the bracket until they click.
Pull down the bracket , then pull up the unit to separate.
Mounting example ( )
Installation in the cutout hole on boat
Notes
Before installing, make sure that the catches on both sides of the bracket are bent inwards 2 mm (3/32 in). If the catches are straight or bent outwards, the unit will not be installed securely and may spring out ( -1).Bend these claws outward for a tight fit, if necessary ( -2).Make sure that the 4 catches on the protection collar are properly engaged in the slots of the unit ( -3).
Mounting the unit in a Japanese
car ( )
You may not be able to install this unit in some makes of Japanese cars. In such a case, consult your Sony dealer.Note
To prevent malfunction, install only with the supplied screws .
Bracket
Support
Soporte
Bracket
Support
Soporte
Bracket
Support
Soporte
Bracket
Support
Soporte
A TOYOTA
B NISSAN
to dashboard/center console
vers le tableau de bord/la console centrale
al salpicadero o consola central
to dashboard/center console
vers le tableau de bord/la console centrale
al salpicadero o consola central
Existing parts supplied with your car
Pièces existantes fournies avec la voiture
Piezas existentes suministradas con su automóvil
Existing parts supplied with your car
Pièces existantes fournies avec la voiture
Piezas existentes suministradas con su automóvil
size
5 × max. 8 mm
(7/32 × max. 5/16 in)
dimension
5 × max. 8 mm
(7/32 × 5/16 po max.)
tamaño
5 × 8 mm máx.
size
5 × max. 8 mm
(7/32 × max. 5/16 in)
dimension
5 × max. 8 mm
(7/32 × 5/16 po max.)
tamaño
5 × 8 mm máx.
size
5 × max. 8 mm
(7/32 × max. 5/16 in)
dimension
5 × max. 8 mm
(7/32 × 5/16 po max.)
tamaño
5 × 8 mm máx.
size
5 × max. 8 mm
(7/32 × max. 5/16 in)
dimension
5 × max. 8 mm
(7/32 × 5/16 po max.)
tamaño
5 × 8 mm máx.
Face the hook inwards.
Tournez le crochet vers
l’intérieur.
Gire el gancho hacia la
parte interior
A
B
Fuse (10 A)
Fusible (10 A)
Fusible (10 A)
Front panel release button
Touche de déverrouillage de
la façade
Botón de liberación del panel
frontal
OFF
Claws
Griffes
Uñas
2
3
1
Unit: mm (in)
Unité : mm (po)
Unidad: mm
Catch
Loquet
Enganche
182 (7 1/4)
53 (2 1/8)
Clip (not supplied)
Clip (non fourni)
Clip (no suministrado)
1
2
Inner console panel
Panneau de console interne
Panel interno de la consola
* Max. size M4 × 6 mm (1/4 in) Dimension max. M4 × 6 mm (1/4 po) Tamaño máx. M4 × 6 mm
*