
Bluetooth Networking Overview · Bluetooth Networking Overview Bluetooth wireless technology lets...
61
Transcript of Bluetooth Networking Overview · Bluetooth Networking Overview Bluetooth wireless technology lets...

Bluetooth Networking Overview
Bluetooth wireless technology lets you make short-range (typically within a distance of 10 meters)
wireless connections between your computer and other Bluetooth enabled devices. Bluetooth
functionality is enabled by the Bluetooth radio that is installed on your computer.
Types of Bluetooth enabled devices you can use with your Bluetooth enabled computer include (but
are not limited to):
• Audio headsets and headphones
• Human interface devices such as a mouse, keyboard, or game controller
• Mobile phones
• Other computers
• Media players
• Digital cameras
• Printers
When you add a Bluetooth enabled device (also referred to as pairing with the device), your computer
discovers the services that the device provides. These services determine the things you can do with
the device. Here are some of the things you can do with various Bluetooth enabled devices:
Audio headsets
• Use your headset for Internet telephone calls.
• Use your headset to listen to music.
Computers
• Play audio stored on another Bluetooth enabled device through your computer.
• Send Personal Information Manager (PIM) items to another computer.
• Receive PIM items from another computer.
• Back up Contacts and Calendar folders from another computer to your computer.
• Restore the backed-up Contacts and Calendar folders to the other computer.
• Synchronize Contacts, Calendars, Mail, and Notes folders.
• Send data, text, pictures, music, and other files to another computer.
• Receive data, text, pictures, music, and other files from another computer.
Mobile Phones

• Use your mobile phone to connect your computer to the Internet.
• Use your computer as a speakerphone for your mobile phone.
• Display video on your computer as you play it on your mobile phone.
• Play audio stored on your mobile phone through your computer.
• Send Personal Information Manager (PIM) items to your mobile phone.
• Receive PIM items from your mobile phone.
• Back up Contacts and Calendar folders on your mobile phone to your computer.
• Restore the backed-up Contacts and Calendar folders to your mobile phone.
• Synchronize Contacts, Calendars, Mail, and Notes folders.
• Send data, text, pictures, music, and other files to your mobile phone.
• Receive data, text, pictures, music, and other files from your mobile phone.
• Use your mobile phone as a proximity device to lock and unlock your computer.
• Use your computer to send and receive SMS messages received on your phone.
• Synchronize files and outlook data with your Windows Phone.
Media players
• Play audio stored on your media player through your computer.
Digital cameras
• Download pictures to your computer.
Other
• Print to a Bluetooth enabled printer.
• Print to a standard printer that is physically connected to a Bluetooth enabled computer.
With your Bluetooth enabled computer, you also can:
• Configure Bluetooth options.
• Turn the Bluetooth radio on and off.
• Control how Bluetooth technology works on your computer.
• Send files and folders to another Bluetooth enabled device.
• Send a web page from Microsoft Internet Explorer to another Bluetooth enabled device.
• Send a web image from Microsoft Internet Explorer to another Bluetooth enabled device.

• Send files from Microsoft Office applications to another Bluetooth enabled device.
• Access files on another Bluetooth enabled device.
• Set rules for sharing files and equipment.
To change the default settings that control how Bluetooth works on your computer, see Control How
Bluetooth Technology Works On My Computer.
If you are having difficulty using other Bluetooth devices with your computer, see Troubleshooting.
Terminology
audio headset
A wearable hands-free audio device that has a speaker and a microphone. Some audio headsets can
be used both for telephone calls and for listening to high-quality stereo audio. Other types of audio
headsets can be used only for telephone calls and for voice playback and recording.
BDA
Bluetooth Device Address (assigned by the manufacturer).
Bluetooth device
Bluetooth enabled hardware such as a computer, printer, fax machine, mouse, keyboard, mobile
phone, headset, headphones, or cameras.
Bluetooth Exchange Folder
The highest-level folder on a Bluetooth enabled computer to which another Bluetooth device has
access. Devices that have been granted access to Bluetooth Exchange Folder also have access to all
subfolders contained within that folder and all files in those subfolders.
CAUTION:The default folder for Bluetooth file exchanges is named Bluetooth Exchange Folder
and is located in My Documents. You can choose a different folder for exchanging Bluetooth files;
however do not select the root directory (for example, C:) or a system folder. Selecting the root
directory or a system folder creates the potential for remote devices to harm the operating
system on your computer.
Bluetooth Exchange Folder is used to store received files. The location and name of the folder can be
specified on the Share tab of Bluetooth Settings. If you change the location or name of the folder, the
path is automatically updated.
Bluetooth wireless technology
Bluetooth wireless technology is a standards-based that allows short-range (typically within a distance
of 10 meters) wireless communication between Bluetooth enabled devices.

internet telephony
A technology that uses the Internet to place and receive telephone calls.
PIM
Personal Information Manager. An application, such as Microsoft® Outlook® , that is used to manage
contacts, send and receive mail, create notes, and schedule events and tasks.
Secure Connection
A connection between Bluetooth devices in which all data exchanged is encrypted.
SMS
Short messaging service, a common way of sending short messages between mobile phones.
shortcut
An icon that provides quick access to the device control panel (see Use the Services of Other Bluetooth
Enabled Devices).
taskbar notification area
The area on the Windows taskbar that displays the time. The Bluetooth icon is usually located here.
Getting Started
1.
Make sure that your Bluetooth adapter is working and is turned on (see Check the Working Condition and
Status of My Bluetooth Adapter).
2. Click the Bluetooth icon in the notification area, and then click Show Bluetooth Devices.
-or-
Double click the Bluetooth icon.
Bluetooth Devices shows all Bluetooth enabled devices that are added to the computer. This window
enables you to do the following:
• Add a Bluetooth Enabled Device
• Use the Services of Other Bluetooth Enabled Devices
• Display the Device Properties

Add and Connect to a Bluetooth Enabled Device Add a Bluetooth Enabled Device
Make a Network Connection to Another Bluetooth Enabled Computer or to a Personal Area Network (PAN)
Check the Working Condition and Status of My Bluetooth Adapter
Add a Bluetooth Enabled Device
To add a Bluetooth enabled device to your computer, you can use the Bluetooth icon located in the
taskbar notification area or you can use a menu item in the Bluetooth Devices control panel
NOTE: Before a Bluetooth device can be found, it must be within range and set to be
discoverable. For information about how to set a particular device to be discoverable, check the
user guide that came with the device.
To add a device using the Bluetooth icon:
Click the Bluetooth icon , click Add a device, and follow the onscreen instructions. The Add a
device wizard handles the pairing process.
To add a device using the Bluetooth Devices control panel:
1. Double-click the Bluetooth icon , and then click Show Bluetooth Devices.
2.
Click Add a device and follow the onscreen instructions. The Add a device wizard handles the
pairing process.
NOTE:
• The setup process for a Bluetooth wireless keyboard involves pairing with your computer.
•
To conserve battery power, the Bluetooth wireless mouse, keyboard, or game controller goes to
sleep after a specified period of inactivity. To wake up the mouse or game controller, move it
around or click any of the controls. To wake up the keyboard, press any key.
After you have added a Bluetooth device to your computer, you can begin using the device (see Use the
Services of Other Bluetooth Enabled Devices).
To remove the device from your computer:
In Bluetooth Devices, select the device and click Remove device.

-or-
Right-click the device and click Remove device.
Make a Network Connection to Another Bluetooth Enabled Computer or to a Personal Area Network (PAN)
You can make a network connection from your computer other Bluetooth enabled devices. A network
connection can be used to share files, synchronize calendar and contact items, or gain access to a
network available on the other device.
There are three methods to make a network connection:
• Directly connect to another Bluetooth device for file sharing or gaming.
•
Connect to a personal area network (PAN). When connected to a PAN, your computer can access files
and services on any other Bluetooth enabled device connected to the PAN.
•
Connect to another Bluetooth device using the Network Access feature. This connection type enables
your computer to access the Internet using the connection available on the other device.
To connect to another Bluetooth enabled device:
1.
If you have not already done so, pair with the Bluetooth enabled device you want to make a network
connection to (see Add a Bluetooth Enabled Device).
2. Double-click the Bluetooth icon , and then click Show Bluetooth Devices.
3.
Right-click the device you want to make a network connection to, click Connect using, and then
select one of the following options:
• Direct connection: Creates a direct connection with another device.
• Ad hoc network: Connects your computer to a PAN.
• Network access: Enables your computer to use the Internet connection from the other device.
NOTE: The network connection types that display depend on the services offered on the other
device.

Check the Working Condition and Status of My Bluetooth Adapter
The appearance of the Bluetooth icon (located in the taskbar notification area) indicates the working
condition and status of your Bluetooth adapter:
The adapter is working and is turned on.
The adapter is either not working or is turned off.
If the appearance of the Bluetooth icon indicates that the Bluetooth adapter is either not working or
is turned off, click the Bluetooth icon , and then click Turn Adapter On. If the Bluetooth icon does
not display, the adapter has been turned off with a hardware switch on your computer and must be
turned on with the hardware switch. Check the manual that came with your computer for information
about the location of the switch and for instructions on how to use it.
Use the Services of Other Bluetooth Enabled Devices
Play Audio Stored on My Bluetooth Enabled Device
Through My Computer
Use a Bluetooth Audio Headset for Internet Telephone
Calls
Use a Bluetooth Audio Headset to Listen to Music
Display Video on this Computer as You Play it on Another
Bluetooth Enabled Device
Access Files on Another Bluetooth Enabled Device
Use My Computer as a Speakerphone for Another
Bluetooth Enabled Device
Use this Computer to Dial a Call on Your Bluetooth
Enabled Phone
Connect to the Internet Using a Bluetooth Enabled Mobile
Phone, Modem, or Other Device
Print to a Bluetooth Enabled Printer
Print From My Computer to the Standard Printer That is
Physically Connected to Another Bluetooth Enabled
Computer
Send and Receive SMS Messages on My Phone
Use My Phone as a Bluetooth Proximity Device for My
Computer
Connect to Another Bluetooth Enabled Computer to Play
Games or Chat
The services of Bluetooth enabled devices that you have add to the computer are displayed on the
device control panel.

To open the device control panel:
1. If you have not already done so, add the device you want to use (see Add a Bluetooth Enabled Device).
2. Double-click the Bluetooth icon in the taskbar notification area.
3. Double-click the icon for the device, or right-click the icon and select Control.
The operations that you can perform with a specific Bluetooth enabled device are listed under Device
Operations. These operations correspond with the services that the device provides.
NOTE: Because of corporate security policies, some expected operations might not be available
because the corresponding device services have been disabled by the IT administrator. Contact
your IT administrator for more information or if you have any questions.
A Connect button is provided for those operations in which it is desirable for the connection to persist
until you decide to disconnect. When the connection is made, a green check mark is displayed next to
the Bluetooth icon image, the label on the button changes to Disconnect, and the description of the
operation changes to indicate the reverse of what was originally stated.
Under Settings, you can view and change the settings that control the interaction between the device
and your computer. These vary depending on the Bluetooth device type.
The following illustration shows the control panel for a Bluetooth enabled computer.

Play Audio Stored on My Bluetooth Enabled Device Through My Computer
You can play audio on another Bluetooth enabled device and listen to it on this computer’s speakers or
headset. This may be convenient when this computer is better equipped with sound devices, but the
Internet content, audio file, or DVD you want to listen to resides on the other Bluetooth device. This is
referred to as streaming audio from one Bluetooth device to another.
1.
If you have not already done so, add the Bluetooth enabled mobile phone or media player you want
to use (see Add a Bluetooth Enabled Device).
2.
Double-click the Bluetooth icon in the taskbar notification area. Double-click the icon for the
player, or right-click the icon and select Control.
3.
Under Device Type Operations\ Music and Audio, click the Connect button opposite Play
audio stored on the (Device Name) Device Type through my computer.
Now, whenever the connection is active and you play audio stored on your mobile phone or media
player, the audio will play through your computer.
To stop streaming audio to this computer, click Disconnect.
Use a Bluetooth Audio Headset for Internet Telephone Calls
Your Bluetooth enabled computer supports the use of a Bluetooth audio headset with various internet
telephony services and instant messaging services that provide voice chat. These services include
Skype™, Microsoft® Linc™, Vonage® , Google Talk™, Yahoo! Messenger™, MSN Messenger, and others.
See the following topics for more information:
Use Software to Establish a Connection to Your Headset
Use a Bluetooth Audio Headset with Skype
Use Voice Commands with Skype and Windows Speech Recognition
Use Software to Establish a Connection to Your Headset
To use a Bluetooth audio headset for telephone calls, you typically need only to add the device to your
computer (see Add a Bluetooth Enabled Device) and turn it on. The connection stops when you turn the
device off and automatically restarts when you turn it on again.

If you turn on a headset that has been added to your computer and it does not automatically make a
connection, you can start the connection using software.
1.
Double-click the Bluetooth icon in the taskbar notification area. Double-click the icon for the audio
headset, or right-click the icon and select Control.
2. Under Headset Operations\ Headset and Speakerphone, click the Connect button.
You can now use your Bluetooth audio headset to place or receive a phone call using an Internet
telephony service or during an voice-enabled instant messaging session.
Use a Bluetooth Audio Headset with Skype
You can use Skype and other Internet telephony applications with your Bluetooth audio headset.
Before you can use your Bluetooth headset with Skype, you must set up Skype to allow the Bluetooth
program to use Skype. Once configured, Skype automatically recognizes your headset, adjusts Audio
In and Audio Out settings to use a Bluetooth Hands-free Audio device, and routes calls to your
headset.
To set up Skype to allow the Bluetooth program to use Skype:
1. Open Skype.
2. On the Tools menu, click Options.
3. Click the Advanced tab, and then click Advanced Settings.
4. Under Other things you can do, click Manage other program access to Skype.
5. Select Bluetooth Headset Helper.exe and click Change.
6. Select Allow this program to use Skype and click OK.
Now, you can use the button on your headset to accept or reject a Skype call, place a call on hold,
hang up, or redial a number.
You can also use voice commands to make Skype calls. See Use Voice Commands with Skype and Windows
Speech Recognition.
Use a Bluetooth Audio Headset with Other Internet Telephony Applications
1. After you have connected to your audio headset, start your internet telephony application.
2.
Adjust the playback (audio output) and recording (audio input) settings in the application to use
Bluetooth hands-free audio.
Use Voice Commands with Skype and Windows Speech Recognition

You can use voice commands with your Bluetooth headset to initiate hands-free calls with Skype or
use Windows Speech Recognition services. Windows Speech Recognition enables you to use voice
commands to perform tasks on your computer, such as saving files, opening programs, and browsing
the Internet. You must first configure the headset to be used for Bluetooth voice recognition.
1.
Double-click the Bluetooth control icon in the taskbar notification area. Double-click the icon for
the audio headset, or right-click the icon and select Control.
2. Under Headset Operations\ Headset and Speakerphone, click the Disconnect button.
3. Click Enable speech recognition for (Device Name) headset.
4. Click the Connect button to reconnect to the Bluetooth headset.
Now, you can begin using Voice recognition.
1. Push the button on your headset to initiate speech recognition.
A window opens to show the voice commands you can use.
2. To start a Skype call, say “Call name”, where name is a Skype contact.
If the computer finds a match for name in your Skype contacts, it initiates the call. If the computer
finds multiple matches, it displays them in a numbered list. Say the number of the contact you want
to call.
-or-
To begin using Windows Speech Recognition, say “Start”.
Windows Speech Recognition enters listening mode and you can begin using voice commands to
control your computer. See the Speech Recognition topics in Windows Help and Support for common
commands and related instructions.
NOTE: You can use the Microsoft Setup Wizard to improve the computer’s ability to recognize
your voice commands. Click the Start button , click Control Panel, then click Ease of
Access. Under Speech Recognition, click Set up a microphone, then follow the instructions in

the wizard.
Use a Bluetooth Audio Headset for Internet Telephone Calls
Your Bluetooth enabled computer supports the use of a Bluetooth audio headset with various internet
telephony services and instant messaging services that provide voice chat. These services include
Skype™, Microsoft® Linc™, Vonage® , Google Talk™, Yahoo! Messenger™, MSN Messenger, and others.
See the following topics for more information:
Use Software to Establish a Connection to Your Headset
Use a Bluetooth Audio Headset with Skype
Use Voice Commands with Skype and Windows Speech Recognition
Use Software to Establish a Connection to Your Headset
To use a Bluetooth audio headset for telephone calls, you typically need only to add the device to your
computer (see Add a Bluetooth Enabled Device) and turn it on. The connection stops when you turn the
device off and automatically restarts when you turn it on again.
If you turn on a headset that has been added to your computer and it does not automatically make a
connection, you can start the connection using software.
1.
Double-click the Bluetooth icon in the taskbar notification area. Double-click the icon for the audio
headset, or right-click the icon and select Control.
2. Under Headset Operations\ Headset and Speakerphone, click the Connect button.
You can now use your Bluetooth audio headset to place or receive a phone call using an Internet
telephony service or during an voice-enabled instant messaging session.
Use a Bluetooth Audio Headset with Skype
You can use Skype and other Internet telephony applications with your Bluetooth audio headset.
Before you can use your Bluetooth headset with Skype, you must set up Skype to allow the Bluetooth
program to use Skype. Once configured, Skype automatically recognizes your headset, adjusts Audio
In and Audio Out settings to use a Bluetooth Hands-free Audio device, and routes calls to your
headset.
To set up Skype to allow the Bluetooth program to use Skype:
1. Open Skype.

2. On the Tools menu, click Options.
3. Click the Advanced tab, and then click Advanced Settings.
4. Under Other things you can do, click Manage other program access to Skype.
5. Select Bluetooth Headset Helper.exe and click Change.
6. Select Allow this program to use Skype and click OK.
Now, you can use the button on your headset to accept or reject a Skype call, place a call on hold,
hang up, or redial a number.
You can also use voice commands to make Skype calls. See Use Voice Commands with Skype and Windows
Speech Recognition.
Use a Bluetooth Audio Headset with Other Internet Telephony Applications
1. After you have connected to your audio headset, start your internet telephony application.
2.
Adjust the playback (audio output) and recording (audio input) settings in the application to use
Bluetooth hands-free audio.
Use Voice Commands with Skype and Windows Speech Recognition
You can use voice commands with your Bluetooth headset to initiate hands-free calls with Skype or
use Windows Speech Recognition services. Windows Speech Recognition enables you to use voice
commands to perform tasks on your computer, such as saving files, opening programs, and browsing
the Internet. You must first configure the headset to be used for Bluetooth voice recognition.
1.
Double-click the Bluetooth control icon in the taskbar notification area. Double-click the icon for
the audio headset, or right-click the icon and select Control.
2. Under Headset Operations\ Headset and Speakerphone, click the Disconnect button.
3. Click Enable speech recognition for (Device Name) headset.
4. Click the Connect button to reconnect to the Bluetooth headset.
Now, you can begin using Voice recognition.
1. Push the button on your headset to initiate speech recognition.
A window opens to show the voice commands you can use.

2. To start a Skype call, say “Call name”, where name is a Skype contact.
If the computer finds a match for name in your Skype contacts, it initiates the call. If the computer
finds multiple matches, it displays them in a numbered list. Say the number of the contact you want
to call.
-or-
To begin using Windows Speech Recognition, say “Start”.
Windows Speech Recognition enters listening mode and you can begin using voice commands to
control your computer. See the Speech Recognition topics in Windows Help and Support for common
commands and related instructions.
NOTE: You can use the Microsoft Setup Wizard to improve the computer’s ability to recognize
your voice commands. Click the Start button , click Control Panel, then click Ease of
Access. Under Speech Recognition, click Set up a microphone, then follow the instructions in
the wizard.
Use a Bluetooth Audio Headset for Internet Telephone Calls
Your Bluetooth enabled computer supports the use of a Bluetooth audio headset with various internet
telephony services and instant messaging services that provide voice chat. These services include
Skype™, Microsoft® Linc™, Vonage® , Google Talk™, Yahoo! Messenger™, MSN Messenger, and others.
See the following topics for more information:
Use Software to Establish a Connection to Your Headset
Use a Bluetooth Audio Headset with Skype
Use Voice Commands with Skype and Windows Speech Recognition

Use Software to Establish a Connection to Your Headset
To use a Bluetooth audio headset for telephone calls, you typically need only to add the device to your
computer (see Add a Bluetooth Enabled Device) and turn it on. The connection stops when you turn the
device off and automatically restarts when you turn it on again.
If you turn on a headset that has been added to your computer and it does not automatically make a
connection, you can start the connection using software.
1.
Double-click the Bluetooth icon in the taskbar notification area. Double-click the icon for the audio
headset, or right-click the icon and select Control.
2. Under Headset Operations\ Headset and Speakerphone, click the Connect button.
You can now use your Bluetooth audio headset to place or receive a phone call using an Internet
telephony service or during an voice-enabled instant messaging session.
Use a Bluetooth Audio Headset with Skype
You can use Skype and other Internet telephony applications with your Bluetooth audio headset.
Before you can use your Bluetooth headset with Skype, you must set up Skype to allow the Bluetooth
program to use Skype. Once configured, Skype automatically recognizes your headset, adjusts Audio
In and Audio Out settings to use a Bluetooth Hands-free Audio device, and routes calls to your
headset.
To set up Skype to allow the Bluetooth program to use Skype:
1. Open Skype.
2. On the Tools menu, click Options.
3. Click the Advanced tab, and then click Advanced Settings.
4. Under Other things you can do, click Manage other program access to Skype.
5. Select Bluetooth Headset Helper.exe and click Change.
6. Select Allow this program to use Skype and click OK.
Now, you can use the button on your headset to accept or reject a Skype call, place a call on hold,
hang up, or redial a number.
You can also use voice commands to make Skype calls. See Use Voice Commands with Skype and Windows
Speech Recognition.
Use a Bluetooth Audio Headset with Other Internet Telephony
Applications
1. After you have connected to your audio headset, start your internet telephony application.

2.
Adjust the playback (audio output) and recording (audio input) settings in the application to use
Bluetooth hands-free audio.
Use Voice Commands with Skype and Windows Speech Recognition
You can use voice commands with your Bluetooth headset to initiate hands-free calls with Skype or
use Windows Speech Recognition services. Windows Speech Recognition enables you to use voice
commands to perform tasks on your computer, such as saving files, opening programs, and browsing
the Internet. You must first configure the headset to be used for Bluetooth voice recognition.
1.
Double-click the Bluetooth control icon in the taskbar notification area. Double-click the icon for
the audio headset, or right-click the icon and select Control.
2. Under Headset Operations\ Headset and Speakerphone, click the Disconnect button.
3. Click Enable speech recognition for (Device Name) headset.
4. Click the Connect button to reconnect to the Bluetooth headset.
Now, you can begin using Voice recognition.
1. Push the button on your headset to initiate speech recognition.
A window opens to show the voice commands you can use.
2. To start a Skype call, say “Call name”, where name is a Skype contact.
If the computer finds a match for name in your Skype contacts, it initiates the call. If the computer
finds multiple matches, it displays them in a numbered list. Say the number of the contact you want
to call.
-or-
To begin using Windows Speech Recognition, say “Start”.
Windows Speech Recognition enters listening mode and you can begin using voice commands to
control your computer. See the Speech Recognition topics in Windows Help and Support for common
commands and related instructions.

NOTE: You can use the Microsoft Setup Wizard to improve the computer’s ability to recognize
your voice commands. Click the Start button , click Control Panel, then click Ease of
Access. Under Speech Recognition, click Set up a microphone, then follow the instructions in
the wizard.
Use a Bluetooth Audio Headset for Internet Telephone Calls
Your Bluetooth enabled computer supports the use of a Bluetooth audio headset with various internet
telephony services and instant messaging services that provide voice chat. These services include
Skype™, Microsoft® Linc™, Vonage® , Google Talk™, Yahoo! Messenger™, MSN Messenger, and others.
See the following topics for more information:
Use Software to Establish a Connection to Your Headset
Use a Bluetooth Audio Headset with Skype
Use Voice Commands with Skype and Windows Speech Recognition
Use Software to Establish a Connection to Your Headset
To use a Bluetooth audio headset for telephone calls, you typically need only to add the device to your
computer (see Add a Bluetooth Enabled Device) and turn it on. The connection stops when you turn the
device off and automatically restarts when you turn it on again.
If you turn on a headset that has been added to your computer and it does not automatically make a
connection, you can start the connection using software.
1.
Double-click the Bluetooth icon in the taskbar notification area. Double-click the icon for the audio
headset, or right-click the icon and select Control.
2. Under Headset Operations\ Headset and Speakerphone, click the Connect button.
You can now use your Bluetooth audio headset to place or receive a phone call using an Internet
telephony service or during an voice-enabled instant messaging session.
Use a Bluetooth Audio Headset with Skype
You can use Skype and other Internet telephony applications with your Bluetooth audio headset.
Before you can use your Bluetooth headset with Skype, you must set up Skype to allow the Bluetooth
program to use Skype. Once configured, Skype automatically recognizes your headset, adjusts Audio

In and Audio Out settings to use a Bluetooth Hands-free Audio device, and routes calls to your
headset.
To set up Skype to allow the Bluetooth program to use Skype:
1. Open Skype.
2. On the Tools menu, click Options.
3. Click the Advanced tab, and then click Advanced Settings.
4. Under Other things you can do, click Manage other program access to Skype.
5. Select Bluetooth Headset Helper.exe and click Change.
6. Select Allow this program to use Skype and click OK.
Now, you can use the button on your headset to accept or reject a Skype call, place a call on hold,
hang up, or redial a number.
You can also use voice commands to make Skype calls. See Use Voice Commands with Skype and Windows
Speech Recognition.
Use a Bluetooth Audio Headset with Other Internet Telephony Applications
1. After you have connected to your audio headset, start your internet telephony application.
2.
Adjust the playback (audio output) and recording (audio input) settings in the application to use
Bluetooth hands-free audio.
Use Voice Commands with Skype and Windows Speech Recognition
You can use voice commands with your Bluetooth headset to initiate hands-free calls with Skype or
use Windows Speech Recognition services. Windows Speech Recognition enables you to use voice
commands to perform tasks on your computer, such as saving files, opening programs, and browsing
the Internet. You must first configure the headset to be used for Bluetooth voice recognition.
1.
Double-click the Bluetooth control icon in the taskbar notification area. Double-click the icon for
the audio headset, or right-click the icon and select Control.
2. Under Headset Operations\ Headset and Speakerphone, click the Disconnect button.
3. Click Enable speech recognition for (Device Name) headset.
4. Click the Connect button to reconnect to the Bluetooth headset.
Now, you can begin using Voice recognition.
1. Push the button on your headset to initiate speech recognition.

A window opens to show the voice commands you can use.
2. To start a Skype call, say “Call name”, where name is a Skype contact.
If the computer finds a match for name in your Skype contacts, it initiates the call. If the computer
finds multiple matches, it displays them in a numbered list. Say the number of the contact you want
to call.
-or-
To begin using Windows Speech Recognition, say “Start”.
Windows Speech Recognition enters listening mode and you can begin using voice commands to
control your computer. See the Speech Recognition topics in Windows Help and Support for common
commands and related instructions.
NOTE: You can use the Microsoft Setup Wizard to improve the computer’s ability to recognize
your voice commands. Click the Start button , click Control Panel, then click Ease of
Access. Under Speech Recognition, click Set up a microphone, then follow the instructions in
the wizard.
Use a Bluetooth Audio Headset for Internet Telephone Calls
Your Bluetooth enabled computer supports the use of a Bluetooth audio headset with various internet
telephony services and instant messaging services that provide voice chat. These services include
Skype™, Microsoft® Linc™, Vonage® , Google Talk™, Yahoo! Messenger™, MSN Messenger, and others.
See the following topics for more information:
Use Software to Establish a Connection to Your Headset
Use a Bluetooth Audio Headset with Skype

Use Voice Commands with Skype and Windows Speech Recognition
Use Software to Establish a Connection to Your Headset
To use a Bluetooth audio headset for telephone calls, you typically need only to add the device to your
computer (see Add a Bluetooth Enabled Device) and turn it on. The connection stops when you turn the
device off and automatically restarts when you turn it on again.
If you turn on a headset that has been added to your computer and it does not automatically make a
connection, you can start the connection using software.
1.
Double-click the Bluetooth icon in the taskbar notification area. Double-click the icon for the audio
headset, or right-click the icon and select Control.
2. Under Headset Operations\ Headset and Speakerphone, click the Connect button.
You can now use your Bluetooth audio headset to place or receive a phone call using an Internet
telephony service or during an voice-enabled instant messaging session.
Use a Bluetooth Audio Headset with Skype
You can use Skype and other Internet telephony applications with your Bluetooth audio headset.
Before you can use your Bluetooth headset with Skype, you must set up Skype to allow the Bluetooth
program to use Skype. Once configured, Skype automatically recognizes your headset, adjusts Audio
In and Audio Out settings to use a Bluetooth Hands-free Audio device, and routes calls to your
headset.
To set up Skype to allow the Bluetooth program to use Skype:
1. Open Skype.
2. On the Tools menu, click Options.
3. Click the Advanced tab, and then click Advanced Settings.
4. Under Other things you can do, click Manage other program access to Skype.
5. Select Bluetooth Headset Helper.exe and click Change.
6. Select Allow this program to use Skype and click OK.
Now, you can use the button on your headset to accept or reject a Skype call, place a call on hold,
hang up, or redial a number.
You can also use voice commands to make Skype calls. See Use Voice Commands with Skype and Windows
Speech Recognition.

Use a Bluetooth Audio Headset with Other Internet Telephony
Applications
1. After you have connected to your audio headset, start your internet telephony application.
2.
Adjust the playback (audio output) and recording (audio input) settings in the application to use
Bluetooth hands-free audio.
Use Voice Commands with Skype and Windows Speech Recognition
You can use voice commands with your Bluetooth headset to initiate hands-free calls with Skype or
use Windows Speech Recognition services. Windows Speech Recognition enables you to use voice
commands to perform tasks on your computer, such as saving files, opening programs, and browsing
the Internet. You must first configure the headset to be used for Bluetooth voice recognition.
1.
Double-click the Bluetooth control icon in the taskbar notification area. Double-click the icon for
the audio headset, or right-click the icon and select Control.
2. Under Headset Operations\ Headset and Speakerphone, click the Disconnect button.
3. Click Enable speech recognition for (Device Name) headset.
4. Click the Connect button to reconnect to the Bluetooth headset.
Now, you can begin using Voice recognition.
1. Push the button on your headset to initiate speech recognition.
A window opens to show the voice commands you can use.
2. To start a Skype call, say “Call name”, where name is a Skype contact.
If the computer finds a match for name in your Skype contacts, it initiates the call. If the computer
finds multiple matches, it displays them in a numbered list. Say the number of the contact you want
to call.

-or-
To begin using Windows Speech Recognition, say “Start”.
Windows Speech Recognition enters listening mode and you can begin using voice commands to
control your computer. See the Speech Recognition topics in Windows Help and Support for common
commands and related instructions.
NOTE: You can use the Microsoft Setup Wizard to improve the computer’s ability to recognize
your voice commands. Click the Start button , click Control Panel, then click Ease of
Access. Under Speech Recognition, click Set up a microphone, then follow the instructions in
the wizard.
Use a Bluetooth Audio Headset to Listen to Music
If you have audio stored on this computer, you can use your Bluetooth enabled headset to listen to it.
1.
If you have not already done so, add the Bluetooth audio headset you want to use (see Add a
Bluetooth Enabled Device).
2.
Double-click the Bluetooth icon in the taskbar notification area. Double-click the icon for the audio
headset, or right-click the icon and select Control.
3.
Under Headset Operations\ Headset and Speakerphone, click the Connect button
opposite Connect to the Bluetooth (Device Name) headset.
4. Under Settings, select the type of hands-free device you are using.
Now when you play audio on your computer, you can listen with your Bluetooth audio headset. To
stop listening to audio from your computer on your headset, click Disconnect.
Display Video on this Computer as You Play it on Another
Bluetooth Enabled Device
If you have a Bluetooth enabled device such as a camera phone that can capture video, you can watch
the video on this computer as you capture or replay it on the Bluetooth device. This is referred to as
streaming video from one Bluetooth device to another.
1.
If you have not already done so, add the Bluetooth device you want to use (see Add a Bluetooth Enabled
Device).

2.
Double-click the Bluetooth icon in the taskbar notification area. Double-click the icon for the audio
headset, or right-click the icon and select Control.
3.
Under Device Type Operations\ Video, click Connect opposite Start displaying video from
the (Device Name) Device Type.
4. Start playing or capturing video on the other Bluetooth device.
A window opens on your computer to display the video.
To stop streaming video to this computer, click Disconnect.
Access Files on Another Bluetooth Enabled Device
1. If you have not already done so, add the Bluetooth enabled device (see Add a Bluetooth Enabled Device).
2.
Double-click the Bluetooth icon in the taskbar notification area. Double-click the icon for the
device, or right-click the icon and select Control.
3.
Under Device Type Operations\ File Transfer, click the Browse the files on the (Device
Name) Device Type.
On this computer, Windows Explorer opens and displays the items stored in the Bluetooth Exchange
Folder on the other device. You can drag these items to folders on this computer. You can also drag
files from this computer to the folder to transfer them to the other device. You may have to authorize
receiving items on the other device.
Use My Computer as a Speakerphone for Another Bluetooth Enabled Device
If this computer is equipped with speakers and a microphone, or has a connected headset, you can
use these devices for calls made through your Bluetooth mobile phone or a computer that has Internet
phone capability.
1.
If you have not already done so, add the Bluetooth enabled mobile phone you want to use (see Add a
Bluetooth Enabled Device).
2.
Double-click the Bluetooth icon in the taskbar notification area. Double-click the icon for the
mobile phone, or right-click the icon and select Control.
3. Under Phone Operations\ Headset and Speakerphone, click Connect opposite Use this

computer as a speakerphone for calls from the (Device Name) phone.
4. On the Bluetooth device, allow the connection, if necessary.
You can now use your computer as a speakerphone for your mobile phone.
Use this Computer to Dial a Call on Your Bluetooth Enabled Phone
You can use your computer to dial a number on your Bluetooth enabled mobile phone or computer.
This may be convenient when you use your computer to look up a phone number on the Internet or in
your contacts list. You can simply copy the number and paste it into the text box on the Bluetooth
Device Control window for the phone. You can also use this feature if prefer to use your computer
keyboard instead of the keypad on your phone.
1.
If you have not already done so, add the Bluetooth enabled mobile phone you want to use (see Add a
Bluetooth Enabled Device).
2.
Double-click the Bluetooth icon in the taskbar notification area. Double-click the icon for the
mobile phone, or right-click the icon and select Control.
3.
Under Phone Operations\ Internet and Telephone, type the phone number in the box next
to Make a call to this number or select a number from the list of the last 10 phone numbers you
dialed.
4. Click Call and use your phone for the conversation.
5. When finished, click Hangup to end the call.
Connect to the Internet Using a Bluetooth Enabled Mobile Phone, Modem, or Other Device
NOTE: The Bluetooth enabled device must offer dial-up networking service.
1.
If you have not already done so, add the Bluetooth enabled device you want to use to connect to the
Internet (see Add a Bluetooth Enabled Device).
2.
Double-click the Bluetooth icon in the taskbar notification area. Double-click the icon for the
device, or right-click the icon and select Control.
3. Under Device Type Operations\ Internet and Telephone, click Connect opposite Use the

(Device Name) Device Type to connect to the Internet.
4. If prompted by your Bluetooth device, accept the connection.
Print to a Bluetooth Enabled Printer
1.
If you have not already done so, add your Bluetooth enabled printer (see Add a Bluetooth Enabled
Device).
NOTE: During the pairing process, You may have to type the PIN code for the printer. Check the
manual that came with the printer for the PIN code or check the Bluetooth menu on the printer
for the passkey.
2. Install the Bluetooth printer on your computer and set it as the default printer.
You can now print to your Bluetooth enabled printer.
Print From My Computer to the Standard Printer That is Physically Connected to Another Bluetooth Enabled Computer
If you have standard printer physically connected to a Bluetooth enabled computer, you can print to it
from your computer.
1.
Verify that the local printer is physically connected to the Bluetooth enabled computer by a cable, is
set as the default printer, and is turned on.
2.
Ensure that the printer is shared. (For information on sharing a printer, click the Start button ,
click Control Panel, click Network and Internet, and then click Network and Sharing Center.)
3.
On your computer, add the Bluetooth enabled computer with the connected printer (see Add a
Bluetooth Enabled Device).
When pairing is complete, the printer is added to the Printers and Faxes list on the other Bluetooth
enabled computer and can be used as any other printer.
If you connect the printer to the Bluetooth enabled computer after you have added it as a Bluetooth
device on your computer, you must manually enable the printing service for that device:
1. Double-click the Bluetooth icon in the taskbar notification area.
2. Right-click the icon for the Bluetooth enabled computer with the printer attached and select
Properties.
3. Click the Services tab.
4. Select the service named Printing (HCRP) and click OK.
Send and Receive SMS Messages on My Phone
If you use the Short Message Service (SMS) on your Bluetooth enabled phone or other device, you
may be able to use your computer to send and receive SMS messages on your phone.
NOTE: This feature is available on SMS-capable phones that support the Bluetooth Message
Access Profile (MAP). Refer to the documentation that came with your phone to see if it supports
this profile.
1. If you have not already done so, add the Bluetooth enabled phone (see Add a Bluetooth Enabled Device).
2.
Double-click the Bluetooth icon in the taskbar notification area. Double-click the icon for the
device, or right-click the icon and select Control.
3.
Under Phone Operations\ SMS Messages, click Connect opposite Connect the (Device
Name) phone to send/receive SMS messages from this computer.
4. On the phone, accept the connection, if necessary.
Upon connection, the SMS Editor window opens on the computer. Messages currently stored on your
phone are downloaded and displayed in the SMS Editor Inbox.

Reading and Replying to Messages
When you receive a new message on your phone, a small window pops up in the notification area of
the taskbar and the message displays in the SMS Inbox.
• To read a message, select it in the Inbox and click View .
• To reply to the message, enter your text and click Reply . Your reply will appear on your phone.
•
To delete a message, select it in the Inbox and click Delete . The message is deleted from the
SMS Inbox and from your phone.
NOTE: If you use your phone to create, delete, or reply to messages while the SMS service is
connected, the SMS Inbox is automatically updated to reflect the changes.

Creating New Messages
To create a new message using SMS Editor, from the SMS Inbox, click Create . Type the address
and message, and click Send . You can click Back to return to the Inbox. The message also
appears on your phone.
Use My Phone as a Bluetooth Proximity Device for My Computer
You can configure your computer to automatically lock whenever your Bluetooth enabled phone is
moved out of range and to unlock when the phone returns within range. The phone is referred to as a
proximity device for the computer. When your computer is locked, you must enter your Windows user
password to unlock it and regain access to your programs and files.
NOTE: The proximity lock feature attempts to connect to your phone using one of the following
Bluetooth profiles, in the order listed.
• Serial Port Profile (SPP)
• Hands-free Profile (HFP)
• Advanced Audio Distribution Profile (A2DP)
If your phone does not support any of these profiles, the proximity lock feature will not be
available. Refer to the documentation that came with your phone for information on supported
Bluetooth profiles and how to enable them.
Enabling Your Phone as a Proximity Device
1.
If you have not already done so, add the Bluetooth enabled phone to your computer (see Add a
Bluetooth Enabled Device).
2.
Double-click the Bluetooth icon in the taskbar notification area. Double-click the icon for the
device, or right-click the icon and select Control.
3.
Under Phone Operations\ Proximity, select Use the (Device Name) as a proximity
device.
NOTE: If the Serial Port Profile is available on your phone for this service, this option displays as
shown in step 3.

If the Hands-free Profile is available on your phone, this option displays as follows:
Use the (Device Name) as a proximity device (this will cause a headset connection to
the phone to remain open)
If the A2DP Profile is available on your phone, this option displays as follows:
Use the (Device Name) as a proximity device (this will cause an audio connection to the
phone to remain open)
If this option does not display, your phone may not support this feature.
4. On the phone, accept the connection, if necessary.
NOTE: Only one device at a time can be enabled as a proximity device. If you attempt to enable
a second device as a proximity device, an alert displays to allow you to disable this service on the
current device.
NOTE: Depending on the Bluetooth profile this feature uses, disconnecting the computer from
other phone services may also disconnect the proximity lock feature. For example, if the
proximity lock feature uses the Hands-free Profile, then disconnecting the Headset and
Speakerphone service will also disconnect the proximity lock feature. An alert displays to enable
you to cancel or continue disconnecting.
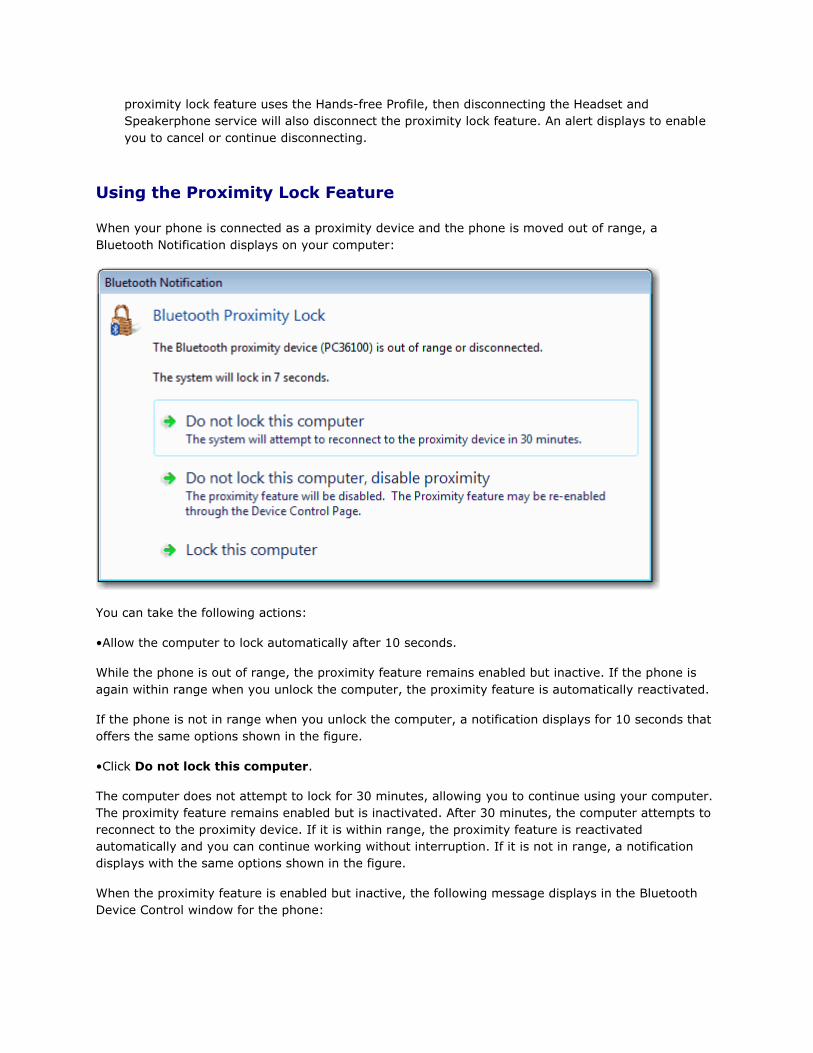
Using the Proximity Lock Feature
When your phone is connected as a proximity device and the phone is moved out of range, a
Bluetooth Notification displays on your computer:

You can take the following actions:
• Allow the computer to lock automatically after 10 seconds.
While the phone is out of range, the proximity feature remains enabled but inactive. If the phone is
again within range when you unlock the computer, the proximity feature is automatically reactivated.
If the phone is not in range when you unlock the computer, a notification displays for 10 seconds that
offers the same options shown in the figure.
• Click Do not lock this computer.
The computer does not attempt to lock for 30 minutes, allowing you to continue using your computer.
The proximity feature remains enabled but is inactivated. After 30 minutes, the computer attempts to
reconnect to the proximity device. If it is within range, the proximity feature is reactivated
automatically and you can continue working without interruption. If it is not in range, a notification
displays with the same options shown in the figure.
When the proximity feature is enabled but inactive, the following message displays in the Bluetooth
Device Control window for the phone:
Proximity is currently inactive because the device is out of range or a connection could not
be established.
When the phone is again within range, you can click Retry to reactivate the phone as a proximity lock.
• Click Do not lock this computer, disable proximity.
The proximity lock feature is disabled and the computer remains available for use. You can use the
Bluetooth Device Control page for the phone to reenable the proximity lock feature.
• Click Lock this computer.
The computer is locked. If the phone is within range when you unlock the computer, the proximity
feature is automatically reactivated.
If the phone is not in range when you unlock the computer, a notification displays for 10 seconds that
offers the same options shown in the figure.
Configuring the Out-of-Range Distance
You can adjust how far your phone must be from the computer before the computer recognizes it as
out of range and displays the proximity lock notification. In the Bluetooth Device Control window, click
Settings, then drag the slider bar closer to the computer or the lock. The closer the bar is to the
computer, the closer the phone must be to prevent the computer from locking.

Use My Phone as a Bluetooth Proximity Device for My Computer
You can configure your computer to automatically lock whenever your Bluetooth enabled phone is
moved out of range and to unlock when the phone returns within range. The phone is referred to as a
proximity device for the computer. When your computer is locked, you must enter your Windows user
password to unlock it and regain access to your programs and files.
NOTE: The proximity lock feature attempts to connect to your phone using one of the following
Bluetooth profiles, in the order listed.
• Serial Port Profile (SPP)
• Hands-free Profile (HFP)
• Advanced Audio Distribution Profile (A2DP)
If your phone does not support any of these profiles, the proximity lock feature will not be
available. Refer to the documentation that came with your phone for information on supported
Bluetooth profiles and how to enable them.
Enabling Your Phone as a Proximity Device
1.
If you have not already done so, add the Bluetooth enabled phone to your computer (see Add a
Bluetooth Enabled Device).
2.
Double-click the Bluetooth icon in the taskbar notification area. Double-click the icon for the
device, or right-click the icon and select Control.
3.
Under Phone Operations\ Proximity, select Use the (Device Name) as a proximity
device.
NOTE: If the Serial Port Profile is available on your phone for this service, this option displays as
shown in step 3.
If the Hands-free Profile is available on your phone, this option displays as follows:
Use the (Device Name) as a proximity device (this will cause a headset connection to
the phone to remain open)
If the A2DP Profile is available on your phone, this option displays as follows:
Use the (Device Name) as a proximity device (this will cause an audio connection to the

phone to remain open)
If this option does not display, your phone may not support this feature.
4. On the phone, accept the connection, if necessary.
NOTE: Only one device at a time can be enabled as a proximity device. If you attempt to enable
a second device as a proximity device, an alert displays to allow you to disable this service on the
current device.
NOTE: Depending on the Bluetooth profile this feature uses, disconnecting the computer from
other phone services may also disconnect the proximity lock feature. For example, if the
proximity lock feature uses the Hands-free Profile, then disconnecting the Headset and
Speakerphone service will also disconnect the proximity lock feature. An alert displays to enable
you to cancel or continue disconnecting.
Using the Proximity Lock Feature
When your phone is connected as a proximity device and the phone is moved out of range, a
Bluetooth Notification displays on your computer:
You can take the following actions:
• Allow the computer to lock automatically after 10 seconds.
While the phone is out of range, the proximity feature remains enabled but inactive. If the phone is
again within range when you unlock the computer, the proximity feature is automatically reactivated.

If the phone is not in range when you unlock the computer, a notification displays for 10 seconds that
offers the same options shown in the figure.
• Click Do not lock this computer.
The computer does not attempt to lock for 30 minutes, allowing you to continue using your computer.
The proximity feature remains enabled but is inactivated. After 30 minutes, the computer attempts to
reconnect to the proximity device. If it is within range, the proximity feature is reactivated
automatically and you can continue working without interruption. If it is not in range, a notification
displays with the same options shown in the figure.
When the proximity feature is enabled but inactive, the following message displays in the Bluetooth
Device Control window for the phone:
Proximity is currently inactive because the device is out of range or a connection could not
be established.
When the phone is again within range, you can click Retry to reactivate the phone as a proximity lock.
• Click Do not lock this computer, disable proximity.
The proximity lock feature is disabled and the computer remains available for use. You can use the
Bluetooth Device Control page for the phone to reenable the proximity lock feature.
• Click Lock this computer.
The computer is locked. If the phone is within range when you unlock the computer, the proximity
feature is automatically reactivated.
If the phone is not in range when you unlock the computer, a notification displays for 10 seconds that
offers the same options shown in the figure.
Configuring the Out-of-Range Distance
You can adjust how far your phone must be from the computer before the computer recognizes it as
out of range and displays the proximity lock notification. In the Bluetooth Device Control window, click
Settings, then drag the slider bar closer to the computer or the lock. The closer the bar is to the
computer, the closer the phone must be to prevent the computer from locking.
Use My Phone as a Bluetooth Proximity Device for My Computer
You can configure your computer to automatically lock whenever your Bluetooth enabled phone is
moved out of range and to unlock when the phone returns within range. The phone is referred to as a
proximity device for the computer. When your computer is locked, you must enter your Windows user
password to unlock it and regain access to your programs and files.

NOTE: The proximity lock feature attempts to connect to your phone using one of the following
Bluetooth profiles, in the order listed.
• Serial Port Profile (SPP)
• Hands-free Profile (HFP)
• Advanced Audio Distribution Profile (A2DP)
If your phone does not support any of these profiles, the proximity lock feature will not be
available. Refer to the documentation that came with your phone for information on supported
Bluetooth profiles and how to enable them.
Enabling Your Phone as a Proximity Device
1.
If you have not already done so, add the Bluetooth enabled phone to your computer (see Add a
Bluetooth Enabled Device).
2.
Double-click the Bluetooth icon in the taskbar notification area. Double-click the icon for the
device, or right-click the icon and select Control.
3.
Under Phone Operations\ Proximity, select Use the (Device Name) as a proximity
device.
NOTE: If the Serial Port Profile is available on your phone for this service, this option displays as
shown in step 3.
If the Hands-free Profile is available on your phone, this option displays as follows:
Use the (Device Name) as a proximity device (this will cause a headset connection to
the phone to remain open)
If the A2DP Profile is available on your phone, this option displays as follows:
Use the (Device Name) as a proximity device (this will cause an audio connection to the
phone to remain open)
If this option does not display, your phone may not support this feature.
4. On the phone, accept the connection, if necessary.
NOTE: Only one device at a time can be enabled as a proximity device. If you attempt to enable
a second device as a proximity device, an alert displays to allow you to disable this service on the
current device.
NOTE: Depending on the Bluetooth profile this feature uses, disconnecting the computer from
other phone services may also disconnect the proximity lock feature. For example, if the
proximity lock feature uses the Hands-free Profile, then disconnecting the Headset and
Speakerphone service will also disconnect the proximity lock feature. An alert displays to enable
you to cancel or continue disconnecting.
Using the Proximity Lock Feature
When your phone is connected as a proximity device and the phone is moved out of range, a
Bluetooth Notification displays on your computer:
You can take the following actions:
• Allow the computer to lock automatically after 10 seconds.
While the phone is out of range, the proximity feature remains enabled but inactive. If the phone is
again within range when you unlock the computer, the proximity feature is automatically reactivated.
If the phone is not in range when you unlock the computer, a notification displays for 10 seconds that
offers the same options shown in the figure.
• Click Do not lock this computer.
The computer does not attempt to lock for 30 minutes, allowing you to continue using your computer.
The proximity feature remains enabled but is inactivated. After 30 minutes, the computer attempts to
reconnect to the proximity device. If it is within range, the proximity feature is reactivated
automatically and you can continue working without interruption. If it is not in range, a notification
displays with the same options shown in the figure.
When the proximity feature is enabled but inactive, the following message displays in the Bluetooth
Device Control window for the phone:

Proximity is currently inactive because the device is out of range or a connection could not
be established.
When the phone is again within range, you can click Retry to reactivate the phone as a proximity lock.
• Click Do not lock this computer, disable proximity.
The proximity lock feature is disabled and the computer remains available for use. You can use the
Bluetooth Device Control page for the phone to reenable the proximity lock feature.
• Click Lock this computer.
The computer is locked. If the phone is within range when you unlock the computer, the proximity
feature is automatically reactivated.
If the phone is not in range when you unlock the computer, a notification displays for 10 seconds that
offers the same options shown in the figure.
Configuring the Out-of-Range Distance
You can adjust how far your phone must be from the computer before the computer recognizes it as
out of range and displays the proximity lock notification. In the Bluetooth Device Control window, click
Settings, then drag the slider bar closer to the computer or the lock. The closer the bar is to the
computer, the closer the phone must be to prevent the computer from locking.
Connect to Another Bluetooth Enabled Computer to Play Games or Chat
You may be able to connect to another Bluetooth enabled computer to play games or chat with
another user. EasyBits games, such as and Checkers, Chess, and Tic-Tac-Toe, and the EasyBits Chat
program are installed on many Bluetooth enabled computers. If the same game or the chat application
is installed on both computers and they are located within range, you can use the Bluetooth
connection to facilitate the shared gaming or chat experience.
Playing EasyBits Games
1.
Ensure that both computers are within range and discoverable. On each computer, click the
Bluetooth icon in the taskbar notification area, and then click Open Settings. Ensure that Allow
Bluetooth Devices to find this computer is selected.
2. On each computer, click the Start button , and then click Games.
3. On each computer, double-click the EasyBits game you want to play.

NOTE: You can run only one EasyBits game at a time.
4.
On one of the computers (but not both), select the name of the other Bluetooth enabled computer
and click Continue.
NOTE: You can start the connection from either computer, but not both.
5. Accept the connection on the other computer.
6. Follow the on-screen instructions to play the game.
Using EasyBits Chat
1. Ensure that both computers are within range and discoverable.
2.
On each computer, click the Bluetooth icon in the taskbar notification area, and then click Open
Settings. Ensure that Allow Bluetooth Devices to find this computer is selected.
3. On each computer, click the Start button , click All Programs, and then click EasyBits Chat.
4.
On one of the computers, select the name of the computer you want to chat with, type your
message, and click Send.
The message automatically appears in the chat window of the receiving computer.
Connect to Another Bluetooth Enabled Computer to Play Games or Chat
You may be able to connect to another Bluetooth enabled computer to play games or chat with
another user. EasyBits games, such as and Checkers, Chess, and Tic-Tac-Toe, and the EasyBits Chat
program are installed on many Bluetooth enabled computers. If the same game or the chat application
is installed on both computers and they are located within range, you can use the Bluetooth
connection to facilitate the shared gaming or chat experience.
Playing EasyBits Games
1.
Ensure that both computers are within range and discoverable. On each computer, click the
Bluetooth icon in the taskbar notification area, and then click Open Settings. Ensure that Allow
Bluetooth Devices to find this computer is selected.
2. On each computer, click the Start button , and then click Games.

3. On each computer, double-click the EasyBits game you want to play.
NOTE: You can run only one EasyBits game at a time.
4.
On one of the computers (but not both), select the name of the other Bluetooth enabled computer
and click Continue.
NOTE: You can start the connection from either computer, but not both.
5. Accept the connection on the other computer.
6. Follow the on-screen instructions to play the game.
Using EasyBits Chat
1. Ensure that both computers are within range and discoverable.
2.
On each computer, click the Bluetooth icon in the taskbar notification area, and then click Open
Settings. Ensure that Allow Bluetooth Devices to find this computer is selected.
3. On each computer, click the Start button , click All Programs, and then click EasyBits Chat.
4.
On one of the computers, select the name of the computer you want to chat with, type your
message, and click Send.
The message automatically appears in the chat window of the receiving computer.
Connect to Another Bluetooth Enabled Computer to Play Games or Chat
You may be able to connect to another Bluetooth enabled computer to play games or chat with
another user. EasyBits games, such as and Checkers, Chess, and Tic-Tac-Toe, and the EasyBits Chat
program are installed on many Bluetooth enabled computers. If the same game or the chat application
is installed on both computers and they are located within range, you can use the Bluetooth
connection to facilitate the shared gaming or chat experience.
Playing EasyBits Games
1.
Ensure that both computers are within range and discoverable. On each computer, click the
Bluetooth icon in the taskbar notification area, and then click Open Settings. Ensure that Allow
Bluetooth Devices to find this computer is selected.

2. On each computer, click the Start button , and then click Games.
3. On each computer, double-click the EasyBits game you want to play.
NOTE: You can run only one EasyBits game at a time.
4.
On one of the computers (but not both), select the name of the other Bluetooth enabled computer
and click Continue.
NOTE: You can start the connection from either computer, but not both.
5. Accept the connection on the other computer.
6. Follow the on-screen instructions to play the game.
Using EasyBits Chat
1. Ensure that both computers are within range and discoverable.
2.
On each computer, click the Bluetooth icon in the taskbar notification area, and then click Open
Settings. Ensure that Allow Bluetooth Devices to find this computer is selected.
3. On each computer, click the Start button , click All Programs, and then click EasyBits Chat.
4.
On one of the computers, select the name of the computer you want to chat with, type your
message, and click Send.
The message automatically appears in the chat window of the receiving computer.
Share Files Between Bluetooth Devices Set the Folder Used to Exchange Files with Another Bluetooth Device
Browse Files on Another Bluetooth Device
Send Files and Folders to Another Bluetooth Enabled Device
Send Files From Microsoft Office Applications to Another Bluetooth Enabled Device
Send a Web Page From Microsoft Internet Explorer to Another Bluetooth Enabled Device
Send a Web Image From Microsoft Internet Explorer to Another Bluetooth Enabled Device

Set the Folder Used to Exchange Files with Another Bluetooth Device
Use this option to set the folder on this computer used for file transfers with the other Bluetooth
enabled device. When the other device sends a file, it will be stored here. Also, a subfolder of this
folder is used as the default location for backing up and restoring contact and calendar information
from other Bluetooth devices. You can create subfolders for organizing files that you transfer, and you
can change the location and name of Bluetooth Exchange Folder.
CAUTION:The default folder for Bluetooth file exchanges is named Bluetooth Exchange Folder
and is located in My Documents. You can choose a different folder for exchanging Bluetooth files;
however do not select the root directory (for example, C:) or a system folder. Selecting the root
directory or a system folder creates the potential for remote devices to harm the operating
system on your computer.
To select a different folder:
1.
Double-click the Bluetooth icon in the taskbar notification area. Double-click the icon for the
device, or right-click the icon and select Control.
2.
Click File Exchange settings in the Settings area to display the folder currently used for Bluetooth
file exchanges.
3. Click Browse to select a different folder or make a new folder.
Also see Set Rules for Sharing Files and Equipment.
Browse Files on Another Bluetooth Device
You can browse the files on another Bluetooth enabled device and exchange files with this computer.
To browse files on another device:
1.
If you have not already done so, add the Bluetooth enabled device you want to use to connect to the
Internet (see Add a Bluetooth Enabled Device).
2.
Double-click the Bluetooth icon in the taskbar notification area. Double-click the icon for the
device, or right-click the icon and select Control.
3.
Under Computer Operations\ File Transfer, click Browse the files on the (Device Name)
Device Type.
4. On the Bluetooth device, accept the connection, if necessary.
A window opens to enable you to browse the folders and files on the other device.

NOTE: You can copy files between the two devices by dragging and dropping them between
folders on your remote device and this computer. You can also right-click on a file or folder, select
Copy, and then paste it to a location on this computer, or vice versa.
Send Files and Folders to Another Bluetooth Enabled Device
You can send a file from this computer to another Bluetooth enabled device such as a mobile phone or
another computer. This feature provides a quick way to transfer files without requiring you to browse
the file system on the other device.
There are several ways of sending files or folders:
Using the Bluetooth Device Control Panel:
1.
If you have not already done so, add the Bluetooth enabled device to which you want to send files
or folders (see Add a Bluetooth Enabled Device).
2.
Double-click the Bluetooth icon in the taskbar notification area. Double-click the icon for the
device, or right-click the icon and select Control.
3.
Under Device Type Operations\ File Transfer, click Send files to the (Device
Name)Device Type
4. Follow the onscreen instructions in Bluetooth Send Wizard.
Using the Send To Bluetooth option:
1. Open Windows Explorer and browse to the file or folder you want to send.
2. Right-click the file or folder, click Send To, and then click Bluetooth.
3. Follow the onscreen instructions in Bluetooth Send Wizard.
Copying or Dragging files and folders to the Bluetooth device icon:
1. Open Windows Explorer and browse to where the file or folder you want to send is located.
2. Double-click the Bluetooth icon in the taskbar notification area.
3.
Copy or drag the file or folder in Windows Explorer to the icon for the destination device in the
Bluetooth Devices window.
NOTE: You may have to authorize receiving the file or folder on the Bluetooth device.

Send Files From Microsoft Office Applications to Another Bluetooth Enabled Device
1. Open the Microsoft Office file you want to send.
2.
On the File menu, point to Send To, point to Bluetooth, and then click the name of the destination
device.
-or-
Click Other, click the device name in the Select Device list, and then click OK.
NOTE: You may have to authorize receiving the file on the Bluetooth device.
Send a Web Page From Microsoft Internet Explorer to Another Bluetooth Enabled Device
1. Open Internet Explorer and browse to the web page you want to send.
2. On the toolbar, click the Send To Bluetooth icon.
3. Follow the onscreen instructions in Send To Bluetooth Wizard.
NOTE: You may have to authorize receiving the web page on the Bluetooth device.
Send a Web Image From Microsoft Internet Explorer to Another Bluetooth Enabled Device
1. Open Internet Explorer and browse to the web page that has the image you want to send.
2. Right-click the image, and then click Send To Bluetooth Device.
3. Follow the onscreen instructions in Send To Bluetooth Wizard.

Share and Manage Personal Information Manager (PIM) Items
Send Personal Information Manager (PIM) Items
Back Up Contacts and Calendar Items from Another Bluetooth Enabled Device
Copy Contacts and Calendar Items Between Bluetooth Devices
Restore the Backed-Up Contacts and Calendar Items of Another Bluetooth Enabled Device
Synchronize Contacts, Calendars, Mail, and Notes Folders
Synchronize Files and Outlook Data with Your Bluetooth Enabled Windows Phone
Send Personal Information Manager (PIM) Items
1.
If you have not already done so, add the Bluetooth enabled device to which and from which you
want to send PIM items (see Add a Bluetooth Enabled Device).
2.
Double-click the Bluetooth icon in the taskbar notification area. Double-click the icon for the
device, or right-click the icon and select Control.
3. If you use Microsoft Outlook:
• Open Outlook Mail, Contacts, Calendar, or Notes and select the items you want to send.
• On the File menu, point to Send To Bluetooth, and then click the name of the receiving device.
-or-
• Drag the selected items to the device icon in the Bluetooth Control panel.
4. If you use another PIM application:
• Open your PIM application and select the items you want to send.
• Drag the selected items to the device icon on the control panel.
If the receiving device uses Outlook, the sent files are stored in the respective Outlook folders. If not,
the sent files are stored in the device shared folder.
To be able to receive PIM items, follow the instructions in Set Rules for Sending and Receiving PIM Items.
NOTE: You may have to authorize sending and PIM items on the Bluetooth device.
Back Up Contacts and Calendar Items from Another Bluetooth Enabled Device
If another Bluetooth enabled device uses a Personal Information Manager (PIM) application, you can
back up the Contacts and Calendar items from that device to your computer. Backups can be restored
to the device to recover lost data, or can be transferred from the computer to another Bluetooth
device.
1.
If you have not already done so, add the other Bluetooth enabled device that has the contacts and
calendar data that you want to back up (see Add a Bluetooth Enabled Device).
2.
Double-click the Bluetooth icon in the taskbar notification area. Double-click the icon for the
device, or right-click the icon and select Control.
3.
Under Device Type Operations\ Backup and Synchronization, click Back up Contacts
and Calendar fromthe(Device Name)Device Typeto my computer.
4. In Select Backup Items, click Back Up Selected Items to accept the default selections.
-or-
If you want to back up contacts but not calendar items (or vice versa), clear the check box for the
item that you do not want to back up, and then click Back Up Selected Items.
A progress bar displays to indicate the status of the backup. When completed, the message “Backup
Successful” displays.
NOTE: You may have to authorize backing up calendar and contact items on the Bluetooth
device.
Restore the Backed-Up Contacts and Calendar Items of Another Bluetooth Enabled Device
If you have backed up the Contacts and Calendar items from another Bluetooth enabled device to your
computer, you can later restore the backed-up folders to the other device.
1.
If you have not already done so, add the other Bluetooth enabled device to which you want to
restore the backed-up Contacts and Calendar items (see Add a Bluetooth Enabled Device).
2.
Double-click the Bluetooth icon in the taskbar notification area. Double-click the icon for the
device, or right-click the icon and select Control.

3.
Under Device Type Operations\ Backup and Synchronization, click Restore backed-up
Contacts and Calendar to the (Device Name) Device Type.
4.
In the My device backups pane, expand the backed-up items containing the files you want to
restore, and then click either Calendar or Contacts.
NOTE: You cannot restore both the contacts and calendar items at the same time. You must
restore them one at a time.
5.
In the right pane, select the check box next to the specific files you want to restore, and then click
Restore.
You can also enter a keyword in the search box and click . Select Search Results in the device
backups pane to display items that match the keyword. Expand the backed-up folder, and then click
Contacts or Calendar, as appropriate.
•
For calendar items, you can enter a date or a word that you think appears in the description or
summary fields.
• For contacts you can enter a name or other word that you think appears in the name field.
A window displays to show progress.
NOTE: You may have to authorize restoring calendar and contact items on the Bluetooth device.
Copy Contacts and Calendar Items Between Bluetooth Devices
If you have multiple Bluetooth enabled devices that store contact, calendar, and other PIM information,
you can use this computer to copy items between them.
• First, back up the information from one device to this computer.
• Then, restore selected information, or all information, from this computer to the second device.
Refer to the instructions for each task.

Synchronize Contacts, Calendars, Mail, and Notes Folders
You can synchronize the Contacts, Calendars, Mail, and Notes folders on your computer with the
respective folders on another Bluetooth enabled device. During synchronization, the contents of each
folder on the other Bluetooth enabled device is compared with the contents of each respective folder
on your computer. If an item exists on one device but not on the other, the item is added. When items
match but show different dates for when they were last updated, you can choose which item to keep
on each device.
1.
If you have not already done so, add the Bluetooth enabled device with which you want to
synchronize your Contacts, Calendars, Mail, and Notes folders (see Add a Bluetooth Enabled Device).
2.
Double-click the Bluetooth icon in the taskbar notification area. Double-click the icon for the
device, or right-click the icon and select Control.
3.
Under Device Type Operations\ Backup and Synchronization, click Synchronize
Contacts and Calendar between this computer and the (Device Name) type.
4. On the other Bluetooth device, accept the connection, if necessary.
5.
In Select Folders to Synchronize, click Synchronize Selected Folders to accept the default
selections.
-or-
If you want to synchronize some folders, but not others, clear the check box for those folders you do
not want to synchronize, and then click Synchronize Selected Folders.
A notification displays when complete. For items that match but show different dates, a window
displays to enable you to choose the item to keep on either device.
NOTE: You may have to authorize the synchronizing on the Bluetooth device.
Synchronize Files and Outlook Data with Your Bluetooth Enabled Windows Phone
If you have a Windows Phone, you can use the ActiveSync service to synchronize music, photos, and
Outlook contacts and e-mail between your phone and computer. You may be able to use a Bluetooth
connection instead of a USB cable to perform the synchronization.

NOTE: You must install the Windows Mobile Device Center (WMDC) on your computer to enable
using ActiveSync with your Windows Phone. Visit microsoft.com for more information.
To synchronize data between your Windows Phone and your computer:
1.
If you have not already done so, add the Windows Mobile phone as a Bluetooth device on this
computer (see Add a Bluetooth Enabled Device).
2.
Double-click the Bluetooth icon in the taskbar notification area. Double-click the icon for the
device, or right-click the icon and select Control.
3. Under Phone Operations\ ActiveSync, click ActiveSync with the (Device Name) phone.
NOTE: If this option does not display, your Windows Phone may not support syncing using a
Bluetooth connection. Refer to the owner’s manual that came with your phone.
4.
On the Windows Phone, accept the connection, if necessary. The synchronization application starts
on your phone.
Control How Bluetooth Technology Works On My Computer
Configure Whether Your Bluetooth Enabled Hands-free
Device Shows Contact Information and Call Logs
Manage Bluetooth Settings
Turn the Bluetooth Radio On and Off
Add or Delete a Communications Port
Manage My Local Bluetooth Adapters
Set Rules for Sharing Files and Equipment
Set Rules for Sending and Receiving PIM Items
Display the Device Properties

Configure Whether Your Bluetooth Enabled Hands-free Device Shows Contact Information and Call Logs
Some hands-free devices provide an LCD display to show caller ID information for incoming calls. If
your device has this capability, and you use an Internet phone service such as Skype™ on your
computer, then you can configure whether the headset displays contact and call information for calls
received on this computer.
1.
If you have not already done so, add the Bluetooth audio headset to your computer (see Add a
Bluetooth Enabled Device).
2.
Double-click the Bluetooth icon in the taskbar notification area. Double-click the icon for the audio
headset, or right-click the icon and select Control.
3. Under Settings, click Headset type and select one of the following:
• My hands-free device does not have a display
• My hands-free device can retrieve and display caller ID and call information
If you select this option, you can choose Do not allow hands-free device to retrieve and display
information if you do not want it to display such information for calls made through this computer.
The headset will continue to display this information when connected to other devices such as your
phone.
4. Click Apply.
Manage Bluetooth Settings
You can configure general options that control Bluetooth operation.
1.
Click the Bluetooth icon in the taskbar notification area, and then click Open Settings. If you are
prompted for an administrator password or confirmation , type your password or click Allow.
NOTE: Because of corporate security policies, it might not be possible to change particular
Bluetooth settings. If so, contact your IT administrator for more information or if you have any
questions.
2. Do any of the following:
• Allow or prevent Bluetooth devices to find this computer.

• Allow or prevent Bluetooth devices from connecting to this computer.
If you later clear this check box, devices that have previously connected to this computer can still do
so.
• Select whether you receive an alert when a new Bluetooth device wants to connect.
• Display or hide the Bluetooth icon in the notification area.
If it is hidden, you can continue to access Bluetooth software by clicking Start, and clicking Control
Panel. Select Devices and Printers, and then right-click your Bluetooth hardware adapter. To
display Bluetooth Settings from Bluetooth Device Control, click Open Bluetooth settings under See
also in the left pane.
Or, you can click Devices
• Turn the Bluetooth Adapter off.
You can also turn off the Adapter by clicking the Bluetooth icon in the taskbar notification area, and
then click Turn Adapter Off.
3. When finished configuring Bluetooth options, click OK.
Turn the Bluetooth Radio On and Off
There may be times, such as when you are flying on a commercial aircraft, when you want to leave
your computer on but are required to turn the Bluetooth radio off. If your Bluetooth adapter is plugged
into a USB port on your computer, you can turn off the radio just by physically removing the adapter.
Similarly, if you want to turn it back on, just plug it in. If your Bluetooth adapter is embedded in your
computer, however, you must turn the radio on and off.
To turn off the Bluetooth radio off, click the Bluetooth icon in the taskbar notification area, and then
click Turn Adapter Off.
By default, the Bluetooth radio is on unless you turn it off.
If the Bluetooth radio is not detected, it is likely that it has been turned off with a hardware switch.
Check the manual that came with your computer for information about the location of the hardware
switch and for instructions on how to use it.

Add or Delete a Communications Port
On the COM Port tab, you can add or delete a serial port.
To view, add, or delete a communications port:
1. Click the Bluetooth icon in the taskbar notification area, and then select Open Settings.
2. In Bluetooth Settings, click the COM Ports tab.
To add a communications port:
1. Click Add.
2. In Add COM Port, select Incoming or Outgoing.
An incoming communications port is used by other Bluetooth enabled devices to create a
communications link to this computer. An outgoing communications port is used by this computer to
create a communications link with another Bluetooth enabled device.
3.
If you selected Outgoing, click Browse, select the Bluetooth device you want to create a link to, and
click OK.
To delete a communications port:
In the list, click to select the communications port you want to delete, and then click Delete.
Manage My Local Bluetooth Adapters
You can view the name, type, and status of each Bluetooth adapter that is installed on this computer.
You can also view the properties of each adapter.
To manage local Bluetooth adapters:
1. Click the Bluetooth icon in the taskbar notification area, and then select Open Settings.
If you are prompted for an administrator password or confirmation , type your password or click
Allow.
2. In Bluetooth Settings, click the Hardware tab.
3. To view properties of a specific adapter, select it and click Properties.
The tabs in the Properties window display the following information:

General tab—Displays basic properties of the adapter.
Advanced tab—Displays properties for the radio, including the Bluetooth Host Controller Interface
(HCI) version and the Bluetooth Link Manager Protocol (LMP) version.
Driver tab—Displays information about the driver and, if these features are available, enables
updating, disabling, and uninstalling the driver.
Details tab—Displays device properties and values.
Set Rules for Sharing Files and Equipment
You can configure your computer to enable other Bluetooth devices to use some of the peripheral
devices that are physically connected to your computer. Examples of such peripheral devices include a
printer and modem.
Also, you can configure your computer to allow other Bluetooth devices to access the files and folders
in Bluetooth Exchange Folder on your computer and to send pictures, music, and other files to the
folder.
1. Click the Bluetooth control icon in the Windows notification area and select Open Settings.
If you are prompted for an administrator password or confirmation , type your password or click
Allow.
2. Click the Share tab.
3. Configure any of the following:
•
Allow other Bluetooth devices to access the files and folders in Bluetooth Exchange Folder and send
files to Bluetooth Exchange Folder.
NOTE:
•
When another Bluetooth device attempts to send you a file, a Bluetooth File Transfer Access
Authorization message is displayed. If the item is being sent from a trusted device, click OK to
authorize access. If the item is not being sent from a trusted device, or you are not sure, ignore
the request or click Cancel to deny access. You can specify whether to allow access only for the
current time, for a specific amount time, or to always allow access for that particular device.
•
Upon receiving a document, you are prompted to save it in your Bluetooth Exchange Folder,
which, by default, is located in the Documents folder. For other file types, such as images or
video, you are prompted to save the files to appropriate folders, such as Pictures or Video,
under Libraries. You can select another folder before saving any file.
• To specify if or how you want to be notified when a remote device attempts to connect to your
computer, click the notification link in the You will receive a notification when a remote

Bluetooth device attempts to connect to this computer statement.
• Open Bluetooth Exchange Folder
•
Designate a different location for Bluetooth Exchange Folder. Click Browse, and then select the
folder where the File Transfer service will save files. Be sure to name the folder Bluetooth
Exchange Folder.
CAUTION:The default folder for Bluetooth file exchanges is named Bluetooth Exchange Folder
and is located in My Documents. You can choose a different folder for exchanging Bluetooth files;
however do not select the root directory (for example, C:) or a system folder. Selecting the root
directory or a system folder creates the potential for remote devices to harm the operating
system on your computer.
• Allow remote Bluetooth devices to use your printer connected to your computer.
• Allow other Bluetooth devices to use your modem to connect to the Internet or to send a fax.
4. When finished configuring sharing properties, click OK.
Set Rules for Sending and Receiving PIM Items
You can specify whether you want to allow other Bluetooth enabled devices to send you PIM items
such as business cards, calendar items, messages, and notes. You can also specify where to store
received items and whether to include attachments with mail that you send and receive.
You can configure default rules for all Bluetooth devices added to your computer, and you can
configure a device to override the default settings.
To configure default rules for all Bluetooth devices:
1.
Right-click the Bluetooth icon in the taskbar notification area, and then click Bluetooth
Configuration.
2. In Bluetooth Configuration, click the PIM Interface tab.
3.
Select Allow Bluetooth devices to send you PIM items such as business cards, calendar
items, mail, and notes check box. If you do not want to allow this, clear the check box.
4. Select the application where you want to send and receive items of each PIM type.
For example, if you have more than one e-mail application on this computer, select the one you want
to synchronize.
If you do not want to receive particular types of PIM items, click Do Not Accept for those types of
items.
5. If desired, select the Include attachments with mail sent or received by this computer check

box. If you do not want to include attachments, clear the check box.
To configure rules for a particular device:
1.
Double-click the Bluetooth icon in the taskbar notification area. Double-click the icon for the
device, or right-click the icon and select Control.
2. Under Tasks in the left pane, click Synchronization settings.
3.
Select the checkboxes next to the PIM items that you want this computer to accept from your
Bluetooth enabled device.
When you synchronize devices, these items are selected by default. You may be able to select
additional items before synchronizing.
4. Select the application where you want to send and receive items of each PIM type.
For example, if you have more than one e-mail application on this computer, select the one you want
to synchronize.
If you do not want to receive particular types of PIM items, click Do Not Accept for those types of
items.
5. Click Apply.
Display the Device Properties
To display hardware data and other information about a Bluetooth device:
1. Double-click the Bluetooth icon in the taskbar notification area.
2. In Bluetooth Devices, right-click the device and select Properties.


