BEM Transponder Operating Guide - BMX Sports WA · BEM Operating Guide for Transponder and Lynx...
29
BMX Event Manager © Operating Guide for Transponder & Lynx Interfaces Contents Contents .................................................................................................................................................... 1 Introduction .............................................................................................................................................. 1 Typical BEM Network Set Up ................................................................................................................. 2 PC Checks ............................................................................................................................................ 3 BEM Settings and Options ....................................................................................................................... 4 Transponder Settings ............................................................................................................................ 4 Results Entry Controls .......................................................................................................................... 7 Scoring with Transponders ....................................................................................................................... 9 Start of Racing Actions ........................................................................................................................ 9 Transponder Scoring Tips and Tricks ................................................................................................. 11 Pre Event Activities and Planning for Transponders .............................................................................. 12 Create Transponder Allocation List .................................................................................................... 12 Allocate Transponders to Riders ........................................................................................................ 13 Setting up the Event in DataCollector ................................................................................................ 15 Validate Transponder Fitting .............................................................................................................. 21 Post Event Transponder Audit ................................................................................................................ 21 BEM and Lynx Interfaces ...................................................................................................................... 23 Lynx Operation................................................................................................................................... 23 Track Considerations for Transponders.................................................................................................. 27 Transponder Start of Race Day Checklist .............................................................................................. 29 Introduction This guide describes the configuration and operation of the BEM program when interfacing to a transponder lap time system and the Lynx camera interworking facilities. The scope of the guide is to cover configuration of the options and settings, pre event activities, post event activities, scoring and trouble shooting. Screen shots and examples used in this guide are from BEM Version 3.2.0 and My-Laps (AMB it ) DataCollector program operating with a ChipX transponder system. Document Version: 2.6 Document Date: 25 June 2013 Software Examples from: BEM Program: Version 3.4.2 MyLaps DataCollector: Version 3.0 Hotfix1 Build 9612 All feedback (good and bad) appreciated to [email protected]
Transcript of BEM Transponder Operating Guide - BMX Sports WA · BEM Operating Guide for Transponder and Lynx...
BMX Event Manager©
Operating Guide for Transponder & Lynx Interfaces
Contents Contents .................................................................................................................................................... 1 Introduction .............................................................................................................................................. 1 Typical BEM Network Set Up ................................................................................................................. 2
PC Checks ............................................................................................................................................ 3 BEM Settings and Options ....................................................................................................................... 4
Transponder Settings ............................................................................................................................ 4 Results Entry Controls .......................................................................................................................... 7
Scoring with Transponders ....................................................................................................................... 9 Start of Racing Actions ........................................................................................................................ 9 Transponder Scoring Tips and Tricks ................................................................................................. 11
Pre Event Activities and Planning for Transponders .............................................................................. 12 Create Transponder Allocation List .................................................................................................... 12 Allocate Transponders to Riders ........................................................................................................ 13 Setting up the Event in DataCollector ................................................................................................ 15 Validate Transponder Fitting .............................................................................................................. 21
Post Event Transponder Audit ................................................................................................................ 21 BEM and Lynx Interfaces ...................................................................................................................... 23
Lynx Operation ................................................................................................................................... 23 Track Considerations for Transponders .................................................................................................. 27 Transponder Start of Race Day Checklist .............................................................................................. 29
Introduction This guide describes the configuration and operation of the BEM program when interfacing to a
transponder lap time system and the Lynx camera interworking facilities.
The scope of the guide is to cover configuration of the options and settings, pre event activities, post
event activities, scoring and trouble shooting.
Screen shots and examples used in this guide are from BEM Version 3.2.0 and My-Laps (AMBit)
DataCollector program operating with a ChipX transponder system.
Document Version: 2.6
Document Date: 25 June 2013
Software Examples from:
BEM Program: Version 3.4.2
MyLaps DataCollector: Version 3.0 Hotfix1 Build 9612 All feedback (good and bad) appreciated to [email protected]
BEM Operating Guide for Transponder and Lynx Interfaces.
2
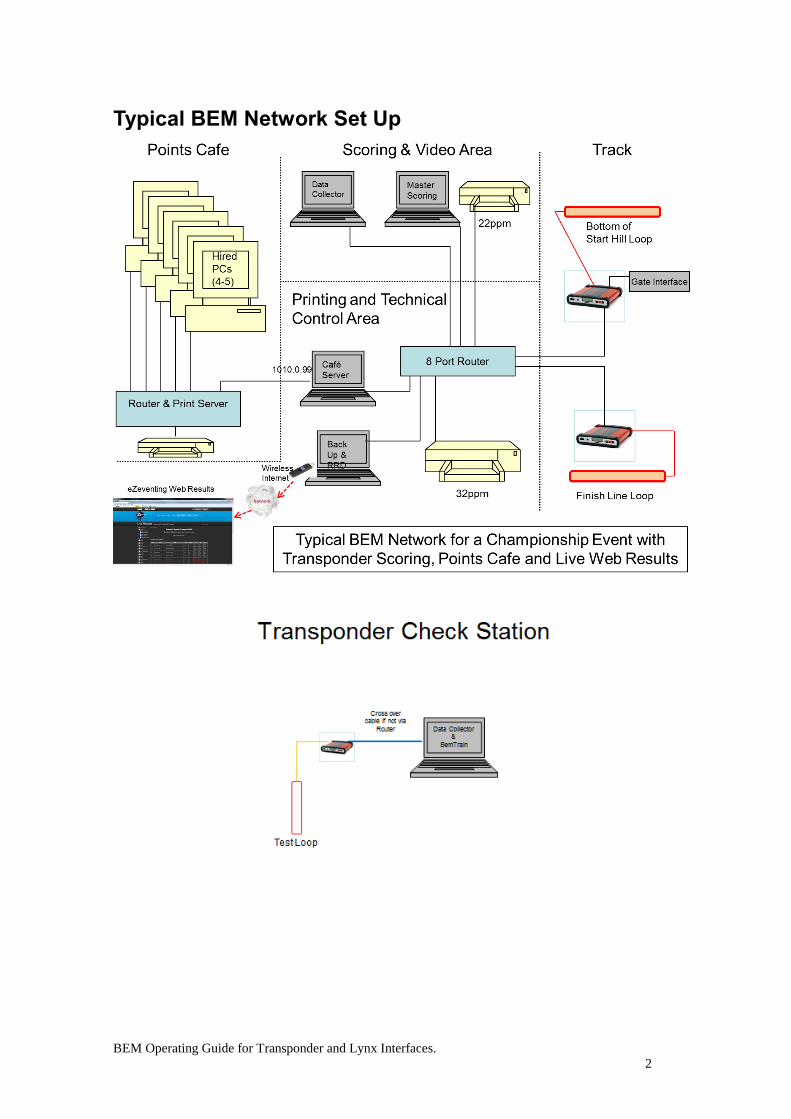
Typical BEM Network Set Up

BEM Operating Guide for Transponder and Lynx Interfaces. 3
PC Checks A common scenario is that laptops and PCs at a BMX event are a collection of association, privately owned
and hired machines. To avoid problems during the event, the following checking / set up pre event are
recommended
Pre-Event
o Run Windows Update to install latest available corrections and service packs.
o Update the anti-virus definitions.
o Set up the required network, drive mapping, user and folder permissions as this can often be a
time consuming task due to the diverse range of firewall settings, firewall programs and
internet security programs encountered, particularly if the computers are from a variety of
sources.
Ensure all computers have the same settings for:
o Region
o Time
o Time zone
o Time format
o Date format
o Language
Typical set up is:
o DataCollector PC to write Live Export files to a “Passings Folder” on the BEM PC.
Note that there are known Windows issues with slow update of mapped drive information that
appear to be avoided by having DataCollector write the export files to a mapped folder with
full access rights on the BEM PC. Therefore this is the recommended configuration rather than
DataCollector writing the export files to its local drive and having BEM read them via a
mapped drive.
o BEM PC:
Set the Passing Files 1 and Passing Files 2 to read the files being exported from the
DataCollector PC.
The Passings Back-up folder should be located on a local drive on the BEM PC.
The use of separate networks for Points Café and Scoring is strongly recommended to prevent any
deliberate or unintended interference with the scoring from the public access Café PCs.
Refer to the RRD User Guide document for detailed information on specific set up requirements for the
Café PCs and for sending live results to the eZeventing web site.
BEM Operating Guide for Transponder and Lynx Interfaces. 4
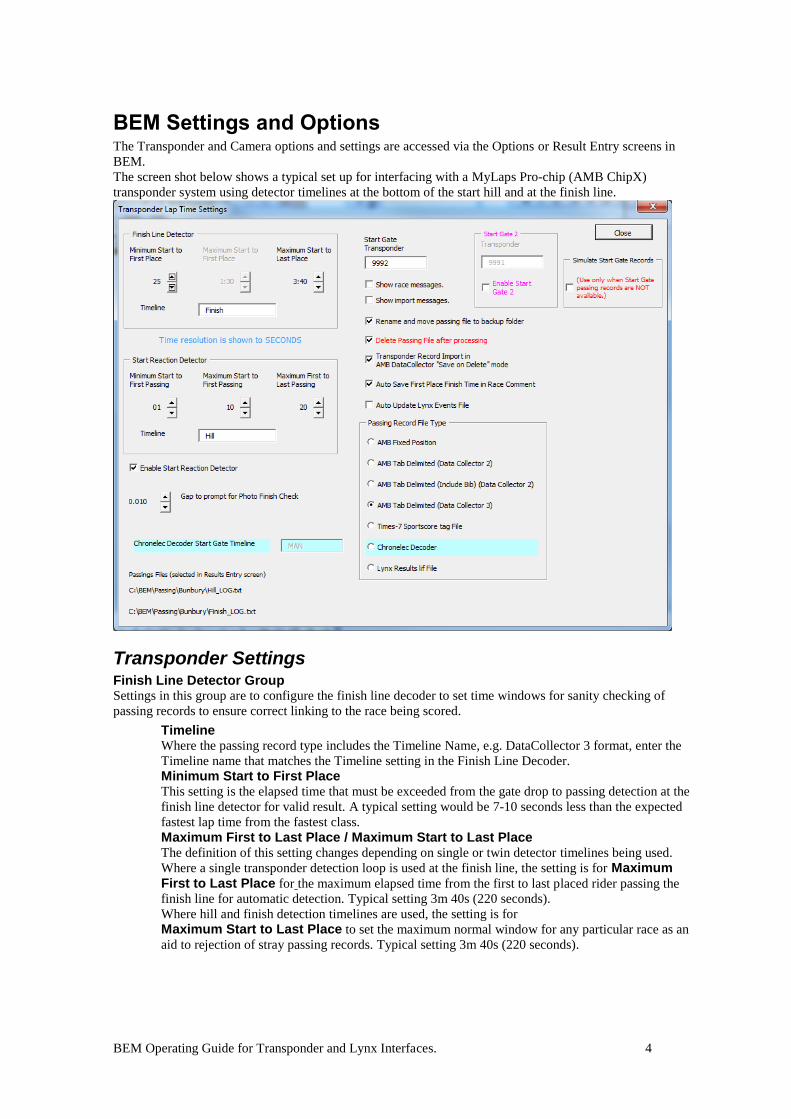
BEM Settings and Options The Transponder and Camera options and settings are accessed via the Options or Result Entry screens in
BEM.
The screen shot below shows a typical set up for interfacing with a MyLaps Pro-chip (AMB ChipX)
transponder system using detector timelines at the bottom of the start hill and at the finish line.
Transponder Settings Finish Line Detector Group Settings in this group are to configure the finish line decoder to set time windows for sanity checking of
passing records to ensure correct linking to the race being scored.
Timeline
Where the passing record type includes the Timeline Name, e.g. DataCollector 3 format, enter the
Timeline name that matches the Timeline setting in the Finish Line Decoder.
Minimum Start to First Place
This setting is the elapsed time that must be exceeded from the gate drop to passing detection at the
finish line detector for valid result. A typical setting would be 7-10 seconds less than the expected
fastest lap time from the fastest class.
Maximum First to Last Place / Maximum Start to Last Place
The definition of this setting changes depending on single or twin detector timelines being used.
Where a single transponder detection loop is used at the finish line, the setting is for Maximum First to Last Place for the maximum elapsed time from the first to last placed rider passing the
finish line for automatic detection. Typical setting 3m 40s (220 seconds).
Where hill and finish detection timelines are used, the setting is for
Maximum Start to Last Place to set the maximum normal window for any particular race as an
aid to rejection of stray passing records. Typical setting 3m 40s (220 seconds).

BEM Operating Guide for Transponder and Lynx Interfaces. 5
Start Reaction Detector Group Settings in the Start Reaction Detector Group are for the track configuration where two detector timelines
are used. Recommended set up is for the second loop to be 10 – 20m after the start gate, typically at the
bottom of the start hill.
Note that these settings are only used where the Enable Start Reaction Detector option is selected.
Timeline
Where the passing record type includes the Timeline, e.g. DataCollector 3 format, enter the
Timeline name that matches the Timeline setting in the bottom of the start hill Decoder.
Minimum Start to First Passing
This setting is the minimum time from the gate drop to the first passing detection. A typical setting
would be 1 or 2 seconds dependant on how far the loop is from the start gate.
Maximum Start to First Passing
The setting is the maximum time expected from the gate drop to the first passing detection. Typical
setting would be 10 seconds.
Maximum First to Last Passing
This setting is the maximum time expected from the first to last rider passing in any particular race.
Typical setting is 20 seconds which should account for most late reaction starts.
Note that should a rider fall on the start and not pass the loop within the set time, they will still be
scored correctly if they cross the Finish Loop within the Maximum Start to Last Place time.
Enable Start Reaction Detector
The option is selected when two detection timelines are used.
Gap to Prompt for Photo Finish Check With transponders typically fixed to front forks in BMX Racing, experience has shown that variations in
placement and bike geometry result in lap time errors for some close results. The setting of this option will
generate an operator prompt to do a photo check should the time gap be equal or smaller than the setting.
Where transponders are used without a camera back up (not recommended) the set the Gap control to 0 to
suppress all prompts.
Typical setting is 0.010 seconds where you have a photo-finish camera as a back-up to take into account the
variations for system accuracy and minor fitting differences between fork types and tyre profiles.
Start Gate Transponder The data entered here must match the pseudo transponder number assigned by the transponder system to
gate drop events.
The data 9992 in the example is for a MyLaps (AMB ChipX) system using the Photo Cell input to the
decoder to generate gate drop events.
Start Gate 2 Transponder
The second start gate 2 transponder is only enabled at tracks with two start hills and each start hill gate
controller using separate Photo Cell inputs into the decoder.
Typical data is 9991 for a MyLaps (AMB ChipX) system.
DO NOT ENABLE THE START GATE 2 TRANSPONDER FOR SINGLE HILL TRACKS.
Simulate Start Gate Records
Note that this option should not be used under normal conditions. The option is provided to allow for results to be determined from the passing records alone and is designed
only to be used where start gate records are not available, either due to a fault or where a start gate controller
is used that is unable to provide a start signal.
Note that while finishing positions set in this mode of operation are accurate, lap times shown do not
accurately reflect the actual lap times.
Messages
The messages settings enable information messages to be displayed should the operator require this level of
detail either to confirm the system is operating normally or to assist with fault tracking.
Show Race Messages Option to show details of the first rider to cross the timeline for the race
being scored.
Show Import Messages Option allows summary messages for imported passing records to be
displayed each time new records are added.
Passing File Handling Rename and move passing file to back up folder. Option when enabled will move and
rename the passing record file to the event back up folder before reading the passing records.
Designed to minimise the number of records read each time a new race is scored as the passing file

BEM Operating Guide for Transponder and Lynx Interfaces. 6
will only contain new records.
Recommended to enable this setting where the import program will re-create the passing file as
required. E.g. AMB DataCollector, Sport Timing Data2Text.
Delete Passing File after Processing. Option when enabled deletes the passing record file
after import to BEM is completed. The option is designed to stop the build up of 100s of small text
files in the back up folder.
Recommended setting is to enable this option only when passing records are able to be retrieved
from the transponder interface program (i.e. AMB DataCollector) and from the decoder.
Transponder Record Import in AMB DataCollector Save on Delete mode. This option is to complement the Save on Delete operation for the Live File Export in the MyLaps
DataCollector program.
Recommended to enable this option when using the MyLaps DataCollector program as the
transponder interface with the “Save on Deletion of file” option for the Live File Export mode used
in DataCollector to minimise the risk of file contention between DataCollector and BEM programs.
Auto Update Lynx Events File
This option (when enabled) will generate an updated Lynx Event (evt) file when subsequent stages of the
event, e.g. Semi Finals are drawn.
Passing Record File Type Group
This group allows the operator to select from a range of pre-defined passing record formats from AMB
(MyLaps), Chronelec (Tag Heuer), Times7 and Lynx timing software. Refer to the individual companies
technical data for full specifications.
Note: Options with shaded background are provided for compatibility with earlier transponder
system interface programs.
AMB Fixed Position is a plain text column dependant format.
Provided for compatibility only as it does not allow for the second timing loop as the timeline
location is not included in the format specification.
AMB Tab Delimited (Data Collector v2) for AMB Data Collector v2 and for Sport Timing Decoder
to Text file Converter.
Provided for compatibility only as it does not allow for the second timing loop as the timeline
location is not included in the format specification.
AMB Tab Delimited (including BIB) provided to give full compatibility with the AMB Data
Collector v2 format options.
Provided for compatibility only as it does not allow for the second timing loop as the timeline
location is not included in the format specification.
AMB Tab Delimited (Data Collector 3) is the recommended format for use with ChipX
Sport Score Tag File is for the Times7 .tag files generated from the Sportscore software.
Chronelec Decoder is to import passing files from the Chronelec / Tag Heuer Protime
transponder system.
Lynx Results lif File is to import race results from the FinishLynx race camera system .lif results
files.
Note: To be able to auto import Lynx results, FinishLynx Event and Schedule files must first be
created and imported into the FinishLynx system.
To generate the files, use the Lynx Events and Lynx Schedule output options from the Race List
Group from the Main Menu screen in BEM.

BEM Operating Guide for Transponder and Lynx Interfaces. 7
Results Entry Controls This section describes controls and operation from the BEM Results Entry Screen.
Transponder and Camera Control Group
Lap Time Button and Options The Lap Time button calculates the lap times for the particular race shown on the results entry screen from
the transponder records or where the Lynx Record Type is used, from the race .lif file.
If the Auto Accept option is selected, the function of the Accept button is performed after the
calculation of the lap times.
The Auto DNS DNF option is only available when both Finish and Hill timelines are used. When
the option is selected, the program will check for DNS and DNF results by comparing passing
records from the Hill and Finish timelines. Where a DNS or DNF is detected, the operator is
prompted to accept or reject the auto detect result.
Where the Auto Import option is enabled, the program will check for and import any outstanding
passing records every time the Lap Time button is clicked before attempting to calculate the lap
times.
Single Import button allows for a one off import of passing records independent from the normal auto-
import files.
Envisaged use is to import records that may have been missed for some reason by the auto-import or deleted
in error from BEM.
Import Now button imports passing records from the specified auto import file(s). They are processed
according to the option settings for Rename and Move and Delete after Processing.
Settings button displays the Transponder Lap Time Settings Screen to enable checking or changing of the
settings without having to exit from the Results Entry Screen.

BEM Operating Guide for Transponder and Lynx Interfaces. 8
Review Passings button allows the operator to review the transponder records, print one or a range of the
records, change the status of selected records and to delete records marked as ignore.
The Status of an individual passing record can be:
assigned (A) where the record is assigned to a race result
not assigned (Not Assigned)
ignore (#) where the operator has explicitly marked the record not to be used.
The record status is changed by the program from Not Assigned to A when results are accepted. Should the
error checking routine receive a transponder number not listed against any rider, an error message is given
and the name shown as ####. The operator can change the status of any or a range of records to ignore (#)
for example if a race needs to be re-run or a rider rides back across the finish line after completing their race.
The following data fields are displayed in the Transponder Passings Review screen:
Ref A sequential numbering of the imported passing records.
Transponder The transponder serial number from the passing record.
Location The location data from the passing record.
Date The date from the passing record where the record format includes the date, otherwise is the
PC date when the record was imported into BEM.
Time Time in the passing record format.
Status Record status of Not Assigned, Assigned or Ignore.
C, M, G Defines the Class, Moto (stage) and Gate (heat) that the record has been assigned to.
Class is the Class_No data from BEM.
Moto is BEM’s internal moto numbering of 1 – 8 for pre-final motos, 16 for final, 15 for semi
final etc.
Gate is the heat number for the Class within the stage.
Event The event number corresponding to the Race List report from BEM.
Plate Rider race number.
Name The Rider Name linked to the Transponder Number. Note that if a Transponder Number is
received that is not assigned to a rider, the Name will be shown as ####.
Lap Nr Lap number data from the passing record and is meaningless in this context.
Thh etc. Break down of the Time field from the passing record into components of hours, minutes,
seconds and milliseconds.
Where results are imported from FinishLynx .lif files, records are not stored in BEM as the individual race
number is included in each .lif file and that is used to select the particular race and auto set the results in
BEM.
BEM Operating Guide for Transponder and Lynx Interfaces. 9
Select Auto Import Transponder Passings Files Group
Passings File 1 and Passings File 2 buttons enable the selection of up to two files for importing
passing records. Typical selection with a two loop ChipX system is for a file per decoder.
Note the default file names in the example above from the DataCollector program live output to file
generation which is the Timeline Name appended with _LOG.txt.
Check on DataCollector and the drive mapping to be sure that you know where the Live File Export is being
sent as experience is that there is often confusion around these settings.
Scoring with Transponders This section starts with the assumption that all hardware is configured, connected and working, all settings
are correct, and the import passings files are correctly specified and all actions on the Start of Race Day
Checklist (see page 29) prior to Race Start Imminent have been completed and signed off.
Start of Racing Actions The start of racing process described here has proven successful in confirming the system is functioning
correctly. Where there have been set up errors (almost always human) it allows for the best chance of rapid
correction in a controlled situation rather than escalation into chaos that can occur if racing continues to run
under a fault scenario.
NOTE the following issues with the Data Collector Program that have been reported to MyLaps but at the
time of preparation of this document, corrections are yet to and may never be provided.
Spontaneous live file output of passing records occurs when DataCollector is started even though
the settings both on the Processing tab and the Live File Settings screen indicate that Live File
Export is Disabled.
Work Around: Toggle Live File Export to enabled then back to disabled.
Changes made to the Export Path for Live File Export are not saved when Live File Export is
Disabled.
Work Around: Always enable Live File Export when selecting the Export Path event though this
may result in unwanted export files that may have to be subsequently deleted.
Enabling Live File Export in “Save on Deletion of file” mode sometimes results in no file output
when the first export file from each decoder are removed. This seems to be a once only occurrence
because once it “gets into gear”, it continues to work as expected.
Suggested (but not proven) Work Around: Start the Live File Export towards the end of practice at
a time when there is a continual stream of passings. Perform several imports into BEM to exercise
the “save on delete” function in DataCollector. Don’t forget to request a “quiet time” before
competition commences to flush all records from DataCollector and delete all practice passing
records from BEM.
BEM Operating Guide for Transponder and Lynx Interfaces. 10
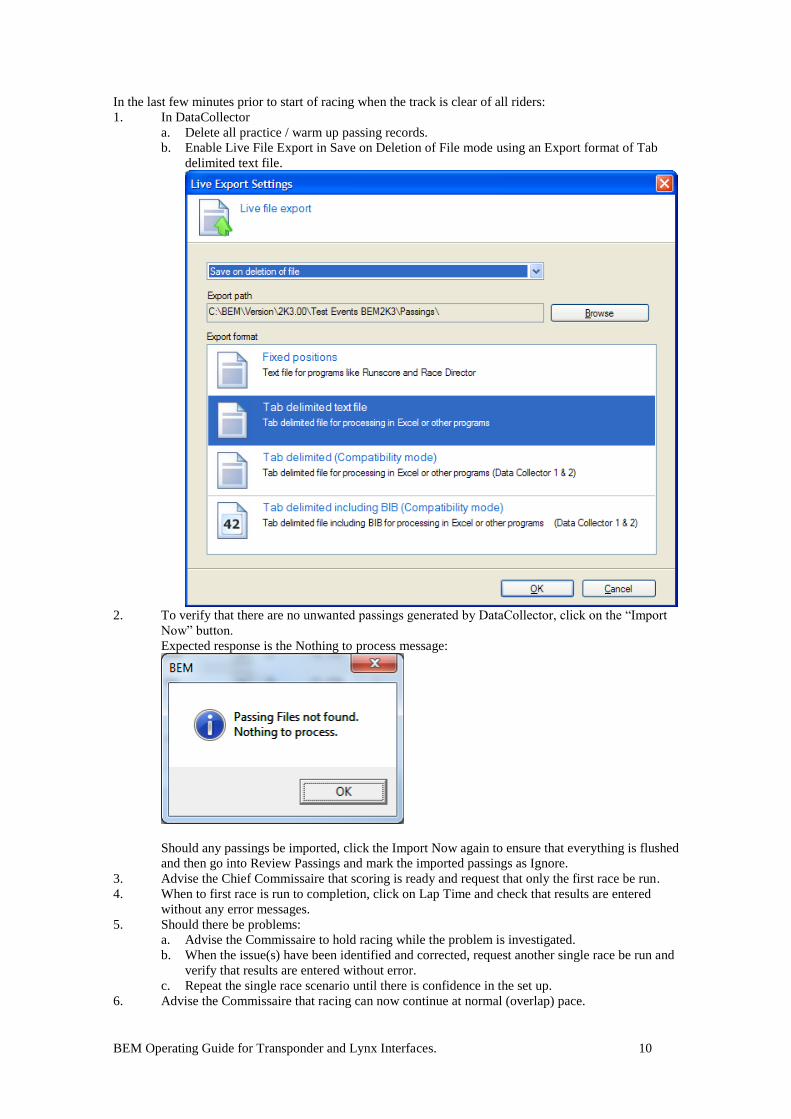
In the last few minutes prior to start of racing when the track is clear of all riders:
1. In DataCollector
a. Delete all practice / warm up passing records.
b. Enable Live File Export in Save on Deletion of File mode using an Export format of Tab
delimited text file.
2. To verify that there are no unwanted passings generated by DataCollector, click on the “Import
Now” button.
Expected response is the Nothing to process message:
Should any passings be imported, click the Import Now again to ensure that everything is flushed
and then go into Review Passings and mark the imported passings as Ignore.
3. Advise the Chief Commissaire that scoring is ready and request that only the first race be run.
4. When to first race is run to completion, click on Lap Time and check that results are entered
without any error messages.
5. Should there be problems:
a. Advise the Commissaire to hold racing while the problem is investigated.
b. When the issue(s) have been identified and corrected, request another single race be run and
verify that results are entered without error.
c. Repeat the single race scenario until there is confidence in the set up.
6. Advise the Commissaire that racing can now continue at normal (overlap) pace.

BEM Operating Guide for Transponder and Lynx Interfaces. 11
7. Let 2-3 races run and then score them (Lap Time button).
8. Repeat step 7.
9. Should unexplained issues occur, go immediately back to step 5.
Transponder Scoring Tips and Tricks The following is a compilation of non-mainstream situations and the suggested actions to manage them.
After disconnection and re-connection of the decoders, e.g. day 2 of a two day event, starting DataCollector
and selecting Last Opened Event and connect to the decoders, one or both decoders are not visible on the
network.
Check all network connections.
In DataCollector, try reselecting the decoders or if that fails, use the Start New Event wizard to re-
set up the event.
Anecdotal evidence is that this frequently occurs with the Start Hill decoder and is triggered by the
change from the default “Start” timeline name to “Hill”.
Clicking on the Lap Time button enters the lap times but no results are set.
Check Auto Accept option is set.
Check Set Place by Time option is set.
Clicking on the Lap Time button gives a “Results not Entered” message for all riders.
You are trying to enter results ahead of the race being run / completed. Click on Clear and wait for
the race to be completed.
DNS or DNF has not been called through to scoring.
A rider is missing a transponder.
Refer the race to the camera operator or other back up system to determine finishing positions.
Enter results manually.
Un check the Set Place by Time option.
Click on Accept to store the new results.
Re select the Set Place by Time option ready for the next transponder result entry.
A rider has the wrong transponder fitted or a bike change has been made without notification to scoring.
Exit from scoring, go to Review Entries and change the transponder number for the involved rider
to the actual transponder number used for the race.
Go back to the race in question on the Results Entry screen.
Click on Clear and answer Yes to clear the results.
Click on Lap Time and check the results are now entered as expected.
How to manage a DNS or DNF result.
Where the program prompts for auto DNS or DNF detection (available with two timelines), verify
the result with Staging or the Track Commissaire before acceptance.
Where the DNS is called through to scoring before the race is scored:
o If using the auto DNS and DNF detection, score the result normally with the Lap Time
button and confirm the auto DNS prompt.
o If not using auto DNS, manually set the DNS before clicking the Lap Time button.
Where a DNF is called through, manually set the DNF before clicking the Lap Time button to avoid
the possibility of a finish line passing (where the rider completes the lap) being recorded as a valid
placing.
How to manage a REL or DISQ result.
Where the REL or DISQ is called through after the race has been scored, the following actions are
required.
o Bring the race in question up on the Results Entry screen.
o Click on Clear and answer Yes to clear the results.
o Set the REL or DISQ result as required.
o Click on Lap Time to re-score the race.
Where the REL or DISQ is called through before the race is scored, enter the REL or DISQ result
manually before clicking on the Lap Time button.
How to reverse finishing positions where a close result has been referred for a camera check.
Bring the race in question up on the Results Entry screen.
Un-check the Set Place by Time option so that results are now by placing rather than lap time.

BEM Operating Guide for Transponder and Lynx Interfaces. 12
Change the finishing positions as advised by the camera operator.
Add a note in the Race Comment area as to the changes made and why.
Click on Accept to store the new results.
Re select the Set Place by Time option ready for the next transponder result entry.
You receive a “Can not identify any valid passing records for riders in this race” message that contains a
Start Gate time.
A false Start Gate record has been generated (known to happen with some gate controllers) shortly
after the real Start Gate Event that has a time that is very close to the passing time of the first rider
to cross the Hill Loop.
o Examine the passing records around the time given for the Start Gate in the Error Message
to indentify the false record.
o Change the status of the false record to Ignore.
o Return to the results entry and click on Lap Time.
You receive a “Can not find a Gate Start record” message that contains passing record details for a rider that
BEM is trying to associate with a Gate Start Event.
Note the Passing Time given for the rider in the error message.
If the Passing Time is not at the expected time for the race being scored then it is likely to be a
stray record. For this scenario:
o Answer Yes to the prompt in the error message to Review Passings Now.
o The record in question will be selected in the Review Passings screen.
o Change the status of the record to Ignore.
o Return to the results entry and click on Lap Time.
If the Passing Time appears to be correct then:
o Check the settings for the Start Reaction Detector are correct.
I.e. May need to make a temporary increase to the Start reaction timer to score the race
should there be a fall on the gate that causes the normal setting to be exceeded.
o Examine the passing records around the record given in the error message for evidence of
other riders in the race and for a Start Gate record.
o If there are valid records at the same time for other riders in the race and no start record is
evident, check how long the rider took from gate to hill loop compared to Start Reaction
time settings.
Go into the Settings and select the Simulate Start Gate Records option.
Return to the results entry, click Clear then Lap Time.
Pre Event Activities and Planning for Transponders The success of running an event with transponders starts with planning the pre-event activities of
transponder allocation and fitting to achieve to 100% accuracy in having transponders fitted to the correct
bikes.
The methods described in the guide are one of many ways to achieve the desired outcome and feedback and
alternative strategies from other user experience is always welcome.
Create Transponder Allocation List Where the race organiser is providing hired transponders to the competitors, there is a significant operational
advantage in having a list of transponders that matches the physical order of the transponders in their trays.
This is equally applicable for the situation where pre event allocation of the transponders to competitors is
done and where transponders are allocated as riders present for registration at the event.
If you have an existing allocation list from a previous event then load this using the procedure at step 5
below.
To create an ordered list of transponder in BEM the steps are:
1. For a pre-entry event where allocation of transponders to riders is to occur prior to event
registration, label each transponder from 1 to xxx.
Typical methods used are:
a. Use a permanent fine point felt tip pen and to clean off post event with dishwashing liquid
and a scourer or mentholated spirits.

BEM Operating Guide for Transponder and Lynx Interfaces. 13
b. Use of plastic key tags (as by vehicle service workshops) that can sit between the
transponder and fork
c. BMXV have experimented with using a BROTHER Label Maker using 12mm ‘TZ’ tape.
Numbers are resilient and very easy to ready, but easy to pick off with a pin, or similar)
after event.
2. Create a “Pre Allocation Scan” Event in DataCollector using a single decoder.
3. Scan the transponders one at a time in numbered order using a desk top loop. To increase the
distance separation from the desk top loop and the transponders and avoid inadvertent or multiple
detection, the following three person operation strategy is suggested.
a) Person 1 manages the “not yet scanned” transponders and hands one transponder at a time in
label order to person 2.
b) Person 2 scans the transponder and hand’s it to person 3 who packs the scanned transponders
in scanned (i.e. label) order.
c) To validate each scanning, use either speakers or headphones plugged into the decoder with the
confirmation beep and/or check the screen passing records.
4. At the completion of the scanning into DataCollector:
d) Select Decoder (if left on “All Passings”) and error will be received)
e) Export Passings to file then
f) Tab delimited text file as the Export format then
g) Duplicate passings so that any inadvertent secondary passings detected will be in separate
Lap files.
5. To Load the list into BEM:
h) Run BEM and select the appropriate Event File. E.g. the Event File to be used for Registration.
i) Verify the Passing Record File Type is AMB Tab Delimited (Data Collector 3)
j) From BEM’s Main Menu, click on Load List in the Transponders group then select the
Lap 1 file created in the previous step.
6. To validate the scanning:
k) Verify that the correct total number of transponders exist in the allocation list.
l) Validate at least 1 in 20 (more if time permits) transponders for match with serial numbers to
BEM Label Number to physical Label.
Allocate Transponders to Riders Transponders can be allocated to riders using Review Entries in BEM which is suitable where the
allocation list is available prior to entries being made and also where changes are made to correct errors,
bike changes, replacing lost transponders etc.
A bulk allocation of transponders to riders to be made, with a significant time saving over manual allocation.
E.g. typical allocation is around 1 minute for 1000 transponders to be allocated.
Note that this feature requires the event to be created with Toolbox version 3.x and no errors reported with
the Class Type data.
To use the bulk allocation feature:
1. Exit BEM and make a pre-allocation safety copy of the Event File so that if a mistake is made
with the transponder allocation settings (e.g. different transponders for Cruisers where the
same for 20” and Cruiser was intended), you can avoid a tedious, manual allocation fix. E.g.
save the Probikx 2012 Round1.bem file as Probikx 2010 Round 1 Pre Allocation.bem
2. Create an allocation list per the Create Transponder Allocation List section (above.)
3. Manually allocate transponders for any special scenarios such as two riders sharing the same
bike and ensure that all private transponders are allocated.

BEM Operating Guide for Transponder and Lynx Interfaces. 14
4. From the main menu screen in BEM, click on the Auto Assign button in the Transponders
group.
Note that the Auto Assign button will be disabled when the Allocation List is empty and
where there are errors reported with the Class Type data.
5. Select the Class or Classes to have the transponders allocated and if the same (or a separate)
transponder is to be allocated to the same rider for each selected Class Type.
Note that Class Type numbering is arbitrary and dependant on how the particular event has
been set up. Class Types shown are the de facto standard.
6. At the completion of the allocation a summary is given.
Should a transponder allocation be made using the wrong transponders being allocated, e.g. “Allocate the
same transponder to all Class Types” being selected when separate transponders were meant to be allocated
for Cruisers, then to correct this, the operator has the rather tedious task of working through each Cruiser
rider in Review Entries and allocating a new transponder for each Cruiser entry or reverting to the pre-
allocation safety copy of the Event File (mentioned on the previous page) made before the allocation was
made. You did make a pre-allocation safety copy didn’t you?

BEM Operating Guide for Transponder and Lynx Interfaces. 15
Setting up the Event in DataCollector This section is a guide to set up the MyLaps DataCollector program for the event and to import the
competitor list from BEM.
Note that this section assumes that the decoders are powered up and connected to the network.
1. In BEM, select Export Data from the Main Menu screen then in the Export Data Menu, select
Orbits Competitor Import format, click on All Entries and save the BEM Export with a
meaningful file name. E.g. Probikx Orbits Export.txt
2. Run DataCollector and select the New event option then the “Start New Event Wizard”
BEM Operating Guide for Transponder and Lynx Interfaces. 16
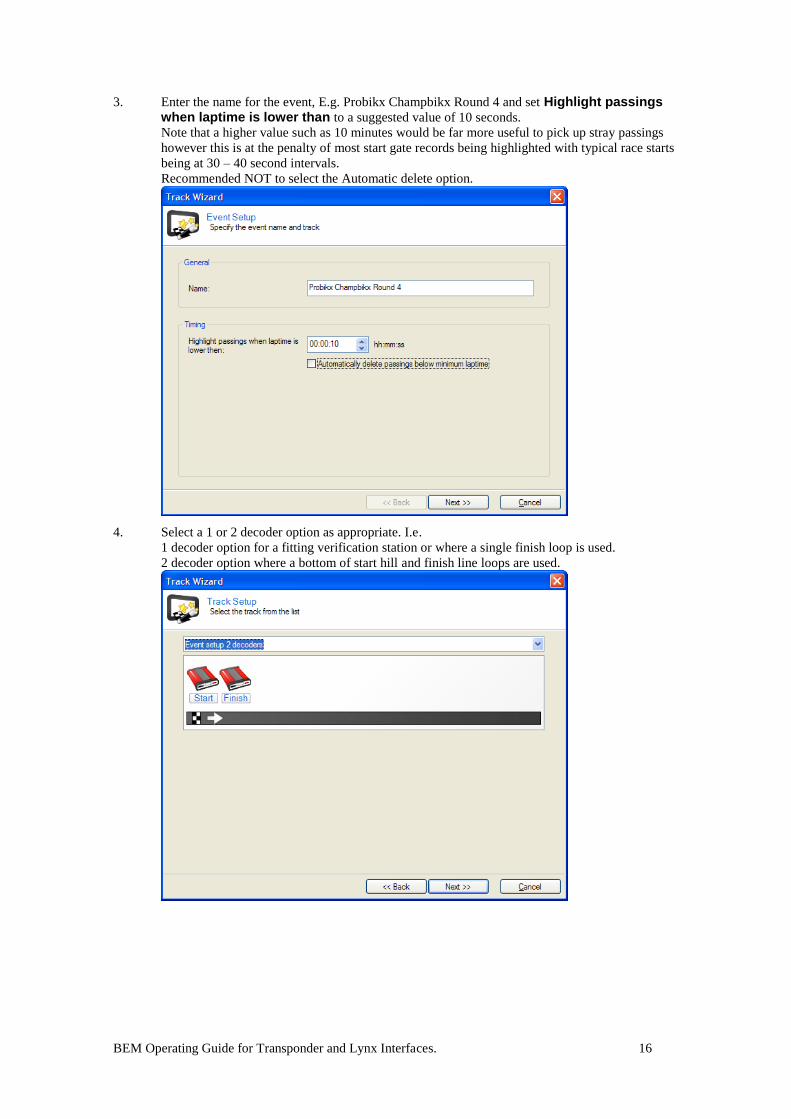
3. Enter the name for the event, E.g. Probikx Champbikx Round 4 and set Highlight passings when laptime is lower than to a suggested value of 10 seconds.
Note that a higher value such as 10 minutes would be far more useful to pick up stray passings
however this is at the penalty of most start gate records being highlighted with typical race starts
being at 30 – 40 second intervals.
Recommended NOT to select the Automatic delete option.
4. Select a 1 or 2 decoder option as appropriate. I.e.
1 decoder option for a fitting verification station or where a single finish loop is used.
2 decoder option where a bottom of start hill and finish line loops are used.

BEM Operating Guide for Transponder and Lynx Interfaces. 17
5. Enter the appropriate Timeline Names. These name must match the Timeline name data in the
BEM options. See Transponder Settings on page 4 of this guide.
Double check the spelling as an exact match is required, e.g. situations have occurred where Hill
has been spelt Hiil or Hil.

BEM Operating Guide for Transponder and Lynx Interfaces. 18
6. Save the event set up and then select the appropriate decoder for each Timeline by double clicking
on each timeline decoder and selecting the appropriate device then click on Next.
Decoders are normally identified by their IP address as a fixed IP address is the normal
configuration.
Verify that the correct decoder was selected.

BEM Operating Guide for Transponder and Lynx Interfaces. 19
7. Repeat for the Finish decoder. Both decoder’s symbols should now be Red indicating that they are
active.
Check the noise level being reported for the decoders which for the best results should be around 10
or less. Issues causing higher levels are typically interference from equipment such as PA
amplifiers and speakers, photo finish camera power supplies and bad connections on the loop.
Check the GPS is shown with a green icon indicating that the time is locked to the satellites.
8. To import the list of competitors generated at step 1 of this section:
a. Click on the Registration tab.
b. In the left pane, click on Import competitors and select the BEM Orbits export file.
BEM Operating Guide for Transponder and Lynx Interfaces. 20
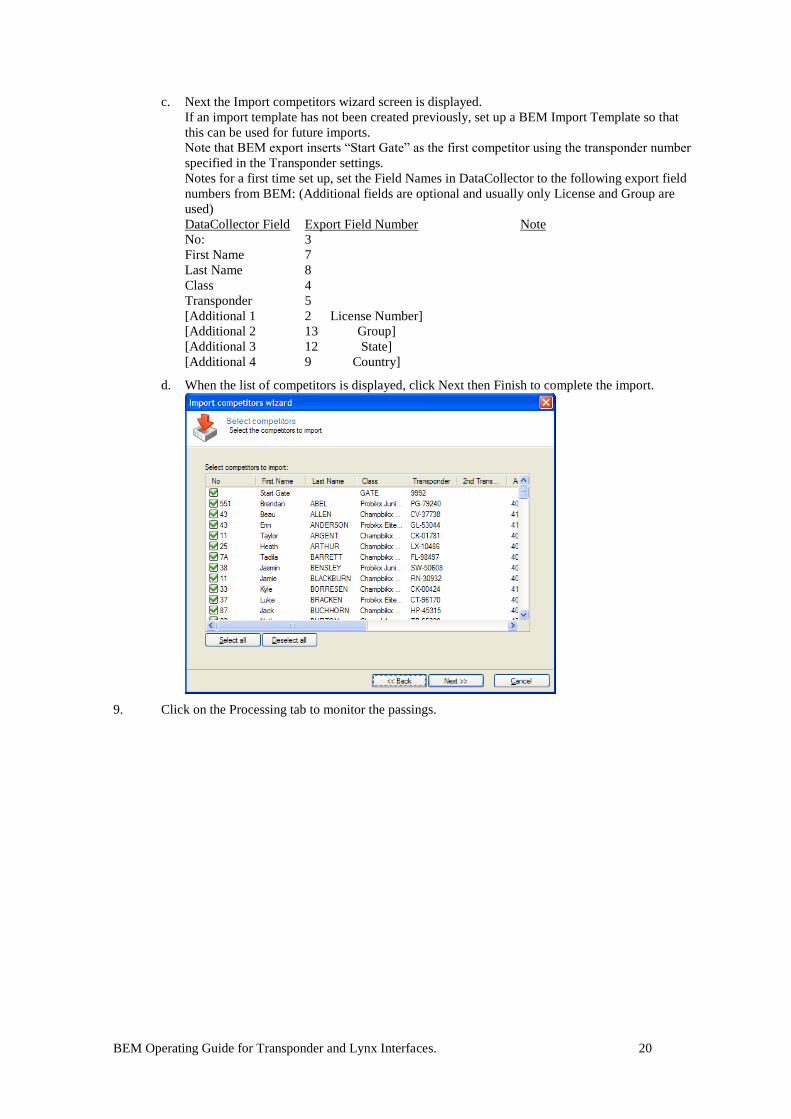
c. Next the Import competitors wizard screen is displayed.
If an import template has not been created previously, set up a BEM Import Template so that
this can be used for future imports.
Note that BEM export inserts “Start Gate” as the first competitor using the transponder number
specified in the Transponder settings.
Notes for a first time set up, set the Field Names in DataCollector to the following export field
numbers from BEM: (Additional fields are optional and usually only License and Group are
used)
DataCollector Field Export Field Number Note
No: 3
First Name 7
Last Name 8
Class 4
Transponder 5
[Additional 1 2 License Number]
[Additional 2 13 Group]
[Additional 3 12 State]
[Additional 4 9 Country]
d. When the list of competitors is displayed, click Next then Finish to complete the import.
9. Click on the Processing tab to monitor the passings.

BEM Operating Guide for Transponder and Lynx Interfaces. 21
Validate Transponder Fitting 1. When the allocation of transponders to riders is completed:
a. At events where race plates are issued, suggested option is to print stickers to put on race
plates using a BEM export as the source to an appropriate Mail Merge document so that
the sticker contains Rider Name, License Number, Class, Race Number, Transponder
Label and Transponder Number.
b. Where race plates are not issued, use a docket or A6 printer at registration to print class
and transponder details which avoids (well mostly avoids) fitting of the wrong transponder
to the wrong bike for riders entering 20” and Cruiser and for families with multiple riders.
2. As a final validation that the correct transponders are fitted to the correct bikes, at the transponder
fitting area set up a validation scanning station using a laptop (preferably with a large external
screen running DataCollector either alone or in conjunction with the BemTrain program to make it
easy for the riders to see their details), decoder and a small custom loop (or desk top loop) so that as
the bikes are leaving the area, they are scanned to validate the transponder number matches the data
in BEM.
To set up DataCollector to display the rider details:
a. In BEM generate an Orbits export file.
b. In DataCollector:
i. Set up a new Fitting Validation Event.
ii. From the Registration Tab, use the Import Competitors function to import the
BEM – Orbits file. If not done already, use the Template function in
DataCollector to identify and label the License and Group fields.
iii. Select the Processing Tab and select the name, class and race number fields to be
displayed.
iv. If using the BemTrain program to display the passings (recommended) then:
1. Set up Live File Export in DataCollector.
2. Set up BemTrain in Fitting Station mode (refer to the BemTrain manual).
3. Another suggestion is that a unique coloured dot be put on the plate to indicate validated scanning
has been done and anyone fronting up for practice without the dot be directed to the transponder
fitting area to be checked and validated.
4. Recommendation that transponder fitters fit all transponders to same fork (generally R/h as this is
easier for right handed people to cut off post event); makes it much easier for Stagers to check and
retrieval crew to spot transponder for post event recovery.
Post Event Transponder Audit At the 2009 Queensland State Titles, transponder collection started after the motos in the run-off area after
the finish line for riders not qualifying to the elimination stages and continued through the quarter and semi
finals for riders not transferring to the next stage. After the finals, all hired transponders were collected again
in the run-off area. This process worked very well and achieved a rate of return that was as better than
expected.
Some words of caution here.
Don’t be too up front when collecting the transponders as the collectors are not finish line judges
and several instances across different events have occurred where transponders have been cut off
either in error or where a relegation has changed the apparently obvious placing resulting in a mad
scramble to find or allocate a new transponder to the rider for the next stage of the event.
Have regard for the feelings of riders who have just missed out on transferring and don’t add insult
to injury by swooping in to recover their transponder.
While presentations were in progress, all returned transponders were packed into the normal shipping trays
(20 per tray) and an audit performed on returns.
For smaller events (say up to 400), practice is simply to pack the transponders back into trays in their
numbered sequence and see which are missing.
To audit by scanning the returns:
1. In DataCollector, set up a Transponder Returns Event using only the Finish Line Decoder.
2. Carry one tray of transponders at a time (20 transponders) across the finish line.
3. When all transponders have been scanned into the Returns Event, export the passings from
DataCollector using Export Passings to file with Tab delimited text file as the Export
format.

BEM Operating Guide for Transponder and Lynx Interfaces. 22
4. From the Main Menu in BEM, click on Return Check in the Transponders group and select
the returns file created in the previous step.
5. BEM then signs off the returns and generates an Outstanding Returns Report of riders still to return
their transponders.
6. Take the Outstanding Returns Report to the announcer.
At the afore mentioned Queensland State Titles, the initial outstanding returns report listed 12 riders from
some 890 transponders and these were accounted for shortly after the announcements were made.
BEM Operating Guide for Transponder and Lynx Interfaces. 23
BEM and Lynx Interfaces The BEM program Lynx interfaces enable:
Generation of Lynx Event (.evt) File
Generation of Lynx Schedule (.sch) File
Auto update of the Lynx Event file as subsequent stages of the event are drawn (i.e. quarter finals,
semi finals)
Setting results in BEM from Lynx Information (.lif) Files.
Lynx Operation
Initial Event and Schedule Files
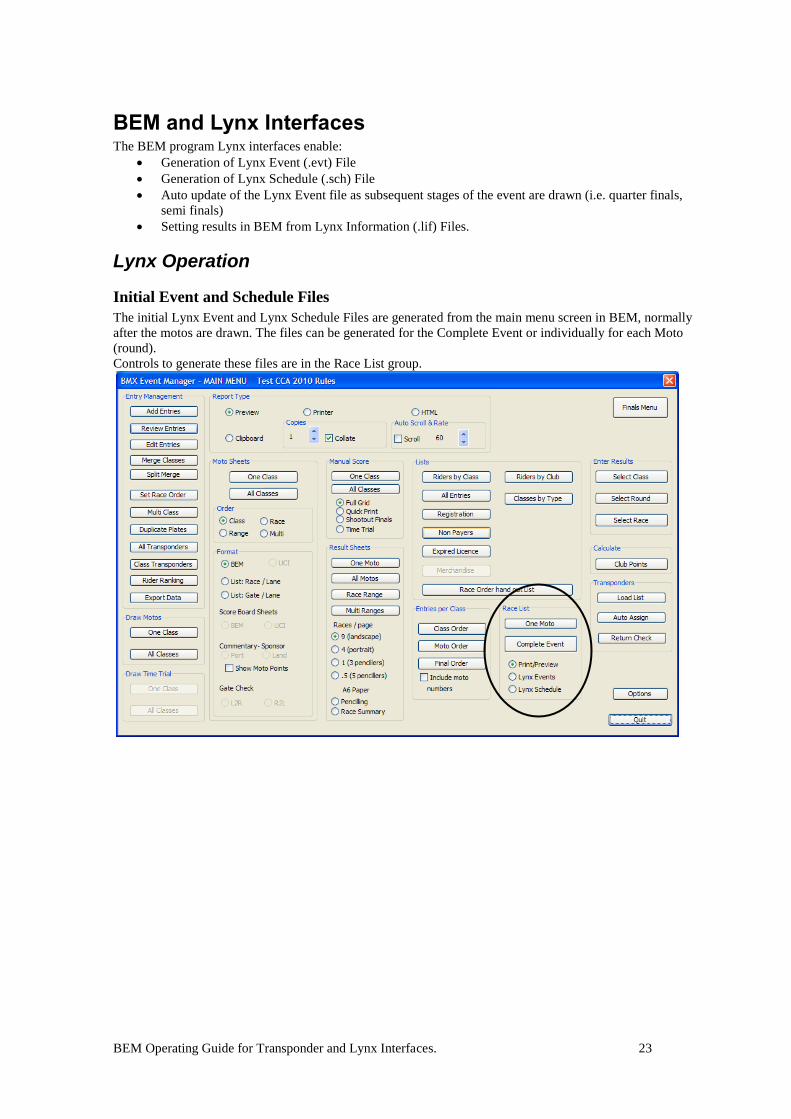
The initial Lynx Event and Lynx Schedule Files are generated from the main menu screen in BEM, normally
after the motos are drawn. The files can be generated for the Complete Event or individually for each Moto
(round).
Controls to generate these files are in the Race List group.

BEM Operating Guide for Transponder and Lynx Interfaces. 24
Set Up Options
The set up options for Auto Update of the Lynx Events file and for import of results from the Lynx
Information file are accessed from either the Transponder and Camera Settings button in the Options
screen or from the Settings button in the Results Entry screen. I.e.
Enable Auto Update Lynx Events File
Select Lynx Results lif File as the Passing Record File Type
Note that the “Rename and move passing file to backup folder” and “Delete passing File after processing”
are applicable to the lif results file and would not normally be selected for Lynx operation
These two options
normally NOT
selected for Lynx
operation.

BEM Operating Guide for Transponder and Lynx Interfaces. 25
Results Entry from lif Files
To select the folder containing the lif Files, from BEM’s Results Entry screen click on the Passings File 1
button and select any lif file in the folder.
Where lap times are included in the lif file, select the “Set Place by Time” option in the Results Entry screen.
To import results, select the appropriate race then click on the Lynx Results button. If the appropriate lif
file exists, results are set in BEM. An error message is given if the lif file can not be found, e.g. if a race that
has not yet been scored in the Lynx program is attempted to be scored in BEM

BEM Operating Guide for Transponder and Lynx Interfaces. 26
Special Results
Special results in the Lynx lif file are handled in BEM as follows:
DNS (did not start) is compatible
DNF (did not finish) is compatible
DQ (disqualified) from Lynx is mapped to the BEM equivalent DISQ
SCR (scratched) from Lynx is mapped to BEM’s REL (relegated) result.
All other special result from Lynx such as FS (false start) and ADV (advance) are not used or recognised in
BEM and will give a warning message.
BEM Operating Guide for Transponder and Lynx Interfaces. 27
Track Considerations for Transponders By careful attention to the physical layout of the track and surrounds, much can be done to minimise
unintended or stray passings that have the potential to impact on the integrity of the transponder results.
Typical causes of stray passings are:
Riders turning around and riding back across the finish line.
Riders taking a short cut across the track.
Officials walking across detector loops with transponders in their pockets.
Bad layout of loops and cables.
Suggestions to optimise the results are (with many taken from AMB’s documentation) are:
The detection loop wires are parallel to the finish line and the distance between the loop wires is 60
cm
The connection box and end box are located at the centre line of the detection loop 30 cm on each
side of the timing zone
Avoid excess loop wires by matching the loop to track width.
No metallic items, electrical devices or wires nearby the detection loop
Avoid loop wires close to each other or looped.
Enforce no bike areas at least 2m around detector loops. Strongly recommend the use of plastic
mesh barriers where the end of the loop is near a spectator area.
Have defined and enforced “spectator to staging” and “finish to spectator” routes for riders with
bikes that avoid detector loop locations.
At tracks where straights are very close together, there is the possibility of detecting transponders
from the adjacent straight. Should this problem be experienced then refer to the Decoder Manual to
adjust the squelch setting on the decoder to increase the signal strength threshold for detection.
Use rider briefing to reinforce the keep away from loops requirements.
Experience from events run by BMXV with decoders located in the score room and connecting the
track loops using RG-6 Quad-shield coaxial cable is that this configuration provides:
o Superior signal to noise
o Resistance to stray passings
o Improved environment for the decoders.
o Easier setup by not having to run external power.
o Major BMXV Clubs are installing permanent in-ground cabling for all the above reasons
plus the advantage of a much faster set-up and take-down at events.
Do not store spare transponders in the scoring room or near the decoders or cabling as stray
passings can be picked up through either coax or Ethernet cabling.

BEM Operating Guide for Transponder and Lynx Interfaces. 28
Finish Line Loop
o Ensure loop is square with the track.
o Finish line is 30cm past the centre line of the loop to account for the set back of the
transponder location on the fork from the leading edge of the front tyre.

BEM Operating Guide for Transponder and Lynx Interfaces. 29
Transponder Start of Race Day Checklist Check list based on bottom of start Hill and Finish line timelines with AMB DataCollector
interface to the decoders.
Check with Windows Explorer that all drive mappings between BEM and
DataCollector PC’s are active and not shown with a red cross. ..............................................
Create a new event in DataCollector .......................................................................................
If first day of the event, clear all passing records from both decoders. ...................................
Generate an Orbits Competitor Import format export from BEM ..........................................
Import the Competitor list into DataCollector ........................................................................
Start of Practice:
Check that start gate records are being received ........................................................
Check that Hill decoder records are being received ...................................................
Check that Finish decoder records are being received ...............................................
Monitor DataCollector for unassigned passing records .............................................
Set up Passing Record import to BEM:
In DataCollector, enable Live File Export (Save on Deletion of File)
Recommend Export path to a unique day or block folder be used. ............................
In BEM Transponder Settings, verify the correct options are selected. I.e.
Rename and Move, Delete after processing, Save on Delete,
Data Collector 3, Start Loop Enabled ....................................................................
In BEM Results Entry:
Select Passing File 1 to Hill_LOG.txt from Live File Export path ............................
Select Passing File 2 to Finish_LOG.txt from Live File Export path ........................
Click Import Now and check records are imported error free. ..................................
Review Passings and verify Start, Hill and Finish records were imported with expected
date, time and competitors .........................................................................................
In DataCollector, disable Live File Export ................................................................
In BEM, repeat Import Now to flush any remaining passing records ........................
Review Passings and mark all for Ignore and then Delete .........................................
Race Start Imminent
Request track clear of all practice riders ....................................................................
In DataCollector
Delete all practice / warm up passing records ...............................................
Enable Live File Export in Save on Deletion of file mode. ..........................
Request first race only be run .....................................................................................
First Race Complete
In BEM, click on Lap Time and verify results are set as expected ............................
Advise racing to continue at normal pace ..................................................................
Post Event
In DataCollector
Disable Live File Export ...............................................................................
Select the Event Setup tab and then click on “Save event”...........................
If using eZeventing check that all uploads have been completed before
disconnecting any computers. .......................................................................