BAGLESS UPRIGHT VACUUM ASPIRADORA VERTICAL SIN BOLSA - Aldi · PDF fileBAGLESS UPRIGHT VACUUM...
23
BAGLESS UPRIGHT VACUUM ASPIRADORA VERTICAL SIN BOLSA English……Page 3 Español…..Página 12
Transcript of BAGLESS UPRIGHT VACUUM ASPIRADORA VERTICAL SIN BOLSA - Aldi · PDF fileBAGLESS UPRIGHT VACUUM...

BAGLESS UPRIGHT VACUUM ASPIRADORA VERTICAL SIN BOLSA English……Page 3 Español…..Página 12
Contents Parts List…..…………………………………………………………… 3 Contents 3 Assembly 4 General Information.………………………………….……………. 5 Safety Instructions 6 User Instructions …………………………………………………….7 Cleaning and Maintenance……………………………..…………. 8 Other Useful Information……….…………………………………. 10 Technical Specifications 10 Storing 10
Bagless Upright Vacuum ________ _MAIN PARTS
AFTER SALES SUPPORT 3 888-367-7373 [email protected]
PARTS
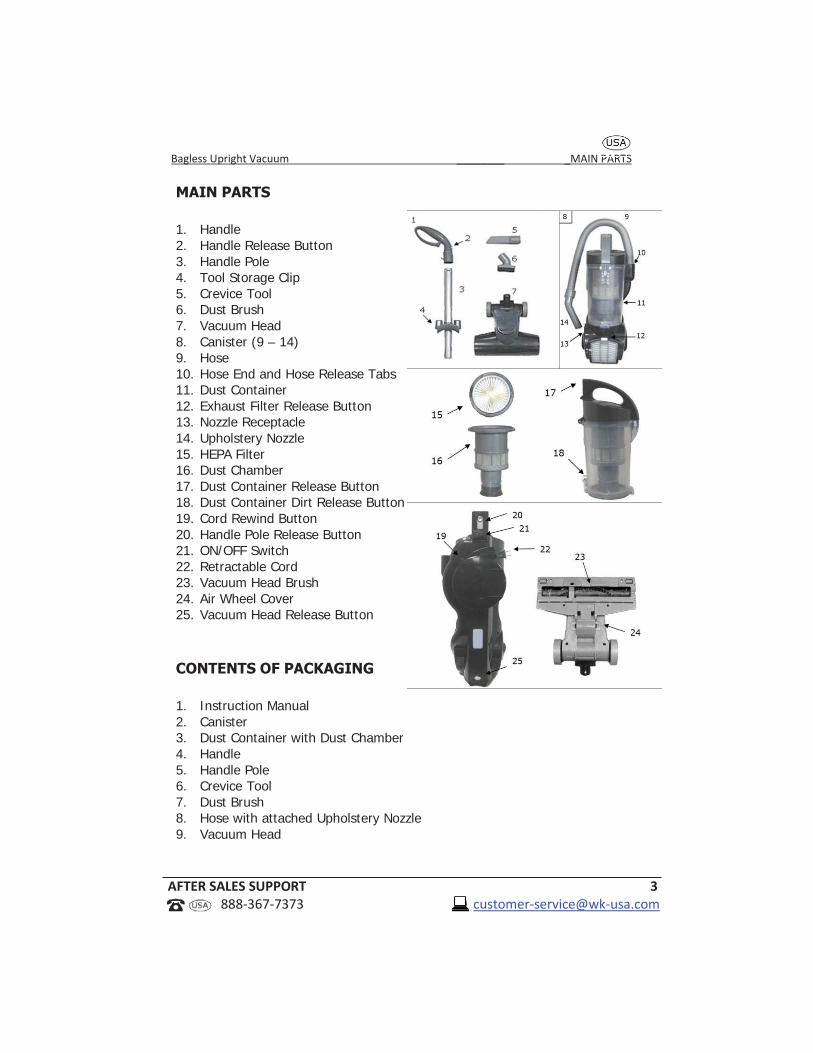
MAIN PARTS
1. Handle 2. Handle Release Button 3. Handle Pole 4. Tool Storage Clip 5. Crevice Tool 6. Dust Brush 7. Vacuum Head 8. Canister (9 – 14) 9. Hose 10. Hose End and Hose Release Tabs 11. Dust Container 12. Exhaust Filter Release Button 13. Nozzle Receptacle 14. Upholstery Nozzle 15. HEPA Filter 16. Dust Chamber 17. Dust Container Release Button 18. Dust Container Dirt Release Button 19. Cord Rewind Button 20. Handle Pole Release Button 21. ON/OFF Switch 22. Retractable Cord 23. Vacuum Head Brush 24. Air Wheel Cover 25. Vacuum Head Release Button
CONTENTS OF PACKAGING
1. Instruction Manual 2. Canister 3. Dust Container with Dust Chamber 4. Handle 5. Handle Pole 6. Crevice Tool 7. Dust Brush 8. Hose with attached Upholstery Nozzle 9. Vacuum Head

Bagless Upright Vacuum ________ _ASSEMBLY
4 AFTER SALES SUPPORT 888-367-7373 [email protected]
EMBLY
ASSEMBLY
Attach Vacuum Head Insert the vacuum head (7) into the hole on the bottom of the vacuum
canister (8). You will hear an audible click. To disassemble the vacuum head from the vacuum canister, press the
vacuum head release button (25) on the canister, then pull the vacuum head out slowly.
Attach Handle Insert the handle pole (3) into the handle (1) until you hear an audible click.
Insert the handle pole, with tool storage clip (4) facing forward, into the hole on top of the canister. You will hear an audible click. Make sure the handle pole is secured.
To disassemble the handle, press the handle pole release button (20) then slowly pull out handle.
Attach Dust Container Place bottom of dust container (11) onto canister body. Dust container is
secure when you hear an audible click.
Bagless Upright Vacuum ____ _GENERAL INFORMATION
AFTER SALES SUPPORT 5 888-367-7373 [email protected]
ATION
GENERAL INFORMATION
When using an electrical appliance, basic safety precautions should also be observed, including the following. PLEASE READ AND SAVE ALL INSTRUCTIONS BEFORE USING THE UPRIGHT VACUUM.
1. Do not use the Vacuum outdoors. It is for household use only. 2. Do not allow the Vacuum to be used as a toy. Close attention is necessary when
Vacuum is used by or near children. 3. Do not use the Vacuum with damaged cord or outlet plug. Do not use the Vacuum
if it has been dropped, damaged, left outdoors, or dropped in water. Return the Vacuum to the service center for examination, repair or refund.
4. Do not attempt to change accessories while the Vacuum is running. 5. Do not handle the plug or the Vacuum with wet hands 6. Use the Vacuum only as described in this manual. Use only manufacturer’s
recommended attachments. 7. Do not put any object into openings of the Vacuum. Do not use with any opening
blocked. Keep free of dust, lint, hair and anything that may reduce air flow. 8. Keep hair, loose clothing, fingers, and all parts of body away from openings and
moving parts. 9. Do not pick up anything that is burning or smoking, such as cigarettes, matches, or
hot ashes with the Vacuum. 10. Do not use abrasive materials to clean the Vacuum. Do not immerse the Vacuum in
water. 11. Do not pick up liquids with the Vacuum or use on wet floors. 12. Do not use the Vacuum on concrete, tar, or similar rough surfaces. 13. Do not pick up pieces of string or fabrics with the Vacuum. 14. Do not clean frayed carpets or tassels on carpets with the Vacuum. 15. Do not use the Vacuum to pick up flammable or combustible liquids such as
gasoline or use in areas where they may be present. 16. Read and follow all operational instructions. 17. Do not use the Vacuum without dust container in place. 18. Store the Vacuum indoors. Store after use to prevent accidents. 19. Do not abuse the power cord. Never carry the Vacuum by the power cord or pull
the power cord to disconnect the outlet plug from an outlet; instead grasp the outlet plug and pull to disconnect.
THIS APPLIANCE HAS A POLARIZED PLUG (ONE PIN IS WIDER THAN THE OTHER) TO REDUCE THE RISK OF ELECTRICAL SHOCK. THIS PLUG IS DESIGNED TO FIT IN A POLARIZED OUTLET ONLY ONE WAY. IF THE PLUG DOES NOT FIT FULLY INTO THE OUTLET, TRY THE PLUG THE OTHER WAY AROUND. IF THE PLUG STILL DOES NOT FIT, CONTACT A QUALIFIED ELECTRICIAN. DO NOT ATTEMPT TO ALTER, DISMANTLE OR FIND ANOTHER WAY AROUND THIS SAFETY FEATURE.
Bagless Upright Vacuum ____ _SAFETY INSTRUCTIONS
6 AFTER SALES SUPPORT 888-367-7373 [email protected]
TIONS
SAFETY INSTRUCTIONS
WARNING! Read and understand all instructions. Failure to follow all instructions listed below may result in electric shock, fire or serious personal injury. The warnings, cautions, and instructions discussed in this instruction manual cannot cover all possible conditions and situations that may occur. It must be understood by the operator that common sense and caution are a factor which cannot be built into this product, but must be supplied by the operator.
ELECTRIC POWER If electric circuit is overloaded with other appliances, your Vacuum may not operate properly. The Vacuum should be operated on a separate electrical circuit from other operating appliances.
SAFETY WARNING Although your Vacuum is easy to operate, for your safety, the warnings below must be followed: 1. Do not place the Vacuum near a heat source. 2. Do not unplug by pulling on the power supply cord. 3. The Vacuum must be unplugged: A. Before any cleaning or maintenance. B. If it appears to be faulty.
THIS PRODUCT IS INTENDED FOR HOUSEHOLD USE ONLY.
SAVE THESE INSTRUCTIONS
Bagless Upright Vacuum_______ __ _ ____________________USER INSTRUCTIONS
AFTER SALES SUPPORT 7 888-367-7373 [email protected]
CTIONS
USER INSTRUCTIONS How to Turn ON/OFF the Upright Vacuum 1. Before using the Vacuum, pull retractable cord out of canister and plug into a
power outlet. 2. The upholstery nozzle (14) MUST be placed securely in the nozzle receptacle (13)
before use. 3. Press the ON/OFF switch (21), on the back of the canister near the base of the
handle to turn the Vacuum ON. 4. Press the ON/OFF switch again to turn the Vacuum OFF. 5. For ease of rewinding, do NOT pull cord out farther than the red tape on the cord.
Please note that there is a yellow tape approximately 2 ½ ft. prior to the red tape. To rewind the cord, press the cord rewind button (19) down to retract the cord. NOTE: Use care and guide the power cord with your hand to ensure that the cord does not whip and become tangled while rewinding. You can stop and start the rewinding until the cord is retracted completely.
6. Unplug the power cord after each use
How to Use the Detachable Canister 1. The detachable canister makes it possible to easily clean stairways, auto interiors
and other hard-to-reach areas of the home. 2. Unplug the Vacuum before detaching the canister. 3. Remove the handle pole from the canister. 4. Press the vacuum head release button and pull on the vacuum head to detach. 5. Use the upholstery nozzle or attach one of the accessory tools (dust brush or
crevice tool) to the end of the upholstery nozzle. 6. For extended reach, remove the handle from the handle pole and attach the
handle pole to the end of the upholstery nozzle. Attach the appropriate accessory to the end of the handle pole.
How to Use the Accessories 1. The crevice tool (5) is used for cleaning radiators, corners, edges, drawers. 2. The dust brush (6) is used for cleaning curtains, shelves, bookshelves, lamps and
other delicate objects. 3. The upholstery nozzle, attached to hose, is used for upholstery. 4. The handle pole (3) is used for extended reach and to add extra strength to your
hose.
How to Empty the Dust Container 1. Press the dust container release button (17) to detach the dust container from the
canister. 2. Press the dust container dirt release button (18) at the bottom of the dust
container and empty the dust into the trash receptacle. 3. Close the dust container dirt release door. 4. Place bottom of the dust container into the canister. Press firmly until you hear an
audible click.
Bagless Upright Vacuum_______ ___ ____________________CLEANING AND MAINTENANCE
8 AFTER SALES SUPPORT 888-367-7373 [email protected]
TENANC
CLEANING AND MAINTENANCE CAUTION:
Always be sure that the Vacuum is turned OFF and UNPLUGGED before cleaning or attempting to store the item. NEVER IMMERSE THE MOTOR in water or any other liquid. NEVER operate the Vacuum without the dust container and filter in place.
How to Clean the Filters 1. To maintain optimal performance, the filters should be cleaned every two
months under normal use. 2. HEPA Filter – The HEPA filter is located under the top dust container lid. Use
the top tab to remove the HEPA filter from the dust container. Hold filter over a trash receptacle and tap out dirt and debris.
3. Exhaust Filter – The exhaust filter is located at the bottom of the vacuum. Press the catch and pull the exhaust filter grill away from the vacuum. Pull the bottom of the filter outward so the top of the filter unhooks from the filter recess. The exhaust filter can be lightly rinsed with warm tap water. Please make sure that the exhaust filter is completely dry before the next use.
How to Clean the Dust Chamber 1. Pull the entire dust chamber out of the dust container. 2. Dirt and debris on the dust chamber screen can be cleaned with a soft brush
or a slightly damp cloth. 3. How to Clean the Dust Container 4. Remove the dust chamber and HEPA filter from the dust container. 5. The dust container can be rinsed with warm soapy water and dried with a soft
cloth. NOTE: Please make sure that the dust chamber has dried completely before next use.
How to Clean the Vacuum Head 1. Turn the vacuum head over so the bottom is facing up. Locate the two tabs on
either side of the air wheel cover. Squeeze the tabs and remove the air wheel cover.
2. Remove any debris that has gathered around the vacuum head brush. String, hair, or fabric will obstruct brush movement.
How to Clean the Hose 1. To remove the hose, press the hose release tabs and pull it out of the vacuum
canister. 2. Clear away any debris or obstruction from hose. Do not use sharp objects to
clean out the hose as they may cause damage.
Bagless Upright Vacuum CLEANING AND MAINTENANCE
AFTER SALES SUPPORT 9 888-367-7373 [email protected]
NANCE
How to Clear Clogs 1. Low suction or poor pick up may be due to a clog in the vacuum canister. If
you notice a change in the sound of the motor or a reduction in performance, check for clogs. CAUTION: Always be sure that the Stick Vacuum is switched OFF and unplugged before attempting to remove a clog.
2. Empty dust container. 3. Check dust container for buildup. 4. Check for clog in vacuum head. 5. Check floor tool
Bagless Upright Vacuum ___ _OTHER USEFUL INFORMATION
10 AFTER SALES SUPPORT 888-367-7373 [email protected]
RMATIO
OTHER USEFUL INFORMATION
Technical Specifications Model Number FJ142L-120-500 Rating Voltage 120V – 60Hz Rated Wattage 1200W
Storing Store the Vacuum in a dry location. Do not place any heavy items on top of Vacuum during storage as this may result in possible damage of the Vacuum. Caution: Any electronic or electrical appliance should not be stored in or exposed to areas of high heat or humidity. Do not store your Upright Vacuum close to stoves, radiators, furnaces or in a bathroom or bathing area.
Service Center If you have any questions in regards to the operation of this Upright Vacuum please contact our service center at:
Wachsmuth & Krogmann, Inc. Tel: 1-888-367-7373 Business Hours: Mon-Fri 10:00am – 5:00pm EST Email: [email protected] Website: www.wk-usa.com
Environmental Protection If the appliance should no longer work at all, please make sure that it is disposed of in an environmentally friendly way.
Bagless Upright Vacuum ___ _OTHER USEFUL INFORMATION
10 AFTER SALES SUPPORT 888-367-7373 [email protected]
RMATIO
Contenido
Lista de componentes ……………………………………………… 12 Contenido 12 Ensamblaje 13
Información general.………………………………….……………. 14 Instrucciones de seguridad 15
Modo de empleo ……………..……………………………………….16 Limpieza y mantenimiento……………………………..…………. 17 Información adicional de utilidad………………………………. 19
Especificaciones técnicas 19 Almacenaje 19

Aspiradora vertical sin bolsa COMPONENTES PRINCIPALES
12 SERVICIO POSVENTA 888-367-7373 [email protected]
IPALES
COMPONENTES PRINCIPALES
1. Mango 2. Botón de desconexión del mango 3. Palo del mango 4. Sujetador de almacenamiento de las herramientas 5. Boquilla rinconera 6. Cepillo para el polvo 7. Cabezal de la aspiradora 8. Contenedor (9 – 14) 9. Manguera flexible 10. Extremo de la manguera y lengüetas de desconexión de la manguera 11. Recipiente guardapolvos 12. Botón de desconexión del filtro de escape 13. Receptáculo de boquilla 14. Boquilla para la tapicería 15. Filtro HEPA 16. Cámara para el polvo 17. Botón de desconexión del recipiente guardapolvos 18. Botón de desconexión del recipiente guardapolvos sucio 19. Botón para rebobinar el cable 20. Botón de desconexión del palo del mango 21. Interruptor ON/OFF (encendido/apagado) 22. Cable retráctil 23. Cepillo del cabezal de vacío 24. Cubierta de la rueda de aire 25. Botón de desconexión de la cabezal de vacío
CONTENIDO DEL EMPAQUE
1. Manual de instrucciones 2. Contenedor 3. Recipiente guardapolvos con cámara de polvo 4. Mango 5. Palo del mango 6. Boquilla rinconera 7. Cepillo para el polvo 8. Manguera con boquilla para la tapicería acoplada 9. Cabezal de vacío
Aspiradora vertical sin bolsa _ ENSAMBLAJE
SERVICIO POSVENTA 13 888-367-7373 [email protected]
MBLAJE
ENSAMBLAJE
Acoplar el cabezal de vacío Introduzca el cabezal de vacío (7) en el orificio de la parte inferior del
contenedor de la aspiradora (8). Escuchará un clic audible. Para desarmar el cabezal de vacío del contenedor de la aspiradora, presione
el botón de desconexión del cabezal de vacío (25) del contenedor y luego jale el cabezal de vacío lentamente.
Acoplar el mango Inserte el palo del mango (3) en el mango (1) hasta que escuche un clic
audible. Inserte el palo del mango, con el sujetador de almacenamiento de herramienta (4) orientado hacia delante, en el orificio que está arriba del contenedor. Escuchará un clic audible. Compruebe que el palo del mango esté bien asegurado.
Para desarmar el mango, presione el botón de desconexión del palo del mango (20) y luego jale lentamente el mango.
Acoplar el recipiente guardapolvos Coloque la parte inferior del recipiente guardapolvos (11) en el cuerpo del
contenedor. El recipiente guardapolvos está asegurado cuando escuche un clic audible.
Aspiradora vertical sin bolsa INFORMACIÓN GENERAL
14 SERVICIO POSVENTA 888-367-7373 [email protected]
ENERAL
INFORMACIÓN GENERAL
Al usar un aparato eléctrico, siempre se deben seguir medidas de seguridad básicas, incluyendo las siguientes. POR FAVOR, LEA Y GUARDE TODAS LAS INSTRUCCIONES ANTES DE USAR LA ASPIRADORA VERTICAL.
1. No utilice la aspiradora en exteriores. Está diseñada únicamente para uso en el hogar. 2. No permita que se utilice la aspiradora como juguete. Debe poner mucha atención
cuando la aspiradora es utilizada por niños o cerca de niños. 3. No utilice la aspiradora si el cable o el enchufe están dañados. No utilice la aspiradora si
se cayó, está dañada, quedó en el exterior o se cayó al agua. Envíe la aspiradora al centro de atención técnica para que la revisen, reparen o le den un reembolso.
4. No intente cambiar los accesorios si la aspiradora está en funcionamiento. 5. No manipule el enchufe ni la aspiradora con las manos mojadas. 6. Utilice la aspiradora únicamente según las indicaciones del manual. Utilice únicamente
los accesorios recomendados por el fabricante. 7. No coloque ningún objeto en las aberturas de la aspiradora. No utilice el aparato con
ninguna abertura bloqueada. Mantenga limpio sin polvo, pelusas, cabellos o cualquier otra cosa que pudiera reducir el caudal de aire.
8. Mantenga el cabello, la ropa suelta, los dedos y todas las partes del cuerpo lejos de las aberturas y piezas móviles.
9. No recoja con la aspiradora nada que se esté quemando o con humo, como cigarrillos, fósforos o cenizas calientes.
10. No utilice materiales abrasivos para limpiar la aspiradora. No sumerja la aspiradora en agua.
11. No recoja líquidos con la aspiradora ni aspire sobre pisos mojados. 12. No utilice la aspiradora sobre superficies de concreto, chapapote u otras superficies
ásperas similares. 13. No recoja trozos de cuerda o tela con la aspiradora. 14. No limpie alfombras deshilachadas ni alfombras con borlas con la aspiradora. 15. No utilice la aspiradora para recoger líquidos inflamables o combustibles como gasolina,
ni la utilice en áreas donde pudiera haber estos productos. 16. Lea y siga todas las instrucciones operativas. 17. No utilice la aspiradora si no está colocado el recipiente guardapolvos. 18. Guarde la aspiradora en interiores. Guarde la aspiradora después de usarla para evitar
accidentes. 19. No le dé un mal uso al cable de alimentación. Nunca transporte la aspiradora por el
cable de alimentación ni tire del cable para desconectarlo del enchufe de tomacorriente; en su lugar, agarre el enchufe del tomacorriente y tire para desconectar.
COMO UNA CARACTERÍSTICA DE SEGURIDAD PARA REDUCIR EL RIESGO DE UNA DESCARGA ELÉCTRICA, ESTE ELECTRODOMÉSTICO CUENTA CON UN ENCHUFE POLARIZADO (UNA CLAVIJA ES MÁS ANCHA QUE LA OTRA). ESTE ENCHUFE ESTÁ DISEÑADO PARA ENCAJAR EN UN TOMACORRIENTE POLARIZADO EN UNA SOLA POSICIÓN. SI EL ENCHUFE NO ENCAJA COMPLETAMENTE EN EL TOMACORRIENTE, INVIERTA LA POSICIÓN DEL ENCHUFE. SI AÚN ASÍ NO ENCAJA, COMUNÍQUESE CON UN ELECTRICISTA CALIFICADO. NO INTENTE MODIFICAR, DESARMAR O DESHACER DE ALGÚN MODO, ESTA CARACTERÍSTICA DE SEGURIDAD.

Aspiradora vertical sin bolsa _ INSTRUCCIONES DE SEGURIDAD
SERVICIO POSVENTA 15 888-367-7373 [email protected]
RIDAD
INSTRUCCIONES DE SEGURIDAD
¡ADVERTENCIA! Lea y entienda todas las instrucciones. No seguir todas las instrucciones indicadas a continuación podría ocasionar descargas eléctricas, incendios o lesiones personales de gravedad. Las advertencias, avisos de precaución, e indicaciones mencionadas en este manual de usuario, no pueden abarcar todas las posibles condiciones y situaciones que podrían ocurrir. El usuario debe comprender que el sentido común y la cautela son elementos que no se pueden fabricar como parte de este producto, sino que deben ser proporcionados por el mismo usuario.
ENERGÍA ELÉCTRICA Si el circuito eléctrico se sobrecarga con otros aparatos electrodomésticos, es posible que su aspiradora no funcione adecuadamente. La aspiradora deberá operarse en un circuito eléctrico distinto al de otros aparatos electrodomésticos en funcionamiento.
ADVERTENCIA DE SEGURIDAD Aunque su aspiradora es fácil de utilizar, por su seguridad, deben seguirse las siguientes precauciones: 1. No coloque su aspiradora cerca de una fuente de calor. 2. No la desconecte del enchufe de la pared jalando del cable de alimentación
eléctrica. 3. La aspiradora debe desconectarse:
a. Antes de limpiarla o darle mantenimiento. b. Si parece estar defectuosa.
ESTE PRODUCTO ESTÁ DISEÑADO ÚNICAMENTE PARA USO DOMÉSTICO.
CONSERVE ESTAS INSTRUCCIONES.

Aspiradora vertical sin bolsa MODO DE EMPLEO
16 SERVICIO POSVENTA 888-367-7373 [email protected]
EMPLEO
MODO DE EMPLEO
Cómo encender/apagar la aspiradora vertical 1. Antes de usar la aspiradora, jale el cable retráctil del contenedor y enchúfelo en el
tomacorriente. 2. La boquilla para la tapicería (14) DEBE colocarse firmemente en el receptáculo de la
boquilla (13) antes del uso. 3. Presione el interruptor ON/OFF (21) ubicado en la parte posterior del contenedor junto
a la base del mango para encender la aspiradora (ON). 4. Presione el interruptor ON/OFF una vez más para apagar (OFF) la aspiradora. 5. Para facilitar el rebobinado, NO tire del cable más allá de la cinta roja marcada en el
cable. Observe que hay una cinta amarilla a unos 2 ½ pies antes de la cinta roja. Para volver a enrollar el cable, presione el botón de enrollado (19) para retraer el cable. NOTA: Sea cuidadoso y guíe el cable de alimentación con la mano para asegurarse de que el cable no de un latigazo ni se enrede mientras se enrolla. Puede parar y comenzar el rebobinado hasta que se retraiga el cable por completo.
6. Desenchufe el cable de alimentación después de cada uso.
Cómo usar el contenedor desmontable 1. El contenedor desmontable permite limpiar fácilmente escaleras, el interior de carros y
otras áreas de la casa que son difíciles de alcanzar. 2. Desenchufe la aspiradora antes de desmontar el contenedor. 3. Retire el palo del mango del contenedor. 4. Presione el botón de desconexión del cabezal y tire del cabezal de la aspiradora para
desmontarlo. 5. Utilice la boquilla para la tapicería o conecte uno de los accesorios (cepillo para el polvo
o boquilla rinconera) en el extremo de la boquilla para la tapicería. 6. Para mayor alcance, quite el mango del palo del mango y conecte el palo del mango en
el extremo de la boquilla para la tapicería. Conecte el accesorio apropiado al extremo del palo del mango.
Cómo usar los accesorios 1. La boquilla rinconera (5) se utiliza para limpiar radiadores, rincones, bordes y cajones. 2. El cepillo para el polvo (6) se utiliza para limpiar cortinas, estantes, libreros, lámparas y
otros objetos delicados. 3. La boquilla para la tapicería, conectada a la manguera flexible, se utiliza para tapicería. 4. El palo del mango (3) se utiliza para extender el alcance y darle mayor solidez a la
manguera flexible.
Cómo vaciar el recipiente guardapolvos 1. Presione el botón de desconexión del recipiente guardapolvos (17) para desmontarlo
del contenedor. 2. Presione el botón de desconexión del recipiente guardapolvos sucio (18) ubicado en la
parte inferior del recipiente guardapolvos y vacíe la suciedad en el bote de basura. 3. Cierre la puerta del recipiente guardapolvos. 4. Coloque la parte inferior del recipiente guardapolvos en el contenedor. Presione
firmemente hasta que escuche un clic audible.

Aspiradora vertical sin bolsa LIMPIEZA Y MANTENIMIENTO
SERVICIO POSVENTA 17 888-367-7373 [email protected]
MIENTO
LIMPIEZA Y MANTENIMIENTO
PRECAUCIÓN:
Siempre compruebe que la aspiradora esté apagada y DESENCHUFADA antes de limpiar o intentar guardar el aparato. NUNCA SUMERJA EL MOTOR en agua o en cualquier otro líquido. NUNCA opere la aspiradora si el recipiente guardapolvos y el filtro no están colocados.
Cómo limpiar los filtros 1. Para mantener un rendimiento óptimo, los filtros deben limpiarse cada dos
meses en condiciones de uso normal. 2. Filtro HEPA: el filtro HEPA se encuentra debajo de la tapa del recipiente
guardapolvos. Use la pestaña superior para retirar el filtro HEPA del recipiente guardapolvos. Sostenga el filtro y sacuda la suciedad y desechos dentro de un bote de basura.
3. Filtro de escape: el filtro de escape se encuentra en la parte inferior de la aspiradora. Presione la presilla y quite la rejilla del filtro de escape de la aspiradora. Jale la parte inferior del filtro hacia afuera para que la parte de arriba se desenganche de la ranura del filtro. Puede enjuagar el filtro de escape ligeramente con agua de grifo caliente. Verifique que el filtro de escape esté completamente seco antes del próximo uso.
Cómo limpiar la cámara de polvo 1. Retire la cámara de polvo completa del recipiente guardapolvos. 2. Puede limpiar la suciedad y residuos del tamiz de la cámara de polvo con un
cepillo suave o un paño ligeramente humedecido. 3. Cómo limpiar el recipiente guardapolvos 4. Retire la cámara de polvo y el filtro HEPA del recipiente guardapolvos. 5. El recipiente guardapolvos puede enjuagarse con agua jabonosa caliente y
secarse con un paño suave. NOTA: Compruebe que la cámara de polvo se haya secado por completo antes del próximo uso.
Cómo limpiar el cabezal de vacío 1. De vuelta el cabezal de vacío para que la parte de abajo quede hacia arriba.
Ubique las dos pestañas a cada lado de la cubierta de la rueda de aire. Apriete las pestañas y retire la cubierta de rueda de aire.
2. Retire los desechos que se hayan acumulado alrededor del cepillo del cabezal de vacío. Cuerdas, cabellos o telas obstruirán el movimiento del cepillo.

Aspiradora vertical sin bolsa _LIMPIEZA Y MANTENIMIENTO
18 SERVICIO POSVENTA 888-367-7373 [email protected]
IENTO
Cómo limpiar la manguera flexible 1. Para retirar la manguera flexible, presione las pestañas de desconexión de la
manguera y quítelo del contenedor de la aspiradora. 2. Limpie cualquier desecho u obstrucción que encuentre en la manguera. No
utilice objetos cortantes para limpiar la manguera ya que esto puede provocar daños.
Cómo quitar obstrucciones 1. La succión lenta o recolección deficiente pueden deberse a una obstrucción en
el contenedor de la aspiradora. Si observa un cambio en el sonido del motor o una disminución del rendimiento del aparato, revise que no haya obstrucciones. PRECAUCIÓN: Siempre compruebe que la aspiradora vertical esté apagada (OFF) y desenchufada antes de intentar quitar una obstrucción.
2. Vacíe el recipiente guardapolvos. 3. Revise que no haya restos acumulados en el recipiente guardapolvos. 4. Revise que no haya una obstrucción en el cabezal de vacío. 5. Revise la herramienta para el piso.

Aspiradora vertical sin bolsa INFORMACIÓN ADICIONAL DE UTILIDAD
SERVICIO POSVENTA 19 888-367-7373 [email protected]
UTILIDA
INFORMACIÓN ADICIONAL DE UTILIDAD
Especificaciones técnicas Número de modelo FJ142L-120-500 Tensión nominal (voltaje) 120 V – 60 Hz Potencia nominal (vataje) 1200 W
Almacenamiento Guarde la aspiradora en un lugar seco. No coloque objetos pesados sobre la aspiradora mientras esté guardada, ya que esto podría provocar daños al aparato. Precaución: Ningún aparato eléctrico o electrónico debe guardarse o estar expuesto en áreas con altos niveles de calor o humedad. No almacene su aspiradora vertical cerca de hornos, radiadores, calefactores, ni en baños o áreas destinadas para bañarse.
Centro de servicio Si tiene cualquier pregunta con respecto al funcionamiento de esta aspiradora vertical, por favor comuníquese con nuestro centro de servicio:
Wachsmuth & Krogmann, Inc. Teléfono: 1-888-367-7373 (Horario de servicio: de lunes a viernes de 10:00 a.m. a 5:00 p.m. EST) Correo electrónico: [email protected] Sitio de Internet: www.wk-usa.com
Protección ambiental Si el aparato electrodoméstico dejara de funcionar, por favor asegúrese de deshacerse de la unidad de forma que no afecte al medio ambiente.

Aspiradora vertical sin bolsa _LIMPIEZA Y MANTENIMIENTO
20 SERVICIO POSVENTA 888-367-7373 [email protected]
MIENTO
DISTRIBUTED BY • DISTRIBUIDO POR: ALDI INC., BATAVIA, IL 60510 www.aldi.us www.aldi.us
MODEL: FJ142-120-500 PRODUCT CODE: 5936 10/2015

Your details / Sus datos:
Name / Nombre
Address / Dirección
Email/Correo electrónico
Date of purchase / Fecha de compra* *We recommend you keep the receipt with this warranty card / Le recomendamos guardar el recibo de compra junto con esta tarjeta de garantía
Location of purchase / Lugar de compra
Description of malfunction / Descripción del defecto:
WARRANTY CARD TARJETA DE GARANTÍA BAGLESS UPRIGHT VACUUM ASPIRADORA VERTICAL SIN BOLSA
AFTER SALES SUPPORT • SERVICIO POSVENTA
888-367-7373
MODEL: FJ142-120-500 PRODUCT CODE: 5936 10/2015
2
Return your completed warranty card together with the faulty product to: Complete su tarjeta de garantía y envíela junto con el producto defectuoso a:
Wachsmuth & Krogmann, Inc. 621 IL Rt. 83, Ste. 202 Bensenville, IL 60106 USA [email protected]
Customer Service Phone Hours: Monday – Friday 10:00am – 5:00pm EST
Horario de Servicio al cliente: lunes a viernes 10:00a.m. – 5:00p.m. EST
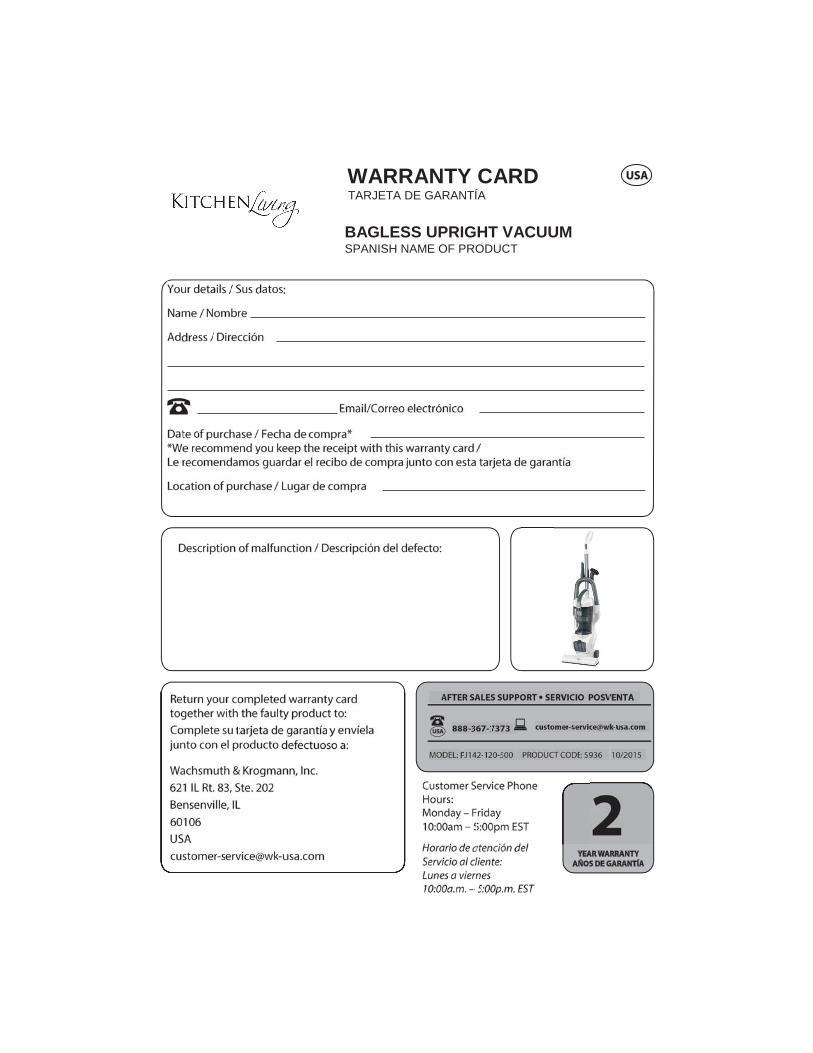
WARRANTY CARD TARJETA DE GARANTÍA BAGLESS UPRIGHT VACUUM SPANISH NAME OF PRODUCT
•
Condiciones de la garantía
Estimado cliente:
La garantía de ALDI le ofrece amplias ventajas en comparación a la obligación legal a la que está sujeta una garantía:
Período de garantía: 2 años a partir de la fecha de compra. 6 meses para piezas de desgaste y consumibles bajo condiciones normales y reglamentarias de uso (p. ej. baterías recargables).
Costes: Reparación/sustitución gratuita o reembolso. Sin costes de transporte.
AVISO: Por favor, póngase en contacto con nuestra línea directa de atención por teléfono, correo electrónico o fax antes de retornar el producto. Esto nos permite proporcionar ayuda en caso de posibles errores del operador.
Para hacer una reclamación bajo la garantía, por favor envíenos:
el artículo defectuoso conjuntamente con el recibo de compra original y la tarjeta de garantía completada de manera apropiada.
el producto con todos los componentes incluidos en el embalaje.
La garantía no cubre daños causados por:
Accidente o sucesos imprevistos (e.g. rayos, agua, fuego). Uso o transporte inadecuados. Inobservancia de las instrucciones de seguridad y mantenimiento. Otro tipo de manejo o modificación inadecuado.
Después del vencimiento del período de garantía, todavía tiene la posibilidad de mandar a reparar su producto si usted corre con los gastos. Si la reparación o estimación de los costos no es gratis, usted será informado de ello previamente.
Esta garantía no limita la obligación legal del vendedor originada por una garantía. El período de garantía solamente se podrá alargar conforme a las normas legales. En los países en que la ley exija una garantía (obligatoria) y/o el almacenamiento de piezas de recambio y/o un sistema de compensación, se aplicarán las condiciones legales mínimas. Al recibir un producto para su reparación, ni la compañía de servicios ni el vendedor asumirán responsabilidad alguna por los datos o los ajustes que el cliente haya podido almacenar en el producto.