AWS IoT SiteWise•Use AWS IoT SiteWise gateway software that runs on any platform that supports AWS...
253
AWS IoT SiteWise User Guide
Transcript of AWS IoT SiteWise•Use AWS IoT SiteWise gateway software that runs on any platform that supports AWS...
AWS IoT SiteWiseUser Guide

AWS IoT SiteWise User Guide
AWS IoT SiteWise: User GuideCopyright © 2020 Amazon Web Services, Inc. and/or its affiliates. All rights reserved.
Amazon's trademarks and trade dress may not be used in connection with any product or service that is notAmazon's, in any manner that is likely to cause confusion among customers, or in any manner that disparages ordiscredits Amazon. All other trademarks not owned by Amazon are the property of their respective owners, who mayor may not be affiliated with, connected to, or sponsored by Amazon.
AWS IoT SiteWise User Guide
Table of Contents. . . . . . . . . . . . . . . . . . . . . . . . . . . . . . . . . . . . . . . . . . . . . . . . . . . . . . . . . . . . . . . . . . . . . . . . . . . . . . . . . . . . . . . . . . . . . . . . . . . . . . . . . . . . . . . . . . . . . . . . . . . . . . . . . . . . . . . . . . . . . . . . . . . . . . vii
What is AWS IoT SiteWise? .... . . . . . . . . . . . . . . . . . . . . . . . . . . . . . . . . . . . . . . . . . . . . . . . . . . . . . . . . . . . . . . . . . . . . . . . . . . . . . . . . . . . . . . . . . . . . . . . . . . . . . . . . . . . . . . 1How AWS IoT SiteWise works .... . . . . . . . . . . . . . . . . . . . . . . . . . . . . . . . . . . . . . . . . . . . . . . . . . . . . . . . . . . . . . . . . . . . . . . . . . . . . . . . . . . . . . . . . . . . . . . . . . . 1Why use AWS IoT SiteWise? .... . . . . . . . . . . . . . . . . . . . . . . . . . . . . . . . . . . . . . . . . . . . . . . . . . . . . . . . . . . . . . . . . . . . . . . . . . . . . . . . . . . . . . . . . . . . . . . . . . . . . 2
Benefits .... . . . . . . . . . . . . . . . . . . . . . . . . . . . . . . . . . . . . . . . . . . . . . . . . . . . . . . . . . . . . . . . . . . . . . . . . . . . . . . . . . . . . . . . . . . . . . . . . . . . . . . . . . . . . . . . . . . . . . . . . 2Use cases .... . . . . . . . . . . . . . . . . . . . . . . . . . . . . . . . . . . . . . . . . . . . . . . . . . . . . . . . . . . . . . . . . . . . . . . . . . . . . . . . . . . . . . . . . . . . . . . . . . . . . . . . . . . . . . . . . . . . . . . 2
Are you new to AWS IoT SiteWise? .... . . . . . . . . . . . . . . . . . . . . . . . . . . . . . . . . . . . . . . . . . . . . . . . . . . . . . . . . . . . . . . . . . . . . . . . . . . . . . . . . . . . . . . . . . . . 3Concepts .... . . . . . . . . . . . . . . . . . . . . . . . . . . . . . . . . . . . . . . . . . . . . . . . . . . . . . . . . . . . . . . . . . . . . . . . . . . . . . . . . . . . . . . . . . . . . . . . . . . . . . . . . . . . . . . . . . . . . . . . . . . . . . . . 3Key components .... . . . . . . . . . . . . . . . . . . . . . . . . . . . . . . . . . . . . . . . . . . . . . . . . . . . . . . . . . . . . . . . . . . . . . . . . . . . . . . . . . . . . . . . . . . . . . . . . . . . . . . . . . . . . . . . . . . . . 5We want to hear from you .... . . . . . . . . . . . . . . . . . . . . . . . . . . . . . . . . . . . . . . . . . . . . . . . . . . . . . . . . . . . . . . . . . . . . . . . . . . . . . . . . . . . . . . . . . . . . . . . . . . . . . . 6
Getting started .... . . . . . . . . . . . . . . . . . . . . . . . . . . . . . . . . . . . . . . . . . . . . . . . . . . . . . . . . . . . . . . . . . . . . . . . . . . . . . . . . . . . . . . . . . . . . . . . . . . . . . . . . . . . . . . . . . . . . . . . . . . . . . . 7Requirements .... . . . . . . . . . . . . . . . . . . . . . . . . . . . . . . . . . . . . . . . . . . . . . . . . . . . . . . . . . . . . . . . . . . . . . . . . . . . . . . . . . . . . . . . . . . . . . . . . . . . . . . . . . . . . . . . . . . . . . . . . 7Setting up an AWS account .... . . . . . . . . . . . . . . . . . . . . . . . . . . . . . . . . . . . . . . . . . . . . . . . . . . . . . . . . . . . . . . . . . . . . . . . . . . . . . . . . . . . . . . . . . . . . . . . . . . . . . 7Using the quick start demo .... . . . . . . . . . . . . . . . . . . . . . . . . . . . . . . . . . . . . . . . . . . . . . . . . . . . . . . . . . . . . . . . . . . . . . . . . . . . . . . . . . . . . . . . . . . . . . . . . . . . . . 8
Creating the AWS IoT SiteWise demo .... . . . . . . . . . . . . . . . . . . . . . . . . . . . . . . . . . . . . . . . . . . . . . . . . . . . . . . . . . . . . . . . . . . . . . . . . . . . . . . . 9Deleting the AWS IoT SiteWise demo .... . . . . . . . . . . . . . . . . . . . . . . . . . . . . . . . . . . . . . . . . . . . . . . . . . . . . . . . . . . . . . . . . . . . . . . . . . . . . . . 10
Tutorials ... . . . . . . . . . . . . . . . . . . . . . . . . . . . . . . . . . . . . . . . . . . . . . . . . . . . . . . . . . . . . . . . . . . . . . . . . . . . . . . . . . . . . . . . . . . . . . . . . . . . . . . . . . . . . . . . . . . . . . . . . . . . . . . . . . . . . . . . 11Calculating OEE .... . . . . . . . . . . . . . . . . . . . . . . . . . . . . . . . . . . . . . . . . . . . . . . . . . . . . . . . . . . . . . . . . . . . . . . . . . . . . . . . . . . . . . . . . . . . . . . . . . . . . . . . . . . . . . . . . . . . 11
Prerequisites ... . . . . . . . . . . . . . . . . . . . . . . . . . . . . . . . . . . . . . . . . . . . . . . . . . . . . . . . . . . . . . . . . . . . . . . . . . . . . . . . . . . . . . . . . . . . . . . . . . . . . . . . . . . . . . . . . . 11How to calculate OEE .... . . . . . . . . . . . . . . . . . . . . . . . . . . . . . . . . . . . . . . . . . . . . . . . . . . . . . . . . . . . . . . . . . . . . . . . . . . . . . . . . . . . . . . . . . . . . . . . . . . . 11
Ingesting data to AWS IoT SiteWise from AWS IoT things .... . . . . . . . . . . . . . . . . . . . . . . . . . . . . . . . . . . . . . . . . . . . . . . . . . . . . . . . . . . 13Prerequisites ... . . . . . . . . . . . . . . . . . . . . . . . . . . . . . . . . . . . . . . . . . . . . . . . . . . . . . . . . . . . . . . . . . . . . . . . . . . . . . . . . . . . . . . . . . . . . . . . . . . . . . . . . . . . . . . . . . 13Creating an AWS IoT policy .... . . . . . . . . . . . . . . . . . . . . . . . . . . . . . . . . . . . . . . . . . . . . . . . . . . . . . . . . . . . . . . . . . . . . . . . . . . . . . . . . . . . . . . . . . . . 14Creating and configuring an AWS IoT thing .... . . . . . . . . . . . . . . . . . . . . . . . . . . . . . . . . . . . . . . . . . . . . . . . . . . . . . . . . . . . . . . . . . . . . . 15Creating a device asset model ... . . . . . . . . . . . . . . . . . . . . . . . . . . . . . . . . . . . . . . . . . . . . . . . . . . . . . . . . . . . . . . . . . . . . . . . . . . . . . . . . . . . . . . . . . 18Creating a device fleet asset model ... . . . . . . . . . . . . . . . . . . . . . . . . . . . . . . . . . . . . . . . . . . . . . . . . . . . . . . . . . . . . . . . . . . . . . . . . . . . . . . . . . 19Creating and configuring a device asset ... . . . . . . . . . . . . . . . . . . . . . . . . . . . . . . . . . . . . . . . . . . . . . . . . . . . . . . . . . . . . . . . . . . . . . . . . . . . 20Creating and configuring a device fleet asset ... . . . . . . . . . . . . . . . . . . . . . . . . . . . . . . . . . . . . . . . . . . . . . . . . . . . . . . . . . . . . . . . . . . . . 22Creating a rule in AWS IoT Core to send data to device assets ... . . . . . . . . . . . . . . . . . . . . . . . . . . . . . . . . . . . . . . . . . . . . . 23Running the device client script ... . . . . . . . . . . . . . . . . . . . . . . . . . . . . . . . . . . . . . . . . . . . . . . . . . . . . . . . . . . . . . . . . . . . . . . . . . . . . . . . . . . . . . . 27Cleaning up resources .... . . . . . . . . . . . . . . . . . . . . . . . . . . . . . . . . . . . . . . . . . . . . . . . . . . . . . . . . . . . . . . . . . . . . . . . . . . . . . . . . . . . . . . . . . . . . . . . . . . . 31Troubleshooting a rule .... . . . . . . . . . . . . . . . . . . . . . . . . . . . . . . . . . . . . . . . . . . . . . . . . . . . . . . . . . . . . . . . . . . . . . . . . . . . . . . . . . . . . . . . . . . . . . . . . . . 32
Configuring alarms for asset property values .... . . . . . . . . . . . . . . . . . . . . . . . . . . . . . . . . . . . . . . . . . . . . . . . . . . . . . . . . . . . . . . . . . . . . . . . . . . . 35Prerequisites ... . . . . . . . . . . . . . . . . . . . . . . . . . . . . . . . . . . . . . . . . . . . . . . . . . . . . . . . . . . . . . . . . . . . . . . . . . . . . . . . . . . . . . . . . . . . . . . . . . . . . . . . . . . . . . . . . . 36Configuring an alarm detection system ..... . . . . . . . . . . . . . . . . . . . . . . . . . . . . . . . . . . . . . . . . . . . . . . . . . . . . . . . . . . . . . . . . . . . . . . . . . . 36Configuring alarms .... . . . . . . . . . . . . . . . . . . . . . . . . . . . . . . . . . . . . . . . . . . . . . . . . . . . . . . . . . . . . . . . . . . . . . . . . . . . . . . . . . . . . . . . . . . . . . . . . . . . . . . . 55
Visualizing and sharing wind farm data in SiteWise Monitor ... . . . . . . . . . . . . . . . . . . . . . . . . . . . . . . . . . . . . . . . . . . . . . . . . . . . . . . . . 64Prerequisites ... . . . . . . . . . . . . . . . . . . . . . . . . . . . . . . . . . . . . . . . . . . . . . . . . . . . . . . . . . . . . . . . . . . . . . . . . . . . . . . . . . . . . . . . . . . . . . . . . . . . . . . . . . . . . . . . . . 65Creating a portal in SiteWise Monitor ... . . . . . . . . . . . . . . . . . . . . . . . . . . . . . . . . . . . . . . . . . . . . . . . . . . . . . . . . . . . . . . . . . . . . . . . . . . . . . . 65Signing in to a portal ... . . . . . . . . . . . . . . . . . . . . . . . . . . . . . . . . . . . . . . . . . . . . . . . . . . . . . . . . . . . . . . . . . . . . . . . . . . . . . . . . . . . . . . . . . . . . . . . . . . . . 68Creating a wind farm project ... . . . . . . . . . . . . . . . . . . . . . . . . . . . . . . . . . . . . . . . . . . . . . . . . . . . . . . . . . . . . . . . . . . . . . . . . . . . . . . . . . . . . . . . . . . 69Creating dashboards to visualize wind farm data .... . . . . . . . . . . . . . . . . . . . . . . . . . . . . . . . . . . . . . . . . . . . . . . . . . . . . . . . . . . . . . . 71Creating AWS SSO users ... . . . . . . . . . . . . . . . . . . . . . . . . . . . . . . . . . . . . . . . . . . . . . . . . . . . . . . . . . . . . . . . . . . . . . . . . . . . . . . . . . . . . . . . . . . . . . . . . 77Adding AWS SSO users to a portal ... . . . . . . . . . . . . . . . . . . . . . . . . . . . . . . . . . . . . . . . . . . . . . . . . . . . . . . . . . . . . . . . . . . . . . . . . . . . . . . . . . . 79Assigning users to a project ... . . . . . . . . . . . . . . . . . . . . . . . . . . . . . . . . . . . . . . . . . . . . . . . . . . . . . . . . . . . . . . . . . . . . . . . . . . . . . . . . . . . . . . . . . . . . 80Cleaning up resources .... . . . . . . . . . . . . . . . . . . . . . . . . . . . . . . . . . . . . . . . . . . . . . . . . . . . . . . . . . . . . . . . . . . . . . . . . . . . . . . . . . . . . . . . . . . . . . . . . . . . 82
Publishing property value updates to Amazon DynamoDB .... . . . . . . . . . . . . . . . . . . . . . . . . . . . . . . . . . . . . . . . . . . . . . . . . . . . . . . . . . 84Prerequisites ... . . . . . . . . . . . . . . . . . . . . . . . . . . . . . . . . . . . . . . . . . . . . . . . . . . . . . . . . . . . . . . . . . . . . . . . . . . . . . . . . . . . . . . . . . . . . . . . . . . . . . . . . . . . . . . . . . 85Configuring AWS IoT SiteWise to publish property value updates .... . . . . . . . . . . . . . . . . . . . . . . . . . . . . . . . . . . . . . . . 85Creating a rule in AWS IoT Core .... . . . . . . . . . . . . . . . . . . . . . . . . . . . . . . . . . . . . . . . . . . . . . . . . . . . . . . . . . . . . . . . . . . . . . . . . . . . . . . . . . . . . . 87Creating a DynamoDB table .... . . . . . . . . . . . . . . . . . . . . . . . . . . . . . . . . . . . . . . . . . . . . . . . . . . . . . . . . . . . . . . . . . . . . . . . . . . . . . . . . . . . . . . . . . . . 89Configuring the DynamoDB rule action .... . . . . . . . . . . . . . . . . . . . . . . . . . . . . . . . . . . . . . . . . . . . . . . . . . . . . . . . . . . . . . . . . . . . . . . . . . . . 90Exploring data in DynamoDB .... . . . . . . . . . . . . . . . . . . . . . . . . . . . . . . . . . . . . . . . . . . . . . . . . . . . . . . . . . . . . . . . . . . . . . . . . . . . . . . . . . . . . . . . . . 90Cleaning up resources .... . . . . . . . . . . . . . . . . . . . . . . . . . . . . . . . . . . . . . . . . . . . . . . . . . . . . . . . . . . . . . . . . . . . . . . . . . . . . . . . . . . . . . . . . . . . . . . . . . . . 92
iii
AWS IoT SiteWise User Guide
Troubleshooting a rule .... . . . . . . . . . . . . . . . . . . . . . . . . . . . . . . . . . . . . . . . . . . . . . . . . . . . . . . . . . . . . . . . . . . . . . . . . . . . . . . . . . . . . . . . . . . . . . . . . . . 94Ingesting data to AWS IoT SiteWise .... . . . . . . . . . . . . . . . . . . . . . . . . . . . . . . . . . . . . . . . . . . . . . . . . . . . . . . . . . . . . . . . . . . . . . . . . . . . . . . . . . . . . . . . . . . . . . . . . 98
Using a gateway .... . . . . . . . . . . . . . . . . . . . . . . . . . . . . . . . . . . . . . . . . . . . . . . . . . . . . . . . . . . . . . . . . . . . . . . . . . . . . . . . . . . . . . . . . . . . . . . . . . . . . . . . . . . . . . . . . . . 98Choosing a gateway platform ..... . . . . . . . . . . . . . . . . . . . . . . . . . . . . . . . . . . . . . . . . . . . . . . . . . . . . . . . . . . . . . . . . . . . . . . . . . . . . . . . . . . . . . . . 98Configuring a gateway .... . . . . . . . . . . . . . . . . . . . . . . . . . . . . . . . . . . . . . . . . . . . . . . . . . . . . . . . . . . . . . . . . . . . . . . . . . . . . . . . . . . . . . . . . . . . . . . . . . . 99Configuring data sources .... . . . . . . . . . . . . . . . . . . . . . . . . . . . . . . . . . . . . . . . . . . . . . . . . . . . . . . . . . . . . . . . . . . . . . . . . . . . . . . . . . . . . . . . . . . . . . 114Upgrading a connector ... . . . . . . . . . . . . . . . . . . . . . . . . . . . . . . . . . . . . . . . . . . . . . . . . . . . . . . . . . . . . . . . . . . . . . . . . . . . . . . . . . . . . . . . . . . . . . . . . . 127
Using AWS IoT Core rules ... . . . . . . . . . . . . . . . . . . . . . . . . . . . . . . . . . . . . . . . . . . . . . . . . . . . . . . . . . . . . . . . . . . . . . . . . . . . . . . . . . . . . . . . . . . . . . . . . . . . . . 129Granting AWS IoT the required access .... . . . . . . . . . . . . . . . . . . . . . . . . . . . . . . . . . . . . . . . . . . . . . . . . . . . . . . . . . . . . . . . . . . . . . . . . . . . 129Configuring the AWS IoT SiteWise rule action .... . . . . . . . . . . . . . . . . . . . . . . . . . . . . . . . . . . . . . . . . . . . . . . . . . . . . . . . . . . . . . . . . 130Reducing costs with basic ingest ... . . . . . . . . . . . . . . . . . . . . . . . . . . . . . . . . . . . . . . . . . . . . . . . . . . . . . . . . . . . . . . . . . . . . . . . . . . . . . . . . . . . 134Troubleshooting the AWS IoT SiteWise rule action .... . . . . . . . . . . . . . . . . . . . . . . . . . . . . . . . . . . . . . . . . . . . . . . . . . . . . . . . . . . 135
Using AWS IoT Events actions .... . . . . . . . . . . . . . . . . . . . . . . . . . . . . . . . . . . . . . . . . . . . . . . . . . . . . . . . . . . . . . . . . . . . . . . . . . . . . . . . . . . . . . . . . . . . . . . 135Using the AWS IoT SiteWise API ... . . . . . . . . . . . . . . . . . . . . . . . . . . . . . . . . . . . . . . . . . . . . . . . . . . . . . . . . . . . . . . . . . . . . . . . . . . . . . . . . . . . . . . . . . . . . 135
Modeling industrial assets ... . . . . . . . . . . . . . . . . . . . . . . . . . . . . . . . . . . . . . . . . . . . . . . . . . . . . . . . . . . . . . . . . . . . . . . . . . . . . . . . . . . . . . . . . . . . . . . . . . . . . . . . . . . . . 137Asset and model states .... . . . . . . . . . . . . . . . . . . . . . . . . . . . . . . . . . . . . . . . . . . . . . . . . . . . . . . . . . . . . . . . . . . . . . . . . . . . . . . . . . . . . . . . . . . . . . . . . . . . . . . . 138Defining asset models ... . . . . . . . . . . . . . . . . . . . . . . . . . . . . . . . . . . . . . . . . . . . . . . . . . . . . . . . . . . . . . . . . . . . . . . . . . . . . . . . . . . . . . . . . . . . . . . . . . . . . . . . . . . 139
Asset properties ... . . . . . . . . . . . . . . . . . . . . . . . . . . . . . . . . . . . . . . . . . . . . . . . . . . . . . . . . . . . . . . . . . . . . . . . . . . . . . . . . . . . . . . . . . . . . . . . . . . . . . . . . . . 140Asset hierarchies ... . . . . . . . . . . . . . . . . . . . . . . . . . . . . . . . . . . . . . . . . . . . . . . . . . . . . . . . . . . . . . . . . . . . . . . . . . . . . . . . . . . . . . . . . . . . . . . . . . . . . . . . . . . 149
Creating assets ... . . . . . . . . . . . . . . . . . . . . . . . . . . . . . . . . . . . . . . . . . . . . . . . . . . . . . . . . . . . . . . . . . . . . . . . . . . . . . . . . . . . . . . . . . . . . . . . . . . . . . . . . . . . . . . . . . . . . 150Mapping industrial data streams to asset properties ... . . . . . . . . . . . . . . . . . . . . . . . . . . . . . . . . . . . . . . . . . . . . . . . . . . . . . . . . . . . . . . . . 151Updating attribute values .... . . . . . . . . . . . . . . . . . . . . . . . . . . . . . . . . . . . . . . . . . . . . . . . . . . . . . . . . . . . . . . . . . . . . . . . . . . . . . . . . . . . . . . . . . . . . . . . . . . . . 151Associating assets ... . . . . . . . . . . . . . . . . . . . . . . . . . . . . . . . . . . . . . . . . . . . . . . . . . . . . . . . . . . . . . . . . . . . . . . . . . . . . . . . . . . . . . . . . . . . . . . . . . . . . . . . . . . . . . . . . 153Updating assets and models ... . . . . . . . . . . . . . . . . . . . . . . . . . . . . . . . . . . . . . . . . . . . . . . . . . . . . . . . . . . . . . . . . . . . . . . . . . . . . . . . . . . . . . . . . . . . . . . . . . 154
Updating assets ... . . . . . . . . . . . . . . . . . . . . . . . . . . . . . . . . . . . . . . . . . . . . . . . . . . . . . . . . . . . . . . . . . . . . . . . . . . . . . . . . . . . . . . . . . . . . . . . . . . . . . . . . . . . 154Updating asset models ... . . . . . . . . . . . . . . . . . . . . . . . . . . . . . . . . . . . . . . . . . . . . . . . . . . . . . . . . . . . . . . . . . . . . . . . . . . . . . . . . . . . . . . . . . . . . . . . . . 154
Deleting assets and models ... . . . . . . . . . . . . . . . . . . . . . . . . . . . . . . . . . . . . . . . . . . . . . . . . . . . . . . . . . . . . . . . . . . . . . . . . . . . . . . . . . . . . . . . . . . . . . . . . . . 155Deleting assets ... . . . . . . . . . . . . . . . . . . . . . . . . . . . . . . . . . . . . . . . . . . . . . . . . . . . . . . . . . . . . . . . . . . . . . . . . . . . . . . . . . . . . . . . . . . . . . . . . . . . . . . . . . . . . 155Deleting asset models ... . . . . . . . . . . . . . . . . . . . . . . . . . . . . . . . . . . . . . . . . . . . . . . . . . . . . . . . . . . . . . . . . . . . . . . . . . . . . . . . . . . . . . . . . . . . . . . . . . . 155
Discovering your asset resources .... . . . . . . . . . . . . . . . . . . . . . . . . . . . . . . . . . . . . . . . . . . . . . . . . . . . . . . . . . . . . . . . . . . . . . . . . . . . . . . . . . . . . . . . . . . . 155Listing all asset models ... . . . . . . . . . . . . . . . . . . . . . . . . . . . . . . . . . . . . . . . . . . . . . . . . . . . . . . . . . . . . . . . . . . . . . . . . . . . . . . . . . . . . . . . . . . . . . . . . 156Describing a specific asset model ... . . . . . . . . . . . . . . . . . . . . . . . . . . . . . . . . . . . . . . . . . . . . . . . . . . . . . . . . . . . . . . . . . . . . . . . . . . . . . . . . . . 156Listing assets ... . . . . . . . . . . . . . . . . . . . . . . . . . . . . . . . . . . . . . . . . . . . . . . . . . . . . . . . . . . . . . . . . . . . . . . . . . . . . . . . . . . . . . . . . . . . . . . . . . . . . . . . . . . . . . . 158Describing a specific asset ... . . . . . . . . . . . . . . . . . . . . . . . . . . . . . . . . . . . . . . . . . . . . . . . . . . . . . . . . . . . . . . . . . . . . . . . . . . . . . . . . . . . . . . . . . . . . 159Listing assets associated to a specific asset ... . . . . . . . . . . . . . . . . . . . . . . . . . . . . . . . . . . . . . . . . . . . . . . . . . . . . . . . . . . . . . . . . . . . . . 159Describing a specific asset property .... . . . . . . . . . . . . . . . . . . . . . . . . . . . . . . . . . . . . . . . . . . . . . . . . . . . . . . . . . . . . . . . . . . . . . . . . . . . . . . 160
Monitoring data with web portals ... . . . . . . . . . . . . . . . . . . . . . . . . . . . . . . . . . . . . . . . . . . . . . . . . . . . . . . . . . . . . . . . . . . . . . . . . . . . . . . . . . . . . . . . . . . . . . . . . . 162SiteWise Monitor roles ... . . . . . . . . . . . . . . . . . . . . . . . . . . . . . . . . . . . . . . . . . . . . . . . . . . . . . . . . . . . . . . . . . . . . . . . . . . . . . . . . . . . . . . . . . . . . . . . . . . . . . . . . . 163SiteWise Monitor concepts .... . . . . . . . . . . . . . . . . . . . . . . . . . . . . . . . . . . . . . . . . . . . . . . . . . . . . . . . . . . . . . . . . . . . . . . . . . . . . . . . . . . . . . . . . . . . . . . . . . . . 164Getting started .... . . . . . . . . . . . . . . . . . . . . . . . . . . . . . . . . . . . . . . . . . . . . . . . . . . . . . . . . . . . . . . . . . . . . . . . . . . . . . . . . . . . . . . . . . . . . . . . . . . . . . . . . . . . . . . . . . . . 165
Creating a portal ... . . . . . . . . . . . . . . . . . . . . . . . . . . . . . . . . . . . . . . . . . . . . . . . . . . . . . . . . . . . . . . . . . . . . . . . . . . . . . . . . . . . . . . . . . . . . . . . . . . . . . . . . . 165Enabling AWS SSO ..... . . . . . . . . . . . . . . . . . . . . . . . . . . . . . . . . . . . . . . . . . . . . . . . . . . . . . . . . . . . . . . . . . . . . . . . . . . . . . . . . . . . . . . . . . . . . . . . . . . . . 166Configuring your portal ... . . . . . . . . . . . . . . . . . . . . . . . . . . . . . . . . . . . . . . . . . . . . . . . . . . . . . . . . . . . . . . . . . . . . . . . . . . . . . . . . . . . . . . . . . . . . . . . . 167Inviting administrators ... . . . . . . . . . . . . . . . . . . . . . . . . . . . . . . . . . . . . . . . . . . . . . . . . . . . . . . . . . . . . . . . . . . . . . . . . . . . . . . . . . . . . . . . . . . . . . . . . . 168Adding portal users ... . . . . . . . . . . . . . . . . . . . . . . . . . . . . . . . . . . . . . . . . . . . . . . . . . . . . . . . . . . . . . . . . . . . . . . . . . . . . . . . . . . . . . . . . . . . . . . . . . . . . . 169
Administering your portals ... . . . . . . . . . . . . . . . . . . . . . . . . . . . . . . . . . . . . . . . . . . . . . . . . . . . . . . . . . . . . . . . . . . . . . . . . . . . . . . . . . . . . . . . . . . . . . . . . . . . 170Changing a portal's name, description, support email, and permissions .... . . . . . . . . . . . . . . . . . . . . . . . . . . . . . . 171Adding or removing portal administrators ... . . . . . . . . . . . . . . . . . . . . . . . . . . . . . . . . . . . . . . . . . . . . . . . . . . . . . . . . . . . . . . . . . . . . . . 172Sending email invitations to portal administrators ... . . . . . . . . . . . . . . . . . . . . . . . . . . . . . . . . . . . . . . . . . . . . . . . . . . . . . . . . . . . 172Adding or removing portal users ... . . . . . . . . . . . . . . . . . . . . . . . . . . . . . . . . . . . . . . . . . . . . . . . . . . . . . . . . . . . . . . . . . . . . . . . . . . . . . . . . . . . 173Deleting a portal ... . . . . . . . . . . . . . . . . . . . . . . . . . . . . . . . . . . . . . . . . . . . . . . . . . . . . . . . . . . . . . . . . . . . . . . . . . . . . . . . . . . . . . . . . . . . . . . . . . . . . . . . . . 174
Creating dashboards (CLI) ... . . . . . . . . . . . . . . . . . . . . . . . . . . . . . . . . . . . . . . . . . . . . . . . . . . . . . . . . . . . . . . . . . . . . . . . . . . . . . . . . . . . . . . . . . . . . . . . . . . . . . 175Querying asset property data .... . . . . . . . . . . . . . . . . . . . . . . . . . . . . . . . . . . . . . . . . . . . . . . . . . . . . . . . . . . . . . . . . . . . . . . . . . . . . . . . . . . . . . . . . . . . . . . . . . . . . . . 178
Querying current values .... . . . . . . . . . . . . . . . . . . . . . . . . . . . . . . . . . . . . . . . . . . . . . . . . . . . . . . . . . . . . . . . . . . . . . . . . . . . . . . . . . . . . . . . . . . . . . . . . . . . . . . 178Querying historical values .... . . . . . . . . . . . . . . . . . . . . . . . . . . . . . . . . . . . . . . . . . . . . . . . . . . . . . . . . . . . . . . . . . . . . . . . . . . . . . . . . . . . . . . . . . . . . . . . . . . . . 179Querying aggregates .... . . . . . . . . . . . . . . . . . . . . . . . . . . . . . . . . . . . . . . . . . . . . . . . . . . . . . . . . . . . . . . . . . . . . . . . . . . . . . . . . . . . . . . . . . . . . . . . . . . . . . . . . . . . 180
Interacting with other services .... . . . . . . . . . . . . . . . . . . . . . . . . . . . . . . . . . . . . . . . . . . . . . . . . . . . . . . . . . . . . . . . . . . . . . . . . . . . . . . . . . . . . . . . . . . . . . . . . . . . . . 182
iv
AWS IoT SiteWise User Guide
Understanding asset properties' MQTT topics ... . . . . . . . . . . . . . . . . . . . . . . . . . . . . . . . . . . . . . . . . . . . . . . . . . . . . . . . . . . . . . . . . . . . . . . . . . . 182Enabling asset property notifications .... . . . . . . . . . . . . . . . . . . . . . . . . . . . . . . . . . . . . . . . . . . . . . . . . . . . . . . . . . . . . . . . . . . . . . . . . . . . . . . . . . . . . 182Querying asset property notification messages .... . . . . . . . . . . . . . . . . . . . . . . . . . . . . . . . . . . . . . . . . . . . . . . . . . . . . . . . . . . . . . . . . . . . . . . . 183
Exporting data to Amazon S3 .... . . . . . . . . . . . . . . . . . . . . . . . . . . . . . . . . . . . . . . . . . . . . . . . . . . . . . . . . . . . . . . . . . . . . . . . . . . . . . . . . . . . . . . . . . . . . . . . . . . . . . . 186Creating the AWS CloudFormation stack .... . . . . . . . . . . . . . . . . . . . . . . . . . . . . . . . . . . . . . . . . . . . . . . . . . . . . . . . . . . . . . . . . . . . . . . . . . . . . . . . . 186Viewing your data in Amazon S3 .... . . . . . . . . . . . . . . . . . . . . . . . . . . . . . . . . . . . . . . . . . . . . . . . . . . . . . . . . . . . . . . . . . . . . . . . . . . . . . . . . . . . . . . . . . . 187Template resource reference .... . . . . . . . . . . . . . . . . . . . . . . . . . . . . . . . . . . . . . . . . . . . . . . . . . . . . . . . . . . . . . . . . . . . . . . . . . . . . . . . . . . . . . . . . . . . . . . . . 189
Security ... . . . . . . . . . . . . . . . . . . . . . . . . . . . . . . . . . . . . . . . . . . . . . . . . . . . . . . . . . . . . . . . . . . . . . . . . . . . . . . . . . . . . . . . . . . . . . . . . . . . . . . . . . . . . . . . . . . . . . . . . . . . . . . . . . . . . . . 192Data protection .... . . . . . . . . . . . . . . . . . . . . . . . . . . . . . . . . . . . . . . . . . . . . . . . . . . . . . . . . . . . . . . . . . . . . . . . . . . . . . . . . . . . . . . . . . . . . . . . . . . . . . . . . . . . . . . . . . . 192
Data encryption .... . . . . . . . . . . . . . . . . . . . . . . . . . . . . . . . . . . . . . . . . . . . . . . . . . . . . . . . . . . . . . . . . . . . . . . . . . . . . . . . . . . . . . . . . . . . . . . . . . . . . . . . . . 193Internetwork traffic privacy .... . . . . . . . . . . . . . . . . . . . . . . . . . . . . . . . . . . . . . . . . . . . . . . . . . . . . . . . . . . . . . . . . . . . . . . . . . . . . . . . . . . . . . . . . . . 195
Identity and access management .... . . . . . . . . . . . . . . . . . . . . . . . . . . . . . . . . . . . . . . . . . . . . . . . . . . . . . . . . . . . . . . . . . . . . . . . . . . . . . . . . . . . . . . . . . . 195Audience .... . . . . . . . . . . . . . . . . . . . . . . . . . . . . . . . . . . . . . . . . . . . . . . . . . . . . . . . . . . . . . . . . . . . . . . . . . . . . . . . . . . . . . . . . . . . . . . . . . . . . . . . . . . . . . . . . . . . 195Authenticating with identities ... . . . . . . . . . . . . . . . . . . . . . . . . . . . . . . . . . . . . . . . . . . . . . . . . . . . . . . . . . . . . . . . . . . . . . . . . . . . . . . . . . . . . . . . 196Managing access using policies ... . . . . . . . . . . . . . . . . . . . . . . . . . . . . . . . . . . . . . . . . . . . . . . . . . . . . . . . . . . . . . . . . . . . . . . . . . . . . . . . . . . . . . . 197How AWS IoT SiteWise works with IAM ..... . . . . . . . . . . . . . . . . . . . . . . . . . . . . . . . . . . . . . . . . . . . . . . . . . . . . . . . . . . . . . . . . . . . . . . . . 199Identity-based policy examples .... . . . . . . . . . . . . . . . . . . . . . . . . . . . . . . . . . . . . . . . . . . . . . . . . . . . . . . . . . . . . . . . . . . . . . . . . . . . . . . . . . . . . 205Using service-linked roles ... . . . . . . . . . . . . . . . . . . . . . . . . . . . . . . . . . . . . . . . . . . . . . . . . . . . . . . . . . . . . . . . . . . . . . . . . . . . . . . . . . . . . . . . . . . . . . 208Using service roles for SiteWise Monitor ... . . . . . . . . . . . . . . . . . . . . . . . . . . . . . . . . . . . . . . . . . . . . . . . . . . . . . . . . . . . . . . . . . . . . . . . . . 210Troubleshooting .... . . . . . . . . . . . . . . . . . . . . . . . . . . . . . . . . . . . . . . . . . . . . . . . . . . . . . . . . . . . . . . . . . . . . . . . . . . . . . . . . . . . . . . . . . . . . . . . . . . . . . . . . . 215
Compliance validation .... . . . . . . . . . . . . . . . . . . . . . . . . . . . . . . . . . . . . . . . . . . . . . . . . . . . . . . . . . . . . . . . . . . . . . . . . . . . . . . . . . . . . . . . . . . . . . . . . . . . . . . . . . 217Resilience .... . . . . . . . . . . . . . . . . . . . . . . . . . . . . . . . . . . . . . . . . . . . . . . . . . . . . . . . . . . . . . . . . . . . . . . . . . . . . . . . . . . . . . . . . . . . . . . . . . . . . . . . . . . . . . . . . . . . . . . . . . . 218Infrastructure security ... . . . . . . . . . . . . . . . . . . . . . . . . . . . . . . . . . . . . . . . . . . . . . . . . . . . . . . . . . . . . . . . . . . . . . . . . . . . . . . . . . . . . . . . . . . . . . . . . . . . . . . . . . . 218Configuration and vulnerability analysis ... . . . . . . . . . . . . . . . . . . . . . . . . . . . . . . . . . . . . . . . . . . . . . . . . . . . . . . . . . . . . . . . . . . . . . . . . . . . . . . . . . 218Security best practices .... . . . . . . . . . . . . . . . . . . . . . . . . . . . . . . . . . . . . . . . . . . . . . . . . . . . . . . . . . . . . . . . . . . . . . . . . . . . . . . . . . . . . . . . . . . . . . . . . . . . . . . . . 219
Use authentication credentials on your OPC-UA servers ... . . . . . . . . . . . . . . . . . . . . . . . . . . . . . . . . . . . . . . . . . . . . . . . . . . . . 219Use encrypted communication modes for your OPC-UA servers ... . . . . . . . . . . . . . . . . . . . . . . . . . . . . . . . . . . . . . . . . . 219Encrypt your gateway's file system ..... . . . . . . . . . . . . . . . . . . . . . . . . . . . . . . . . . . . . . . . . . . . . . . . . . . . . . . . . . . . . . . . . . . . . . . . . . . . . . . 219Grant SiteWise Monitor users minimum possible permissions .... . . . . . . . . . . . . . . . . . . . . . . . . . . . . . . . . . . . . . . . . . . . 219Don't expose sensitive information .... . . . . . . . . . . . . . . . . . . . . . . . . . . . . . . . . . . . . . . . . . . . . . . . . . . . . . . . . . . . . . . . . . . . . . . . . . . . . . . . 220Follow AWS IoT Greengrass security best practices .... . . . . . . . . . . . . . . . . . . . . . . . . . . . . . . . . . . . . . . . . . . . . . . . . . . . . . . . . . . 220See also .... . . . . . . . . . . . . . . . . . . . . . . . . . . . . . . . . . . . . . . . . . . . . . . . . . . . . . . . . . . . . . . . . . . . . . . . . . . . . . . . . . . . . . . . . . . . . . . . . . . . . . . . . . . . . . . . . . . . . 220
Logging and monitoring .... . . . . . . . . . . . . . . . . . . . . . . . . . . . . . . . . . . . . . . . . . . . . . . . . . . . . . . . . . . . . . . . . . . . . . . . . . . . . . . . . . . . . . . . . . . . . . . . . . . . . . . . . . . . . . . 221Monitoring service logs .... . . . . . . . . . . . . . . . . . . . . . . . . . . . . . . . . . . . . . . . . . . . . . . . . . . . . . . . . . . . . . . . . . . . . . . . . . . . . . . . . . . . . . . . . . . . . . . . . . . . . . . . 221
Managing logging in AWS IoT SiteWise (console) ... . . . . . . . . . . . . . . . . . . . . . . . . . . . . . . . . . . . . . . . . . . . . . . . . . . . . . . . . . . . . . 222Managing logging in AWS IoT SiteWise (CLI) ... . . . . . . . . . . . . . . . . . . . . . . . . . . . . . . . . . . . . . . . . . . . . . . . . . . . . . . . . . . . . . . . . . . . 222Example: AWS IoT SiteWise log file entries ... . . . . . . . . . . . . . . . . . . . . . . . . . . . . . . . . . . . . . . . . . . . . . . . . . . . . . . . . . . . . . . . . . . . . . 223
Monitoring gateway logs .... . . . . . . . . . . . . . . . . . . . . . . . . . . . . . . . . . . . . . . . . . . . . . . . . . . . . . . . . . . . . . . . . . . . . . . . . . . . . . . . . . . . . . . . . . . . . . . . . . . . . . 223Using Amazon CloudWatch Logs .... . . . . . . . . . . . . . . . . . . . . . . . . . . . . . . . . . . . . . . . . . . . . . . . . . . . . . . . . . . . . . . . . . . . . . . . . . . . . . . . . . . 224Using local file system logs .... . . . . . . . . . . . . . . . . . . . . . . . . . . . . . . . . . . . . . . . . . . . . . . . . . . . . . . . . . . . . . . . . . . . . . . . . . . . . . . . . . . . . . . . . . 225
Monitoring with Amazon CloudWatch metrics ... . . . . . . . . . . . . . . . . . . . . . . . . . . . . . . . . . . . . . . . . . . . . . . . . . . . . . . . . . . . . . . . . . . . . . . . . . 225Gateway metrics ... . . . . . . . . . . . . . . . . . . . . . . . . . . . . . . . . . . . . . . . . . . . . . . . . . . . . . . . . . . . . . . . . . . . . . . . . . . . . . . . . . . . . . . . . . . . . . . . . . . . . . . . . . . 226
Logging API calls with AWS CloudTrail .. . . . . . . . . . . . . . . . . . . . . . . . . . . . . . . . . . . . . . . . . . . . . . . . . . . . . . . . . . . . . . . . . . . . . . . . . . . . . . . . . . . . . 227AWS IoT SiteWise information in CloudTrail .. . . . . . . . . . . . . . . . . . . . . . . . . . . . . . . . . . . . . . . . . . . . . . . . . . . . . . . . . . . . . . . . . . . . . . 227Example: AWS IoT SiteWise log file entries ... . . . . . . . . . . . . . . . . . . . . . . . . . . . . . . . . . . . . . . . . . . . . . . . . . . . . . . . . . . . . . . . . . . . . . 228
Tagging your resources .... . . . . . . . . . . . . . . . . . . . . . . . . . . . . . . . . . . . . . . . . . . . . . . . . . . . . . . . . . . . . . . . . . . . . . . . . . . . . . . . . . . . . . . . . . . . . . . . . . . . . . . . . . . . . . . . 229Using tags in AWS IoT SiteWise .... . . . . . . . . . . . . . . . . . . . . . . . . . . . . . . . . . . . . . . . . . . . . . . . . . . . . . . . . . . . . . . . . . . . . . . . . . . . . . . . . . . . . . . . . . . . . 229
Tagging with the AWS Management Console .... . . . . . . . . . . . . . . . . . . . . . . . . . . . . . . . . . . . . . . . . . . . . . . . . . . . . . . . . . . . . . . . . . 229Tagging with the AWS IoT SiteWise API ... . . . . . . . . . . . . . . . . . . . . . . . . . . . . . . . . . . . . . . . . . . . . . . . . . . . . . . . . . . . . . . . . . . . . . . . . . . 229
Using tags with IAM policies ... . . . . . . . . . . . . . . . . . . . . . . . . . . . . . . . . . . . . . . . . . . . . . . . . . . . . . . . . . . . . . . . . . . . . . . . . . . . . . . . . . . . . . . . . . . . . . . . . . 230Troubleshooting .... . . . . . . . . . . . . . . . . . . . . . . . . . . . . . . . . . . . . . . . . . . . . . . . . . . . . . . . . . . . . . . . . . . . . . . . . . . . . . . . . . . . . . . . . . . . . . . . . . . . . . . . . . . . . . . . . . . . . . . . . . 232
Troubleshooting an AWS IoT SiteWise gateway .... . . . . . . . . . . . . . . . . . . . . . . . . . . . . . . . . . . . . . . . . . . . . . . . . . . . . . . . . . . . . . . . . . . . . . . 232Configuring and accessing AWS IoT SiteWise gateway logs .... . . . . . . . . . . . . . . . . . . . . . . . . . . . . . . . . . . . . . . . . . . . . . . . 232AWS IoT SiteWise doesn't receive data from OPC-UA servers ... . . . . . . . . . . . . . . . . . . . . . . . . . . . . . . . . . . . . . . . . . . . . . 233Common AWS IoT Greengrass issues .... . . . . . . . . . . . . . . . . . . . . . . . . . . . . . . . . . . . . . . . . . . . . . . . . . . . . . . . . . . . . . . . . . . . . . . . . . . . . . 233
Troubleshooting an AWS IoT SiteWise rule action .... . . . . . . . . . . . . . . . . . . . . . . . . . . . . . . . . . . . . . . . . . . . . . . . . . . . . . . . . . . . . . . . . . . . 233Configuring AWS IoT Core logs .... . . . . . . . . . . . . . . . . . . . . . . . . . . . . . . . . . . . . . . . . . . . . . . . . . . . . . . . . . . . . . . . . . . . . . . . . . . . . . . . . . . . . 234
v
AWS IoT SiteWise User Guide
Configuring a republish error action .... . . . . . . . . . . . . . . . . . . . . . . . . . . . . . . . . . . . . . . . . . . . . . . . . . . . . . . . . . . . . . . . . . . . . . . . . . . . . . . 234Error: Member must be within 900 seconds before and 300 seconds after the currenttimestamp .... . . . . . . . . . . . . . . . . . . . . . . . . . . . . . . . . . . . . . . . . . . . . . . . . . . . . . . . . . . . . . . . . . . . . . . . . . . . . . . . . . . . . . . . . . . . . . . . . . . . . . . . . . . . . . . . . . 236Error: Property value does not match data type <type> .... . . . . . . . . . . . . . . . . . . . . . . . . . . . . . . . . . . . . . . . . . . . . . . . . . . . 236Error: User: <role-arn> is not authorized to perform: iotsitewise:BatchPutAssetPropertyValueon resource .... . . . . . . . . . . . . . . . . . . . . . . . . . . . . . . . . . . . . . . . . . . . . . . . . . . . . . . . . . . . . . . . . . . . . . . . . . . . . . . . . . . . . . . . . . . . . . . . . . . . . . . . . . . . . . . . . 236Error: iot.amazonaws.com is unable to perform: sts:AssumeRole on resource: <role-arn> .... . . . . . . . 236Info: No requests were sent. PutAssetPropertyValueEntries was empty after performingsubstitution templates. ... . . . . . . . . . . . . . . . . . . . . . . . . . . . . . . . . . . . . . . . . . . . . . . . . . . . . . . . . . . . . . . . . . . . . . . . . . . . . . . . . . . . . . . . . . . . . . . . . . 237
Quotas .... . . . . . . . . . . . . . . . . . . . . . . . . . . . . . . . . . . . . . . . . . . . . . . . . . . . . . . . . . . . . . . . . . . . . . . . . . . . . . . . . . . . . . . . . . . . . . . . . . . . . . . . . . . . . . . . . . . . . . . . . . . . . . . . . . . . . . . 238Document history .... . . . . . . . . . . . . . . . . . . . . . . . . . . . . . . . . . . . . . . . . . . . . . . . . . . . . . . . . . . . . . . . . . . . . . . . . . . . . . . . . . . . . . . . . . . . . . . . . . . . . . . . . . . . . . . . . . . . . . . . 241AWS glossary .... . . . . . . . . . . . . . . . . . . . . . . . . . . . . . . . . . . . . . . . . . . . . . . . . . . . . . . . . . . . . . . . . . . . . . . . . . . . . . . . . . . . . . . . . . . . . . . . . . . . . . . . . . . . . . . . . . . . . . . . . . . . . . 246
vi

AWS IoT SiteWise User Guide
The AWS IoT SiteWise service is currently in preview. Under preview service terms and conditions, theservice is subject to change.
vii
AWS IoT SiteWise User GuideHow AWS IoT SiteWise works
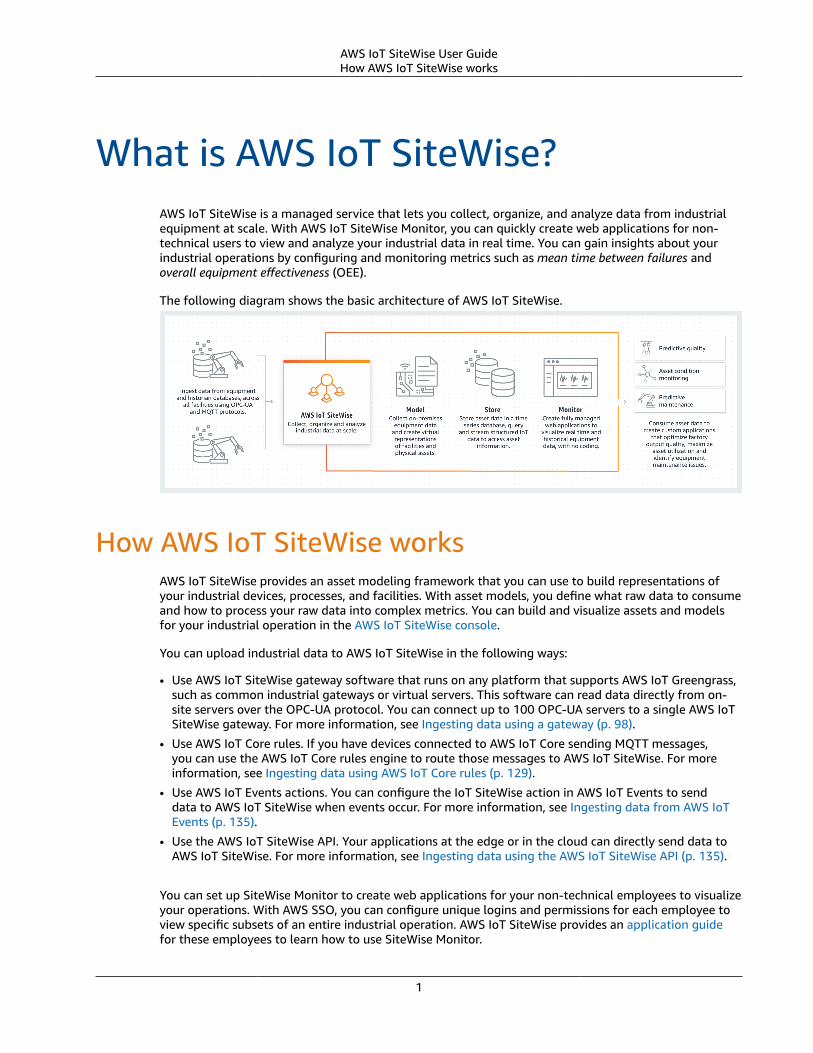
What is AWS IoT SiteWise?AWS IoT SiteWise is a managed service that lets you collect, organize, and analyze data from industrialequipment at scale. With AWS IoT SiteWise Monitor, you can quickly create web applications for non-technical users to view and analyze your industrial data in real time. You can gain insights about yourindustrial operations by configuring and monitoring metrics such as mean time between failures andoverall equipment effectiveness (OEE).
The following diagram shows the basic architecture of AWS IoT SiteWise.
How AWS IoT SiteWise worksAWS IoT SiteWise provides an asset modeling framework that you can use to build representations ofyour industrial devices, processes, and facilities. With asset models, you define what raw data to consumeand how to process your raw data into complex metrics. You can build and visualize assets and modelsfor your industrial operation in the AWS IoT SiteWise console.
You can upload industrial data to AWS IoT SiteWise in the following ways:
• Use AWS IoT SiteWise gateway software that runs on any platform that supports AWS IoT Greengrass,such as common industrial gateways or virtual servers. This software can read data directly from on-site servers over the OPC-UA protocol. You can connect up to 100 OPC-UA servers to a single AWS IoTSiteWise gateway. For more information, see Ingesting data using a gateway (p. 98).
• Use AWS IoT Core rules. If you have devices connected to AWS IoT Core sending MQTT messages,you can use the AWS IoT Core rules engine to route those messages to AWS IoT SiteWise. For moreinformation, see Ingesting data using AWS IoT Core rules (p. 129).
• Use AWS IoT Events actions. You can configure the IoT SiteWise action in AWS IoT Events to senddata to AWS IoT SiteWise when events occur. For more information, see Ingesting data from AWS IoTEvents (p. 135).
• Use the AWS IoT SiteWise API. Your applications at the edge or in the cloud can directly send data toAWS IoT SiteWise. For more information, see Ingesting data using the AWS IoT SiteWise API (p. 135).
You can set up SiteWise Monitor to create web applications for your non-technical employees to visualizeyour operations. With AWS SSO, you can configure unique logins and permissions for each employee toview specific subsets of an entire industrial operation. AWS IoT SiteWise provides an application guidefor these employees to learn how to use SiteWise Monitor.
1
AWS IoT SiteWise User GuideWhy use AWS IoT SiteWise?
Why use AWS IoT SiteWise?BenefitsCollect data consistently from all your sources
With AWS IoT SiteWise, you can gather data reliably from multiple facilities, structure it, and makeit accessible and understandable without developing additional software. You can index informationand metrics about equipment or processes across multiple facilities, so it’s readily available forapplications.
Identify issues quickly with remote monitoring
Assess the performance of your industrial equipment remotely, across locations, with AWS IoTSiteWise. You can remotely diagnose a problem and only dispatch technicians when needed to fixissues. You can spend less time coordinating onsite diagnostic activities and let your engineers focuson what they do best: understanding your operations and designing better systems.
Improve cross-facility processes with a central data source
Visibility across industrial facilities lets you streamline operations, and identify gaps in productionand waste. With AWS IoT SiteWise, you can create models of industrial processes and equipmentacross multiple facilities, and then visualize live and historical data through customizable charts anddashboards. Through SiteWise Monitor, you can launch private web applications with your asset datain minutes with AWS. You and your industrial engineers can use these web applications to betterunderstand your operations, improve processes, and reduce waste across your entire organization.
Use casesManufacturing
Manufacturing companies employ complex processes on their factory floors. Quality assuranceengineers and assembly robots inspect each product at various points in the assembly line, but thisoften involves manual work and can be subject to human error. AWS IoT SiteWise helps you collectdata from manufacturing lines and assembly robots, transfer it to the AWS Cloud, and structureperformance metrics for your specific equipment and processes. You can view production lineoutput in SiteWise Monitor to assist in production planning and identify equipment and processdeficiencies, production gaps, or product defects. You can also use these metrics to understand theoverall effectiveness of your operations and identify opportunities for innovation and improvement.
Food and beverage
Food and beverage industry facilities handle a wide variety of food processing, including grindinggrain to flour, butchering and packing meat, and assembling, cooking, and freezing microwaveablemeals. These processing plants often span multiple locations with process engineers and equipmentoperators in a centralized location monitoring processes and equipment. For example, they mightmonitor refrigeration units, assess ingredient handling and expiration, or monitor waste creationacross facilities to ensure operational efficiency. With AWS IoT SiteWise, you can group sensordata streams from multiple locations by production line and facilities so that your engineers andoperators can better understand and improve processes across facilities.
Energy and utilities
Companies often deploy their power generation assets in remote areas, far from the technicians whoare trained to fix the equipment. When there's an issue, the technicians receive a notification, travelto the site to diagnose the problem, and then make another trip to fix it. With AWS IoT SiteWise, youcan resolve equipment issues easier and more efficiently. With SiteWise Monitor, you can monitorasset performance remotely in real time and access historical equipment data from anywhere. This
2
AWS IoT SiteWise User GuideAre you new to AWS IoT SiteWise?
lets you pinpoint potential problems, dispatch the right resources, and both prevent and fix issuesfaster.
Are you new to AWS IoT SiteWise?If you're a first-time user of AWS IoT SiteWise, we recommend that you read about the components andconcepts of AWS IoT SiteWise and set up the AWS IoT SiteWise demo (p. 7).
• Key components of AWS IoT SiteWise (p. 5)• AWS IoT SiteWise concepts (p. 3)
You can complete the following tutorials to explore certain features of AWS IoT SiteWise:
• Visualizing and sharing wind farm data in AWS IoT SiteWise Monitor (p. 64)• Ingesting data to AWS IoT SiteWise from AWS IoT things (p. 13)• Publishing property value updates to Amazon DynamoDB (p. 84)
See the following topics to learn more about AWS IoT SiteWise:
• Ingesting data to AWS IoT SiteWise (p. 98)• Modeling industrial assets (p. 137)• Monitoring data with AWS IoT SiteWise Monitor (p. 162)• Querying asset property values and aggregates (p. 178)• Interacting with other AWS services (p. 182)
AWS IoT SiteWise conceptsThe following are the core concepts of AWS IoT SiteWise:
Gateway
A gateway connects to OPC-UA servers to deliver your industrial data streams to AWS IoT SiteWise.You can create a gateway on any device or platform that can run AWS IoT Greengrass. The gatewaysoftware exists as a connector that you can add to your AWS IoT Greengrass group. For moreinformation, see Ingesting data using a gateway (p. 98).
Asset
When you ingest data into AWS IoT SiteWise from your industrial equipment, your devices,equipment, and processes are each represented as assets. Each asset has data associated with it. Forexample, a piece of equipment might have a serial number, a location, a make and model, and aninstall date. It might also have time series values for availability, performance, quality, temperature,pressure, and so on. You can organize assets into hierarchies, where assets have access to the datastored in its child assets. For more information, see Modeling industrial assets (p. 137).
Asset model
Every asset is created from an asset model. Asset models are declarative structures that standardizethe format of your assets. Asset models enforce consistent information across multiple assets ofthe same type, so that you can process data in assets that represent groups of devices. In each assetmodel, you can define attributes (p. 4), time series inputs (measurements (p. 4)), time seriestransformations (transforms (p. 4)), time series aggregations (metrics (p. 4)), and assethierarchies (p. 4). For more information, see Modeling industrial assets (p. 137).
3

AWS IoT SiteWise User GuideConcepts
Asset property
Asset properties are the structures within each asset that contain industrial data. Each property has adata type and can have a unit. A property can be an attribute (p. 4), a measurement (p. 4), atransform (p. 4), or a metric (p. 4). For more information, see Asset properties (p. 140).
Attribute
Attributes are asset properties that represent information that generally doesn't change, such asdevice manufacturer or device location. Attributes can have default values. Each asset that youcreate from an asset model contains the default values of the attributes of that model. For moreinformation, see Attributes (p. 140).
Measurement
Measurements are asset properties that represent a device or equipment's raw sensor time seriesdata streams. For more information, see Measurements (p. 141).
Transform
Transforms are asset properties that represent transformed time series data. Every transform has amathematical expression (formula (p. 4)) that defines how to transform data points from oneform to another. The transformed data points hold a one-to-one relationship with the input datapoints. For more information, see Transforms (p. 141).
Metric
Metrics are asset properties that represent aggregated time series data. Every metric has amathematical expression (formula (p. 4)) that defines how to aggregate data points, and a timeinterval over which to compute that aggregation. Metrics output a single data point per given timeinterval. For more information, see Metrics (p. 142).
Aggregate
Aggregates are basic metrics that AWS IoT SiteWise automatically computes for all time series data.For more information, see Querying asset property aggregates (p. 180).
Asset hierarchy
You can define asset hierarchies to create logical representations of your industrial operations.To create a hierarchy, you define a hierarchy definition in an asset model, and then you associateassets created from that model and the model specified in the hierarchy definition. Metrics inparent assets can aggregate data from child assets' properties, so you can calculate statistics thatprovide insight to your operation or a subset of your operation. For more information, see Assethierarchies (p. 149).
Formula
Every transform (p. 4) and metric (p. 4) property has a formula that defines howthat property transforms or aggregates data. Formulas consist of property inputs, operators,and functions offered by AWS IoT SiteWise. For more information, see Using formulaexpressions (p. 144).
Property alias
You can define aliases on asset properties to easily identify an asset property when you ingest orretrieve asset data. When you use a gateway (p. 3) to ingest data from OPC-UA servers, yourproperty aliases must match the OPC-UA paths of your raw data streams. For more information, seeMapping industrial data streams to asset properties (p. 151).
Property notification
When you enable property notifications for an asset property, AWS IoT SiteWise publishes an MQTTmessage to AWS IoT Core each time that property receives a new value. The message payloadcontains information about that property value update. You can use property value notifications to
4

AWS IoT SiteWise User GuideKey components
create solutions that connect your industrial data in AWS IoT SiteWise with other AWS services. Formore information, see Interacting with other AWS services (p. 182).
Portal
An SiteWise Monitor portal is a web application that you can use to visualize and share your AWS IoTSiteWise data. A portal has one or more administrators and contains zero or more projects.
Portal administrator
Each SiteWise Monitor portal has one or more portal administrators. Portal administratorsuse the portal to create projects that contain collections of assets and dashboards. The portaladministrator then assigns assets and owners to each project. By controlling access to the project,portal administrators specify which assets that project owners and viewers can see.
Project
Each SiteWise Monitor portal contains a set of projects. Each project has a subset of your AWSIoT SiteWise assets associated with it. Project owners create one or more dashboards to provide aconsistent way to view the data associated with those assets. Project owners can invite viewers tothe project to allow them to view the assets and dashboards in the project. The project is the basicunit of sharing within SiteWise Monitor. Project owners can invite users who were given access to theportal by the AWS administrator. A user must have access to a portal before a project in that portalcan be shared with that user.
Project owner
Each SiteWise Monitor project has owners. Project owners create visualizations in the form ofdashboards to represent operational data in a consistent manner. When dashboards are ready toshare, the project owner can invite viewers to the project. Project owners can also assign otherowners to the project.
Project viewer
Each SiteWise Monitor project has viewers. Project viewers can connect to the portal to view thedashboards that project owners created. In each dashboard, project viewers can adjust time framesto better understand operational data. Project viewers can only view dashboards in the projects towhich they have access.
Dashboard
Each project contains a set of dashboards. Dashboards provide a set of visualizations for the valuesof a set of assets. Project owners create the dashboards and the visualizations that it contains. Whena project owner is ready to share the set of dashboards, the owner can invite viewers to the project,which gives them access to all dashboards in the project. If you want a different set of viewers fordifferent dashboards, you must divide the dashboards between projects. When viewers look atdashboards, they can adjust the time period.
Visualization
In each dashboard, project owners decide how to display the values for the properties of the assetsassociated with the project. Availability might best be represented as a line chart, while other valuesmight be displayed as bar charts or key performance indicators (KPIs). Project owners customizeeach visualization to provide the best understanding of the data for that asset.
Key components of AWS IoT SiteWiseThe following are the core components of AWS IoT SiteWise:
• Gateway software – The AWS IoT SiteWise connector runs on any platform that supports AWS IoTGreengrass (version 1.10.0 or later). The connector polls data streams over the OPC-UA protocoland uploads the data to AWS IoT SiteWise over a secured internet connection. The connector also
5

AWS IoT SiteWise User GuideWe want to hear from you
caches data locally in case internet connectivity is interrupted. To learn how to configure the AWS IoTSiteWise connector, see Ingesting data using a gateway (p. 98).
• Gateway management – Tools that the AWS IoT SiteWise console provides so that you can configureyour edge gateways and update existing gateway configurations. To learn how to configure gatewaysand sources, see Adding the gateway to AWS IoT SiteWise (p. 112).
• Asset modeling – Tools provided in the AWS IoT SiteWise console to model assets, processes, andfacilities. You can create multiple assets from asset models and uploaded data streams. You candefine assets as children of other assets to represent processes and entire facilities, and you can definetransforms and metrics that AWS IoT SiteWise computes from the uploaded data streams. AWS IoTSiteWise also automatically computes a set of basic aggregates for your data. To learn how to createmodels and assets, see Modeling industrial assets (p. 137). To learn how to query aggregated assetproperty values, see Querying asset property aggregates (p. 180).
• AWS IoT SiteWise Monitor – A data visualization and monitoring web application that you and otherscan access from any device. You can configure portals and dashboards with unique subsets of yourindustrial operation for your non-technical employees to gain insights from. To learn how to configureSiteWise Monitor, see Monitoring data with AWS IoT SiteWise Monitor (p. 162). To learn how to usethe SiteWise Monitor web application, see the SiteWise Monitor Application Guide.
• AWS IoT Core integration – An AWS IoT Core rules action to ingest data to AWS IoT SiteWiseand an option to publish asset property values to MQTT topics for integration with other AWSservices. To learn how to ingest data from AWS IoT Core, see Ingesting data using AWS IoT Corerules (p. 129). To learn how to send asset property data to AWS IoT Core, see Interacting with otherAWS services (p. 182).
• CLI and SDKs – An API that lets you create, manage, and update your assets, portals, and dashboards.You can use the API to read assets' current, historical, and aggregated property values. You can alsouse the API to upload data to asset properties. The AWS IoT SiteWise API is available in the AWSCommand Line Interface (CLI) and in SDKs for various programming languages.
We want to hear from youWe welcome your feedback. To contact us, visit the AWS IoT SiteWise Discussion Forums or use one ofthe feedback links:
• Provide feedback at the bottom of the page.• Feedback at the top right of the page.
6

AWS IoT SiteWise User GuideRequirements
Getting started with AWS IoTSiteWise
With AWS IoT SiteWise, you can collect, organize, and analyze your data.
AWS IoT SiteWise provides a demo that you can use to explore the service without configuring a realdata source. For more information, see Using the AWS IoT SiteWise demo (p. 8).
You can complete the following tutorials to explore certain features of AWS IoT SiteWise:
• Visualizing and sharing wind farm data in AWS IoT SiteWise Monitor (p. 64)• Ingesting data to AWS IoT SiteWise from AWS IoT things (p. 13)• Publishing property value updates to Amazon DynamoDB (p. 84)
See the following topics to learn more about AWS IoT SiteWise:
• Ingesting data to AWS IoT SiteWise (p. 98)• Modeling industrial assets (p. 137)• Monitoring data with AWS IoT SiteWise Monitor (p. 162)• Querying asset property values and aggregates (p. 178)• Interacting with other AWS services (p. 182)
RequirementsYou must have an AWS account to get started with AWS IoT SiteWise. If you don't have one, see Settingup an AWS account (p. 7).
AWS IoT SiteWise is available in the following AWS Regions:
• US East (N. Virginia) – us-east-1• US West (Oregon) – us-west-2• Europe (Frankfurt) – eu-central-1• Europe (Ireland) – eu-west-1
Use the Region selector in the AWS Management Console to switch to one of these Regions.
Setting up an AWS accountIf you do not have an AWS account, complete the following steps to create one.
To sign up for an AWS account
1. Open https://portal.aws.amazon.com/billing/signup.2. Follow the online instructions.
Part of the sign-up procedure involves receiving a phone call and entering a verification code on thephone keypad.
7
AWS IoT SiteWise User GuideUsing the quick start demo
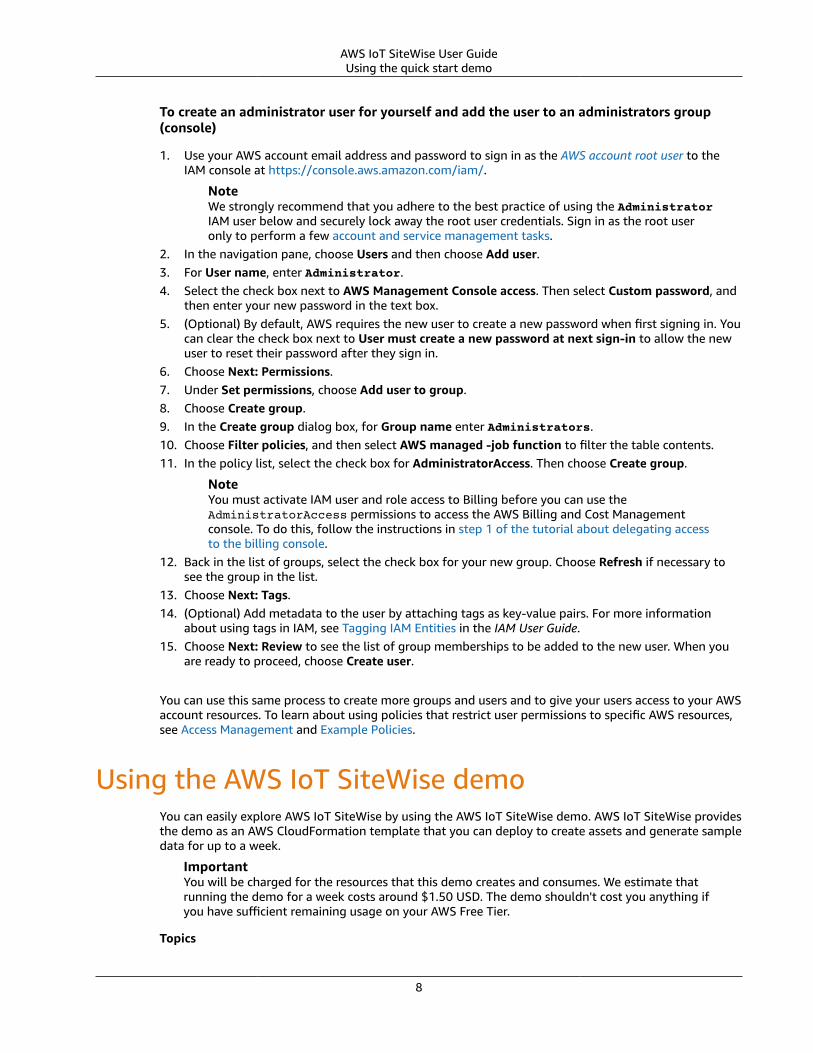
To create an administrator user for yourself and add the user to an administrators group(console)
1. Use your AWS account email address and password to sign in as the AWS account root user to theIAM console at https://console.aws.amazon.com/iam/.
NoteWe strongly recommend that you adhere to the best practice of using the AdministratorIAM user below and securely lock away the root user credentials. Sign in as the root useronly to perform a few account and service management tasks.
2. In the navigation pane, choose Users and then choose Add user.3. For User name, enter Administrator.4. Select the check box next to AWS Management Console access. Then select Custom password, and
then enter your new password in the text box.5. (Optional) By default, AWS requires the new user to create a new password when first signing in. You
can clear the check box next to User must create a new password at next sign-in to allow the newuser to reset their password after they sign in.
6. Choose Next: Permissions.7. Under Set permissions, choose Add user to group.8. Choose Create group.9. In the Create group dialog box, for Group name enter Administrators.10. Choose Filter policies, and then select AWS managed -job function to filter the table contents.11. In the policy list, select the check box for AdministratorAccess. Then choose Create group.
NoteYou must activate IAM user and role access to Billing before you can use theAdministratorAccess permissions to access the AWS Billing and Cost Managementconsole. To do this, follow the instructions in step 1 of the tutorial about delegating accessto the billing console.
12. Back in the list of groups, select the check box for your new group. Choose Refresh if necessary tosee the group in the list.
13. Choose Next: Tags.14. (Optional) Add metadata to the user by attaching tags as key-value pairs. For more information
about using tags in IAM, see Tagging IAM Entities in the IAM User Guide.15. Choose Next: Review to see the list of group memberships to be added to the new user. When you
are ready to proceed, choose Create user.
You can use this same process to create more groups and users and to give your users access to your AWSaccount resources. To learn about using policies that restrict user permissions to specific AWS resources,see Access Management and Example Policies.
Using the AWS IoT SiteWise demoYou can easily explore AWS IoT SiteWise by using the AWS IoT SiteWise demo. AWS IoT SiteWise providesthe demo as an AWS CloudFormation template that you can deploy to create assets and generate sampledata for up to a week.
ImportantYou will be charged for the resources that this demo creates and consumes. We estimate thatrunning the demo for a week costs around $1.50 USD. The demo shouldn't cost you anything ifyou have sufficient remaining usage on your AWS Free Tier.
Topics
8
AWS IoT SiteWise User GuideCreating the AWS IoT SiteWise demo
• Creating the AWS IoT SiteWise demo (p. 9)• Deleting the AWS IoT SiteWise demo (p. 10)
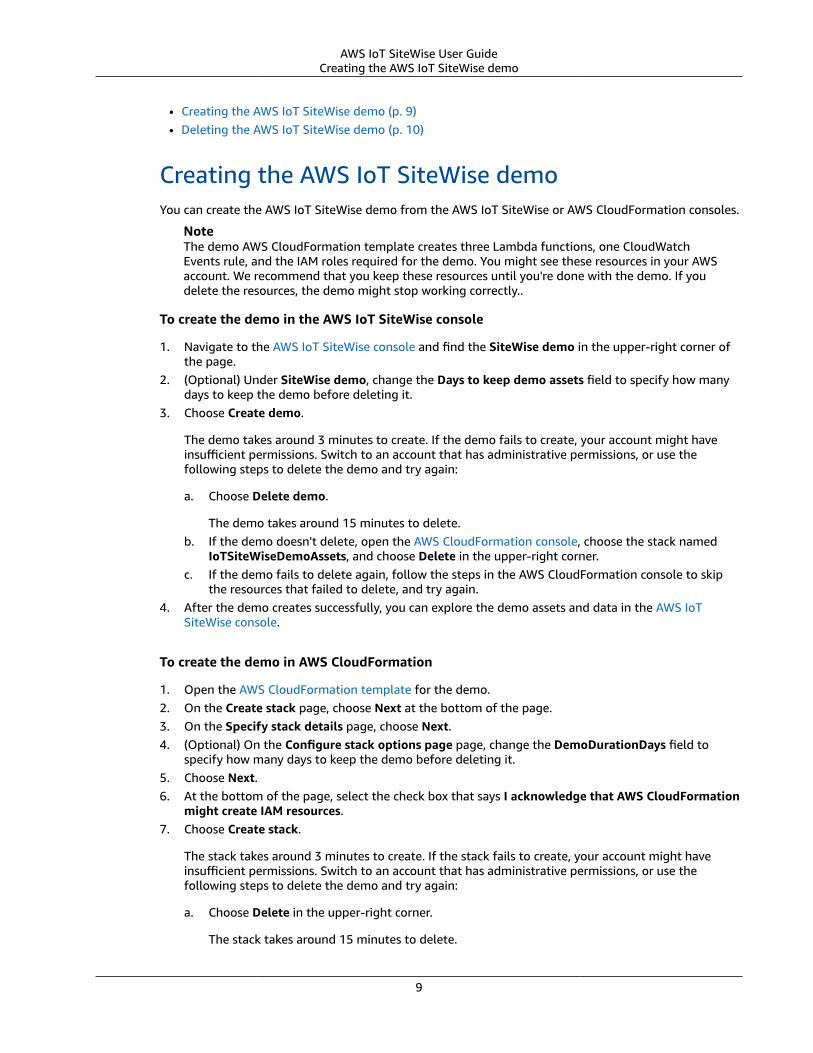
Creating the AWS IoT SiteWise demoYou can create the AWS IoT SiteWise demo from the AWS IoT SiteWise or AWS CloudFormation consoles.
NoteThe demo AWS CloudFormation template creates three Lambda functions, one CloudWatchEvents rule, and the IAM roles required for the demo. You might see these resources in your AWSaccount. We recommend that you keep these resources until you're done with the demo. If youdelete the resources, the demo might stop working correctly..
To create the demo in the AWS IoT SiteWise console
1. Navigate to the AWS IoT SiteWise console and find the SiteWise demo in the upper-right corner ofthe page.
2. (Optional) Under SiteWise demo, change the Days to keep demo assets field to specify how manydays to keep the demo before deleting it.
3. Choose Create demo.
The demo takes around 3 minutes to create. If the demo fails to create, your account might haveinsufficient permissions. Switch to an account that has administrative permissions, or use thefollowing steps to delete the demo and try again:
a. Choose Delete demo.
The demo takes around 15 minutes to delete.b. If the demo doesn't delete, open the AWS CloudFormation console, choose the stack named
IoTSiteWiseDemoAssets, and choose Delete in the upper-right corner.c. If the demo fails to delete again, follow the steps in the AWS CloudFormation console to skip
the resources that failed to delete, and try again.4. After the demo creates successfully, you can explore the demo assets and data in the AWS IoT
SiteWise console.
To create the demo in AWS CloudFormation
1. Open the AWS CloudFormation template for the demo.2. On the Create stack page, choose Next at the bottom of the page.3. On the Specify stack details page, choose Next.4. (Optional) On the Configure stack options page page, change the DemoDurationDays field to
specify how many days to keep the demo before deleting it.5. Choose Next.6. At the bottom of the page, select the check box that says I acknowledge that AWS CloudFormation
might create IAM resources.7. Choose Create stack.
The stack takes around 3 minutes to create. If the stack fails to create, your account might haveinsufficient permissions. Switch to an account that has administrative permissions, or use thefollowing steps to delete the demo and try again:
a. Choose Delete in the upper-right corner.
The stack takes around 15 minutes to delete.
9
AWS IoT SiteWise User GuideDeleting the AWS IoT SiteWise demo
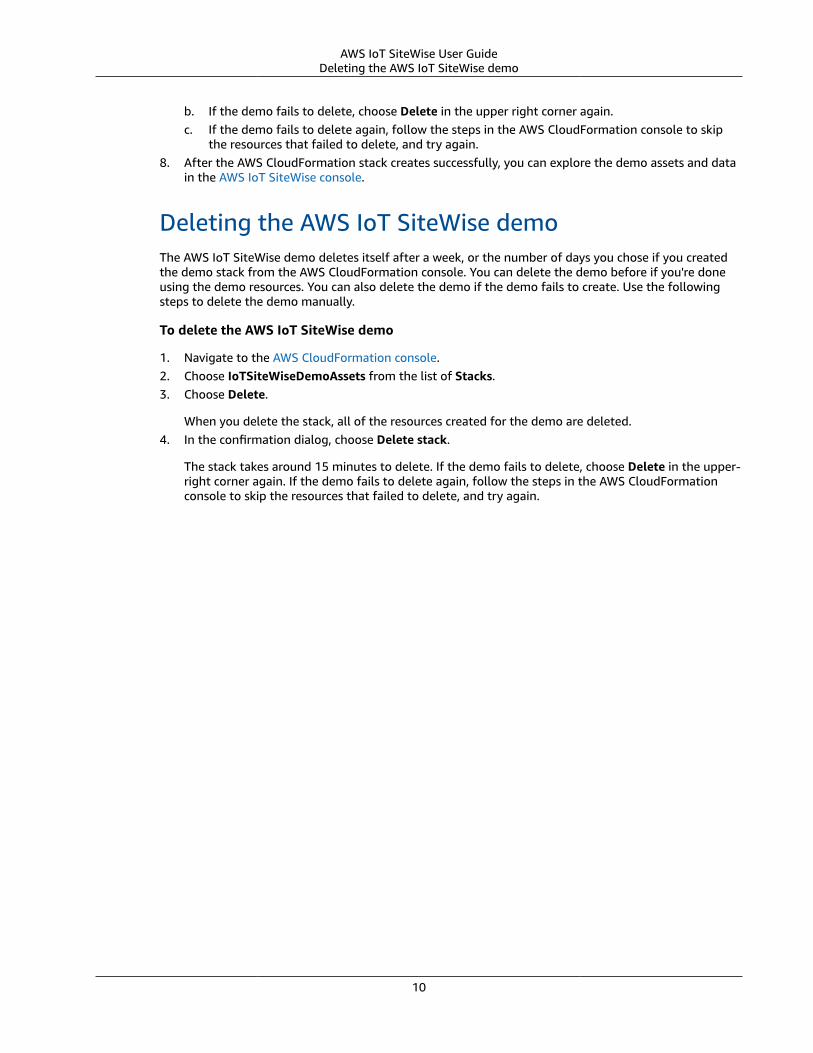
b. If the demo fails to delete, choose Delete in the upper right corner again.c. If the demo fails to delete again, follow the steps in the AWS CloudFormation console to skip
the resources that failed to delete, and try again.8. After the AWS CloudFormation stack creates successfully, you can explore the demo assets and data
in the AWS IoT SiteWise console.
Deleting the AWS IoT SiteWise demoThe AWS IoT SiteWise demo deletes itself after a week, or the number of days you chose if you createdthe demo stack from the AWS CloudFormation console. You can delete the demo before if you're doneusing the demo resources. You can also delete the demo if the demo fails to create. Use the followingsteps to delete the demo manually.
To delete the AWS IoT SiteWise demo
1. Navigate to the AWS CloudFormation console.2. Choose IoTSiteWiseDemoAssets from the list of Stacks.3. Choose Delete.
When you delete the stack, all of the resources created for the demo are deleted.4. In the confirmation dialog, choose Delete stack.
The stack takes around 15 minutes to delete. If the demo fails to delete, choose Delete in the upper-right corner again. If the demo fails to delete again, follow the steps in the AWS CloudFormationconsole to skip the resources that failed to delete, and try again.
10

AWS IoT SiteWise User GuideCalculating OEE
AWS IoT SiteWise tutorialsYou can use the following tutorials to work with AWS IoT SiteWise.
Topics• Calculating OEE in AWS IoT SiteWise (p. 11)• Ingesting data to AWS IoT SiteWise from AWS IoT things (p. 13)• Configuring alarms for asset property values with AWS IoT Events (p. 35)• Visualizing and sharing wind farm data in AWS IoT SiteWise Monitor (p. 64)• Publishing property value updates to Amazon DynamoDB (p. 84)
Calculating OEE in AWS IoT SiteWiseThis tutorial provides an example of how to calculate overall equipment effectiveness (OEE) for amanufacturing process. As a result, your OEE calculations or formulas might differ from those shownhere. In general, OEE is defined as Availability * Quality * Performance. To learn more aboutcalculating OEE, see Overall equipment effectiveness on Wikipedia.
PrerequisitesTo complete this tutorial, you must configure data ingestion for a device that has the following threedata streams:
• Equipment_State – A numerical code that represents the state of the machine, such as idle, fault,planned stop, or normal operation.
• Good_Count – A data stream where each data point contains the number of successful operationssince the last data point.
• Bad_Count – A data stream where each data point contains the number of unsuccessful operationssince the last data point.
To configure data ingestion, see Ingesting data to AWS IoT SiteWise (p. 98). If you don't have anavailable industrial operation, you can write a script that generates and uploads sample data through theAWS IoT SiteWise API.
How to calculate OEEIn this tutorial, you create an asset model that calculates OEE from three data input streams:Equipment_State, Good_Count, and Bad_Count. In this example, consider a generic packagingmachine, such as one that's used for packaging sugar, potato chips, or paint. In the AWS IoT SiteWiseconsole, create an AWS IoT SiteWise asset model with the following measurements, transforms, andmetrics. Then, you can create an asset to represent the packaging machine and observe how AWS IoTSiteWise calculates OEE.
Define the following measurements (p. 141) to represent the raw data streams from the packagingmachine.
Measurements
• Equipment_State – A data stream (or measurement) that provides the current state of the packagingmachine in numerical codes:
11
AWS IoT SiteWise User GuideHow to calculate OEE
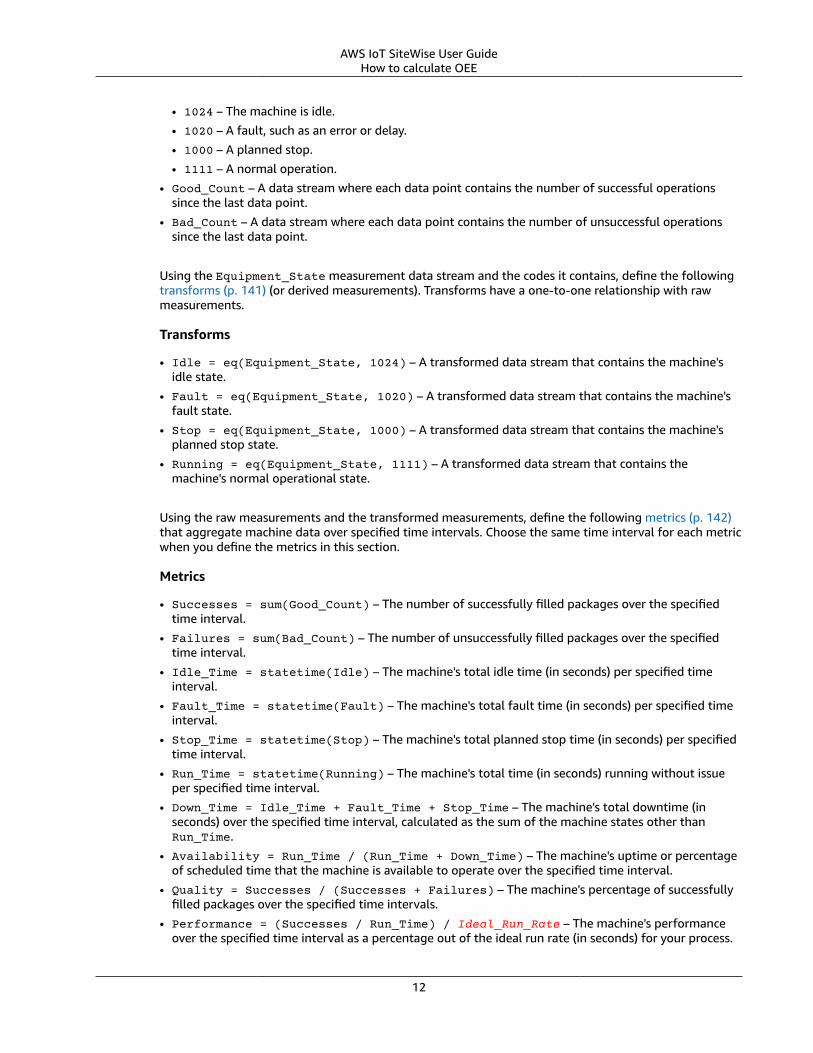
• 1024 – The machine is idle.• 1020 – A fault, such as an error or delay.• 1000 – A planned stop.• 1111 – A normal operation.
• Good_Count – A data stream where each data point contains the number of successful operationssince the last data point.
• Bad_Count – A data stream where each data point contains the number of unsuccessful operationssince the last data point.
Using the Equipment_State measurement data stream and the codes it contains, define the followingtransforms (p. 141) (or derived measurements). Transforms have a one-to-one relationship with rawmeasurements.
Transforms
• Idle = eq(Equipment_State, 1024) – A transformed data stream that contains the machine'sidle state.
• Fault = eq(Equipment_State, 1020) – A transformed data stream that contains the machine'sfault state.
• Stop = eq(Equipment_State, 1000) – A transformed data stream that contains the machine'splanned stop state.
• Running = eq(Equipment_State, 1111) – A transformed data stream that contains themachine's normal operational state.
Using the raw measurements and the transformed measurements, define the following metrics (p. 142)that aggregate machine data over specified time intervals. Choose the same time interval for each metricwhen you define the metrics in this section.
Metrics
• Successes = sum(Good_Count) – The number of successfully filled packages over the specifiedtime interval.
• Failures = sum(Bad_Count) – The number of unsuccessfully filled packages over the specifiedtime interval.
• Idle_Time = statetime(Idle) – The machine's total idle time (in seconds) per specified timeinterval.
• Fault_Time = statetime(Fault) – The machine's total fault time (in seconds) per specified timeinterval.
• Stop_Time = statetime(Stop) – The machine's total planned stop time (in seconds) per specifiedtime interval.
• Run_Time = statetime(Running) – The machine's total time (in seconds) running without issueper specified time interval.
• Down_Time = Idle_Time + Fault_Time + Stop_Time – The machine's total downtime (inseconds) over the specified time interval, calculated as the sum of the machine states other thanRun_Time.
• Availability = Run_Time / (Run_Time + Down_Time) – The machine's uptime or percentageof scheduled time that the machine is available to operate over the specified time interval.
• Quality = Successes / (Successes + Failures) – The machine's percentage of successfullyfilled packages over the specified time intervals.
• Performance = (Successes / Run_Time) / Ideal_Run_Rate – The machine's performanceover the specified time interval as a percentage out of the ideal run rate (in seconds) for your process.
12

AWS IoT SiteWise User GuideIngesting data to AWS IoT SiteWise from AWS IoT things
For example, your Ideal_Run_Rate might be 60 packages per minute (1 package per second). If yourIdeal_Run_Rate is per minute or per hour, you need to divide it by the appropriate unit conversionfactor because Run_Time is in seconds.
• OEE = Availability * Quality * Performance – The machine's overall equipmenteffectiveness over the specified time interval. This formula calculates OEE as a fraction out of 1.
Ingesting data to AWS IoT SiteWise from AWS IoTthings
You can easily ingest data to AWS IoT SiteWise from a fleet of AWS IoT things by using device shadows.Device shadows are JSON objects that store current state information for an AWS IoT device. For moreinformation, see Device shadow service in the AWS IoT Developer Guide.
After you complete this tutorial, you can set up an operation in AWS IoT SiteWise based on AWS IoTthings. By using AWS IoT things, you can also easily integrate your operation with other useful featuresof AWS IoT. For example, you can configure AWS IoT features to do the following tasks:
• Configure additional rules to stream data to AWS IoT Events, Amazon DynamoDB, and other AWSservices. For more information, see Rules in the AWS IoT Developer Guide.
• Index, search, and aggregate your device data with the AWS IoT Fleet Indexing service. For moreinformation, see Fleet indexing service in the AWS IoT Developer Guide.
• Audit and secure your devices with AWS IoT Device Defender. For more information, see AWS IoTDevice Defender in the AWS IoT Developer Guide.
In this tutorial, you learn how to ingest data from AWS IoT things' device shadows to assets in AWS IoTSiteWise. To do so, you create one or more AWS IoT things and run a script that updates each thing'sdevice shadow with CPU and memory usage data. You use CPU and memory usage data in this tutorial toimitate realistic sensor data. Then, you create a rule with an AWS IoT SiteWise action that sends this datato an asset in AWS IoT SiteWise every time a thing's device shadow updates. For more information, seeIngesting data using AWS IoT Core rules (p. 129).
Topics• Prerequisites (p. 13)
• Creating an AWS IoT policy (p. 14)
• Creating and configuring an AWS IoT thing (p. 15)
• Creating a device asset model (p. 18)
• Creating a device fleet asset model (p. 19)
• Creating and configuring a device asset (p. 20)
• Creating and configuring a device fleet asset (p. 22)
• Creating a rule in AWS IoT Core to send data to device assets (p. 23)
• Running the device client script (p. 27)
• Cleaning up resources after the tutorial (p. 31)
• Troubleshooting a rule (p. 32)
PrerequisitesTo complete this tutorial, you need the following:
13
AWS IoT SiteWise User GuideCreating an AWS IoT policy
• An AWS account. If you don't have one, see Setting up an AWS account (p. 7).• A development computer running Windows, macOS, Linux, or Unix to access the AWS Management
Console. For more information, see Getting Started with the AWS Management Console.• An IAM user with administrator permissions.• Python 3 installed on your development computer or installed on the device that you want to register
as an AWS IoT thing.
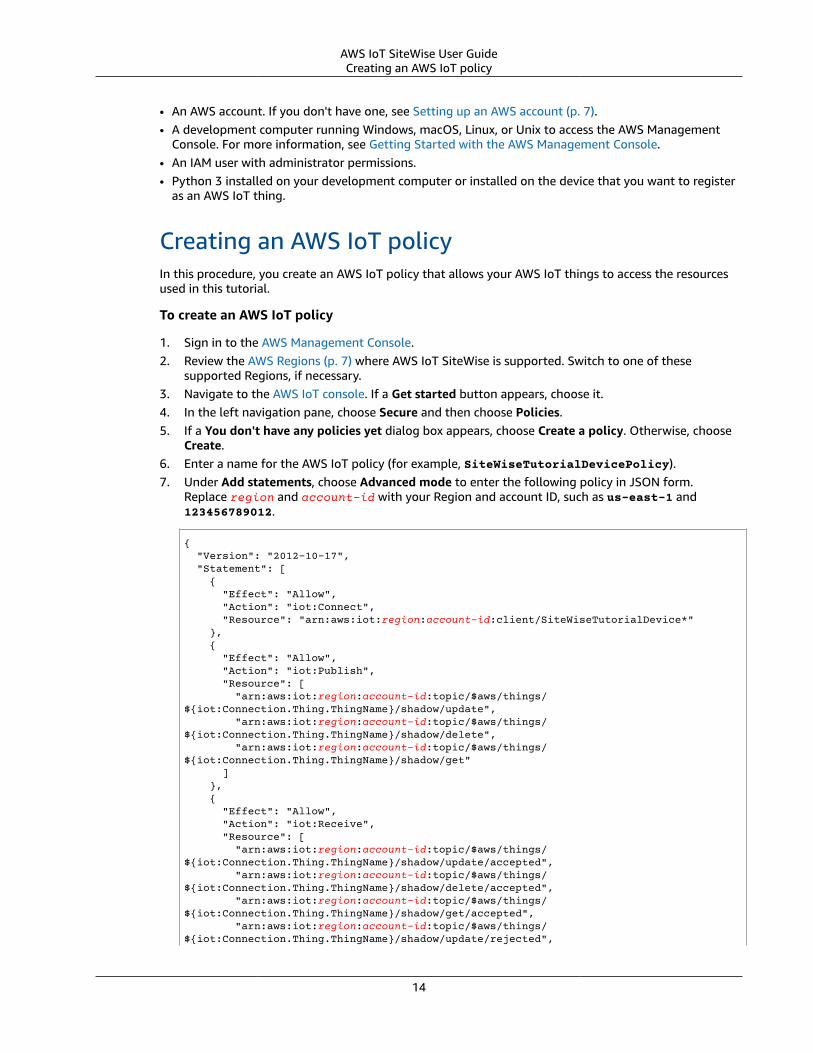
Creating an AWS IoT policyIn this procedure, you create an AWS IoT policy that allows your AWS IoT things to access the resourcesused in this tutorial.
To create an AWS IoT policy
1. Sign in to the AWS Management Console.2. Review the AWS Regions (p. 7) where AWS IoT SiteWise is supported. Switch to one of these
supported Regions, if necessary.3. Navigate to the AWS IoT console. If a Get started button appears, choose it.4. In the left navigation pane, choose Secure and then choose Policies.5. If a You don't have any policies yet dialog box appears, choose Create a policy. Otherwise, choose
Create.6. Enter a name for the AWS IoT policy (for example, SiteWiseTutorialDevicePolicy).7. Under Add statements, choose Advanced mode to enter the following policy in JSON form.
Replace region and account-id with your Region and account ID, such as us-east-1 and123456789012.
{ "Version": "2012-10-17", "Statement": [ { "Effect": "Allow", "Action": "iot:Connect", "Resource": "arn:aws:iot:region:account-id:client/SiteWiseTutorialDevice*" }, { "Effect": "Allow", "Action": "iot:Publish", "Resource": [ "arn:aws:iot:region:account-id:topic/$aws/things/${iot:Connection.Thing.ThingName}/shadow/update", "arn:aws:iot:region:account-id:topic/$aws/things/${iot:Connection.Thing.ThingName}/shadow/delete", "arn:aws:iot:region:account-id:topic/$aws/things/${iot:Connection.Thing.ThingName}/shadow/get" ] }, { "Effect": "Allow", "Action": "iot:Receive", "Resource": [ "arn:aws:iot:region:account-id:topic/$aws/things/${iot:Connection.Thing.ThingName}/shadow/update/accepted", "arn:aws:iot:region:account-id:topic/$aws/things/${iot:Connection.Thing.ThingName}/shadow/delete/accepted", "arn:aws:iot:region:account-id:topic/$aws/things/${iot:Connection.Thing.ThingName}/shadow/get/accepted", "arn:aws:iot:region:account-id:topic/$aws/things/${iot:Connection.Thing.ThingName}/shadow/update/rejected",
14
AWS IoT SiteWise User GuideCreating and configuring an AWS IoT thing
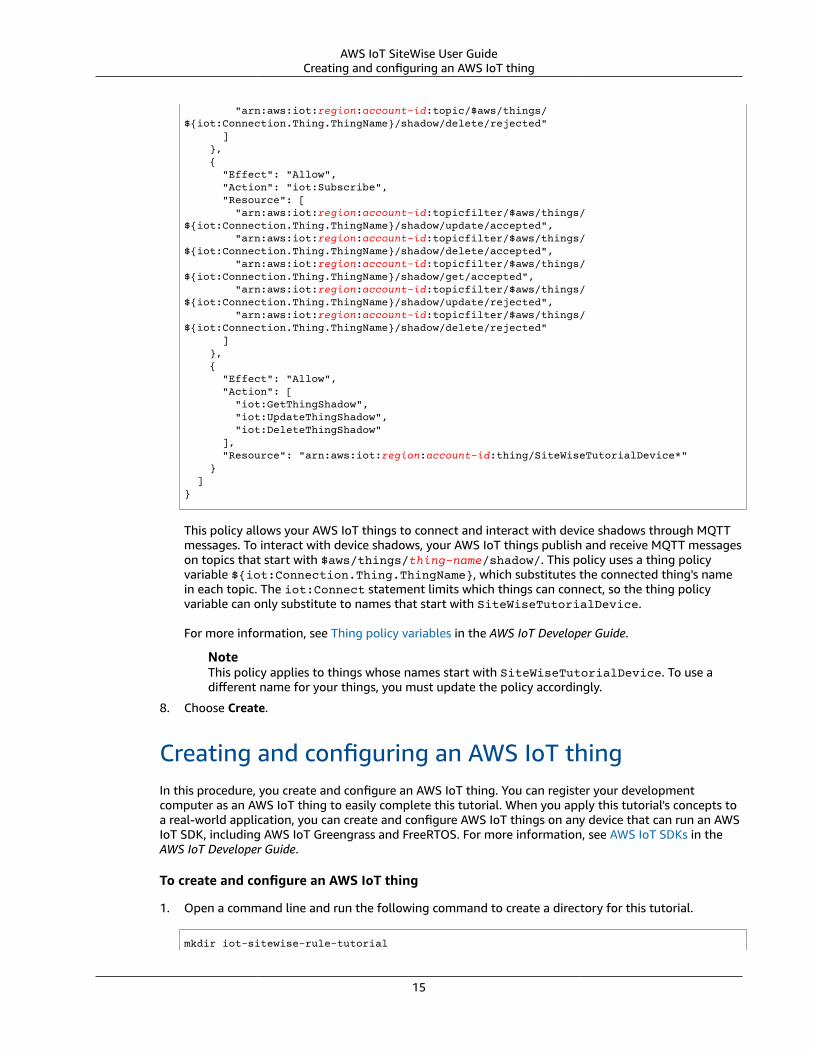
"arn:aws:iot:region:account-id:topic/$aws/things/${iot:Connection.Thing.ThingName}/shadow/delete/rejected" ] }, { "Effect": "Allow", "Action": "iot:Subscribe", "Resource": [ "arn:aws:iot:region:account-id:topicfilter/$aws/things/${iot:Connection.Thing.ThingName}/shadow/update/accepted", "arn:aws:iot:region:account-id:topicfilter/$aws/things/${iot:Connection.Thing.ThingName}/shadow/delete/accepted", "arn:aws:iot:region:account-id:topicfilter/$aws/things/${iot:Connection.Thing.ThingName}/shadow/get/accepted", "arn:aws:iot:region:account-id:topicfilter/$aws/things/${iot:Connection.Thing.ThingName}/shadow/update/rejected", "arn:aws:iot:region:account-id:topicfilter/$aws/things/${iot:Connection.Thing.ThingName}/shadow/delete/rejected" ] }, { "Effect": "Allow", "Action": [ "iot:GetThingShadow", "iot:UpdateThingShadow", "iot:DeleteThingShadow" ], "Resource": "arn:aws:iot:region:account-id:thing/SiteWiseTutorialDevice*" } ]}
This policy allows your AWS IoT things to connect and interact with device shadows through MQTTmessages. To interact with device shadows, your AWS IoT things publish and receive MQTT messageson topics that start with $aws/things/thing-name/shadow/. This policy uses a thing policyvariable ${iot:Connection.Thing.ThingName}, which substitutes the connected thing's namein each topic. The iot:Connect statement limits which things can connect, so the thing policyvariable can only substitute to names that start with SiteWiseTutorialDevice.
For more information, see Thing policy variables in the AWS IoT Developer Guide.
NoteThis policy applies to things whose names start with SiteWiseTutorialDevice. To use adifferent name for your things, you must update the policy accordingly.
8. Choose Create.
Creating and configuring an AWS IoT thingIn this procedure, you create and configure an AWS IoT thing. You can register your developmentcomputer as an AWS IoT thing to easily complete this tutorial. When you apply this tutorial's concepts toa real-world application, you can create and configure AWS IoT things on any device that can run an AWSIoT SDK, including AWS IoT Greengrass and FreeRTOS. For more information, see AWS IoT SDKs in theAWS IoT Developer Guide.
To create and configure an AWS IoT thing
1. Open a command line and run the following command to create a directory for this tutorial.
mkdir iot-sitewise-rule-tutorial
15
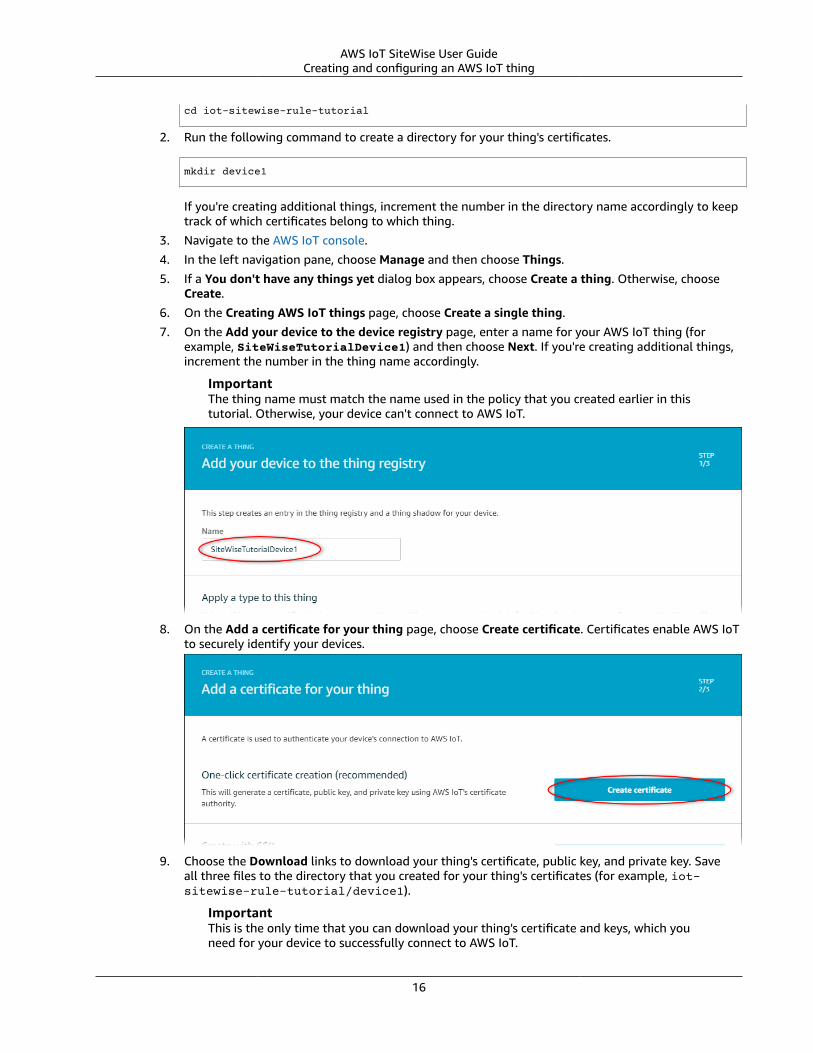
AWS IoT SiteWise User GuideCreating and configuring an AWS IoT thing
cd iot-sitewise-rule-tutorial
2. Run the following command to create a directory for your thing's certificates.
mkdir device1
If you're creating additional things, increment the number in the directory name accordingly to keeptrack of which certificates belong to which thing.
3. Navigate to the AWS IoT console.
4. In the left navigation pane, choose Manage and then choose Things.
5. If a You don't have any things yet dialog box appears, choose Create a thing. Otherwise, chooseCreate.
6. On the Creating AWS IoT things page, choose Create a single thing.
7. On the Add your device to the device registry page, enter a name for your AWS IoT thing (forexample, SiteWiseTutorialDevice1) and then choose Next. If you're creating additional things,increment the number in the thing name accordingly.
ImportantThe thing name must match the name used in the policy that you created earlier in thistutorial. Otherwise, your device can't connect to AWS IoT.
8. On the Add a certificate for your thing page, choose Create certificate. Certificates enable AWS IoTto securely identify your devices.
9. Choose the Download links to download your thing's certificate, public key, and private key. Saveall three files to the directory that you created for your thing's certificates (for example, iot-sitewise-rule-tutorial/device1).
ImportantThis is the only time that you can download your thing's certificate and keys, which youneed for your device to successfully connect to AWS IoT.
16
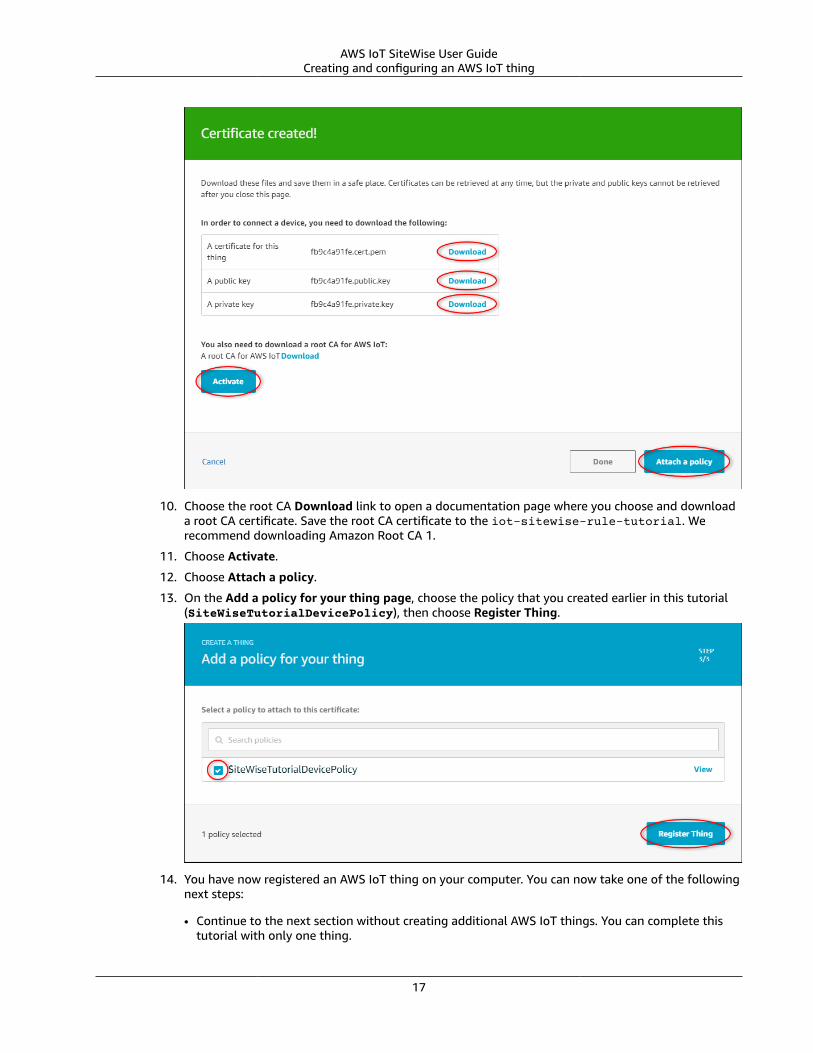
AWS IoT SiteWise User GuideCreating and configuring an AWS IoT thing
10. Choose the root CA Download link to open a documentation page where you choose and downloada root CA certificate. Save the root CA certificate to the iot-sitewise-rule-tutorial. Werecommend downloading Amazon Root CA 1.
11. Choose Activate.
12. Choose Attach a policy.
13. On the Add a policy for your thing page, choose the policy that you created earlier in this tutorial(SiteWiseTutorialDevicePolicy), then choose Register Thing.
14. You have now registered an AWS IoT thing on your computer. You can now take one of the followingnext steps:
• Continue to the next section without creating additional AWS IoT things. You can complete thistutorial with only one thing.
17
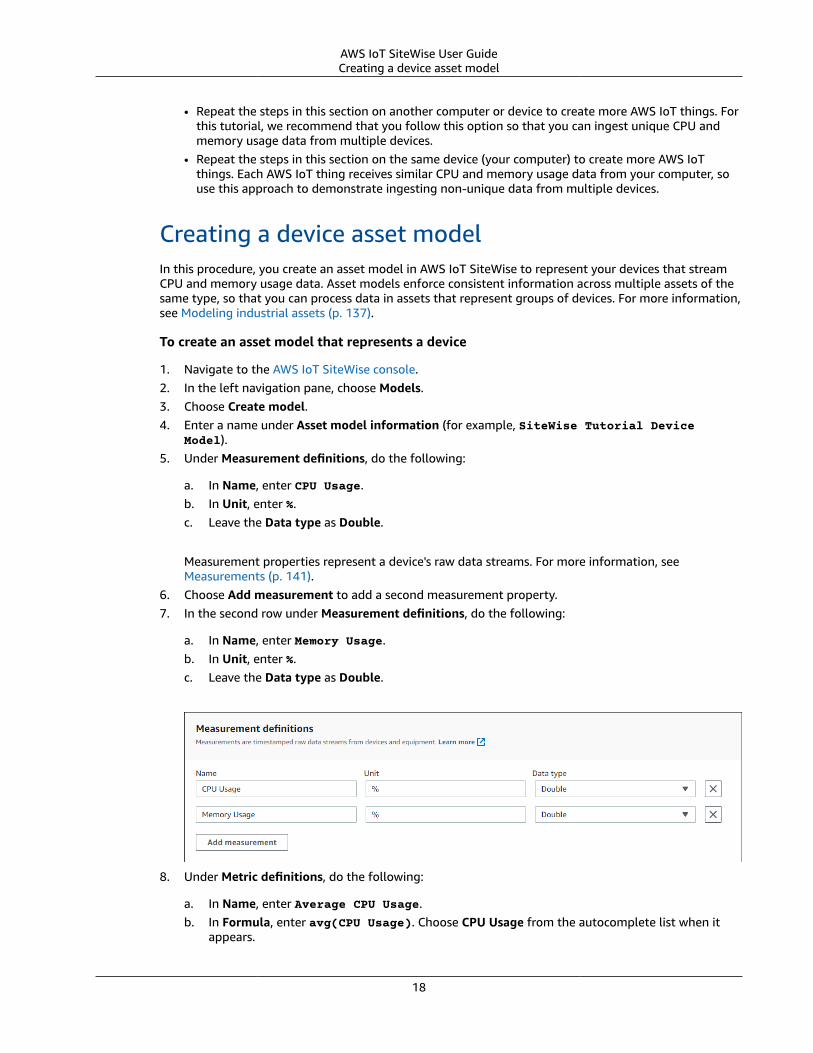
AWS IoT SiteWise User GuideCreating a device asset model
• Repeat the steps in this section on another computer or device to create more AWS IoT things. Forthis tutorial, we recommend that you follow this option so that you can ingest unique CPU andmemory usage data from multiple devices.
• Repeat the steps in this section on the same device (your computer) to create more AWS IoTthings. Each AWS IoT thing receives similar CPU and memory usage data from your computer, souse this approach to demonstrate ingesting non-unique data from multiple devices.
Creating a device asset modelIn this procedure, you create an asset model in AWS IoT SiteWise to represent your devices that streamCPU and memory usage data. Asset models enforce consistent information across multiple assets of thesame type, so that you can process data in assets that represent groups of devices. For more information,see Modeling industrial assets (p. 137).
To create an asset model that represents a device
1. Navigate to the AWS IoT SiteWise console.2. In the left navigation pane, choose Models.3. Choose Create model.4. Enter a name under Asset model information (for example, SiteWise Tutorial Device
Model).5. Under Measurement definitions, do the following:
a. In Name, enter CPU Usage.b. In Unit, enter %.c. Leave the Data type as Double.
Measurement properties represent a device's raw data streams. For more information, seeMeasurements (p. 141).
6. Choose Add measurement to add a second measurement property.7. In the second row under Measurement definitions, do the following:
a. In Name, enter Memory Usage.b. In Unit, enter %.c. Leave the Data type as Double.
8. Under Metric definitions, do the following:
a. In Name, enter Average CPU Usage.b. In Formula, enter avg(CPU Usage). Choose CPU Usage from the autocomplete list when it
appears.
18
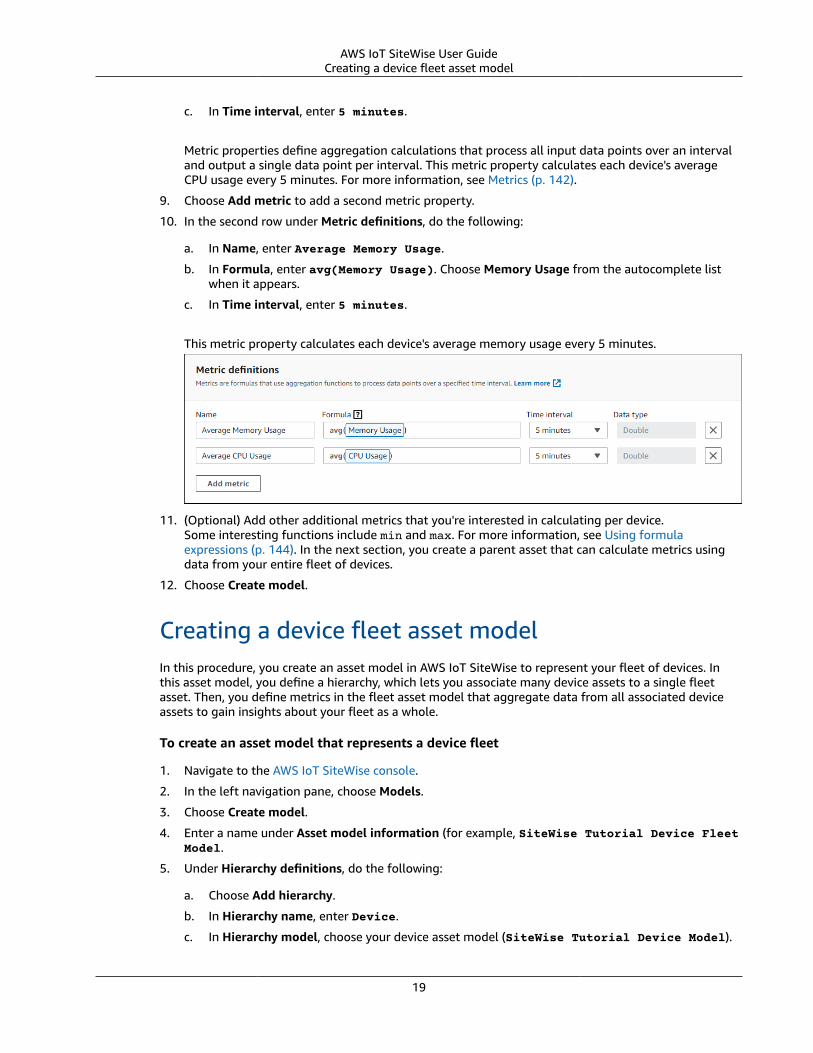
AWS IoT SiteWise User GuideCreating a device fleet asset model
c. In Time interval, enter 5 minutes.
Metric properties define aggregation calculations that process all input data points over an intervaland output a single data point per interval. This metric property calculates each device's averageCPU usage every 5 minutes. For more information, see Metrics (p. 142).
9. Choose Add metric to add a second metric property.
10. In the second row under Metric definitions, do the following:
a. In Name, enter Average Memory Usage.
b. In Formula, enter avg(Memory Usage). Choose Memory Usage from the autocomplete listwhen it appears.
c. In Time interval, enter 5 minutes.
This metric property calculates each device's average memory usage every 5 minutes.
11. (Optional) Add other additional metrics that you're interested in calculating per device.Some interesting functions include min and max. For more information, see Using formulaexpressions (p. 144). In the next section, you create a parent asset that can calculate metrics usingdata from your entire fleet of devices.
12. Choose Create model.
Creating a device fleet asset modelIn this procedure, you create an asset model in AWS IoT SiteWise to represent your fleet of devices. Inthis asset model, you define a hierarchy, which lets you associate many device assets to a single fleetasset. Then, you define metrics in the fleet asset model that aggregate data from all associated deviceassets to gain insights about your fleet as a whole.
To create an asset model that represents a device fleet
1. Navigate to the AWS IoT SiteWise console.
2. In the left navigation pane, choose Models.
3. Choose Create model.
4. Enter a name under Asset model information (for example, SiteWise Tutorial Device FleetModel.
5. Under Hierarchy definitions, do the following:
a. Choose Add hierarchy.
b. In Hierarchy name, enter Device.
c. In Hierarchy model, choose your device asset model (SiteWise Tutorial Device Model).
19
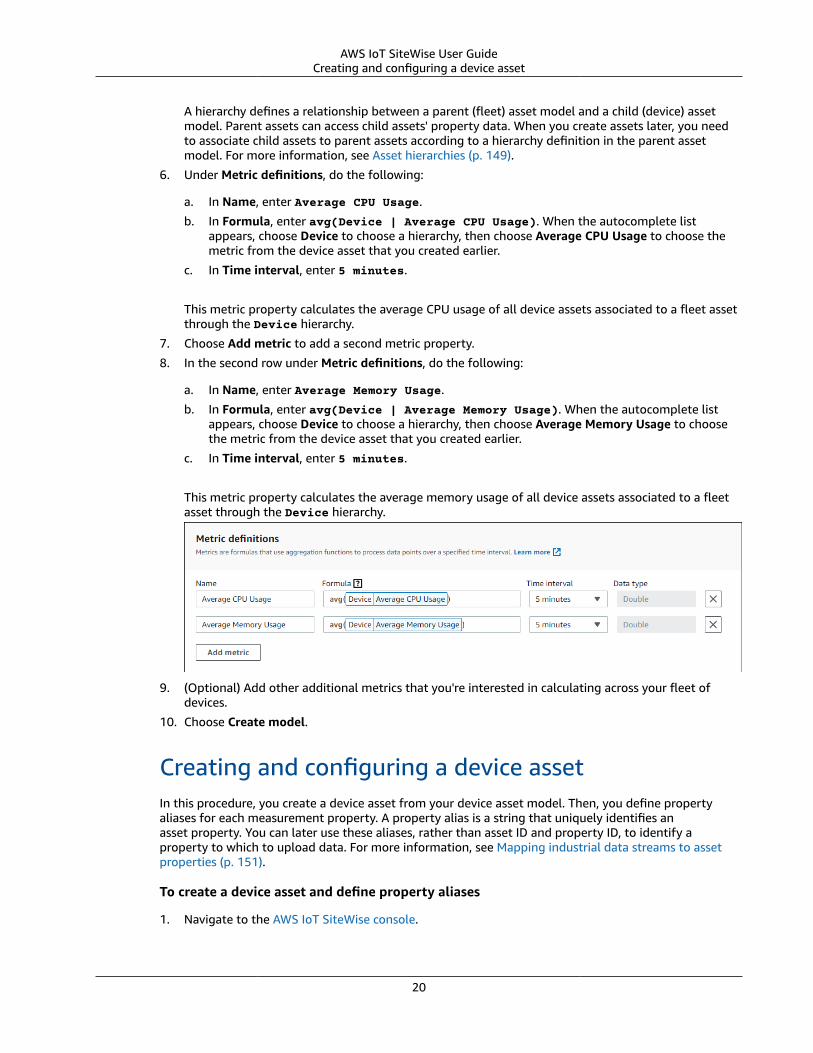
AWS IoT SiteWise User GuideCreating and configuring a device asset
A hierarchy defines a relationship between a parent (fleet) asset model and a child (device) assetmodel. Parent assets can access child assets' property data. When you create assets later, you needto associate child assets to parent assets according to a hierarchy definition in the parent assetmodel. For more information, see Asset hierarchies (p. 149).
6. Under Metric definitions, do the following:
a. In Name, enter Average CPU Usage.
b. In Formula, enter avg(Device | Average CPU Usage). When the autocomplete listappears, choose Device to choose a hierarchy, then choose Average CPU Usage to choose themetric from the device asset that you created earlier.
c. In Time interval, enter 5 minutes.
This metric property calculates the average CPU usage of all device assets associated to a fleet assetthrough the Device hierarchy.
7. Choose Add metric to add a second metric property.
8. In the second row under Metric definitions, do the following:
a. In Name, enter Average Memory Usage.
b. In Formula, enter avg(Device | Average Memory Usage). When the autocomplete listappears, choose Device to choose a hierarchy, then choose Average Memory Usage to choosethe metric from the device asset that you created earlier.
c. In Time interval, enter 5 minutes.
This metric property calculates the average memory usage of all device assets associated to a fleetasset through the Device hierarchy.
9. (Optional) Add other additional metrics that you're interested in calculating across your fleet ofdevices.
10. Choose Create model.
Creating and configuring a device assetIn this procedure, you create a device asset from your device asset model. Then, you define propertyaliases for each measurement property. A property alias is a string that uniquely identifies anasset property. You can later use these aliases, rather than asset ID and property ID, to identify aproperty to which to upload data. For more information, see Mapping industrial data streams to assetproperties (p. 151).
To create a device asset and define property aliases
1. Navigate to the AWS IoT SiteWise console.
20
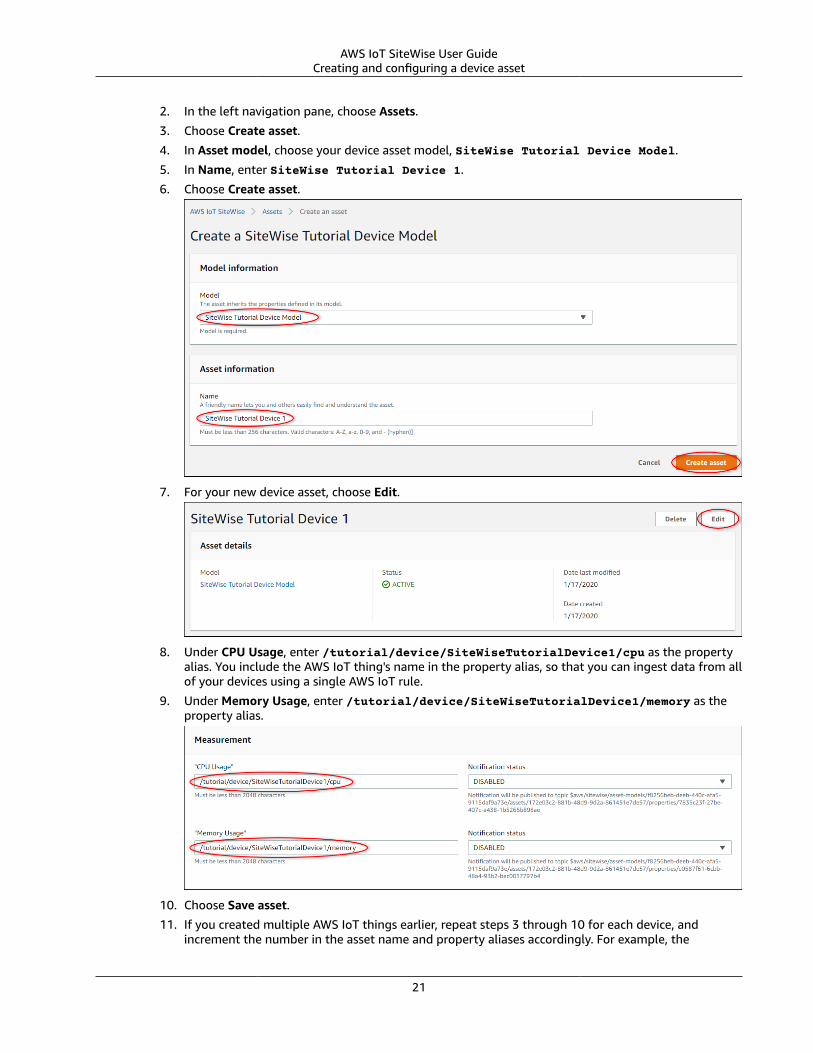
AWS IoT SiteWise User GuideCreating and configuring a device asset
2. In the left navigation pane, choose Assets.
3. Choose Create asset.
4. In Asset model, choose your device asset model, SiteWise Tutorial Device Model.
5. In Name, enter SiteWise Tutorial Device 1.
6. Choose Create asset.
7. For your new device asset, choose Edit.
8. Under CPU Usage, enter /tutorial/device/SiteWiseTutorialDevice1/cpu as the propertyalias. You include the AWS IoT thing's name in the property alias, so that you can ingest data from allof your devices using a single AWS IoT rule.
9. Under Memory Usage, enter /tutorial/device/SiteWiseTutorialDevice1/memory as theproperty alias.
10. Choose Save asset.
11. If you created multiple AWS IoT things earlier, repeat steps 3 through 10 for each device, andincrement the number in the asset name and property aliases accordingly. For example, the
21
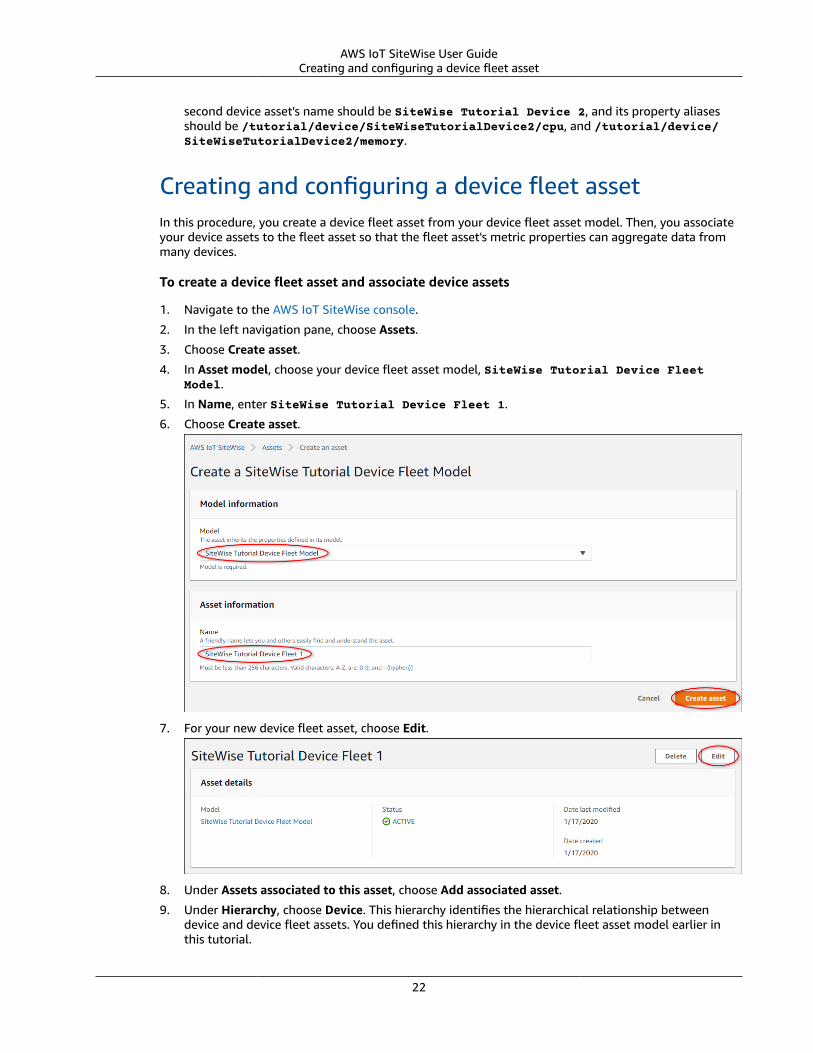
AWS IoT SiteWise User GuideCreating and configuring a device fleet asset
second device asset's name should be SiteWise Tutorial Device 2, and its property aliasesshould be /tutorial/device/SiteWiseTutorialDevice2/cpu, and /tutorial/device/SiteWiseTutorialDevice2/memory.
Creating and configuring a device fleet assetIn this procedure, you create a device fleet asset from your device fleet asset model. Then, you associateyour device assets to the fleet asset so that the fleet asset's metric properties can aggregate data frommany devices.
To create a device fleet asset and associate device assets
1. Navigate to the AWS IoT SiteWise console.
2. In the left navigation pane, choose Assets.
3. Choose Create asset.
4. In Asset model, choose your device fleet asset model, SiteWise Tutorial Device FleetModel.
5. In Name, enter SiteWise Tutorial Device Fleet 1.
6. Choose Create asset.
7. For your new device fleet asset, choose Edit.
8. Under Assets associated to this asset, choose Add associated asset.
9. Under Hierarchy, choose Device. This hierarchy identifies the hierarchical relationship betweendevice and device fleet assets. You defined this hierarchy in the device fleet asset model earlier inthis tutorial.
22
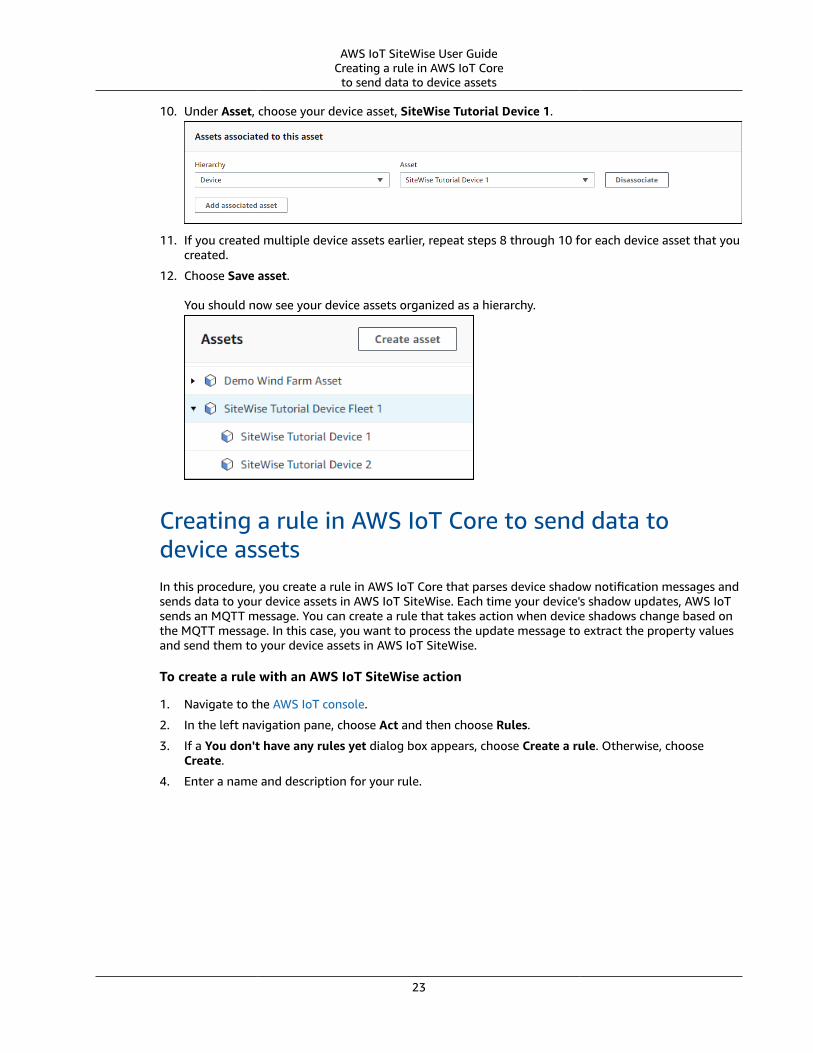
AWS IoT SiteWise User GuideCreating a rule in AWS IoT Core
to send data to device assets
10. Under Asset, choose your device asset, SiteWise Tutorial Device 1.
11. If you created multiple device assets earlier, repeat steps 8 through 10 for each device asset that youcreated.
12. Choose Save asset.
You should now see your device assets organized as a hierarchy.
Creating a rule in AWS IoT Core to send data todevice assetsIn this procedure, you create a rule in AWS IoT Core that parses device shadow notification messages andsends data to your device assets in AWS IoT SiteWise. Each time your device's shadow updates, AWS IoTsends an MQTT message. You can create a rule that takes action when device shadows change based onthe MQTT message. In this case, you want to process the update message to extract the property valuesand send them to your device assets in AWS IoT SiteWise.
To create a rule with an AWS IoT SiteWise action
1. Navigate to the AWS IoT console.
2. In the left navigation pane, choose Act and then choose Rules.
3. If a You don't have any rules yet dialog box appears, choose Create a rule. Otherwise, chooseCreate.
4. Enter a name and description for your rule.
23
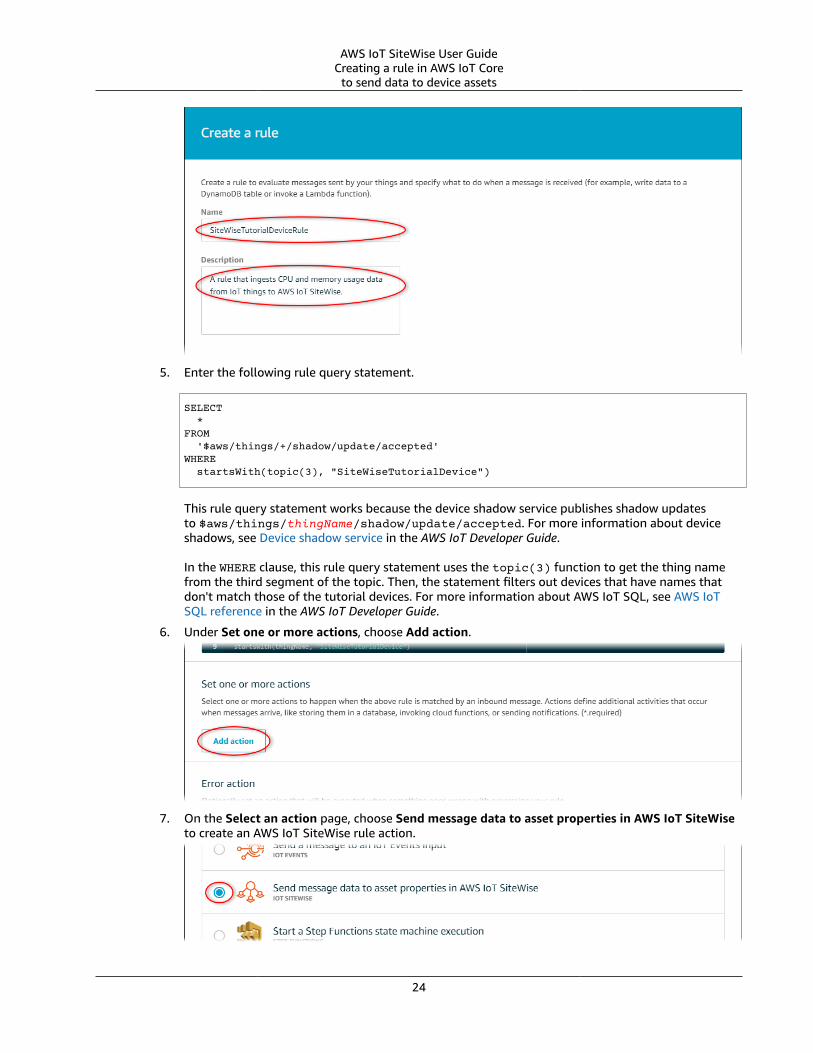
AWS IoT SiteWise User GuideCreating a rule in AWS IoT Core
to send data to device assets
5. Enter the following rule query statement.
SELECT *FROM '$aws/things/+/shadow/update/accepted'WHERE startsWith(topic(3), "SiteWiseTutorialDevice")
This rule query statement works because the device shadow service publishes shadow updatesto $aws/things/thingName/shadow/update/accepted. For more information about deviceshadows, see Device shadow service in the AWS IoT Developer Guide.
In the WHERE clause, this rule query statement uses the topic(3) function to get the thing namefrom the third segment of the topic. Then, the statement filters out devices that have names thatdon't match those of the tutorial devices. For more information about AWS IoT SQL, see AWS IoTSQL reference in the AWS IoT Developer Guide.
6. Under Set one or more actions, choose Add action.
7. On the Select an action page, choose Send message data to asset properties in AWS IoT SiteWiseto create an AWS IoT SiteWise rule action.
24
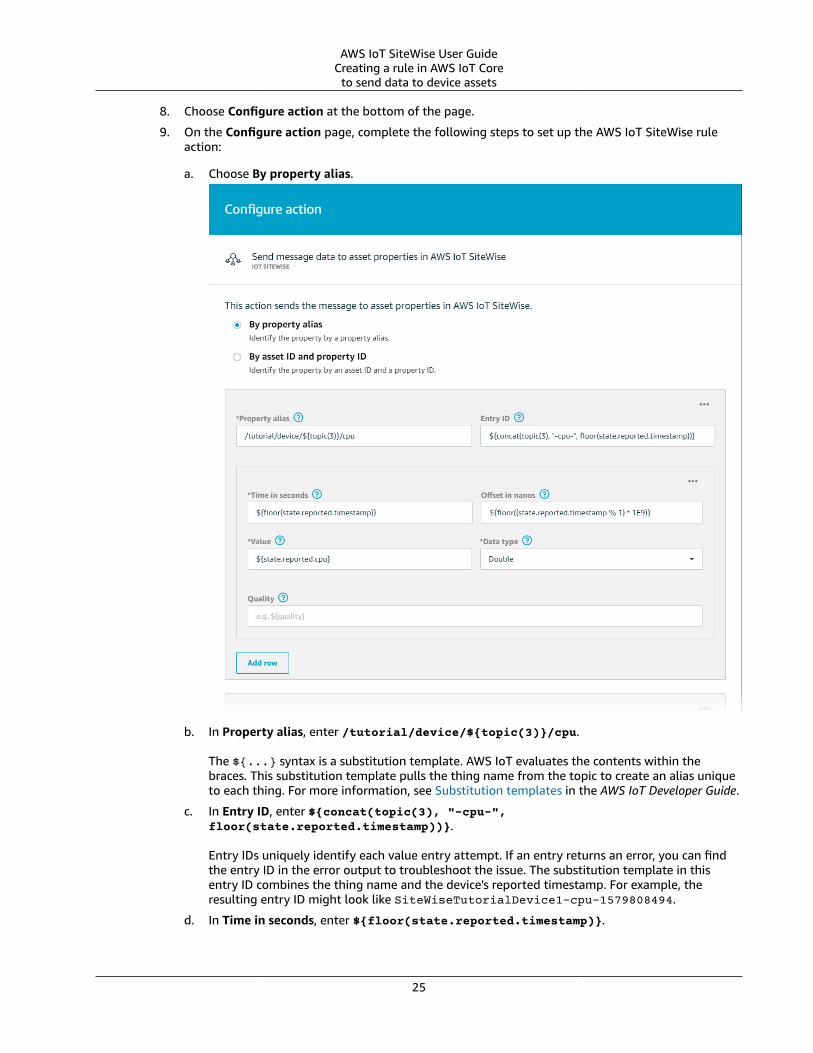
AWS IoT SiteWise User GuideCreating a rule in AWS IoT Core
to send data to device assets
8. Choose Configure action at the bottom of the page.
9. On the Configure action page, complete the following steps to set up the AWS IoT SiteWise ruleaction:
a. Choose By property alias.
b. In Property alias, enter /tutorial/device/${topic(3)}/cpu.
The ${...} syntax is a substitution template. AWS IoT evaluates the contents within thebraces. This substitution template pulls the thing name from the topic to create an alias uniqueto each thing. For more information, see Substitution templates in the AWS IoT Developer Guide.
c. In Entry ID, enter ${concat(topic(3), "-cpu-",floor(state.reported.timestamp))}.
Entry IDs uniquely identify each value entry attempt. If an entry returns an error, you can findthe entry ID in the error output to troubleshoot the issue. The substitution template in thisentry ID combines the thing name and the device's reported timestamp. For example, theresulting entry ID might look like SiteWiseTutorialDevice1-cpu-1579808494.
d. In Time in seconds, enter ${floor(state.reported.timestamp)}.
25
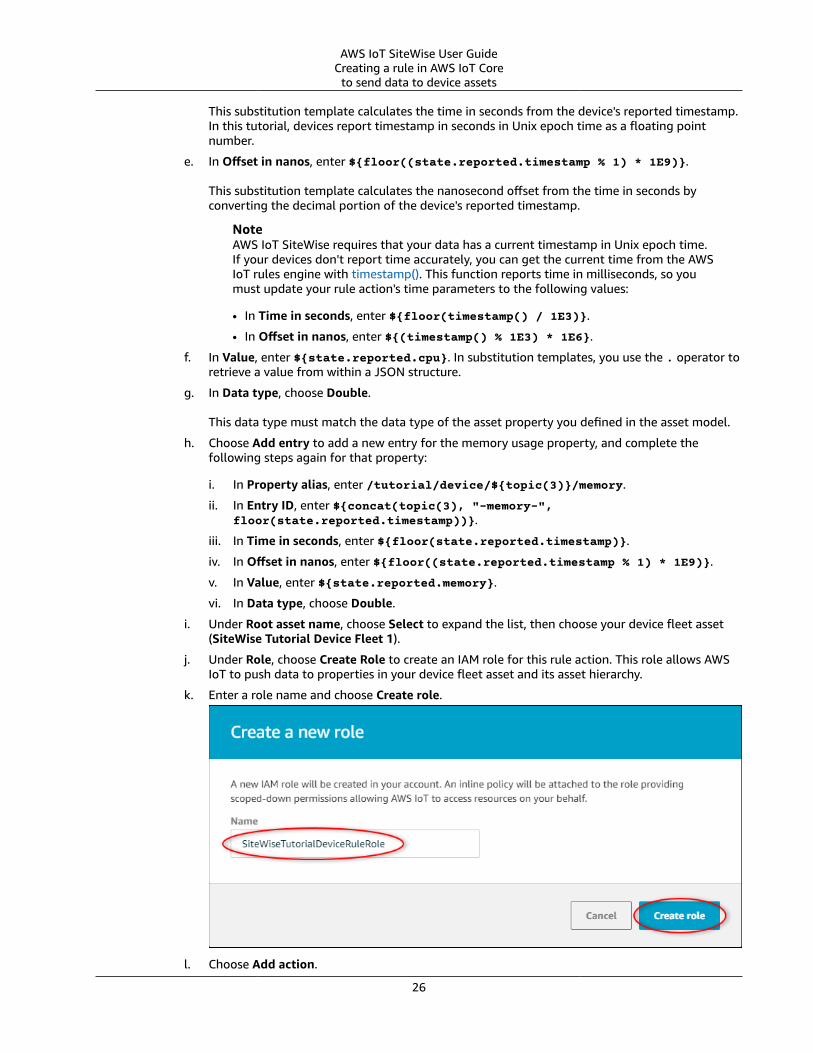
AWS IoT SiteWise User GuideCreating a rule in AWS IoT Core
to send data to device assets
This substitution template calculates the time in seconds from the device's reported timestamp.In this tutorial, devices report timestamp in seconds in Unix epoch time as a floating pointnumber.
e. In Offset in nanos, enter ${floor((state.reported.timestamp % 1) * 1E9)}.
This substitution template calculates the nanosecond offset from the time in seconds byconverting the decimal portion of the device's reported timestamp.
NoteAWS IoT SiteWise requires that your data has a current timestamp in Unix epoch time.If your devices don't report time accurately, you can get the current time from the AWSIoT rules engine with timestamp(). This function reports time in milliseconds, so youmust update your rule action's time parameters to the following values:
• In Time in seconds, enter ${floor(timestamp() / 1E3)}.
• In Offset in nanos, enter ${(timestamp() % 1E3) * 1E6}.
f. In Value, enter ${state.reported.cpu}. In substitution templates, you use the . operator toretrieve a value from within a JSON structure.
g. In Data type, choose Double.
This data type must match the data type of the asset property you defined in the asset model.
h. Choose Add entry to add a new entry for the memory usage property, and complete thefollowing steps again for that property:
i. In Property alias, enter /tutorial/device/${topic(3)}/memory.
ii. In Entry ID, enter ${concat(topic(3), "-memory-",floor(state.reported.timestamp))}.
iii. In Time in seconds, enter ${floor(state.reported.timestamp)}.
iv. In Offset in nanos, enter ${floor((state.reported.timestamp % 1) * 1E9)}.
v. In Value, enter ${state.reported.memory}.
vi. In Data type, choose Double.
i. Under Root asset name, choose Select to expand the list, then choose your device fleet asset(SiteWise Tutorial Device Fleet 1).
j. Under Role, choose Create Role to create an IAM role for this rule action. This role allows AWSIoT to push data to properties in your device fleet asset and its asset hierarchy.
k. Enter a role name and choose Create role.
l. Choose Add action.
26

AWS IoT SiteWise User GuideRunning the device client script
10. (Optional) Configure an error action that you can use to troubleshoot your rule. For moreinformation, see Troubleshooting a rule (p. 32).
11. Choose Create rule at the bottom of the page to finish creating the rule.
Running the device client scriptBecause you aren't using an actual device to report data, you run a script to update your AWS IoT thing'sdevice shadow with CPU and memory usage to imitate real sensor data. To run the script, you must firstinstall required Python packages. In this procedure, you install the required Python packages and thenrun the device client script.
To configure and run the device client script
1. Navigate to the AWS IoT console.2. At the bottom of the left navigation pane, choose Settings.3. Save your custom endpoint for use with the device client script. You use this endpoint to interact
with your thing's shadows. This endpoint is unique to your account in the current Region.
Your custom endpoint should look like the following example.
identifier.iot.region.amazonaws.com
4. Open a command line and run the following command to navigate to the tutorial directory youcreated earlier.
cd iot-sitewise-rule-tutorial
5. Run the following command to install the AWS IoT Device SDK for Python.
pip3 install AWSIoTPythonSDK
For more information, see AWS IoT Device SDK for Python in the AWS IoT Developer Guide6. Run the following command to install psutil, a cross-platform process and system utilities library.
pip3 install psutil
For more information, see psutil in the Python Package Index.7. Create a file called thing_performance.py in the iot-sitewise-rule-tutorial directory
and then copy the following Python code into the file.
from AWSIoTPythonSDK.MQTTLib import AWSIoTMQTTShadowClient
import jsonimport psutilimport argparseimport loggingimport time
# Configures the argument parser for this program.def configureParser(): parser = argparse.ArgumentParser() parser.add_argument("-e", "--endpoint", action="store", required=True, dest="host", help="Your AWS IoT custom endpoint") parser.add_argument("-r", "--rootCA", action="store", required=True, dest="rootCAPath", help="Root CA file path")
27
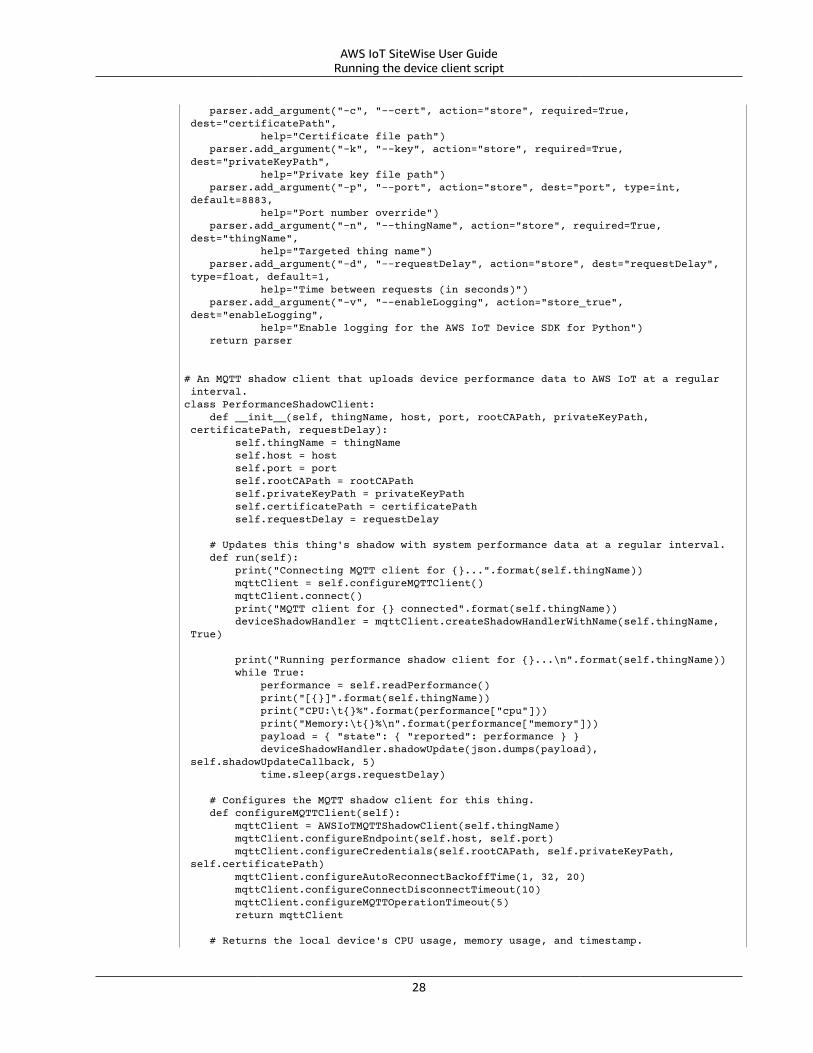
AWS IoT SiteWise User GuideRunning the device client script
parser.add_argument("-c", "--cert", action="store", required=True, dest="certificatePath", help="Certificate file path") parser.add_argument("-k", "--key", action="store", required=True, dest="privateKeyPath", help="Private key file path") parser.add_argument("-p", "--port", action="store", dest="port", type=int, default=8883, help="Port number override") parser.add_argument("-n", "--thingName", action="store", required=True, dest="thingName", help="Targeted thing name") parser.add_argument("-d", "--requestDelay", action="store", dest="requestDelay", type=float, default=1, help="Time between requests (in seconds)") parser.add_argument("-v", "--enableLogging", action="store_true", dest="enableLogging", help="Enable logging for the AWS IoT Device SDK for Python") return parser
# An MQTT shadow client that uploads device performance data to AWS IoT at a regular interval.class PerformanceShadowClient: def __init__(self, thingName, host, port, rootCAPath, privateKeyPath, certificatePath, requestDelay): self.thingName = thingName self.host = host self.port = port self.rootCAPath = rootCAPath self.privateKeyPath = privateKeyPath self.certificatePath = certificatePath self.requestDelay = requestDelay
# Updates this thing's shadow with system performance data at a regular interval. def run(self): print("Connecting MQTT client for {}...".format(self.thingName)) mqttClient = self.configureMQTTClient() mqttClient.connect() print("MQTT client for {} connected".format(self.thingName)) deviceShadowHandler = mqttClient.createShadowHandlerWithName(self.thingName, True)
print("Running performance shadow client for {}...\n".format(self.thingName)) while True: performance = self.readPerformance() print("[{}]".format(self.thingName)) print("CPU:\t{}%".format(performance["cpu"])) print("Memory:\t{}%\n".format(performance["memory"])) payload = { "state": { "reported": performance } } deviceShadowHandler.shadowUpdate(json.dumps(payload), self.shadowUpdateCallback, 5) time.sleep(args.requestDelay)
# Configures the MQTT shadow client for this thing. def configureMQTTClient(self): mqttClient = AWSIoTMQTTShadowClient(self.thingName) mqttClient.configureEndpoint(self.host, self.port) mqttClient.configureCredentials(self.rootCAPath, self.privateKeyPath, self.certificatePath) mqttClient.configureAutoReconnectBackoffTime(1, 32, 20) mqttClient.configureConnectDisconnectTimeout(10) mqttClient.configureMQTTOperationTimeout(5) return mqttClient
# Returns the local device's CPU usage, memory usage, and timestamp.
28
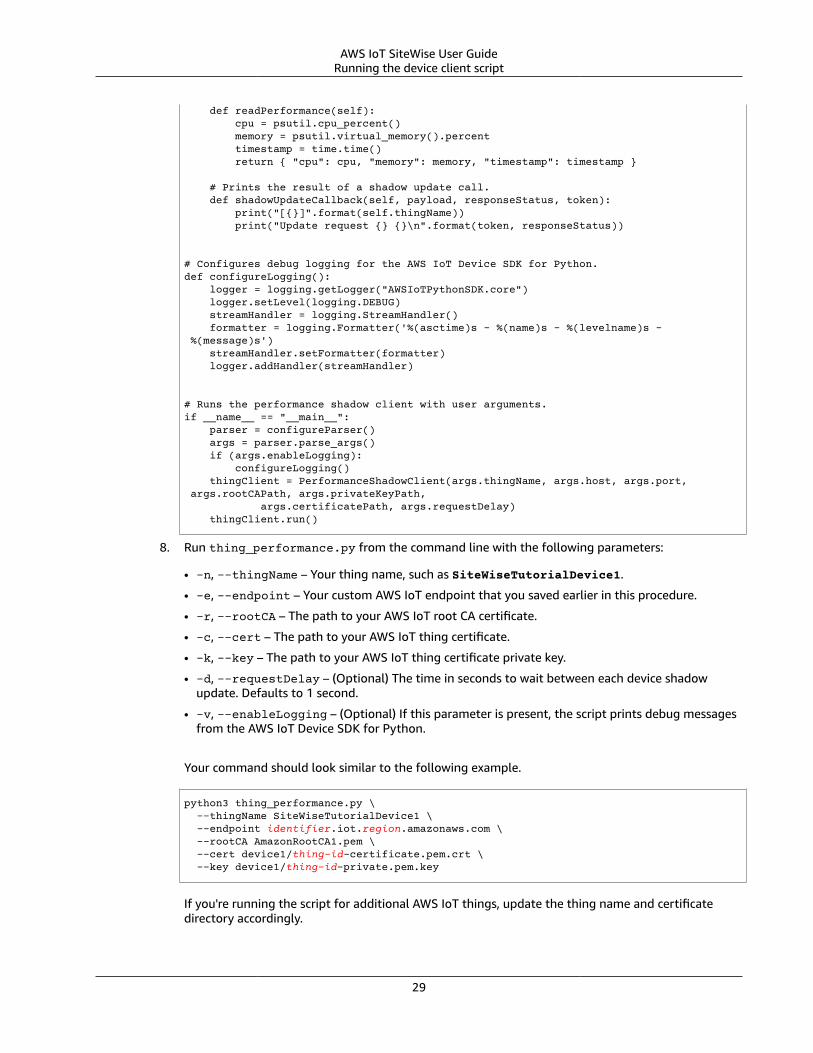
AWS IoT SiteWise User GuideRunning the device client script
def readPerformance(self): cpu = psutil.cpu_percent() memory = psutil.virtual_memory().percent timestamp = time.time() return { "cpu": cpu, "memory": memory, "timestamp": timestamp } # Prints the result of a shadow update call. def shadowUpdateCallback(self, payload, responseStatus, token): print("[{}]".format(self.thingName)) print("Update request {} {}\n".format(token, responseStatus))
# Configures debug logging for the AWS IoT Device SDK for Python.def configureLogging(): logger = logging.getLogger("AWSIoTPythonSDK.core") logger.setLevel(logging.DEBUG) streamHandler = logging.StreamHandler() formatter = logging.Formatter('%(asctime)s - %(name)s - %(levelname)s - %(message)s') streamHandler.setFormatter(formatter) logger.addHandler(streamHandler)
# Runs the performance shadow client with user arguments.if __name__ == "__main__": parser = configureParser() args = parser.parse_args() if (args.enableLogging): configureLogging() thingClient = PerformanceShadowClient(args.thingName, args.host, args.port, args.rootCAPath, args.privateKeyPath, args.certificatePath, args.requestDelay) thingClient.run()
8. Run thing_performance.py from the command line with the following parameters:
• -n, --thingName – Your thing name, such as SiteWiseTutorialDevice1.
• -e, --endpoint – Your custom AWS IoT endpoint that you saved earlier in this procedure.
• -r, --rootCA – The path to your AWS IoT root CA certificate.
• -c, --cert – The path to your AWS IoT thing certificate.
• -k, --key – The path to your AWS IoT thing certificate private key.
• -d, --requestDelay – (Optional) The time in seconds to wait between each device shadowupdate. Defaults to 1 second.
• -v, --enableLogging – (Optional) If this parameter is present, the script prints debug messagesfrom the AWS IoT Device SDK for Python.
Your command should look similar to the following example.
python3 thing_performance.py \ --thingName SiteWiseTutorialDevice1 \ --endpoint identifier.iot.region.amazonaws.com \ --rootCA AmazonRootCA1.pem \ --cert device1/thing-id-certificate.pem.crt \ --key device1/thing-id-private.pem.key
If you're running the script for additional AWS IoT things, update the thing name and certificatedirectory accordingly.
29
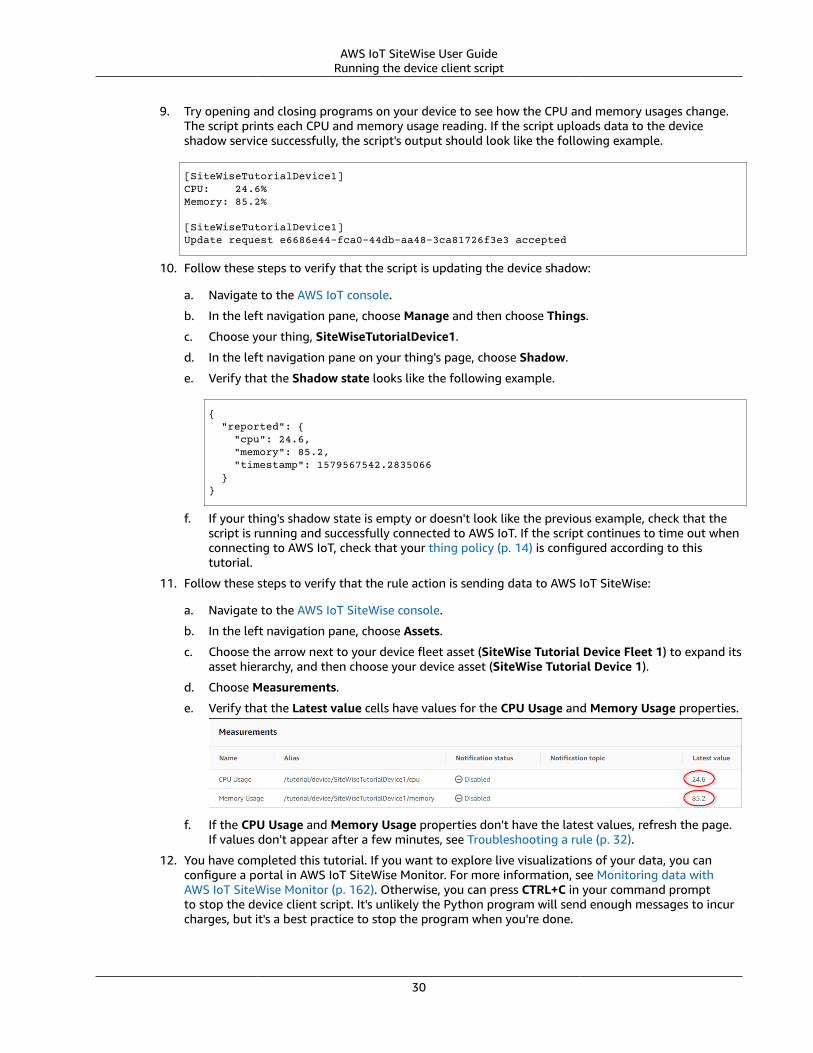
AWS IoT SiteWise User GuideRunning the device client script
9. Try opening and closing programs on your device to see how the CPU and memory usages change.The script prints each CPU and memory usage reading. If the script uploads data to the deviceshadow service successfully, the script's output should look like the following example.
[SiteWiseTutorialDevice1]CPU: 24.6%Memory: 85.2%
[SiteWiseTutorialDevice1]Update request e6686e44-fca0-44db-aa48-3ca81726f3e3 accepted
10. Follow these steps to verify that the script is updating the device shadow:
a. Navigate to the AWS IoT console.
b. In the left navigation pane, choose Manage and then choose Things.
c. Choose your thing, SiteWiseTutorialDevice1.
d. In the left navigation pane on your thing's page, choose Shadow.
e. Verify that the Shadow state looks like the following example.
{ "reported": { "cpu": 24.6, "memory": 85.2, "timestamp": 1579567542.2835066 }}
f. If your thing's shadow state is empty or doesn't look like the previous example, check that thescript is running and successfully connected to AWS IoT. If the script continues to time out whenconnecting to AWS IoT, check that your thing policy (p. 14) is configured according to thistutorial.
11. Follow these steps to verify that the rule action is sending data to AWS IoT SiteWise:
a. Navigate to the AWS IoT SiteWise console.
b. In the left navigation pane, choose Assets.
c. Choose the arrow next to your device fleet asset (SiteWise Tutorial Device Fleet 1) to expand itsasset hierarchy, and then choose your device asset (SiteWise Tutorial Device 1).
d. Choose Measurements.
e. Verify that the Latest value cells have values for the CPU Usage and Memory Usage properties.
f. If the CPU Usage and Memory Usage properties don't have the latest values, refresh the page.If values don't appear after a few minutes, see Troubleshooting a rule (p. 32).
12. You have completed this tutorial. If you want to explore live visualizations of your data, you canconfigure a portal in AWS IoT SiteWise Monitor. For more information, see Monitoring data withAWS IoT SiteWise Monitor (p. 162). Otherwise, you can press CTRL+C in your command promptto stop the device client script. It's unlikely the Python program will send enough messages to incurcharges, but it's a best practice to stop the program when you're done.
30
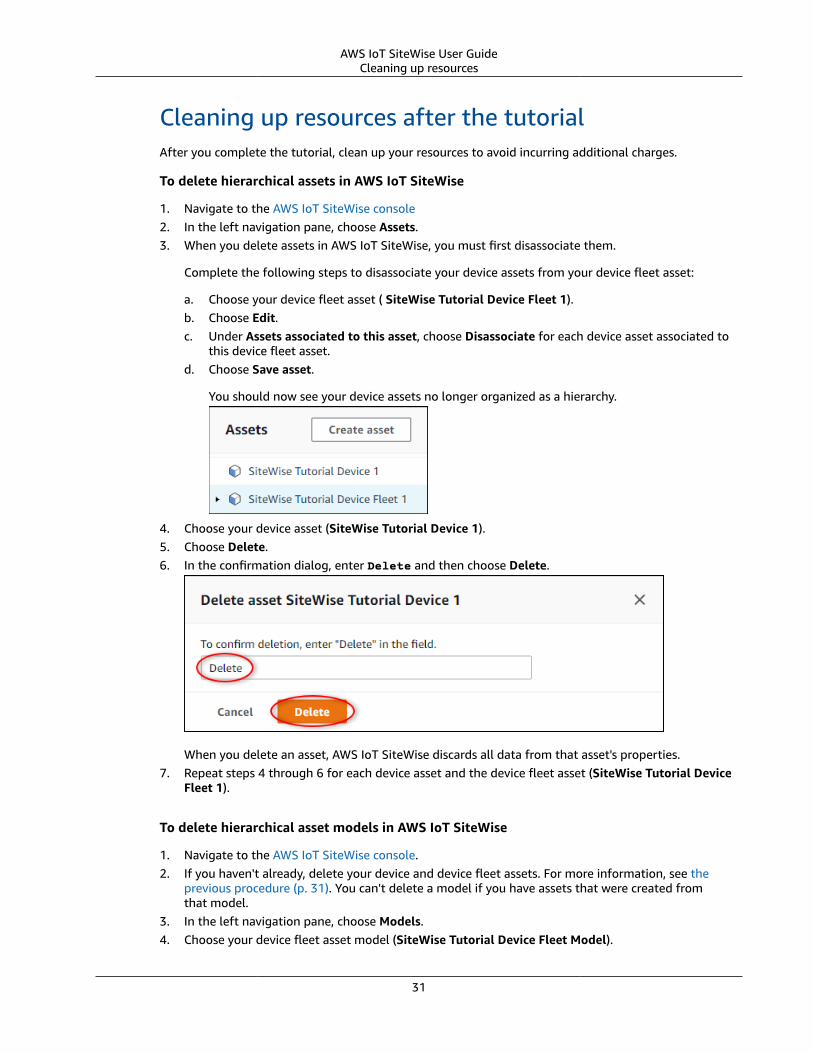
AWS IoT SiteWise User GuideCleaning up resources
Cleaning up resources after the tutorialAfter you complete the tutorial, clean up your resources to avoid incurring additional charges.
To delete hierarchical assets in AWS IoT SiteWise
1. Navigate to the AWS IoT SiteWise console2. In the left navigation pane, choose Assets.3. When you delete assets in AWS IoT SiteWise, you must first disassociate them.
Complete the following steps to disassociate your device assets from your device fleet asset:
a. Choose your device fleet asset ( SiteWise Tutorial Device Fleet 1).b. Choose Edit.c. Under Assets associated to this asset, choose Disassociate for each device asset associated to
this device fleet asset.d. Choose Save asset.
You should now see your device assets no longer organized as a hierarchy.
4. Choose your device asset (SiteWise Tutorial Device 1).5. Choose Delete.6. In the confirmation dialog, enter Delete and then choose Delete.
When you delete an asset, AWS IoT SiteWise discards all data from that asset's properties.7. Repeat steps 4 through 6 for each device asset and the device fleet asset (SiteWise Tutorial Device
Fleet 1).
To delete hierarchical asset models in AWS IoT SiteWise
1. Navigate to the AWS IoT SiteWise console.2. If you haven't already, delete your device and device fleet assets. For more information, see the
previous procedure (p. 31). You can't delete a model if you have assets that were created fromthat model.
3. In the left navigation pane, choose Models.4. Choose your device fleet asset model (SiteWise Tutorial Device Fleet Model).
31
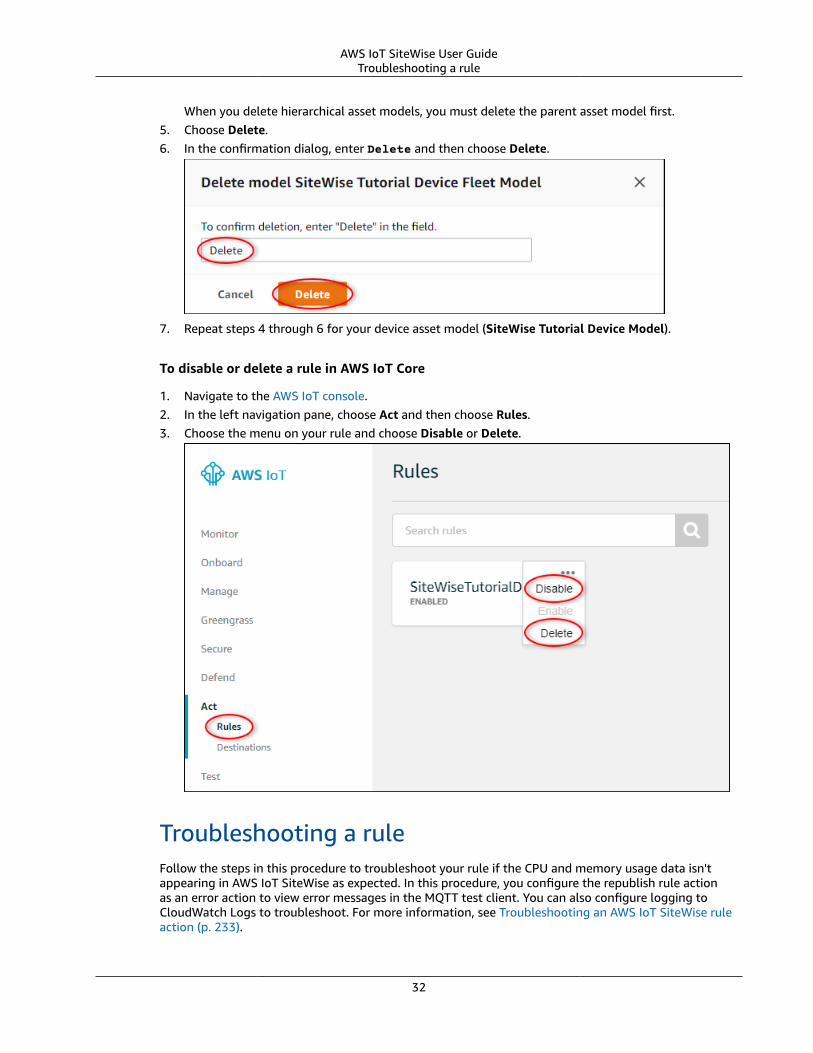
AWS IoT SiteWise User GuideTroubleshooting a rule
When you delete hierarchical asset models, you must delete the parent asset model first.5. Choose Delete.6. In the confirmation dialog, enter Delete and then choose Delete.
7. Repeat steps 4 through 6 for your device asset model (SiteWise Tutorial Device Model).
To disable or delete a rule in AWS IoT Core
1. Navigate to the AWS IoT console.2. In the left navigation pane, choose Act and then choose Rules.3. Choose the menu on your rule and choose Disable or Delete.
Troubleshooting a ruleFollow the steps in this procedure to troubleshoot your rule if the CPU and memory usage data isn'tappearing in AWS IoT SiteWise as expected. In this procedure, you configure the republish rule actionas an error action to view error messages in the MQTT test client. You can also configure logging toCloudWatch Logs to troubleshoot. For more information, see Troubleshooting an AWS IoT SiteWise ruleaction (p. 233).
32
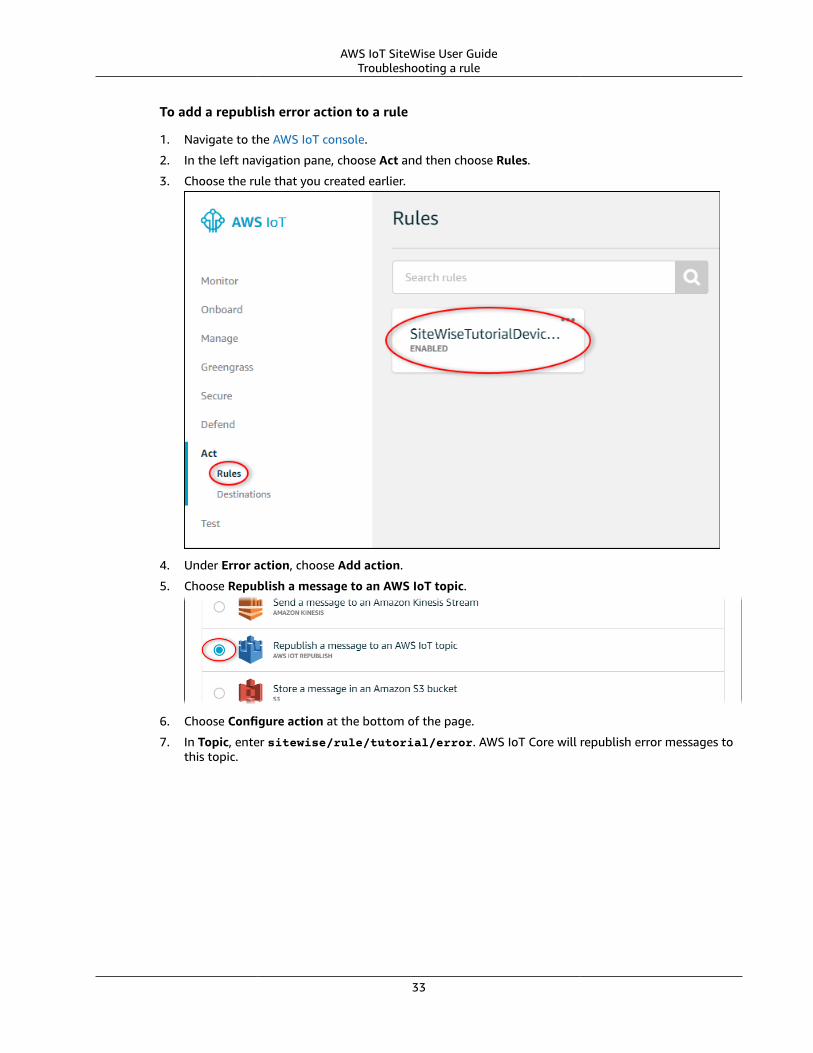
AWS IoT SiteWise User GuideTroubleshooting a rule
To add a republish error action to a rule
1. Navigate to the AWS IoT console.
2. In the left navigation pane, choose Act and then choose Rules.
3. Choose the rule that you created earlier.
4. Under Error action, choose Add action.
5. Choose Republish a message to an AWS IoT topic.
6. Choose Configure action at the bottom of the page.
7. In Topic, enter sitewise/rule/tutorial/error. AWS IoT Core will republish error messages tothis topic.
33
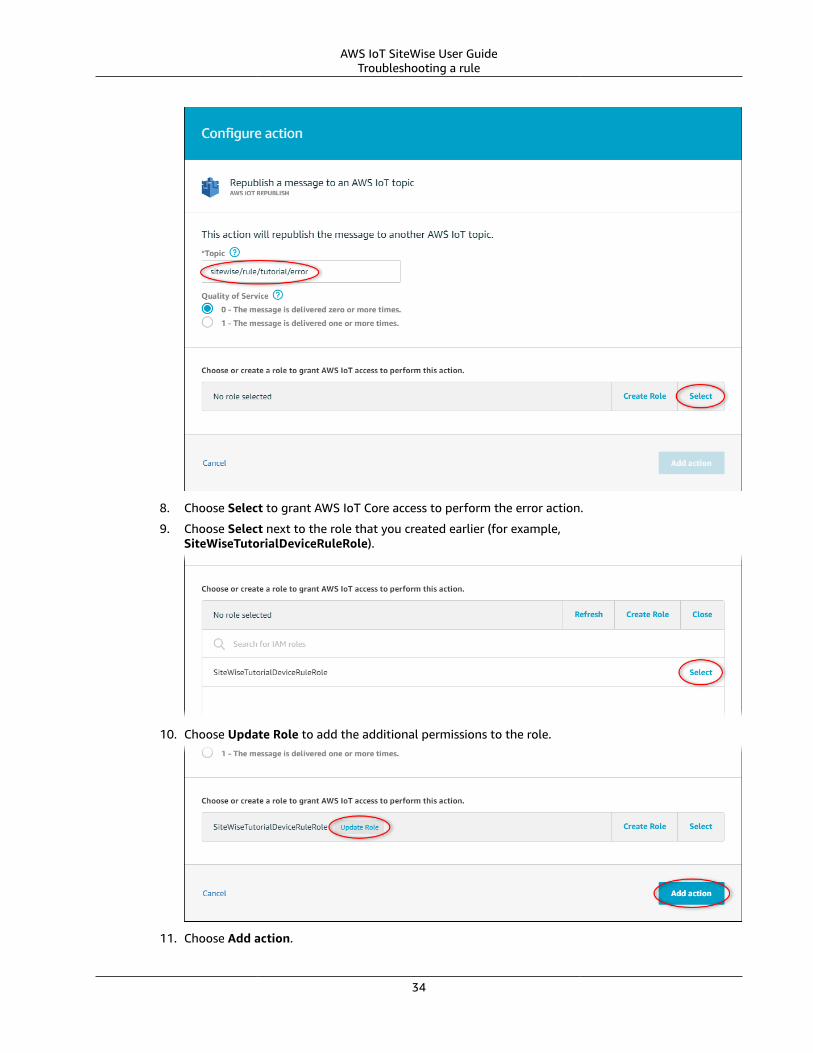
AWS IoT SiteWise User GuideTroubleshooting a rule
8. Choose Select to grant AWS IoT Core access to perform the error action.
9. Choose Select next to the role that you created earlier (for example,SiteWiseTutorialDeviceRuleRole).
10. Choose Update Role to add the additional permissions to the role.
11. Choose Add action.
34
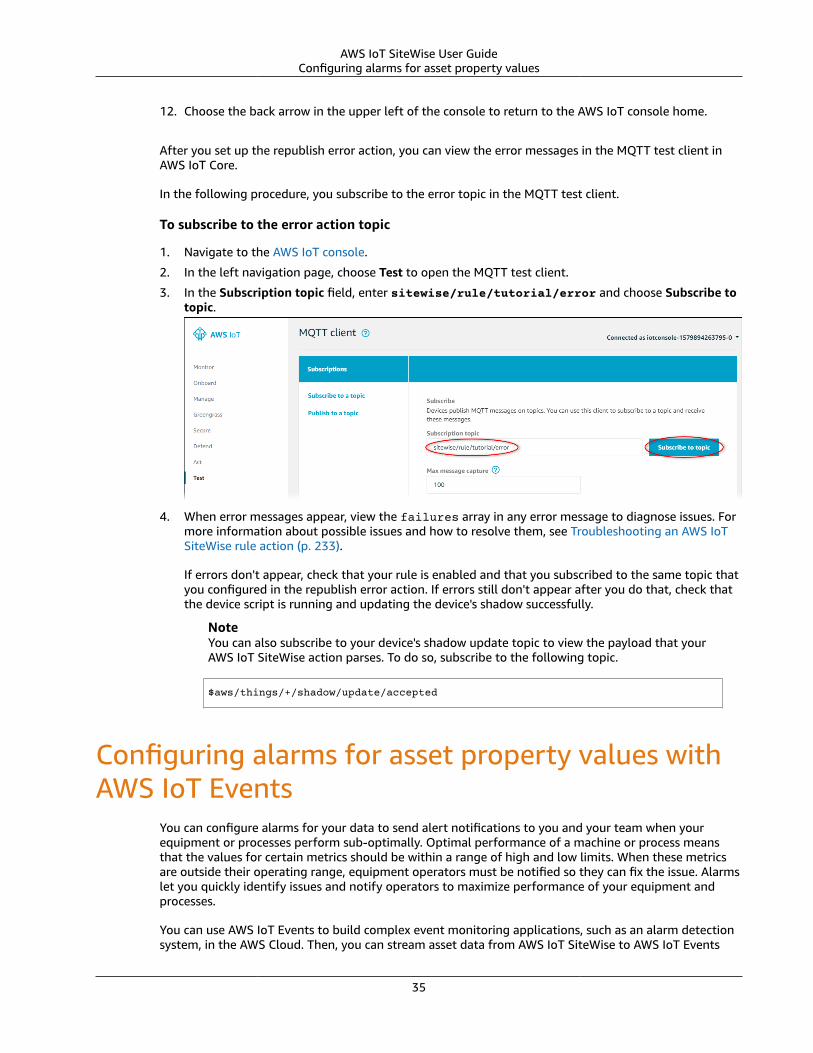
AWS IoT SiteWise User GuideConfiguring alarms for asset property values
12. Choose the back arrow in the upper left of the console to return to the AWS IoT console home.
After you set up the republish error action, you can view the error messages in the MQTT test client inAWS IoT Core.
In the following procedure, you subscribe to the error topic in the MQTT test client.
To subscribe to the error action topic
1. Navigate to the AWS IoT console.
2. In the left navigation page, choose Test to open the MQTT test client.
3. In the Subscription topic field, enter sitewise/rule/tutorial/error and choose Subscribe totopic.
4. When error messages appear, view the failures array in any error message to diagnose issues. Formore information about possible issues and how to resolve them, see Troubleshooting an AWS IoTSiteWise rule action (p. 233).
If errors don't appear, check that your rule is enabled and that you subscribed to the same topic thatyou configured in the republish error action. If errors still don't appear after you do that, check thatthe device script is running and updating the device's shadow successfully.
NoteYou can also subscribe to your device's shadow update topic to view the payload that yourAWS IoT SiteWise action parses. To do so, subscribe to the following topic.
$aws/things/+/shadow/update/accepted
Configuring alarms for asset property values withAWS IoT Events
You can configure alarms for your data to send alert notifications to you and your team when yourequipment or processes perform sub-optimally. Optimal performance of a machine or process meansthat the values for certain metrics should be within a range of high and low limits. When these metricsare outside their operating range, equipment operators must be notified so they can fix the issue. Alarmslet you quickly identify issues and notify operators to maximize performance of your equipment andprocesses.
You can use AWS IoT Events to build complex event monitoring applications, such as an alarm detectionsystem, in the AWS Cloud. Then, you can stream asset data from AWS IoT SiteWise to AWS IoT Events
35

AWS IoT SiteWise User GuidePrerequisites
to trigger alarm events for your data. For more information, see What is AWS IoT Events? in the AWS IoTEvents Developer Guide.
AWS IoT Events lets you send a message to Amazon Simple Notification Service when an event occurs.You can create subscriptions in Amazon SNS to configure who receives notifications for your alarms. Formore information, see What is Amazon SNS? in the Amazon Simple Notification Service Developer Guide.
In this tutorial, you configure resources in AWS IoT Events, Amazon SNS, and AWS Lambda to create areusable alarm detection system in the AWS Cloud. Then, you learn how to use this system to configurealarms for your asset properties in AWS IoT SiteWise.
Topics• Prerequisites (p. 36)• Configuring an alarm detection system (p. 36)• Configuring alarms (p. 55)
PrerequisitesTo complete this tutorial, you need the following:
• An AWS account. If you don't have one, see Setting up an AWS account (p. 7).• A development computer running Windows, macOS, Linux, or Unix to access the AWS Management
Console. For more information, see Getting Started with the AWS Management Console.• An IAM user with administrator permissions.• Python 3 installed on your computer.• AWS SDK for Python (Boto 3) installed on your computer and configured with your AWS
authentication credentials. This tutorial requires version 1.12.49 or later of the SDK for Python (Boto3). For more information, see Quickstart in the AWS SDK for Python (Boto 3) Getting Started.
Configuring an alarm detection systemYou can create an alarm detection system that lets you easily configure alarms for your industrial data.You need to set up the alarm detection system only once in each Region that you use AWS IoT SiteWise.Then, you can configure alarms for your asset properties to receive an alert when data values exceed lowor high thresholds. For more information, see Configuring alarms (p. 55).
ImportantBefore you can configure an alarm detection system, you must meet the prerequisites for thistutorial. For more information, see Prerequisites (p. 36).
Topics• Creating an Amazon SNS topic for alert messages (p. 36)• Creating inputs for your alarm detection model in AWS IoT Events (p. 37)• Creating an alarm detection model in AWS IoT Events (p. 40)• Creating a Lambda function to send asset property values to AWS IoT Events (p. 50)
Creating an Amazon SNS topic for alert messagesWith Amazon SNS, you can publish messages to topics. Then, you can create subscriptions to receivenotifications when a message is published to a topic. For this alarm detection system, you create a topicthat receives alarm messages from AWS IoT Events. Then, you subscribe to the topic when you configurealarms.
36
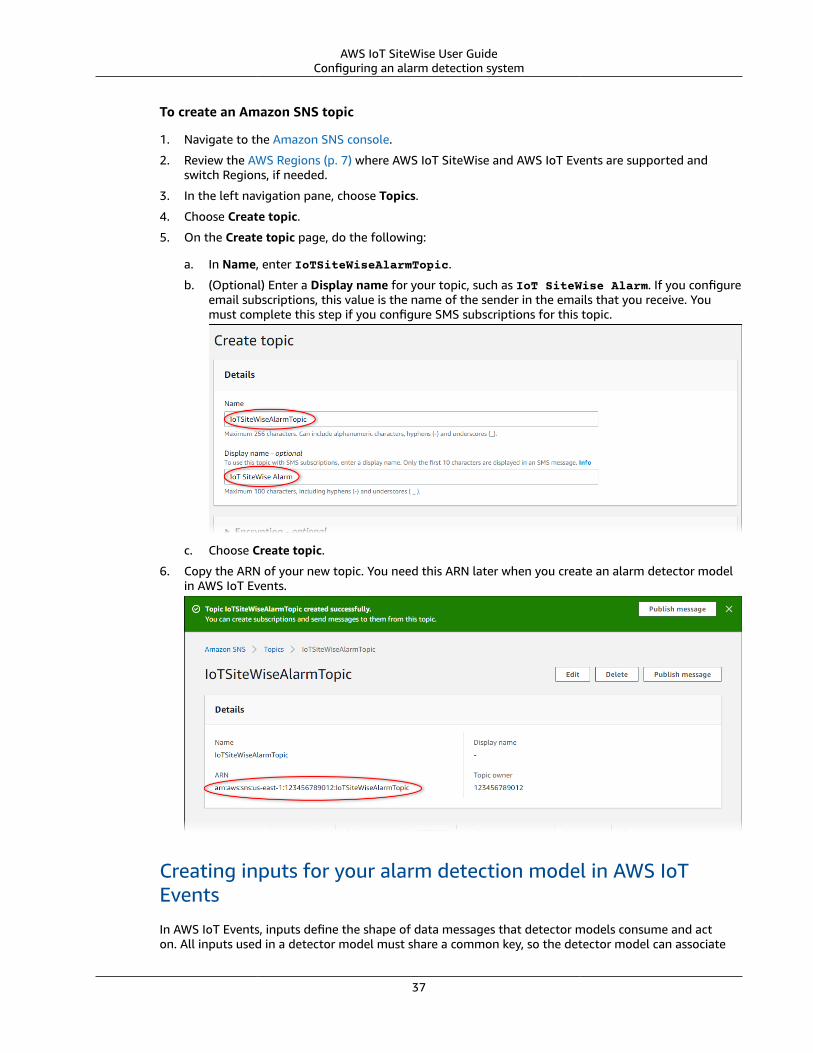
AWS IoT SiteWise User GuideConfiguring an alarm detection system
To create an Amazon SNS topic
1. Navigate to the Amazon SNS console.
2. Review the AWS Regions (p. 7) where AWS IoT SiteWise and AWS IoT Events are supported andswitch Regions, if needed.
3. In the left navigation pane, choose Topics.
4. Choose Create topic.
5. On the Create topic page, do the following:
a. In Name, enter IoTSiteWiseAlarmTopic.
b. (Optional) Enter a Display name for your topic, such as IoT SiteWise Alarm. If you configureemail subscriptions, this value is the name of the sender in the emails that you receive. Youmust complete this step if you configure SMS subscriptions for this topic.
c. Choose Create topic.
6. Copy the ARN of your new topic. You need this ARN later when you create an alarm detector modelin AWS IoT Events.
Creating inputs for your alarm detection model in AWS IoTEvents
In AWS IoT Events, inputs define the shape of data messages that detector models consume and acton. All inputs used in a detector model must share a common key, so the detector model can associate
37
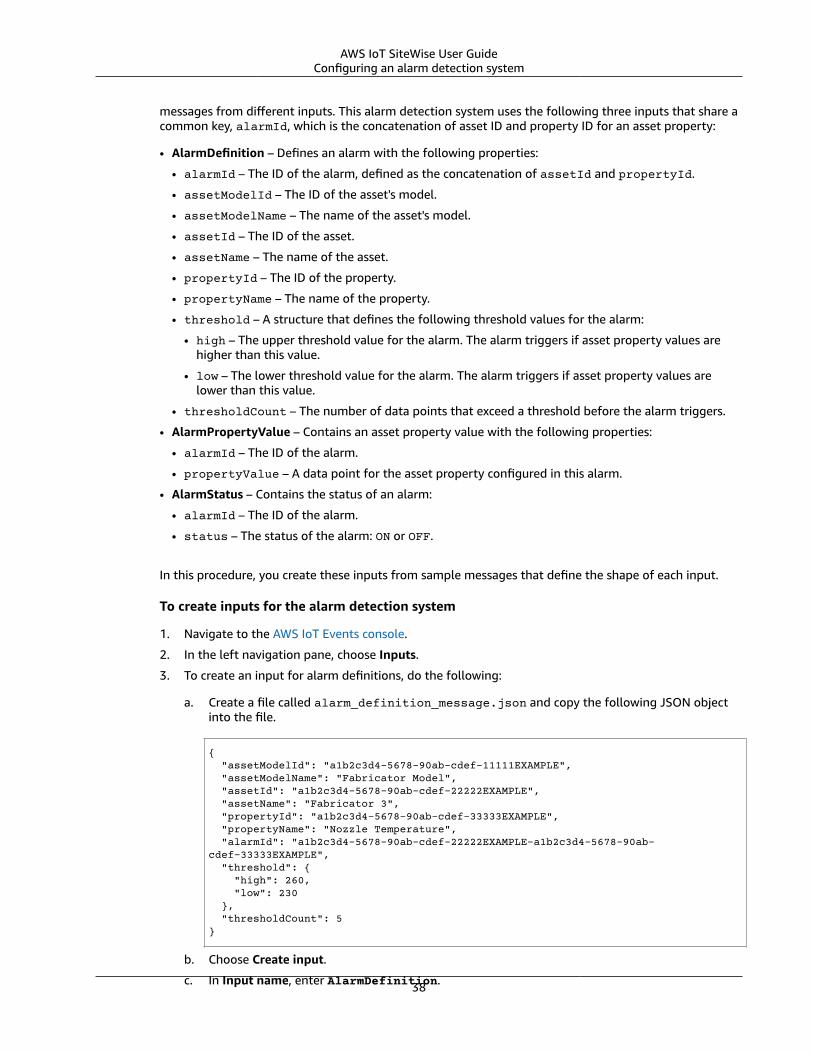
AWS IoT SiteWise User GuideConfiguring an alarm detection system
messages from different inputs. This alarm detection system uses the following three inputs that share acommon key, alarmId, which is the concatenation of asset ID and property ID for an asset property:
• AlarmDefinition – Defines an alarm with the following properties:
• alarmId – The ID of the alarm, defined as the concatenation of assetId and propertyId.
• assetModelId – The ID of the asset's model.
• assetModelName – The name of the asset's model.
• assetId – The ID of the asset.
• assetName – The name of the asset.
• propertyId – The ID of the property.
• propertyName – The name of the property.
• threshold – A structure that defines the following threshold values for the alarm:
• high – The upper threshold value for the alarm. The alarm triggers if asset property values arehigher than this value.
• low – The lower threshold value for the alarm. The alarm triggers if asset property values arelower than this value.
• thresholdCount – The number of data points that exceed a threshold before the alarm triggers.
• AlarmPropertyValue – Contains an asset property value with the following properties:
• alarmId – The ID of the alarm.
• propertyValue – A data point for the asset property configured in this alarm.
• AlarmStatus – Contains the status of an alarm:
• alarmId – The ID of the alarm.
• status – The status of the alarm: ON or OFF.
In this procedure, you create these inputs from sample messages that define the shape of each input.
To create inputs for the alarm detection system
1. Navigate to the AWS IoT Events console.
2. In the left navigation pane, choose Inputs.
3. To create an input for alarm definitions, do the following:
a. Create a file called alarm_definition_message.json and copy the following JSON objectinto the file.
{ "assetModelId": "a1b2c3d4-5678-90ab-cdef-11111EXAMPLE", "assetModelName": "Fabricator Model", "assetId": "a1b2c3d4-5678-90ab-cdef-22222EXAMPLE", "assetName": "Fabricator 3", "propertyId": "a1b2c3d4-5678-90ab-cdef-33333EXAMPLE", "propertyName": "Nozzle Temperature", "alarmId": "a1b2c3d4-5678-90ab-cdef-22222EXAMPLE-a1b2c3d4-5678-90ab-cdef-33333EXAMPLE", "threshold": { "high": 260, "low": 230 }, "thresholdCount": 5}
b. Choose Create input.
c. In Input name, enter AlarmDefinition.38
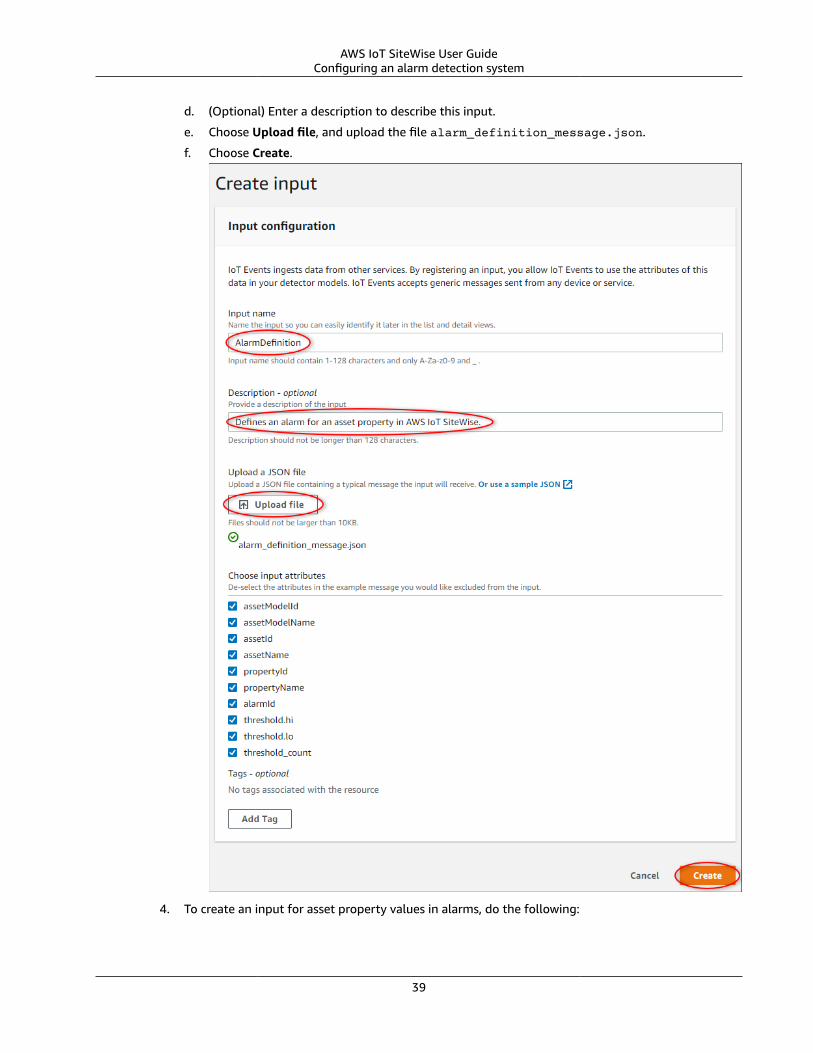
AWS IoT SiteWise User GuideConfiguring an alarm detection system
d. (Optional) Enter a description to describe this input.
e. Choose Upload file, and upload the file alarm_definition_message.json.
f. Choose Create.
4. To create an input for asset property values in alarms, do the following:
39

AWS IoT SiteWise User GuideConfiguring an alarm detection system
a. Create a file called alarm_property_value_message.json and copy the following JSONobject into the file.
{ "alarmId": "a1b2c3d4-5678-90ab-cdef-11111EXAMPLE-a1b2c3d4-5678-90ab-cdef-22222EXAMPLE", "propertyValue": 241}
b. Choose Create input.
c. In Input name, enter AlarmPropertyValue.
d. (Optional) Enter a description to describe this input.
e. Choose Upload file, and upload the file alarm_property_value_message.json.
f. Choose Create.
5. To create an input for alarm status, do the following:
a. Create a file called alarm_status_message.json and copy the following JSON object intothe file.
{ "alarmId": "a1b2c3d4-5678-90ab-cdef-11111EXAMPLE-a1b2c3d4-5678-90ab-cdef-22222EXAMPLE", "status": "OFF"}
b. Choose Create input.
c. In Input name, enter AlarmStatus.
d. (Optional) Enter a description to describe this input.
e. Choose Upload file, and upload the file alarm_status_message.json.
f. Choose Create.
You should have three inputs in AWS IoT Events.
Creating an alarm detection model in AWS IoT Events
Detector models define how AWS IoT Events processes data from inputs. In the alarm detection system,AWS IoT Events creates a detector from the detector model for each alarm. Each detector has a state,and this state changes when certain conditions are met. When data exceeds an alarm threshold, thedetector transitions to an alarm state and sends an alert to Amazon SNS. For more information, seeCreate a detector model in the AWS IoT Events Developer Guide.
40
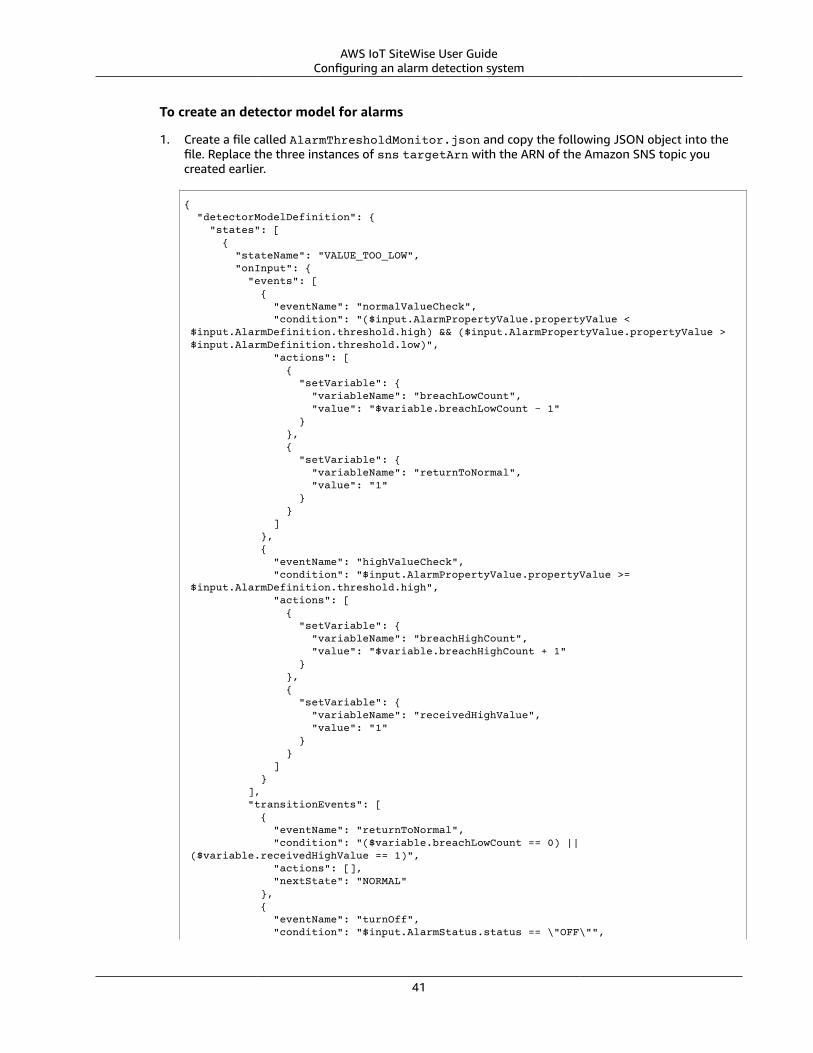
AWS IoT SiteWise User GuideConfiguring an alarm detection system
To create an detector model for alarms
1. Create a file called AlarmThresholdMonitor.json and copy the following JSON object into thefile. Replace the three instances of sns targetArn with the ARN of the Amazon SNS topic youcreated earlier.
{ "detectorModelDefinition": { "states": [ { "stateName": "VALUE_TOO_LOW", "onInput": { "events": [ { "eventName": "normalValueCheck", "condition": "($input.AlarmPropertyValue.propertyValue < $input.AlarmDefinition.threshold.high) && ($input.AlarmPropertyValue.propertyValue > $input.AlarmDefinition.threshold.low)", "actions": [ { "setVariable": { "variableName": "breachLowCount", "value": "$variable.breachLowCount - 1" } }, { "setVariable": { "variableName": "returnToNormal", "value": "1" } } ] }, { "eventName": "highValueCheck", "condition": "$input.AlarmPropertyValue.propertyValue >= $input.AlarmDefinition.threshold.high", "actions": [ { "setVariable": { "variableName": "breachHighCount", "value": "$variable.breachHighCount + 1" } }, { "setVariable": { "variableName": "receivedHighValue", "value": "1" } } ] } ], "transitionEvents": [ { "eventName": "returnToNormal", "condition": "($variable.breachLowCount == 0) || ($variable.receivedHighValue == 1)", "actions": [], "nextState": "NORMAL" }, { "eventName": "turnOff", "condition": "$input.AlarmStatus.status == \"OFF\"",
41
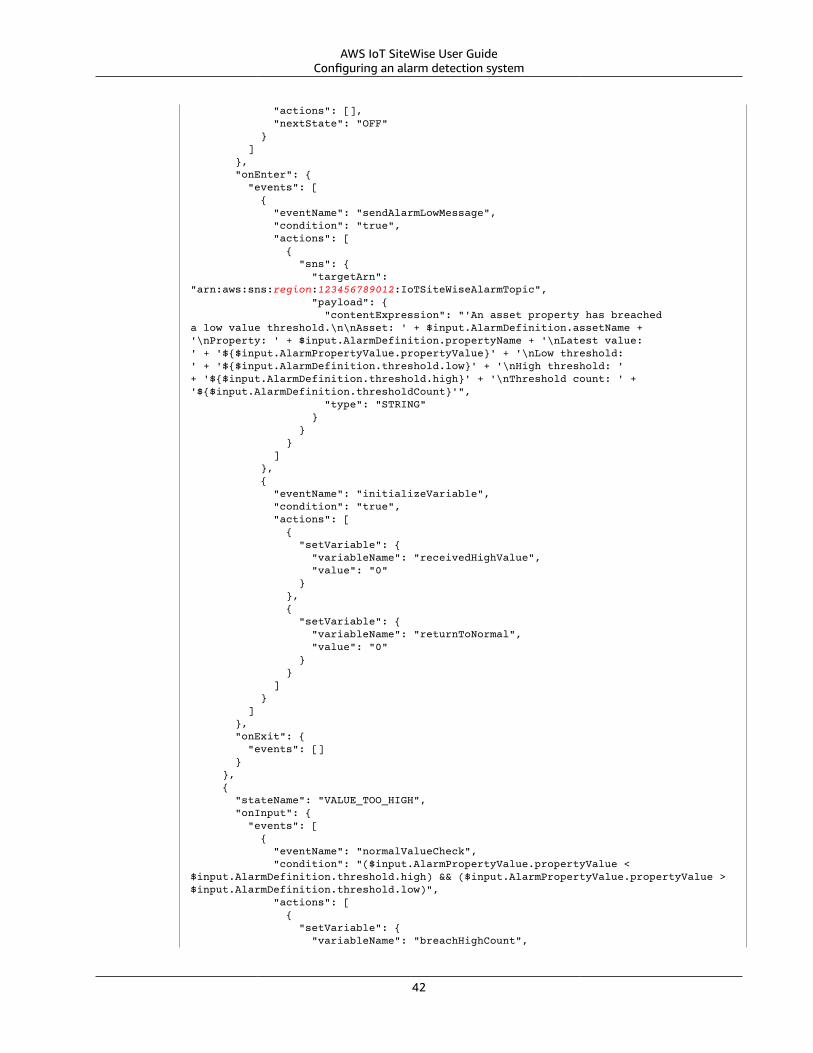
AWS IoT SiteWise User GuideConfiguring an alarm detection system
"actions": [], "nextState": "OFF" } ] }, "onEnter": { "events": [ { "eventName": "sendAlarmLowMessage", "condition": "true", "actions": [ { "sns": { "targetArn": "arn:aws:sns:region:123456789012:IoTSiteWiseAlarmTopic", "payload": { "contentExpression": "'An asset property has breached a low value threshold.\n\nAsset: ' + $input.AlarmDefinition.assetName + '\nProperty: ' + $input.AlarmDefinition.propertyName + '\nLatest value: ' + '${$input.AlarmPropertyValue.propertyValue}' + '\nLow threshold: ' + '${$input.AlarmDefinition.threshold.low}' + '\nHigh threshold: ' + '${$input.AlarmDefinition.threshold.high}' + '\nThreshold count: ' + '${$input.AlarmDefinition.thresholdCount}'", "type": "STRING" } } } ] }, { "eventName": "initializeVariable", "condition": "true", "actions": [ { "setVariable": { "variableName": "receivedHighValue", "value": "0" } }, { "setVariable": { "variableName": "returnToNormal", "value": "0" } } ] } ] }, "onExit": { "events": [] } }, { "stateName": "VALUE_TOO_HIGH", "onInput": { "events": [ { "eventName": "normalValueCheck", "condition": "($input.AlarmPropertyValue.propertyValue < $input.AlarmDefinition.threshold.high) && ($input.AlarmPropertyValue.propertyValue > $input.AlarmDefinition.threshold.low)", "actions": [ { "setVariable": { "variableName": "breachHighCount",
42
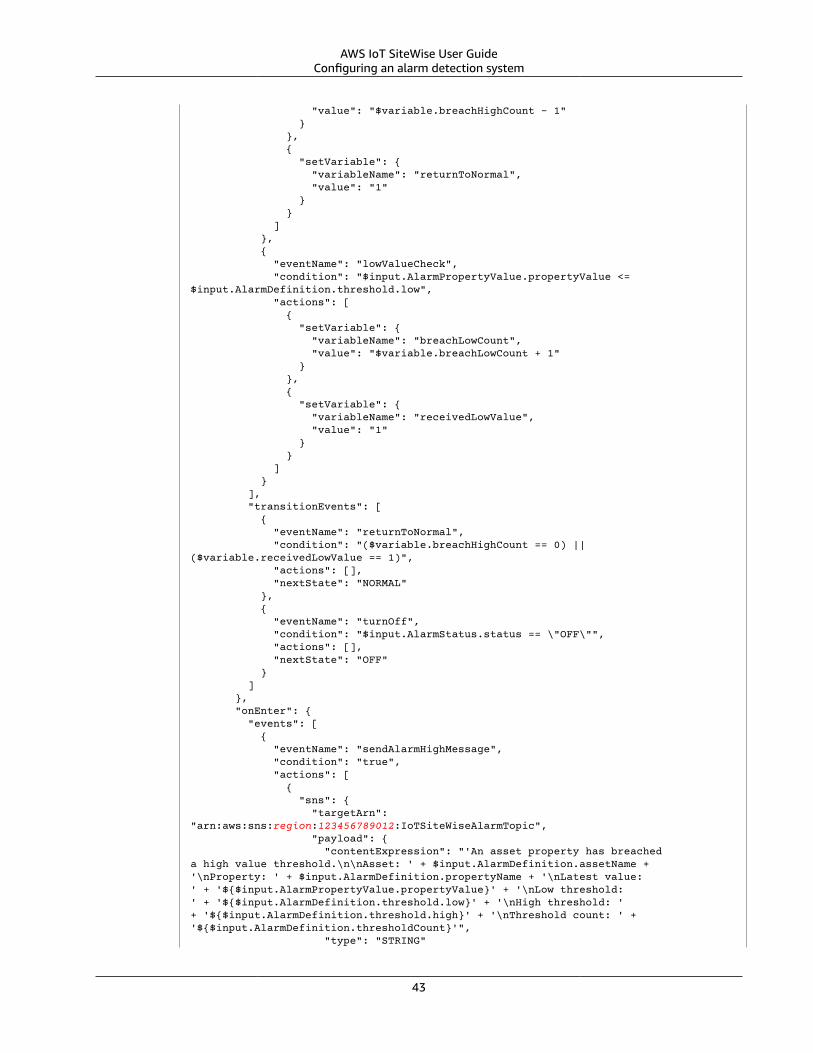
AWS IoT SiteWise User GuideConfiguring an alarm detection system
"value": "$variable.breachHighCount - 1" } }, { "setVariable": { "variableName": "returnToNormal", "value": "1" } } ] }, { "eventName": "lowValueCheck", "condition": "$input.AlarmPropertyValue.propertyValue <= $input.AlarmDefinition.threshold.low", "actions": [ { "setVariable": { "variableName": "breachLowCount", "value": "$variable.breachLowCount + 1" } }, { "setVariable": { "variableName": "receivedLowValue", "value": "1" } } ] } ], "transitionEvents": [ { "eventName": "returnToNormal", "condition": "($variable.breachHighCount == 0) || ($variable.receivedLowValue == 1)", "actions": [], "nextState": "NORMAL" }, { "eventName": "turnOff", "condition": "$input.AlarmStatus.status == \"OFF\"", "actions": [], "nextState": "OFF" } ] }, "onEnter": { "events": [ { "eventName": "sendAlarmHighMessage", "condition": "true", "actions": [ { "sns": { "targetArn": "arn:aws:sns:region:123456789012:IoTSiteWiseAlarmTopic", "payload": { "contentExpression": "'An asset property has breached a high value threshold.\n\nAsset: ' + $input.AlarmDefinition.assetName + '\nProperty: ' + $input.AlarmDefinition.propertyName + '\nLatest value: ' + '${$input.AlarmPropertyValue.propertyValue}' + '\nLow threshold: ' + '${$input.AlarmDefinition.threshold.low}' + '\nHigh threshold: ' + '${$input.AlarmDefinition.threshold.high}' + '\nThreshold count: ' + '${$input.AlarmDefinition.thresholdCount}'", "type": "STRING"
43
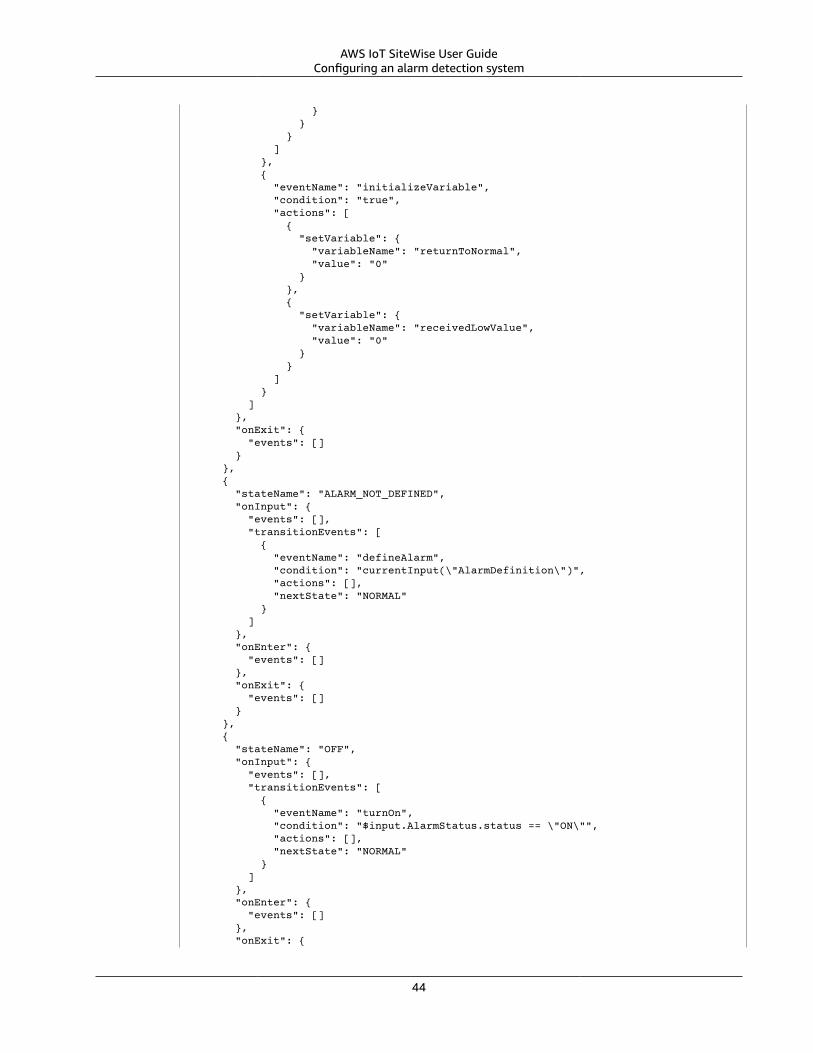
AWS IoT SiteWise User GuideConfiguring an alarm detection system
} } } ] }, { "eventName": "initializeVariable", "condition": "true", "actions": [ { "setVariable": { "variableName": "returnToNormal", "value": "0" } }, { "setVariable": { "variableName": "receivedLowValue", "value": "0" } } ] } ] }, "onExit": { "events": [] } }, { "stateName": "ALARM_NOT_DEFINED", "onInput": { "events": [], "transitionEvents": [ { "eventName": "defineAlarm", "condition": "currentInput(\"AlarmDefinition\")", "actions": [], "nextState": "NORMAL" } ] }, "onEnter": { "events": [] }, "onExit": { "events": [] } }, { "stateName": "OFF", "onInput": { "events": [], "transitionEvents": [ { "eventName": "turnOn", "condition": "$input.AlarmStatus.status == \"ON\"", "actions": [], "nextState": "NORMAL" } ] }, "onEnter": { "events": [] }, "onExit": {
44
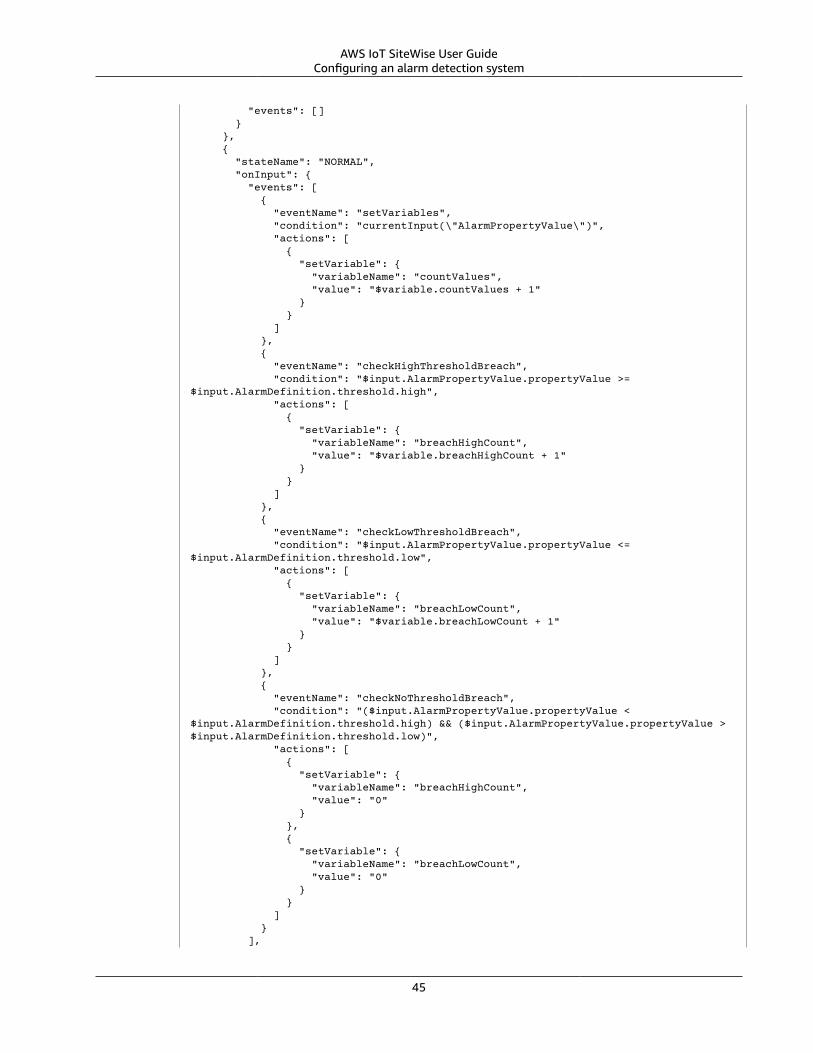
AWS IoT SiteWise User GuideConfiguring an alarm detection system
"events": [] } }, { "stateName": "NORMAL", "onInput": { "events": [ { "eventName": "setVariables", "condition": "currentInput(\"AlarmPropertyValue\")", "actions": [ { "setVariable": { "variableName": "countValues", "value": "$variable.countValues + 1" } } ] }, { "eventName": "checkHighThresholdBreach", "condition": "$input.AlarmPropertyValue.propertyValue >= $input.AlarmDefinition.threshold.high", "actions": [ { "setVariable": { "variableName": "breachHighCount", "value": "$variable.breachHighCount + 1" } } ] }, { "eventName": "checkLowThresholdBreach", "condition": "$input.AlarmPropertyValue.propertyValue <= $input.AlarmDefinition.threshold.low", "actions": [ { "setVariable": { "variableName": "breachLowCount", "value": "$variable.breachLowCount + 1" } } ] }, { "eventName": "checkNoThresholdBreach", "condition": "($input.AlarmPropertyValue.propertyValue < $input.AlarmDefinition.threshold.high) && ($input.AlarmPropertyValue.propertyValue > $input.AlarmDefinition.threshold.low)", "actions": [ { "setVariable": { "variableName": "breachHighCount", "value": "0" } }, { "setVariable": { "variableName": "breachLowCount", "value": "0" } } ] } ],
45
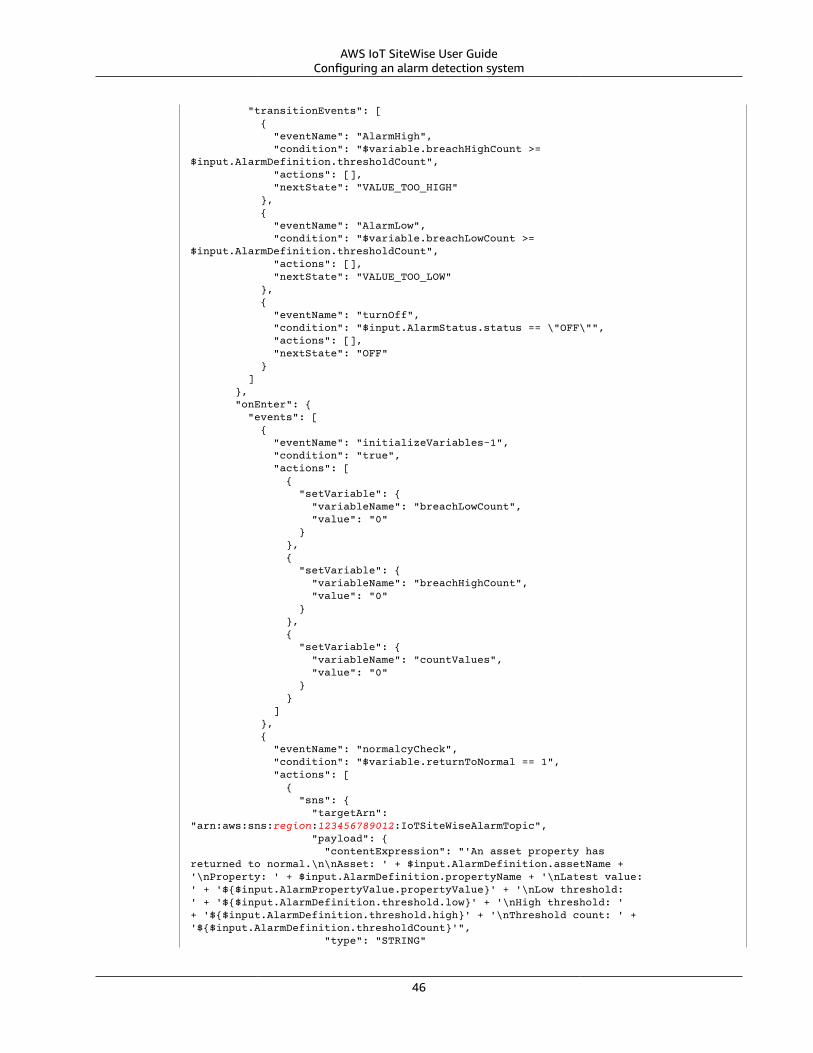
AWS IoT SiteWise User GuideConfiguring an alarm detection system
"transitionEvents": [ { "eventName": "AlarmHigh", "condition": "$variable.breachHighCount >= $input.AlarmDefinition.thresholdCount", "actions": [], "nextState": "VALUE_TOO_HIGH" }, { "eventName": "AlarmLow", "condition": "$variable.breachLowCount >= $input.AlarmDefinition.thresholdCount", "actions": [], "nextState": "VALUE_TOO_LOW" }, { "eventName": "turnOff", "condition": "$input.AlarmStatus.status == \"OFF\"", "actions": [], "nextState": "OFF" } ] }, "onEnter": { "events": [ { "eventName": "initializeVariables-1", "condition": "true", "actions": [ { "setVariable": { "variableName": "breachLowCount", "value": "0" } }, { "setVariable": { "variableName": "breachHighCount", "value": "0" } }, { "setVariable": { "variableName": "countValues", "value": "0" } } ] }, { "eventName": "normalcyCheck", "condition": "$variable.returnToNormal == 1", "actions": [ { "sns": { "targetArn": "arn:aws:sns:region:123456789012:IoTSiteWiseAlarmTopic", "payload": { "contentExpression": "'An asset property has returned to normal.\n\nAsset: ' + $input.AlarmDefinition.assetName + '\nProperty: ' + $input.AlarmDefinition.propertyName + '\nLatest value: ' + '${$input.AlarmPropertyValue.propertyValue}' + '\nLow threshold: ' + '${$input.AlarmDefinition.threshold.low}' + '\nHigh threshold: ' + '${$input.AlarmDefinition.threshold.high}' + '\nThreshold count: ' + '${$input.AlarmDefinition.thresholdCount}'", "type": "STRING"
46
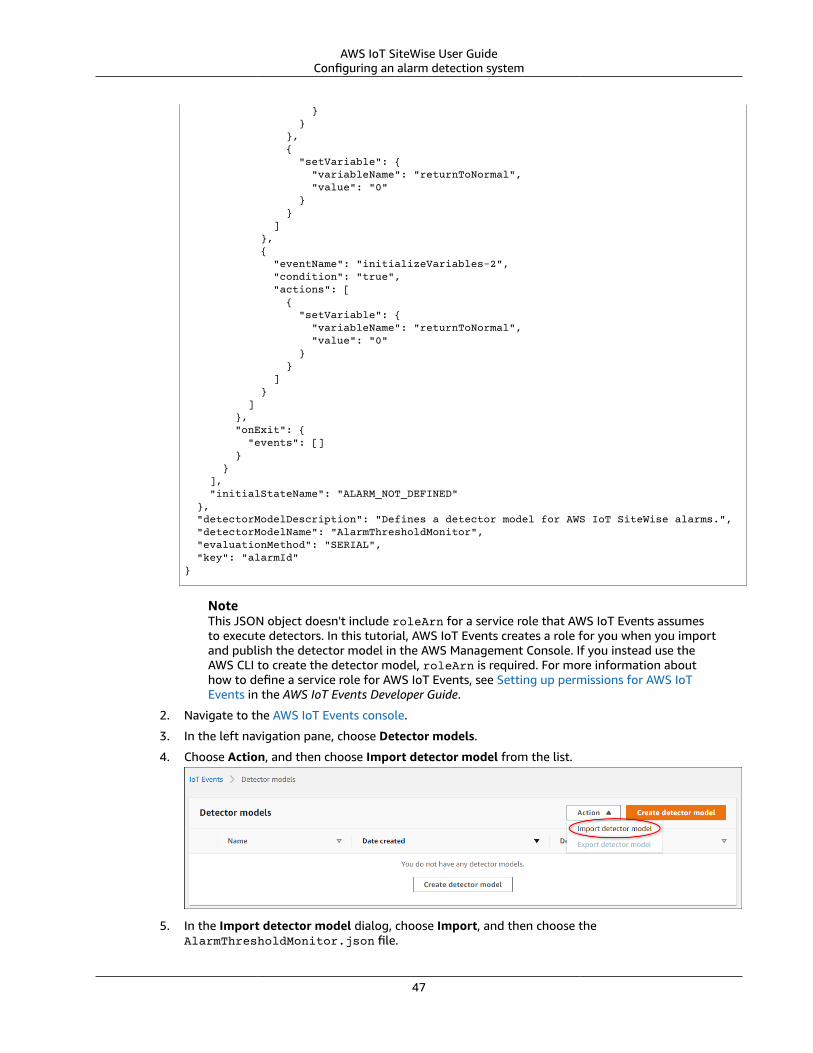
AWS IoT SiteWise User GuideConfiguring an alarm detection system
} } }, { "setVariable": { "variableName": "returnToNormal", "value": "0" } } ] }, { "eventName": "initializeVariables-2", "condition": "true", "actions": [ { "setVariable": { "variableName": "returnToNormal", "value": "0" } } ] } ] }, "onExit": { "events": [] } } ], "initialStateName": "ALARM_NOT_DEFINED" }, "detectorModelDescription": "Defines a detector model for AWS IoT SiteWise alarms.", "detectorModelName": "AlarmThresholdMonitor", "evaluationMethod": "SERIAL", "key": "alarmId"}
NoteThis JSON object doesn't include roleArn for a service role that AWS IoT Events assumesto execute detectors. In this tutorial, AWS IoT Events creates a role for you when you importand publish the detector model in the AWS Management Console. If you instead use theAWS CLI to create the detector model, roleArn is required. For more information abouthow to define a service role for AWS IoT Events, see Setting up permissions for AWS IoTEvents in the AWS IoT Events Developer Guide.
2. Navigate to the AWS IoT Events console.
3. In the left navigation pane, choose Detector models.
4. Choose Action, and then choose Import detector model from the list.
5. In the Import detector model dialog, choose Import, and then choose theAlarmThresholdMonitor.json file.
47
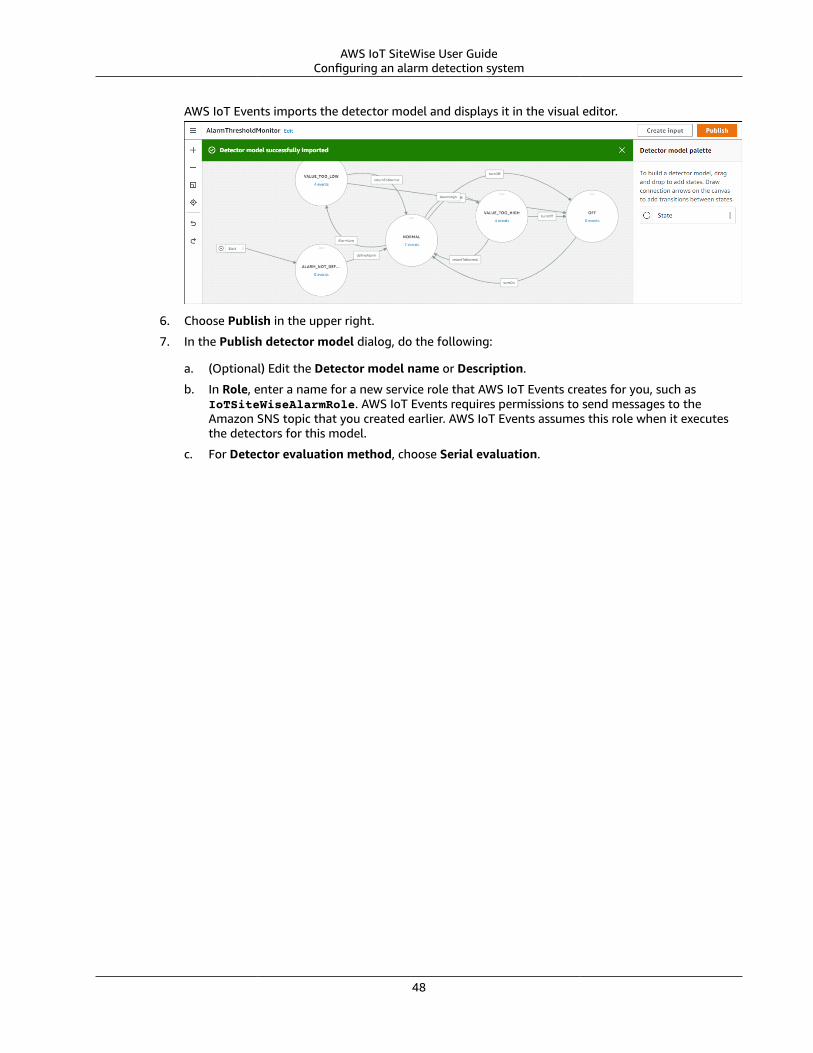
AWS IoT SiteWise User GuideConfiguring an alarm detection system
AWS IoT Events imports the detector model and displays it in the visual editor.
6. Choose Publish in the upper right.
7. In the Publish detector model dialog, do the following:
a. (Optional) Edit the Detector model name or Description.
b. In Role, enter a name for a new service role that AWS IoT Events creates for you, such asIoTSiteWiseAlarmRole. AWS IoT Events requires permissions to send messages to theAmazon SNS topic that you created earlier. AWS IoT Events assumes this role when it executesthe detectors for this model.
c. For Detector evaluation method, choose Serial evaluation.
48
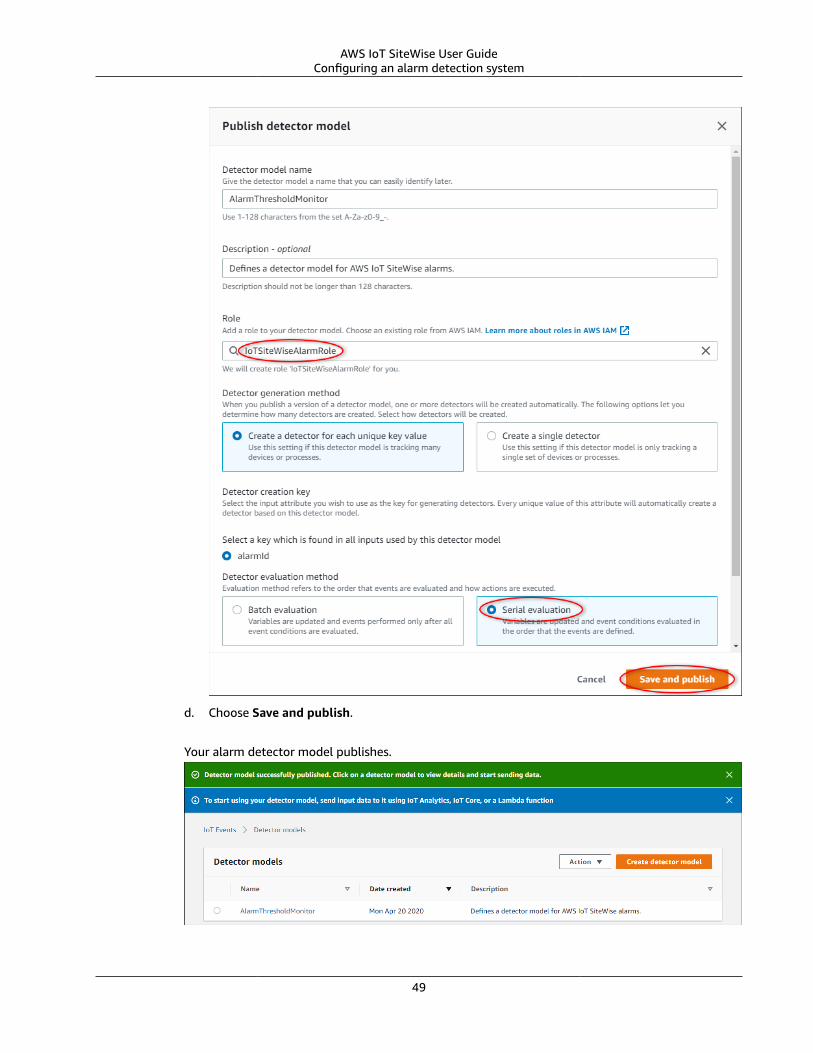
AWS IoT SiteWise User GuideConfiguring an alarm detection system
d. Choose Save and publish.
Your alarm detector model publishes.
49
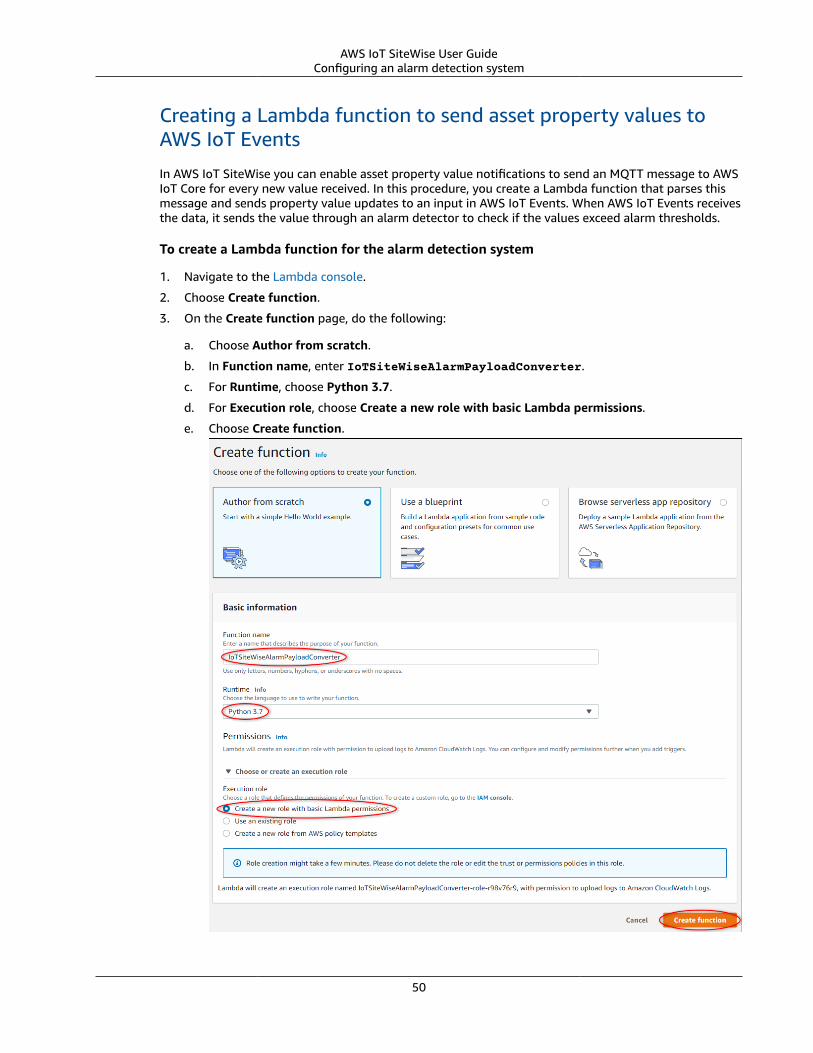
AWS IoT SiteWise User GuideConfiguring an alarm detection system
Creating a Lambda function to send asset property values toAWS IoT Events
In AWS IoT SiteWise you can enable asset property value notifications to send an MQTT message to AWSIoT Core for every new value received. In this procedure, you create a Lambda function that parses thismessage and sends property value updates to an input in AWS IoT Events. When AWS IoT Events receivesthe data, it sends the value through an alarm detector to check if the values exceed alarm thresholds.
To create a Lambda function for the alarm detection system
1. Navigate to the Lambda console.
2. Choose Create function.
3. On the Create function page, do the following:
a. Choose Author from scratch.
b. In Function name, enter IoTSiteWiseAlarmPayloadConverter.
c. For Runtime, choose Python 3.7.
d. For Execution role, choose Create a new role with basic Lambda permissions.
e. Choose Create function.
50

AWS IoT SiteWise User GuideConfiguring an alarm detection system
The page for your new function opens.
4. In the inline code editor under Function code, paste the following Lambda function code.
import boto3 import json import uuid # Flattens messages produced by AWS IoT SiteWise to feed to AWS IoT Events. def lambda_handler(event, context): print("Received raw message from AWS IoT Core.") messages = [] # Flatten the list of values from AWS IoT SiteWise into messages for AWS IoT Events. for value in event["values"]: # Include only good quality values. if value["quality"] == "GOOD": payload = { "alarmId": event["alarmId"] } if "doubleValue" in value["value"]: payload["propertyValue"] = float(value["value"]["doubleValue"]) elif "integerValue" in value["value"]: payload["propertyValue"] = int(value["value"]["integerValue"]) else: continue # Filter out non-numeric values. message = { "messageId": str(uuid.uuid4()), "inputName": "AlarmPropertyValue", "payload": json.dumps(payload) } messages.append(message) # Send the flattened messages to AWS IoT Events. iote_client = boto3.client("iotevents-data") response = iote_client.batch_put_message(messages=messages) status = int(response["ResponseMetadata"]["HTTPStatusCode"]) if status == 200: print("Successfully wrote %d values to AWS IoT Events." % (len(messages))) else: print("Failed to write values to AWS IoT Events. Status code: %d" % (status))
5. Choose Save.
Lambda requires permissions to send messages to AWS IoT Events when the function runs. In thisprocedure, you add the required permissions to the function's role so that Lambda can successfully runthe function.
51
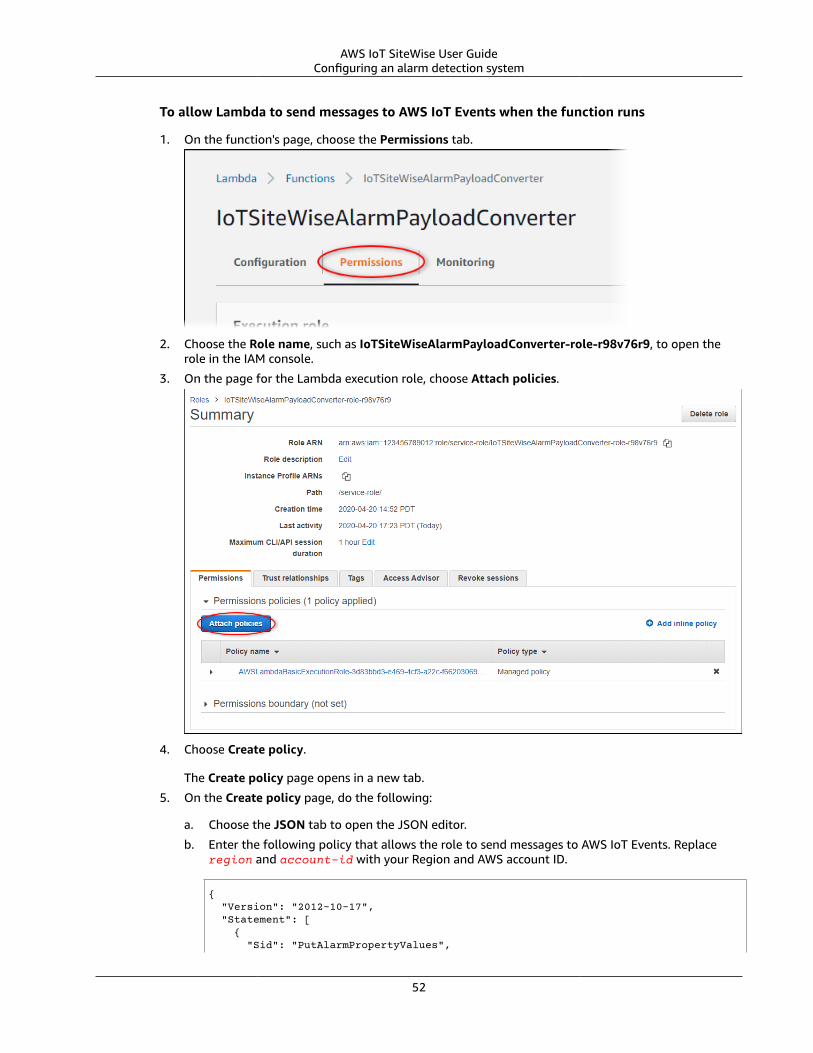
AWS IoT SiteWise User GuideConfiguring an alarm detection system
To allow Lambda to send messages to AWS IoT Events when the function runs
1. On the function's page, choose the Permissions tab.
2. Choose the Role name, such as IoTSiteWiseAlarmPayloadConverter-role-r98v76r9, to open therole in the IAM console.
3. On the page for the Lambda execution role, choose Attach policies.
4. Choose Create policy.
The Create policy page opens in a new tab.
5. On the Create policy page, do the following:
a. Choose the JSON tab to open the JSON editor.
b. Enter the following policy that allows the role to send messages to AWS IoT Events. Replaceregion and account-id with your Region and AWS account ID.
{ "Version": "2012-10-17", "Statement": [ { "Sid": "PutAlarmPropertyValues",
52
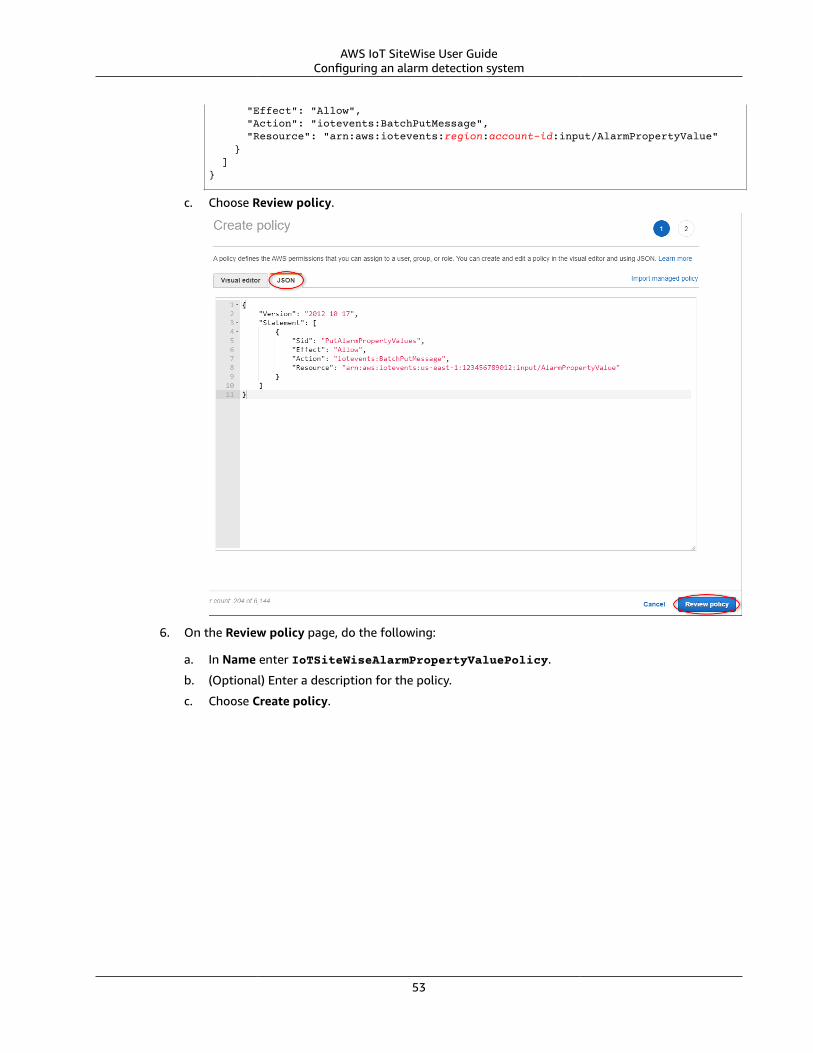
AWS IoT SiteWise User GuideConfiguring an alarm detection system
"Effect": "Allow", "Action": "iotevents:BatchPutMessage", "Resource": "arn:aws:iotevents:region:account-id:input/AlarmPropertyValue" } ]}
c. Choose Review policy.
6. On the Review policy page, do the following:
a. In Name enter IoTSiteWiseAlarmPropertyValuePolicy.
b. (Optional) Enter a description for the policy.
c. Choose Create policy.
53
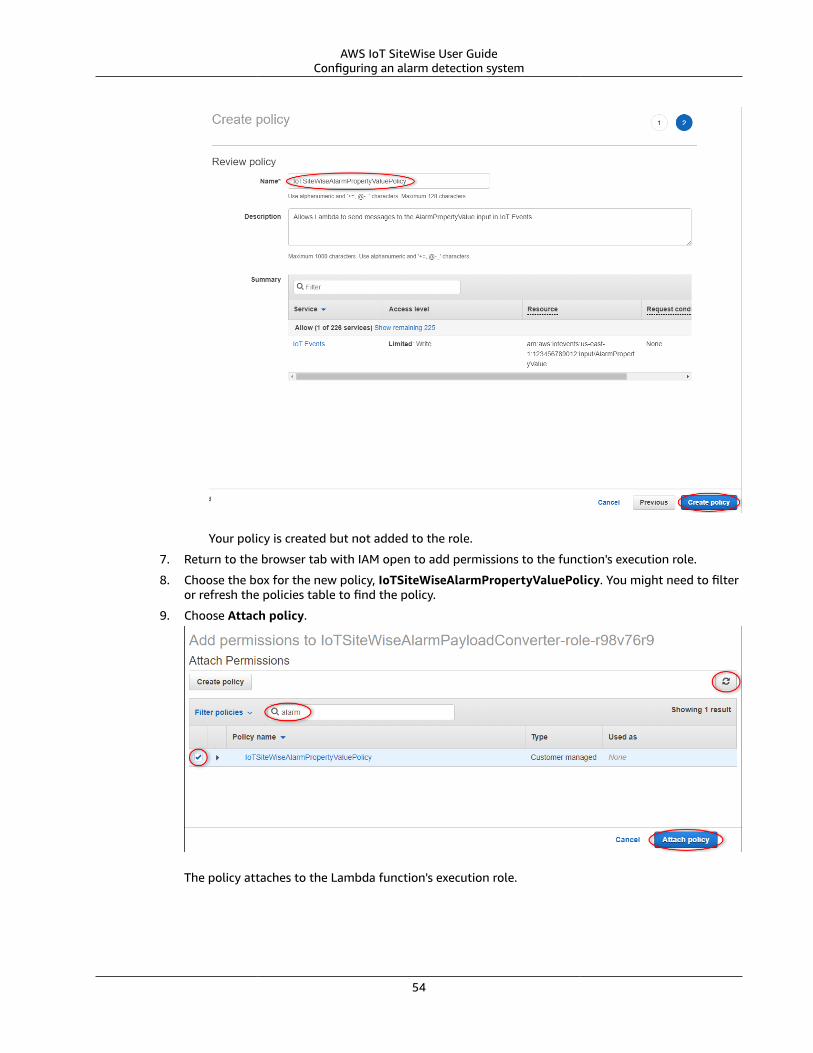
AWS IoT SiteWise User GuideConfiguring an alarm detection system
Your policy is created but not added to the role.
7. Return to the browser tab with IAM open to add permissions to the function's execution role.
8. Choose the box for the new policy, IoTSiteWiseAlarmPropertyValuePolicy. You might need to filteror refresh the policies table to find the policy.
9. Choose Attach policy.
The policy attaches to the Lambda function's execution role.
54
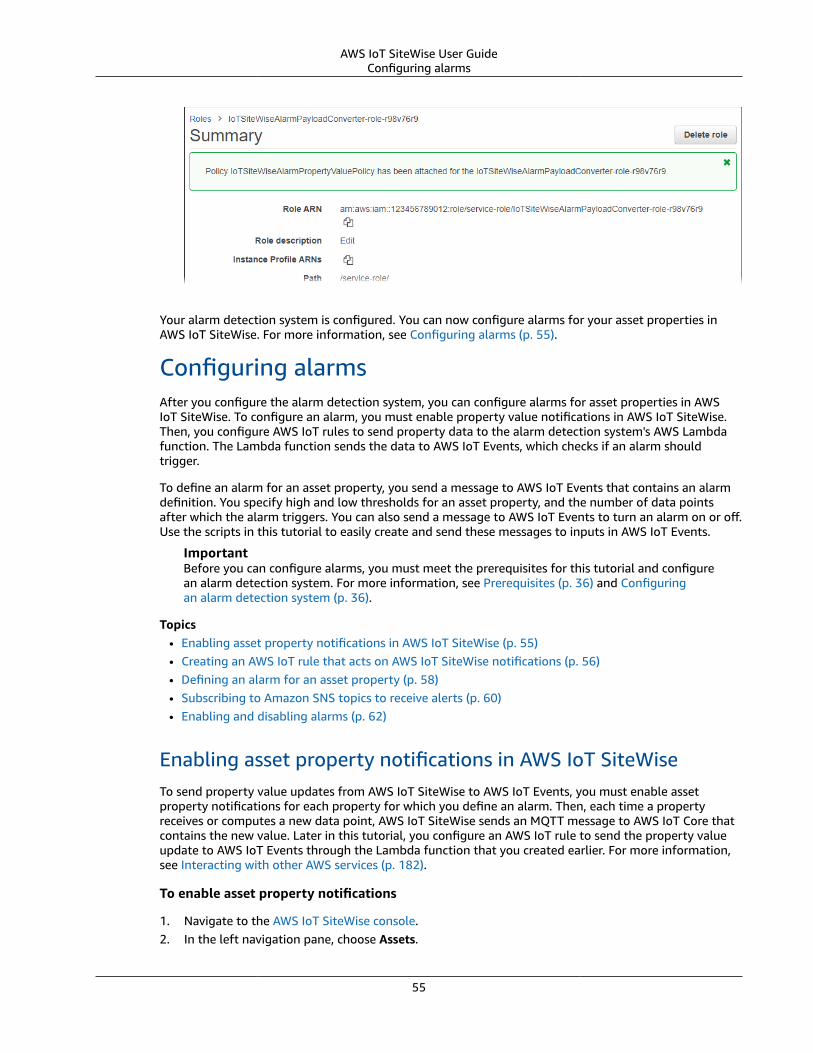
AWS IoT SiteWise User GuideConfiguring alarms
Your alarm detection system is configured. You can now configure alarms for your asset properties inAWS IoT SiteWise. For more information, see Configuring alarms (p. 55).
Configuring alarmsAfter you configure the alarm detection system, you can configure alarms for asset properties in AWSIoT SiteWise. To configure an alarm, you must enable property value notifications in AWS IoT SiteWise.Then, you configure AWS IoT rules to send property data to the alarm detection system's AWS Lambdafunction. The Lambda function sends the data to AWS IoT Events, which checks if an alarm shouldtrigger.
To define an alarm for an asset property, you send a message to AWS IoT Events that contains an alarmdefinition. You specify high and low thresholds for an asset property, and the number of data pointsafter which the alarm triggers. You can also send a message to AWS IoT Events to turn an alarm on or off.Use the scripts in this tutorial to easily create and send these messages to inputs in AWS IoT Events.
ImportantBefore you can configure alarms, you must meet the prerequisites for this tutorial and configurean alarm detection system. For more information, see Prerequisites (p. 36) and Configuringan alarm detection system (p. 36).
Topics• Enabling asset property notifications in AWS IoT SiteWise (p. 55)• Creating an AWS IoT rule that acts on AWS IoT SiteWise notifications (p. 56)• Defining an alarm for an asset property (p. 58)• Subscribing to Amazon SNS topics to receive alerts (p. 60)• Enabling and disabling alarms (p. 62)
Enabling asset property notifications in AWS IoT SiteWiseTo send property value updates from AWS IoT SiteWise to AWS IoT Events, you must enable assetproperty notifications for each property for which you define an alarm. Then, each time a propertyreceives or computes a new data point, AWS IoT SiteWise sends an MQTT message to AWS IoT Core thatcontains the new value. Later in this tutorial, you configure an AWS IoT rule to send the property valueupdate to AWS IoT Events through the Lambda function that you created earlier. For more information,see Interacting with other AWS services (p. 182).
To enable asset property notifications
1. Navigate to the AWS IoT SiteWise console.2. In the left navigation pane, choose Assets.
55
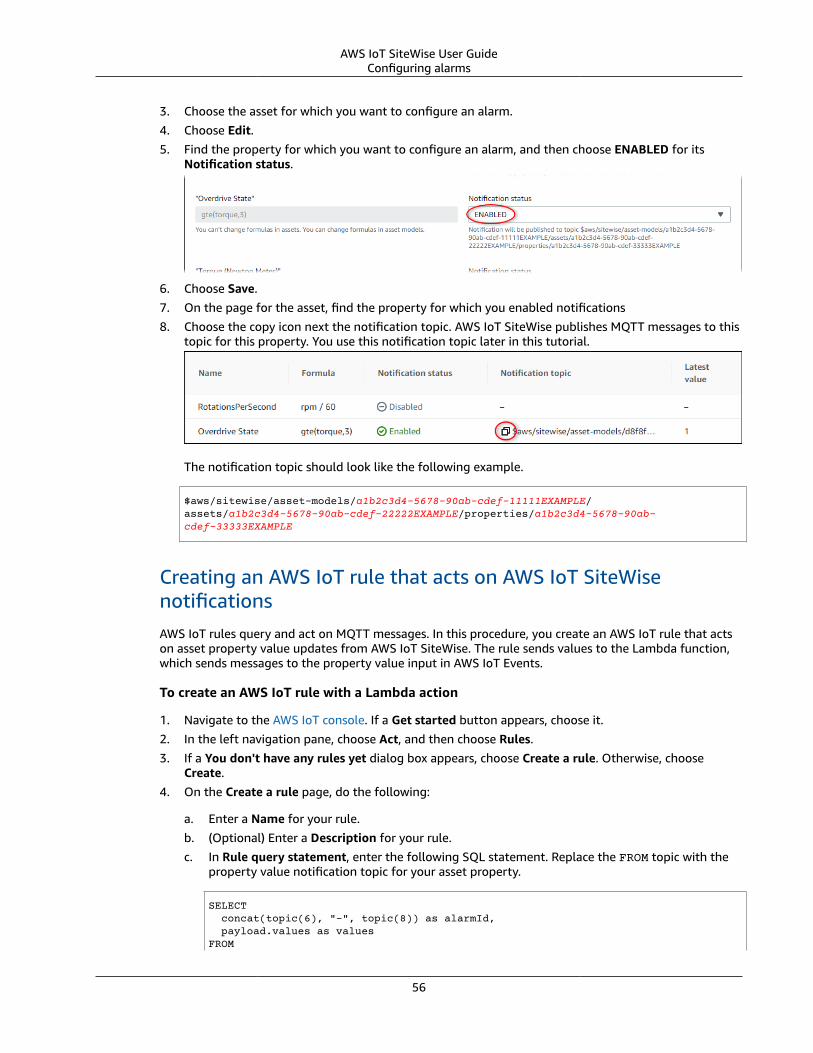
AWS IoT SiteWise User GuideConfiguring alarms
3. Choose the asset for which you want to configure an alarm.4. Choose Edit.5. Find the property for which you want to configure an alarm, and then choose ENABLED for its
Notification status.
6. Choose Save.7. On the page for the asset, find the property for which you enabled notifications8. Choose the copy icon next the notification topic. AWS IoT SiteWise publishes MQTT messages to this
topic for this property. You use this notification topic later in this tutorial.
The notification topic should look like the following example.
$aws/sitewise/asset-models/a1b2c3d4-5678-90ab-cdef-11111EXAMPLE/assets/a1b2c3d4-5678-90ab-cdef-22222EXAMPLE/properties/a1b2c3d4-5678-90ab-cdef-33333EXAMPLE
Creating an AWS IoT rule that acts on AWS IoT SiteWisenotificationsAWS IoT rules query and act on MQTT messages. In this procedure, you create an AWS IoT rule that actson asset property value updates from AWS IoT SiteWise. The rule sends values to the Lambda function,which sends messages to the property value input in AWS IoT Events.
To create an AWS IoT rule with a Lambda action
1. Navigate to the AWS IoT console. If a Get started button appears, choose it.2. In the left navigation pane, choose Act, and then choose Rules.3. If a You don't have any rules yet dialog box appears, choose Create a rule. Otherwise, choose
Create.4. On the Create a rule page, do the following:
a. Enter a Name for your rule.b. (Optional) Enter a Description for your rule.c. In Rule query statement, enter the following SQL statement. Replace the FROM topic with the
property value notification topic for your asset property.
SELECT concat(topic(6), "-", topic(8)) as alarmId, payload.values as valuesFROM
56
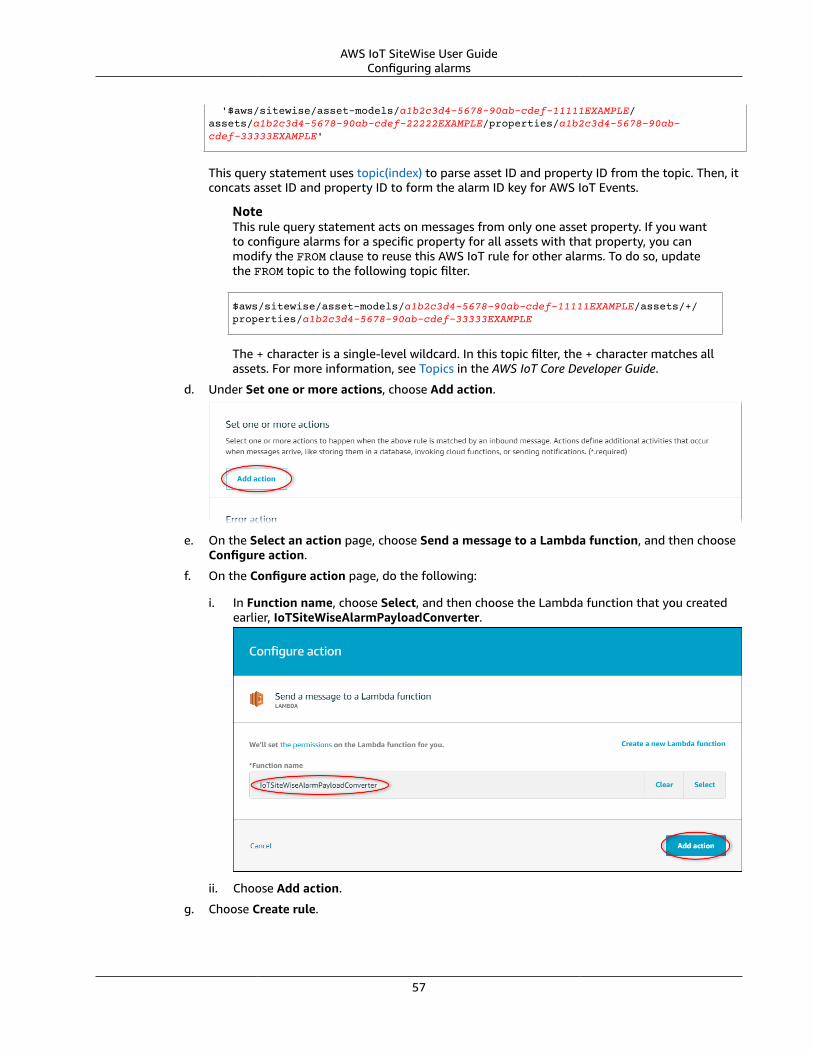
AWS IoT SiteWise User GuideConfiguring alarms
'$aws/sitewise/asset-models/a1b2c3d4-5678-90ab-cdef-11111EXAMPLE/assets/a1b2c3d4-5678-90ab-cdef-22222EXAMPLE/properties/a1b2c3d4-5678-90ab-cdef-33333EXAMPLE'
This query statement uses topic(index) to parse asset ID and property ID from the topic. Then, itconcats asset ID and property ID to form the alarm ID key for AWS IoT Events.
NoteThis rule query statement acts on messages from only one asset property. If you wantto configure alarms for a specific property for all assets with that property, you canmodify the FROM clause to reuse this AWS IoT rule for other alarms. To do so, updatethe FROM topic to the following topic filter.
$aws/sitewise/asset-models/a1b2c3d4-5678-90ab-cdef-11111EXAMPLE/assets/+/properties/a1b2c3d4-5678-90ab-cdef-33333EXAMPLE
The + character is a single-level wildcard. In this topic filter, the + character matches allassets. For more information, see Topics in the AWS IoT Core Developer Guide.
d. Under Set one or more actions, choose Add action.
e. On the Select an action page, choose Send a message to a Lambda function, and then chooseConfigure action.
f. On the Configure action page, do the following:
i. In Function name, choose Select, and then choose the Lambda function that you createdearlier, IoTSiteWiseAlarmPayloadConverter.
ii. Choose Add action.
g. Choose Create rule.
57
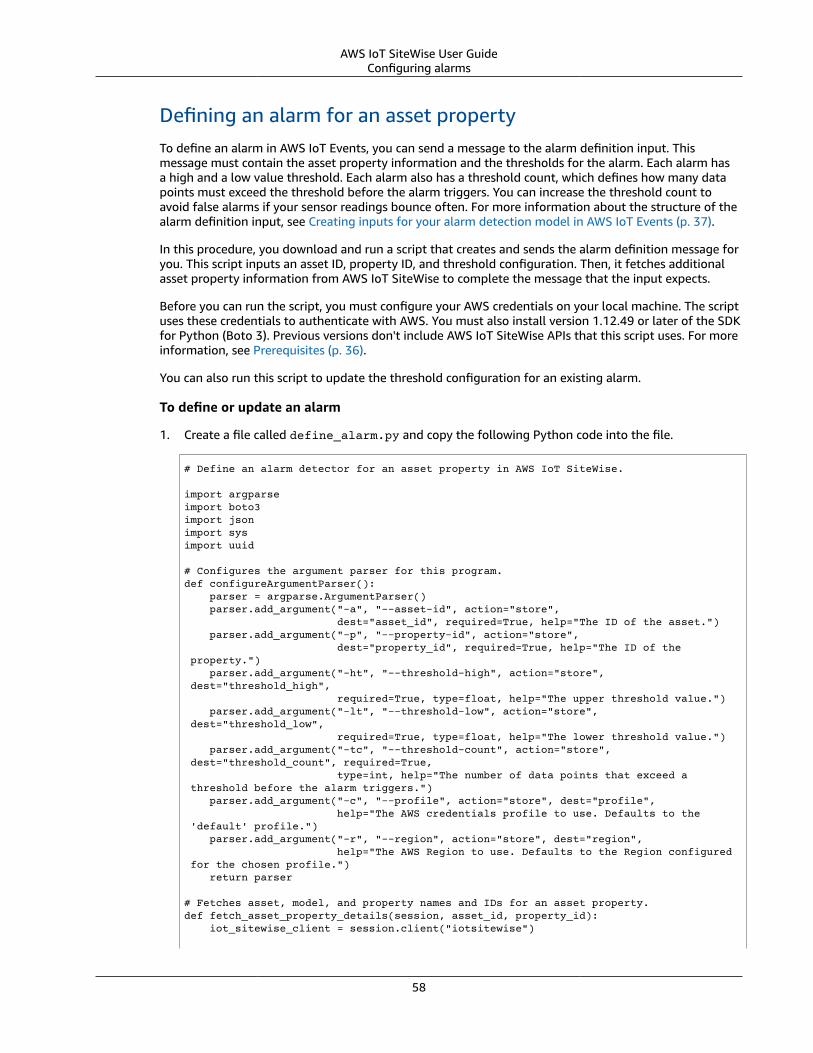
AWS IoT SiteWise User GuideConfiguring alarms
Defining an alarm for an asset propertyTo define an alarm in AWS IoT Events, you can send a message to the alarm definition input. Thismessage must contain the asset property information and the thresholds for the alarm. Each alarm hasa high and a low value threshold. Each alarm also has a threshold count, which defines how many datapoints must exceed the threshold before the alarm triggers. You can increase the threshold count toavoid false alarms if your sensor readings bounce often. For more information about the structure of thealarm definition input, see Creating inputs for your alarm detection model in AWS IoT Events (p. 37).
In this procedure, you download and run a script that creates and sends the alarm definition message foryou. This script inputs an asset ID, property ID, and threshold configuration. Then, it fetches additionalasset property information from AWS IoT SiteWise to complete the message that the input expects.
Before you can run the script, you must configure your AWS credentials on your local machine. The scriptuses these credentials to authenticate with AWS. You must also install version 1.12.49 or later of the SDKfor Python (Boto 3). Previous versions don't include AWS IoT SiteWise APIs that this script uses. For moreinformation, see Prerequisites (p. 36).
You can also run this script to update the threshold configuration for an existing alarm.
To define or update an alarm
1. Create a file called define_alarm.py and copy the following Python code into the file.
# Define an alarm detector for an asset property in AWS IoT SiteWise. import argparse import boto3 import json import sys import uuid # Configures the argument parser for this program. def configureArgumentParser(): parser = argparse.ArgumentParser() parser.add_argument("-a", "--asset-id", action="store", dest="asset_id", required=True, help="The ID of the asset.") parser.add_argument("-p", "--property-id", action="store", dest="property_id", required=True, help="The ID of the property.") parser.add_argument("-ht", "--threshold-high", action="store", dest="threshold_high", required=True, type=float, help="The upper threshold value.") parser.add_argument("-lt", "--threshold-low", action="store", dest="threshold_low", required=True, type=float, help="The lower threshold value.") parser.add_argument("-tc", "--threshold-count", action="store", dest="threshold_count", required=True, type=int, help="The number of data points that exceed a threshold before the alarm triggers.") parser.add_argument("-c", "--profile", action="store", dest="profile", help="The AWS credentials profile to use. Defaults to the 'default' profile.") parser.add_argument("-r", "--region", action="store", dest="region", help="The AWS Region to use. Defaults to the Region configured for the chosen profile.") return parser # Fetches asset, model, and property names and IDs for an asset property. def fetch_asset_property_details(session, asset_id, property_id): iot_sitewise_client = session.client("iotsitewise")
58
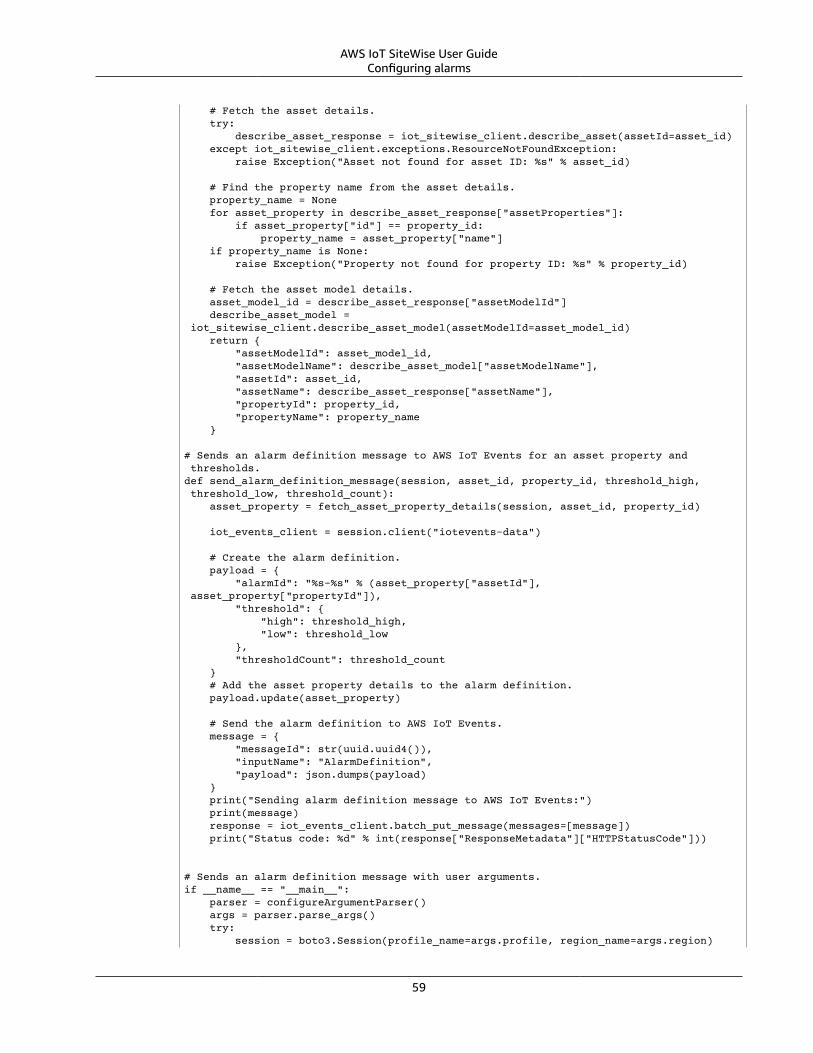
AWS IoT SiteWise User GuideConfiguring alarms
# Fetch the asset details. try: describe_asset_response = iot_sitewise_client.describe_asset(assetId=asset_id) except iot_sitewise_client.exceptions.ResourceNotFoundException: raise Exception("Asset not found for asset ID: %s" % asset_id) # Find the property name from the asset details. property_name = None for asset_property in describe_asset_response["assetProperties"]: if asset_property["id"] == property_id: property_name = asset_property["name"] if property_name is None: raise Exception("Property not found for property ID: %s" % property_id) # Fetch the asset model details. asset_model_id = describe_asset_response["assetModelId"] describe_asset_model = iot_sitewise_client.describe_asset_model(assetModelId=asset_model_id) return { "assetModelId": asset_model_id, "assetModelName": describe_asset_model["assetModelName"], "assetId": asset_id, "assetName": describe_asset_response["assetName"], "propertyId": property_id, "propertyName": property_name } # Sends an alarm definition message to AWS IoT Events for an asset property and thresholds. def send_alarm_definition_message(session, asset_id, property_id, threshold_high, threshold_low, threshold_count): asset_property = fetch_asset_property_details(session, asset_id, property_id) iot_events_client = session.client("iotevents-data") # Create the alarm definition. payload = { "alarmId": "%s-%s" % (asset_property["assetId"], asset_property["propertyId"]), "threshold": { "high": threshold_high, "low": threshold_low }, "thresholdCount": threshold_count } # Add the asset property details to the alarm definition. payload.update(asset_property) # Send the alarm definition to AWS IoT Events. message = { "messageId": str(uuid.uuid4()), "inputName": "AlarmDefinition", "payload": json.dumps(payload) } print("Sending alarm definition message to AWS IoT Events:") print(message) response = iot_events_client.batch_put_message(messages=[message]) print("Status code: %d" % int(response["ResponseMetadata"]["HTTPStatusCode"])) # Sends an alarm definition message with user arguments. if __name__ == "__main__": parser = configureArgumentParser() args = parser.parse_args() try: session = boto3.Session(profile_name=args.profile, region_name=args.region)
59
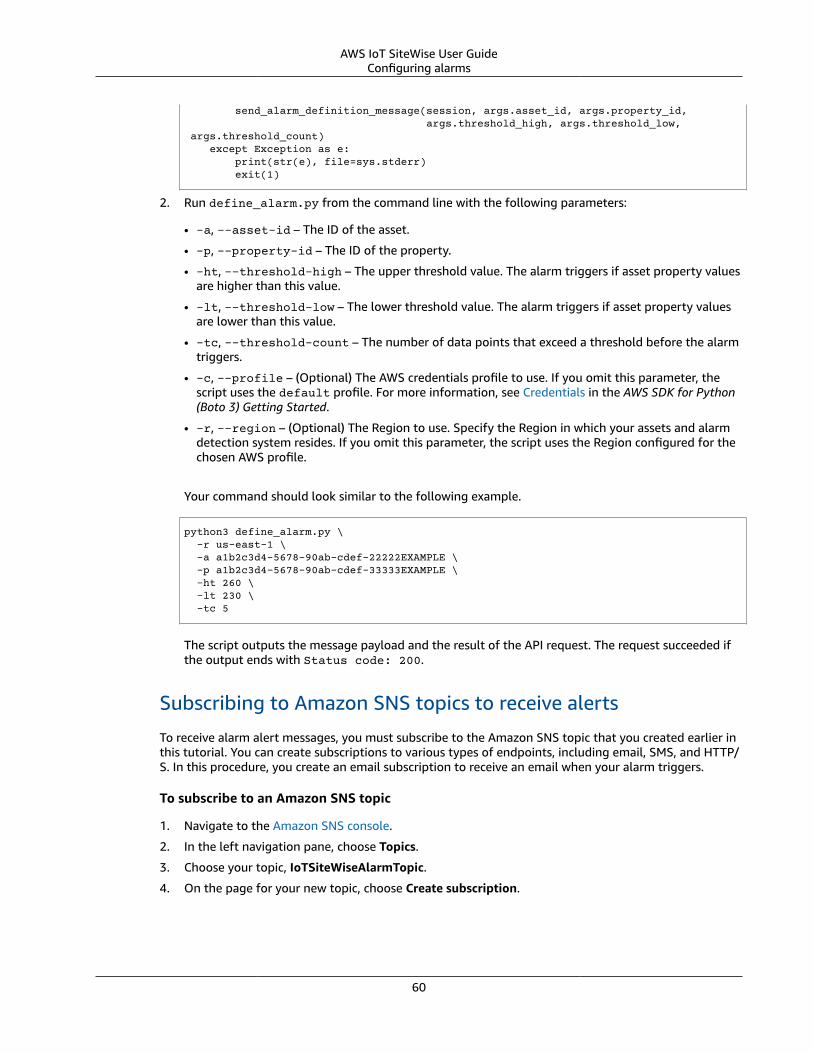
AWS IoT SiteWise User GuideConfiguring alarms
send_alarm_definition_message(session, args.asset_id, args.property_id, args.threshold_high, args.threshold_low, args.threshold_count) except Exception as e: print(str(e), file=sys.stderr) exit(1)
2. Run define_alarm.py from the command line with the following parameters:
• -a, --asset-id – The ID of the asset.
• -p, --property-id – The ID of the property.
• -ht, --threshold-high – The upper threshold value. The alarm triggers if asset property valuesare higher than this value.
• -lt, --threshold-low – The lower threshold value. The alarm triggers if asset property valuesare lower than this value.
• -tc, --threshold-count – The number of data points that exceed a threshold before the alarmtriggers.
• -c, --profile – (Optional) The AWS credentials profile to use. If you omit this parameter, thescript uses the default profile. For more information, see Credentials in the AWS SDK for Python(Boto 3) Getting Started.
• -r, --region – (Optional) The Region to use. Specify the Region in which your assets and alarmdetection system resides. If you omit this parameter, the script uses the Region configured for thechosen AWS profile.
Your command should look similar to the following example.
python3 define_alarm.py \ -r us-east-1 \ -a a1b2c3d4-5678-90ab-cdef-22222EXAMPLE \ -p a1b2c3d4-5678-90ab-cdef-33333EXAMPLE \ -ht 260 \ -lt 230 \ -tc 5
The script outputs the message payload and the result of the API request. The request succeeded ifthe output ends with Status code: 200.
Subscribing to Amazon SNS topics to receive alerts
To receive alarm alert messages, you must subscribe to the Amazon SNS topic that you created earlier inthis tutorial. You can create subscriptions to various types of endpoints, including email, SMS, and HTTP/S. In this procedure, you create an email subscription to receive an email when your alarm triggers.
To subscribe to an Amazon SNS topic
1. Navigate to the Amazon SNS console.
2. In the left navigation pane, choose Topics.
3. Choose your topic, IoTSiteWiseAlarmTopic.
4. On the page for your new topic, choose Create subscription.
60
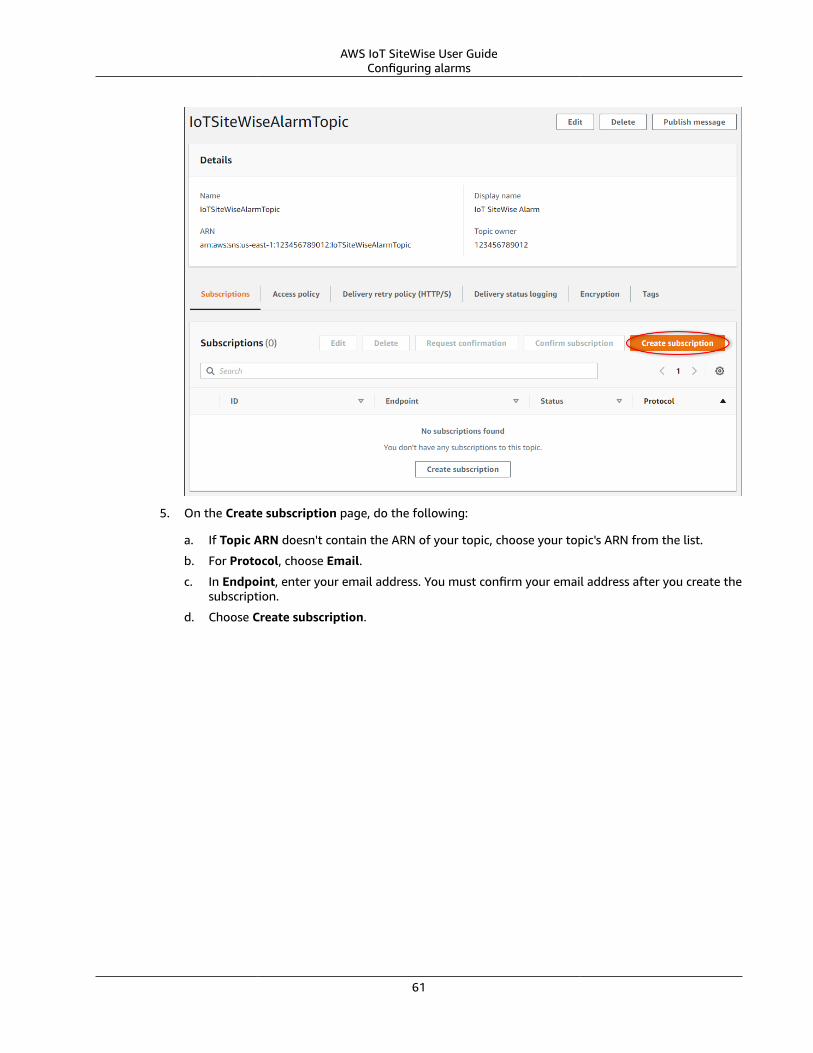
AWS IoT SiteWise User GuideConfiguring alarms
5. On the Create subscription page, do the following:
a. If Topic ARN doesn't contain the ARN of your topic, choose your topic's ARN from the list.
b. For Protocol, choose Email.
c. In Endpoint, enter your email address. You must confirm your email address after you create thesubscription.
d. Choose Create subscription.
61
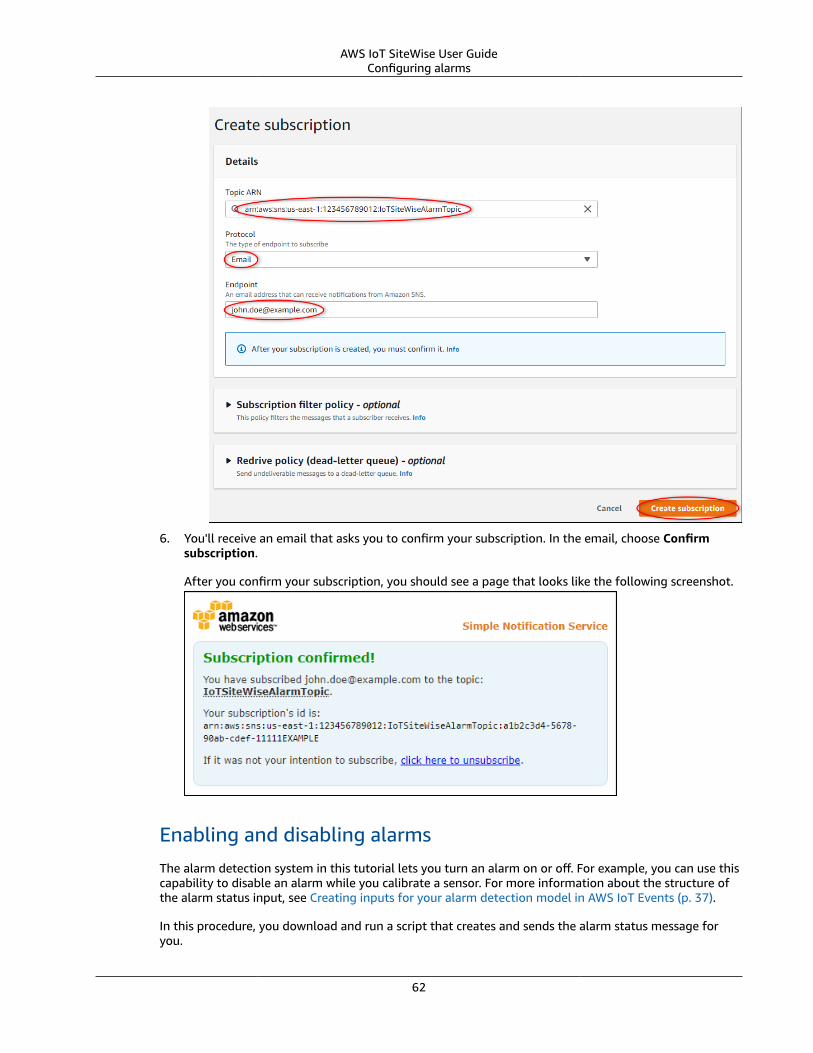
AWS IoT SiteWise User GuideConfiguring alarms
6. You'll receive an email that asks you to confirm your subscription. In the email, choose Confirmsubscription.
After you confirm your subscription, you should see a page that looks like the following screenshot.
Enabling and disabling alarmsThe alarm detection system in this tutorial lets you turn an alarm on or off. For example, you can use thiscapability to disable an alarm while you calibrate a sensor. For more information about the structure ofthe alarm status input, see Creating inputs for your alarm detection model in AWS IoT Events (p. 37).
In this procedure, you download and run a script that creates and sends the alarm status message foryou.
62
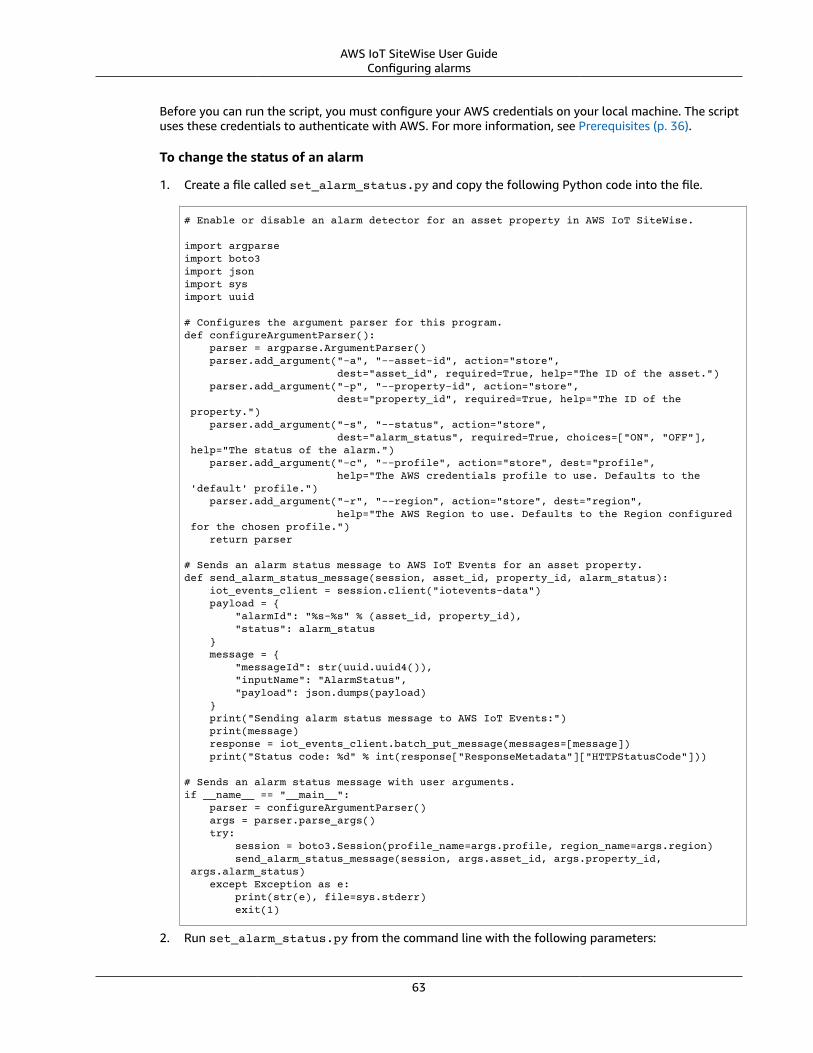
AWS IoT SiteWise User GuideConfiguring alarms
Before you can run the script, you must configure your AWS credentials on your local machine. The scriptuses these credentials to authenticate with AWS. For more information, see Prerequisites (p. 36).
To change the status of an alarm
1. Create a file called set_alarm_status.py and copy the following Python code into the file.
# Enable or disable an alarm detector for an asset property in AWS IoT SiteWise. import argparse import boto3 import json import sys import uuid # Configures the argument parser for this program. def configureArgumentParser(): parser = argparse.ArgumentParser() parser.add_argument("-a", "--asset-id", action="store", dest="asset_id", required=True, help="The ID of the asset.") parser.add_argument("-p", "--property-id", action="store", dest="property_id", required=True, help="The ID of the property.") parser.add_argument("-s", "--status", action="store", dest="alarm_status", required=True, choices=["ON", "OFF"], help="The status of the alarm.") parser.add_argument("-c", "--profile", action="store", dest="profile", help="The AWS credentials profile to use. Defaults to the 'default' profile.") parser.add_argument("-r", "--region", action="store", dest="region", help="The AWS Region to use. Defaults to the Region configured for the chosen profile.") return parser # Sends an alarm status message to AWS IoT Events for an asset property. def send_alarm_status_message(session, asset_id, property_id, alarm_status): iot_events_client = session.client("iotevents-data") payload = { "alarmId": "%s-%s" % (asset_id, property_id), "status": alarm_status } message = { "messageId": str(uuid.uuid4()), "inputName": "AlarmStatus", "payload": json.dumps(payload) } print("Sending alarm status message to AWS IoT Events:") print(message) response = iot_events_client.batch_put_message(messages=[message]) print("Status code: %d" % int(response["ResponseMetadata"]["HTTPStatusCode"])) # Sends an alarm status message with user arguments. if __name__ == "__main__": parser = configureArgumentParser() args = parser.parse_args() try: session = boto3.Session(profile_name=args.profile, region_name=args.region) send_alarm_status_message(session, args.asset_id, args.property_id, args.alarm_status) except Exception as e: print(str(e), file=sys.stderr) exit(1)
2. Run set_alarm_status.py from the command line with the following parameters:
63
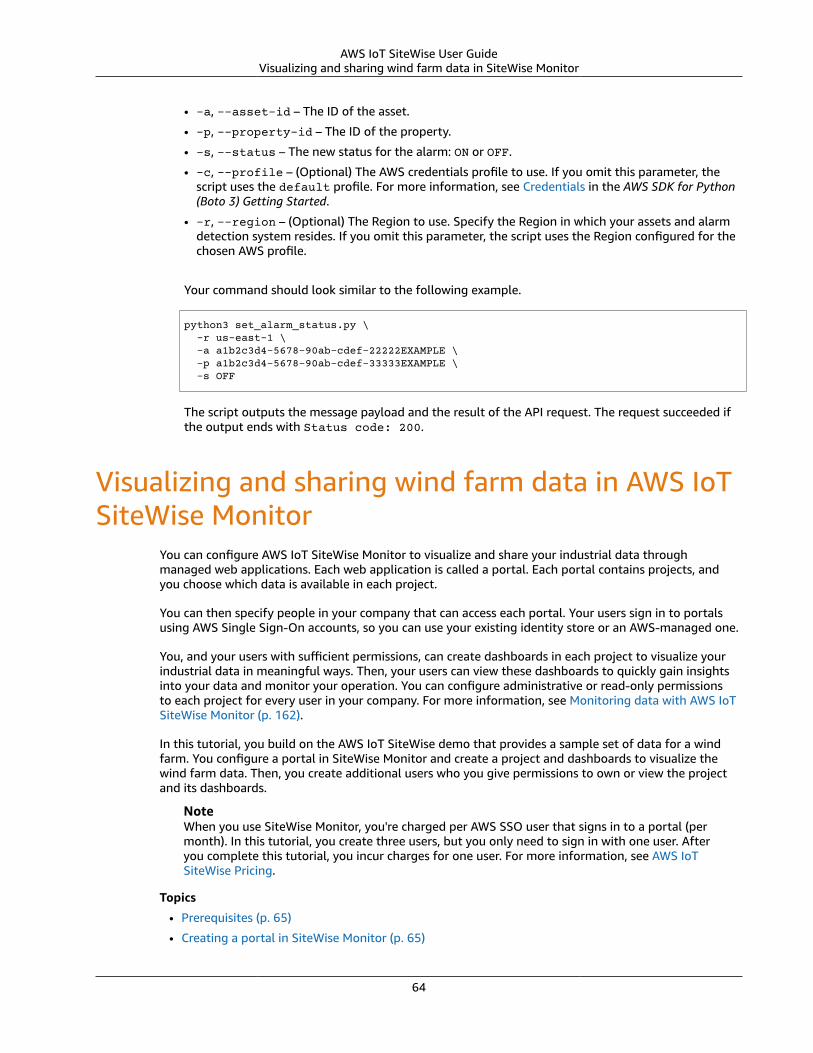
AWS IoT SiteWise User GuideVisualizing and sharing wind farm data in SiteWise Monitor
• -a, --asset-id – The ID of the asset.
• -p, --property-id – The ID of the property.
• -s, --status – The new status for the alarm: ON or OFF.
• -c, --profile – (Optional) The AWS credentials profile to use. If you omit this parameter, thescript uses the default profile. For more information, see Credentials in the AWS SDK for Python(Boto 3) Getting Started.
• -r, --region – (Optional) The Region to use. Specify the Region in which your assets and alarmdetection system resides. If you omit this parameter, the script uses the Region configured for thechosen AWS profile.
Your command should look similar to the following example.
python3 set_alarm_status.py \ -r us-east-1 \ -a a1b2c3d4-5678-90ab-cdef-22222EXAMPLE \ -p a1b2c3d4-5678-90ab-cdef-33333EXAMPLE \ -s OFF
The script outputs the message payload and the result of the API request. The request succeeded ifthe output ends with Status code: 200.
Visualizing and sharing wind farm data in AWS IoTSiteWise Monitor
You can configure AWS IoT SiteWise Monitor to visualize and share your industrial data throughmanaged web applications. Each web application is called a portal. Each portal contains projects, andyou choose which data is available in each project.
You can then specify people in your company that can access each portal. Your users sign in to portalsusing AWS Single Sign-On accounts, so you can use your existing identity store or an AWS-managed one.
You, and your users with sufficient permissions, can create dashboards in each project to visualize yourindustrial data in meaningful ways. Then, your users can view these dashboards to quickly gain insightsinto your data and monitor your operation. You can configure administrative or read-only permissionsto each project for every user in your company. For more information, see Monitoring data with AWS IoTSiteWise Monitor (p. 162).
In this tutorial, you build on the AWS IoT SiteWise demo that provides a sample set of data for a windfarm. You configure a portal in SiteWise Monitor and create a project and dashboards to visualize thewind farm data. Then, you create additional users who you give permissions to own or view the projectand its dashboards.
NoteWhen you use SiteWise Monitor, you're charged per AWS SSO user that signs in to a portal (permonth). In this tutorial, you create three users, but you only need to sign in with one user. Afteryou complete this tutorial, you incur charges for one user. For more information, see AWS IoTSiteWise Pricing.
Topics
• Prerequisites (p. 65)
• Creating a portal in SiteWise Monitor (p. 65)
64
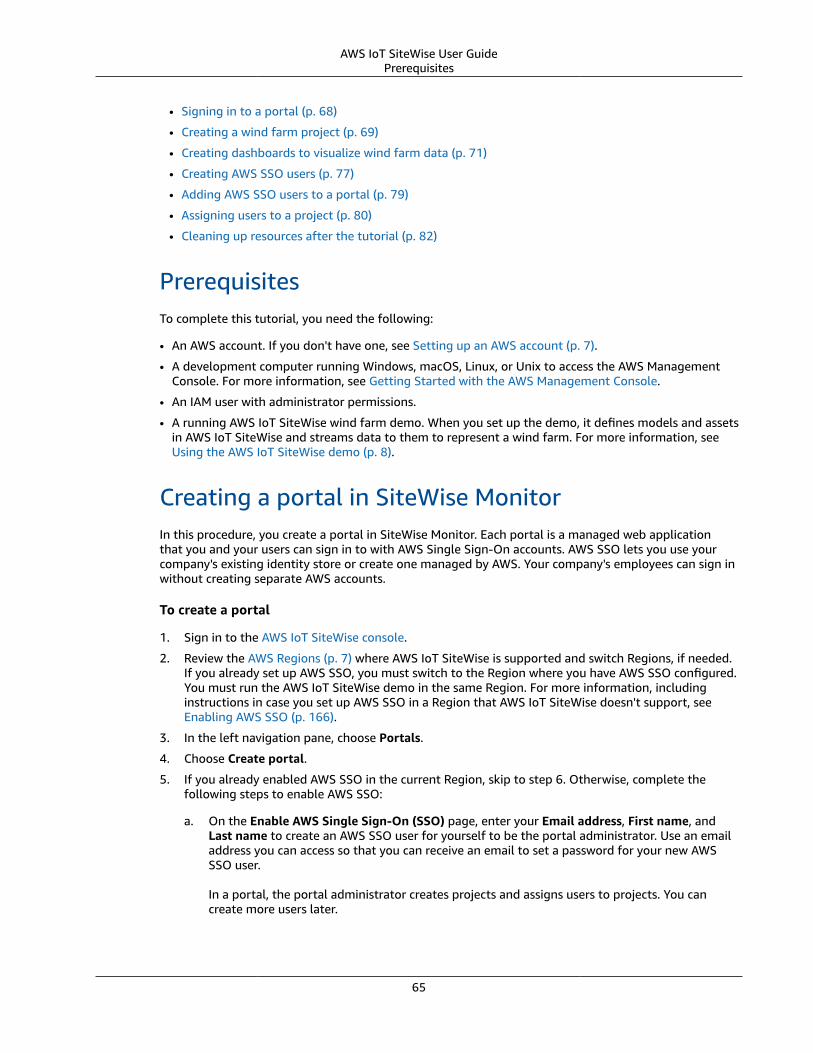
AWS IoT SiteWise User GuidePrerequisites
• Signing in to a portal (p. 68)
• Creating a wind farm project (p. 69)
• Creating dashboards to visualize wind farm data (p. 71)
• Creating AWS SSO users (p. 77)
• Adding AWS SSO users to a portal (p. 79)
• Assigning users to a project (p. 80)
• Cleaning up resources after the tutorial (p. 82)
PrerequisitesTo complete this tutorial, you need the following:
• An AWS account. If you don't have one, see Setting up an AWS account (p. 7).
• A development computer running Windows, macOS, Linux, or Unix to access the AWS ManagementConsole. For more information, see Getting Started with the AWS Management Console.
• An IAM user with administrator permissions.
• A running AWS IoT SiteWise wind farm demo. When you set up the demo, it defines models and assetsin AWS IoT SiteWise and streams data to them to represent a wind farm. For more information, seeUsing the AWS IoT SiteWise demo (p. 8).
Creating a portal in SiteWise MonitorIn this procedure, you create a portal in SiteWise Monitor. Each portal is a managed web applicationthat you and your users can sign in to with AWS Single Sign-On accounts. AWS SSO lets you use yourcompany's existing identity store or create one managed by AWS. Your company's employees can sign inwithout creating separate AWS accounts.
To create a portal
1. Sign in to the AWS IoT SiteWise console.
2. Review the AWS Regions (p. 7) where AWS IoT SiteWise is supported and switch Regions, if needed.If you already set up AWS SSO, you must switch to the Region where you have AWS SSO configured.You must run the AWS IoT SiteWise demo in the same Region. For more information, includinginstructions in case you set up AWS SSO in a Region that AWS IoT SiteWise doesn't support, seeEnabling AWS SSO (p. 166).
3. In the left navigation pane, choose Portals.
4. Choose Create portal.
5. If you already enabled AWS SSO in the current Region, skip to step 6. Otherwise, complete thefollowing steps to enable AWS SSO:
a. On the Enable AWS Single Sign-On (SSO) page, enter your Email address, First name, andLast name to create an AWS SSO user for yourself to be the portal administrator. Use an emailaddress you can access so that you can receive an email to set a password for your new AWSSSO user.
In a portal, the portal administrator creates projects and assigns users to projects. You cancreate more users later.
65
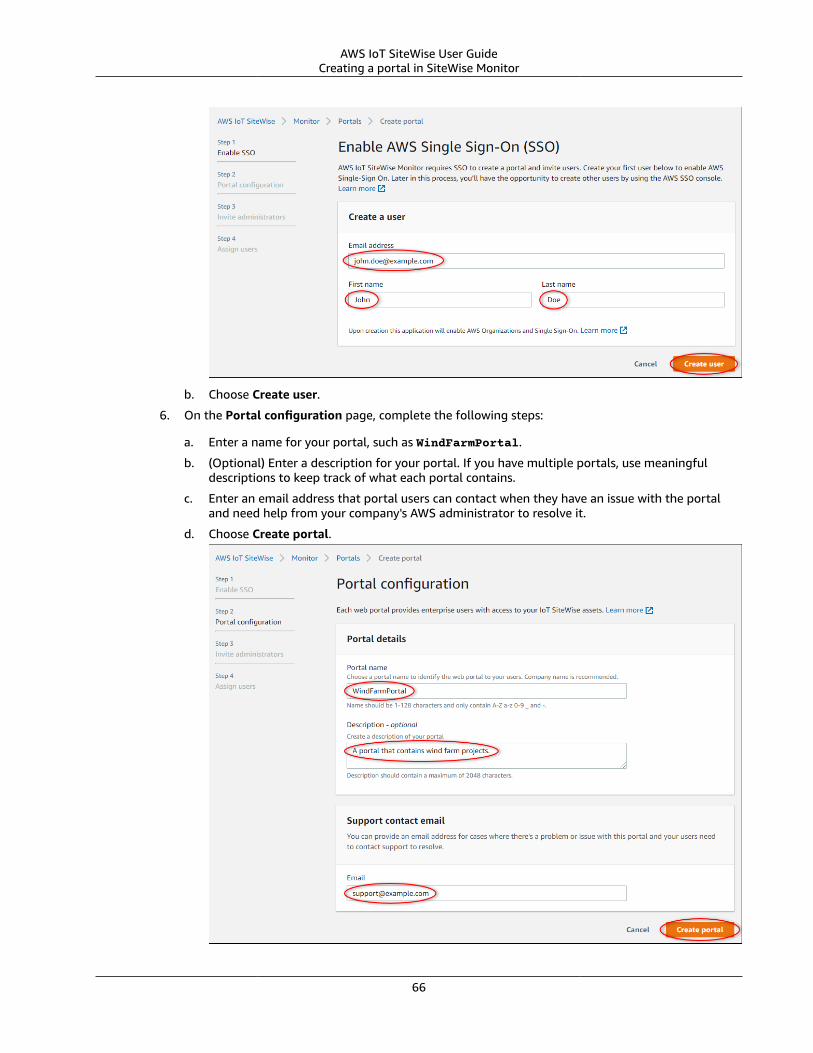
AWS IoT SiteWise User GuideCreating a portal in SiteWise Monitor
b. Choose Create user.
6. On the Portal configuration page, complete the following steps:
a. Enter a name for your portal, such as WindFarmPortal.
b. (Optional) Enter a description for your portal. If you have multiple portals, use meaningfuldescriptions to keep track of what each portal contains.
c. Enter an email address that portal users can contact when they have an issue with the portaland need help from your company's AWS administrator to resolve it.
d. Choose Create portal.
66
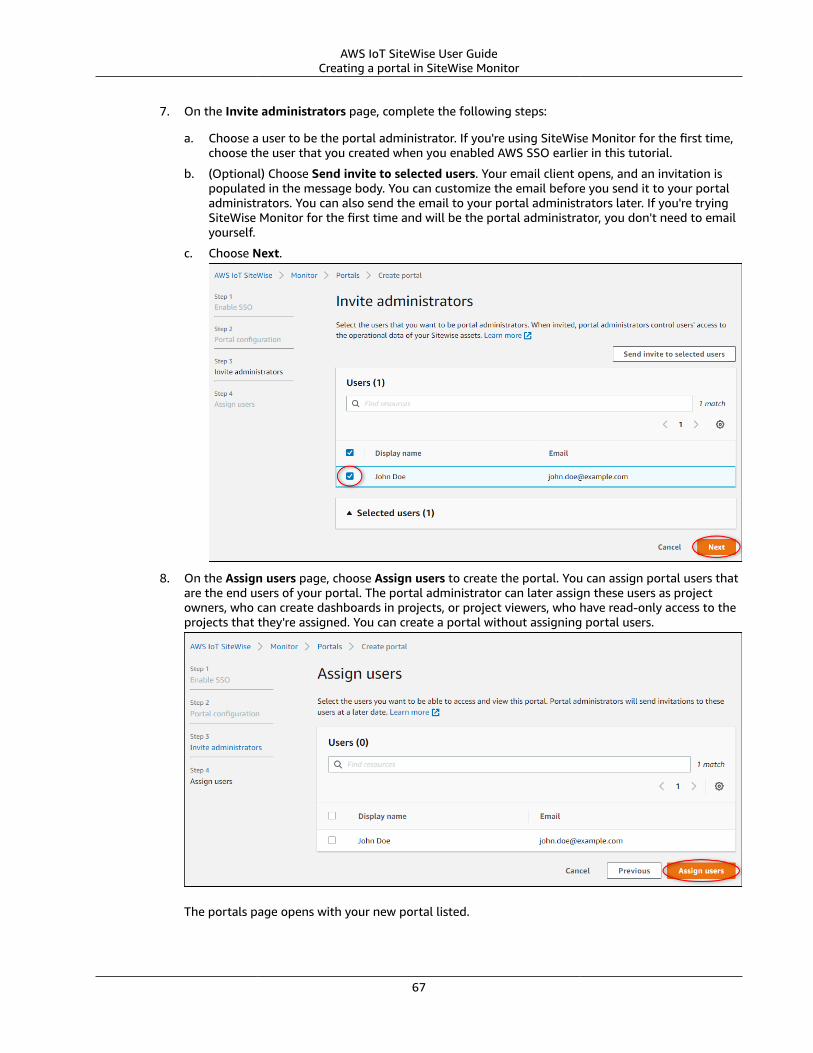
AWS IoT SiteWise User GuideCreating a portal in SiteWise Monitor
7. On the Invite administrators page, complete the following steps:
a. Choose a user to be the portal administrator. If you're using SiteWise Monitor for the first time,choose the user that you created when you enabled AWS SSO earlier in this tutorial.
b. (Optional) Choose Send invite to selected users. Your email client opens, and an invitation ispopulated in the message body. You can customize the email before you send it to your portaladministrators. You can also send the email to your portal administrators later. If you're tryingSiteWise Monitor for the first time and will be the portal administrator, you don't need to emailyourself.
c. Choose Next.
8. On the Assign users page, choose Assign users to create the portal. You can assign portal users thatare the end users of your portal. The portal administrator can later assign these users as projectowners, who can create dashboards in projects, or project viewers, who have read-only access to theprojects that they're assigned. You can create a portal without assigning portal users.
The portals page opens with your new portal listed.
67
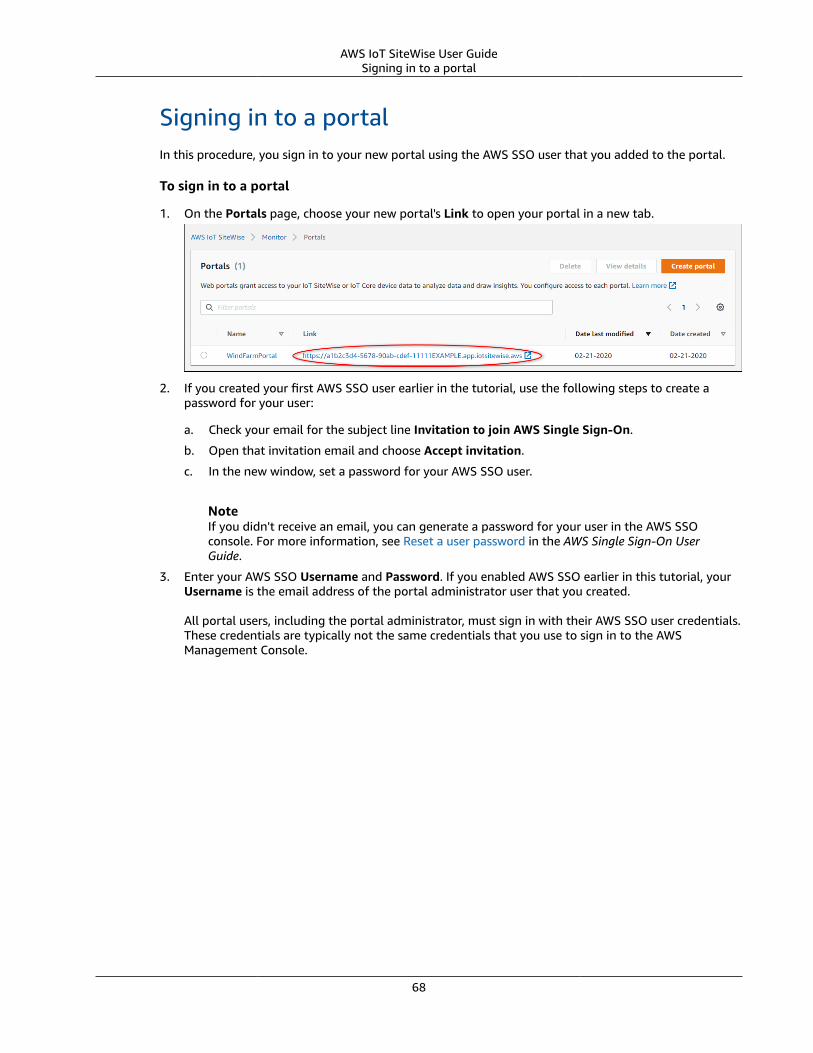
AWS IoT SiteWise User GuideSigning in to a portal
Signing in to a portalIn this procedure, you sign in to your new portal using the AWS SSO user that you added to the portal.
To sign in to a portal
1. On the Portals page, choose your new portal's Link to open your portal in a new tab.
2. If you created your first AWS SSO user earlier in the tutorial, use the following steps to create apassword for your user:
a. Check your email for the subject line Invitation to join AWS Single Sign-On.
b. Open that invitation email and choose Accept invitation.
c. In the new window, set a password for your AWS SSO user.
NoteIf you didn't receive an email, you can generate a password for your user in the AWS SSOconsole. For more information, see Reset a user password in the AWS Single Sign-On UserGuide.
3. Enter your AWS SSO Username and Password. If you enabled AWS SSO earlier in this tutorial, yourUsername is the email address of the portal administrator user that you created.
All portal users, including the portal administrator, must sign in with their AWS SSO user credentials.These credentials are typically not the same credentials that you use to sign in to the AWSManagement Console.
68
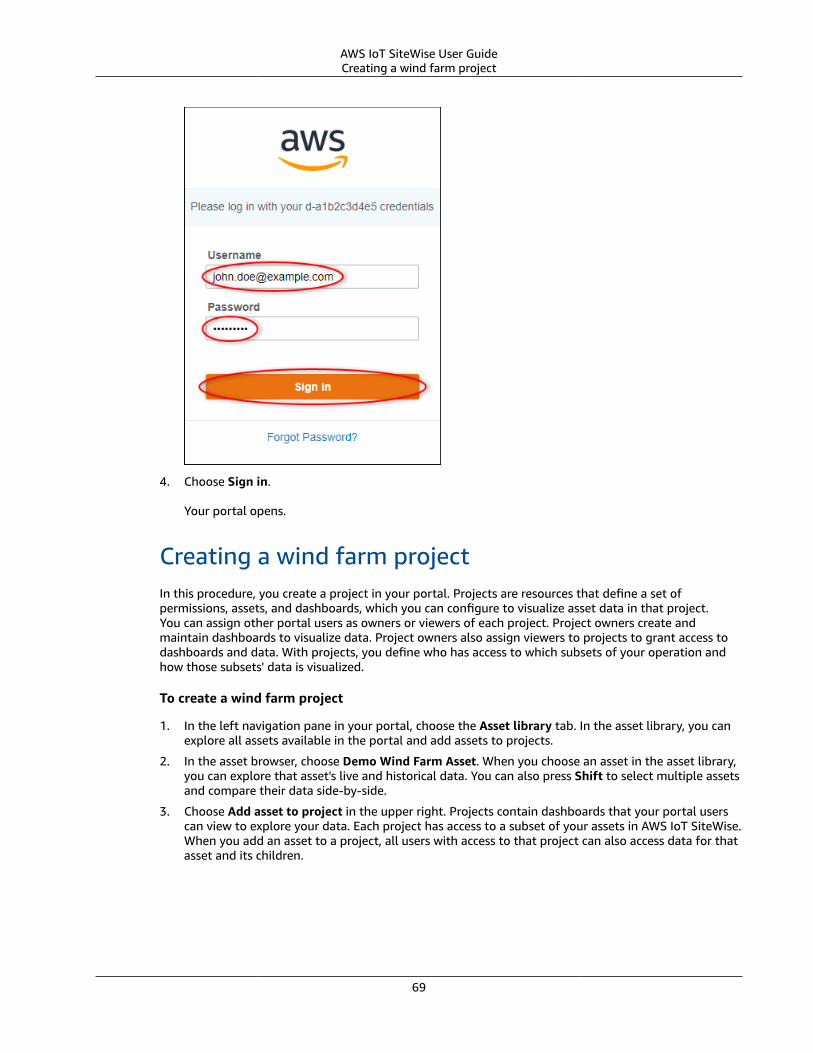
AWS IoT SiteWise User GuideCreating a wind farm project
4. Choose Sign in.
Your portal opens.
Creating a wind farm projectIn this procedure, you create a project in your portal. Projects are resources that define a set ofpermissions, assets, and dashboards, which you can configure to visualize asset data in that project.You can assign other portal users as owners or viewers of each project. Project owners create andmaintain dashboards to visualize data. Project owners also assign viewers to projects to grant access todashboards and data. With projects, you define who has access to which subsets of your operation andhow those subsets' data is visualized.
To create a wind farm project
1. In the left navigation pane in your portal, choose the Asset library tab. In the asset library, you canexplore all assets available in the portal and add assets to projects.
2. In the asset browser, choose Demo Wind Farm Asset. When you choose an asset in the asset library,you can explore that asset's live and historical data. You can also press Shift to select multiple assetsand compare their data side-by-side.
3. Choose Add asset to project in the upper right. Projects contain dashboards that your portal userscan view to explore your data. Each project has access to a subset of your assets in AWS IoT SiteWise.When you add an asset to a project, all users with access to that project can also access data for thatasset and its children.
69

AWS IoT SiteWise User GuideCreating a wind farm project
4. In the Add asset to project dialog, choose Create new project, and then choose Next.
5. In the Create new project dialog, enter a Project name and Project description for your project,and then choose Add asset to project.
Your new project's page opens.
70
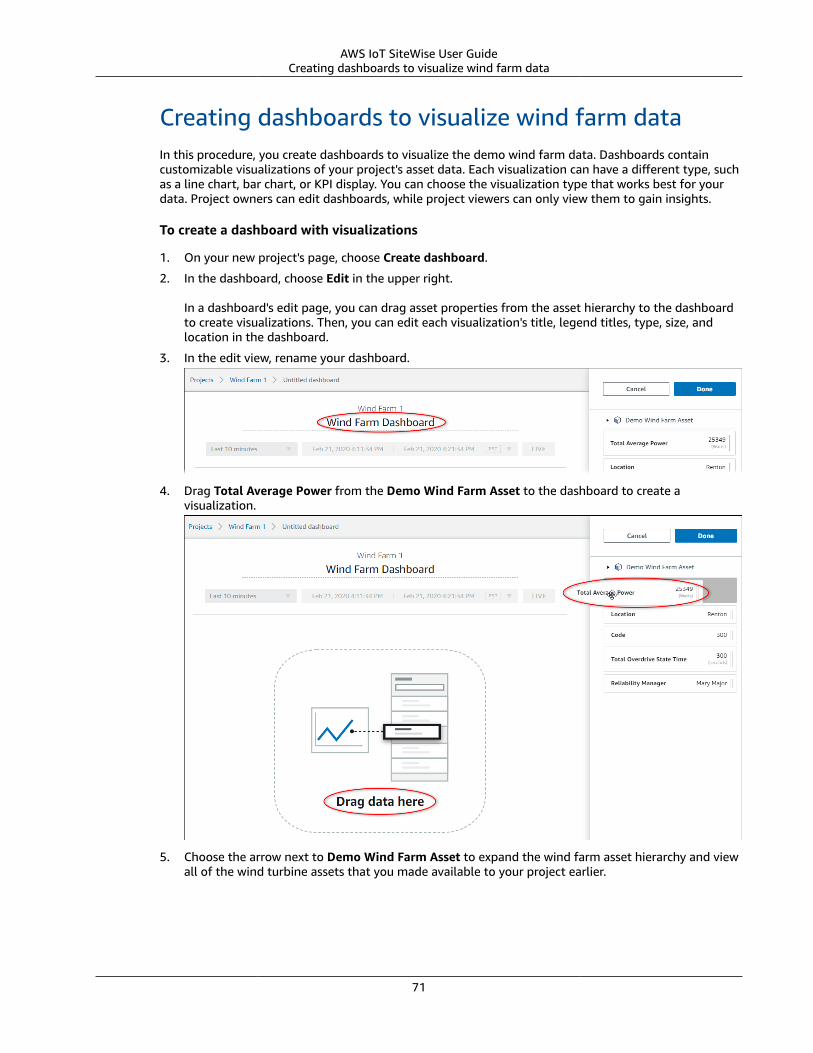
AWS IoT SiteWise User GuideCreating dashboards to visualize wind farm data
Creating dashboards to visualize wind farm dataIn this procedure, you create dashboards to visualize the demo wind farm data. Dashboards containcustomizable visualizations of your project's asset data. Each visualization can have a different type, suchas a line chart, bar chart, or KPI display. You can choose the visualization type that works best for yourdata. Project owners can edit dashboards, while project viewers can only view them to gain insights.
To create a dashboard with visualizations
1. On your new project's page, choose Create dashboard.
2. In the dashboard, choose Edit in the upper right.
In a dashboard's edit page, you can drag asset properties from the asset hierarchy to the dashboardto create visualizations. Then, you can edit each visualization's title, legend titles, type, size, andlocation in the dashboard.
3. In the edit view, rename your dashboard.
4. Drag Total Average Power from the Demo Wind Farm Asset to the dashboard to create avisualization.
5. Choose the arrow next to Demo Wind Farm Asset to expand the wind farm asset hierarchy and viewall of the wind turbine assets that you made available to your project earlier.
71
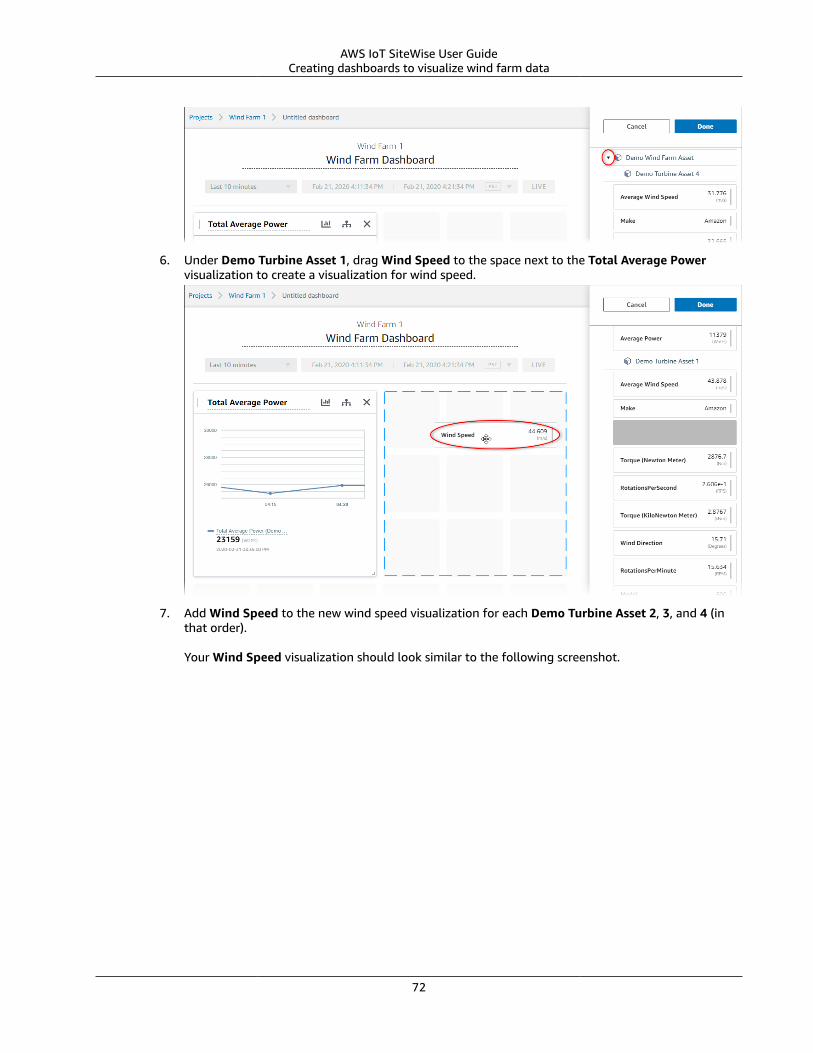
AWS IoT SiteWise User GuideCreating dashboards to visualize wind farm data
6. Under Demo Turbine Asset 1, drag Wind Speed to the space next to the Total Average Powervisualization to create a visualization for wind speed.
7. Add Wind Speed to the new wind speed visualization for each Demo Turbine Asset 2, 3, and 4 (inthat order).
Your Wind Speed visualization should look similar to the following screenshot.
72
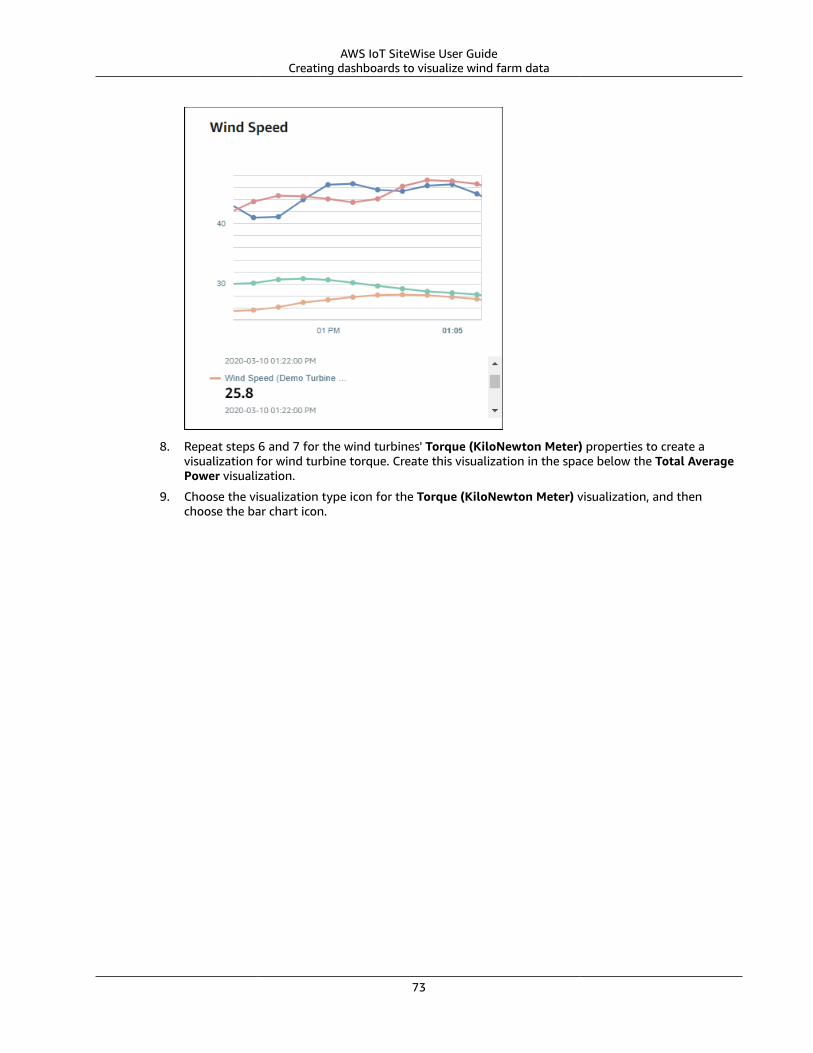
AWS IoT SiteWise User GuideCreating dashboards to visualize wind farm data
8. Repeat steps 6 and 7 for the wind turbines' Torque (KiloNewton Meter) properties to create avisualization for wind turbine torque. Create this visualization in the space below the Total AveragePower visualization.
9. Choose the visualization type icon for the Torque (KiloNewton Meter) visualization, and thenchoose the bar chart icon.
73
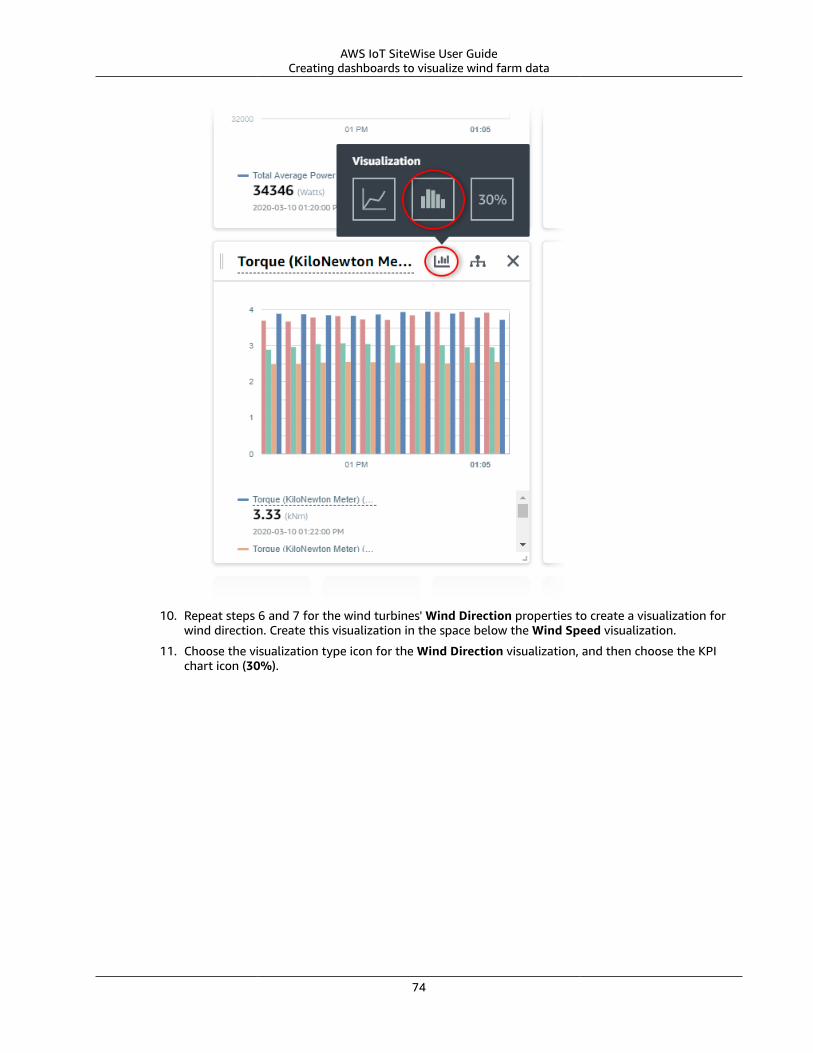
AWS IoT SiteWise User GuideCreating dashboards to visualize wind farm data
10. Repeat steps 6 and 7 for the wind turbines' Wind Direction properties to create a visualization forwind direction. Create this visualization in the space below the Wind Speed visualization.
11. Choose the visualization type icon for the Wind Direction visualization, and then choose the KPIchart icon (30%).
74
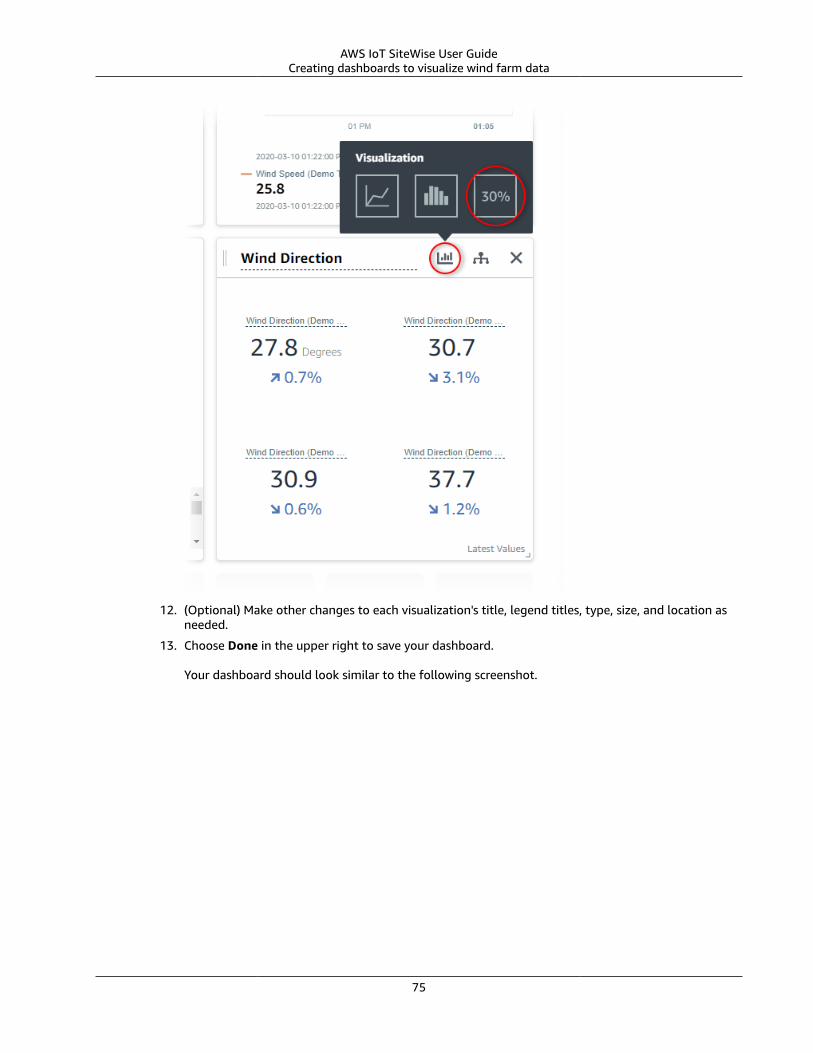
AWS IoT SiteWise User GuideCreating dashboards to visualize wind farm data
12. (Optional) Make other changes to each visualization's title, legend titles, type, size, and location asneeded.
13. Choose Done in the upper right to save your dashboard.
Your dashboard should look similar to the following screenshot.
75

AWS IoT SiteWise User GuideCreating dashboards to visualize wind farm data
14. (Optional) Create an additional dashboard for each wind turbine asset.
As a best practice, we recommend that you create a dashboard for each asset so that your projectviewers can investigate any issues with each individual asset. You can only add up to 5 assets to eachvisualization, so you must create multiple dashboards for your hierarchical assets in many scenarios.
A dashboard for a demo wind turbine might look similar to the following screenshot.
76
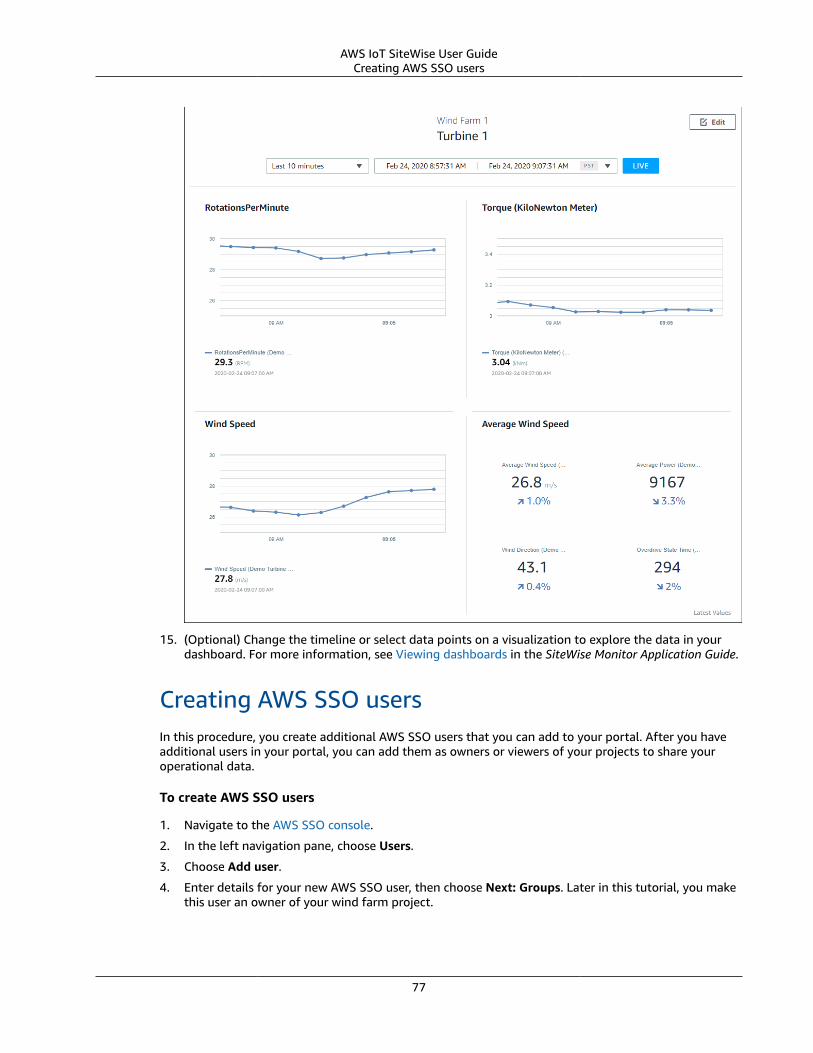
AWS IoT SiteWise User GuideCreating AWS SSO users
15. (Optional) Change the timeline or select data points on a visualization to explore the data in yourdashboard. For more information, see Viewing dashboards in the SiteWise Monitor Application Guide.
Creating AWS SSO usersIn this procedure, you create additional AWS SSO users that you can add to your portal. After you haveadditional users in your portal, you can add them as owners or viewers of your projects to share youroperational data.
To create AWS SSO users
1. Navigate to the AWS SSO console.
2. In the left navigation pane, choose Users.
3. Choose Add user.
4. Enter details for your new AWS SSO user, then choose Next: Groups. Later in this tutorial, you makethis user an owner of your wind farm project.
77
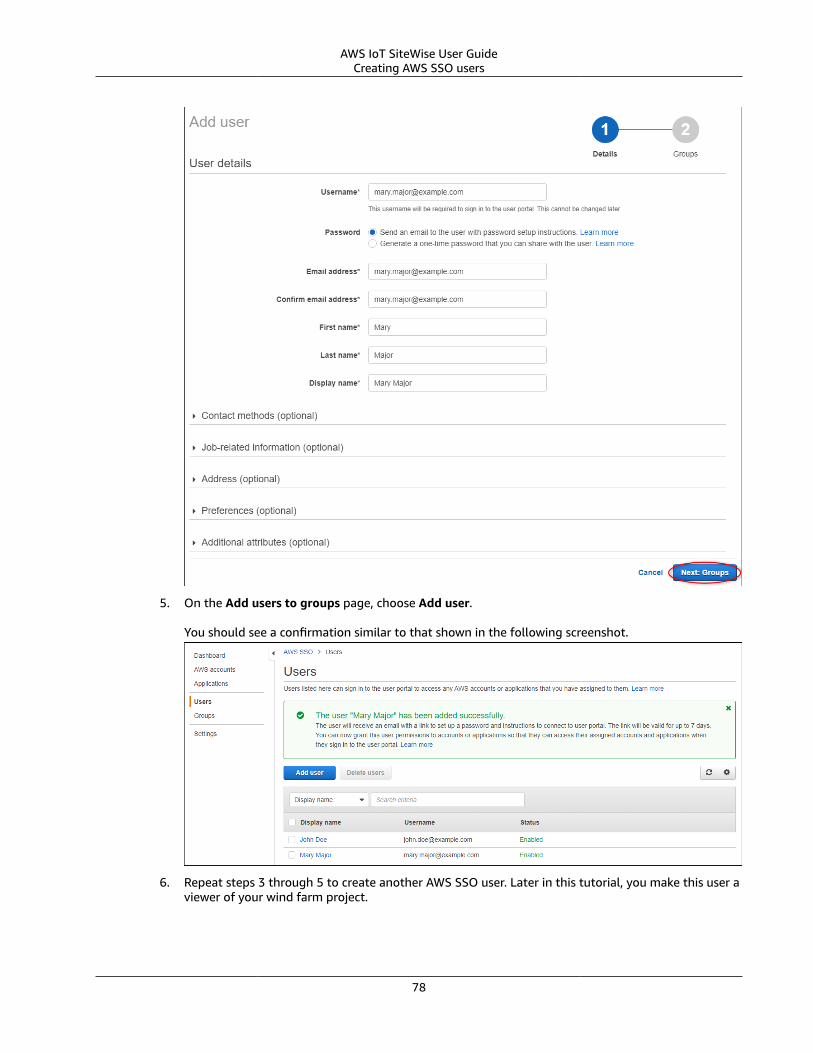
AWS IoT SiteWise User GuideCreating AWS SSO users
5. On the Add users to groups page, choose Add user.
You should see a confirmation similar to that shown in the following screenshot.
6. Repeat steps 3 through 5 to create another AWS SSO user. Later in this tutorial, you make this user aviewer of your wind farm project.
78
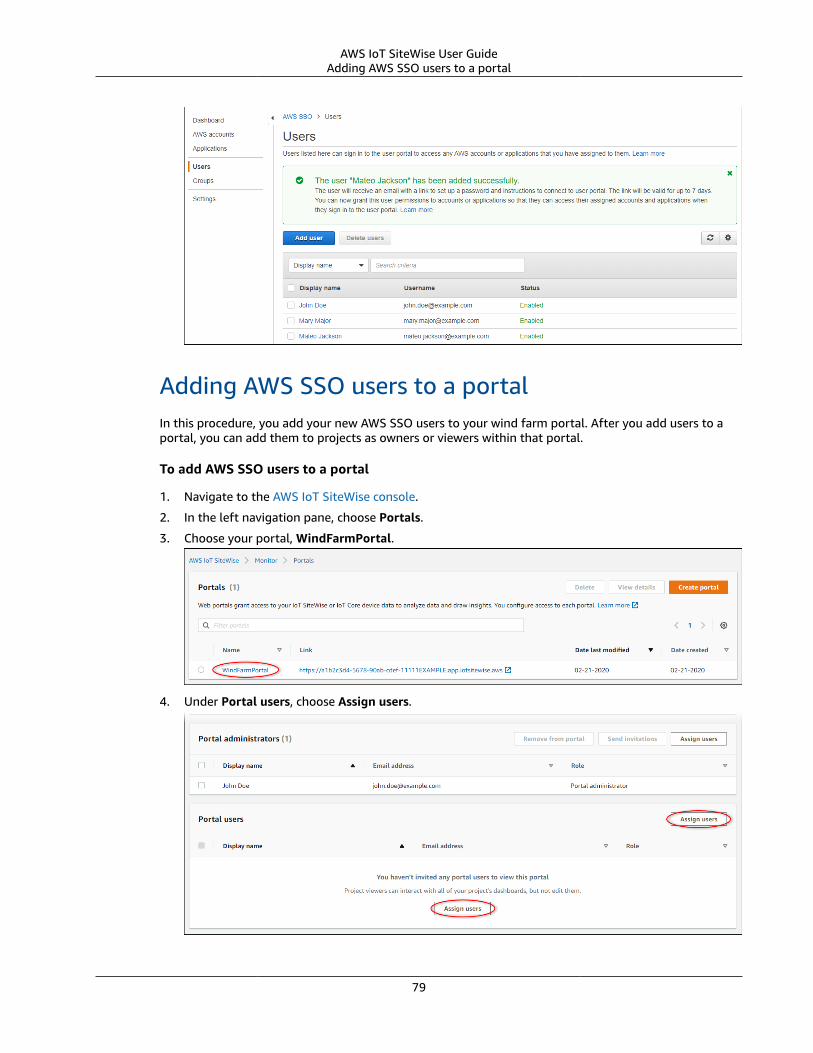
AWS IoT SiteWise User GuideAdding AWS SSO users to a portal
Adding AWS SSO users to a portalIn this procedure, you add your new AWS SSO users to your wind farm portal. After you add users to aportal, you can add them to projects as owners or viewers within that portal.
To add AWS SSO users to a portal
1. Navigate to the AWS IoT SiteWise console.
2. In the left navigation pane, choose Portals.
3. Choose your portal, WindFarmPortal.
4. Under Portal users, choose Assign users.
79
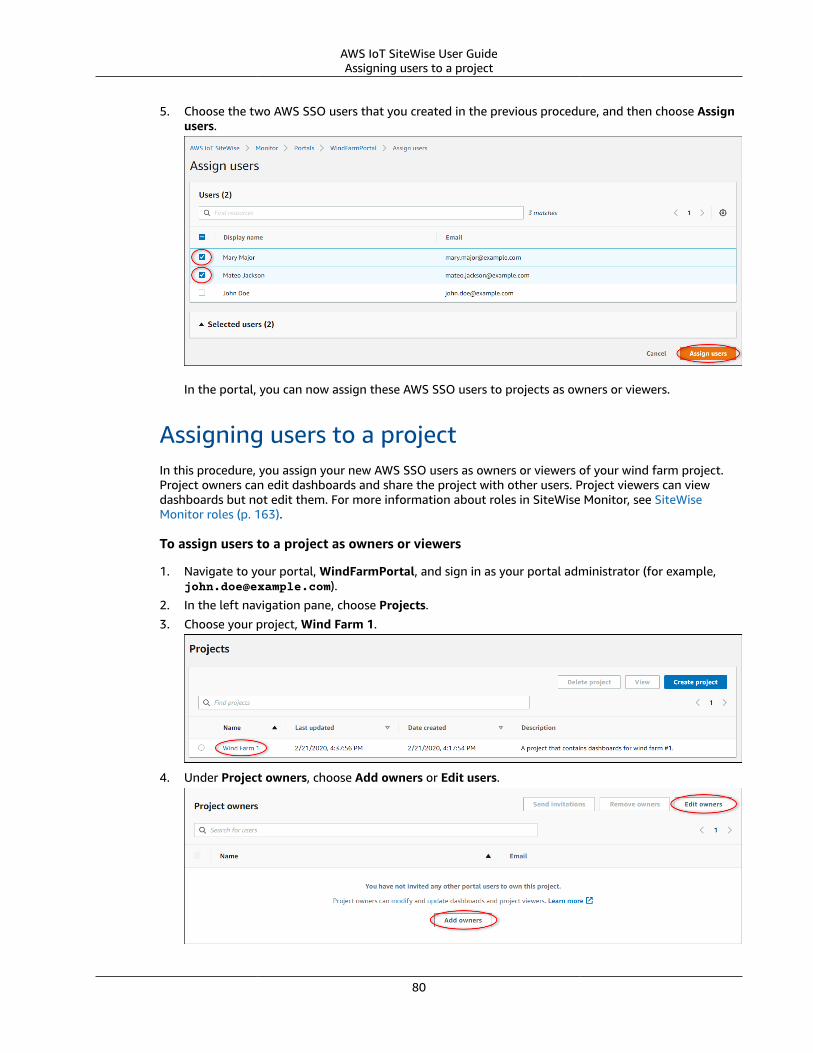
AWS IoT SiteWise User GuideAssigning users to a project
5. Choose the two AWS SSO users that you created in the previous procedure, and then choose Assignusers.
In the portal, you can now assign these AWS SSO users to projects as owners or viewers.
Assigning users to a projectIn this procedure, you assign your new AWS SSO users as owners or viewers of your wind farm project.Project owners can edit dashboards and share the project with other users. Project viewers can viewdashboards but not edit them. For more information about roles in SiteWise Monitor, see SiteWiseMonitor roles (p. 163).
To assign users to a project as owners or viewers
1. Navigate to your portal, WindFarmPortal, and sign in as your portal administrator (for example,[email protected]).
2. In the left navigation pane, choose Projects.3. Choose your project, Wind Farm 1.
4. Under Project owners, choose Add owners or Edit users.
80

AWS IoT SiteWise User GuideAssigning users to a project
5. Choose the user to add as a project owner (for example, Mary Major), and then choose the >> icon.
6. Choose Save.
Your AWS SSO user Mary Major can sign in to this portal to edit the dashboards in this project andshare this project with other users in this portal.
7. Under Project viewers, choose Add viewers.
8. Choose the user to add as a project viewer, and then choose the >> icon.
81
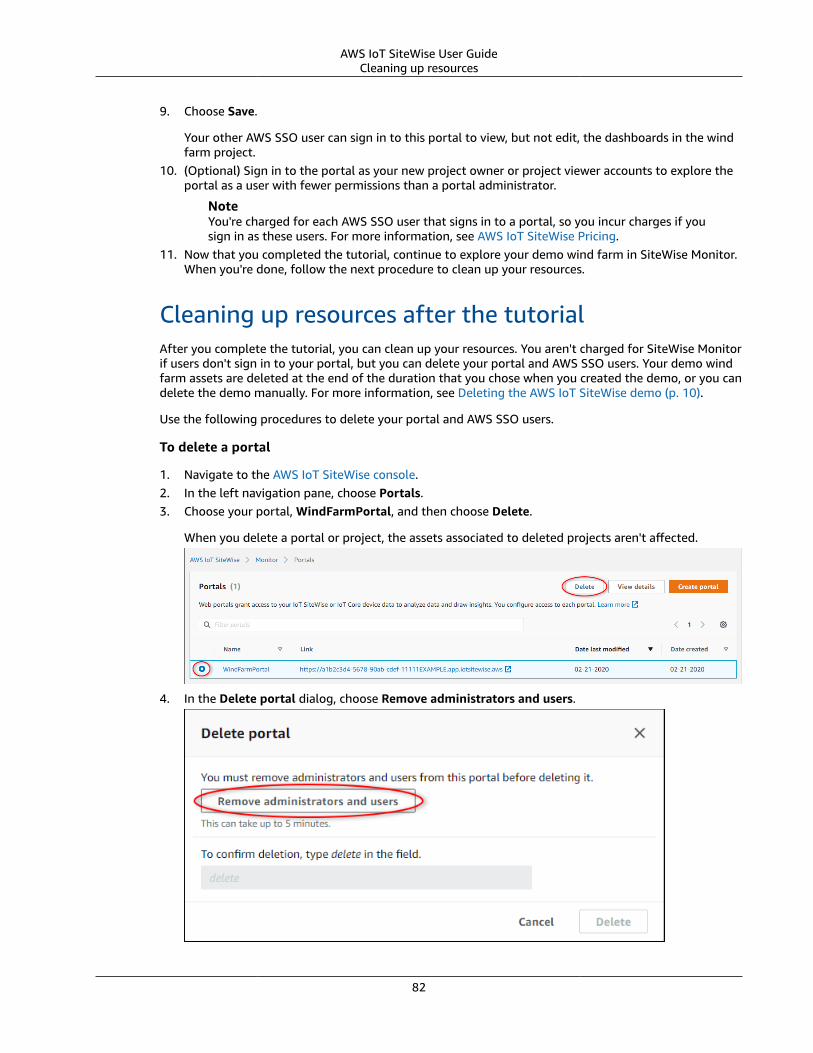
AWS IoT SiteWise User GuideCleaning up resources
9. Choose Save.
Your other AWS SSO user can sign in to this portal to view, but not edit, the dashboards in the windfarm project.
10. (Optional) Sign in to the portal as your new project owner or project viewer accounts to explore theportal as a user with fewer permissions than a portal administrator.
NoteYou're charged for each AWS SSO user that signs in to a portal, so you incur charges if yousign in as these users. For more information, see AWS IoT SiteWise Pricing.
11. Now that you completed the tutorial, continue to explore your demo wind farm in SiteWise Monitor.When you're done, follow the next procedure to clean up your resources.
Cleaning up resources after the tutorialAfter you complete the tutorial, you can clean up your resources. You aren't charged for SiteWise Monitorif users don't sign in to your portal, but you can delete your portal and AWS SSO users. Your demo windfarm assets are deleted at the end of the duration that you chose when you created the demo, or you candelete the demo manually. For more information, see Deleting the AWS IoT SiteWise demo (p. 10).
Use the following procedures to delete your portal and AWS SSO users.
To delete a portal
1. Navigate to the AWS IoT SiteWise console.2. In the left navigation pane, choose Portals.3. Choose your portal, WindFarmPortal, and then choose Delete.
When you delete a portal or project, the assets associated to deleted projects aren't affected.
4. In the Delete portal dialog, choose Remove administrators and users.
82

AWS IoT SiteWise User GuideCleaning up resources
5. Enter delete to confirm deletion, and then choose Delete.
To delete AWS SSO users
1. Navigate to the AWS SSO console.
2. In the left navigation pane, choose Users.
3. Select the check box for each user to delete, and then choose Delete users.
4. In the Delete users dialog, enter DELETE, and then choose Delete users.
83
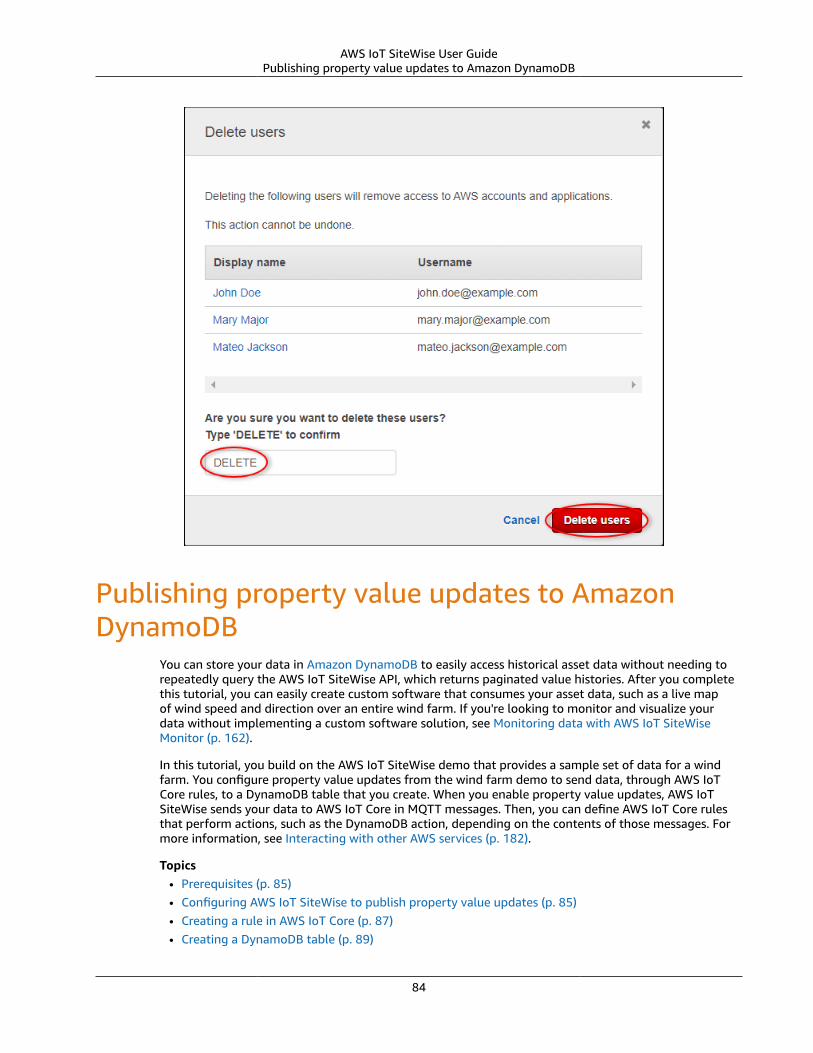
AWS IoT SiteWise User GuidePublishing property value updates to Amazon DynamoDB
Publishing property value updates to AmazonDynamoDB
You can store your data in Amazon DynamoDB to easily access historical asset data without needing torepeatedly query the AWS IoT SiteWise API, which returns paginated value histories. After you completethis tutorial, you can easily create custom software that consumes your asset data, such as a live mapof wind speed and direction over an entire wind farm. If you're looking to monitor and visualize yourdata without implementing a custom software solution, see Monitoring data with AWS IoT SiteWiseMonitor (p. 162).
In this tutorial, you build on the AWS IoT SiteWise demo that provides a sample set of data for a windfarm. You configure property value updates from the wind farm demo to send data, through AWS IoTCore rules, to a DynamoDB table that you create. When you enable property value updates, AWS IoTSiteWise sends your data to AWS IoT Core in MQTT messages. Then, you can define AWS IoT Core rulesthat perform actions, such as the DynamoDB action, depending on the contents of those messages. Formore information, see Interacting with other AWS services (p. 182).
Topics• Prerequisites (p. 85)• Configuring AWS IoT SiteWise to publish property value updates (p. 85)• Creating a rule in AWS IoT Core (p. 87)• Creating a DynamoDB table (p. 89)
84
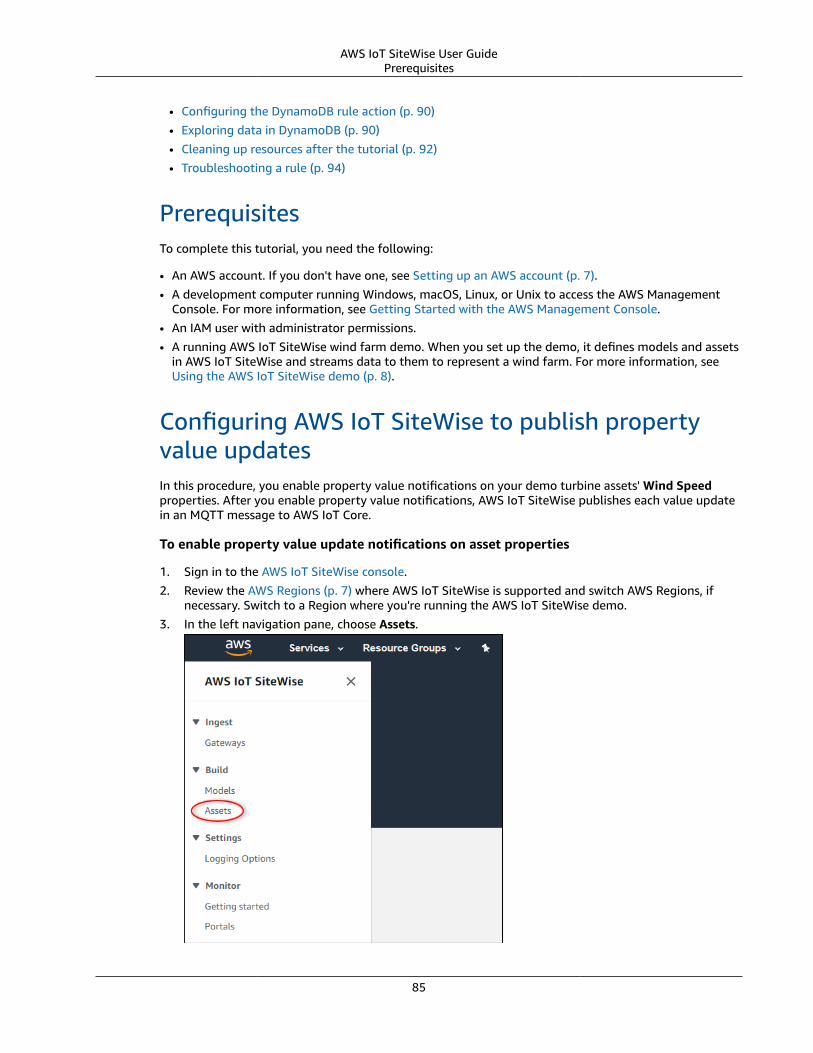
AWS IoT SiteWise User GuidePrerequisites
• Configuring the DynamoDB rule action (p. 90)• Exploring data in DynamoDB (p. 90)• Cleaning up resources after the tutorial (p. 92)• Troubleshooting a rule (p. 94)
PrerequisitesTo complete this tutorial, you need the following:
• An AWS account. If you don't have one, see Setting up an AWS account (p. 7).• A development computer running Windows, macOS, Linux, or Unix to access the AWS Management
Console. For more information, see Getting Started with the AWS Management Console.• An IAM user with administrator permissions.• A running AWS IoT SiteWise wind farm demo. When you set up the demo, it defines models and assets
in AWS IoT SiteWise and streams data to them to represent a wind farm. For more information, seeUsing the AWS IoT SiteWise demo (p. 8).
Configuring AWS IoT SiteWise to publish propertyvalue updatesIn this procedure, you enable property value notifications on your demo turbine assets' Wind Speedproperties. After you enable property value notifications, AWS IoT SiteWise publishes each value updatein an MQTT message to AWS IoT Core.
To enable property value update notifications on asset properties
1. Sign in to the AWS IoT SiteWise console.2. Review the AWS Regions (p. 7) where AWS IoT SiteWise is supported and switch AWS Regions, if
necessary. Switch to a Region where you're running the AWS IoT SiteWise demo.3. In the left navigation pane, choose Assets.
85

AWS IoT SiteWise User GuideConfiguring AWS IoT SiteWise topublish property value updates
4. Choose the arrow next to Demo Wind Farm Asset to expand the wind farm asset's hierarchy.
5. Choose a demo turbine and choose Edit.
6. Update the Wind Speed property's Notification status to ENABLED.
7. Choose Save asset at the bottom of the page.
8. Repeat steps 5 through 7 for each demo turbine asset.
9. Choose a demo turbine (for example, Demo Turbine Asset 1).
10. Choose Measurements.
11. Choose the copy icon next to the Wind Speed property to copy the notification topic to yourclipboard. Save the notification topic to use later in this tutorial. You only need to record thenotification topic from one turbine.
The notification topic should look like the following example.
$aws/sitewise/asset-models/a1b2c3d4-5678-90ab-cdef-11111EXAMPLE/assets/a1b2c3d4-5678-90ab-cdef-22222EXAMPLE/properties/a1b2c3d4-5678-90ab-cdef-33333EXAMPLE
86
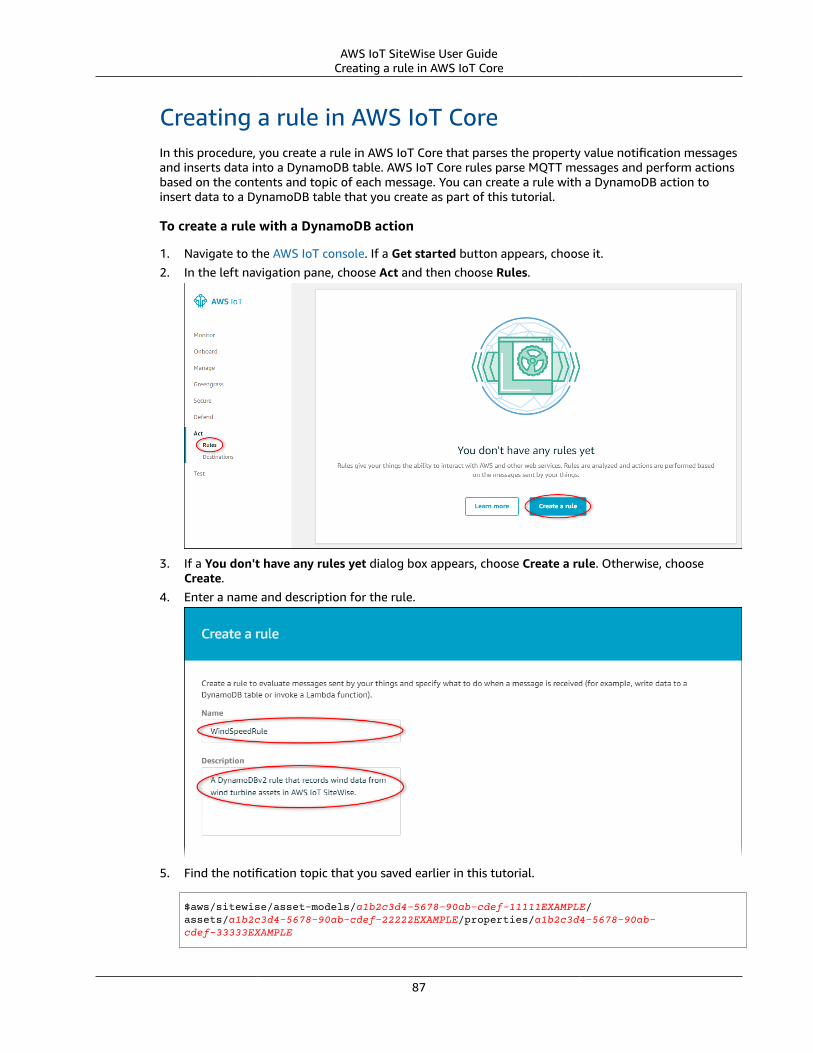
AWS IoT SiteWise User GuideCreating a rule in AWS IoT Core
Creating a rule in AWS IoT CoreIn this procedure, you create a rule in AWS IoT Core that parses the property value notification messagesand inserts data into a DynamoDB table. AWS IoT Core rules parse MQTT messages and perform actionsbased on the contents and topic of each message. You can create a rule with a DynamoDB action toinsert data to a DynamoDB table that you create as part of this tutorial.
To create a rule with a DynamoDB action
1. Navigate to the AWS IoT console. If a Get started button appears, choose it.2. In the left navigation pane, choose Act and then choose Rules.
3. If a You don't have any rules yet dialog box appears, choose Create a rule. Otherwise, chooseCreate.
4. Enter a name and description for the rule.
5. Find the notification topic that you saved earlier in this tutorial.
$aws/sitewise/asset-models/a1b2c3d4-5678-90ab-cdef-11111EXAMPLE/assets/a1b2c3d4-5678-90ab-cdef-22222EXAMPLE/properties/a1b2c3d4-5678-90ab-cdef-33333EXAMPLE
87
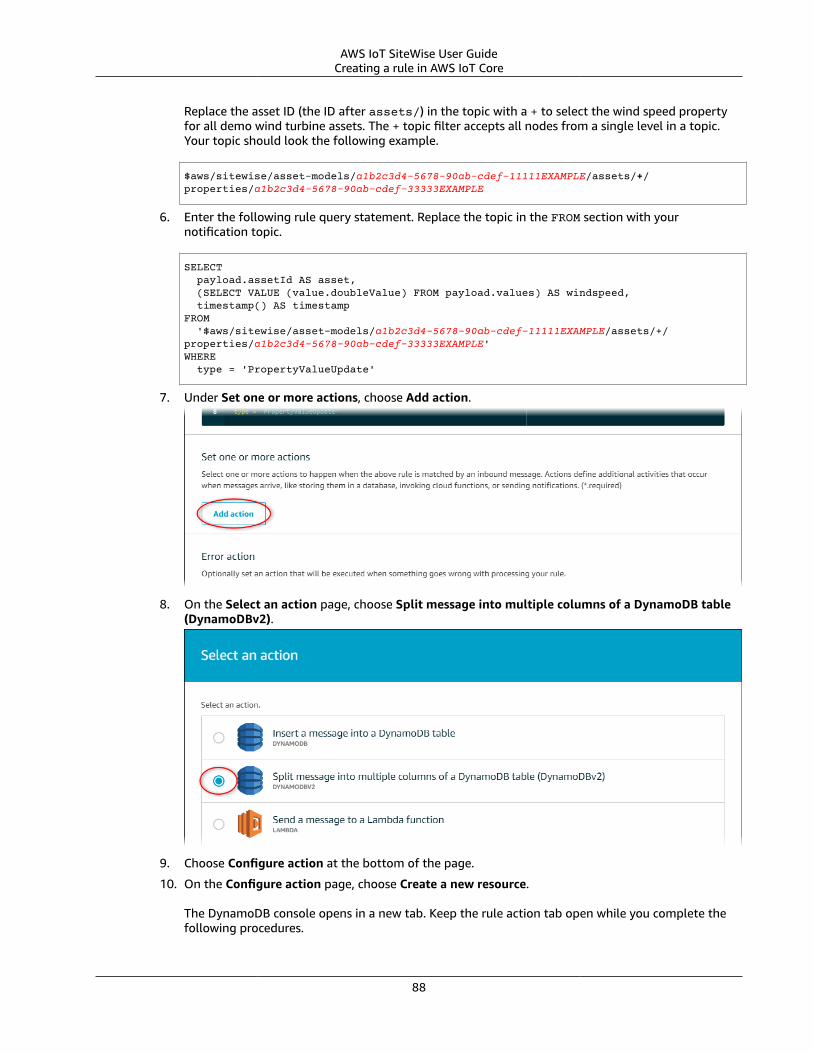
AWS IoT SiteWise User GuideCreating a rule in AWS IoT Core
Replace the asset ID (the ID after assets/) in the topic with a + to select the wind speed propertyfor all demo wind turbine assets. The + topic filter accepts all nodes from a single level in a topic.Your topic should look the following example.
$aws/sitewise/asset-models/a1b2c3d4-5678-90ab-cdef-11111EXAMPLE/assets/+/properties/a1b2c3d4-5678-90ab-cdef-33333EXAMPLE
6. Enter the following rule query statement. Replace the topic in the FROM section with yournotification topic.
SELECT payload.assetId AS asset, (SELECT VALUE (value.doubleValue) FROM payload.values) AS windspeed, timestamp() AS timestampFROM '$aws/sitewise/asset-models/a1b2c3d4-5678-90ab-cdef-11111EXAMPLE/assets/+/properties/a1b2c3d4-5678-90ab-cdef-33333EXAMPLE' WHERE type = 'PropertyValueUpdate'
7. Under Set one or more actions, choose Add action.
8. On the Select an action page, choose Split message into multiple columns of a DynamoDB table(DynamoDBv2).
9. Choose Configure action at the bottom of the page.
10. On the Configure action page, choose Create a new resource.
The DynamoDB console opens in a new tab. Keep the rule action tab open while you complete thefollowing procedures.
88
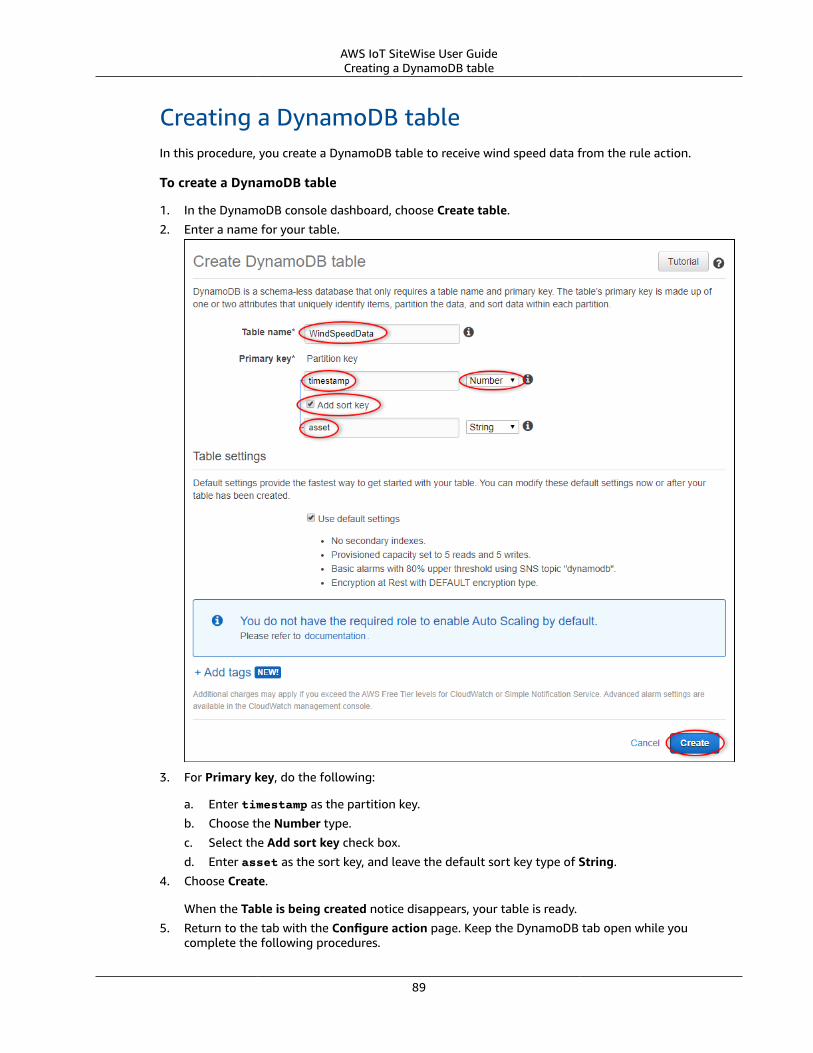
AWS IoT SiteWise User GuideCreating a DynamoDB table
Creating a DynamoDB tableIn this procedure, you create a DynamoDB table to receive wind speed data from the rule action.
To create a DynamoDB table
1. In the DynamoDB console dashboard, choose Create table.
2. Enter a name for your table.
3. For Primary key, do the following:
a. Enter timestamp as the partition key.
b. Choose the Number type.
c. Select the Add sort key check box.
d. Enter asset as the sort key, and leave the default sort key type of String.
4. Choose Create.
When the Table is being created notice disappears, your table is ready.
5. Return to the tab with the Configure action page. Keep the DynamoDB tab open while youcomplete the following procedures.
89
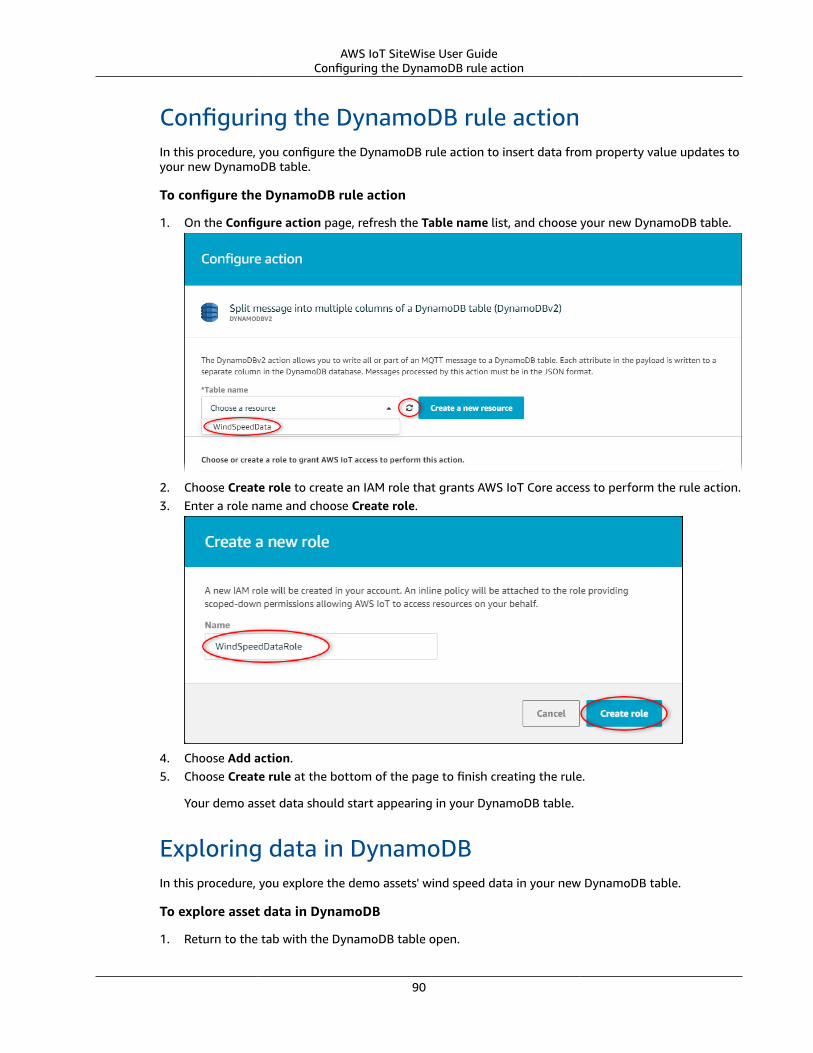
AWS IoT SiteWise User GuideConfiguring the DynamoDB rule action
Configuring the DynamoDB rule actionIn this procedure, you configure the DynamoDB rule action to insert data from property value updates toyour new DynamoDB table.
To configure the DynamoDB rule action
1. On the Configure action page, refresh the Table name list, and choose your new DynamoDB table.
2. Choose Create role to create an IAM role that grants AWS IoT Core access to perform the rule action.3. Enter a role name and choose Create role.
4. Choose Add action.5. Choose Create rule at the bottom of the page to finish creating the rule.
Your demo asset data should start appearing in your DynamoDB table.
Exploring data in DynamoDBIn this procedure, you explore the demo assets' wind speed data in your new DynamoDB table.
To explore asset data in DynamoDB
1. Return to the tab with the DynamoDB table open.
90
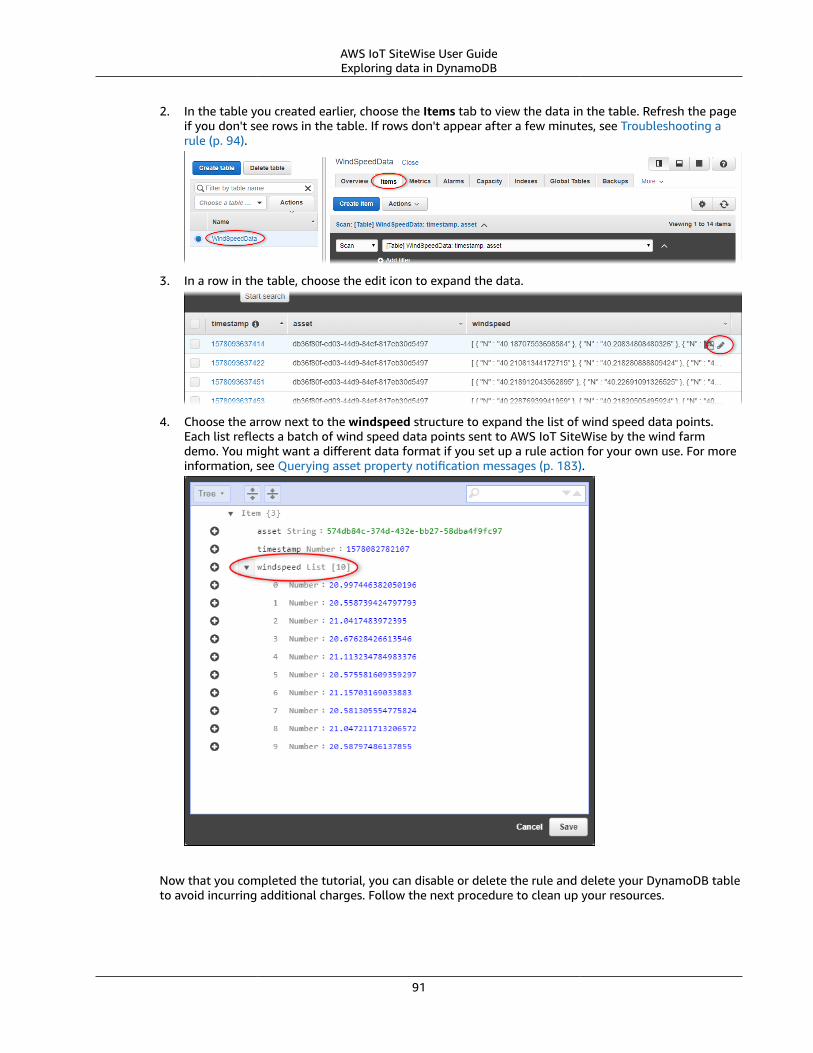
AWS IoT SiteWise User GuideExploring data in DynamoDB
2. In the table you created earlier, choose the Items tab to view the data in the table. Refresh the pageif you don't see rows in the table. If rows don't appear after a few minutes, see Troubleshooting arule (p. 94).
3. In a row in the table, choose the edit icon to expand the data.
4. Choose the arrow next to the windspeed structure to expand the list of wind speed data points.Each list reflects a batch of wind speed data points sent to AWS IoT SiteWise by the wind farmdemo. You might want a different data format if you set up a rule action for your own use. For moreinformation, see Querying asset property notification messages (p. 183).
Now that you completed the tutorial, you can disable or delete the rule and delete your DynamoDB tableto avoid incurring additional charges. Follow the next procedure to clean up your resources.
91
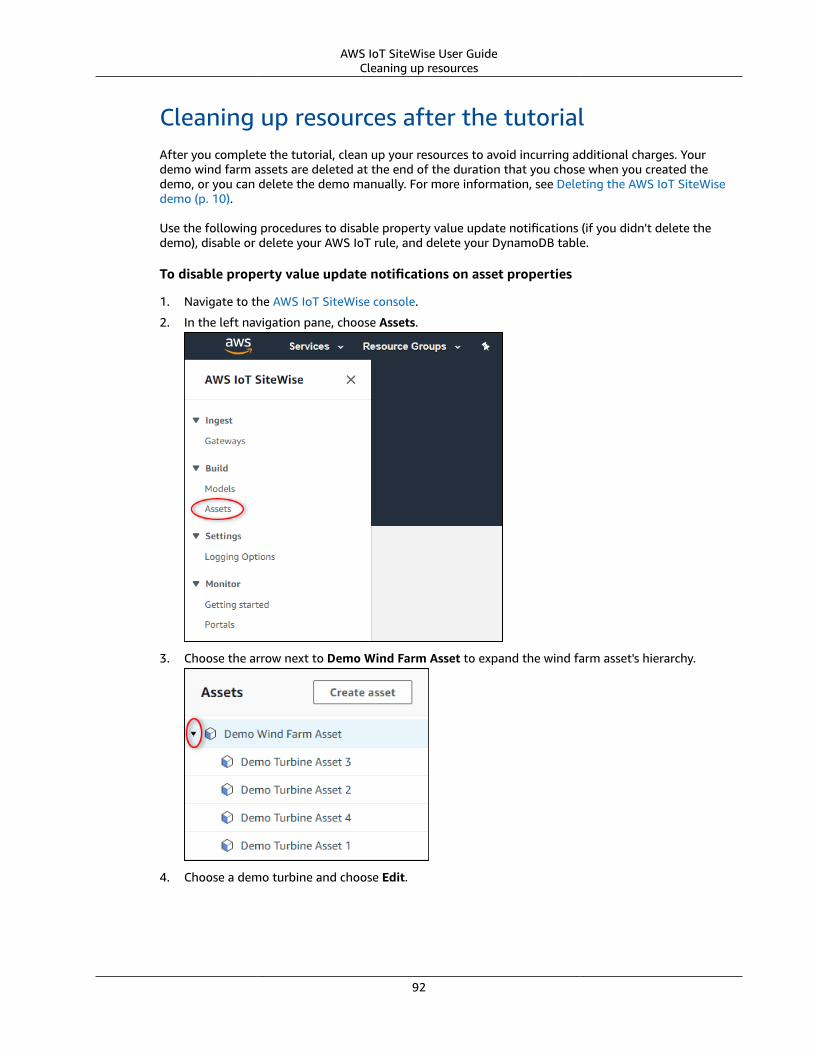
AWS IoT SiteWise User GuideCleaning up resources
Cleaning up resources after the tutorialAfter you complete the tutorial, clean up your resources to avoid incurring additional charges. Yourdemo wind farm assets are deleted at the end of the duration that you chose when you created thedemo, or you can delete the demo manually. For more information, see Deleting the AWS IoT SiteWisedemo (p. 10).
Use the following procedures to disable property value update notifications (if you didn't delete thedemo), disable or delete your AWS IoT rule, and delete your DynamoDB table.
To disable property value update notifications on asset properties
1. Navigate to the AWS IoT SiteWise console.
2. In the left navigation pane, choose Assets.
3. Choose the arrow next to Demo Wind Farm Asset to expand the wind farm asset's hierarchy.
4. Choose a demo turbine and choose Edit.
92
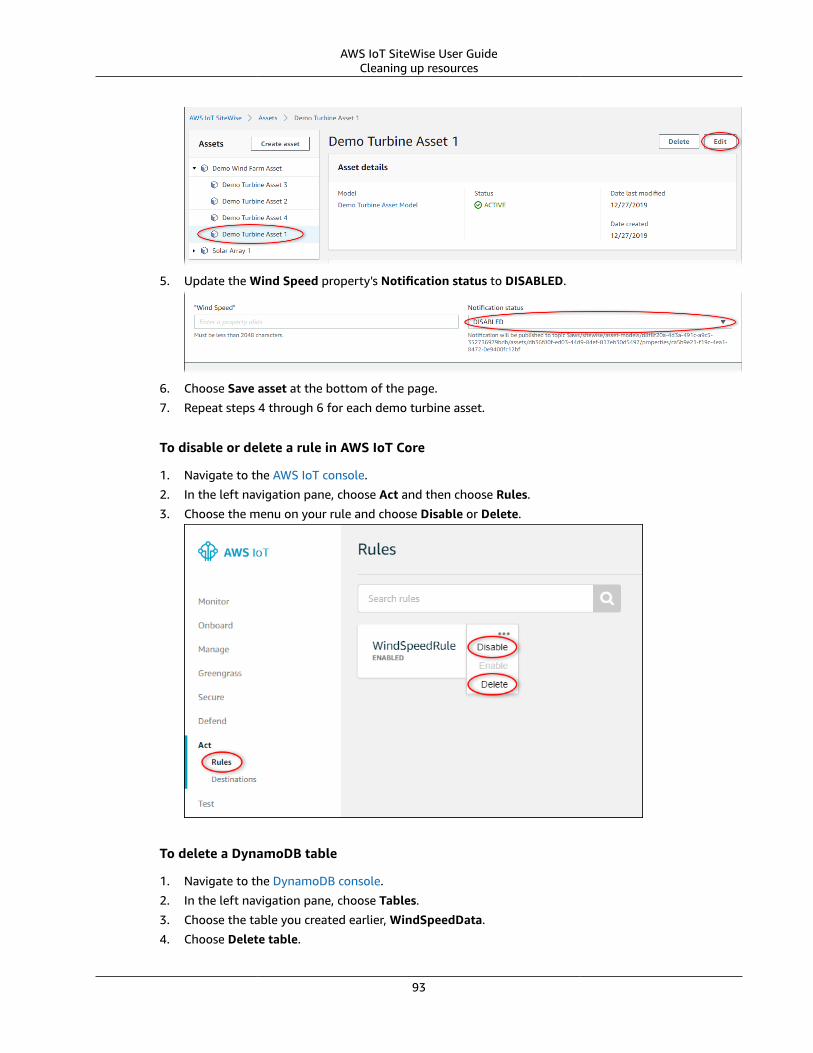
AWS IoT SiteWise User GuideCleaning up resources
5. Update the Wind Speed property's Notification status to DISABLED.
6. Choose Save asset at the bottom of the page.
7. Repeat steps 4 through 6 for each demo turbine asset.
To disable or delete a rule in AWS IoT Core
1. Navigate to the AWS IoT console.
2. In the left navigation pane, choose Act and then choose Rules.
3. Choose the menu on your rule and choose Disable or Delete.
To delete a DynamoDB table
1. Navigate to the DynamoDB console.
2. In the left navigation pane, choose Tables.
3. Choose the table you created earlier, WindSpeedData.
4. Choose Delete table.
93
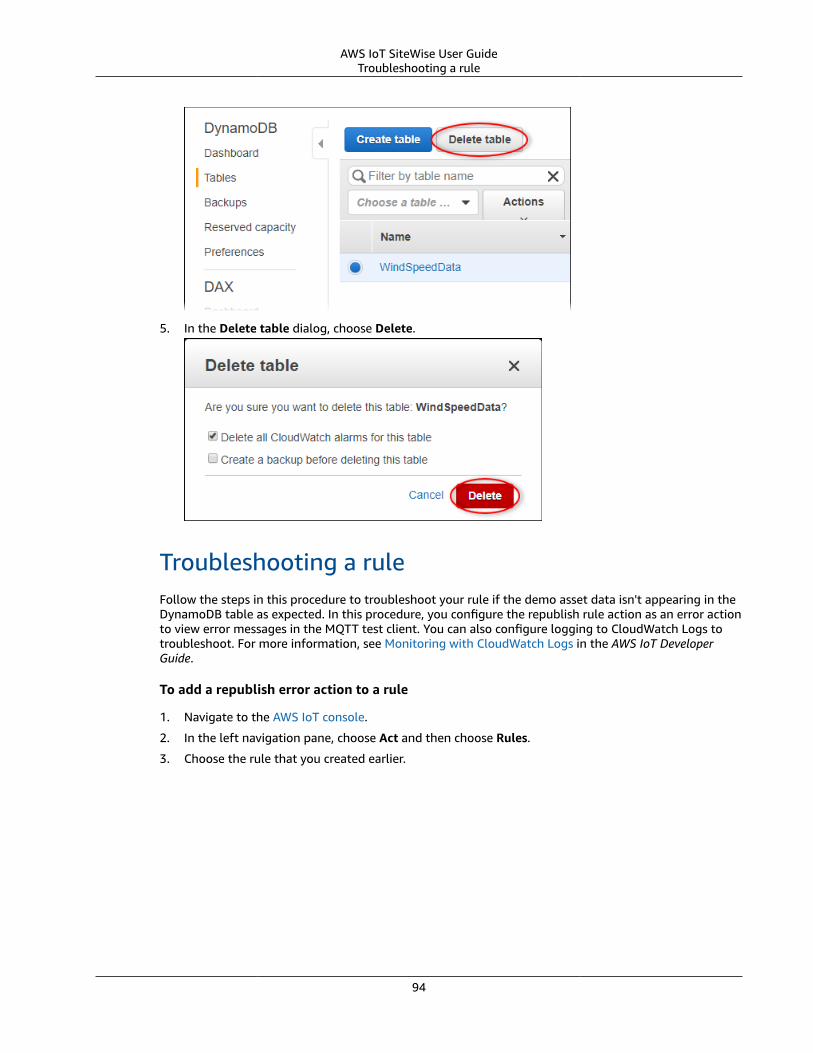
AWS IoT SiteWise User GuideTroubleshooting a rule
5. In the Delete table dialog, choose Delete.
Troubleshooting a ruleFollow the steps in this procedure to troubleshoot your rule if the demo asset data isn't appearing in theDynamoDB table as expected. In this procedure, you configure the republish rule action as an error actionto view error messages in the MQTT test client. You can also configure logging to CloudWatch Logs totroubleshoot. For more information, see Monitoring with CloudWatch Logs in the AWS IoT DeveloperGuide.
To add a republish error action to a rule
1. Navigate to the AWS IoT console.
2. In the left navigation pane, choose Act and then choose Rules.
3. Choose the rule that you created earlier.
94
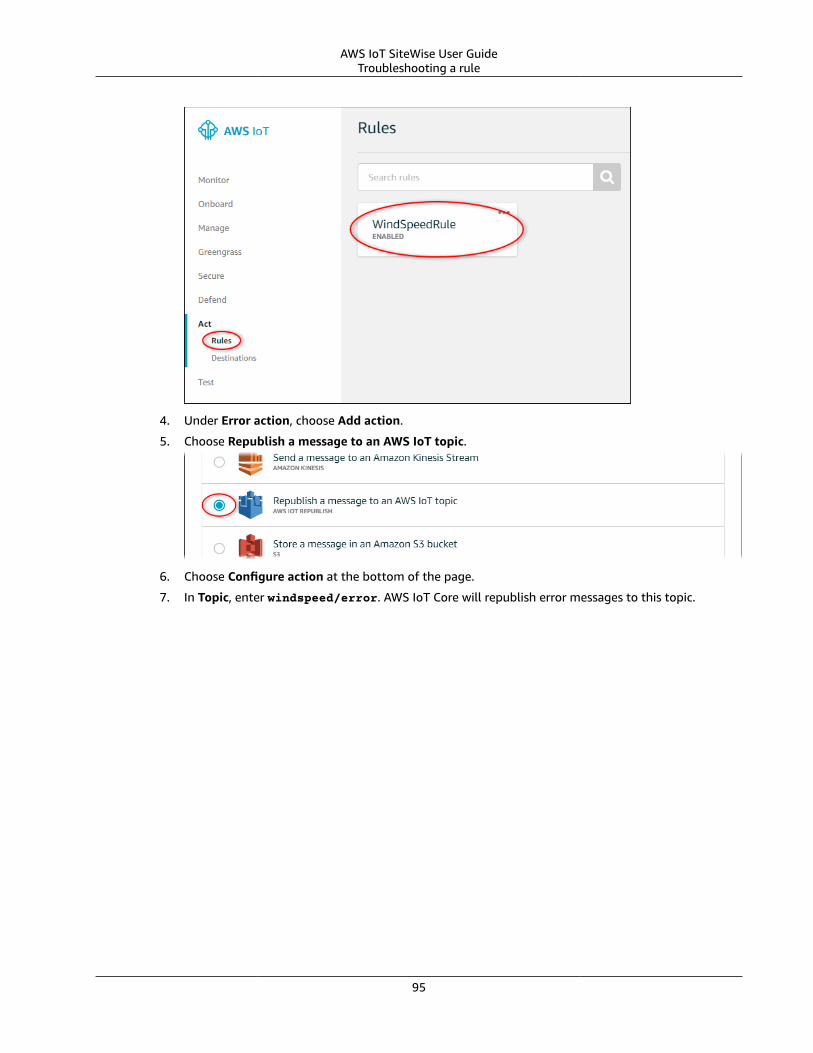
AWS IoT SiteWise User GuideTroubleshooting a rule
4. Under Error action, choose Add action.
5. Choose Republish a message to an AWS IoT topic.
6. Choose Configure action at the bottom of the page.
7. In Topic, enter windspeed/error. AWS IoT Core will republish error messages to this topic.
95
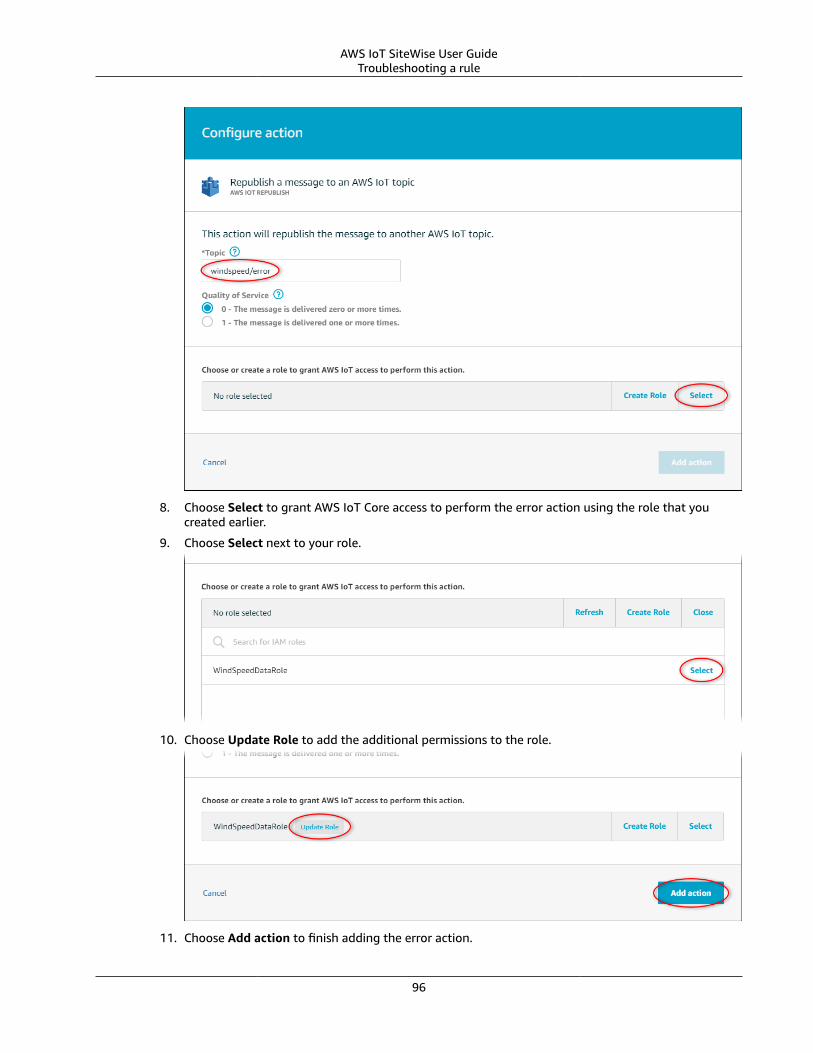
AWS IoT SiteWise User GuideTroubleshooting a rule
8. Choose Select to grant AWS IoT Core access to perform the error action using the role that youcreated earlier.
9. Choose Select next to your role.
10. Choose Update Role to add the additional permissions to the role.
11. Choose Add action to finish adding the error action.
96

AWS IoT SiteWise User GuideTroubleshooting a rule
12. Choose the back arrow in the upper left of the console to return to the AWS IoT Core console home.
After you set up the republish error action, you can view the error messages in the MQTT test client inAWS IoT Core.
In the following procedure, you subscribe to the error topic in the MQTT test client.
To subscribe to the error action topic
1. In the AWS IoT Core console's left navigation page, choose Test.2. In the Subscription topic field, enter windspeed/error and choose Subscribe to topic.
3. Watch for error messages to appear and explore the failures array in an error message todiagnose the following common issues:
• Typos in the rule query statement• Insufficient role permissions
If errors don't appear, check that your rule is enabled and that you subscribed to the same topic thatyou configured in the republish error action. If errors still don't appear, check that your demo windfarm assets still exist and that you enabled notifications on the wind speed properties. If your demoassets expired and disappeared from AWS IoT SiteWise, you can create a new demo and update therule query statement to reflect the updated asset model and property IDs.
97

AWS IoT SiteWise User GuideUsing a gateway
Ingesting data to AWS IoT SiteWiseAWS IoT SiteWise consumes industrial data and matches data to assets that represent your industrialoperations. You must create assets and asset models to receive data in AWS IoT SiteWise. You canconfigure your data sources before building assets, but AWS IoT SiteWise won't receive any data sentuntil you create assets and set asset property aliases to your data stream paths. For instructions to buildyour virtual industrial operation, see Modeling industrial assets (p. 137).
You can send industrial data to AWS IoT SiteWise using any of the following options:
• Use an AWS IoT SiteWise gateway (p. 98) to upload data from OPC-UA servers. The gatewayserves as the intermediary between AWS IoT SiteWise and your OPC-UA servers. AWS IoT SiteWiseprovides an AWS IoT Greengrass connector that you can deploy on any platform that can run AWS IoTGreengrass to set up a gateway.
• Use AWS IoT Core rules (p. 129) to upload data from MQTT messages published by an AWS IoT thingor another AWS service.
• Use AWS IoT Events actions (p. 135) to upload data from AWS IoT Events when an event occurs.• Use the AWS IoT SiteWise API (p. 135) to upload data from any other source.
Ingesting data using a gatewayAn AWS IoT SiteWise gateway connects to OPC-UA servers to deliver your industrial data streams to theAWS Cloud. You can deploy the AWS IoT SiteWise connector on any device or platform that can run AWSIoT Greengrass.
NoteThis documentation describes how to set up the latest version of the AWS IoT SiteWiseconnector, version 6. For more information and the connector version changelog, see the AWSIoT SiteWise connector in the AWS IoT Greengrass Developer Guide.
For more information about how to identify and resolve gateway issues, see Troubleshooting an AWS IoTSiteWise gateway (p. 232).
Topics• Choosing a gateway platform (p. 98)• Configuring a gateway (p. 99)• Configuring data sources (p. 114)• Upgrading a connector (p. 127)
Choosing a gateway platformChoose an AWS IoT SiteWise gateway platform that best suits your industrial operation. You canconfigure a gateway on any platform that can run AWS IoT Greengrass. All gateway devices must meetthe following requirements:
• Supports AWS IoT Greengrass Core software v1.10.0 or later. For more information, see Supportedplatforms and requirements in the AWS IoT Greengrass Developer Guide.
• Has at least 1 GB of RAM.• Has at least 10 GB of free disk space.• Supports a Java 8 virtual machine (JVM).
98
AWS IoT SiteWise User GuideConfiguring a gateway
Choose a gateway with sufficient disk, networking, and compute capacity for your workload.
The disk space required for caching data for intermittent internet connectivity depends on the followingfactors:
• Number of data streams uploaded
• Data points per data stream per second
• Size of each data point
• Communication speeds
• Expected network downtime
The compute capacity required to poll and upload data depends on the following factors:
• Number of data streams uploaded
• Data points per data stream per second
Configuring a gatewayA gateway serves as the intermediary between your OPC-UA servers and AWS IoT SiteWise. You caneasily deploy the AWS IoT SiteWise gateway software on any platform that can run AWS IoT Greengrass.For more information, see Choosing a gateway platform (p. 98).
To configure a gateway that runs on Amazon EC2, you can create the required dependencies froman AWS CloudFormation template. For more information, see Configuring gateway dependencies onAmazon Elastic Compute Cloud (p. 113).
NoteWe recommend that you complete the following steps with someone who has IT administrativeaccess to your local and corporate networks. These steps might require someone withknowledge of your OPC-UA servers and the authority to configure firewall settings.
Topics
• Setting up the gateway environment (p. 99)
• Creating an IAM policy and role (p. 101)
• Configuring an AWS IoT Greengrass group (p. 107)
• Configuring the AWS IoT SiteWise connector (p. 109)
• Adding the gateway to AWS IoT SiteWise (p. 112)
• Configuring gateway dependencies on Amazon Elastic Compute Cloud (p. 113)
Setting up the gateway environmentIn this procedure, you install AWS IoT Greengrass and configure your gateway to use with AWS IoTSiteWise.
NoteThis section includes instructions to install packages using the apt command. This is applicableto systems running Ubuntu or similar. If you aren't using a similar system, consult thedocumentation for your distribution and use the recommended package installer.
To set up the gateway
1. As appropriate, modify the BIOS settings of the gateway as follows.
99
AWS IoT SiteWise User GuideConfiguring a gateway
a. Ensure that the gateway automatically restarts after a potential power failure, if applicable.b. Ensure that the gateway won't hibernate or sleep, if applicable.
2. Ensure that the gateway connects to the internet.3. (Optional) To use the gateway without the mouse, keyboard, and monitor, do the following steps to
set up ssh on the gateway:
a. If you haven't already installed the SSH package, run the following command.
sudo apt install ssh
b. Run the following command.
service ssh status
c. Search for Active: active (running) in the output to confirm that the SSH server isrunning,
d. Press Q to exit.
You can use SSH to connect to the gateway from another computer by running the command sshusername@IPv4, where username is the user login and IPv4 is the IP address of the gateway.
Run the following command to use a port other than the default port 22.
ssh username@IPv4 -p port-number
4. Download and install AWS IoT Greengrass Core software v1.10.0 or later, and create an AWS IoTGreengrass group for your gateway. To do so, follow the instructions in Getting started with AWS IoTGreengrass in the AWS IoT Greengrass Developer Guide.
We recommend that you run the AWS IoT Greengrass device setup script to quickly get started. Ifyou want to review AWS IoT Greengrass requirements and processes more closely, you can walkthrough the steps in Module 1 and Module 2 to set up AWS IoT Greengrass.
ImportantReview the AWS Regions (p. 7) where AWS IoT SiteWise is supported. When you choose aRegion for AWS IoT Greengrass, make sure that the Region also supports AWS IoT SiteWise.Otherwise, you can't connect your gateway to AWS IoT SiteWise.
Before you continue to the next step, you should have AWS IoT Greengrass Core software installedon your gateway.
5. Run the following commands to install Java 8.
sudo apt updatesudo apt install openjdk-8-jre
The AWS IoT SiteWise gateway software that you install later in this guide uses a Java 8 runtime.6. Run the following command to verify that Java installed successfully.
java -version
7. The AWS IoT Greengrass Core software assumes a java8 directory. Run the following command tolink your Java installation to that java8 directory.
sudo ln -s /usr/bin/java /usr/bin/java8
100
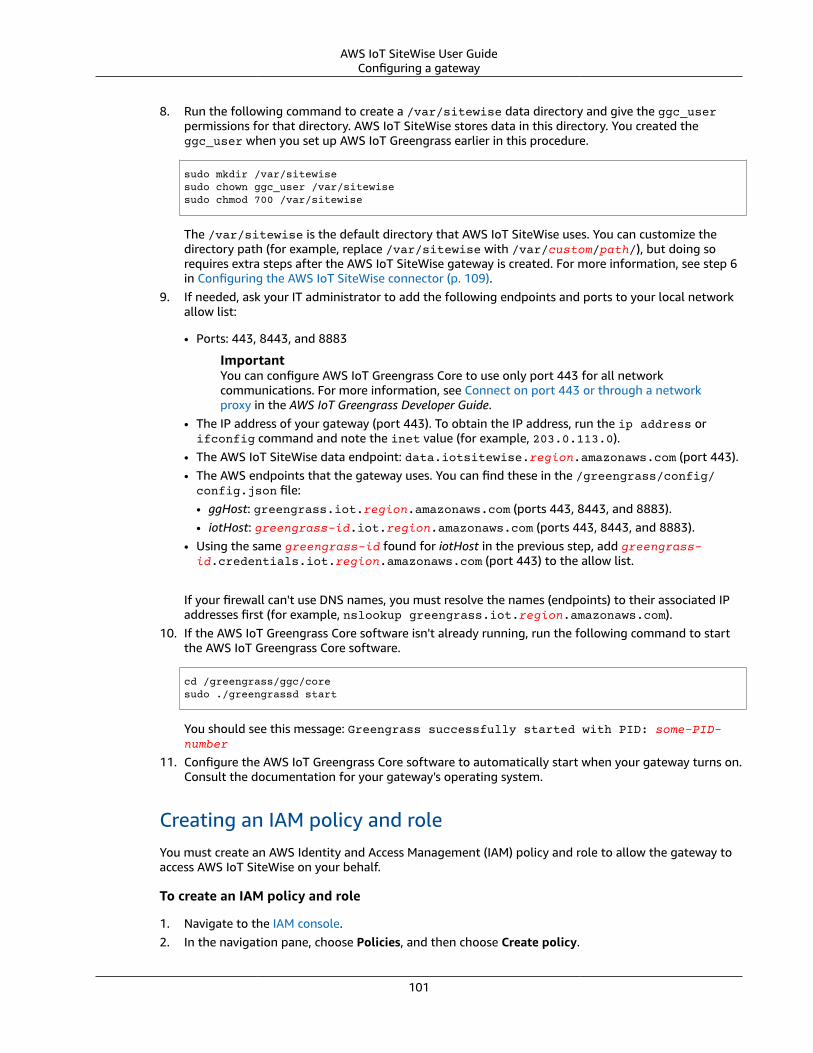
AWS IoT SiteWise User GuideConfiguring a gateway
8. Run the following command to create a /var/sitewise data directory and give the ggc_userpermissions for that directory. AWS IoT SiteWise stores data in this directory. You created theggc_user when you set up AWS IoT Greengrass earlier in this procedure.
sudo mkdir /var/sitewise sudo chown ggc_user /var/sitewisesudo chmod 700 /var/sitewise
The /var/sitewise is the default directory that AWS IoT SiteWise uses. You can customize thedirectory path (for example, replace /var/sitewise with /var/custom/path/), but doing sorequires extra steps after the AWS IoT SiteWise gateway is created. For more information, see step 6in Configuring the AWS IoT SiteWise connector (p. 109).
9. If needed, ask your IT administrator to add the following endpoints and ports to your local networkallow list:
• Ports: 443, 8443, and 8883
ImportantYou can configure AWS IoT Greengrass Core to use only port 443 for all networkcommunications. For more information, see Connect on port 443 or through a networkproxy in the AWS IoT Greengrass Developer Guide.
• The IP address of your gateway (port 443). To obtain the IP address, run the ip address orifconfig command and note the inet value (for example, 203.0.113.0).
• The AWS IoT SiteWise data endpoint: data.iotsitewise.region.amazonaws.com (port 443).• The AWS endpoints that the gateway uses. You can find these in the /greengrass/config/config.json file:• ggHost: greengrass.iot.region.amazonaws.com (ports 443, 8443, and 8883).• iotHost: greengrass-id.iot.region.amazonaws.com (ports 443, 8443, and 8883).
• Using the same greengrass-id found for iotHost in the previous step, add greengrass-id.credentials.iot.region.amazonaws.com (port 443) to the allow list.
If your firewall can't use DNS names, you must resolve the names (endpoints) to their associated IPaddresses first (for example, nslookup greengrass.iot.region.amazonaws.com).
10. If the AWS IoT Greengrass Core software isn't already running, run the following command to startthe AWS IoT Greengrass Core software.
cd /greengrass/ggc/coresudo ./greengrassd start
You should see this message: Greengrass successfully started with PID: some-PID-number
11. Configure the AWS IoT Greengrass Core software to automatically start when your gateway turns on.Consult the documentation for your gateway's operating system.
Creating an IAM policy and roleYou must create an AWS Identity and Access Management (IAM) policy and role to allow the gateway toaccess AWS IoT SiteWise on your behalf.
To create an IAM policy and role
1. Navigate to the IAM console.2. In the navigation pane, choose Policies, and then choose Create policy.
101
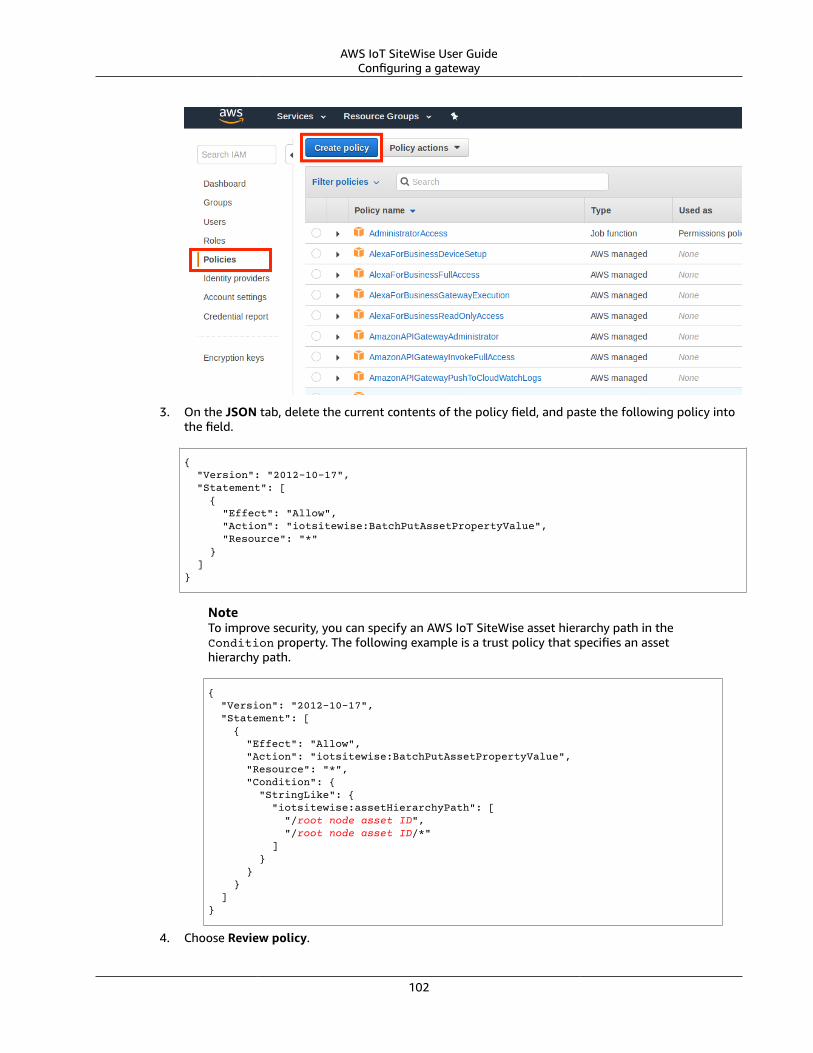
AWS IoT SiteWise User GuideConfiguring a gateway
3. On the JSON tab, delete the current contents of the policy field, and paste the following policy intothe field.
{ "Version": "2012-10-17", "Statement": [ { "Effect": "Allow", "Action": "iotsitewise:BatchPutAssetPropertyValue", "Resource": "*" } ]}
NoteTo improve security, you can specify an AWS IoT SiteWise asset hierarchy path in theCondition property. The following example is a trust policy that specifies an assethierarchy path.
{ "Version": "2012-10-17", "Statement": [ { "Effect": "Allow", "Action": "iotsitewise:BatchPutAssetPropertyValue", "Resource": "*", "Condition": { "StringLike": { "iotsitewise:assetHierarchyPath": [ "/root node asset ID", "/root node asset ID/*" ] } } } ]}
4. Choose Review policy.
102
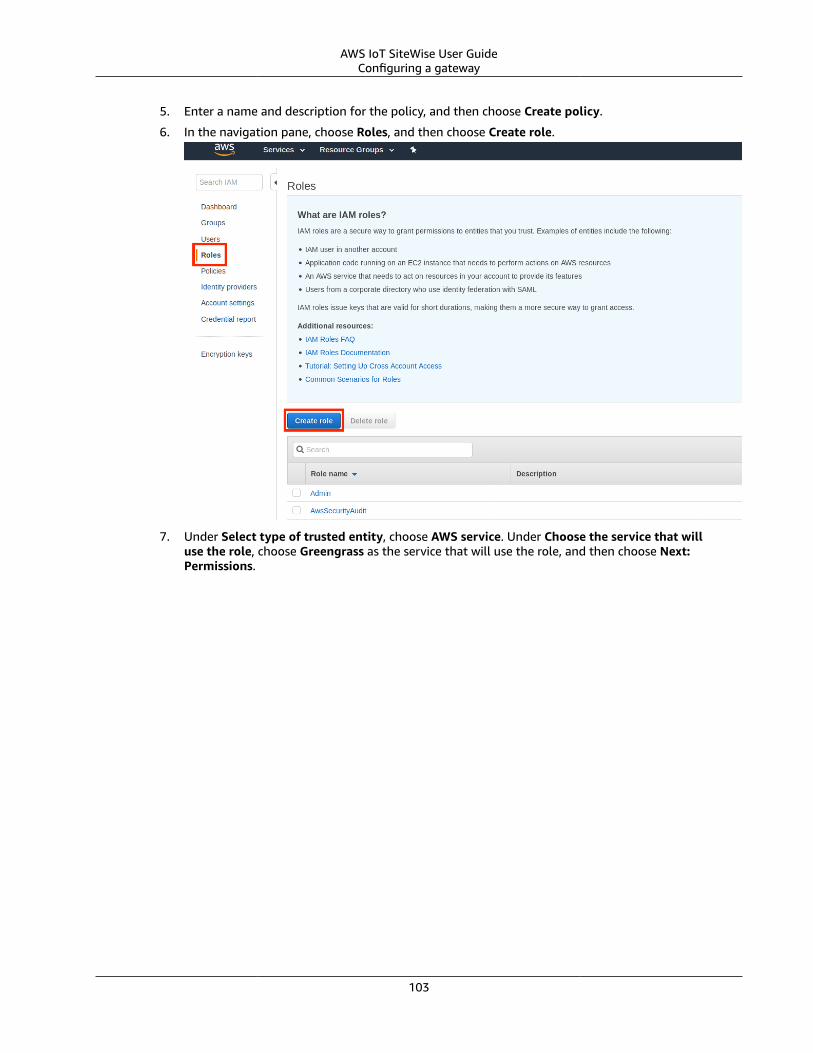
AWS IoT SiteWise User GuideConfiguring a gateway
5. Enter a name and description for the policy, and then choose Create policy.
6. In the navigation pane, choose Roles, and then choose Create role.
7. Under Select type of trusted entity, choose AWS service. Under Choose the service that willuse the role, choose Greengrass as the service that will use the role, and then choose Next:Permissions.
103

AWS IoT SiteWise User GuideConfiguring a gateway
8. Search for the policy that you created (SiteWiseDemo), select the check box, and then choose Next:Tags.
104
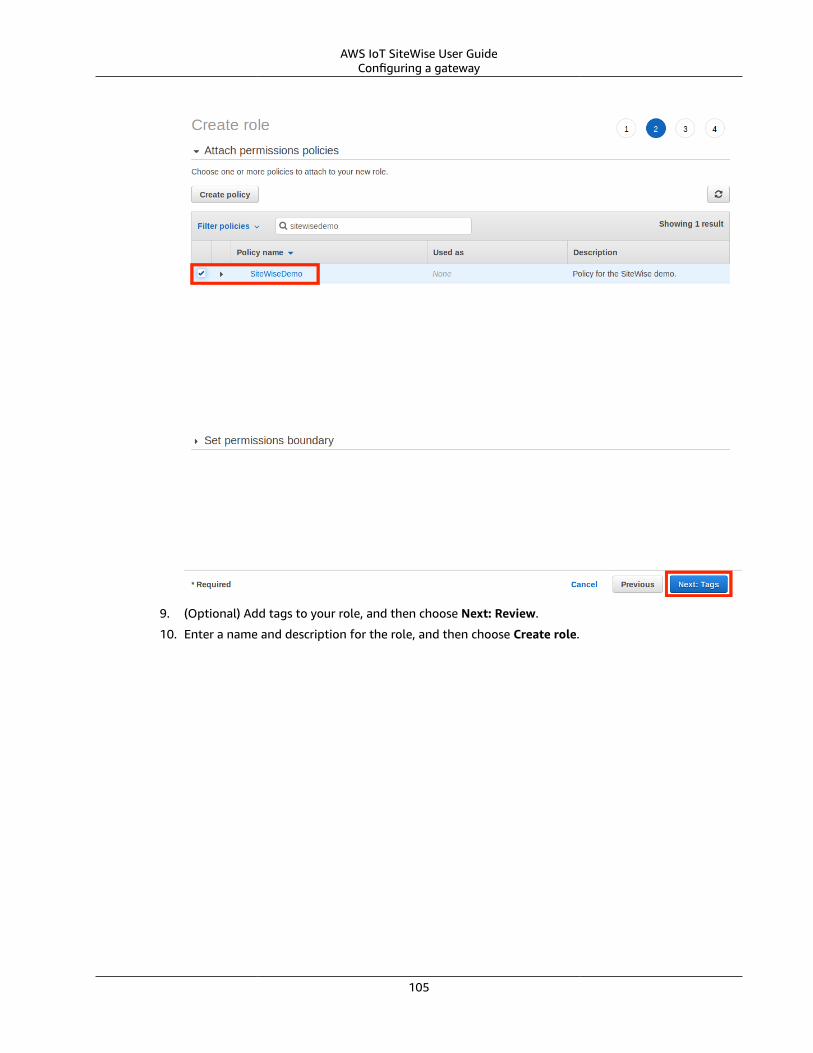
AWS IoT SiteWise User GuideConfiguring a gateway
9. (Optional) Add tags to your role, and then choose Next: Review.
10. Enter a name and description for the role, and then choose Create role.
105
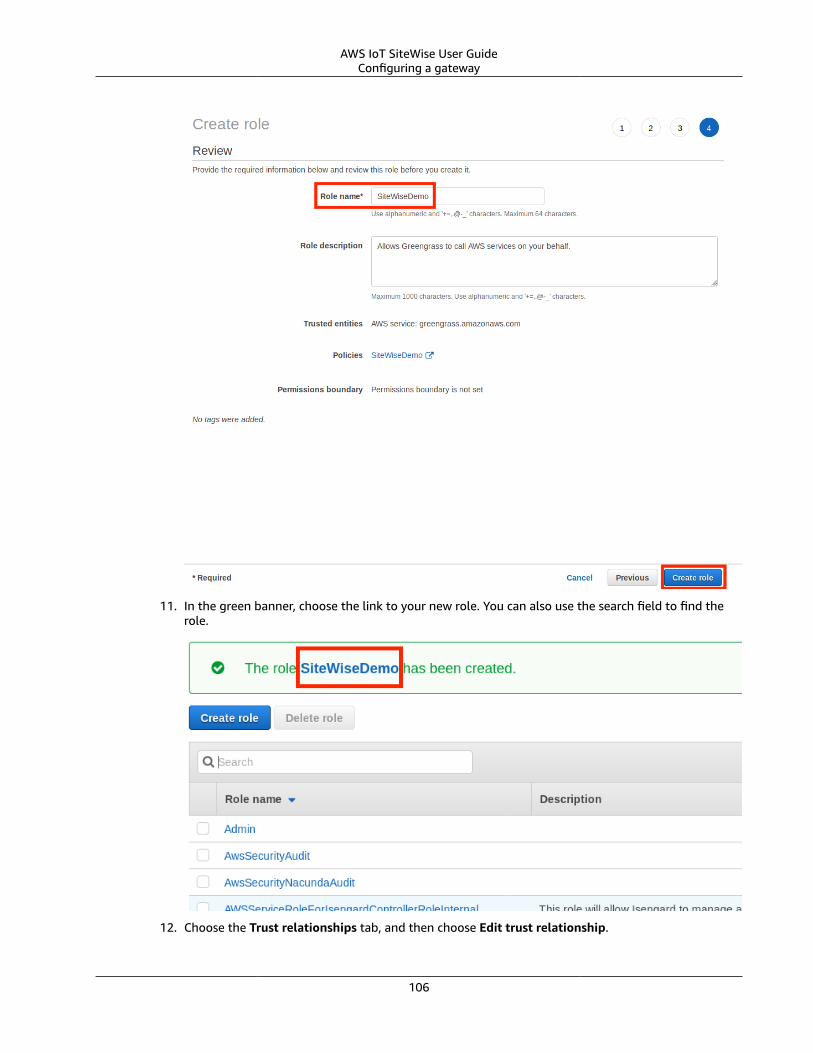
AWS IoT SiteWise User GuideConfiguring a gateway
11. In the green banner, choose the link to your new role. You can also use the search field to find therole.
12. Choose the Trust relationships tab, and then choose Edit trust relationship.
106

AWS IoT SiteWise User GuideConfiguring a gateway
13. Replace the current contents of the policy field with the following, and then choose Update TrustPolicy.
{ "Version": "2012-10-17", "Statement": [ { "Effect": "Allow", "Principal": { "Service": "greengrass.amazonaws.com" }, "Action": "sts:AssumeRole" } ]}
Configuring an AWS IoT Greengrass group
To attach an IAM role to a group and enable stream manager
1. Navigate to the AWS IoT Greengrass console.
2. In the left navigation pane, under Greengrass, choose Groups, and then choose the group that youcreated in Setting up the gateway environment (p. 99).
107
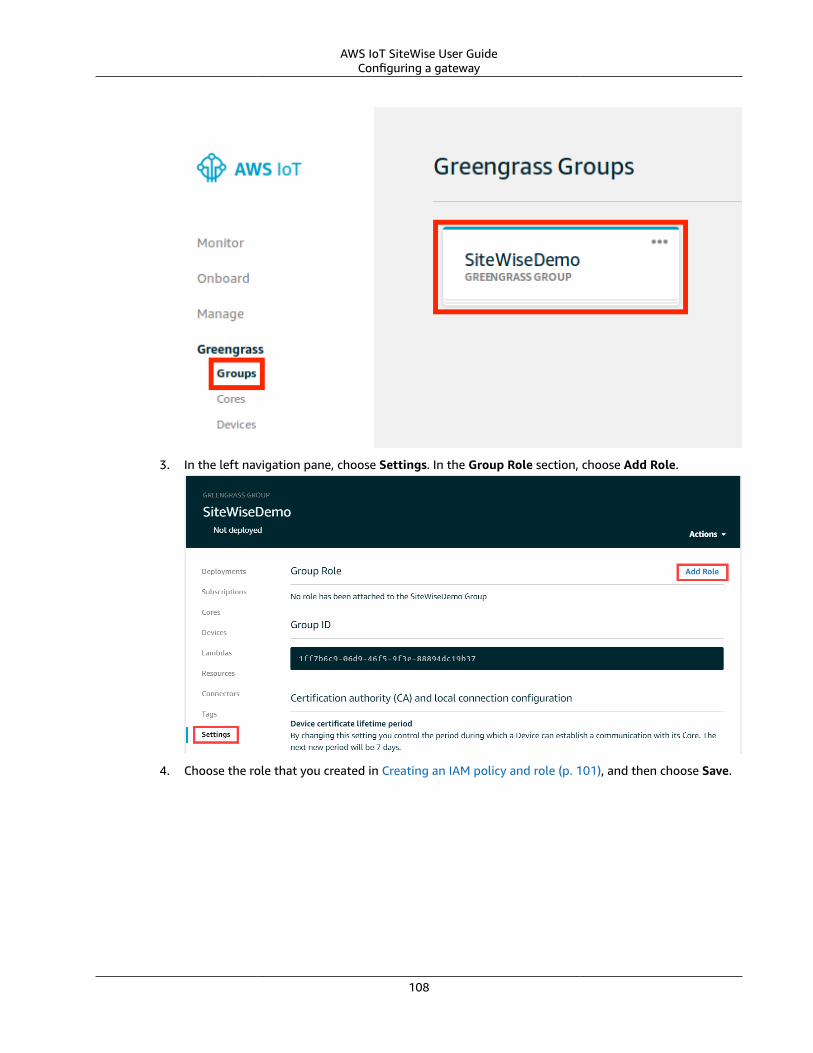
AWS IoT SiteWise User GuideConfiguring a gateway
3. In the left navigation pane, choose Settings. In the Group Role section, choose Add Role.
4. Choose the role that you created in Creating an IAM policy and role (p. 101), and then choose Save.
108
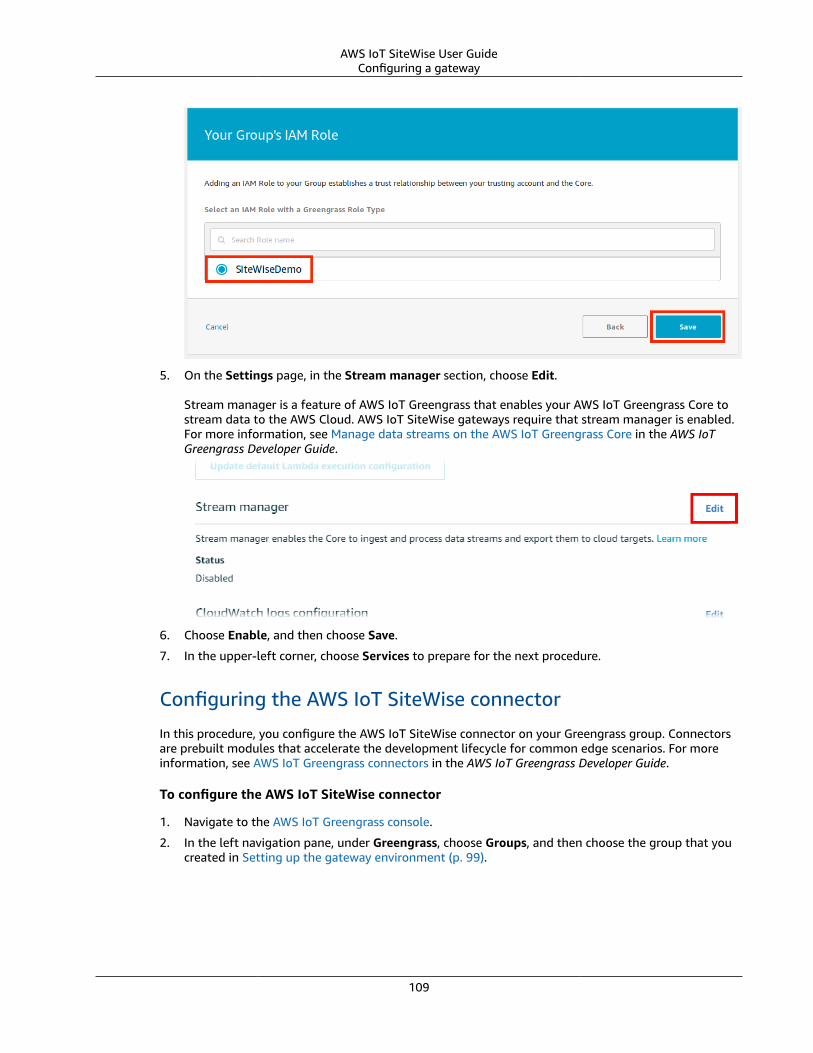
AWS IoT SiteWise User GuideConfiguring a gateway
5. On the Settings page, in the Stream manager section, choose Edit.
Stream manager is a feature of AWS IoT Greengrass that enables your AWS IoT Greengrass Core tostream data to the AWS Cloud. AWS IoT SiteWise gateways require that stream manager is enabled.For more information, see Manage data streams on the AWS IoT Greengrass Core in the AWS IoTGreengrass Developer Guide.
6. Choose Enable, and then choose Save.
7. In the upper-left corner, choose Services to prepare for the next procedure.
Configuring the AWS IoT SiteWise connector
In this procedure, you configure the AWS IoT SiteWise connector on your Greengrass group. Connectorsare prebuilt modules that accelerate the development lifecycle for common edge scenarios. For moreinformation, see AWS IoT Greengrass connectors in the AWS IoT Greengrass Developer Guide.
To configure the AWS IoT SiteWise connector
1. Navigate to the AWS IoT Greengrass console.
2. In the left navigation pane, under Greengrass, choose Groups, and then choose the group that youcreated in Setting up the gateway environment (p. 99).
109
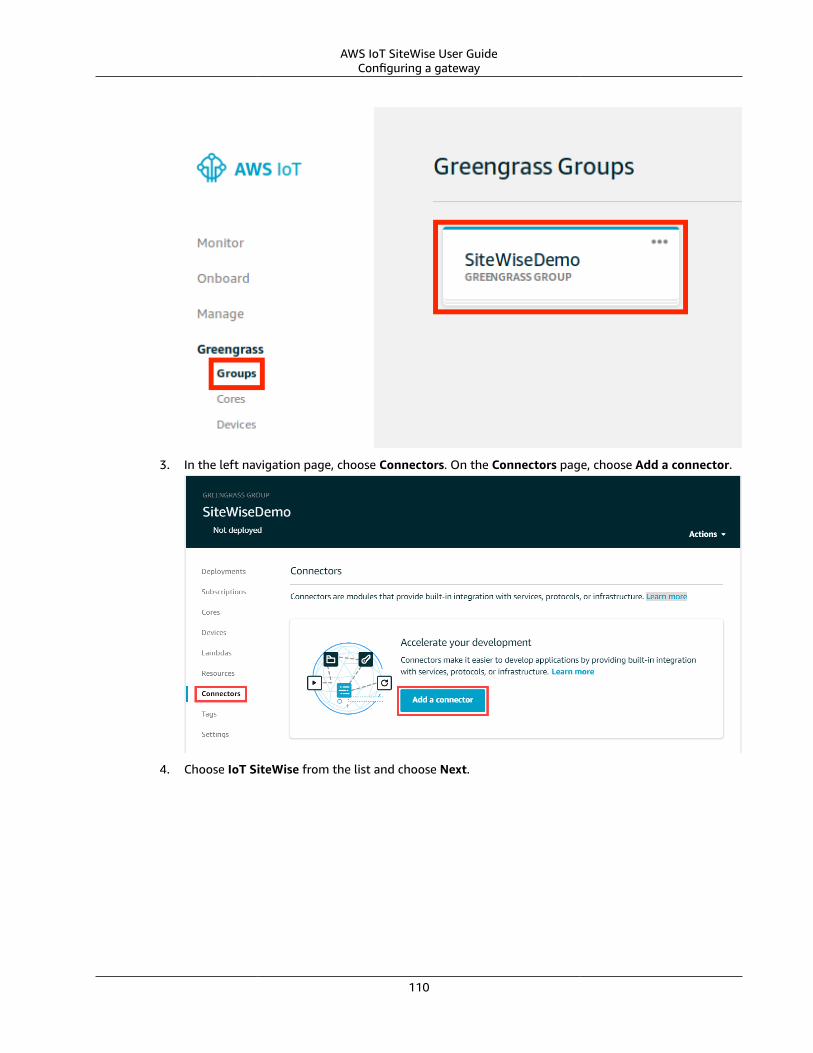
AWS IoT SiteWise User GuideConfiguring a gateway
3. In the left navigation page, choose Connectors. On the Connectors page, choose Add a connector.
4. Choose IoT SiteWise from the list and choose Next.
110
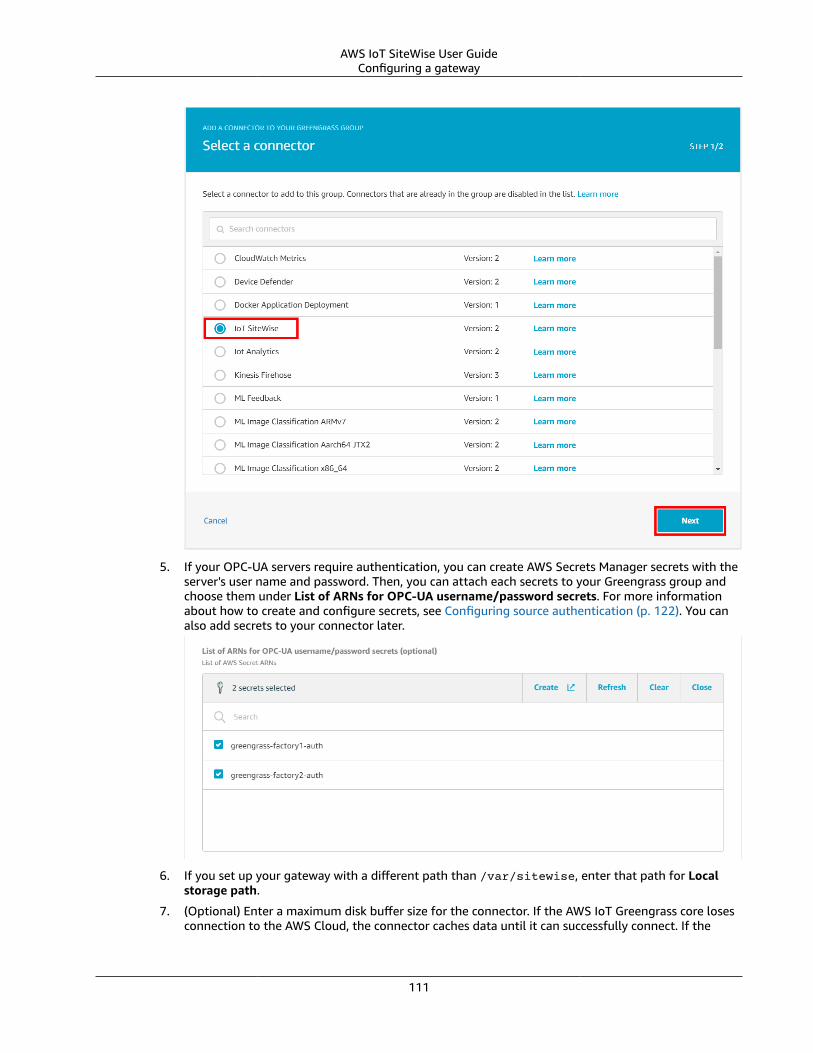
AWS IoT SiteWise User GuideConfiguring a gateway
5. If your OPC-UA servers require authentication, you can create AWS Secrets Manager secrets with theserver's user name and password. Then, you can attach each secrets to your Greengrass group andchoose them under List of ARNs for OPC-UA username/password secrets. For more informationabout how to create and configure secrets, see Configuring source authentication (p. 122). You canalso add secrets to your connector later.
6. If you set up your gateway with a different path than /var/sitewise, enter that path for Localstorage path.
7. (Optional) Enter a maximum disk buffer size for the connector. If the AWS IoT Greengrass core losesconnection to the AWS Cloud, the connector caches data until it can successfully connect. If the
111

AWS IoT SiteWise User GuideConfiguring a gateway
cache size exceeds the maximum disk buffer size, the connector discards the oldest data from thequeue.
8. Choose Add.
9. In the upper-right corner, in the Actions menu, choose Deploy.
10. Choose Automatic detection to start the deployment.
If the deployment fails, choose Deploy again. If the deployment continues to fail, see AWS IoTGreengrass deployment troubleshooting.
Adding the gateway to AWS IoT SiteWiseIn this procedure, you add your gateway's Greengrass group to AWS IoT SiteWise. After you register yourgateway with AWS IoT SiteWise, the service can deploy your data source configurations to your gateway.
To add the gateway to AWS IoT SiteWise
1. Navigate to the AWS IoT SiteWise console.
2. Choose Add gateway.
3. On the Add SiteWise gateway page, do the following:
1. Enter a Name for the gateway. Consider including the location of the gateway in the name so thatyou can easily identify it.
2. For Greengrass group ID, choose the Greengrass group that you created earlier.
Example
3. Choose Add gateway.
After your gateway creates, you can add a source for each OPC-UA server from which you want yourgateway to ingest data. For more information, see Configuring data sources (p. 114).
112
AWS IoT SiteWise User GuideConfiguring a gateway
You can view CloudWatch metrics to verify that your gateway is connected to AWS IoT SiteWise. Formore information, see Gateway metrics (p. 226).
Configuring gateway dependencies on Amazon Elastic ComputeCloudYou can configure a gateway that runs on Amazon EC2. The gateway runs in the AWS Cloud and ingestsdata from your industrial data sources to AWS IoT SiteWise. For more information, see What is AmazonEC2? in the Amazon EC2 User Guide for Linux Instances.
AWS IoT SiteWise provides an AWS CloudFormation template that you can use to easily creategateway dependencies on an Amazon EC2 instance. When you create a stack from the template, AWSCloudFormation creates the required AWS resources for you to run a gateway. Then, you can create agateway that uses the AWS IoT Greengrass Core running on the Amazon EC2 instance.
The AWS CloudFormation template creates the following resources:
• An Amazon EC2 instance
• An Amazon Virtual Private Cloud
• An AWS IoT Greengrass group
• AWS Identity and Access Management (IAM) roles
ImportantYou will be charged for the resources that this AWS CloudFormation template creates and uses.These charges include an AWS IoT Greengrass device and compute capacity and data transfer forAmazon EC2.
Prerequisites
To create gateway dependencies on Amazon EC2 from this stack template, you need the following:
• The AWS IoT SiteWise service-linked role in your AWS account. This role creates automatically whenyou use the AWS IoT SiteWise console. For more information, see Using service-linked roles for AWSIoT SiteWise (p. 208).
• An AWS IoT Greengrass service role attached to your AWS account in the Region where you create thisstack. For more information, see AWS IoT Greengrass service role in the AWS IoT Greengrass DeveloperGuide.
Creating the AWS CloudFormation stack
You can create a stack in AWS CloudFormation to create an Amazon EC2 instance with AWS IoTGreengrass gateway dependencies.
To create gateway dependencies on Amazon EC2
1. Open the AWS CloudFormation template and sign in to the AWS Management Console.
2. On the Create stack page, choose Next at the bottom of the page.
3. On the Specify stack details page, enter a GroupName for the AWS IoT Greengrass group that thistemplate creates for the gateway.
4. (Optional) Change any of the template's other parameters:
• InstanceType – The Amazon EC2 instance type. For more information, see Instance types in theAmazon EC2 User Guide for Linux Instances.
113
AWS IoT SiteWise User GuideConfiguring data sources
• SecurityAccessCIDR – The CIDR block for the virtual private cloud (VPC). For more information,see VPCs and subnets in the Amazon VPC User Guide.
5. Choose Next.
6. On the Configure stack options page, choose Next.
7. At the bottom of the page, choose the check boxes that acknowledge that AWS CloudFormationrequires access capabilities.
8. Choose Create stack.
The stack takes around 5 minutes to create. If the stack fails to create, your account might haveinsufficient permissions, or you might not have the prerequisite IAM roles. Follow these steps todelete the stack and try again:
a. Choose Delete in the upper-right corner.
The stack takes a few minutes to delete.
b. If the stack fails to delete, choose Delete again.
c. If the stack fails to delete again, follow the steps in the AWS CloudFormation console to skip theresources that failed to delete, and try again.
9. After the stack creates successfully, you can create a gateway with the AWS IoT Greengrass groupthat deploys to the Amazon EC2 instance. For more information, see Adding the gateway to AWS IoTSiteWise (p. 112).
ImportantAfter you create the stack, you can see the new resources in your AWS account. Your gatewaymight stop working correctly if you delete or modify these resources. We recommend that youdon't modify these resources unless you want to change settings on your gateway's AWS IoTGreengrass group.
Configuring data sourcesAfter you set up a gateway, you can configure data sources so that your gateway can ingest data fromlocal servers to AWS IoT SiteWise. Each source represents a local server, such as an OPC-UA server, thatyour gateway connects and retrieves industrial data streams. For more information about setting up agateway, see Configuring a gateway (p. 99).
NoteAWS IoT SiteWise restarts your gateway each time you add or edit a source. Your gateway won'tingest data while it's restarting. The time to restart your gateway depends on the number ofOPC-UA tags on your gateway's OPC-UA sources. Restart time can range from a few seconds (fora gateway with few tags) to several minutes (for a gateway with many tags).
After you create sources, you can associate your data streams with an asset. For more information abouthow to create and use assets, see Modeling industrial assets (p. 137).
You can view CloudWatch metrics to verify that a data source is connected to AWS IoT SiteWise. Formore information, see Gateway metrics (p. 226).
Topics
• Configuring data sources (console) (p. 115)
• Configuring data sources (AWS CLI) (p. 116)
• Enabling your source servers to trust the gateway (p. 121)
• Configuring source authentication (p. 122)
• Using OPC-UA node filters (p. 126)
114
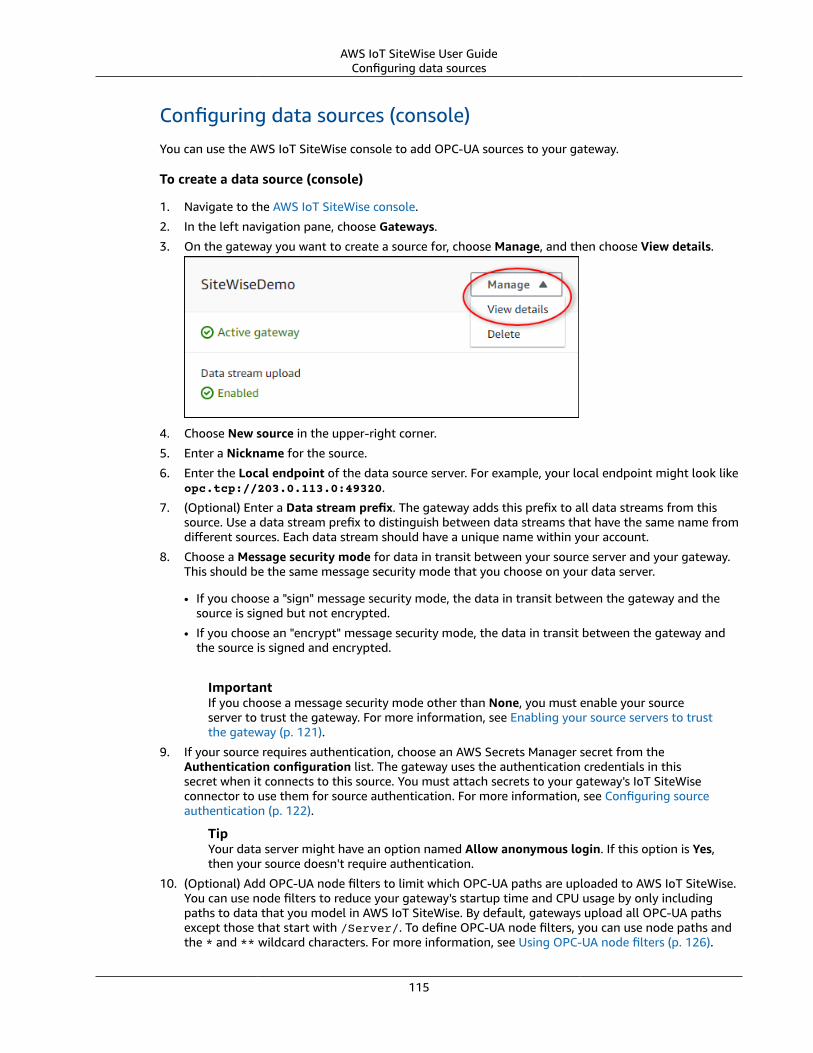
AWS IoT SiteWise User GuideConfiguring data sources
Configuring data sources (console)You can use the AWS IoT SiteWise console to add OPC-UA sources to your gateway.
To create a data source (console)
1. Navigate to the AWS IoT SiteWise console.
2. In the left navigation pane, choose Gateways.
3. On the gateway you want to create a source for, choose Manage, and then choose View details.
4. Choose New source in the upper-right corner.
5. Enter a Nickname for the source.
6. Enter the Local endpoint of the data source server. For example, your local endpoint might look likeopc.tcp://203.0.113.0:49320.
7. (Optional) Enter a Data stream prefix. The gateway adds this prefix to all data streams from thissource. Use a data stream prefix to distinguish between data streams that have the same name fromdifferent sources. Each data stream should have a unique name within your account.
8. Choose a Message security mode for data in transit between your source server and your gateway.This should be the same message security mode that you choose on your data server.
• If you choose a "sign" message security mode, the data in transit between the gateway and thesource is signed but not encrypted.
• If you choose an "encrypt" message security mode, the data in transit between the gateway andthe source is signed and encrypted.
ImportantIf you choose a message security mode other than None, you must enable your sourceserver to trust the gateway. For more information, see Enabling your source servers to trustthe gateway (p. 121).
9. If your source requires authentication, choose an AWS Secrets Manager secret from theAuthentication configuration list. The gateway uses the authentication credentials in thissecret when it connects to this source. You must attach secrets to your gateway's IoT SiteWiseconnector to use them for source authentication. For more information, see Configuring sourceauthentication (p. 122).
TipYour data server might have an option named Allow anonymous login. If this option is Yes,then your source doesn't require authentication.
10. (Optional) Add OPC-UA node filters to limit which OPC-UA paths are uploaded to AWS IoT SiteWise.You can use node filters to reduce your gateway's startup time and CPU usage by only includingpaths to data that you model in AWS IoT SiteWise. By default, gateways upload all OPC-UA pathsexcept those that start with /Server/. To define OPC-UA node filters, you can use node paths andthe * and ** wildcard characters. For more information, see Using OPC-UA node filters (p. 126).
115

AWS IoT SiteWise User GuideConfiguring data sources
11. Choose Save.
AWS IoT SiteWise deploys the gateway configuration to your AWS IoT Greengrass core. You don'tneed to manually trigger a deployment.
Configuring data sources (AWS CLI)You can use the AWS IoT SiteWise API and AWS Command Line Interface to add sources to your gateway.You define sources in gateway capabilities. A gateway capability represents a software feature that runson the gateway, such as the capability to collect industrial data from OPC-UA sources.
Gateway capabilities have the following components:
• A configuration – A JSON document that defines all of the data sources for a capability.• A namespace – A unique string that identifies the type and version of a capability. For example, the
OPC-UA source capability namespace is iotsitewise:opcuacollector:version, where versionis the version of the OPC-UA capability. All OPC-UA sources are defined in one capability with thisnamespace.
• A synchronization status – A status that indicates if a capability is synchronized between the AWSCloud and the gateway. The sync status can be one of the following:• IN_SYNC – The gateway is running the capability configuration.• OUT_OF_SYNC – The gateway hasn't received the capability configuration.• SYNC_FAILED – The gateway rejected the capability configuration.
After you update a capability configuration, its sync status is OUT_OF_SYNC until the gateway receivesand applies or rejects the updated configuration.
Use the following operations to query and update your gateway sources and capability configurations:
• DescribeGateway – Retrieves information about a specific gateway. The response includes a list ofcapability summaries, including capability namespaces.
• DescribeGatewayCapabilityConfiguration – Retrieves the configuration of a specific capability. Use thisoperation to retrieve a capability configuration to update.
• ListGateways – Lists information about all gateways. The response includes a list of capabilitysummaries for each gateway, including capability namespaces.
• UpdateGatewayCapabilityConfiguration – Updates a gateway capability configuration or defines a newcapability configuration. This operation identifies capabilities by a capability namespace. If you providea namespace that already exists, this operation updates the capability for that namespace. Otherwise,this operation creates a new capability.
WarningThe UpdateGatewayCapabilityConfiguration operation overwrites the existing capabilityconfiguration with the configuration that you provide in the payload. To avoid deleting yourcapability's configuration, you must add to the existing configuration when you update thecapability.
Gateway capabilities• OPC-UA sources (p. 116)
OPC-UA sources
You can define OPC-UA data sources in a gateway capability. You must define all of your OPC-UA sourcesin a single capability configuration.
116
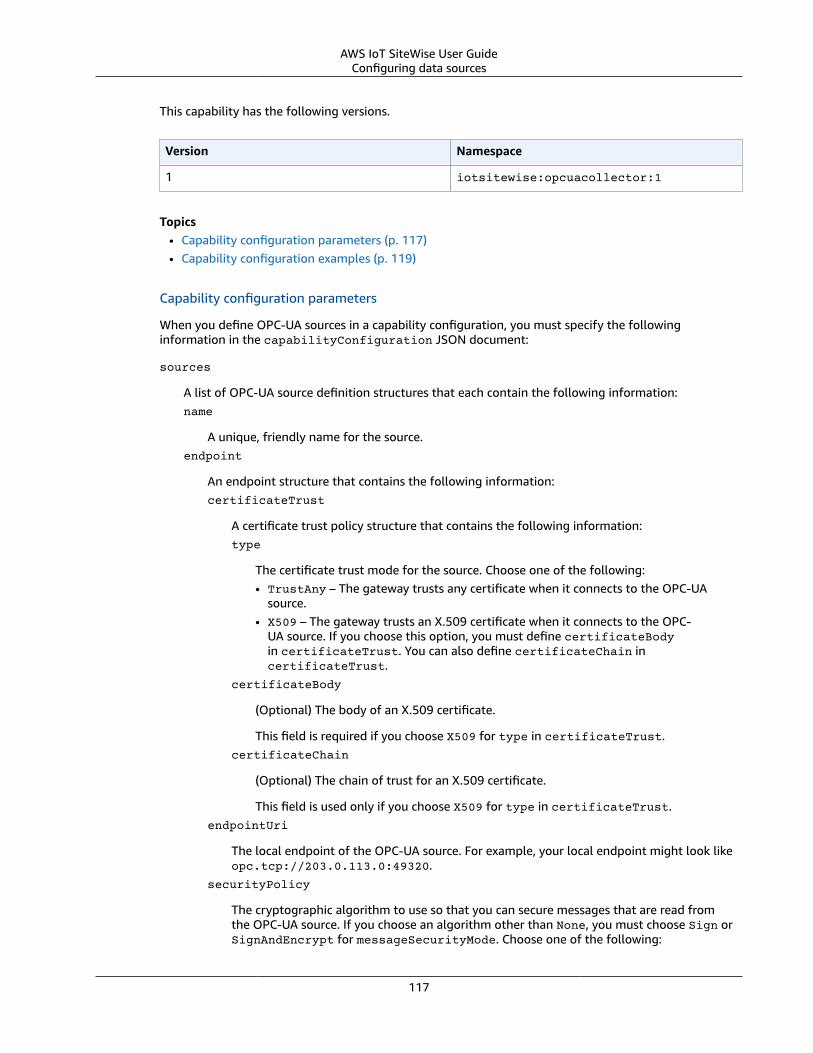
AWS IoT SiteWise User GuideConfiguring data sources
This capability has the following versions.
Version Namespace
1 iotsitewise:opcuacollector:1
Topics• Capability configuration parameters (p. 117)• Capability configuration examples (p. 119)
Capability configuration parameters
When you define OPC-UA sources in a capability configuration, you must specify the followinginformation in the capabilityConfiguration JSON document:
sources
A list of OPC-UA source definition structures that each contain the following information:name
A unique, friendly name for the source.endpoint
An endpoint structure that contains the following information:certificateTrust
A certificate trust policy structure that contains the following information:type
The certificate trust mode for the source. Choose one of the following:• TrustAny – The gateway trusts any certificate when it connects to the OPC-UA
source.• X509 – The gateway trusts an X.509 certificate when it connects to the OPC-
UA source. If you choose this option, you must define certificateBodyin certificateTrust. You can also define certificateChain incertificateTrust.
certificateBody
(Optional) The body of an X.509 certificate.
This field is required if you choose X509 for type in certificateTrust.certificateChain
(Optional) The chain of trust for an X.509 certificate.
This field is used only if you choose X509 for type in certificateTrust.endpointUri
The local endpoint of the OPC-UA source. For example, your local endpoint might look likeopc.tcp://203.0.113.0:49320.
securityPolicy
The cryptographic algorithm to use so that you can secure messages that are read fromthe OPC-UA source. If you choose an algorithm other than None, you must choose Sign orSignAndEncrypt for messageSecurityMode. Choose one of the following:
117
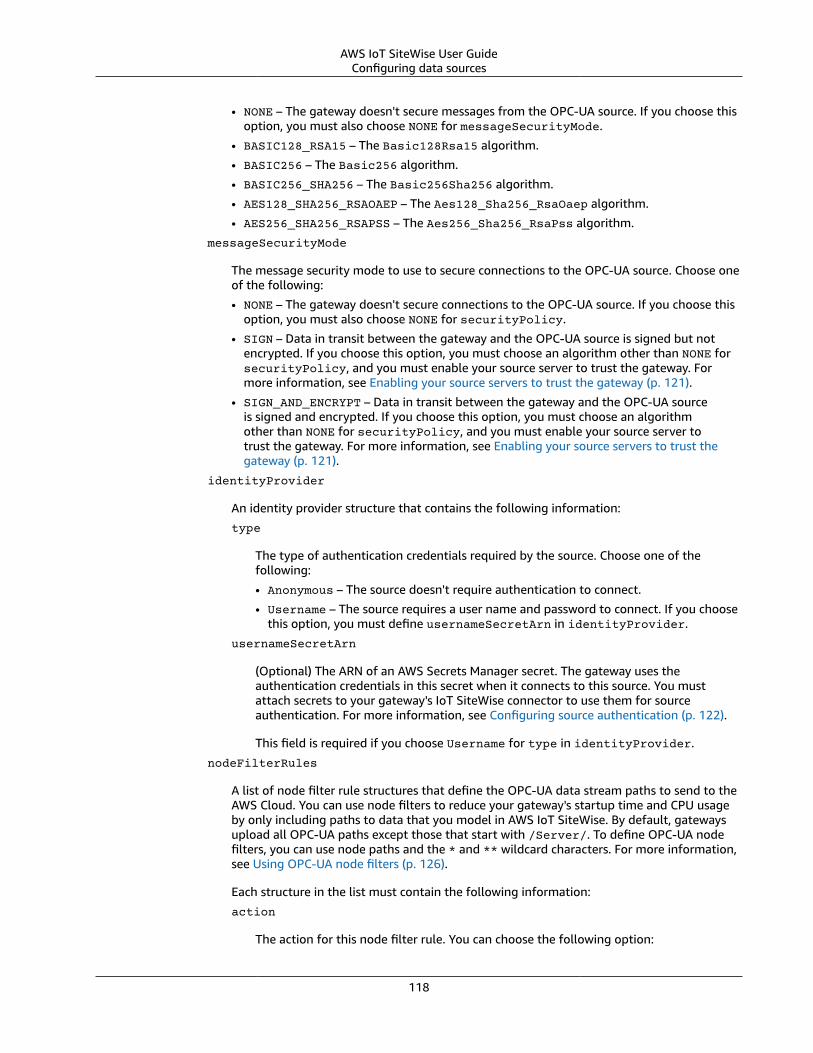
AWS IoT SiteWise User GuideConfiguring data sources
• NONE – The gateway doesn't secure messages from the OPC-UA source. If you choose thisoption, you must also choose NONE for messageSecurityMode.
• BASIC128_RSA15 – The Basic128Rsa15 algorithm.
• BASIC256 – The Basic256 algorithm.
• BASIC256_SHA256 – The Basic256Sha256 algorithm.
• AES128_SHA256_RSAOAEP – The Aes128_Sha256_RsaOaep algorithm.
• AES256_SHA256_RSAPSS – The Aes256_Sha256_RsaPss algorithm.
messageSecurityMode
The message security mode to use to secure connections to the OPC-UA source. Choose oneof the following:
• NONE – The gateway doesn't secure connections to the OPC-UA source. If you choose thisoption, you must also choose NONE for securityPolicy.
• SIGN – Data in transit between the gateway and the OPC-UA source is signed but notencrypted. If you choose this option, you must choose an algorithm other than NONE forsecurityPolicy, and you must enable your source server to trust the gateway. Formore information, see Enabling your source servers to trust the gateway (p. 121).
• SIGN_AND_ENCRYPT – Data in transit between the gateway and the OPC-UA sourceis signed and encrypted. If you choose this option, you must choose an algorithmother than NONE for securityPolicy, and you must enable your source server totrust the gateway. For more information, see Enabling your source servers to trust thegateway (p. 121).
identityProvider
An identity provider structure that contains the following information:
type
The type of authentication credentials required by the source. Choose one of thefollowing:
• Anonymous – The source doesn't require authentication to connect.
• Username – The source requires a user name and password to connect. If you choosethis option, you must define usernameSecretArn in identityProvider.
usernameSecretArn
(Optional) The ARN of an AWS Secrets Manager secret. The gateway uses theauthentication credentials in this secret when it connects to this source. You mustattach secrets to your gateway's IoT SiteWise connector to use them for sourceauthentication. For more information, see Configuring source authentication (p. 122).
This field is required if you choose Username for type in identityProvider.
nodeFilterRules
A list of node filter rule structures that define the OPC-UA data stream paths to send to theAWS Cloud. You can use node filters to reduce your gateway's startup time and CPU usageby only including paths to data that you model in AWS IoT SiteWise. By default, gatewaysupload all OPC-UA paths except those that start with /Server/. To define OPC-UA nodefilters, you can use node paths and the * and ** wildcard characters. For more information,see Using OPC-UA node filters (p. 126).
Each structure in the list must contain the following information:
action
The action for this node filter rule. You can choose the following option:
118
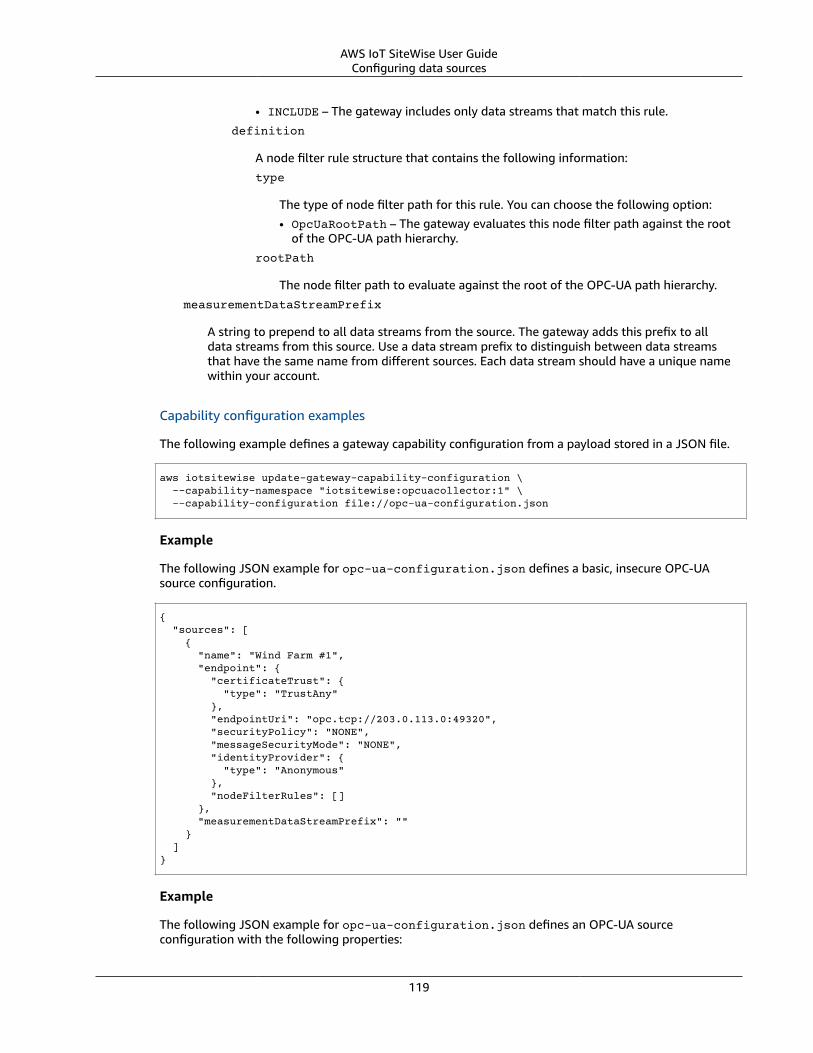
AWS IoT SiteWise User GuideConfiguring data sources
• INCLUDE – The gateway includes only data streams that match this rule.definition
A node filter rule structure that contains the following information:type
The type of node filter path for this rule. You can choose the following option:• OpcUaRootPath – The gateway evaluates this node filter path against the root
of the OPC-UA path hierarchy.rootPath
The node filter path to evaluate against the root of the OPC-UA path hierarchy.measurementDataStreamPrefix
A string to prepend to all data streams from the source. The gateway adds this prefix to alldata streams from this source. Use a data stream prefix to distinguish between data streamsthat have the same name from different sources. Each data stream should have a unique namewithin your account.
Capability configuration examples
The following example defines a gateway capability configuration from a payload stored in a JSON file.
aws iotsitewise update-gateway-capability-configuration \ --capability-namespace "iotsitewise:opcuacollector:1" \ --capability-configuration file://opc-ua-configuration.json
Example
The following JSON example for opc-ua-configuration.json defines a basic, insecure OPC-UAsource configuration.
{ "sources": [ { "name": "Wind Farm #1", "endpoint": { "certificateTrust": { "type": "TrustAny" }, "endpointUri": "opc.tcp://203.0.113.0:49320", "securityPolicy": "NONE", "messageSecurityMode": "NONE", "identityProvider": { "type": "Anonymous" }, "nodeFilterRules": [] }, "measurementDataStreamPrefix": "" } ]}
Example
The following JSON example for opc-ua-configuration.json defines an OPC-UA sourceconfiguration with the following properties:
119
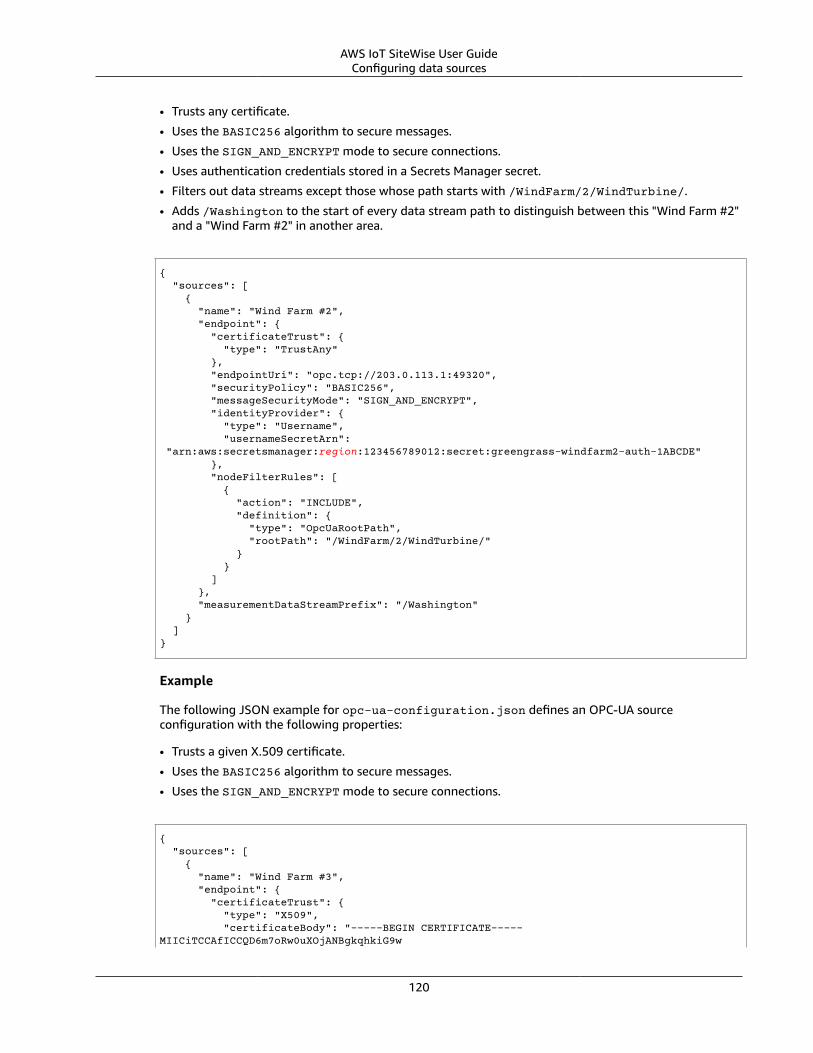
AWS IoT SiteWise User GuideConfiguring data sources
• Trusts any certificate.
• Uses the BASIC256 algorithm to secure messages.
• Uses the SIGN_AND_ENCRYPT mode to secure connections.
• Uses authentication credentials stored in a Secrets Manager secret.
• Filters out data streams except those whose path starts with /WindFarm/2/WindTurbine/.
• Adds /Washington to the start of every data stream path to distinguish between this "Wind Farm #2"and a "Wind Farm #2" in another area.
{ "sources": [ { "name": "Wind Farm #2", "endpoint": { "certificateTrust": { "type": "TrustAny" }, "endpointUri": "opc.tcp://203.0.113.1:49320", "securityPolicy": "BASIC256", "messageSecurityMode": "SIGN_AND_ENCRYPT", "identityProvider": { "type": "Username", "usernameSecretArn": "arn:aws:secretsmanager:region:123456789012:secret:greengrass-windfarm2-auth-1ABCDE" }, "nodeFilterRules": [ { "action": "INCLUDE", "definition": { "type": "OpcUaRootPath", "rootPath": "/WindFarm/2/WindTurbine/" } } ] }, "measurementDataStreamPrefix": "/Washington" } ]}
Example
The following JSON example for opc-ua-configuration.json defines an OPC-UA sourceconfiguration with the following properties:
• Trusts a given X.509 certificate.
• Uses the BASIC256 algorithm to secure messages.
• Uses the SIGN_AND_ENCRYPT mode to secure connections.
{ "sources": [ { "name": "Wind Farm #3", "endpoint": { "certificateTrust": { "type": "X509", "certificateBody": "-----BEGIN CERTIFICATE-----MIICiTCCAfICCQD6m7oRw0uXOjANBgkqhkiG9w
120
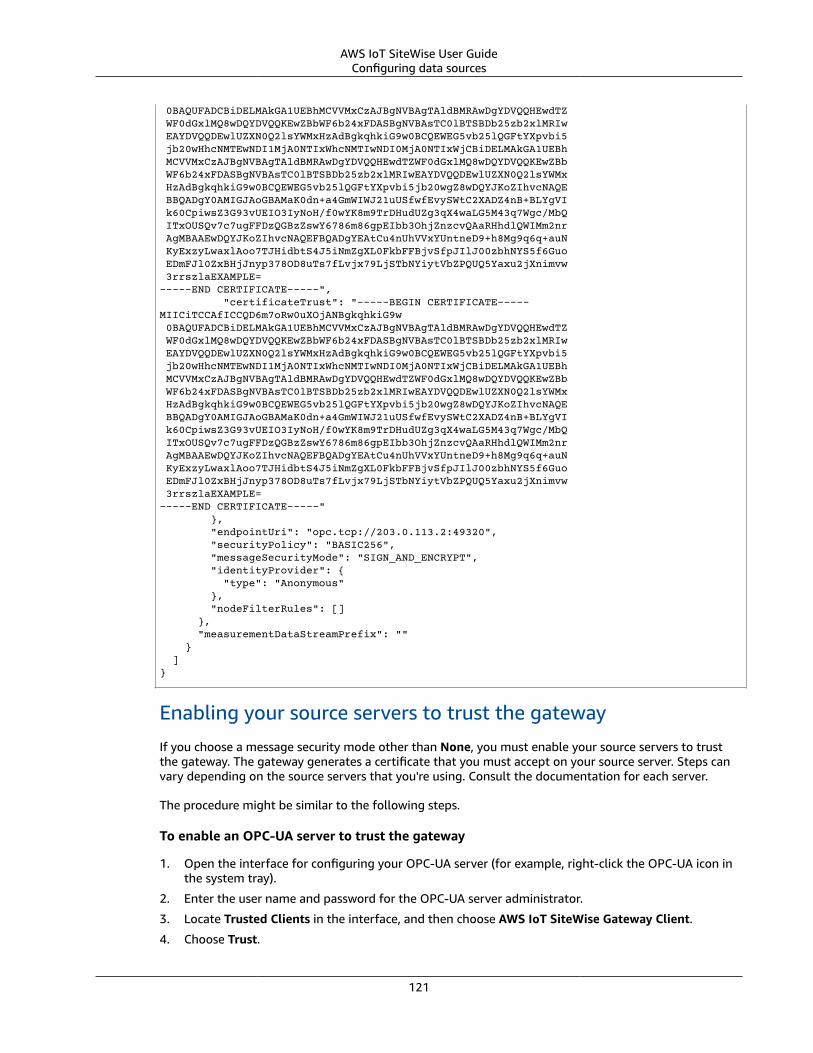
AWS IoT SiteWise User GuideConfiguring data sources
0BAQUFADCBiDELMAkGA1UEBhMCVVMxCzAJBgNVBAgTAldBMRAwDgYDVQQHEwdTZ WF0dGxlMQ8wDQYDVQQKEwZBbWF6b24xFDASBgNVBAsTC0lBTSBDb25zb2xlMRIw EAYDVQQDEwlUZXN0Q2lsYWMxHzAdBgkqhkiG9w0BCQEWEG5vb25lQGFtYXpvbi5 jb20wHhcNMTEwNDI1MjA0NTIxWhcNMTIwNDI0MjA0NTIxWjCBiDELMAkGA1UEBh MCVVMxCzAJBgNVBAgTAldBMRAwDgYDVQQHEwdTZWF0dGxlMQ8wDQYDVQQKEwZBb WF6b24xFDASBgNVBAsTC0lBTSBDb25zb2xlMRIwEAYDVQQDEwlUZXN0Q2lsYWMx HzAdBgkqhkiG9w0BCQEWEG5vb25lQGFtYXpvbi5jb20wgZ8wDQYJKoZIhvcNAQE BBQADgY0AMIGJAoGBAMaK0dn+a4GmWIWJ21uUSfwfEvySWtC2XADZ4nB+BLYgVI k60CpiwsZ3G93vUEIO3IyNoH/f0wYK8m9TrDHudUZg3qX4waLG5M43q7Wgc/MbQ ITxOUSQv7c7ugFFDzQGBzZswY6786m86gpEIbb3OhjZnzcvQAaRHhdlQWIMm2nr AgMBAAEwDQYJKoZIhvcNAQEFBQADgYEAtCu4nUhVVxYUntneD9+h8Mg9q6q+auN KyExzyLwaxlAoo7TJHidbtS4J5iNmZgXL0FkbFFBjvSfpJIlJ00zbhNYS5f6Guo EDmFJl0ZxBHjJnyp378OD8uTs7fLvjx79LjSTbNYiytVbZPQUQ5Yaxu2jXnimvw 3rrszlaEXAMPLE=-----END CERTIFICATE-----", "certificateTrust": "-----BEGIN CERTIFICATE-----MIICiTCCAfICCQD6m7oRw0uXOjANBgkqhkiG9w 0BAQUFADCBiDELMAkGA1UEBhMCVVMxCzAJBgNVBAgTAldBMRAwDgYDVQQHEwdTZ WF0dGxlMQ8wDQYDVQQKEwZBbWF6b24xFDASBgNVBAsTC0lBTSBDb25zb2xlMRIw EAYDVQQDEwlUZXN0Q2lsYWMxHzAdBgkqhkiG9w0BCQEWEG5vb25lQGFtYXpvbi5 jb20wHhcNMTEwNDI1MjA0NTIxWhcNMTIwNDI0MjA0NTIxWjCBiDELMAkGA1UEBh MCVVMxCzAJBgNVBAgTAldBMRAwDgYDVQQHEwdTZWF0dGxlMQ8wDQYDVQQKEwZBb WF6b24xFDASBgNVBAsTC0lBTSBDb25zb2xlMRIwEAYDVQQDEwlUZXN0Q2lsYWMx HzAdBgkqhkiG9w0BCQEWEG5vb25lQGFtYXpvbi5jb20wgZ8wDQYJKoZIhvcNAQE BBQADgY0AMIGJAoGBAMaK0dn+a4GmWIWJ21uUSfwfEvySWtC2XADZ4nB+BLYgVI k60CpiwsZ3G93vUEIO3IyNoH/f0wYK8m9TrDHudUZg3qX4waLG5M43q7Wgc/MbQ ITxOUSQv7c7ugFFDzQGBzZswY6786m86gpEIbb3OhjZnzcvQAaRHhdlQWIMm2nr AgMBAAEwDQYJKoZIhvcNAQEFBQADgYEAtCu4nUhVVxYUntneD9+h8Mg9q6q+auN KyExzyLwaxlAoo7TJHidbtS4J5iNmZgXL0FkbFFBjvSfpJIlJ00zbhNYS5f6Guo EDmFJl0ZxBHjJnyp378OD8uTs7fLvjx79LjSTbNYiytVbZPQUQ5Yaxu2jXnimvw 3rrszlaEXAMPLE=-----END CERTIFICATE-----" }, "endpointUri": "opc.tcp://203.0.113.2:49320", "securityPolicy": "BASIC256", "messageSecurityMode": "SIGN_AND_ENCRYPT", "identityProvider": { "type": "Anonymous" }, "nodeFilterRules": [] }, "measurementDataStreamPrefix": "" } ]}
Enabling your source servers to trust the gateway
If you choose a message security mode other than None, you must enable your source servers to trustthe gateway. The gateway generates a certificate that you must accept on your source server. Steps canvary depending on the source servers that you're using. Consult the documentation for each server.
The procedure might be similar to the following steps.
To enable an OPC-UA server to trust the gateway
1. Open the interface for configuring your OPC-UA server (for example, right-click the OPC-UA icon inthe system tray).
2. Enter the user name and password for the OPC-UA server administrator.
3. Locate Trusted Clients in the interface, and then choose AWS IoT SiteWise Gateway Client.
4. Choose Trust.
121
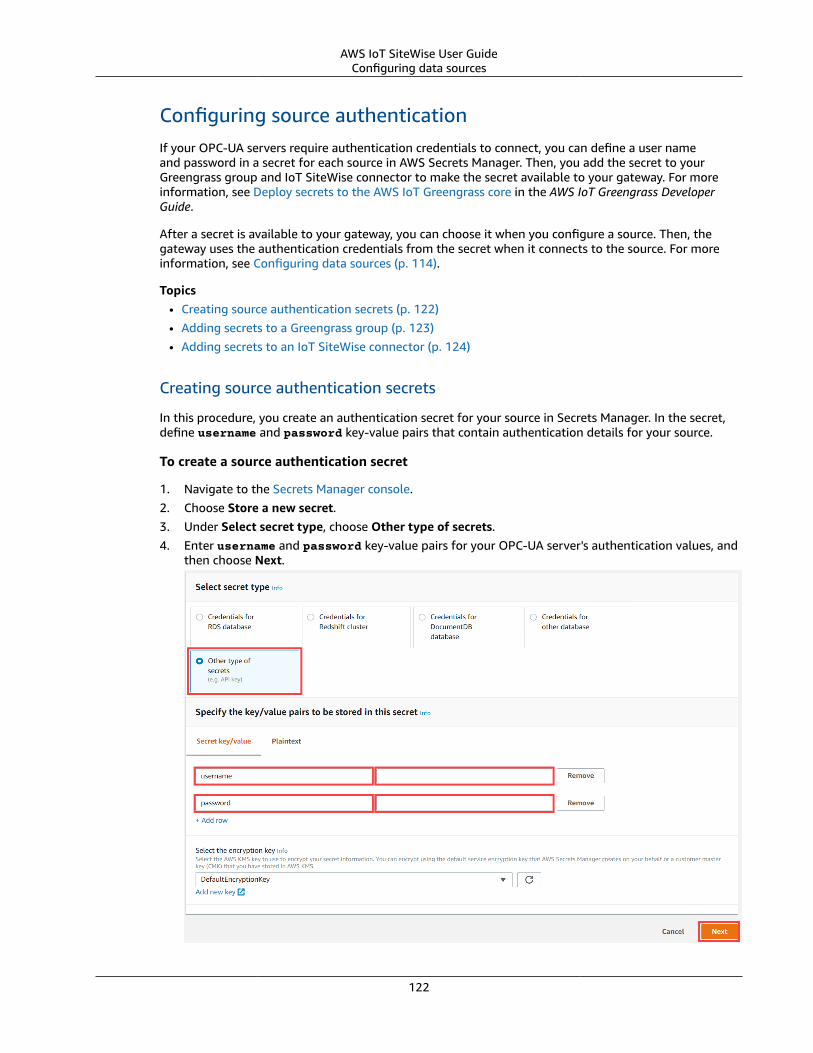
AWS IoT SiteWise User GuideConfiguring data sources
Configuring source authenticationIf your OPC-UA servers require authentication credentials to connect, you can define a user nameand password in a secret for each source in AWS Secrets Manager. Then, you add the secret to yourGreengrass group and IoT SiteWise connector to make the secret available to your gateway. For moreinformation, see Deploy secrets to the AWS IoT Greengrass core in the AWS IoT Greengrass DeveloperGuide.
After a secret is available to your gateway, you can choose it when you configure a source. Then, thegateway uses the authentication credentials from the secret when it connects to the source. For moreinformation, see Configuring data sources (p. 114).
Topics• Creating source authentication secrets (p. 122)• Adding secrets to a Greengrass group (p. 123)• Adding secrets to an IoT SiteWise connector (p. 124)
Creating source authentication secrets
In this procedure, you create an authentication secret for your source in Secrets Manager. In the secret,define username and password key-value pairs that contain authentication details for your source.
To create a source authentication secret
1. Navigate to the Secrets Manager console.2. Choose Store a new secret.3. Under Select secret type, choose Other type of secrets.4. Enter username and password key-value pairs for your OPC-UA server's authentication values, and
then choose Next.
122
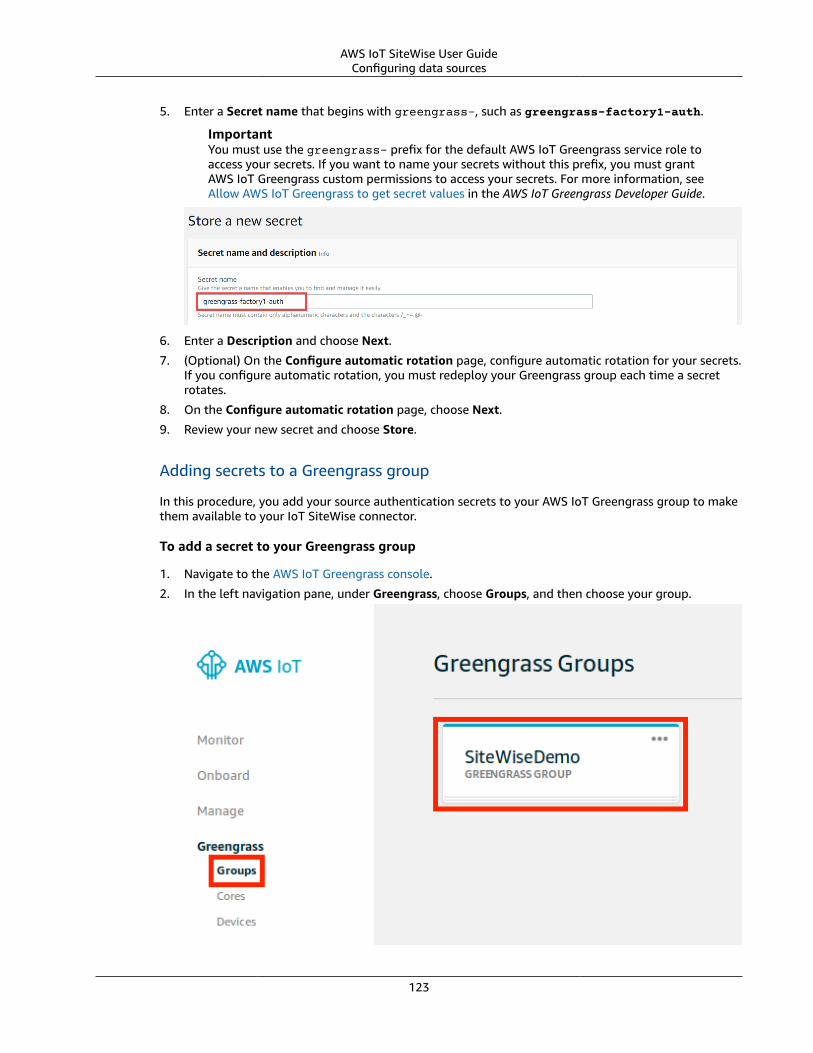
AWS IoT SiteWise User GuideConfiguring data sources
5. Enter a Secret name that begins with greengrass-, such as greengrass-factory1-auth.
ImportantYou must use the greengrass- prefix for the default AWS IoT Greengrass service role toaccess your secrets. If you want to name your secrets without this prefix, you must grantAWS IoT Greengrass custom permissions to access your secrets. For more information, seeAllow AWS IoT Greengrass to get secret values in the AWS IoT Greengrass Developer Guide.
6. Enter a Description and choose Next.
7. (Optional) On the Configure automatic rotation page, configure automatic rotation for your secrets.If you configure automatic rotation, you must redeploy your Greengrass group each time a secretrotates.
8. On the Configure automatic rotation page, choose Next.
9. Review your new secret and choose Store.
Adding secrets to a Greengrass group
In this procedure, you add your source authentication secrets to your AWS IoT Greengrass group to makethem available to your IoT SiteWise connector.
To add a secret to your Greengrass group
1. Navigate to the AWS IoT Greengrass console.
2. In the left navigation pane, under Greengrass, choose Groups, and then choose your group.
123
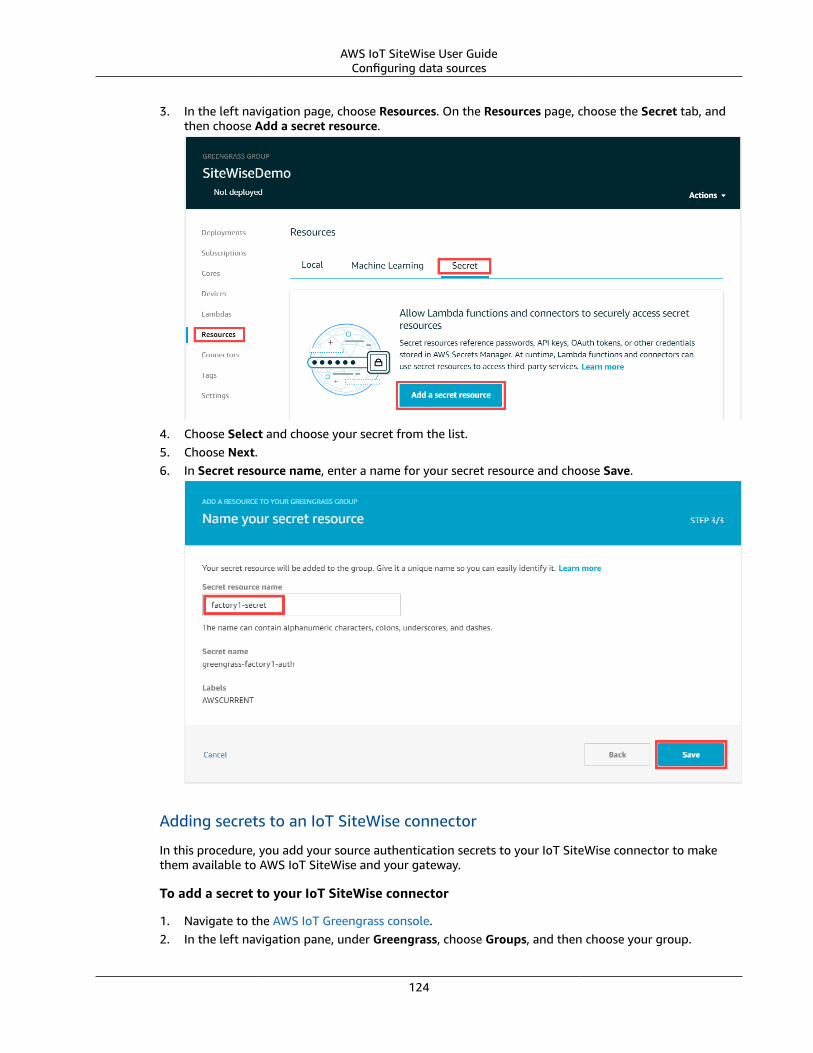
AWS IoT SiteWise User GuideConfiguring data sources
3. In the left navigation page, choose Resources. On the Resources page, choose the Secret tab, andthen choose Add a secret resource.
4. Choose Select and choose your secret from the list.5. Choose Next.6. In Secret resource name, enter a name for your secret resource and choose Save.
Adding secrets to an IoT SiteWise connector
In this procedure, you add your source authentication secrets to your IoT SiteWise connector to makethem available to AWS IoT SiteWise and your gateway.
To add a secret to your IoT SiteWise connector
1. Navigate to the AWS IoT Greengrass console.2. In the left navigation pane, under Greengrass, choose Groups, and then choose your group.
124
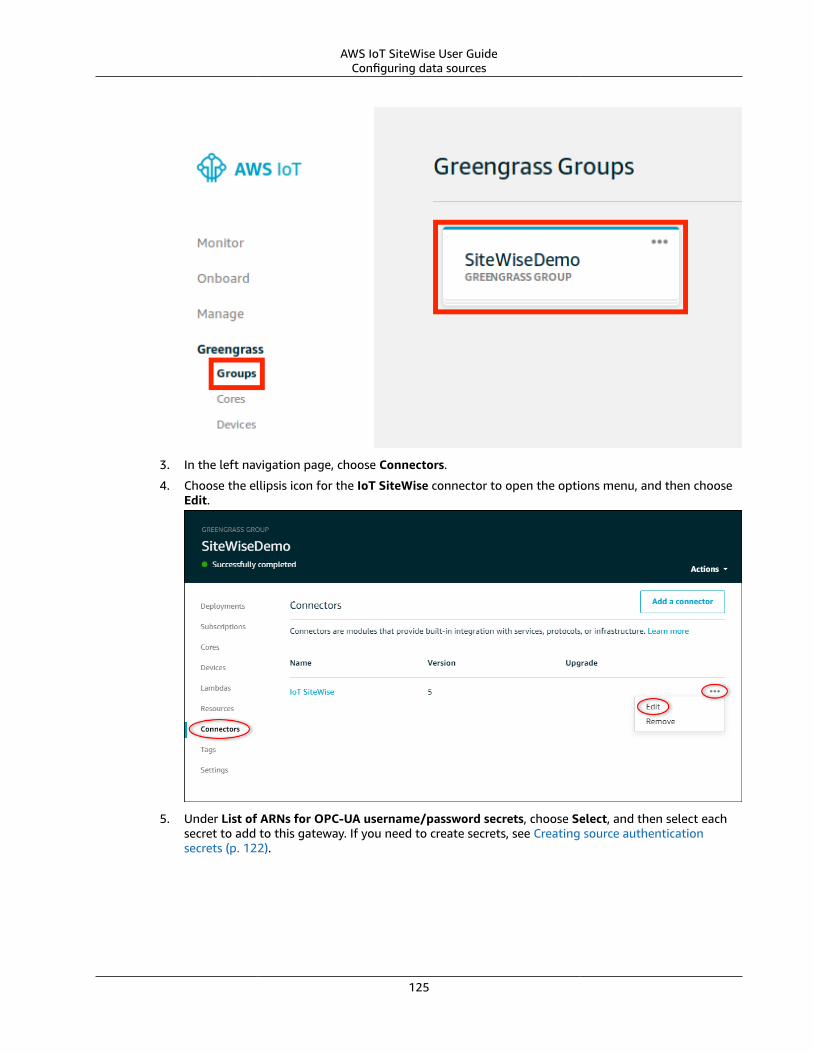
AWS IoT SiteWise User GuideConfiguring data sources
3. In the left navigation page, choose Connectors.
4. Choose the ellipsis icon for the IoT SiteWise connector to open the options menu, and then chooseEdit.
5. Under List of ARNs for OPC-UA username/password secrets, choose Select, and then select eachsecret to add to this gateway. If you need to create secrets, see Creating source authenticationsecrets (p. 122).
125
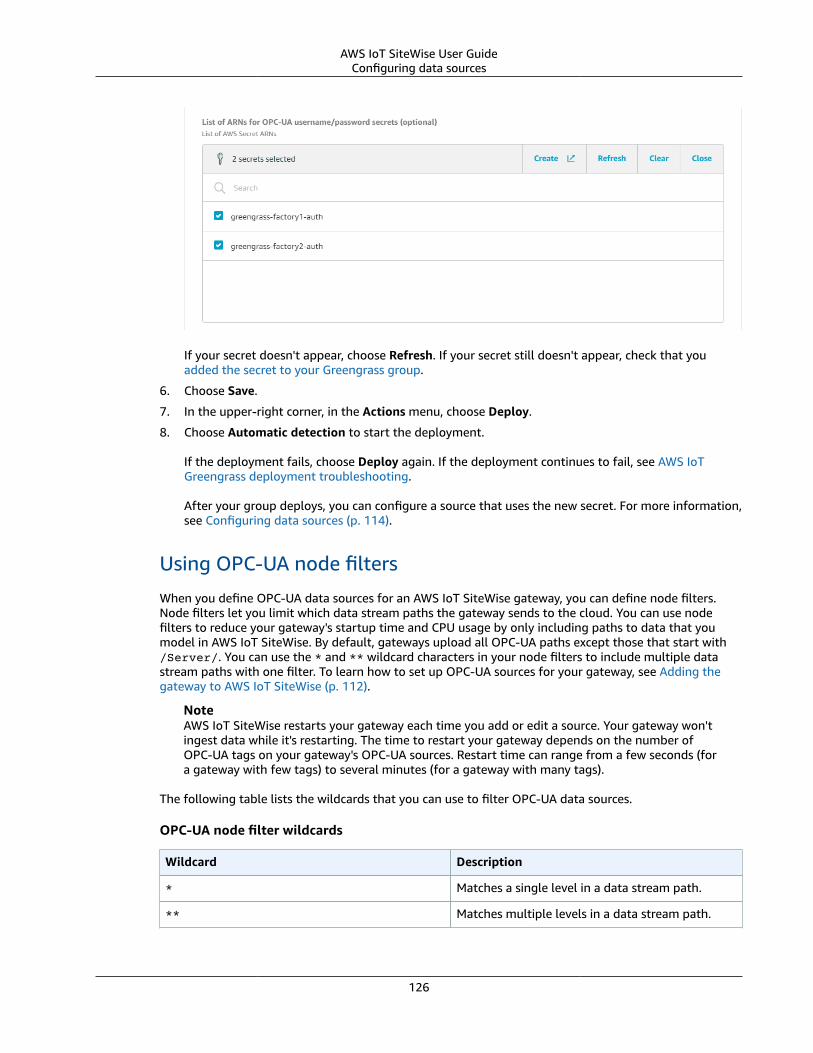
AWS IoT SiteWise User GuideConfiguring data sources
If your secret doesn't appear, choose Refresh. If your secret still doesn't appear, check that youadded the secret to your Greengrass group.
6. Choose Save.
7. In the upper-right corner, in the Actions menu, choose Deploy.
8. Choose Automatic detection to start the deployment.
If the deployment fails, choose Deploy again. If the deployment continues to fail, see AWS IoTGreengrass deployment troubleshooting.
After your group deploys, you can configure a source that uses the new secret. For more information,see Configuring data sources (p. 114).
Using OPC-UA node filters
When you define OPC-UA data sources for an AWS IoT SiteWise gateway, you can define node filters.Node filters let you limit which data stream paths the gateway sends to the cloud. You can use nodefilters to reduce your gateway's startup time and CPU usage by only including paths to data that youmodel in AWS IoT SiteWise. By default, gateways upload all OPC-UA paths except those that start with/Server/. You can use the * and ** wildcard characters in your node filters to include multiple datastream paths with one filter. To learn how to set up OPC-UA sources for your gateway, see Adding thegateway to AWS IoT SiteWise (p. 112).
NoteAWS IoT SiteWise restarts your gateway each time you add or edit a source. Your gateway won'tingest data while it's restarting. The time to restart your gateway depends on the number ofOPC-UA tags on your gateway's OPC-UA sources. Restart time can range from a few seconds (fora gateway with few tags) to several minutes (for a gateway with many tags).
The following table lists the wildcards that you can use to filter OPC-UA data sources.
OPC-UA node filter wildcards
Wildcard Description
* Matches a single level in a data stream path.
** Matches multiple levels in a data stream path.
126
AWS IoT SiteWise User GuideUpgrading a connector
NoteIf you configure a source with a broad filter and then later change the source to use a morerestrictive filter, AWS IoT SiteWise stops storing data that doesn't match the new filter.
Example Example scenario using node filters
Consider the following hypothetical data streams:
• /WA/Factory 1/Line 1/PCL1
• /WA/Factory 1/Line 1/PCL2
• /WA/Factory 1/Line 2/Counter1
• /WA/Factory 1/Line 2/PCL1
• /OR/Factory 1/Line 1/PCL1
• /OR/Factory 1/Line 2/Counter2
Using the previous data streams, you can define node filters to limit what data to include from yourOPC-UA source.
1. To select all nodes in the state of Washington, use /WA/.
2. To select all PCL data streams, use /*/*/*/PCL* or /**/PCL*. You can include multiple directoriesor folders with the ** wildcard characters.
3. To select all counters in the state of Washington, use /WA/**/Counter*.
4. To select all counters from Line 2, use /**/Line 2/Counter*.
Upgrading a connectorImportantVersion 6 of the IoT SiteWise connector introduces new requirements: AWS IoT Greengrass Coresoftware v1.10.0 and stream manager. Before you upgrade your connector, check that yourgateway meets these requirements, or you won't be able to deploy your gateway.
You can easily upgrade your gateway's connector after a new IoT SiteWise connector version is released.
NoteIn this procedure, you redeploy your Greengrass group and restart your gateway. Your gatewaywon't ingest data while it's restarting. The time to restart your gateway depends on the numberof OPC-UA tags on your gateway's OPC-UA sources. Restart time can range from a few seconds(for a gateway with few tags) to several minutes (for a gateway with many tags).
To upgrade an IoT SiteWise connector
1. Navigate to the AWS IoT Greengrass console.
2. In the left navigation pane, under Greengrass, choose Groups, and then choose the group that youcreated when you set up your gateway.
127
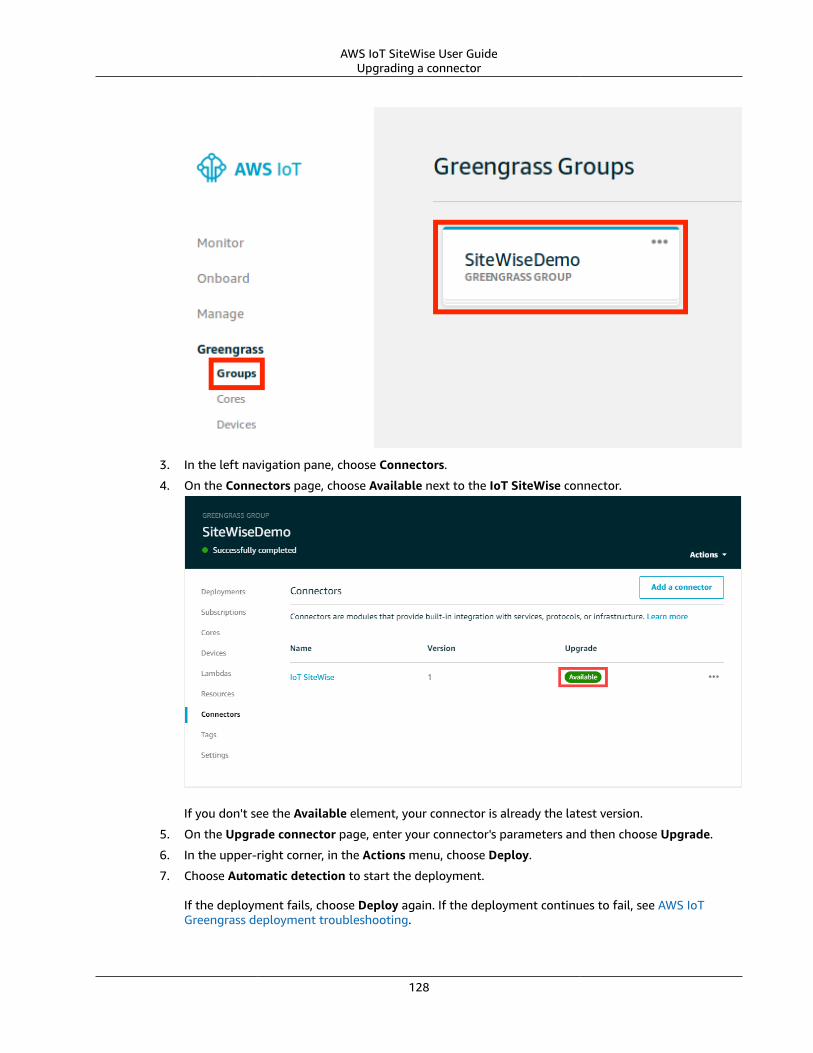
AWS IoT SiteWise User GuideUpgrading a connector
3. In the left navigation pane, choose Connectors.
4. On the Connectors page, choose Available next to the IoT SiteWise connector.
If you don't see the Available element, your connector is already the latest version.
5. On the Upgrade connector page, enter your connector's parameters and then choose Upgrade.
6. In the upper-right corner, in the Actions menu, choose Deploy.
7. Choose Automatic detection to start the deployment.
If the deployment fails, choose Deploy again. If the deployment continues to fail, see AWS IoTGreengrass deployment troubleshooting.
128
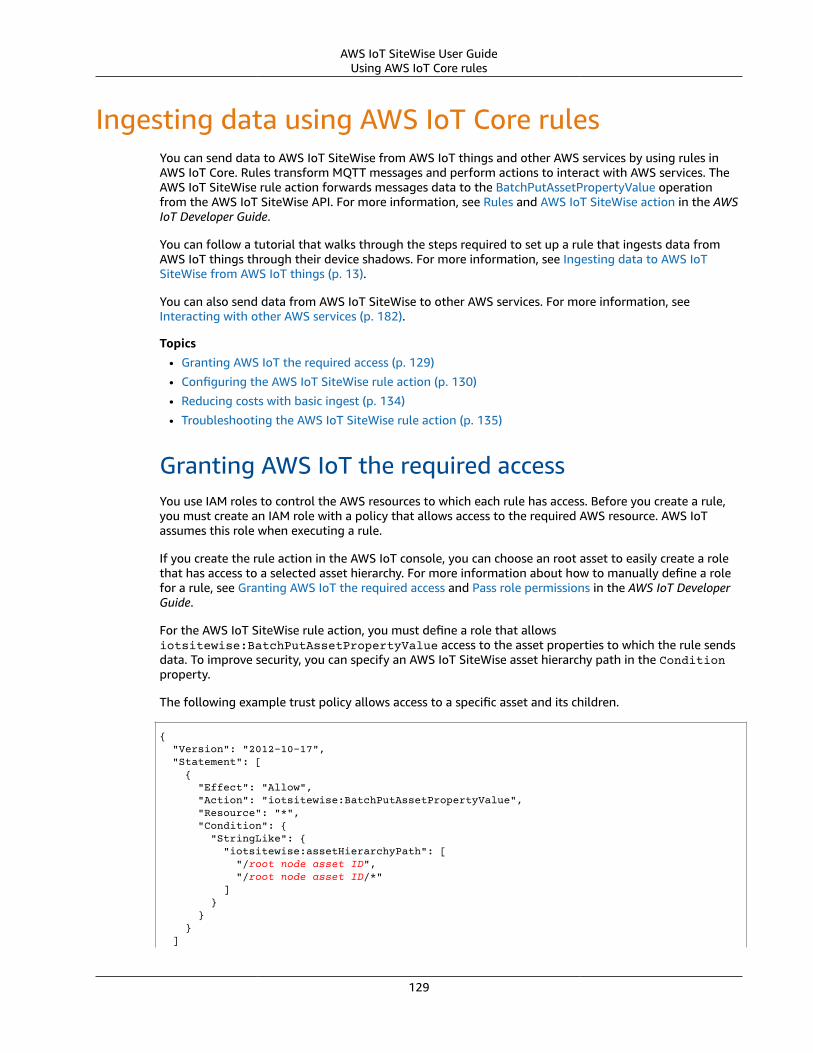
AWS IoT SiteWise User GuideUsing AWS IoT Core rules
Ingesting data using AWS IoT Core rulesYou can send data to AWS IoT SiteWise from AWS IoT things and other AWS services by using rules inAWS IoT Core. Rules transform MQTT messages and perform actions to interact with AWS services. TheAWS IoT SiteWise rule action forwards messages data to the BatchPutAssetPropertyValue operationfrom the AWS IoT SiteWise API. For more information, see Rules and AWS IoT SiteWise action in the AWSIoT Developer Guide.
You can follow a tutorial that walks through the steps required to set up a rule that ingests data fromAWS IoT things through their device shadows. For more information, see Ingesting data to AWS IoTSiteWise from AWS IoT things (p. 13).
You can also send data from AWS IoT SiteWise to other AWS services. For more information, seeInteracting with other AWS services (p. 182).
Topics• Granting AWS IoT the required access (p. 129)
• Configuring the AWS IoT SiteWise rule action (p. 130)
• Reducing costs with basic ingest (p. 134)
• Troubleshooting the AWS IoT SiteWise rule action (p. 135)
Granting AWS IoT the required accessYou use IAM roles to control the AWS resources to which each rule has access. Before you create a rule,you must create an IAM role with a policy that allows access to the required AWS resource. AWS IoTassumes this role when executing a rule.
If you create the rule action in the AWS IoT console, you can choose an root asset to easily create a rolethat has access to a selected asset hierarchy. For more information about how to manually define a rolefor a rule, see Granting AWS IoT the required access and Pass role permissions in the AWS IoT DeveloperGuide.
For the AWS IoT SiteWise rule action, you must define a role that allowsiotsitewise:BatchPutAssetPropertyValue access to the asset properties to which the rule sendsdata. To improve security, you can specify an AWS IoT SiteWise asset hierarchy path in the Conditionproperty.
The following example trust policy allows access to a specific asset and its children.
{ "Version": "2012-10-17", "Statement": [ { "Effect": "Allow", "Action": "iotsitewise:BatchPutAssetPropertyValue", "Resource": "*", "Condition": { "StringLike": { "iotsitewise:assetHierarchyPath": [ "/root node asset ID", "/root node asset ID/*" ] } } } ]
129
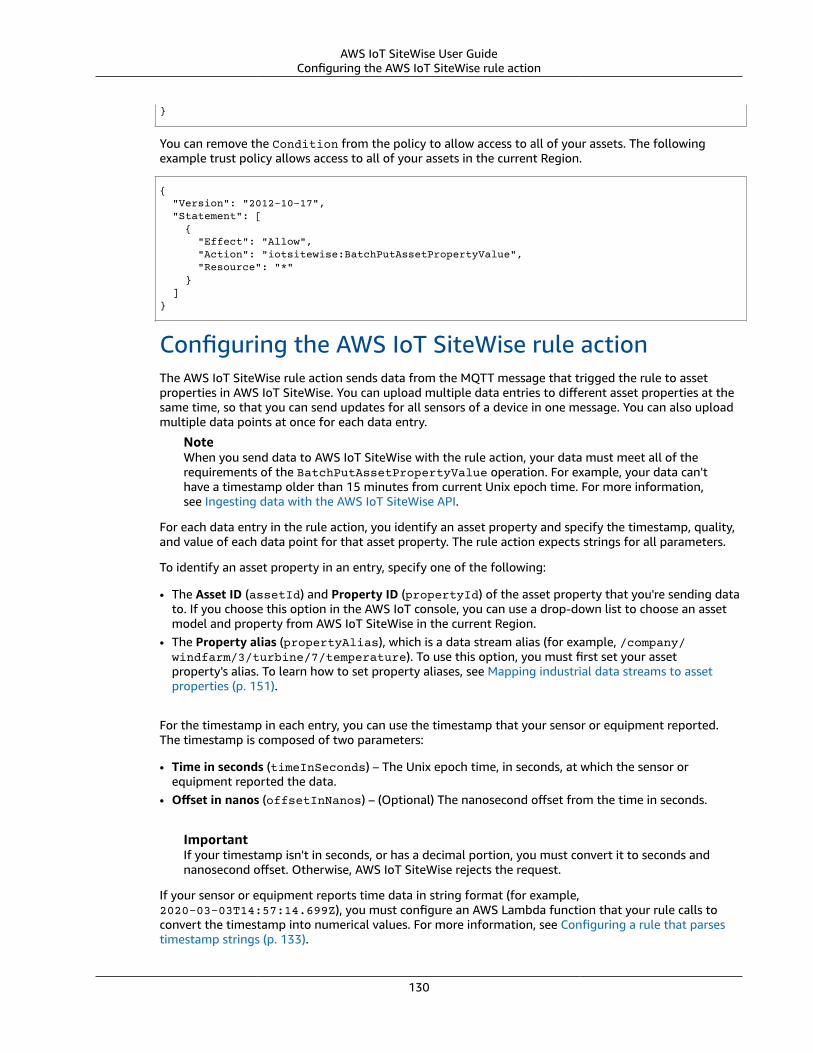
AWS IoT SiteWise User GuideConfiguring the AWS IoT SiteWise rule action
}
You can remove the Condition from the policy to allow access to all of your assets. The followingexample trust policy allows access to all of your assets in the current Region.
{ "Version": "2012-10-17", "Statement": [ { "Effect": "Allow", "Action": "iotsitewise:BatchPutAssetPropertyValue", "Resource": "*" } ]}
Configuring the AWS IoT SiteWise rule actionThe AWS IoT SiteWise rule action sends data from the MQTT message that trigged the rule to assetproperties in AWS IoT SiteWise. You can upload multiple data entries to different asset properties at thesame time, so that you can send updates for all sensors of a device in one message. You can also uploadmultiple data points at once for each data entry.
NoteWhen you send data to AWS IoT SiteWise with the rule action, your data must meet all of therequirements of the BatchPutAssetPropertyValue operation. For example, your data can'thave a timestamp older than 15 minutes from current Unix epoch time. For more information,see Ingesting data with the AWS IoT SiteWise API.
For each data entry in the rule action, you identify an asset property and specify the timestamp, quality,and value of each data point for that asset property. The rule action expects strings for all parameters.
To identify an asset property in an entry, specify one of the following:
• The Asset ID (assetId) and Property ID (propertyId) of the asset property that you're sending datato. If you choose this option in the AWS IoT console, you can use a drop-down list to choose an assetmodel and property from AWS IoT SiteWise in the current Region.
• The Property alias (propertyAlias), which is a data stream alias (for example, /company/windfarm/3/turbine/7/temperature). To use this option, you must first set your assetproperty's alias. To learn how to set property aliases, see Mapping industrial data streams to assetproperties (p. 151).
For the timestamp in each entry, you can use the timestamp that your sensor or equipment reported.The timestamp is composed of two parameters:
• Time in seconds (timeInSeconds) – The Unix epoch time, in seconds, at which the sensor orequipment reported the data.
• Offset in nanos (offsetInNanos) – (Optional) The nanosecond offset from the time in seconds.
ImportantIf your timestamp isn't in seconds, or has a decimal portion, you must convert it to seconds andnanosecond offset. Otherwise, AWS IoT SiteWise rejects the request.
If your sensor or equipment reports time data in string format (for example,2020-03-03T14:57:14.699Z), you must configure an AWS Lambda function that your rule calls toconvert the timestamp into numerical values. For more information, see Configuring a rule that parsestimestamp strings (p. 133).
130
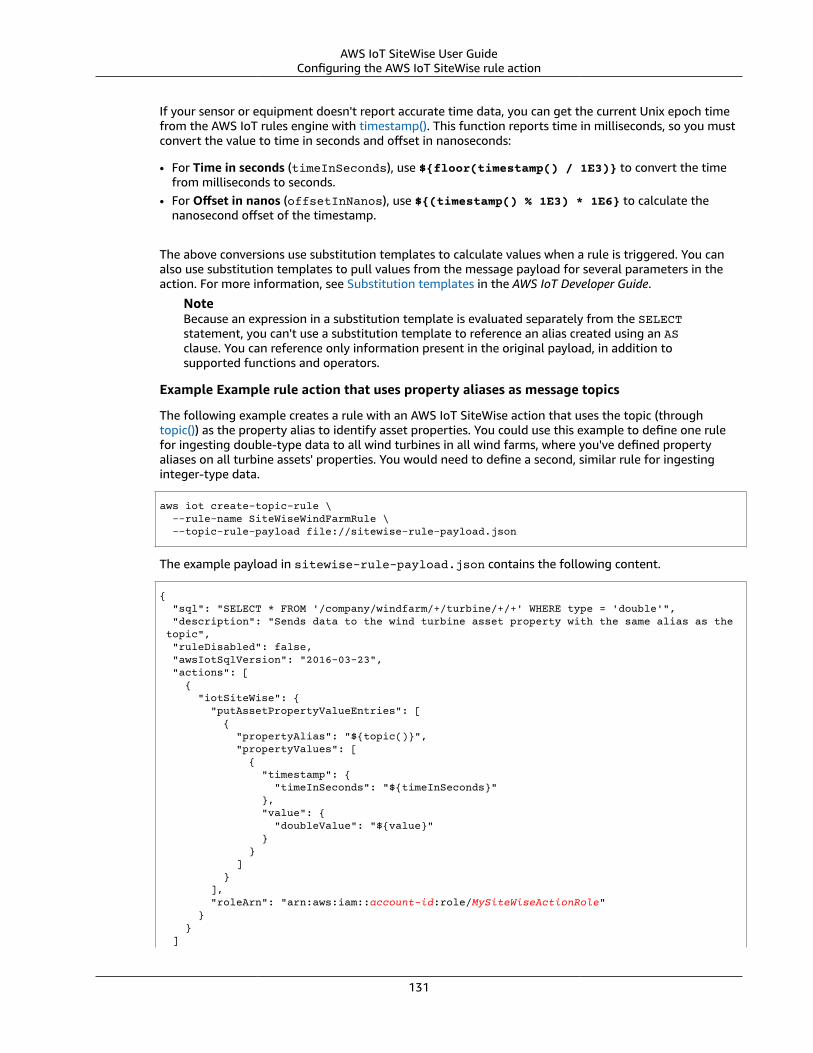
AWS IoT SiteWise User GuideConfiguring the AWS IoT SiteWise rule action
If your sensor or equipment doesn't report accurate time data, you can get the current Unix epoch timefrom the AWS IoT rules engine with timestamp(). This function reports time in milliseconds, so you mustconvert the value to time in seconds and offset in nanoseconds:
• For Time in seconds (timeInSeconds), use ${floor(timestamp() / 1E3)} to convert the timefrom milliseconds to seconds.
• For Offset in nanos (offsetInNanos), use ${(timestamp() % 1E3) * 1E6} to calculate thenanosecond offset of the timestamp.
The above conversions use substitution templates to calculate values when a rule is triggered. You canalso use substitution templates to pull values from the message payload for several parameters in theaction. For more information, see Substitution templates in the AWS IoT Developer Guide.
NoteBecause an expression in a substitution template is evaluated separately from the SELECTstatement, you can't use a substitution template to reference an alias created using an ASclause. You can reference only information present in the original payload, in addition tosupported functions and operators.
Example Example rule action that uses property aliases as message topics
The following example creates a rule with an AWS IoT SiteWise action that uses the topic (throughtopic()) as the property alias to identify asset properties. You could use this example to define one rulefor ingesting double-type data to all wind turbines in all wind farms, where you've defined propertyaliases on all turbine assets' properties. You would need to define a second, similar rule for ingestinginteger-type data.
aws iot create-topic-rule \ --rule-name SiteWiseWindFarmRule \ --topic-rule-payload file://sitewise-rule-payload.json
The example payload in sitewise-rule-payload.json contains the following content.
{ "sql": "SELECT * FROM '/company/windfarm/+/turbine/+/+' WHERE type = 'double'", "description": "Sends data to the wind turbine asset property with the same alias as the topic", "ruleDisabled": false, "awsIotSqlVersion": "2016-03-23", "actions": [ { "iotSiteWise": { "putAssetPropertyValueEntries": [ { "propertyAlias": "${topic()}", "propertyValues": [ { "timestamp": { "timeInSeconds": "${timeInSeconds}" }, "value": { "doubleValue": "${value}" } } ] } ], "roleArn": "arn:aws:iam::account-id:role/MySiteWiseActionRole" } } ]
131
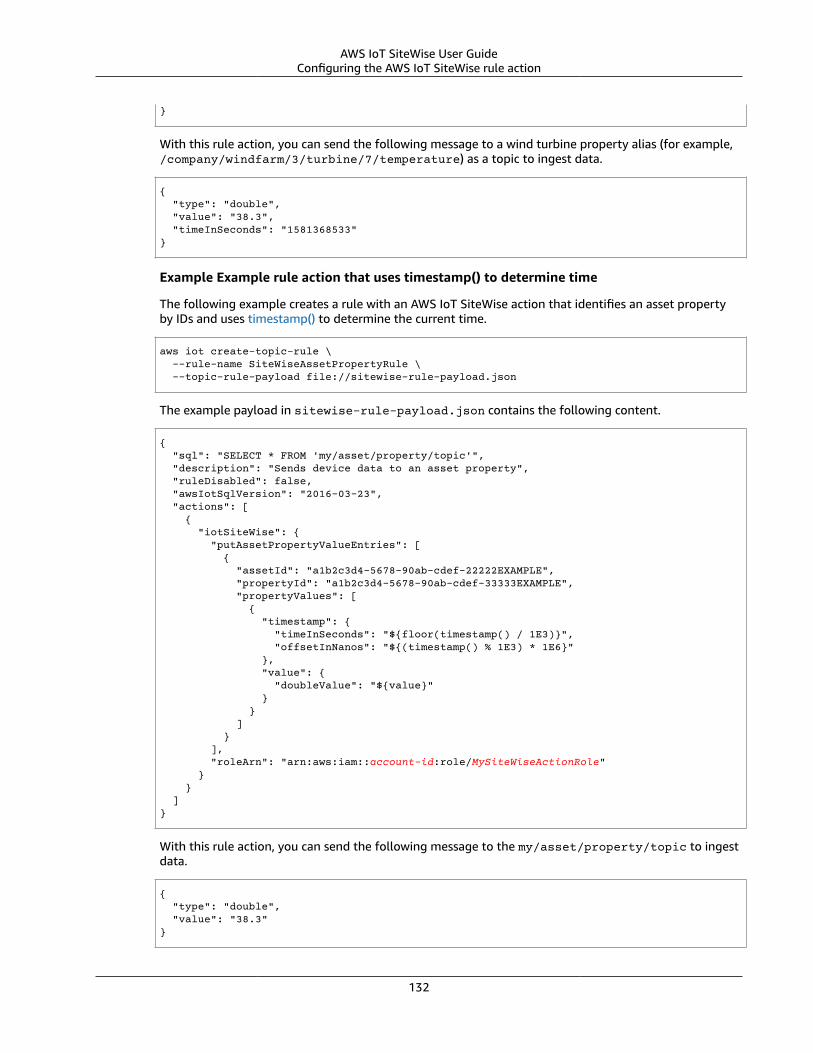
AWS IoT SiteWise User GuideConfiguring the AWS IoT SiteWise rule action
}
With this rule action, you can send the following message to a wind turbine property alias (for example,/company/windfarm/3/turbine/7/temperature) as a topic to ingest data.
{ "type": "double", "value": "38.3", "timeInSeconds": "1581368533"}
Example Example rule action that uses timestamp() to determine time
The following example creates a rule with an AWS IoT SiteWise action that identifies an asset propertyby IDs and uses timestamp() to determine the current time.
aws iot create-topic-rule \ --rule-name SiteWiseAssetPropertyRule \ --topic-rule-payload file://sitewise-rule-payload.json
The example payload in sitewise-rule-payload.json contains the following content.
{ "sql": "SELECT * FROM 'my/asset/property/topic'", "description": "Sends device data to an asset property", "ruleDisabled": false, "awsIotSqlVersion": "2016-03-23", "actions": [ { "iotSiteWise": { "putAssetPropertyValueEntries": [ { "assetId": "a1b2c3d4-5678-90ab-cdef-22222EXAMPLE", "propertyId": "a1b2c3d4-5678-90ab-cdef-33333EXAMPLE", "propertyValues": [ { "timestamp": { "timeInSeconds": "${floor(timestamp() / 1E3)}", "offsetInNanos": "${(timestamp() % 1E3) * 1E6}" }, "value": { "doubleValue": "${value}" } } ] } ], "roleArn": "arn:aws:iam::account-id:role/MySiteWiseActionRole" } } ]}
With this rule action, you can send the following message to the my/asset/property/topic to ingestdata.
{ "type": "double", "value": "38.3"}
132
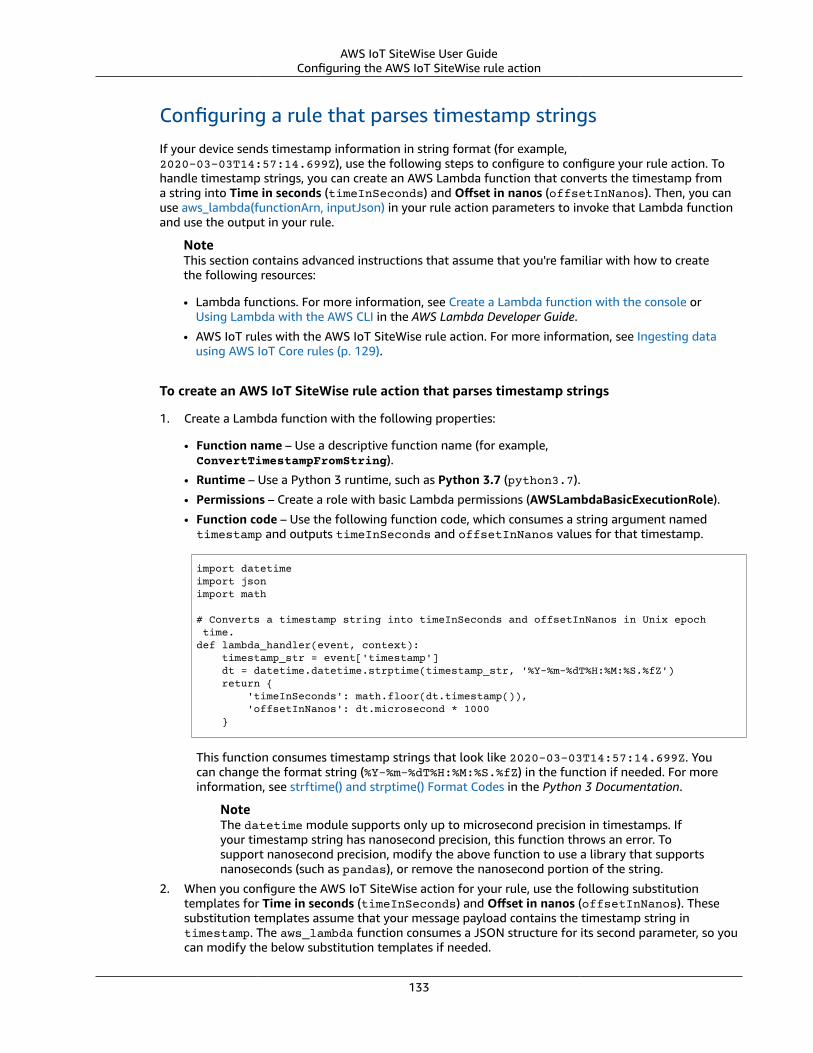
AWS IoT SiteWise User GuideConfiguring the AWS IoT SiteWise rule action
Configuring a rule that parses timestamp stringsIf your device sends timestamp information in string format (for example,2020-03-03T14:57:14.699Z), use the following steps to configure to configure your rule action. Tohandle timestamp strings, you can create an AWS Lambda function that converts the timestamp froma string into Time in seconds (timeInSeconds) and Offset in nanos (offsetInNanos). Then, you canuse aws_lambda(functionArn, inputJson) in your rule action parameters to invoke that Lambda functionand use the output in your rule.
NoteThis section contains advanced instructions that assume that you're familiar with how to createthe following resources:
• Lambda functions. For more information, see Create a Lambda function with the console orUsing Lambda with the AWS CLI in the AWS Lambda Developer Guide.
• AWS IoT rules with the AWS IoT SiteWise rule action. For more information, see Ingesting datausing AWS IoT Core rules (p. 129).
To create an AWS IoT SiteWise rule action that parses timestamp strings
1. Create a Lambda function with the following properties:
• Function name – Use a descriptive function name (for example,ConvertTimestampFromString).
• Runtime – Use a Python 3 runtime, such as Python 3.7 (python3.7).
• Permissions – Create a role with basic Lambda permissions (AWSLambdaBasicExecutionRole).
• Function code – Use the following function code, which consumes a string argument namedtimestamp and outputs timeInSeconds and offsetInNanos values for that timestamp.
import datetimeimport jsonimport math
# Converts a timestamp string into timeInSeconds and offsetInNanos in Unix epoch time.def lambda_handler(event, context): timestamp_str = event['timestamp'] dt = datetime.datetime.strptime(timestamp_str, '%Y-%m-%dT%H:%M:%S.%fZ') return { 'timeInSeconds': math.floor(dt.timestamp()), 'offsetInNanos': dt.microsecond * 1000 }
This function consumes timestamp strings that look like 2020-03-03T14:57:14.699Z. Youcan change the format string (%Y-%m-%dT%H:%M:%S.%fZ) in the function if needed. For moreinformation, see strftime() and strptime() Format Codes in the Python 3 Documentation.
NoteThe datetime module supports only up to microsecond precision in timestamps. Ifyour timestamp string has nanosecond precision, this function throws an error. Tosupport nanosecond precision, modify the above function to use a library that supportsnanoseconds (such as pandas), or remove the nanosecond portion of the string.
2. When you configure the AWS IoT SiteWise action for your rule, use the following substitutiontemplates for Time in seconds (timeInSeconds) and Offset in nanos (offsetInNanos). Thesesubstitution templates assume that your message payload contains the timestamp string intimestamp. The aws_lambda function consumes a JSON structure for its second parameter, so youcan modify the below substitution templates if needed.
133

AWS IoT SiteWise User GuideReducing costs with basic ingest
• For Time in seconds (timeInSeconds), use the following substitution template.
${aws_lambda('arn:aws:lambda:region:account-id:function:ConvertTimestampFromString', {'timestamp': timestamp}).timeInSeconds}
• For Offset in nanos (offsetInNanos), use the following substitution template.
${aws_lambda('arn:aws:lambda:region:account-id:function:ConvertTimestampFromString', {'timestamp': timestamp}).offsetInNanos}
For each parameter, replace region and account-id with your Region and AWS account ID. If youused a different name for your Lambda function, change that as well.
3. Grant AWS IoT permissions to invoke your function with the lambda:InvokeFunction permission.For more information, see aws_lambda(functionArn, inputJson).
4. Test your rule (for example, use the AWS IoT MQTT test client) and verify that AWS IoT SiteWisereceives the data that you send.
If your rule doesn't work as expected, see Troubleshooting an AWS IoT SiteWise ruleaction (p. 233).
NoteThis solution invokes the Lambda function twice for each timestamp string. You can createanother rule to reduce the number of Lambda function invocations if your rule handles multipledata points that have the same timestamp in each payload.To do so, create a rule with a republish action that invokes the Lambda and publishes theoriginal payload with the timestamp string converted to timeInSeconds and offsetInNanos.Then, create a rule with an AWS IoT SiteWise rule action to consume the converted payload.With this approach, you reduce the number of times that the rule invokes the Lambda butincrease the number of AWS IoT rule actions executed. Consider the pricing of each service ifyou apply this solution to your use case.
Reducing costs with basic ingestAWS IoT Core provides a feature called Basic Ingest that you can use to send data through AWS IoTCore without incurring AWS IoT messaging costs. Basic Ingest optimizes data flow for high volume dataingestion workloads by removing the publish/subscribe message broker from the ingestion path. You canuse Basic Ingest if you know which rules your messages should be routed to.
To use Basic Ingest, you send messages directly to a specific rule using a special topic, $aws/rules/rule-name. For example, to send a message to a rule named SiteWiseWindFarmRule, yousend a message to the topic $aws/rules/SiteWiseWindFarmRule.
If your rule action uses substitution templates that contain topic(Decimal), you can pass the original topicat the end of the Basic Ingest special topic, such as $aws/rules/rule-name/original-topic. Forexample, to use Basic Ingest with the wind farm property alias example from the previous section, youcan send messages to the following topic.
$aws/rules/SiteWiseWindFarmRule//company/windfarm/3/turbine/7/temperature
NoteThe above example includes a second slash (//) because AWS IoT removes the Basic Ingestprefix ($aws/rules/rule-name/) from the topic that's visible to the rule action. In thisexample, the rule receives the topic /company/windfarm/3/turbine/7/temperature.
134

AWS IoT SiteWise User GuideTroubleshooting the AWS IoT SiteWise rule action
For more information, see Reducing messaging costs with basic ingest in the AWS IoT Developer Guide.
Troubleshooting the AWS IoT SiteWise rule actionTo troubleshoot your AWS IoT SiteWise rule action in AWS IoT Core, you can configure CloudWatch Logsor you can configure a republish error action for your rule. For more information, see Troubleshooting anAWS IoT SiteWise rule action (p. 233).
Ingesting data from AWS IoT EventsWith AWS IoT Events, you can build complex event monitoring applications for your IoT fleet in the AWSCloud. You can use the IoT SiteWise action in AWS IoT Events to send data to asset properties in AWS IoTSiteWise when an event occurs.
For more information, see the following topics in the AWS IoT Events Developer Guide:
• What is AWS IoT Events?• AWS IoT Events actions• IoT SiteWise action
Ingesting data using the AWS IoT SiteWise APIYou can use the AWS IoT SiteWise API to send timestamped industrial data to your assets' attributeand measurement properties. The API accepts a payload that contains timestamp-quality-value (TQV)structures.
Use the BatchPutAssetPropertyValue operation to upload your data. With this operation, you can uploadmultiple data entries at a time, so that you can collect data from several devices and send it all in a singlerequest.
ImportantThe BatchPutAssetPropertyValue operation is subject to quotas on the number of entries perrequest and the number of TQV data points per entry. AWS IoT SiteWise also rejects any datawith a timestamp dated to more than 15 minutes in the past or more than 5 minutes in thefuture. For more information about these quotas, see BatchPutAssetPropertyValue in the AWSIoT SiteWise API Reference.
To identify an asset property, you can specify one of the following:
• The assetId and propertyId of the asset property that you are sending data to.• The propertyAlias, which is a data stream alias (for example, /company/windfarm/3/turbine/7/temperature). To use this option, you must first set your asset property's alias. To learnhow to set property aliases, see Mapping industrial data streams to asset properties (p. 151).
The following example demonstrates how to send a wind turbine's temperature and rotations per minute(RPM) readings from a payload stored in a JSON file.
aws iotsitewise batch-put-asset-property-value --cli-input-json file://batch-put-payload.json
The example payload in batch-put-payload.json contains the following content.
{
135
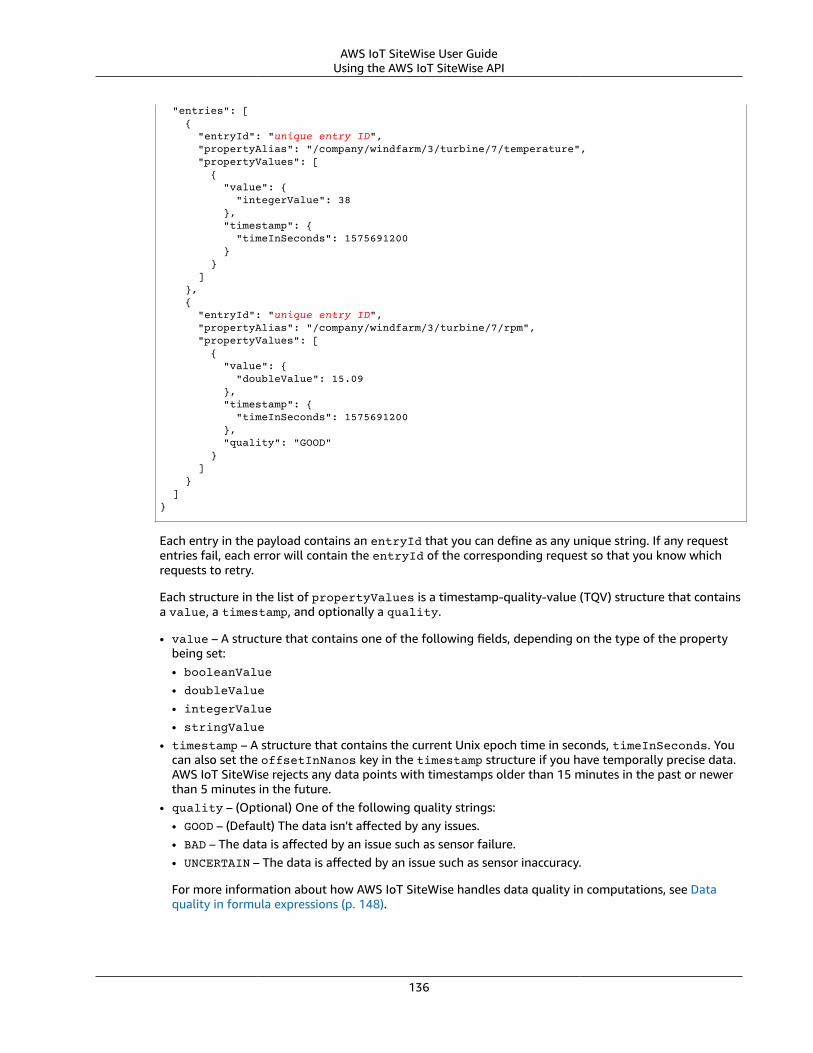
AWS IoT SiteWise User GuideUsing the AWS IoT SiteWise API
"entries": [ { "entryId": "unique entry ID", "propertyAlias": "/company/windfarm/3/turbine/7/temperature", "propertyValues": [ { "value": { "integerValue": 38 }, "timestamp": { "timeInSeconds": 1575691200 } } ] }, { "entryId": "unique entry ID", "propertyAlias": "/company/windfarm/3/turbine/7/rpm", "propertyValues": [ { "value": { "doubleValue": 15.09 }, "timestamp": { "timeInSeconds": 1575691200 }, "quality": "GOOD" } ] } ]}
Each entry in the payload contains an entryId that you can define as any unique string. If any requestentries fail, each error will contain the entryId of the corresponding request so that you know whichrequests to retry.
Each structure in the list of propertyValues is a timestamp-quality-value (TQV) structure that containsa value, a timestamp, and optionally a quality.
• value – A structure that contains one of the following fields, depending on the type of the propertybeing set:• booleanValue
• doubleValue
• integerValue
• stringValue
• timestamp – A structure that contains the current Unix epoch time in seconds, timeInSeconds. Youcan also set the offsetInNanos key in the timestamp structure if you have temporally precise data.AWS IoT SiteWise rejects any data points with timestamps older than 15 minutes in the past or newerthan 5 minutes in the future.
• quality – (Optional) One of the following quality strings:• GOOD – (Default) The data isn't affected by any issues.• BAD – The data is affected by an issue such as sensor failure.• UNCERTAIN – The data is affected by an issue such as sensor inaccuracy.
For more information about how AWS IoT SiteWise handles data quality in computations, see Dataquality in formula expressions (p. 148).
136
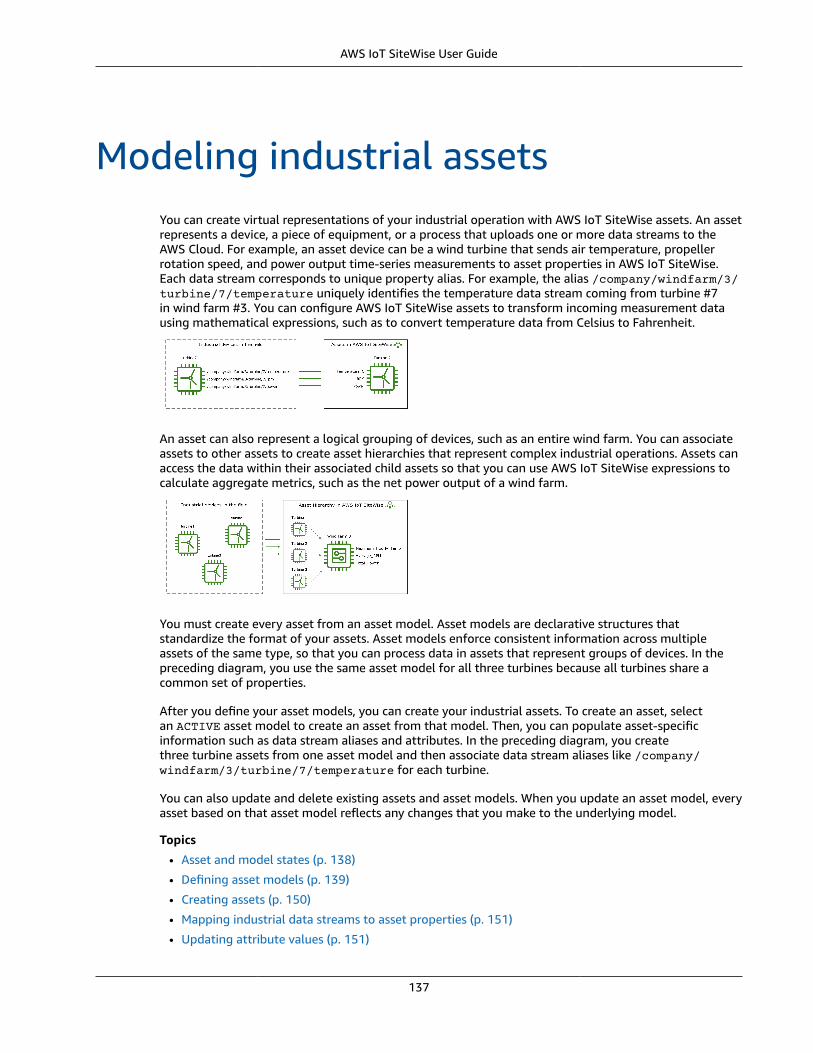
AWS IoT SiteWise User Guide
Modeling industrial assetsYou can create virtual representations of your industrial operation with AWS IoT SiteWise assets. An assetrepresents a device, a piece of equipment, or a process that uploads one or more data streams to theAWS Cloud. For example, an asset device can be a wind turbine that sends air temperature, propellerrotation speed, and power output time-series measurements to asset properties in AWS IoT SiteWise.Each data stream corresponds to unique property alias. For example, the alias /company/windfarm/3/turbine/7/temperature uniquely identifies the temperature data stream coming from turbine #7in wind farm #3. You can configure AWS IoT SiteWise assets to transform incoming measurement datausing mathematical expressions, such as to convert temperature data from Celsius to Fahrenheit.
An asset can also represent a logical grouping of devices, such as an entire wind farm. You can associateassets to other assets to create asset hierarchies that represent complex industrial operations. Assets canaccess the data within their associated child assets so that you can use AWS IoT SiteWise expressions tocalculate aggregate metrics, such as the net power output of a wind farm.
You must create every asset from an asset model. Asset models are declarative structures thatstandardize the format of your assets. Asset models enforce consistent information across multipleassets of the same type, so that you can process data in assets that represent groups of devices. In thepreceding diagram, you use the same asset model for all three turbines because all turbines share acommon set of properties.
After you define your asset models, you can create your industrial assets. To create an asset, selectan ACTIVE asset model to create an asset from that model. Then, you can populate asset-specificinformation such as data stream aliases and attributes. In the preceding diagram, you createthree turbine assets from one asset model and then associate data stream aliases like /company/windfarm/3/turbine/7/temperature for each turbine.
You can also update and delete existing assets and asset models. When you update an asset model, everyasset based on that asset model reflects any changes that you make to the underlying model.
Topics
• Asset and model states (p. 138)
• Defining asset models (p. 139)
• Creating assets (p. 150)
• Mapping industrial data streams to asset properties (p. 151)
• Updating attribute values (p. 151)
137
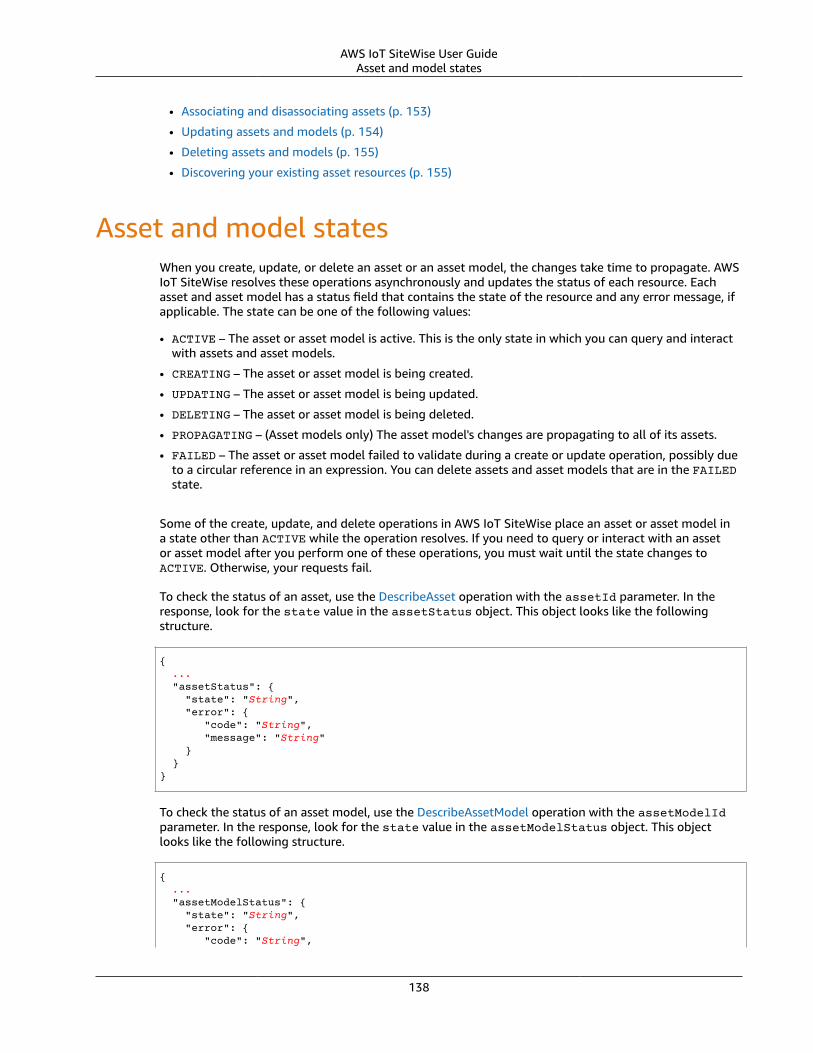
AWS IoT SiteWise User GuideAsset and model states
• Associating and disassociating assets (p. 153)
• Updating assets and models (p. 154)
• Deleting assets and models (p. 155)
• Discovering your existing asset resources (p. 155)
Asset and model statesWhen you create, update, or delete an asset or an asset model, the changes take time to propagate. AWSIoT SiteWise resolves these operations asynchronously and updates the status of each resource. Eachasset and asset model has a status field that contains the state of the resource and any error message, ifapplicable. The state can be one of the following values:
• ACTIVE – The asset or asset model is active. This is the only state in which you can query and interactwith assets and asset models.
• CREATING – The asset or asset model is being created.
• UPDATING – The asset or asset model is being updated.
• DELETING – The asset or asset model is being deleted.
• PROPAGATING – (Asset models only) The asset model's changes are propagating to all of its assets.
• FAILED – The asset or asset model failed to validate during a create or update operation, possibly dueto a circular reference in an expression. You can delete assets and asset models that are in the FAILEDstate.
Some of the create, update, and delete operations in AWS IoT SiteWise place an asset or asset model ina state other than ACTIVE while the operation resolves. If you need to query or interact with an assetor asset model after you perform one of these operations, you must wait until the state changes toACTIVE. Otherwise, your requests fail.
To check the status of an asset, use the DescribeAsset operation with the assetId parameter. In theresponse, look for the state value in the assetStatus object. This object looks like the followingstructure.
{ ... "assetStatus": { "state": "String", "error": { "code": "String", "message": "String" } }}
To check the status of an asset model, use the DescribeAssetModel operation with the assetModelIdparameter. In the response, look for the state value in the assetModelStatus object. This objectlooks like the following structure.
{ ... "assetModelStatus": { "state": "String", "error": { "code": "String",
138
AWS IoT SiteWise User GuideDefining asset models
"message": "String" } }}
Defining asset modelsAWS IoT SiteWise asset models drive standardization of your industrial data. An asset model contains aname, description, asset properties, and asset hierarchy definitions. For example, you can define a windturbine model with temperature, rotations per minute (RPM), and power properties. Then, you can definea wind farm model with a net power output property and a wind turbine hierarchy definition.
NoteWe recommend that you model your operation starting with the lowest-level nodes. Assethierarchy definitions contain references to existing asset models. By following this approach,you can define asset hierarchies as you create your models.
You can use the AWS IoT SiteWise API to define asset models programmatically. Use theCreateAssetModel operation to create an asset model based on the AssetModelProperty andAssetModelHierarchyDefinition types. Asset hierarchies are optional when you create an asset model.
The following example demonstrates how to create an asset model from a payload stored in a JSON file.
aws iotsitewise create-asset-model --cli-input-json file://model-payload.json
The payload in model-payload.json uses the following syntax.
{ "assetModelName": "String", "assetModelDescription": "String", "assetModelProperties": Array of AssetModelProperty, "assetModelHierarchies": Array of AssetModelHierarchyDefinition}
Give your asset model a unique, friendly name that you can use to easily identify it, such as WindTurbine or Wind Turbine Model.
The CreateAssetModel operation returns a structure that contains the unique assetModelId thatyou refer to when creating an asset. The response also contains the assetModelStatus, which containsa state which is initially CREATING. The asset model's status is CREATING until the changes propagate.
ImportantThe asset model creation process can take up to a few minutes for complex models. To checkthe current status of your asset model, use the DescribeAssetModel operation by specifying theassetModelId. After the asset model status is ACTIVE, you can use the asset model to createassets. For more information, see Asset and model states (p. 138).
The following sections describe the different types of asset properties and asset hierarchies. Each sectionalso covers how you can define the respective AssetModelProperty or AssetModelHierarchyDefinitionstructures that you can include in the CreateAssetModel operation payload.
Topics
• Asset properties (p. 140)
• Asset hierarchies (p. 149)
139
AWS IoT SiteWise User GuideAsset properties
Asset propertiesAsset properties are the structures within each asset that contain asset data. Asset properties can be anyof the following types:
• Attributes – An asset's generally static properties, such as device manufacturer or geographic region.• Measurements – An asset's raw device's sensor data streams, such as timestamped rotation speed
values or timestamped temperature values in Celsius. A measurement is defined by a data stream alias.• Transforms – An asset's transformed time-series values, such as timestamped temperature values in
Fahrenheit. A transform is defined by an expression and the variables to consume with that expression.All transforms are DOUBLE type.
• Metrics – An asset's data aggregated over a specified time interval, such as the hourly averagetemperature. A metric is defined by a time interval, an expression, and the variables to consume withthat expression. Metric expressions can access associated assets' metric properties. All metrics areDOUBLE type.
Each asset property has a basic data type, which you must define as one of the following types:
• STRING – A string with up to 1024 bytes.• INTEGER – A signed 32-bit integer with range [-2,147,483,648, 2,147,483,647].• DOUBLE – A floating point number with range [-10^100, 10^100] and IEEE 754 double precision.• BOOLEAN – true or false.
Transforms and metrics must have the DOUBLE data type.
You can also define a scientific unit for each asset property, such as mm or Celsius.
Topics• Attributes (p. 140)• Measurements (p. 141)• Transforms (p. 141)• Metrics (p. 142)• Using formula expressions (p. 144)
For an example of how to use measurements, transforms, and metrics to calculate Overall EquipmentEffectiveness (OEE), see Calculating OEE in AWS IoT SiteWise (p. 11).
AttributesAsset attributes represent information that is generally static, such as device manufacturer or geographiclocation. Each asset that you create from an asset model contains the attributes of that model.
The Attribute structure contains an optional defaultValue field that you can define to create anattribute with a default value. To set an asset's attributes to a value other than the asset model's defaultvalue, see Updating attribute values (p. 151).
Example Example attribute structure
The following example demonstrates an attribute that represents an asset's region and defaults toNorth America. This structure is an example of an AssetModelProperty that contains an Attribute,which you then specify as a part of the CreateAssetModel request payload to create an attributeproperty.
140

AWS IoT SiteWise User GuideAsset properties
{ ... "assetModelProperties": [ { "name": "Serial Number", "dataType": "STRING", "type": { "attribute": { "defaultValue": "BLT123" } } } ], ...}
MeasurementsA measurement represents a device's raw sensor data stream, such as timestamped temperature valuesor timestamped rotations per minute (RPM) values.
The Measurement structure is an empty structure when you define an asset model because you laterconfigure each asset to use unique device data streams. To set an asset's measurement property to adevice's sensor data stream, see the Mapping industrial data streams to asset properties (p. 151).
Example Example measurement structure
The following example demonstrates a measurement property that represents an asset's temperaturesensor readings. This structure is an example of an AssetModelProperty that contains a Measurement,which you then specify as a part of the CreateAssetModel request payload to create a measurementproperty.
{ ... "assetModelProperties": [ { "name": "Temperature_C", "dataType": "DOUBLE", "type": { "measurement": {} }, "unit": "Celsius" } ], ...}
TransformsTransforms are mathematical expressions that map an asset property's data points from one formto another. A transform expression consists of asset property variables, mathematical operators, andcommon functions. The transformed data points hold a one-to-one relationship with the input datapoints.
For example, if your asset has a temperature measurement stream named Temperature_C with unitsin Celsius, you can convert each data point to Fahrenheit with the formula Temperature_F = 9/5* Temperature_C + 32. Each time AWS IoT SiteWise receives a data point in the Temperature_Cmeasurement stream, the corresponding Temperature_F value is calculated and available as theTemperature_F property within a few seconds.
141
AWS IoT SiteWise User GuideAsset properties
The Transform structure has two components:
1. An expression string. Transform expressions can use common functions and relational functions.For more information, see Using formula expressions (p. 144).
2. A list of variables that defines the other properties of your asset to use in the expression. Eachvariable structure contains a simple name for use in the expression and a value structure thatidentifies which property to link to that variable. The value structure contains the followinginformation:• propertyId – The ID of the property from which to pull values. You can use the property's name
instead of its ID.
ImportantTransforms can only input properties that are INTEGER or DOUBLE type. Transforms mustinput one non-attribute property and any number of attribute properties. AWS IoT SiteWisecalculates a new transformed data point each time the non-attribute input property receivesa new data point. New attribute values don't trigger transform updates.
Example Example transform structure
The following example demonstrates a transform property that converts an asset's temperaturemeasurement data from Celsius to Fahrenheit. This structure is an example of an AssetModelPropertythat contains a Transform, which you then specify as a part of the CreateAssetModel request payload tocreate a transform property. Transforms must have a dataType of DOUBLE.
{ ... "assetModelProperties": [ ... { "name": "Temperature_F", "dataType": "DOUBLE", "type": { "transform": { "expression": "9/5 * temp_c + 32", "variables": [ { "name": "temp_c", "value": { "propertyId": "Temperature_C" } } ] } }, "unit": "Fahrenheit" } ], ...}
MetricsMetrics are mathematical expressions that use aggregate functions to process all input data points andoutput a single data point per specified time interval. For example, a metric can calculate the averagehourly temperature from a temperature data stream.
The Metric structure has three components:
1. An expression string. Metric expressions can use common functions, aggregation functions, andtemporal functions. For more information, see Using formula expressions (p. 144).
142
AWS IoT SiteWise User GuideAsset properties
2. A window time interval. AWS IoT SiteWise supports the following tumbling window time intervals,where each interval starts when the previous one ends:• 1m – 1 minute, computed at the end of each minute (12:00:00 AM, 12:01:00 AM, 12:02:00 AM, and
so on).• 5m – 5 minutes, computed at the end of every five minutes starting on the hour (12:00:00 AM,
12:05:00 AM, 12:10:00 AM, and so on).• 15m – 15 minutes, computed at the end of every fifteen minutes starting on the hour (12:00:00 AM,
12:15:00 AM, 12:30:00 AM, and so on).• 1h – 1 hour (60 minutes), computed at the end of every hour in UTC (12:00:00 AM, 01:00:00 AM,
02:00:00 AM, and so on).• 1d – 1 day (24 hours), computed at the end of every day in UTC (12:00:00 AM Monday, 12:00:00 AM
Tuesday, and so on).• 1w – 1 week (7 days), computed at the end of every Sunday in UTC (every 12:00:00 AM Monday).
When aggregating data points, the start of each interval is exclusive and the end of each interval isinclusive. AWS IoT SiteWise places the computed data point at the end of the interval.
3. A list of variables that defines the other properties of your asset or child assets to use in theexpression. Each variable structure contains a simple name for use in the expression and a valuestructure that identifies which property to link to that variable. The value structure contains thefollowing information:• propertyId – The ID of the property from which to pull values. You can use the property's name
instead of its ID if the property is defined in the current model (rather than defined in a model froma hierarchy).
• hierarchyId – (Optional) The ID of the hierarchy from which to query child assets for theproperty. You can use the hierarchy definition's name instead of its ID. If you omit this value, AWSIoT SiteWise finds the property in the current model.
ImportantMetrics can only input properties that are INTEGER or DOUBLE type. If you define any metricinput variables in a metric's expression, those inputs must have the same window as theoutput metric.
AWS IoT SiteWise also automatically computes a set of basic aggregation metrics for all asset properties.For more information, see Querying asset property aggregates (p. 180).
Example Example metric structure
The following example demonstrates a metric property that aggregates an asset's temperaturemeasurement data to calculate average hourly temperature in Fahrenheit. This structure is an example ofan AssetModelProperty that contains a Metric, which you then specify as a part of the CreateAssetModelrequest payload to create a metric property. Metrics must have a dataType of DOUBLE.
{ ... "assetModelProperties": [ ... { "name": "Average_Hourly_Temperature_F", "dataType": "DOUBLE", "type": { "metric": { "expression": "avg(temp_f)", "variables": [ { "name": "temp_f", "value": { "propertyId": "Temperature_F"
143

AWS IoT SiteWise User GuideAsset properties
} } ], "window": { "tumbling": { "interval": "1h" } } } }, "unit": "Fahrenheit" } ], ...}
Using formula expressions
With formula expressions, you can define the mathematical functions to transform and aggregate yourraw industrial data to gain insights about your operation. For more information about how to defineproperties that use formula expressions, see Transforms (p. 141) and Metrics (p. 142).
Topics
• Operators (p. 144)
• Common functions (p. 145)
• Relational functions (p. 145)
• Aggregation functions (p. 146)
• Temporal functions (p. 146)
• Late data ingestion (p. 148)
• Data quality in transforms and metrics (p. 148)
• Undefined, infinite, and overflow values (p. 148)
• Counting filtered data points (p. 149)
Operators
You can use the following common mathematical operators in your expressions.
Operator Description
+ Adds the left and right operands.
- Subtracts the right operand from the leftoperand.
/ Divides the left operand by the right operand.
* Multiplies the left and right operands.
^ Raises the left operand to the power of the rightoperand (exponentiation).
% Returns the remainder from dividing the leftoperand by the right operand (modulo). The resulthas the same sign as the left operand.
144
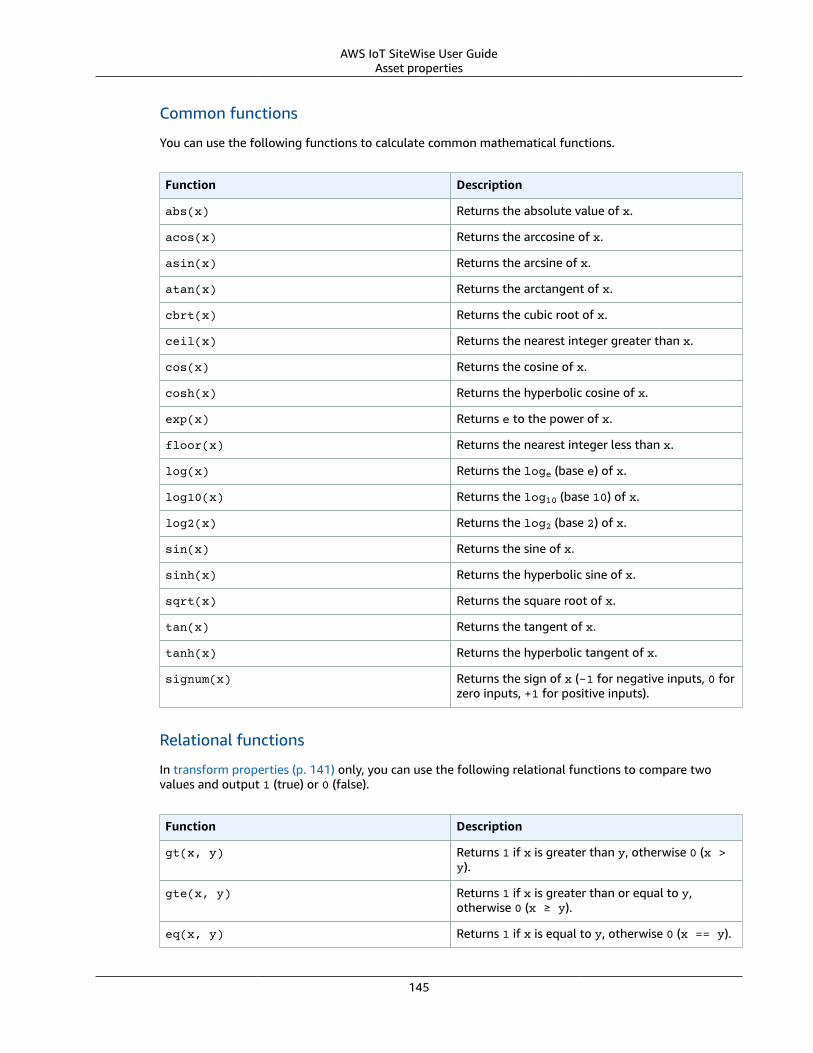
AWS IoT SiteWise User GuideAsset properties
Common functions
You can use the following functions to calculate common mathematical functions.
Function Description
abs(x) Returns the absolute value of x.
acos(x) Returns the arccosine of x.
asin(x) Returns the arcsine of x.
atan(x) Returns the arctangent of x.
cbrt(x) Returns the cubic root of x.
ceil(x) Returns the nearest integer greater than x.
cos(x) Returns the cosine of x.
cosh(x) Returns the hyperbolic cosine of x.
exp(x) Returns e to the power of x.
floor(x) Returns the nearest integer less than x.
log(x) Returns the loge (base e) of x.
log10(x) Returns the log10 (base 10) of x.
log2(x) Returns the log2 (base 2) of x.
sin(x) Returns the sine of x.
sinh(x) Returns the hyperbolic sine of x.
sqrt(x) Returns the square root of x.
tan(x) Returns the tangent of x.
tanh(x) Returns the hyperbolic tangent of x.
signum(x) Returns the sign of x (-1 for negative inputs, 0 forzero inputs, +1 for positive inputs).
Relational functions
In transform properties (p. 141) only, you can use the following relational functions to compare twovalues and output 1 (true) or 0 (false).
Function Description
gt(x, y) Returns 1 if x is greater than y, otherwise 0 (x >y).
gte(x, y) Returns 1 if x is greater than or equal to y,otherwise 0 (x ≥ y).
eq(x, y) Returns 1 if x is equal to y, otherwise 0 (x == y).
145
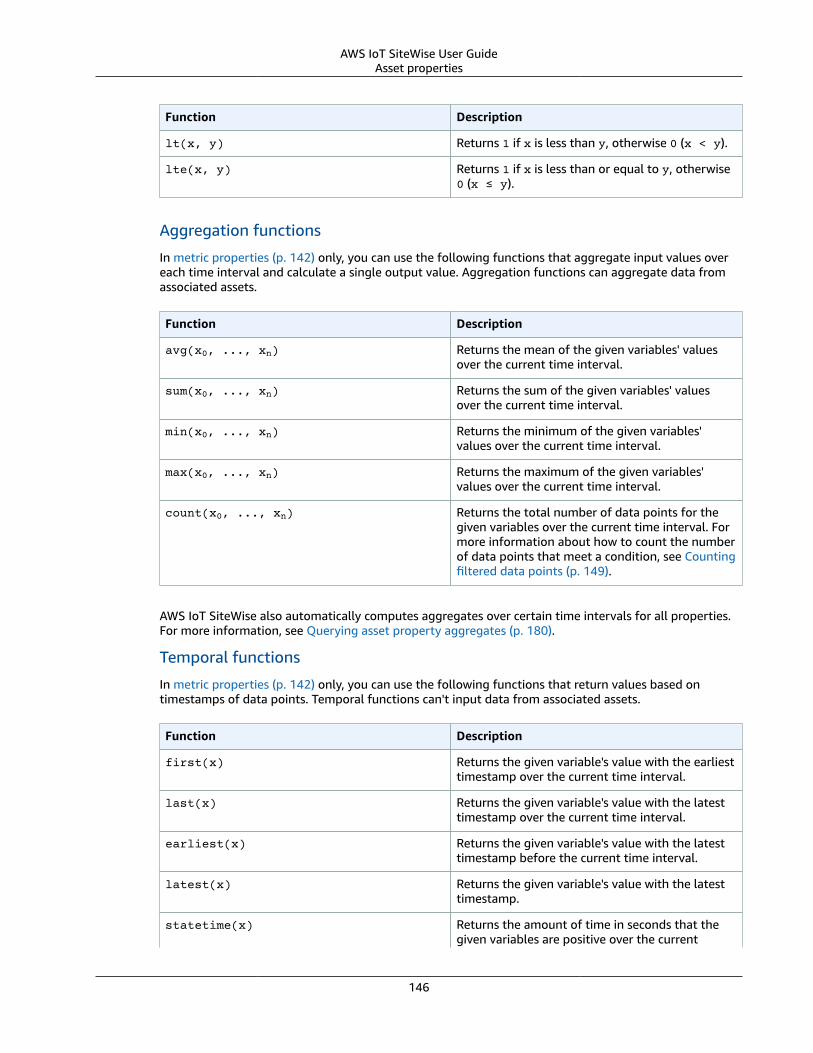
AWS IoT SiteWise User GuideAsset properties
Function Description
lt(x, y) Returns 1 if x is less than y, otherwise 0 (x < y).
lte(x, y) Returns 1 if x is less than or equal to y, otherwise0 (x ≤ y).
Aggregation functions
In metric properties (p. 142) only, you can use the following functions that aggregate input values overeach time interval and calculate a single output value. Aggregation functions can aggregate data fromassociated assets.
Function Description
avg(x0, ..., xn) Returns the mean of the given variables' valuesover the current time interval.
sum(x0, ..., xn) Returns the sum of the given variables' valuesover the current time interval.
min(x0, ..., xn) Returns the minimum of the given variables'values over the current time interval.
max(x0, ..., xn) Returns the maximum of the given variables'values over the current time interval.
count(x0, ..., xn) Returns the total number of data points for thegiven variables over the current time interval. Formore information about how to count the numberof data points that meet a condition, see Countingfiltered data points (p. 149).
AWS IoT SiteWise also automatically computes aggregates over certain time intervals for all properties.For more information, see Querying asset property aggregates (p. 180).
Temporal functions
In metric properties (p. 142) only, you can use the following functions that return values based ontimestamps of data points. Temporal functions can't input data from associated assets.
Function Description
first(x) Returns the given variable's value with the earliesttimestamp over the current time interval.
last(x) Returns the given variable's value with the latesttimestamp over the current time interval.
earliest(x) Returns the given variable's value with the latesttimestamp before the current time interval.
latest(x) Returns the given variable's value with the latesttimestamp.
statetime(x) Returns the amount of time in seconds that thegiven variables are positive over the current
146
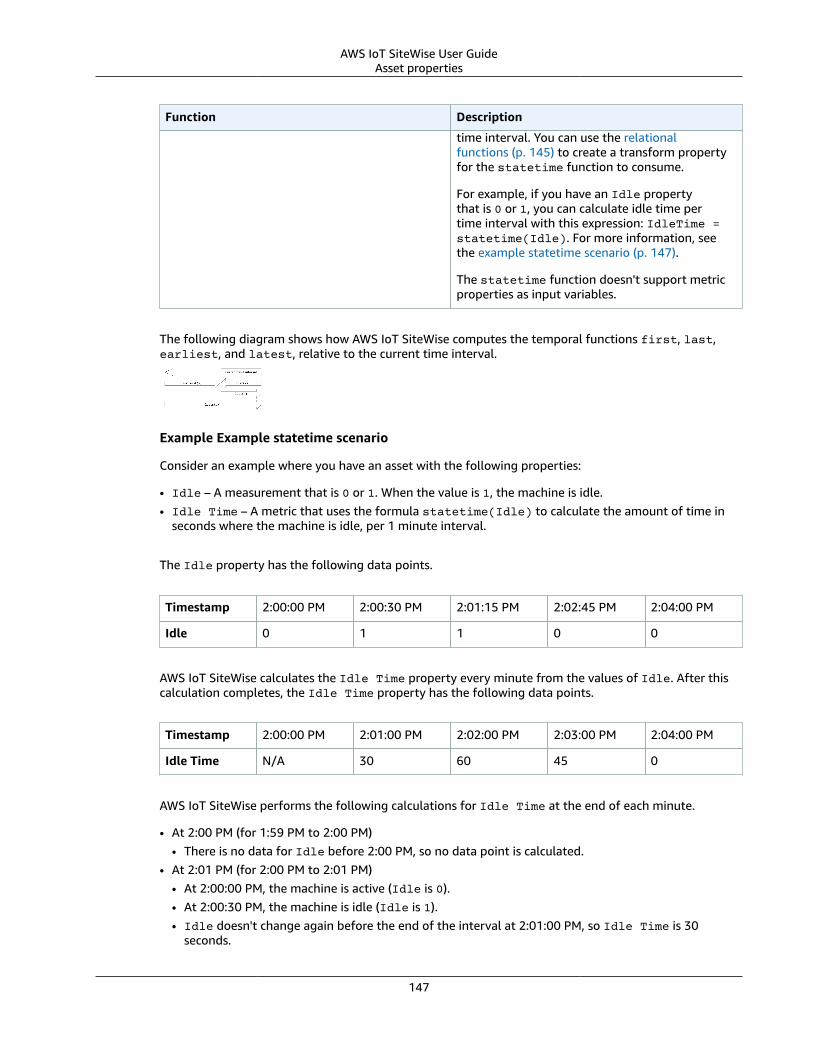
AWS IoT SiteWise User GuideAsset properties
Function Description
time interval. You can use the relationalfunctions (p. 145) to create a transform propertyfor the statetime function to consume.
For example, if you have an Idle propertythat is 0 or 1, you can calculate idle time pertime interval with this expression: IdleTime =statetime(Idle). For more information, seethe example statetime scenario (p. 147).
The statetime function doesn't support metricproperties as input variables.
The following diagram shows how AWS IoT SiteWise computes the temporal functions first, last,earliest, and latest, relative to the current time interval.
Example Example statetime scenario
Consider an example where you have an asset with the following properties:
• Idle – A measurement that is 0 or 1. When the value is 1, the machine is idle.• Idle Time – A metric that uses the formula statetime(Idle) to calculate the amount of time in
seconds where the machine is idle, per 1 minute interval.
The Idle property has the following data points.
Timestamp 2:00:00 PM 2:00:30 PM 2:01:15 PM 2:02:45 PM 2:04:00 PM
Idle 0 1 1 0 0
AWS IoT SiteWise calculates the Idle Time property every minute from the values of Idle. After thiscalculation completes, the Idle Time property has the following data points.
Timestamp 2:00:00 PM 2:01:00 PM 2:02:00 PM 2:03:00 PM 2:04:00 PM
Idle Time N/A 30 60 45 0
AWS IoT SiteWise performs the following calculations for Idle Time at the end of each minute.
• At 2:00 PM (for 1:59 PM to 2:00 PM)• There is no data for Idle before 2:00 PM, so no data point is calculated.
• At 2:01 PM (for 2:00 PM to 2:01 PM)• At 2:00:00 PM, the machine is active (Idle is 0).• At 2:00:30 PM, the machine is idle (Idle is 1).• Idle doesn't change again before the end of the interval at 2:01:00 PM, so Idle Time is 30
seconds.
147
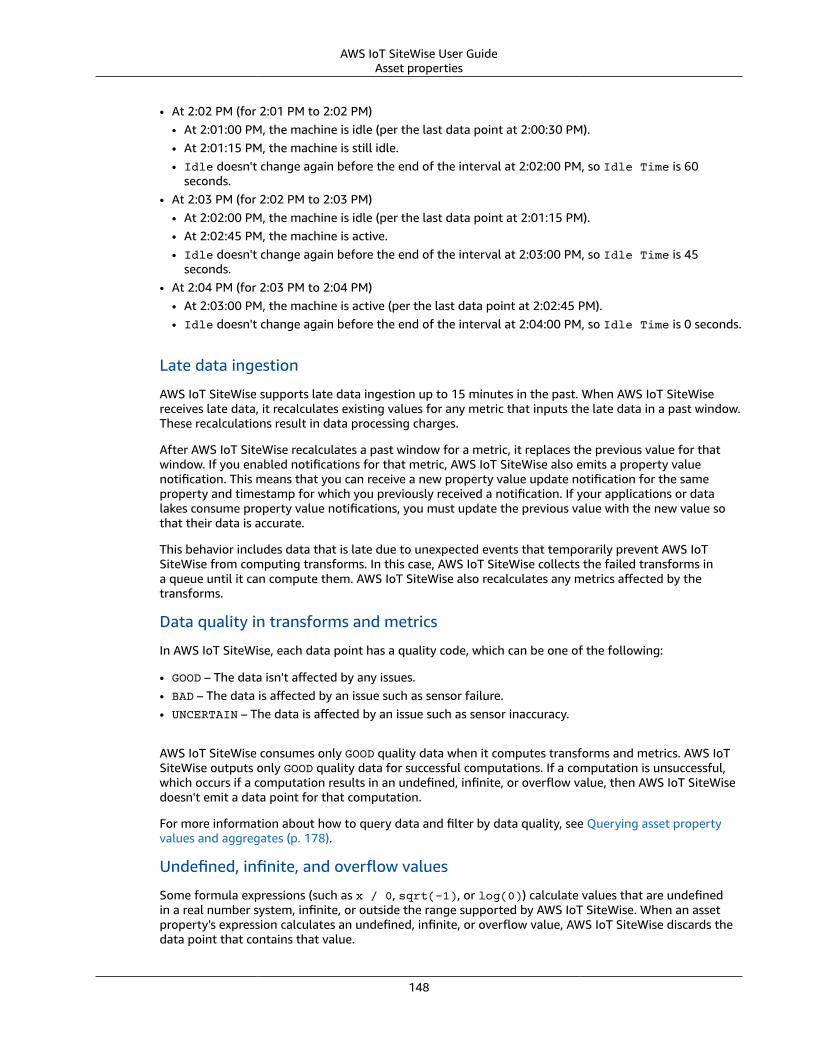
AWS IoT SiteWise User GuideAsset properties
• At 2:02 PM (for 2:01 PM to 2:02 PM)• At 2:01:00 PM, the machine is idle (per the last data point at 2:00:30 PM).• At 2:01:15 PM, the machine is still idle.• Idle doesn't change again before the end of the interval at 2:02:00 PM, so Idle Time is 60
seconds.• At 2:03 PM (for 2:02 PM to 2:03 PM)
• At 2:02:00 PM, the machine is idle (per the last data point at 2:01:15 PM).• At 2:02:45 PM, the machine is active.• Idle doesn't change again before the end of the interval at 2:03:00 PM, so Idle Time is 45
seconds.• At 2:04 PM (for 2:03 PM to 2:04 PM)
• At 2:03:00 PM, the machine is active (per the last data point at 2:02:45 PM).• Idle doesn't change again before the end of the interval at 2:04:00 PM, so Idle Time is 0 seconds.
Late data ingestion
AWS IoT SiteWise supports late data ingestion up to 15 minutes in the past. When AWS IoT SiteWisereceives late data, it recalculates existing values for any metric that inputs the late data in a past window.These recalculations result in data processing charges.
After AWS IoT SiteWise recalculates a past window for a metric, it replaces the previous value for thatwindow. If you enabled notifications for that metric, AWS IoT SiteWise also emits a property valuenotification. This means that you can receive a new property value update notification for the sameproperty and timestamp for which you previously received a notification. If your applications or datalakes consume property value notifications, you must update the previous value with the new value sothat their data is accurate.
This behavior includes data that is late due to unexpected events that temporarily prevent AWS IoTSiteWise from computing transforms. In this case, AWS IoT SiteWise collects the failed transforms ina queue until it can compute them. AWS IoT SiteWise also recalculates any metrics affected by thetransforms.
Data quality in transforms and metrics
In AWS IoT SiteWise, each data point has a quality code, which can be one of the following:
• GOOD – The data isn't affected by any issues.• BAD – The data is affected by an issue such as sensor failure.• UNCERTAIN – The data is affected by an issue such as sensor inaccuracy.
AWS IoT SiteWise consumes only GOOD quality data when it computes transforms and metrics. AWS IoTSiteWise outputs only GOOD quality data for successful computations. If a computation is unsuccessful,which occurs if a computation results in an undefined, infinite, or overflow value, then AWS IoT SiteWisedoesn't emit a data point for that computation.
For more information about how to query data and filter by data quality, see Querying asset propertyvalues and aggregates (p. 178).
Undefined, infinite, and overflow values
Some formula expressions (such as x / 0, sqrt(-1), or log(0)) calculate values that are undefinedin a real number system, infinite, or outside the range supported by AWS IoT SiteWise. When an assetproperty's expression calculates an undefined, infinite, or overflow value, AWS IoT SiteWise discards thedata point that contains that value.
148
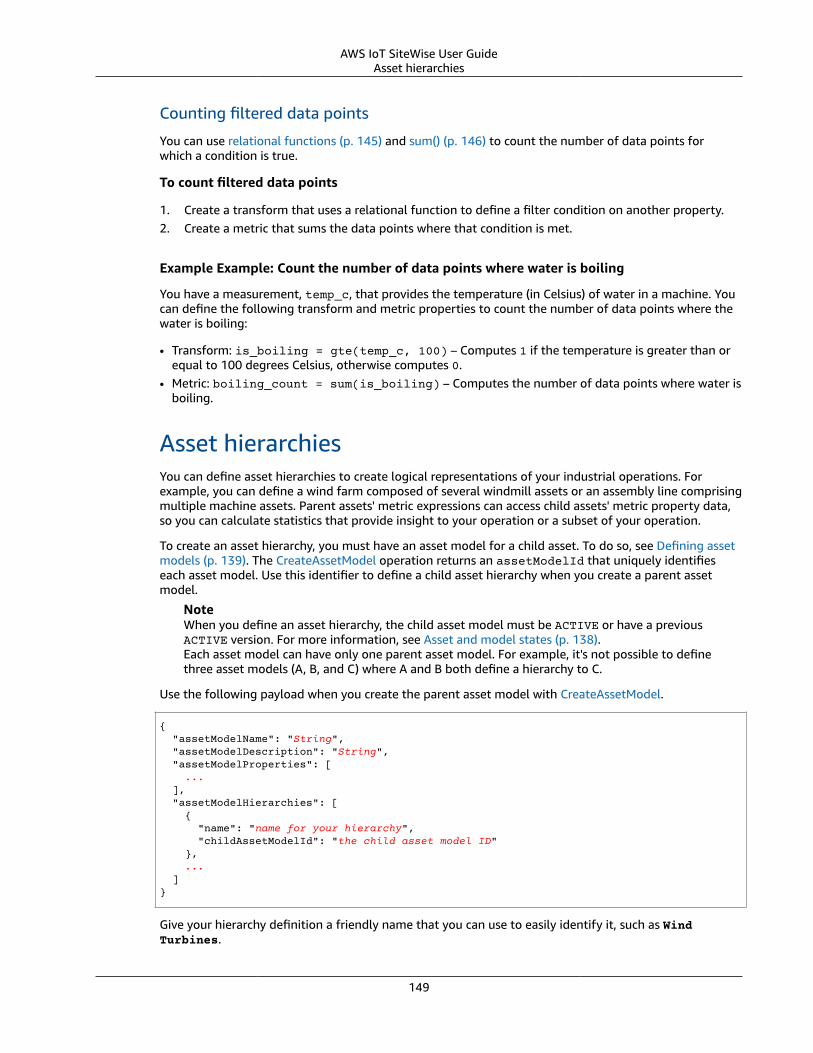
AWS IoT SiteWise User GuideAsset hierarchies
Counting filtered data points
You can use relational functions (p. 145) and sum() (p. 146) to count the number of data points forwhich a condition is true.
To count filtered data points
1. Create a transform that uses a relational function to define a filter condition on another property.2. Create a metric that sums the data points where that condition is met.
Example Example: Count the number of data points where water is boiling
You have a measurement, temp_c, that provides the temperature (in Celsius) of water in a machine. Youcan define the following transform and metric properties to count the number of data points where thewater is boiling:
• Transform: is_boiling = gte(temp_c, 100) – Computes 1 if the temperature is greater than orequal to 100 degrees Celsius, otherwise computes 0.
• Metric: boiling_count = sum(is_boiling) – Computes the number of data points where water isboiling.
Asset hierarchiesYou can define asset hierarchies to create logical representations of your industrial operations. Forexample, you can define a wind farm composed of several windmill assets or an assembly line comprisingmultiple machine assets. Parent assets' metric expressions can access child assets' metric property data,so you can calculate statistics that provide insight to your operation or a subset of your operation.
To create an asset hierarchy, you must have an asset model for a child asset. To do so, see Defining assetmodels (p. 139). The CreateAssetModel operation returns an assetModelId that uniquely identifieseach asset model. Use this identifier to define a child asset hierarchy when you create a parent assetmodel.
NoteWhen you define an asset hierarchy, the child asset model must be ACTIVE or have a previousACTIVE version. For more information, see Asset and model states (p. 138).Each asset model can have only one parent asset model. For example, it's not possible to definethree asset models (A, B, and C) where A and B both define a hierarchy to C.
Use the following payload when you create the parent asset model with CreateAssetModel.
{ "assetModelName": "String", "assetModelDescription": "String", "assetModelProperties": [ ... ], "assetModelHierarchies": [ { "name": "name for your hierarchy", "childAssetModelId": "the child asset model ID" }, ... ]}
Give your hierarchy definition a friendly name that you can use to easily identify it, such as WindTurbines.
149

AWS IoT SiteWise User GuideCreating assets
After you create your parent and child assets, you can associate them. To associate and disassociate yourassets, see Associating and disassociating assets (p. 153).
Creating assetsYou can create an asset from an asset model. If you haven't already created an asset model, see Definingasset models (p. 139). You must have an assetModelId to create an asset. If you created an assetmodel but don't know its assetModelId, you can use the ListAssetModels operation to view all of yourasset models.
NoteYou can only create assets from ACTIVE models. If your model's state isn't ACTIVE, you mayneed to wait for up to a few minutes before you can create assets from that model. For moreinformation, see Asset and model states (p. 138).
To create an asset from an asset model, use the CreateAsset operation. Specify the following parameters:
• assetName – The new asset's name. Give your asset a unique, friendly name that you can use to easilyidentify it.
• assetModelId – The ID of the model to create the asset from.
The following example demonstrates how to create an asset from an asset model.
aws iotsitewise create-asset \ --asset-name "Wind Turbine 7" \ --asset-model-id a1b2c3d4-5678-90ab-cdef-11111EXAMPLE
The operation returns a response that contains your new asset's assetId and status in the followingformat.
{ "assetId": "String", "assetArn": "String", "assetStatus": { "state": "String", "error": { "code": "String", "message": "String" } }}
The operation's response also contains an assetStatus with a state string, which is initiallyCREATING. The asset's status is CREATING until the changes propagate.
ImportantThe asset creation process can take up to a minute. To check your asset's status, usethe DescribeAsset operation with your asset's ID as the assetId parameter. After theassetStatus's state is ACTIVE, you can perform update operations on your asset. For moreinformation, see Asset and model states (p. 138).
Finish configuring your asset with any of the following optional actions:
• Mapping industrial data streams to asset properties (p. 151) if your asset has measurementproperties.
• Updating attribute values (p. 151) if your asset has unique attribute values.
150
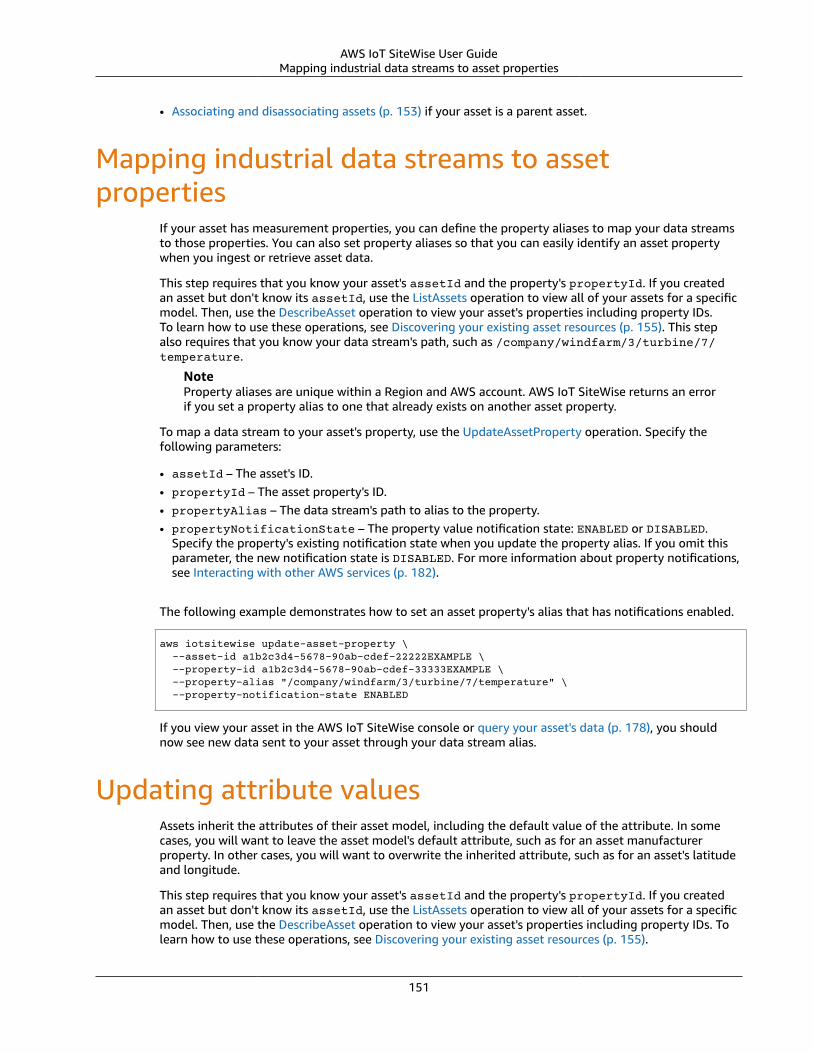
AWS IoT SiteWise User GuideMapping industrial data streams to asset properties
• Associating and disassociating assets (p. 153) if your asset is a parent asset.
Mapping industrial data streams to assetproperties
If your asset has measurement properties, you can define the property aliases to map your data streamsto those properties. You can also set property aliases so that you can easily identify an asset propertywhen you ingest or retrieve asset data.
This step requires that you know your asset's assetId and the property's propertyId. If you createdan asset but don't know its assetId, use the ListAssets operation to view all of your assets for a specificmodel. Then, use the DescribeAsset operation to view your asset's properties including property IDs.To learn how to use these operations, see Discovering your existing asset resources (p. 155). This stepalso requires that you know your data stream's path, such as /company/windfarm/3/turbine/7/temperature.
NoteProperty aliases are unique within a Region and AWS account. AWS IoT SiteWise returns an errorif you set a property alias to one that already exists on another asset property.
To map a data stream to your asset's property, use the UpdateAssetProperty operation. Specify thefollowing parameters:
• assetId – The asset's ID.• propertyId – The asset property's ID.• propertyAlias – The data stream's path to alias to the property.• propertyNotificationState – The property value notification state: ENABLED or DISABLED.
Specify the property's existing notification state when you update the property alias. If you omit thisparameter, the new notification state is DISABLED. For more information about property notifications,see Interacting with other AWS services (p. 182).
The following example demonstrates how to set an asset property's alias that has notifications enabled.
aws iotsitewise update-asset-property \ --asset-id a1b2c3d4-5678-90ab-cdef-22222EXAMPLE \ --property-id a1b2c3d4-5678-90ab-cdef-33333EXAMPLE \ --property-alias "/company/windfarm/3/turbine/7/temperature" \ --property-notification-state ENABLED
If you view your asset in the AWS IoT SiteWise console or query your asset's data (p. 178), you shouldnow see new data sent to your asset through your data stream alias.
Updating attribute valuesAssets inherit the attributes of their asset model, including the default value of the attribute. In somecases, you will want to leave the asset model's default attribute, such as for an asset manufacturerproperty. In other cases, you will want to overwrite the inherited attribute, such as for an asset's latitudeand longitude.
This step requires that you know your asset's assetId and the property's propertyId. If you createdan asset but don't know its assetId, use the ListAssets operation to view all of your assets for a specificmodel. Then, use the DescribeAsset operation to view your asset's properties including property IDs. Tolearn how to use these operations, see Discovering your existing asset resources (p. 155).
151
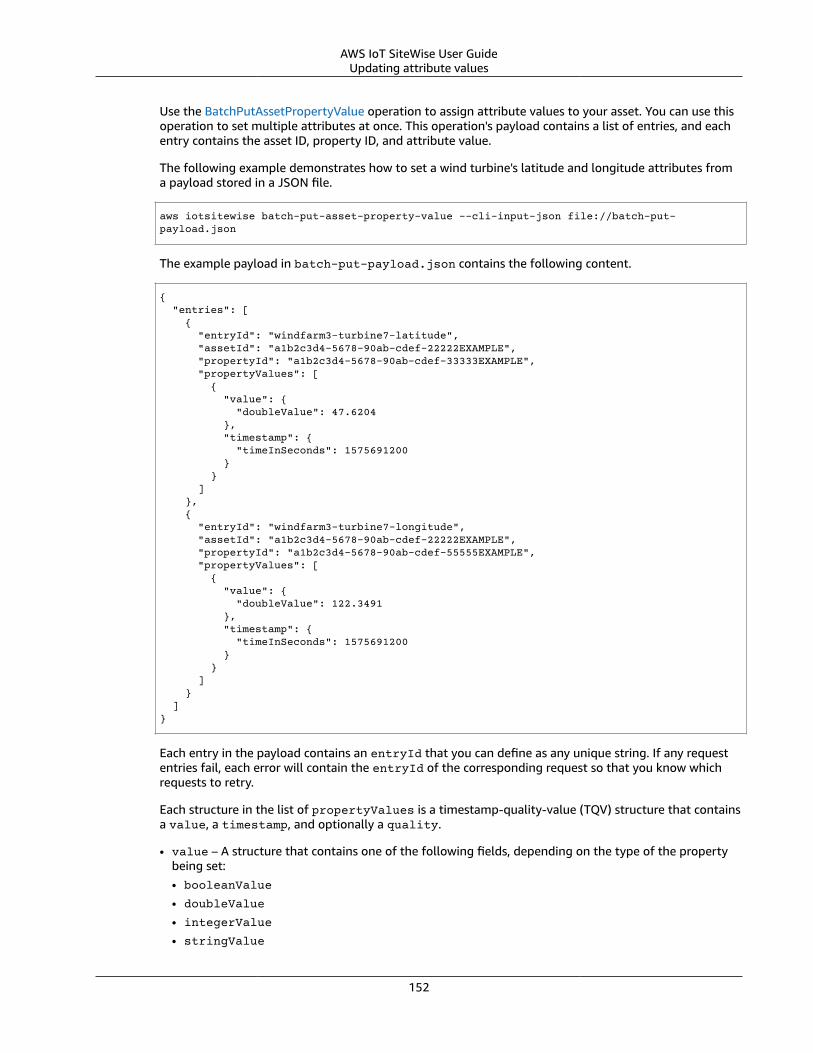
AWS IoT SiteWise User GuideUpdating attribute values
Use the BatchPutAssetPropertyValue operation to assign attribute values to your asset. You can use thisoperation to set multiple attributes at once. This operation's payload contains a list of entries, and eachentry contains the asset ID, property ID, and attribute value.
The following example demonstrates how to set a wind turbine's latitude and longitude attributes froma payload stored in a JSON file.
aws iotsitewise batch-put-asset-property-value --cli-input-json file://batch-put-payload.json
The example payload in batch-put-payload.json contains the following content.
{ "entries": [ { "entryId": "windfarm3-turbine7-latitude", "assetId": "a1b2c3d4-5678-90ab-cdef-22222EXAMPLE", "propertyId": "a1b2c3d4-5678-90ab-cdef-33333EXAMPLE", "propertyValues": [ { "value": { "doubleValue": 47.6204 }, "timestamp": { "timeInSeconds": 1575691200 } } ] }, { "entryId": "windfarm3-turbine7-longitude", "assetId": "a1b2c3d4-5678-90ab-cdef-22222EXAMPLE", "propertyId": "a1b2c3d4-5678-90ab-cdef-55555EXAMPLE", "propertyValues": [ { "value": { "doubleValue": 122.3491 }, "timestamp": { "timeInSeconds": 1575691200 } } ] } ]}
Each entry in the payload contains an entryId that you can define as any unique string. If any requestentries fail, each error will contain the entryId of the corresponding request so that you know whichrequests to retry.
Each structure in the list of propertyValues is a timestamp-quality-value (TQV) structure that containsa value, a timestamp, and optionally a quality.
• value – A structure that contains one of the following fields, depending on the type of the propertybeing set:• booleanValue
• doubleValue
• integerValue
• stringValue
152
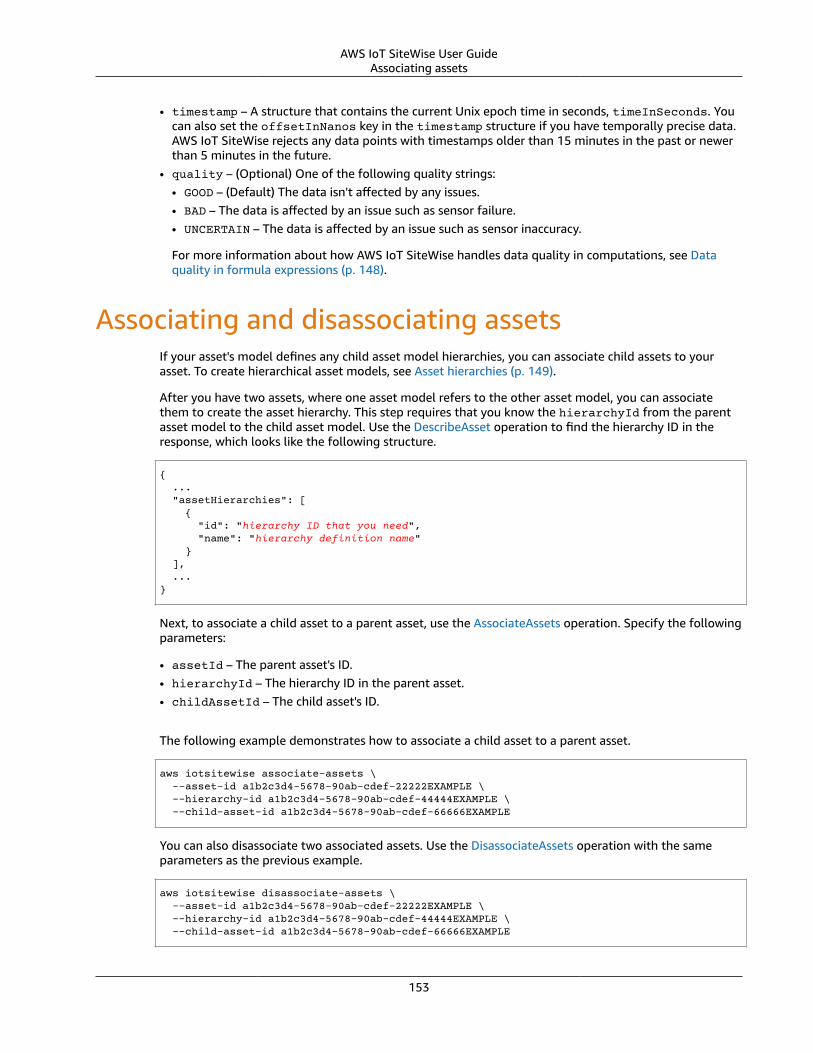
AWS IoT SiteWise User GuideAssociating assets
• timestamp – A structure that contains the current Unix epoch time in seconds, timeInSeconds. Youcan also set the offsetInNanos key in the timestamp structure if you have temporally precise data.AWS IoT SiteWise rejects any data points with timestamps older than 15 minutes in the past or newerthan 5 minutes in the future.
• quality – (Optional) One of the following quality strings:• GOOD – (Default) The data isn't affected by any issues.• BAD – The data is affected by an issue such as sensor failure.• UNCERTAIN – The data is affected by an issue such as sensor inaccuracy.
For more information about how AWS IoT SiteWise handles data quality in computations, see Dataquality in formula expressions (p. 148).
Associating and disassociating assetsIf your asset's model defines any child asset model hierarchies, you can associate child assets to yourasset. To create hierarchical asset models, see Asset hierarchies (p. 149).
After you have two assets, where one asset model refers to the other asset model, you can associatethem to create the asset hierarchy. This step requires that you know the hierarchyId from the parentasset model to the child asset model. Use the DescribeAsset operation to find the hierarchy ID in theresponse, which looks like the following structure.
{ ... "assetHierarchies": [ { "id": "hierarchy ID that you need", "name": "hierarchy definition name" } ], ...}
Next, to associate a child asset to a parent asset, use the AssociateAssets operation. Specify the followingparameters:
• assetId – The parent asset's ID.• hierarchyId – The hierarchy ID in the parent asset.• childAssetId – The child asset's ID.
The following example demonstrates how to associate a child asset to a parent asset.
aws iotsitewise associate-assets \ --asset-id a1b2c3d4-5678-90ab-cdef-22222EXAMPLE \ --hierarchy-id a1b2c3d4-5678-90ab-cdef-44444EXAMPLE \ --child-asset-id a1b2c3d4-5678-90ab-cdef-66666EXAMPLE
You can also disassociate two associated assets. Use the DisassociateAssets operation with the sameparameters as the previous example.
aws iotsitewise disassociate-assets \ --asset-id a1b2c3d4-5678-90ab-cdef-22222EXAMPLE \ --hierarchy-id a1b2c3d4-5678-90ab-cdef-44444EXAMPLE \ --child-asset-id a1b2c3d4-5678-90ab-cdef-66666EXAMPLE
153
AWS IoT SiteWise User GuideUpdating assets and models
Updating assets and modelsYou can update your assets and asset models in AWS IoT SiteWise to modify their names and definitions.These update operations are asynchronous and take time to propagate through AWS IoT SiteWise. Checkthe status of the asset or asset model before you make additional changes. You must wait until thechanges propagate before you can use the resources.
Updating assetsYou can update an asset's name using the UpdateAsset operation. Specify the following parameters:
• assetId – The asset's ID.• assetName – The asset's new name.
The following example demonstrates how to update an asset's name.
aws iotsitewise update-asset \ --asset-id a1b2c3d4-5678-90ab-cdef-22222EXAMPLE \ --asset-name "Wind Turbine 8"
The asset's status is UPDATING until the changes propagate. For more information, see Asset and modelstates (p. 138).
Updating asset modelsYou can update an asset model's name, description, properties, and hierarchies using theUpdateAssetModel operation. Specify the following parameter:
• assetModelId – The asset model's ID.
Specify the updated asset model in the payload. To learn about the expected format of an asset model,see Defining asset models (p. 139). You can't change the type or data type of an existing property.
WarningThe UpdateAssetModel operation overwrites the existing model with the model that youprovide in the payload. To avoid deleting your asset model's properties or hierarchies, you mustinclude their IDs and definitions in the updated asset model payload. To learn how to query yourmodel's existing structure, see Describing a specific asset model (p. 156).
The following example demonstrates how to update an asset model.
aws iotsitewise update-asset-model \ --asset-model-id a1b2c3d4-5678-90ab-cdef-11111EXAMPLE \ --cli-input-json file://model-payload.json
When you update an asset model, every asset based on that model reflects any changes that you maketo the underlying model. Until the changes propagate, each asset has the UPDATING state. You mustwait until those assets return to the ACTIVE state before you interact with them. During this time,the updated asset model's status will be PROPAGATING. For more information, see Asset and modelstates (p. 138).
ImportantIf you remove a property from an asset model or update a property's formula expression, AWSIoT SiteWise deletes all previous data for that property. If you remove a hierarchy definitionfrom an asset model, AWS IoT SiteWise disassociates all assets in that hierarchy.
154
AWS IoT SiteWise User GuideDeleting assets and models
Deleting assets and modelsYou can delete your assets and models from AWS IoT SiteWise when you're done with them. The deleteoperations are asynchronous and take time to propagate through AWS IoT SiteWise.
Deleting assetsYou can delete your assets using the DeleteAsset operation. Before you can delete an asset, you mustfirst disassociate its child assets. You can use the DescribeAsset operation with the assetId parameterto list your asset's hierarchies. Next, you can use the ListAssociatedAssets operation with the assetIdand hierarchyId parameters to find your asset's child assets. Then, to remove child assets from anasset, see Associating and disassociating assets (p. 153).
To use the DeleteAsset operation, specify the following parameter:
• assetId – The asset's ID.
The following example demonstrates how to delete an asset.
aws iotsitewise delete-asset --asset-id a1b2c3d4-5678-90ab-cdef-22222EXAMPLE
The asset's status will be DELETING until the changes propagate. For more information, see Asset andmodel states (p. 138). After the asset is deleted, you can't query that asset. If you do, the API returns anHTTP 404 response.
ImportantAWS IoT SiteWise deletes all property data for deleted assets.
Deleting asset modelsYou can delete your asset models using the DeleteAssetModel operation. Before you can delete anasset model, you must first delete all assets created from the asset model. You can use the ListAssetsoperation with the assetModelId parameter to list all assets that use your asset model.
To use the DeleteAssetModel operation, specify the following parameter:
• assetModelId – The asset model's ID.
The following example demonstrates how to delete an asset model.
aws iotsitewise delete-asset-model --asset-model-id a1b2c3d4-5678-90ab-cdef-11111EXAMPLE
The asset model's status will be DELETING until the changes propagate. For more information, see Assetand model states (p. 138). After the asset model is deleted, you can't query that asset model. If you do,the API returns an HTTP 404 response.
Discovering your existing asset resourcesYou can explore your existing asset resources and discover the structure of your virtual industrialoperation using the AWS IoT SiteWise API. Use these operations to find model IDs, asset IDs, propertyIDs, reference IDs, and other information about your assets and asset models. To explore asset propertydata, see Querying asset property values and aggregates (p. 178).
155
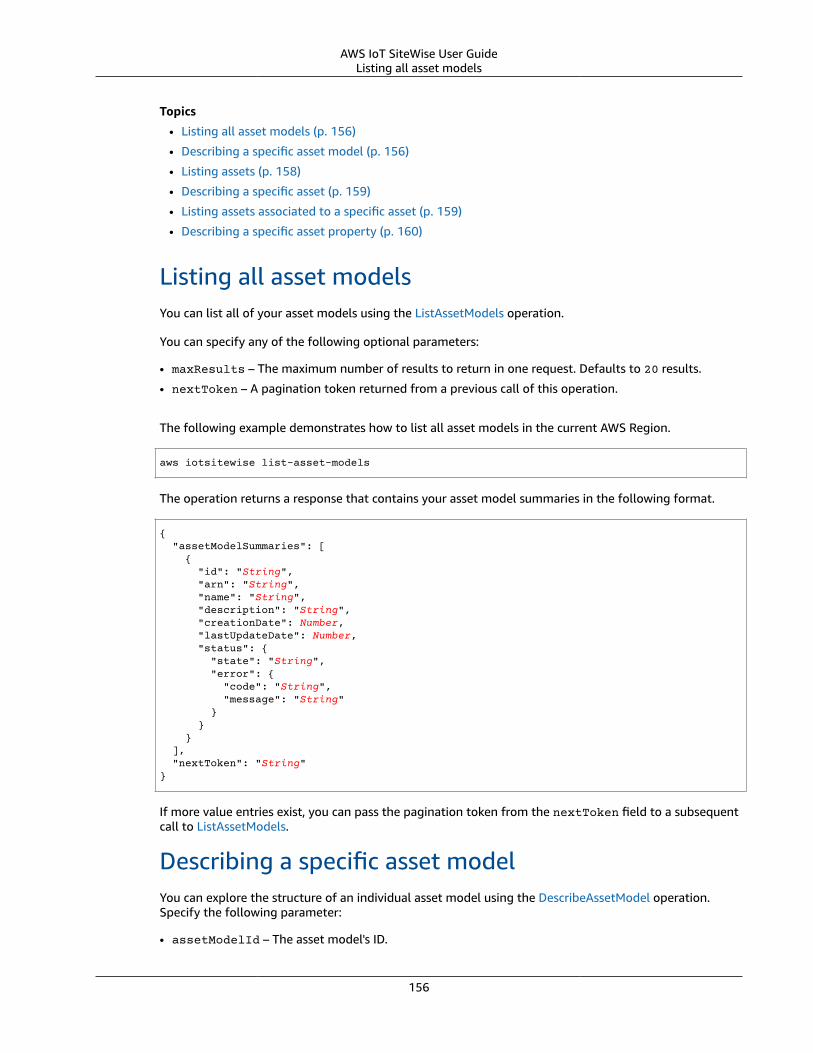
AWS IoT SiteWise User GuideListing all asset models
Topics
• Listing all asset models (p. 156)
• Describing a specific asset model (p. 156)
• Listing assets (p. 158)
• Describing a specific asset (p. 159)
• Listing assets associated to a specific asset (p. 159)
• Describing a specific asset property (p. 160)
Listing all asset modelsYou can list all of your asset models using the ListAssetModels operation.
You can specify any of the following optional parameters:
• maxResults – The maximum number of results to return in one request. Defaults to 20 results.
• nextToken – A pagination token returned from a previous call of this operation.
The following example demonstrates how to list all asset models in the current AWS Region.
aws iotsitewise list-asset-models
The operation returns a response that contains your asset model summaries in the following format.
{ "assetModelSummaries": [ { "id": "String", "arn": "String", "name": "String", "description": "String", "creationDate": Number, "lastUpdateDate": Number, "status": { "state": "String", "error": { "code": "String", "message": "String" } } } ], "nextToken": "String"}
If more value entries exist, you can pass the pagination token from the nextToken field to a subsequentcall to ListAssetModels.
Describing a specific asset modelYou can explore the structure of an individual asset model using the DescribeAssetModel operation.Specify the following parameter:
• assetModelId – The asset model's ID.
156
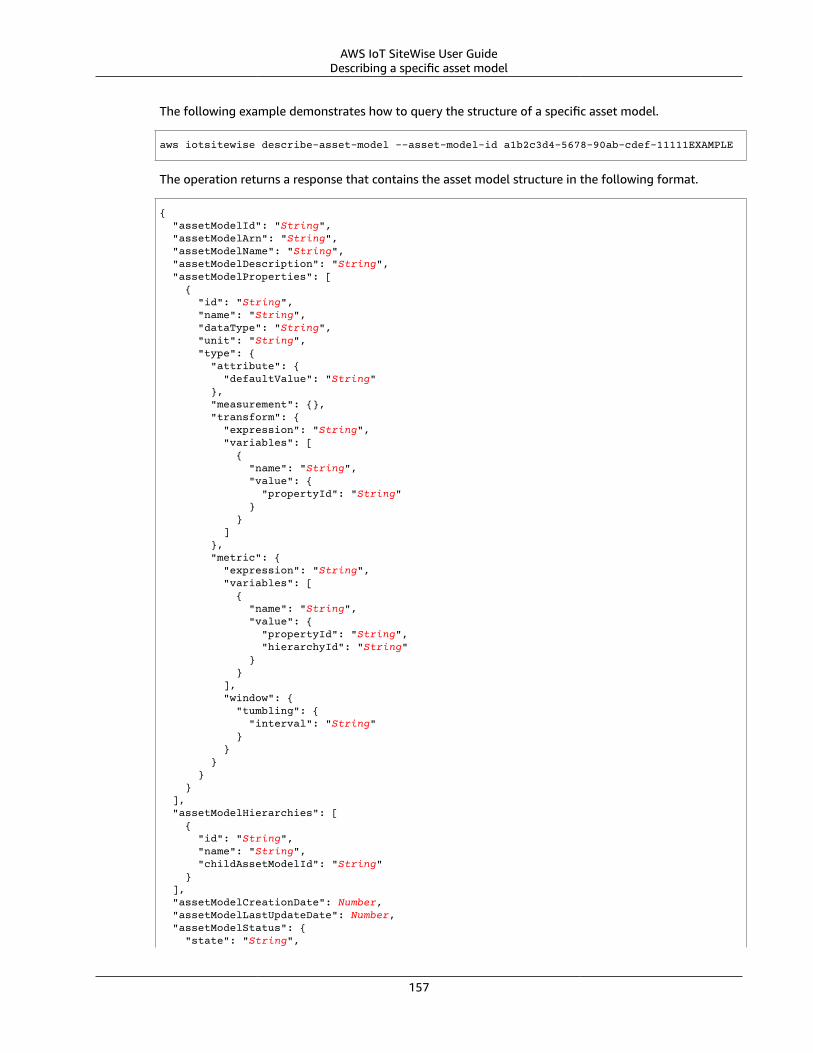
AWS IoT SiteWise User GuideDescribing a specific asset model
The following example demonstrates how to query the structure of a specific asset model.
aws iotsitewise describe-asset-model --asset-model-id a1b2c3d4-5678-90ab-cdef-11111EXAMPLE
The operation returns a response that contains the asset model structure in the following format.
{ "assetModelId": "String", "assetModelArn": "String", "assetModelName": "String", "assetModelDescription": "String", "assetModelProperties": [ { "id": "String", "name": "String", "dataType": "String", "unit": "String", "type": { "attribute": { "defaultValue": "String" }, "measurement": {}, "transform": { "expression": "String", "variables": [ { "name": "String", "value": { "propertyId": "String" } } ] }, "metric": { "expression": "String", "variables": [ { "name": "String", "value": { "propertyId": "String", "hierarchyId": "String" } } ], "window": { "tumbling": { "interval": "String" } } } } } ], "assetModelHierarchies": [ { "id": "String", "name": "String", "childAssetModelId": "String" } ], "assetModelCreationDate": Number, "assetModelLastUpdateDate": Number, "assetModelStatus": { "state": "String",
157

AWS IoT SiteWise User GuideListing assets
"error": { "code": "String", "message": "String" } }}
Listing assetsYou can list your existing assets using the ListAssets operation.
Specify at least one of the following required parameters:
• assetModelId – The asset model ID to filter assets by. This parameter is required if you choose ALLfor filter.
• filter – The asset filter: ALL or TOP_LEVEL. Defaults to ALL. If you choose ALL, you must specify anasset model ID to filter assets by.
You can also specify any of the following optional parameters:
• maxResults – The maximum number of results to return in one request. Defaults to 20 results.• nextToken – A pagination token returned from a previous call of this operation.
The following example lists all top-level assets in the current AWS Region.
aws iotsitewise list-assets --filter TOP_LEVEL
The operation returns a response that contains your asset summaries in the following format.
{ "assetSummaries": [ { "id": "String", "arn": "String", "name": "String", "assetModelId": "String", "creationDate": Number, "lastUpdateDate": Number, "status": { "state": "String", "error": { "code": "String", "message": "String" } }, "hierarchies": [ { "id": "String", "name": "String" } ] } ], "nextToken": "String"}
If more value entries exist, you can pass the pagination token from the nextToken field to a subsequentcall to ListAssets.
158
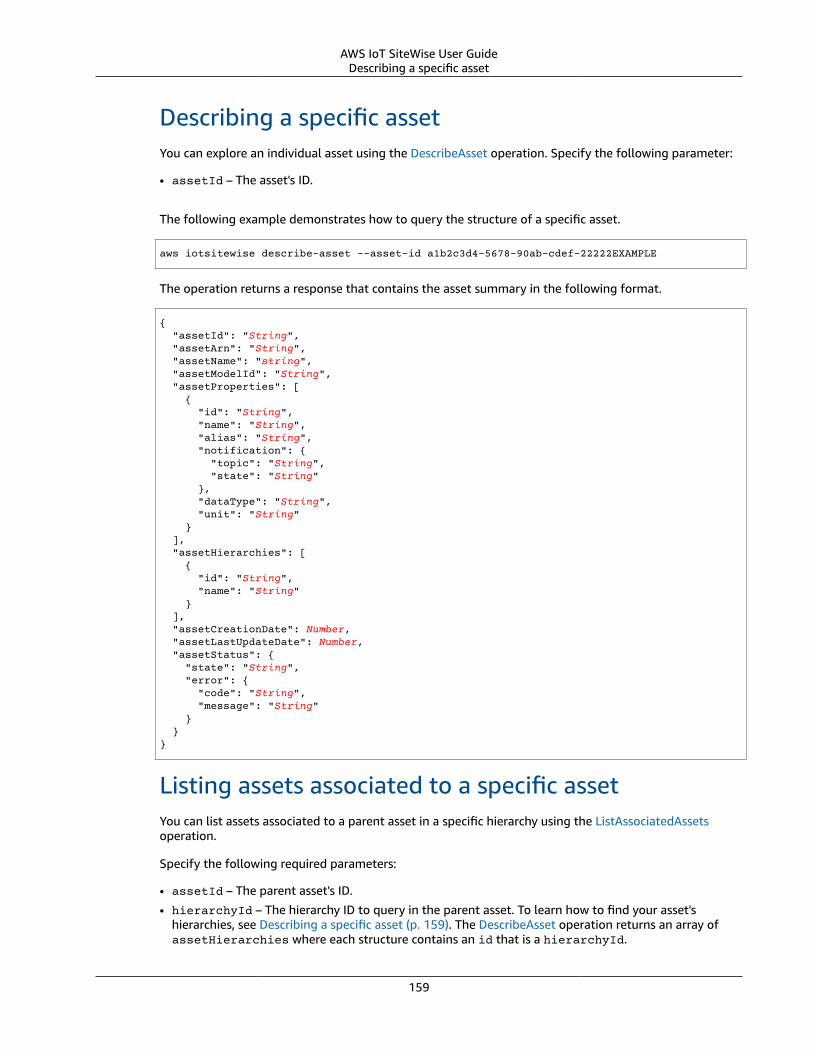
AWS IoT SiteWise User GuideDescribing a specific asset
Describing a specific assetYou can explore an individual asset using the DescribeAsset operation. Specify the following parameter:
• assetId – The asset's ID.
The following example demonstrates how to query the structure of a specific asset.
aws iotsitewise describe-asset --asset-id a1b2c3d4-5678-90ab-cdef-22222EXAMPLE
The operation returns a response that contains the asset summary in the following format.
{ "assetId": "String", "assetArn": "String", "assetName": "string", "assetModelId": "String", "assetProperties": [ { "id": "String", "name": "String", "alias": "String", "notification": { "topic": "String", "state": "String" }, "dataType": "String", "unit": "String" } ], "assetHierarchies": [ { "id": "String", "name": "String" } ], "assetCreationDate": Number, "assetLastUpdateDate": Number, "assetStatus": { "state": "String", "error": { "code": "String", "message": "String" } }}
Listing assets associated to a specific assetYou can list assets associated to a parent asset in a specific hierarchy using the ListAssociatedAssetsoperation.
Specify the following required parameters:
• assetId – The parent asset's ID.
• hierarchyId – The hierarchy ID to query in the parent asset. To learn how to find your asset'shierarchies, see Describing a specific asset (p. 159). The DescribeAsset operation returns an array ofassetHierarchies where each structure contains an id that is a hierarchyId.
159
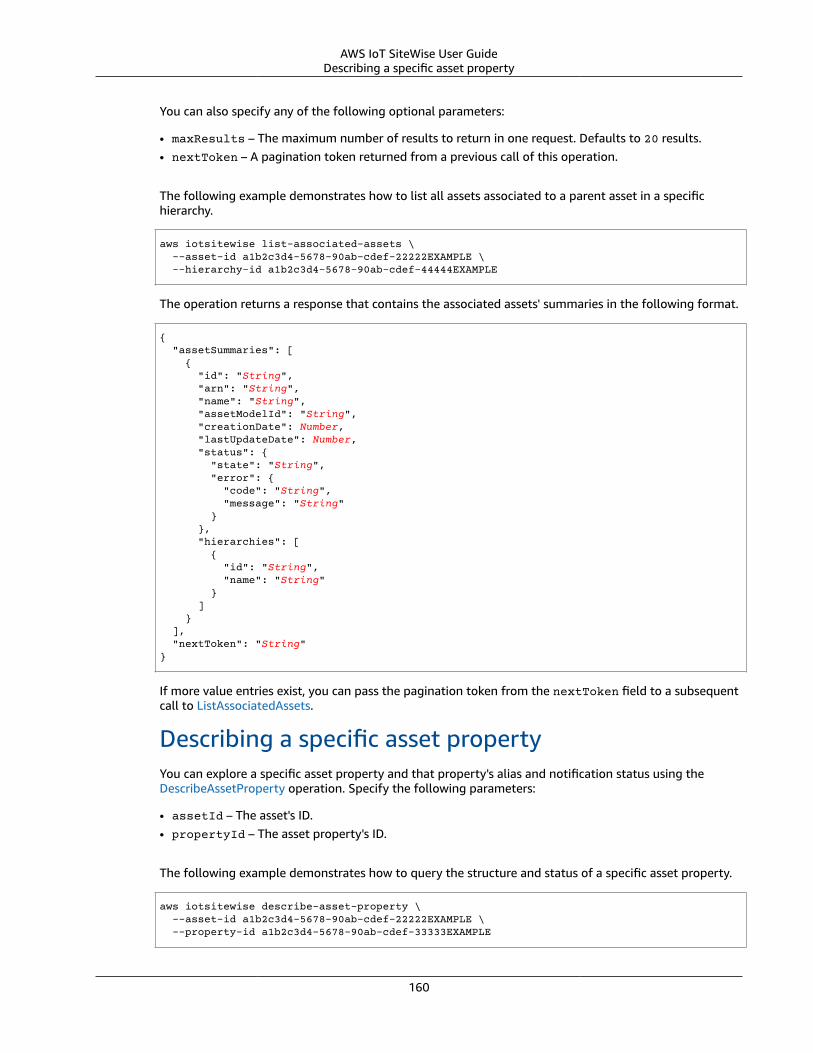
AWS IoT SiteWise User GuideDescribing a specific asset property
You can also specify any of the following optional parameters:
• maxResults – The maximum number of results to return in one request. Defaults to 20 results.• nextToken – A pagination token returned from a previous call of this operation.
The following example demonstrates how to list all assets associated to a parent asset in a specifichierarchy.
aws iotsitewise list-associated-assets \ --asset-id a1b2c3d4-5678-90ab-cdef-22222EXAMPLE \ --hierarchy-id a1b2c3d4-5678-90ab-cdef-44444EXAMPLE
The operation returns a response that contains the associated assets' summaries in the following format.
{ "assetSummaries": [ { "id": "String", "arn": "String", "name": "String", "assetModelId": "String", "creationDate": Number, "lastUpdateDate": Number, "status": { "state": "String", "error": { "code": "String", "message": "String" } }, "hierarchies": [ { "id": "String", "name": "String" } ] } ], "nextToken": "String"}
If more value entries exist, you can pass the pagination token from the nextToken field to a subsequentcall to ListAssociatedAssets.
Describing a specific asset propertyYou can explore a specific asset property and that property's alias and notification status using theDescribeAssetProperty operation. Specify the following parameters:
• assetId – The asset's ID.• propertyId – The asset property's ID.
The following example demonstrates how to query the structure and status of a specific asset property.
aws iotsitewise describe-asset-property \ --asset-id a1b2c3d4-5678-90ab-cdef-22222EXAMPLE \ --property-id a1b2c3d4-5678-90ab-cdef-33333EXAMPLE
160
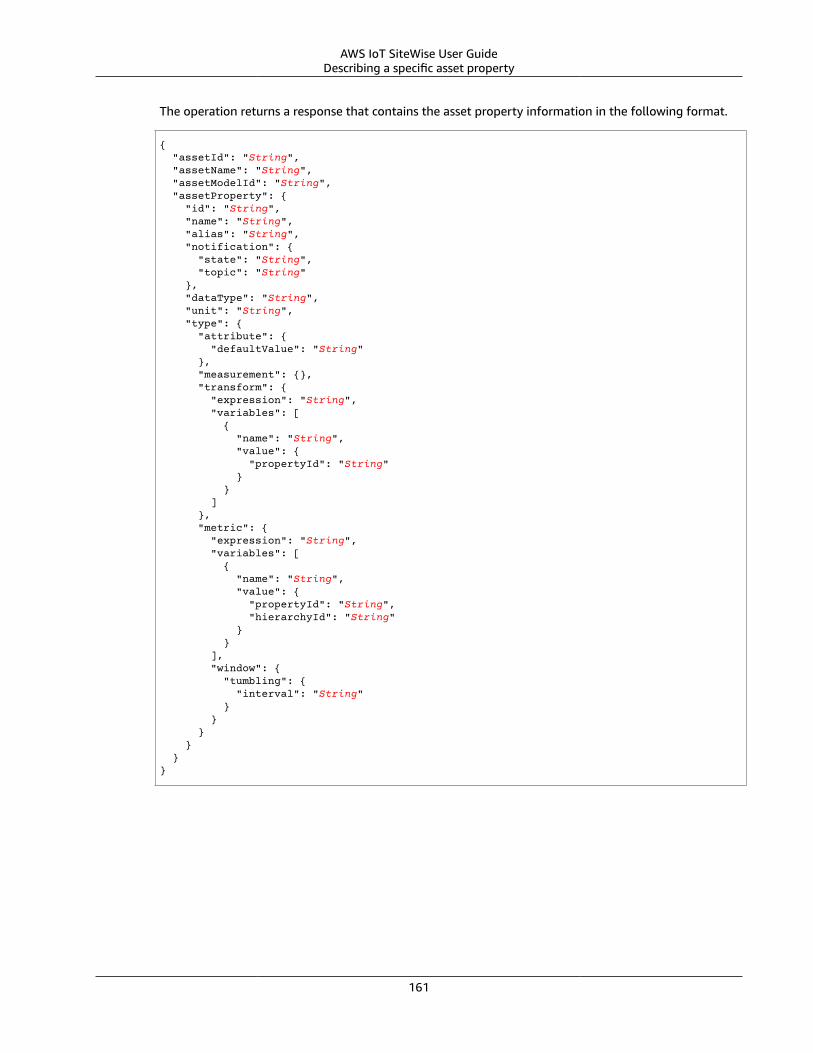
AWS IoT SiteWise User GuideDescribing a specific asset property
The operation returns a response that contains the asset property information in the following format.
{ "assetId": "String", "assetName": "String", "assetModelId": "String", "assetProperty": { "id": "String", "name": "String", "alias": "String", "notification": { "state": "String", "topic": "String" }, "dataType": "String", "unit": "String", "type": { "attribute": { "defaultValue": "String" }, "measurement": {}, "transform": { "expression": "String", "variables": [ { "name": "String", "value": { "propertyId": "String" } } ] }, "metric": { "expression": "String", "variables": [ { "name": "String", "value": { "propertyId": "String", "hierarchyId": "String" } } ], "window": { "tumbling": { "interval": "String" } } } } }}
161
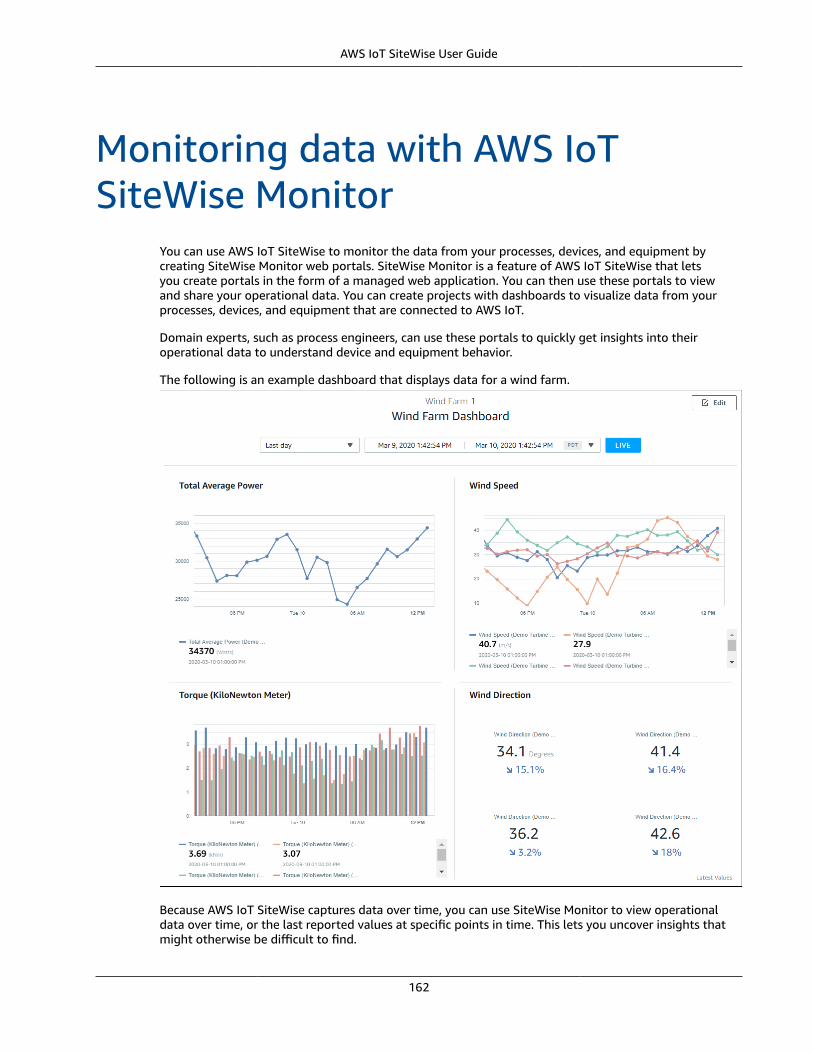
AWS IoT SiteWise User Guide
Monitoring data with AWS IoTSiteWise Monitor
You can use AWS IoT SiteWise to monitor the data from your processes, devices, and equipment bycreating SiteWise Monitor web portals. SiteWise Monitor is a feature of AWS IoT SiteWise that letsyou create portals in the form of a managed web application. You can then use these portals to viewand share your operational data. You can create projects with dashboards to visualize data from yourprocesses, devices, and equipment that are connected to AWS IoT.
Domain experts, such as process engineers, can use these portals to quickly get insights into theiroperational data to understand device and equipment behavior.
The following is an example dashboard that displays data for a wind farm.
Because AWS IoT SiteWise captures data over time, you can use SiteWise Monitor to view operationaldata over time, or the last reported values at specific points in time. This lets you uncover insights thatmight otherwise be difficult to find.
162
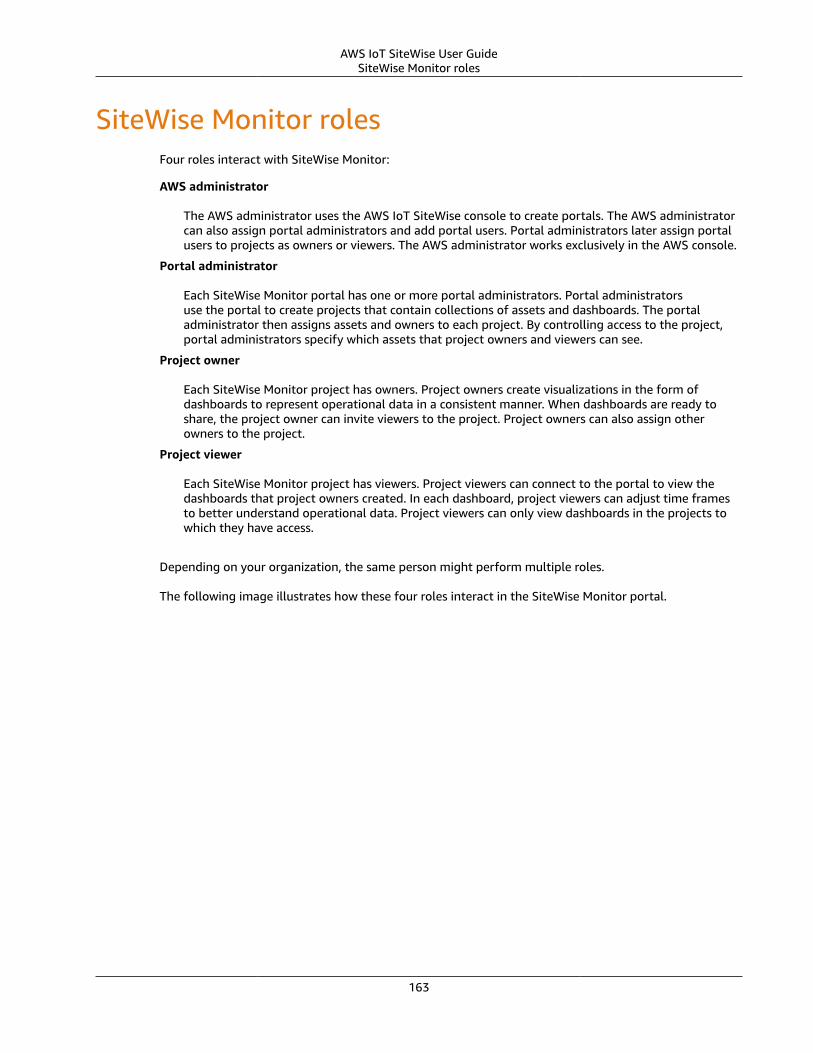
AWS IoT SiteWise User GuideSiteWise Monitor roles
SiteWise Monitor rolesFour roles interact with SiteWise Monitor:
AWS administrator
The AWS administrator uses the AWS IoT SiteWise console to create portals. The AWS administratorcan also assign portal administrators and add portal users. Portal administrators later assign portalusers to projects as owners or viewers. The AWS administrator works exclusively in the AWS console.
Portal administrator
Each SiteWise Monitor portal has one or more portal administrators. Portal administratorsuse the portal to create projects that contain collections of assets and dashboards. The portaladministrator then assigns assets and owners to each project. By controlling access to the project,portal administrators specify which assets that project owners and viewers can see.
Project owner
Each SiteWise Monitor project has owners. Project owners create visualizations in the form ofdashboards to represent operational data in a consistent manner. When dashboards are ready toshare, the project owner can invite viewers to the project. Project owners can also assign otherowners to the project.
Project viewer
Each SiteWise Monitor project has viewers. Project viewers can connect to the portal to view thedashboards that project owners created. In each dashboard, project viewers can adjust time framesto better understand operational data. Project viewers can only view dashboards in the projects towhich they have access.
Depending on your organization, the same person might perform multiple roles.
The following image illustrates how these four roles interact in the SiteWise Monitor portal.
163
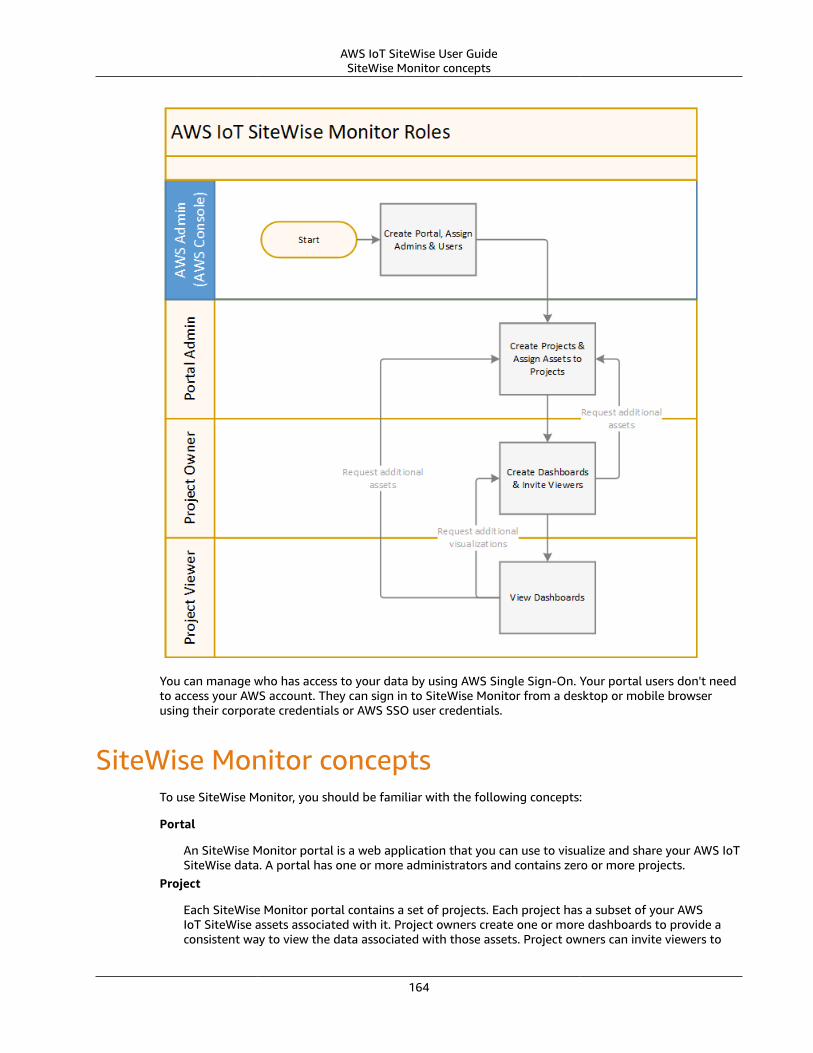
AWS IoT SiteWise User GuideSiteWise Monitor concepts
You can manage who has access to your data by using AWS Single Sign-On. Your portal users don't needto access your AWS account. They can sign in to SiteWise Monitor from a desktop or mobile browserusing their corporate credentials or AWS SSO user credentials.
SiteWise Monitor conceptsTo use SiteWise Monitor, you should be familiar with the following concepts:
Portal
An SiteWise Monitor portal is a web application that you can use to visualize and share your AWS IoTSiteWise data. A portal has one or more administrators and contains zero or more projects.
Project
Each SiteWise Monitor portal contains a set of projects. Each project has a subset of your AWSIoT SiteWise assets associated with it. Project owners create one or more dashboards to provide aconsistent way to view the data associated with those assets. Project owners can invite viewers to
164
AWS IoT SiteWise User GuideGetting started
the project to allow them to view the assets and dashboards in the project. The project is the basicunit of sharing within SiteWise Monitor. Project owners can invite users who were given access to theportal by the AWS administrator. A user must have access to a portal before a project in that portalcan be shared with that user.
Asset
When data is ingested into AWS IoT SiteWise from your industrial equipment, your devices,equipment, and processes are each represented as assets. Each asset has data associated with it. Forexample, a piece of equipment might have a serial number, a location, a make and model, and aninstall date. It might also have time series values for availability, performance, quality, temperature,pressure, and so on. The portal administrator assigns sets of assets to each project.
Dashboard
Each project contains a set of dashboards. Dashboards provide a set of visualizations for the valuesof a set of assets. Project owners create the dashboards and the visualizations that it contains. Whena project owner is ready to share the set of dashboards, the owner can invite viewers to the project,which gives them access to all dashboards in the project. If you want a different set of viewers fordifferent dashboards, you must divide the dashboards between projects. When viewers look atdashboards, they can adjust the time period.
Visualization
In each dashboard, project owners decide how to display the values for the properties of the assetsassociated with the project. Availability might best be represented as a line chart, while other valuesmight be displayed as bar charts or key performance indicators (KPIs). Project owners customizeeach visualization to provide the best understanding of the data for that asset.
Getting started with AWS IoT SiteWise MonitorIf you're the AWS administrator for your organization, you create portals from the AWS IoT SiteWiseconsole. Complete the following steps to create a portal so that members of your organization can viewyour AWS IoT SiteWise data:
1. Enable AWS SSO if it's not already enabled2. Configure and create a portal3. Add portal administrators and send invitation emails4. Add portal users
You complete these steps in the AWS IoT SiteWise console.
After you create a portal, the portal administrator can view your AWS IoT SiteWise assets and assignthem to projects in the portal. Project owners can then create dashboards to visualize the propertiesof the assets that help project viewers understand how your devices, processes, and equipment areperforming.
You can follow a tutorial that walks through the steps required to set up a portal with a project,dashboards, and multiple users for a specific scenario using wind farm data. For more information, seeVisualizing and sharing wind farm data in AWS IoT SiteWise Monitor (p. 64).
Creating a portalYou create a SiteWise Monitor portal in the AWS IoT SiteWise console.
To create a portal
1. Sign in to the AWS IoT SiteWise console.
165
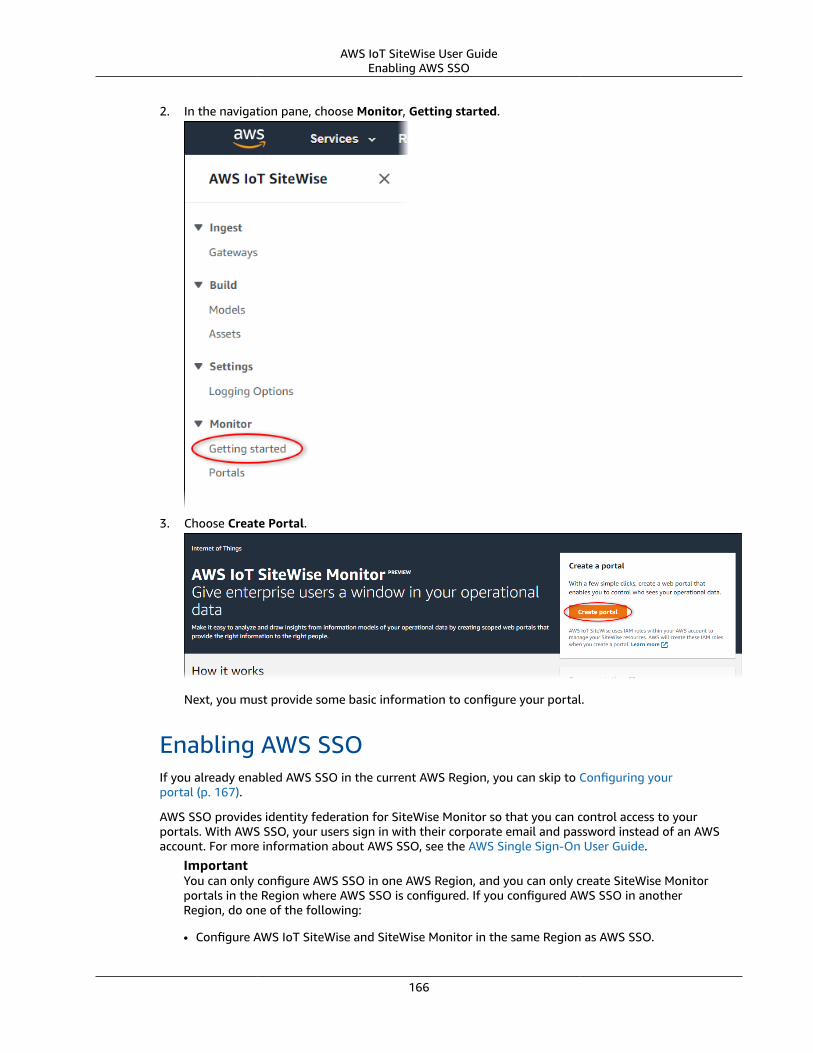
AWS IoT SiteWise User GuideEnabling AWS SSO
2. In the navigation pane, choose Monitor, Getting started.
3. Choose Create Portal.
Next, you must provide some basic information to configure your portal.
Enabling AWS SSOIf you already enabled AWS SSO in the current AWS Region, you can skip to Configuring yourportal (p. 167).
AWS SSO provides identity federation for SiteWise Monitor so that you can control access to yourportals. With AWS SSO, your users sign in with their corporate email and password instead of an AWSaccount. For more information about AWS SSO, see the AWS Single Sign-On User Guide.
ImportantYou can only configure AWS SSO in one AWS Region, and you can only create SiteWise Monitorportals in the Region where AWS SSO is configured. If you configured AWS SSO in anotherRegion, do one of the following:
• Configure AWS IoT SiteWise and SiteWise Monitor in the same Region as AWS SSO.
166

AWS IoT SiteWise User GuideConfiguring your portal
• Delete the AWS SSO configuration from the AWS Single Sign-On console before completingthe steps in this section.
In this procedure, SiteWise Monitor performs the following steps for you:
1. Enables AWS Organizations, a prerequisite for AWS SSO. For more information, see AWSOrganizations User Guide.
2. Creates an AWS organization and sets your AWS account as the master account.
3. Enables AWS SSO in the current AWS Region.
To enable AWS SSO
1. Enter the Email address, First name, and Last name for the user that you want as your portaladministrator. The given email address will receive an email to set a password for the new AWS SSOuser. If you want to be the portal administrator, enter your email and name to create an AWS SSOidentity to use with your portal. You can create more users later.
For more information, see Manage identities in AWS SSO in the AWS Single Sign-On User Guide.
2. Choose Create User to create the portal administrator user and enable AWS SSO.
All portal users, including the portal administrator, must sign in with their AWS SSO identity. Thesecredentials are typically not the same credentials that you use to sign in to the AWS ManagementConsole.
Configuring your portalYour users use portals to view your data. You can customize a portal's name, description, support contactemail, and permissions.
To configure a portal
1. Enter a name for your portal.
2. (Optional) Enter a description for your portal. If you have multiple portals, use meaningfuldescriptions to help you keep track of what each portal contains.
167
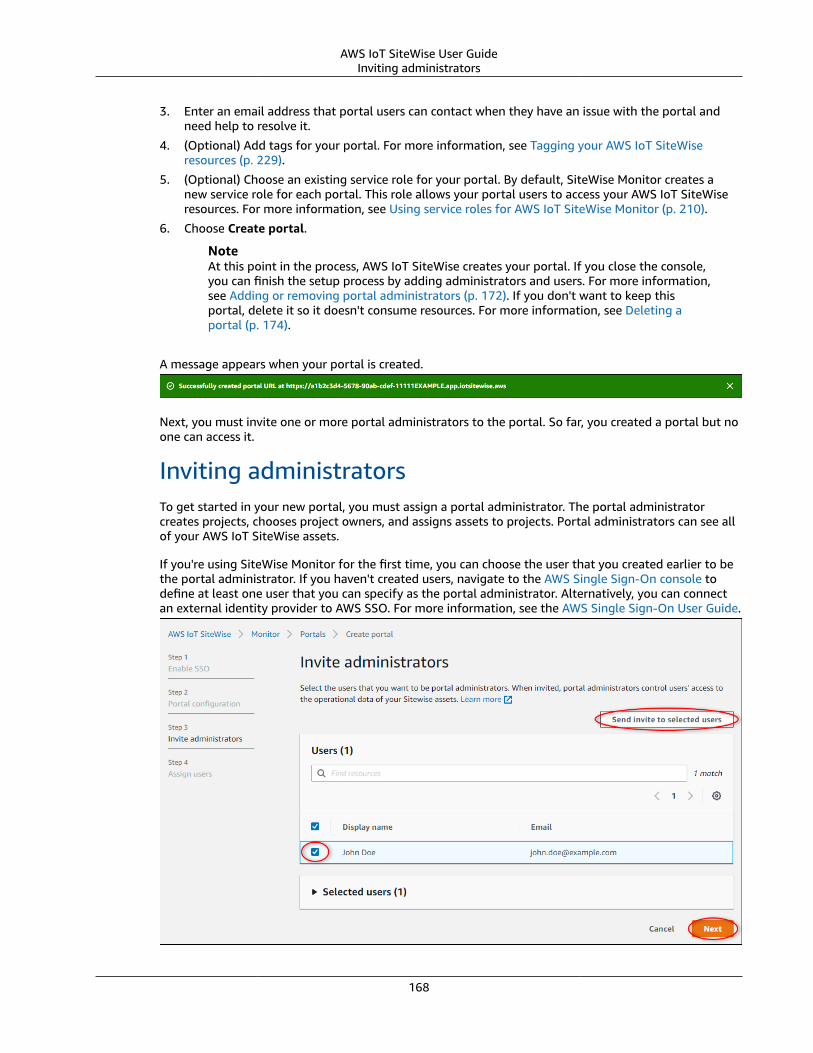
AWS IoT SiteWise User GuideInviting administrators
3. Enter an email address that portal users can contact when they have an issue with the portal andneed help to resolve it.
4. (Optional) Add tags for your portal. For more information, see Tagging your AWS IoT SiteWiseresources (p. 229).
5. (Optional) Choose an existing service role for your portal. By default, SiteWise Monitor creates anew service role for each portal. This role allows your portal users to access your AWS IoT SiteWiseresources. For more information, see Using service roles for AWS IoT SiteWise Monitor (p. 210).
6. Choose Create portal.
NoteAt this point in the process, AWS IoT SiteWise creates your portal. If you close the console,you can finish the setup process by adding administrators and users. For more information,see Adding or removing portal administrators (p. 172). If you don't want to keep thisportal, delete it so it doesn't consume resources. For more information, see Deleting aportal (p. 174).
A message appears when your portal is created.
Next, you must invite one or more portal administrators to the portal. So far, you created a portal but noone can access it.
Inviting administratorsTo get started in your new portal, you must assign a portal administrator. The portal administratorcreates projects, chooses project owners, and assigns assets to projects. Portal administrators can see allof your AWS IoT SiteWise assets.
If you're using SiteWise Monitor for the first time, you can choose the user that you created earlier to bethe portal administrator. If you haven't created users, navigate to the AWS Single Sign-On console todefine at least one user that you can specify as the portal administrator. Alternatively, you can connectan external identity provider to AWS SSO. For more information, see the AWS Single Sign-On User Guide.
168

AWS IoT SiteWise User GuideAdding portal users
To invite administrators
1. Select the check boxes for the users that you want as your portal administrators. The users areadded to the Selected users list.
If you don't see the user that you want to add in the list, navigate to the AWS Single Sign-Onconsole to add users to your identity store. You can then return to your portal configuration to addthe user to the list of portal administrators. For more information about how to add users to AWSSSO, see Manage your AWS SSO directory.
2. (Optional) Choose Send invite to selected users. Your email client opens, and an invitation ispopulated in the message body, as shown in the following example.
You can customize the email before you send it to your portal administrators. You can also sendthe email to your portal administrators later. If you're trying SiteWise Monitor for the first time andadding your new account as the portal administrator, you don't need to email yourself.
3. If you add a user that you don't want as an administrator, clear the check box for that user.
4. When you're finished inviting portal administrators, choose Next.
You can change the list of portal administrators later. For more information, see Adding or removingportal administrators (p. 172).
NoteBecause only a portal administrator can create projects and assign assets to them, your portal isof limited use until you specify at least one portal administrator.
As the last step, you add users who can access your new portal.
Adding portal usersYou control which users have access to your portals. In each portal, the portal administrators create oneor more projects and assign portal users as owners or viewers for each project. Each project owner caninvite additional portal users to own or view the project.
If you see the user that you want to add in the Directory list, complete the following steps.
To add portal users
1. Choose users from the Users list. If you're using SiteWise Monitor for the first time, you don't needto add your portal administrator as a portal user.
If you don't see the user that you want to add in the list, navigate to the AWS Single Sign-Onconsole to add users to your identity store. You can then return to your portal configuration to addthe user to the list of portal users. For more information about how to add users to AWS SSO, seeManage your AWS SSO directory.
169
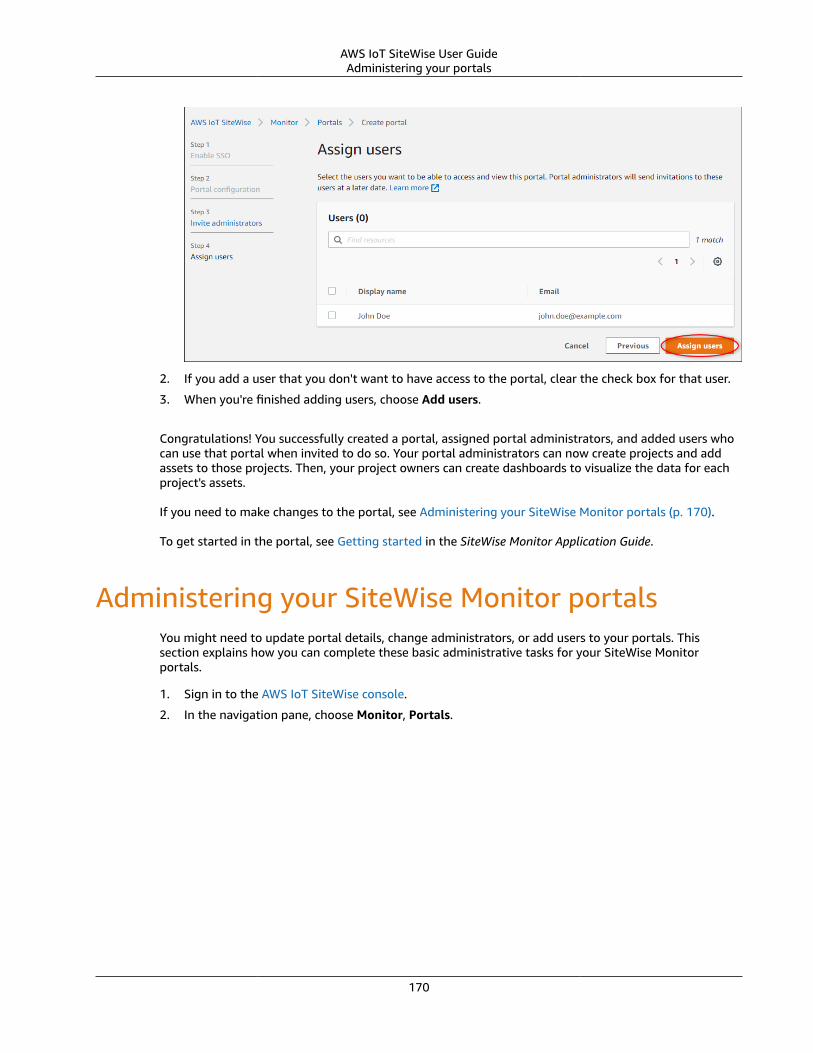
AWS IoT SiteWise User GuideAdministering your portals
2. If you add a user that you don't want to have access to the portal, clear the check box for that user.
3. When you're finished adding users, choose Add users.
Congratulations! You successfully created a portal, assigned portal administrators, and added users whocan use that portal when invited to do so. Your portal administrators can now create projects and addassets to those projects. Then, your project owners can create dashboards to visualize the data for eachproject's assets.
If you need to make changes to the portal, see Administering your SiteWise Monitor portals (p. 170).
To get started in the portal, see Getting started in the SiteWise Monitor Application Guide.
Administering your SiteWise Monitor portalsYou might need to update portal details, change administrators, or add users to your portals. Thissection explains how you can complete these basic administrative tasks for your SiteWise Monitorportals.
1. Sign in to the AWS IoT SiteWise console.
2. In the navigation pane, choose Monitor, Portals.
170
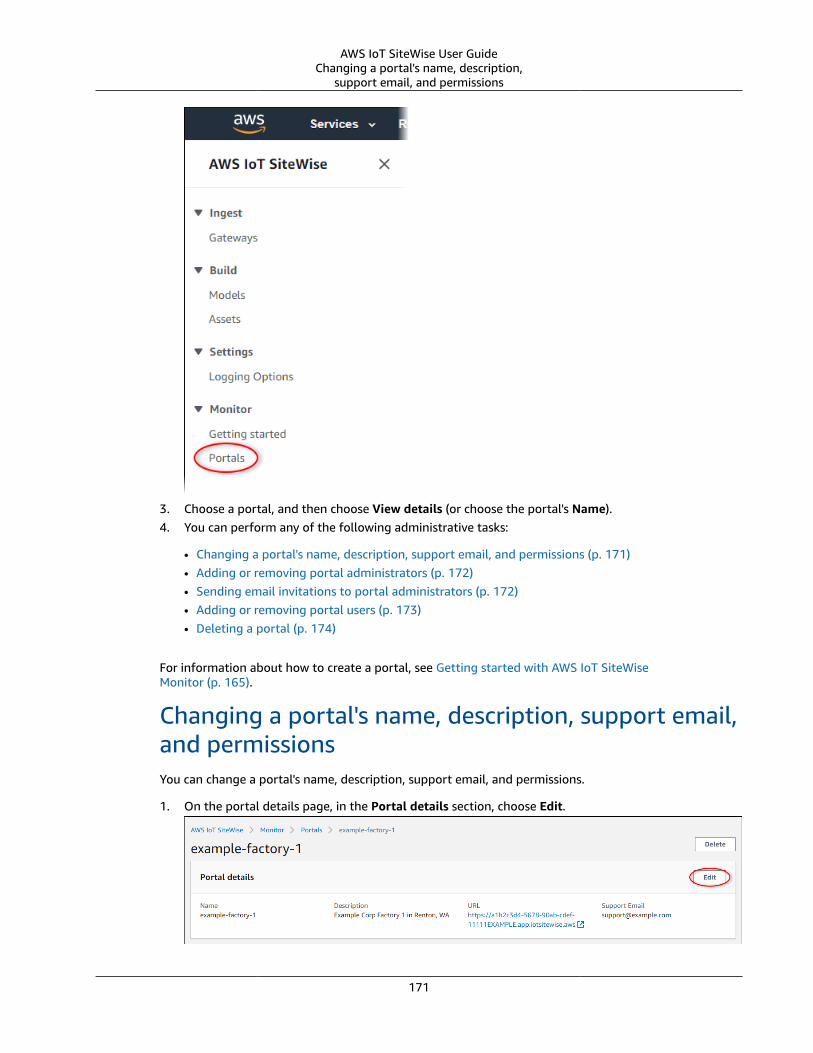
AWS IoT SiteWise User GuideChanging a portal's name, description,
support email, and permissions
3. Choose a portal, and then choose View details (or choose the portal's Name).4. You can perform any of the following administrative tasks:
• Changing a portal's name, description, support email, and permissions (p. 171)• Adding or removing portal administrators (p. 172)• Sending email invitations to portal administrators (p. 172)• Adding or removing portal users (p. 173)• Deleting a portal (p. 174)
For information about how to create a portal, see Getting started with AWS IoT SiteWiseMonitor (p. 165).
Changing a portal's name, description, support email,and permissionsYou can change a portal's name, description, support email, and permissions.
1. On the portal details page, in the Portal details section, choose Edit.
171

AWS IoT SiteWise User GuideAdding or removing portal administrators
2. Update the Name, Description, Support contact email, or Permissions.
3. When you're finished, choose Save.
Adding or removing portal administratorsIn a few steps, you can add or remove users as administrators for a portal.
To add portal administrators
1. On the portal details page, in the Portal administrators section, choose Assign users.
2. On the Assign administrators page, select the check boxes for the users, and then choose Assignadministrators.
If you don't see the user that you want to add in the list, navigate to the AWS Single Sign-Onconsole to add users to your identity store. You can then return to your portal configuration to addthe user to the list of portal administrators. For more information about how to add users to AWSSSO, see Manage your AWS SSO directory.
To remove portal administrators
• On the portal details page, in the Portal administrators section, select the check box for each userto remove, and then choose Remove from portal.
NoteLeaving a portal without a portal administrator is not recommended.
Sending email invitations to portal administratorsYou can send email invitations to portal administrators through their AWS SSO email address.
1. On the portal details page, in the Portal administrators section, select the check boxes for theportal administrators.
172
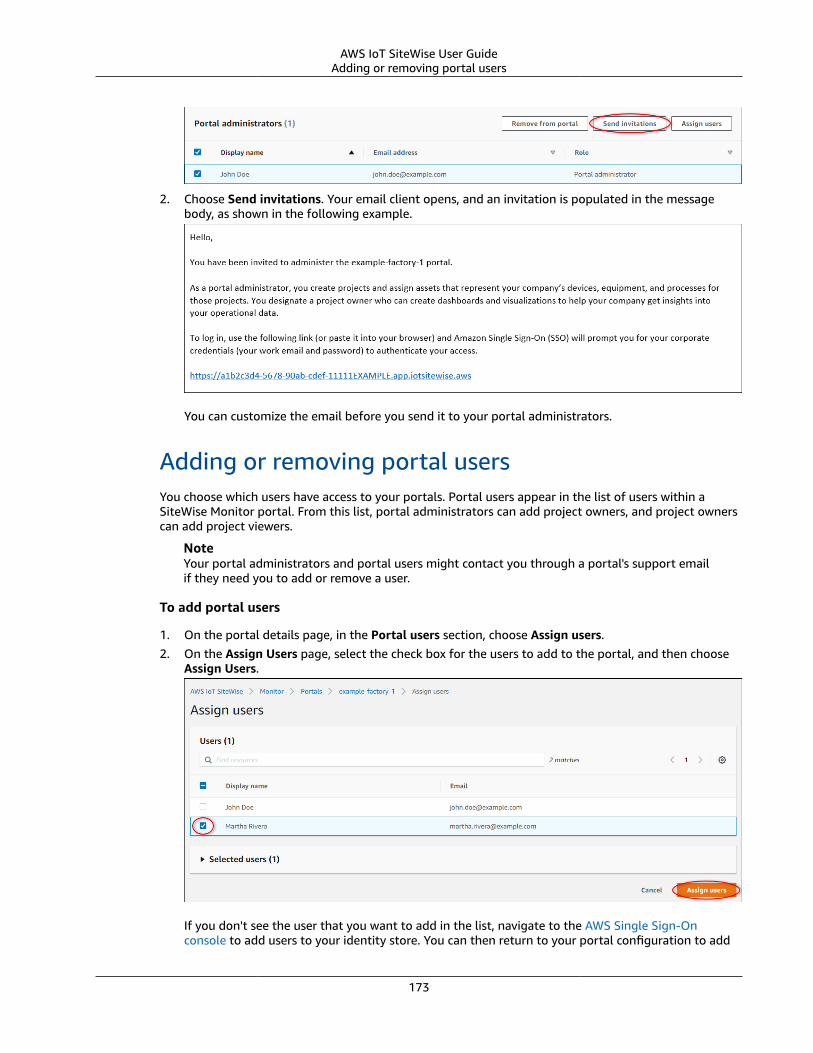
AWS IoT SiteWise User GuideAdding or removing portal users
2. Choose Send invitations. Your email client opens, and an invitation is populated in the messagebody, as shown in the following example.
You can customize the email before you send it to your portal administrators.
Adding or removing portal usersYou choose which users have access to your portals. Portal users appear in the list of users within aSiteWise Monitor portal. From this list, portal administrators can add project owners, and project ownerscan add project viewers.
NoteYour portal administrators and portal users might contact you through a portal's support emailif they need you to add or remove a user.
To add portal users
1. On the portal details page, in the Portal users section, choose Assign users.2. On the Assign Users page, select the check box for the users to add to the portal, and then choose
Assign Users.
If you don't see the user that you want to add in the list, navigate to the AWS Single Sign-Onconsole to add users to your identity store. You can then return to your portal configuration to add
173
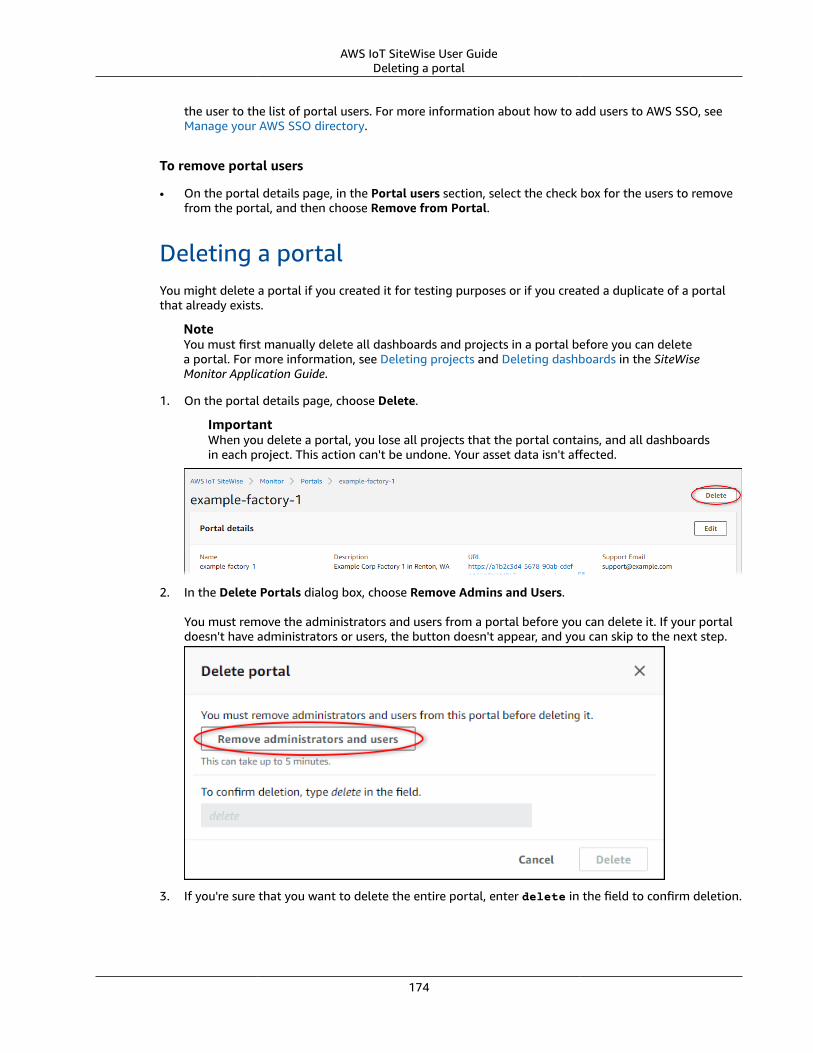
AWS IoT SiteWise User GuideDeleting a portal
the user to the list of portal users. For more information about how to add users to AWS SSO, seeManage your AWS SSO directory.
To remove portal users
• On the portal details page, in the Portal users section, select the check box for the users to removefrom the portal, and then choose Remove from Portal.
Deleting a portalYou might delete a portal if you created it for testing purposes or if you created a duplicate of a portalthat already exists.
NoteYou must first manually delete all dashboards and projects in a portal before you can deletea portal. For more information, see Deleting projects and Deleting dashboards in the SiteWiseMonitor Application Guide.
1. On the portal details page, choose Delete.
ImportantWhen you delete a portal, you lose all projects that the portal contains, and all dashboardsin each project. This action can't be undone. Your asset data isn't affected.
2. In the Delete Portals dialog box, choose Remove Admins and Users.
You must remove the administrators and users from a portal before you can delete it. If your portaldoesn't have administrators or users, the button doesn't appear, and you can skip to the next step.
3. If you're sure that you want to delete the entire portal, enter delete in the field to confirm deletion.
174
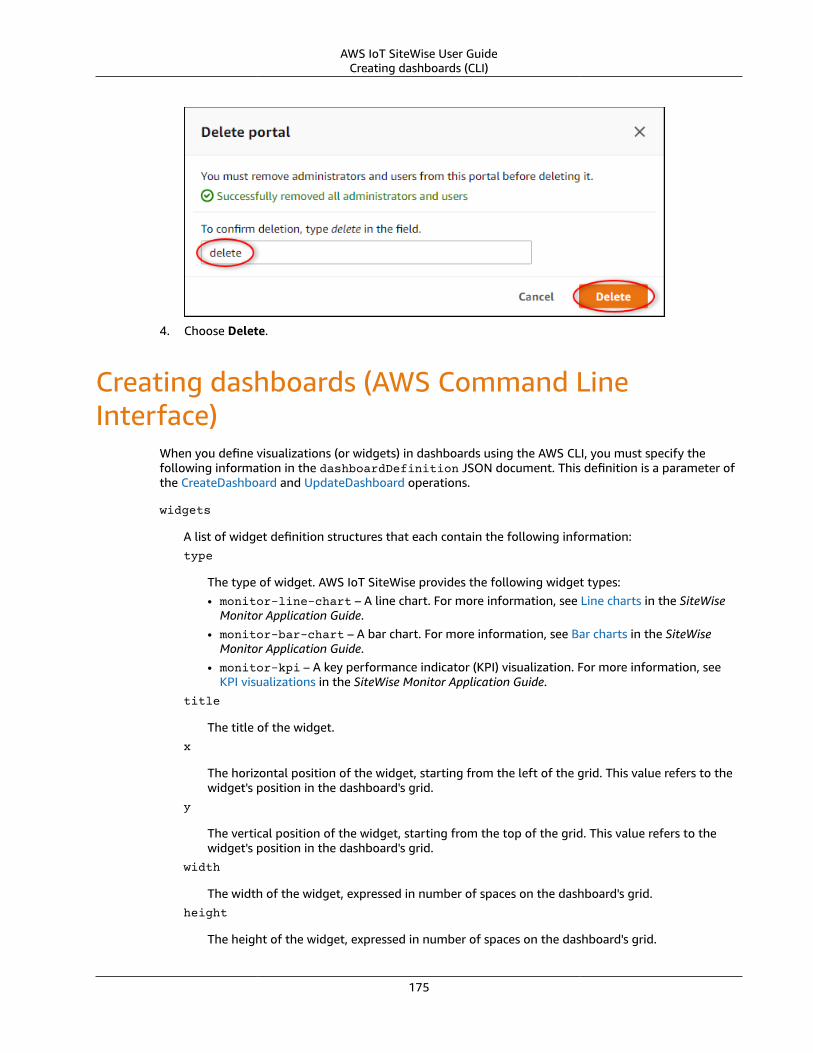
AWS IoT SiteWise User GuideCreating dashboards (CLI)
4. Choose Delete.
Creating dashboards (AWS Command LineInterface)
When you define visualizations (or widgets) in dashboards using the AWS CLI, you must specify thefollowing information in the dashboardDefinition JSON document. This definition is a parameter ofthe CreateDashboard and UpdateDashboard operations.
widgets
A list of widget definition structures that each contain the following information:type
The type of widget. AWS IoT SiteWise provides the following widget types:• monitor-line-chart – A line chart. For more information, see Line charts in the SiteWise
Monitor Application Guide.• monitor-bar-chart – A bar chart. For more information, see Bar charts in the SiteWise
Monitor Application Guide.• monitor-kpi – A key performance indicator (KPI) visualization. For more information, see
KPI visualizations in the SiteWise Monitor Application Guide.title
The title of the widget.x
The horizontal position of the widget, starting from the left of the grid. This value refers to thewidget's position in the dashboard's grid.
y
The vertical position of the widget, starting from the top of the grid. This value refers to thewidget's position in the dashboard's grid.
width
The width of the widget, expressed in number of spaces on the dashboard's grid.height
The height of the widget, expressed in number of spaces on the dashboard's grid.
175
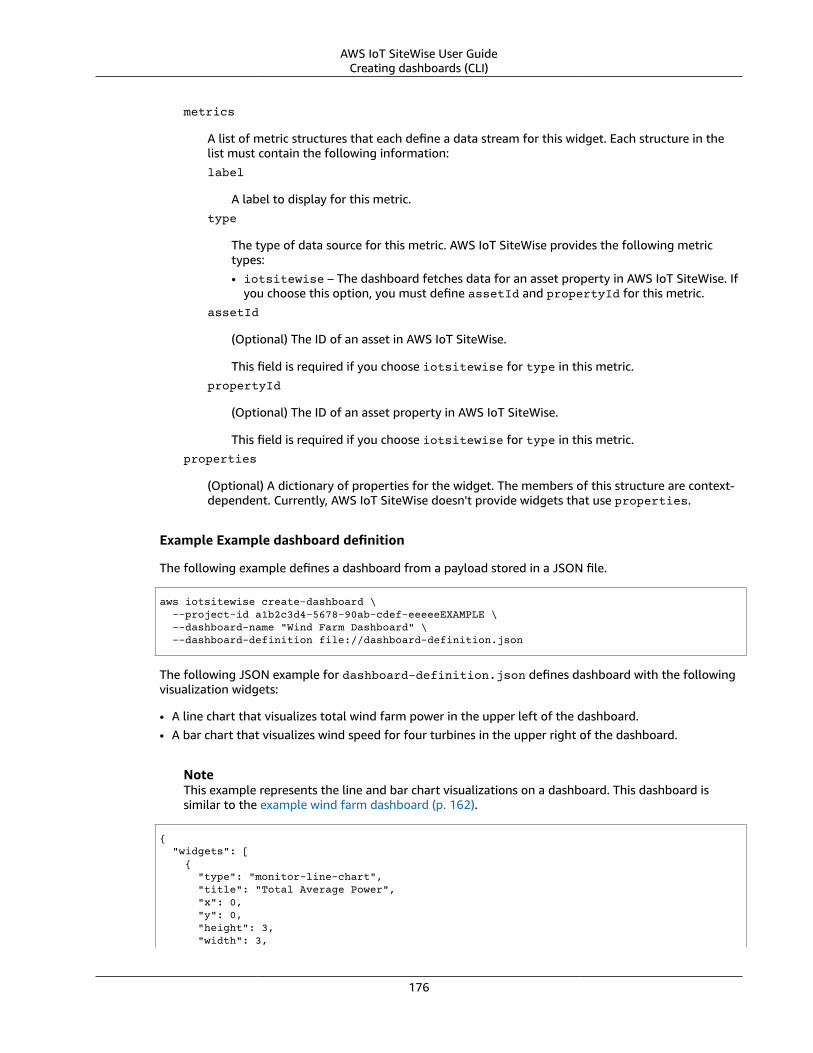
AWS IoT SiteWise User GuideCreating dashboards (CLI)
metrics
A list of metric structures that each define a data stream for this widget. Each structure in thelist must contain the following information:label
A label to display for this metric.type
The type of data source for this metric. AWS IoT SiteWise provides the following metrictypes:• iotsitewise – The dashboard fetches data for an asset property in AWS IoT SiteWise. If
you choose this option, you must define assetId and propertyId for this metric.assetId
(Optional) The ID of an asset in AWS IoT SiteWise.
This field is required if you choose iotsitewise for type in this metric.propertyId
(Optional) The ID of an asset property in AWS IoT SiteWise.
This field is required if you choose iotsitewise for type in this metric.properties
(Optional) A dictionary of properties for the widget. The members of this structure are context-dependent. Currently, AWS IoT SiteWise doesn't provide widgets that use properties.
Example Example dashboard definition
The following example defines a dashboard from a payload stored in a JSON file.
aws iotsitewise create-dashboard \ --project-id a1b2c3d4-5678-90ab-cdef-eeeeeEXAMPLE \ --dashboard-name "Wind Farm Dashboard" \ --dashboard-definition file://dashboard-definition.json
The following JSON example for dashboard-definition.json defines dashboard with the followingvisualization widgets:
• A line chart that visualizes total wind farm power in the upper left of the dashboard.• A bar chart that visualizes wind speed for four turbines in the upper right of the dashboard.
NoteThis example represents the line and bar chart visualizations on a dashboard. This dashboard issimilar to the example wind farm dashboard (p. 162).
{ "widgets": [ { "type": "monitor-line-chart", "title": "Total Average Power", "x": 0, "y": 0, "height": 3, "width": 3,
176
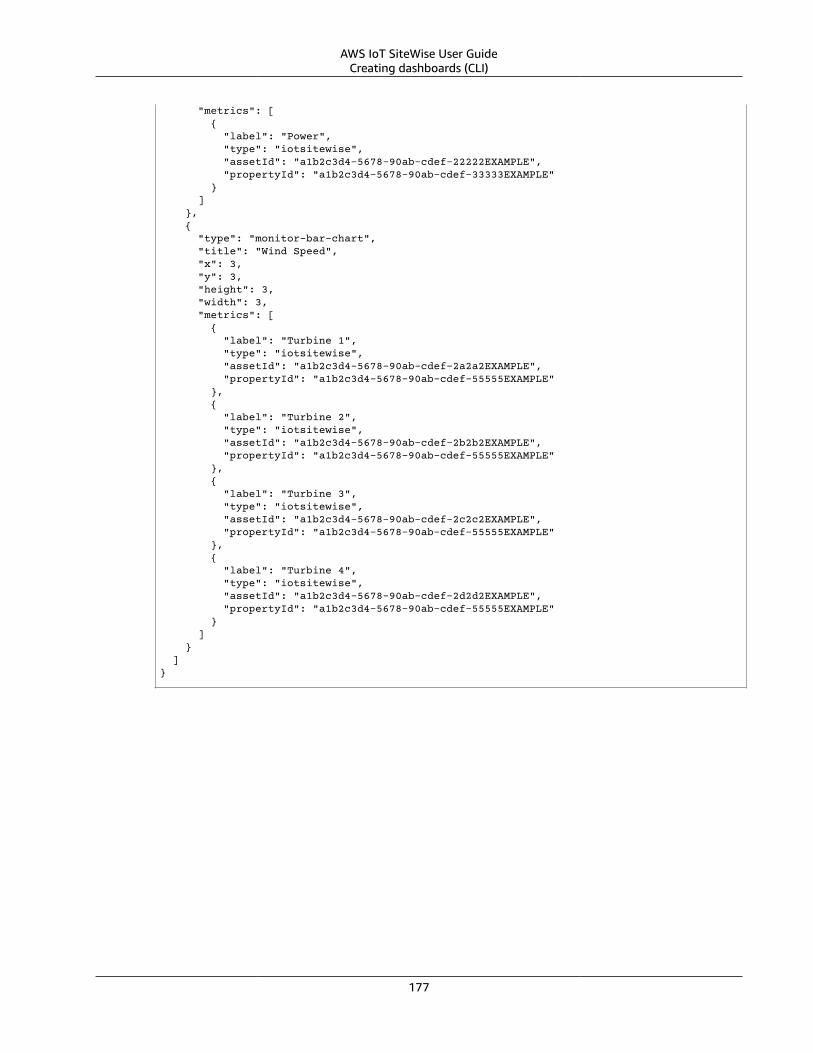
AWS IoT SiteWise User GuideCreating dashboards (CLI)
"metrics": [ { "label": "Power", "type": "iotsitewise", "assetId": "a1b2c3d4-5678-90ab-cdef-22222EXAMPLE", "propertyId": "a1b2c3d4-5678-90ab-cdef-33333EXAMPLE" } ] }, { "type": "monitor-bar-chart", "title": "Wind Speed", "x": 3, "y": 3, "height": 3, "width": 3, "metrics": [ { "label": "Turbine 1", "type": "iotsitewise", "assetId": "a1b2c3d4-5678-90ab-cdef-2a2a2EXAMPLE", "propertyId": "a1b2c3d4-5678-90ab-cdef-55555EXAMPLE" }, { "label": "Turbine 2", "type": "iotsitewise", "assetId": "a1b2c3d4-5678-90ab-cdef-2b2b2EXAMPLE", "propertyId": "a1b2c3d4-5678-90ab-cdef-55555EXAMPLE" }, { "label": "Turbine 3", "type": "iotsitewise", "assetId": "a1b2c3d4-5678-90ab-cdef-2c2c2EXAMPLE", "propertyId": "a1b2c3d4-5678-90ab-cdef-55555EXAMPLE" }, { "label": "Turbine 4", "type": "iotsitewise", "assetId": "a1b2c3d4-5678-90ab-cdef-2d2d2EXAMPLE", "propertyId": "a1b2c3d4-5678-90ab-cdef-55555EXAMPLE" } ] } ]}
177
AWS IoT SiteWise User GuideQuerying current values
Querying asset property values andaggregates
You can use the AWS IoT SiteWise API operations to query your asset properties' current values, historicalvalues, and aggregates over specific time intervals. You can use these features to gain quick insights ordevelop software solutions that integrate with the industrial data stored in your AWS IoT SiteWise assets.
You can also explore your asset data live in AWS IoT SiteWise Monitor. To learn how to configure SiteWiseMonitor, see Monitoring data with AWS IoT SiteWise Monitor (p. 162).
The actions described in this section return property value objects that contain timestamp, quality, value(TQV) structures.
• The timestamp contains the current Unix epoch time in seconds with nanosecond offset.• The quality contains one of the following strings that indicate the quality of the data point:
• GOOD – The data isn't affected by any issues.• BAD – The data is affected by an issue such as sensor failure.• UNCERTAIN – The data is affected by an issue such as sensor inaccuracy.
• The value contains one of the following fields, depending on the type of the property:• booleanValue
• doubleValue
• integerValue
• stringValue
Topics• Querying current asset property values (p. 178)• Querying historical asset property values (p. 179)• Querying asset property aggregates (p. 180)
Querying current asset property valuesUse the GetAssetPropertyValue action to query the current value of an asset property.
To identify an asset property, you can specify one of the following:
• The assetId and propertyId of the asset property that you are sending data to.• The propertyAlias, which is a data stream alias (for example, /company/windfarm/3/turbine/7/temperature). To use this option, you must first set your asset property's alias. To learnhow to set property aliases, see Mapping industrial data streams to asset properties (p. 151).
The following example demonstrates how to query a property's current value by assetId andpropertyId.
aws iotsitewise get-asset-property-value \ --asset-id a1b2c3d4-5678-90ab-cdef-22222EXAMPLE \
178
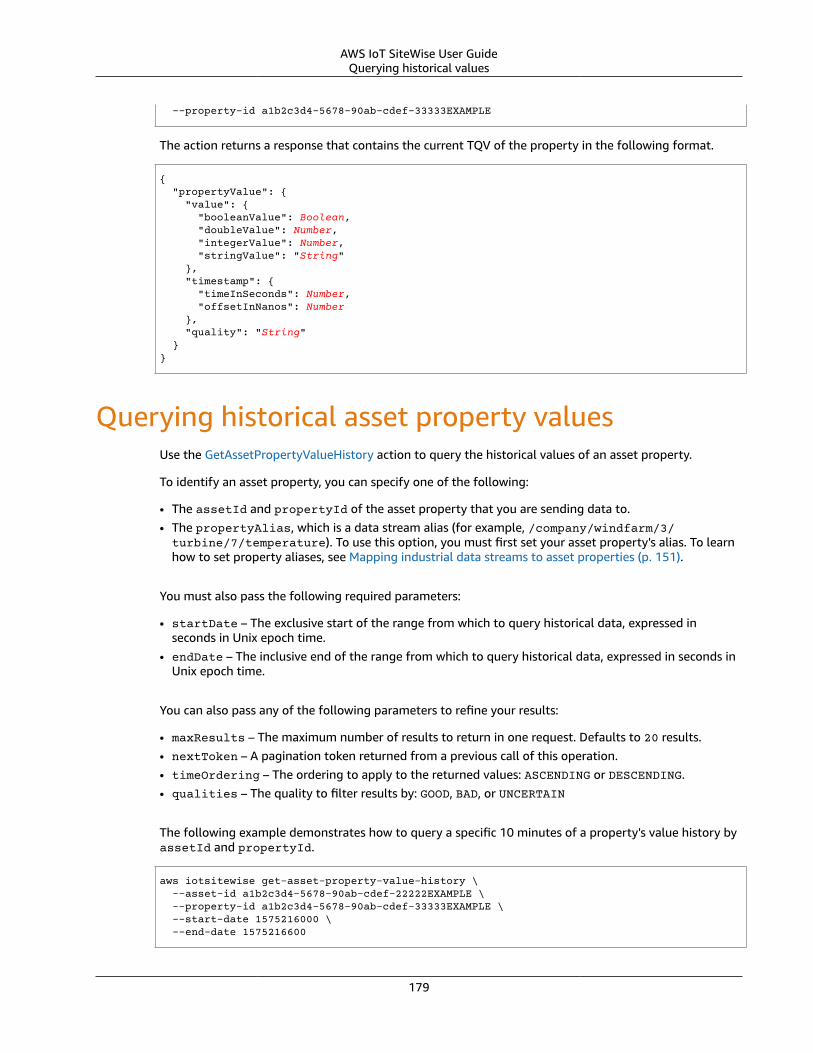
AWS IoT SiteWise User GuideQuerying historical values
--property-id a1b2c3d4-5678-90ab-cdef-33333EXAMPLE
The action returns a response that contains the current TQV of the property in the following format.
{ "propertyValue": { "value": { "booleanValue": Boolean, "doubleValue": Number, "integerValue": Number, "stringValue": "String" }, "timestamp": { "timeInSeconds": Number, "offsetInNanos": Number }, "quality": "String" }}
Querying historical asset property valuesUse the GetAssetPropertyValueHistory action to query the historical values of an asset property.
To identify an asset property, you can specify one of the following:
• The assetId and propertyId of the asset property that you are sending data to.• The propertyAlias, which is a data stream alias (for example, /company/windfarm/3/turbine/7/temperature). To use this option, you must first set your asset property's alias. To learnhow to set property aliases, see Mapping industrial data streams to asset properties (p. 151).
You must also pass the following required parameters:
• startDate – The exclusive start of the range from which to query historical data, expressed inseconds in Unix epoch time.
• endDate – The inclusive end of the range from which to query historical data, expressed in seconds inUnix epoch time.
You can also pass any of the following parameters to refine your results:
• maxResults – The maximum number of results to return in one request. Defaults to 20 results.• nextToken – A pagination token returned from a previous call of this operation.• timeOrdering – The ordering to apply to the returned values: ASCENDING or DESCENDING.• qualities – The quality to filter results by: GOOD, BAD, or UNCERTAIN
The following example demonstrates how to query a specific 10 minutes of a property's value history byassetId and propertyId.
aws iotsitewise get-asset-property-value-history \ --asset-id a1b2c3d4-5678-90ab-cdef-22222EXAMPLE \ --property-id a1b2c3d4-5678-90ab-cdef-33333EXAMPLE \ --start-date 1575216000 \ --end-date 1575216600
179
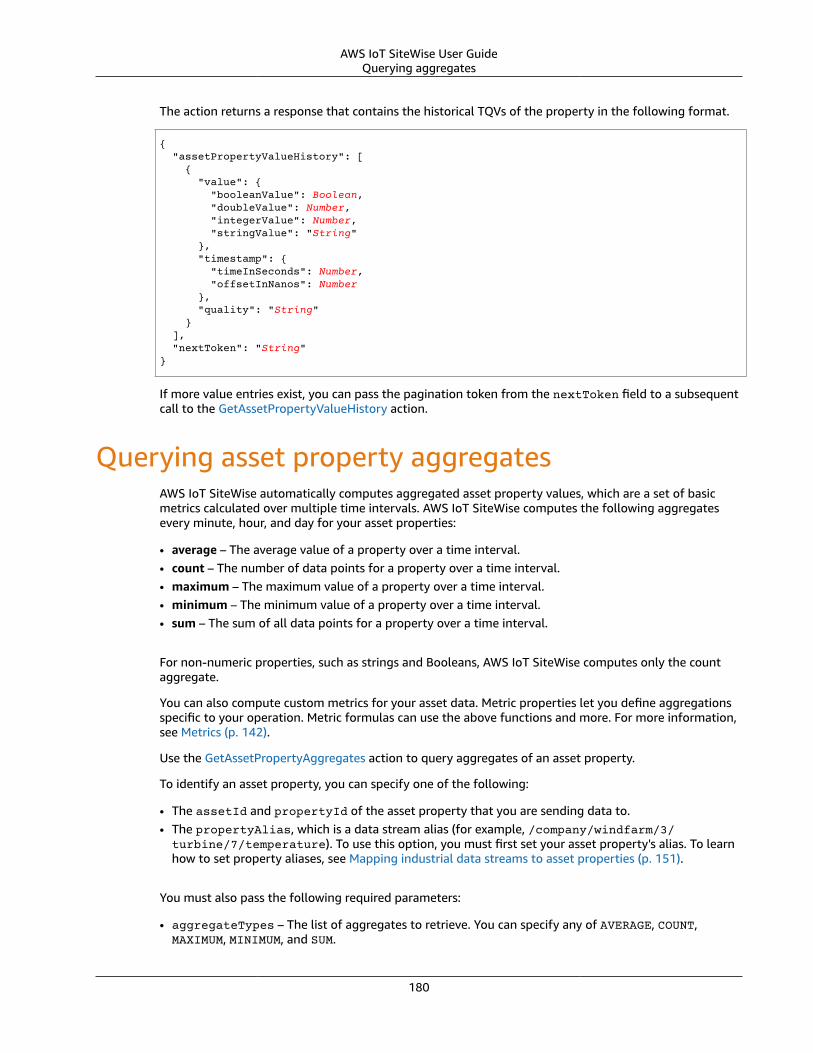
AWS IoT SiteWise User GuideQuerying aggregates
The action returns a response that contains the historical TQVs of the property in the following format.
{ "assetPropertyValueHistory": [ { "value": { "booleanValue": Boolean, "doubleValue": Number, "integerValue": Number, "stringValue": "String" }, "timestamp": { "timeInSeconds": Number, "offsetInNanos": Number }, "quality": "String" } ], "nextToken": "String"}
If more value entries exist, you can pass the pagination token from the nextToken field to a subsequentcall to the GetAssetPropertyValueHistory action.
Querying asset property aggregatesAWS IoT SiteWise automatically computes aggregated asset property values, which are a set of basicmetrics calculated over multiple time intervals. AWS IoT SiteWise computes the following aggregatesevery minute, hour, and day for your asset properties:
• average – The average value of a property over a time interval.• count – The number of data points for a property over a time interval.• maximum – The maximum value of a property over a time interval.• minimum – The minimum value of a property over a time interval.• sum – The sum of all data points for a property over a time interval.
For non-numeric properties, such as strings and Booleans, AWS IoT SiteWise computes only the countaggregate.
You can also compute custom metrics for your asset data. Metric properties let you define aggregationsspecific to your operation. Metric formulas can use the above functions and more. For more information,see Metrics (p. 142).
Use the GetAssetPropertyAggregates action to query aggregates of an asset property.
To identify an asset property, you can specify one of the following:
• The assetId and propertyId of the asset property that you are sending data to.• The propertyAlias, which is a data stream alias (for example, /company/windfarm/3/turbine/7/temperature). To use this option, you must first set your asset property's alias. To learnhow to set property aliases, see Mapping industrial data streams to asset properties (p. 151).
You must also pass the following required parameters:
• aggregateTypes – The list of aggregates to retrieve. You can specify any of AVERAGE, COUNT,MAXIMUM, MINIMUM, and SUM.
180
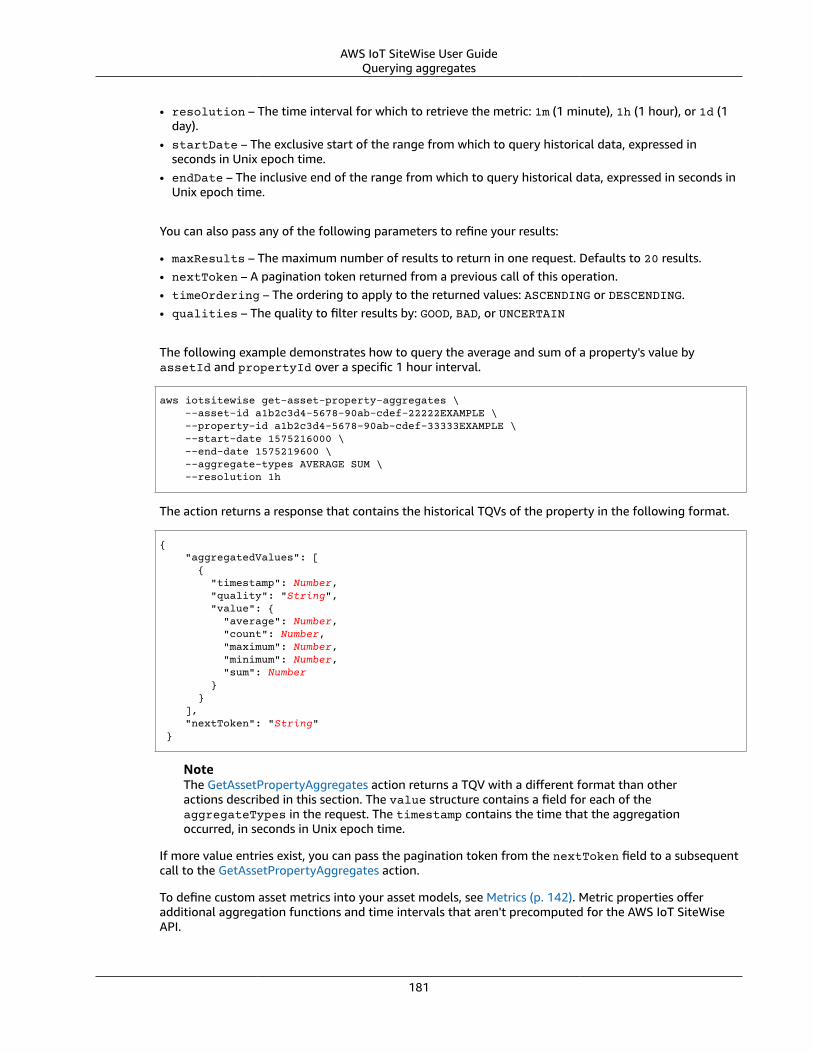
AWS IoT SiteWise User GuideQuerying aggregates
• resolution – The time interval for which to retrieve the metric: 1m (1 minute), 1h (1 hour), or 1d (1day).
• startDate – The exclusive start of the range from which to query historical data, expressed inseconds in Unix epoch time.
• endDate – The inclusive end of the range from which to query historical data, expressed in seconds inUnix epoch time.
You can also pass any of the following parameters to refine your results:
• maxResults – The maximum number of results to return in one request. Defaults to 20 results.• nextToken – A pagination token returned from a previous call of this operation.• timeOrdering – The ordering to apply to the returned values: ASCENDING or DESCENDING.• qualities – The quality to filter results by: GOOD, BAD, or UNCERTAIN
The following example demonstrates how to query the average and sum of a property's value byassetId and propertyId over a specific 1 hour interval.
aws iotsitewise get-asset-property-aggregates \ --asset-id a1b2c3d4-5678-90ab-cdef-22222EXAMPLE \ --property-id a1b2c3d4-5678-90ab-cdef-33333EXAMPLE \ --start-date 1575216000 \ --end-date 1575219600 \ --aggregate-types AVERAGE SUM \ --resolution 1h
The action returns a response that contains the historical TQVs of the property in the following format.
{ "aggregatedValues": [ { "timestamp": Number, "quality": "String", "value": { "average": Number, "count": Number, "maximum": Number, "minimum": Number, "sum": Number } } ], "nextToken": "String" }
NoteThe GetAssetPropertyAggregates action returns a TQV with a different format than otheractions described in this section. The value structure contains a field for each of theaggregateTypes in the request. The timestamp contains the time that the aggregationoccurred, in seconds in Unix epoch time.
If more value entries exist, you can pass the pagination token from the nextToken field to a subsequentcall to the GetAssetPropertyAggregates action.
To define custom asset metrics into your asset models, see Metrics (p. 142). Metric properties offeradditional aggregation functions and time intervals that aren't precomputed for the AWS IoT SiteWiseAPI.
181
AWS IoT SiteWise User GuideUnderstanding asset properties' MQTT topics
Interacting with other AWS servicesAWS IoT SiteWise can publish asset data to the AWS IoT MQTT publish-subscribe message broker, sothat you can interact with your asset data from other AWS services. AWS IoT SiteWise assigns each assetproperty a unique MQTT topic that you can use to route your asset data to other AWS services using AWSIoT Core rules. For example, you can configure AWS IoT Core rules to do the following tasks:
• Identify equipment failure and notify appropriate personnel by sending data to AWS IoT Events.• Historize select asset data for use in external software solutions by sending data to Amazon
DynamoDB.• Generate weekly reports by triggering an AWS Lambda function.
You can follow a tutorial that walks through the steps required to set up a rule that stores propertyvalues in DynamoDB. For more information, see Publishing property value updates to AmazonDynamoDB (p. 84).
For more information about how to configure a rule, see Rules in the AWS IoT Developer Guide.
You can also consume data from other AWS services back into AWS IoT SiteWise. To ingest data throughthe AWS IoT SiteWise rule action, see Ingesting data using AWS IoT Core rules (p. 129).
Topics• Understanding asset properties' MQTT topics (p. 182)• Enabling asset property notifications (p. 182)• Querying asset property notification messages (p. 183)
Understanding asset properties' MQTT topicsEvery asset property has a unique MQTT topic path in the following format.
$aws/sitewise/asset-models/assetModelId/assets/assetId/properties/propertyId
NoteAWS IoT SiteWise doesn't support the # (multi-level) topic filter wildcard in the AWS IoT Corerules engine. You can use the + (single-level) wildcard. For example, you can use the followingtopic filter to match all updates for a particular asset model.
$aws/sitewise/asset-models/assetModelId/assets/+/properties/+
To learn more about topic filter wildcards, see Topics in the AWS IoT Core Developer Guide.
Enabling asset property notificationsBy default, AWS IoT SiteWise doesn't publish property value updates. Use the UpdateAssetPropertyaction to enable MQTT message publishing for an asset property. You then pass the followingparameters:
• assetId – The asset's ID.
182
AWS IoT SiteWise User GuideQuerying asset property notification messages
• propertyId – The asset property's ID.• propertyNotificationState – The property value notification state: ENABLED or DISABLED.• propertyAlias – The alias of the property. Specify the property's existing alias when you update the
notification state. If you omit this parameter, the property's existing alias is removed.
If you don't know your resources' IDs, you can use the ListAssetModels, ListAssets, and DescribeAssetactions to look up your AWS IoT SiteWise assets. To learn how to use these actions, see Discovering yourexisting asset resources (p. 155).
The following example demonstrates how to enable property value notifications for an asset propertywith an alias.
aws iotsitewise update-asset-property \ --asset-id a1b2c3d4-5678-90ab-cdef-22222EXAMPLE \ --property-id a1b2c3d4-5678-90ab-cdef-33333EXAMPLE \ --property-notification-state ENABLED \ --property-alias "/company/windfarm/3/turbine/7/temperature"
You can also disable MQTT message publishing by passing --property-notification-stateDISABLED.
Querying asset property notification messagesAWS IoT SiteWise publishes asset property data updates to AWS IoT Core in the following format.
{ "type": "PropertyValueUpdate", "payload": { "assetId": "String", "propertyId": "String", "values": [ { "timestamp": { "timeInSeconds": Number, "offsetInNanos": Number }, "quality": "String", "value": { "booleanValue": Boolean, "doubleValue": Number, "integerValue": Number, "stringValue": "String" } } ] }}
Each structure in the values list is a timestamp-quality-value (TQV) structure.
• The timestamp contains the current Unix epoch time in seconds with nanosecond offset.• The quality contains one of the following strings that indicate the quality of the data point:
• GOOD – The data isn't affected by any issues.• BAD – The data is affected by an issue such as sensor failure.• UNCERTAIN – The data is affected by an issue such as sensor inaccuracy.
183
AWS IoT SiteWise User GuideQuerying asset property notification messages
• The value contains one of the following fields, depending on the type of the property:• booleanValue
• doubleValue
• integerValue
• stringValue
To parse values out of the values array, you need to use complex nested object queries in your rules'SQL statements. For more information, see Nested object queries in the AWS IoT Developer Guide, or seethe Publishing property value updates to Amazon DynamoDB (p. 84) tutorial for a specific example ofparsing asset property notification messages.
Example Example query to extract the array of values
The following statement demonstrates how to query the array of updated property values for a specificdouble-type property on all assets with that property.
SELECT (SELECT VALUE (value.doubleValue) FROM payload.values) AS windspeedFROM '$aws/sitewise/asset-models/a1b2c3d4-5678-90ab-cdef-11111EXAMPLE/assets/+/properties/a1b2c3d4-5678-90ab-cdef-33333EXAMPLE' WHERE type = 'PropertyValueUpdate'
The previous rule query statement outputs data in the following format.
{ "windspeed": [ 26.32020195042838, 26.282584572975477, 26.352566977372508, 26.283084346171442, 26.571883739599322, 26.60684140743005, 26.628738636715045, 26.273486932802125, 26.436379105473964, 26.600590095377303 ]}
Example Example query to extract a single value
The following statement demonstrates how to query the first value from the array of property values fora specific double-type property on all assets with that property.
SELECT get((SELECT VALUE (value.doubleValue) FROM payload.values), 0) AS windspeedFROM '$aws/sitewise/asset-models/a1b2c3d4-5678-90ab-cdef-11111EXAMPLE/assets/+/properties/a1b2c3d4-5678-90ab-cdef-33333EXAMPLE' WHERE type = 'PropertyValueUpdate'
The previous rule query statement outputs data in the following format.
{
184
AWS IoT SiteWise User GuideQuerying asset property notification messages
"windspeed": 26.32020195042838}
ImportantThis rule query statement ignores value updates other than the first in each batch. Each batchcan contain up to 10 values. If you need to include the remaining values, you must set up a morecomplex solution to output asset property values to other services. For example, you can set upa rule with an AWS Lambda action to republish each value in the array to another topic, and setup another rule to query that topic and publish each value to the desired rule action.
185

AWS IoT SiteWise User GuideCreating the AWS CloudFormation stack
Exporting data to Amazon SimpleStorage Service
You can export incoming data from AWS IoT SiteWise to an Amazon S3 bucket in your account. You canback up your data in a format that lets you create historical reports or analyze your data with complexmethods.
AWS IoT SiteWise provides this feature as a AWS CloudFormation template. When you create a stackfrom the template, AWS CloudFormation creates the required AWS resources to stream incoming datafrom AWS IoT SiteWise to an S3 bucket.
Then, the S3 bucket receives all of your asset property data sent from AWS IoT SiteWise property valueupdate messages. The S3 bucket also receives your asset metadata, which includes asset and propertynames and other information.
For more information about how to enable property value update messages for the asset properties toexport to Amazon S3, see Interacting with other AWS services (p. 182).
This feature stores your asset property data and asset metadata in Amazon S3 in Apache Parquet format.Parquet is a columnar data format that saves space and enables faster queries compared to row-orientedformats like JSON.
NoteWhen this feature retrieves asset metadata, it supports up to approximately 5,000 assetproperties. This limitation applies only to asset metadata. This limitation doesn't apply to theamount of properties supported when the feature exports asset property data.
Each resource's name includes a prefix that you can customize when you create the stack. Resourcesinclude the following:
• Amazon S3 buckets• AWS Lambda functions• AWS IoT Core rules• AWS Identity and Access Management roles• Amazon Kinesis Data Firehose streams• AWS Glue databases
For a complete list, see Resources created from the template (p. 189).
ImportantYou will be charged for the resources that this AWS CloudFormation template creates andconsumes. These charges include data storage and data transfer for multiple AWS services.
Topics• Creating the AWS CloudFormation stack (p. 186)• Viewing your data in Amazon S3 (p. 187)• Resources created from the template (p. 189)
Creating the AWS CloudFormation stackYou can create a stack in AWS CloudFormation to export your asset data to Amazon S3.
186
AWS IoT SiteWise User GuideViewing your data in Amazon S3
To export data to Amazon S3
1. Open the AWS CloudFormation template and sign in to the AWS Management Console.2. On the Create stack page, choose Next at the bottom of the page.3. On the Specify stack details page, enter a BucketName for the S3 bucket that this template creates
to receive asset data. This bucket name must be globally unique. For more information, see Rules forbucket naming in the Amazon Simple Storage Service Developer Guide.
4. (Optional) Change any of the template's other parameters:
• GlobalResourcePrefix – A prefix for names of global resources, such as IAM roles, created fromthis template.
• LocalResourcePrefix – A prefix for names of resources created from this template in the currentRegion.
NoteIf you create this template multiple times, you might need to change the bucket name andresource prefix parameters to avoid resource name conflicts.
5. Choose Next.6. On the Configure stack options page, choose Next.7. At the bottom of the page, select the check box that says I acknowledge that AWS CloudFormation
might create IAM resources.8. Choose Create stack.
The stack takes a few minutes to create. If the stack fails to create, your account might haveinsufficient permissions, or you might have entered a bucket name that already exists. Use thefollowing steps to delete the stack and try again:
a. Choose Delete in the upper-right corner.
The stack takes a few minutes to delete.
NoteAWS CloudFormation doesn't delete S3 buckets or CloudWatch log groups. You candelete these resources in the consoles for those services.
b. If the stack fails to delete, choose Delete again.c. If the stack fails to delete again, follow the steps in the AWS CloudFormation console to skip the
resources that failed to delete, and try again.9. After the AWS CloudFormation stack creates successfully, follow the next procedure to explore your
asset property data in Amazon S3.
ImportantAfter you create the stack, you can see the new resources in your AWS account. The featuremight stop working correctly if you delete or modify these resources. We recommend that youdon't modify these resources unless you want to stop sending data to the bucket or want tocustomize this feature.
Viewing your data in Amazon S3After you create the feature, you can view your asset property data and asset metadata in Amazon S3.
NoteAsset metadata updates every 6 hours. You may need to wait up to 6 hours to see assetmetadata appear in the S3 bucket.
187
AWS IoT SiteWise User GuideViewing your data in Amazon S3
This feature stores asset property data in the following columns, where each row contains a data point:
• type – The type of property notification (PropertyValueUpdate).
• asset_id – The ID of the asset that received a data point.
• asset_property_id – The ID of the property that received a data point for the asset.
• time_in_seconds – The time at which the data was received, expressed in seconds in Unix epoch time.
• offset_in_nanos – The nanosecond offset from timeInSeconds.
• asset_property_quality – The quality of the data point: GOOD, UNCERTAIN, or BAD.
• asset_property_value – The value of the data point.
• asset_property_data_type – The data type of the asset property: boolean, double, integer, orstring.
This feature stores asset metadata in the following columns, where each row contains an asset property:
• asset_id – The ID of the asset.
• asset_name – The name of the asset.
• asset_model_id – The ID of the asset's model.
• asset_property_id – The ID of the asset property.
• asset_property_name – The name of the asset property.
• asset_property_data_type – The data type of the asset property: BOOLEAN, DOUBLE, INTEGER, orSTRING.
• asset_property_unit – The unit of the asset property.
• asset_property_alias – The alias of the asset property.
To view your AWS IoT SiteWise data in Amazon S3
1. Navigate to the Amazon S3 console.
2. From the list of buckets, choose the bucket with the name you chose when you created thetemplate.
3. In the bucket, choose one of the following folders:
• asset-property-updates – This folder contains asset property data exported from AWS IoTSiteWise.
• asset-metadata – This folder contains asset details exported from AWS IoT SiteWise.
4. Choose the object that you want to view.
5. On the object's page, do the following:
a. Choose the Select from tab.
In this panel, you can preview records from Parquet files.
b. For File format, choose Parquet.
c. Choose Show file preview to show the contents of the file in JSON format.
NoteIf new data doesn't appear in the bucket, check that you enabled property value updatenotifications for your asset properties. For more information, see Interacting with other AWSservices (p. 182).
After you have your asset property data in Amazon S3, you can use several AWS services to generatereports or analyze and query your data:
188

AWS IoT SiteWise User GuideTemplate resource reference
• Run SQL queries on your data using Amazon Athena.• Perform big data analysis using Amazon EMR.• Search and analyze your data using Amazon Elasticsearch Service.
You can find other AWS services that can interact with your data in Amazon S3 listed under Analytics inthe AWS Management Console.
NoteThe stack creates an AWS Glue database to format asset property data. You can't query thisdatabase for asset data.To query asset data from the S3 bucket with Athena, you can create a new AWS Glue databaseand configure crawlers to create AWS Glue tables. For more information, see Defining crawlersin the AWS Glue Developer Guide.
Resources created from the templateWhen you create a stack from the template, AWS CloudFormation creates the following resources. Mostresources' names include a prefix that you can customize when you create the stack.
Resource name parameters
• BucketName – The name of the S3 bucket created from this template that receives asset data.• GlobalResourcePrefix – A prefix for names of global resources created from this template.
Defaults to sitewise-export-to-s3.• LocalResourcePrefix – A prefix for names of resources created from this template in the current
Region. Defaults to sitewise_export_to_s3.
Resources created by the AWS CloudFormation template
Resource Description Name
S3 bucket for processed data This bucket contains twofolders. One folder receivesthe flattened, formatted datafrom the Kinesis Data Firehosedelivery stream, and the otherfolder receives asset metadata.
${BucketName}
AWS Glue database This database contains theAWS Glue table that this stackcreates.
${LocalResourcePrefix}_firehose_glue_database
AWS Glue table The Kinesis Data Firehosedelivery stream uses this table toformat data to Parquet format.
${LocalResourcePrefix}_firehose_glue_table
AWS Lambda function thattransforms data
This function flattens the arrayof values in property valuenotification messages sent fromAWS IoT SiteWise.
${LocalResourcePrefix}_lambda_transform_function
IAM role for the transformLambda function
This role allows Lambda to storeexecution logs for the transformfunction.
${GlobalResourcePrefix}-lambda-transform-role
189
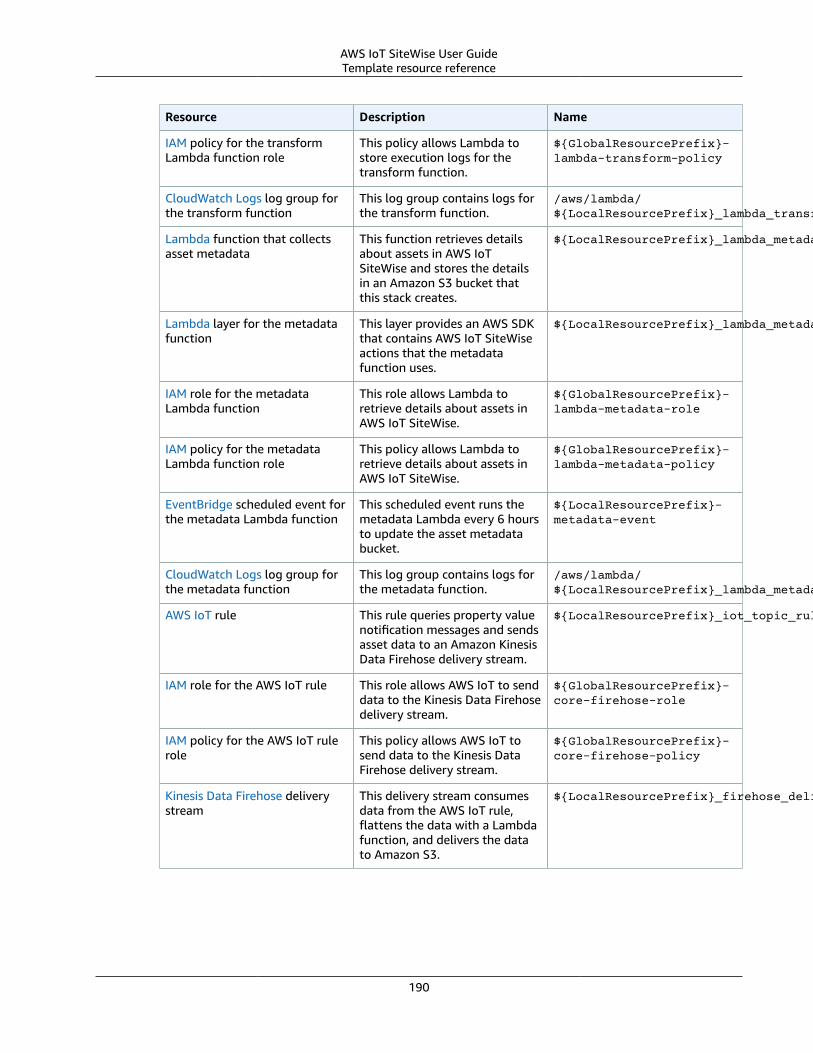
AWS IoT SiteWise User GuideTemplate resource reference
Resource Description Name
IAM policy for the transformLambda function role
This policy allows Lambda tostore execution logs for thetransform function.
${GlobalResourcePrefix}-lambda-transform-policy
CloudWatch Logs log group forthe transform function
This log group contains logs forthe transform function.
/aws/lambda/${LocalResourcePrefix}_lambda_transform_function
Lambda function that collectsasset metadata
This function retrieves detailsabout assets in AWS IoTSiteWise and stores the detailsin an Amazon S3 bucket thatthis stack creates.
${LocalResourcePrefix}_lambda_metadata_function
Lambda layer for the metadatafunction
This layer provides an AWS SDKthat contains AWS IoT SiteWiseactions that the metadatafunction uses.
${LocalResourcePrefix}_lambda_metadata_layer
IAM role for the metadataLambda function
This role allows Lambda toretrieve details about assets inAWS IoT SiteWise.
${GlobalResourcePrefix}-lambda-metadata-role
IAM policy for the metadataLambda function role
This policy allows Lambda toretrieve details about assets inAWS IoT SiteWise.
${GlobalResourcePrefix}-lambda-metadata-policy
EventBridge scheduled event forthe metadata Lambda function
This scheduled event runs themetadata Lambda every 6 hoursto update the asset metadatabucket.
${LocalResourcePrefix}-metadata-event
CloudWatch Logs log group forthe metadata function
This log group contains logs forthe metadata function.
/aws/lambda/${LocalResourcePrefix}_lambda_metadata_function
AWS IoT rule This rule queries property valuenotification messages and sendsasset data to an Amazon KinesisData Firehose delivery stream.
${LocalResourcePrefix}_iot_topic_rule
IAM role for the AWS IoT rule This role allows AWS IoT to senddata to the Kinesis Data Firehosedelivery stream.
${GlobalResourcePrefix}-core-firehose-role
IAM policy for the AWS IoT rulerole
This policy allows AWS IoT tosend data to the Kinesis DataFirehose delivery stream.
${GlobalResourcePrefix}-core-firehose-policy
Kinesis Data Firehose deliverystream
This delivery stream consumesdata from the AWS IoT rule,flattens the data with a Lambdafunction, and delivers the datato Amazon S3.
${LocalResourcePrefix}_firehose_delivery_stream
190
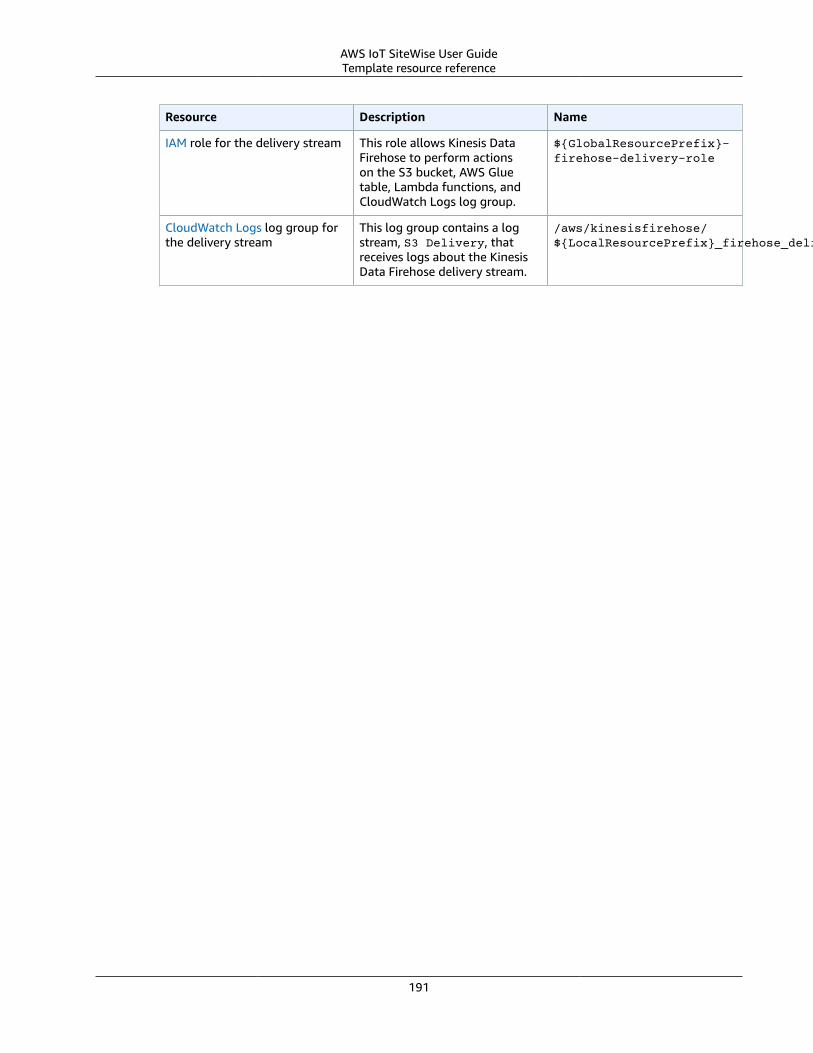
AWS IoT SiteWise User GuideTemplate resource reference
Resource Description Name
IAM role for the delivery stream This role allows Kinesis DataFirehose to perform actionson the S3 bucket, AWS Gluetable, Lambda functions, andCloudWatch Logs log group.
${GlobalResourcePrefix}-firehose-delivery-role
CloudWatch Logs log group forthe delivery stream
This log group contains a logstream, S3 Delivery, thatreceives logs about the KinesisData Firehose delivery stream.
/aws/kinesisfirehose/${LocalResourcePrefix}_firehose_delivery_stream
191
AWS IoT SiteWise User GuideData protection
Security in AWS IoT SiteWiseCloud security at AWS is the highest priority. As an AWS customer, you benefit from a data center andnetwork architecture that is built to meet the requirements of the most security-sensitive organizations.
Security is a shared responsibility between AWS and you. The shared responsibility model describes thisas security of the cloud and security in the cloud:
• Security of the cloud – AWS is responsible for protecting the infrastructure that runs AWS services inthe AWS Cloud. AWS also provides you with services that you can use securely. Third-party auditorsregularly test and verify the effectiveness of our security as part of the AWS compliance programs. Tolearn about the compliance programs that apply to AWS IoT SiteWise, see AWS services in scope bycompliance program.
• Security in the cloud – Your responsibility is determined by the AWS service that you use. You are alsoresponsible for other factors including the sensitivity of your data, your company’s requirements, andapplicable laws and regulations.
This documentation helps you understand how to apply the shared responsibility model when using AWSIoT SiteWise. The following topics show you how to configure AWS IoT SiteWise to meet your securityand compliance objectives. You also learn how to use other AWS services that help you to monitor andsecure your AWS IoT SiteWise resources.
Topics
• Data protection in AWS IoT SiteWise (p. 192)
• Identity and access management for AWS IoT SiteWise (p. 195)
• Compliance validation for AWS IoT SiteWise (p. 217)
• Resilience in AWS IoT SiteWise (p. 218)
• Infrastructure security in AWS IoT SiteWise (p. 218)
• Configuration and vulnerability analysis in AWS IoT SiteWise (p. 218)
• Security best practices for AWS IoT SiteWise (p. 219)
Data protection in AWS IoT SiteWiseAWS IoT SiteWise conforms to the AWS shared responsibility model, which includes regulations andguidelines for data protection. AWS is responsible for protecting the global infrastructure that runs allthe AWS services. AWS maintains control over data hosted on this infrastructure, including the securityconfiguration controls for handling customer content and personal data. AWS customers and APNpartners, acting either as data controllers or data processors, are responsible for any personal data thatthey put in the AWS Cloud.
For data protection purposes, we recommend that you protect AWS account credentials and set upindividual user accounts with AWS Identity and Access Management (IAM), so that each user is given onlythe permissions necessary to fulfill their job duties. We also recommend that you secure your data in thefollowing ways:
• Use multi-factor authentication (MFA) with each account.
192
AWS IoT SiteWise User GuideData encryption
• Use SSL/TLS to communicate with AWS resources.
• Set up API and user activity logging with AWS CloudTrail.
• Use AWS encryption solutions, along with all default security controls within AWS services.
• Use advanced managed security services such as Amazon Macie, which assists in discovering andsecuring personal data that is stored in Amazon S3.
We strongly recommend that you never put sensitive identifying information, such as your customers'account numbers, into free-form fields such as a Name field. This includes when you work with AWS IoTSiteWise or other AWS services using the console, API, AWS CLI, or AWS SDKs. Any data that you enterinto AWS IoT SiteWise or other services might get picked up for inclusion in diagnostic logs. When youprovide a URL to an external server, don't include credentials information in the URL to validate yourrequest to that server.
For more information about data protection, see the AWS Shared Responsibility Model and GDPR blogpost on the AWS Security Blog.
Topics• Data encryption (p. 193)
• Internetwork traffic privacy (p. 195)
Data encryptionData encryption refers to protecting data while in-transit (as it travels to and from AWS IoT SiteWise,and between gateways and OPC-UA servers), and at rest (while it is stored on local devices or in AWSservices). You can protect data in transit using Transport Layer Security (TLS) or at rest using client-sideencryption.
For more information about server-side encryption and client-side encryption, review the topics listedbelow.
Topics• Encryption at rest (p. 193)
• Encryption in transit (p. 194)
• Key management (p. 195)
Encryption at restAWS IoT SiteWise stores your data in the AWS Cloud and on gateways.
Data at rest in the AWS Cloud
AWS IoT SiteWise stores data in other AWS services that encrypt data at rest by default.
Data at rest on gateways
AWS IoT SiteWise gateways store the following data on the local file system:
• OPC-UA source configuration information
• The set of OPC-UA data stream paths from connected OPC-UA sources
• Industrial data cached when the gateway loses connection to the internet
193
AWS IoT SiteWise User GuideData encryption
AWS IoT SiteWise gateways run on AWS IoT Greengrass. AWS IoT Greengrass relies on Unix filepermissions and full-disk encryption (if enabled) to protect data at rest on the core. It's your responsiblityto secure the file system and device.
However, AWS IoT Greengrass does encrypt local copies of your OPC-UA server secrets retrieved fromSecrets Manager. For more information, see Secrets encryption in the AWS IoT Greengrass DeveloperGuide.
For more information about encryption at rest on AWS IoT Greengrass cores, see Encryption at rest in theAWS IoT Greengrass Developer Guide.
Encryption in transitAWS IoT SiteWise has three modes of communication where data is in transit:
• Over the Internet (p. 194) – Communication between local devices (including gateways) and AWS IoTSiteWise is encrypted.
• Over the Local Network (p. 194) – Communication between gateways and OPC-UA sources can beencrypted.
• Between Components on Gateways (p. 194) – Communication between AWS IoT Greengrasscomponents on AWS IoT SiteWise gateways isn't encrypted.
Data in transit over the internet
AWS IoT SiteWise uses Transport Layer Security (TLS) to encrypt all communication over the internet.All data sent to the AWS Cloud is sent over a TLS connection using MQTT or HTTPS protocols, so it'ssecure by default. Gateways, which run on AWS IoT Greengrass, and property value notifications use theAWS IoT transport security model. For more information, see Transport security in the AWS IoT DeveloperGuide.
Data in transit over the local network
AWS IoT SiteWise gateways follow OPC-UA specifications for communication with local OPC-UA sources.It's your responsibility to configure your sources to use a message security mode that encrypts data intransit.
Gateways support the following message security modes to connect to local OPC-UA sources:
• Basic256 – Sign and encrypt• Basic256 – Sign• Basic128Rsa15 – Sign and encrypt• Basic128Rsa15 – Sign• None
If you choose a sign message security mode, data in transit between gateways and sources is signed butnot encrypted. If you choose an encrypt message security mode, the data in transit between gatewaysand sources is signed and encrypted. For more information about configuring sources, see Adding thegateway to AWS IoT SiteWise (p. 112).
Data in transit between local components on gateways
AWS IoT SiteWise gateways run on AWS IoT Greengrass, which doesn't encrypt data exchangedlocally on the AWS IoT Greengrass core because the data doesn't leave the device. This includescommunication between AWS IoT Greengrass components such as the AWS IoT SiteWise connector. Formore information, see Data on the core device in the AWS IoT Greengrass Developer Guide.
194
AWS IoT SiteWise User GuideInternetwork traffic privacy
Key managementAWS IoT SiteWise doesn't support customer-managed encryption keys for data encrypted in the AWSCloud.
AWS IoT SiteWise gateways run on AWS IoT Greengrass, and AWS IoT Greengrass core devices usepublic and private keys to authenticate with the AWS Cloud and encrypt local secrets, such as OPC-UAauthentication secrets. For more information, see Key management in the AWS IoT Greengrass DeveloperGuide.
Internetwork traffic privacyConnections between AWS IoT SiteWise and on-premise applications, such as gateways, are secured overTransport Layer Security (TLS) connections. For more information, see Encryption in transit (p. 194).
AWS IoT SiteWise doesn't support connections between Availability Zones within a Region, connectionsbetween Regions, or connections between AWS accounts.
Identity and access management for AWS IoTSiteWise
AWS Identity and Access Management (IAM) is an AWS service that helps an administrator securelycontrol access to AWS resources. IAM administrators control who can be authenticated (signed in) andauthorized (have permissions) to use AWS IoT SiteWise resources. IAM is an AWS service that you can usewith no additional charge.
Topics• Audience (p. 195)• Authenticating with identities (p. 196)• Managing access using policies (p. 197)• How AWS IoT SiteWise works with IAM (p. 199)• AWS IoT SiteWise identity-based policy examples (p. 205)• Using service-linked roles for AWS IoT SiteWise (p. 208)• Using service roles for AWS IoT SiteWise Monitor (p. 210)• Troubleshooting AWS IoT SiteWise identity and access (p. 215)
AudienceHow you use AWS Identity and Access Management (IAM) differs, depending on the work you do in AWSIoT SiteWise.
Service user – If you use the AWS IoT SiteWise service to do your job, then your administrator providesyou with the credentials and permissions that you need. As you use more AWS IoT SiteWise features todo your work, you might need additional permissions. Understanding how access is managed can helpyou request the right permissions from your administrator. If you cannot access a feature in AWS IoTSiteWise, see Troubleshooting AWS IoT SiteWise identity and access (p. 215).
Service administrator – If you're in charge of AWS IoT SiteWise resources at your company, you probablyhave full access to AWS IoT SiteWise. It's your job to determine which AWS IoT SiteWise features andresources your employees should access. You must then submit requests to your IAM administrator to
195
AWS IoT SiteWise User GuideAuthenticating with identities
change the permissions of your service users. Review the information on this page to understand thebasic concepts of IAM. To learn more about how your company can use IAM with AWS IoT SiteWise, seeHow AWS IoT SiteWise works with IAM (p. 199).
IAM administrator – If you're an IAM administrator, you might want to learn details about how you canwrite policies to manage access to AWS IoT SiteWise. To view example AWS IoT SiteWise identity-basedpolicies that you can use in IAM, see AWS IoT SiteWise identity-based policy examples (p. 205).
Authenticating with identitiesAuthentication is how you sign in to AWS using your identity credentials. For more information aboutsigning in using the AWS Management Console, see The IAM Console and Sign-in Page in the IAM UserGuide.
You must be authenticated (signed in to AWS) as the AWS account root user, an IAM user, or by assumingan IAM role. You can also use your company's single sign-on authentication, or even sign in using Googleor Facebook. In these cases, your administrator previously set up identity federation using IAM roles.When you access AWS using credentials from another company, you are assuming a role indirectly.
To sign in directly to the AWS Management Console, use your password with your root user email or yourIAM user name. You can access AWS programmatically using your root user or IAM user access keys. AWSprovides SDK and command line tools to cryptographically sign your request using your credentials. Ifyou don’t use AWS tools, you must sign the request yourself. Do this using Signature Version 4, a protocolfor authenticating inbound API requests. For more information about authenticating requests, seeSignature Version 4 Signing Process in the AWS General Reference.
Regardless of the authentication method that you use, you might also be required to provide additionalsecurity information. For example, AWS recommends that you use multi-factor authentication (MFA) toincrease the security of your account. To learn more, see Using Multi-Factor Authentication (MFA) in AWSin the IAM User Guide.
AWS Account Root UserWhen you first create an AWS account, you begin with a single sign-in identity that has complete accessto all AWS services and resources in the account. This identity is called the AWS account root user andis accessed by signing in with the email address and password that you used to create the account. Westrongly recommend that you do not use the root user for your everyday tasks, even the administrativeones. Instead, adhere to the best practice of using the root user only to create your first IAM user. Thensecurely lock away the root user credentials and use them to perform only a few account and servicemanagement tasks.
IAM users and groupsAn IAM user is an identity within your AWS account that has specific permissions for a single person orapplication. An IAM user can have long-term credentials such as a user name and password or a set ofaccess keys. To learn how to generate access keys, see Managing Access Keys for IAM Users in the IAMUser Guide. When you generate access keys for an IAM user, make sure you view and securely save the keypair. You cannot recover the secret access key in the future. Instead, you must generate a new access keypair.
An IAM group is an identity that specifies a collection of IAM users. You can't sign in as a group. Youcan use groups to specify permissions for multiple users at a time. Groups make permissions easier tomanage for large sets of users. For example, you could have a group named IAMAdmins and give thatgroup permissions to administer IAM resources.
Users are different from roles. A user is uniquely associated with one person or application, but a roleis intended to be assumable by anyone who needs it. Users have permanent long-term credentials, but
196
AWS IoT SiteWise User GuideManaging access using policies
roles provide temporary credentials. To learn more, see When to Create an IAM User (Instead of a Role) inthe IAM User Guide.
IAM roles
An IAM role is an identity within your AWS account that has specific permissions. It is similar to an IAMuser, but is not associated with a specific person. You can temporarily assume an IAM role in the AWSManagement Console by switching roles. You can assume a role by calling an AWS CLI or AWS APIoperation or by using a custom URL. For more information about methods for using roles, see Using IAMRoles in the IAM User Guide.
IAM roles with temporary credentials are useful in the following situations:
• Temporary IAM user permissions – An IAM user can assume an IAM role to temporarily take ondifferent permissions for a specific task.
• Federated user access – Instead of creating an IAM user, you can use existing identities from AWSDirectory Service, your enterprise user directory, or a web identity provider. These are known asfederated users. AWS assigns a role to a federated user when access is requested through an identityprovider. For more information about federated users, see Federated Users and Roles in the IAM UserGuide.
• Cross-account access – You can use an IAM role to allow someone (a trusted principal) in a differentaccount to access resources in your account. Roles are the primary way to grant cross-account access.However, with some AWS services, you can attach a policy directly to a resource (instead of using a roleas a proxy). To learn the difference between roles and resource-based policies for cross-account access,see How IAM Roles Differ from Resource-based Policies in the IAM User Guide.
• AWS service access – A service role is an IAM role that a service assumes to perform actions in youraccount on your behalf. When you set up some AWS service environments, you must define a rolefor the service to assume. This service role must include all the permissions that are required for theservice to access the AWS resources that it needs. Service roles vary from service to service, but manyallow you to choose your permissions as long as you meet the documented requirements for thatservice. Service roles provide access only within your account and cannot be used to grant accessto services in other accounts. You can create, modify, and delete a service role from within IAM. Forexample, you can create a role that allows Amazon Redshift to access an Amazon S3 bucket on yourbehalf and then load data from that bucket into an Amazon Redshift cluster. For more information, seeCreating a Role to Delegate Permissions to an AWS Service in the IAM User Guide.
• Applications running on Amazon EC2 – You can use an IAM role to manage temporary credentialsfor applications that are running on an EC2 instance and making AWS CLI or AWS API requests.This is preferable to storing access keys within the EC2 instance. To assign an AWS role to an EC2instance and make it available to all of its applications, you create an instance profile that is attachedto the instance. An instance profile contains the role and enables programs that are running on theEC2 instance to get temporary credentials. For more information, see Using an IAM Role to GrantPermissions to Applications Running on Amazon EC2 Instances in the IAM User Guide.
To learn whether to use IAM roles, see When to Create an IAM Role (Instead of a User) in the IAM UserGuide.
Managing access using policiesYou control access in AWS by creating policies and attaching them to IAM identities or AWS resources. Apolicy is an object in AWS that, when associated with an identity or resource, defines their permissions.AWS evaluates these policies when an entity (root user, IAM user, or IAM role) makes a request.Permissions in the policies determine whether the request is allowed or denied. Most policies are storedin AWS as JSON documents. For more information about the structure and contents of JSON policydocuments, see Overview of JSON Policies in the IAM User Guide.
197
AWS IoT SiteWise User GuideManaging access using policies
An IAM administrator can use policies to specify who has access to AWS resources, and what actionsthey can perform on those resources. Every IAM entity (user or role) starts with no permissions. In otherwords, by default, users can do nothing, not even change their own password. To give a user permissionto do something, an administrator must attach a permissions policy to a user. Or the administrator canadd the user to a group that has the intended permissions. When an administrator gives permissions to agroup, all users in that group are granted those permissions.
IAM policies define permissions for an action regardless of the method that you use to perform theoperation. For example, suppose that you have a policy that allows the iam:GetRole action. A user withthat policy can get role information from the AWS Management Console, the AWS CLI, or the AWS API.
Identity-based policiesIdentity-based policies are JSON permissions policy documents that you can attach to an identity, suchas an IAM user, role, or group. These policies control what actions that identity can perform, on whichresources, and under what conditions. To learn how to create an identity-based policy, see Creating IAMPolicies in the IAM User Guide.
Identity-based policies can be further categorized as inline policies or managed policies. Inline policiesare embedded directly into a single user, group, or role. Managed policies are standalone policies thatyou can attach to multiple users, groups, and roles in your AWS account. Managed policies include AWSmanaged policies and customer managed policies. To learn how to choose between a managed policy oran inline policy, see Choosing Between Managed Policies and Inline Policies in the IAM User Guide.
Resource-based policiesResource-based policies are JSON policy documents that you attach to a resource such as an Amazon S3bucket. Service administrators can use these policies to define what actions a specified principal (accountmember, user, or role) can perform on that resource and under what conditions. Resource-based policiesare inline policies. There are no managed resource-based policies.
Access control lists (ACLs)Access control lists (ACLs) are a type of policy that controls which principals (account members, users, orroles) have permissions to access a resource. ACLs are similar to resource-based policies, although theydo not use the JSON policy document format. Amazon S3, AWS WAF, and Amazon VPC are examplesof services that support ACLs. To learn more about ACLs, see Access Control List (ACL) Overview in theAmazon Simple Storage Service Developer Guide.
Other policy typesAWS supports additional, less-common policy types. These policy types can set the maximumpermissions granted to you by the more common policy types.
• Permissions boundaries – A permissions boundary is an advanced feature in which you set themaximum permissions that an identity-based policy can grant to an IAM entity (IAM user or role).You can set a permissions boundary for an entity. The resulting permissions are the intersection ofentity's identity-based policies and its permissions boundaries. Resource-based policies that specifythe user or role in the Principal field are not limited by the permissions boundary. An explicit denyin any of these policies overrides the allow. For more information about permissions boundaries, seePermissions Boundaries for IAM Entities in the IAM User Guide.
• Service control policies (SCPs) – SCPs are JSON policies that specify the maximum permissions foran organization or organizational unit (OU) in AWS Organizations. AWS Organizations is a service forgrouping and centrally managing multiple AWS accounts that your business owns. If you enable allfeatures in an organization, then you can apply service control policies (SCPs) to any or all of youraccounts. The SCP limits permissions for entities in member accounts, including each AWS account
198
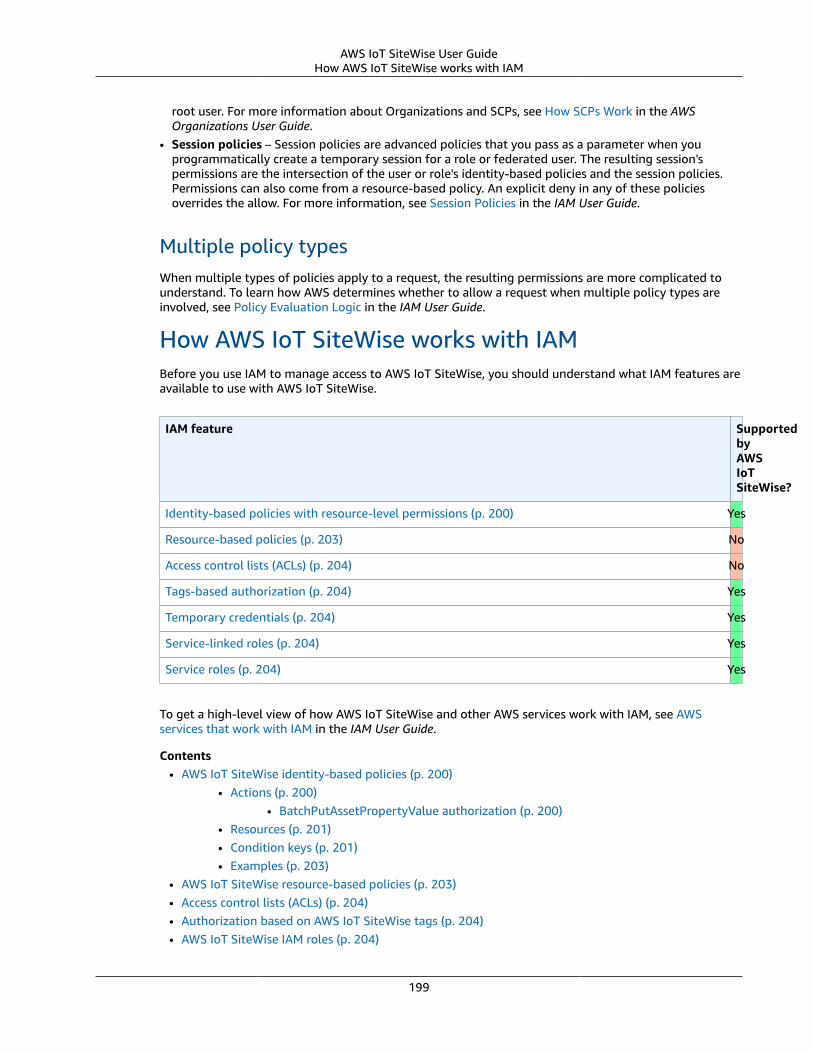
AWS IoT SiteWise User GuideHow AWS IoT SiteWise works with IAM
root user. For more information about Organizations and SCPs, see How SCPs Work in the AWSOrganizations User Guide.
• Session policies – Session policies are advanced policies that you pass as a parameter when youprogrammatically create a temporary session for a role or federated user. The resulting session'spermissions are the intersection of the user or role's identity-based policies and the session policies.Permissions can also come from a resource-based policy. An explicit deny in any of these policiesoverrides the allow. For more information, see Session Policies in the IAM User Guide.
Multiple policy typesWhen multiple types of policies apply to a request, the resulting permissions are more complicated tounderstand. To learn how AWS determines whether to allow a request when multiple policy types areinvolved, see Policy Evaluation Logic in the IAM User Guide.
How AWS IoT SiteWise works with IAMBefore you use IAM to manage access to AWS IoT SiteWise, you should understand what IAM features areavailable to use with AWS IoT SiteWise.
IAM feature SupportedbyAWSIoTSiteWise?
Identity-based policies with resource-level permissions (p. 200) Yes
Resource-based policies (p. 203) No
Access control lists (ACLs) (p. 204) No
Tags-based authorization (p. 204) Yes
Temporary credentials (p. 204) Yes
Service-linked roles (p. 204) Yes
Service roles (p. 204) Yes
To get a high-level view of how AWS IoT SiteWise and other AWS services work with IAM, see AWSservices that work with IAM in the IAM User Guide.
Contents• AWS IoT SiteWise identity-based policies (p. 200)
• Actions (p. 200)• BatchPutAssetPropertyValue authorization (p. 200)
• Resources (p. 201)• Condition keys (p. 201)• Examples (p. 203)
• AWS IoT SiteWise resource-based policies (p. 203)• Access control lists (ACLs) (p. 204)• Authorization based on AWS IoT SiteWise tags (p. 204)• AWS IoT SiteWise IAM roles (p. 204)
199
AWS IoT SiteWise User GuideHow AWS IoT SiteWise works with IAM
• Using temporary credentials with AWS IoT SiteWise (p. 204)• Service-linked roles (p. 204)• Service roles (p. 204)• Choosing an IAM role in AWS IoT SiteWise (p. 205)
AWS IoT SiteWise identity-based policiesWith IAM identity-based policies, you can specify allowed or denied actions and resources as well asthe conditions under which actions are allowed or denied. AWS IoT SiteWise supports specific actions,resources, and condition keys. To learn about all of the elements that you use in a JSON policy, see IAMJSON policy elements reference in the IAM User Guide.
Actions
The Action element of an IAM identity-based policy describes the specific action or actions that will beallowed or denied by the policy. Policy actions usually have the same name as the associated AWS APIoperation. The action is used in a policy to grant permissions to perform the associated operation.
Policy actions in AWS IoT SiteWise use the following prefix before the action: iotsitewise:.For example, to grant someone permission to upload asset property data to AWS IoTSiteWise with the BatchPutAssetPropertyValue API operation, you include theiotsitewise:BatchPutAssetPropertyValue action in their policy. Policy statements must includeeither an Action or NotAction element. AWS IoT SiteWise defines its own set of actions that describetasks that you can perform with this service.
To specify multiple actions in a single statement, separate them with commas as follows.
"Action": [ "iotsitewise:action1", "iotsitewise:action2"]
You can specify multiple actions using wildcards (*). For example, to specify all actions that begin withthe word Describe, include the following action.
"Action": "iotsitewise:Describe*"
To see a list of AWS IoT SiteWise actions, see Actions Defined by AWS IoT SiteWise in the IAM User Guide.
BatchPutAssetPropertyValue authorization
AWS IoT SiteWise authorizes access to the BatchPutAssetPropertyValue action in an unusual way. Formost actions, when you allow or deny access to an action, that action returns an error if permissionsaren't granted. When you use BatchPutAssetPropertyValue, you can send multiple data entries todifferent assets and asset properties in a single API request, and AWS IoT SiteWise authorizes each dataentry independently. For any individual entry that fails authorization in the request, AWS IoT SiteWiseincludes an AccessDeniedException in the returned list of errors. AWS IoT SiteWise receives the datafor any entry that authorizes and succeeds, even if another entry in the same request fails.
ImportantIf one entry is denied permissions, all entries for the same asset are also denied. For example,consider a scenario where you allow access to a property Property1 for any asset using thepropertyId condition key. If you send a BatchPutAssetPropertyValue request thatcontains entries for Asset1.Property1, Asset1.Property2, Asset2.Property1, and
200
AWS IoT SiteWise User GuideHow AWS IoT SiteWise works with IAM
Asset3.Property3, then the only entry that succeeds is Asset2.Property1. If you sendthose entries in separate BatchPutAssetPropertyValue requests, then Asset1.Property1and Asset2.Property1 succeed.
Resources
The Resource element specifies the object or objects to which the action applies. Statements mustinclude either a Resource or a NotResource element. You specify a resource using an ARN or using thewildcard (*) to indicate that the statement applies to all resources.
Each IAM policy statement applies to the resources that you specify using their ARNs. An ARN has thefollowing general syntax.
arn:${Partition}:${Service}:${Region}:${Account}:${ResourceType}/${ResourcePath}
For more information about the format of ARNs, see Amazon Resource Names (ARNs) and AWS servicenamespaces.
For example, to specify the asset with ID a1b2c3d4-5678-90ab-cdef-22222EXAMPLE in yourstatement, use the following ARN.;
"Resource": "arn:aws:iotsitewise:region:123456789012:asset/a1b2c3d4-5678-90ab-cdef-22222EXAMPLE"
To specify all assets that belong to a specific account, use the wildcard (*):
"Resource": "arn:aws:iotsitewise:region:123456789012:asset/*"
Some AWS IoT SiteWise actions, such as those for creating resources, can't be performed on a specificresource. In those cases, you must use the wildcard (*).
"Resource": "*"
To specify multiple resources in a single statement, separate the ARNs with commas.
"Resource": [ "resource1", "resource2"]
To see a list of AWS IoT SiteWise resource types and their ARNs, see Resources Defined by AWS IoTSiteWise in the IAM User Guide. To learn with which actions you can specify the ARN of each resource, seeActions Defined by AWS IoT SiteWise.
Condition keys
The Condition element (or Condition block) lets you specify conditions in which a statement is ineffect. The Condition element is optional. You can build conditional expressions that use conditionoperators, such as equals or less than, to match the condition in the policy with values in the request.
If you specify multiple Condition elements in a statement, or multiple keys in a single Conditionelement, AWS evaluates them using a logical AND operation. If you specify multiple values for a singlecondition key, AWS evaluates the condition using a logical OR operation. All of the conditions must bemet before the statement's permissions are granted.
201
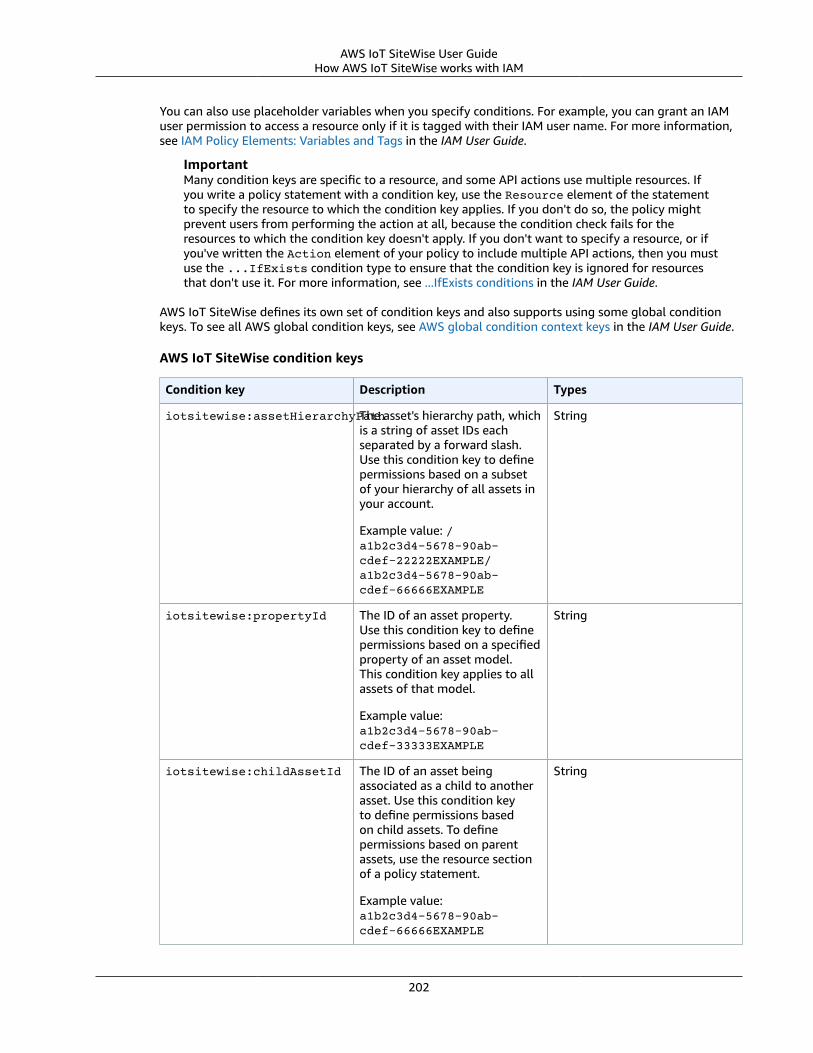
AWS IoT SiteWise User GuideHow AWS IoT SiteWise works with IAM
You can also use placeholder variables when you specify conditions. For example, you can grant an IAMuser permission to access a resource only if it is tagged with their IAM user name. For more information,see IAM Policy Elements: Variables and Tags in the IAM User Guide.
ImportantMany condition keys are specific to a resource, and some API actions use multiple resources. Ifyou write a policy statement with a condition key, use the Resource element of the statementto specify the resource to which the condition key applies. If you don't do so, the policy mightprevent users from performing the action at all, because the condition check fails for theresources to which the condition key doesn't apply. If you don't want to specify a resource, or ifyou've written the Action element of your policy to include multiple API actions, then you mustuse the ...IfExists condition type to ensure that the condition key is ignored for resourcesthat don't use it. For more information, see ...IfExists conditions in the IAM User Guide.
AWS IoT SiteWise defines its own set of condition keys and also supports using some global conditionkeys. To see all AWS global condition keys, see AWS global condition context keys in the IAM User Guide.
AWS IoT SiteWise condition keys
Condition key Description Types
iotsitewise:assetHierarchyPathThe asset's hierarchy path, whichis a string of asset IDs eachseparated by a forward slash.Use this condition key to definepermissions based on a subsetof your hierarchy of all assets inyour account.
Example value: /a1b2c3d4-5678-90ab-cdef-22222EXAMPLE/a1b2c3d4-5678-90ab-cdef-66666EXAMPLE
String
iotsitewise:propertyId The ID of an asset property.Use this condition key to definepermissions based on a specifiedproperty of an asset model.This condition key applies to allassets of that model.
Example value:a1b2c3d4-5678-90ab-cdef-33333EXAMPLE
String
iotsitewise:childAssetId The ID of an asset beingassociated as a child to anotherasset. Use this condition keyto define permissions basedon child assets. To definepermissions based on parentassets, use the resource sectionof a policy statement.
Example value:a1b2c3d4-5678-90ab-cdef-66666EXAMPLE
String
202
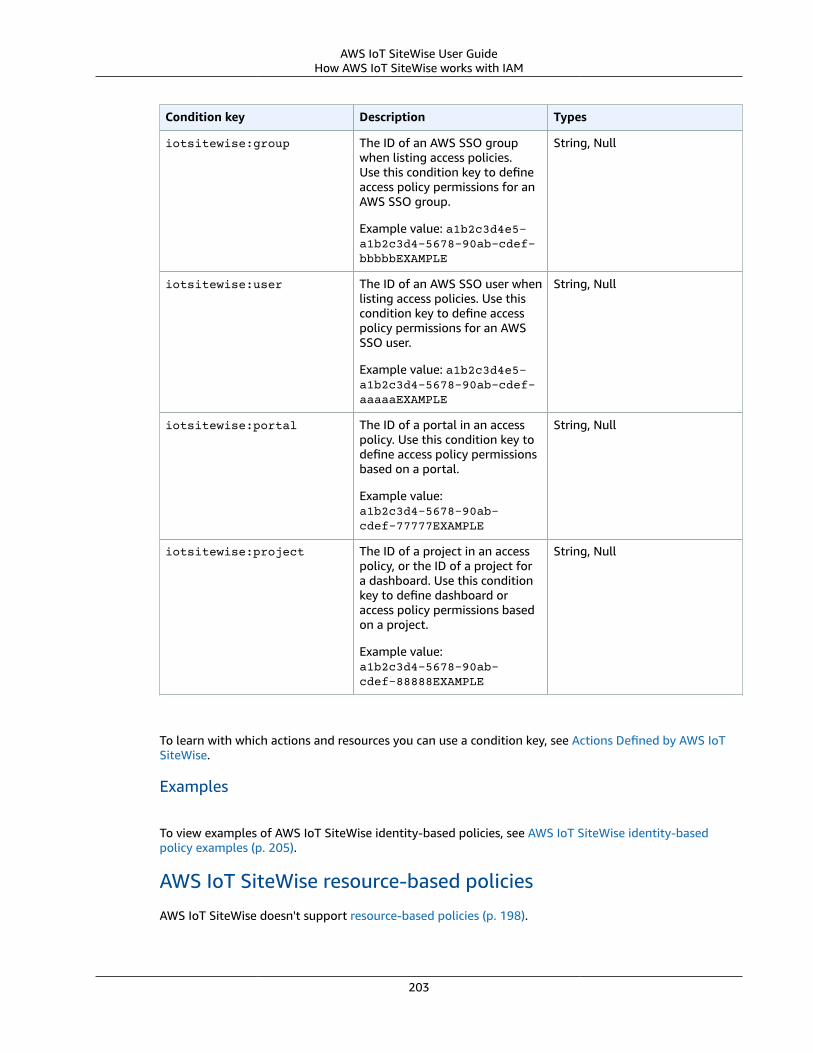
AWS IoT SiteWise User GuideHow AWS IoT SiteWise works with IAM
Condition key Description Types
iotsitewise:group The ID of an AWS SSO groupwhen listing access policies.Use this condition key to defineaccess policy permissions for anAWS SSO group.
Example value: a1b2c3d4e5-a1b2c3d4-5678-90ab-cdef-bbbbbEXAMPLE
String, Null
iotsitewise:user The ID of an AWS SSO user whenlisting access policies. Use thiscondition key to define accesspolicy permissions for an AWSSSO user.
Example value: a1b2c3d4e5-a1b2c3d4-5678-90ab-cdef-aaaaaEXAMPLE
String, Null
iotsitewise:portal The ID of a portal in an accesspolicy. Use this condition key todefine access policy permissionsbased on a portal.
Example value:a1b2c3d4-5678-90ab-cdef-77777EXAMPLE
String, Null
iotsitewise:project The ID of a project in an accesspolicy, or the ID of a project fora dashboard. Use this conditionkey to define dashboard oraccess policy permissions basedon a project.
Example value:a1b2c3d4-5678-90ab-cdef-88888EXAMPLE
String, Null
To learn with which actions and resources you can use a condition key, see Actions Defined by AWS IoTSiteWise.
Examples
To view examples of AWS IoT SiteWise identity-based policies, see AWS IoT SiteWise identity-basedpolicy examples (p. 205).
AWS IoT SiteWise resource-based policies
AWS IoT SiteWise doesn't support resource-based policies (p. 198).
203

AWS IoT SiteWise User GuideHow AWS IoT SiteWise works with IAM
Access control lists (ACLs)AWS IoT SiteWise doesn't support ACLs (p. 198).
Authorization based on AWS IoT SiteWise tagsYou can attach tags to AWS IoT SiteWise resources or pass tags in a request to AWS IoT SiteWise. Tocontrol access based on tags, you provide tag information in the condition element of a policy using theiotsitewise:ResourceTag/key-name, aws:RequestTag/key-name, or aws:TagKeys conditionkeys. For more information about tagging AWS IoT SiteWise resources, see Tagging your AWS IoTSiteWise resources (p. 229).
To view an example identity-based policy for limiting access to a resource based on the tags on thatresource, see Viewing AWS IoT SiteWise assets based on tags (p. 207).
AWS IoT SiteWise IAM rolesAn IAM role is an entity within your AWS account that has specific permissions.
Using temporary credentials with AWS IoT SiteWise
You can use temporary credentials to sign in with federation, assume an IAM role, or to assume a cross-account role. You obtain temporary security credentials by calling AWS STS API operations such asAssumeRole or GetFederationToken.
AWS IoT SiteWise supports using temporary credentials.
SiteWise Monitor supports federated users to access portals. When a user signs in to a portal, SiteWiseMonitor generates a session policy that provides the following permissions:
• Read-only access to the assets and asset data in AWS IoT SiteWise in your account to which thatportal's role provides access.
• Access to projects in that portal to which the user has administrator (project owner) or read-only(project viewer) access.
For more information about federated portal user permissions, see Using service-linked roles for AWS IoTSiteWise (p. 208).
Service-linked roles
Service-linked roles allow AWS services to access resources in other services to complete an action onyour behalf. Service-linked roles appear in your IAM account and are owned by the service. An IAMadministrator can view but not edit the permissions for service-linked roles.
AWS IoT SiteWise supports service-linked roles. For details about creating or managing AWS IoT SiteWiseservice-linked roles, see Using service-linked roles for AWS IoT SiteWise (p. 208).
Service roles
This feature allows a service to assume a service role on your behalf. This role allows the service toaccess resources in other services to complete an action on your behalf. Service roles appear in yourIAM account and are owned by the account. This means that an IAM administrator can change thepermissions for this role. However, doing so might break the functionality of the service.
AWS IoT SiteWise uses a service role to allow SiteWise Monitor portal users to access some of your AWSIoT SiteWise resources on your behalf. For more information, see Using service roles for AWS IoT SiteWiseMonitor (p. 210).
204
AWS IoT SiteWise User GuideIdentity-based policy examples
Choosing an IAM role in AWS IoT SiteWise
When you create a portal resource in AWS IoT SiteWise, you must choose a role to allow the federatedusers of your SiteWise Monitor portal to access AWS IoT SiteWise on your behalf. If you have previouslycreated a service role, then AWS IoT SiteWise provides you with a list of roles to choose from. Otherwise,you can create a role with the required permissions when you create a portal. It's important to choose arole that allows access to your assets and asset data. For more information, see Using service roles forAWS IoT SiteWise Monitor (p. 210).
AWS IoT SiteWise identity-based policy examplesBy default, IAM users and roles don't have permission to create or modify AWS IoT SiteWise resources.They also can't perform tasks using the AWS Management Console, AWS CLI, or AWS API. An IAMadministrator must create IAM policies that grant users and roles permission to perform specific APIoperations on the specified resources they need. The administrator must then attach those policies tothe IAM users or groups that require those permissions.
To learn how to create an IAM identity-based policy using these example JSON policy documents, seeCreating policies on the JSON tab in the IAM User Guide.
Topics
• Policy best practices (p. 205)
• Using the AWS IoT SiteWise console (p. 206)
• Allowing users to view their own permissions (p. 206)
• Allowing users to ingest data to assets in one hierarchy (p. 206)
• Viewing AWS IoT SiteWise assets based on tags (p. 207)
Policy best practices
Identity-based policies are very powerful. They determine whether someone can create, access, or deleteAWS IoT SiteWise resources in your account. These actions can incur costs for your AWS account. Whenyou create or edit identity-based policies, follow these guidelines and recommendations:
• Get Started Using AWS Managed Policies – To start using AWS IoT SiteWise quickly, use AWSmanaged policies to give your employees the permissions they need. These policies are alreadyavailable in your account and are maintained and updated by AWS. For more information, see GetStarted Using Permissions With AWS Managed Policies in the IAM User Guide.
• Grant Least Privilege – When you create custom policies, grant only the permissions requiredto perform a task. Start with a minimum set of permissions and grant additional permissions asnecessary. Doing so is more secure than starting with permissions that are too lenient and then tryingto tighten them later. For more information, see Grant Least Privilege in the IAM User Guide.
• Enable MFA for Sensitive Operations – For extra security, require IAM users to use multi-factorauthentication (MFA) to access sensitive resources or API operations. For more information, see UsingMulti-Factor Authentication (MFA) in AWS in the IAM User Guide.
• Use Policy Conditions for Extra Security – To the extent that it's practical, define the conditions underwhich your identity-based policies allow access to a resource. For example, you can write conditions tospecify a range of allowable IP addresses that a request must come from. You can also write conditionsto allow requests only within a specified date or time range, or to require the use of SSL or MFA. Formore information, see IAM JSON Policy Elements: Condition in the IAM User Guide.
205
AWS IoT SiteWise User GuideIdentity-based policy examples
Using the AWS IoT SiteWise console
To access the AWS IoT SiteWise console, you must have a minimum set of permissions. These permissionsmust allow you to list and view details about the AWS IoT SiteWise resources in your AWS account. Ifyou create an identity-based policy that is more restrictive than the minimum required permissions, theconsole won't function as intended for entities (IAM users or roles) with that policy.
To ensure that those entities can still use the AWS IoT SiteWise console, attach theAWSIoTSiteWiseConsoleFullAccess managed policy to those entities or define equivalent permissions forthose entities. For more information, see Adding permissions to a user in the IAM User Guide.
You don't need to allow minimum console permissions for users that are making calls only to the AWSCLI or the AWS API. Instead, allow access to only the actions that match the API operation that you'retrying to perform.
Allowing users to view their own permissions
This example shows how you might create a policy that allows IAM users to view the inline and managedpolicies that are attached to their user identity. This policy includes permissions to complete this actionon the console or programmatically using the AWS CLI or AWS API.
{ "Version": "2012-10-17", "Statement": [ { "Sid": "ViewOwnUserInfo", "Effect": "Allow", "Action": [ "iam:GetUserPolicy", "iam:ListGroupsForUser", "iam:ListAttachedUserPolicies", "iam:ListUserPolicies", "iam:GetUser" ], "Resource": ["arn:aws:iam::*:user/${aws:username}"] }, { "Sid": "NavigateInConsole", "Effect": "Allow", "Action": [ "iam:GetGroupPolicy", "iam:GetPolicyVersion", "iam:GetPolicy", "iam:ListAttachedGroupPolicies", "iam:ListGroupPolicies", "iam:ListPolicyVersions", "iam:ListPolicies", "iam:ListUsers" ], "Resource": "*" } ]}
Allowing users to ingest data to assets in one hierarchy
In this example, you want to grant an IAM user in your AWS account access to write data to all assetproperties in a specific hierarchy of assets, starting from the root asset a1b2c3d4-5678-90ab-cdef-22222EXAMPLE. The policy grants the iotsitewise:BatchPutAssetPropertyValue
206
AWS IoT SiteWise User GuideIdentity-based policy examples
permission to the user. This policy uses the iotsitewise:assetHierarchyPath condition key torestrict access to assets whose hierarchy path matches the asset or its descendants.
{ "Version": "2012-10-17", "Statement": [ { "Sid": "PutAssetPropertyValuesForHierarchy", "Effect": "Allow", "Action": "iotsitewise:BatchPutAssetPropertyValue", "Resource": "arn:aws:iotsitewise:*:*:asset/*", "Condition": { "StringLike": { "iotsitewise:assetHierarchyPath": [ "/a1b2c3d4-5678-90ab-cdef-22222EXAMPLE", "/a1b2c3d4-5678-90ab-cdef-22222EXAMPLE/*" ] } } } ]}
Viewing AWS IoT SiteWise assets based on tagsYou can use conditions in your identity-based policy to control access to AWS IoT SiteWise resourcesbased on tags. This example shows how you might create a policy that allows viewing an asset. However,permission is granted only if the asset tag Owner has the value of that user's user name. This policy alsogrants the permissions necessary to complete this action on the console.
{ "Version": "2012-10-17", "Statement": [ { "Sid": "ListAllAssets", "Effect": "Allow", "Action": [ "iotsitewise:ListAssets", "iotsitewise:ListAssociatedAssets" ], "Resource": "*" }, { "Sid": "DescribeAssetIfOwner", "Effect": "Allow", "Action": "iotsitewise:DescribeAsset", "Resource": "arn:aws:iotsitewise:*:*:asset/*", "Condition": { "StringEquals": { "iotsitewise:ResourceTag/Owner": "${aws:username}" } } } ]}
You can attach this policy to the IAM users in your account. If a user named richard-roe attempts toview an AWS IoT SiteWise asset, the asset must be tagged Owner=richard-roe or owner=richard-roe. Otherwise he is denied access. The condition tag key Owner matches both Owner and ownerbecause condition key names are not case-sensitive. For more information, see IAM JSON PolicyElements: Condition in the IAM User Guide.
207

AWS IoT SiteWise User GuideUsing service-linked roles
Using service-linked roles for AWS IoT SiteWiseAWS IoT SiteWise uses AWS Identity and Access Management (IAM) service-linked roles. A service-linkedrole is a unique type of IAM role that is linked directly to AWS IoT SiteWise. Service-linked roles arepredefined by AWS IoT SiteWise and include all the permissions that the service requires to call otherAWS services on your behalf.
A service-linked role makes setting up AWS IoT SiteWise easier because you don't have to manually addthe necessary permissions. AWS IoT SiteWise defines the permissions of its service-linked roles, andunless defined otherwise, only AWS IoT SiteWise can assume its roles. The defined permissions includethe trust policy and the permissions policy, and that permissions policy can't be attached to any otherIAM entity.
You can delete a service-linked role only after first deleting their related resources. This protects yourAWS IoT SiteWise resources because you can't inadvertently remove permission to access the resources.
For information about other services that support service-linked roles, see AWS services that work withIAM and look for the services that have Yes in the Service-Linked Role column. Choose a Yes with a linkto view the service-linked role documentation for that service.
Service-linked role permissions for AWS IoT SiteWiseAWS IoT SiteWise uses the service-linked role named AWSServiceRoleForIoTSiteWise – AWS IoTSiteWise uses this service-linked role to deploy gateways (which run on AWS IoT Greengrass) andperform logging.
The AWSServiceRoleForIoTSiteWise service-linked role trusts the following services to assume the role:
• iotsitewise.amazonaws.com
The role uses the following permissions policy to allow AWS IoT SiteWise to complete actions on otherservices' resources in your account:
{ "Version": "2012-10-17", "Statement": [ { "Action": [ "greengrass:GetAssociatedRole", "greengrass:GetCoreDefinition", "greengrass:GetCoreDefinitionVersion", "greengrass:GetGroup", "greengrass:GetGroupVersion" ], "Resource": "*", "Effect": "Allow" }, { "Action": [ "logs:CreateLogGroup", "logs:DescribeLogGroups" ], "Resource": "arn:aws:logs:*:*:log-group:/aws/iotsitewise*", "Effect": "Allow" }, { "Action": [ "logs:CreateLogStream", "logs:DescribeLogStreams",
208

AWS IoT SiteWise User GuideUsing service-linked roles
"logs:PutLogEvents" ], "Resource": "arn:aws:logs:*:*:log-group:/aws/iotsitewise*:log-stream:*", "Effect": "Allow" } ]}
You must configure permissions to allow an IAM entity (such as a user, group, or role) to create, edit, ordelete a service-linked role. For more information, see Service-linked role permissions in the IAM UserGuide.
Creating a service-linked role for AWS IoT SiteWiseYou don't need to manually create a service-linked role. When you perform any operation in the AWS IoTSiteWise console, AWS IoT SiteWise creates the service-linked role for you.
If you delete this service-linked role, and then need to create it again, you can use the same process torecreate the role in your account. When you perform any operation in the AWS IoT SiteWise console,AWS IoT SiteWise creates the service-linked role for you again.
You can also use the IAM console or API to create a service-linked role for AWS IoT SiteWise.
• To do so in the IAM console, create a service-linked role with the IoT SiteWise use case.
• To do so using the AWS CLI or IAM API, create a service-linked role with theiotsitewise.amazonaws.com service name.
For more information, see Creating a service-linked role in the IAM User Guide.
If you delete this service-linked role, you can use this same process to create the role again.
Editing a service-linked role for AWS IoT SiteWiseAWS IoT SiteWise doesn't allow you to edit the AWSServiceRoleForIoTSiteWise service-linked role. Afteryou create a service-linked role, you can't change the name of the role because various entities mightreference the role. However, you can edit the description of the role using IAM. For more information, seeEditing a service-linked role in the IAM User Guide.
Deleting a service-linked role for AWS IoT SiteWiseIf you no longer need a feature or service that requires a service-linked role, we recommend that youdelete that role. That way you don't have an unused entity that isn't actively monitored or maintained.However, you must clean up the resources for your service-linked role before you can manually delete it.
NoteIf the AWS IoT SiteWise service is using the role when you try to delete the resources, then thedeletion might fail. If that happens, wait for a few minutes and try again.
To delete AWS IoT SiteWise resources used by the AWSServiceRoleForIoTSiteWise
1. Disable logging for AWS IoT SiteWise. For more information, see Changing your logging level(console) (p. 222) or Changing your logging level (CLI) (p. 223).
2. Delete any active gateways.
To manually delete the service-linked role using IAM
209
AWS IoT SiteWise User GuideUsing service roles for SiteWise Monitor
Use the IAM console, the AWS CLI, or the AWS API to delete the AWSServiceRoleForIoTSiteWise service-linked role. For more information, see Deleting a Service-Linked Role in the IAM User Guide.
Supported Regions for AWS IoT SiteWise service-linked rolesAWS IoT SiteWise supports using service-linked roles in all of the Regions where the service is available.For more information, see AWS IoT SiteWise Endpoints and Quotas.
Using service roles for AWS IoT SiteWise MonitorA service role is an IAM role that a service assumes to perform actions in your account on your behalf.When you set up some AWS service environments, you must define a role for the service to assume. Thisservice role must include all the permissions that are required for the service to access the AWS resourcesthat it needs. Service roles vary from service to service, but many allow you to choose your permissionsas long as you meet the documented requirements for that service. Service roles provide access onlywithin your account and cannot be used to grant access to services in other accounts. You can create,modify, and delete a service role from within IAM. For example, you can create a role that allows AmazonRedshift to access an Amazon S3 bucket on your behalf and then load data from that bucket into anAmazon Redshift cluster. For more information, see Creating a Role to Delegate Permissions to an AWSService in the IAM User Guide.
To allow federated SiteWise Monitor portal users to access your AWS IoT SiteWise assets and asset data,you must attach a service role to each portal that you create. The service role must specify SiteWiseMonitor as a trusted entity and include specific permissions (p. 210).
When you create a SiteWise Monitor portal, you must choose a role that allows users of that portal toaccess your AWS IoT SiteWise resources. The AWS IoT SiteWise console can create and configure the rolefor you. You can edit the role in IAM later. Your portal users will have issues using their SiteWise Monitorportals if you remove the required permissions from the role or delete the role.
NotePortals created before April 29, 2020 didn't require service roles. If you created portals beforethis date, you must attach service roles to continue using them. To do so, navigate to thePortals page in the AWS IoT SiteWise console, and then choose Migrate all portals to use IAMroles.
The following sections describe how to create and manage the SiteWise Monitor service role in the AWSManagement Console or the AWS Command Line Interface.
Contents• Service role permissions for SiteWise Monitor (p. 210)• Managing the SiteWise Monitor service role (console) (p. 211)
• Finding a portal's service role (console) (p. 212)• Creating the SiteWise Monitor service role (console) (p. 212)• Changing a portal's service role (console) (p. 212)
• Managing the SiteWise Monitor service role (CLI) (p. 212)• Finding a portal's service role (CLI) (p. 213)• Creating the SiteWise Monitor service role (CLI) (p. 213)
Service role permissions for SiteWise MonitorWhen you create a portal, AWS IoT SiteWise lets you create a role whose name starts withAWSIoTSiteWiseMonitorServiceRole. This role allows federated SiteWise Monitor users to access yourportal configuration, assets, and asset data.
210

AWS IoT SiteWise User GuideUsing service roles for SiteWise Monitor
The role trusts the following service to assume the role:
• monitor.iotsitewise.amazonaws.com
The role uses the following permissions policy, whose name starts withAWSIoTSiteWiseMonitorServicePortalPolicy, to allow SiteWise Monitor users to complete actions onresources in your account.
{ "Version": "2012-10-17", "Statement": [ { "Effect": "Allow", "Action": [ "iotsitewise:CreateProject", "iotsitewise:DescribeProject", "iotsitewise:UpdateProject", "iotsitewise:DeleteProject", "iotsitewise:ListProjects", "iotsitewise:BatchAssociateProjectAssets", "iotsitewise:BatchDisassociateProjectAssets", "iotsitewise:ListProjectAssets", "iotsitewise:CreateDashboard", "iotsitewise:DescribeDashboard", "iotsitewise:UpdateDashboard", "iotsitewise:DeleteDashboard", "iotsitewise:ListDashboards", "iotsitewise:CreateAccessPolicy", "iotsitewise:DescribeAccessPolicy", "iotsitewise:UpdateAccessPolicy", "iotsitewise:DeleteAccessPolicy", "iotsitewise:ListAccessPolicies", "iotsitewise:DescribeAsset", "iotsitewise:ListAssets", "iotsitewise:ListAssociatedAssets", "iotsitewise:DescribeAssetProperty", "iotsitewise:GetAssetPropertyValue", "iotsitewise:GetAssetPropertyValueHistory", "iotsitewise:GetAssetPropertyAggregates", "sso-directory:DescribeUsers" ], "Resource": "*" } ]}
When a portal user signs in, SiteWise Monitor creates a session policy based on the intersection of theservice role and that user's access policies. Access policies define AWS SSO identities' level of accessto your portals and projects. For more information about portal permissions and access policies, seeAdministering your SiteWise Monitor portals (p. 170) and CreateAccessPolicy.
Managing the SiteWise Monitor service role (console)
The AWS IoT SiteWise console makes it easy to manage the SiteWise Monitor service role for yourportals. When you create a portal, the console checks if you have any existing roles that can be attachedto that portal. If not, the console can create and configure a service role for you. For more information,see Creating the SiteWise Monitor service role (console) (p. 212).
Topics
• Finding a portal's service role (console) (p. 212)
211
AWS IoT SiteWise User GuideUsing service roles for SiteWise Monitor
• Creating the SiteWise Monitor service role (console) (p. 212)
• Changing a portal's service role (console) (p. 212)
Finding a portal's service role (console)
Use the following steps to find the service role attached to a SiteWise Monitor portal.
To find a portal's service role
1. Navigate to the AWS IoT SiteWise console.
2. In the left navigation pane, choose Portals.
3. Choose the portal for which you want to find the service role.
The role attached to the portal appears under Permissions, Service role.
Creating the SiteWise Monitor service role (console)
When you create a SiteWise Monitor portal, you can create a new service role for your portal. For moreinformation, see Creating a portal (p. 165).
To create a service role for an existing portal
1. Navigate to the AWS IoT SiteWise console.
2. In the left navigation pane, choose Portals.
3. Choose the portal for which you want to create a new service role.
4. Under Portal details, choose Edit.
5. Under Permissions, choose Create and use a new service role from the list.
6. Enter a name for your new role.
7. Choose Save.
Changing a portal's service role (console)
Use the following procedure to choose a different SiteWise Monitor service role for a portal.
To change a portal's service role
1. Navigate to the AWS IoT SiteWise console.
2. In the left navigation pane, choose Portals.
3. Choose the portal for which you want to change the service role.
4. Under Portal details, choose Edit.
5. Under Permissions, choose Use an existing role.
6. Choose an existing role to attach to this portal.
7. Choose Save.
Managing the SiteWise Monitor service role (CLI)You can use the AWS CLI for the following portal service role management tasks:
Topics
212
AWS IoT SiteWise User GuideUsing service roles for SiteWise Monitor
• Finding a portal's service role (CLI) (p. 213)
• Creating the SiteWise Monitor service role (CLI) (p. 213)
Finding a portal's service role (CLI)
To find the service role attached to a SiteWise Monitor portal, run the following command to list all ofyour portals in the current Region.
aws iotsitewise list-portals
The action returns a response that contains your portal summaries in the following format.
{ "portalSummaries": [ { "id": "a1b2c3d4-5678-90ab-cdef-aaaaaEXAMPLE", "name": "WindFarmPortal", "description": "A portal that contains wind farm projects for Example Corp.", "roleArn": "arn:aws:iam::123456789012:role/service-role/role-name", "startUrl": "https://a1b2c3d4-5678-90ab-cdef-aaaaaEXAMPLE.app.iotsitewise.aws", "creationDate": "2020-02-04T23:01:52.90248068Z", "lastUpdateDate": "2020-02-04T23:01:52.90248078Z" } ]}
You can also use the DescribePortal operation to find your portal's role if you know the ID of your portal.
Creating the SiteWise Monitor service role (CLI)
Use the following steps to create a new SiteWise Monitor service role.
To create a SiteWise Monitor service role
1. Create a role with a trust policy that allows SiteWise Monitor to assume the role. This examplecreates a role named MySiteWiseMonitorPortalRole from a trust policy stored in a JSON string.
Linux, macOS, or Unix
aws iam create-role --role-name MySiteWiseMonitorPortalRole --assume-role-policy-document '{ "Version": "2012-10-17", "Statement": [ { "Effect": "Allow", "Principal": { "Service": "monitor.iotsitewise.amazonaws.com" }, "Action": "sts:AssumeRole" } ]}'
Windows command prompt
aws iam create-role --role-name MySiteWiseMonitorPortalRole --assume-role-policy-document "{\"Version\":\"2012-10-17\",\"Statement\":[{\"Effect\":\"Allow\",
213
AWS IoT SiteWise User GuideUsing service roles for SiteWise Monitor
\"Principal\":{\"Service\":\"monitor.iotsitewise.amazonaws.com\"},\"Action\":\"sts:AssumeRole\"}]}"
2. Copy the role ARN from the role metadata in the output. When you create a portal, you use thisARN to associate the role with your portal. For more information about creating a portal, seeCreatePortal in the AWS IoT SiteWise API Reference.
3. Create a file called portal-service-role-policy.json and copy the following JSON objectinto the file.
{ "Version": "2012-10-17", "Statement": [ { "Effect": "Allow", "Action": [ "iotsitewise:CreateProject", "iotsitewise:DescribeProject", "iotsitewise:UpdateProject", "iotsitewise:DeleteProject", "iotsitewise:ListProjects", "iotsitewise:BatchAssociateProjectAssets", "iotsitewise:BatchDisassociateProjectAssets", "iotsitewise:ListProjectAssets", "iotsitewise:CreateDashboard", "iotsitewise:DescribeDashboard", "iotsitewise:UpdateDashboard", "iotsitewise:DeleteDashboard", "iotsitewise:ListDashboards", "iotsitewise:CreateAccessPolicy", "iotsitewise:DescribeAccessPolicy", "iotsitewise:UpdateAccessPolicy", "iotsitewise:DeleteAccessPolicy", "iotsitewise:ListAccessPolicies", "iotsitewise:DescribeAsset", "iotsitewise:ListAssets", "iotsitewise:ListAssociatedAssets", "iotsitewise:DescribeAssetProperty", "iotsitewise:GetAssetPropertyValue", "iotsitewise:GetAssetPropertyValueHistory", "iotsitewise:GetAssetPropertyAggregates", "sso-directory:DescribeUsers" ], "Resource": "*" } ]}
4. To create a policy with the service role permissions, run the following command.
aws iam create-policy \ --policy-name MySiteWiseMonitorPortalPolicy \ --description "Allows access to portal and asset resources in AWS IoT SiteWise." \ --policy-document file://portal-service-role-policy.json
Copy the policy ARN from the policy metadata in the output.
5. To attach the policy to the role, run the following command.
aws iam attach-role-policy \ --role-name MySiteWiseMonitorPortalRole \ --policy-arn arn:aws:iam::123456789012:policy/MySiteWiseMonitorPortalPolicy
214
AWS IoT SiteWise User GuideTroubleshooting
To attach a service role to an existing portal
1. To retrieve the portal's existing details, run the following command. Replace portal-id with the IDof the portal.
aws iotsitewise describe-portal --portal-id portal-id
The operation returns a response that contains the portal's details in the following format.
{ "portalId": "a1b2c3d4-5678-90ab-cdef-aaaaaEXAMPLE", "portalArn": "arn:aws:iotsitewise:region:account-id:portal/a1b2c3d4-5678-90ab-cdef-aaaaaEXAMPLE", "portalName": "WindFarmPortal", "portalDescription": "A portal that contains wind farm projects for Example Corp.", "portalClientId": "E-1a2b3c4d5e6f_sn6tbqHVzLWVEXAMPLE", "portalStartUrl": "https://a1b2c3d4-5678-90ab-cdef-aaaaaEXAMPLE.app.iotsitewise.aws", "portalContactEmail": "[email protected]", "portalStatus": { "state": "ACTIVE" }, "portalCreationDate": "2020-04-29T23:01:52.90248068Z", "portalLastUpdateDate": "2020-04-29T00:28:26.103548287Z", "roleArn": "arn:aws:iam::123456789012:role/service-role/AWSIoTSiteWiseMonitorServiceRole_1aEXAMPLE"}
2. To attach a service role to a portal, run the following command. Replace role-arn with the servicerole ARN, and replace the remaining parameters with the portal's existing values.
aws iotsitewise update-portal \ --portal-id portal-id \ --role-arn role-arn \ --portal-name portal-name \ --portal-description portal-description \ --portal-contact-email portal-contact-email
Troubleshooting AWS IoT SiteWise identity andaccessUse the following information to help you diagnose and fix common issues that you might encounterwhen working with AWS IoT SiteWise and IAM.
Topics
• I am not authorized to perform an action in AWS IoT SiteWise (p. 216)
• I am not authorized to perform iam:PassRole (p. 216)
• I want to view my access keys (p. 216)
• I'm an administrator and want to allow others to access AWS IoT SiteWise (p. 217)
• I want to allow people outside of my AWS account to access my AWS IoT SiteWiseresources (p. 217)
215
AWS IoT SiteWise User GuideTroubleshooting
I am not authorized to perform an action in AWS IoT SiteWise
If the AWS Management Console tells you that you're not authorized to perform an action, then youmust contact your administrator for assistance. Your administrator is the person that provided you withyour user name and password.
The following example error occurs when the mateojackson IAM user tries to use the console to viewdetails about an asset but does not have iotsitewise:DescribeAsset permissions.
User: arn:aws:iam::123456789012:user/mateojackson is not authorized to perform: iotsitewise:DescribeAsset on resource: a1b2c3d4-5678-90ab-cdef-22222EXAMPLE
In this case, Mateo asks his administrator to update his policies to allow him to access the asset resourcewith ID a1b2c3d4-5678-90ab-cdef-22222EXAMPLE using the iotsitewise:DescribeAssetaction.
I am not authorized to perform iam:PassRole
If you receive an error that you're not authorized to perform the iam:PassRole action, then you mustcontact your administrator for assistance. Your administrator is the person that provided you with youruser name and password. Ask that person to update your policies to allow you to pass a role to AWS IoTSiteWise.
Some AWS services allow you to pass an existing role to that service, instead of creating a new servicerole or service-linked role. To do this, you must have permissions to pass the role to the service.
The following example error occurs when an IAM user named marymajor tries to use the console toperform an action in AWS IoT SiteWise. However, the action requires the service to have permissionsgranted by a service role. Mary does not have permissions to pass the role to the service.
User: arn:aws:iam::123456789012:user/marymajor is not authorized to perform: iam:PassRole
In this case, Mary asks her administrator to update her policies to allow her to perform theiam:PassRole action.
I want to view my access keys
After you create your IAM user access keys, you can view your access key ID at any time. However, youcan't view your secret access key again. If you lose your secret key, you must create a new access key pair.
Access keys consist of two parts: an access key ID (for example, AKIAIOSFODNN7EXAMPLE) and a secretaccess key (for example, wJalrXUtnFEMI/K7MDENG/bPxRfiCYEXAMPLEKEY). Like a user name andpassword, you must use both the access key ID and secret access key together to authenticate yourrequests. Manage your access keys as securely as you do your user name and password.
ImportantDo not provide your access keys to a third party, even to help find your canonical user ID. Bydoing this, you might give someone permanent access to your account.
When you create an access key pair, you are prompted to save the access key ID and secret access key ina secure location. The secret access key is available only at the time you create it. If you lose your secretaccess key, you must add new access keys to your IAM user. You can have a maximum of two access keys.If you already have two, you must delete one key pair before creating a new one. To view instructions,see Managing Access Keys in the IAM User Guide.
216

AWS IoT SiteWise User GuideCompliance validation
I'm an administrator and want to allow others to access AWS IoTSiteWiseTo allow others to access AWS IoT SiteWise, you must create an IAM entity (user or role) for the person orapplication that needs access. They will use the credentials for that entity to access AWS. You must thenattach a policy to the entity that grants them the correct permissions in AWS IoT SiteWise.
To get started right away, see Creating Your First IAM Delegated User and Group in the IAM User Guide.
I want to allow people outside of my AWS account to access myAWS IoT SiteWise resourcesYou can create a role that users in other accounts or people outside of your organization can use toaccess your resources. You can specify who is trusted to assume the role. For services that supportresource-based policies or access control lists (ACLs), you can use those policies to grant people access toyour resources.
To learn more, consult the following:
• To learn whether AWS IoT SiteWise supports these features, see How AWS IoT SiteWise works withIAM (p. 199).
• To learn how to provide access to your resources across AWS accounts that you own, see ProvidingAccess to an IAM User in Another AWS Account That You Own in the IAM User Guide.
• To learn how to provide access to your resources to third-party AWS accounts, see Providing Access toAWS Accounts Owned by Third Parties in the IAM User Guide.
• To learn how to provide access through identity federation, see Providing Access to ExternallyAuthenticated Users (Identity Federation) in the IAM User Guide.
• To learn the difference between using roles and resource-based policies for cross-account access, seeHow IAM Roles Differ from Resource-based Policies in the IAM User Guide.
Compliance validation for AWS IoT SiteWiseAWS IoT SiteWise is not in scope of any AWS compliance programs.
For a list of AWS services in scope of specific compliance programs, see AWS Services in Scope byCompliance Program. For general information, see AWS Compliance Programs.
You can download third-party audit reports using AWS Artifact. For more information, see Downloadingreports in AWS Artifact.
Your compliance responsibility when using AWS IoT SiteWise is determined by the sensitivity of yourdata, your company's compliance objectives, and applicable laws and regulations. AWS provides thefollowing resources to help with compliance:
• Security and Compliance Quick Start Guides – These deployment guides discuss architecturalconsiderations and provide steps for deploying security- and compliance-focused baselineenvironments on AWS.
• Architecting for HIPAA Security and Compliance Whitepaper – This whitepaper describes howcompanies can use AWS to create HIPAA-compliant applications.
• AWS Compliance Resources – This collection of workbooks and guides might apply to your industryand location.
• Evaluating resources with rules in the AWS Config Developer Guide – The AWS Config service assesseshow well your resource configurations comply with internal practices, industry guidelines, andregulations.
217

AWS IoT SiteWise User GuideResilience
• AWS Security Hub – This AWS service provides a comprehensive view of your security state within AWSthat helps you check your compliance with security industry standards and best practices.
Resilience in AWS IoT SiteWiseThe AWS global infrastructure is built around AWS Regions and Availability Zones. AWS Regions providemultiple physically separated and isolated Availability Zones, which are connected with low-latency,high-throughput, and highly redundant networking. With Availability Zones, you can design and operateapplications and databases that automatically fail over between zones without interruption. AvailabilityZones are more highly available, fault tolerant, and scalable than traditional single or multiple datacenter infrastructures.
For more information about AWS Regions and Availability Zones, see AWS Global Infrastructure.
In addition to the AWS global infrastructure, AWS IoT SiteWise offers several features to help supportyour data resiliency and backup needs:
• You can publish property value updates to AWS IoT Core through MQTT messages, then configurerules to act upon that data. With this feature, you can back up data in other AWS services suchas Amazon S3 and Amazon DynamoDB. For more information, see Interacting with other AWSservices (p. 182).
• You can use the AWS IoT SiteWise Get* APIs to retrieve and backup historical asset property data. Formore information, see Querying historical asset property values (p. 179).
• You can use the AWS IoT SiteWise Describe* APIs to retrieve the definitions for your resources, suchas assets and models. You can backup these definitions and later use them to recreate your resources.For more information, see Discovering your existing asset resources (p. 155).
Infrastructure security in AWS IoT SiteWiseAs a managed service, AWS IoT SiteWise is protected by the AWS global network security procedures thatare described in the Amazon Web Services: Overview of Security Processes whitepaper.
You use AWS published API calls to access AWS IoT SiteWise through the network. Clients must supportTransport Layer Security (TLS) 1.0 or later. We recommend TLS 1.2 or later. Clients must also supportcipher suites with perfect forward secrecy (PFS) such as Ephemeral Diffie-Hellman (DHE) or Elliptic CurveEphemeral Diffie-Hellman (ECDHE). Most modern systems such as Java 7 and later support these modes.
Additionally, requests must be signed by using an access key ID and a secret access key that is associatedwith an IAM principal. Or you can use the AWS Security Token Service (AWS STS) to generate temporarysecurity credentials to sign requests.
AWS IoT SiteWise gateways, which run on AWS IoT Greengrass, use X.509 certificates and cryptographickeys to connect and authenticate to the AWS Cloud. For more information, see Device authentication andauthorization for AWS IoT Greengrass in the AWS IoT Greengrass Developer Guide.
Configuration and vulnerability analysis in AWS IoTSiteWise
IoT fleets can consist of large numbers of devices that have diverse capabilities, are long-lived, and aregeographically distributed. These characteristics make fleet setup complex and error-prone. Becausedevices are often constrained in computational power, memory, and storage capabilities, this limits
218
AWS IoT SiteWise User GuideSecurity best practices
the use of encryption and other forms of security on the devices themselves. Also, devices often usesoftware with known vulnerabilities. These factors make IoT fleets an attractive target for hackers andmake it difficult to secure your device fleet on an ongoing basis.
AWS IoT Device Defender addresses these challenges by providing tools to identify security issues anddeviations from best practices. You can use AWS IoT Device Defender to analyze, audit, and monitorconnected devices to detect abnormal behavior, and mitigate security risks. AWS IoT Device Defendercan audit device fleets to ensure they adhere to security best practices and detect abnormal behavior ondevices. This makes it possible to enforce consistent security policies across your AWS IoT device fleetand respond quickly when devices are compromised. For more information, see AWS IoT Device Defenderin the AWS IoT Developer Guide.
If you use AWS IoT SiteWise gateways to ingest data to the service, it's your responsibility to configureand maintain your gateway's environment. This responsibility includes upgrading to the latest versions ofthe gateway's system software, AWS IoT Greengrass software, and the AWS IoT SiteWise connector. Formore information, see Configure the AWS IoT Greengrass core in the AWS IoT Greengrass Developer Guideand Upgrading a connector (p. 127).
Security best practices for AWS IoT SiteWiseThis topic contains security best practices for AWS IoT SiteWise.
Use authentication credentials on your OPC-UAserversRequire authentication credentials to connect to your OPC-UA servers. Consult the documentationfor your servers to do so. Then, to allow your gateway to connect to your OPC-UA servers, addserver authentication secrets to your gateway. For more information, see Configuring sourceauthentication (p. 122).
Use encrypted communication modes for your OPC-UA serversChoose an encrypted message security mode when you configure your OPC-UA sources for yourgateway, so your industrial data is secure as it moves from your OPC-UA servers to the gateway. For moreinformation, see Data in transit over the local network (p. 194) and Adding the gateway to AWS IoTSiteWise (p. 112).
Encrypt your gateway's file systemEncrypt and secure your gateway, so your industrial data is secure as it moves through the gateway. Ifyour gateway has a hardware security module, you can configure AWS IoT Greengrass to secure yourgateway. For more information, see Hardware security integration in the AWS IoT Greengrass DeveloperGuide. Otherwise, consult the documentation for your operating system to learn how to encrypt andsecure your file system.
Grant SiteWise Monitor users minimum possiblepermissionsFollow the principle of least privilege by using the minimum set of access policy permissions for yourAWS SSO users and groups.
219
AWS IoT SiteWise User GuideDon't expose sensitive information
• When you create a portal, define a role that allows the minimum set of assets needed for that portal.For more information, see Using service roles for AWS IoT SiteWise Monitor (p. 210).
• When you and your portal administrators create and share projects, use the minimum set of assetsneeded for that project.
• When a user or group no longer needs access to a portal or project, remove them from that resource.If that user or group is no longer applicable to your organization, delete that user or group from youridentity store.
The least principle best practice also applies to IAM roles. For more information, see Policy bestpractices (p. 205).
Don't expose sensitive informationYou should prevent the logging of credentials and other sensitive information, such as personallyidentifiable information (PII). We recommend that you implement the following safeguards even thoughaccess to local logs on a gateway requires root privileges and access to CloudWatch Logs requires IAMpermissions.
• Don't use sensitive information in names, descriptions, or properties of your assets or models.• Don't use sensitive information in gateway or source names.• Don't use sensitive information in names or descriptions of your portals, projects, or dashboards.
Follow AWS IoT Greengrass security best practicesFollow AWS IoT Greengrass security best practices for your gateway. For more information, see Securitybest practices in the AWS IoT Greengrass Developer Guide.
See also• Security best practices in the AWS IoT Developer Guide• Ten security golden rules for IoT solutions
220

AWS IoT SiteWise User GuideMonitoring service logs
Logging and monitoring in AWS IoTSiteWise
Monitoring is an important part of maintaining the reliability, availability, and performance of AWS IoTSiteWise and your other AWS solutions. AWS IoT SiteWise supports the following monitoring tools towatch the service, report when something is wrong, and take automatic actions when appropriate:
• Amazon CloudWatch monitors your AWS resources and the applications that you run on AWS in realtime. You can collect and track metrics, create customized dashboards, and set alarms that notify youor take actions when a specified metric reaches a threshold that you specify. For example, you can haveCloudWatch track CPU usage or other metrics of your Amazon EC2 instances and automatically launchnew instances when needed. For more information, see the Amazon CloudWatch User Guide.
• Amazon CloudWatch Logs enables you to monitor, store, and access your log files from AWS IoTSiteWise gateways, CloudTrail, and other sources. CloudWatch Logs can monitor information in thelog files and notify you when certain thresholds are met. You can also archive your log data in highlydurable storage. For more information, see the Amazon CloudWatch Logs User Guide.
• AWS CloudTrail captures API calls and related events made by or on behalf of your AWS accountand delivers the log files to an Amazon S3 bucket that you specify. You can identify which usersand accounts called AWS, the source IP address from which the calls were made, and when the callsoccurred. For more information, see the AWS CloudTrail User Guide.
Topics• Monitoring AWS IoT SiteWise with Amazon CloudWatch Logs (p. 221)• Monitoring gateway logs (p. 223)• Monitoring AWS IoT SiteWise with Amazon CloudWatch metrics (p. 225)• Logging AWS IoT SiteWise API calls with AWS CloudTrail (p. 227)
Monitoring AWS IoT SiteWise with AmazonCloudWatch Logs
You can configure AWS IoT SiteWise to log information to CloudWatch Logs to monitor and troubleshootthe service.
When you use the AWS IoT SiteWise console, AWS IoT SiteWise creates a service-linked role that allowsthe service to log information on your behalf. If you don't use the AWS IoT SiteWise console, you mustcreate a service-linked role manually to receive logs. For more information, see Creating a service-linkedrole for AWS IoT SiteWise (p. 209).
By default, AWS IoT SiteWise doesn't log information to CloudWatch Logs. To enable logging, choose alogging level other than Disabled (OFF). AWS IoT SiteWise supports the following logging levels:
• OFF – Logging is disabled.• ERROR – Errors are logged.• INFO – Errors and informational messages are logged.
You can also configure gateways to log information to CloudWatch Logs through AWS IoT Greengrass.For more information, see Monitoring gateway logs (p. 223).
221
AWS IoT SiteWise User GuideManaging logging in AWS IoT SiteWise (console)
You can also configure AWS IoT Core to log information to CloudWatch Logs if you are troubleshootingan AWS IoT SiteWise rule action. For more information, see Troubleshooting an AWS IoT SiteWise ruleaction (p. 233).
Contents
• Managing logging in AWS IoT SiteWise (console) (p. 222)
• Finding your logging level (console) (p. 222)
• Changing your logging level (console) (p. 222)
• Managing logging in AWS IoT SiteWise (CLI) (p. 222)
• Finding your logging level (CLI) (p. 223)
• Changing your logging level (CLI) (p. 223)
• Example: AWS IoT SiteWise log file entries (p. 223)
Managing logging in AWS IoT SiteWise (console)You can use the AWS IoT SiteWise console for the following logging configuration tasks.
Topics
• Finding your logging level (console) (p. 222)
• Changing your logging level (console) (p. 222)
Finding your logging level (console)Use the following procedure to find your current logging level in the AWS IoT SiteWise console.
To find your current AWS IoT SiteWise logging level
1. Navigate to the AWS IoT SiteWise console.
2. In the left navigation pane, choose Logging options.
The current logging status appears under Logging status. If logging is enabled, the current logginglevel appears under Level of verbosity.
Changing your logging level (console)Use the following procedure to change your logging level in the AWS IoT SiteWise console.
To change your AWS IoT SiteWise logging level
1. Navigate to the AWS IoT SiteWise console.
2. In the left navigation pane, choose Logging options.
3. Choose Edit.
4. Choose the Level of verbosity to enable.
5. Choose Save.
Managing logging in AWS IoT SiteWise (CLI)You can use the AWS Command Line Interface (AWS CLI) for the following logging configuration tasks.
222
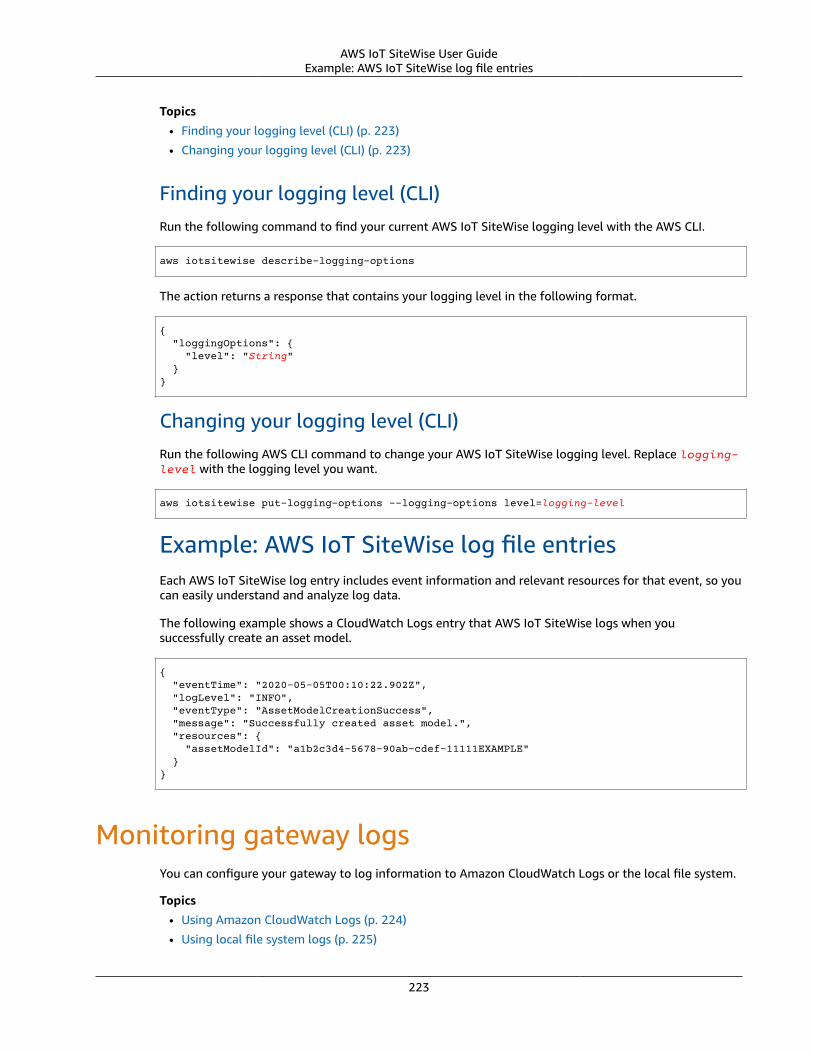
AWS IoT SiteWise User GuideExample: AWS IoT SiteWise log file entries
Topics
• Finding your logging level (CLI) (p. 223)
• Changing your logging level (CLI) (p. 223)
Finding your logging level (CLI)Run the following command to find your current AWS IoT SiteWise logging level with the AWS CLI.
aws iotsitewise describe-logging-options
The action returns a response that contains your logging level in the following format.
{ "loggingOptions": { "level": "String" }}
Changing your logging level (CLI)Run the following AWS CLI command to change your AWS IoT SiteWise logging level. Replace logging-level with the logging level you want.
aws iotsitewise put-logging-options --logging-options level=logging-level
Example: AWS IoT SiteWise log file entriesEach AWS IoT SiteWise log entry includes event information and relevant resources for that event, so youcan easily understand and analyze log data.
The following example shows a CloudWatch Logs entry that AWS IoT SiteWise logs when yousuccessfully create an asset model.
{ "eventTime": "2020-05-05T00:10:22.902Z", "logLevel": "INFO", "eventType": "AssetModelCreationSuccess", "message": "Successfully created asset model.", "resources": { "assetModelId": "a1b2c3d4-5678-90ab-cdef-11111EXAMPLE" }}
Monitoring gateway logsYou can configure your gateway to log information to Amazon CloudWatch Logs or the local file system.
Topics
• Using Amazon CloudWatch Logs (p. 224)
• Using local file system logs (p. 225)
223
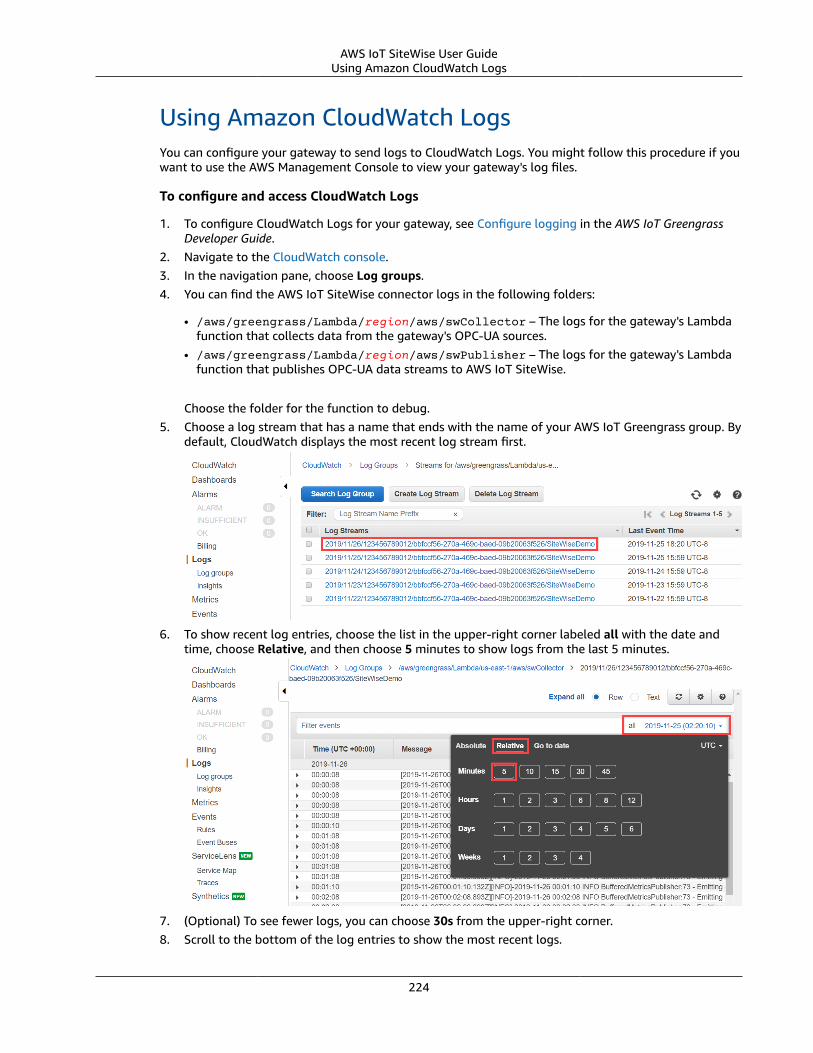
AWS IoT SiteWise User GuideUsing Amazon CloudWatch Logs
Using Amazon CloudWatch LogsYou can configure your gateway to send logs to CloudWatch Logs. You might follow this procedure if youwant to use the AWS Management Console to view your gateway's log files.
To configure and access CloudWatch Logs
1. To configure CloudWatch Logs for your gateway, see Configure logging in the AWS IoT GreengrassDeveloper Guide.
2. Navigate to the CloudWatch console.3. In the navigation pane, choose Log groups.4. You can find the AWS IoT SiteWise connector logs in the following folders:
• /aws/greengrass/Lambda/region/aws/swCollector – The logs for the gateway's Lambdafunction that collects data from the gateway's OPC-UA sources.
• /aws/greengrass/Lambda/region/aws/swPublisher – The logs for the gateway's Lambdafunction that publishes OPC-UA data streams to AWS IoT SiteWise.
Choose the folder for the function to debug.5. Choose a log stream that has a name that ends with the name of your AWS IoT Greengrass group. By
default, CloudWatch displays the most recent log stream first.
6. To show recent log entries, choose the list in the upper-right corner labeled all with the date andtime, choose Relative, and then choose 5 minutes to show logs from the last 5 minutes.
7. (Optional) To see fewer logs, you can choose 30s from the upper-right corner.8. Scroll to the bottom of the log entries to show the most recent logs.
224

AWS IoT SiteWise User GuideUsing local file system logs
Using local file system logsYou can configure your gateway to store logs locally. You might follow this procedure if you want to usethe command line or local software to view your gateway's log files.
To configure and access local file system logs
1. To configure local file system logs on your gateway, see Configure logging in the AWS IoT GreengrassDeveloper Guide.
NoteYou must have root permissions to read AWS IoT Greengrass logs on the file system.
2. On your gateway, run the following command to list all AWS IoT SiteWise connector log files andtheir file details.
sudo ls -l /greengrass-root/ggc/var/log/user/region/aws
You can find the most recent AWS IoT SiteWise connector logs in the following files:
• swCollector.log – The most recent logs for the Lambda function that collects data from thegateway's OPC-UA sources.
• swPublisher.log – The most recent logs for the Lambda function that publishes OPC-UA datastreams to AWS IoT SiteWise.
You can view older logs in the files named swCollector.log-timestamp andswPublisher.log-timestamp.
3. Run the following command to view the publisher log file contents, for example.
sudo tail -f swPublisher.log
The tail command shows the end of a file, and the -f option shows new lines as they're appendedto the file.
Monitoring AWS IoT SiteWise with AmazonCloudWatch metrics
You can monitor AWS IoT SiteWise using CloudWatch, which collects raw data and processes it intoreadable, near real-time metrics. These statistics are kept for 15 months, so that you can access historicalinformation and gain a better perspective on how your web application or service is performing. Youcan also set alarms that watch for certain thresholds, and send notifications or take actions when thosethresholds are met. For more information, see the Amazon CloudWatch User Guide.
AWS IoT SiteWise publishes the metrics and dimensions listed in the sections below to the AWS/IoTSiteWise namespace.
TipAWS IoT SiteWise publishes metrics on a one minute interval. When you view these metrics ingraphs in the CloudWatch console, we recommend that you choose a Period of 1 minute. Thislets you see the highest available resolution of your metric data.
Contents
225

AWS IoT SiteWise User GuideGateway metrics
• Gateway metrics (p. 226)
Gateway metricsAWS IoT SiteWise publishes the following gateway metrics. All gateway metrics are published on a oneminute interval.
ImportantTo receive gateway metrics, you must use at least version 6 of the AWS IoT SiteWise connectoron your gateway. For more information, see AWS IoT SiteWise connector in the AWS IoTGreengrass Developer Guide.
Gateway metrics
Metric Description
Gateway.Heartbeat Generated every minute for each gateway(gatewayId) connected.
Gateway.PublishSuccessCount The number of data points that a gateway(gatewayId) successfully published.
Gateway.PublishFailureCount The number of data points that a gateway(gatewayId) failed to publish.
This metric counts errors that resultfrom the gateway's calls to theBatchPutAssetPropertyValue operation. For moreinformation about troubleshooting gateways,see Troubleshooting an AWS IoT SiteWisegateway (p. 232).
Gateway.ProcessFailureCount The number of data points that a gateway(gatewayId) failed to process.
This metric count errors that occur betweenthe gateway and the gateway's sources,including errors reported by sources. For moreinformation about troubleshooting gateways,see Troubleshooting an AWS IoT SiteWisegateway (p. 232).
Gateway source metrics
Metric Description
OPCUACollector.Heartbeat Generated every minute for each OPC-UAsource (sourceName) connected to a gateway(gatewayId).
OPCUACollector.ActiveDataStreamCount The number of data streams that a gateway(gatewayId) subscribed to for an OPC-UA source(sourceName).
OPCUACollector.IncomingValuesCount The number of data points that a gateway(gatewayId) received for an OPC-UA source(sourceName).
226
AWS IoT SiteWise User GuideLogging API calls with AWS CloudTrail
Logging AWS IoT SiteWise API calls with AWSCloudTrail
AWS IoT SiteWise is integrated with AWS CloudTrail, a service that provides a record of actions taken bya user, role, or an AWS service in AWS IoT SiteWise. CloudTrail captures API calls for AWS IoT SiteWise asevents. The calls captured include calls from the AWS IoT SiteWise console and code calls to the AWS IoTSiteWise API operations. If you create a trail, you can enable continuous delivery of CloudTrail events toan Amazon S3 bucket, including events for AWS IoT SiteWise. If you don't configure a trail, you can stillview the most recent events in the CloudTrail console in Event history. Using the information collectedby CloudTrail, you can determine the request that was made to AWS IoT SiteWise, the IP address fromwhich the request was made, who made the request, when it was made, and additional details.
For more information about CloudTrail, see the AWS CloudTrail User Guide.
AWS IoT SiteWise information in CloudTrailCloudTrail is enabled on your AWS account when you create the account. When supported event activityoccurs in AWS IoT SiteWise, that activity is recorded in a CloudTrail event along with other AWS serviceevents in Event history. You can view, search, and download recent events in your AWS account. Formore information, see Viewing events with CloudTrail event history.
For an ongoing record of events in your AWS account, including events for AWS IoT SiteWise, create atrail. A trail enables CloudTrail to deliver log files to an Amazon S3 bucket. By default, when you createa trail in the console, the trail applies to all AWS Regions. The trail logs events from all Regions in theAWS partition and delivers the log files to the Amazon S3 bucket that you specify. Additionally, you canconfigure other AWS services to further analyze and act upon the event data collected in CloudTrail logs.For more information, see the following:
• Overview for creating a trail
• CloudTrail supported services and integrations
• Configuring Amazon SNS notifications for CloudTrail
• Receiving CloudTrail log files from multiple Regions and Receiving CloudTrail log files from multipleaccounts
Most AWS IoT SiteWise actions are logged by CloudTrail and are documented in the AWS IoT SiteWiseAPI Reference.
The following data plane actions aren't logged by CloudTrail:
• BatchPutAssetPropertyValue
• GetAssetPropertyValue
• GetAssetPropertyValueHistory
• GetAssetPropertyAggregates
Every event or log entry contains information about who generated the request. The identityinformation helps you determine the following:
• Whether the request was made with root or AWS Identity and Access Management (IAM) usercredentials.
• Whether the request was made with temporary security credentials for a role or federated user.
• Whether the request was made by another AWS service.
227
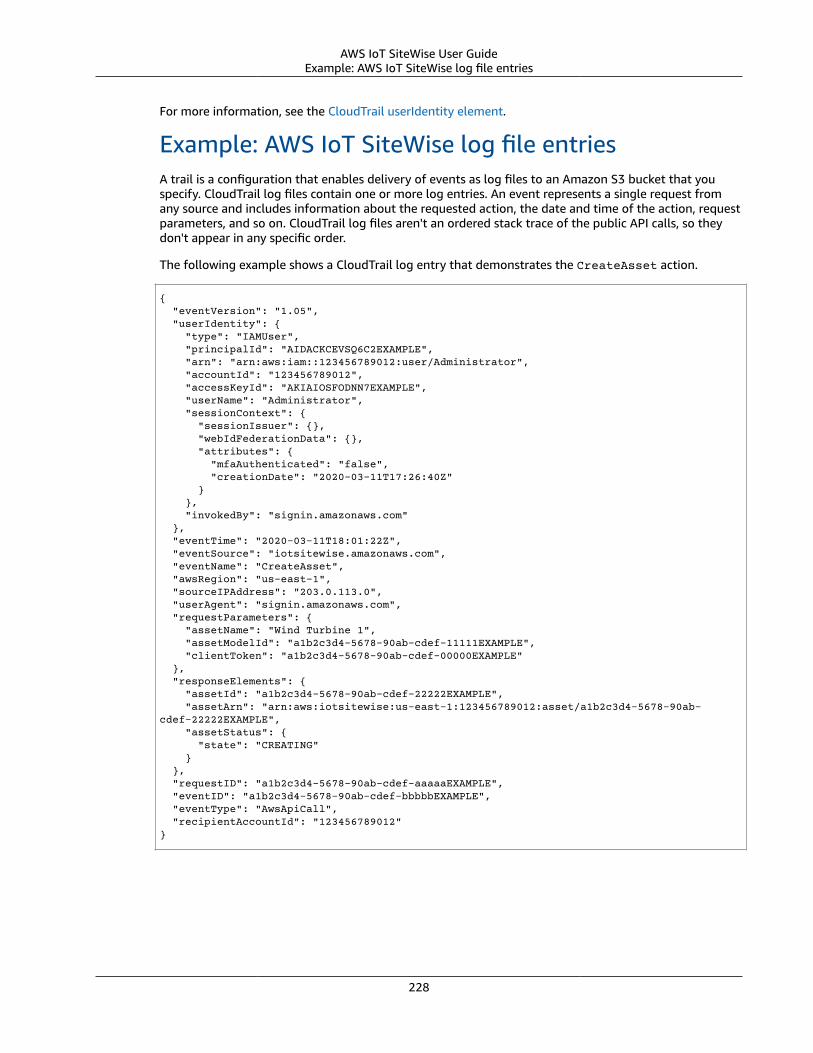
AWS IoT SiteWise User GuideExample: AWS IoT SiteWise log file entries
For more information, see the CloudTrail userIdentity element.
Example: AWS IoT SiteWise log file entriesA trail is a configuration that enables delivery of events as log files to an Amazon S3 bucket that youspecify. CloudTrail log files contain one or more log entries. An event represents a single request fromany source and includes information about the requested action, the date and time of the action, requestparameters, and so on. CloudTrail log files aren't an ordered stack trace of the public API calls, so theydon't appear in any specific order.
The following example shows a CloudTrail log entry that demonstrates the CreateAsset action.
{ "eventVersion": "1.05", "userIdentity": { "type": "IAMUser", "principalId": "AIDACKCEVSQ6C2EXAMPLE", "arn": "arn:aws:iam::123456789012:user/Administrator", "accountId": "123456789012", "accessKeyId": "AKIAIOSFODNN7EXAMPLE", "userName": "Administrator", "sessionContext": { "sessionIssuer": {}, "webIdFederationData": {}, "attributes": { "mfaAuthenticated": "false", "creationDate": "2020-03-11T17:26:40Z" } }, "invokedBy": "signin.amazonaws.com" }, "eventTime": "2020-03-11T18:01:22Z", "eventSource": "iotsitewise.amazonaws.com", "eventName": "CreateAsset", "awsRegion": "us-east-1", "sourceIPAddress": "203.0.113.0", "userAgent": "signin.amazonaws.com", "requestParameters": { "assetName": "Wind Turbine 1", "assetModelId": "a1b2c3d4-5678-90ab-cdef-11111EXAMPLE", "clientToken": "a1b2c3d4-5678-90ab-cdef-00000EXAMPLE" }, "responseElements": { "assetId": "a1b2c3d4-5678-90ab-cdef-22222EXAMPLE", "assetArn": "arn:aws:iotsitewise:us-east-1:123456789012:asset/a1b2c3d4-5678-90ab-cdef-22222EXAMPLE", "assetStatus": { "state": "CREATING" } }, "requestID": "a1b2c3d4-5678-90ab-cdef-aaaaaEXAMPLE", "eventID": "a1b2c3d4-5678-90ab-cdef-bbbbbEXAMPLE", "eventType": "AwsApiCall", "recipientAccountId": "123456789012"}
228
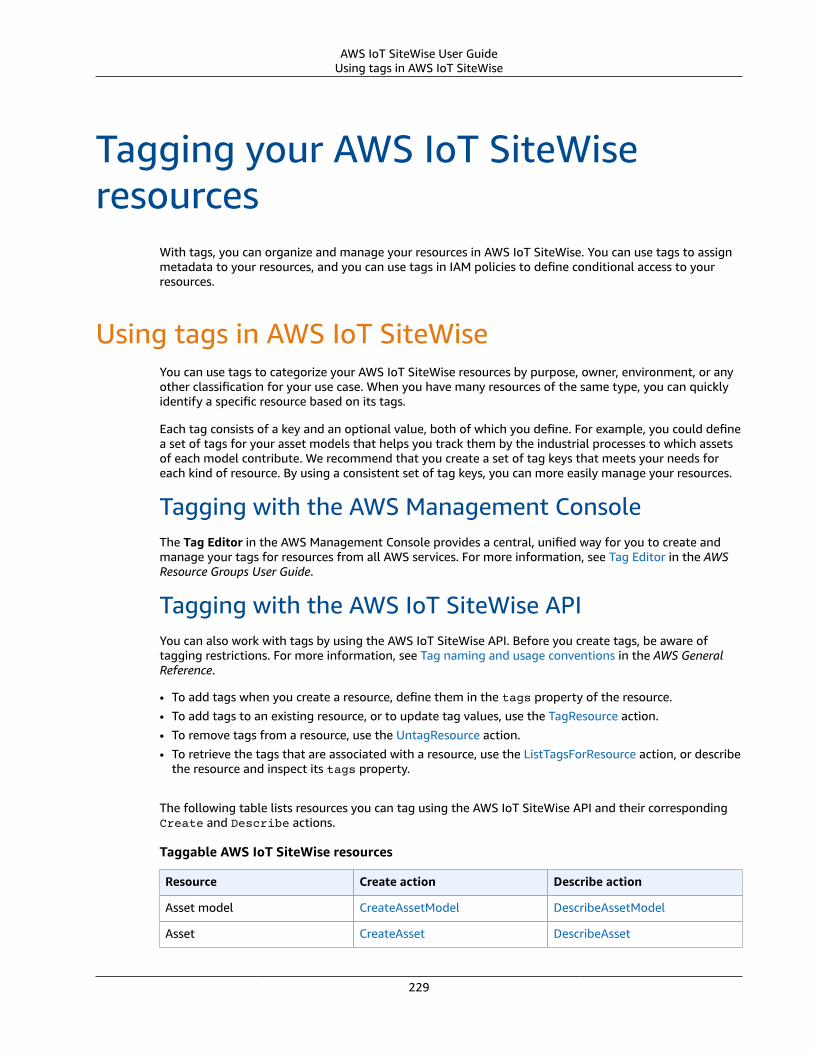
AWS IoT SiteWise User GuideUsing tags in AWS IoT SiteWise
Tagging your AWS IoT SiteWiseresources
With tags, you can organize and manage your resources in AWS IoT SiteWise. You can use tags to assignmetadata to your resources, and you can use tags in IAM policies to define conditional access to yourresources.
Using tags in AWS IoT SiteWiseYou can use tags to categorize your AWS IoT SiteWise resources by purpose, owner, environment, or anyother classification for your use case. When you have many resources of the same type, you can quicklyidentify a specific resource based on its tags.
Each tag consists of a key and an optional value, both of which you define. For example, you could definea set of tags for your asset models that helps you track them by the industrial processes to which assetsof each model contribute. We recommend that you create a set of tag keys that meets your needs foreach kind of resource. By using a consistent set of tag keys, you can more easily manage your resources.
Tagging with the AWS Management ConsoleThe Tag Editor in the AWS Management Console provides a central, unified way for you to create andmanage your tags for resources from all AWS services. For more information, see Tag Editor in the AWSResource Groups User Guide.
Tagging with the AWS IoT SiteWise APIYou can also work with tags by using the AWS IoT SiteWise API. Before you create tags, be aware oftagging restrictions. For more information, see Tag naming and usage conventions in the AWS GeneralReference.
• To add tags when you create a resource, define them in the tags property of the resource.• To add tags to an existing resource, or to update tag values, use the TagResource action.• To remove tags from a resource, use the UntagResource action.• To retrieve the tags that are associated with a resource, use the ListTagsForResource action, or describe
the resource and inspect its tags property.
The following table lists resources you can tag using the AWS IoT SiteWise API and their correspondingCreate and Describe actions.
Taggable AWS IoT SiteWise resources
Resource Create action Describe action
Asset model CreateAssetModel DescribeAssetModel
Asset CreateAsset DescribeAsset
229
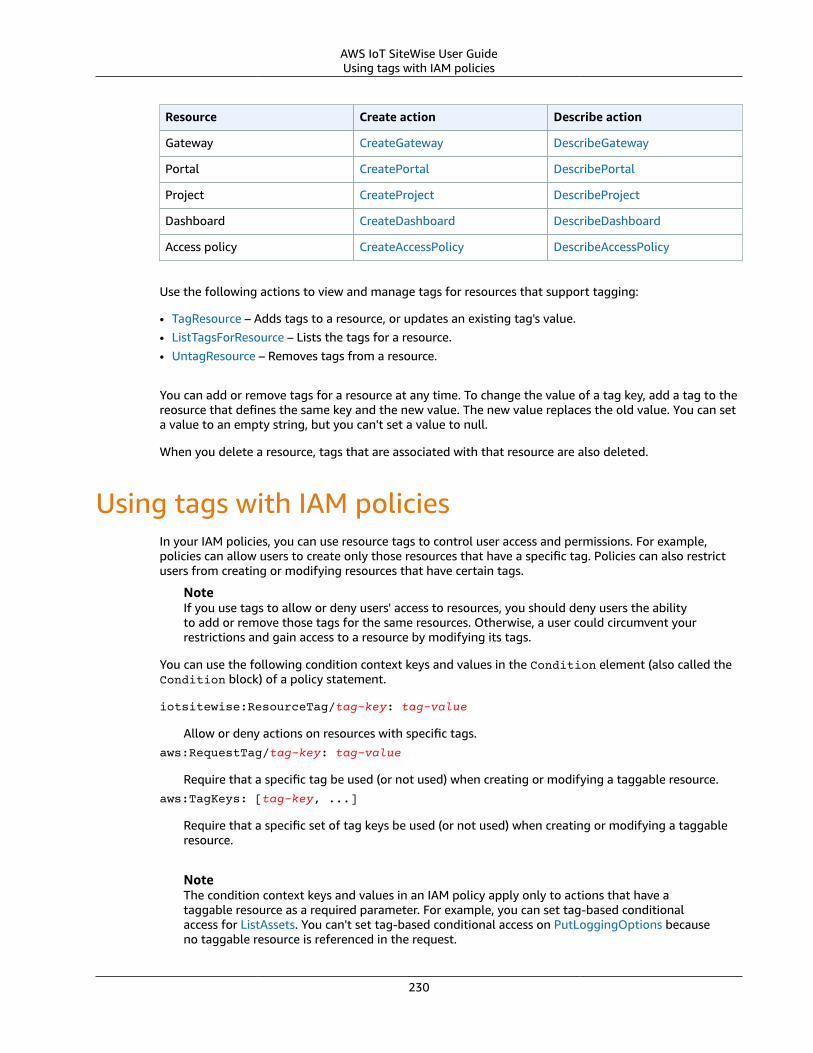
AWS IoT SiteWise User GuideUsing tags with IAM policies
Resource Create action Describe action
Gateway CreateGateway DescribeGateway
Portal CreatePortal DescribePortal
Project CreateProject DescribeProject
Dashboard CreateDashboard DescribeDashboard
Access policy CreateAccessPolicy DescribeAccessPolicy
Use the following actions to view and manage tags for resources that support tagging:
• TagResource – Adds tags to a resource, or updates an existing tag's value.• ListTagsForResource – Lists the tags for a resource.• UntagResource – Removes tags from a resource.
You can add or remove tags for a resource at any time. To change the value of a tag key, add a tag to thereosurce that defines the same key and the new value. The new value replaces the old value. You can seta value to an empty string, but you can't set a value to null.
When you delete a resource, tags that are associated with that resource are also deleted.
Using tags with IAM policiesIn your IAM policies, you can use resource tags to control user access and permissions. For example,policies can allow users to create only those resources that have a specific tag. Policies can also restrictusers from creating or modifying resources that have certain tags.
NoteIf you use tags to allow or deny users' access to resources, you should deny users the abilityto add or remove those tags for the same resources. Otherwise, a user could circumvent yourrestrictions and gain access to a resource by modifying its tags.
You can use the following condition context keys and values in the Condition element (also called theCondition block) of a policy statement.
iotsitewise:ResourceTag/tag-key: tag-value
Allow or deny actions on resources with specific tags.aws:RequestTag/tag-key: tag-value
Require that a specific tag be used (or not used) when creating or modifying a taggable resource.aws:TagKeys: [tag-key, ...]
Require that a specific set of tag keys be used (or not used) when creating or modifying a taggableresource.
NoteThe condition context keys and values in an IAM policy apply only to actions that have ataggable resource as a required parameter. For example, you can set tag-based conditionalaccess for ListAssets. You can't set tag-based conditional access on PutLoggingOptions becauseno taggable resource is referenced in the request.
230

AWS IoT SiteWise User GuideUsing tags with IAM policies
For more information, see Controlling access to AWS resources using resource tags and IAM JSON policyreference in the IAM User Guide.
Example IAM policies using tags
• Viewing AWS IoT SiteWise assets based on tags (p. 207)
231
AWS IoT SiteWise User GuideTroubleshooting an AWS IoT SiteWise gateway
Troubleshooting AWS IoT SiteWiseFollow the steps in this section to help troubleshoot and resolve issues with AWS IoT SiteWise.
Contents• Troubleshooting an AWS IoT SiteWise gateway (p. 232)
• Configuring and accessing AWS IoT SiteWise gateway logs (p. 232)• AWS IoT SiteWise doesn't receive data from OPC-UA servers (p. 233)• Common AWS IoT Greengrass issues (p. 233)
• Troubleshooting an AWS IoT SiteWise rule action (p. 233)• Configuring AWS IoT Core logs (p. 234)• Configuring a republish error action (p. 234)• Error: Member must be within 900 seconds before and 300 seconds after the current
timestamp (p. 236)• Error: Property value does not match data type <type> (p. 236)• Error: User: <role-arn> is not authorized to perform:
iotsitewise:BatchPutAssetPropertyValue on resource (p. 236)• Error: iot.amazonaws.com is unable to perform: sts:AssumeRole on resource: <role-
arn> (p. 236)• Info: No requests were sent. PutAssetPropertyValueEntries was empty after performing
substitution templates. (p. 237)
Troubleshooting an AWS IoT SiteWise gatewayAWS IoT SiteWise gateways run an AWS IoT Greengrass connector. You can configure your gateway to logconnector events to CloudWatch and to your gateway's local filesystem. Then, you can view the log filesassociated with the connector to troubleshoot your gateway.
You can also view CloudWatch metrics reported by your gateways to troubleshoot issues withconnectivity or data streams. For more information, see Gateway metrics (p. 226).
Topics• Configuring and accessing AWS IoT SiteWise gateway logs (p. 232)• AWS IoT SiteWise doesn't receive data from OPC-UA servers (p. 233)• Common AWS IoT Greengrass issues (p. 233)
Configuring and accessing AWS IoT SiteWise gatewaylogsBefore you can view gateway logs, you must configure your gateway to send logs to Amazon CloudWatchLogs or store logs on the local file system.
• Use CloudWatch Logs if you want to use the AWS Management Console to view your gateway's logfiles. For more information, see Using Amazon CloudWatch Logs (p. 224).
• Use local file system logs if you want to use the command line or local software to view your gateway'slog files. For more information, see Using local file system logs (p. 225).
232
AWS IoT SiteWise User GuideAWS IoT SiteWise doesn't receive
data from OPC-UA servers
AWS IoT SiteWise doesn't receive data from OPC-UAserversIf your AWS IoT SiteWise assets aren't receiving data sent by your OPC-UA servers, you can search yourgateway's logs to troubleshoot issues. Issues can include any of the following:
• Incorrect property aliases. If your asset's property aliases don't exactly match your OPC-UA datastreams, including any source prefix you defined, then AWS IoT SiteWise won't receive data for thoseasset properties.
In the gateway logs, look for WARN level log entries that contain a ResourceNotFoundException. Inthese entries, you can find text such as alias=/company/windfarm/3/turbine/7/temperatureto discover any data streams not received by AWS IoT SiteWise.
• Incorrect data types. If your asset's property data types don't match your OPC-UA data types, thenAWS IoT SiteWise won't receive data for those asset properties. For example, if an OPC-UA stream hasan integer data type, your corresponding asset property must be INTEGER data type. A DOUBLE-typeasset property won't receive OPC-UA integer streams.
• Incorrect AWS IoT Greengrass role permissions. Verify that your gateway configuration meets all of theAWS IoT SiteWise connector requirements.
• Exceeding AWS IoT SiteWise service quotas. If your large or complex AWS IoT SiteWise operation isn'treceiving all of your expected data, review the AWS IoT SiteWise quotas (p. 238) and verify that yoursetup doesn't exceed any service quotas.
Common AWS IoT Greengrass issuesTo find solutions to many issues configuring or deploying your gateway on AWS IoT Greengrass, seeTroubleshooting AWS IoT Greengrass in the AWS IoT Greengrass Developer Guide.
Troubleshooting an AWS IoT SiteWise rule actionTo troubleshoot your AWS IoT SiteWise rule action in AWS IoT Core, you can do one of the followingprocedures:
• Configure CloudWatch Logs• Configure a republish error action for your rule
Next, compare the error messages with the errors in this topic to troubleshoot your issue.
Topics• Configuring AWS IoT Core logs (p. 234)• Configuring a republish error action (p. 234)• Error: Member must be within 900 seconds before and 300 seconds after the current
timestamp (p. 236)• Error: Property value does not match data type <type> (p. 236)• Error: User: <role-arn> is not authorized to perform: iotsitewise:BatchPutAssetPropertyValue on
resource (p. 236)• Error: iot.amazonaws.com is unable to perform: sts:AssumeRole on resource: <role-arn> (p. 236)• Info: No requests were sent. PutAssetPropertyValueEntries was empty after performing substitution
templates. (p. 237)
233
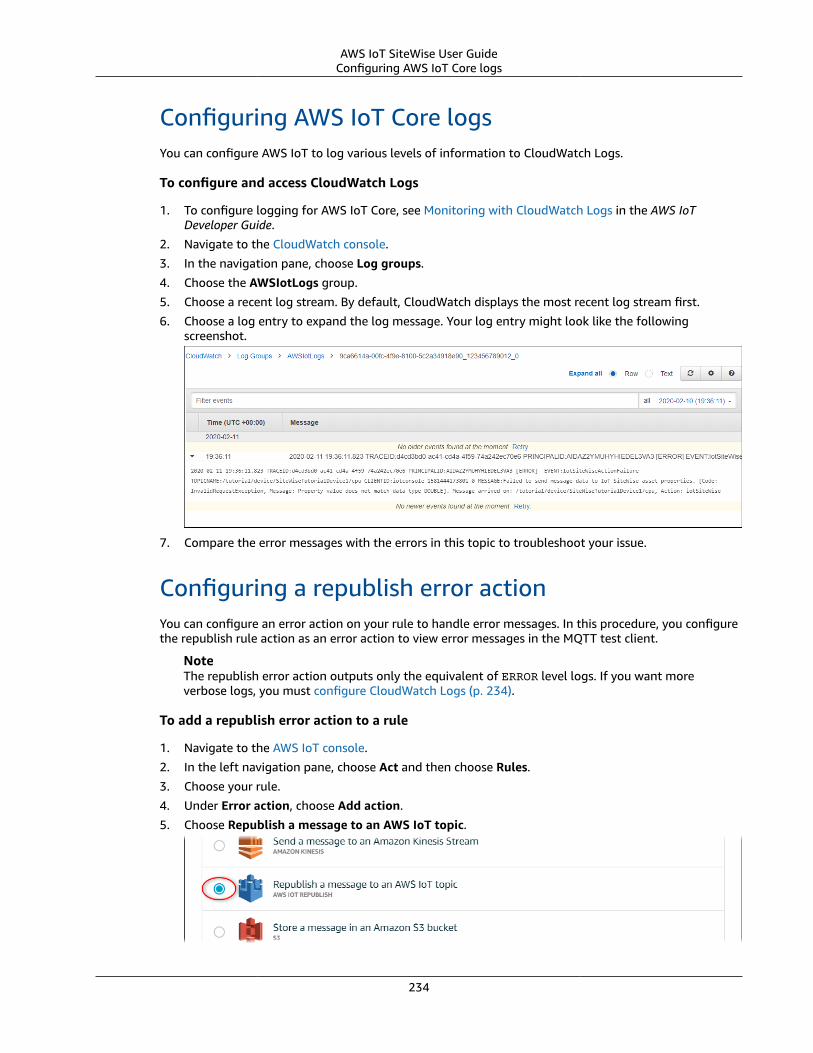
AWS IoT SiteWise User GuideConfiguring AWS IoT Core logs
Configuring AWS IoT Core logsYou can configure AWS IoT to log various levels of information to CloudWatch Logs.
To configure and access CloudWatch Logs
1. To configure logging for AWS IoT Core, see Monitoring with CloudWatch Logs in the AWS IoTDeveloper Guide.
2. Navigate to the CloudWatch console.
3. In the navigation pane, choose Log groups.
4. Choose the AWSIotLogs group.
5. Choose a recent log stream. By default, CloudWatch displays the most recent log stream first.
6. Choose a log entry to expand the log message. Your log entry might look like the followingscreenshot.
7. Compare the error messages with the errors in this topic to troubleshoot your issue.
Configuring a republish error actionYou can configure an error action on your rule to handle error messages. In this procedure, you configurethe republish rule action as an error action to view error messages in the MQTT test client.
NoteThe republish error action outputs only the equivalent of ERROR level logs. If you want moreverbose logs, you must configure CloudWatch Logs (p. 234).
To add a republish error action to a rule
1. Navigate to the AWS IoT console.
2. In the left navigation pane, choose Act and then choose Rules.
3. Choose your rule.
4. Under Error action, choose Add action.
5. Choose Republish a message to an AWS IoT topic.
234
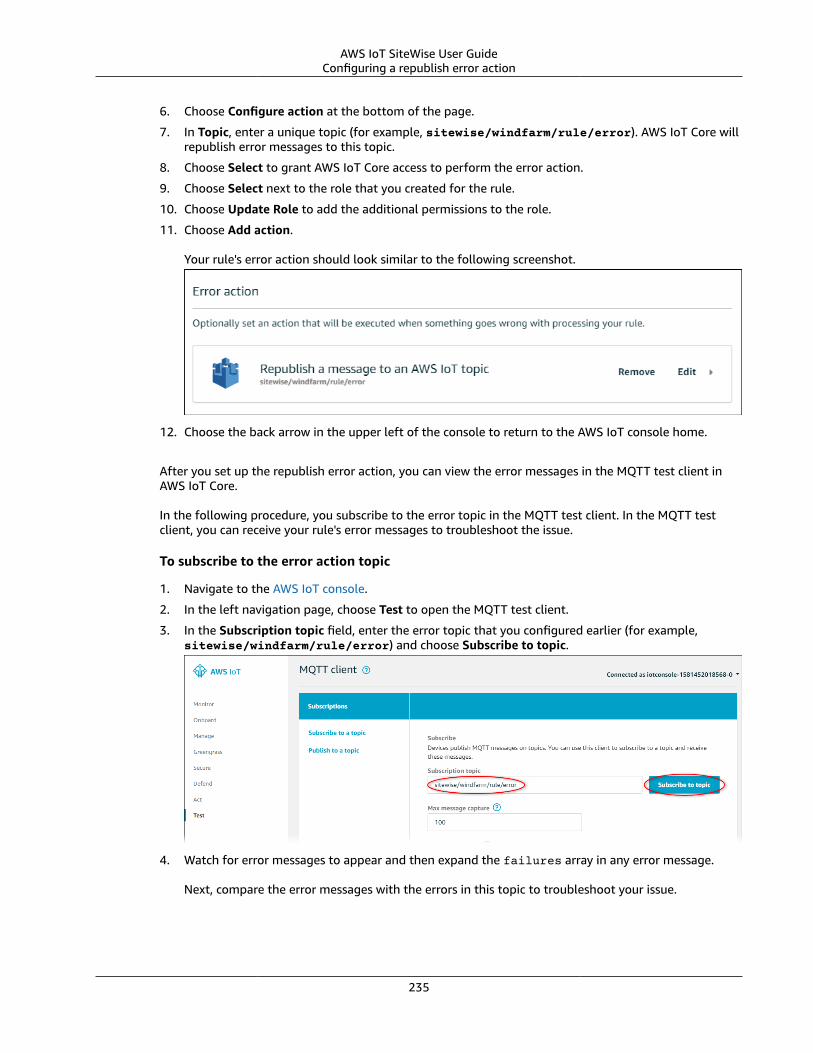
AWS IoT SiteWise User GuideConfiguring a republish error action
6. Choose Configure action at the bottom of the page.
7. In Topic, enter a unique topic (for example, sitewise/windfarm/rule/error). AWS IoT Core willrepublish error messages to this topic.
8. Choose Select to grant AWS IoT Core access to perform the error action.
9. Choose Select next to the role that you created for the rule.
10. Choose Update Role to add the additional permissions to the role.
11. Choose Add action.
Your rule's error action should look similar to the following screenshot.
12. Choose the back arrow in the upper left of the console to return to the AWS IoT console home.
After you set up the republish error action, you can view the error messages in the MQTT test client inAWS IoT Core.
In the following procedure, you subscribe to the error topic in the MQTT test client. In the MQTT testclient, you can receive your rule's error messages to troubleshoot the issue.
To subscribe to the error action topic
1. Navigate to the AWS IoT console.
2. In the left navigation page, choose Test to open the MQTT test client.
3. In the Subscription topic field, enter the error topic that you configured earlier (for example,sitewise/windfarm/rule/error) and choose Subscribe to topic.
4. Watch for error messages to appear and then expand the failures array in any error message.
Next, compare the error messages with the errors in this topic to troubleshoot your issue.
235
AWS IoT SiteWise User GuideError: Member must be within 900 seconds before
and 300 seconds after the current timestamp
Error: Member must be within 900 seconds beforeand 300 seconds after the current timestampYour timestamp is older than 15 minutes or newer than 5 minutes, compared to current Unix epoch time.Try the following:
• Check that your timestamp is in Unix epoch (UTC) time. If you provide a timestamp with a differenttimezone, you encounter this error.
• Check that your timestamp is in seconds. AWS IoT SiteWise expects timestamps split into time inseconds (in Unix epoch time) and offset in nanoseconds.
• Check that you're uploading data that is timestamped no later than 15 minutes in the past.
Error: Property value does not match data type<type>An entry in your rule action has a different data type than the target asset property. For example, yourtarget asset property is a DOUBLE and your selected data type is Integer or you passed the value inintegerValue. Try the following:
• If you configure the rule from the AWS IoT console, check that each entry has the correct Data typechosen.
• If you configure the rule from the API or AWS CLI, check that your value object uses the correct typefield (for example, doubleValue for a DOUBLE property).
Error: User: <role-arn> is not authorized to perform:iotsitewise:BatchPutAssetPropertyValue on resourceYour rule isn't authorized to access the target asset property, or the target asset property doesn't exist.Try the following:
• Check that your property alias is correct and that you have an asset property with the given propertyalias. For more information, see Mapping industrial data streams to asset properties (p. 151).
• Check that your rule has a role and that the role allowsiotsitewise:BatchPutAssetPropertyValue permission to the targeted asset property, suchas through the target asset's hierarchy. For more information, see Granting AWS IoT the requiredaccess (p. 129).
Error: iot.amazonaws.com is unable to perform:sts:AssumeRole on resource: <role-arn>Your IAM user isn't authorized to assume the role on your rule.
Check that your IAM user is allowed iam:PassRole permission to the role on your rule. For moreinformation, see Pass role permissions in the AWS IoT Developer Guide.
236
AWS IoT SiteWise User GuideInfo: No requests were sent. PutAssetPropertyValueEntries
was empty after performing substitution templates.
Info: No requests were sent.PutAssetPropertyValueEntries was empty afterperforming substitution templates.
NoteThis message is an INFO level log.
Your request doesn't have at least one entry with all of the required parameters.
Check that your rule's parameters, including substitution templates, result in non-empty values.Substitution templates can't access values defined in AS clauses in your rule query statement. For moreinformation, see Substitution templates in the AWS IoT Developer Guide.
237
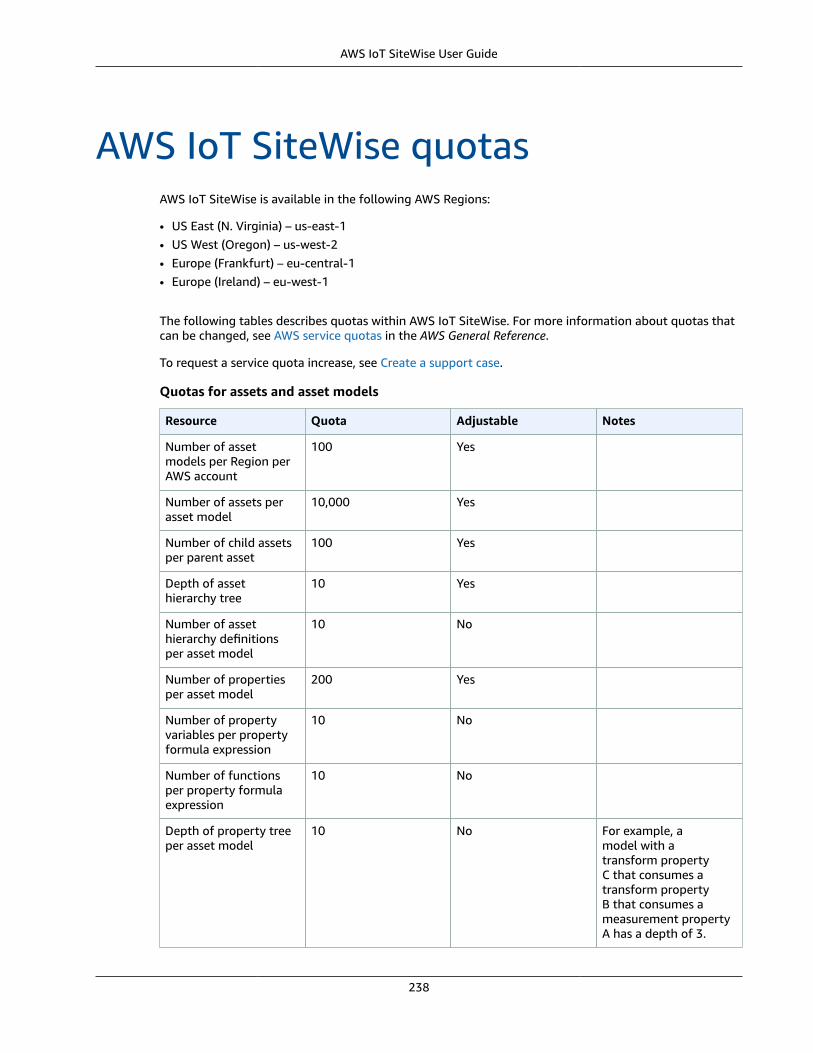
AWS IoT SiteWise User Guide
AWS IoT SiteWise quotasAWS IoT SiteWise is available in the following AWS Regions:
• US East (N. Virginia) – us-east-1• US West (Oregon) – us-west-2• Europe (Frankfurt) – eu-central-1• Europe (Ireland) – eu-west-1
The following tables describes quotas within AWS IoT SiteWise. For more information about quotas thatcan be changed, see AWS service quotas in the AWS General Reference.
To request a service quota increase, see Create a support case.
Quotas for assets and asset models
Resource Quota Adjustable Notes
Number of assetmodels per Region perAWS account
100 Yes
Number of assets perasset model
10,000 Yes
Number of child assetsper parent asset
100 Yes
Depth of assethierarchy tree
10 Yes
Number of assethierarchy definitionsper asset model
10 No
Number of propertiesper asset model
200 Yes
Number of propertyvariables per propertyformula expression
10 No
Number of functionsper property formulaexpression
10 No
Depth of property treeper asset model
10 No For example, amodel with atransform propertyC that consumes atransform propertyB that consumes ameasurement propertyA has a depth of 3.
238
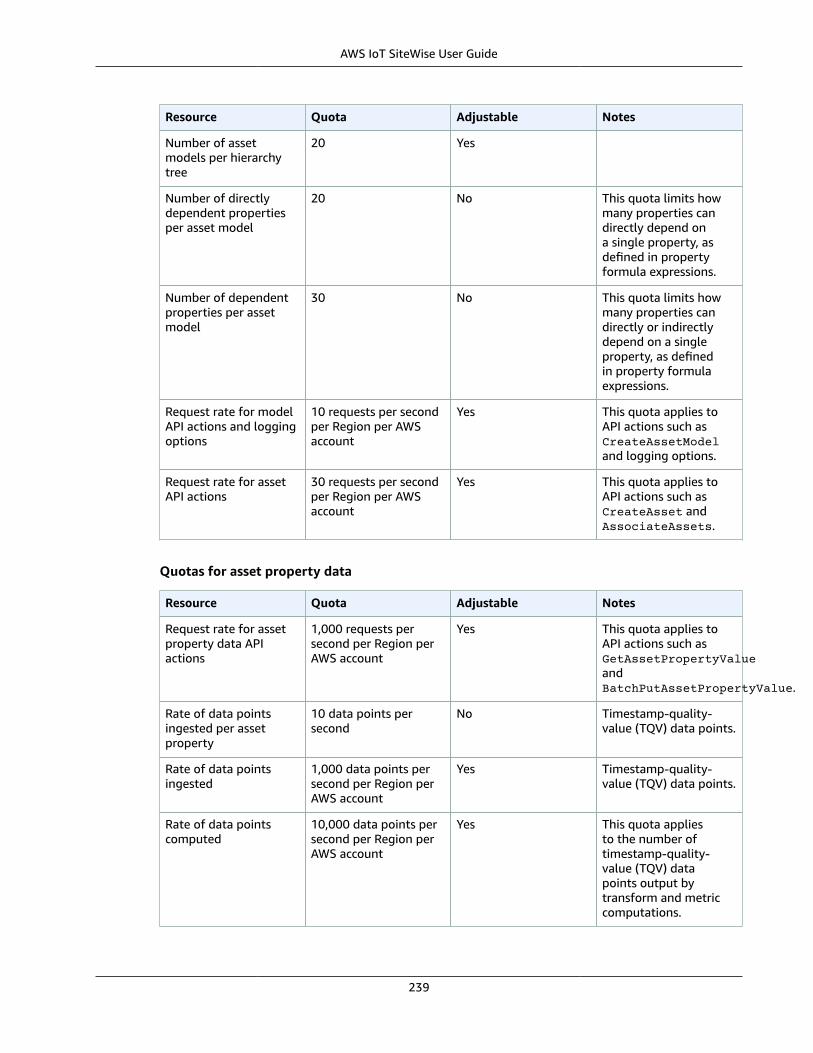
AWS IoT SiteWise User Guide
Resource Quota Adjustable Notes
Number of assetmodels per hierarchytree
20 Yes
Number of directlydependent propertiesper asset model
20 No This quota limits howmany properties candirectly depend ona single property, asdefined in propertyformula expressions.
Number of dependentproperties per assetmodel
30 No This quota limits howmany properties candirectly or indirectlydepend on a singleproperty, as definedin property formulaexpressions.
Request rate for modelAPI actions and loggingoptions
10 requests per secondper Region per AWSaccount
Yes This quota applies toAPI actions such asCreateAssetModeland logging options.
Request rate for assetAPI actions
30 requests per secondper Region per AWSaccount
Yes This quota applies toAPI actions such asCreateAsset andAssociateAssets.
Quotas for asset property data
Resource Quota Adjustable Notes
Request rate for assetproperty data APIactions
1,000 requests persecond per Region perAWS account
Yes This quota applies toAPI actions such asGetAssetPropertyValueandBatchPutAssetPropertyValue.
Rate of data pointsingested per assetproperty
10 data points persecond
No Timestamp-quality-value (TQV) data points.
Rate of data pointsingested
1,000 data points persecond per Region perAWS account
Yes Timestamp-quality-value (TQV) data points.
Rate of data pointscomputed
10,000 data points persecond per Region perAWS account
Yes This quota appliesto the number oftimestamp-quality-value (TQV) datapoints output bytransform and metriccomputations.
239
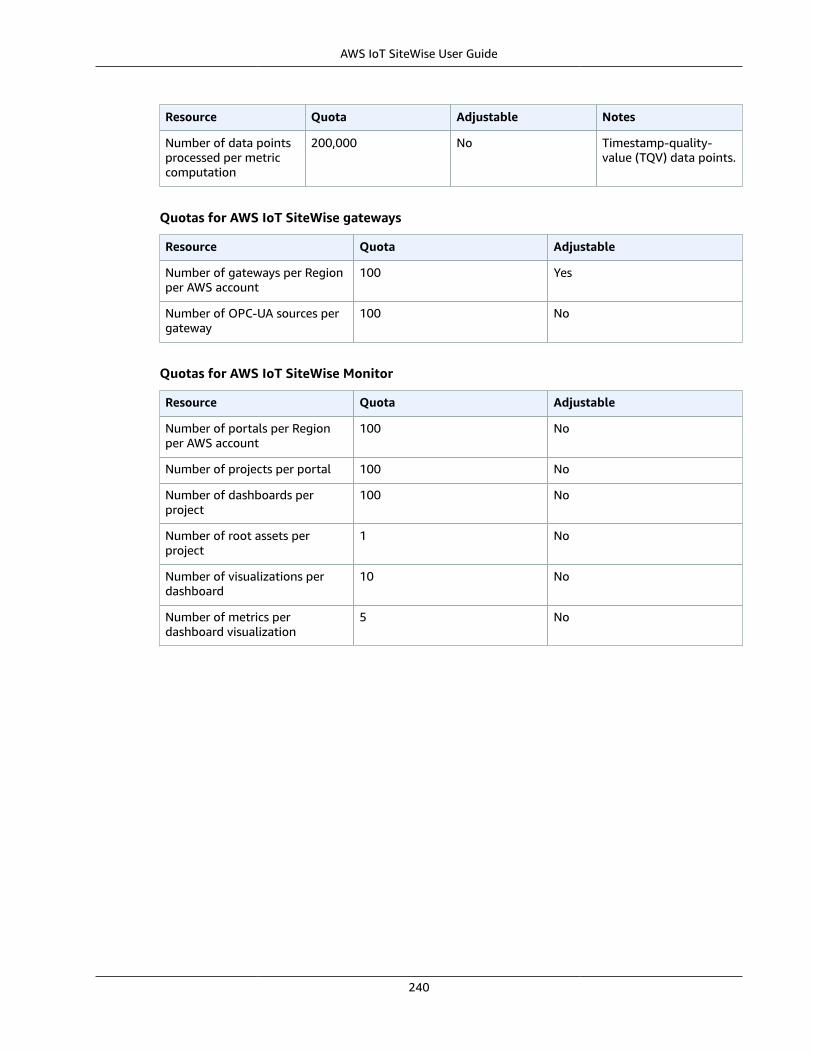
AWS IoT SiteWise User Guide
Resource Quota Adjustable Notes
Number of data pointsprocessed per metriccomputation
200,000 No Timestamp-quality-value (TQV) data points.
Quotas for AWS IoT SiteWise gateways
Resource Quota Adjustable
Number of gateways per Regionper AWS account
100 Yes
Number of OPC-UA sources pergateway
100 No
Quotas for AWS IoT SiteWise Monitor
Resource Quota Adjustable
Number of portals per Regionper AWS account
100 No
Number of projects per portal 100 No
Number of dashboards perproject
100 No
Number of root assets perproject
1 No
Number of visualizations perdashboard
10 No
Number of metrics perdashboard visualization
5 No
240
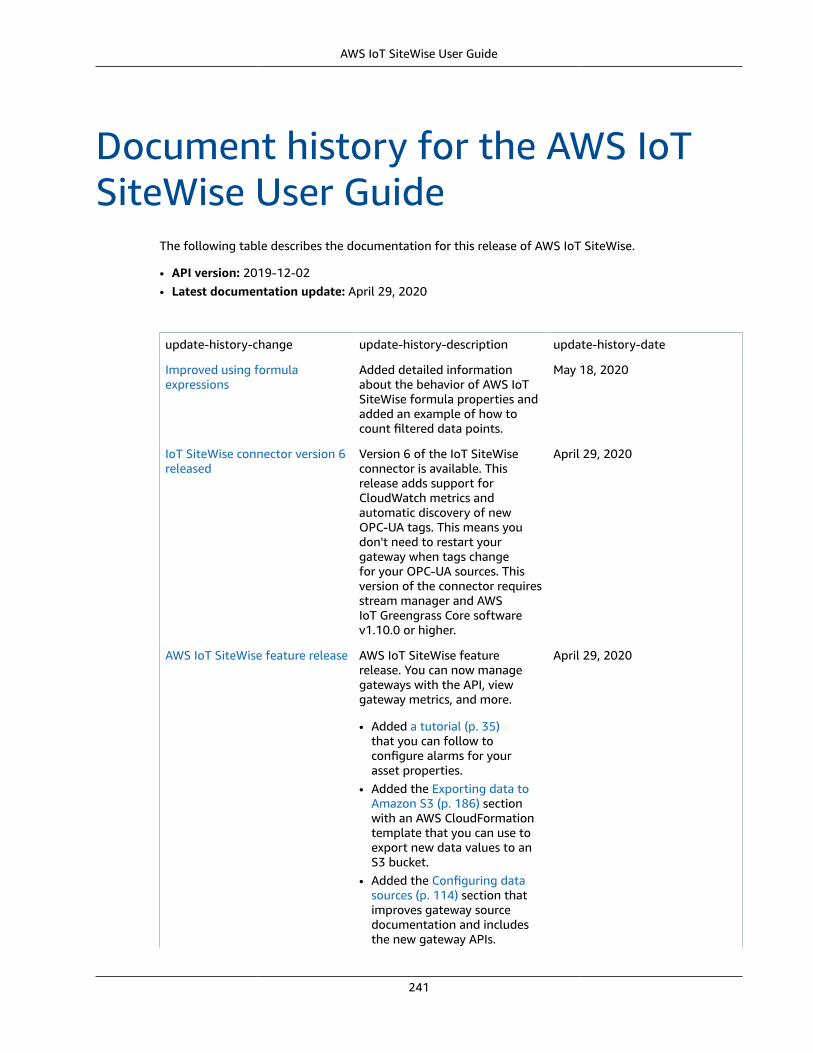
AWS IoT SiteWise User Guide
Document history for the AWS IoTSiteWise User Guide
The following table describes the documentation for this release of AWS IoT SiteWise.
• API version: 2019-12-02• Latest documentation update: April 29, 2020
update-history-change update-history-description update-history-date
Improved using formulaexpressions
Added detailed informationabout the behavior of AWS IoTSiteWise formula properties andadded an example of how tocount filtered data points.
May 18, 2020
IoT SiteWise connector version 6released
Version 6 of the IoT SiteWiseconnector is available. Thisrelease adds support forCloudWatch metrics andautomatic discovery of newOPC-UA tags. This means youdon't need to restart yourgateway when tags changefor your OPC-UA sources. Thisversion of the connector requiresstream manager and AWSIoT Greengrass Core softwarev1.10.0 or higher.
April 29, 2020
AWS IoT SiteWise feature release AWS IoT SiteWise featurerelease. You can now managegateways with the API, viewgateway metrics, and more.
• Added a tutorial (p. 35)that you can follow toconfigure alarms for yourasset properties.
• Added the Exporting data toAmazon S3 (p. 186) sectionwith an AWS CloudFormationtemplate that you can use toexport new data values to anS3 bucket.
• Added the Configuring datasources (p. 114) section thatimproves gateway sourcedocumentation and includesthe new gateway APIs.
April 29, 2020
241
AWS IoT SiteWise User Guide
• Added the gatewaymetrics (p. 226) section thatdescribes the CloudWatchmetrics that gateways publish.
• Added the Configuringa gateway on AmazonEC2 (p. 113) section withan AWS CloudFormationtemplate that you can use toquickly configure gatewaydependencies on an AmazonEC2 instance.
• Added the portal serviceroles (p. 210) section thatdescribes the new permissionsfeature of SiteWise Monitorportals.
• Added the Tagging your AWSIoT SiteWise resources (p. 229)section.
• Updated the Creatingdashboards (CLI) (p. 175)section for the new dashboarddefinition structure.
• Added the Security (p. 192)section.
Ingesting data from AWS IoTEvents
Added information about how toingest data from AWS IoT Eventswhen an event occurs.
April 20, 2020
Visualizing and sharing windfarm data in SiteWise Monitortutorial
Added a tutorial that you canfollow to learn how to use AWSIoT SiteWise Monitor to visualizeand share asset data.
March 12, 2020
Configuring a rule that parsestimestamp strings
Added information about howto create a rule that parsestimestamp strings into thetimestamp format expected byAWS IoT SiteWise.
March 12, 2020
AWS IoT SiteWise concepts Added a glossary of AWS IoTSiteWise concepts that you canuse to learn about the serviceand its common terms.
March 5, 2020
Removed AWS IoTGreengrass installationinstructions (p. 241)
Removed the AWS IoTGreengrass Core softwareinstallation instructions fromthe AWS IoT SiteWise UserGuide. The AWS IoT GreengrassDeveloper Guide offers a devicesetup script and instructions toset up AWS IoT Greengrass onother platforms such as AmazonEC2 and Docker.
February 14, 2020
242
AWS IoT SiteWise User Guide
Improved ingesting data usingAWS IoT Core rules
Added detailed informationabout how to use and howto troubleshoot the AWS IoTSiteWise rule action, which youcan use to ingest data fromMQTT messages through AWSIoT Core.
February 14, 2020
IoT SiteWise connector version 5released
Version 5 of the IoT SiteWiseconnector is available. Thisrelease fixes a compatibilityissue with AWS IoT GreengrassCore software v1.9.4.
February 12, 2020
IoT SiteWise connector version 4released
Version 4 of the IoT SiteWiseconnector is available. Thisrelease fixes an issue with OPC-UA server reconnection.
February 7, 2020
Restructured modeling industrialassets
Restructured the UpdatingAssets and Models section intomultiple topics within ModelingIndustrial Assets.
• Asset and modelstates (p. 138)
• Mapping industrialdata streams to assetproperties (p. 151)
• Updating attributevalues (p. 151)
• Associating and disassociatingassets (p. 153)
• Updating assets andmodels (p. 154)
• Deleting assets andmodels (p. 155)
February 4, 2020
Ingesting data from AWS IoTthings tutorial
Added a tutorial that you canfollow to learn how to configurean AWS IoT SiteWise rule actionto ingest data from a new orexisting fleet of AWS IoT things.
February 4, 2020
Restructured retrieving datafrom AWS IoT SiteWise (p. 241)
Restructured the RetrievingData section into two top-level sections: Querying assetproperty values and aggregatesand Interacting with other AWSservices.
January 21, 2020
Publishing property valueupdates to Amazon DynamoDBtutorial
Added a tutorial that you canfollow to learn how to useproperty value notifications tostore asset data in DynamoDB.
January 8, 2020
243
AWS IoT SiteWise User Guide
Using formula expressions Added the formula expressionreference to organize theconstants and functionsavailable for use in transformand metric properties.Restructured Asset propertiesinto separate topics for eachproperty type.
January 7, 2020
Using OPC-UA node filters Added information about howto use OPC-UA node filters toimprove gateway performancewhen adding gateway sources.
January 3, 2020
Upgrading a connector Added information about how toupgrade a gateway when a newconnector version is released.
December 30, 2019
IoT SiteWise connector version 3released
Version 3 of the IoT SiteWiseconnector is available. Thisrelease removes the iot:*permissions requirement.
December 17, 2019
IoT SiteWise connector version 2released
Version 2 of the IoT SiteWiseconnector is available. Thisrelease adds support formultiple OPC-UA secretresources.
December 10, 2019
Creating dashboards (AWS CLI) Added information about how tocreate a dashboard in AWS IoTSiteWise Monitor using the AWSCLI.
December 6, 2019
244
AWS IoT SiteWise User Guide
AWS IoT SiteWise version 2released
Released preview for version 2of AWS IoT SiteWise. You cannow ingest data over OPC-UA,MQTT, and HTTP, model yourdata in asset hierarchies, andvisualize your data with SiteWiseMonitor.
• Rewrote the assetmodeling (p. 137) sectionfor changes to assets, assetmodels, and asset hierarchies.
• Updated the dataingestion (p. 98) section toinclude AWS IoT Greengrassconnector steps and non-gateway data ingestionsections.
• Added the AWS IoT SiteWiseMonitor (p. 162) sectionand a separate applicationguide that shows how to usethe SiteWise Monitor webapplication.
• Added Querying assetproperty values andaggregates (p. 178) andInteracting with other AWSservices (p. 182) sections.
• Rewrote the gettingstarted (p. 7) section to matchthe updated demo experience.
December 2, 2019
AWS IoT SiteWise version 1released
Released initial preview forversion 1 of AWS IoT SiteWise.
February 25, 2019
245

AWS IoT SiteWise User Guide
AWS glossaryFor the latest AWS terminology, see the AWS glossary in the AWS General Reference.
246