AutoMerge for MS CRM 2013 - mscrm-addons.com for M… · AutoMerge for MS CRM 2013 Version 2013.2,...
97
AutoMerge for MS CRM 2013 Version 2013.2, October 2013 User Guide (How to use AutoMerge for MS CRM 2013) The content of this document is subject to change without notice. “Microsoft” and “Microsoft CRM” are registered trademarks of Microsoft Inc. All other product- and company names mentioned are trademarks of their respectful owners.
Transcript of AutoMerge for MS CRM 2013 - mscrm-addons.com for M… · AutoMerge for MS CRM 2013 Version 2013.2,...

AutoMerge
for MS CRM 2013
Version 2013.2, October 2013
User Guide
(How to use AutoMerge for MS CRM 2013)
The content of this document is subject to change without notice.
“Microsoft” and “Microsoft CRM” are registered trademarks of Microsoft Inc.
All other product- and company names mentioned are trademarks of their respectful owners.

User Guide
AutoMerge for MS CRM 2013 Page 2
Table of Contents
1 USER GUIDE ........................................................................................................................................4
2 INTRODUCTION ................................................................................................................................4
3 USE OF THE AUTOMERGE FUNCTIONALITY ...........................................................................5
3.1 Workflow (on Premise)................................................................................................................................................... 5
3.1.1 CreateDocument. .................................................................................................................................................... 8
3.1.1.1 DebugThisRequest ............................................................................................................................................. 9
3.1.1.2 TemplateToExecute ........................................................................................................................................... 9
3.1.1.3 SaveAs ..................................................................................................................................................................... 9
3.1.1.4 PrintTo .................................................................................................................................................................... 9
3.1.1.5 SaveOnlyIntoTemp ............................................................................................................................................ 9
3.1.2 AttachToEmail ....................................................................................................................................................... 10
3.1.2.1 DebugThisRequest .......................................................................................................................................... 11
3.1.2.2 EmailToAttach ................................................................................................................................................... 11
3.1.2.3 DocumentGUID ................................................................................................................................................ 11
3.1.3 AttachToLetter ...................................................................................................................................................... 12
3.1.3.1 DebugThisRequest .......................................................................................................................................... 13
3.1.3.2 LetterToAttach .................................................................................................................................................. 13
3.1.3.3 DocumentGUID ................................................................................................................................................ 13
3.1.4 DeleteTempDocument....................................................................................................................................... 13
3.1.4.1 DebugThisRequest .......................................................................................................................................... 14
3.1.4.2 DocumentGUID ................................................................................................................................................ 14
3.1.5 SendEmail ............................................................................................................................................................... 15
3.1.5.1 DebugThisRequest .......................................................................................................................................... 16
3.1.5.2 EmailToSend ...................................................................................................................................................... 16
3.2 Workflow (CRM Online) .............................................................................................................................................. 16
3.3 Dialog ................................................................................................................................................................................. 33
4 TEMPORARY DOCUMENT........................................................................................................... 36
5 DCP CLIENT / TEMPLATES .......................................................................................................... 38
6 HOW TO FILTER LINKED ENTITIES DURING THE MERGE PROCESS ............................ 39
7 HOW TO PRINT DOCUMENTS WITH AUTOMERGE .......................................................... 42
7.1 How to install and add a printer before using it with AutoMerge ............................................................ 42
7.2 Specific settings for plug-in based printing (depreciated) ........................................................................... 43
7.3 Service-based printing with AutoMerge .............................................................................................................. 45
7.3.1 Create and configure a service for printing documents ...................................................................... 45

User Guide
AutoMerge for MS CRM 2013 Page 3
7.3.1.1 AutoMerge Printer Tab Overview ............................................................................................................. 51
7.3.1.2 Local Printer Configuration ......................................................................................................................... 52
7.3.1.3 Google CloudPrint Configuration ............................................................................................................. 53
7.3.1.4 Printer Configuration Details and Printer Capabilities ..................................................................... 54
7.3.1.5 Troubleshooting .............................................................................................................................................. 57
7.3.2 How to add a service-based printing step to a workflow or dialog ................................................ 59
8 EXAMPLES ......................................................................................................................................... 66
8.1 Scenario 1: Workflow ................................................................................................................................................... 66
8.2 Scenario 2: Dialog ......................................................................................................................................................... 76
8.2.1 Part 1: User Interaction ...................................................................................................................................... 77
8.2.2 Part 2: AutoMerge steps ................................................................................................................................... 81
8.2.2.1 Part 2.1: Generate and print ........................................................................................................................ 81
8.2.2.2 Part 2.2: Generate only .................................................................................................................................. 84
8.2.2.3 Part 2.3: Attach to Email ............................................................................................................................... 85
8.2.2.4 Part 2.4: Attach to Letter .............................................................................................................................. 87
8.2.3 Result Dialog .......................................................................................................................................................... 89
8.2.4 Test Dialog .............................................................................................................................................................. 90
9 HOW TO ACTIVATE DEBUGGING FOR AUTOMERGE ....................................................... 95
10 CONTACT .......................................................................................................................................... 97

User Guide
AutoMerge for MS CRM 2013 Page 4
1 User Guide
This guide gives detailed explanations of all functionalities provided by AutoMerge for MS CRM
2013.
If you need to reach us, see the Contact page.
2 Introduction
AutoMerge provides the possibility to create and print documents automatically triggered from a
workflow or dialog. After the document is created, it can be attached to emails and letters as well.
Main Features:
CreateDocument
Enables the creation of Word-documents with data from MS CRM. It’s capable to resolve any
relations and works with custom entities as well as with standard CRM entities. Therefore,
AutoMerge provides the opportunity to automatically create e.g. quotes, invoices, etc. including
data from related records like “other contacts”, accounts, products, etc.
Attach to Email/Letter
With this functionality the generated document can be attached to emails and letters.
PrintOut
AutoMerge also provides the possibility to print out the created document.
DeleteDocument
Delete an existing document from the “MSCRM-ADDONS.com User/Temp Settings” entity.
SendEmail
Gives you the ability to send an existing email.
This documentation aims to describe the main settings, including step-by-step descriptions about how
to use all benefits provided by AutoMerge.

User Guide
AutoMerge for MS CRM 2013 Page 5
3 Use of the AutoMerge functionality
For using the AutoMerge functionality, there is no client software necessary. It can be accessed directly
within CRM from workflows and dialogs. The following descriptions show where the AutoMerge
functionality can be found and which requests are available.
There are two possibilities to set up AutoMerge (On-Premise or CRM Online). While AutoMerge
On-Premise works as a Plugin in CRM, AutoMerge for CRM Online needs a service (see
AutoMerge Installation Guide for MS CRM 2013).
To create workflows for On-Premise read chapter 3.1 and for CRM online chapter 3.2 of this user
guide.
3.1 Workflow (on Premise)
This section shows how the AutoMerge functionality can be used when starting from a workflow (this
works only for On-Premise version). Open Settings -> Processes within CRM. See next screenshots:
Hit [New] to create a process.

User Guide
AutoMerge for MS CRM 2013 Page 6
Type in a name for the new process, define the starting entity and select “Workflow” in the drop down
box. For starting with a new workflow, select “New blank process”. Hit [OK] to proceed. See Screenshot
above.
Then, the standard workflow configuration window will appear.

User Guide
AutoMerge for MS CRM 2013 Page 7
Use it to create your own workflow. If you would like to use the AutoMerge functionality, go to “Add
Step” -> “AutoMergeWF”. See next screenshot:
Here you can see all five available AutoMerge steps. The handling of these is like the handling of
standard workflow steps:
AttachToEmail
AttachToLetter
CreateDocument
DeleteTempDocument
SendEmail

User Guide
AutoMerge for MS CRM 2013 Page 8
3.1.1 CreateDocument
Select this option to create a new document based on a template.
First, give your new step a meaningful name.
Then hit [Set Properties] to define the settings.
See next screenshot:
User Guide
AutoMerge for MS CRM 2013 Page 9
The “CreateDocument” functionality provides the following properties:
3.1.1.1 DebugThisRequest
If this box is set to “True” the AutoMerge Plugin will write debug information while the creation of the
template. This is only required if this part of the process doesn’t work correctly. Due to the fact that it
will slow down the whole process, we recommend setting it to “False” in normal cases.
3.1.1.2 TemplateToExecute
Use this lookup-field to select a template. It will be the base of your generated document. You have
the choice between all templates stored in the “DocumentsCorePack Templates” entity in CRM. Please
note that the selected template must be compatible with the entity of this workflow. That means if you
create for example a workflow for the entity “contact”, the starting entity of the selected template has
to be “contact” as well. Please also keep in mind that only “.docx” templates will work with
AutoMerge.
3.1.1.3 SaveAs
Here you have the possibility to define the data type of the created document. The following file
extensions are available. The left column shows the text you have to type in and the left one the file
extension of the result document.
You have to type in File extension
text .txt
png .png
jpeg .jpg
html .html
epub .epub
doc .doc
docx .docx
bmp .bmp
pdf .pdf
If you leave this field empty, ”.docx” will be taken as default type.
3.1.1.4 PrintTo
This field gives you the possibility to define the path of a network printer. If AutoMerge can find an
available printer by following this path, the document will be printed out after the creation.
3.1.1.5 SaveOnlyIntoTemp
If this option box is set to “True” the generated document will only be stored in the “MSCRM-
ADDONS.com User/Temp Settings” of CRM. If it is set to “False” the document will be stored in a file
share or SharePoint additionally, depending on the adjustment of the DocumentsCorePack Server.

User Guide
AutoMerge for MS CRM 2013 Page 10
3.1.2 AttachToEmail
Select this option to attach a created document to an existing email. This step is often used in
combination with the “SendEmail”-step described later.
Important: If the file type of the generated document you want to be attached is “html”, its content
will be copied into the email body. If it is any other file type, the generated document will be added as
attachment to the email.
First, give your new step a meaningful name.

User Guide
AutoMerge for MS CRM 2013 Page 11
Then hit [Set Properties] to define the settings:
The “AttachToEmail” functionality provides the following properties:
3.1.2.1 DebugThisRequest
If this box is set to “True” the AutoMerge Plugin will write debug information while executing this
request. This is only required if this part of the process doesn’t work correctly. Due to the fact that it
will slow down the whole process, we recommend setting it to “False” in normal cases.
3.1.2.2 EmailToAttach
This lookup can be used to define the email to which the created document should be attached. You
have the possibility to select an existing email, but you can also refer to one in this workflow earlier
created email as well.
3.1.2.3 DocumentGUID
This lookup provides the possibility to select the document which should be attached. The handling of
this property is similar to the above one. You can select an existing document by clicking on the
lookup button and you can also use a document created in this workflow before.

User Guide
AutoMerge for MS CRM 2013 Page 12
3.1.3 AttachToLetter
Select this option to attach a created document to an existing letter.
First, give your new step a meaningful name.
Then hit [Set Properties] to define the settings:

User Guide
AutoMerge for MS CRM 2013 Page 13
The “AttachToLetter” functionality provides the following properties:
3.1.3.1 DebugThisRequest
If this box is set to “True” the AutoMerge Plugin will write debug information while executing this
request. This is only required if this part of the process doesn’t work correctly. Due to the fact that it
will slow down the whole process, we recommend setting it to “False” in normal cases.
3.1.3.2 LetterToAttach
This lookup can be used to define the letter to which the created document should be attached. You
have the possibility to select an existing letter, but you can refer to one in this workflow earlier created
letter as well.
3.1.3.3 DocumentGUID
This lookup provides the possibility to select the document which should be attached. The handling of
this property is similar to the above one. You can select an existing document by clicking on the
lookup button and you can also use a document created in this workflow before.
3.1.4 DeleteTempDocument
Select this option to delete an existing document from the “MSCRM-ADDONS.com User/Temp
Settings” entity.
First, give your new step a meaningful name.
Then hit [Set Properties] to define the settings:
See next screenshot:

User Guide
AutoMerge for MS CRM 2013 Page 14
The “DeleteTempDocument” functionality provides the following properties:
3.1.4.1 DebugThisRequest
If this box is set to “True” the AutoMerge Plugin will write debug information while executing this
request. This is only required if this part of the process doesn’t work correctly. Due to the fact that it
will slow down the whole process, we recommend setting it to “False” in normal cases.
3.1.4.2 DocumentGUID
This lookup provides the possibility to select the document which should be removed.
You can select an existing document by clicking on the lookup button and you can also use a
document created in this workflow before.

User Guide
AutoMerge for MS CRM 2013 Page 15
3.1.5 SendEmail
Use this step to send an existing email.
First, give your new step a meaningful name.
Then hit [Set Properties] to define the settings.

User Guide
AutoMerge for MS CRM 2013 Page 16
The “SendEmail” functionality provides the following properties:
3.1.5.1 DebugThisRequest
If this box is set to “True” the AutoMerge Plugin will write debug information while executing this
request. This is only required if this part of the process doesn’t work correctly. Due to the fact that it
will slow down the whole process, we recommend setting it to “False” in normal cases.
3.1.5.2 EmailToSend
This lookup field can be used to define the email which should be sent. You have the possibility to
select an existing email, but you can refer to one in this workflow earlier created email by using the
“Form Assistant” as well.
3.2 Workflow (CRM Online)
First of all, start in the settings of your CRM system and click on ’Processes’ in the ribbon. See next
screenshots:
User Guide
AutoMerge for MS CRM 2013 Page 17
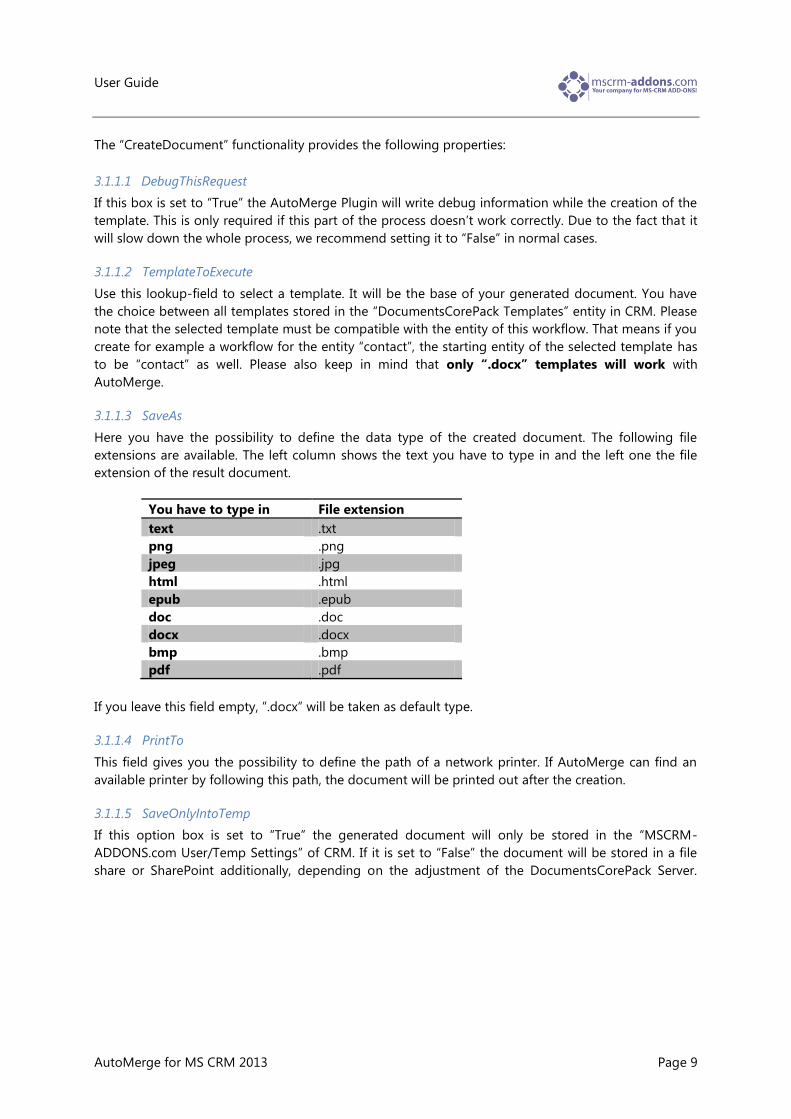
Then click on ‘New’ to create a new workflow. A webpage dialog pops up (see next screenshot). Type
in a name, determine an entity and choose ‘Workflow’ as the process category. Afterwards, click on
‘OK’.
After clicking on ‘OK’, you will see the following window. Start to define and add the steps you would
like to have in your workflow. If you would like to e.g. create the document as a first step of your
workflow, click on the ’Add Step’-drop-down menu and select ‘Create Record’. (See screenshot below)

User Guide
AutoMerge for MS CRM 2013 Page 18
Now, the first step is added to your workflow. Type in a description of the step, e.g. create document.
Afterwards, open the drop-down menu within this first step, select ‘MSCRM-ADDONS.com
AutoMergeWorkingItems’ and click on ‘Set Properties’. (See next screenshot)
The following window will open to configure the first step of your workflow. (See screenshot below)
Type in a name and define the AutoMerge-action. In our example, we select the action
‘CreateDocument’.
User Guide
AutoMerge for MS CRM 2013 Page 19
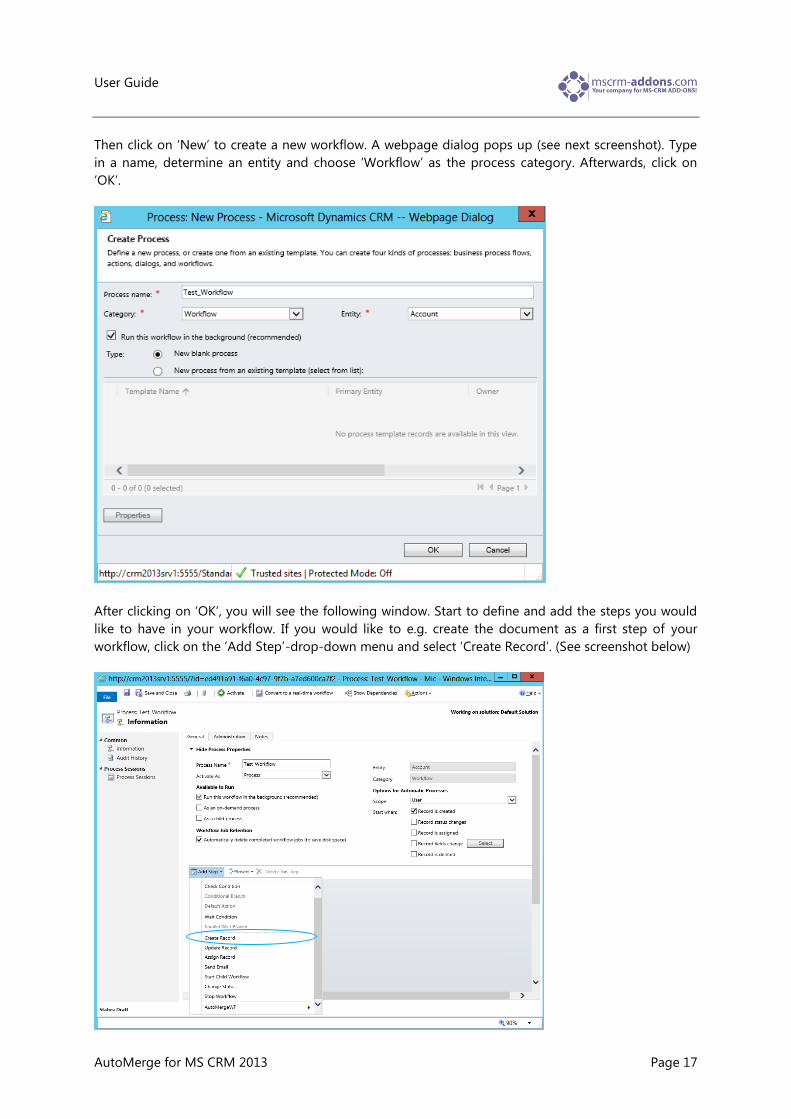
After that, choose the template to be used within the workflow (see next screenshot ellipse 1) and the
file format the document should be saved as (see next screenshot ellipse 2).
Furthermore, it is very important to insert the ‘PrimaryRecordUrl’. For that, set the cursor in the
‘PrimaryRecordUrl’-field and go to the ‘Look for’-area within the form assistant on the right side. Select
‘Record URL(Dynamics)’ from the second drop-down-menu (see next screenshot, ellipse 3 and 4), click
on ‘Add’ and then on ‘OK’. After that, the ‘PrimaryRecordUrl’-field is filled out automatically. (See
bottom screenshot, coloured in yellow) Click ‘Save and Close’.

User Guide
AutoMerge for MS CRM 2013 Page 20
The first step of your workflow is now added and fully configured. In case you want to stop your
workflow at this point, you can click on ‘Save and Close’ and finish here. In case you want to add
further steps to your workflow, define a condition to be fulfilled before adding further steps.
1 2
3
4
User Guide
AutoMerge for MS CRM 2013 Page 21
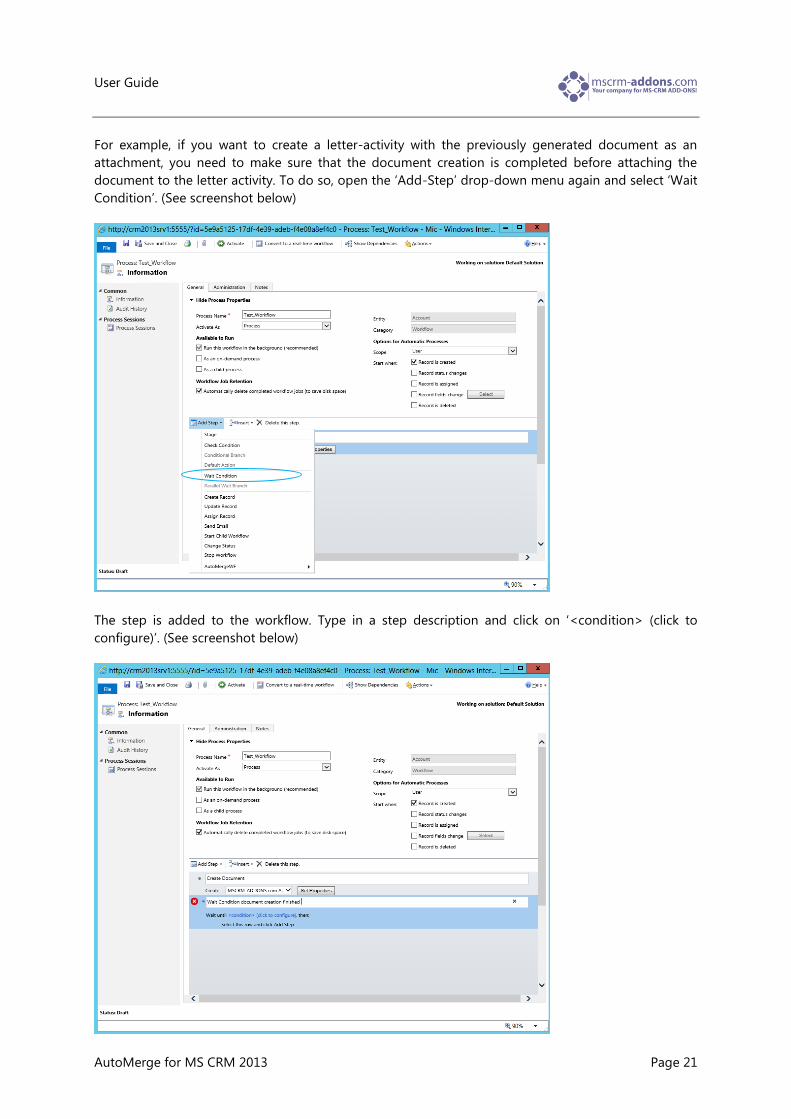
For example, if you want to create a letter-activity with the previously generated document as an
attachment, you need to make sure that the document creation is completed before attaching the
document to the letter activity. To do so, open the ‘Add-Step’ drop-down menu again and select ‘Wait
Condition’. (See screenshot below)
The step is added to the workflow. Type in a step description and click on ‘<condition> (click to
configure)’. (See screenshot below)

User Guide
AutoMerge for MS CRM 2013 Page 22
After that, a window pops up. In this window, you can define the condition to be fulfilled for workflow
proceeding. In our case, we select ‘Create document (MSCRM-ADDONS.com
AutoMergeWorkingItems)’ from the first drop-down menu, ‘Status’ from the second drop-down menu,
‘Equals’ from the third drop-down menu and ‘Inactive’ from the fourth drop-down menu. (See next
screenshots).
Click on save and close. Now, you have determined that step 2 of your workflow (in our example to
attach the created document to a letter-activity) will only be executed if the first step, namely the
document generation, has finished successfully.

User Guide
AutoMerge for MS CRM 2013 Page 23
Afterwards, your workflow configuration will look like in the following screenshot:
To add another step, e.g. to create a letter-activity, click on ‘Select this row and click Add Step’ (see
screenshot ellipse 1) and afterwards on ‘Add Step’. (See screenshot, ellipse 2)
1
2

User Guide
AutoMerge for MS CRM 2013 Page 24
Then, select ‘Create Record’ from the drop-down menu. The new step is now added to your workflow
and ready for configuration. Type in a step description (e.g. Attach document to letter), open the drop-
down menu within this second step and select ‘Letter’. (See next screenshot)
Afterwards, click on ‘Set Properties’ and a letter-activity-window will open. (See screenshot below)
Within this window, define a sender, a subject and type in your letter-text. Then, set the cursor in the
‘Recipient’-field to define the recipient.
To do so, go to the ‘Look for’-area within the form assistant on the right side. Select ‘Account’ in both
drop-down-menus, click on ‘Add’ and then on ‘OK’. Now the ‘Recipient’-field is filled out correctly (see
screenshot below, colored in yellow).

User Guide
AutoMerge for MS CRM 2013 Page 25
Click on ‘Save and Close’. Now you are back in the general workflow-window again and you can see
the added and completely configured letter-activity. In a next step, you have to define that the
previously created document should be added to this letter-activity. For
that, click on ‘Add Step’ and select ‘Create Record’ from the drop-down menu.
(See next screenshot)
User Guide
AutoMerge for MS CRM 2013 Page 26
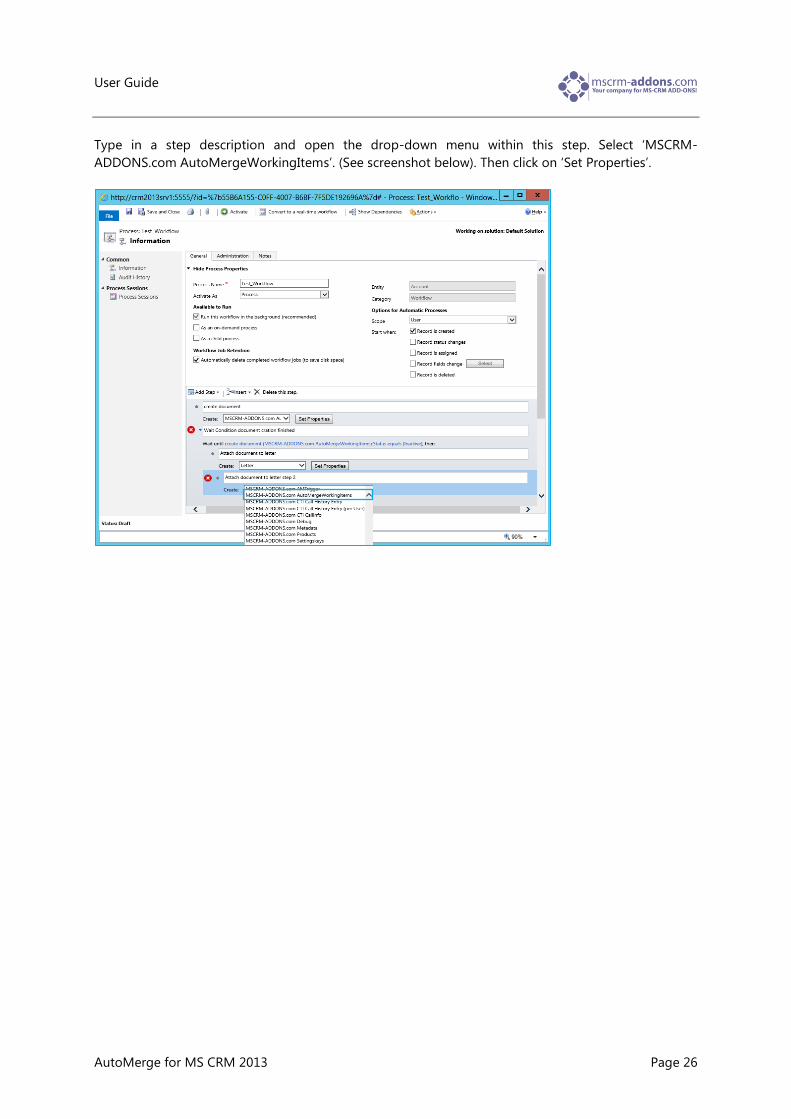
Type in a step description and open the drop-down menu within this step. Select ‘MSCRM-
ADDONS.com AutoMergeWorkingItems’. (See screenshot below). Then click on ‘Set Properties’.

User Guide
AutoMerge for MS CRM 2013 Page 27
A window will pop up to configure the ‘AttachToLetter’-workflow-step. Put a name and define the
AutoMerge action (in this example choose ‘AttachToLetter’, see screenshot, ellipse 1) Within the
‘Attach to Letter’-section, determine the letter-activity to which the created document should be
attached to (see screenshot ‘LetterToAttach-field, ellipse 2) and the document which should be
attached (see screenshot ‘DocumentGUID_Letter’-field, ellipse 2).
1
2
User Guide
AutoMerge for MS CRM 2013 Page 28
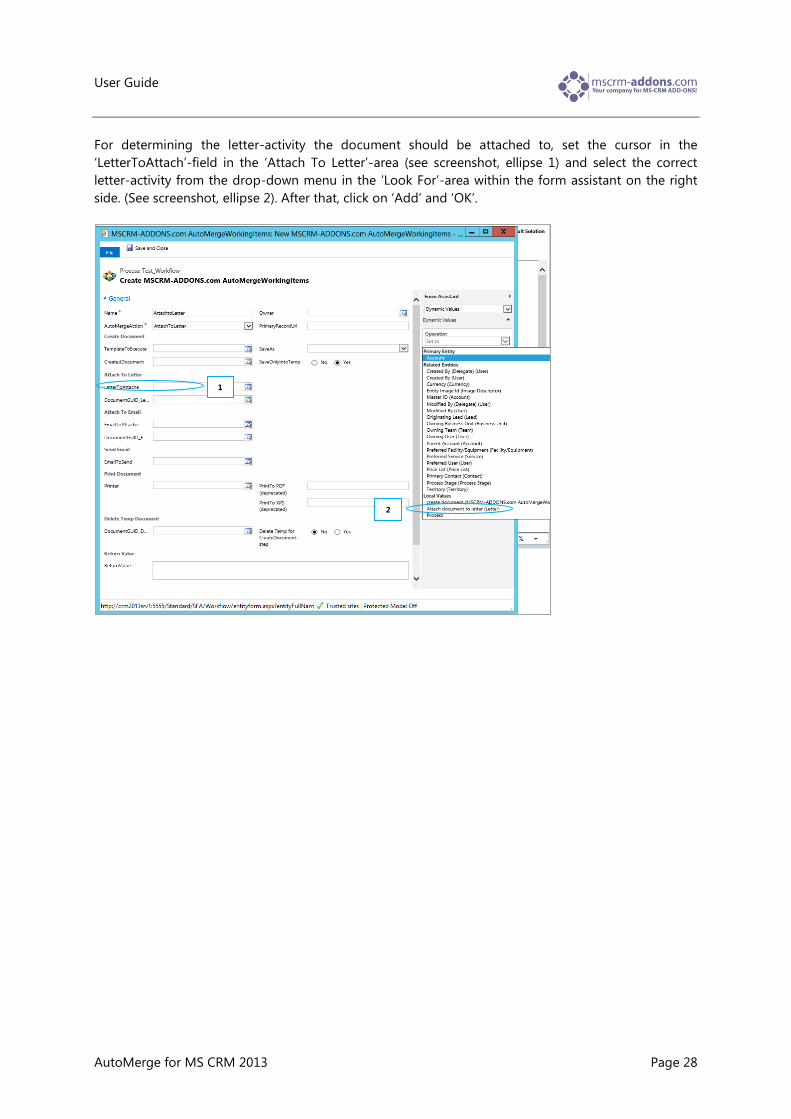
For determining the letter-activity the document should be attached to, set the cursor in the
‘LetterToAttach’-field in the ‘Attach To Letter’-area (see screenshot, ellipse 1) and select the correct
letter-activity from the drop-down menu in the ‘Look For’-area within the form assistant on the right
side. (See screenshot, ellipse 2). After that, click on ‘Add’ and ‘OK’.
1
2

User Guide
AutoMerge for MS CRM 2013 Page 29
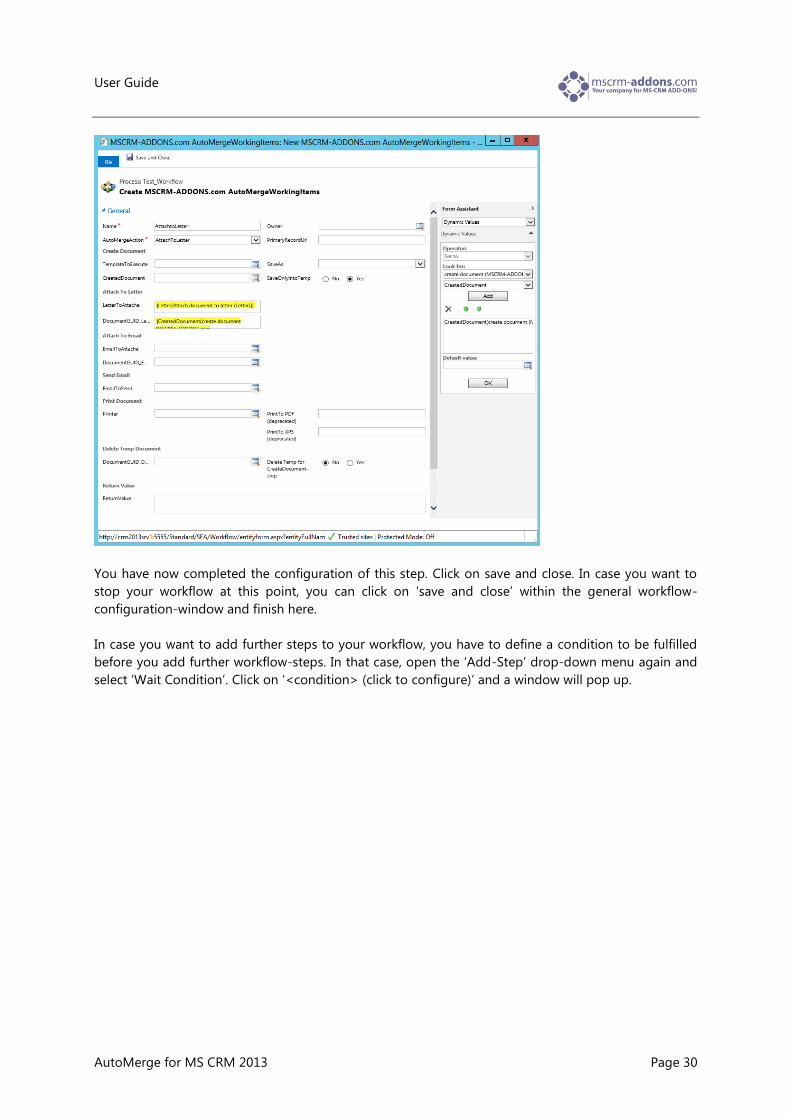
To determine the document to be attached, set the cursor in the ‘DocumentGUID_Letter’-field (see
screenshot, ellipse 1) and select the correct document from the drop-down box in the ‘Look For’-area
within the form assistant on the right side. (See screenshot, ellipse 2) Click on ‘Add’ and ‘OK’.
1
User Guide
AutoMerge for MS CRM 2013 Page 30
You have now completed the configuration of this step. Click on save and close. In case you want to
stop your workflow at this point, you can click on ‘save and close’ within the general workflow-
configuration-window and finish here.
In case you want to add further steps to your workflow, you have to define a condition to be fulfilled
before you add further workflow-steps. In that case, open the ‘Add-Step’ drop-down menu again and
select ‘Wait Condition’. Click on ‘<condition> (click to configure)’ and a window will pop up.
User Guide
AutoMerge for MS CRM 2013 Page 31
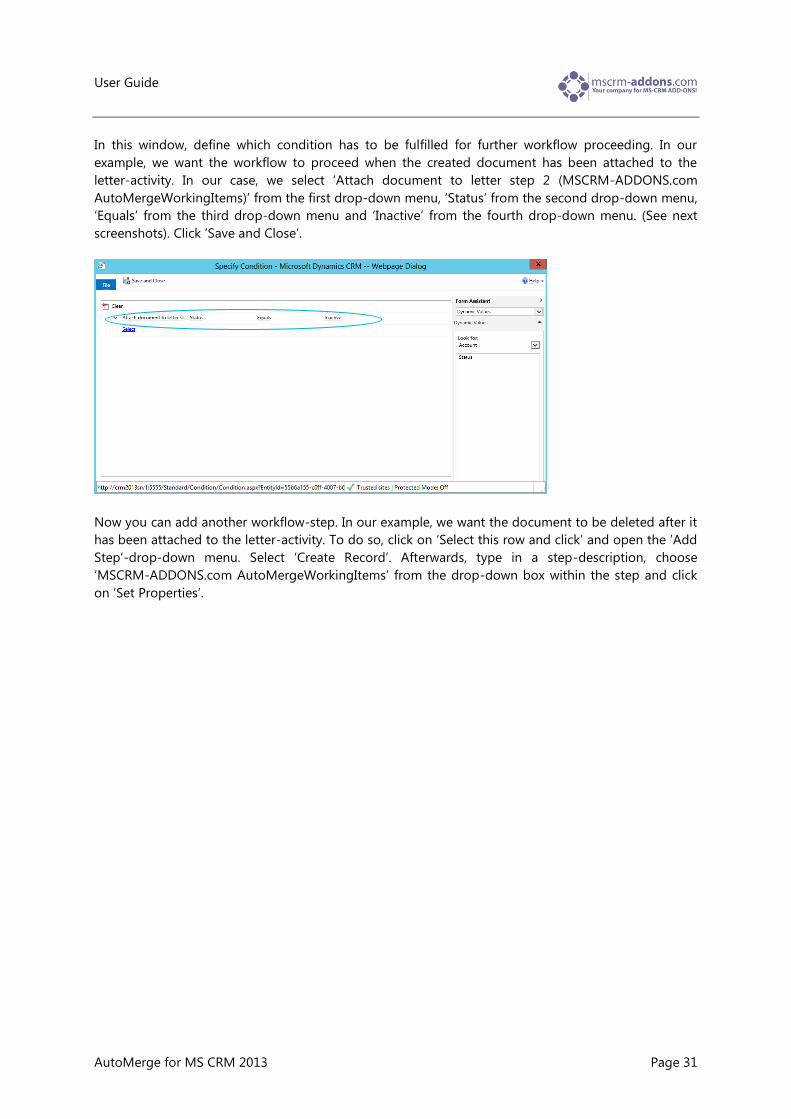
In this window, define which condition has to be fulfilled for further workflow proceeding. In our
example, we want the workflow to proceed when the created document has been attached to the
letter-activity. In our case, we select ‘Attach document to letter step 2 (MSCRM-ADDONS.com
AutoMergeWorkingItems)’ from the first drop-down menu, ‘Status’ from the second drop-down menu,
‘Equals’ from the third drop-down menu and ‘Inactive’ from the fourth drop-down menu. (See next
screenshots). Click ‘Save and Close’.
Now you can add another workflow-step. In our example, we want the document to be deleted after it
has been attached to the letter-activity. To do so, click on ‘Select this row and click’ and open the ’Add
Step’-drop-down menu. Select ‘Create Record’. Afterwards, type in a step-description, choose
‘MSCRM-ADDONS.com AutoMergeWorkingItems’ from the drop-down box within the step and click
on ‘Set Properties’.
User Guide
AutoMerge for MS CRM 2013 Page 32
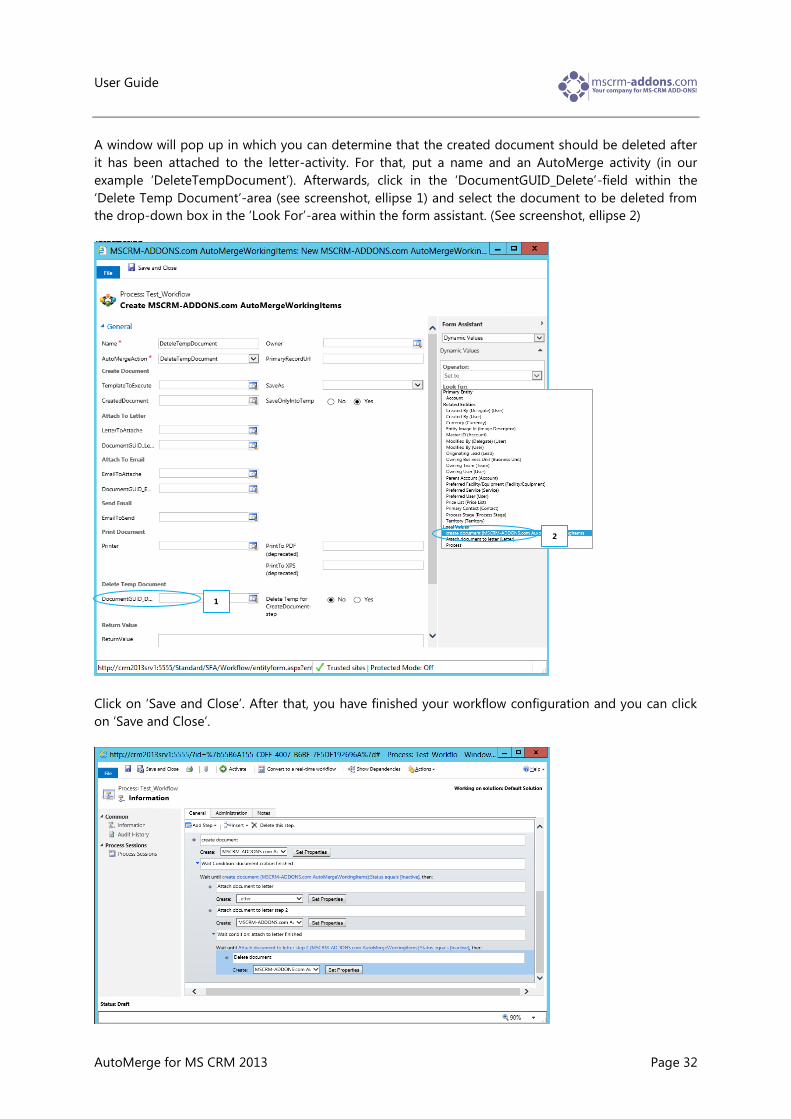
A window will pop up in which you can determine that the created document should be deleted after
it has been attached to the letter-activity. For that, put a name and an AutoMerge activity (in our
example ‘DeleteTempDocument’). Afterwards, click in the ‘DocumentGUID_Delete’-field within the
‘Delete Temp Document’-area (see screenshot, ellipse 1) and select the document to be deleted from
the drop-down box in the ‘Look For’-area within the form assistant. (See screenshot, ellipse 2)
Click on ‘Save and Close’. After that, you have finished your workflow configuration and you can click
on ‘Save and Close’.
1
2

User Guide
AutoMerge for MS CRM 2013 Page 33
3.3 Dialog
From a dialog you can use the same AutoMerge steps as from a workflow. This chapter shows how you
can access these functionalities.
Within CRM open Settings -> Processes
The next step is to create a new dialog. This works nearly the same way as creating a new workflow.
Click [New] as shown in the screenshot above.

User Guide
AutoMerge for MS CRM 2013 Page 34
Thereupon the following window will appear:
Type in a name of the new dialog, define the starting entity and select “Dialog” in the drop down box.
To start with a new dialog, select “New blank process”. Hit [OK] to proceed. Then the dialog
configuration window will appear.

User Guide
AutoMerge for MS CRM 2013 Page 35
Here you can see that the AutoMerge add-in provides the same steps for dialogs.
Due to the fact that these work totally the same way as for workflows, they aren’t described once again
in this section. Please see chapter: 3.1.1 CreateDocument downwards for more information regarding
the steps.

User Guide
AutoMerge for MS CRM 2013 Page 36
4 Temporary Document
Every time when you create a new document by using the “CreateDocument” step it will be stored in
the “MSCRM-ADDONS.com User/Temp Settings”.
The normal way is to save it on the SharePoint as well or attached it to an activity and to delete it at
the end of the process by using “DeleteTempDocument” step.
But especially for developing your process it could be very helpful not to delete it automatically (e.g. if
you want to continue working with this temp document). How this can be done is described
underneath:
Within CRM hit [Advanced Find] in the Ribbon.
Then the following window will open:
In the „Look for“ box select the „MSCRM-ADDONS.com User/Temp Settings” entity. To receive all
stored settings only hit [Results]. See next screenshot:

User Guide
AutoMerge for MS CRM 2013 Page 37
To ensure that every record name is unique, AutoMerge stores them by using the following structure:
“AM_Doc_” + a new Guid. If you want to have a look at the generated document directly, douple click
on the record and navigate to the “Notes”-section.
There you can see the generated document attached. Its name is taken from the “Document Name”-
setting of the template. If the name is not defined, the default structure (“AM_Doc_” + a new Guid) will
be taken. In this example the generated document is of the type “.pdf” This was defined in the
“SaveAs” property of the “CreateDocument”-step.
To open the document click on it and your web browser will provide you different ways to achieve this.

User Guide
AutoMerge for MS CRM 2013 Page 38
5 DCP Client / Templates
For generating documents using AutoMerge you need .docx templates as a base.
This section is dealing with templates. It describes what the necessary steps to create them.
To be able to create or modify templates the DocumentsCorePack Client is required.
It can be downloaded from our website by using the following link: DocumentsCorePack.
Before you install the DCP Client we recommend reading the “Install Guide”, especially chapter 7
“Installing the client component”. The whole guide can be found here: Installing DocumentsCorePack.
At this point, the foundation stone for working with templates is laid. The following link will direct you
to the DocumentsCorePack User Guide. Chapter 3 “DocumentsCorePack Templates” will walk you
through the steps for creating templates.
Please keep in mind that only .docx (Office Open XML) templates are compatible with
AutoMerge.
Here is the link to the user guide: DocumentsCorePack User Guide

User Guide
AutoMerge for MS CRM 2013 Page 39
6 How to filter linked entities during the merge process
It is possible to filter the linked entities of a 1:N and a N:N relationship during the merge process
based on their IDs. This works in combination with DocumentsCorePack and AutoMerge but only with
“docx”-templates.
To achieve this, you have to create a new record of the “MSCRM-ADDONS.com User/Temp Settings”
entity containing a filter.
Name
Use the “Name”-field to define for which user, entity type and record ID the filter should be used.
Structure: AMPreFilter|<<ID of the user who should use the filter>>|<<the logical name of
the starting entity of the template>>|<<ID of the record (of template starting entity) for which
the filter should be used>>|<<logical name of the linked entity which should be filtered>>|
Example: AMPreFilter|{DC9B80F8-C781-46D8-9FD6-A3B610836975}|account|{7b069E5412-
84F6-E111-977B-00155DC8AE09}|contact|
Value
Use the “Value”-field to define the IDs of the linked records which should be shown in the template.
Structure:
<filter>
<entity><<logical name of the linked entity which should be filtered>></entity>
<values>
<value><<ID of linked record which should be shown>></value>
<value><<ID of linked record which should be shown>></value>
…….
</values>
</filter>
Example:
<filter>
<entity>contact</entity>
<values>
<value>{12E5214A-88BF-E111-A7C1-00155DC8AE09}</value>
<value>{12E5214A-88BF-E111-A7C1-00155DC8AE09}</value>
</values>
</filter>
Important: The IDs must be in upper case and must contain brackets.
During each merge process of “docx”-templates, the DocumentsCorePack Client or the AutoMerge
add-on looks for a suitable filter. If such a filter is found, only linked records with a matching ID will be
shown. The filter gets deleted afterwards. Otherwise, the usual merge process remains unchanged.

User Guide
AutoMerge for MS CRM 2013 Page 40
Example
Here you can see an account named “ptm EDV-Systeme”. It has several related contacts.
User Guide
AutoMerge for MS CRM 2013 Page 41
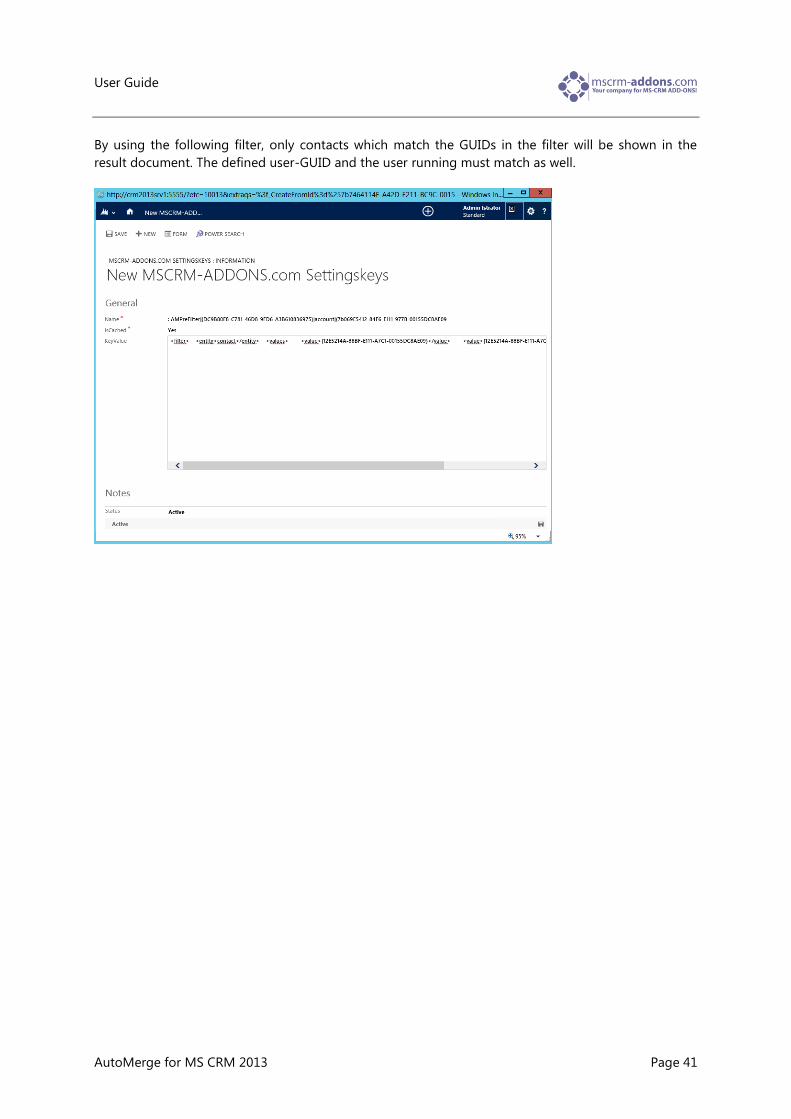
By using the following filter, only contacts which match the GUIDs in the filter will be shown in the
result document. The defined user-GUID and the user running must match as well.

User Guide
AutoMerge for MS CRM 2013 Page 42
7 How to print documents with AutoMerge
This chapter explains how to print documents with AutoMerge. It deals with the prerequisites, namely
to install and add a printer before using it with AutoMerge, the specific settings for plug-in-based
printing and the procedure of service-based printing.
7.1 How to install and add a printer before using it with AutoMerge
With AutoMerge for MS Dynamics CRM 2013 On-Premise/Online, you are able to print the dynamically
generated document automatically to a specific printer.
Before you can start to use this functionality, there are several things to do. Because AutoMerge runs
as service with a service user, you have to install the printer as described in the steps below to ensure
that the service user has access.
How to install a printer which is visible for services:
Go to the Control Panel -> Devices and Printers
Click on “Add a printer”
It is very important to select “Add a local printer” (see screenshot below)

User Guide
AutoMerge for MS CRM 2013 Page 43
Step through the rest of the wizard and create a new port. Type in a simple name for the printer,
without using spaces. This makes it easier for you to retype the printer name in the different workflows
of AutoMerge. (See screenshot below)
At the end, please try to print a test-page to see if it is working correctly.
7.2 Specific settings for plug-in based printing (depreciated)
With AutoMerge for Microsoft Dynamics CRM 2013 On-Premise/Online, you are able to print the
dynamically generated document automatically to a specific printer. Sometimes, the printer settings
regarding trays, duplex, size, etc. are not applied if you define them using a specific user account,
because the service runs under different user accounts. In order to avoid this, AutoMerge offers you
the possibility to define specific printing options in the workflow itself.
The table below lists all special settings which you can define for the printer in the workflow. To make
use of them, you just have to add the options you need when entering the printer name in the
workflow-configuration. Of course you can also combine settings, like in the following example:
HP2025|copycount=2|tray=3
NOTE: The settings listed below are valid for plug-in based printing processes only.

User Guide
AutoMerge for MS CRM 2013 Page 44
AVAILABLE SETTINGS FOR PLUG-IN BASED PRINTING PROCESSES WITH AUTOMERGE
Name Possible values Description
mediasize a3
a3rotated
a4
a4rotated
a5
a5rotated
a6
a6rotated
If you have a specific mediasize you can use this setting.
eg.:
HP2025|mediasize=a4
copycount 1-999 Define how many copies you want to have.
eg.:
HP2025|copycount=4
duplex onsided
twosidedlongedge
twosidedshortedge
For printers which are able to print twosided you can use this option.
outputcolor grayscale
color
monochrome
Define the color using this setting.
tray 1-99 Each tray has a number and the first tray is normally auto select.
In most cases, you have to try the different numbers to find out which
number refers to which tray.
e.g.:
HP2025|tray=2
User Guide
AutoMerge for MS CRM 2013 Page 45
7.3 Service-based printing with AutoMerge
AutoMerge now offers a service-based printing option which is available additionally to the already
known plugin-based printing-option. The additional option is available within AutoMerge for MS
Dynamics CRM 2011 v5.30 and higher and is based on a service which is running in the background.
This sub-chapter covers the following essential topics:
Creation of a service for printing documents
Adding the service-based printing step to a workflow or dialog
Exception 1: Adding the service-based printing step to already existing workflows
Exception 2: Adding the service-based printing step to workflows including a ‘Delete
Document’-step
Before you continue reading, please make sure that you installed AutoMerge v5.30 or higher. After
that, please proceed as described in the sections below.
NOTE: If you already run a service for printing documents (as this is quite usual when using
AutoMerge with CRM Online), you can skip the first section of this article and can continue reading in
the ‘How to add the service-based printing step to a workflow’-section further down.
7.3.1 Create and configure a service for printing documents
There is a complete new Printing Solution in place since version 5.38. AutoMerge Printing-Feature
provides the possibility to create and manage Printer Configurations for:
starting local print jobs via AutoMerge Local Printer Configuration
supported format:
starting global print jobs over internet via Google CloudPrint Configuration
supported formats:
- .docx
- .html
- .jpg
- .bmp
General introduction:
This chapter will give you detailed information about how to create and configure a service for printing
documents using AutoMerge for MS Dynamics CRM 2013
Before you are able to add the service-based printing to a workflow, you need to configure and start a
service. To do so, please follow the steps below:

User Guide
AutoMerge for MS CRM 2013 Page 46
1. Start the AutoMerge ServiceManagement from within the Windows start menu:
2. Here you can create a new service or choose an existing one. If you want to create a new service,
type in a name of the service and click on the green tick (see next screenshot).

User Guide
AutoMerge for MS CRM 2013 Page 47
3. After that, you have to define which type of jobs the service should work on. Select ‘only printjobs’.
Furthermore, you have the possibility to set a filter for the printer to be used. Setting this filter is
essential e.g. in the following case: If you have offices in Austria and the US, you can type in the name
of the printer located at your site (e.g. at your Austrian office) in order to avoid that your documents
are printed by the printer located at the other site (e.g. at your American office). See next screenshot:
4. Then, switch to the ‘CRM Connection Setup’-tab and type in the CRM Server-URL. After that, click on
‘Save service configuration’. See next screenshot:

User Guide
AutoMerge for MS CRM 2013 Page 48
In case the following message box is popping up, click on ‘OK’. (See screenshot below)
Within the “CRM Connection Setup”-tap you can verify the “Advanced Options”. (See next screenshot).

User Guide
AutoMerge for MS CRM 2013 Page 49
This action will open following dialog:
Advanced Settings: Here you can set your CRM online option, enable your proxy settings and define
the credentials etc. (see screenshot below). Return to the CRM Connection tab to save your settings.

User Guide
AutoMerge for MS CRM 2013 Page 50
Log: Here you have an overview about your logfiles.
5. Afterwards, click on ‘Start Service’ and the service starts to run in the background (see screenshot
below)

User Guide
AutoMerge for MS CRM 2013 Page 51
To continue go to the new added service called “AutoMergeTest” and switch to the AutoMerge
[Printer] Tab:
7.3.1.1 AutoMerge Printer Tab Overview
The AutoMerge Printer Tag is available since v5.34. The picture below shows an overview of the printer
configurations for CRM:
[ 1 ] Google CloudPrinting Configuration
[ 2 ] Local Printer Configuration
Following actions can be done:
[ 3 ] Manually Reload Printer Configuration
[ 4 ] Create Printer Configuration
[ 5 ] Edit Printer Configuration
[ 6 ] Copy Printer Configuration
[ 7 ] Delete Printer Configuration
1
2

User Guide
AutoMerge for MS CRM 2013 Page 52
7.3.1.2 Local Printer Configuration
The local Printer Configuration supports user defined printer settings, used for local print jobs.
1
2
3
4
5
6
6
User Guide
AutoMerge for MS CRM 2013 Page 53
Service Logon: Here you can specify the user that should be running the service on your system. The
choice of the user context will influence the setup and behaviour of the printers.
Authentication Types:
local system account:
Running under the local system account requires to setup printers as local printers.
(see: http://blogs.mscrm-addons.com/post/2012/12/13/Print-settings-for-AutoMerge.aspx)
Attention! A local system account will see only local printers; while you’re currently logged on
user account will also see network and remote printers.
custom account:
Using a custom account will enable the service to use the printers, as if that user was logged on.
Note: If your credentials change, your existing configurations might become invalid or behave
differently! It is recommended to check the existing Local Printer Configurations to ensure that they
are also compatible with the modified user.
7.3.1.3 Google CloudPrint Configuration
The Google CloudPrint Coinfiguration supports internet-based print jobs of AutoMerge, via internet
using printers added to a google-account. The document to print is sent to a Google service together
with Google CloudPrint Configuration and then forwarded to your chosen Printer.
The advantage of this kind of printer configuration is that it can be used to start print jobs globally.
Before you can use this feature you have to add printers to your google-account.
You can connect any number of printers that you like to Google CloudPrint.
http://www.google.at/cloudprint/learn/
Please read detailed and official information about Google CloudPrint before using AutoMerge for
creating any Google CloudPrint Printer Configurations and before starting any print job via
Google CloudPrint:
http://www.google.at/cloudprint/learn/
https://developers.google.com/cloud-print/

User Guide
AutoMerge for MS CRM 2013 Page 54
7.3.1.4 Printer Configuration Details and Printer Capabilities
You are able to create and to edit your existing configuration and save it. The picture below displays
the Capability Settings of a chosen printer of a Local Printer Configuration. The same scenario could
be applied to a Google Cloudprint Configuration.
[ 1 ] Press the reload-button for refreshing the list of available printers.
[ 2 ] Print test .pdf-pages using the displayed configurations to verify your printer settings and its
functionality.
[ 3 ] Leaving the printer default enabled will use the printer default at the time of the print process.
Please note, that the default value displayed in the drop down section is not necessarily the default
value used while printing, as the default value is depending on the user running the service and printer
driver setup at the time of printing.
[ 4 ] Unchecking the default option will set the selected value on any print, regardless of the user
running the service and printer driver setup at the time of printing.
1
2
3

User Guide
AutoMerge for MS CRM 2013 Page 55
Example: set Monochrome printing.
Other types of capabilities:
Numeric-specified Capabilities (set / type in a number):
Text-specified Capabilities (type in a text):
Local Printer Configurations have a fixed set of Printer Capabilities. The availability depends on the
features of the printer itself:
Color
Copies
Duplex
EvenOddFilter
Orientation
PaperSizes
PaperSources
PrintSelection
PrinterResolutions
Scale
Google CloudPrint Configurations have a varying set of printer capabilities, based on the installed
driver. Each Google Cloud printer can have completely different capabilities.
4

User Guide
AutoMerge for MS CRM 2013 Page 56
Create Printer Configuration
For creating a new configuration click on the [New] Button inside the AutoMerge Printing Tab.
This action will open the following dialog where you must type in a Configuration name before going
on:
[1] You need to specify a configuration name to be able to create a printer configuration.
[2] Google CloudPrint Mode is enabled per default.
Note: Modifying the printer type will discard all changes you have done on the current setting!
[3] Supply your Google account credentials to retrieve the list of available printers for that account.
[4] Click on the drop-down button or open a saved document to print a TestPage
Google Cloud Printer Local Printer
After having configured and started the service for printing, you can start to configure a workflow
including the service-based printing option. In the example below, we will highlight how to
appropriately add this ‘Print to’-step.
1 2
3
4
User Guide
AutoMerge for MS CRM 2013 Page 57
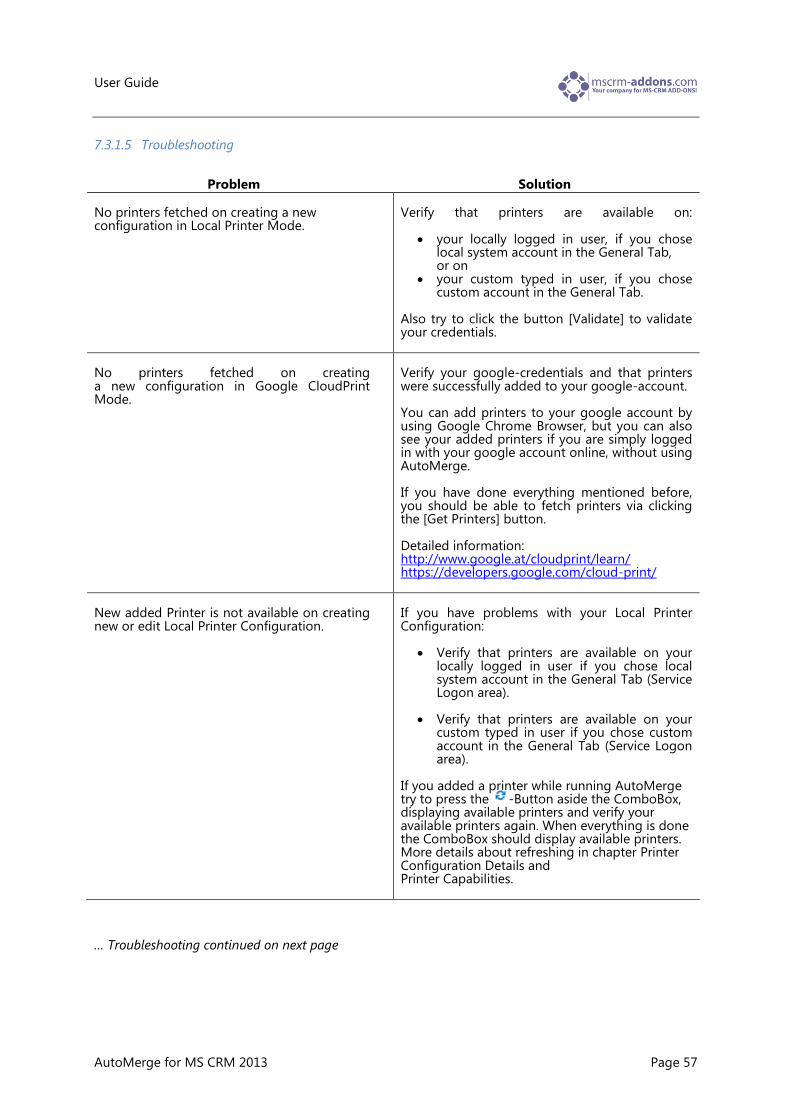
7.3.1.5 Troubleshooting
Problem Solution
No printers fetched on creating a new configuration in Local Printer Mode.
Verify that printers are available on:
your locally logged in user, if you chose local system account in the General Tab, or on
your custom typed in user, if you chose custom account in the General Tab.
Also try to click the button [Validate] to validate your credentials.
No printers fetched on creating a new configuration in Google CloudPrint Mode.
Verify your google-credentials and that printers were successfully added to your google-account. You can add printers to your google account by using Google Chrome Browser, but you can also see your added printers if you are simply logged in with your google account online, without using AutoMerge. If you have done everything mentioned before, you should be able to fetch printers via clicking the [Get Printers] button. Detailed information: http://www.google.at/cloudprint/learn/ https://developers.google.com/cloud-print/
New added Printer is not available on creating new or edit Local Printer Configuration.
If you have problems with your Local Printer Configuration:
Verify that printers are available on your locally logged in user if you chose local system account in the General Tab (Service Logon area).
Verify that printers are available on your
custom typed in user if you chose custom account in the General Tab (Service Logon area).
If you added a printer while running AutoMerge try to press the -Button aside the ComboBox, displaying available printers and verify your available printers again. When everything is done the ComboBox should display available printers. More details about refreshing in chapter Printer Configuration Details and Printer Capabilities.
… Troubleshooting continued on next page
User Guide
AutoMerge for MS CRM 2013 Page 58
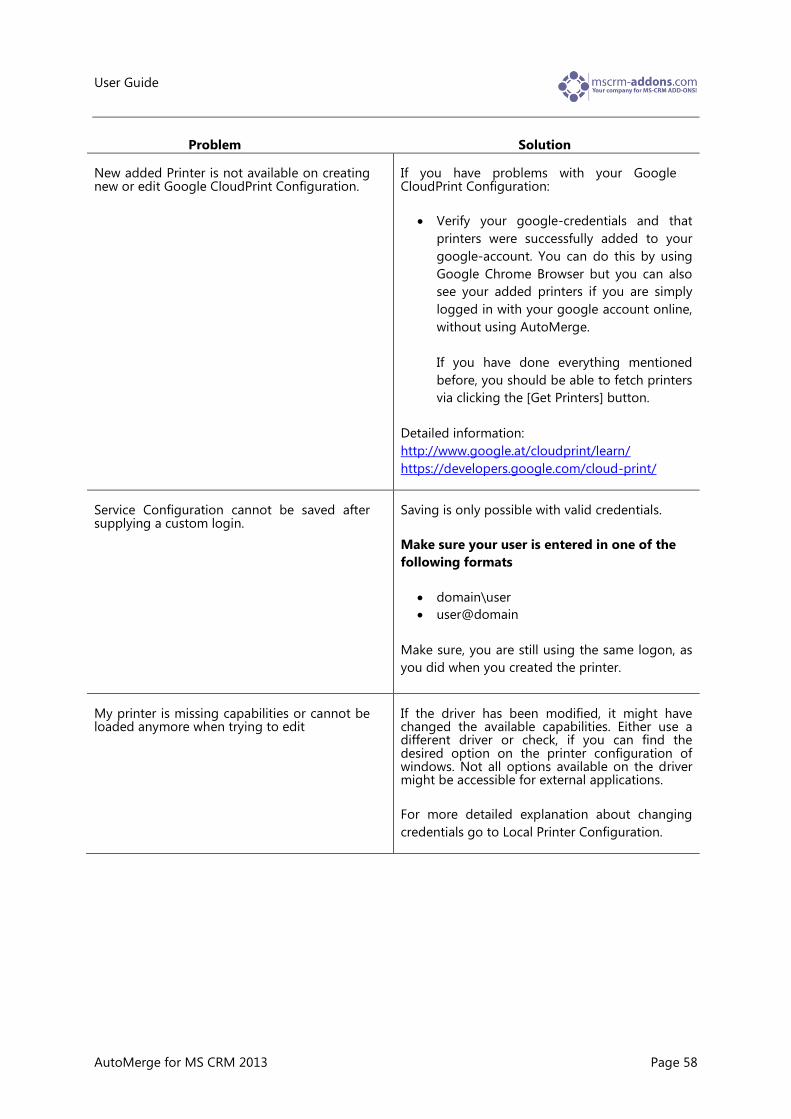
Problem Solution New added Printer is not available on creating new or edit Google CloudPrint Configuration.
If you have problems with your Google CloudPrint Configuration:
Verify your google-credentials and that
printers were successfully added to your
google-account. You can do this by using
Google Chrome Browser but you can also
see your added printers if you are simply
logged in with your google account online,
without using AutoMerge.
If you have done everything mentioned
before, you should be able to fetch printers
via clicking the [Get Printers] button.
Detailed information:
http://www.google.at/cloudprint/learn/
https://developers.google.com/cloud-print/
Service Configuration cannot be saved after supplying a custom login.
Saving is only possible with valid credentials.
Make sure your user is entered in one of the
following formats
domain\user
user@domain
Make sure, you are still using the same logon, as
you did when you created the printer.
My printer is missing capabilities or cannot be loaded anymore when trying to edit
If the driver has been modified, it might have changed the available capabilities. Either use a different driver or check, if you can find the desired option on the printer configuration of windows. Not all options available on the driver might be accessible for external applications.
For more detailed explanation about changing
credentials go to Local Printer Configuration.

User Guide
AutoMerge for MS CRM 2013 Page 59
7.3.2 How to add a service-based printing step to a workflow or dialog
After creating the local or cloud printers with the ServiceManagment they are available for your dialog
or workflow. In this chapter we go through the steps needed to use them in the dialog or workflow.
1. Start your CRM. Go to the ‘Processes’ within the ‘Settings’-area. Here, you have the possibility to
create a new workflow. See next screenshots:
2. Start to create a workflow and to add the ‘CreateDocument’-step. If you would like to add the
service based printing step afterwards, click on ‘Add Step’ (see screenshot, ellipse 1) and chose ‘Create
Record’ from the drop down menu (see screenshot below, ellipse 2).
1
2

User Guide
AutoMerge for MS CRM 2013 Page 60
3. Then, open the drop-down menu within the newly added step and chose ‘MSCRM-ADDONS.com
AutoMergeWorkingItems’ (see next screenshot).
4. Afterwards, click on ‘Set Properties’. See next screenshot:
A new window opens. Within this window, you can continue to appropriately configure the newly
added step. Type in the name of the step (see screenshot below, ellipse 1) and select ‘PrintDocument’
as ‘AutoMergeAction’ (see screenshot below, ellipse 2). Then go to the ‘Print Document’-section and
click on the look-up-field next to the ‘Printer’-field and define to which printer the generated
document should be send (see screenshot below, ellipse 3):
For more information about how to create a template click here and watch our YouTube video.
IMPORTANT: Before choosing the printer within this step, you have to ensure that the printer has
been installed and added appropriately. Furthermore, it is crucial to use the same name a sused during
the printer-installation process. For more details, please see chapter 7.1.

User Guide
AutoMerge for MS CRM 2013 Page 61
1
2
3

User Guide
AutoMerge for MS CRM 2013 Page 62
5. Finish to configure the service-based printing step by adding the ‘PrimaryRecordURL’. To do so, you
have to select ‘CreateDocument:OutputDocumentRef’ from the first drop-down menu of the ‘Look
for’-area within the form assistant on the right (see screenshot, ellipse 1). Afterwards, select
‘RecordURL(Dynamic)’ from the drop-down menu below (see screenshot, ellipse 2).
Then, click on ‘Add’ (see screenshot, ellipse 3) and on ‘OK’ (see screenshot, ellipse 4). Afterwards, the
‘PrimaryRecordURL’-field is automatically filled (see screenshot, ellipse 5). Click ‘Save and Close’. Now
you have appropriately added the service-based printing step.
NOTE: If there is already a printer name specified within the ‘PrintTo-field in the ‘Create Document’-
section, you have to delete this name to avoid double printing (see screenshot, ellipse 6).
Screenshot: add PrimaryRecordURL
1
2
3
4
5
6

User Guide
AutoMerge for MS CRM 2013 Page 63
Exception 1: Adding the service-based printing step to already existing workflows
If you would like to add the service-based printing step to an existing workflow which includes a plug-
in based printing step, you need to do the following:
Chose the workflow which you would like to modify and deactivate it. Then, double-click on it and
open the ‘CreateDocument’-step by clicking on ‘Set Properties’ (see next screenshot, ellipse 1). A new
window will open. Within this window, delete the printer-name (see next screenshot, ellipse 2) and
click on ‘Save and Close’.
After having deleted the plug-in based printer step, you can add the service-based printer step directly
after the already existing ‘Create Document’-step of the workflow. To do so, please follow the steps in
the ‘How to add the service-based printing step to a workflow’-section above.
Exception 2: Adding the service-based printing step to workflows including a ‘Delete
Document’-step
If you would like to add the service-based printing step to a workflow which includes a ‘Delete
Document’-step it is important to know that the service is only checking every 90 seconds if there are
generated documents to be printed.
In the worst case, documents are generated and deleted within this 90 seconds and the service is not
able to print the documents, because they have been already deleted. To avoid this, it is important to
include a ‘Wait’-condition before the ‘Delete Document’-step in your workflow. To do so, follow the
steps below:
1
1

User Guide
AutoMerge for MS CRM 2013 Page 64
1. Click on ‘Add Step’ (see screenshot, ellipse 1) and chose ‘Wait Condition’ from the drop down menu
(see next screenshot, ellipse 2)
2. Click on ‘condition (click to configure)’ within the newly added wait condition (see next
screenshot, ellipse 1). A new window opens. Within this new window, you have to specify the wait
condition. Chose ‘Print Document (MSCRM-ADDONS.com AutoMergeWorkingItem’ from the first drop
down menu, ‘Status’ from the second, ‘Equals’ from the third and ‘Inactive’ from the fourth drop down
menu (see screenshot, ellipse 2).
1
2

User Guide
AutoMerge for MS CRM 2013 Page 65
The condition now causes that generated documents are only deleted if they have been already
printed. Afterwards click on ‘Save and Close’ to complete this workflow step (see screenshot, ellipse 3).
1
2

User Guide
AutoMerge for MS CRM 2013 Page 66
8 Examples
In this section you can find two AutoMerge examples.
8.1 Scenario 1: Workflow
In the first scenario we want to use AutoMerge to achieve the following: For each newly created
contact we want to create a welcome letter and attach it to a CRM letter-activity. This Scenario only
works with On-Premise. For CRM online examples, please read chapter 3.2 “Workflow CRM
online”
INFO: This example workflow can be downloaded here: http://mscrm-
addons.com/LinkClick.aspx?fileticket=Pdo9Ke3QM8A%3d&tabid=176&mid=830
To achieve this, we have to create a new workflow. Within CRM we navigate to “Settings” ->
“Processes” and hit [New]. See screenshot below:
Click on [New] to create a new process. See screenshot above.

User Guide
AutoMerge for MS CRM 2013 Page 67
Thereupon, the following dialog will appear:
We type in a name of the new process (“Generate and attach Welcome letter to letter activity”), select
the “contact” entity and choose the “Workflow” category. Furthermore, we leave the default setting
“New blank process”.
We hit [OK] to proceed.

User Guide
AutoMerge for MS CRM 2013 Page 68
Then the following window will open:
Due to the fact that we want to create a welcome letter for every new contact we have to choose
“Record is created” as starting option. Then we add a new “CreateDocument”-step to the workflow.
See next screenshot:
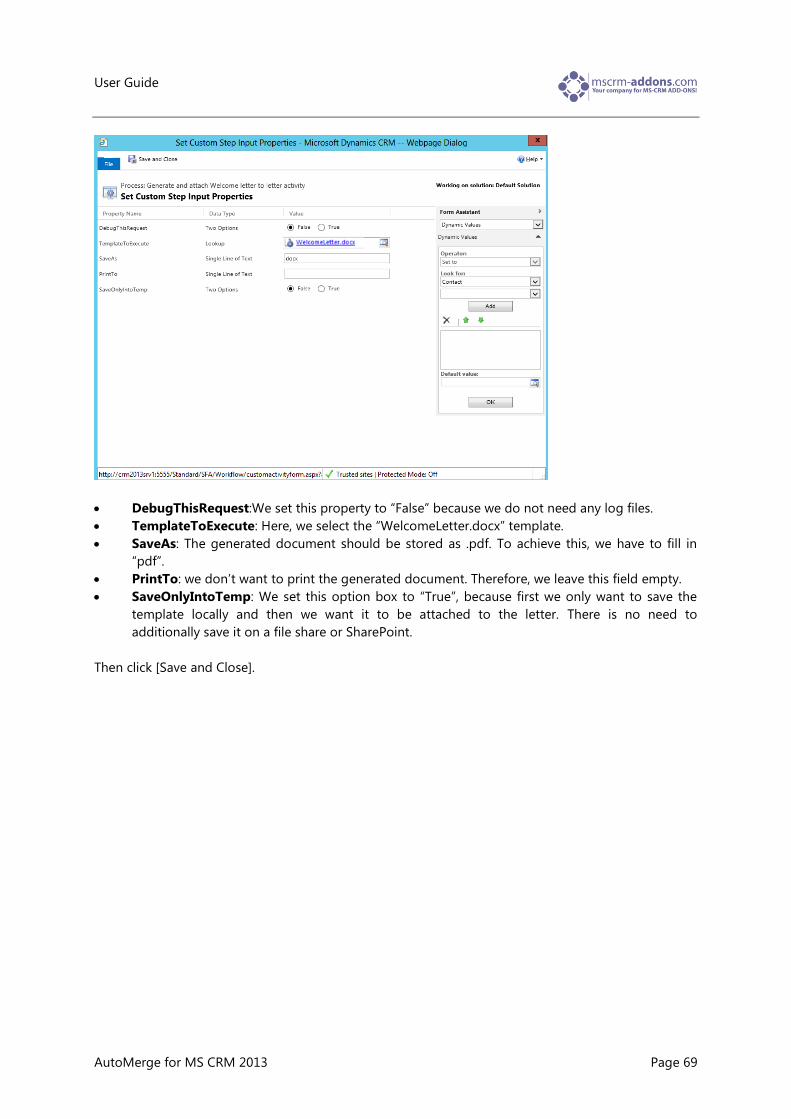
We type in the name “Generate welcome letter” and hit [Set Properties] to define them. Thereupon, a
new dialog will appear:
User Guide
AutoMerge for MS CRM 2013 Page 69
DebugThisRequest:We set this property to “False” because we do not need any log files.
TemplateToExecute: Here, we select the “WelcomeLetter.docx” template.
SaveAs: The generated document should be stored as .pdf. To achieve this, we have to fill in
“pdf”.
PrintTo: we don’t want to print the generated document. Therefore, we leave this field empty.
SaveOnlyIntoTemp: We set this option box to “True”, because first we only want to save the
template locally and then we want it to be attached to the letter. There is no need to
additionally save it on a file share or SharePoint.
Then click [Save and Close].

User Guide
AutoMerge for MS CRM 2013 Page 70
Next, we want to create a letter to which the generated document will be attached later. To achieve
this, we add the standard workflow step “Create Record” to the workflow. We type in the name “Create
Letter”, choose “letter” in the drop down box and hit the “Set Properties”-button.
We selecte any user as sender.
The “Recipient” should be the newly created contact. This can be achieved by using the “Form
Assistant” at the right side of the window: First, we place the cursor in the “Recipient” field. Then, we
select the “Contact” entity and its “Contact” field. Afterwards, we hit [Add] and [Ok] to include it. The
“Regarding” field is set automatically.
We hit [Save and Close] to proceed.
Next, we have to attach the generated document to the created letter. This can be done by using the
“AttachToLetter” request of the AutoMerge steps. We add this step, type in the name “Attach
Document To Letter” and hit [Set Properties] again. Thereupon, the following dialog will appear:

User Guide
AutoMerge for MS CRM 2013 Page 71
Within this dialog, we define the values of the following properties:
DebugThisRequest: We set this property to “False” because we do not need any log files.
LetterToAttach: Here we have to refer to the before created letter. We do this by using the
“Form Assistant” again. First, we set the cursor in the field of the property. Then, we select
“Create Letter (Letter)” of the “Local Values” like shown in the screenshot above. Then, we hit
[Add] and [OK].
DocumentGUID: Here we have to refer to the document generated before. This can be
achieved similarly to the “LetterToAttach” property. But in this case we select “Generate
welcome letter:OutputDocumentRef (MSCRM-ADDONS.com User/Temp Settings)” and hit [Add]
and [Ok].

User Guide
AutoMerge for MS CRM 2013 Page 72
Then, the dialog will look like this:
We complete our adjustment by pressing [Save and Close].
The final part of our workflow is to delete the temporary document again, because it is already
attached to the letter and we don’t need it any more. For that, we add the “DeleteTempDocument”
step at the end of the workflow. We type in the name “Delete Temp Document” and hit [Set
Properties].
Then, the following window will open:

User Guide
AutoMerge for MS CRM 2013 Page 73
Here we only have to set two properties.
DebugThisRequest: We set this property to “False” because we do not need any log files.
DocumentGUID: Here we have to refer to the document generated before. To achieve this we
do the following: Set the cursor into the value field. Then we select “Generate welcome
letter:OutputDocumentRef (MSCRM-ADDONS.com User/Temp Settings)” from the “Form
Assistant” and hit [Add] and [Ok].
Then, after all properties have been set correctly, we hit [Save and Close].
The finished workflow will look like this:
After hitting [Activate] the workflow will be enabled and we can try it out.
To do this, we create a new contact and navigate to “Workflows”. After a short duration we are able to
find our configured workflow there (shown in the screenshot below).

User Guide
AutoMerge for MS CRM 2013 Page 74
Under “Activities”, we can find the created letter:
We open it and navigate to the “Notes”-section where we can find the attached welcome letter.
User Guide
AutoMerge for MS CRM 2013 Page 75
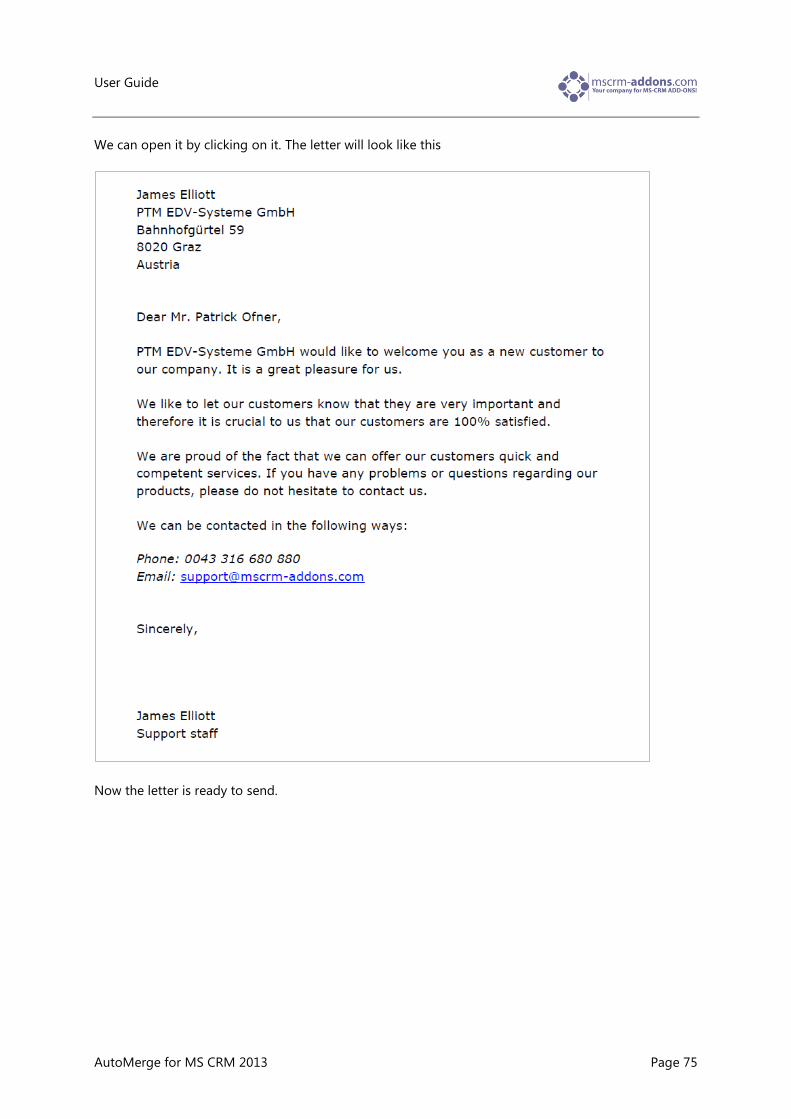
We can open it by clicking on it. The letter will look like this
Now the letter is ready to send.

User Guide
AutoMerge for MS CRM 2013 Page 76
8.2 Scenario 2: Dialog
In this second scenario we want to use AutoMerge to achieve the following: After the user has chosen
or opened a quote he should have the possibility to select a template for the merge process. Further
on he should also be able to define the file extension of the generated document and if the document
should be attached to an email or letter. If the user chooses attach it to a letter, he should have the
possibility to define whether he wants to print the letter or not.
If the user chooses “attach to email” it should be sent automatically.
This scenario only works with On-Premise. This Scenario only works with On-Premise. For CRM
online examples, please read chapter 3.2 “Workflow CRM online”
We put this into practise by using the AutoMerge functionality inside a CRM dialog.
INFO: This example dialog can be downloaded here: http://mscrm-
addons.com/LinkClick.aspx?fileticket=UYKRsDlYho0%3d&tabid=176&mid=830
Within CRM, we navigate to “Settings” -> “Processes” and hit [New].
In the popped up window we type in a name of the process (“Generate Standard Quote”), select
“Quote” as entity and choose the “Dialog” category.
We hit [Ok] to continue.

User Guide
AutoMerge for MS CRM 2013 Page 77
The following window will open:
8.2.1 Part 1: User Interaction
First, the user should be able to select a template from a pick list. Therefore, we add the “Query Crm
Data”-step to our dialog. We define the name “Retrieve Standard Templates” and hit [Set Properties].
We use the popped up window to define a query. It will retrieve all templates of the type “quote”
starting with “Standard_Quote_” of the “DocumentsCorePack Templates”-entity.
We hit [Save and Close] to proceed.

User Guide
AutoMerge for MS CRM 2013 Page 78
Next, we add a new page to the dialog and type in the name “Quote Templates”. Underneath, we
include a new “Prompt and Response” with the name “Which Template do you want?”
To define its properties we hit [Set Properties]:

User Guide
AutoMerge for MS CRM 2013 Page 79
We define “Please choose a template” as “Prompt Text” and set the “Response Type” to “Option Set
(picklist)”. We check “Query CRM data” then select “Retrieve Standard Templates” and use the “Name”-
column.
We hit [Save and Close] to continue.
Next, we want to give the user the possibility to select the file extension of the generated document.
Because of that, we add a further “Page” to our dialog and name it “File Types”. Same as above, we
add a “Prompt and Response”-step to it. We name it “What file type do you want?”.
We click on [Set Properties] to set them up.
The “Prompt Text” should be “Please choose a file type.” As “Response Type” we choose “Option Set
(picklist)” again. But in this case we check “Define Value” and add “docx”, “pdf”, epub” and “html” as
“Response Values”. This can be achieved by clicking on the green cross.
We hit [Save and Close] to proceed.
The final part is to provide the user the possibility to select if he wants to attach the generated
document to an email, to a letter or to a letter and print it out.
For that we add a further “Page” to the dialog and name it “Actions”. Underneath, we add a “Prompt
and Response”-step as well. We give it the name “What do you want to do with the document?”

User Guide
AutoMerge for MS CRM 2013 Page 80
We hit [Set Properties] to set them up.
We define “Please choose an action” as “Prompt Text” and select the “Response Type” “Options Set
(picklist)”. Then we check “Define Values” and add the following items by hitting the green cross to the
list:
Name: AttachToEmail Value: AttachToEmail
Name: AttachToLetter Value: AttachToLetter
Name: AttachToLetterAndPrint Value: AttachToLetterAndPrint
We hit [Save and Close] to proceed.

User Guide
AutoMerge for MS CRM 2013 Page 81
8.2.2 Part 2: AutoMerge steps
Next, we add a “Check Condition”-step with the name “Print or not”. We use it to decide if the
document should only be generated or if it should be printed as well.
To define it, we click on the condition itself:
We select the “What do you want to do with the document?” prompt and response, created before.
Next, we choose its “Response Value” and define that it has to “Equals” “AttachToLetterAndPrint”.
We complete the condition by clicking [Save and Close].
8.2.2.1 Part 2.1: Generate and print
If this condition is true we want to generate and print the document and attach it to a new letter.
Therefore, we add the “GenerateDocument”-step of the AutoMerge functionalities to it underneath.
We name it “Generate and print document” and hit [Set Properties].
This window allows us to define the following properties:
User Guide
AutoMerge for MS CRM 2013 Page 82
DebugThisRequest: We set this property to “False” because we do not need any log files.
TemplateToExecute: Here we have to refer to the template chosen from the user before. To
achieve this, we put the cursor into the field and use the “Form Assistant” on the right side of
the window. We select the “Which Template do you want? (DocumentsCorePack Template)”-
prompt and response as shown in the screenshot above. Then we select “DocumentsCorePack
Template” hit [Add] and [Ok].
SaveAs: Here we have to refer to the selected file type. This works the same way as for the
property above, except that we select “What file type do you want?” and “Response Value”.
PrintTo: We are using this property to define the path of a network printer. In this case
“\\tilsiter\HP LaserJet P2015 Series PCL 6”.
SaveOnlyIntoTemp: We set this property to “True”.
We hit [Save and Close] to proceed.
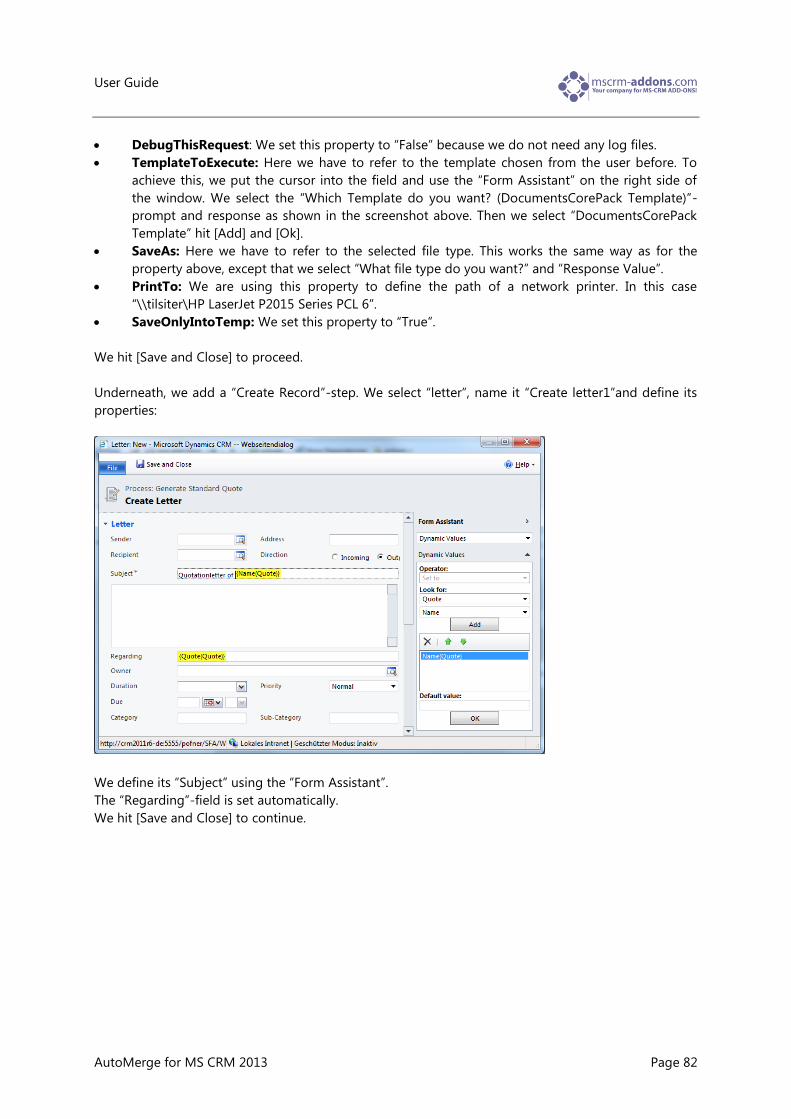
Underneath, we add a “Create Record”-step. We select “letter”, name it “Create letter1”and define its
properties:
We define its “Subject” using the “Form Assistant”.
The “Regarding”-field is set automatically.
We hit [Save and Close] to continue.
User Guide
AutoMerge for MS CRM 2013 Page 83
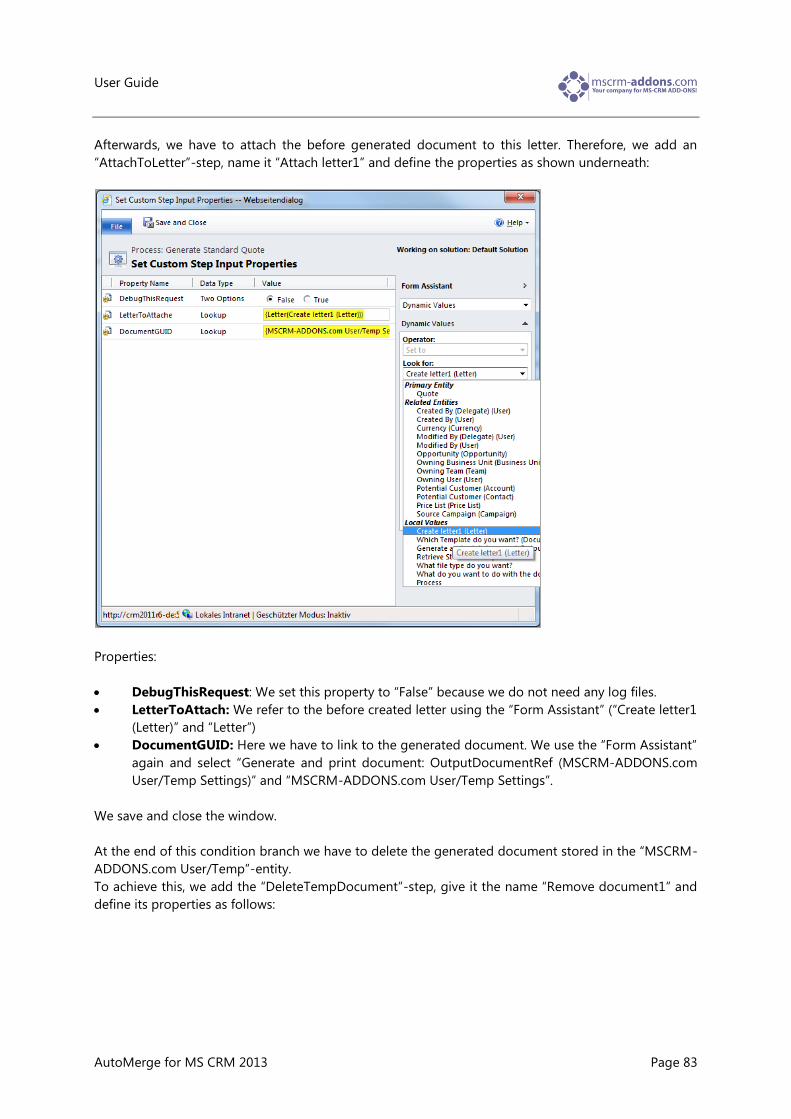
Afterwards, we have to attach the before generated document to this letter. Therefore, we add an
“AttachToLetter”-step, name it “Attach letter1” and define the properties as shown underneath:
Properties:
DebugThisRequest: We set this property to “False” because we do not need any log files.
LetterToAttach: We refer to the before created letter using the “Form Assistant” (“Create letter1
(Letter)” and “Letter”)
DocumentGUID: Here we have to link to the generated document. We use the “Form Assistant”
again and select “Generate and print document: OutputDocumentRef (MSCRM-ADDONS.com
User/Temp Settings)” and “MSCRM-ADDONS.com User/Temp Settings”.
We save and close the window.
At the end of this condition branch we have to delete the generated document stored in the “MSCRM-
ADDONS.com User/Temp”-entity.
To achieve this, we add the “DeleteTempDocument”-step, give it the name “Remove document1” and
define its properties as follows:
User Guide
AutoMerge for MS CRM 2013 Page 84
We use the “DocumentGUID”-property to refer to the generated document. For that, we select
“Generate and print document: OutputDocumentRef (MSCRM-ADDONS.com User/Temp Settings)”
and “MSCRM-ADDONS.com User/Temp Settings”.
8.2.2.2 Part 2.2: Generate only
Next, we have to focus the else branch of the condition. It will be executed if the user has selected
“AttachToEmail” or ”AttachToLetter”.
First, we have to add the “Default Action”–step (else branch) to create the if condition.
Then, we add a new “CreateDocument”-step with the name “Generate document only” to the else
branch. We define the properties same as in the if branch before, except that we leave the “PrintTo”-
property empty because we only want to create the document.
Next, we have to add a further condition to this else branch. If the user has chosen “AttachToEmail” we
have to use an email, otherwise (“AttachToLetter”) we have to use a letter.
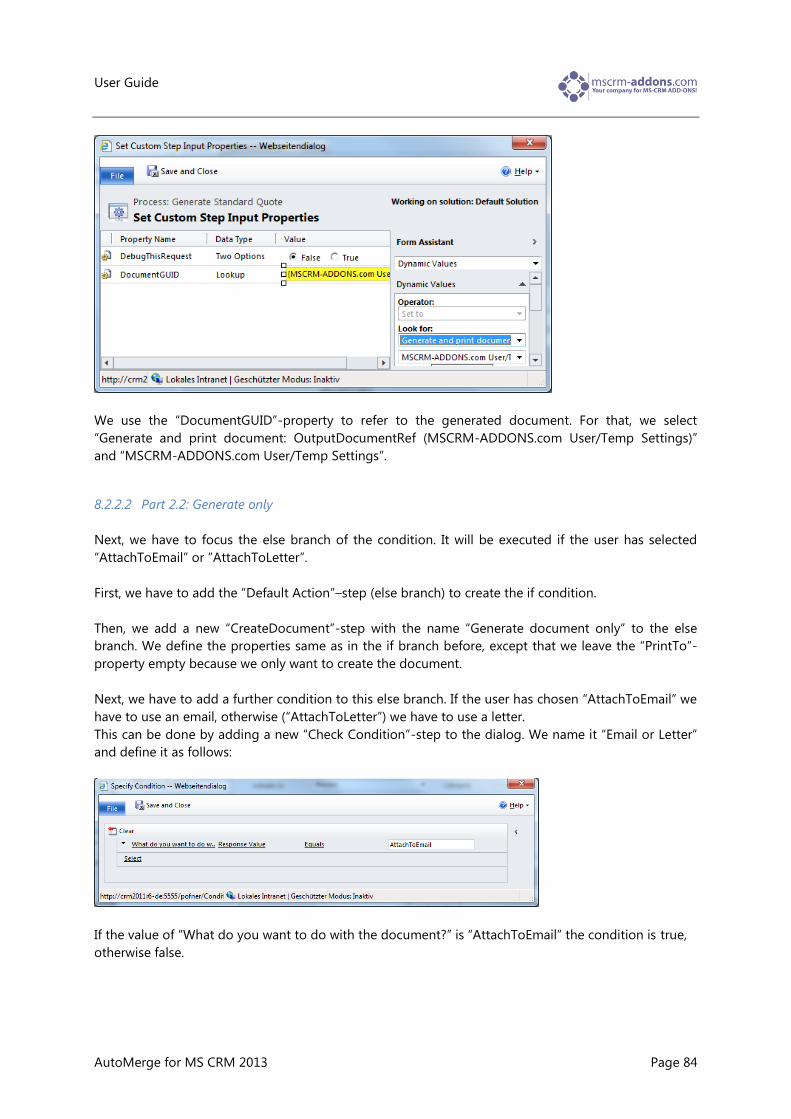
This can be done by adding a new “Check Condition”-step to the dialog. We name it “Email or Letter”
and define it as follows:
If the value of “What do you want to do with the document?” is “AttachToEmail” the condition is true,
otherwise false.
User Guide
AutoMerge for MS CRM 2013 Page 85
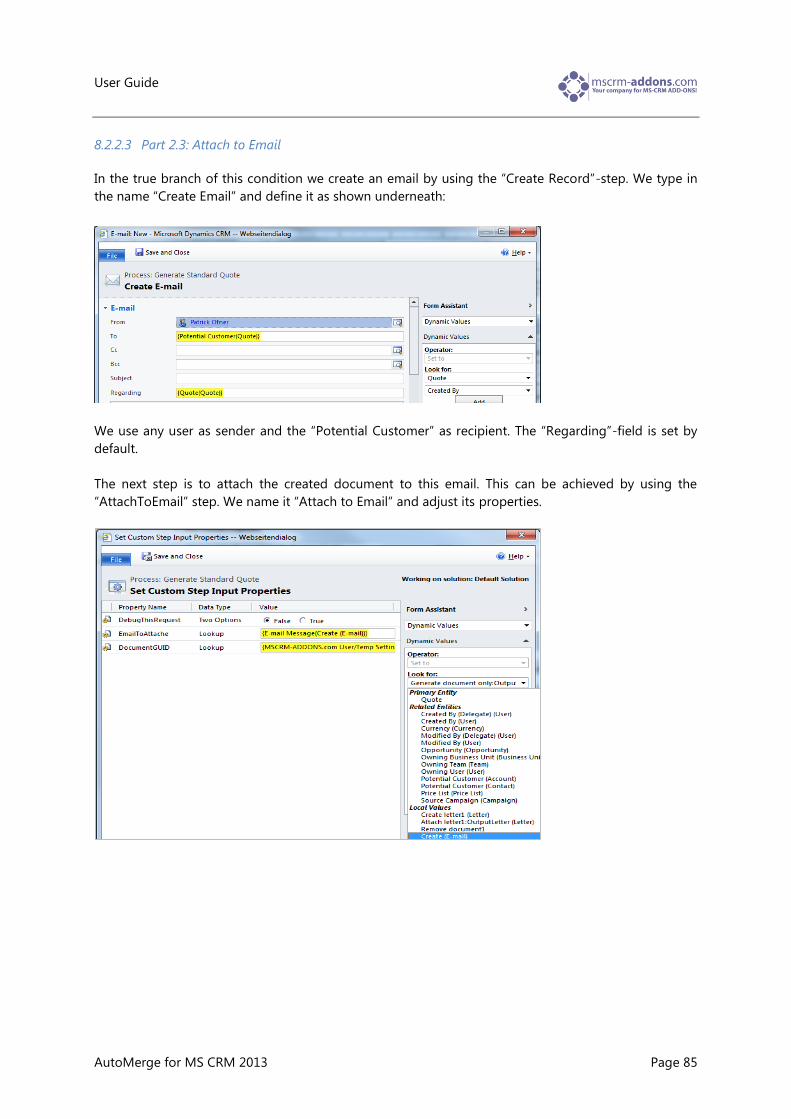
8.2.2.3 Part 2.3: Attach to Email
In the true branch of this condition we create an email by using the “Create Record”-step. We type in
the name “Create Email” and define it as shown underneath:
We use any user as sender and the “Potential Customer” as recipient. The “Regarding”-field is set by
default.
The next step is to attach the created document to this email. This can be achieved by using the
“AttachToEmail” step. We name it “Attach to Email” and adjust its properties.
User Guide
AutoMerge for MS CRM 2013 Page 86
Properties:
DebugThisRequest: We set this property to “False” because we do not need any log files.
LetterToAttach: We refer to the before created email using the “Form Assistant” (“Create (Email)”
and “E-mail Message”).
DocumentGUID: Here we have to link to the generated document. We use the “Form Assistant”
again and select “Generate document only: OutputDocumentRef (MSCRM-ADDONS.com
User/Temp Settings)” and “MSCRM-ADDONS.com User/Temp Settings”.
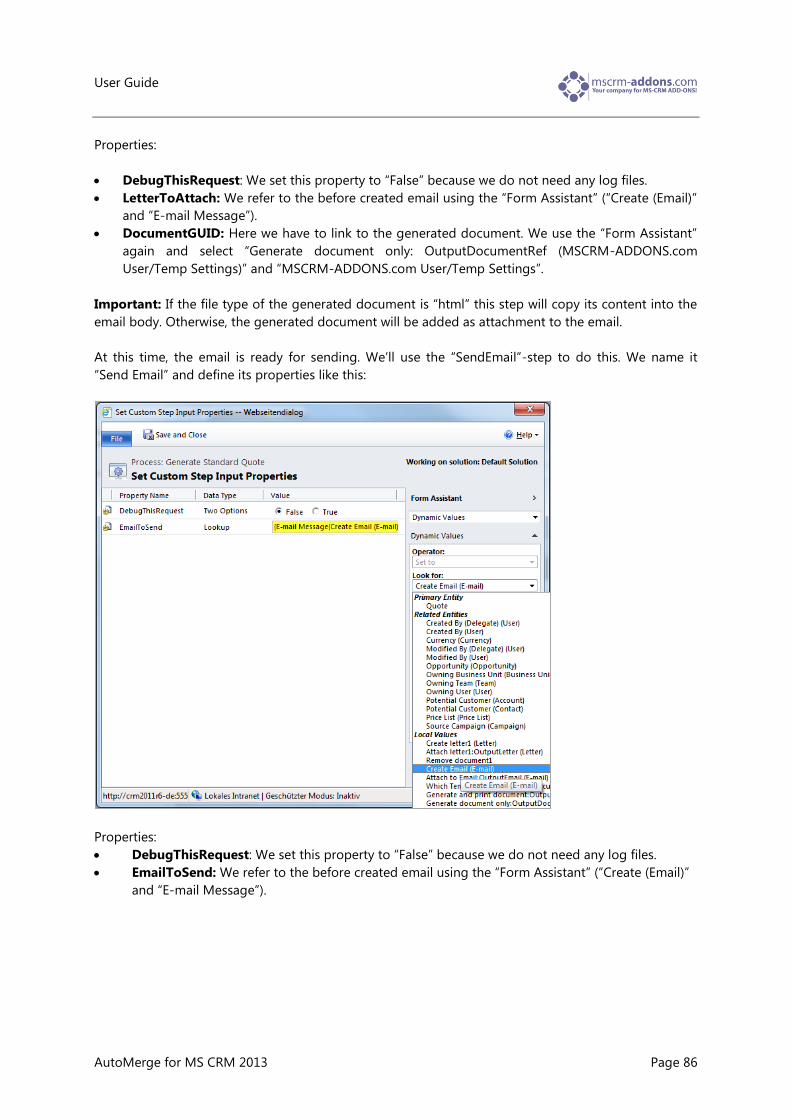
Important: If the file type of the generated document is “html” this step will copy its content into the
email body. Otherwise, the generated document will be added as attachment to the email.
At this time, the email is ready for sending. We’ll use the “SendEmail”-step to do this. We name it
“Send Email” and define its properties like this:
Properties:
DebugThisRequest: We set this property to “False” because we do not need any log files.
EmailToSend: We refer to the before created email using the “Form Assistant” (“Create (Email)”
and “E-mail Message”).
User Guide
AutoMerge for MS CRM 2013 Page 87
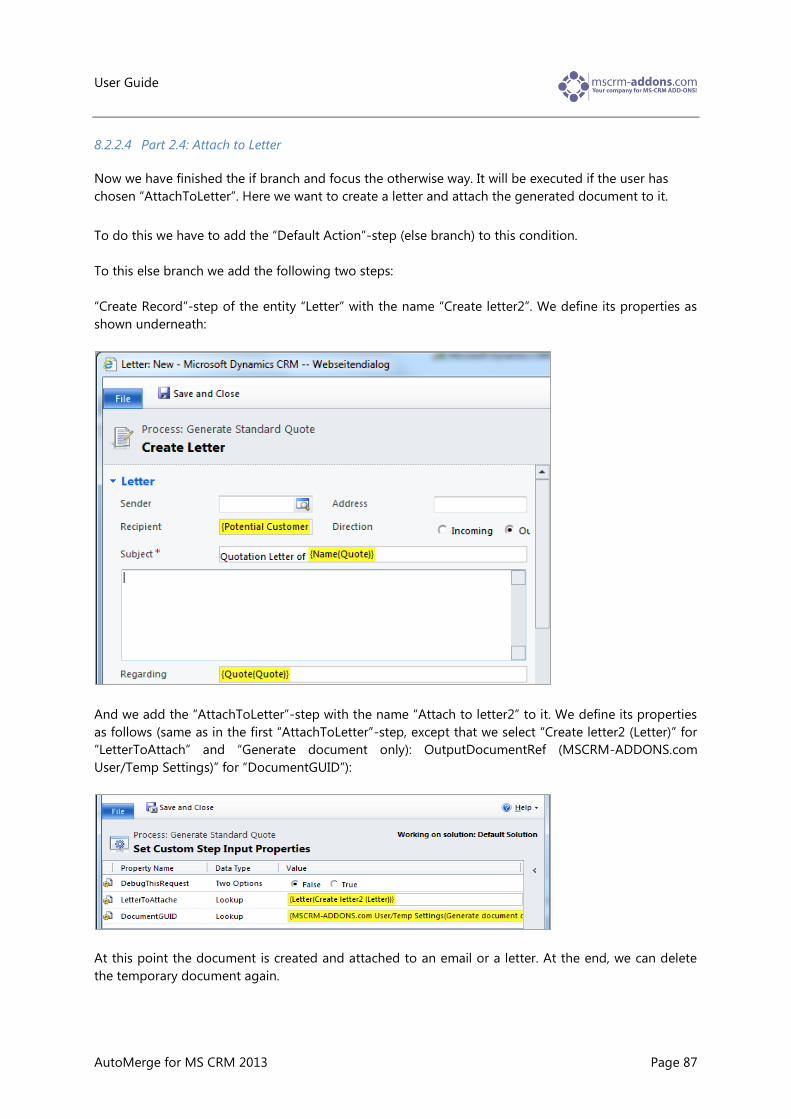
8.2.2.4 Part 2.4: Attach to Letter
Now we have finished the if branch and focus the otherwise way. It will be executed if the user has
chosen “AttachToLetter”. Here we want to create a letter and attach the generated document to it.
To do this we have to add the “Default Action”-step (else branch) to this condition.
To this else branch we add the following two steps:
“Create Record”-step of the entity “Letter” with the name “Create letter2”. We define its properties as
shown underneath:
And we add the “AttachToLetter”-step with the name “Attach to letter2” to it. We define its properties
as follows (same as in the first “AttachToLetter”-step, except that we select “Create letter2 (Letter)” for
“LetterToAttach” and “Generate document only): OutputDocumentRef (MSCRM-ADDONS.com
User/Temp Settings)” for “DocumentGUID”):
At this point the document is created and attached to an email or a letter. At the end, we can delete
the temporary document again.

User Guide
AutoMerge for MS CRM 2013 Page 88
Therefore, we add the “DeleteTempDocument”-step outside of the if condition to our dialog. The
reason for that is that we want to delete the document in any case (“AttachToEmail” or
“AttachToLetter”). We name it “Remove document 2” and define its properties as shown below:
Properties:
DebugThisRequest: We set this property to “False” because we do not need any log files.
DocumentGUID: Here we have to link to the generated document. We use the “Form Assistant”
again and select “Generate document only: OutputDocumentRef (MSCRM-ADDONS.com
User/Temp Settings)” and “MSCRM-ADDONS.com User/Temp Settings”.
Now we are finished.
After the dialog has been activated, it can be used.

User Guide
AutoMerge for MS CRM 2013 Page 89
8.2.3 Result Dialog
Part 1: User Interaction
Part 2:
AutoMerge steps
Part 2.1:
Generate
and print
Part 2.2:
Generate only
Part 2.2.1:
Attach to Email
Part 2.2.2:
Attach to
Letter

User Guide
AutoMerge for MS CRM 2013 Page 90
8.2.4 Test Dialog
To start our dialog, we open a quote and hit “Background Processes” in the ribbon.
Thereupon, we choose our dialog and hit [Ok]:

User Guide
AutoMerge for MS CRM 2013 Page 91
First, we can choose between all standard templates. We choose “Standard_Quote_”English.docx” and
hit [Next].
In this window we have the possibility to select the file type. We choose “pdf” and hit [Next] to
continue.

User Guide
AutoMerge for MS CRM 2013 Page 92
Then we can define what should happen with the generated document. We select “AttachToEmail” and
hit [Next] to proceed.
After a short time, this window will pop up and let us know that the dialog has ended.
We hit [Finish] to close it.
User Guide
AutoMerge for MS CRM 2013 Page 93
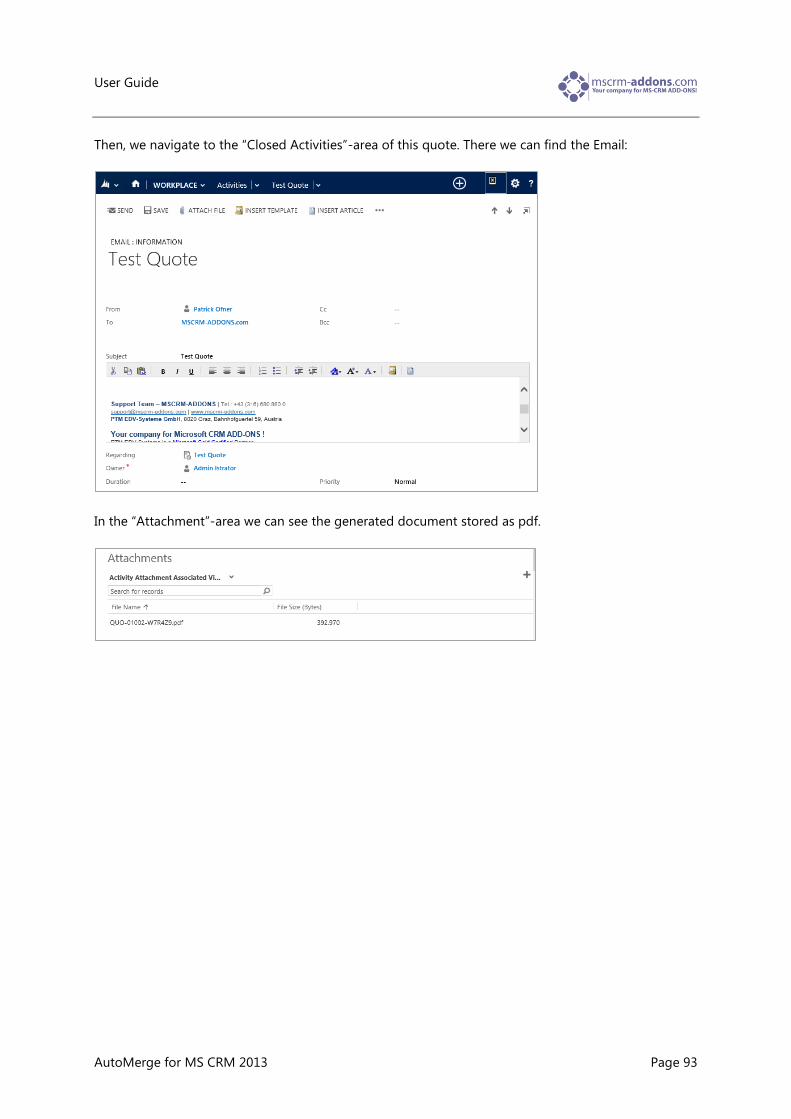
Then, we navigate to the “Closed Activities”-area of this quote. There we can find the Email:
In the “Attachment”-area we can see the generated document stored as pdf.

User Guide
AutoMerge for MS CRM 2013 Page 94
User Guide
AutoMerge for MS CRM 2013 Page 95
9 How to activate debugging for AutoMerge
This article describes how to activate debugging for AutoMerge for Microsoft Dynamics CRM 2013.
Basically, there are two possibilities to enable debugging.
Solution 1: Activate file debugging by using the AutoMerge configuration (Recommended).
Solution 2: Activate debugging by using the AutoMerge configuration.
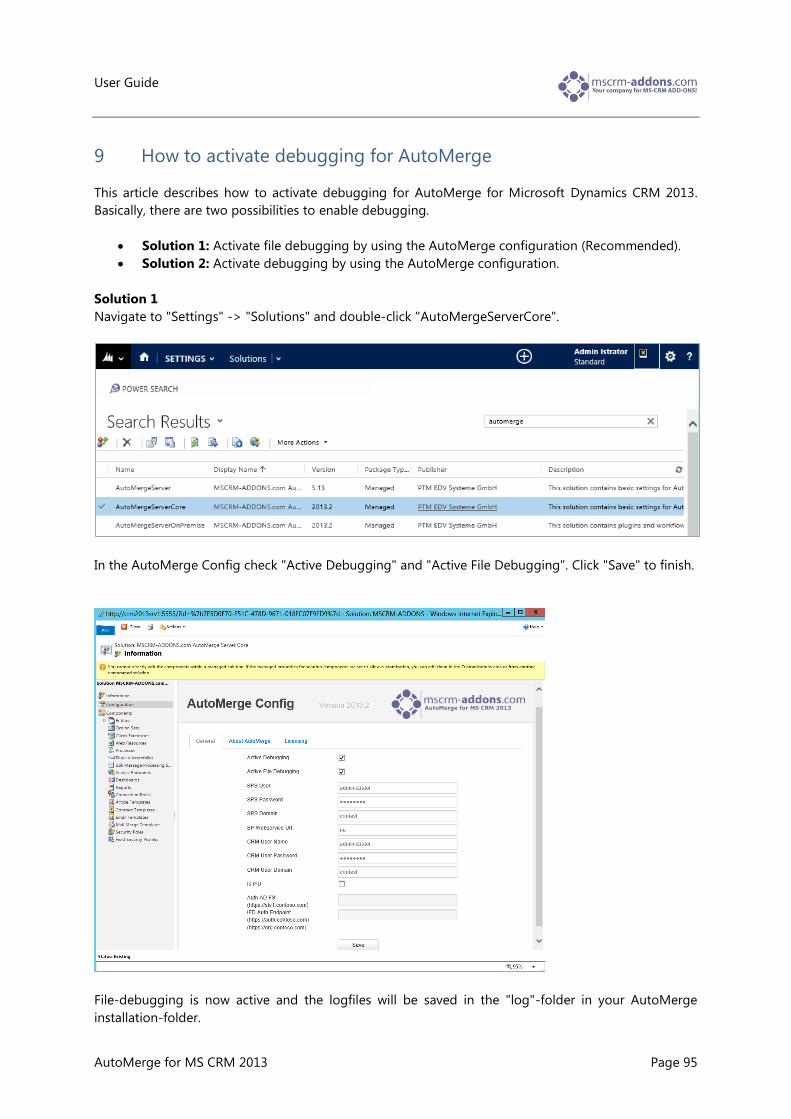
Solution 1
Navigate to "Settings" -> "Solutions" and double-click "AutoMergeServerCore".
In the AutoMerge Config check "Active Debugging" and "Active File Debugging". Click "Save" to finish.
File-debugging is now active and the logfiles will be saved in the "log"-folder in your AutoMerge
installation-folder.

User Guide
AutoMerge for MS CRM 2013 Page 96
Navigate to the installation-path of AutoMerge and send the files in the "log"-folder with an error
description to our support address ([email protected]).
Example: C:\Program Files (x86)\PTM EDV-Systeme GmbH\AutoMerge for Microsoft CRM 2011\log
Solution 2
Within your CRM, navigate to “Settings” -> “Solutions” and double-click on the “AutoMergeServer”-
solution. (See next screenshot)
c
c
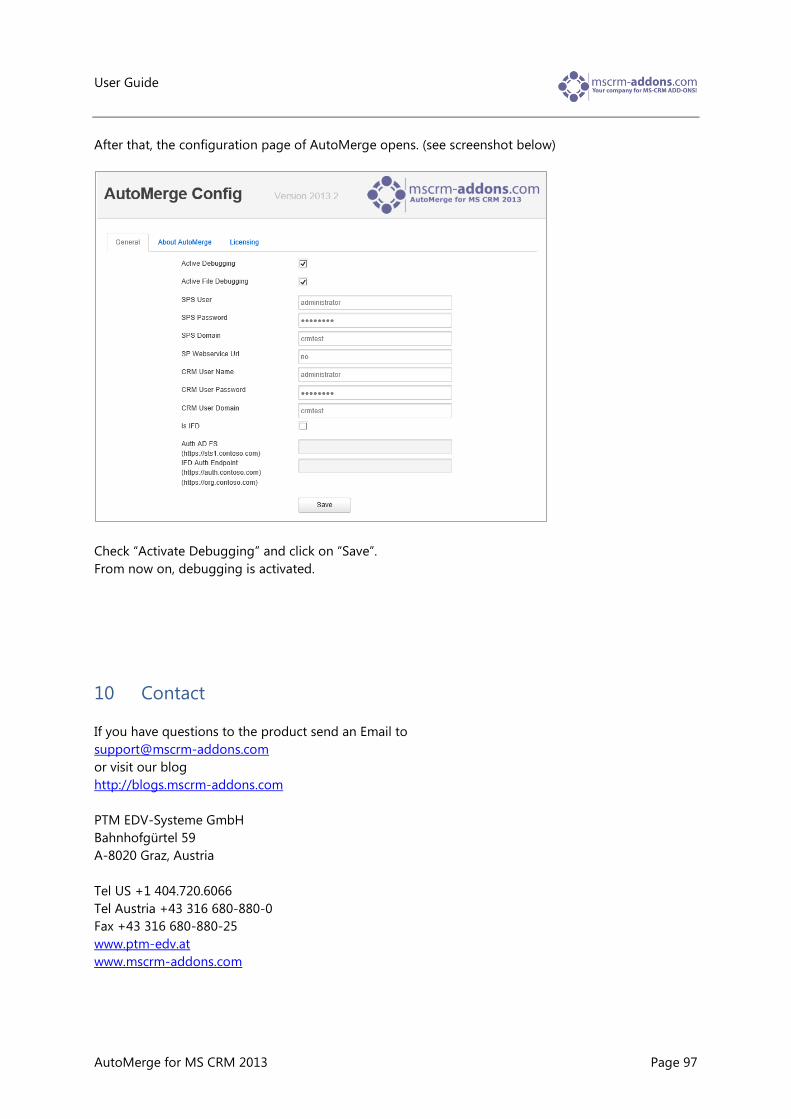
User Guide
AutoMerge for MS CRM 2013 Page 97
After that, the configuration page of AutoMerge opens. (see screenshot below)
Check “Activate Debugging” and click on “Save”.
From now on, debugging is activated.
10 Contact
If you have questions to the product send an Email to
or visit our blog
http://blogs.mscrm-addons.com
PTM EDV-Systeme GmbH
Bahnhofgürtel 59
A-8020 Graz, Austria
Tel US +1 404.720.6066
Tel Austria +43 316 680-880-0
Fax +43 316 680-880-25
www.ptm-edv.at
www.mscrm-addons.com