ATLAS.ti 5.2: A Qualitative Data Analysis Tool
27
ATLAS.ti 5.2: A Qualitative Data Analysis Tool Part I: Terminology of ATLAS.ti .....................................................................2 Part II: Design logic ...................................................................................... 3 Part III: The Atlas.ti Workspace....................................................................4 Toolbars .......................................................................................................5 Main Toolbar .................................................................................................5 Primary Document Toolbar ............................................................................. 6 Part IV: Optimizing Textual Primary Documents ........................................... 7 To save a Word document (.doc) as .rtf ........................................................... 7 Part V: Create and manage a basic HU .......................................................... 8 Part VI: How ATLAS.ti Handles Documents ................................................. 10 Example file structure .................................................................................. 10 Using Copy Bundle ...................................................................................... 11 To create a Copy Bundle ............................................................................ 11 Unbundle (install) your project ...................................................................... 12 To unbundle your project ........................................................................... 12 Part VII: Editing textual primary documents............................................... 13 To edit a textual primary document ............................................................... 13 Part VIII: Basic analysis tools: quotations and coding ............................... 14 Quotations.................................................................................................. 14 Coding ....................................................................................................... 15 Free Coding ............................................................................................. 15 Open Coding ............................................................................................ 16 List Coding............................................................................................... 16 Auto Coding ............................................................................................. 17 Optimizing Documents for Auto-coding ........................................................ 18 In-Vivo Coding ......................................................................................... 19 Quick ...................................................................................................... 19 Part IX: Modifying quotations and codes ..................................................... 20 To correct a quotation .................................................................................. 20 To rename a code........................................................................................ 20 Unlink a quotation (separate it from a code) ................................................... 21 Delete a quotation ....................................................................................... 21 Delete a code .............................................................................................. 22 Part X: Comments and Memos..................................................................... 22 To create a comment: .................................................................................. 22 A little bit more about memos… ..................................................................... 24 To create a “free” memo .............................................................................. 24 Creating a memo from text ........................................................................... 25 Attach a memo to another object .................................................................. 26 Part XI: Coding Support for Beginning Theory Development ....................... 26 References .................................................................................................. 27
Transcript of ATLAS.ti 5.2: A Qualitative Data Analysis Tool
ATLAS.ti 5.2: A Qualitative Data Analysis Tool
Part I: Terminology of ATLAS.ti ..................................................................... 2 Part II: Design logic ...................................................................................... 3 Part III: The Atlas.ti Workspace.................................................................... 4
Toolbars ....................................................................................................... 5 Main Toolbar ................................................................................................. 5 Primary Document Toolbar ............................................................................. 6
Part IV: Optimizing Textual Primary Documents ........................................... 7
To save a Word document (.doc) as .rtf ........................................................... 7 Part V: Create and manage a basic HU .......................................................... 8 Part VI: How ATLAS.ti Handles Documents ................................................. 10
Example file structure .................................................................................. 10 Using Copy Bundle ...................................................................................... 11
To create a Copy Bundle ............................................................................ 11 Unbundle (install) your project ...................................................................... 12
To unbundle your project ........................................................................... 12 Part VII: Editing textual primary documents ............................................... 13
To edit a textual primary document ............................................................... 13 Part VIII: Basic analysis tools: quotations and coding ............................... 14
Quotations .................................................................................................. 14 Coding ....................................................................................................... 15
Free Coding ............................................................................................. 15 Open Coding ............................................................................................ 16 List Coding............................................................................................... 16 Auto Coding ............................................................................................. 17 Optimizing Documents for Auto-coding ........................................................ 18 In-Vivo Coding ......................................................................................... 19 Quick ...................................................................................................... 19
Part IX: Modifying quotations and codes ..................................................... 20
To correct a quotation .................................................................................. 20 To rename a code ........................................................................................ 20 Unlink a quotation (separate it from a code) ................................................... 21 Delete a quotation ....................................................................................... 21 Delete a code .............................................................................................. 22
Part X: Comments and Memos ..................................................................... 22
To create a comment: .................................................................................. 22 A little bit more about memos… ..................................................................... 24 To create a “free” memo .............................................................................. 24 Creating a memo from text ........................................................................... 25 Attach a memo to another object .................................................................. 26
Part XI: Coding Support for Beginning Theory Development ....................... 26 References .................................................................................................. 27

ATLAS.ti 5.2: A Qualitative Data Analysis Tool
Center for Student Success Andrea Harvey University of New Mexico [email protected]
Page 2 of 27
Part I: Terminology of ATLAS.ti As you work with the program, these somewhat arbitrary terms take on greater meaning. Hermeneutic Unit (HU): This is the skeletal structure of your project. Hermeneutics is defined as the science of interpreting text empirically. Primary Documents (PDs): Your data – usually textual – but can also be video and images. Sometimes Atlas.ti refers to PDS as PTs (primary text); they are the same. PDs may include transcribed interviews, field notes, observations, etc. A PD is not the same as your actual data; it is called a PD once it is linked to your project. Quotation: These are the pieces of data (text, video, etc.), of any length, that are selected for analysis. Think of it as the text you might highlight on paper. Codes: Terms of analysis or interpretation you assign to your data (text). Think of codes as the notations you make in the margins of your documents. Objects: Items created in your HU (codes, memos, families, etc.). Memos: Developing ideas or notes as you analyze and code your data. Memos can be “free” or attached to specific PDs or codes. Some people use memos to keep a diary of their thoughts throughout the research process, eventually using it as a draft for a publication. Comments: Comments are similar to memos, but they really act more like screen notes. They cannot be exported from Atlas.ti like memos and other objects. Families: If you have many PDS, families can help you group or categorize them. For instance, a family could be all of your interviews or field notes. Networks: At the highest level of analysis and interpretation are networks. Here you can define conceptual relationships between your objects (codes, quotations, etc.). For instance, you may find a relationship between one code “motivation” is responsible for growth in “reading ability.”

ATLAS.ti 5.2: A Qualitative Data Analysis Tool
Center for Student Success Andrea Harvey University of New Mexico [email protected]
Page 3 of 27
Part II: Design logic Atlas.ti is designed to be flexible and allow you to record your thoughts at any time in the analysis process. Therefore, the workspace of the program has many functions and tools that can seem overwhelming to the novice. However, the program is almost limitless in its qualitative analysis capabilities. In fact, the design of the program reflects the non-linear approach to qualitative research. There is a basic work procedure that can help the novice user approach their first use. It is as follows: A typical work-procedure:
1. Ready your data for use in the program. Transcribe all written notes into a word-processing program and then proofread, edit and format them (covered later in this document) for use in the program.
2. Create the initial project: a hermeneutic unit. The HU's main purpose is to act
as an organizational container for findings, codes, memos, structures and data.
3. Create primary documents (PDs) from anywhere on your computer. The HU
ties all of these PDs together in a single unit. Note: The HU only stores links to these documents on your computer. It is a good idea to store all PDs within an overall project folder, where you also store the HU. If you move your PDs, the HU may not be able to call them up later. 4. Begin reviewing your PDs. This is the beginning of the analytical process.
You would begin marking your data with quotations, creating codes and memos, and recording your developing thoughts. This is obviously not a single step but an evolving process.
5. A comparative analysis of coded texts may follow, linking other PDs to the
HU. 6. Families may be created at this point, further linking PDs in groups according
to data type (observations, interviews, video, etc.). Families can also be the foundation for concept or semantic development from codes.
7. If families are created, queries may be used to link different PDs and continue
the recursive nature of qualitative analysis. 8. Creating the final report from the HU and its many components.
Note: ATLAS.ti is flexible and allows you to take less of a linear approach. At the same time, you cannot begin to develop a conceptual theory without some analysis and coding.

ATLAS.ti 5.2: A Qualitative Data Analysis Tool
Center for Student Success Andrea Harvey University of New Mexico [email protected]
Page 4 of 27
Part III: The Atlas.ti Workspace The Workspace The flexibility of Atlas.ti means that you will have many tools and options for accessing those tools to work with. When you open Atlas.ti the first time, you will be presented with a blank HU, pictured below. As you add PDs and begin analyzing and coding your data, your HU will become much more dynamic.
Once you have attached PDs to your HU, these menus will fill up with links to those data sources.
As you create and eventually code quotations, they will appear in this menu.
The codes you create will be displayed in this menu as they are established.
If you create memos, they will be displayed in this menu.

ATLAS.ti 5.2: A Qualitative Data Analysis Tool
Center for Student Success Andrea Harvey University of New Mexico [email protected]
Page 5 of 27
Toolbars Like most Windows-based programs, you can execute the commands of this program from the main menu and its sub-menus, or you can use the toolbars. The main menu, pictured below, has sub-menus for the various commands associated with the HU.
Most of these commands are also available from one click on the toolbar. However, it can be difficult to remember the command that is attached to each tool option. There are two ways to remind yourself:
⇒ Lay your mouse pointer over the button; a description will appear in the gray area at the bottom of the HU window.
⇒ Lay your mouse pointer over the button and right click the mouse; a description will appear in a pop-up window.
In the beginning, you will find some of these tools are never used. Here is a quick reference for those that you will use most often.
Main Toolbar Save HU Query Assign PD Last Quotation

ATLAS.ti 5.2: A Qualitative Data Analysis Tool
Center for Student Success Andrea Harvey University of New Mexico [email protected]
Page 6 of 27
Primary Document Toolbar This toolbar will not become operational until you have a PD loaded into your HU (even the descriptors that appear when activated by your mouse). Again, there are only certain tools that you will use in the beginning; they are explained below
Go line Displays text at a specific line number.
Search
Activates the search tool.
Free Quotation Creates a free quotation from text that is selected.
Open coding Creates a new code.
In-vivo coding Creates a quotation and code from selected text.
Code By list Assigns a code to highlighted text from already exiting codes.
Quick coding Assigns selected code to text as it is highlighted.
Create memo Attach memo to selected text or create a “free memo.”
Modify quotation Enables you to edit or redefine quotation size.
Line number Turns this display option on/off.
Margin Turns this display option on/off.
Display Quotation
Displays current quotation and cursor position.
Zoom
Makes PD text larger. Hold down CTRL key and press button to return text to normal size.

ATLAS.ti 5.2: A Qualitative Data Analysis Tool
Center for Student Success Andrea Harvey University of New Mexico [email protected]
Page 7 of 27
Part IV: Optimizing Textual Primary Documents The majority of your time will be spent working with your primary documents (PDs), whether they be text, audio, graphic, or video. Therefore, it is important to optimize the usefulness of your PDs. In this most recent version of ATLAS.ti, you do not need to make special preparation to your textual PDs, but there are a few recommendations that will make them more useful and flexible in the program. ⇒ ATLAS.ti 5.2 now supports .doc and .html file types. Earlier versions only supported .rtf and .txt file types. ⇒ You can now edit your PDs within the program. However, .doc or .html PDs are
not editable within ATLAS.ti. You will have to make a copy of the original file and save it as .rtf or .txt to access the editing menu.
To save a Word document (.doc) as .rtf: 1. With the file open, select File – Save As. 2. In the Save As type: drop-down menu, select .rtf (Rich Text Format). 3. You now have an exact copy of the Word file, with the same name (if you did not change the name); the only change is that it has a different file extension, .rtf, which can be edited within the program. Note: Editing a textual PD will be covered on page 13 on this document.

ATLAS.ti 5.2: A Qualitative Data Analysis Tool
Center for Student Success Andrea Harvey University of New Mexico [email protected]
Page 8 of 27
Part V: Create and manage a basic HU There is no right or wrong way to create and manage an HU, as stated earlier in this document. There are, however, some steps that you simply must execute to get started. One of the most important steps is to think about organization before you start a new HU. It is in your best interest to save your HU and PDs in the same folder. If you have different types of data, i.e. text, audio, video, it is recommended that you create different folders for each type of media. 1. Open ATLAS.ti. You will see a blank workspace and the following window. 2. If this is your first HU, your only option is to create a new HU. 3. Notice that the program did not prompt you to save; you must do this immediately. 4. Go to the main menu. Select File – Save As. Make certain to save your new HU in an appropriate source. 5. Once you have saved the HU, you will need to attach any PDs that are ready to analyze. 6. Go to the main menu. Select Documents – Assign.

ATLAS.ti 5.2: A Qualitative Data Analysis Tool
Center for Student Success Andrea Harvey University of New Mexico [email protected]
Page 9 of 27
7. Highlight all documents (PDs) you want to link to your HU. You can select more than one document by holding down the SHIFT key and using your mouse to select all documents you would like to assign to your HU. Click Open. Tip: You can also use a drag & drop method to assign PDs to your HU. Simply open the file in which your PDs are stored; drag the file you want to assign to the HU into the ATLAS.ti workspace; and drop it. The file will open in the workspace and appear in your PD drop-down menu. 8. Now all of those PDs are linked to your HU. 9. You should now see all of these documents listed in the drop-down PD menu in your workspace. 10. You can bring a PD into your workspace by selecting it from the drop-down menu. Note: You can assign a PD at any time or a single PD multiple times to your HU. ATLAS.ti assigns your PD a number as it is assigned (PD 1, PD 2, PD 3…). This is helpful if you plan to use a single document more than once in your project but want to code it in a different way. 11. If you would like to remove a PD from the HU, go to the Documents menu or right-click the PD in the drop-down list. Select Disconnect. Note: Disconnecting a PD before it is analyzed is a simple action, but this action is far more complex after you’ve assigned quotations and codes to a PD. Unless you do not plan to use that PD or its associated quotations in your project, it is a good idea to disconnect it. If you do decide to disconnect a PD with attached quotations, you will be asked whether you want to remove its quotations. You will not be deleting the PD’s text; you will simply disconnect those links to the PD and the PD itself from the project.

ATLAS.ti 5.2: A Qualitative Data Analysis Tool
Center for Student Success Andrea Harvey University of New Mexico [email protected]
Page 10 of 27
Part VI: How ATLAS.ti Handles Documents
As a new user, it is important understand how the program actually uses the documents you assign to your project. When you create an HU, ATLAS.ti does not store your text, audio, video, etc. in the project, rather it creates links to those documents, much like the links on a web site. If you’ve ever gotten an “error 404” when attempting to use a link on a web site, this is a similar logic that ATLAS.ti employs when you move or rename a file you’ve linked to your project. Moreover, once you begin analyzing documents, assigning them quotations and codes, ATLAS.ti uses a coordinate system to locate those references in your PDs. Therefore, the makers of ATLAS.ti suggest that you do not use Windows Explorer to copy and/or back-up your project. ATLAS.ti has a built-in feature to help make your project portable: Copy Bundle. The Copy Bundle feature serves two purposes: to migrate projects from one location to another and to provide security to back-up and restore projects. While the Copy Bundle feature is powerful, it will be most useful if you have set up a simple file structure. Makers of ATLAS.ti suggest you use one folder to store the project and its data. Example file structure: The following file structure could easily be moved/backed-up to several sources using the Copy Bundle. The base folder, Practice Documents, holds all subsequent folders related to the project, including the HU itself and all data (see picture right). If you choose to set up a project this way, the subfolders, Audio PDs, HUs, Textual PDs, and Video PDs, should never be moved without moving the base folder, Practice Documents.

ATLAS.ti 5.2: A Qualitative Data Analysis Tool
Center for Student Success Andrea Harvey University of New Mexico [email protected]
Page 11 of 27
Using Copy Bundle The Copy Bundle feature can only be used once you’ve created your HU, assigned your PDs, and saved it. Copy Bundle involves two steps: creating and unpacking. When you create a bundle, a single compressed archive is created. This single file is then unpacked by ATLAS.ti. Again, if all folders reside in a single base folder, the program can unpack it easily. To create a Copy Bundle: 1. Make sure the latest version of your HU is saved. 2. Go to Tools – Copy Bundle - Create. 3. The following window will appear. All files that can be bundled will appear in the top-right pane. If a file cannot be bundled, the Report window will explain the reason for the problem. Possible reasons a file cannot be bundled:
⇒ The document no longer exists. ⇒ The document was copied without its existing LOG file (see page 13). ⇒ Document was replaced by another file.
4. When all files you want in the bundle are listed, select the Create Bundle button. 5. You will be prompted to select a location for the bundle; by default ATLAS.ti will select the folder where you HU is saved. It will also use your project name as the default title of the bundle, with the file extension .acb (ATLAS.ti Copy Bundle). You may accept the default name/location or change it. Then select Save.

ATLAS.ti 5.2: A Qualitative Data Analysis Tool
Center for Student Success Andrea Harvey University of New Mexico [email protected]
Page 12 of 27
Unbundle (install) your project: The installation of the bundle (compressed files) can be accomplished using two slightly different strategies: Migrate and Restore. Migrate This particular strategy operates under the assumption that you are “migrating” your project to another location to resume working on the project. Choose this option when you are moving your project, HU and associated files, between two different work locations. If a PD in the bundle is older than one at the new location, it will not be unbundled, protecting you from overwriting a newer version of your PD. Restore This strategy is used to replace a back-up of your project. Unlike migrate, using this option will not protect you from overwriting files; all files will be “restored.” Use this option when installing a project that was created as a back-up. To unbundle your project: 1. Open your compressed copy bundle (.acb). You will be prompted to choose the program to open it with. 2. Choose the radio button, Select the program from a list. Browse to find ATLAS.ti. 3. The program will launch, and the Install Bundle window will appear. 4. In the example, pictured right, the Status Report informs the user what action will be taken in the install process. As a basic user, you will likely encounter no conflicts (see color code in window), but the more complex your project becomes the more likely you may experience conflicts in migrating from one location to another. Remember, the Install Bundle feature is unpacking everything, including your HU. If the HU has been updated, then it will replace the HU in the location in which you are unbundling. You can prevent this by selecting Exclude HU.

ATLAS.ti 5.2: A Qualitative Data Analysis Tool
Center for Student Success Andrea Harvey University of New Mexico [email protected]
Page 13 of 27
Part VII: Editing textual primary documents ATLAS.ti now enables users to edit primary documents within the program. While this feature seems simple, the nature of ATLAS.ti’s design makes it somewhat more complex than it would appear. Since your textual PDs are only linked to the project, editing those documents can interfere with the analysis features of this program. Quotations and codes, discussed in the next sections, do not become a part of your PDs but rather exist as transparent layers that are saved in your HU. Therefore, when you edit a PD in ATLAS.ti, the program must reassign those quotations and codes to an appropriate location. In order to do this action, a companion file (.log) is created when you edit and save those changes. While this is an excellent addition to the program, it creates more files to be managed. This presents another argument for using the Copy Bundle feature of ATLAS.ti. To edit a textual primary document: 1. Open the PD in your workspace. Remember, a PD can only be edited if it is a rich text (.rtf) or a plain text (.txt) document. 2. Click on the Edit button in the main toolbar.
3. Once you’ve turned on Edit mode, the above toolbar’s features will all become active. 4. When you are finished editing, click on the down arrow next to the Edit button. Note: There is no Undo function in editing mode, so make changes purposeful. 5. If you do save the changes you’ve made, then ATLAS.ti will create a .log file for this PD and store it in your project. 6. Once this .log file has been created, it can never be separated from the original file. ATLAS.ti will no longer be able to open that PD without the file.
ATLAS.ti 5.2: A Qualitative Data Analysis Tool
Center for Student Success Andrea Harvey University of New Mexico [email protected]
Page 14 of 27
These numbers tell you the origin and order of the quotation. So this is PD 1, quotation # 1.
Part VIII: Basic analysis tools: quotations and coding
At this point, there is no particular order of commands to follow. Once you have a PD open, you will see your workspace change to an environment that enables you to apply principles of qualitative methodology. The following steps represent one approach to analyzing and interpreting your data, but the flexibility of the program allows you take the approach that works for you.
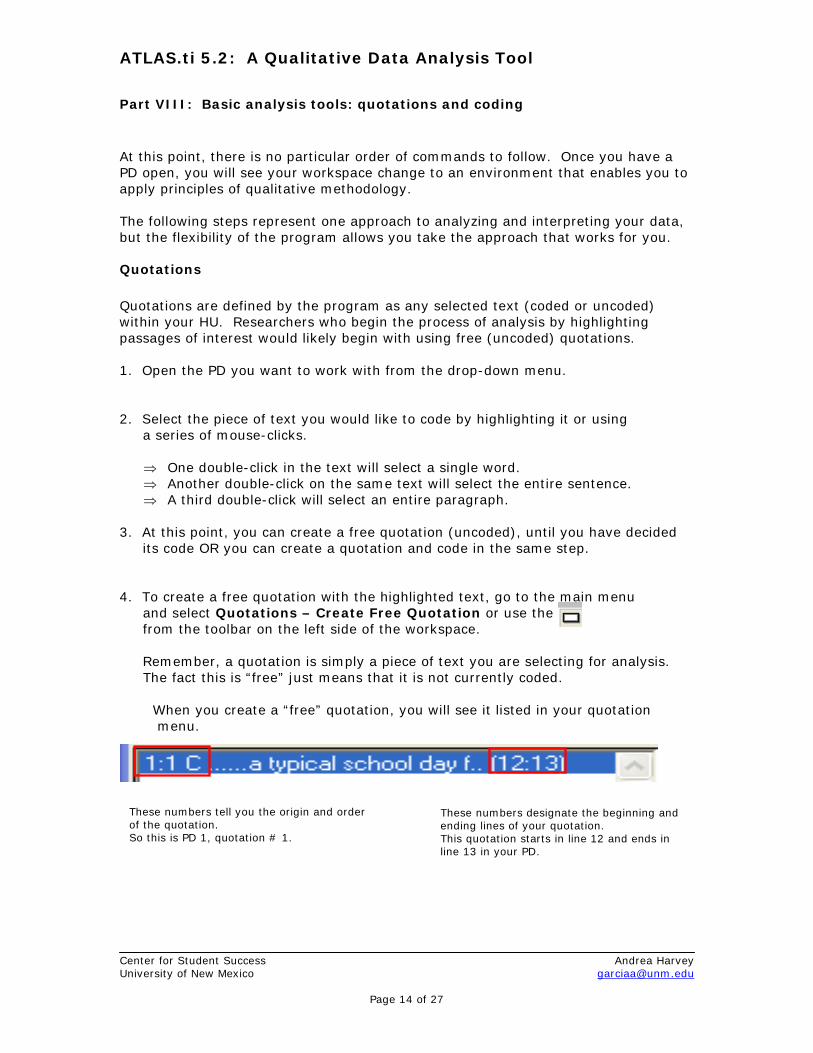
Quotations Quotations are defined by the program as any selected text (coded or uncoded) within your HU. Researchers who begin the process of analysis by highlighting passages of interest would likely begin with using free (uncoded) quotations. 1. Open the PD you want to work with from the drop-down menu.
2. Select the piece of text you would like to code by highlighting it or using a series of mouse-clicks.
⇒ One double-click in the text will select a single word. ⇒ Another double-click on the same text will select the entire sentence. ⇒ A third double-click will select an entire paragraph.
3. At this point, you can create a free quotation (uncoded), until you have decided its code OR you can create a quotation and code in the same step. 4. To create a free quotation with the highlighted text, go to the main menu and select Quotations – Create Free Quotation or use the from the toolbar on the left side of the workspace. Remember, a quotation is simply a piece of text you are selecting for analysis. The fact this is “free” just means that it is not currently coded.
When you create a “free” quotation, you will see it listed in your quotation menu.
These numbers designate the beginning and ending lines of your quotation. This quotation starts in line 12 and ends in line 13 in your PD.

ATLAS.ti 5.2: A Qualitative Data Analysis Tool
Center for Student Success Andrea Harvey University of New Mexico [email protected]
Page 15 of 27
5. Your quotation will now appear in the quotation drop-down menu and in the “margin” of the document. When you are ready to code this quotation, you can click on this bar, and it will select (highlight) that text for further analysis or editing.
6. If you already know the code you would like to use, then you may use one of ATLAS.ti’s coding options.
Coding There are six basic coding options in ATLAS.ti: free, open, list, auto, in-vivo, and quick. They are all equally easy to use and some appear to execute the same task, but it is really a matter of preference and approach.
Free Coding If you already have an idea of the codes you will be using, then you can create a list of free codes to associate with quotations as you analyze your data. You can import them, which is only recommended if you have a long list. See your help guide for more information. You can also create your list in ATLAS.ti as well.
1. Select Codes – Create Free Code from the main menu.
2. You will see the following window, where you
can type in codes.
3. Type in your code(s) and select OK.
ATLAS.ti 5.2: A Qualitative Data Analysis Tool
Center for Student Success Andrea Harvey University of New Mexico [email protected]
Page 16 of 27
Note: The | symbol, shown in the picture at the bottom of the previous page, is usually located above your Enter key.
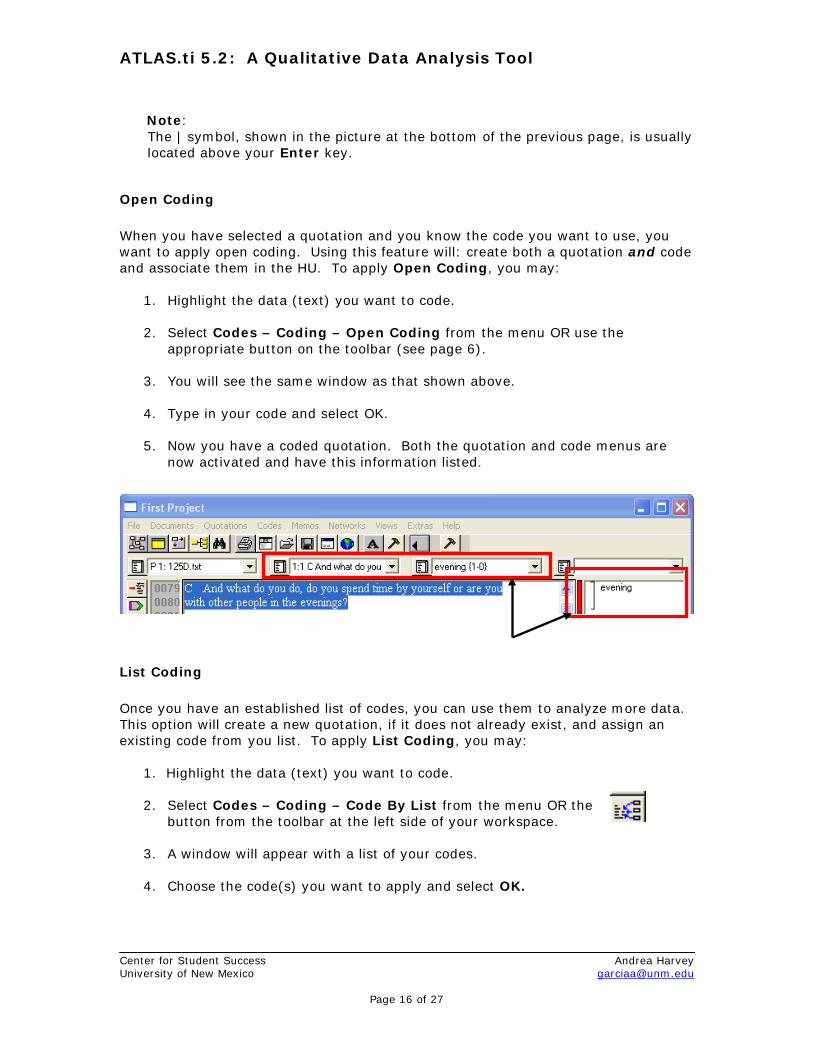
Open Coding When you have selected a quotation and you know the code you want to use, you want to apply open coding. Using this feature will: create both a quotation and code and associate them in the HU. To apply Open Coding, you may:
1. Highlight the data (text) you want to code. 2. Select Codes – Coding – Open Coding from the menu OR use the
appropriate button on the toolbar (see page 6). 3. You will see the same window as that shown above. 4. Type in your code and select OK.
5. Now you have a coded quotation. Both the quotation and code menus are
now activated and have this information listed.
List Coding Once you have an established list of codes, you can use them to analyze more data. This option will create a new quotation, if it does not already exist, and assign an existing code from you list. To apply List Coding, you may:
1. Highlight the data (text) you want to code. 2. Select Codes – Coding – Code By List from the menu OR the button from the toolbar at the left side of your workspace. 3. A window will appear with a list of your codes. 4. Choose the code(s) you want to apply and select OK.

ATLAS.ti 5.2: A Qualitative Data Analysis Tool
Center for Student Success Andrea Harvey University of New Mexico [email protected]
Page 17 of 27
Auto Coding
This option allows you to create and code quotations in an entire PD or all PDs within an HU. You must have an established code to use this function.
1. Select Codes – Coding – Auto-coding from the menu.
2. Make certain you select the code
you would like to use from the drop-down menu.
3. Pick a search term or expression
and type it in Enter or select Search Expression.
4. If you want to only search for
capital or lower-case instances of your search term, check the Case Sensitive option.
5. If you want to search for variations on the search term, for example, evening and evenings, check Use GREP option.
6. If you want to view each instance BEFORE it is coded, check Confirm
Always.
7. Decide where to search in the Scope of Search box.
Note: if you only want to search one PD, it must be open in the workspace.
8. Decide how much of the text
should be used in the quotation by selecting your preference from Select as quotation.
9. Once you have chosen your auto-coding options, select the Start button.
10. In this example, the program
found and coded 56 instances of evening or evenings. This
information can be found in two places.

ATLAS.ti 5.2: A Qualitative Data Analysis Tool
Center for Student Success Andrea Harvey University of New Mexico [email protected]
Page 18 of 27
11. When you close this window, you will see that the program has coded and
created quotations for all 56 instances.
Optimizing Documents for Auto-coding
When analyzing textual data from a focus group, questionnaire, or interviews, you may have data that includes multiple speakers.
Data can be marked-up with unique identifiers that will optimize your documents to work with the auto-coding feature.
Simple examples are:
⇒ P: or <Peter>for a respondent with the name Peter ⇒ 07-01-03letter for a letter written on the first of July 2003.1
The use of a unique identifier for a respondent will enable a user to select an entire section by a particular respondent without selecting other instances of Peter, mentioned in other respondents’ answers.
To force the Auto-Coding tool to recognize an entire respondent’s section, a section delimiter is required. So the section would begin with a unique identifier, as shown above, and end with either a hard return or an empty line, denoting the end of that respondent’s section.
⇒ It is recommended that two hard returns are used to delimit sections, reserving a single hard return to denote a respondent’s section into paragraphs.
1 ATLAS.ti Help Menu

ATLAS.ti 5.2: A Qualitative Data Analysis Tool
Center for Student Success Andrea Harvey University of New Mexico [email protected]
Page 19 of 27
⇒ When auto-coding such a document, you would choose Multi Hard Returns for extending the matched text.
⇒ Using <Peter> as the search pattern would then yield a quotation including everything from <Peter> up to the empty line. 2
In-Vivo Coding
In-vivo coding uses the text itself to create a code. This option is limited to 40 characters.
1. Select the passage (40 characters or less).
2. Select in-vivo code
from toolbar OR select Codes – Coding – Code In Vivo from the menu.
3. The text appears
highlighted and is translated into a code in the margin and code menu.
Quick Quick coding is really only quick if you use the toolbar to code; the menus can be cumbersome to this process. Quick coding is best used when you have a single code that you want to use to analyze an entire document. In order to use this function, you must have an existing code in your project.
1. Select the code you would like to use from your drop-down menu. 2. Select the text you would like to associate with the code.
3 Select the Quick Code button from the toolbar or go to Codes – Coding – Quick Coding.
2 ATLAS.ti Help Menu

ATLAS.ti 5.2: A Qualitative Data Analysis Tool
Center for Student Success Andrea Harvey University of New Mexico [email protected]
Page 20 of 27
Part IX: Modifying quotations and codes
There are a variety of reasons you may need to modify quotations or codes. Sometimes you will make mistakes, and other times you will simply need to change your analysis. Again, ATLAS.ti responds to the nature of qualitative research. To correct a quotation:
1. Select the quotation (highlight it completely) or select the bar in the margin to ensure you get the entire quotation.
2. Select the text you would like to make the quotation reflect
your analysis.
3. Select the Correct quotation icon (checkmark) from the tool bar.
4. The corrected quotation will appear.
To rename a code:
1. Open the Code Manager by selecting the list icon to the left of the drop-down menu.
2. Select the code you wish to rename.
3. Right-click on the highlighted code.
Select Rename from the drop-down menu.
4. The code will become a typeable region
where you can rename it.

ATLAS.ti 5.2: A Qualitative Data Analysis Tool
Center for Student Success Andrea Harvey University of New Mexico [email protected]
Page 21 of 27
Unlink a quotation (separate it from a code):
1. Select the quotation by double-clicking the code associated with that quotation in the margin. You will notice that the quotation will become highlighted in the text when it is selected.
2. Right-click the code.
3. Select Unlink from the drop-down menu.
Delete a quotation:
1. Select the quotation by double-clicking it. 2. Right-click on the selected quotation. 3. Select Delete from the drop-down menu.
4. If you have no codes connected to this quotation, the program will execute the action. However, if you have codes linked to the quotation, the program will give you this message:
References refer to codes; so if you delete the quotation, you are simply deleting its association to a particular code, not the code itself.

ATLAS.ti 5.2: A Qualitative Data Analysis Tool
Center for Student Success Andrea Harvey University of New Mexico [email protected]
Page 22 of 27
Delete a code:
1. Open the code list window (to the left of your code drop-down list).
2. Select the code from the Code Manager to delete.
3. Right-click the code, and select Delete from the menu.
4. If there are no quotations linked to this code,
then the program will execute the action. If there are quotations linked to the code, the program will ask you if you want to continue. If you select Yes, you will then be prompted to make a decision about whether you want the quotations deleted as well.
5. If you select No, then the program will
delete the code and leave all linked quotations as free quotations. If you select Yes, the quotation (if it is not related to other codes) AND the code will both be deleted.
Part X: Comments and Memos Comments and memos are flexible tools that enable a user to have a word-processing tool within the Hermeneutic Unit. The main difference between the two is that comments must be attached to certain objects i.e. codes, quotations, documents. Memos, however, can be free or linked to an object.
To create a comment: 1. Open any object list within your hermeneutic unit by selecting the icon to the left. This will open the manager of that object list.

ATLAS.ti 5.2: A Qualitative Data Analysis Tool
Center for Student Success Andrea Harvey University of New Mexico [email protected]
Page 23 of 27
2. In this example, the Code Manager is being opened.
3. The Code Manager displays a list of all codes within this project.
⇒ Notice the grey line with white area beneath it. This lower window is a space to add comments or descriptions about a particular object in your project. 4. Highlight the object to which you will add the comment. 5. Place your cursor in the white lower window and begin typing. 6. If your comment is long, you can select the comment editor, shown by the arrow above. You will be given a larger space on your desktop. 7. When you have completed working on a comment, close the window by selecting the X sign; you will be prompted to save this comment. If you select another object, the comment is saved automatically.

ATLAS.ti 5.2: A Qualitative Data Analysis Tool
Center for Student Success Andrea Harvey University of New Mexico [email protected]
Page 24 of 27
You will know it is saved because a tilda ~ appears next to the object.
A little bit more about memos… A memo is initially a free comment; it exists as other objects and thus can be named. After it is created, it can remain free or be linked to another object in the hermeneutic unit. Memos are saved and can be accessed from the final dropdown menu in the main workspace.
To create a “free” memo: 1. If you have a primary document open, make certain you do not have any text highlighted. If you do, this memo will become attached to it. 2. Select the Memo on main menu and then Create free memo or use the button on Primary Document tool bar. 3. You will see a default title for your new memo. You may choose a type of your memo using the Type: dropdown menu. Now, you can begin composing a memo, or close the memo window.

ATLAS.ti 5.2: A Qualitative Data Analysis Tool
Center for Student Success Andrea Harvey University of New Mexico [email protected]
Page 25 of 27
4. Your new memo will be saved automatically and will appear in Memo Manager. To access it and include/ edit the content, select the memo, place your cursor in the white lower window and start typing. If you have a list of memos, select the memo you wish to compose and begin typing in the white lower window. Creating a memo from text: Attaching a comment and attaching a memo to other objects in you HU is not the same action. When you attach a memo, you will still be allowed to attach that memo to other objects in the future. 1. Select a piece of text (or image, video, etc.) for your memo.
2. Select the Memo main menu and then Attach memo or use the button on the primary document tool bar. 3. The Memo window will appear, and memo will be named automatically, you can begin writing. At the same time you will see a memo appearing in the margin area of your PD. 4. If the memo does not appear in the margin area, you will need to turn on certain option in ATLAS.ti. To do this:
⇒ point your mouse in a blank area of the margin ⇒ use a single right click ⇒ select Object Type > All
5. If you want to turn on the icons associated with the various objects, you can also select Use Images. You will see an icon appear when you add them to your PD.

ATLAS.ti 5.2: A Qualitative Data Analysis Tool
Center for Student Success Andrea Harvey University of New Mexico [email protected]
Page 26 of 27
Attach a memo to another object The benefit of using memos is that you can attach them to any other object in your project. 1. Open the Memo Manager. 2. Select the memo you would like to attach to another object. 3. Right-click on the selected memo. 4. Select Link Memo to. 5. Depending on what you choose, a list of quotations, codes or memos will pop up. 6. Scroll to the object you want to link the memo to; select OK.
Part XI: Coding Support for Beginning Theory Development These principles will be covered more thoroughly in Intermediate ATLAS.ti.
Groundedness: The first number shows the number of quotations already associated with this code. A large number shows the strength of this evidence. Density. The second number shows this code’s link to other codes. Codes with a large second number can be interpreted as having a high degree of theoretical density.

ATLAS.ti 5.2: A Qualitative Data Analysis Tool
Center for Student Success Andrea Harvey University of New Mexico [email protected]
Page 27 of 27
References
Center for Applied Statistics: Lancaster University. Atlas.ti 4X, Retrieved November 18, 2005 from: http://www.cas.lancs.ac.uk/short_courses/atlas_ti.html DeMoss, Karen (2004). Atlas.ti: A primer for novices. Struebing, J. Introduction to working with Atlast.ti. Retrieved November 21, 2005 from: http://www.valt.helsinki.fi/atk/atlas/atlastu.htm#h3