ASW20 Refinishing Project by Ken Kochanski - 8KCAB · good argument to refinish wings earlier...
16
ASW 20B Wing Refinishing by Ken Kochanski Planning This wing-refinishing project is a continuation of my efforts to make my 1986 ASW-20B look and perform better than new. The project and this document are a work in progress and I will make periodic additions as the project moves down the road. So, If things sometime appear a bit untidy, please bear with me. As with my fuselage project, I am consulting with experienced, factory-trained and rated glider repair people to provide guidance and inspection of ongoing work. Improper workmanship in gelcoat removal could possibly impact the structural integrity of your glider. Do not undertake this work unless you have glider repair professionals participating in your project. Although I started my 20 cleanup with the fuselage because I though it was an easier project, the wings are actually easier to work with in many respects. They are much lighter and can I confidently move them around using a crude one-man rig and a couple of saw horses. In addition, your are really workings on 'flat' surfaces and don't have to move them very much to complete your work. However, wing refinishing is typically considered more difficult because you have to remove the old gelcoat and profile the flying surfaces before repainting. I plan to perform and document the following refinishing steps: Control Surface Removal Wing Gelcoat Removal Spar Bump Smoothing Leading Edhe Profiling with Templates Filler Application and Smoothing Wing gelcoat application and sanding. Control surface sanding and gelcoating (includes mass balancing). Control surface installation and sealing (will probably use a rolling seal).
Transcript of ASW20 Refinishing Project by Ken Kochanski - 8KCAB · good argument to refinish wings earlier...

ASW 20B Wing Refinishing by Ken Kochanski
Planning
This wing-refinishing project is a continuation of my efforts to make my 1986ASW-20B look and perform better than new. The project and this documentare a work in progress and I will make periodic additions as the projectmoves down the road. So, If things sometime appear a bit untidy, please bearwith me.
As with my fuselage project, I am consulting with experienced, factory-trained andrated glider repair people to provide guidance and inspection of ongoing work.Improper workmanship in gelcoat removal could possibly impact the structuralintegrity of your glider. Do not undertake this work unless you have glider repairprofessionals participating in your project.
Although I started my 20 cleanup with the fuselage because I though it was aneasier project, the wings are actually easier to work with in many respects. Theyare much lighter and can I confidently move them around using a crude one-manrig and a couple of saw horses. In addition, your are really workings on 'flat'surfaces and don't have to move them very much to complete your work. However,wing refinishing is typically considered more difficult because you have to removethe old gelcoat and profile the flying surfaces before repainting.
I plan to perform and document the following refinishing steps:
Control Surface Removal
Wing Gelcoat Removal
Spar Bump Smoothing
Leading Edhe Profiling with Templates
Filler Application and Smoothing
Wing gelcoat application and sanding.
Control surface sanding and gelcoating (includes mass balancing).
Control surface installation and sealing (will probably use a rolling seal).

Control surface removal
The control surfaces were removed per the maintenance manual. The ends of thecontrol rods and control rod openings were sealed with plastic bags and tape toreduce dust penetration. I will do a mass balance before working on the surfaces tocheckpoint the ranges supplied in the maintenance manual.
Wing Gelcoat Removal
Gelcoat removal is the problem with these projects and my discussions withprofessional refinishers and others confirm that there is no easy way to get the oldgelcoat off. Most folks seem to use a grinder of some type, although I heard onestory about someone who chipped the gelcoat off a badly crazed glider using achisel to remove one chip at a time. Yikes!
The grinders (usually electric high speed) seem to require a fair amount ofexperience to use correctly. Like Indy Car racers, grinder drivers typically reportdoing some minor damage (that had to be repaired) before they get the winningtechnique down. Lose your focus for a second and you could easily 'install' a newNACA duct in the leading edge of your wing!
Although I figured I would eventually wind up using a grinder, the darn thingsscare me and I decided to start with any other more-forgiving mechanism I couldfind. Slower would be fine if I could make steady safe progress. I actually startedsanding by hand, which was gruesome, and quickly migrated to an 'air file'introduced to me by Richard Kellerman, local pilot, weatherman, and sometimesglider refinisher. I have been subsequently informed that air files are used by somefactories for final finishing sanding. The air file is typically used for automotivebody repair and is officially known as a straight-line sander. The base moves aboutan inch in each direction at a relatively slow speed, perhaps 10 cycles a second.Gelcoat removal is slow and controlled, but much faster than sanding by hand.
I purchased my air file at Pep Boys for about $60. I replaced the rubber coveredbase with a piece of 3/16" x 2" x 14" aluminum stock to get a hard base like asanding bar. However, this mod is probably not necessary if you are just removinggelcoat. I did it because I plan to use the file to profile my wings.
I also discovered that True Value Master Mechanic 60 Grit open coat resin papercuts at a good rate for a long time. (I sanded the tops of the wings to the wingglass with two packs of 5 sheets ... total cost less than $6.00) The paper has asticky back; just cut the sheet in half and line up in the middle of the sanding bar.I'm also sure other open coat resin papers will do a good job.
The air file is used just likeany other sanding bar;keep the unitperpendicular to the chordline as you apply pressuremoving the rig up andback on a 45-degree line.Apply moderate pressureand move the sandingarea left and right;overlapping the work areato average out gelcoatremoval. It will take 15minutes or so, but you willsoon start to see a darkblotchy pattern appear andas you sand further, youwill just start to uncoverfiberglass. The 60-grit paper seems to rip the gelcoat off without touching the

fiberglass surface, and you get a pattern of small holes appearing in the gelcoat.(See picture below) Change your pattern, until you run out of working room. Thenstart a new section and overlap the areas to get a continuous blotchy surface. Totell you the truth, sanding the gelcoat off is pretty boring; you just keep movingthe air file and the glass surface slowly appears.
So the big question is, "How much gelcoat do you have to sand off?" Well, everyoneI talked to is emphatic about removing all crazing, sanding down to the glass ifnecessary. Any crazing left behind will propagate through the new gelcoat to thesurface. Since my wing surfaces have sparse and light crazing, I was soon able tosand to a point where all the crazing appeared to be removed. I checked thesurface with a 10-power scope and could find no indication of crazing. By the way,crazing looks very different than sanding scratches in that sanding leaves a gougethat has a rounded bottom; crazing looks a fracture with sharp vertical edges andno discernable bottom. However, back to question 1 ... did I remove enoughmaterial? While I originally thought so, I decided to remove some additional gelcoatjust to make sure. (This issue is still not resolved; some refinishing professionalsthink every bit of gelcoat should be removed, even if it does not show any visibledamage. This is clearly the safest approach to insure longevity in the new gelcoat,but is it necessary? I may yet make an effort to remove additional material.)
This picture shows someof my final surface,pending any decision toremove additionalgelcoat. This is thebottom of my right wing;the root is on the leftand the leading edge isat the lower end of thepicture. The wing areaon the left (of the twoparallel pencil linesrunning from the LE tomid chord) was firstsanded with the air fileuntil the gelcoat wasquite thin and the 'high'glass areas just startedto break through. Theglass is the graysplotches in the picture.I then used a palm-sized
random-orbital sander with 100 grit resin paper to sand those areas that were stillcompletely covered by gelcoat. I am working left to right, so the area to the right ofthe parallel lines only shows the sanding pattern left by the air file; it clearly is lesssplotchy that the area on the left which was also sanded with the small orbital.While I think this level of sanding is fine for the shallow crazing on my glider, youmay have to remove all the gelcoat to fix your crazing damage. This may be agood argument to refinish wings earlier rather than later.
I have expended about 10hours on each wing side toremove gelcoat to thislevel. In addition, I willhave to spend someadditional time removing allthe gelcoat from my leadingedge, which is crazed allthe way to the glasssurface. I will use a smallsanding block and 100 grit

resin paper to finish the jobon the leading edge startedby the air file and orbitalsander; although I maygive the air file another trywith less coarse paper. Theair file was extremely easyto control and I was able tobring it a good distancearound the leading edge asI sanded wing surfaces. Ialso used the orbital toagain assist in the lowareas. Since we have had avery mild November(1999), I was also able towork outside for twoconsecutive weekends. Idon't know how I wouldhave managed the dustworking in my basement asoriginally planned. A pictureof the bottom of my sanded wing follows. The white areas are areas covered by thingelcoat. All remaining gelcoat was examined with a 10-power scope to insure nocrazing was evident.
A magnified (10x) contrastenhanced picture of myleading edge crazing follows.This will be sanded down tothe fiberglass surface. Theairfile made the more lateralscratches in the upper areaof the picture.
As the weather returned tonormal Novembertemperatures, I moved indoorsto continue working. Ifabricated the followingcollector for my air file. Sumppump hose was uses tofabricate a Y-shaped pickupnozzle, which straddles the airfile. The air file does not throwmuch gelcoat; material tends togather on each side of the

blade. The nozzle sucks theloose material off the surfaceand also does a good jobpulling dust out of the airaround the tool. Suction issupplied by large (low noise)shop vac; the shop vac hoseruns up the high-pressure airline to the air file. This mod and the shop vent fankeep the air virtually dust free.
I have to finish sanding theleading edge so I stood thewing up on end to make thework easier. A quick check withthe LE templates indicated thatthe leading edge was amazinglyclose to the design profile. Thewing was most accurate fromthe root to the flap/aileronjunction i.e. the planformbreak. The leading edge of theouter third of the wing deviatedthe most in that the nose (the4 inches from LE) of the airfoilwas too flat on top and bottom.
Well, the holidays really slowedup the project, and I had to take some time to build a spray booth. I looked aroundat some commercial establishments and considered my garage, but eventuallydecided to build a painting and sanding facility in my basement. The area is roughly35' long by 10' wide by 7' high. I won't go into too much detail, but I installedfluorescent lights, dropped a ceiling frame, and built detachable 8' by 7' detachablewall sections. All surfaces are covered in 6-mil poly ... and an exhaust fan exitingthrough a walkout door keeps the unit under negative pressure. I can take down orassemble the unit in one hour. I painted the top surface of my wing and no odorwas evident in the house, which was a real concern.
The next step involved spraying thetop of the wing with SimtekSanding Surfacer to smooth out thespar bumps. I applied one quart ofmaterial to the upper wing surface,extending the pattern 4 - 6 incheson each side of the spar. I appliedthree coats of material, at30-minute intervals, using a quartof Surfacer total. By the way, Iused a new gravity feed spray gun,which allowed spraying thick fillers

and gelcoat without thinning. I gotthis unit at a web site for about$70.
I sanded the next night using a contour sander made out of 1/8' Plexiglas. In 30minutes, I had the spar section from root to spoiler sanded to a tolerance of 2 mills.The following picture shows the wing after the spar bumps were painted andsanded.
I wasn't sure what totackle next, but finallydecided to spray theleading edge with a coatof Prestec to restore theleading edge sharpness... and just to buildmaterial to preventbreaking through on thefinal sanding. A coupleof commercialrefinishers stressed theneed to have additionalleading edge material onthe wing. I basically justsprayed the LE andextended the pattern 6"on top and 3" on thebottom. I then turned
the wing leading edge down to insure the gelcoat flowed to the nose of the airfoil.When the Prestec dried, I applied a disclosure agent and sanded using thetemplates to verify LE profile.
The bottom of the wing was actually pretty smooth, but it was covered with smallvoids (bubbles between the factory gelcoat and first layer of glass?) which couldtranslate into a sea of pinholes in the final spraying operation. I discussed with myex-glider works buddy, and he suggested brush painting the wing with filler toinsure all the voids were filled. However, before starting to paint, I installed astraight pin in each blowhole. In discussing this with folks, some said no paint couldget in the hole, others suggested using compressed air to keep the paint out, and afew said I should use pins. I was too chicken to leave the holes exposed. I usedsimple #17 silk pins. The box said it held 400 pins, but I was almost out afterplugging the 225 blowholes on my wing. As we know, there is no truth inadvertising.
I then brush painted the wing with Simtek Sanding Sealer and then immediatelysprayed the freshly painted surface to insure I had enough build to insure a smoothfinish. The brush marks actually showed through the surface of the sprayed coat,but everything sanded off nicely, removing all the voids. By the way, I noticed thatthe pins disrupt the spray pattern and you could have a little void behind each pin.This seems to be created by down stream air currents behind the pin. I set my gunto a finer setting as I sprayed the blow hole area. Removing the pins is easy;simply bend the pin a little and spin it to break the bond to produce a nice roundhole. I tried pulling the first four with needle nose pliers, and wound up extractingone blow hole needle and breaking the newly painted surface around another,
before coming up with the spin technique.
Although some refinishers hand sand using 4' long straight bar, I again sanded withthe 16" bar on my air file, first insuring that the wing was supported levelly using athird horse about mid span. I sighted down the leading edge and added shims tothe middle horse to insure the bottom surface was level. After painting and sandingthe bottom, it looked so good that I flipped the wing and rechecked the top to get avoid count. The top surface was in much better shape then the bottom. The sparbump work had already covered up a lot of voids, the leading edge sprayingextended 6" up the top surface, and a fair amount of good original gelcoatremained. I am currently trying to figure out if I should just brush paint the topsurface to be sure I have no problems with the final spraying. After agonizing for aday, I simply bit the bullet and brush painted the entire top of the wing withsanding Surfacer to insure all voids were filled before I started the final topcoatpainting. I will sand smooth tonight (3/15/00) and prepare for final painting thisweekend.
A line of straight pins extendsto infinity. I actually have notcounted, but remember seeinga note somewhere that eachwing had 225 blowholes.Inserting a #17 silk pin intoeach hole takes approximately30 minutes. I talked my wifeinto assisting on this run.
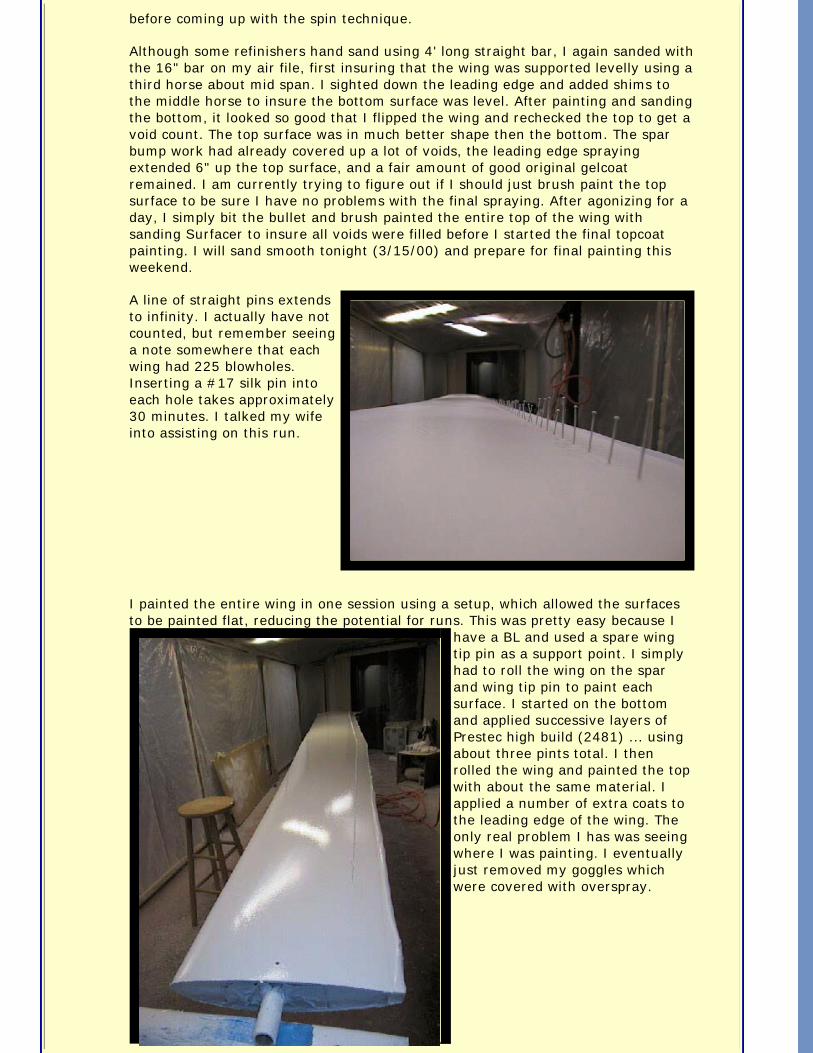
I painted the entire wing in one session using a setup, which allowed the surfacesto be painted flat, reducing the potential for runs. This was pretty easy because I
have a BL and used a spare wingtip pin as a support point. I simplyhad to roll the wing on the sparand wing tip pin to paint eachsurface. I started on the bottomand applied successive layers ofPrestec high build (2481) ... usingabout three pints total. I thenrolled the wing and painted the topwith about the same material. Iapplied a number of extra coats tothe leading edge of the wing. Theonly real problem I has was seeingwhere I was painting. I eventuallyjust removed my goggles whichwere covered with overspray.

The paint dried with the typicalorange peel. I then applied amixture of thinned dope over bothwing surfaces to disclose sandingprogress. You simply have to sanduntil the blue is gone.
I use the air file to knock the highpoints off the paint (just about tothe bottom of the orange peel) andthen hand sand with a two-foot barsander to remove the remainingblue. I also immediately sanded thespoiler area to see if I had anycoverage or fit problems.
The finishing work went verysmoothly from this point. I used the
air file to do the 400, 600 and 800 grit wet sanding. At this point, I did someexperimenting with the 3M Boat Refinishing products Richard Kellerman'discovered'.
This 3M page has an extensive list of gelcoat polishing products. As directed, I usedthe 3M High Gloss gelcoat Compound which "is designed to quickly remove P600

dual action or 1000 wet sanding scratches from production gel coat." This produceda reasonable shine, although I could still see 800 grit scratch marks. I then used3M Finesse-It(TM) II Finishing Material, which was designed to removes light tomedium oxidation on gelcoat for boat reconditioning. This stuff worked greatbringing out the finish on Richard's new ASW-27. It also brought up the shine onmy re-finish, but I could still see some scratches. I concluded that the compoundsalone could not produce the finish I desired. I therefore continued sanding thewings through 1000 and 1200 grits before using the compounds. The results wereexcellent. I will never again use the large buffing wheel and hard wax utilized bymost glider manufacturers.
These compounds were applied usingthe pad systems recommended at the3M site. I used a big DeWaltSander/Buffer (DEWALT DW849 7/9"0-1000/3000 RPM Variable-SpeedElectronic Right Angle Polisher ) todrive the pads at the correct RPM.Thefinal buffing will produce a mirror likesurface, but this is actually just thegloss from the gelcoat surface. The
compounds actually are wax free and you have to apply a type and brand of yourchoosing. I used Mother's canauba, although it probably had some silicone content.And I hate to say it, but the wax will actually lower the gloss a little!The buffingand waxing took about two days.
The original unpainted control surfaces were attached and sealed using an "S" sealrecommended by Hank Nixon. Hank uses an aircraft dacron which is glued to thecontrol surface and wing edge using thinned contact cement. The seals are moredurable then the Teflon tape and the process does not reduce the bonding areaavailable to the curved Mylar seals installed on top.
I made my seals out ofa 2" roll of lightweightaircraft dacronpurchased fromAircraft Spruce. First,rough-cut the length tofit in between thehinges and thenprecise cut just beforeapplication. Once thelength is correct, holdthe strip at the endsand fold it overbetween your fingers,holding tension andrubbing the stripagainst the trailingedge of the wing to setthe crease. This "V"-shaped piece of dacron is then inserted into the gap. I thenused a small stiff solder flux brush to apply thinned contact cement to the wing andthe top layer of dacron. The top layer of dacron is then folded onto the wing edgeand additional thinned cement is brushed on to insure good adhesion. The otherside of the seal is attached to the control surface by folding the dacon back to applycement to the dacron and control surface. Once I was rolling, each section tookabout 10 minutes . the entire wing was sealed in about two hours. I let the dacronseals sit overnight and applied the mylar at the next session. The curved mylar sealwas applied using transfer tape per the standard procedure. Since the mylar wasbeing attached to a contact cement impregnated dacron surface (not on top ofTeflon tape) the work went quickly and the bond was excellent.

I was behind schedule at this point and cleaned up the wing for inspection by myA&P. I was a little nervous on the first take off, but the ship did not cork-screwthrough the air. Stall testing indicated that the sharpened leading edges did notnoticeably change stall characteristics. I think the ship flew better, although this ispretty subjective. I have one season on my new wing finish and I am quite happywith the result. The left wing is now in my basement and I should make progressquickly, as the procedures are now familiar.Going forward, I will also refinish thecontrol surfaces . and finally the elevator. I expect those will happen next year.
Although it took morethen a year, I also built anew set of winglets formy 20 using foam cores(Eppler 205) and vacuumbagging techniques usedby model airplanebuilders. I had actuallyplanned to design myown, but was fortunate toacquire a proven designfrom one of our premier20 drivers.
.
© 2007 Sailplane Racing Association HOME | ADMIN | RULES | POLLS | GENERAL | CONTESTS | WEATHER | CONTACT

ASW-20B Fuselage Refinishing Project by Ken Kochanski
Planning
Do you really have the time to complete this project? Based on the work of others, Iestimated that my fuselage-refinishing project would take about 200 hours and would becompleted over a 4-month period between November and February. My base hoursestimate was about right, but I performed a complete gear system cleanup, installednew tail tank and 'P' systems. And did some other things that easily bumped the time upanother 50 hours or so. Although 250 hours is just 15 hours a week over four months, Iactually could not spend that much time on the project and completion ran late.
You will also need a place to prep, paint and finish the ship. I did the initial gelcoatsanding, prep and painting in a garage during the late fall, and did the final sanding andpolishing in my basement. The latter allowed me to work through the winter. Based onthe work of others in my club, I had a good sense of the skills, materials and equipmentI would need to complete the job.
You have to obtain gelcoat, solvents, spraying equipment, and sanding supplies well inadvance of the project. I ordered German wet/dry from Eastern Sailplane (ES) becauseit has superior cutting and staying power. I also installed a 220-Volt outlet in mybasement and purchased a compressor to run the air- powered sander (jitterbug) usedfor final sanding. (An electric powered sander is fine for gelcoat removal ... you need anon- electric (air or elbow) sander for the final wet sanding.)
Having experienced people around or accessible to guide you through the process isessential. The work you are doing could impact the structural integrity of your ship andhas to be examined and monitored by people with the appropriate credentials. Inaddition to local A&Ps, I was fortunate to have someone around who worked atSchempp-Hirth building and repairing gliders.
Gelcoat Removal
Removing the old gel coat quickly without damaging the underlying glass structure isthe first task. The experience of several refinishing projects indicated that using arandom orbital sander with a very coarse grit was the most effective way to achievethese dual objectives. How coarse? Well, how about 10 - 15 grit. The 'rocks' on thepaper appear to pulverize the gelcoat, but bounce off the underlying fiberglass. Theorbital sander also appears to offer additional protection because the velocities and heatgenerated by the orbiting pattern are low compared to a rotating wheel sander.

Since all of my gelcoat cracking occurred on the top and bottom seams where thefuselage was joined, I planned to completely sand off the gelcoat in these areas, andthen sand all remaining areas with 100 grit wet/dry to supply tooth for the final gelcoatapplication. However, you should seal every opening into the glider before starting tosand. This will greatly ease your cleanup problem later. I closed up the cockpit, wingroot openings, and tail openings with sheet plastic, cardboard, and tape. I started on theupper surface just behind the cockpit. Gelcoat removal with the orbital/10 grit setup waseasy to control. During the first 15 - 30 seconds or so, you can see the gelcoat surfaceroughen and powder off, another half minute takes you through the gelcoat and you willsee filler (different color substrate) or fiberglass.
I usually worked an area roughly 6 inches long by 4wide. I tried to remove the material without creatingflat spots. Moving the sander across the fuselagecenterline at 45-degree angle (like sanding wings)seemed to work fine. You are sanding a curvedsurface, so work carefully and stop frequently in thebeginning to inspect your work with your advisor.We used a 10-power magnifier to check the glasssurface, but never found any evidence of damagewith this method. Skill and feel will develop quicklyand you will be able to move right down thefuselage. I could sand one linear foot of fuselage inabout 15-20 minutes before changing paper. We alsohad the exhaust fans working and wore masks todeal with the dust.
Photos 1 and 2show the top ofthe tail boom andnose after theremoval process.The filler thatremained in the low areas was examination with a10X scope and showed no cracking, so it was left onthe glider.
Painting
We constructed a spray booth in a garage using amassive blue drop cloth purchased from JC Whitney.The drop cloth hung from floor to ceiling andenclosed a work area 35' long by 15 wide. Wepressurized the space using two 20" K-Mart fansmounted in a box approx. 20" wide x 40" high x 10"deep. Furnace filters were mounted behind the fans.The box sat on the floor in an opening cut in thedrop cloth. The drop cloth was screwed to the boxperimeter to make an air tight seal. The fans pulled
air from the adjacent garage area through the furnace filters and this pressurized thework area with air free of airborne particles. The drop cloth also had an opening for anexhaust box containing just furnace filters to trap overspray. We had no overspray inthe air and very little residual overspray in the next garage bay.
Simtek Sanding Surfacer (a filler) was sprayed on the top and bottom sanded area torestore the desired contour. The top was painted and sanded first, and the fuselage wasflipped to repeat the process on the bottom. The entire fuselage was then sanded with100 grit/wet dry to provide a consistent surface for the final gelcoat application. Iactually had to spend a little more time with the filler step to take care of The DreadedPinholes. Pinholes can have many sources related to the physical surface being paintedand the fluid properties of the paint. The end result is a small void in your finish. I did a

close inspection of the filled surface and use a small paintbrush to fill every void I couldsee. Although this seemed like an extravagant time consuming bit of work, I wound upwith a final finish that only had a dozen pinholes over the entire fuselage. These wereeasily fixed during the final sanding phase.
Painting the entire fuselage in one session was the goal. Some factories mount thefuselage in a rig, which allows free rotation along the fuselage centerline. We used asimilar concept and fabricated a cradle that gave use enough rotation so we could sprayall surfaces non-stop. The 20 was suspended by the rear carry through on a frameconstructed from 3/4" pipe. A small line at the tail allowed the entire fuselage to besuspended approximately 2 feet off the floor. A weight hung off either side of the rigcaused the fuselage to list 45 degrees, which allowed painting of the top and bottomurfaces. In addition, we were able to move completely around and under the fuselageand not worry about tangling hoses in the supporting fixtures.
The actual paintingprocess was prettyanticlimactic. Thespray booth was setup, fans were turnedon to clean theenvironment, the floorwas wet down to trapdust, the fuselage waswiped with acetoneremove remainingsurface material, andthe gelcoat was mixedand sprayed. (Weused american-madeSimtec Prestec ... acatalyzed polyestercoating.) We movedcontinuously around the fuselage, starting with a tack coat, and tipping the fuselagefrom side to side, adding coats on all surface until the desired film thickness wasachieved. Basically, you spray the gel coat until it is just ready to run. Runs are noproblem ... just get it on thick sand off later. We wore high quality masks, overalls,gloves and goggles.
The fans with furnace filters did an excellent job keeping the suspended particles out ofthe air. One the spraying was complete, we cleaned up and let the fuselage hang for 24hours to dry. The surface dried to a hard, white, shiny, orange peel. I brought thefuselage home a day later and put in my basement for final sanding.
Final Sanding
This step takes some time, but it is really straightforward. You have to sand the newgelcoat with 400, 600, 800, 1000, 1200, and 1500 Grit Wet/Dry to get the final surfacefinish and gloss.
The first sanding with 400 grit is hardest because it takes off the most material. Apply adisclosure agent to let you easily see the unsanded surfaces. I mixed red dope with dopethinner in a 1:3 ratio and wiped the mixture on all surfaces. Literally looks like hell ...but you can't do the job properly without it. I also fabricated some trays to place underthe fuselage to catch the runoff. A 6' x 2' furring strip frame covered with plastic dropcloth makes a nice tray.
I sanded with anair-powered jitterbug,sanding at a 45-degreebias to the fuselage
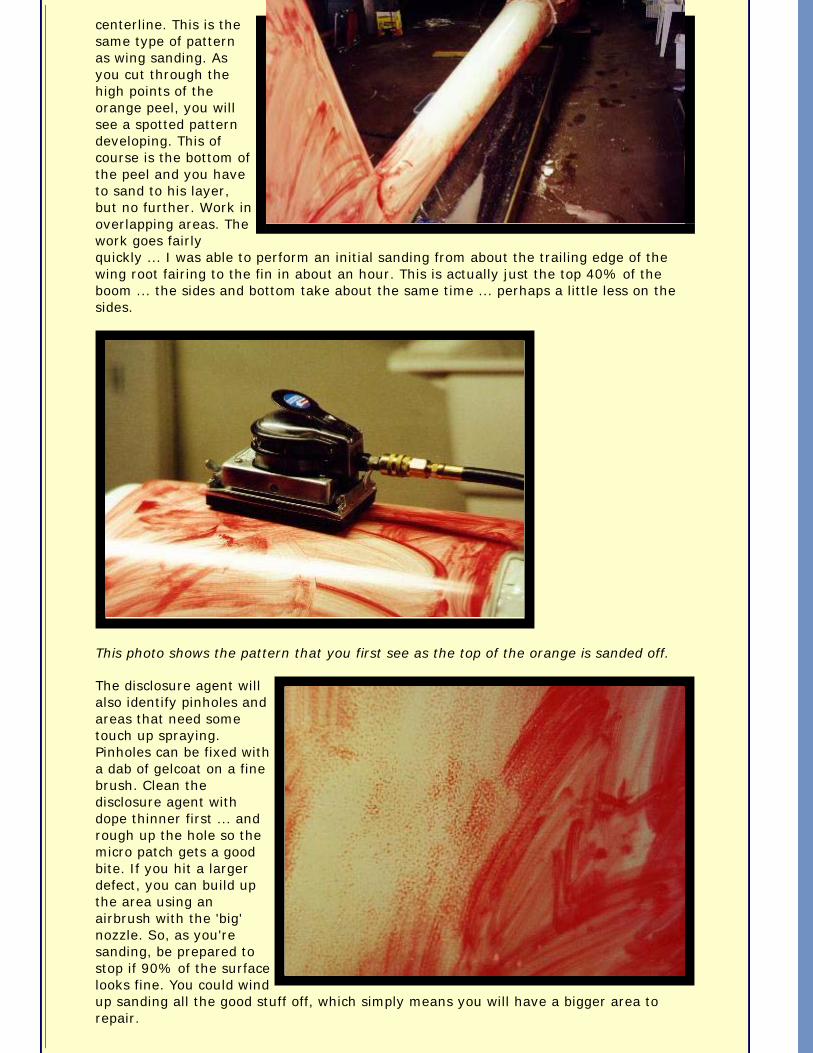
centerline. This is thesame type of patternas wing sanding. Asyou cut through thehigh points of theorange peel, you willsee a spotted patterndeveloping. This ofcourse is the bottom ofthe peel and you haveto sand to his layer,but no further. Work inoverlapping areas. Thework goes fairlyquickly ... I was able to perform an initial sanding from about the trailing edge of thewing root fairing to the fin in about an hour. This is actually just the top 40% of theboom ... the sides and bottom take about the same time ... perhaps a little less on thesides.
This photo shows the pattern that you first see as the top of the orange is sanded off.
The disclosure agent willalso identify pinholes andareas that need sometouch up spraying.Pinholes can be fixed witha dab of gelcoat on a finebrush. Clean thedisclosure agent withdope thinner first ... andrough up the hole so themicro patch gets a goodbite. If you hit a largerdefect, you can build upthe area using anairbrush with the 'big'nozzle. So, as you'resanding, be prepared tostop if 90% of the surfacelooks fine. You could windup sanding all the good stuff off, which simply means you will have a bigger area torepair.

I did all the sanding for one grit first. You have to clean everything as you change gritsto prevent contamination. Residual coarser grits will mar the surface of the followingfine grit sanding.
I ran into some problems on the fin when I sanded through the gelcoat on the sharpleading edge at the top of the fin. Took a couple of re-sprayings with the air brushbefore I got the sanding technique down. The concave sections around the fin/fuselagejoint and the wing fairing require the use of a hard flexible backing for the wet /drysandpaper. A hard backing is required on all sandings to create a smooth finish. Neversand with your fingers!
The 600 - 1200 grit sandings are essentially the same. However, instead of the dopemix, I used a soft lead pencil as the disclosure agent. Simply scribble hatch marks allover the fuselage and sand off. Check you work periodically with a 5 - 10X magnifier tosee if you are removing all the scratches from the prior grit.
Buffing
This is the fun part! All your hard work will be rewarded as a gleaming new fuselagecomes to life in front of your eyes. Yes, all the imperfections that you know about arestill there, but the buffing makes it hard to see them under fluorescent light, andimpossible to see in the sun. I have used the giant factory buffing wheel and ahome-brew wheel (made by stacking 10" cotton buffing wheels) with equal success. Iactually prefer the smaller wheel because it is easier to handle. I used a couple ofdifferent rouges and waxes, but the hard wax supplied by ES seemed to work the best.
Buffing is actually a skill in itself. You can 'burn' the gelcoat if you allow the wheel to siton one section too long. This is easier to do along the sharper edges like the trailingedge of the wing fairing. Just sand off the discoloration with 1500 grit and re-buff morecarefully.
Buffing -Addendum
The following finishing technique was discovered two years later when I refinisedmy wings. I suggest this method for fuslage refinishing also.
The finishing work (on the wings) went very smoothly from this point. I used theair file to do the 400, 600 and 800 grit wet sanding. At this point, I did someexperimenting with the 3M Boat Refinishing products Richard Kellerman'discovered'.
This 3M page has an extensive list of gelcoat polishing products. As directed, Iused the 3M High Gloss gelcoat Compound which "is designed to quickly removeP600 dual action or 1000 wet sanding scratches from production gel coat." Thisproduced a reasonable shine, although I could still see 800 grit scratch marks. Ithen used 3M Finesse-It(TM) II Finishing Material, which was designed to removeslight to medium oxidation on gelcoat for boat reconditioning. This stuff workedgreat bringing out the finish on Richard's new ASW-27. It also brought up theshine on my re-finish, but I could still see some scratches. I concluded that thecompounds alone could not produce the finish I desired. I therefore continued wetsanding the wings through 1000 and 1200 grits before using the compounds. Theresults were excellent. I will never again use the large buffing wheel and hard waxutilized by most glider manufacturers.
These compounds were applied usingthe pad systems recommended at the3M site. I used a big DeWaltSander/Buffer (DEWALT DW849 7/9"0-1000/3000 RPM Variable-SpeedElectronic Right Angle Polisher) todrive the pads at the correct RPM.The

final buffing will produce a mirror likesurface, but this is actually just the
gloss from the gelcoat surface. The compounds actually are wax free and you haveto apply a type and brand of your choosing. I used Mother's canauba, although itprobably had some silicone content. And I hate to say it, but the wax will actuallylower the gloss a little! The buffing and waxing took about two days.
Rudder/Gear Doors/Control Hookup Hatch Door
I sanded and painted my rudder, gear doors, and control hookup hatch door after Ifinished the fuselage. I actually painted the entire rudder and doors with an air brushusing a wide nozzle and unthinned gelcoat. I painted the rudder flat ... one side eachevening. Remember to perform a rudder balance check per your manual to insure thatthe overall weight and rudder mass balance is within limits.
The control hookup hatch door fit can cause you some problems if excess gelcoat hasfilled the corners of the recessed door opening. Patiently chisel and/or sand the excessuntil the door fits properly.
Final Assembly
Mount the canopy and check the fit. I sprayed my canopy rails on the fuselage and hadto do some sanding to get the fit correct. Put all the pieces together and check 3 times.Apply seals, N numbers, contest numbers, manufacturer decals, do a weight and balanceand have the ship inspected.
The only thing you have to do after this is go fly! ... and answer questions about howyou spent your winter vacation!
I want to thank Richard Kellerman, Bruce Conrad, Eastern Sailplane, and M&H Soaringfor providing the information and help to make this project possible.
Simtek1188 N. Grove StreetBldgs. K&LAnaheim, CA92806(714)630-5092
© 2007 Sailplane Racing Association HOME | ADMIN | RULES | POLLS | GENERAL | CONTESTS | WEATHER | CONTACT