Assistant Water Safety Instructor Course Facilitator … Water Safety Instructor Course and Water...
72
Assistant Water Safety Instructor Course and Water Safety Instructor Course Facilitator Guide
Transcript of Assistant Water Safety Instructor Course Facilitator … Water Safety Instructor Course and Water...
Assistant Water Safety Instructor Course and Water Safety Instructor Course
Facilitator Guide

Assistant Water Safety Instructor Course and Water Safety Instructor Course Facilitator Guide -1-
Copyright © 2005 The Canadian Red Cross Society (Updated and reprinted 2008) All rights reserved. No part of this publication may be reproduced, stored in a retrieval system, or transmitted, in any form or by any means, electronic, mechanical, photocopying, recording, or otherwise, without prior written permission from The Canadian Red Cross Society. Cette publication est également disponible en français. www.redcross.ca 1.877.356.3226
Assistant Water Safety Instructor Course and Water Safety Instructor Course Facilitator Guide -2-
Acknowledgements The Canadian Red Cross wishes to thank the many volunteers and staff involved in the revision of the Water Safety Program for their invaluable efforts. Their tireless work and dedication during the development process have created these new programs and products, of which we are very proud. We would also like to thank the many Authorized Providers, Instructor Trainers, Instructors, and parents who participated in the market research. Their input and guidance helped shape the new look of our program and product offerings. We would also like to express our appreciation to the many Authorized Providers who graciously agreed to operate a pilot site for the programs during development.
INSTRUCTOR DEVELOPMENT PROGRAM
Instructor Committee Members Pilot Course Conductors and Pilot
Gail Botten (co-chair) Site Sponsors
Shelley Dalke (co-chair) St. Johns Canada Games Aquatic Centre
Marie-Josée Chicoine Tiffany Ellin
Laura-Lee Dam Gena Fowler
Loriann Ierullo Glen Haines
Rachelle Kopp Elsa Stanley
Lana Keim
Johane Lafleur We would also like to extend a very special thank you
Darlene Pieroway to the following individuals who were instrumental
Elsa Stanley in providing leadership and vision to the creative
Instructor Trainer Committee Members process:
Wayne Little (Chair) Yvan Chalifour
Gail Botten Marie-Josée Chicoine
Shelley Dalke Shelley Dalke
Michelle Hebein Michelle Hebein
Mark Kristalovich
Shelley Kwong Johane Lafleur
Johane Lafleur Colleen Lavender
Elsa Stanley Michele Mercier
Eric Ritterrath
Karen Shank
ADDITIONAL RESOURCES
Coaching Young Swimmers—Swimming/Natation Canada 1990
YMCA Water Fitness for Health
Swimming and Water Safety Manual 1995
Water Safety Instructor Manual 1995
Full Body Flexibility by Jay Blahnik
Assistant Water Safety Instructor Course and Water Safety Instructor Course Facilitator Guide -3-
Assistant Water Safety Instructor Course pages 3-31 Water Safety Instructor Course pages 32-48 AWSI Appendices pages 49-66 WSI Appendices pages 67-71
Assistant Water Safety Instructor Course and Water Safety Instructor Course Facilitator Guide -4-
Assistant Water Safety Instructor Course
As a Canadian Red Cross Water Safety Instructor Trainer, it is
important to provide courses that relay information in an
interesting, exciting and challenging way. This guide is designed
to assist you with course planning. In it you will find: a definition of
the purpose or goal of the session, topics that need to be covered
in the session and some suggested activities. The activities are
yours to use, modify, build on and be inspired by! The suggested
activities do not cover all of the information that needs to be
covered in the session, so don’t forget to add your own material
and ideas!
Contents
Introduction
Screening
Red Cross Swim
Communication
Learning
Safety Supervision
Teaching
Science of Swimming
Developing Swimmer
Strokes
Skills and Water Safety
Fitness
Final Evaluation / Next Steps
Assistant Water Safety Instructor Course and Water Safety Instructor Course Facilitator Guide -5-
INTRODUCTION 1 hour (class) **Important: The first 30 minutes will set the tone for the remainder of the course. Ensure that you set a positive and encouraging learning environment for your candidates. For example, welcome each candidate with a smile, ensure the instruction room is easy to find, and make the room inviting as candidates enter. OBJECTIVES 1. Provide candidates with the course agenda, course materials, expectations, and evaluation criteria. 2. Provide candidates with an orientation to the facility and to safety procedures. 3. Introduce candidates to the principle of inclusion as it applies to the Red Cross Swimming and Water Safety Program. SUGGESTED ACTIVITIES (Please note: these activities do not cover all points that need to be included in your session. You will need to incorporate some of your own activities to ensure all of the above bulleted points are covered.)
Each person gets three sticky notes Have candidates write one interesting thing about
themselves on each sticky note. Put the three sticky notes in a balloon and then blow up the balloon and tie.
(Be sure to have different coloured balloons). Now have the group start in a circle and on “go” throw the
balloons in the air and try to keep them up there until you say “stop”. Have candidates grab a balloon, not
their own. Candidates pop the balloon, read the sticky notes, and try to find the person that matches the
sticky notes. Be sure to clean up the balloons before moving on. This activity provides lots of fun and noise.
Lunch bag activity Distribute one lunch bag to each candidate. Have the candidates write their
name vertically down one side of the lunch bag using a marker. Beside each letter of their name they need
to write down a positive adjective that would describe them best, e.g.:
G – goofy A – attentive I – imaginative L – leader
Have each candidate tape their lunch bag on the desk in front of them, so that everyone can see their name.
Explain that throughout the course, this is where paperwork, feedback, evaluations, and maybe even treats
will be placed, so look often.
Distribute the Candidate Information Sheet (Appendix A) and have the candidates
complete it. Collect the sheet. Anyone not meeting the age pre-requisite should be addressed immediately,
in private. Transfer the information from these sheets to the master sheet. Once the information has been
transferred to the master sheet, please destroy the individual Candidate Information Sheets. Remember the
Assistant Water Safety Instructor Course and Water Safety Instructor Course Facilitator Guide -6-
master sheet should not be passed around for the candidates to complete because of the Privacy Act. If
there are any concerns that may limit performance, they must be address immediately in private with the
individual.
Hang 3 flipchart stations around the room
a) Facility and Course Guidelines (e.g. course rules such as: respect, comply with facility rules, clean up
the room, you may bring snacks, etc.)
b) What are your expectations? What do you want to learn? What do you hope to gain from the course?
c) What do you think you will be evaluated on? ( e.g. strokes, leadership, etc.).
Have the candidates select a marker and rotate to the three flipcharts to write down their ideas. When
completed, have them return to their seats. Review, discuss and add points where necessary.
Assistant Water Safety Instructor Course and Water Safety Instructor Course Facilitator Guide -7-
SCREENING 1 hour (pool) You need to ensure that the candidates know and can perform the strokes, skills and distances of the Red Cross Swim Kids Program. OBJECTIVES 1. Meet prerequisite skill and stroke requirements for: front crawl; back crawl; elementary back stroke; breast stroke; shallow dive; feet first and head first surface dive with 2m underwater swim; treading water; distance swim 500m; rescue breathing, with adaptations for infants, children, and adults; conscious choking rescue; throwing assist with a line; reaching assist with an aid (meet the performance criteria of Red Cross Swim Kids Level 10 or the highest level in which the skill is evaluated). SUGGESTED ACTIVITIES
Stations Water Safety Instructor Trainer to create stations for all strokes and skills. Each station should have the name of the skill and all performance criteria. Have the candidates walk through the stations completing the stroke or skill while the WSIT monitors. Refer to the AWSI Manual appendix B and D for the listing of items to be screened.
Assistant Water Safety Instructor Course and Water Safety Instructor Course Facilitator Guide -8-
RED CROSS SWIM 1.5 hours (class) OBJECTIVES 1. Know the Red Cross history in Canada, programs and services, and Seven Fundamental Principles. 2. Identify the various components of the Red Cross Swim program.. 3. Identify the components of the Haddon Matrix Injury Prevention Model (PEE [personal, environment, and
equipment]; PSSS [Prepare! Stay Safe! Survive!]). 4. Identify the difference between an “accident” and an “incident” and that “accidents” are predictable and
preventable (injury prevention). SUGGESTED ACTIVITIES (Please note: these activities do not cover all points that need to be included in your session. You will need to incorporate some of your own activities to ensure all of the above bulleted points are covered.)
Seven Fundamental Principles Have candidates complete the crossword puzzle (Appendix B).
Review answer key when the puzzle is complete.
Water Safety Program Divide class into small groups (two or three to a group). Ask them to
complete the Red Cross AWSI Manual Seek & Find Activity (Appendix C). Review answers together.
Injury Prevention Activity Break into small groups. Have each group share a personal physical
scar or injury story. After sharing amongst themselves, have each group choose one story to dissect. Using
the chart on pg 2.8 of the AWSI manual, have each group fill in the chart by detailing how the injury could
have been avoided. There must be at least three items in each category. Ask the groups to identify if any of
these injuries or scars were truly an “accident”-- an unavoidable incident. Each time look at the factors
involved and determine if, at some point in the series of events, someone could have made a choice or
taken a different action that would have prevented this incident from occurring. Ask the candidates to
identify why the Canadian Red Cross would choose to use an injury prevention approach to create the
Swimming and Water Safety Program. Refer candidates to section titled Tips for Developing Water Safe
Attitudes and Behaviours on pg 2.7 of the AWSI manual.
Drowning Research Divide the class into groups of two. Hand out the current issue of Drowning
Research or Drownings and other water-related injuries in Canada 10 Years of Research (available at
www.redcross.ca). Assign each group a Typical Victim Profile or a Typical Scenario to review. Each group is
to present their profile or scenario and identify how the Canadian Red Cross Swimming and Water Safety
program addresses the factors raised.
Assistant Water Safety Instructor Course and Water Safety Instructor Course Facilitator Guide -9-
Summary of Information Divide the candidates into two groups. Place one group of candidates
in a circle sitting on chairs facing out. Have the second set of candidates place a chair directly opposite the
inside circle so that the candidates are facing the inner circle. Give each member of both circles one
Canadian Red Cross Swimming and Water Safety Program Question Card (Appendix D). You may decide to
give more than one card if you have a small group. The inner circle partner begins by reading his/her
question card to the partner in the outer circle. Together they discuss the answer to the question. The
person who asks the questions keeps notes on the back of the card for the brief presentation at the end of
the activity. Then the outer circle partner reads his/her question card and the partners discuss their answers,
recording notes on the card. After three minutes, call for a rotation. The inner circle stays put and the outer
circle moves clockwise to the next person. Repeat activity until the outer circle completes one full rotation.
Have the candidates read the question out to the group and the recorded answers. Provide additional
information when necessary. Information can also be found in Red Cross Swim, Chapter Two of the AWSI
Manual.
Assistant Water Safety Instructor Course and Water Safety Instructor Course Facilitator Guide -10-
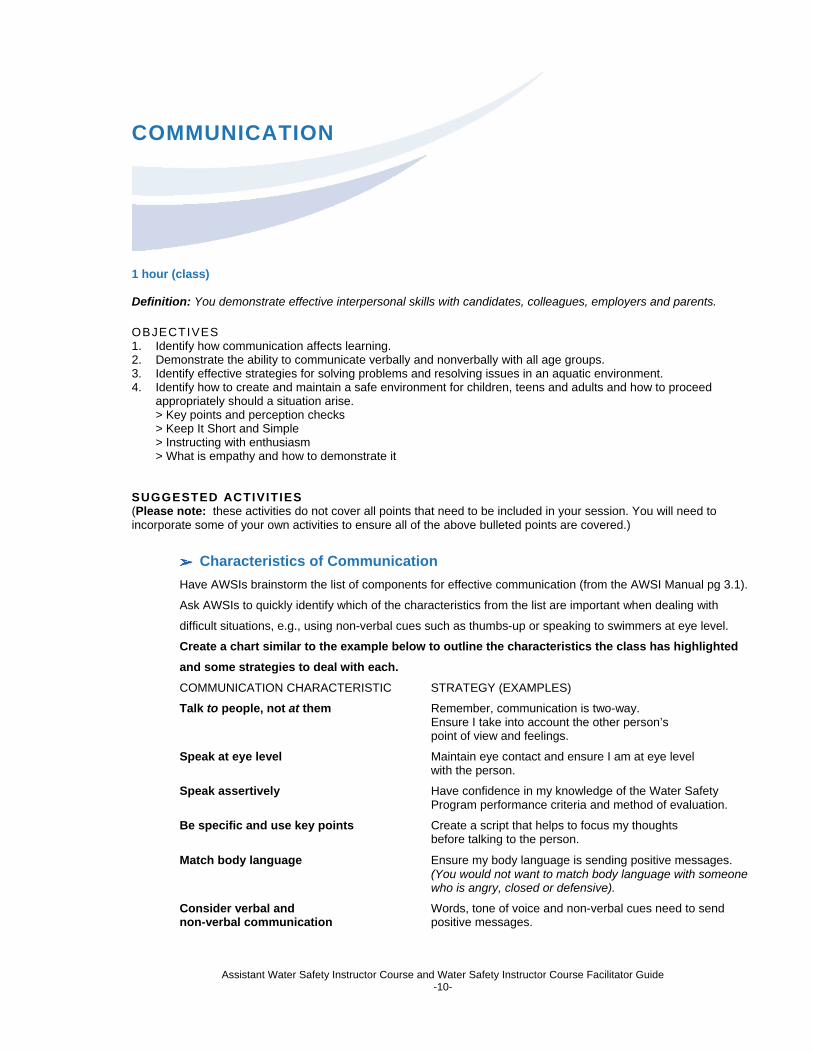
COMMUNICATION 1 hour (class) Definition: You demonstrate effective interpersonal skills with candidates, colleagues, employers and parents. OBJECTIVES 1. Identify how communication affects learning. 2. Demonstrate the ability to communicate verbally and nonverbally with all age groups. 3. Identify effective strategies for solving problems and resolving issues in an aquatic environment. 4. Identify how to create and maintain a safe environment for children, teens and adults and how to proceed
appropriately should a situation arise. > Key points and perception checks > Keep It Short and Simple > Instructing with enthusiasm > What is empathy and how to demonstrate it
SUGGESTED ACTIVITIES (Please note: these activities do not cover all points that need to be included in your session. You will need to incorporate some of your own activities to ensure all of the above bulleted points are covered.)
Characteristics of Communication
Have AWSIs brainstorm the list of components for effective communication (from the AWSI Manual pg 3.1).
Ask AWSIs to quickly identify which of the characteristics from the list are important when dealing with
difficult situations, e.g., using non-verbal cues such as thumbs-up or speaking to swimmers at eye level.
Create a chart similar to the example below to outline the characteristics the class has highlighted
and some strategies to deal with each.
COMMUNICATION CHARACTERISTIC STRATEGY (EXAMPLES)
Talk to people, not at them Remember, communication is two-way. Ensure I take into account the other person’s point of view and feelings.
Speak at eye level Maintain eye contact and ensure I am at eye level with the person.
Speak assertively Have confidence in my knowledge of the Water Safety Program performance criteria and method of evaluation.
Be specific and use key points Create a script that helps to focus my thoughts before talking to the person.
(You would not want to match body language with someone who is angry, closed or defensive).
Consider verbal and Words, tone of voice and non-verbal cues need to send non-verbal communication positive messages.
Match body language Ensure my body language is sending positive messages.
Assistant Water Safety Instructor Course and Water Safety Instructor Course Facilitator Guide -11-
Role Playing (Parent/WSI Relations)
Candidates will work in partners. They will be provided with a scenario which they must resolve. The
scenario will be role-played for the rest of the candidates. Parent/WSI scenarios can be found in Appendix
E.
Tone, Volume, Voices, Directions, Verbal/Nonverbal Messages
Play the Aladdin video selection, where he comes out of the lamp for the first time and sings the song. Ask
the class questions related to how tone, volume, voices, directions and verbal/non-verbal communication
were used in the clip. How can we as instructors do the same for our classes? Ask group why it is important
to have verbal and non-verbal language match. Typical responses might be: to meet individual learner
needs (such as visual or auditory learners), to ensure a lack of confusion, to make yourself believable. Place
candidates in partners. Each pair is to come up with two examples of non-matching verbal and non-verbal
communication. When one partner demonstrates these mismatches, the partner who is not mismatching
calls “freeze” and manipulates the mismatched partner so that the messages do match.
Being Specific, Using Key Points and Perception Checks
Headband Game
Tape a specific game card to the game headband of one candidate, the guesser, ensuring that the
candidate is unaware of the item featured on the card. Send the guesser candidate out of the room. Instruct
the remaining candidates to be vague and non-specific when providing hints to the guesser about the item
attached to his/her headband. Invite the guesser candidate back into the room, and have the remaining
candidates provide the hints as instructed. Once the guesser has guessed the item, choose a new guesser,
and provide a new card. Again, send the guesser out of the room. This time, instruct the remaining
candidates to be specific and provide key points to the guesser regarding the item to be guessed. Bring the
guesser in and repeat the game. Choose one last guesser. Place a card on the headband. The item on this
card should not be known to the guesser nor the remaining candidates (e.g. KAVA, which is a type of plant).
Repeat the game. Once all three guessers have had a turn, ask the candidates which one was the easiest to
guess. The answer should be when the candidates were being specific and using key points. What
happened in the third case? How can the game continue if no one understands? Discuss the importance of
perception checks.
Assistant Water Safety Instructor Course and Water Safety Instructor Course Facilitator Guide -12-
LEARNING 1.5 hours (class) Definition: You provide accurate program content to reach candidates in a variety of ways. You are also incorporating the utilization of progressions and evaluations to ensure that individual candidates are successful. OBJECTIVES 1. Identify the learning characteristics for the age categories and identify appropriate teaching strategies for the age
categories. 2. Identify the four learning styles (visual, auditory, tactile, and kinaesthetic). 3. Demonstrate an understanding of why and how people learn (learning process, domains of learning). SUGGESTED ACTIVITIES (Please note: these activities do not cover all points that need to be included in your session. You will need to incorporate some of your own activities to ensure all of the above bulleted points are covered.)
Age Characteristics Create an interactive activity using the chart on pages 4.5 - 4.6 of the Learning
Chapter of the AWSI Manual. Using recipe cards, re-create the chart. List the ages (e.g., toddlers 12-24
months or young adults ages 15-20 years) and the items (e.g. major feature of that age group) on different
colored cards and then all of the information for each on a separate color as well. On the floor or a large
table arrange the headings and items in proper order; ask the class to arrange the recipe cards with the
characteristics under the proper age groups. Let the candidates know that they must have consensus on
their decisions. This will generate discussion regarding their perceptions of the different age groups’
characteristics, interests and abilities. After they have finalized their decisions have them compare to pages
4.5 -4.6 of the AWSI Manual. Facilitate a discussion on how the age characteristics will affect the activities
used to teach skills, strokes and fitness.
Factors that Affect Learning Split the candidates into four small groups. Provide each group
with a set of paints and paintbrushes and a sheet of flip chart paper. Each group receives written directions
as to what they are to paint. There should not be any talking during this activity as each group should not be
aware of the other group’s directions.
Group 1 “Paint a brontosaurus”
Group 2 “Paint a dinosaur”
Group 3 “Paint an animal”
Group 4 “Paint hebtzyqnp”
Group 4 will have no idea what it is they are being asked to paint, as the word they are provided will not
make any sense to them. Group 3 will paint whichever animal the group agrees on. Group 1 and 2 will have
little or no difficulty painting their pictures.
Assistant Water Safety Instructor Course and Water Safety Instructor Course Facilitator Guide -13-
Give the groups a few minutes to finish their painting, post each picture on the wall and compare. Let the
groups know that the goal was to paint a picture of a brontosaurus (input); however, depending on what
they perceived the directions to be, they processed a different message (storage). The actual painting of the
picture was the retrieval. Discuss with the group the purpose of the activity: to show that when learners are
at different levels of cognitive development they may hear messages differently than the communicator
intended.
Ask Group 4 how they felt when they couldn’t understand what their task was?
Ask Group 3 how they dealt with directions that they understood, but that were not specific enough to clearly
identify their task?
Ask Groups 1 and 2 how they felt about the directions (retrieval). How easy was it to perform the skill
understanding the directions and knowing exactly what was expected? Relate this activity to a pre-school
class that may have children ranging from 3-years-old to 5-years-old in the same class. When giving verbal
directions will all the children understand the language the instructor is using? Because the main factors that
affect learning are the input and the experience of the person receiving the input, it is easier to communicate
the task if the learners can see what is being asked of them (visual).
Factors that Affect Learning Use an activity that is unfamiliar to the candidates; one that it is
likely that they have had very little, if any, experience performing (such as origami, or if you prefer a wet
activity, backwards breast stroke works well).
> Provide the candidates with verbal direction only > Allow the candidates time to practice, but do not provide any feedback
Ask the candidates how successful they have been performing the task? As a group identify what affected
their learning.
Using the same activity: > Provide the candidates with a brief explanation of the task > Provide the candidates with a demonstration of the task > Break the task into manageable chunks (progressions) > Provide the candidates with constructive feedback > Provide practice time
As a group, discuss the success of the group and what affected their success: > Motivational Factors—was the goal easily understood and achievable? > Is the learner able to tell when the goal has been achieved? > Is the challenge degree appropriate? > Was the use of manageable chunks beneficial to the learners? > Satisfaction or reward is anticipated > Experience is enjoyable
As a group discuss what factors affected their ability to learn the task the first time: > Unsure of what the task was > Unfamiliar with the task—no previous experience to draw from > Anxiety caused by lack of direction and feedback > Limited practice time

Assistant Water Safety Instructor Course and Water Safety Instructor Course Facilitator Guide -14-
SAFETY SUPERVISION 3 hours (2 hours class; 1 hour pool) Definition: You anticipate, prevent, and react to unsafe situations in your classes. OBJECTIVES
1. Identify the key factors in safety supervision. 2. Identify safe formations for activities.
SUGGESTED ACTIVITIES (Please note: these activities do not cover all points that need to be included in your session. You will need to incorporate some of your own activities to ensure all of the above bulleted points are covered.)
Draw a Safe Instructor Break class into two groups. Give each group a large piece of paper and a
“characteristics box”. A “characteristics box” is one that contains many of the qualities that make up a safe
instructor. These qualities must be discovered by the candidates much like you would discover treasure in a
treasure chest. Inside the box you can have puzzles, word scrambles, clues, and various objects that will
help the candidates form a picture of a safe instructor.
Have the candidates start by tracing one person from their group onto the large piece of paper. Once done,
they can open their characteristic box and start figuring out the qualities. As they figure them out, they can
either place the items on the picture or add them to their drawing.
Items in the box would include: > A picture of a whistle and buoyant aid that have been cut into pieces. They must put the pieces together
to figure out what they are. > Pieces of colored paper with scrambled words on them that all relate to what they do during their class to
be safe (i.e. use formations, never turn back, stay with class, first in water, last out of water) > Clues that they need to figure out (i.e. I come with many boxes and names for every row, I need to keep it
current as our progression it will show. Answer: Worksheet/attendance sheet) Once done, review items together as a group.
Assistant Water Safety Instructor Course and Water Safety Instructor Course Facilitator Guide -15-
Safe Simulations, Continuous Scan, and Head Counts Have one person leave the
room. Have the rest of the class all do a similar activity. One person in the group then changes the activity in
a minor way. An example of this would be to have all candidates standing in a scatter formation with their
feet together and hands folded with their right arm over the left on their chest. One person will have their
hands folded with their left arm over their right. The person outside then comes back in the room and tries to
guess which person is different. Repeat the activity more than one time each time doing something different.
In one of these situations, have one person missing from the group all together. As a group, review the
importance of using a continuous scan and head counts. Try and list as many reasons why they are needed.
Formations Play the following games: Duck Duck Goose
Have the class sit in a circle. One person is the goose. They walk around the circle tapping people on the
head and labeling them as ducks. When they label a person as a goose, that person has to jump up and
race the other person around the circle in opposite directions to get back to the empty spot. The object is to
get to the spot so that you don’t have to be the one walking around it.
Object Pick Up
Put candidates into two lines. The lines should form a corner formation. Candidates are assigned a
number. Each line will have the same series of numbers. Five objects are placed equal distance from the
candidates. The candidates then turn to face away from the center of the formation. The instructor then
yells out a number and an object. Whoever has that number (one from each team) will then race to be the
first to pick up the object.
Shoe Scramble
Have all the candidates remove their shoes and place them at the other end of the room. Divide them into
two teams. On go, they must do a crab walk to the shoe pile, find their shoes, put them on properly and
jump on one foot back to tag the next teammate. The first team to be sitting down with their shoes on
properly wins.
Salmon Says
Same game as Simon Says. Scatter formation.
Wheelbarrow Race
Place candidates into partners. Have wheelbarrow race to other end of the room and back.
Refer candidates to the formation chart on page 5.5 of the AWSI Manual. Review the description of the
formation used in each game and the best uses of the formation. Once done, discuss the importance of
using formations. Why do we need them? When do we use them?
Assistant Water Safety Instructor Course and Water Safety Instructor Course Facilitator Guide -16-
Safety Situations: (wet) Divide class into groups of four or five. Give each group a safety situation to demonstrate. After each demonstration, the class should discuss how a WSI should deal with the situation. Situations: 1) Swimmer gets in over his / her head 2) Swimmer goes missing 3) Instructor leaves class to get equipment 4) Instructor busy talking to a parent
Never Leave Swimmers on Own, Active Classes (wet) Have candidates experience a
class you teach in the water where there is too much swimmer inactivity: you talk too much and too long, the
candidates only get to practice one at a time, there isn’t enough space for everyone, and you leave the class
alone to get more kickboards. Afterwards, ask them how they felt during the class. Ask them how they think
an active 6-year-old child would feel. Then ask them how that active 6-year-old child might have behaved in
such a class. Be sure to model the session again ensuring activity is high, you never leave the class,
equipment is prepared etc.
Lakefront/Oceanfront Instructing Take a picture of a lakefront setting in your area (or find a
picture in a magazine or online) and another of an oceanfront setting. Have them blown up and laminated.
Divide the class into two groups. Give one group the lakefront picture and an erasable marker and the other
group the oceanfront setting and a marker. Have them draw in any hazards that they would need to be
aware of if they were teaching swimming lessons there. Present to the group and have them include how
they would correct these hazards.
Assistant Water Safety Instructor Course and Water Safety Instructor Course Facilitator Guide -17-
TEACHING 3 hours (1 hour class; 2 hour pool) Definition: You provide accurate program content to reach candidates in a variety of ways. OBJECTIVES 1. Identify and define the features of the following teaching methods:
Direct Discovery Games
2. Identify and define the following corrective methods: Shaping Over-correction Physical Manipulation
3. Identify the importance of teaching through progressions. 4. Demonstrate the ability to plan a progression activity using the key information from safety supervision,
communication, learning, and teaching sessions. 5. Demonstrate feedback (immediate, specific, directed at changeable behaviour, short and simple, constructive) SUGGESTED ACTIVITIES (Please note: these activities do not cover all points that need to be included in your session. You will need to incorporate some of your own activities to ensure all of the above bulleted points are covered.)
Defining Progressions Give half of the class the materials needed to build a predetermined craft
project, such as a ginger bread house, a bookmark or a puzzle. Tell them to go ahead and complete the
project but don’t tell them what they are building or how it should look. Give the other half of the class the
same materials along with a picture and step-by-step instructions on how to put the item together. Give both
groups approximately ten minutes to finish the project. What was the end result? Who was successful and
why? Discuss that the second group was successful because they were given clear instructions (or
progressions) to follow. They were able to work at one progression until they were ready to move on to the
next. The end result is that they created a project that had the desired end result. The first group may have
completed the project but it most likely is not the desired end result and they may have done steps in an
order that made it harder to help accomplish the task. Define the term progression and discuss how it relates
to Water Safety, Swimming and Fitness. Have the class find examples in their manual of progressions in
each of the areas of Water Safety, Swimming and Fitness.
Constant Feedback, Short and Simple Feedback Break class into pairs. Give each group
a bag of Lego™. Show only one of the partners a pre-constructed house and tell them that they need to

Assistant Water Safety Instructor Course and Water Safety Instructor Course Facilitator Guide -18-
have their partner build the same house. One group can give feedback as needed, the other group gives
feedback after one minute and the third group can only give feedback after they have finished the house.
Give the groups two minutes to build the house. Which groups were closest to completing the house? How
does the amount of feedback given affect the outcome of a skill?
Corrective Technique (Physical Manipulation, Over-correction, Shaping) Break the
class into three groups. Give each group a glob of play dough. Tell them to create a teddy bear. As they
make the teddy bear, go around to each group. To one group, physically manipulate their hands to make the
teddy bear, the other group you will use shaping (ears as flat as a pancake) to help them and the third group
you will use over-correction. Once done, ask the candidates what you did to help them create the teddy
bear. Define each of the corrective techniques. Discuss the importance of using all three types of correction
when teaching their lessons.
Breaking Down a Skill when Correcting Give each candidate an item extracted from the
program and ask them to prepare a three minute teaching session using that item. Set the class up into peer
classes. Before the candidate teaches their session, assign the people in their peer class an error for the
skill they are teaching. The candidate must then determine what the fault is and use either a different
teaching method or a different corrective method to correct the error. Switch around so all candidates have
the opportunity to teach.
Games Method Divide the candidates into three groups. Each group is given a topic from the
following list to brainstorm and instructed to prepare a flipchart to present their ideas to the rest of the class.
Group 1 How can games be used in an instructional setting? Group 2 What should you consider in leading a class through a safe, enjoyable game? Group 3 What should you consider when giving instructions for the game?

Assistant Water Safety Instructor Course and Water Safety Instructor Course Facilitator Guide -19-
SCIENCE OF SWIMMING 1 hour (0.5 hour class; 0.5 hour pool) Definition: Introduction of physical principles as applied to swim strokes and water safety skills. OBJECTIVES 1. Identify the physical principles as applied to strokes and water safety skills (centre of buoyancy, centre of mass,
Archimedes’ principle, resistance, propulsion, form drag, frictional drag, the law of action and reaction, law of levers).
2. Identify the effects of physical principles as applied to strokes and water safety skills. SUGGESTED ACTIVITIES (Please note: these activities do not cover all points that need to be included in your session. You will need to incorporate some of your own activities to ensure all of the above bulleted points are covered.)
Buoyancy Have the candidates draw self portraits (stick figures will do) of themselves and then have
them cut out their picture. Next give them a blank piece of paper and have them draw a wave across the top,
1/4 of the way down the page. Have the candidate glue or tape the picture of themselves in a vertical float
position where they predict that they will float. When that class enters the water, have them perform a
vertical float to determine whether or not their prediction was correct. As a group discuss why some people
float differently than others and why some people cannot float at all. Discuss what else beside body type
affects buoyancy such as: body position, lung capacity, and confidence (comfort level) in the water.
An alternative activity is to provide the candidates with magazines and catalogues. Have them cut out
pictures of people with different body types: muscular, lean, and overweight. Have the candidates draw a
wave across the top of a blank piece of paper, 1/4 of the way down the page. Have candidates glue or tape
the pictures of the people on the paper in a vertical float position where they predict people with those body
types will float. Have the groups present their pictures and explain why they think that the different body
types will float in different positions. Discuss what other factors affect buoyancy, such as: body position, lung
capacity (Archimedes’ Principle), center of gravity and confidence (comfort level) in the water.
Resistance Have candidates roll a marble across a cookie sheet. Note how quickly and easily it rolls
across. Now take some shaving cream or whip cream and squirt it onto the cookie sheet (even a few stripes
across or diagonally will work). Now roll the marble across the cookie sheet again. Did the marble make it
as far as it did the first time? What slowed it down? The cream is creating resistance. Ask the class what
things cause resistance when swimming in the water.

Assistant Water Safety Instructor Course and Water Safety Instructor Course Facilitator Guide -20-
Propulsion Using a wind up bath toy, wind it up and place it in a bowl of water. Ask the class what
physical principle is acting on it to make it move forward? How do we use propulsion to move through the
water?
Physical Principles Activities Provide candidates with Physical Principles Task Sheet from
Appendix F. In pairs have them go through the tasks and record their outcomes.
Assistant Water Safety Instructor Course and Water Safety Instructor Course Facilitator Guide -21-
DEVELOPING SWIMMER 2 hours (pool)
Definition: Progressions leading up to the front crawl progressions. OBJECTIVES 1. Identify the progressions of the developing swimmer. 2. Demonstrate the ability to break down skills into progressions and teach the progression. 3. Identify how physical principles apply to developing swimmer skills.
SUGGESTED ACTIVITIES (Please note: these activities do not cover all points that need to be included in your session. You will need to incorporate some of your own activities to ensure all of the above bulleted points are covered.)
Developing Swimmer Progressions Have all of the developing swimmer progressions listed
on separate paper cups. Candidates are to rearrange the cups into a pyramid with the progression order
they think is correct. Discuss as a group. As you review each progression, be sure to point out how each
one builds on the other. Stick a red dot onto any progression step that is wrong. Once you have checked all
progressions, go back to the first red dot and remove that cup. What happens? Does the progression
pyramid fall? If not, does it become unstable? Point out that while having one progression step out of order
may not be the end of the world, it does create an unstable foundation on which to build the progressions.
Continue removing the incorrect progressions until the pyramid falls. Point out the importance of using the
correct order of progressions and that the successes are much higher when built upon a stable foundation.
Teaching the Progressions of Developing Swimmer using a Theme Incorporate the
theme of a popular kids television show such as Dora the Explorer TM into your progression demonstration.
During your demonstration the candidates are acting as swimmers in a lesson program. Dora is a four year
old child who loves to explore!! She has discovered that at the end of the Developing Swimmer
Progressions is a big reward…the chance to learn about Front Crawl!! To get to the end of the progressions
she must find her way through the Developing Swimmer Progressions. She’ll need a special friend to help
her do this…everyone yell “MAP!” The Map has a special song. It goes like this: “ If there’s a place you
need to go, I’m the one you need to know, I’m the Map. I’m the Map, I’m the Map, I’m the Map. If there’s a
place you gotta get, I can get you there I bet, I’m the Map. I’m the Map, I’m the Map, I’m the MAP!! Map
(actually a poster or flipchart with the developing swimmer progressions on it) will tell Dora how to get to
Front Crawl. Take them through the progressions and include some puzzles or riddles along the way. For
example, before moving to the progression of Opening Eyes Underwater, they must figure out and do the
actions for a song you hum for them. A song that they love to play. Play it with them and then move on.
Along the way you can call on the help of Backpack. Backpack has everything you could ever imagine
needing!! Have them yell “Backpack” and pull out equipment that you can use for the next progression you
Assistant Water Safety Instructor Course and Water Safety Instructor Course Facilitator Guide -22-
are introducing. Swiper the fox can steal the equipment back when done. Don’t forget to yell “Swiper No
Swiping” three times to try and stop him!!
Footprints Prepare large, letter-sized paper “footprints” of the Developing Swimmer steps. Then
prepare smaller “footprints” of the progression to these steps. Divide class into partners. Give each group
one big footprint and its corresponding smaller footprints. Groups are to put the progressions (smaller
footprints) into the correct order. Each group then puts the large developing swimmer “footprints” on the wall
with the little progression steps beneath. Review the progressions, and then have pairs prepare their
progression steps for presentation in the pool.
Assistant Water Safety Instructor Course and Water Safety Instructor Course Facilitator Guide -23-
STROKES
6 hours (0.5 hours class; 5.5 hours pool)
Definition: The development of six different swimming strokes with the aim of helping prepare people for any activity in, on or around the water. OBJECTIVES 1. Accurately demonstrate strokes to the Red Cross Swim Kids Level 10 performance criteria. 2. Identify the effective order for teaching and correcting strokes. 3. Identify the progressions used to teach each stroke and how to use physical principles to identify stroke
correction strategies. 4. Participate in stroke drills and identify the purpose of the drill.
SUGGESTED ACTIVITIES (Please note: these activities do not cover all points that need to be included in your session. You will need to incorporate some of your own activities to ensure all of the above bulleted points are covered.)
Front Crawl
Modeling (wet) WSI candidates will experience a series of drills and activities that develop the
progressions of front crawl lead by the WSIT. Refer to the AWSI Manual pg 9.3 and the chart beginning on
pg 9.4 for the complete list of progressions.
Operative Principle The operative principle (see Operative Principle handout Appendix G). How do
the components of the operative principle relate? Break group into partners. Give each pair an Operative
Principle Task card (Appendix H). Give them a few minutes to analyze the card and determine what
operative principle is in need of correction. Come up with a drill to correct the error. Share and debate if
necessary.
Corrective Lab Take candidates through a 20-minute corrective lab (Appendix I) focusing on all
three correctives, breaking skills down, and use of specific, constructive feedback.
Drill Development (wet) WSI will break off into small groups and brainstorm at least four drills
using a variety of equipment. They will then splinter into other groups and teach their drills to their fellow
WSIs.
Assistant Water Safety Instructor Course and Water Safety Instructor Course Facilitator Guide -24-
Groups are to be divided into: > Body Position > Legs > Arms > Breathing > Coordination and Timing
Back Crawl
Modeling WSI candidates will experience a series of drills and activities that develop the progressions
of back crawl lead by the WSIT. Refer to the AWSI Manual pg 9.12 and the chart beginning on pg 9.13 for
the complete list of progressions.
Stroke Drill—Side Crawl The WSIT will explain about streamlining. Back Crawl is the number one
stroke where candidates plow through the water. This drill will help those candidates who still swim flat on
their backs.
> Have candidates perform side glide with kicking for 8 kicks for a distance, rolling onto other side after every 8 kicks
> Length 2 will be 6 kicks of side glide with flutter kick > Length 3 will be 5 kicks of side glide with flutter kick > Finally, length 4 will be 3 kicks of side glide with flutter kick
This drill is an over-correction of the shoulder roll and forces the candidate to streamline and stretch. Split
the class into three groups. Have the candidates look at the other progressions for Back Crawl. Challenge
them to come up with a drill that uses over-correction (group one), shaping (group two) and physical
manipulation (group three).
Corrective Methods and Formations Break the class into groups of four to six. Create
operative principle cards similar to the Front Crawl cards shown in Appendix H. Each group will have one
“instructor” and the rest will be candidates. Give each candidate a different operative principle card. Each
candidate can decide what corrective method will need to be shown in order to correct the error. The
“instructor” must set up a formation that allows for continuous practice and easy feedback. The “instructor”
then must determine the error, and correct it using a drill. The end result should be that all candidates are
doing individual drills in the same formation.
Whip Kick
Modeling Take instructors through the progressions for Whip Kick.
Progressions to Teach Recover and Power Phases Divide candidates into two groups.
Assign each group ways to teach Whip Kick. Make sure one group has Whip Kick on front, the other on
back. Have each group come up with a series of progressions or activities to teach Whip Kick for the
recovery and power phase. List the key points and physical principles that affect each progression. Record
on flipchart paper. Present to group.
Assistant Water Safety Instructor Course and Water Safety Instructor Course Facilitator Guide -25-
Elementary Backstroke
Modeling Take candidates through the progressions for Elementary Backstroke. Refer to the AWSI
Manual pg 9.19 and the chart beginning on pg 9.20 for the complete list of progressions.
Leg Action Execute leg movements holding a kickboard or noodle on their stomach while the
instructor manipulates the swimmer’s legs and adds resistance with hands on inside of foot. The instructor
then lets go and the student does the exercise without the help of the instructor.
Peer Evaluation Have candidates partner up and evaluate each other’s Elementary Backstroke.
They need to be referring to their AWSI Manual pages 9.20-9.24 for a listing of the progression standards.
They should be using the techniques of Operative Principle to ensure that all stroke errors are being noticed
and corrected. Remind them to use proper feedback techniques and a variety of methods.
Breast Stroke
Modeling Take candidates through the progressions for Breast Stroke. Refer to the AWSI Manual pg
9.25 and the chart beginning on pg 9.26 for the complete list of progressions.
Drills and Peer Teaching Divide candidates in groups of three. Candidates will travel through
stations, rotating positions as either “instructor” or “swimmer”. Stations are made up of either drills, stroke
corrections or strategies for teaching a specific progression step. (Appendix J)
Butterfly
Simple Introduction to Butterfly Spread out candidates in the shallow water, have WSIs
perform the following:
> The Wave – Knees, Bum, Tummy (point to and say out loud). > Spring Action – Arms and Head, have candidates imagine their head is attached to a spring that their arms
are pulling, so that when their arms are back, their head will “bong” back. When their arms are down their head is down. With their chin back, have them repeat the action rotating their arms around in a circle.
> Kick – In a straight line formation have candidates push off the wall in a front glide position. While performing, have them lift their bottoms once in the air, repeat the sequence with two bum lifts.
> Kick, Kick, Bong - Put steps 2 and 3 together, front glide, with a bum, bum, followed by a bong.
Modeling Take candidates through the progressions for Butterfly. Refer to the AWSI Manual pg 9.32
and the chart beginning on pg 9.33 for the complete list of progressions.
Progression Order Divide candidates into small groups and give each group a mixed-up set of
skills and activity cards used to teach Butterfly. Have groups order the skills according to progressions, e.g.
bellies and bottoms, wave motion, etc. When completed, have candidates refer to their AWSI Manual, page
9.32, to check their order. Record on flipchart paper. Have groups add any other ideas they have for
teaching these progressions. Present ideas to group.

Assistant Water Safety Instructor Course and Water Safety Instructor Course Facilitator Guide -26-
Sidestroke
Modeling Take candidates through the progressions for Sidestroke. Refer to the AWSI Manual pg
9.38 and the chart beginning on pg 9.39 for the complete list of progressions.
Common Errors Have candidates come up with some common errors that may be seen in
swimmers learning Sidestroke. For each error, they need to find one drill to correct it using physical
manipulation, over-correction and shaping. As an added challenge, have them come up with some key
words or phrases that are unique and fun.
Assistant Water Safety Instructor Course and Water Safety Instructor Course Facilitator Guide -27-
SKILLS AND WATER SAFETY
6 hours (1 hour class; 5 hours pool)
Definition: Providing candidates with skills and water safety that allow them to use an Injury Prevention approach to attitudes, knowledge and skills. OBJECTIVES 1. Identify the importance of skills and water safety content in the Red Cross Swim program and the placement of
the skills and water safety content items in the Haddon Matrix Injury Prevention Model. 2. Accurately demonstrate the skills and water safety items to the performance criteria of the Red Cross Swim
program (Red Cross Swim Preschool, Red Cross Swim Kids, and Red Cross Swim Programs for Adults & Teens).
3. Identify the progressions of all skills and water safety content items.
SUGGESTED ACTIVITIES (Please note: these activities do not cover all points that need to be included in your session. You will need to incorporate some of your own activities to ensure all of the above bulleted points are covered.)
Modeling Take candidates through a demonstration of some of the activities in each section.
Demonstrated items should be those that may have safety concerns (e.g. spotting for diving) and the harder
progressions. Progressions not demonstrated in the water should be referred to once in the classroom.
Please see Appendix K for Skill and Water Safety activities to do in the water.
Prepare, Stay Safe, Survive Post flipcharts around the room. Label the flipcharts Prepare! Stay
Safe! Survive! And Personal, Equipment, Environment.
a. Have candidates place the activities and demonstrations that were done in the water under the appropriate headings. Share as a group. b. Relate the activities to the five strategies for incorporating injury prevention. What strategy did each of the activities relate to? What safety supervision items do we need to be aware of? Looking back on the activities done in the water, decide which activities incorporated injury prevention, and
which of the five strategies were covered. Divide into pairs to discuss, and then share as a whole group.
Look at the progressions and activities that were not done in the water. Where would they fit on the
flipcharts?
Assistant Water Safety Instructor Course and Water Safety Instructor Course Facilitator Guide -28-
FITNESS 2 hours (1 hour class; 1 hour pool)
Definition: Teaching swimmers to enjoy aquatic activities and setting them on the road to lifelong fitness. OBJECTIVES
1. Identify how fitness relates to swimming. 2. Identify the components of fitness, the F.I.T.T. principle, and the purpose of using the target heart
rate zone. 3. Identify methods for building endurance. 4. Ensure candidates are introduced to the fitness components of the Red Cross Swim programs and the
fitness content contained in the Red Cross Swim Journal.
SUGGESTED ACTIVITIES (Please note: these activities do not cover all points that need to be included in your session. You will need to incorporate some of your own activities to ensure all of the above bulleted points are covered.)
Role-Play Candidates will be asked to group together and discuss the scenario card they
receive. From the scenario, the group must then provide a role-playing scenario for the rest of the
candidates that will provide a solution to the scenario on the card.
SCENARIOS INCLUDE: > Parent approaches you, the instructor, and wants to know the importance of his/her child maintaining
physical fitness. > A swimmer in your lessons asks you to re-teach him about the F.I.T.T. Principle – particularly what it
stands for. > A co-worker asks you to provide a list of sample activities to maintain cardiovascular fitness, muscular
strength, muscular endurance and flexibility in the water. > An adult asks you what is the purpose of the Target Heart Rate Zone.
Methods for Building Endurance Take candidates through a sample of various endurance
activities. Be sure to point out that the use of Over Distance Training is helpful in building endurance. Have
candidates swim a short distance to begin with. As each lesson progresses, challenge them to increase the
distance. This principle is used to develop endurance in the lower levels. They are not expected to be able
to complete the distances of the Red Cross Swim Program distance swim on the first day of the lessons.
Build up slowly and make it fun!! Have them playing a game such as What Time is it Mr/Mrs Shark where
they have to swim a short distance back to the edge. As endurance increases, so can the activities. Try the
Newspaper Relay. The object is to keep the newspaper dry to the other side of the pool. Swimmers take a
newspaper and swim on their back to the other side. Make sure they are reading the news out loud—it adds

Assistant Water Safety Instructor Course and Water Safety Instructor Course Facilitator Guide -29-
to the fun! Partner swims or silly swims where you eliminate the use of arms or legs are also fun ways to
build endurance. Make sure to stretch afterwards. For examples of stretches to use, see Appendix L.
Synchronized Swimming and Eggbeater Have candidates try out the synchronized
swimming activities listed in the AWSI Manual page 11.3. Break them into two groups. One group is
responsible for breaking down one of the skills of synchronized swimming into smaller progressions and a
game. The other group is responsible for doing the same for eggbeater.
Fitness Activities for Working on Cardio, Intervals, Endurance and Speed Take
candidates through the following drills. Once done, have them use their manuals and worksheets to
determine when these activities would best be used in the Red Cross Swimming and Water Safety Program.
How could they change the activities to meet the needs of different age groups (as defined in chart on pages
4.5 - 4.6 in the AWSI Manual)?
Drills
Cardio Swim 200m; take pulse at end of each 50m Intervals Swim 5 x 25m lengths of Front Crawl. Take a 10 second rest between each length. This gives your body time to recover to swim the next length. Increasing endurance Swim 25m, swim 50m, swim 75m, swim 100m, and time yourself. Increasing speed Try to swim one 25m length of the pool in 2 minutes. Repeat the activity 4 more times each time trying to decrease your time by 5 seconds.
Determining Maximum Heart Rate Determining Maximum Heart Rate Show candidates how to determine maximum heart rate and target heart rate, then provide practice scenarios to determine maximum and target heart rate of various ages.
Your target heart range is the ideal range to maintain during exercise. To do a heart rate check: 1. Start timing on the first beat and count “0.” 2. Count “1” on the second beat and so on for 15 seconds. 3. To determine your heart rate, double the number of beats you counted and then double that number again. To find your resting heart rate, check your heart rate while you’re sitting quietly. To find your exercise heart rate, pause for a moment in the middle of your workout to do a heart rate check. You can calculate your target heart rate using Karvonen’s formula: 1. Record your resting heart rate (RHR): _________ 2. Calculate your maximum heart rate (MRH): ________
For males, MRH = 214 – (0.8 x age) For females, MRH = 209 – (0.7 x age)
3. Calculate your training zone values: 60% of maximum heart rate: [(______ – ______) x .60] + _____ _= ______ MHR RHR RHR 60%MHR
Assistant Water Safety Instructor Course and Water Safety Instructor Course Facilitator Guide -30-
80% of maximum heart rate: [(______ – ______) x .80] + _____ _= ______ MHR RHR RHR 80%MHR 4. Now use your training zone values to calculate your target heart rate: Target heart rate range on land: ______ to ______ 60%MHR 80%MHR Target heart rate in the water: (______ – 17) to (______ – 17) = ______ to ______ 60%MHR 80%MHR [start margin note] Your target heart rate is 17 beats per minute lower in the water than on land. That’s because: Water increases the pressure on the outside of the body, so your heart does not have to work as hard to pump
blood back. Water removes the effect of gravity upon the body. The surrounding water removes the heat your body has generated by exercising. [end margin note] [Insert illustrations of carotid and radial pulse from AquaAdults Journal] Example for a 30-year-old male: Resting heart rate: 64 Maximum heart rate: 214 – (0.8 x 30) = 190 60% of maximum heart rate: [(190 – 64) x .60] + 64 = [126 x .60] + 64 = 140 80% of maximum heart rate: [(190 – 64) x .80] + 64 = [126 x .80] + 64 = 165 Target heart rate range on land: 140 to 165 Target heart rate in the water: (140 – 17) to (165 – 17) = 123 to 148
Give candidates the following chart and have them fill in the three columns.
Age Maximum Heart Rate Target Heart Rate 60% Target Heart Rate 85% 8 15 23 29 34 39 43 56 65 74
Assistant Water Safety Instructor Course and Water Safety Instructor Course Facilitator Guide -31-
FINAL EVALUATION / NEXT STEPS
1 hour (class)
Definition: To inform candidates of their status in the WSI Program and prepare them for the next steps to take in completing their goal to become a Water Safety Instructor. OBJECTIVES Candidates receive: 1. The final course evaluation (verbal and written) 2. Teaching Experience information on how and when to complete the Teaching experience assignments (if not
done during the course). 3. Information on the role of the AWSI (employment and volunteer opportunities). 4. Next steps toward becoming a WSI (AWSI certification process, WSI course prerequisites). And finally congratulate all candidates for a job well done on behalf of you, the facility, and the Canadian Red Cross.

Assistant Water Safety Instructor Course and Water Safety Instructor Course Facilitator Guide -32-
Water Safety Instructor Course
As a Canadian Red Cross Water Safety Instructor Trainer it
is important to provide courses that relay information in an
interesting, exciting and challenging way. This guide is designed
to assist you with course planning. In it you will find: a definition of
the purpose or goal of the session, topics that need to be covered
in the session and some suggested activities. The activities are
yours to use, modify, build on and be inspired by! The suggested
activities do not cover all of the information that needs to be
covered in the session, so don’t forget to add your own material
and ideas!
Contents
Introduction
Canadian Red Cross
Instructor Emergency Response (I.E.R.)
Planning
Red Cross Swim Preschool
Red Cross Swim Kids
Red Cross Swim Programs for Adults & Teens
Evaluation Made Simple
Final Evaluation / Next Steps
Assistant Water Safety Instructor Course and Water Safety Instructor Course Facilitator Guide -33-
INTRODUCTION 1 hour (class)
OBJECTIVES 1. Provide candidates with an introduction to the course; review the agenda, course expectations, course materials,
and evaluation criteria. 2. Provide candidates with an orientation to the facility/site and safety procedures. SUGGESTED ACTIVITIES (Please note: these activities do not cover all points that need to be included in your session. You will need to incorporate some of your own activities to ensure all of the above bulleted points are covered.)
Name Pantomime Have candidates stand in a circle. Ask each person to think of an action verb that
starts with the first letter of their name. One at a time, have each person act out their action verb without
talking. Have the rest of the group try to guess the person’s name and verb, e.g. Galloping Gail, Jumping
James, Shy Shelley, Dramatic Darlene, etc.
Distribute the Folded Nameplate (Appendix A) and have each candidate write his/her name on
them. Have the candidate fold the nameplate and place it in front of him/her on the table. This will assist the
WSIT and the other candidates in remembering names.
Have Candidates Draw a Picture of Themselves or a partner, and then have the rest of the
group try to identify who they are.
Jelly Bean Jam In each envelope, insert nine jelly beans of different colors. Give an envelope of jelly
beans to each person. Tell your group that the object of this game is to get nine jelly beans of the same
color by asking others for the color of the jelly bean you want, then trade one of yours in return. Before
candidates trade jelly beans, they must introduce themselves. Candidates may trade only one jelly bean at a
time. This activity takes time because several people may be pursuing the same jelly bean colour. The first
person to get nine matching jelly beans is the winner. Keep playing until everyone has a group of matching
jelly beans.
Find your Nut Hand out an assortment of nuts and bolts, one nut or bolt per candidate. Have the
candidates find the person who holds the nut or bolt that fits theirs. Once the candidates find their match, the
two partners must discover three things in common with one another, and use these things to help introduce
each other to the class.
Assistant Water Safety Instructor Course and Water Safety Instructor Course Facilitator Guide -34-
CANADIAN RED CROSS 1 hour (class) Definition: To further define the roles of the Water Safety Instructor in the Canadian Red Cross and provide more history that builds on the information learned in the AWSI. OBJECTIVES
1. Identify the roles and responsibilities of a WSI representing the Canadian Red Cross. 2. Identify the requirements to maintain a current WSI certification. 3. Identify how to represent the Canadian Red Cross in a professional manner. 4. Identify appropriate uses for the Red Cross emblem. 5. Identify potential signs of maltreatment/harassment and an appropriate course of action for handling
potential disclosures (AWSI Manual, Appendix H). SUGGESTED ACTIVITIES (Please note: these activities do not cover all points that need to be included in your session. You will need to incorporate some of your own activities to ensure all of the above bulleted points are covered.)
PowerPoint Presentation Show the Canadian Red Cross PowerPoint presentation or print the
slides onto overhead transparencies. Use the speaker notes to discuss the slides. Have the class identify the
common theme that underlies the work of Canadian Red Cross staff and volunteers. (Promoting
humanitarian values and injury prevention).
The Emblem Review the information in the WSI Manual on the Red Cross Emblem and its use. Point
out that although the symbol is seen many places, often used to symbolize first aid, it is copyrighted and
cannot be used except to promote the Canadian Red Cross. Have the candidates brainstorm a list of top
recognizable logos, for example: Coke, McDonalds, Clothing Labels, Ford, BMW, etc. Have the candidates
determine if each of the logos would actually be known worldwide. (Coke, the Red Cross and Michelin tires
are recognized worldwide.)
The Code of Conduct Have candidates review the code of conduct. Facilitate a discussion on what
the code of conduct means. For example, when you teach children about injury prevention, you become a
role model. Is it appropriate to teach children to always wear a lifejacket in a boat and then not demonstrate
the behaviour yourself when out at a lake or river?
Roles and Responsibilities of a Canadian Red Cross WSI Have the candidates list the
qualities of a great instructor they have had in the past. Look for qualities such as: always on time, greets
the swimmers by name, shows an interest in each swimmer, completes administrative work, recognizes
swimmers’ accomplishments, etc. Ask them to identify how they will ensure that they demonstrate these

Assistant Water Safety Instructor Course and Water Safety Instructor Course Facilitator Guide -35-
qualities (through planning and attention to the work they undertake). Conclusion: upon completion of this
course you will be certified as a Canadian Red Cross Water Safety Instructor;, it is important to keep in mind
that you are seen as a representative of the organization and the values that it holds. Ensure that you do
your part in promoting the humanitarian values and injury prevention messages when the opportunity
arises.
Assistant Water Safety Instructor Course and Water Safety Instructor Course Facilitator Guide -36-
INSTRUCTOR EMERGENCY RESPONSE SKILLS (IERS) 2 hours (class) Definition: Items that are taught, practiced, and evaluated to ensure the WSI candidates can respond in an emergency. OBJECTIVES 1. Successfully demonstrate performance criteria on the required IER skills (WSIT Manual, Appendix F3). MANDATORY ACTIVITIES: (Please note: these activities do not cover all points that need to be included in your session. You will need to incorporate some of your own activities to ensure all of the above bulleted points are covered.)
IER Experiences Have candidates share IER experiences they have had within the last couple
years. Discuss what action they took and what they would do differently the next time. Discuss also how to
reduce or prevent this situation from happening again. Then use these examples as the base for the pool
scenarios. Make necessary additions to ensure all IER skills are covered. Or do the following activity:
Suggested Sample Instructional Emergency Response Scenarios
Role Playing 1. Assign roles of instructor, candidates, parents, etc. 2. Act out roles as described in the situations. 3. Discuss and evaluate performance. Instructor #1 Teach surface support to a Red Cross Swim Kids 4 class. Group #1 You are a Red Cross Swim Kids 4 class. One of you gets a mouthful of water,
panics and grabs the person next to you. Instructor #2 Teach shallow dive to a Red Cross Swim Kids 8 class. Group #2 You are a Red Cross Swim Kids 8 class. One of you gets a cramp in your calf. Instructor #3 Teach foot first surface dives to a Red Cross Swim Kids 10 class. Group #3 You are a Red Cross Swim Kids 10 class. One of you simulates a
submerged victim. Instructor #4 Teach front and side rolls to a Red Cross Swim Kids 5 class. Group #4 You are a Red Cross Swim Kids 5 class. One of you has mastered movement
underwater and is swimming quickly toward one wall. You hit the wall and your nose starts to bleed.
Instructor #5 Teach front stride dive to a Red Cross Swim Kids 6 class. Group #5 You are a Red Cross Swim Kids 6 class. One of you will dislocate your shoulder
on entry. Instructor #6 Teach submersion to a Red Cross Swim Basics (Adult) class.
Assistant Water Safety Instructor Course and Water Safety Instructor Course Facilitator Guide -37-
Group #6 You are a Red Cross Swim Basics (Adult) class. One of you swallows your gum while submerging and starts to choke.
Instructor #7 Teach stride entry to a Red Cross Swim Kids 7 class. Group #7 You are a Red Cross Swim Kids 7 class. After a couple of entries, one of you will
twist an ankle while doing a stride entry. Instructor #8 Your Red Cross Swim Kids 10 class is swimming the 500m endurance swim.
Candidates are in a single loop formation. Group #8 You are swimming your 500m distance swim, and one swimmer
hyperventilates and goes unconscious, non-breathing. Instructor #9 You are reviewing Red Cross Swim Kids 5 dolphin dives (in preparation
for kneeling dives) in the shallow end. Group #9 You are reviewing dolphin dives. One swimmer dives too deep and hits head.
Assistant Water Safety Instructor Course and Water Safety Instructor Course Facilitator Guide -38-
PLANNING 2 hours (class) Definition: Development of both long-term and short-term lesson plans to ensure that the content is covered during a lesson set and everyone’s needs are met. OBJECTIVES 1. Identify why WSIs use lesson plans. 2. Identify the key components of daily and long-term lesson plans. 3. Demonstrate the ability to create effective long-term and daily lesson plans. SUGGESTED ACTIVITIES (Please note: these activities do not cover all points that need to be included in your session. You will need to incorporate some of your own activities to ensure all of the above bulleted points are covered.)
Long-Term Planning Gather some brochures of various destinations from a travel agent. Assign
groups of candidates to different trips and give them a brochure. Put up the “Planning a Trip” overhead
(Appendix B). Have candidates work in groups to answer the questions. Quickly review them as a group.
Using a white board or flip chart, map out one of the destinations into a 10 day grid. What things are they
going to do each day (no details, just the items)? As you are mapping out the plan, be sure to point out that
they may want to do some things or everything more than once so plan for that as well. Point out that to plan
a trip, you need to have in mind the length of time gone, what you will take, what you will do, goals, etc. This
is the same as lesson planning. Identify the purpose of long term lesson plans: a determination of the skills
to be covered, focusing on what day and what skill not how the skills will be covered. Ensure the long-term
lesson plans include the following details: when to introduce each new skill/water safety item/stroke/fitness
activity, a review and practice of skill/water safety item/stroke/fitness activity, an introduction of all skill/water
safety item/stroke/fitness activity by the fourth or fifth lesson, identifies that skill/water safety
item/stroke/fitness activity are repeated a minimum of three times in a lesson set, the instructor should begin
with those skills which were developed in the previous levels, similar skills are linked together, and water
safety and swimming are covered everyday, etc. As a group, create a long-term lesson plan using the
worksheet for Red Cross Swim Kids 6.
Short-Term Planning Identify that the long-term lesson plan is to determine the “what”; a short-
term lesson plan is to clarify the “how”. It is also the tool where the individual needs of your swimmers can
be written down. Look at the long-term plan for the trip that was planned above. Let’s take a close look at
Day 4. We want to plan that day in detail – creating a short-term plan. A short-term lesson plan should
include: date, time, level, lesson day, skills listed, methods used, progressions, formations used (minimum of
three), safety supervision concerns, equipment and back up. Together, create a brief plan for Day 4 of the
Assistant Water Safety Instructor Course and Water Safety Instructor Course Facilitator Guide -39-
trip. Now, as a whole group, create a short-term lesson plan for Day 4 of your Red Cross Swim Kids 6 class
by using the long-term lesson plan you designed as a group.
Short-Term Plan for Different Age Groups Break class into three groups. Assign each group
a topic of Preschool, Adult or Multi-Level. Have them create a short-term plan for Day 3 of a pre-determined
level in the Red Cross Swim Program. Have them prepare their plan on a flipchart and present to the class.
Discuss how the plans differed according to the different age or levels that they were teaching.
Self Evaluation Have candidates draw a self-portrait. Put the questions listed below on an overhead
or flipchart and have them evaluate how they did. How does this apply to lessons? What should they be
doing when they are teaching their lessons? Point out that they need to be evaluating their lessons at the
end of each day. What went well, what didn’t, what needs to be done again or differently? All of these things
are important to ensure that they teach the best lesson possible.
Self Evaluation Questions 1. Did I give myself two eyes? A nose? A mouth? 2. Was my hair too straight or too curly in the picture or just right? 3. Did I remember to include all distinguishing characteristics – the things that make me special? 4. What could I have done differently to make the portrait look more like me? 5. Is there anything that I could try the next time I try to draw a picture of myself?
Assistant Water Safety Instructor Course and Water Safety Instructor Course Facilitator Guide -40-
RED CROSS SWIM PRESCHOOL 6.5 hours (2 hours class; 4.5 hours pool) Definition: Seven-level, stand-alone program that allows swimmers to enter various levels based on age and ability. Designed for infants, toddlers, preschoolers and their caregivers. OBJECTIVES 1. Identify the content item and match it to the observation or performance criteria for each level of the Red Cross
Swim Preschool program. 2. Demonstrate the ability to apply the Red Cross Swim Preschool program progressions in a peer teaching
environment. 3. Identify strategies to teach through a caregiver in the water, for parented levels. 4. Identify effective teaching strategies to meet the needs of the preschool age groups and characteristics. 5. Demonstrate effective supports, holds, and body positions for participants in the Red Cross Swim Preschool
program. 6. Identify the program support materials and use for the Red Cross Swim Preschool program. SUGGESTED ACTIVITIES (Please note: these activities do not cover all points that need to be included in your session. You will need to incorporate some of your own activities to ensure all of the above bulleted points are covered.)
Age Characteristics Divide class into five groups and assign each group an age characteristic:
a) 0 – 12 months b) 13 – 24 months c) 22 – 36 months d) 36 – 50 months e) 48 – 60 months Give each group a picture or magazine clipping of a child in their age group, a small square of cork board,
several small straight pins and a photocopied chart of their group’s characteristics. Give them five minutes to
cut out each characteristic and pin it to the picture on the cork board. Once done, give each group several
pictures of toys and items that a child in their age group would use or play with. Have the candidates identify
how that child will interact with the toy. For example, if they are given a ball and a cookie at age two,
chances are they will not share the ball but will happily share the cookie!! Have each group summarize the
physical, social, hearing and speech characteristics of their age group, and share findings. Have each group
list what considerations or activities should be incorporated into lessons, taking into account the listed
characteristics. Have each group share their findings with the class.
Safety Supervision Best done if class can observe a preschool class with parent, and a preschool
class without parent. While observing, have learners list all possible class management and safety concerns
Assistant Water Safety Instructor Course and Water Safety Instructor Course Facilitator Guide -41-
observed. List all concerns on a flip chart. Discuss each concern and how you, as the instructor, would
eliminate or address each concern listed.
Experience the Canadian Red Cross Preschool Program WSIT leads the group through
all holding positions appropriate for infants and preschoolers using real infants and preschoolers, dolls, or
infant actars. WSIT leads the learners through songs and games for infants and preschoolers. At the
completion of each song or game discuss the purpose and skills learned. Take candidates through a themed
Red Cross Preschool Lesson of your choice. You can use a lesson plan from the Sample Lesson plans on
the AWSI CD Rom with Lesson Plans or create one of your own.
Communication (Enthusiasm) Divide the class into two teams. List a number of different
emotions. The first person on each team runs to the other end of the room and gets an emotion from the list.
S/he then must go back to his/her team and act out that emotion until the team guesses it. Play continues
until the list is finished. Relate this to teaching preschoolers. How does our enthusiasm affect the class?
What kinds of things will keep a preschooler’s attention? Discuss how body language and facial expression
can affect communication with a preschooler. On a flipchart, list as a group, ways that instructors can use
their bodies to communicate. How does our body language influence the emotions and feelings of
preschoolers in our classes? We need to recognize that our enthusiasm for what we do will affect our
classes and our swimmers’ motivation.
Communication with Parents Give candidates each a doll. Taking turns being the instructor; have
them practice giving instructions as if they are talking to the parents. Each candidate can choose a portion of
a lesson to conduct from the sample lesson plans. Their communication should include instructions that are
simple for the kids to understand as well as include explanations of physical principles, common errors and
ways to correct for the parents. To get a slightly more realistic feel of talking to parents, do this activity very
early in the course when they don’t know each other as well. Then do it again once they have learned more
course information.
Assistant Water Safety Instructor Course and Water Safety Instructor Course Facilitator Guide -42-
RED CROSS SWIM KIDS
7 hours (1.5 hours class; 5.5 hours pool)
Definition: A 10-level program designed to provide solid and manageable skill progressions from one level to the next. OBJECTIVES 1. Demonstrate the ability to apply the Red Cross Swim Kids program progressions in a peer teaching environment. 2. Teach the content item and identify the performance criteria for each level of the Red Cross Swim Kids program. 3. Identify effective teaching strategies to meet the needs of the children’s age group characteristics. 4. Identify the program support materials and use for the Red Cross Swim Kids program. SUGGESTED ACTIVITIES (Please note: these activities do not cover all points that need to be included in your session. You will need to incorporate some of your own activities to ensure all of the above bulleted points are covered.)
Experiencing the Red Cross Swim Kids Program WSIT leads the group through a variety
of Red Cross Swim Kids Program activities and progressions. Choose these activities from the level by level
summary in your WSI Manual Red Cross Swim Kids chapter. Select skills based on class weakness or lack
of experience and demonstrate. Be sure to keep the progressions in order and logical. You will want to
break out the Swimming Progressions, Water Safety and Skill Progressions and Fitness Progressions. You
can spread out your sessions and have different focuses for each one, i.e. Swimming Progressions may
have a classroom focus of physical principles, drills, and corrective methods while Water Safety
Progressions may focus on games and learning styles.
Swimming (Use of Drills) Identify that there are a large number of drills that, when used, create
errors that have to be corrected. Provide some examples. Have class break into groups, assign each group
a stroke, and have them identify a minimum of five progressions that would need corrections. For this
activity, groups can review the drills used in the previous activity. Have groups switch when done. Have the
new group identify the progression that should be used instead. Share results with the whole class.
Formations and Placement Put candidates into four groups. Place four pool floor plans around
the room and designate one per group. Each group is given a level and a skill within that level. They must
find an area of the pool in which they will teach that skill including the formation they will use and where they
will place the instructor. Each group rotates through the posters. They then switch activities and repeat the
Assistant Water Safety Instructor Course and Water Safety Instructor Course Facilitator Guide -43-
process. Candidates are encouraged to challenge themselves to use different formations each time. Lead
the candidates through a discussion of which formations were successful and which weren’t.
Progressions Divide candidates into small groups. Provide each group with a copy of the
worksheets for the Red Cross Swim Kids Program. Assign each group a skill (either swimming or water
safety skill) to follow the progression through the program. Each group will identify the progression steps
including the evaluation criteria of the progression. Present these findings to the class.
Stroke Errors Identify common stroke and skill errors, physical principles and corrections.
Fitness Have the candidates swim a distance and time themselves. Do it on more than one occasion
and track their personal best.
Lesson Observation Show the Sample Lesson Plans to the class. Choose one lesson plan and
take the class through the lesson plan in the water using them as the candidates. Role-model effective
instructional techniques.
Prior to the lesson, have each instructor candidate review the lesson observation questions (Appendix C).
Once the lesson is over have the candidates complete the questions.
Review the lesson observation questions together.
1) Have the group identify how these factors (safety supervision, class management, transitions and activity level) contributed to the success of the class. Give each candidate a behaviour card. A behaviour card can be any type of behaviour that may be
observed in a lesson by a student (fear, authority challenger, boredom, etc.) As you move through each
activity, select one candidate to read his/her behaviour card. Have the candidate identify what strategy or
alternative activity s/he would identify as a potential solution to effectively meet the challenge identified on
the behaviour card. Invite the class to provide alternative options as well. Identify successful strategies.
Communication (Empathy): Have each candidate choose a partner. Designate one partner
“instructor” and the other “learner”. Give all the instructors a cue card with a communication element (e.g.
towering teacher) and give the learners a cue card with a feeling (e.g. frustrated). Ask the instructors to
assign a skill to the learners (e.g. draw a picture of a horse) and allow the instructors and the learners to
interact. Post a flipchart with the word “feeling” on one column and the word “empathy” on the other.
Brainstorm for ways of showing empathy toward learners. ** You might need to define the word “empathy”!
See Empathy task cards – communication in Appendix D
Assistant Water Safety Instructor Course and Water Safety Instructor Course Facilitator Guide -44-
RED CROSS SWIM PROGRAM FOR ADULTS & TEENS
2.5 hours (1.5 hours class; 1 hour pool)
Definition: A flexible 11 module program (Red Cross Swim Basics, Red Cross Swim Strokes and 9 modules in Red Cross Swim Sports) designed to provide youth and adults an opportunity to gain knowledge and skills according to their own interests and abilities in a safe, enjoyable environment OBJECTIVES 1. Demonstrate the ability to apply the Red Cross Swim Basics program progressions in a peer teaching
environment. 2. Teach the content item and identify the performance criteria for the Red Cross Swim Basics and Red Cross
Swim Strokes levels. 3. Identify where to find the skills teaching criteria for each of the 9 Red Cross Swim Sports modules. 4. Identify effective teaching strategies to meet the needs of the age characteristics. 5. Identify the program support materials and use for the Red Cross Swim Basics, Red Cross Swim Strokes and
Red Cross Swim Sports program. SUGGESTED ACTIVITIES (Please note: 1. These activities do not cover all points that need to be included in your session. You will need to incorporate some of your own activities to ensure all of the above bulleted points are covered.) 2. Ensure you have printed copies of the Red Cross Swim Sports lesson plans available for the groups to use during this session.)
Overview of Program Divide class into two groups. Assign groups a discussion question on the
programs such as: What makes the Red Cross Swim Basics, Red Cross Swim Strokes and Red Cross
Swim Sports programs different from the Red Cross Swim Preschool and Red Cross Swim Kids programs?
How does Red Cross Swim Basics meet the learning and physical skill acquisition needs of the learners?
How does a WSI evaluate progress for swimmers in Red Cross Swim Strokes? How can a WSI incorporate
injury prevention knowledge into the Red Cross Swim Sports modules? Share together in the larger group.
Review the content of each level; Red Cross Swim Basics, Red Cross Swim Strokes, Red Cross Swim
Sports: Swim Workout, Triathlon Swim , Lifesaving, Boating, Diving, Water Polo, Underwater Hockey,
Synchronized Swimming, Surfing and Boogie Boarding. Divide the class into 5 groups; assign each group
two modules. Each group will summarize the content and references for the components for each module
assigned. For example: the F.I.T.T. principle, mannequin carry, passing the puck, etc.
Program Products Review when and how to use the Red Cross Swim Journal.) Discuss how WSIs
and swimmers can use the “Track your Progress” and the” Personal Best” charts in the Red Cross Swim
Journal. Review how the modules are laid out. Clarify that the focus is on an individualized approach to
learning, and to catering to the needs of the class. Give the class four “Chart Your Own Course” (goal
Assistant Water Safety Instructor Course and Water Safety Instructor Course Facilitator Guide -45-
setting) journal entries that have been filled out by “candidates” in an adult class. Ensure that the goals are
varied. Have the candidates put the “Chart Your Own Course” journal entries to use by planning a workout
for that class.
Adult Learning Characteristics Review the characteristic chart for teen and adult age groups
(AWSI manual page 4.5 & 4.6). Brainstorm benefits and challenges of teaching teens & adults from a
learning characteristics standpoint. Brainstorm ways to overcome the listed challenges.
Program Content (Peer Teaching) Each person teaches one component of the Red Cross
Swim Basics, Red Cross Swim Strokes & Red Cross Swim Sports program, focusing on terminology and
activities that are appropriate to the adult & teen age groups.
Suggested peer teaching topics > Back Float and recovery > PFD/lifejackets > Dolphin dives > Warm up/cool down > F.I.T.T. principle > Target heart rate > Sailboat >Mannequin carry
>Red Cross Swim Kids 4 Front Crawl Arms Recovery (progress from Red Cross Swim Kids 3 Front Crawl
Arms Recovery- see Strokes Chart)
Assistant Water Safety Instructor Course and Water Safety Instructor Course Facilitator Guide -46-
EVALUATION MADE SIMPLE 2 hours (class)
Definition: The incorporation of progressive learning and an individualized approach to instruction designed to help swimmers improve each time they enter the water safely and have fun. In other words, evaluation is ongoing. OBJECTIVES 1. Define and demonstrate how to evaluate performance using continuous evaluation and the 3x rule for content
item completion. 2. Provide feedback/final evaluation in written form to participants of the Red Cross Swim program using the Red
Cross Swim program evaluation products. 3. Identify the importance of evaluating according to Red Cross performance criteria. 4. Evaluate progressively and determine the final result. 5. Identify specified use of all Red Cross Swim program recognition products. SUGGESTED ACTIVITIES (Please note: these activities do not cover all points that need to be included in your session. You will need to incorporate some of your own activities to ensure all of the above bulleted points are covered.)
Filling out a Worksheet Create a mock class listing the various skills that class can and can’t do.
Hand out the worksheets to the candidates and have them fill them out. Review the accurate version with
the class.
Evaluation Made Simple Introduce candidates to the “Evaluation Made Simple” (EMS) section
(WSI Manual page 7.3-7.4) in their manuals. Review each question and how each question should be
thought through and decided upon. Discuss different situations in which the EMS section may need to be
used fully. Hand out EMS Task Cards (Appendix E) and have candidates answer each of the cards with a
decision as to what they would do. Have them read the back of the card for immediate feedback.
Recognition Products Break into three groups: Progress cards Worksheets Journal Brainstorm what should be included in criteria from a parent’s point of view. Progress cards Must be legible and directed to the swimmer. Include specific comments as to why a child received a complete or incomplete. Ensure correct spelling. Clearly indicate which level the child should pursue next. Ensure the date and the instructor’s name is on the card. Comments include: a positive constructive comment, specific activities to work on, specific activities done well and a personal comment, e.g., you listened well in class.
Assistant Water Safety Instructor Course and Water Safety Instructor Course Facilitator Guide -47-
Worksheets Parents are permitted to view worksheets. Update each child’s progress after each lesson. Ensure worksheets are legible. Journal Used to track progress in the Red Cross Swim Basics program Used to track progress in the Red Cross Swim Strokes program Used to track participation in the Red Cross Swim Sports program Has tools for participants to track fitness Instructors sign and date participation
Brainstorm a list of creative, positive, words that can be used as encouragement for candidates.
Discuss techniques for communicating with parents on Day 1, throughout lesson, mid-session, and on the
last day.
Using worksheets, have candidates identify the difference between 3x in one lesson and 3x in a set of
lessons.

Assistant Water Safety Instructor Course and Water Safety Instructor Course Facilitator Guide -48-
FINAL EVALUATION / NEXT STEPS 1 hour
OBJECTIVES Candidates receive 1. The final course evaluation (verbal and written). 2. Teaching Experience information on how and when to complete the Teaching Experience assignments (if not
done during the course). 3. Information on WSI certification (employment and volunteer opportunities, recertification requirements). 4. Next steps toward becoming a WSI Trainer (course prerequisites). And finally congratulate all candidates for a job well done on behalf of you, the facility, and the Canadian Red Cross.
Assistant Water Safety Instructor Course and Water Safety Instructor Course Facilitator Guide -49-
APPENDICES
AWSI Appendices Appendix A Candidate Information Sheet Appendix B Seven Fundamental Principles of the Red Cross Crossword and Answer Key Appendix C Red Cross AWSI Manual Seek and Find Activity & Answers Appendix D Red Cross Question Cards Appendix E Parent/Instructor Scenarios Appendix F Physical Principles Task Sheet Appendix G Operative Principle Handout Appendix H Operative Principle Task Cards Appendix I Front Crawl Corrective Lab Appendix J Breast Stroke Stations Appendix K Skill and Water Safety Activities Appendix L Flexibility Stretches for Fitness
WSI Appendices Appendix A Intro Activity Appendix B Planning a Trip—Lesson Planning Appendix C Lesson Observation Questions Appendix D Empathy Task Cards Appendix E Evaluation Made Simple Task Cards
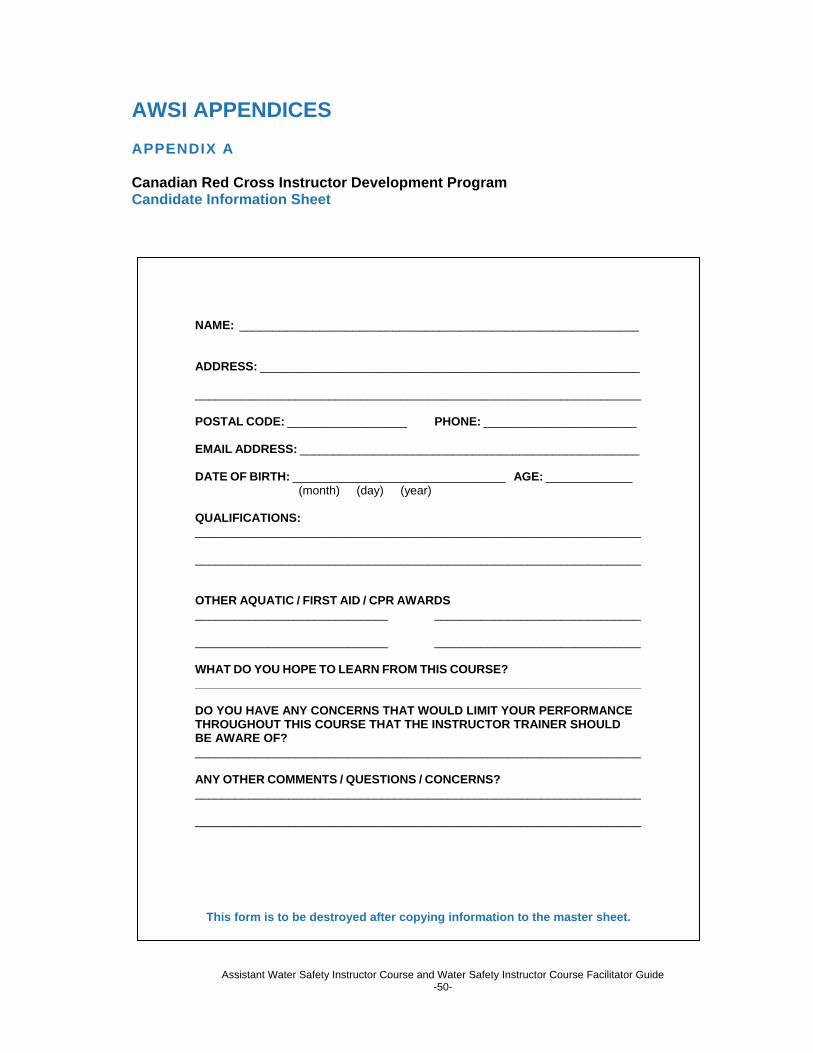
Assistant Water Safety Instructor Course and Water Safety Instructor Course Facilitator Guide -50-
AWSI APPENDICES APPENDIX A Canadian Red Cross Instructor Development Program Candidate Information Sheet
NAME: ____________________________________________________________
ADDRESS: _________________________________________________________
___________________________________________________________________
POSTAL CODE: __________________ PHONE: _______________________
EMAIL ADDRESS: ___________________________________________________
DATE OF BIRTH: ________________________________ AGE: _____________ (month) (day) (year)
QUALIFICATIONS: ___________________________________________________________________
___________________________________________________________________
OTHER AQUATIC / FIRST AID / CPR AWARDS _____________________________ _______________________________
_____________________________ _______________________________
WHAT DO YOU HOPE TO LEARN FROM THIS COURSE?
___________________________________________________________________
DO YOU HAVE ANY CONCERNS THAT WOULD LIMIT YOUR PERFORMANCE THROUGHOUT THIS COURSE THAT THE INSTRUCTOR TRAINER SHOULD BE AWARE OF? ___________________________________________________________________
ANY OTHER COMMENTS / QUESTIONS / CONCERNS? ___________________________________________________________________ ___________________________________________________________________
This form is to be destroyed after copying information to the master sheet.
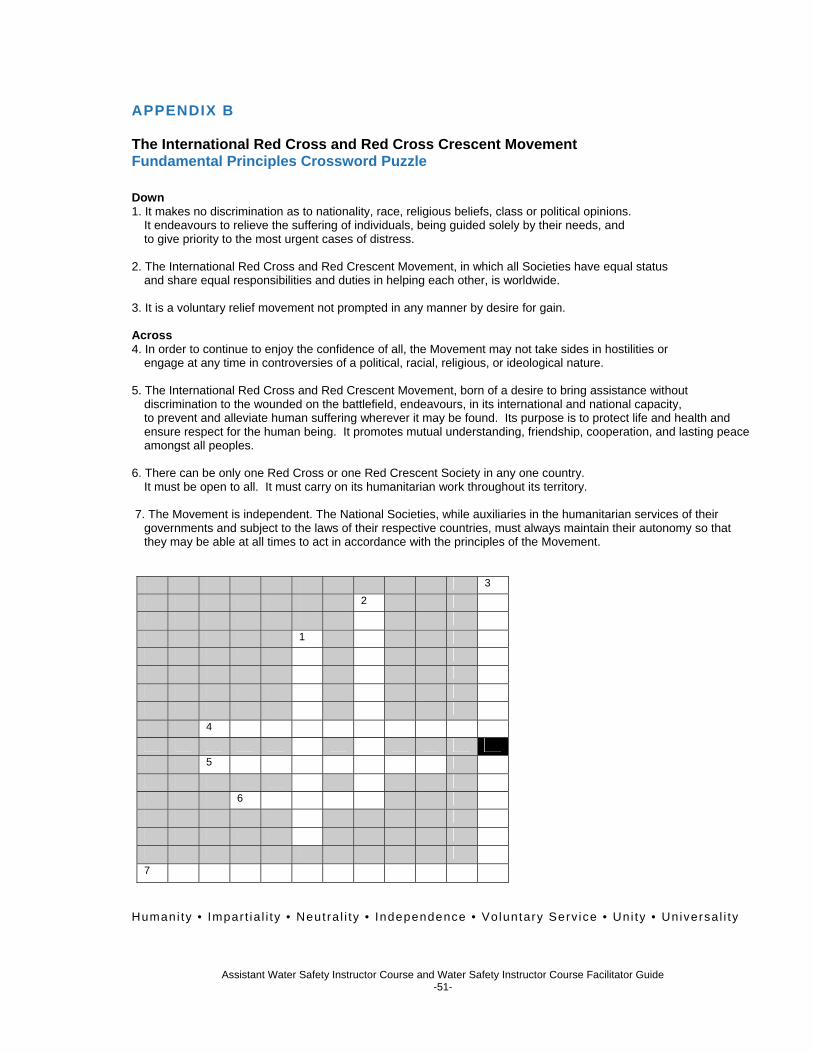
Assistant Water Safety Instructor Course and Water Safety Instructor Course Facilitator Guide -51-
APPENDIX B The International Red Cross and Red Cross Crescent Movement Fundamental Principles Crossword Puzzle
Down 1. It makes no discrimination as to nationality, race, religious beliefs, class or political opinions.
It endeavours to relieve the suffering of individuals, being guided solely by their needs, and to give priority to the most urgent cases of distress.
2. The International Red Cross and Red Crescent Movement, in which all Societies have equal status
and share equal responsibilities and duties in helping each other, is worldwide. 3. It is a voluntary relief movement not prompted in any manner by desire for gain. Across 4. In order to continue to enjoy the confidence of all, the Movement may not take sides in hostilities or
engage at any time in controversies of a political, racial, religious, or ideological nature. 5. The International Red Cross and Red Crescent Movement, born of a desire to bring assistance without
discrimination to the wounded on the battlefield, endeavours, in its international and national capacity, to prevent and alleviate human suffering wherever it may be found. Its purpose is to protect life and health and ensure respect for the human being. It promotes mutual understanding, friendship, cooperation, and lasting peace amongst all peoples.
6. There can be only one Red Cross or one Red Crescent Society in any one country.
It must be open to all. It must carry on its humanitarian work throughout its territory. 7. The Movement is independent. The National Societies, while auxiliaries in the humanitarian services of their
governments and subject to the laws of their respective countries, must always maintain their autonomy so that they may be able at all times to act in accordance with the principles of the Movement.
3
2
1
4
5
6
7
Humani ty • Impar t ia l i ty • Neutra l i ty • Independence • Voluntary Serv ice • Uni ty • Universa l i ty
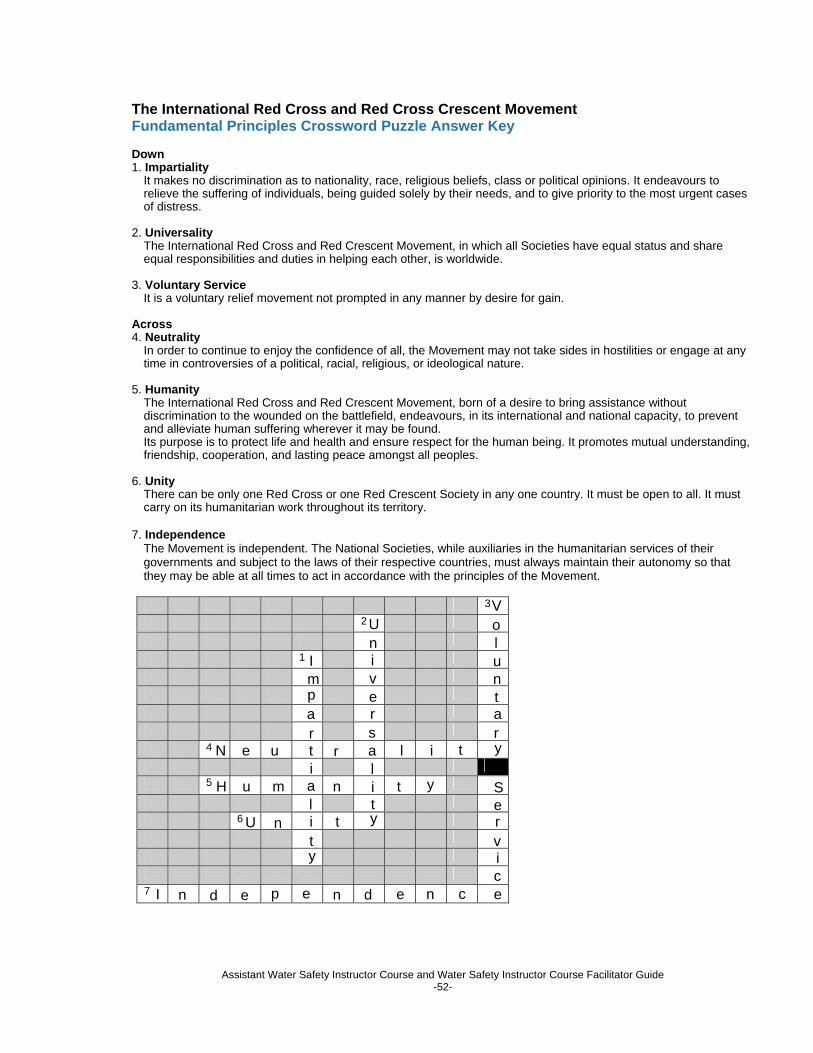
Assistant Water Safety Instructor Course and Water Safety Instructor Course Facilitator Guide -52-
The International Red Cross and Red Cross Crescent Movement Fundamental Principles Crossword Puzzle Answer Key Down 1. Impartiality
It makes no discrimination as to nationality, race, religious beliefs, class or political opinions. It endeavours to relieve the suffering of individuals, being guided solely by their needs, and to give priority to the most urgent cases of distress.
2. Universality
The International Red Cross and Red Crescent Movement, in which all Societies have equal status and share equal responsibilities and duties in helping each other, is worldwide.
3. Voluntary Service
It is a voluntary relief movement not prompted in any manner by desire for gain. Across 4. Neutrality
In order to continue to enjoy the confidence of all, the Movement may not take sides in hostilities or engage at any time in controversies of a political, racial, religious, or ideological nature.
5. Humanity
The International Red Cross and Red Crescent Movement, born of a desire to bring assistance without discrimination to the wounded on the battlefield, endeavours, in its international and national capacity, to prevent and alleviate human suffering wherever it may be found. Its purpose is to protect life and health and ensure respect for the human being. It promotes mutual understanding, friendship, cooperation, and lasting peace amongst all peoples.
6. Unity
There can be only one Red Cross or one Red Crescent Society in any one country. It must be open to all. It must carry on its humanitarian work throughout its territory.
7. Independence
The Movement is independent. The National Societies, while auxiliaries in the humanitarian services of their governments and subject to the laws of their respective countries, must always maintain their autonomy so that they may be able at all times to act in accordance with the principles of the Movement.
3
2
1
4
5
6
7
Voluntary
ServiceI n d e p e n d
Universality
l i t y
I m p a r t i a
tl iru e N
y tnm u H
tn U
e n c
Assistant Water Safety Instructor Course and Water Safety Instructor Course Facilitator Guide -53-
APPENDIX C Red Cross AWSI Manual Seek & Find Activity Use your AWSI manual and CD to answer these questions 1. What is the aim and goal of Canadian Red Cross Water Safety Services? 2. What is the mission of the Canadian Red Cross? 3. What are the five strategies used to create positive learning? 4. List the programs offered by the Canadian Red Cross Water Safety Program. 5. How does evaluation differ between these programs? 6. Which program requires parents or caregivers to participate in the water with the children? 7. How do you know when you’ve changed the water safety attitude of a swimmer? 8. There are levels in the Red Cross Swim Kids program. 9. What is inclusion? Progressive learning? 10. What are the five basic physical principles involved in swimming? 11. What is one of your first priorities during your first lesson each set? 12. What are the three main teaching methods? 13. What are the three steps in a progression? 14. How many modules are there in Red Cross Swim Sports? 15. List four of the Red Cross Swim Sports modules? Red Cross AWSI Manual Seek & Find Activity Answer Key
1. To reduce drowning and water-related fatalities by providing Canadians with:
> the awareness and knowledge to recognize and avoid dangerous situations > the knowledge and skills required to save lives > the basic rescue skills to enable them to save others > the knowledge and awareness to recognize hazardous environments and equipment
in their communities and to provide solutions 2. To improve the lives of vulnerable people by mobilizing the power of humanity in Canada and around the world. 3. Language, small chunks, ask why, wise choices, simulate choices 4. Red Cross Swim Preschool Red Cross Swim Kids Red Cross Swim Basics
Red Cross Swim Strokes Red Cross Swim Sports Red Cross Swim @ School
5. Red Cross Swim Preschool: first 3 levels based on age, not ability; last 4 levels evaluative. Red Cross Swim Kids: evaluative
Red Cross Swim @ School: participation Red Cross Swim Basics: evaluative Red Cross Swim Strokes: evaluative Red Cross Swim Sports: personal interest, participation and fitness 6. Red Cross Swim Preschool 7. Watch for a change in his or her behaviour in, on, and around the water 8. 10 9. Inclusion: providing activities that can be adapted for a variety of skill abilities so that all swimmers can
participate comfortably Progressive Learning: planning your activities so that each swimmer is working on the next step within the
progression for his or her own personal skill and knowledge development 10. Buoyancy, Resistance, Propulsion, Laminar Flow, Conservation of Momentum 11. Screening 12. Direct, Discovery and Games Methods 13. 1. Lead up to a new skill 2. Introduce the new skill 3. Reinforce the learning of a new skill 14. Nine modules 15. Synchronized Swimming, Swim Workout, Triathlon Swim, Boating, Surfing & Boogie Boarding, Underwater
Hockey, Water Polo, Diving, Lifesaving
Assistant Water Safety Instructor Course and Water Safety Instructor Course Facilitator Guide -54-
APPENDIX D Red Cross Question Cards
Summarize the 60 years of history of the Red Cross Swimming and
Water Safety Program
What is the aim and goals of
Red Cross Water Safety Services?
Explain what a Sphere of Influence is.
How does it involve you?
Provide the names and a brief explanation of the
programs in the Red Cross Swimming and Water
Safety Program
What has been the impact of Canadian Red Cross
Water Safety Services on the rate of drowning and aquatic related injuries
in Canada?
How do the Red Cross Swimming and Water Safety
Programs meet the mission of the Canadian Red Cross?
Assistant Water Safety Instructor Course and Water Safety Instructor Course Facilitator Guide -55-
APPENDIX E Parent / WSI Scenarios (Communication) Parent / WSI “My child has missed two lessons? What are you going to do for my child?” Parent / WSI “My child was brilliant throughout the session, you even said so! Why did s/he not complete the level? I didn’t see this coming, and you never warned me.” Parent / WSI “My child’s skills are obviously not as strong as the other five kids in his class, and it’s week 7 of a 10-week session…what should we do to ensure s/he completes the level?” Parent / WSI “I see that in your class there is a child with special needs. It seems as though my child is not receiving enough attention because of this child.” Parent / WSI “I have been observing the class you are teaching and feel as though you are not making it challenging enough because it is a multi-level class.” WSI / Child It is the last day of classes. You have given a little girl an incomplete. As you hand her the card, tears stream down her face as she hands you a small gift and says “This is for you teacher.” Adult Candidate / WSI An adult learner has just completed Red Cross Swim Basics and is asking you what program to register in next. Teen Candidate / WSI One of your teen candidates is exhibiting signs of infatuation with you. The candidate takes it one step further and asks you out on a date. How would you deal with this situation?
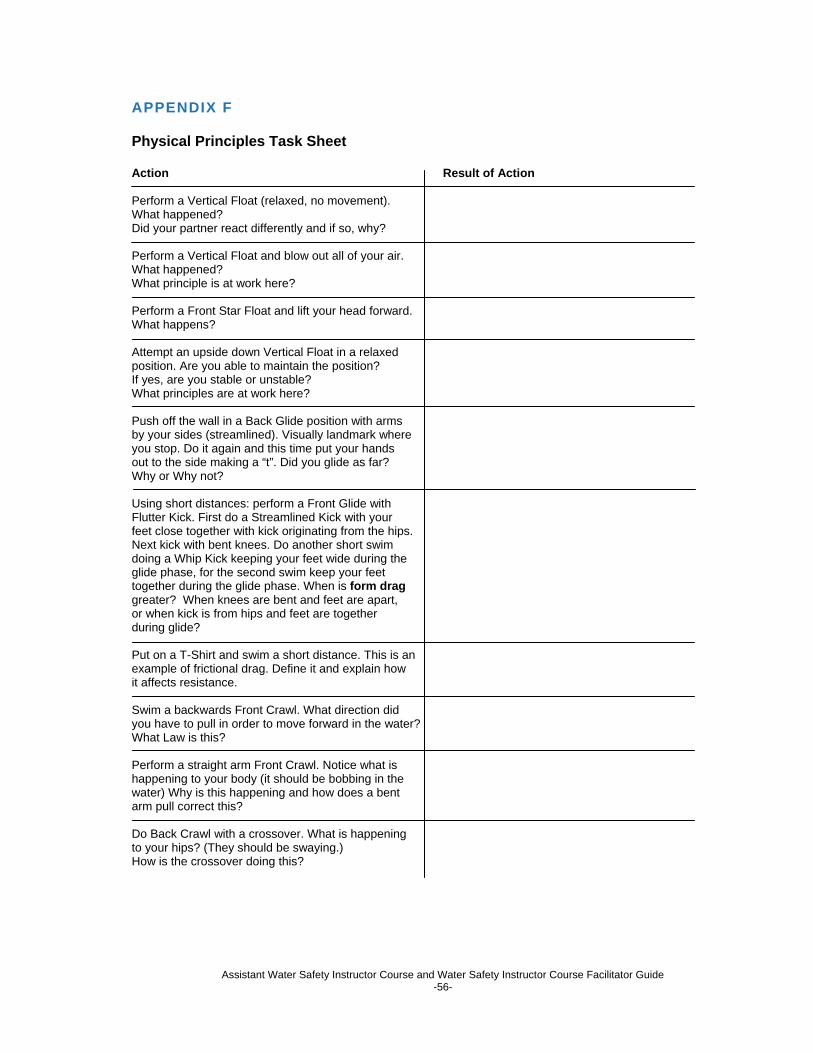
Assistant Water Safety Instructor Course and Water Safety Instructor Course Facilitator Guide -56-
APPENDIX F Physical Principles Task Sheet Action Result of Action Perform a Vertical Float (relaxed, no movement). What happened? Did your partner react differently and if so, why? Perform a Vertical Float and blow out all of your air. What happened? What principle is at work here? Perform a Front Star Float and lift your head forward. What happens? Attempt an upside down Vertical Float in a relaxed position. Are you able to maintain the position? If yes, are you stable or unstable? What principles are at work here? Push off the wall in a Back Glide position with arms by your sides (streamlined). Visually landmark where you stop. Do it again and this time put your hands out to the side making a “t”. Did you glide as far? Why or Why not? Using short distances: perform a Front Glide with Flutter Kick. First do a Streamlined Kick with your feet close together with kick originating from the hips. Next kick with bent knees. Do another short swim doing a Whip Kick keeping your feet wide during the glide phase, for the second swim keep your feet together during the glide phase. When is form drag greater? When knees are bent and feet are apart, or when kick is from hips and feet are together during glide? Put on a T-Shirt and swim a short distance. This is an example of frictional drag. Define it and explain how it affects resistance. Swim a backwards Front Crawl. What direction did you have to pull in order to move forward in the water? What Law is this? Perform a straight arm Front Crawl. Notice what is happening to your body (it should be bobbing in the water) Why is this happening and how does a bent arm pull correct this? Do Back Crawl with a crossover. What is happening to your hips? (They should be swaying.) How is the crossover doing this?
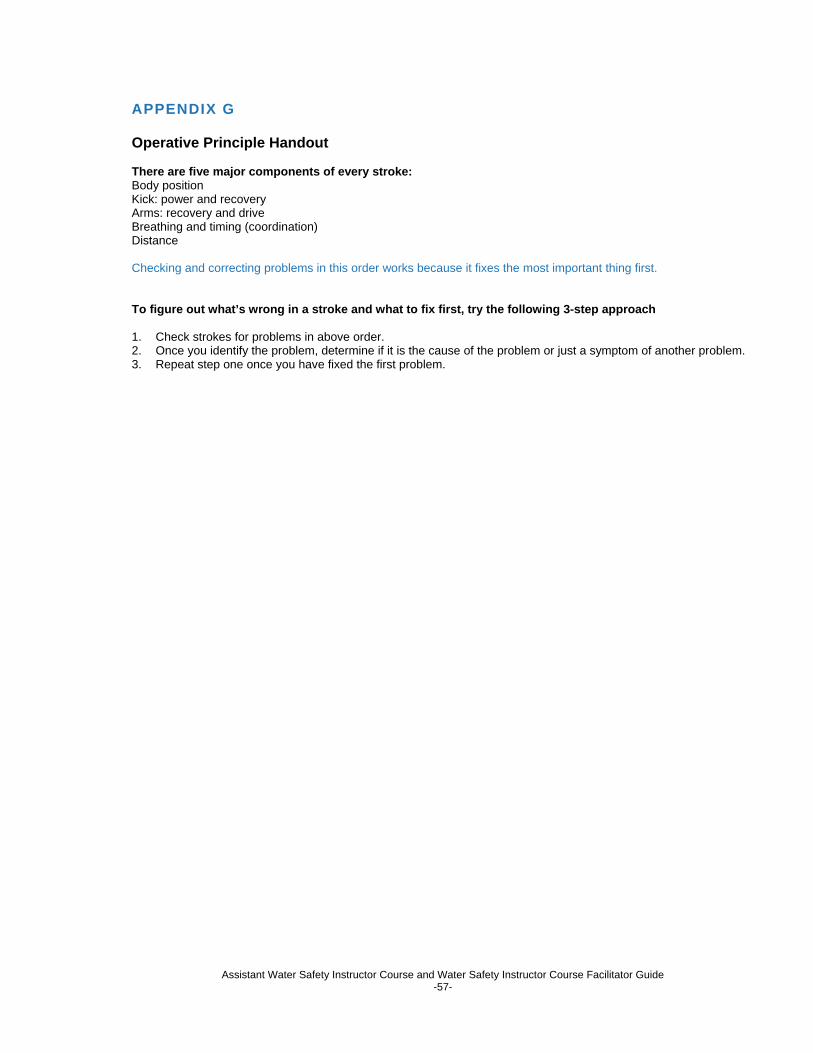
Assistant Water Safety Instructor Course and Water Safety Instructor Course Facilitator Guide -57-
APPENDIX G Operative Principle Handout There are five major components of every stroke: Body position Kick: power and recovery Arms: recovery and drive Breathing and timing (coordination) Distance Checking and correcting problems in this order works because it fixes the most important thing first. To figure out what’s wrong in a stroke and what to fix first, try the following 3-step approach 1. Check strokes for problems in above order. 2. Once you identify the problem, determine if it is the cause of the problem or just a symptom of another problem. 3. Repeat step one once you have fixed the first problem.
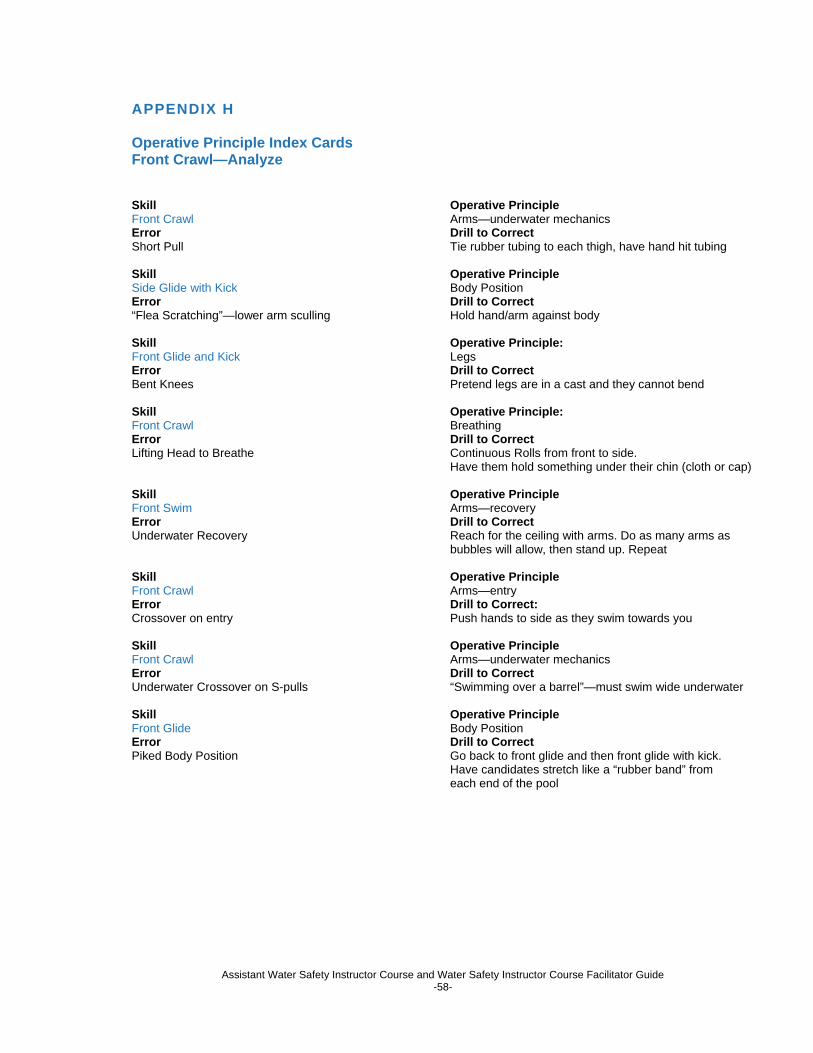
Assistant Water Safety Instructor Course and Water Safety Instructor Course Facilitator Guide -58-
APPENDIX H Operative Principle Index Cards Front Crawl—Analyze Skill Front Crawl Error Short Pull
Operative Principle Arms—underwater mechanics Drill to Correct Tie rubber tubing to each thigh, have hand hit tubing
Skill Side Glide with Kick Error “Flea Scratching”—lower arm sculling
Operative Principle Body Position Drill to Correct Hold hand/arm against body
Skill Front Glide and Kick Error Bent Knees
Operative Principle: Legs Drill to Correct Pretend legs are in a cast and they cannot bend
Skill Front Crawl Error Lifting Head to Breathe
Operative Principle: Breathing Drill to Correct Continuous Rolls from front to side. Have them hold something under their chin (cloth or cap)
Skill Front Swim Error Underwater Recovery
Operative Principle Arms—recovery Drill to Correct Reach for the ceiling with arms. Do as many arms as bubbles will allow, then stand up. Repeat
Skill Front Crawl Error Crossover on entry
Operative Principle Arms—entry Drill to Correct: Push hands to side as they swim towards you
Skill Front Crawl Error Underwater Crossover on S-pulls
Operative Principle Arms—underwater mechanics Drill to Correct “Swimming over a barrel”—must swim wide underwater
Skill Front Glide Error Piked Body Position
Operative Principle Body Position Drill to Correct Go back to front glide and then front glide with kick. Have candidates stretch like a “rubber band” from each end of the pool

Assistant Water Safety Instructor Course and Water Safety Instructor Course Facilitator Guide -59-
APPENDIX I Front Crawl Corrective Lab Put candidates into pairs. One partner from each group comes forward to receive a skill, an error and a corrective condition. They then go back and demonstrate for the other partner. That partner needs to determine the error and then correct it using the corrective condition. Only then will the error be fixed. Skill Error Conditions bobs not exhaling underwater none bobs lemon face (hates it; uncomfortable) over-correction front float doesn’t know how to stand up breakdown and teach progression (goes under in 15 seconds) to stand up back float chin down on chest (sinks) physical manipulation back float toes to the ceiling (pikes and sinks) over-correction front glide lasts for only a second (1/2 metre) shaping and concrete point to swim to back glide pushes off too strong over-correction front glide with kick bent knees physical manipulation and over-correction front glide with kick flexed feet physical manipulation, shaping and supports head back glide with kick kicks down all 3 correctives, supports head side glide with kick leading arm aimed towards all 3 correctives
the pool bottom side glide with kick shoulder too far forward all 3 correctives, positive specific feedback
(face in water with a scull) 123 breathe not rolling shoulders all 3 correctives, positive specific feedback and breakdown front crawl breathes late (into armpit) as above front crawl error free needs to leave alone!
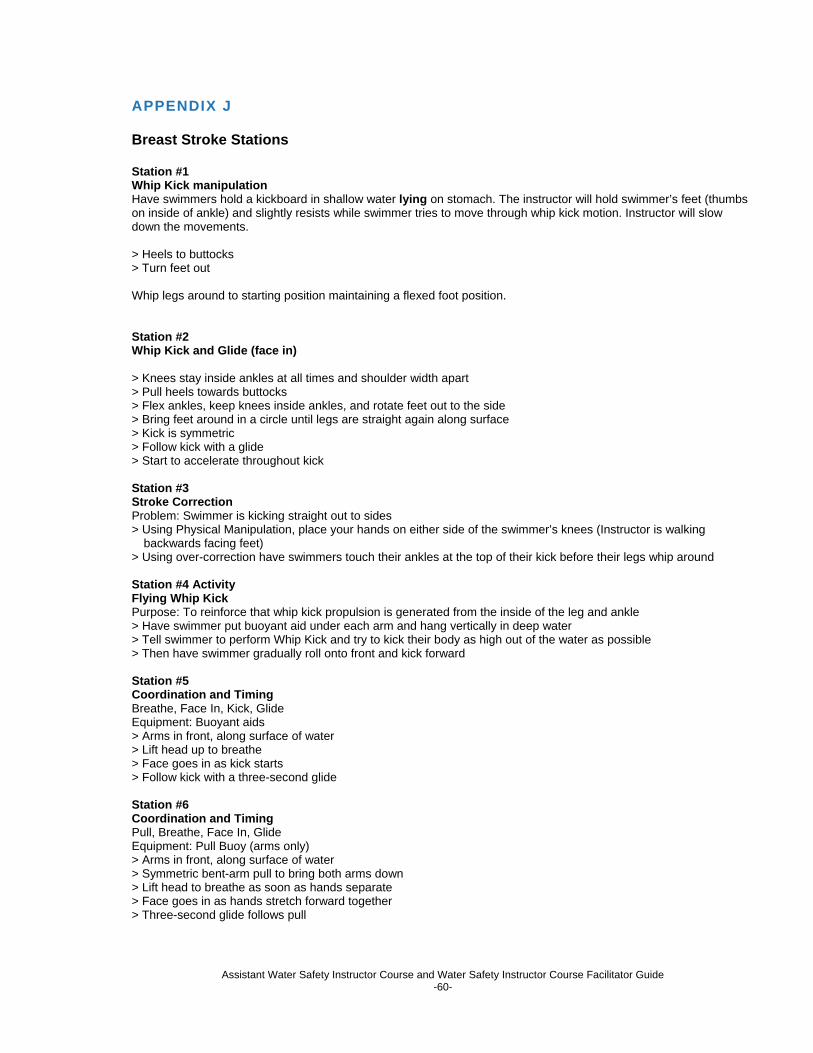
Assistant Water Safety Instructor Course and Water Safety Instructor Course Facilitator Guide -60-
APPENDIX J Breast Stroke Stations Station #1 Whip Kick manipulation Have swimmers hold a kickboard in shallow water lying on stomach. The instructor will hold swimmer’s feet (thumbs on inside of ankle) and slightly resists while swimmer tries to move through whip kick motion. Instructor will slow down the movements. > Heels to buttocks > Turn feet out Whip legs around to starting position maintaining a flexed foot position. Station #2 Whip Kick and Glide (face in) > Knees stay inside ankles at all times and shoulder width apart > Pull heels towards buttocks > Flex ankles, keep knees inside ankles, and rotate feet out to the side > Bring feet around in a circle until legs are straight again along surface > Kick is symmetric > Follow kick with a glide > Start to accelerate throughout kick Station #3 Stroke Correction Problem: Swimmer is kicking straight out to sides > Using Physical Manipulation, place your hands on either side of the swimmer’s knees (Instructor is walking
backwards facing feet) > Using over-correction have swimmers touch their ankles at the top of their kick before their legs whip around Station #4 Activity Flying Whip Kick Purpose: To reinforce that whip kick propulsion is generated from the inside of the leg and ankle > Have swimmer put buoyant aid under each arm and hang vertically in deep water > Tell swimmer to perform Whip Kick and try to kick their body as high out of the water as possible > Then have swimmer gradually roll onto front and kick forward Station #5 Coordination and Timing Breathe, Face In, Kick, Glide Equipment: Buoyant aids > Arms in front, along surface of water > Lift head up to breathe > Face goes in as kick starts > Follow kick with a three-second glide Station #6 Coordination and Timing Pull, Breathe, Face In, Glide Equipment: Pull Buoy (arms only) > Arms in front, along surface of water > Symmetric bent-arm pull to bring both arms down > Lift head to breathe as soon as hands separate > Face goes in as hands stretch forward together > Three-second glide follows pull
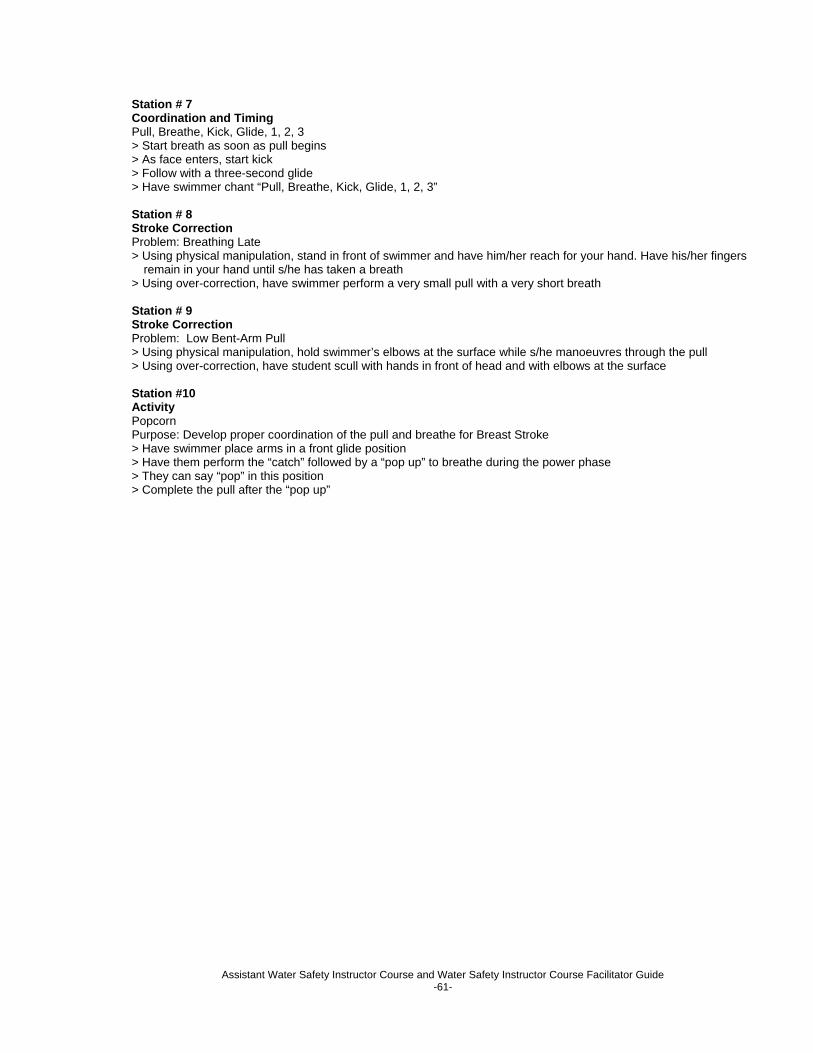
Assistant Water Safety Instructor Course and Water Safety Instructor Course Facilitator Guide -61-
Station # 7 Coordination and Timing Pull, Breathe, Kick, Glide, 1, 2, 3 > Start breath as soon as pull begins > As face enters, start kick > Follow with a three-second glide > Have swimmer chant “Pull, Breathe, Kick, Glide, 1, 2, 3” Station # 8 Stroke Correction Problem: Breathing Late > Using physical manipulation, stand in front of swimmer and have him/her reach for your hand. Have his/her fingers
remain in your hand until s/he has taken a breath > Using over-correction, have swimmer perform a very small pull with a very short breath Station # 9 Stroke Correction Problem: Low Bent-Arm Pull > Using physical manipulation, hold swimmer’s elbows at the surface while s/he manoeuvres through the pull > Using over-correction, have student scull with hands in front of head and with elbows at the surface Station #10 Activity Popcorn Purpose: Develop proper coordination of the pull and breathe for Breast Stroke > Have swimmer place arms in a front glide position > Have them perform the “catch” followed by a “pop up” to breathe during the power phase > They can say “pop” in this position > Complete the pull after the “pop up”
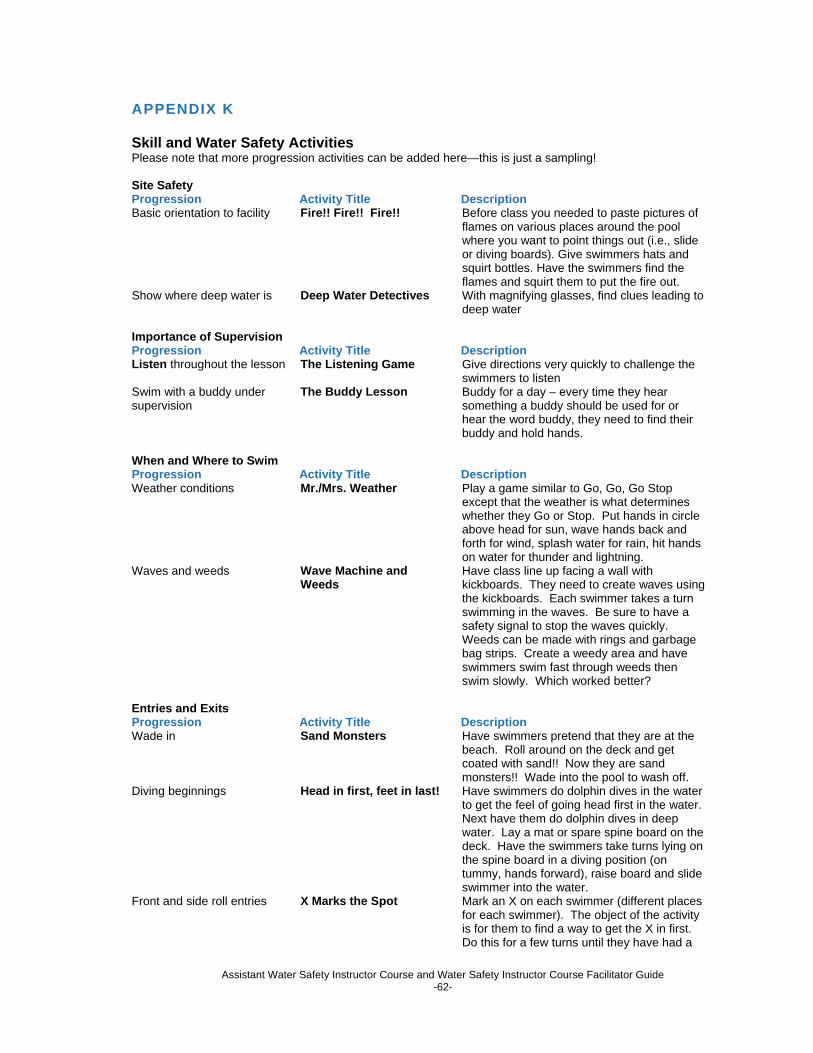
Assistant Water Safety Instructor Course and Water Safety Instructor Course Facilitator Guide -62-
APPENDIX K Skill and Water Safety Activities Please note that more progression activities can be added here—this is just a sampling! Site Safety Progression Activity Title Description Basic orientation to facility Fire!! Fire!! Fire!! Before class you needed to paste pictures of
flames on various places around the pool where you want to point things out (i.e., slide or diving boards). Give swimmers hats and squirt bottles. Have the swimmers find the flames and squirt them to put the fire out.
Show where deep water is Deep Water Detectives With magnifying glasses, find clues leading to deep water
Importance of Supervision Progression Activity Title Description Listen throughout the lesson The Listening Game Give directions very quickly to challenge the
swimmers to listen Swim with a buddy under supervision
The Buddy Lesson Buddy for a day – every time they hear something a buddy should be used for or hear the word buddy, they need to find their buddy and hold hands.
When and Where to Swim Progression Activity Title Description Weather conditions Mr./Mrs. Weather Play a game similar to Go, Go, Go Stop
except that the weather is what determines whether they Go or Stop. Put hands in circle above head for sun, wave hands back and forth for wind, splash water for rain, hit hands on water for thunder and lightning.
Waves and weeds Wave Machine and Weeds
Have class line up facing a wall with kickboards. They need to create waves using the kickboards. Each swimmer takes a turn swimming in the waves. Be sure to have a safety signal to stop the waves quickly. Weeds can be made with rings and garbage bag strips. Create a weedy area and have swimmers swim fast through weeds then swim slowly. Which worked better?
Entries and Exits Progression Activity Title Description Wade in Sand Monsters Have swimmers pretend that they are at the
beach. Roll around on the deck and get coated with sand!! Now they are sand monsters!! Wade into the pool to wash off.
Diving beginnings Head in first, feet in last! Have swimmers do dolphin dives in the water to get the feel of going head first in the water. Next have them do dolphin dives in deep water. Lay a mat or spare spine board on the deck. Have the swimmers take turns lying on the spine board in a diving position (on tummy, hands forward), raise board and slide swimmer into the water.
Front and side roll entries X Marks the Spot Mark an X on each swimmer (different places for each swimmer). The object of the activity is for them to find a way to get the X in first. Do this for a few turns until they have had a

Assistant Water Safety Instructor Course and Water Safety Instructor Course Facilitator Guide -63-
chance to try getting both their shoulder and the back of their neck in first. This is an example of the use of Discovery Method for front and side roll.
PFDs and Lifejackets Progression Activity Title Description Orientation and movement Corked Using painted corks or other coloured objects,
float them in the water approximately 2m from the class. Have the swimmers swim to the corks in their PFDs/Lifejackets and gather the colors that you yell out.
How to put on your PFD/lifejacket
The Parachute Game Using a parachute or bed sheet and a teddy bear, do the following demonstrations. Put the PFD/Lifejacket onto the middle of the sheet and place the teddy on top of it. Teddy is too cool to wear a PFD and he is going to sit on it rather than put it on. Have everyone hold an edge of the PFD and shake it gently to make waves. What happens? Where are the bear and the PFD? Would he be able to grab it and put it on easily? Next put the PFD/Lifejacket on and don’t do any of the buckles or straps up. What happens when the waves come? (Bear should still fall out of PFD.) Last, do all the buckles and straps up properly and see what happens.
Cold Water Survival Progression Activity Title Description Identify major heat loss areas
Pin the Tail on the Hot Spot
Put up a poster of a body, and give swimmers big red circles. Have the swimmers swim a crazy swim to the edge, then close their eyes and place the circle on a HOT SPOT. Once done, see how close they came and label any missed spots.
Cold water, HELP/huddle A Cold Shower Have swimmers put on PFDs and enter the water. Ask them to get into the HELP position. Ask them what they would do if they were in a group and in cold water. They should answer Huddle. Tell them when you give them the signal they need to get into Huddle position as quickly as possible. Don’t tell them that the signal is the cold hose!! Spray them with the hose until they are in Huddle position. Repeat the game a few times.
Self rescue from a fall through Ice
Self Rescue Activity Important to note: don’t have the swimmers fall through the ice. It is a skill that they don’t need to practice!! Instead have them start in the water. Place several mats on the water supported by a pool edge (corner spot works best). Have the swimmers practice the steps of Ice Self Rescue.
Boating Progression Activity Title Description Prepare for safe boating Bailer Relay, Paddle
Soccer, Makin’ Waves Play the following games to allow swimmers to experience how these pieces of equipment are important. Bailer Relay: Two groups, one has a bailer the other doesn’t. Set up a relay where they have to swim to a bucket and take
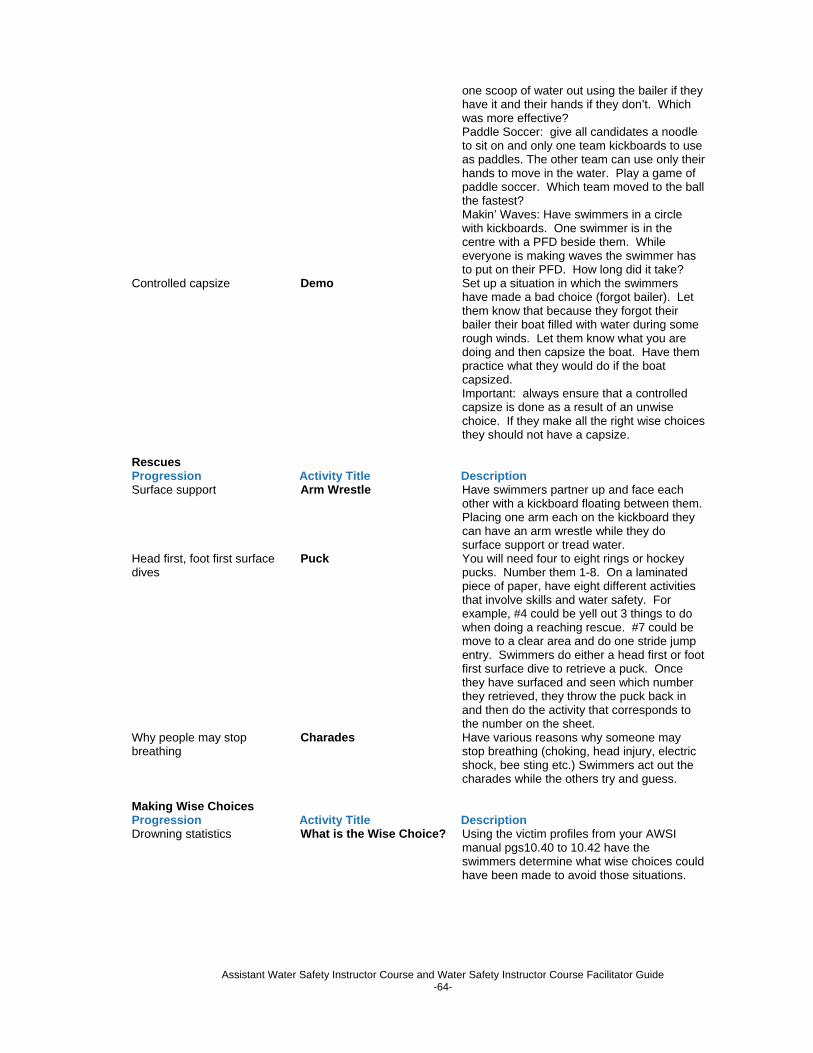
Assistant Water Safety Instructor Course and Water Safety Instructor Course Facilitator Guide -64-
one scoop of water out using the bailer if they have it and their hands if they don’t. Which was more effective? Paddle Soccer: give all candidates a noodle to sit on and only one team kickboards to use as paddles. The other team can use only their hands to move in the water. Play a game of paddle soccer. Which team moved to the ball the fastest? Makin’ Waves: Have swimmers in a circle with kickboards. One swimmer is in the centre with a PFD beside them. While everyone is making waves the swimmer has to put on their PFD. How long did it take?
Controlled capsize Demo Set up a situation in which the swimmers have made a bad choice (forgot bailer). Let them know that because they forgot their bailer their boat filled with water during some rough winds. Let them know what you are doing and then capsize the boat. Have them practice what they would do if the boat capsized. Important: always ensure that a controlled capsize is done as a result of an unwise choice. If they make all the right wise choices they should not have a capsize.
Rescues Progression Activity Title Description Surface support Arm Wrestle Have swimmers partner up and face each
other with a kickboard floating between them. Placing one arm each on the kickboard they can have an arm wrestle while they do surface support or tread water.
Head first, foot first surface dives
Puck You will need four to eight rings or hockey pucks. Number them 1-8. On a laminated piece of paper, have eight different activities that involve skills and water safety. For example, #4 could be yell out 3 things to do when doing a reaching rescue. #7 could be move to a clear area and do one stride jump entry. Swimmers do either a head first or foot first surface dive to retrieve a puck. Once they have surfaced and seen which number they retrieved, they throw the puck back in and then do the activity that corresponds to the number on the sheet.
Why people may stop breathing
Charades Have various reasons why someone may stop breathing (choking, head injury, electric shock, bee sting etc.) Swimmers act out the charades while the others try and guess.
Making Wise Choices Progression Activity Title Description Drowning statistics What is the Wise Choice? Using the victim profiles from your AWSI
manual pgs10.40 to 10.42 have the swimmers determine what wise choices could have been made to avoid those situations.
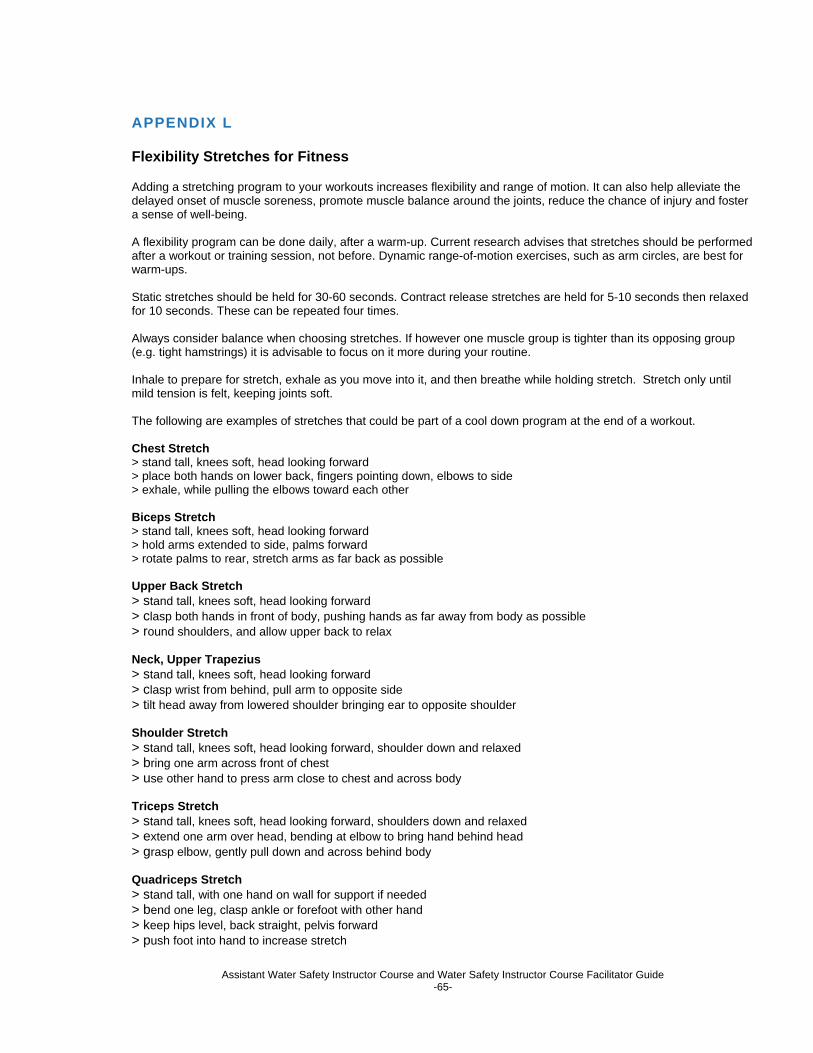
Assistant Water Safety Instructor Course and Water Safety Instructor Course Facilitator Guide -65-
APPENDIX L Flexibility Stretches for Fitness Adding a stretching program to your workouts increases flexibility and range of motion. It can also help alleviate the delayed onset of muscle soreness, promote muscle balance around the joints, reduce the chance of injury and foster a sense of well-being. A flexibility program can be done daily, after a warm-up. Current research advises that stretches should be performed after a workout or training session, not before. Dynamic range-of-motion exercises, such as arm circles, are best for warm-ups. Static stretches should be held for 30-60 seconds. Contract release stretches are held for 5-10 seconds then relaxed for 10 seconds. These can be repeated four times. Always consider balance when choosing stretches. If however one muscle group is tighter than its opposing group (e.g. tight hamstrings) it is advisable to focus on it more during your routine. Inhale to prepare for stretch, exhale as you move into it, and then breathe while holding stretch. Stretch only until mild tension is felt, keeping joints soft. The following are examples of stretches that could be part of a cool down program at the end of a workout. Chest Stretch > stand tall, knees soft, head looking forward > place both hands on lower back, fingers pointing down, elbows to side > exhale, while pulling the elbows toward each other Biceps Stretch > stand tall, knees soft, head looking forward > hold arms extended to side, palms forward > rotate palms to rear, stretch arms as far back as possible Upper Back Stretch > stand tall, knees soft, head looking forward > clasp both hands in front of body, pushing hands as far away from body as possible > round shoulders, and allow upper back to relax Neck, Upper Trapezius > stand tall, knees soft, head looking forward > clasp wrist from behind, pull arm to opposite side > tilt head away from lowered shoulder bringing ear to opposite shoulder Shoulder Stretch > stand tall, knees soft, head looking forward, shoulder down and relaxed > bring one arm across front of chest > use other hand to press arm close to chest and across body Triceps Stretch > stand tall, knees soft, head looking forward, shoulders down and relaxed > extend one arm over head, bending at elbow to bring hand behind head > grasp elbow, gently pull down and across behind body Quadriceps Stretch > stand tall, with one hand on wall for support if needed > bend one leg, clasp ankle or forefoot with other hand > keep hips level, back straight, pelvis forward > push foot into hand to increase stretch
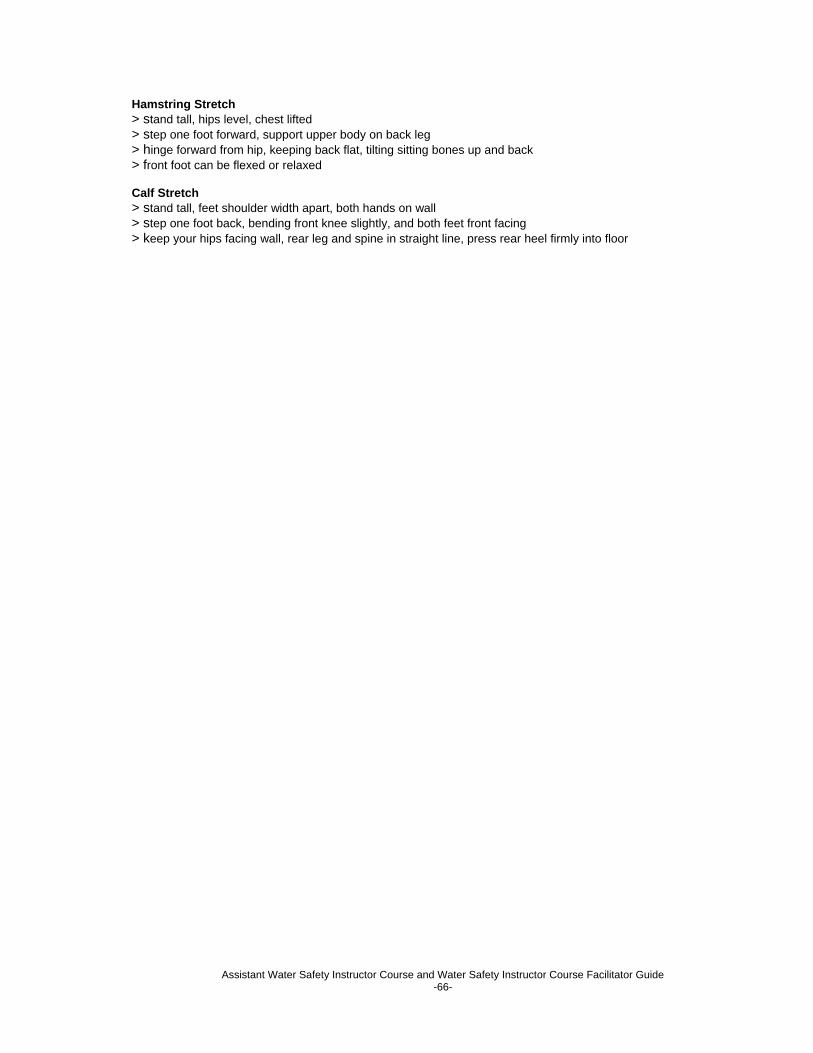
Assistant Water Safety Instructor Course and Water Safety Instructor Course Facilitator Guide -66-
Hamstring Stretch > stand tall, hips level, chest lifted > step one foot forward, support upper body on back leg > hinge forward from hip, keeping back flat, tilting sitting bones up and back > front foot can be flexed or relaxed Calf Stretch > stand tall, feet shoulder width apart, both hands on wall > step one foot back, bending front knee slightly, and both feet front facing > keep your hips facing wall, rear leg and spine in straight line, press rear heel firmly into floor
Assistant Water Safety Instructor Course and Water Safety Instructor Course Facilitator Guide -67-
WSI APPENDICES APPENDIX A Introduction Activity The PLARP Rules
THE PLARP RULES Participate Listen Ask with respect Respect confidentiality Pass
FOLD HERE
Assistant Water Safety Instructor Course and Water Safety Instructor Course Facilitator Guide -68-
APPENDIX B Planning a Trip—Lesson Planning YOU ARE GOING ON A TRIP!!!!! 1. Where are you going? For how long will you be gone? 2. What will you take with you? 3. What are you going to do?
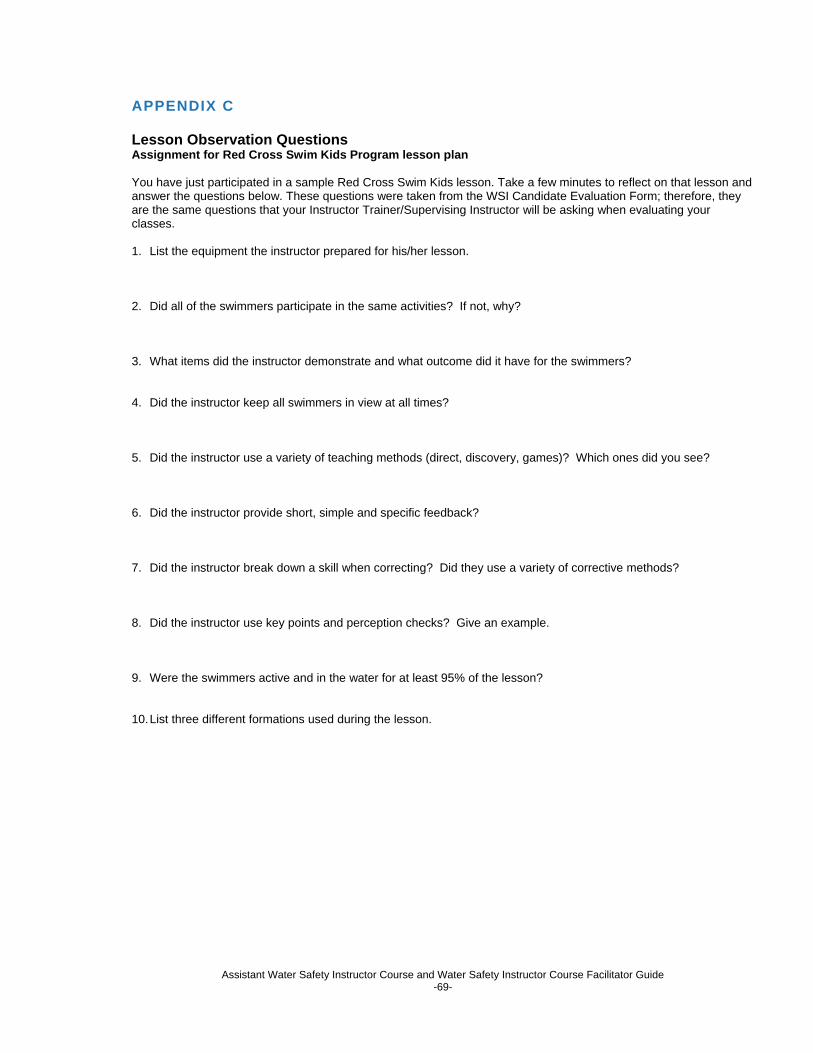
Assistant Water Safety Instructor Course and Water Safety Instructor Course Facilitator Guide -69-
APPENDIX C Lesson Observation Questions Assignment for Red Cross Swim Kids Program lesson plan You have just participated in a sample Red Cross Swim Kids lesson. Take a few minutes to reflect on that lesson and answer the questions below. These questions were taken from the WSI Candidate Evaluation Form; therefore, they are the same questions that your Instructor Trainer/Supervising Instructor will be asking when evaluating your classes. 1. List the equipment the instructor prepared for his/her lesson. 2. Did all of the swimmers participate in the same activities? If not, why? 3. What items did the instructor demonstrate and what outcome did it have for the swimmers? 4. Did the instructor keep all swimmers in view at all times? 5. Did the instructor use a variety of teaching methods (direct, discovery, games)? Which ones did you see? 6. Did the instructor provide short, simple and specific feedback? 7. Did the instructor break down a skill when correcting? Did they use a variety of corrective methods? 8. Did the instructor use key points and perception checks? Give an example. 9. Were the swimmers active and in the water for at least 95% of the lesson? 10. List three different formations used during the lesson.
Assistant Water Safety Instructor Course and Water Safety Instructor Course Facilitator Guide -70-
APPENDIX D Empathy Task Cards
Shy Towering over learner—
overbearing
Unsure Arms crossed;
only answer “yes” or “no”
Super-excited Give lots of suggestions and
never listens to learner
Frustrated Distracted; look everywhere
except your learner
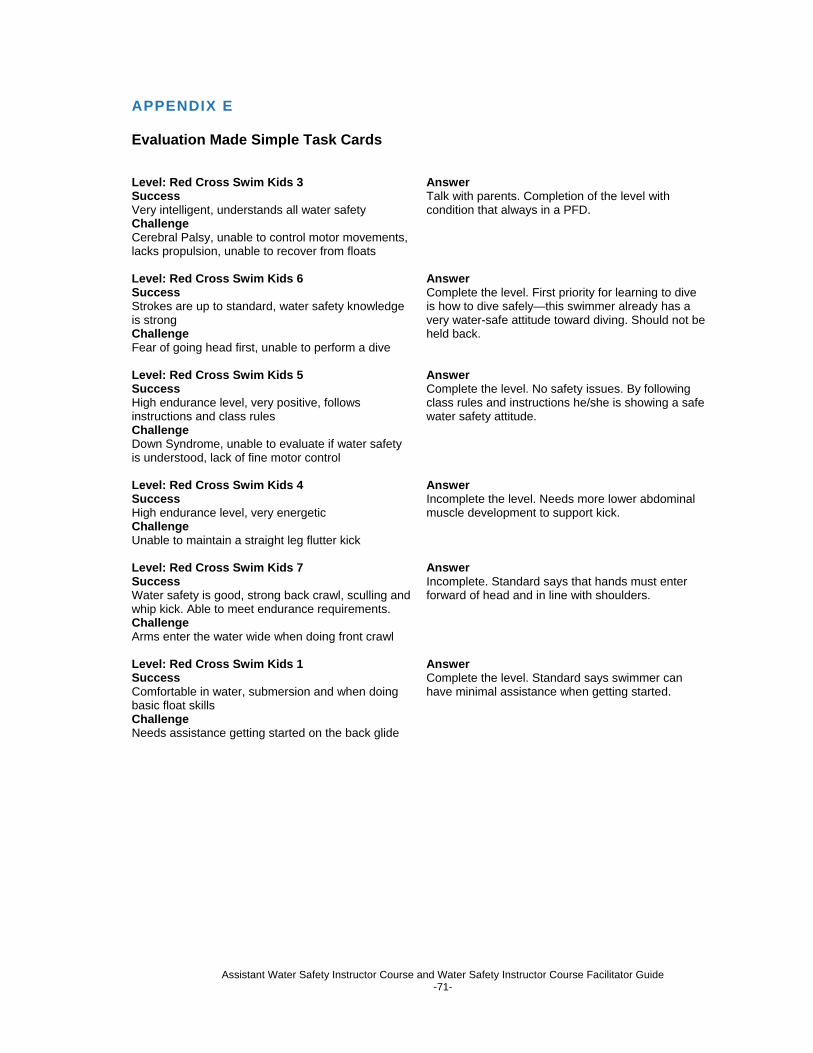
Assistant Water Safety Instructor Course and Water Safety Instructor Course Facilitator Guide -71-
APPENDIX E Evaluation Made Simple Task Cards Level: Red Cross Swim Kids 3 Success Very intelligent, understands all water safety Challenge Cerebral Palsy, unable to control motor movements, lacks propulsion, unable to recover from floats
Answer Talk with parents. Completion of the level with condition that always in a PFD.
Level: Red Cross Swim Kids 6 Success Strokes are up to standard, water safety knowledge is strong Challenge Fear of going head first, unable to perform a dive
Answer Complete the level. First priority for learning to dive is how to dive safely—this swimmer already has a very water-safe attitude toward diving. Should not be held back.
Level: Red Cross Swim Kids 5 Success High endurance level, very positive, follows instructions and class rules Challenge Down Syndrome, unable to evaluate if water safety is understood, lack of fine motor control
Answer Complete the level. No safety issues. By following class rules and instructions he/she is showing a safe water safety attitude.
Level: Red Cross Swim Kids 4 Success High endurance level, very energetic Challenge Unable to maintain a straight leg flutter kick
Answer Incomplete the level. Needs more lower abdominal muscle development to support kick.
Level: Red Cross Swim Kids 7 Success Water safety is good, strong back crawl, sculling and whip kick. Able to meet endurance requirements. Challenge Arms enter the water wide when doing front crawl
Answer Incomplete. Standard says that hands must enter forward of head and in line with shoulders.
Level: Red Cross Swim Kids 1 Success Comfortable in water, submersion and when doing basic float skills Challenge Needs assistance getting started on the back glide
Answer Complete the level. Standard says swimmer can have minimal assistance when getting started.