Assignment #5 Chess Due: 1:15pm on Friday, May 17th
25
Steve Cooper Handout #36 CS 106A May 10, 2013 Assignment #5 – Chess Due: 1:15pm on Friday, May 17th Your Early Assignment Help (YEAH) hours: Monday 05/13 at 7PM in 200-303 Handout by Thomas Fu For this assignment, your job is going to be to create the game of Chess. This game, which originated in its current form in the late 15 th century, is currently one of the world’s most popular and ubiquitous games. By the time you are done with this assignment, you will have your very own version of this classic game, quite similar to the kind you might find already installed on your computer 1 . Much like the earlier assignments, though, you'll likely want to decompose this one into a series of smaller problems, and get started early. We’ll also outline an approach in this handout that should help you get through the steps. Figure 1. Image of the Chess game you’re going to program. In this assignment, we first describe the starter classes. We then propose a series of steps you can take to create the game. After suggesting some possible extensions, we include several useful methods you'll likely wish to use, as part of Appendix A. And, if you are not familiar with the game of chess, Appendix B includes lots of details. 1 If you’re on a Mac, try looking for Chess in the Applications folder.
Transcript of Assignment #5 Chess Due: 1:15pm on Friday, May 17th

Steve Cooper Handout #36
CS 106A May 10, 2013
Assignment #5 – Chess
Due: 1:15pm on Friday, May 17th Your Early Assignment Help (YEAH) hours: Monday 05/13 at 7PM in 200-303
Handout by Thomas Fu
For this assignment, your job is going to be to create the game of Chess. This game, which
originated in its current form in the late 15th
century, is currently one of the world’s most popular
and ubiquitous games. By the time you are done with this assignment, you will have your very
own version of this classic game, quite similar to the kind you might find already installed on
your computer1. Much like the earlier assignments, though, you'll likely want to decompose this
one into a series of smaller problems, and get started early. We’ll also outline an approach in this
handout that should help you get through the steps.
Figure 1. Image of the Chess game you’re going to program.
In this assignment, we first describe the starter classes. We then propose a series of steps you
can take to create the game. After suggesting some possible extensions, we include several useful
methods you'll likely wish to use, as part of Appendix A. And, if you are not familiar with the
game of chess, Appendix B includes lots of details.
1 If you’re on a Mac, try looking for Chess in the Applications folder.

-2-
The Java Files
To get started, let’s take a look at the files that you’ll be getting for this assignment. When you
open up the Chess assignment in Eclipse you’ll see a list of Java files that looks something like
this:
Figure 2. Listing of the files contained in the Chess Assignment.
There are four groups of interesting classes, detailed below.
1) The Chess Pieces
The different types of chess pieces are really what make chess such an interesting game (a board
of entirely pawns would make for a really boring game). There are six distinct types of pieces:
Pawn, Knight, Bishop, Rook, Queen, and King. Each piece has its own unique rules governing
how it can move and capture other pieces. Details about how the pieces move are found in
Appendix B. The bulk of what you’ll be writing for this assignment is the code that will
determine whether a given piece can move to a specified spot on the board. Basically, you’ll be
enforcing the rules of chess.
Let’s take a look at the structure behind how we’re going to be representing the chess pieces. In
Java-speak, we have six different classes (Pawn, Knight, Bishop, Rook, King and Queen) that
are all subclasses of a ChessPiece superclass. This is analogous to the ACM Graphics Library,
where we have GRects, GOvals, GPolygons, GLabels, etc. all of which are subclasses of the
GObject superclass. We have exactly the same thing here. In picture form the structure of our
piece classes looks like this:
Figure 3. Diagram of the ChessPiece class hierarchy.
ChessPiece
Pawn Knight Bishop Castle King Queen

-3-
We’ve defined a general ChessPiece class that’s responsible for managing the things that are
common across all different types of chess pieces. For instance, every ChessPiece, regardless of
its type, needs to know where it is and what color it is. Then, to get the individual functionality
of each individual type of chess piece, we expanded upon this abstract ChessPiece class and
made specific types of ChessPieces. If this is confusing, you can keep it straight by just
remembering that every Knight is a ChessPiece, but not every ChessPiece is a Knight.
So why did we do this? Since we know that Knights, Pawns, Bishops, etc. are going to have a lot
of overlapping functionality, rather than implementing the same methods a bunch of times, we
just have to do it once in ChessPiece. Then anything that inherits from ChessPiece gets it for free.
This is one of the big benefits of object-oriented programming; it just makes some things really
convenient.
But wait, I get that all the classes like Pawn and Rook extend this ChessPiece superclass, but
where is ChessPiece.java? Why can’t I see it in my Chess assignment? The short answer is, it’s
just like a GraphicsProgram. Remember how your Breakout program extended GraphicsProgram
but you couldn’t actually see GraphicsProgram.java? Well it’s the same deal here. Just like
GraphicsProgram.java lives in acm.jar, ChessPiece.java lives in ChessLib.jar and its interface is
described starting in Appendix A of the handout.
2) The ChessBoard
We begin a discussion of the other classes and java files you’ll be dealing with in this assignment.
Probably the most straightforward of these is the ChessBoard class. This is primary because this
class does basically what you would expect – it allows you to store a bunch of ChessPieces at
different locations (that is what a real life chessboard does after all). Now, to start diving into the
details of this class, let’s begin by looking at the code in ChessBoard.java (comments omitted in
the interest of saving space):
public class ChessBoard{
public static final int BOARD_SIZE = 8;
public ChessBoard()
{
}
public ChessPiece pieceAt(int row, int col)
{
}
public void addPiece(ChessPiece piece)
{
}
public void removePiece(int row, int col)
{
}
}
-4-
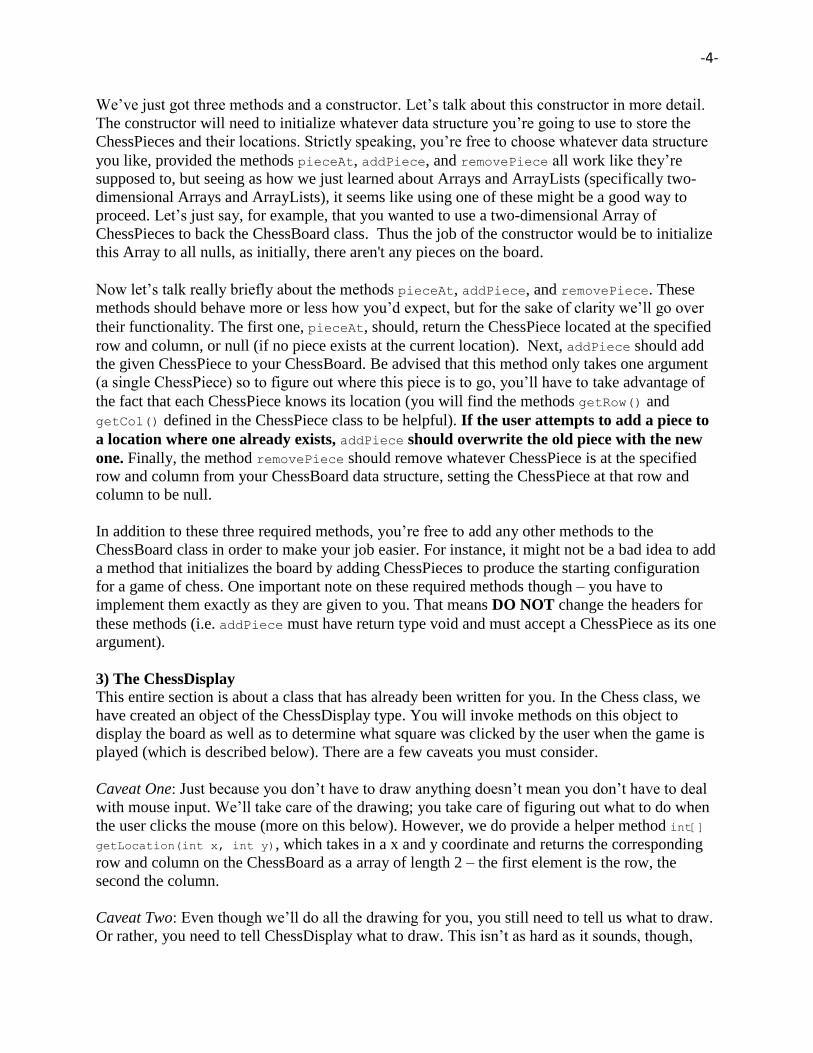
We’ve just got three methods and a constructor. Let’s talk about this constructor in more detail.
The constructor will need to initialize whatever data structure you’re going to use to store the
ChessPieces and their locations. Strictly speaking, you’re free to choose whatever data structure
you like, provided the methods pieceAt, addPiece, and removePiece all work like they’re
supposed to, but seeing as how we just learned about Arrays and ArrayLists (specifically two-
dimensional Arrays and ArrayLists), it seems like using one of these might be a good way to
proceed. Let’s just say, for example, that you wanted to use a two-dimensional Array of
ChessPieces to back the ChessBoard class. Thus the job of the constructor would be to initialize
this Array to all nulls, as initially, there aren't any pieces on the board.
Now let’s talk really briefly about the methods pieceAt, addPiece, and removePiece. These
methods should behave more or less how you’d expect, but for the sake of clarity we’ll go over
their functionality. The first one, pieceAt, should, return the ChessPiece located at the specified
row and column, or null (if no piece exists at the current location). Next, addPiece should add
the given ChessPiece to your ChessBoard. Be advised that this method only takes one argument
(a single ChessPiece) so to figure out where this piece is to go, you’ll have to take advantage of
the fact that each ChessPiece knows its location (you will find the methods getRow() and
getCol() defined in the ChessPiece class to be helpful). If the user attempts to add a piece to
a location where one already exists, addPiece should overwrite the old piece with the new
one. Finally, the method removePiece should remove whatever ChessPiece is at the specified
row and column from your ChessBoard data structure, setting the ChessPiece at that row and
column to be null.
In addition to these three required methods, you’re free to add any other methods to the
ChessBoard class in order to make your job easier. For instance, it might not be a bad idea to add
a method that initializes the board by adding ChessPieces to produce the starting configuration
for a game of chess. One important note on these required methods though – you have to
implement them exactly as they are given to you. That means DO NOT change the headers for
these methods (i.e. addPiece must have return type void and must accept a ChessPiece as its one
argument).
3) The ChessDisplay
This entire section is about a class that has already been written for you. In the Chess class, we
have created an object of the ChessDisplay type. You will invoke methods on this object to
display the board as well as to determine what square was clicked by the user when the game is
played (which is described below). There are a few caveats you must consider.
Caveat One: Just because you don’t have to draw anything doesn’t mean you don’t have to deal
with mouse input. We’ll take care of the drawing; you take care of figuring out what to do when
the user clicks the mouse (more on this below). However, we do provide a helper method int[]
getLocation(int x, int y), which takes in a x and y coordinate and returns the corresponding
row and column on the ChessBoard as a array of length 2 – the first element is the row, the
second the column.
Caveat Two: Even though we’ll do all the drawing for you, you still need to tell us what to draw.
Or rather, you need to tell ChessDisplay what to draw. This isn’t as hard as it sounds, though,

-5-
and you can do this through the conveniently named method void draw(ChessBoard board)
defined in the ChessDisplay class. We’ll discuss more about when to call this method in the next
section, but for now all you need to know is this. You pass in a ChessBoard (which here we
called board) all loaded up with ChessPieces into the draw method, and ChessDisplay will then
draw that board to the screen. It will then stay on the screen until you call draw again. Anytime
you want to update the screen, you just call draw.
Caveat Three: To make the game look nicer, when the user selects a piece to move (again, more
on this in the next section), your job is to highlight the square that piece is sitting on to make it
stand out. We’ve written three methods for you, void selectSquare(double row, double col,
Color c), void unselectSquare(int row, int col), and void unselectAll(). The method
selectSquare highlights the square at the given row and column with the given color;
unselectSquare changes the square at the given row and column to its original color; and
unselectAll changes all squares drawn to the screen to their original colors.
One more note about the ChessDisplay class. When you use the methods selectSquare,
unselectSquare, unselectAll each of these methods addresses the chessboard using the same
convention as a GraphicsProgram. That is, the square corresponding to row-column coordinates
of (0,0) is the top left square on the chessboard. (See Figure 4 below.) This is consistent with the
idea of having the origin in the top left of the screen. Additionally, this is the default convention
for how the chessboard is labeled when it is displayed to the screen, as shown in the Figure
below. Again, all methods in ChessDisplay use the convention that (0,0) is the top left
square of the chessboard. Basically this means if you say:
display.selectSquare(0, 0, Color.YELLOW);
display.draw(board);
then the square in the upper left-hand corner will be highlighted.
Figure 4.Image of the default numbering scheme for the chessboard as it is displayed to the screen. Observe how the coordinate
(0,0) corresponds to the upper left-hand corner of the chessboard.

-6-
4) The Chess Class
***If you are not familiar with the game of Chess, see Appendix B for a game
description****
So far we’ve discussed the ChessPiece subclasses (these represent the individual chess pieces),
the ChessBoard class (which represents the board that holds these pieces), and the ChessDisplay
class (which draws everything to the screen). Now we turn to the Chess class, which actually will
be managing the game. This file is responsible for reading mouse input from the screen and
handling the gameplay accordingly. This means that nearly all of the action in Chess will be the
result of MouseEvents, which work just like they did in earlier GraphicsPrograms.
The games of chess works by alternating turns between a White player and a Black player, with
the White player always playing first. You will need to mirror this functionality in your program.
Unlike in games like Breakout, all the action in Chess happens in response to a user action, so
the bulk of your code will be in mousePressed (see Part III under our “Suggested Approach”
section for more details about mousePressed, including pseudocode). You will therefore need to
keep track of the turn across mousePressed calls.
During a single turn the user will select one of their pieces by clicking on it, which will highlight
it. We have provided a helper method int[] getLocation(int x, int y) in the ChessDisplay
class which translates x and y coordinates to a row and column on the ChessBoard (see
Appendix A for more details about this method). The user will then click a second time on the
square that he or she would like to move the piece to. If the piece is unable to move to the square,
or the user re-clicks the same square, the piece is un-highlighted and nothing happens – it
continues to be that player’s turn, and the player can try the two-click process again, with that
piece or another one.
If they are able to move the piece to that square, the piece should be moved, capturing the
opponent’s piece if appropriate. You should also print the line “color pieceType moved from
(oldRow, oldCol) to (newRow, newCol)” with the italicized words replaced with their appropriate
values. An example would be the following line: White queen moved from (0,1) to (2,3). Feel
free to use real Chess notation for this line as well!
You will also need to print a message when one of the players is in check, which you can
determine by calling our helper method boolean isInCheck(ChessBoard board, int Player).
You should print something like “Black is in check.”
The games ends when one of players is in checkmate or stalemate, which you can figure out by
calling our helper methods boolean isInCheckMate(ChessBoard board, int Player) and
boolean isInStalemate(ChessBoard board, int Player) on the Chess class. When this happens,
print a message like “Black is in checkmate. Game over.” or “Stalemate. Game over.” and stop
responding to mouseclicks.
See Part III under our “Suggested Approach” section for a more in-depth discussion of gameplay
mechanics.

-7-
The Pieces Redux
Having discussed the ChessBoard class responsible for keeping track of the pieces and their
locations, and the Chess class, responsible for the gameplay, it is now time to turn our attention
back to the chess pieces themselves. With an understanding of Chess and ChessBoard under our
belts, we can now move into a more thorough understanding of the ChessPiece subclasses. In
particular, we begin our discussion with some of the fields that each of these classes inherits
from ChessPiece.
It is important to note the stuff that you get for free from the ChessPiece class. Because your
Knight, Rook, Queen, etc. classes all subclass from ChessPiece, you get access to the instance
variables that are defined in ChessPiece. In particular, you have access to the variables shown in
the code block below:
What this means (don’t worry about what protected means, you can treat it like private) is that
you can treat this code like it’s in each of your chess piece files (Pawn.java, King.java, etc.). This
means that in any of the ChessPiece subclasses (i.e. Pawn, Knight, Bishop, Rook, Queen, and
King) you can use row, col, color, BLACK, or WHITE as if it had been defined directly in the class
you are working in.
For instance, let us consider the constructor for the Rook class:
Notice how this constructor is using row, col, and color as if they had been defined in the Rook
class itself (even though if you look in Rook.java you will not see them). You can do this in any
method in any of the ChessPiece subclasses.
Because each of the pieces Queen, King, etc. all subclass from ChessPiece, when we are dealing
with a ChessPiece, we need a way to tell which type of piece is it. For instance, if somewhere in
your code you have a line like:
ChessPiece piece = board.pieceAt(row, col);
public Rook(int initialRow, int initialCol, int pieceColor)
{
row = initialRow;
col = initialCol;
color = pieceColor;
}
public static final int BLACK = 0;
public static final int WHITE = 1;
protected int row, col;
protected int color;

-8-
There is no way to tell a priori what kind of ChessPiece piece is (it could just as easily be a Pawn
as a King). This is equivalent to your code in Breakout when you said something like:
GObject collider = getElementAt(x, y);
Just as you were unsure whether the GObject called collider was a GOval, GRect, GLabel, etc.,
in the example code above, it is unclear whether the ChessPiece called piece is a Queen, King,
Knight, etc.
Therefore, we’ve had to add a way to distinguish different ChessPiece subclasses. You are not
required to use this code, but it may be useful for debugging. We definie an enumerated type
called PieceType in the file PieceType.java, and each class implements a method getType() that
returns the enumerated type of the object. This method is already written for you. An example of
its usage is below.
We have one last comment about ChessPiece subclasses. If you go open up any of the chess
piece files, say Pawn.java, you’ll see basically the same thing in all of them. First of all there’s a
constructor (e.g. public Pawn(int row, int col, int color)) that is filled in for you, a
method public boolean canMoveTo(int row, int col, ChessBoard board), and a
method public PieceType getType(). The only one of these you need to worry about doing
anything with is canMoveTo.
Now when you first look in Pawn.java, say, you’ll see that it looks like canMoveTo is already
filled in. In fact, it’s calling a method called automagicPawnCanMoveTo(row, col, board).
What’s this automagic thing? Well, in some sense, it’s a gift. This is a method that will always
give you the correct answer for whether or not your piece, in this case, a pawn, can move to a
given location. Why is it there? So you can test your Chess.java and ChessBoard.java code
before diving into messing with the ChessPieces. What does this mean? It means that you should
be sure that Chess and ChessBoard are absolutely 100% working before you start working on the
ChessPieces or things will get very difficult very fast. It also means that nowhere in your final
project should you have any calls to any automagic methods. Got it? No automagic method calls
in your final project.
ChessPiece piece = board.pieceAt(row, col);
switch (piece.getType())
{
case KING: doKingThings(); break;
case QUEEN: doQueenThings(); break;
…
}

-9-
The assignment: Our Suggested Approach
Having discussed all of the parts of this assignment, we now outline a suggested strategy for
tackling this project. This is, by no means, the only way of doing this assignment, but it is a quite
reasonable way that should make this project manageable.
Part I: Implement the required methods in the ChessBoard Class
This basically just involves filling in the methods for the ChessBoard.java class. Unfortunately,
there’s not a great way to test your implementation right off the bat, but at the same time, there’s
really not a whole lot to do here. While you’re free to use whatever data structures you want to
back the ChessBoard class, a two-dimensional Array or ArrayList seems quite reasonable. Once
you get this data structure set up, write the three required methods (addPiece, removePiece, and
pieceAt).
Part II: Write a method to initialize the ChessBoard
This can be done in either the ChessBoard class (within the constructor) or the Chess class, but
basically at some point you’re going to need a method to create the initial board setup. In
particular, after the board is initialized, it should look like this:
Figure 5. Initial configuration of the Chess game. When your board is initialized the pieces should be in exactly this
configuration.
Make sure to use the addPiece method to add the pieces to the chess board. For example, if you
are initializing the board in the constructor for the ChessBoard class, you might use the following
code to add a black rook: addPiece(new Rook(0,7,ChessPiece.BLACK));
In order to make sure that your board is initialized correctly, try calling display.draw(board);
from your run method in Chess.java. This method will cause the ChessPiece configuration stored
in the ChessBoard called board to be drawn to the screen.
-10-
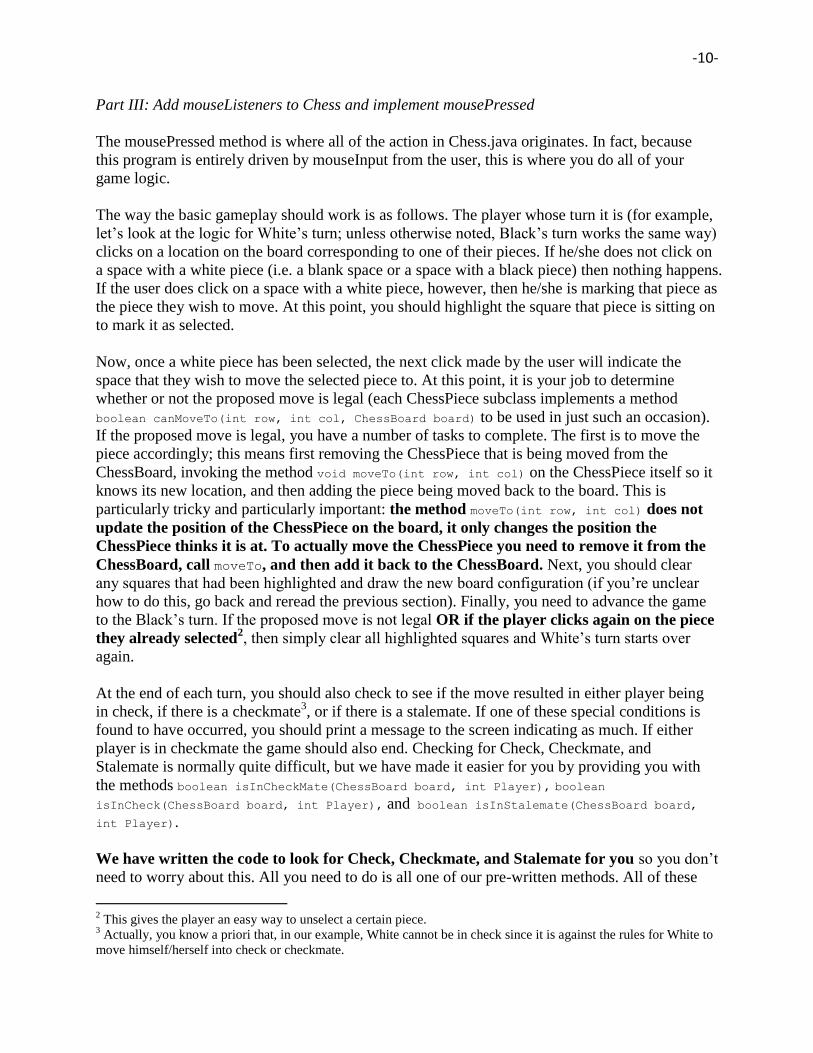
Part III: Add mouseListeners to Chess and implement mousePressed
The mousePressed method is where all of the action in Chess.java originates. In fact, because
this program is entirely driven by mouseInput from the user, this is where you do all of your
game logic.
The way the basic gameplay should work is as follows. The player whose turn it is (for example,
let’s look at the logic for White’s turn; unless otherwise noted, Black’s turn works the same way)
clicks on a location on the board corresponding to one of their pieces. If he/she does not click on
a space with a white piece (i.e. a blank space or a space with a black piece) then nothing happens.
If the user does click on a space with a white piece, however, then he/she is marking that piece as
the piece they wish to move. At this point, you should highlight the square that piece is sitting on
to mark it as selected.
Now, once a white piece has been selected, the next click made by the user will indicate the
space that they wish to move the selected piece to. At this point, it is your job to determine
whether or not the proposed move is legal (each ChessPiece subclass implements a method
boolean canMoveTo(int row, int col, ChessBoard board) to be used in just such an occasion).
If the proposed move is legal, you have a number of tasks to complete. The first is to move the
piece accordingly; this means first removing the ChessPiece that is being moved from the
ChessBoard, invoking the method void moveTo(int row, int col) on the ChessPiece itself so it
knows its new location, and then adding the piece being moved back to the board. This is
particularly tricky and particularly important: the method moveTo(int row, int col) does not
update the position of the ChessPiece on the board, it only changes the position the
ChessPiece thinks it is at. To actually move the ChessPiece you need to remove it from the
ChessBoard, call moveTo, and then add it back to the ChessBoard. Next, you should clear
any squares that had been highlighted and draw the new board configuration (if you’re unclear
how to do this, go back and reread the previous section). Finally, you need to advance the game
to the Black’s turn. If the proposed move is not legal OR if the player clicks again on the piece
they already selected2, then simply clear all highlighted squares and White’s turn starts over
again.
At the end of each turn, you should also check to see if the move resulted in either player being
in check, if there is a checkmate3, or if there is a stalemate. If one of these special conditions is
found to have occurred, you should print a message to the screen indicating as much. If either
player is in checkmate the game should also end. Checking for Check, Checkmate, and
Stalemate is normally quite difficult, but we have made it easier for you by providing you with
the methods boolean isInCheckMate(ChessBoard board, int Player), boolean
isInCheck(ChessBoard board, int Player), and boolean isInStalemate(ChessBoard board,
int Player).
We have written the code to look for Check, Checkmate, and Stalemate for you so you don’t
need to worry about this. All you need to do is all one of our pre-written methods. All of these
2 This gives the player an easy way to unselect a certain piece.
3 Actually, you know a priori that, in our example, White cannot be in check since it is against the rules for White to
move himself/herself into check or checkmate.

-11-
can be called from the Chess class, and each returns a boolean indicating if either check,
checkmate, or stalemate conditions are active for the given player (here, the player is specified
by using the constants ChessPiece.WHITE and ChessPiece.BLACK).
Since that may have been a lot all to handle all at once, let’s go ahead and lay it out in
pseudocode, just to make sure it’s clear:
Now, here’s the cool thing: as the assignment is given to you, each of the ChessPiece subclasses
come with an “automagic” method that will correctly determine whether or not a piece can move
to a specified square for you. So when you have completed Part III of this outline, you should
public void mousePressed(MouseEvent e)
{
Figure out which player’s turn it is
call getLocation(e.getX(), e.getY()) to convert the mouse click location in
pixels to a row and column on the ChessBoard
if(this is the first click of their turn)
{
if(they click on a piece of their own color)
{
highlight spot where the player clicked with selectSquare
store the piece at the location the user clicked so you can move it
on the next click
draw the board
}
}
else
{
check to see if the piece selected on the previous click can move to the
spot selected on this click with the canMoveTo method.
if(the chosen piece can move to the selected spot AND the selected spot is
not the spot the piece already occupies)
{
remove the piece from the board with the method removePiece
update the ChessPiece’s location with the method moveTo
add the updated ChessPiece back to the board addPiece
clear all highlighted squares with the method unselectAll
draw the board
check for Checkmates or Stalemates with isInCheckmate or
isinStalemate and print appropriate message
advance to next player’s turn
}
else
{
clear all highlighted squares
draw the board
remain the same player’s turn
}
}
}

-12-
have a fully working Chess game. Once everything here is working, it’s time to get going on the
rules governing the motions of the chess pieces.
Part IV: Implement canMoveTo for the Knight
Note: I recommend that you test each implementation of canMoveTo as you write it. Just
place a few pieces on a ChessBoard and try playing around with your pieces to make sure
they move like you expect. For instance, if I were testing my Knight, I would make a board
with only two Black Knights and two White Knights just to see if everything worked how I
wanted.
Next, you need to start implementing the canMoveTo methods for each of the pieces, starting with
the Knight.
The first thing to check is: does the Knight move two spaces in one direction and one space in a
different direction? If it does not, then you already know the move isn’t valid so you can stop
now. If the Knight is trying to move in an L-shape though, then you need to check the status of
the destination square. In particular, a piece can never capture another piece of its same color, so
if the destination is occupied by another piece of the same color, then the move is not valid.
Otherwise, we’re almost home free. The only thing left to check is if the proposed move would
put the player who controls the Knight in check. That is, a player is never allowed to make a
move that would put himself/herself into check, so if the proposed move would put the Knight’s
own King into check then it is not legal. We’ve given you a method called boolean
moveWouldCauseCheck(int finalRow, int finalCol, ChessBoard board) that will check this for
you. You can call this from your canMoveTo method, and if you provide the row and column of
the proposed destination (as well as the ChessBoard), this method will tell you whether or not
that move will cause you to move into Check. This method is included in the method reference
sheet in Appendix A.
In pseudocode, this might look like:
public boolean canMoveTo(int row, int col, ChessBoard board)
{
if the space at (row,col) is two spaces in one direction and one space in the
other direction from (this.row, this.col)
if the space at (row,col) is occupied by a piece with the same color
as this.color
return false;
else
check to see whether or not this move would cause the player to
move him/herself into check using moveWouldCauseCheck
if this would cause check
return false
else
return true
else
return false;
}

-13-
Part V: Implement canMoveTo for the Rook
The first thing to do when determining whether or not a given move for a Rook is legal is to
figure out whether or not the destination square lies along one of the horizontal or vertical lines
emanating from the Rook. If the proposed square is not along one of these lines then obviously
the move isn’t valid. If it is along one of these lines, then the next thing to check is whether or
not the Rook can actually make it to that square. If there is a piece of either color between the
Rook and the square it is trying to move to, then the move is not valid:
Figure 7. In the left board configuration, the Black Rook (red circle) cannot move to capture the white pawn (green square)
because her path is blocked by a black pawn. In the right board configuration the pawn has moved so the rook is free to capture
the pawn.
And, finally it is necessary to check that the destination square either contains a piece of the
opposing color or contains no pieces. Of course, even if the Rook’s path is unobstructed by other
pieces, the move is only valid if it does not put the King of that Rook’s color in check.
Part VI: Implement canMoveTo for the Bishop
The Bishop is very similar to the Rook, except that it can only move along diagonal lines. The
remaining requirements are the same – the Bishop can only move to a given square as long as it
lies along one of the allowed directions of motion and as long as no pieces stand between its
current location and its destination square. Again, the destination must either contain a piece of
the opposing color or be empty, and the move must not put the King of that Bishop’s color into
check.

-14-
Part VII: Implement canMoveTo for the Queen
Once you have canMoveTo for the Rook and Bishop, canMoveTo for the Queen should be
straightforward. The Bishop can only move along diagonals, and the Rook can only move along
horizontal or vertical lines. The Queen can move along both diagonals and horizontal and
vertical lines – she is a combination of the Rook and the Bishop. This means you can basically
copy and paste the code from your Rook and Bishop canMoveTo method straight into Queen.java
and get them working with only minor modifications. Much like the Bishop and Rook, the
Queen can only move to a given square as long as it lies along one of these allowed directions of
motion and as long as no pieces stand between its current location and its destination.
Additionally, the destination must either contain a piece of the opposing color or be empty, and
the move is only valid as long as it does not put the Queen’s King into check.
Figure 8. In the left board configuration, the Black Queen (red circle) cannot move to capture the white pawn (green square)
because her path is blocked by a black pawn. In the right board configuration the pawn has moved so the queen is free to capture
the pawn.
Part VIII: Implement canMoveTo for the King
Because the King can only move one square at a time (in any direction), checking that is it
unobstructed by pieces along its path is not a concern. Of course, it cannot move to a space
currently occupied by one of its own pieces, and it cannot move in such a way that would put it
into check.
Part IX: Implement canMoveTo for the Pawn
The Pawns are the hardest class to implement canMoveTo for. There’s nothing inherently tricky
about Pawns, there’s just a lot to check for. Things to keep in mind: (1) the direction that Pawns
can move depends on their color; (2) pawns move forward but capture diagonally; (3) pawns can
only even move one space at a time (either straight ahead or on diagonals) except for their very

-15-
first move, in which case they are allowed to move two spaces forward (they still cannot jump
over any pieces).
As with all other pieces, Pawns cannot capture pieces of their own color, and they cannot move
in such a way that would put their own King in check.
And that’s it, if you’ve made it this far then you’re done! Congratulate yourself and play a
few games of chess with your friends. Or, if you’re really bored, then read on about some of
the extension possibilities with Chess (there’s a lot).

-16-
For experienced chess players only:
If you’re familiar with the game of Chess, however, you’ll know that this is not how chessboards
are actually labeled. With the official scheme for labeling chessboards, the “origin” of the
chessboard is the lower left-hand corner of the chessboard and is assigned the label a1 (with ‘a’
representing the first column and ‘1’ representing the first row). The row and column labels then
increase as you move up and to the right:
Figure 6.Image of the traditional numbering scheme for a chessboard. Observe how the coordinate a1 corresponds to the lower
left-hand corner of the chessboard.
If you would like to switch the labeling displayed in your Chess game from the default one
(Figure 5) to the official chess labeling (Figure 6). Simply use the method useRealChessLabels
defined in the ChessDisplay class and explained in Appendix A of the handout. Note that
changing the way the labels are displayed on the screen does not change how the
ChessDisplay methods address the squares, it only changes the labels displayed.

-17-
Extensions Because of the rich nature of the chess game, this assignment is particularly well suited for
extensions. Here are just a few ideas, but feel free to add your own.
Add Castling or En Passant
These are both more advanced chess moves that require more logic than the basic version of the
Chess rules we had you implement in this assignment. Adding in these moves (more detail on
which can easily be found in Wikipedia) will make the game more complete.
Write your own method(s) to test for check, checkmate, or stalemate.
Sure we give you the code to do this already, but it could be fun to write these tests yourself.
They’re not actually that difficult, but they require a lot of comfort with array manipulation. The
basic idea to test for whether or not you’re in check is to see if any enemy piece can move to the
same square as your King. If you want a real challenge, try implementing the method
moveWouldCauseCheck.
Print out the game in Chess Algebraic Notion
It is quite easy to print out messages to the screen in chess (just use the print() or println()
commands). A nice feature to add would be saving the game history (all of the moves, in chess
notation) to a file.
Change the display
While the graphics for Chess are certainly passable, they are also quite boring (there’s so little
color). Fortunately, this assignment was written so that you can have fun with the display. In
order to extend this, there are a number of things you can do. One is simply changing what the
pieces and chessboard look like when they are drawn. To change what the chessboard looks like,
simply include a method called public void draw() in the ChessBoard class. You can treat this
method almost exactly like you are working in a graphics program, except instead of just saying
add(), remove(), removeAll(), getSize(), or getWidth(), you need to say display.add(),
display.getSize(), display.removeAll(), etc. The same will work with each of your ChessPiece
subclasses, except here you need to include a method public void draw(double squareX,
double squareY, double squareSideLength), where square and squareY give you the location
(in pixels) of the upper left corner of the square the piece is in, and squareSideLength gives you
the size of the square.
Highlight all available moves
It’s one thing to check if a certain move is valid or not. It’s another to find all available moves. It
would be nice if, when a user clicks on a certain piece to select it, you highlighted all spaces to
which they could possibly move.
Add a computer player
Sure, it’s tricky, but it can be done. A reasonable first-pass at doing this is to consider all
possible moves you can make, somehow assigning points to each of those moves (plus certain
number of points for each piece captured, minus a certain number of points for each piece you
open up to being captured, etc.) and then pick the highest scoring move. You can do a lot here.

-18-
Appendix A: Reference Methods This appendix is designed to serve as a reference for you when you are programming Chess. It’s
a list of all the methods that you can use for free in your implementation of this game.
Class Method Name Description ChessDisplay void draw(ChessBoard board) Updates the drawing of
the chessboard on the
screen based on the
locations of the
ChessPieces stored in
board ChessDisplay int[] getLocation(int mouseX, int mouseY) Converts an x-y
coordinate of a
mouseClick location to
a row and column of a
square on the
chessboard. The row-
column pair is returned
as an array of ints of
length 2. ChessDisplay void selectSquare(int row, int col, Color c) Marks a specified
square on the displayed
chessboard with the
specified color ChessDisplay void unselectSquare(int row, int col) Returns the specified
square on the displayed
chessboard to its default
color ChessDisplay void unselectAll()
Returns all squares on
the displayed
chessboard to their
default colors ChessDisplay useRealChessLabels(boolean useLabel) Changes the labeling
convention for the
chessboard as it is
drawn to the screen.
Passing in true will
label the chessboard
according to the official
convention, while
passing in false will
label the chessboard
according to the ACM
Graphics convention. Chess void println(String str) Prints a given string to
the TextField beneath
the displayed
chessboard (with a
carriage return) Chess void print(String str) Prints a given string to
the TextField beneath
the displayed
chessboard

-19-
Chess boolean isInCheckMate(ChessBoard board, int player) Returns a Boolean
indicating whether or
not the specified player
is in checkmate (the
player is identified by
the constants
ChessPiece.BLACK/
ChessPiece.WHITE) Chess boolean isInCheck(ChessBoard board, int player) Returns a Boolean
indicating whether or
not the specified player
is in check (the player
is identified by the
constants
ChessPiece.BLACK/
ChessPiece.WHITE) Chess boolean isInStalemate(ChessBoard board, int player) Returns a Boolean
indicating whether or
not the specified player
has been put into a
stalemate situation(the
player is identified by
the constants
ChessPiece.BLACK/
ChessPiece.WHITE) ChessPiece boolean moveWouldCauseCheck(int finalRow, int
finalCol, ChessBoard board) Returns a Boolean
indicating whether or
not moving the piece to
the position at
(finalRow, finalCol)
would cause the player
identified by color to be
put in check ChessPiece int getRow() Returns the row number
of the ChessPiece ChessPiece int getCol() Returns the column
number of the
ChessPiece ChessPiece int getColor() Returns the an int
corresponding to the
color of the ChessPiece
(ChessPiece.BLACK or
ChessPiece.WHITE) ChessPiece void moveTo(int row, int col) Updates the position of
the ChessPiece to be the
location specified by
(row, col)
-20-
Appendix B – How the game of chess is played
The Game
The basic idea behind chess is pretty simple. It’s a two-player game played on an 8 by 8 grid
(Figure 1), with each player controlling his or her own army of colored pieces (traditionally
colored white and black). The game always begins with the pieces arranged as shown in Figure 1,
and starts with White moving one of his/her pieces. The players then alternate turns, with each
player moving one of their own pieces on their turn (the exact rules governing how each piece
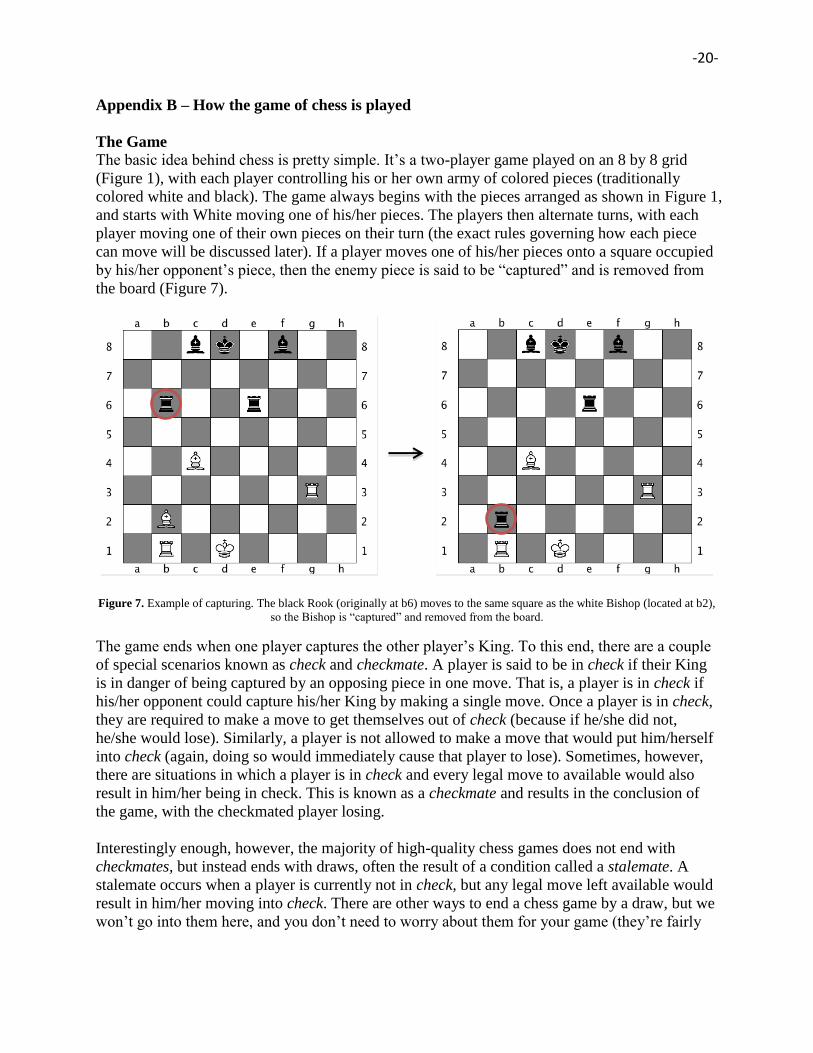
can move will be discussed later). If a player moves one of his/her pieces onto a square occupied
by his/her opponent’s piece, then the enemy piece is said to be “captured” and is removed from
the board (Figure 7).
Figure 7. Example of capturing. The black Rook (originally at b6) moves to the same square as the white Bishop (located at b2),
so the Bishop is “captured” and removed from the board.
The game ends when one player captures the other player’s King. To this end, there are a couple
of special scenarios known as check and checkmate. A player is said to be in check if their King
is in danger of being captured by an opposing piece in one move. That is, a player is in check if
his/her opponent could capture his/her King by making a single move. Once a player is in check,
they are required to make a move to get themselves out of check (because if he/she did not,
he/she would lose). Similarly, a player is not allowed to make a move that would put him/herself
into check (again, doing so would immediately cause that player to lose). Sometimes, however,
there are situations in which a player is in check and every legal move to available would also
result in him/her being in check. This is known as a checkmate and results in the conclusion of
the game, with the checkmated player losing.
Interestingly enough, however, the majority of high-quality chess games does not end with
checkmates, but instead ends with draws, often the result of a condition called a stalemate. A
stalemate occurs when a player is currently not in check, but any legal move left available would
result in him/her moving into check. There are other ways to end a chess game by a draw, but we
won’t go into them here, and you don’t need to worry about them for your game (they’re fairly

-21-
infrequent, but hey, they make for great extensions. If you want to read about them check out
http://en.wikipedia.org/wiki/Draw_(chess)).
The Pieces
The Knight
This is what a knight looks like on a chessboard:
Figure 8. Image of a knight.
So what make a knight really interesting, and really easy, is how it moves. In particular the
knight moves in L-shapes, moving first two squares in one direction and then one square in a
perpendicular direction:
Figure 9. Diagram showing all of the spots where the Knight can move. Notice that every viable spot is two spaces away in one
direction and then one space away in a perpendicular direction. Courtesy of www.thechesszone.com
The Knight is the only piece in chess that can jump over other pieces. What this means is, if you
want to check to see if a given move with a Knight is valid, all you need to do is look at the state
of the square the Knight is trying to move to.
The Queen
The Queen is considered the most powerful piece in chess. This is because of its extensive ability
to move and capture pieces.

-22-
Figure 10. Image of a Queen. Like the King, it’s depicted by a crown, but it’s very different than a King. Don’t get them
confused.
A queen is allowed to move and capture enemy pieces along any straight line (horizontal,
vertical, or diagonal) from the square that she currently occupies:
Figure 11. Diagram showing all squares to which the black Queen is allowed to legally move. Notice that every viable spot is on
a straight line emanating out from the Queen’s current location. Courtesy of www.thechesszone.com
The Bishop and Rook
Figure 12. Images of a Bishop (left) and Rook (right). The Rook is often called a Castle, but the official name is a Rook so that’s
what we’re going to use.
Since we already talked about the Queen in a fair amount of depth, I’m going to go much faster
through the Bishop and Rook. They can effectively be thought of as less-powerful variants on the
Queen. In particular, the Bishop is a variant that can only move along diagonals, whereas the
Rook is a variant that can only move along horizontal or vertical lines.

-23-
Figure 13. Diagrams showing all squares to which the black Bishop (left) and white Rook (right) are allowed to legally move.
Notice that every viable spot is on a straight line emanating out from the Bishop or Rook’s current location, but the straight lines
allowed are different for the Bishop and Rook. Courtesy of www.thechesszone.com
The King
Figure 14. Image of a King.
Like the Knight, the King is also quite a simple piece. This is because its range of motion is quite
limited. In particular, the King can only move one space, but it can move in any direction. To
answer your question (if you haven’t played Chess before), yes it is a little weird that the most
important piece in the game is also one of the weakest as far as its ability to attack and move.
That’s just how it goes.
Figure 15. Diagram showing all the spaces where the black King can legally move. Courtesy of www.thechesszone.com

-24-
The Pawn
Figure 16 Image of a pawn. The picture of it is boring, but the way it moves is quite interesting.
Interestingly enough, the pawn, which is definitely the weakest piece in the game of Chess, is
also the most complicated to get right. We’ll go slowly to make sure everything’s clear. The first
interesting thing to say about pawns is that they only can move “forward.” In this case forward is
defined as towards the opponent’s side of the board. In our orientation, this means that White
pawns must always move up the screen, and Black pawns must always move down.
Now, ordinarily, pawns only move along a vertical line (always towards the opponent’s side of
the board) and they only move one space at a time. Except for two scenarios: a pawn’s first move
and capturing. For instance, each pawn is given the option of moving forward either one or two
spaces on its first move (assuming that these paths lie unblocked by any pieces):
Figure 17. Diagram showing the unique movement of a pawn on its first move. Since the white Pawns shown have not been
moved, they have the option of moving forward either one or two spaces (as indicated by the blue arrows) on their first move.
This only applies if this move is not blocked by any piece, friend or enemy. Courtesy of www.thechesszone.com
Additionally, Pawns have another interesting wrinkle in that they capture differently than they
move. In particular, while Pawns are only allowed to move along a vertical line forward, they
capture on a diagonal line forward:

-25-
Figure 18. Diagrams showing the unique way in which Pawns capture. Although pawns an only move forward along vertical
lines, they are only allowed to capture forward along diagonal lines.
This also means, however, that Pawns cannot capture directly forward:
Figure 19. Diagram showing pawns who cannot capture each other (red boxes). Since pawns can only capture on diagonals,
neither the black nor the white pawn in either of the red boxes can move in the current configuration.
Finally (and this you don’t have to worry about), if a Pawn makes it all the way to the other side
of the board, the player in command of the Pawn gets to replace that Pawn with their choice of a
Knight, Bishop, Rook, or Queen (in this version of Chess is taken care of automatically for you –
try it, it’s kind of cool).