Ascension's Atlas Style in GIMP - Cartographers' Guild · 1 Ascension's Atlas Tutorial in GIMP What...
11
1 Ascension's Atlas Tutorial in GIMP What follows is, as near as I can make it, an approximation in gimp of Ascension’s Photoshop Atlas Style tutorial. Only the techniques used are in this version, so I highly recommend that you follow along in the original tutorial while you go through it, as his explanations of the thinking behind each step are extremely valuable. 1. First, we need to make a Channel for our coastline. a. Rename Background layer to Ocean (double‐click layer name to rename) b. Filter Æ Render Æ Clouds Æ Solid Noise (Randomize checked, detail 15, size 9/9) c. Duplicate the Ocean layer (Layer Æ Duplicate Layer). This can also be done by clicking the duplicate icon in the layers toolbox. Rename the new layer to Noise. d. Create a new layer named Clip. Fill it with 50% gray, and change the layer mode to Lighten Only. e. On the Noise layer, use a paintbrush at 30% opacity and paint white to fill in land areas and black to fill in sea. You'll end up with cloudy light land and flat grey sea:
Transcript of Ascension's Atlas Style in GIMP - Cartographers' Guild · 1 Ascension's Atlas Tutorial in GIMP What...

1
Ascension's Atlas Tutorial in GIMP What follows is, as near as I can make it, an approximation in gimp of Ascension’s Photoshop Atlas Style tutorial. Only the techniques used are in this version, so I highly recommend that you follow along in the original tutorial while you go through it, as his explanations of the thinking behind each step are extremely valuable.
1. First, we need to make a Channel for our coastline.
a. Rename Background layer to Ocean (double‐click layer name to rename)
b. Filter Render Clouds Solid Noise (Randomize checked, detail 15, size 9/9)
c. Duplicate the Ocean layer (Layer Duplicate Layer). This can also be done by clicking the duplicate icon in the layers toolbox. Rename the new layer to Noise.
d. Create a new layer named Clip. Fill it with 50% gray, and change the layer mode to Lighten Only.
e. On the Noise layer, use a paintbrush at 30% opacity and paint white to fill in land areas and black to fill in sea. You'll end up with cloudy light land and flat grey sea:

Ascension’s Atlas Tutorial in GIMP
2
f. With the Fuzzy Select Tool (Sample Merged and threshold of 0), click in the grey area.
g. Create a new layer named Coastline (Layer Fill Type: White). Fill your selection with black by dragging the black color from your toolbox to the drawing area.
h. Select None.
i. With a paintbrush at 100% opacity and black foreground color, paint over any unwanted islands from the creation process.
j. Grab the Select by Color tool and click anywhere in the white area. You should see “marching ants” surrounding your land mass(es).
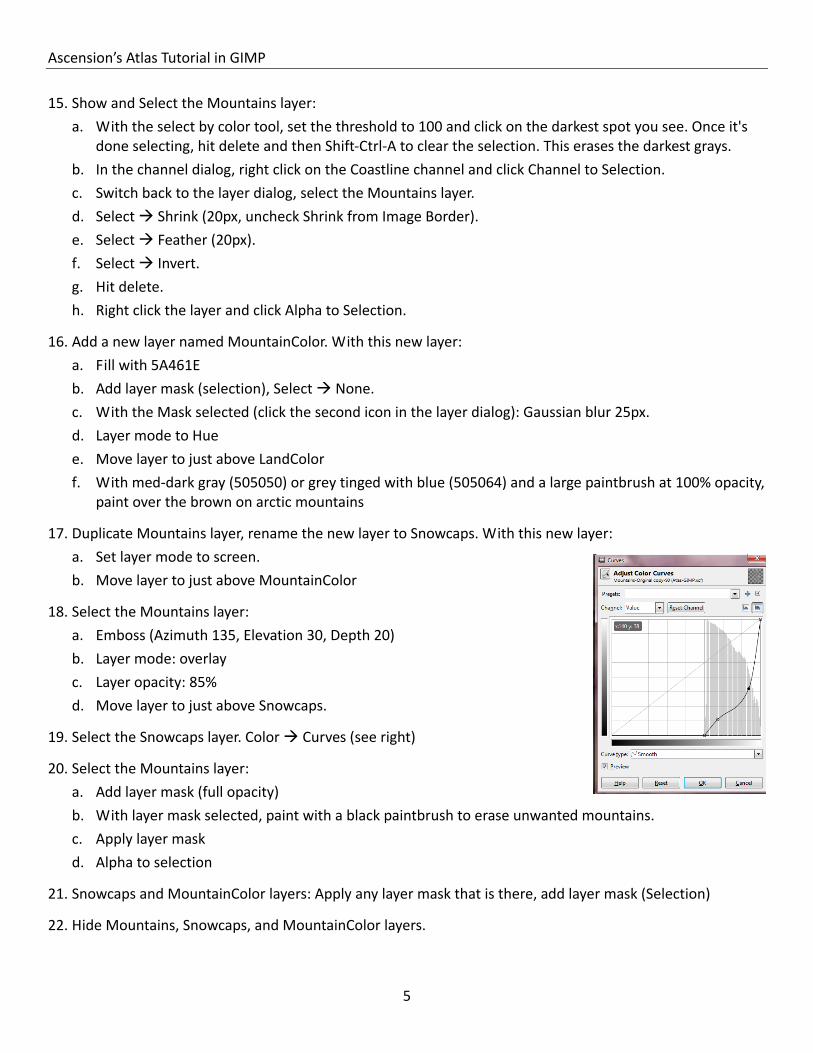
k. Switch to the Channels dialog (if you don't see it, you can make it appear by using the Windows Dockable Dialogs menu option. At the bottom of the channels dialog, click the new channel icon. Name the new channel Coastline, and check the box for Initialize from Selection.
l. Switch back to the layers dialog. Delete the Noise, Clip, and Coastline layers.
2. Duplicate Ocean layer and rename the copy to Land. With the Land layer:
a. Filter Map Bump Map (Map: Land layer. Azimuth: 135, Elevation: 30, Depth 8)
b. Right‐click the layer in the layers dialog, and click Add Layer Mask. Check the button for Channel, and Coastline should appear in the dropbox. Click ok.
3. Create a new layer (Transparency fill type) and name it LandGlow. Fill with a light blue color (40C8FF, RGB 64,200,255 – On palette as Land Glow). Add a layer mask (Channel: Coastline). With the mask selected, Filters Blur Gaussian Blur (22px). Move the LandGlow layer to beneath Land, above Ocean. See right for an example at 100% zoom.
4. Create a new layer (Transparency fill type) and name it LandColor and move it to just above the Land layer.
5. Fill with a linear gradient straight from the top edge to the bottom edge of the image (Ascension's Atlas Tutorial Land Gradient).
6. Add a layer mask (Channel: Coastline)
7. Set layer mode to Hard Light.
8. Curves (see right). This stops the white from washing out near the top of the map.

Ascension’s Atlas Tutorial in GIMP
3
9. So far you should have 4 layers, all visible (from top to bottom): LandColor, Land, LandGlow, Ocean.
10. Duplicate the Ocean layer and rename the copy to Hills. On the Hills layer:
a. Filters Render Clouds Difference Clouds
b. Repeat Difference Clouds (Ctrl‐F or Filters Repeat “Difference Clouds”).
c. Normalize.

Ascension’s Atlas Tutorial in GIMP
4
11. At this point, it should look something like this:
12. Duplicate the Hills layer, rename the copy to Mountains, and hide the Mountains layer.
13. With the Hills layer:
a. Filters Noise HSV Noise ( Holdness 2, Hue 0, Saturation 0, Value 30). See right for an example at 100% zoom.
14. Hide Hills layer.
Ascension’s Atlas Tutorial in GIMP
5
15. Show and Select the Mountains layer:
a. With the select by color tool, set the threshold to 100 and click on the darkest spot you see. Once it's done selecting, hit delete and then Shift‐Ctrl‐A to clear the selection. This erases the darkest grays.
b. In the channel dialog, right click on the Coastline channel and click Channel to Selection.
c. Switch back to the layer dialog, select the Mountains layer.
d. Select Shrink (20px, uncheck Shrink from Image Border).
e. Select Feather (20px).
f. Select Invert.
g. Hit delete.
h. Right click the layer and click Alpha to Selection.
16. Add a new layer named MountainColor. With this new layer:
a. Fill with 5A461E
b. Add layer mask (selection), Select None.
c. With the Mask selected (click the second icon in the layer dialog): Gaussian blur 25px.
d. Layer mode to Hue
e. Move layer to just above LandColor
f. With med‐dark gray (505050) or grey tinged with blue (505064) and a large paintbrush at 100% opacity, paint over the brown on arctic mountains
17. Duplicate Mountains layer, rename the new layer to Snowcaps. With this new layer:
a. Set layer mode to screen.
b. Move layer to just above MountainColor
18. Select the Mountains layer:
a. Emboss (Azimuth 135, Elevation 30, Depth 20)
b. Layer mode: overlay
c. Layer opacity: 85%
d. Move layer to just above Snowcaps.
19. Select the Snowcaps layer. Color Curves (see right)
20. Select the Mountains layer:
a. Add layer mask (full opacity)
b. With layer mask selected, paint with a black paintbrush to erase unwanted mountains.
c. Apply layer mask
d. Alpha to selection
21. Snowcaps and MountainColor layers: Apply any layer mask that is there, add layer mask (Selection)
22. Hide Mountains, Snowcaps, and MountainColor layers.

Ascension’s Atlas Tutorial in GIMP
6
23. Show and select the Hills layer: a. Move to just above land color
b. Select by Color (threshold 60): click on darkest spot
c. Save to channel (HillOutline)
d. Select none
24. Coastline channel to selection, shrink 10px, feather 10px, invert
25. Select HillOutline channel, fill selection with black
26. Select hills layer: a. Add layer mask (Channel: HillOutline), and apply
b. Colors Auto Normalize
c. Hide layer
27. New layer (HillColor): a. Move just above LandColor
b. Fill with brown (5A461E)
c. Add layer mask (Channel: HillOutline)
d. Mode to Soft Light, opacity 50%
28. New layer: HillBumps:
a. Fill layer with 50% grey
b. Filters Map Bump Map (Map: Hills layer, Azimuth 135, Elevation 30, Depth 10)
c. Add layer mask (Channel: HillOutline)
d. Apply layer mask
e. Overlay mode
29. Right‐click Mountains layer, hit Alpha to Selection, invert selection
30. HillBumps:
a. Add layer mask (selection)
b. Select none
c. Alpha to Selection, invert selection
d. Feather 20px, then fill with 50% grey. This softens the edge of hills near the coasts so that they don't cut off as abruptly.
31. Show Mountains, Snowcaps, and MountainColor layers.

Ascension’s Atlas Tutorial in GIMP
7
32. So far you should have 10 layers, with 9 of them visible. From top to bottom: Mountains, Snowcaps, MountainColor, HillBumps, HillColor, Hills (invisible), Land Color, Land, Land Glow, Ocean. Your continent should now be looking something like this:
33. Select the LandColor layer, create new layer (Layer Fill Type: Transparency), named Adjust1. With Adjust1:
a. Set the Foreground color to your dark green (405018), background color to papyrus (f0e6be)
b. Filters Render Felimage Noise (size 50/50)
c. Layer mode to Hue
d. Opacity to 25%
e. Add layer mask (Channel: Coastline)
34. New layer (Transparency), name it Adjust2. With Adjust2:
a. Airbrush tool, using colors from step 22 to paint extensions of desert/plains
b. Layer mode to Hue
c. Add layer mask (Channel: Coastline)

Ascension’s Atlas Tutorial in GIMP
8
35. Duplicate Ocean layer, rename new layer to OceanBumps:
a. Filters Map Bump Map (Bump layer: Ocean, 135, 30, 5)
36. New layer, name it OceanColor:
a. Fill with Sea Fill color (6ea0c8)
b. Repeat Bump Map
37. Move Ocean layer to just above Ocean Color and set mode to Overlay
38. Duplicate OceanBumps layer and rename to Shelf:
a. Move above Ocean
b. Channel (Coastline) to selection, grow 20px, feather 20px, invert
c. Select Shelf layer again, fill black
d. Select None
39. New layer, name it Shelf2:
a. Filters Render Felimage Noise (3/3, Oct 6.5, Lac 2.2, Hurst .15)
b. Overlay mode
c. merge down
40. With the Shelf layer:
a. Select by Color (threshold 40) on black area
b. Sharpen selection, invert
c. Fill white
d. Select None
e. With the paint bucket tool (Fill similar colors, threshold 150), fill any “holes” with white (see right):
f. emboss (135,30,30)
g. overlay mode, 30% opacity
41. If you’re running out of memory, this is a good time to save a copy of the image with layers intact (File Save a Copy) and then merge your visible layers. (Note: Make sure you save a copy first! If you decide something needs to be changed, it’s much easier to change one layer than to start all the way over.)
42. New layer (transparency), name it River Layout, and move it to the top of the layer stack (should be above Mountains). With this new layer selected:
a. Grab the Ink tool (size 10 or so, something easily seen when zoomed out). If you’re using a tablet, turn all of the sensitivity options off; we don’t need to worry about tapering for this tutorial.
b. Draw in some squiggly lightning bolts, start at the sea and work your way inland. Think of your river as a tree, it’s going to be wider at the base (near the sea) and as it goes up and branches out the branches get smaller and thinner and more numerous. We’ll worry about thinness later so for now we just want to do up a general layout of how the river systems will look. Since our river is a tree, it’s not going to have numerous fat trunks that join as it grows upwards. Sure, it’s possible to make trees do that but

Ascension’s Atlas Tutorial in GIMP
9
that requires the hand of man to bind them in such a way…nature does not bind her children in such ways so just make your river be a tree, you can make your own bonsai rivers after the tutorial.
c. Reduce the opacity to something just visible, so that you can trace the layout in the next step and still see what you’re doing (30% or so)
43. Channel (Coastline) to selection
44. New layer, name it Rivers:
a. Change your ink size to 1, your foreground color to something easily visible (e.g., white), zoom in to 200% or so, and draw squiggly lines in where your big layout lines are. This should look something like this:
b. Right‐click the Rivers layer, and click Alpha to Selection.
c. Fill with your Rivers color (406480)
d. Layer mode to multiply
e. Layer opacity to 33% or so, enough to be visible everywhere but not overpower your desert.
45. Delete the River Layout layer.
46. Next we’ll create a latitude/longitude grid. Create a new layer (transparency), name it Lines:
a. Filters Render Patterns Grid (change spacing to 200x200, offset to 0x0)
b. Set layer mode and opacity to taste (Overlay @ 33% as a default)
47. Next is a stroke along the coastline. Create a new layer, name it CoastStroke:
a. Apply layer mask (Channel: Coastline)
b. Make your foreground color black, and your background color 50% gray
c. Fill with a bi‐linear gradient from the middle to the bottom of the image, holding control while you drag
Ascension’s Atlas Tutorial in GIMP
10
to keep it straight up and down. This will make for a lighter stroke on the lighter tundra/desert terrains.
d. Apply the layer mask
e. Alpha to selection
f. Shrink selection by 1px (uncheck Shrink from image border)
g. Hit the delete key, then Select none
h. Layer mode to Multiply
i. Layer opacity to 33% or so
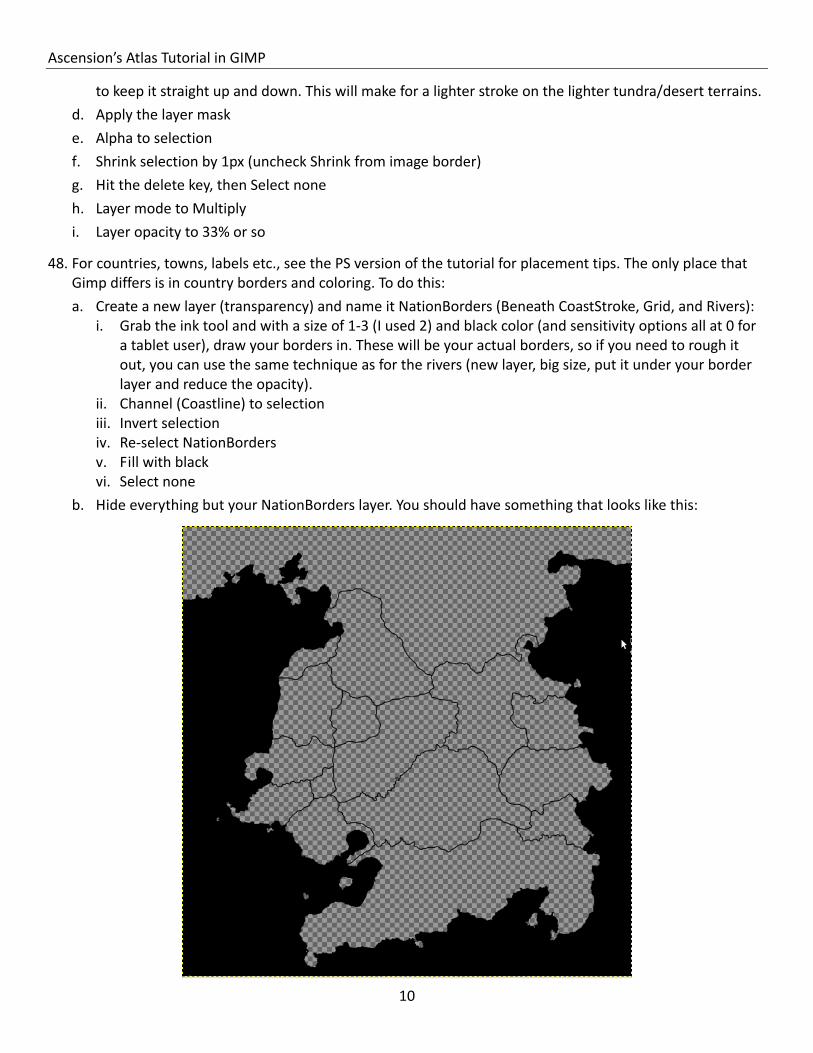
48. For countries, towns, labels etc., see the PS version of the tutorial for placement tips. The only place that Gimp differs is in country borders and coloring. To do this:
a. Create a new layer (transparency) and name it NationBorders (Beneath CoastStroke, Grid, and Rivers): i. Grab the ink tool and with a size of 1‐3 (I used 2) and black color (and sensitivity options all at 0 for
a tablet user), draw your borders in. These will be your actual borders, so if you need to rough it out, you can use the same technique as for the rivers (new layer, big size, put it under your border layer and reduce the opacity).
ii. Channel (Coastline) to selection iii. Invert selection iv. Re‐select NationBorders v. Fill with black vi. Select none
b. Hide everything but your NationBorders layer. You should have something that looks like this:

Ascension’s Atlas Tutorial in GIMP
11
c. Create a new layer (transparency), move it just below your NationBorders layer and name it NationFill: i. Grab the paint bucket tool (sample merged, fill similar colors, fill transparent areas, threshold 15). ii. Fill each country with a different color (see the PS version for details)
d. Right‐click NationBorders, choose Alpha to Selection
e. Re‐select NationFill.
f. Grow selection 15px, feather selection 30px
g. Add layer mask (selection)
h. Select none
49. NationBorders layer: Merge down with NationFill, add layer mask (Channel: Coastline)
50. Show all layers
51. NationFill layer: mode to overlay, opacity 30. Your image at this point should look similar to that below. For the rest of the decorations, the techniques for adding them are the same as they are in Photoshop, so it’s better to simply follow Ascension’s original tutorial for them.