Applications Manual TUHS series · 2019-10-16 · Applications Manual for TUHS series 1. Pin...
19
2019/7/25 Rev. 1.10E Applications Manual TUHS series
Transcript of Applications Manual TUHS series · 2019-10-16 · Applications Manual for TUHS series 1. Pin...

2019/7/25Rev. 1.10E
Applications ManualTUHS series

Applications Manual for TUHS series
1. Pin AssignmentPin assignment
2. Connection for Standard UseConnection for standard useInput fuse :F1Smoothing capacitor for input voltage :CbcInrush current limiting resistor :R1Input capacitor (TUHS25) :C1Varistor :SK1Output capacitor :CoAC line filter :L1Y capactor :C11,C12,C13
3. DeratingOutput current deratingInput voltage derating
4. Operation under low temperature condition A-10Outline of unstable operation at low temperature
and countermeasures5. Holdup time
Holdup timeHoldup voltage
6. Board layoutCaution points of board layoutReference PCB layout
Note: Information contained in this document is subject to change without notice for improvement.The materials are intended as a reference design, component values and circuit examplesdescribed in this document varies depending on operating conditions and component variations.Please select the components and design under consideration of usage condition etc.
5.2 A-13
A-93.2
6.2 A-166.1 A-14
2.1
2.4 A-62.5
2.8
A-1
A-2A-4
A-2
A-7
2.3 A-4
A-72.6 A-7
A-7
3.1
A-125.1
A-14
Contents
PageA-1
2.2
1.1
2.7
A-12
2.9 A-7
A-104.1
A-8A-8
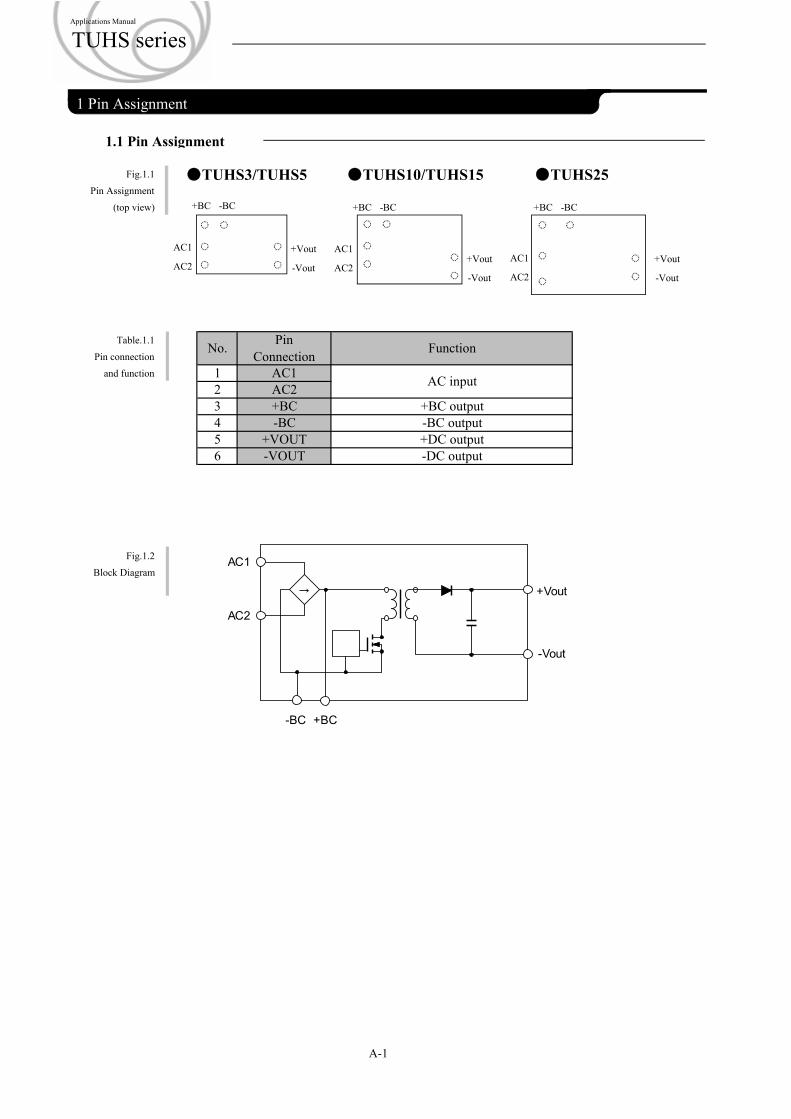
1.1 Pin Assignment
Fig.1.1 ●TUHS3/TUHS5 ●TUHS10/TUHS15 ●TUHS25Pin Assignment
(top view)
Table.1.1
Pin connection
and function
Fig.1.2
Block Diagram
6
1 AC1
45
-BC
PinConnection
23
FunctionNo.
-DC output
AC inputAC2+BC +BC output
-BC output+VOUT +DC output-VOUT
A-1
2.1 Pin configuration1 Pin Assignment
AC2
AC1
+BC -BC
-Vout
+Vout
AC2
AC1
+BC -BC
-Vout
+Vout
AC2
AC1
+BC -BC
-Vout
+Vout
Applications Manual
TUHS series
→
AC1
AC2
-BC +BC
+Vout
-Vout
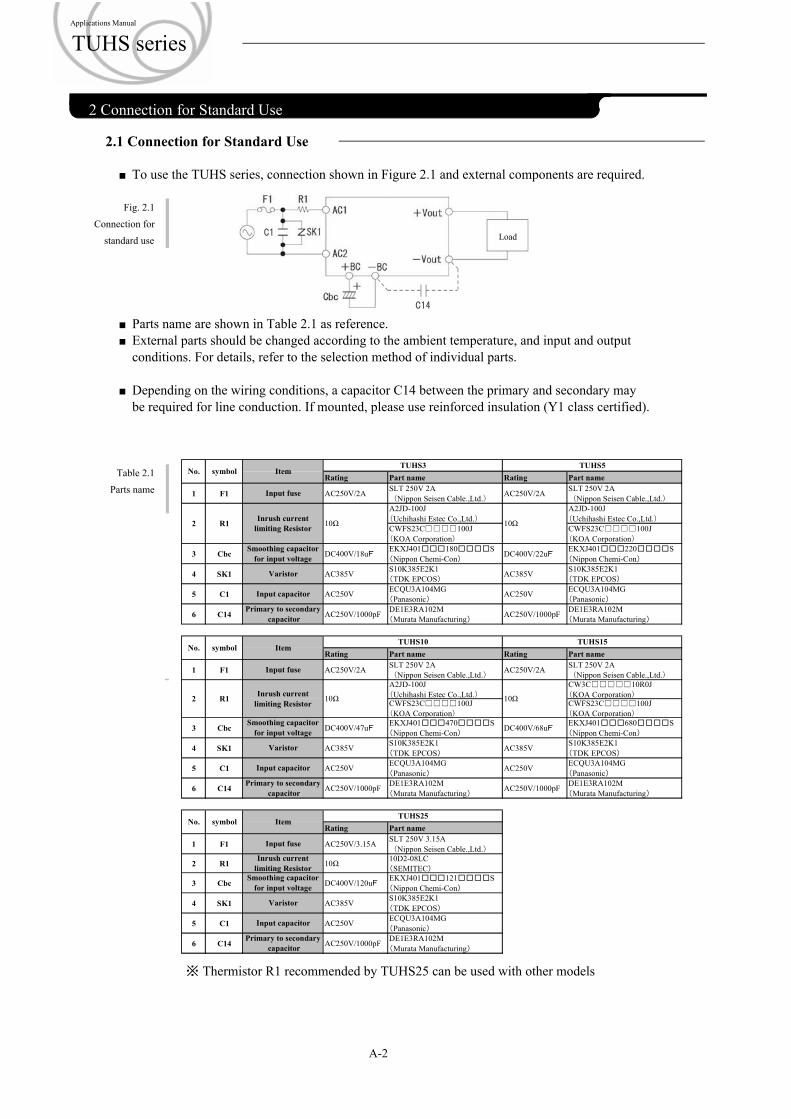
2.1 Connection for Standard Use
■ To use the TUHS series, connection shown in Figure 2.1 and external components are required.
Fig. 2.1
Connection for
standard use
■ Parts name are shown in Table 2.1 as reference.■ External parts should be changed according to the ambient temperature, and input and output
conditions. For details, refer to the selection method of individual parts.
■ Depending on the wiring conditions, a capacitor C14 between the primary and secondary may be required for line conduction. If mounted, please use reinforced insulation (Y1 class certified).
Table 2.1
Parts name
※ Thermistor R1 recommended by TUHS25 can be used with other models
A-2
2.1 Pin configuration2 Connection for Standard Use
Load
Applications Manual
TUHS series
C14
C1
Rating Part name Rating Part name
1 F1 AC250V/2A SLT 250V 2A(Nippon Seisen Cable.,Ltd.) AC250V/2A SLT 250V 2A
(Nippon Seisen Cable.,Ltd.)A2JD-100J(Uchihashi Estec Co.,Ltd.)
A2JD-100J(Uchihashi Estec Co.,Ltd.)
CWFS23C□□□□100J(KOA Corporation)
CWFS23C□□□□100J(KOA Corporation)
3 Cbc DC400V/18uF EKXJ401□□□180□□□□S(Nippon Chemi-Con) DC400V/22uF EKXJ401□□□220□□□□S
(Nippon Chemi-Con)
4 SK1 AC385V S10K385E2K1(TDK EPCOS) AC385V S10K385E2K1
(TDK EPCOS)
5 C1 AC250V ECQU3A104MG(Panasonic) AC250V ECQU3A104MG
(Panasonic)
6 C14 AC250V/1000pF DE1E3RA102M(Murata Manufacturing) AC250V/1000pF DE1E3RA102M
(Murata Manufacturing)
Rating Part name Rating Part name
1 F1 AC250V/2A SLT 250V 2A(Nippon Seisen Cable.,Ltd.) AC250V/2A SLT 250V 2A
(Nippon Seisen Cable.,Ltd.)A2JD-100J(Uchihashi Estec Co.,Ltd.)
CW3C□□□□□10R0J(KOA Corporation)
CWFS23C□□□□100J(KOA Corporation)
CWFS23C□□□□100J(KOA Corporation)
3 Cbc DC400V/47uF EKXJ401□□□470□□□□S(Nippon Chemi-Con) DC400V/68uF EKXJ401□□□680□□□□S
(Nippon Chemi-Con)
4 SK1 AC385V S10K385E2K1(TDK EPCOS) AC385V S10K385E2K1
(TDK EPCOS)
5 C1 AC250V ECQU3A104MG(Panasonic) AC250V ECQU3A104MG
(Panasonic)
6 C14 AC250V/1000pF DE1E3RA102M(Murata Manufacturing) AC250V/1000pF DE1E3RA102M
(Murata Manufacturing)
Rating Part name
1 F1 AC250V/3.15A SLT 250V 3.15A(Nippon Seisen Cable.,Ltd.)
2 R1 10Ω 10D2-08LC(SEMITEC)
3 Cbc DC400V/120uF EKXJ401□□□121□□□□S(Nippon Chemi-Con)
4 SK1 AC385V S10K385E2K1(TDK EPCOS)
5 C1 AC250V ECQU3A104MG(Panasonic)
6 C14 AC250V/1000pF DE1E3RA102M(Murata Manufacturing)
R1 Inrush currentlimiting Resistor
Primary to secondary capacitor
Primary to secondary capacitor
No.TUHS3
symbol Item
Varistor
Item
No. symbol
2 R1 Inrush currentlimiting Resistor 10Ω
2
No. symbol
Varistor
Primary to secondary capacitor
Input fuse
Smoothing capacitorfor input voltage
Varistor
Input capacitor
Smoothing capacitorfor input voltage
ItemTUHS25
Input fuse
Inrush currentlimiting Resistor
Smoothing capacitorfor input voltage
TUHS5
Input fuse
TUHS15TUHS10
10Ω 10Ω
10Ω
Input capacitor
Input capacitor

■ When connect the output to FG of an equipment, a noise may become big. The noise can be reduced by connecting external filter and grounding capacitor on the input side. Refer to Fig2.2.
■ Parts name are shown in Table 2.2 as reference of connecting output to FG.
Fig. 2.2
Recomemended
circuit of connect
output to FG
Table 2.2
Parts name
(connect output
to FG)
※Refer to Table 2.1 for F1, R1, Cbc, SK1,and C1.
■When using multiple power supplies, a noise filter separately from the above circuit may be required
A-3
Applications Manual
TUHS series
Rating Part name Rating Part name
1 L1 25.0mH/0.4A SU10VFC-R04250(TOKIN)
25.0mH/0.4A SU10VFC-R04250(TOKIN)
2 C11,C12 AC250V/2200pF CD45-E2GA222M(TDK)
AC250V/2200pF CD45-E2GA222M(TDK)
3 C13 AC250V/0.022uF LE223(Okaya Elecotric Industries)
AC250V/0.022uF LE223(Okaya Elecotric Industries)
Rating Part name Rating Part name
1 L1 25.0mH/0.4A SU10VFC-R04250(TOKIN)
35.0mH/0.5A SS11VL-R05350(TOKIN )
2 C11,C12 AC250V/2200pF CD45-E2GA222M(TDK)
AC250V/2200pF CD45-E2GA222M(TDK)
3 C13 AC250V/0.022uF LE223(Okaya Elecotric Industries)
AC250V/0.022uF LE223(Okaya Elecotric Industries)
Rating Part name
1 L1 35.0mH/0.5A SS11VL-R05350(TOKIN )
2 C11,C12 AC250V/2200pF CD45-E2GA222M(TDK)
3 C13 AC250V/0.022uF LE223(Okaya Elecotric Industries)
No.
Y capacitors
symbol Item
No. symbolTUHS3
Y capacitors
Item
AC line filter
AC line filter
TUHS15TUHS10
TUHS5
Y capacitors
No. symbol ItemTUHS25
AC line filter

2.2 Input fuse :F1
■ No protective fuse is preinstalled on the input side. To protect the unit, install a slow-blow type fuse shown in Table 2.2 in the input circuit.
■ In the case of using DC input, please use a DC fuse.The reference DC fuse type name is shown follow.
DC fuse type nameꞏ ꞏ ꞏBD20 (DC400V 2A)(Daito Communication Apparatus Co., Ltd.)
■ When the fuse is blown out, the input voltage is applied to the both ends of fuse terminals.If the TUHS is used in the equipment which need to comply safety standard certification,please keep the distance (2.5mm or more) between the terminals of fuse to satisfy therequirement of safety standard.
Table 2.3
Recommended
fuse
2.3 Smoothing capacitor for input voltage: Cbc
■ In order to smooth input voltage, connect aluminum electrolytic capacitor Cbc between +BC and -BC.Recommended capacitance of Cbc is shown in Table 2.4.
■ Please select the voltage rating of the aluminum electrolytic capacitor to match the specification of the input voltage range.
AC100V system ꞏ ꞏ ꞏ DC200V or moreAC200V system ꞏ ꞏ ꞏ DC400V or more
■ Ripple voltage and hold-up time will vary depending on input and output conditionsPlease select the smoothing capacitor capacity refer to the table 2.4.
■ Please do not exceed allowable capacity of Cbc to avoid the power supply failure.■ If you would like to confirm hold-up time for selecting the capacity of Cbc, please refer to Section 5
Hold-up Time.■ When the power supply is operated under -20℃, it may cause the smoothing capacitor ripple
voltage increase due to the characteristic of equivalent seies resistor. Choose the capacitor which has 3 times or more than recommended capacitance.
■ When a small capacitor than the recommended capacity is selected, ripple voltage of the smoothingvoltage will increase. Select a capacitor of which the ripple voltage does not exceed 25 Vp-p.There is a possibility of more than ripple current rating of the smoothing capacitor, please parts selection after confirming the allowable ripple current of the capacitor.
Table 2.4Recommended
capacitanceCbc
※1 Including wide input of AC100V/AC200V
Model
TUHS315uF
18uF
15uF
AC100V system ※1 47uF
AC100V system ※1
Only AC200V system
22uF
TUHS5
47uF
22uF
15uF
TUHS10
22uF
68uF
Allowable maxcapacitance
Recommended capacitance(Ta>=-20℃、20msec or more on AC100V)
Input condition Io<=100%AC100V system ※1
Io<=50% Io<=75%
33uF
10uF
68uF
150uF10uF 15uF 18uF
27uF
4.7uF
AC100V system ※1 10uF
33uF27uF 33uF
Only AC200V system
4.7uF
18uF
10uF
TUHS15 220uF
33uF 47uF
2A 2ADC Rated current
6.8uF
Io<=25%
Only AC200V system
2ATUHS3 TUHS5
AC Rated currentItem TUHS10
2A 2A2A
2.2uF68uF
18uF
68uFOnly AC200V system 15uF
22uF
4.7uF 6.8uF 10uF
22uF
TUHS15
A-4
2A 2A
TUHS253.15A
2A
TUHS25 390uFAC100V system ※1 47uF 68uF 82uF 120uF
Only AC200V system
Applications Manual
TUHS series

■ Electrolytic capacitor has lifetime. So make sure that the lifetime is no problem under the usage condition.
■ Detail formula is different by capacitor manufacturer.When calculating the lifetime, follow the instruction of capacitor manufacturers.
■ The temperature of the electrolytic capacitor is required for lifetime calculation.■ Please measure the point of the electrolytic capacitor at which the temperature is maximum.■ High frequency ripple current does not flow through to Cbc.
The ripple current which has twice of input frequency and depends on the output load(shown in Fig2.3) flows into Cbc.
■ The relationship between effective ripple current of Cbc and load factor is shown in Fig2.4 (A),(B),(C),(D),(E).
■ The ripple current changes approximately 1.5 times depending on PCB patterns, external parts, ambient temperature, etc. If the ripple current value which 1.5 times of the data shown in Fig.2.4, exceed the allowable ripple current of electrolytic capacitor, please measure the actual ripple current value, then calculate the lifetime.
Fig. 2.3
Current
of Cbc
Fig. 2.4
Effective ripple
current of Cbc
A-4
(A) TUHS3(Reference) 120Hz (B) TUHS5(Reference) 120Hz
(D) TUHS15(Reference) 120Hz(C) TUHS10(Reference) 120Hz
Load factor[%]
rippl
e cur
rent
[mA
rms]
Applications Manual
TUHS series
Load factor[%]
rippl
e cur
rent
[mA
rms]
Load factor[%]
rippl
e cur
rent
[mA
rms]
Load factor[%]
rippl
e cur
rent
[mA
rms]
(E) TUHS25(Reference) 120Hz
Load factor[%]
rippl
e cur
rent
[mA
rms]

2.4 Inrush current limiting Resistor: R1
■ The TUHS series have no internal inrush current limiting circuit. ■ Connect resistor R1 between AC input and power supply to limit inrush current up to
50A(TUHS3/5/10/15) and 60A(TUHS25). Select a resistor which has enough permissible current capability.
■ Fomula of inrush current is shown below. Please calculate the inrush current from this equation.
■ Inrush current prevention element has power loss and genetates heat by input current.Please select the power thermistor if the power loss of the resistor and efficiency drop are not acceptable.
■ When a power thermistor is used, inrush current will increase at high ambient temperaturebecause of the reduction of the resistance of the thermistor. Please do not turn on/off the inputrepeatedly within a short period of time. Keep appropriate intervals to allow the power supplyto cool down sufficiently before turning on.
■ The inrush current value, with the parts shown in Table 2.1, shown in Fig 2.5.
Fig. 2.5
Inrush current
values
■ Available AC voltage for inrush current prevention element varies by the smoothing capacitor value.The relationship between the value of smoothing capacitor and AC voltage of the recommended inrush current prevention element to reference is shown in Figure 2.6.
Fig. 2.6
Characteristics of
power thermistor
resistor
R1
■ Under low temperature conditions, the output of power supply may be unstable due to high ESR values of the power thermistor and Cbc. Check with the actual device before use.※Refer to page A-8 for operation under low temperature conditions.
A-6
L
inp RR
VI
1
2* Ip :Inrush current[peak]Vin:Input voltage[rms]R1 :Inrush current limiting Resistor
AC200Vin
Ta:85ºC
Ta:25ºC
Ta:-20ºC
23A
21A
7A
TUHS5F24セメント抵抗(1K100JA)使用
TUHS5F24Use resistor (1K100JA)
AC200Vin
Ta:85ºC
Ta:25ºC
Ta:-20ºC
48A
24A
4A
TUHS25F24サーミスタ(10D2-08LC)使用
TUHS25F24Use thermistor (10D2-08LC)
Applications Manual
TUHS series
2.5 Input capacitor:C1(TUHS25)■ To comply with conducterd noise CISPR22-B, EN55022-B, connect capacitor C1 which is 0.1μF
between AC input terminals.■ Use a capacitor with a rated voltage of AC250V which complies with the safety standards.■ If 0.11μF or more capacitor is connected, the discharge resistor is necessary in order to
comply UL60950-1. Please connect the discharge resistor which satisfy the following formula.
2.6 Varistor:SK1■ In order to comply with IEC61000-4-5 Level 3 (surge immunity), coonnect a surge protective device.■ Overvoltage category changes depending on the location for installing the power supply.
Recommended components is complying to the overvoltage category II.For example, home electronics and information equipment corresponds the installation category II.And they are installed the primary part of the equipment which is connected to outlet by power cable.If installation category III (required to connect distribution panel directly) is required, the varistor must be bigger than recommended varistor.Please confirm whether the components comply the standards.
2.7 Output capacitor:Co■ In the TUHS series, the output capacitor is basically unnecessary. Reduce the ripple voltage or suppress
fluctuation in an output voltage by connecting the output electorolytic capacitor or ceramic capacitor.The connection example is shown in Fig 2.7.
■ When the pulse load is connected, the output voltage will change transiently.Please check the level of the fluctuation in your situation.And if the transient output voltage change is not acceptable, please connect the output capacitor Co.
Fig.2.7
Connecting Example of
an External Capacitor
to the Output Side
Table 2.5
Recommended
capacitance
Co
2.8 AC line filter:L1■ The commom mode choke coil should be selected with confirmation because there are wire grade
and rated temperature of bobbin.
2.9 Y Capacitors:C11,C12,C13■ Please choose safety certified capacitor (Y1, Y2 class approved) to C11 and C12. However,
if secondary circuit is shorted to FG, not connected by capacitor, please choose Y1 class capacitor as C11 and C12.
■ During high voltage test, the voltage applied to C13 is determined by the value of C11, C12 and C13.Please note the rated voltage of the capacitor. Fomula of the voltage applied to C13 is shown below.
■ The noise reduction level depends on the location of the grounding capacitor.Please connect the capacitor as close as possible to the power supply.
0~330μFTUHS5 TUHS10 TUHS15
0~47μF 0~150μF
5V 0~100μF 0~100μFTUHS25
-
A-7
12V 0~470μF0~47μF
Output voltage TUHS3
0~68μF 0~68μF
0~150μF
24V 0~22μF 0~22μF
15V 0~47μF 0~47μF 0~120μF 0~120μF 0~390μF
0~1000μF
0~220μF
42.4)2(Vlog1
ine1 /≦
CR
testCCCCC
VV312111
1211C13
VC13 :Voltage applied to C12C11,C12 :Y capacitor on the primary sideC13 :Y capacitor on the secondary sideVtest :Test voltage
R :Discharge resistorC1:Input capacitanceVin:Input voltage 120V or 240V[rms]
Load
Applications Manual
TUHS series

3.1 Output current derating
3.1 Output derating
■ Please have sufficient ventilation to keep the temperature of point A in Fig.3.1 at Table 3.1or below. Please also make sure that the ambient temperature does not exceed 85℃
■ Derating curve is shown Fig.3.2.Note: In the hatched area, the specification of Ripple, Ripple Noise is different form other area.
Table 3.1
Point A Temperature
Fig. 3.1
Temperature measuring
point on the case
(Top view)
Fig. 3.2
Output derating
A-8
Model TUHS3 TUHS5 TUHS10
Point A 105℃ 105℃ 105℃ 100℃ 95℃ 100℃
TUHS15 TUHS25
Output voltage all all all 12V,24V 15V all
2.1 Pin configuration3.Derating
(A) TUHS3 Derating curve(Reference)
(B) TUHS5 Derating curve(Reference)
(C) TUHS10 Derating curve(Reference)
(D) TUHS15 Derating curve(Reference)
Point A(Center of the Case)
Applications Manual
TUHS series

3.2 Input derating
■ Input derating curve is shown Fig.3.3.In cases that conform with safety standard, input voltage range is AC100-AC240V (50/60Hz) and DC120-DC370V.
■ The operating temperature range, please refer to Section 3.1.
Fig. 3.3
Input derating
A-9
(A) TUHS3
(B) TUHS5/TUHS10/TUHS15/TUHS25
Applications Manual
TUHS series
(AC input) (DC input)
(AC input) (DC input)
Load
fact
or[%
]
Input voltage[Vac]
Load
fact
or[%
]
Input voltage[Vdc]
Load
fact
or[%
]
Input voltage[Vac]
Load
fact
or[%
]
Input voltage[Vdc]
(E) TUHS25 Derating curve(Reference)

4.1 Outline of unstable operation at low temperature and countermeasures
■ At low temperatures, ESR of Cbc and power thermistor become high.At this condition, the output voltage may become unstable due to the voltage drop on the inrush current limiting components and Cbc. Please select the appropriate Cbc and R1.
■ The output voltage becomes unstable easily when the components temperature is low and startupor dynamic load change.Fig. 4.1 shows stable operation at 25ºC and unstable operation at -40ºC after startup and at dynamic load changes. The power supply is repeatedly starting and stopping if unstable operation is happened.
Fig.4.1
Difference of
operation with
temperature
■ The operation is improved by increasing the temperature of the component.<Notes for operation at ambient temperatures between -20ºC and -40ºC>
* Output voltage may be unstable continuously at low load current. In this case, minimumload current is necessary.
* The output becomes stable after a few minutes operation because the characteristics of thermistor and Cbc become stable.
A-10
VacVin Vo
Io
TUHS
2.1 Pin configuration4. Operation Under Low Temperature Conditions
Start-up (TUHS25F12)
Load 0% ⇒ 100% (TUHS25F12)
Vac(100V/div)
Vin(100V/div)
Vo(5V/div)
(200ms/div)
Vac(100V/div)
Vin(100V/div)
Vo(5V/div) unstable
(200ms/div)
Io(1A/div)
Vo(5V/div)
(100ms/div)
Io(1A/div)
Vo(5V/div) unstable
(100ms/div)
Vac Vo
Io
TUHS
Ta=25℃ Ta=-40℃
Load
Applications Manual
TUHS series
Vin

■ In order to avoid unstable operation, please reduce the input ripple voltage of the BC terminal.Please be three times or more of the recommended capacity in connection permission capacitywithin the capacity of the Cbc. Please select the capacitor with low ESR and excellent temperature characteristics.
■ In order to avoid unstable operation, please reduce the voltage drop due to inrush currentprevention element.Please select the value of inrush current limiting resistor R1 depending on the load factor.Fig. 4.2 shows the upper limit of the resistance of inrush current limiting resistor.Please select the resistance of power thermistor or resistor to be less than the value of upper limit.Note that the resistance should be lower than the value shown in Fig.4.2 if the temperature characteristic of Cbc is bad or high ESR type is used.
Fig.4.2
Connection permission
inrush current limiting
resistance upper limit
*Allowable resistance with 3 times capacitance from recommended value of Cbc by using KXJ series (Nippon Chemi-Con)
■
Fomula of resistance value of R1 and R1' is shown below.
■
Fig.4.3
The inrush current
parallel limiting resistor
in low temperature
A-11
By connecting R1 and R1' thermally by silicone rubber etc., the power loss of inrush current limitingelement can be reduced efficiently because the resistance of power thermistor reduces due to the heatfrom the resistor R1'.
If the resistance of power thermistor which may exceed the value shown in Fig.4.2, thermal resistorwhich the resistance doesn't change by ambient temperature should be connected in parallel with thethermistor (shown in Fig.4.3).
R1
R1´
´´´//
11
1111 RR
RRRR R1 :Inrush current limiting power thermistorR1´:Inrush current limiting resistor to be connected in parallel
Load factor[%]
Con
nect
ion
perm
issi
on re
sist
ance
up
per l
imit
[Ω]
Applications Manual
TUHS sereis

5.1 Hold-up time■ Hold-up time is determined by the capacitance of Cbc. Fig. 5.1 shows the relationship
between hold-up time and load within the allowable capacitance of Cbc.■ Fomula of capacitance of Cbc is shown below.
Fig. 5.1
Relationship
between
hold-up time
and Cbc
A-12
)(tCbc 22
hold
hin VVPo
η
thold[sec] :Hold-up timeVin[ V ] :Input VoltageVh [ V ] :Minimum input voltage for regulated output voltagePo [ W ] :Output powerη [ % ] :Power supply efficiency
2.1 Pin configuration5. Hold-up Time, Hold-up Voltage
TUHS3 Hold-up time (AC100V) TUHS3 Hold-up time (AC200V)
TUHS5 Hold-up time (AC100V) TUHS5 Hold-up time (AC200V)
TUHS10 Hold-up time (AC100V) TUHS10 Hold-up time (AC200V)
TUHS15 Hold-up time (AC100V) TUHS15 Hold-up time (AC200V)
(Reference)
Load factor[%]
Hol
d-up
tim
e [m
sec]
Load factor[%]
Hol
d-up
tim
e [m
sec]
Load factor[%]
Hol
d-up
tim
e [m
sec]
Load factor[%]
Hol
d-up
tim
e [m
sec]
Load factor[%]
Hol
d-up
tim
e [m
sec]
Load factor[%]
Hol
d-up
tim
e [m
sec]
Load factor[%]
Hol
d-up
tim
e [m
sec]
Load factor[%]
Hol
d-up
tim
e [m
sec]
Applications Manual
TUHS series
(Reference)
(Reference) (Reference)
(Reference) (Reference)
(Reference) (Reference)
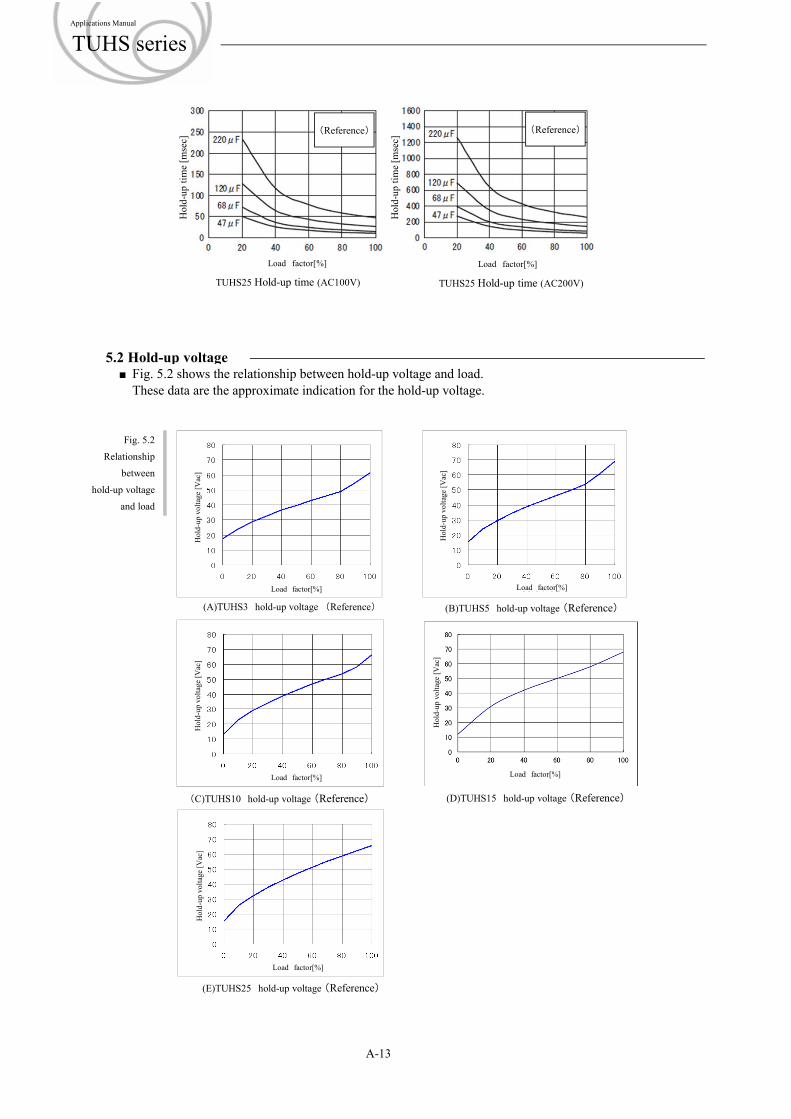
5.2 Hold-up voltage■ Fig. 5.2 shows the relationship between hold-up voltage and load.
These data are the approximate indication for the hold-up voltage.
Fig. 5.2
Relationship
between
hold-up voltage
and load
A-13
(A)TUHS3 hold-up voltage (Reference) (B)TUHS5 hold-up voltage (Reference)
(C)TUHS10 hold-up voltage (Reference) (D)TUHS15 hold-up voltage (Reference)
Load factor[%]
Hol
d-up
vol
tage
[Vac
]
Applications Manual
TUHS series
Load factor[%]
Hol
d-up
vol
tage
[Vac
]
(E)TUHS25 hold-up voltage (Reference)
Load factor[%]
Hol
d-up
tim
e [m
sec]
Load factor[%]
Hol
d-up
tim
e [m
sec]
TUHS25 Hold-up time (AC100V) TUHS25 Hold-up time (AC200V)
(Reference) (Reference)
Load factor[%]
Hol
d-up
vol
tage
[Vac
]
Load factor[%]
Hol
d-up
vol
tage
[Vac
]
Load factor[%]
Hol
d-up
vol
tage
[Vac
]

6.1 Considerations for component placement and wiring pattern
■ Recommend not wire the high voltage line (AC and +BC voltage) on the surface of the primary components side.
■ The distance between the pattern connected to AC and +BC must be separeted 3mm or more.■ And the distance between primary elements (components and patterns) and secondary elements
must be separeted 8mm or more.■ Figure 6.1. shows the creepage distance as reference.■ Exterior of the electrolytic capacitor is considered as same potential as the negative terminal, it will
be included in the primary component. Please note the distance between secondary side (including pattern) and exterior of the electrolytic capacitor.
■ However, the clearance and creepage distance varies depending on the usage condition and the requirement of the safety standard, please confirm before the PCB design.
Fig.6.1
Creepage distance
■ Prohibited area of the wiring pattern and component placement is shown in Figure 6.2. (A), (B), (C).
Fig.6.2
Prohibited area of
arround power supply
A-14
3mm or more8mm or more
2.1 Pin configuration6.Board layout
(A) TUHS3/TUHS5 (B) TUHS10/TUHS15
(C) TUHS25
Inhibition area of patternand parts of the primaryInhibition area of pattern
and parts of the secondary
Inhibition area of pattern and parts of the primary
Inhibition area of pattern and parts of the secondary
Inhibition area of patternand parts of the primary
Inhibition area of patternand parts of the secondary
Applications Manual
TUHS series

■ There is the possibility that the significant radiation noise is generated, please connect inputsmoothing capacitor Cbc to the ± BC terminal as close as possible.
■ If 2 layer or more substrate is used, the radiation noise can be reduced by crossing the output pattern (+Vo, -Vo) as shown in Fig.6.3.
Fig.6.3
Output wire
reference
■ Long output wiring may generate significant radiation noise, please wire it as short as possible.■ If it is difficult to be short the output wiring, 470~2200pF capacitor C14 should be connected
between primary (+BC or -BC) and secondary (+Vout or -Vout) to reduce radiation noise.10~100MHz radiation noise can be reduced by connecting C14.
■ The capacitor C14 which is connected between primary and secondary must be Y1 class certified (reinforced insulation).
■ Figure 6.4. shows the connection between primary and secondary capacitor C14.
Fig.6.4
Circuit of connect
capacitor
between primary
and secondary
A-15
Load
C14
-Vout
+Vout
Patterns of the surface of power supply mounting surfacePatterns of the opposite surface of power supply mounting
Applications Manual
TUHS series
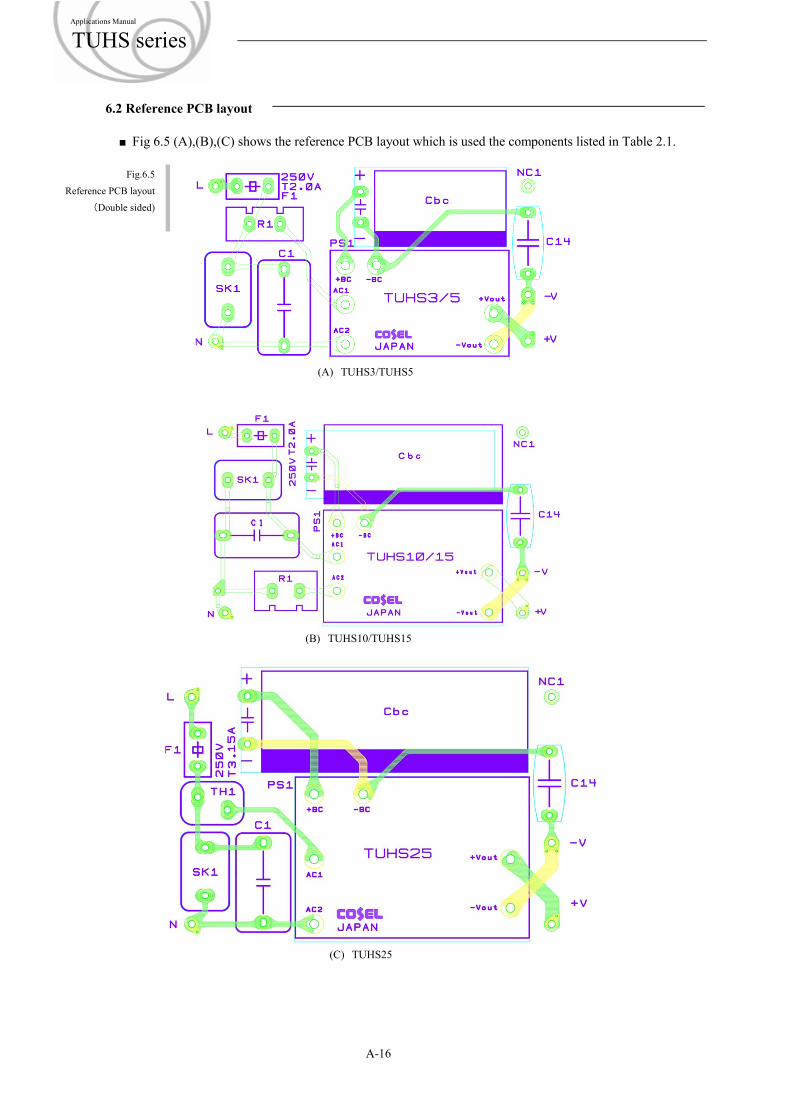
6.2 Reference PCB layout
■ Fig 6.5 (A),(B),(C) shows the reference PCB layout which is used the components listed in Table 2.1.
Fig.6.5
Reference PCB layout
(Double sided)
A-16
(A) TUHS3/TUHS5
(B) TUHS10/TUHS15
(C) TUHS25
Applications Manual
TUHS series

Revision history
A-17
Applications Manual
TUHS series
No. date page content1 2014.5.1 A-2 table2.1 Reference AC Fuse Type Name change2 2014.5.1 A-3 Reference DC Fuse Type name added3 2014.5.1 A-4 But, if the ripple current of ・・・ deleted4 2014.11.14 A-1 1.1 Block Diagram added5 2014.11.14 A-8 3.2 input derating added6 2015.1.23 A-2 Change of fig 2.2 and table 2.17 2015.5.20 - Add items related to TUHS15F8 2015.11.20 A-12 Changing the formula of Hold-up time9 2017.9.20 - Add items related to 15V
10 2019.07.25 A-2,A-7,A-14,A16
condenser for Line Conduction C1,C14・・・added
12 2019.07.25 A-2 Changed inrush limiting resistor to A2JD-100J L3.5(Uchihashi EstecCo.,Ltd.)、CWFS23C 10Ω(KOA corporation)
13 2019.07.25 A-3 Changed Y capacitors to CD45-E2GA222M(TDK)