Grocery List Generator | App for iPod Touch, iPhone and iPad.

App Generator Overview

Page 2
Table of Contents Introduction ............................................................................................................................................ 1
The Evoke Generator Interface ............................................................................................................... 1
The Repositories Page ............................................................................................................................. 2
Repository Server ................................................................................................................................ 2
Repository Object ............................................................................................................................... 3
File Scan .......................................................................................................................................... 4
The Data Model Page .............................................................................................................................. 1
The Code Page ........................................................................................................................................ 5
Data Entities ........................................................................................................................................ 5
Connecting Your Data to the Model ............................................................................................... 5
Selections ............................................................................................................................................ 7
Project ............................................................................................................................................... 10
Generate ........................................................................................................................................... 11
The PhoneGap Page .............................................................................................................................. 12
Templates.............................................................................................................................................. 13
Tokens ............................................................................................................................................... 13
Template Language ........................................................................................................................... 14
rem ................................................................................................................................................ 15
log .................................................................................................................................................. 15
messagebox................................................................................................................................... 15
debug ............................................................................................................................................ 17
set .................................................................................................................................................. 18
If/else ............................................................................................................................................ 18
switch/case ................................................................................................................................... 18
for .................................................................................................................................................. 19
read ............................................................................................................................................... 20
preread .......................................................................................................................................... 20
Num() ............................................................................................................................................ 20
String() ........................................................................................................................................... 20
Token Modifiers ............................................................................................................................ 21

Page 3
Token Keywords ............................................................................................................................ 22

Page 1
Introduction This document contains a high-level overview of the functionality provided by Evoke’s App
Generator.
The Evoke App Generator goes hand in hand with Evoke's App Designer and is used to produce
Visual Studio projects that manifest the design data in runnable application code. It can also be used
to "kick-start" your App Designer data modelling process by connecting to your existing data
repository and retrieving meta data as a starting point in creating an Evoke data model.
The Evoke Generator Interface There are four main sections (pages) in the Evoke Generator UI:
1. Repositories
2. Data Model
3. Code
4. PhoneGap
The Repositories page is typically used during the initial installation/setup phase.
The Data Model page is primarily intended for generating part or all of an Evoke data model from an
existing database.
The Code page is where the essential data model -> database linkage is defined and from where you
will generate a Visual Studio solution for your Evoke application.
The PhoneGap page allows you to create a zip file that can be submitted to the Adobe PhoneGap
cloud build service in order to quickly create your deployable iOS or Android native app package.
When you first start the Evoke Generator you will be presented with a login dialogue:
You should – at this point – already be assigned a user and password for an Evoke Account.
Upon successful authentication you will be presented with the Evoke Generator screen and any
existing data for your account will be displayed (on the Repositories page).
As with the Evoke Designer whenever you make a change to an Evoke entity/object the change
notification icon appears (see the Code tab below) along with the standard revert and save buttons.
Page 2
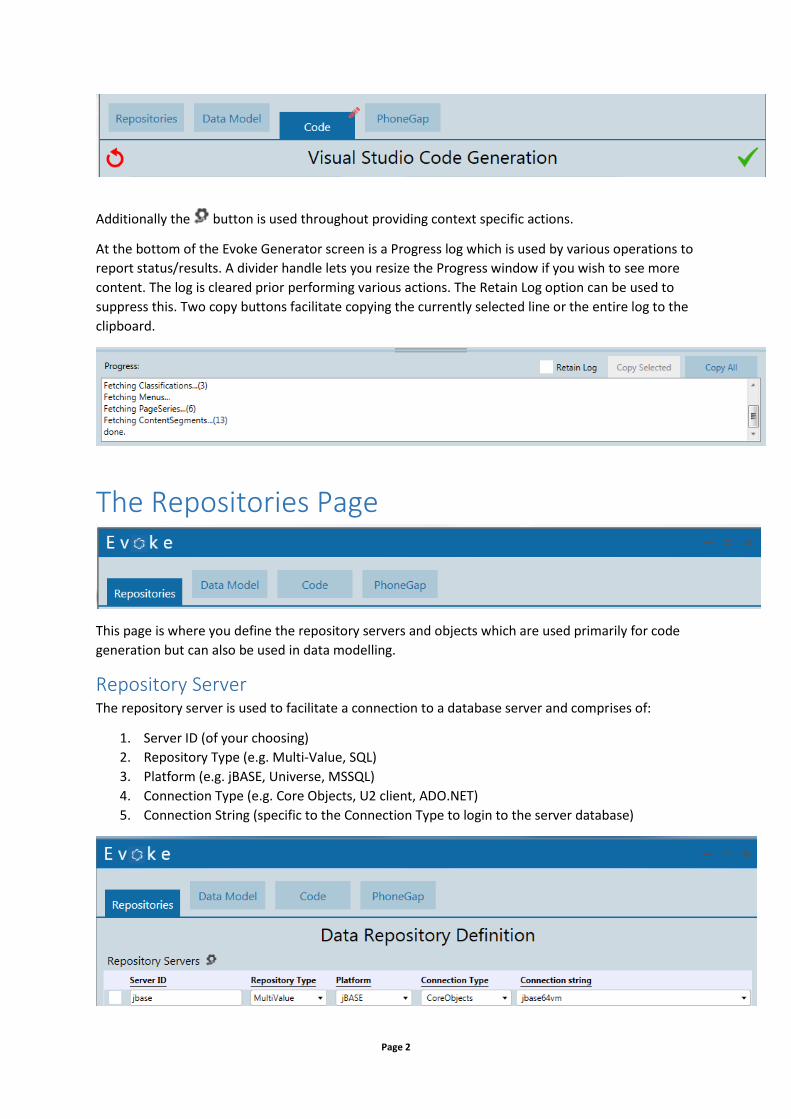
Additionally the button is used throughout providing context specific actions.
At the bottom of the Evoke Generator screen is a Progress log which is used by various operations to
report status/results. A divider handle lets you resize the Progress window if you wish to see more
content. The log is cleared prior performing various actions. The Retain Log option can be used to
suppress this. Two copy buttons facilitate copying the currently selected line or the entire log to the
clipboard.
The Repositories Page
This page is where you define the repository servers and objects which are used primarily for code
generation but can also be used in data modelling.
Repository Server The repository server is used to facilitate a connection to a database server and comprises of:
1. Server ID (of your choosing)
2. Repository Type (e.g. Multi-Value, SQL)
3. Platform (e.g. jBASE, Universe, MSSQL)
4. Connection Type (e.g. Core Objects, U2 client, ADO.NET)
5. Connection String (specific to the Connection Type to login to the server database)
Page 3
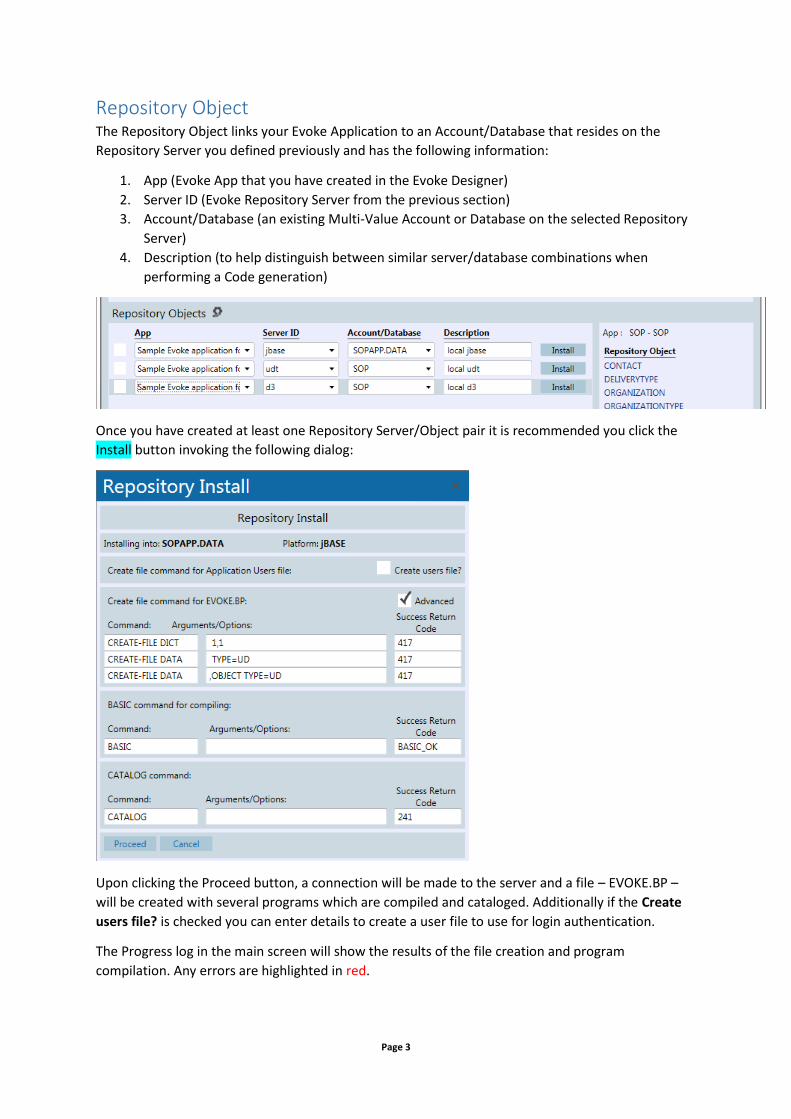
Repository Object The Repository Object links your Evoke Application to an Account/Database that resides on the
Repository Server you defined previously and has the following information:
1. App (Evoke App that you have created in the Evoke Designer)
2. Server ID (Evoke Repository Server from the previous section)
3. Account/Database (an existing Multi-Value Account or Database on the selected Repository
Server)
4. Description (to help distinguish between similar server/database combinations when
performing a Code generation)
Once you have created at least one Repository Server/Object pair it is recommended you click the
Install button invoking the following dialog:
Upon clicking the Proceed button, a connection will be made to the server and a file – EVOKE.BP –
will be created with several programs which are compiled and cataloged. Additionally if the Create
users file? is checked you can enter details to create a user file to use for login authentication.
The Progress log in the main screen will show the results of the file creation and program
compilation. Any errors are highlighted in red.

Page 4
File Scan Once you have installed the EVOKE.BP utility programs you can perform a file scan to build a list of
files in your account/database that should be paired to the relevant entity in your Evoke data model.
1. First select a Repository Object (if you have more than one) by clicking on the background of
the applicable row (clicking a field will also perform the select).
2. Click on the action menu ( )
(Note: this action menu option is also available on the other pages of the Generator)
A dialogue will appear which will give you some control as to how the file scan is performed.
If you have configured an account in the mv.NET Data Manager then you may just want to check the
Use mv.NET Visible File List.
Additionally the Ignore mv.NET temporary files option will skip files starting with MVNET.TMP.
Note that file scanning is an operation you can perform at any time and does not affect previous data
model pairing of entities and files.
Page 1
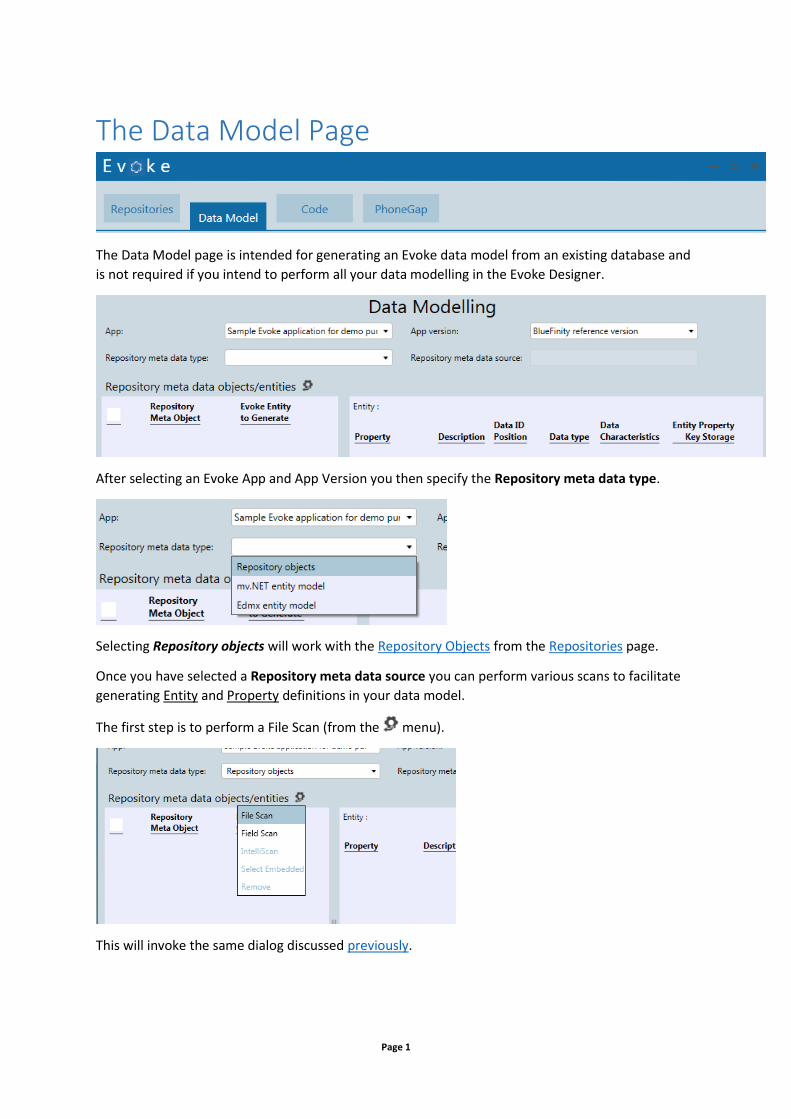
The Data Model Page
The Data Model page is intended for generating an Evoke data model from an existing database and
is not required if you intend to perform all your data modelling in the Evoke Designer.
After selecting an Evoke App and App Version you then specify the Repository meta data type.
Selecting Repository objects will work with the Repository Objects from the Repositories page.
Once you have selected a Repository meta data source you can perform various scans to facilitate
generating Entity and Property definitions in your data model.
The first step is to perform a File Scan (from the menu).
This will invoke the same dialog discussed previously.

Page 2
After a successful file scan the resulting set of files are displayed under the Repository Meta Object
column and a suggested Entity name (under Evoke Entity to Generate) beside it. You can edit these
names at any time prior to saving back to the data model. Any Entity names that match (ignoring
case) existing entities in the data model will be highlighted:
The next step is to do a Field Scan (on a single file) or an IntelliScan (on multiple files). IntelliScan is
the best choice when there is more than one file as this will direct the field scanning process to look
for relationships between files.
The IntelliScan operates on the selected meta objects (or all if none are selected). In the example on
the left the APPUSER file was deselected as the Entity already exists.
Upon clicking the Scan button each file selected from the meta objects list is scanned for attribute
definitions, associated groups and foreign keys. For existing mv.NET accounts the Use mv.NET
schema option will read the schema information instead of scanning the dictionaries.

Page 3
Upon saving the results are returned to the Data Model page:

Page 4
The ticked object denotes an Entity generated from an association (in this case an association called
Orders within the Customer file). When you have finished making adjustments to Entity and Property
names click the save button at the top of the screen to generated the Entity and Property objects in
your repository.

Page 5
The Code Page
The Code page is where you will finalize the Evoke data modelling by associating the
entity/properties to the target database/account and then generate a Visual Studio project/solution.
Data Entities
Connecting the data repository to the data model Within Evoke, the movement of data between the UI data model (created within the designer) and
the data repository (database) is done via a "data-blob". The structure of this data blob (there is one
data-blob structure per entity type) is totally under your control, but ultimately, you will need to
create a mapping between the elements of data within the data blob and the properties of each of
your data model entities. The Data Entities tab is where you define this mapping information.
This data-blob is broken down into a series of discrete data elements, each of which is associated
with a property of a data entity. It might be that for some entities there exists a file (termed as
repository object) which has a very strong correlation in terms of data content with that of the
entity. In these situations you can associate the file with the entity and the code generator will then
be able to automatically create the database-resident code to read and write data from/to that file
via the data blob.
If there isn't a file with such a strong data correlation, you will be responsible for writing the custom
code (in DataBASIC) to read and write data from the relevant file(s) via the data blob.
Automatically matching properties with attributes Before associating repository objects with entities you will first need to select a Repository source.
Typically you would use the same repository source for each entity which you can easily accomplish
by checking all or multiple entities prior to selecting the repository source.
The choices of repository object stems from performing a File Scan against the Repository source.
You may have already performed this scan on the Repositories page but if you need to perform a file
scan you can do so here using the action button ( ) next to the Repository object dropdown.
Page 6
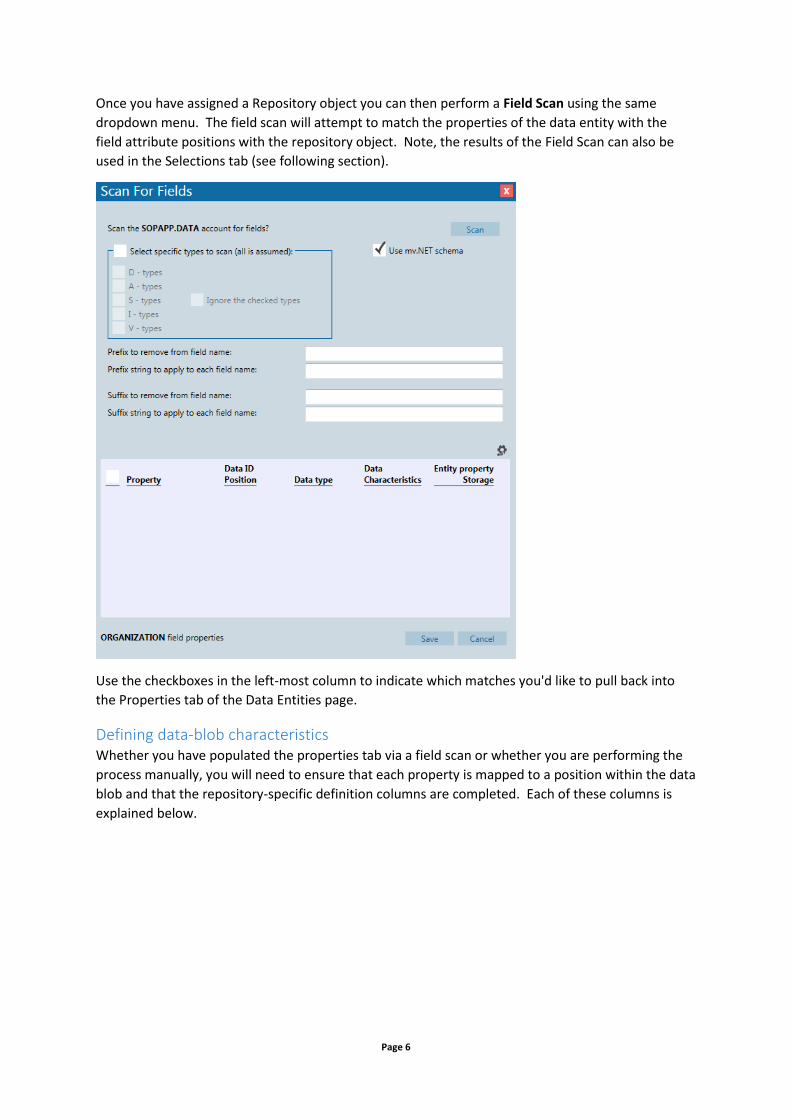
Once you have assigned a Repository object you can then perform a Field Scan using the same
dropdown menu. The field scan will attempt to match the properties of the data entity with the
field attribute positions with the repository object. Note, the results of the Field Scan can also be
used in the Selections tab (see following section).
Use the checkboxes in the left-most column to indicate which matches you'd like to pull back into
the Properties tab of the Data Entities page.
Defining data-blob characteristics Whether you have populated the properties tab via a field scan or whether you are performing the
process manually, you will need to ensure that each property is mapped to a position within the data
blob and that the repository-specific definition columns are completed. Each of these columns is
explained below.

Page 7
Data type
Read-only. This is the data type of the property as defined within the app designer.
Entity property key storage
For entity property types, you need to define how (in terms of primary key/item ID storage) the
association or relationship between entity types is implemented within the data repository. There
are 4 options here:
Local key storage Indicates that the key(s) of associated/related record(s) are stored within this data-blob (record/item).
Remote (foreign) key storage Indicates that the key of this data-blob (record/item) is held within each associated/related record/item.
Embedded Multi-value Indicates that associated/related items are held as one or more multi-valued attributes within this data-blob (record/item).
Embedded Sub-value Indicates that associated/related items are held as one or more submulti-valued attributes within this data-blob (record/item).
Data ID position
This column holds a value which is dependent on the data type of the property.
For properties that are not Entity data types, it should hold an integer number greater than zero
indicating the associated data blob position.
For Entity properties, that have an Entity Property Key Storage setting of Local key storage, it should
hold an integer number greater than zero indicating the associated data blob position where the
key(s) are held.
For Entity properties, that have an Entity Property Key Storage setting of Remote (foreign) key
storage, it should hold the name of the property within the associated entity type that holds the key
of this data-blob (record/item).
Data characteristics
xxxx.

Page 8
Selections The Selections tab allows you to define repository-specific selection and sort clauses to be used by
the code generator.
When defining Selection and Sort clauses you can enter them directly in the appropriate text fields
or click the text builder button to the right.
The screen shot below shows the text builder for the Selection clause:
In the Criteria Builder you can populate the Output field by either entering text directly or by using

Page 9
the drop downs to populate the query. You can also drag a value from the Property list or Filter
Name list and drop in the appropriate place in the query.
If you have multiple conditions you can reorder them by clicking on the desired row and dropping on
the target row.
Similarly the Sort Builder stems from the Sort clause: text builder button and is functionally similar
to the Criteria Builder in regard to entering text, drag-drop, and reorder.
Page 10
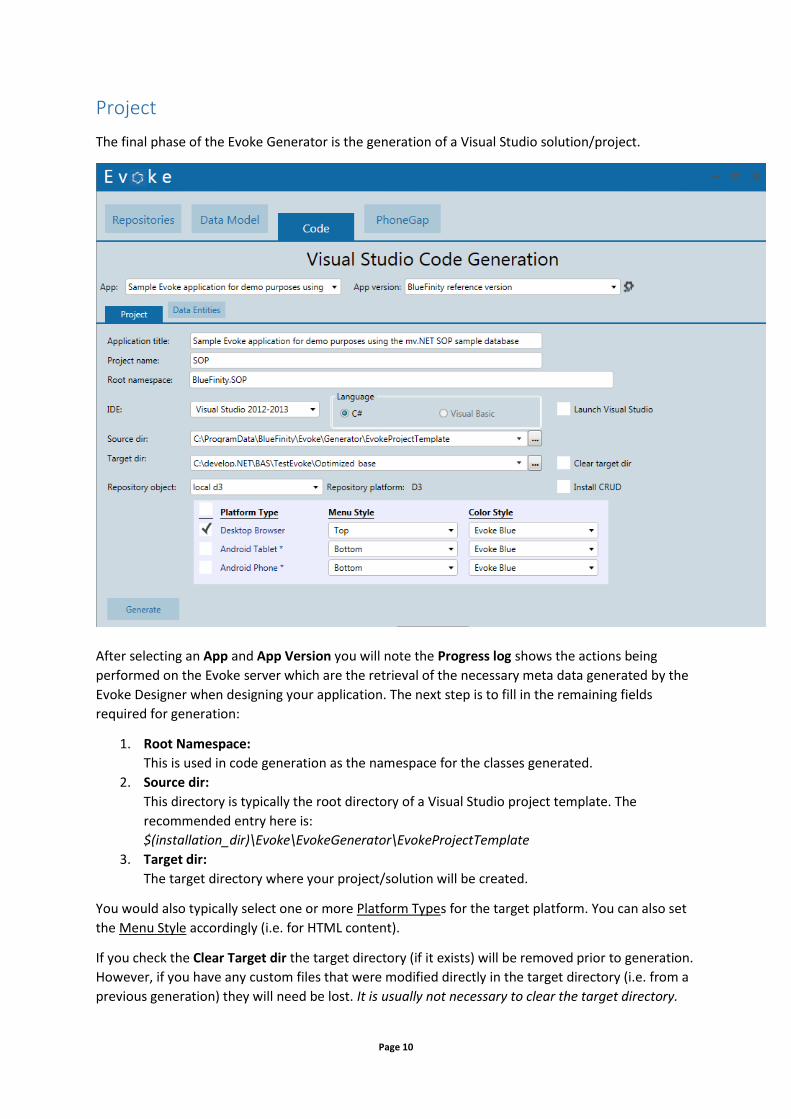
Project
The final phase of the Evoke Generator is the generation of a Visual Studio solution/project.
After selecting an App and App Version you will note the Progress log shows the actions being
performed on the Evoke server which are the retrieval of the necessary meta data generated by the
Evoke Designer when designing your application. The next step is to fill in the remaining fields
required for generation:
1. Root Namespace:
This is used in code generation as the namespace for the classes generated.
2. Source dir:
This directory is typically the root directory of a Visual Studio project template. The
recommended entry here is:
$(installation_dir)\Evoke\EvokeGenerator\EvokeProjectTemplate
3. Target dir:
The target directory where your project/solution will be created.
You would also typically select one or more Platform Types for the target platform. You can also set
the Menu Style accordingly (i.e. for HTML content).
If you check the Clear Target dir the target directory (if it exists) will be removed prior to generation.
However, if you have any custom files that were modified directly in the target directory (i.e. from a
previous generation) they will need be lost. It is usually not necessary to clear the target directory.

Page 11
Generate Clicking the Generate button will populate your target directory based on the Source dir content. If
you checked the Launch Visual Studio option the generated solution will be opened using the
default application.
Additionally the Install CRUD option should be used whenever your Data Model has been modified.
This action is performed after the target directory has been populated with the generated solution.

Page 12
The PhoneGap Page
Page 13
Templates The Evoke Generator comes with its own template-driven file generator. Although it is primarily
engineered towards working with Evoke meta data and Visual Studio the resulting output can be
easily customized.
It is worth noting that the Source dir value does not have to represent a Visual Studio
project/solution directory but can be any valid directory with a mixture of template/non-template
files. You could, for example, write template code that represents an SQL query using the Entity and
Property classes as a basis for constructing SQL.
A template file is usually a mixture of textual content and tokens but as well as token substitution is
a rich template language.
The flow-control of the generation process is to recreate the directory/file structure from the Source
dir provided. However, there are some key words than can be used in place of directory/file names
to produce dynamic content. The keyword must in token form (see Tokens).
Example
A directory called {[Page]} will generate a directory for each Evoke Page Series using the Name
property of the Page Series. Likewise a file name of {[Page]}.cs will generate a file using the same
name with a suffix of .cs. However, you can also achieve the same result using
{[Page]}.{[code_suffix]} where the {[code_suffix]} is derived from the Language radio button on the
Project generation page. The {[…]} notation is referred to as a token.
Dynamic directory/file derivation is also possible but due to filename restriction the ~ character
must be used instead of \, @ instead of * and ' instead of ".
Example
{['~CSS~' + TargetPlatform.Name + '[email protected]']}
The above means get every file under EvokeTemplates\CSS\Desktop\BrowserSpecific\*.css
(Assuming the TargetPlatform was Desktop)
Tokens A token represents a value either from an object stemming from content as a combination of
template code and Evoke meta data or a variable of your own choosing (see set). The basic syntax of
a token is:
{[keyword]}
The keyword can be thought of as an instance of a class and therefore can be supplemented with
property names and a few C# modifiers.
e.g. AllProperties[evProperty.DataCharacteristics].Name.ToUpper()
In the above example the current Evoke Property (i.e. from an Entity) is assumed to have a
DataCharacteristics value being a key to an Evoke Property. The AllProperties value refers to a
collection of all Property items (i.e. from all Entities). Finally the Name property is extracted and
converted to upper case.

Page 14
Template Language The Evoke template language supports for following logic/syntax:
rem
messagebox
debug
set (variable)
if/else
switch/case/default
for/continue
read/else
preread
Num()
String()
List()
Add()
AddIf()
Substring()
ToString()
ToInt()
ToLower()
ToUpper()
Trim()
Split()
Join()
Replace()
IndexOf()
Contains()
Length
Count
[] (array reference)
Anything not within a {[…]} is considered raw textual content with the exception of the read and
preread directives (which can contain inner {[…]} tokens). However, within a {[…]} words that are not
surrounded by double-quotes (") are parsed like tokens.
There are three ways to generate content in a file:
1. Raw, non-template language, text.
2. A template token (either from Evoke content or a variable defined from a set directive.
3. A read (or preread) directive.
All the template language directives have the syntax of:
{[directive: …]}
Example {[set: propCount = "Number of properties = " + evEntity.Properties.Count]}
All template language directives have a starting marker “{[“ and an ending marker “]}”. The
Page 15
significance of this is that when a template is compiled (when the Generate button is clicked) line-
breaks do not affect the template language (i.e. an if-else clause can span multiple lines or can be on
a single line) but it can affect the way resulting textual content is inserted into the resulting file (i.e.
the non-template content inside an if/else will retain its formatting if it spans multiple lines).
You can indent template source for readability (e.g. for if/else, switch/case, for-loop) but you should
only use the tab (\t) character as these are stripped during the compilation of the template whereas
spaces are interpreted as content.
rem The rem command is used for adding comments to your template.
{[rem: Initialize some pre-forloop vars below]}
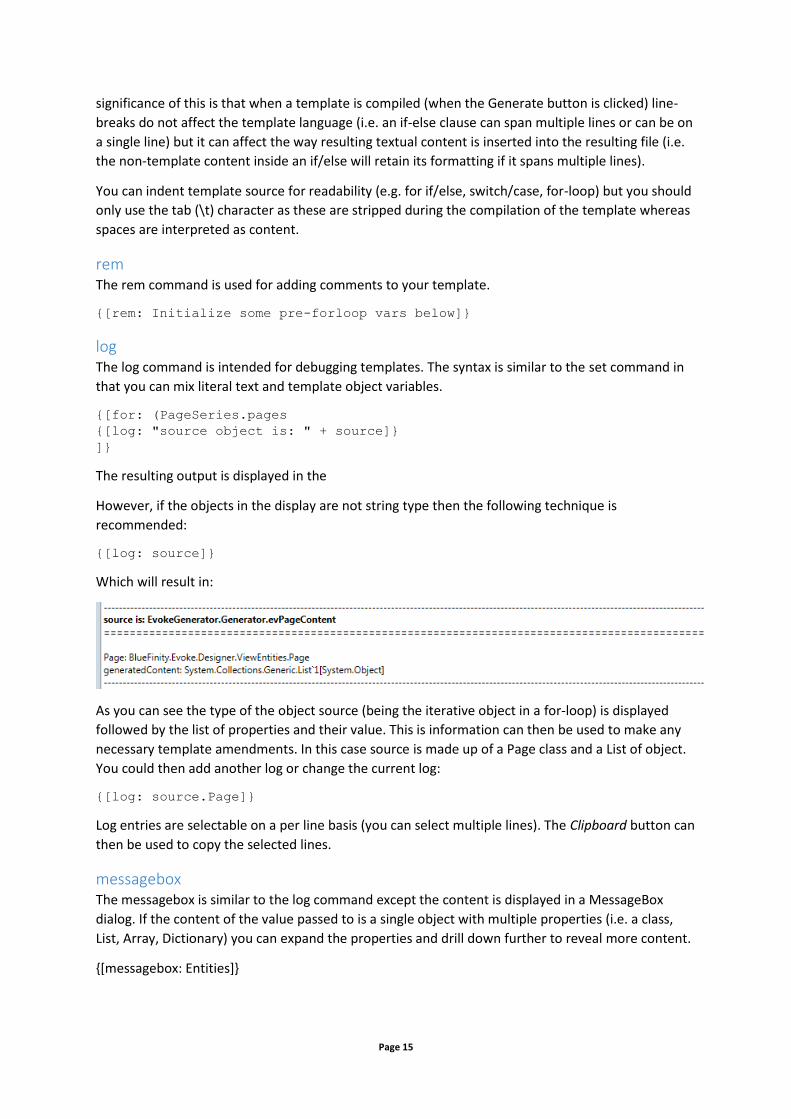
log The log command is intended for debugging templates. The syntax is similar to the set command in
that you can mix literal text and template object variables.
{[for: (PageSeries.pages
{[log: "source object is: " + source]}
]}
The resulting output is displayed in the
However, if the objects in the display are not string type then the following technique is
recommended:
{[log: source]}
Which will result in:
As you can see the type of the object source (being the iterative object in a for-loop) is displayed
followed by the list of properties and their value. This is information can then be used to make any
necessary template amendments. In this case source is made up of a Page class and a List of object.
You could then add another log or change the current log:
{[log: source.Page]}
Log entries are selectable on a per line basis (you can select multiple lines). The Clipboard button can
then be used to copy the selected lines.
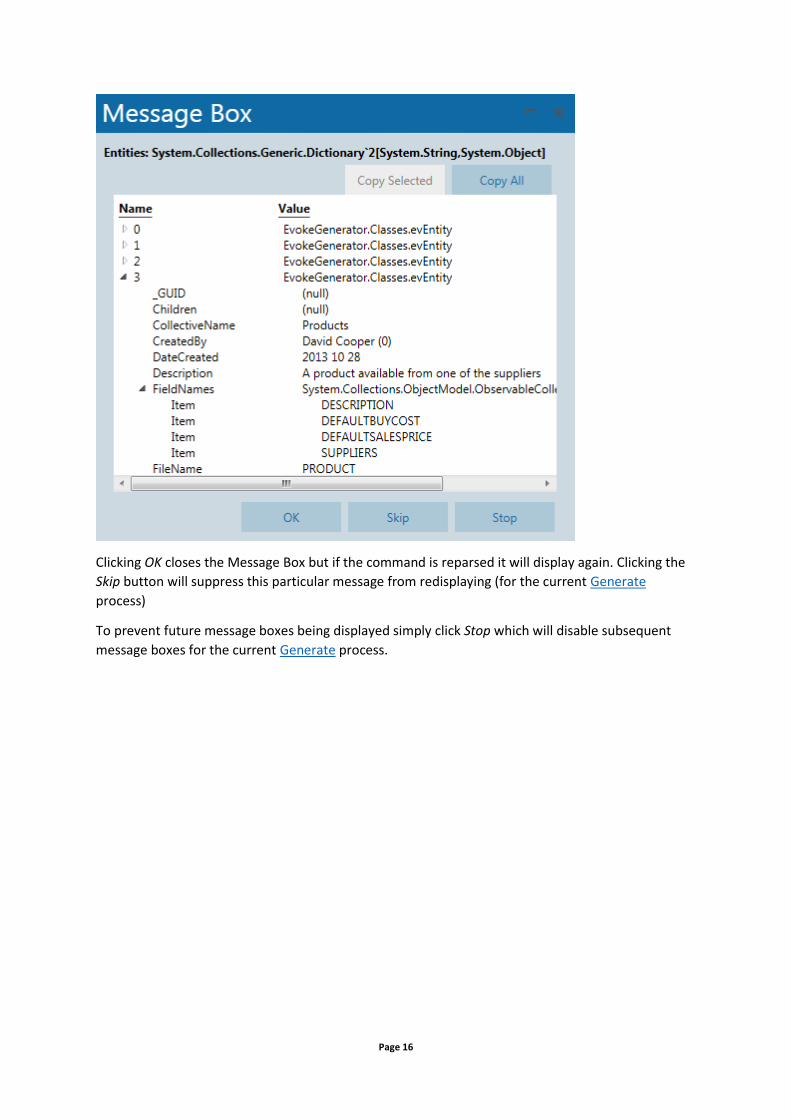
messagebox The messagebox is similar to the log command except the content is displayed in a MessageBox
dialog. If the content of the value passed to is a single object with multiple properties (i.e. a class,
List, Array, Dictionary) you can expand the properties and drill down further to reveal more content.
{[messagebox: Entities]}
Page 16
Clicking OK closes the Message Box but if the command is reparsed it will display again. Clicking the
Skip button will suppress this particular message from redisplaying (for the current Generate
process)
To prevent future message boxes being displayed simply click Stop which will disable subsequent
message boxes for the current Generate process.
Page 17
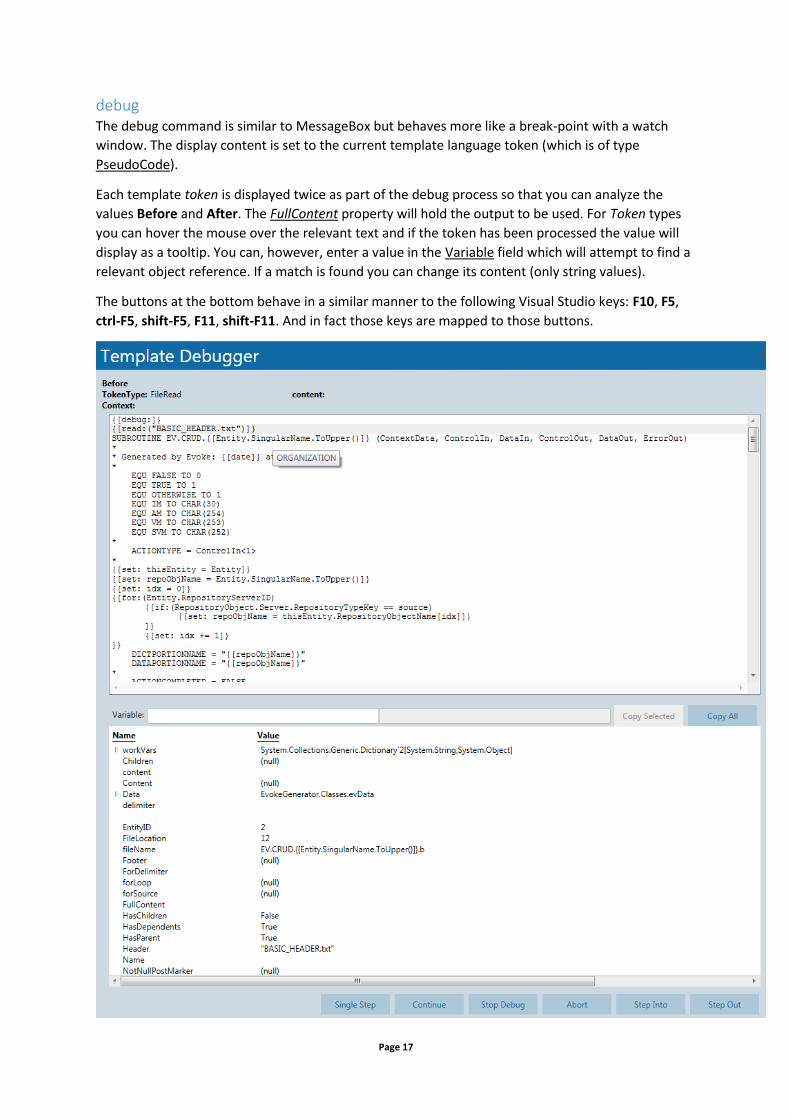
debug The debug command is similar to MessageBox but behaves more like a break-point with a watch
window. The display content is set to the current template language token (which is of type
PseudoCode).
Each template token is displayed twice as part of the debug process so that you can analyze the
values Before and After. The FullContent property will hold the output to be used. For Token types
you can hover the mouse over the relevant text and if the token has been processed the value will
display as a tooltip. You can, however, enter a value in the Variable field which will attempt to find a
relevant object reference. If a match is found you can change its content (only string values).
The buttons at the bottom behave in a similar manner to the following Visual Studio keys: F10, F5,
ctrl-F5, shift-F5, F11, shift-F11. And in fact those keys are mapped to those buttons.

Page 18
set The set command is used for creating/amending tokens which can be later used in template
directives or as content. Tokens are initialize using =
{[set: myvar = null]}
…and can be appended thus:
{[set: myvar += "some more content"]}
You can mix literals and token logic:
{[set: myvar = "source is of type: " + source.ToString()]}
Lists can be dynamically instantiated and populated:
{[set: mylist = List()]}
{[for: (1-Entities.Count)
{[set: mylist.Add(source)
]}
If/else {[if: (Boolean expression)
…
]}{[else:
…
]}
The else: clause is optional but if used must be followed by the same (Boolean expression) as the if:
clause. Note: however, that the else: clause has its own closing ]}.
The (Boolean expression) supports && (Boolean and) and || (Boolean or) as well as (…) parentheses
to group expressions (otherwise the expression follows the precedence of processing && before ||.
Additionally the ! character (not) can be used to invert the boolean result.
Example {[if: (!(evProperty.IsList || evProperty.Name == "Key") &&
evProperty.Type.ToString().ToLower() != "boolean")
{[set: myvar = "abc"]}
]}{[else:
{[set: myvar = "xyz"]}
]}
<div id="myvar" class="{[myvar]}">
...
Note in the above example we could just as easily have non-template code between the if-else
structure which would end up being raw textual content.
switch/case The switch directive is similar to the if directive in its opening/closing structure:
{[switch:(myvar)
...
]}
The switch content should then contain at least one case directive and optionally a default. The case

Page 19
options are all assumed literals.
Example {[switch:(evProperty.Type)
{[case: AlphaNumeric]}
...
{[case: Currency,Decimal]}
...
{[default:]}
...
]}
As you can see, in the second case, to combine multiple values use comma separation (no spacing
required).
for The for directive combines for and foreach and is designed (primarily) to work with Entities and their
content and Page Series and their related content but can operate on any List or array. You can also
use it as a numbered sequence using n-m notation, however both the n and m values can be either
integers or template token variables.
The iteration variable is always known as source and can be referenced like a variable. However, it is
recommended to assign another variable to source for situations where for-loops are nested within
for-loops.
e.g. {[set: myvar = source]}
The for directive supports continue ({[continue: ]}) for by-passing the remaining logic in the for-loop
and also a special delimiter directive for joining results.
Example 1 <div id="Buttons"
{[for: (AllPageSeries)
{[set: page = source]}
<Button id="btn{[page.Name]}">{[page.Name]}</Button>
]}
</div>
Example 2 string[] pages = { {[for: (AllPageSeries){[delimiter:,
]}"{[source.Name]}"]} };
The delimiter directive recognizes ~NewLine as a special keyboard for inserting a carriage-
return/linefeed.
Example 3 {[set: seqlist = List()]}
{[for: (0-TargetPlatforms.Count)
{[set: seqlist.Add(source)]}
]}
{[seqlist.Join(",")]}

Page 20
read The read (and preread) reads in a text file from $(install_dir)\Evoke\Generator\EvokeTemplates.
Note: EvokeTemplates and not EvokeProjectTemplate.
The content of the text file is then inserted into the current template content or assigned to a
variable (depending on the syntax used).
Example 1 {[read: {[page.Name]}_CustomTitle.txt]}[{else:
<span>{[Application_Title]}</span>
]}
Example 2 {[read: (heading = {[page.Name]}_CustomTitle.txt) ]}[{else:
{[set heading = "<span>" + Application_Title + "</span>"
]}
Because the read action can read in a file which contains template language as well as textual
content it is possible to have recursion as long as the read will eventually fail or be bypassed due to
another template directive (e.g. if, switch).
preread The preread directive is similar to the read directive except that all preread directives are processed
at compile time. This enables static content or common template logic to be stored in the
EvokeTemplates directory and used in more than one place. A typical use would be to place inside a
for loop on Entities or Properties of an Entity to initialize variables.
Example {[preread: PropertySettings.txt]}
Num() The Num function returns a true or false if the argument is numeric.
Example {[if: (Num(evProperty.DataCharacteristics))
...
]}
String() The String function is used to generate a repetition of a value.
Example {[if: (reposDataCharacteristics.Trim().Length == 0 ||
!Num(reposDataCharacteristics))
{[set: reposDataCharacteristics = "2"]}
]}
{[set: precision = "1" + String("0", reposDataCharacteristics)]}

Page 21
Token Modifiers The following work similarly to their .NET counterparts
Substring(start[, length])
ToString()
ToInt()
ToLower()
ToUpper()
Trim() (no arguments)
Split(value) (note: string not array of char)
Join(value)
Replace(search_value, replacement_value)
IndexOf(value)
Contains(value)
Add(value)
AddIf(value) – same as Add but will not throw an exception if the target value exists in the
list.
Length
Count (note: no parentheses)
[index]
Examples {[set: mylist = null]}
{[if: (myvar.IndexOf(",") >= 0)
{[set: mylist = myvar.Split(",")]}
]}
{[set: nbr = mylist.Count]}
{[set: len = mylist.Length]}
{[set: UpperCase = mylist.ToString().ToUpper()]}
{[set: LowerCase = mylist.ToString().ToLower()]}
{[set: firstChar = myvar.Substring(0, 1)]}
{[set: remainder = myvar.Substring(1).Replace(",", " ").Trim()]}
Page 22
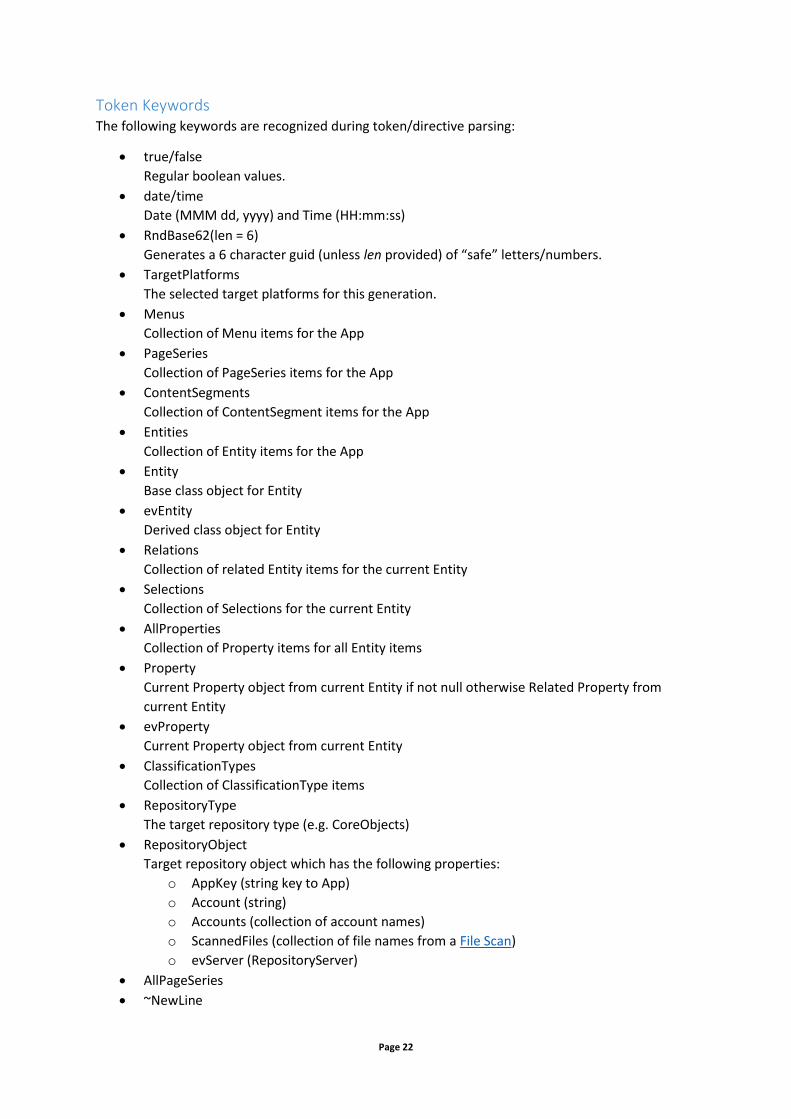
Token Keywords The following keywords are recognized during token/directive parsing:
true/false
Regular boolean values.
date/time
Date (MMM dd, yyyy) and Time (HH:mm:ss)
RndBase62(len = 6)
Generates a 6 character guid (unless len provided) of “safe” letters/numbers.
TargetPlatforms
The selected target platforms for this generation.
Menus
Collection of Menu items for the App
PageSeries
Collection of PageSeries items for the App
ContentSegments
Collection of ContentSegment items for the App
Entities
Collection of Entity items for the App
Entity
Base class object for Entity
evEntity
Derived class object for Entity
Relations
Collection of related Entity items for the current Entity
Selections
Collection of Selections for the current Entity
AllProperties
Collection of Property items for all Entity items
Property
Current Property object from current Entity if not null otherwise Related Property from
current Entity
evProperty
Current Property object from current Entity
ClassificationTypes
Collection of ClassificationType items
RepositoryType
The target repository type (e.g. CoreObjects)
RepositoryObject
Target repository object which has the following properties:
o AppKey (string key to App)
o Account (string)
o Accounts (collection of account names)
o ScannedFiles (collection of file names from a File Scan)
o evServer (RepositoryServer)
AllPageSeries
~NewLine

Page 23
Carriage-return/line-feed
~Tab
Tab character
You can also escape characters within quoted strings:
{[property.Name + ":\r\n\r\n\t= \"" + myarray[property.Name] + "\""]}