
“The PC has been cryingstatic9.cdn.ubi.com/customersupportfaqfiles/... · Return Policy: Please...
31
Ubi Soft Entertainment, Inc., 625 Third Street, Third Floor, San Francisco, CA 94107 © 2003 Ubi Soft Entertainment. All Rights Reserved. Splinter Cell, Ubi Soft, and the Ubi Soft logo are trademarks of Ubi Soft Entertainment in the U.S. and/or other countries. Made in the U.S.A. “The PC has been crying out for a game like this!” – PC Gamer www.splintercell.com
Transcript of “The PC has been cryingstatic9.cdn.ubi.com/customersupportfaqfiles/... · Return Policy: Please...

Ubi Soft Entertainment, Inc., 625 Third Street, Third Floor, San Francisco, CA 94107
© 2003 Ubi Soft Entertainment. All Rights Reserved. Splinter Cell, Ubi Soft, and the Ubi Soft logo are trademarks of Ubi Soft Entertainment in the U.S. and/or other countries.
Made in the U.S.A.
“The PC has been crying out for a game like this!”
– PC Gamer
www.splintercell.com

WARRANTYUbi Soft warrants to the original purchaser of its products that the products will be free from defects in materials and workmanship for a period of ninety (90) days from the date of purchase. Ubi Soft products are sold “as is,” without any expressed or implied warranties of any kind, and Ubi Soft is not liable for any losses or damages of any kind resulting from use of its products. Ubi Soft agrees for a period of ninety (90) days to either replace defective product free of charge provided you return the defective item with dated proof of purchase to the store from which the product was originally purchased or repair or replace the defective product at its option free of charge, when accompanied with a proof of purchase and sent to our offices postage prepaid. This warranty is not applicable to normal wear and tear, and shall be void if the defect in the product is found to be as a result of abuse, unreasonable use, mistreatment, or neglect of the product.Limitations: This warranty is in lieu of all other warranties and no other representations or claims of any nature shall be binding on, or obligate Ubi Soft. Any implied warranties applicable to Ubi Soft products, including warranties of merchantability and fitness for a particular purpose, are limited to the ninety (90) day period described above. In no event will Ubi Soft be liable for any special, incidental, or consequential damages resulting from possession, use, or malfunction of Ubi Soft products. Some states do not allow limitations as to how long an implied warranty lasts and/or exclusions or limitations of incidental or consequential damages. So the above limitations and/or exclusions of liability may not apply to you. This warranty gives you specific rights, and you may also have other rights that vary from state to state.Notice: Ubi Soft reserves the right to make improvements in its products at any time and without notice.Refunds: Ubi Soft cannot provide refunds or otherwise process returns for credit of any kind other than an identical product replacement. Any product refund request must occur at the place of purchase, as the individual retail outlets set their own refund policy. This policy covers identical product replacements only.Product/Documentation Replacements: Please contact a Ubi Soft Technical Support representative directly before sending your product to us. In many cases, a replacement is not the best solution. Our support representatives will help you determine if a replacement is necessary or available. You will need to first acquire an RMA (Return Materials Authorization) number to process your return or replacement. Without an RMA number from a support representative, your replacement request will not be processed.If we determine a return or replacement is necessary:Within the 90-Day Warranty Period: Please return the product (media only) along with a copy of the original sales receipt, showing the date of purchase, a brief description of the difficulty you are experiencing including your name, address (no PO boxes) and phone number to the address below. If the product was damaged through misuse or accident (cracks, scratches), or if you do not have a dated sales receipt, then this 90-day warranty is rendered void and you will need to follow the instructions for returns after the 90-day warranty period.After the 90-Day Warranty Period: Please return the product (media only) along with a check or money order for the amount corresponding to your product (see replacement fees below) made payable to Ubi Soft, a brief description of the difficulty you are experiencing, including your name, address (no PO boxes), RMA number, and phone number to the address below.Replacement Fees: Our most recent replacement fee schedule is available online. Please visit http://support.ubi.com for an updated price list.Warranty Address and Contact InformationPhone: 919-460-9778Hours: 9am–9pm (EST), M–FAddress: Ubi Soft Support/3200 Gateway Centre Blvd./Suite 100/Morrisville, NC 27560Please use a traceable delivery method when sending products to Ubi Soft.To order Ubi Soft products in the United States, please call toll free 877-604-6523.
TECHNICAL SUPPORTBefore contacting Ubi Soft Entertainment’s Technical Support Department, please first read through this manual and the README file (on the game CD). Also browse through our FAQ listings or search our support database at our website, http://support.ubi.com. Here you will find the most recently updated information since the game’s release.
Also please make sure that your computer meets the minimum system requirements, as our support representatives will be unable to assist customers whose computers do not meet these criteria.
Whenever you contact the Technical Support Department, please include the following information or have it available if you are calling:• Complete product title (including version number)• Exact error message reported (if applicable) and a brief description of the problem you’re encountering• Processor speed and manufacturer • Amount of RAM • Operating system• Video card that you are using and amount of RAM it has• Maker and speed of your CD-ROM or DVD-ROM drive• Type of sound card you are using
Contact Us Over the Internet: This is the best way to contact us. Our website is open 24 hours a day, 7 days a week and it contains the most up-to-date Technical Support information available, including patches that can be downloaded free of charge. We update the Support pages on a daily basis, so please check here first for solutions to your problems: http://support.ubi.com/
Contact Us by Email: For fastest response via email, please visit our website at: http://support.ubi.com/
From this site, you will be able to enter the Ubi Soft Entertainment Solution Center where you can browse through our listings of Frequently Asked Questions (FAQ), search our database of known problems and solutions, or, for fastest email response, you can send in a request for Personal Assistance from a Technical Support Representative. It may take up to 72 hours for us to respond to your email depending upon the volume of messages we receive.
Contact Us by Phone: You can also contact us by phone by calling (919) 460-9778. Note that this number is for technical assistance only. No hints or tips are given over the Technical Support line. When calling our Technical Support line, please make sure you are in front of your computer and have all of the necessary information listed above at hand. Be advised that our Technical Support Representatives are available to help you Monday–Friday from 9 am–9 pm (Eastern Standard Time). While we do not charge for technical support, normal long-distance charges apply. To avoid long-distance charges, or to contact a support representative directly after these hours, please feel free to use one of the other support avenues listed above. Email issues usually receive a response within 2 business days.
Contact Us by Standard Mail: If all else fails you can write to us at:
Ubi Soft Technical Support, 3200 Gateway Center Blvd., Suite 100, Morrisville, NC 27560
Return Policy: Please do not send any game returns directly to Ubi Soft Entertainment before contacting technical support. It is our policy that game returns must be dealt with by the retailer or online site where you purchased the product. If you have a damaged or scratched CD, please visit our FAQ listing for your game and get the latest replacement policy and pricing. We will not accept unsolicited returns/exchanges without prior approval and an RMA (Return Materials Authorization) number from a support representative.

Table of ContentsIntroduction . . . . . . . . . . . . . . . . . . . . . . . . . . . . . . . . . . . . . . . . . . . . . . . .3
Overview . . . . . . . . . . . . . . . . . . . . . . . . . . . . . . . . . . . . . . . . . . . . . . . . . . .3Quick Start . . . . . . . . . . . . . . . . . . . . . . . . . . . . . . . . . . . . . . . . . . . . . . . . .3Starting a Campaign . . . . . . . . . . . . . . . . . . . . . . . . . . . . . . . . . . . . . . . . . . .3
Joining a Multiplayer Game . . . . . . . . . . . . . . . . . . . . . . . . . . . . . . . . . . . .4Creating a Multiplayer Game . . . . . . . . . . . . . . . . . . . . . . . . . . . . . . . . . . .4
Minimum Specifications . . . . . . . . . . . . . . . . . . . . . . . . . . . . . . . . . . . . . . . .5Installation . . . . . . . . . . . . . . . . . . . . . . . . . . . . . . . . . . . . . . . . . . . . . . . . .5Uninstalling . . . . . . . . . . . . . . . . . . . . . . . . . . . . . . . . . . . . . . . . . . . . . . . . .6
Pre-Game Screens . . . . . . . . . . . . . . . . . . . . . . . . . . . . . . . . . . . . . . . . . . .7Main Menu . . . . . . . . . . . . . . . . . . . . . . . . . . . . . . . . . . . . . . . . . . . . . . . . .7Campaign . . . . . . . . . . . . . . . . . . . . . . . . . . . . . . . . . . . . . . . . . . . . . . . . .7Custom Mission . . . . . . . . . . . . . . . . . . . . . . . . . . . . . . . . . . . . . . . . . . . . .8Training . . . . . . . . . . . . . . . . . . . . . . . . . . . . . . . . . . . . . . . . . . . . . . . . . . .8Options . . . . . . . . . . . . . . . . . . . . . . . . . . . . . . . . . . . . . . . . . . . . . . . . . . . .9
Game . . . . . . . . . . . . . . . . . . . . . . . . . . . . . . . . . . . . . . . . . . . . . . . . . .9Sound . . . . . . . . . . . . . . . . . . . . . . . . . . . . . . . . . . . . . . . . . . . . . . . . . .9Graphics . . . . . . . . . . . . . . . . . . . . . . . . . . . . . . . . . . . . . . . . . . . . . . .10HUD . . . . . . . . . . . . . . . . . . . . . . . . . . . . . . . . . . . . . . . . . . . . . . . . . .10Multiplayer . . . . . . . . . . . . . . . . . . . . . . . . . . . . . . . . . . . . . . . . . . . . . .11Controls . . . . . . . . . . . . . . . . . . . . . . . . . . . . . . . . . . . . . . . . . . . . . . . .11
Planning Computer . . . . . . . . . . . . . . . . . . . . . . . . . . . . . . . . . . . . . . . . . . .11Navigation Bar . . . . . . . . . . . . . . . . . . . . . . . . . . . . . . . . . . . . . . . . . . .12Briefing Room . . . . . . . . . . . . . . . . . . . . . . . . . . . . . . . . . . . . . . . . . . . .12Gear Room . . . . . . . . . . . . . . . . . . . . . . . . . . . . . . . . . . . . . . . . . . . . . .13Planning Room . . . . . . . . . . . . . . . . . . . . . . . . . . . . . . . . . . . . . . . . . . .16Execute Mission Room . . . . . . . . . . . . . . . . . . . . . . . . . . . . . . . . . . . . . .19
In-Game Interface: HUD . . . . . . . . . . . . . . . . . . . . . . . . . . . . . . . . . . . . . .20Your Operative . . . . . . . . . . . . . . . . . . . . . . . . . . . . . . . . . . . . . . . . . . . . . .20Your Weapon Status . . . . . . . . . . . . . . . . . . . . . . . . . . . . . . . . . . . . . . . . . .20Reticle . . . . . . . . . . . . . . . . . . . . . . . . . . . . . . . . . . . . . . . . . . . . . . . . . . .21Action Icon . . . . . . . . . . . . . . . . . . . . . . . . . . . . . . . . . . . . . . . . . . . . . . . .21Waypoints and Planning . . . . . . . . . . . . . . . . . . . . . . . . . . . . . . . . . . . . . . .21Other Operatives in Your Team . . . . . . . . . . . . . . . . . . . . . . . . . . . . . . . . . . .21Other Teams . . . . . . . . . . . . . . . . . . . . . . . . . . . . . . . . . . . . . . . . . . . . . . .21Map . . . . . . . . . . . . . . . . . . . . . . . . . . . . . . . . . . . . . . . . . . . . . . . . . . . . .21In-Game Menu . . . . . . . . . . . . . . . . . . . . . . . . . . . . . . . . . . . . . . . . . . . . .22
How to Play . . . . . . . . . . . . . . . . . . . . . . . . . . . . . . . . . . . . . . . . . . . . . . .22Who Am I? . . . . . . . . . . . . . . . . . . . . . . . . . . . . . . . . . . . . . . . . . . . . . . . .22
My Role and Responsibilities . . . . . . . . . . . . . . . . . . . . . . . . . . . . . . . . . .22Switching between Teammates and Team Hold . . . . . . . . . . . . . . . . . . . . . .22
What Is My Mission? . . . . . . . . . . . . . . . . . . . . . . . . . . . . . . . . . . . . . . . . . .23What Do I Do? . . . . . . . . . . . . . . . . . . . . . . . . . . . . . . . . . . . . . . . . . . . .23Default Mission Objective . . . . . . . . . . . . . . . . . . . . . . . . . . . . . . . . . . . .23
Who Else Is in the World? . . . . . . . . . . . . . . . . . . . . . . . . . . . . . . . . . . . . . .23Other Rainbow Teams . . . . . . . . . . . . . . . . . . . . . . . . . . . . . . . . . . . . . . .23Terrorists . . . . . . . . . . . . . . . . . . . . . . . . . . . . . . . . . . . . . . . . . . . . . . .24Hostages . . . . . . . . . . . . . . . . . . . . . . . . . . . . . . . . . . . . . . . . . . . . . . . .25
Looking and Moving Around . . . . . . . . . . . . . . . . . . . . . . . . . . . . . . . . . . . . .25Peeking and Changing Stance . . . . . . . . . . . . . . . . . . . . . . . . . . . . . . . . . . .25Night Vision . . . . . . . . . . . . . . . . . . . . . . . . . . . . . . . . . . . . . . . . . . . . . . . .25Interacting with the Environment . . . . . . . . . . . . . . . . . . . . . . . . . . . . . . . . .26
How Do I . . . . . . . . . . . . . . . . . . . . . . . . . . . . . . . . . . . . . . . . . . . . . . .26How to Order My Team . . . . . . . . . . . . . . . . . . . . . . . . . . . . . . . . . . . . . .26Team Quick Order Interface (QOI) . . . . . . . . . . . . . . . . . . . . . . . . . . . . . . .26Issuing a Team Order on Zulu Go Code . . . . . . . . . . . . . . . . . . . . . . . . . . .26Situations and Default Actions . . . . . . . . . . . . . . . . . . . . . . . . . . . . . . . . .27Using Doors/Windows . . . . . . . . . . . . . . . . . . . . . . . . . . . . . . . . . . . . . . .28Using Ladders . . . . . . . . . . . . . . . . . . . . . . . . . . . . . . . . . . . . . . . . . . . .28
1 Table of Contents

IntroductionThe year is 2005. In the minds of millions, the conflicts of the 20thcentury have been forgotten, relegated to history books or dustyarchives. They are subjects for movies, stories told by aging grandfa-thers that seem less and less relevant in the brave new world of glob-al terrorism and vicious international conflict.But not everything that is buried is dead. Old hatreds still linger. Oldmysteries remain unsolved. And old enemies may yet rise again, re-energized and prepared to pick up the tools of modern terror to carryon their ancient battles.Only one bulwark stands between the world and terrors both new andrevisited: RAINBOW, an international task force dedicated to combat-ing terrorism in all its forms. A top-secret organization consisting ofthe best counter-terrorism operatives the United Nations has to offer.Rainbow is the most potent weapon in the world's arsenal. Backed bythe most sophisticated technology available, and trained to the limitsof human capability, they are our best hope in the war against terror.They may also be our last.
OverviewIn Tom Clancy’s Rainbow Six™3: Raven Shield™, you lead an elite, inter-national anti-terrorist unit code named “Rainbow.” You assume the roleof mission commander; before and after each mission, you plan outevery detail, from the operatives and their gear to their exact paths andactions. During missions you lead from the front by controlling any ofthe 8 Rainbow operatives as they engage terrorists and save the world.Raven Shield contains 15 missions linked to form a single cam-paign. During missions the action gets intense, and with “one-shot,one-kill lethality,” the world of Raven Shield is extremely unforgiv-ing. As your skills sharpen, the missions get gradually harder, keep-ing up the pressure.Remember, when Rainbow gets called in, it’s because it’s anextremely important mission and all other options have beenexhausted… Hit ’em hard and hit ’em fast!
Quick StartStarting a Campaign1.Insert the Raven Shield CD into your computer and start the game.2.When the Main Menu appears, click on Campaign.3.At the Campaign screen, click on New Campaign.4.Type in a name for your new campaign.5.Select a difficulty level.
Introduction 3
Switching between Weapons and Equipment . . . . . . . . . . . . . . . . . . . . . . . . .29Engaging Tangos and Rules of Engagement (RoE) . . . . . . . . . . . . . . . . . . . . . .29Shooting . . . . . . . . . . . . . . . . . . . . . . . . . . . . . . . . . . . . . . . . . . . . . . . . . .29
Reticle . . . . . . . . . . . . . . . . . . . . . . . . . . . . . . . . . . . . . . . . . . . . . . . . .29Firing . . . . . . . . . . . . . . . . . . . . . . . . . . . . . . . . . . . . . . . . . . . . . . . . . .30Rate of Fire (RoF) . . . . . . . . . . . . . . . . . . . . . . . . . . . . . . . . . . . . . . . . .30Reloading . . . . . . . . . . . . . . . . . . . . . . . . . . . . . . . . . . . . . . . . . . . . . . .30Zooming . . . . . . . . . . . . . . . . . . . . . . . . . . . . . . . . . . . . . . . . . . . . . . . .30Weapon Attachments . . . . . . . . . . . . . . . . . . . . . . . . . . . . . . . . . . . . . . .31Auto-Aim . . . . . . . . . . . . . . . . . . . . . . . . . . . . . . . . . . . . . . . . . . . . . . .31Bullet Penetration of Doors . . . . . . . . . . . . . . . . . . . . . . . . . . . . . . . . . . .32
Using Other Items . . . . . . . . . . . . . . . . . . . . . . . . . . . . . . . . . . . . . . . . . . .32Passive Items . . . . . . . . . . . . . . . . . . . . . . . . . . . . . . . . . . . . . . . . . . . .32Heartbeat Sensor . . . . . . . . . . . . . . . . . . . . . . . . . . . . . . . . . . . . . . . . . .32Deploying Explosive Charges and Mines . . . . . . . . . . . . . . . . . . . . . . . . . . .32Throwing Grenades . . . . . . . . . . . . . . . . . . . . . . . . . . . . . . . . . . . . . . . . .33
Finishing a Mission: Debriefing Screen . . . . . . . . . . . . . . . . . . . . . . . . . . .34Multiplayer . . . . . . . . . . . . . . . . . . . . . . . . . . . . . . . . . . . . . . . . . . . . . . .34
Differences between Single and Multiplayer Play . . . . . . . . . . . . . . . . . . . . . . .34Multiplayer Screen . . . . . . . . . . . . . . . . . . . . . . . . . . . . . . . . . . . . . . . . . . .35
Main Buttons . . . . . . . . . . . . . . . . . . . . . . . . . . . . . . . . . . . . . . . . . . . . .35Server Lists . . . . . . . . . . . . . . . . . . . . . . . . . . . . . . . . . . . . . . . . . . . . . .35Filter/Information Areas . . . . . . . . . . . . . . . . . . . . . . . . . . . . . . . . . . . . . .36
Create Server Screen . . . . . . . . . . . . . . . . . . . . . . . . . . . . . . . . . . . . . . . . . .37Main Buttons . . . . . . . . . . . . . . . . . . . . . . . . . . . . . . . . . . . . . . . . . . . . .37Options . . . . . . . . . . . . . . . . . . . . . . . . . . . . . . . . . . . . . . . . . . . . . . . . .38Restriction Kit . . . . . . . . . . . . . . . . . . . . . . . . . . . . . . . . . . . . . . . . . . . .39
In-Game Menu . . . . . . . . . . . . . . . . . . . . . . . . . . . . . . . . . . . . . . . . . . . . . .40Teammate Radar . . . . . . . . . . . . . . . . . . . . . . . . . . . . . . . . . . . . . . . . . . . .41Communications and the Console . . . . . . . . . . . . . . . . . . . . . . . . . . . . . . . . .41Using Multiplayer-Only Items . . . . . . . . . . . . . . . . . . . . . . . . . . . . . . . . . . . .41Dying and Activating Death Cameras . . . . . . . . . . . . . . . . . . . . . . . . . . . . . . .42The Console . . . . . . . . . . . . . . . . . . . . . . . . . . . . . . . . . . . . . . . . . . . . . . .42
Basic Commands . . . . . . . . . . . . . . . . . . . . . . . . . . . . . . . . . . . . . . . . . .42Administrator-Only Commands . . . . . . . . . . . . . . . . . . . . . . . . . . . . . . . . .43
Equipment . . . . . . . . . . . . . . . . . . . . . . . . . . . . . . . . . . . . . . . . . . . . . . . .44Primary Weapons . . . . . . . . . . . . . . . . . . . . . . . . . . . . . . . . . . . . . . . . . . . .44
Sub-Machine Guns . . . . . . . . . . . . . . . . . . . . . . . . . . . . . . . . . . . . . . . . .44Assault Rifles . . . . . . . . . . . . . . . . . . . . . . . . . . . . . . . . . . . . . . . . . . . .46Shotguns . . . . . . . . . . . . . . . . . . . . . . . . . . . . . . . . . . . . . . . . . . . . . . .48Sniper Rifles . . . . . . . . . . . . . . . . . . . . . . . . . . . . . . . . . . . . . . . . . . . . .48Light Machine Guns . . . . . . . . . . . . . . . . . . . . . . . . . . . . . . . . . . . . . . . .49
Secondary Weapons . . . . . . . . . . . . . . . . . . . . . . . . . . . . . . . . . . . . . . . . . .50Pistols . . . . . . . . . . . . . . . . . . . . . . . . . . . . . . . . . . . . . . . . . . . . . . . . .50Machine Pistols . . . . . . . . . . . . . . . . . . . . . . . . . . . . . . . . . . . . . . . . . . .51
Credits . . . . . . . . . . . . . . . . . . . . . . . . . . . . . . . . . . . . . . . . . . . . . . . . . .54Warranty . . . . . . . . . . . . . . . . . . . . . . . . . . . . . . . . . . . . . . .inside front coverTechnical Support . . . . . . . . . . . . . . . . . . . . . . . . . . . . . . . .inside back cover
2 Table of Contents

8.If you choose to create an Internet server that is not a dedicatedserver, proceed to Step 9. Otherwise, proceed to Step 14.
9.Click on the World Wide Web: Create New Account OR if youalready have an account, skip to Step 7.
10.Enter the required information and click on the Submit button.11.Click on Yes to install Ubi.com Manager software.12.Exit your Internet browser to return to the game.13.Enter your Login Name and Password and click the check box.14.Once in the game, click Play or join a team (Green or Red).15.If the Multiplayer Menu is not displayed, press the Tab key to dis-
play it.16.Click on the Gear Menu button.17.Select the weapons and equipment you want to use by clicking on
the image to bring up a list of choices to the right. Once you’rehappy with your selections, click on the Close button.
18.Finally, click on the Ready button in the lower right of the screento tell the server you’re ready to play.
The round launches when the Time Remaining reaches zero or allplayers click on Ready… Enjoy!
Minimum SpecificationsIn order to play Raven Shield on your computer, your system mustmeet the following criteria:
• Processor: 800 MHz Pentium III, AMD Athlon, or equivalent.• Memory: 128 MB of RAM.• Operating System: Windows® 98/2000/ME/XP.• DirectX®: DirectX 8.1 or higher (included on CD).• Video Card: 32 MB.• Drive Space: 2.0 GB minimum hard drive space.• CD-ROM: 4X or better.• Sound Card: DirectX 8.1 or higher compatible sound device.• Internet/Network Play: Properly configured TCP/IP connection at
56.6 KBPS or faster.
InstallationTo install Raven Shield, follow these simple steps:1.Start your computer.2.Insert the Raven Shield Installation CD into your CD-ROM drive.
The Autorun Menu should appear.Note: If the Autorun Menu does not automatically appear, dou-ble-click on the My Computer icon located on your desktop, then
Introduction 5
6.Click on Start.7.When you’re finished listening to the briefing, click on the Load
Plan button in the bottom right of the screen.8.Select the Default plan and click on the Load button.9.Click on the Go to Execute Mission Room button near the Load
Plan button.10.Click on Start Mission and enjoy!
Joining a Multiplayer Game1.Insert the Raven Shield CD into your computer and start the game.2.When the Main Menu appears, click on Multiplayer.3.If you choose to connect to the Internet, proceed to Step 4. If you
choose to connect using LAN, proceed to Step 9.4.Click on the World Wide Web: Create New Account OR if you
already have an account, skip to Step 7.5.Enter the required information and click on the Submit button.6.Click on Yes to install Ubi.com Manager software.7.Exit your Internet browser to return to the game.8.Enter your Login Name and Password and click the check box.9.Select a server from the server list and click the Join button.
10.Once in the game, click Play or join a team (Green or Red).11.If the Multiplayer Menu is not displayed, press the Tab key to dis-
play it.12.Click on the Gear Menu button.13.Select the weapons and equipment you want to use by clicking on
the image to bring up a list of choices to the right. Once you’rehappy with your selections, click on the Close button.
14.Finally, click on the Ready button in the lower right of the screento tell the server you’re ready to play.
15.The round launches when the Time Remaining reaches zero or allplayers click on Ready… Have fun!
Creating a Multiplayer Game1.Insert the Raven Shield CD into your computer and start the
game.2.When the Main Menu appears, click on Multiplayer.3.Click on the Create button to go to the Create Server screen.4.Select a Game Mode and then enter a name for your server.5.Select a Map and a Game Type.6.Click on the Add to Map List button in between the Map and
Map List.7.Click on the Launch button to create the server.
4 Introduction

Pre-Game ScreensMain Menu This is the first screen that appearswhen you start Raven Shield and hasthe following options:
• Campaign: Takes you to theCampaign screen, where youResume and Create new single-player campaigns.
• Custom Mission: Takes you to theCustom Mission screen, whereyou play individual missions using various mission objectives.
• Multiplayer: Takes you to the Multiplayer screen, where you Joinand Create multiplayer games (see Multiplayer section).
• Training: Takes you directly into the Training Mission, where youlearn how to play the game.
• Options: Takes you to the Options screen, where you set RavenShield’s customizable options.
• Credits: Displays the game credits.• Quit: Exits Raven Shield.
Campaign This screen allows you to manipu-late campaigns and has a numberof options:Resume Campaign: Allows you toresume a previously saved game.1.Select Resume Campaign.2.Select Campaign in center window.3.Click Start in bottom right. This
takes you to the Planning Computer.New Campaign: Allows you to start a new campaign.1.Select New Campaign.2.Type a Campaign Name in the center window.3.Select a Difficulty mode.
Recruit: Easy (terrorists take more time before shooting).Veteran: Moderate.Elite: Hard (terrorists take less time before shooting).
4.Click Start in bottom right. This takes you to the Planning Computer.Delete Campaign: Allows you to delete a saved campaign.
Pre-Game Screens 7
double-click on the icon that corresponds to your computer’s CD-ROM drive. The Autorun Menu should now appear.
3.Click on the Install button. The installation wizard now walksyou through each step of the setup and installation process forthe game.Once you have created a directory for Raven Shield, the game isinstalled on your hard drive. The game automatically asks you ifyou want to install DirectX 8.1. You can not play Raven Shieldwithout 8.1 or higher on your computer. If you already have a ver-sion of DirectX that is 8.1 or higher, simply check the No button,and it does not install DirectX. If you are not sure, click Yes, andthe DirectX installer performs its own verification.
4.After installing the game, select Red Storm Entertainment: RavenShield: Play Raven Shield from your computer’s Start Menu ordouble-click the Play Raven Shield shortcut on your desktop.Doing either starts the game.
Note: The Raven Shield Play CD must be in your CD-ROM drive tostart the game.
UninstallingTo uninstall Raven Shield, follow these simple steps:1.Start your computer.2.Insert either Raven Shield CD into your CD-ROM drive. The
Autorun Menu should appear.3.When it appears, click on the Uninstall Raven Shield button. The
uninstall wizard automatically asks if you really want to uninstallthe game. If you are sure you want to remove Raven Shield fromyour hard drive, click the Yes button. If you don’t want to unin-stall the game, click No, which cancels the process.
If you uninstall Raven Shield, all previously saved campaigns andgames remain on your hard drive, unless you answer Yes to the“Delete all configuration and saved games files?” question.Note: You can also uninstall Raven Shield by using the Add/RemovePrograms control panel in Windows.
6 Introduction

OptionsThe Options screen lets you customize the game and consists of six dif-ferent pages: Game, Sound, Graphic, HUD, Multiplayer, and Controls.
Game Always Run: When activated, youroperative always runs. Holding theRun key makes him/her walk.Invert Mouse: Inverts the up/downaxis on your mouse.Mouse Sensitivity: Alters the sensitiv-ity of your mouse and the speed atwhich it turns your character.Auto-Aim: None, Low, Medium, High: Allows your crosshairs to auto-matically lock onto tangos when they come into view (see Firing:Auto-Aim section). Note: Auto Aim is not available in multiplayeradversarial games.Prompt for Load a Plan: The option displays the Load a Plan windowwhen you first go to the Gear, Planning, or Execute Room for each mis-sion. It allows you to load any default or saved plan.Restore to Default Button: Restores all the options on this page totheir default state.
SoundAmbient Sounds: Sets the volume ofall sound effects.Voices: Sets the volume of all voices.Music: Sets the volume of all music.Sound Quality: Sets the quality ofthe sound played in the game. Lowerquality sounds may result in highergame performance. 3D audio is onlyavailable with high-quality sounds.Audio Virtualization: Sets the audio output mode for a two-channelmonitoring configuration (two speakers, headphones). NoVirtualization means stereo playback with no additional CPU usage.Low and high HRTF refers to “Head-Related Transfer Functions,”which emulates 3D sound immersion. The lower setting may result inhigher game performance.3D Audio Hardware Acceleration: Enables sound card hardware sup-port. The option must be enabled to activate EAX™.EAX: If your sound card is compatible with Creative Labs EAXProcessing, enabling this option greatly improves your sound experience.
Pre-Game Screens 9
1.Select Delete Campaign.2.Select Campaign in center window.3.Click the Delete button in bottom right.
The following options are available on almost every screen of the game.Main Menu: Takes you to the Main Menu screen.Options: Takes you to the Options screen. After altering the customiz-able game options, you automatically return to your previous screen.
Custom Mission This screen allows you to play indi-vidual missions using a variety ofmission objectives. To start a custommission, use the following steps:1.Select a custom mission mode.
Practice Mission: You can prac-tice the mission exactly as itplays during the campaign.Lone Wolf: You are by yourself with the sole objective of reachingthe extraction zone alive.Terrorist Hunt: Your objective is to neutralize all terrorists onthe map.Hostage Rescue: Your objective is to rescue the hostages byescorting them to the extraction zone.
2.Select Map in center window. (To unlock a map you must com-plete it in Campaign mode first.)
3.Select a difficulty mode.Recruit: Easy.Veteran: Moderate.Elite: Hard.
4.Set the number of terrorists in center right (not available inPractice Mission Mode).
5.Click Start in bottom right. This takes you to the Planning Computer.
Training The Training screen allows you toselect training scenarios and learnhow to play the game. To begin ascenario, simply select it and thenclick on the Start button in the bot-tom right of the screen.
8 Pre-Game Screens

Display First-Person Weapon: Displays the first-person weapon.Display Reticle: Displays the targeting reticle.Display Waypoint Info: Displays the current waypoint graphic andwaypoint actions.Display Action Icon: Displays an icon, which shows you how you caninteract with the environment.Display Teammate Names: Displays the name of a teammate whenyou point at them.Display Multiplayer Radar: Displays the teammate radar in multiplay-er games.Restore to Default Button: Restores all the options on this page totheir default state.
MultiplayerPlayer Name: This is your opera-tive’s name.Gender: This is your operative’s gen-der, which determines your voice inthe game.Connection Speed: This is yourInternet connection type.Arm Patch: This is the arm patchdisplayed on your character. You can make your own arm patches bycreating images using the same format as the .tga files in the arm-patch directory. Custom arm patches are automatically downloadedand displayed by other players on the server.Restore to Default Button: Restores all the options on this page totheir default state.
Controls This screen allows you to remap yourkeyboard and mouse controls to yourown taste. To remap an action, sim-ply click on the currently assignedkey and then press the new control.Restore to Default Button: Restoresall the options on this page to theirdefault state.
Planning ComputerThe Planning Computer allows you to create/or modify your prepara-tions for the current mission, and to give you all the backgroundinformation you need to go in and get the job done. It consists of aNavigation Bar at the bottom and four different screens on top.
Pre-Game Screens 11
Restore to Default Button: Restores all the options on this page totheir default state.
GraphicsSetting any of the options below toMedium or Low may result in highergame performance.Video Resolution: Sets the videoresolution.Texture Detail: Sets the environmen-tal texture detail level.Lightmap Detail: Sets the environ-mental lightmap detail level.Rainbow Detail: Sets the Rainbow character detail level.Hostage Detail: Sets the Hostage character detail level.Terrorist Detail: Sets the Terrorist character detail level.Rainbow Shadow Detail: Sets the Rainbow character shadow detail level.Hostage Shadow Detail: Sets the Hostage character shadow detail level.Terrorist Shadow Detail: Sets the Terrorist character shadow detail level.Terrain Detail: Sets the detail level for grass and things on the ground.Decal Detail: Sets the bullet impact and explosion decal detail level.Animated Geometry: Allows animated geometry, such as trees movingwith the wind.Gore Level: Sets the blood and gore level in the game.Hide Dead Bodies: Forces dead bodies to disappear from the map.Restore to Default Button: Restores all the options on this page totheir default state.
HUD The in-game user interface or HUDcontains a great deal of informa-tion. You can customize what infor-mation it displays by using the fol-lowing options.Display Character Info: Displays youroperative’s health, stance, name,and current rules of engagement.Display Current Team Info: Displays your computer-controlled team-mates health and current action.Display Other Team Info: Displays information about the health andcurrent actions of other computer-controlled teams.Display Weapon Info: Displays weapon icon, name, attachment name,rate of fire, rounds in weapon, and remaining magazines.
10 Pre-Game Screens

• Mission Orders: Mission Orders displays detailed informationabout your mission, including things to be aware of, any specialnotes on terrorists (also known as Tangos), and hostages.
Gear RoomIn the Gear Room, you select andequip your teams. There are threedifferent areas within the GearRoom, each with their own purpose:Operative Area, Gear Area, andInformation Area.
Operative AreaThe Operative Area consists of a listof all of the currently active Rainbow operatives at the top and yourthree teams below.
• Operatives Roster: The Operative Roster containsall the Rainbow operatives in the game sorted bytheir specialties: Assault, Recon, Sniper,Demolitions, and Electronics.- Assault: Specialize in combat using all weapons
other than sniper rifles.- Recon: Specialize in stealthy movement and remain-
ing undetected.- Sniper: Specialize in combat using sniper rifles.- Demolitions: Specialize in placing and deactivating explosives.- Electronics: Specialize in placing and manipulating elec-
tronic devices.When you click on an operative, you select him/her and get detailedinformation in the Information Area on the right of the screen.
• Your Teams: To add an operative to a team, select the operativeand then click on the + button to the left of one of the teamnames. If no + button appears, it is either because that team isfull (maximum of 4 operatives per team) or you’ve alreadyassigned the maximum number of operatives to your teams (maxi-mum of 8 operatives per mission). By selecting an operative in a team, you can perform three dif-ferent actions:- Move them to another team by clicking the + next to the name
of that team.- Promote/Demote them within the team by clicking the arrow up
and arrow down buttons to the right of their team name.- Remove them from the team by clicking the – button to the left
of their team name.
Pre-Game Screens 13
Navigation Bar The navigation bar allows you to change the current screen in thePlanning Computer. It also allows you to do other things like savingand loading mission plans, accessing the Options screen, and exitingthe Mission Planning Computer to the Main Menu screen.
• Main Menu: Exits the Planning Computer and takes you to theMain Menu screen.
• Options: Takes you to the Options screen and then returns you tothe Planning Computer when you’re done.
• Briefing Room: Changes the information in the top of thePlanning Computer to the Briefing Room.
• Gear Room: Changes the information in the top of the PlanningComputer to the Gear Room.
• Planning Room: Changes the information in the top of thePlanning Computer to the Planning Room.
• Execute Mission Room: Changes the information in the top of thePlanning Computer to the Execute Mission Room, where you canlaunch your mission.
• Save Plan: Opens a window that allows you to save all the infor-mation in the Planning Computer, your planning, under a nameyou specify.
• Load Plan: Opens a window that allows you to load a previouslysaved mission plan. Note: When you load a plan you override all information currentlyin the Planning Computer.
• Quick Play: Loads the Action planning, which contains 4 opera-tives and 1 waypoint, and begins the mission immediately.
Briefing Room
The Briefing Room tells you about yourupcoming mission and its objectives.
• Control: When the screen firstappears, Control tells you aboutthe overall situation and yourmission orders.
• John Clark: John Clark tells youmore about the tactical situation,how this mission connects withprevious missions, and who you’re up against.
• Kevin Sweeney: Kevin Sweeney tells you about why you’re goingin on this mission and what’s behind the terrorists’ actions.
• News Wire: The News Wire tells you how the public was informedabout your last mission and is in the form of a newspaper articleor press release.
12 Pre-Game Screens

- Assign to Team: This small button in the upper right assigns theuniform/armor to all members of this team.
Information Area
This area displays both information and lists of items.When you select an operative, it displays their history,skills, health status, and campaign statistics.Operative skills are as follows:
• Assault: Affects how fast your reticle adjusts frommaximum inaccuracy to maximum accuracy with allweapons other than sniper rifles.
• Demolitions: Affects how fast you can plant and dis-arm explosives.
• Electronics: Affects how fast you can plant and disable elec-tronic devices.
• Sniper: Affects how fast your reticle adjusts from maximum inac-curacy to maximum accuracy with sniper rifles.
• Stealth: Affects how much noise you create when moving.• Self Control: Affects how willing AI-controlled characters are to
shoot when there is a good chance of missing the target. Thehigher the value, the longer they wait, and the more accurate theybecome before pulling the trigger.
• Leadership: Affects the length of time between your issuingorders and your teammates’ responding to your orders.
• Observation: Affects how observant computer-controlled charac-ters are and how likely they are to see and hear other charactersin the game.
As you play through the campaign, your operatives get better andtheir skills increase. Even operatives you don’t take on a mission trainand get slightly better with time. The number next to each skill is theoperative’s current skill level, while the number in parentheses is thetotal amount this skill has increased throughout the campaign.When you select gear, this area displays a list of all the gear availablein that category and information about currently selected pieces ofgear. There are two tabs in the lower window for weapons. The firstshows a text description of the weapon, while the second shows sta-tistics for the weapon. The lower the rating, the worse a weapon is ina given category.
• Range: Maximum range of the weapon.• Damage: Amount of damage the weapon inflicts at point-blank range.• Accuracy: Base accuracy of the weapon.• Stability: How stable the weapon is when firing (i.e., the more
stable it is, the less it jumps when you shoot).
Pre-Game Screens 15
Gear AreaThe Gear Area allows you to change the gear of an oper-ative to suit their skills and your tastes. It consists of anumber of images that represent the operative’s gear inthe middle of the screen. By clicking on the images, alist of all the available gear appears in the InformationArea to the left.
• Primary Weapon- Weapon: This is the operative’s main weapon (see
Primary Weapons section).- Ammo: Ammunition type for the weapon. FMJ is the standard
ammunition. JHP does more damage to unarmored targets, butless to targets wearing body armor. 00 Buck shoots 9 bullets atonce from a shotgun, while Slug shoots a single large projectile.
- Attachment: Attachment for the weapon, which could includeSound Suppressor (Silencer), High Capacity Magazine, Mini-Scope, and Thermal Scope Attachment (see WeaponAttachments section).
- Assign to Team: Located along the right side of each image, thisbutton assigns the weapon, ammo, and attachment to all mem-bers of this team.
• Secondary Weapon- Weapon: This is the operative’s secondary weapon (see
Secondary Weapons section).- Ammo: Ammunition type for the weapon.- Attachment: Attachment for the weapon.- Assign to Team: Located along the right side of each image, this
button assigns the weapon, ammo, and attachment to all mem-bers of this team.
• Item 1 and 2- Item: These could be anything from a heartbeat sensor to frag
grenades (see Using Other Items section).- Assign to Team: Located along the right side of each image, this
button assigns the item to all members of this team.• Assign Gear to All Teams
Located along the bottom of the gear area, this button assigns allof the equipment displayed above to all operatives on all teams.
• Uniform/Armor- Uniform/Armor: This is the operatives’ camouflage and armor
level. The heavier the armor, the more damage the operative cansustain, but the slower they perform actions like picking locks.
14 Pre-Game Screens

• Path Buttons - Go to First Waypoint (Home): Centers map on and selects the
first waypoint for the selected team.- Go to Previous Waypoint (Page Down): Centers map on and
selects the previous waypoint for the selected team.- Play/Pause: Moves map view through waypoint list for selected
team at the movement mode of the waypoint path.- Go to Next Waypoint (Page Up): Centers map on and selects the
next waypoint for the selected team.- Go to Last Waypoint (End): Centers map on and selects the last
waypoint for the selected team.- Lock/Unlock Camera on Action: If you don’t want the camera to
automatically move when you use Path buttons, use this controlto lock and unlock the camera to the currently selected waypoint.
Creating/Modifying Waypoint PlansWhen you create a waypoint path fora team, the first waypoint must be inan insertion zone. These appear asdark red boxes in the map. To drop awaypoint, simply click on the map.To place another waypoint, moveyour mouse cursor and click again.
Path Window Now that you have two waypoints,you have a waypoint path.Computer-controlled teams followtheir waypoint paths during mis-sions. These paths also serve as aguide for you to follow during a mis-sion to make sure you don’t get lostand wander around too much (seeIn-Game Interface: HUD: Waypointsand Planning section).
In the center of each waypoint path is a small icon that tells you theRules of Engagement or RoE (see Rules of Engagement section) forthe path between the two points. All AI-controlled operatives followRoE to engage targets.
• Assault (gun icon): Fire at will.• Infiltrate (silenced pistol icon): Fire only with silenced weapons.
When fired upon, fire back with all weapons.• Recon (binocular icon): Fire only if fired upon.
Pre-Game Screens 17
• Recovery: How fast the reticle recovers toward the center of the screen.
Planning RoomThe Planning Room is where youactually put down waypoints andcreate a plan. When you don’tdirectly control a team, they followtheir waypoints and mission plan.The Planning Room consists of theMap Window and the Map Toolbar.
Map WindowThe Map Window displays a large image of your mission area. Youcan translate or scroll the map by moving your mouse cursor off theright, left, top, and bottom of the Planning Room. You can also usethe Scroll Map Up (W), Scroll Map Down (S), Scroll Map Left (A),and Scroll Map Right (D) keys on the keyboard.
Map ToolbarThe map toolbar contains a number of options that let you manipu-late the map, which are grouped into four areas: Edit/Display Teambuttons, Delete buttons, Map buttons, and Path buttons. There arealso two keyboard-only controls that allow you to Change Map AngleTowards Overhead (T) and Map Angle Towards Ground Level (G).
• Current/Display Team Buttons - Edit Team: Red (1), Green (2), Gold (3)
Selects the current team. Only one team can be selected at a time.- Display Team Waypoints: Red (4), Green (5), Gold (6)
Toggles the display of each team’s waypoints on the map.• Delete Buttons
- Delete Selected Waypoint.- Delete All Waypoints for Selected Team.- Delete All Waypoints for All Teams.
• Map Buttons - Rotate Map Counterclockwise (Q).- Rotate Map Clockwise (E).- Zoom In (R).- Zoom Out (F).- Go Up One Level (C): Changes the map to show the floor above
the current floor.- Go Down One Level (X): Changes the map to show the floor
below the current floor.
16 Pre-Game Screens

• Snipe: This option is only available if this is a Wait for Go Codewaypoint. It allows you to specify the direction you want a com-puter-controlled team to snipe, while waiting.
• Breach: This option is only available near a door and tells a com-puter-controlled team to destroy the door(s) and make rapid entry.
You can also right click to place a waypoint onto the map. If you dothis, the Waypoint Window automatically appears.
3D ViewTo the lower left of the screen is a 3D button that pops up a 3D win-dow looking into the game world from the selected waypoint. You canlook around in this view by moving your cursor into the window, click-ing and holding, and then moving your mouse around.
Map LegendThe ? button in the lower right of the screen brings up the map leg-end, which defines all the icons and images in the map.
Execute Mission Room The Execute Mission Room is the lastroom you must enter in order to starta mission. You can skip any otherroom, but this one is mandatory. Ifyou don’t have a team and/or waypointplan already, a window appears andprompts you to load a saved missionplan. The screen displays the missionobjectives, mission location, teamcompositions, waypoints, and go codes assigned to each team. You canselect which team you want to lead by clicking on the team.At the bottom of the screen are three buttons:
• Go Back to Planning: This button exits the screen and takes youto your previous Planning Computer screen.
• Play Mission in Observer Mode: This button begins the missionwith all teams controlled by the computer, allowing you to watchthe action without participating.
• Play Mission: This begins the mission with you leading whicheverteam you chose.
Pre-Game Screens 19
The path itself tells you the movement mode:• Blitz (solid line): Run.• Normal (dashed line): Move at normal speed.• Recon (dotted line): Use a crouched posture and move at nor-
mal speed.Right clicking on the RoE icon on a waypoint path makes the PathWindow appear. It lets you change the RoE and movement mode forthat piece of the path. All waypoint paths added immediately afterthis piece of the path, automatically use the same RoE and move-ment mode.
Waypoint Window Right-clicking on a waypoint iconmakes the Waypoint Window appear.This menu allows you to change thetype and action of this waypoint. Waypoint types are as follows:
• Normal: This is the standardwaypoint type, and simply marksa point on the path.
• Objective: Assigns a number between 1 and 10 to this waypoint,forcing a computer-controlled team to send you a voice messagewhen they reach this point.
• Alpha: Assigns a Wait for Alpha Go Code action.• Bravo: Assigns a Wait for Bravo Go Code action.• Charlie: Assigns a Wait for Charlie Go Code action.• Delete: Delete this waypoint.
Waypoint actions are as follows:• None: This is the standard waypoint action; nothing special happens.• Frag: This action pops up a circle on the map where you can
specify exactly where you want a computer-controlled team tothrow a frag grenade.
• Flash: This action pops up a circle on the map where you canspecify exactly where you want a computer-controlled team tothrow a flashbang grenade.
• Gas: This action pops up a circle on the map where you can spec-ify exactly where you want a computer-controlled team to throw atear gas grenade.
• Smoke: This action pops up a circle on the map where you canspecify exactly where you want a computer-controlled team tothrow a smoke grenade.
18 Pre-Game Screens

ReticleIn the center of the screen is your reticle, which consists of 2 pieces:the center dot and the 4 moving crosshairs. The reticle represents thecurrent accuracy of your weapon (see Shooting: Reticle section).Bullets you fire hit somewhere within the crosshairs. The longer youwait before taking a shot, the closer the crosshairs get and the moreaccurate your shot will be.
Action IconBelow the reticle at the bottom center of the screen is the Actionicon. When you point the center reticle dot at something in the envi-ronment that you can interact with, this icon appears. The icon sym-bolizes what you and your team can do at this location (seeInteracting with the Environment section).
Waypoints and PlanningYour current waypoint appears in your screen as a floating circle withits range in meters. If your waypoint is not in view, an arrow appearsalong the edge of the screen indicating the direction you need to turnto find it. If you planned a special action for a waypoint, such as Waitfor Alpha Go Code or Throw a Frag Grenade, it appears in the centerof the screen when you reach the waypoint.Below your health and name are the current Rules of Engagement(RoE). RoE determine how your AI teammates engage the enemy andchange automatically based on your planning as teams reach way-points (see Engaging Tangos and Rules of Engagement section).
Other Operatives in Your TeamIn the upper right of the screen is your team’s status. Each teammember has a health icon that functions identically to your own.Below is your team’s current action, such as Following and Engaging.
Other TeamsIn the lower right of the screen is information about other teams thatyou’re not currently controlling. This information includes teamnames, health icons, and their current actions. Glance at this infor-mation occasionally to make sure none of your teams are waiting foryou to issue a go code before they continue moving.
MapBy pressing the Toggle Map key (G), a full screen map appears inyour screen and rotates to match the direction your character’s fac-ing. This map depicts your current position, all of your unachievedwaypoints, and any tangos that you’ve spotted. To zoom the map in,press the Zoom In Map key ([). To zoom the map out, press the ZoomOut Map key (]).
In-Game Interface: HUD 21
In-Game Interface: HUD
The Heads Up Display or HUD provides you with the information youneed during a mission. This includes data such as your health statusand the amount of ammunition remaining for your weapons. Becauseyou can filter things out of your HUD (see Options: HUD sectionabove), you can press and hold the Show Complete HUD key (F1) tosee everything in your HUD at one time.
Your OperativeIn the upper left of the screen are your operative’s stance (standing,crouching, or prone), health, and name. If the health icon is full,you’re healthy. If it’s half-full, you’re wounded and can no longer run.If it’s empty, it’s time to switch to another operative.
Your Weapon StatusThe status of your weapon appears in the lower left of the screen. Inthe top of the box is the icon of your current weapon, along with itsname and attachment. Below this, starting from the left, are yourRate of Fire (see Shooting: Rate of Fire section), rounds in theweapon, and magazines remaining. As you shoot, the number ofrounds in the weapon decreases. As you reload and discard emptymagazines, the number of magazines remaining decreases.
20 In-Game Interface: HUD

ment, there are times you may want to control them directly to bestaccomplish a particular task. You can switch between your teammatesby using the Previous Team Member (Home) and Next Team Member(End) keys or by pressing and holding the Operative Menu key (7).You can also tell your team to hold position by using the Toggle TeamHold key (R). This allows you to leave your team behind while you per-form some especially risky or sneaky maneuver. To have them reformaround you again, simply press the Toggle Team Hold key again.
What Is My Mission?What Do I Do?Your mission is to protect the innocent and stop the guilty. Rainbowonly gets called after all other options have been exhausted on situa-tions of international importance. That means when you go in, hithard and fast, but be careful what you shoot. Shooting hostagesand/or surrendered terrorists is not acceptable. In fact, shootinghostages causes you to fail a mission automatically.
Default Mission ObjectiveAll missions have a default objective, whether it is stated or not. Thisobjective is to neutralize all terrorists. If you accomplish this objec-tive, you automatically complete all remaining objectives. The onlyexception to this is on Recon missions, where you must remain unde-tected. Should you shoot a terrorist in this type of mission, you auto-matically fail the mission.
Who Else Is in the World?You and your team aren’t the only ones in the world. There are 3 dif-ferent types of people you will encounter: other Rainbow Teams,Terrorists, and Hostages.
Other Rainbow TeamsSwitching between TeamsWhen you plan a mission, you have the option to field up to 3 teams.These can contain up to 8 operatives total. You can switch betweenteams by using the Previous Team (Page Up) and Next Team (PageDown) keys. When you’re not controlling a team directly, the teammembers follow their planned waypoint and actions. If they don’thave any waypoints, they simply hold their position waiting for you totake control of them.
Go CodesOccasionally, teams you don’t control directly require orders from you.These situations include teams waiting for Go Codes and SniperControls. As mentioned in the Planning section above, Go Codes area great way to coordinate activities between teams. When teams
How to Play 23
In-Game MenuYou can pause the game and bringup the In-Game Menu by pressingthe In-Game Menu key (Esc). Thismenu displays statistics on all youroperatives including health status,kills, hit percentage, rounds fired,and rounds that hit target. It alsodisplays your mission objectives andtheir status.At the bottom of the menu are buttons that allow you to do the following:
• Quit Raven Shield: Exits the game.• Quit to the Main Menu: Returns you to the Main Menu screen.• Go to the Options Menu: Allows you to change the current options
and then return to the game.• Abort Mission and Retry Action: Restarts the mission from the
beginning of the action phase.• Abort Mission and Retry Planning: Restarts the current mission
from the beginning of the planning phase.
How to PlayWho Am I?My Role and ResponsibilitiesYou are an elite Rainbow counter-terrorism operative, trained to thelimits of human capabilities. In Raven Shield you play two uniqueroles: mission leader and individual team leader. As mission leader,you are responsible for selecting your teams, equipping them, andpreparing a plan of attack. Once you begin a mission, you are respon-sible for issuing Go Codes and Freeing your snipers to fire when theyhave targets (see Controlling Other Rainbow Teams section).You also assume the role of one of the individual team leaders withup to 3 computer-controlled teammates following you. You lead fromthe front and are usually the first to encounter the enemy. It’s up toyou to decide how best to engage them, minimize your own casual-ties, and complete your mission.
Switching between Teammates and Team HoldBehind you are up to 3 computer-controlled teammates. Each hasown responsibilities and sweeps pre-designated areas for targets.When you approach a door, your team automatically deploys aroundyou to best cover your entry into the room.Since each member of a team has his own capabilities and equip-
22 How to Play

Hostages Hostages are the innocent peopleterrorists usually threaten to hurt.Hostages are panicky, unpredictableelements in an already wildly out-of-control situation. When they seeyou, they tend to react in veryunpredictable ways. Some run toyou or freeze in place, while othershit the ground and beg not to behurt. Hostages are physically and emotionally overwhelmed and oth-erwise not prepared for the situation they’re in. The only way tointeract with hostages is to rescue them (see Interacting with theEnvironment section).
Looking and Moving AroundTo look around the world, move your mouse. This controls where yourcharacter looks. To move, use the Move Forward (W), Move Backward(S), Sidestep Left (A), and Sidestep Right (D) keys. You can movefaster by pressing and holding the Run key (Right Mouse Button) atthe same time as the Move and/or Sidestep keys. Using the Run key,however, greatly increases the amount of noise you make and alsomakes shooting accurately much more difficult.
Peeking and Changing StancePeeking is extremely useful for looking around objects without com-pletely exposing yourself to enemy fire. You can peek using the PeekLeft (Q) and Peek Right (E) keys. You can also fluidly peek by press-ing and holding the Fluid Posture (Left Control) key and moving yourmouse. This allows you to peek as little or as much as needed.When you’re trying to avoid being shot or detected, it also helps tominimize your stance. The three stances you can assume are stand-ing, crouching, and prone. To lower your stance, press the StanceDown key (X). To raise your stance, press the Stance Up key (C). Youcan also fluidly adjust your stance between standing and crouchingby holding the Fluid Posture key and moving your mouse.While holding the Fluid Posture key, your mouse changes your pos-ture to peeking only, and cannot be used to look around or aim.When you release the key, your posture and peeking status remain intheir current positions, and the mouse once again allows you to lookaround. When you want to stop peeking and to snap your stance tostanding or crouching, simply press the Fluid Posture key twice.
Night Vision Rainbow is an elite unit and has access to all the latest technology.To help Rainbow operate at night and in darkened conditions, team
How to Play 25
reach waypoints with attached Go Codes, they wait until you issue theappropriate Go Code. To issue Go Codes, simply press the appropriatekey: Alpha Go Code (J), Bravo Go Code (K), Charlie Go Code (L), andZulu Go Code (,). To know whether a team is currently waiting for aGo Code, see the In-Game Interface: Other Teams section.
Sniper ControlsWhen a team reaches a Snipe until Go Code waypoint (see Planning sec-tion above), they stop and inform you if they have targets or not. If theyhave no targets, you receive a message saying, “Green team, sights arecold.” If they have targets, you receive a message saying, “Green team,sights are hot.” If you want the team to fire on the target(s), you canfree them by using the Toggle Sniper Control key (T). From this point, onthey’ll shoot any terrorist they see. If you want them to hold their fire,simply press the Toggle Sniper Control key again.
All Teams Hold You can also tell all teams, including your present team, to hold theirposition by pressing the Toggle All Teams Hold key (H). To have allteams resume the mission and follow their preplanned waypoints,simply press the Toggle All Teams Hold key again.
Call for Status ReportYou can ask your teams for a status report by pressing the Call forStatus Report key (8). Your computer-controlled team leaders respondwith what they are currently doing and the number of team membersout of action.
Terrorists Terrorists, also known as “Tangos,”are the enemy. These guys must bestopped at all costs. They have theirown objectives, which usually involvehurting innocent people for politicalor ideological reasons and/ordestruction or theft of property thatdoesn’t belong to them. Basically,there are only two ways to deal withTangos: stop them by force if they’re armed (shoot them) or takethem into custody if they aren’t armed or have surrendered (seeInteracting with the Environment section).
24 How to Play

on Zulu, access the QOI normally, but instead of left-clicking on theorder, right-click on it. Now the team will wait for you to issue theZulu Go Code before executing the quick order.If you want to coordinate this order with another team, switch toanother team and issue another quick order on Zulu. Then switch to athird team, press the Zulu Go Code key (,), and watch the fun.
Situations and Default ActionsDoors (Open/Close)
• Open (Default): You or your team move to the door, assume room-entry formation, and open the door.
• Open and Grenade: Same as Open, but the team throws in agrenade once the door is open.
• Open and Clear: Same as Open, but the team rushes through thedoor to engage all tangos.
• Open, Grenade, and Clear: Same as Open and Grenade, but theteam rushes through the door to engage all tangos.
Locked DoorsWhen you order your team to interact with a locked door, they treat itexactly like an unlocked door. This means that you can issue thesame orders as in Doors, and the team automatically unlocks the doorbefore proceeding with their orders.When you unlock a door, it does not open automatically. It simplychanges from locked to unlocked. To perform this action, you mustpress and hold the Action key until it is complete.
• Unlock (Default): You unlock it.Windows/Shutters (Open/Close)
• Open (Default): You or your team move to the window and open it.• Open and Grenade: Same as Open, but the team throws a
grenade through once the window is open.
Ladders (Climb Up/Down)• Climb (Default): You or your team move to the ladder, assume
ladder-covering formation, and climb the ladder.
Ground Not Near You• Move To: Your team moves to the designated location.• Move To and Grenade: Same as Move To, but the team throws in
a grenade once they are within range of the location.
Ground Near You• Reform on Me (Default): Your team returns to you and follows.
How to Play 27
members use night vision goggles. To turn your night vision on andoff, press the Toggle Night Vision key (5).
Interacting with the EnvironmentHow Do IInteracting with your environment is extremely important in RavenShield. It allows you to do everything from opening doors to securingsurrendered terrorists. To interact with your environment, move nearto and look at an area/object you can interact with. When a bright,high-intensity Action icon (see In-Game Interface: Action Icon above)appears in the bottom center of the screen, press the Action key(Space Bar) to perform the action the icon represents.
How to Order My TeamOrdering your team to interact with the environment is just as simpleas doing it yourself. Look at an object or area where you want them todo something from a distance. When a dull, low-intensity Action iconappears in the bottom center of the screen, press the Action key toorder your team to perform the default action (see Situations andDefault Actions section).
Team Quick Order Interface (QOI)The default action is not the onlyaction you can order your team toperform. Instead of pressing andreleasing the Action key, press andhold it. The team Quick OrderInterface (QOI) appears in the centerof your screen and contains all theorders you can issue to your team atthat location. To issue an order,move your mouse until you highlightthe desired order and left-click on it.Orders that utilize grenades require one additional step to issuethem. After clicking on an order, the menu changes to all thegrenades your team currently has on them. Click on a grenade to fin-ish issuing the order.You’ll know you’ve issued an order when the QOI disappears whileyou’re still holding the Action key, and you hear your character vocal-ly issue the order. To exit the QOI without issuing an order, releasethe Action key before you click on an order.
Issuing a Team Order on Zulu Go CodeBy using the QOI, you can even coordinate activities between multi-ple teams. To do this, you need to issue quick orders that wait for theZulu Go Code before the teams execute them. To issue a quick order
26 How to Play

also go up and down ladders quickly by holding the Run key whilesimultaneously using the Move keys. But remember, climbing fastermakes more noise and is more likely to cause enemies to notice you.
Switching between Weapons and Equipment Each Rainbow has 4 pieces of equipment they can utilize: PrimaryWeapon, Secondary Weapon, Item 1, and Item 2. Computer-con-trolled Rainbow team members automatically switch between theiravailable gear as needed. You can switch your current operative’s gearby using the Primary Weapon (1), Secondary Weapon (2), Item 1 (3),and Item 2 (4) keys.If you’re not sure what gear your current operative has, press andhold the Inventory Menu key (6). This brings up a menu of your oper-ative’s gear in the middle of your screen, similar to the QOI (seeTeam Quick Order Interface above). Use the mouse to highlight thedesired piece of equipment and left-click on it to equip it.
Engaging Tangos and Rules of Engagement (RoE)As the player, it’s completely up to you when you engage tangos andwhen you don’t. Remember that on Recon missions engaging tangosis an automatic mission failure.Your team, however, engages tangos based on the current Rules ofEngagement (RoE):
• Assault: Engage all tangos.• Infiltrate: Engage all tangos with silenced weapons only; if fired
upon, engage all tangos regardless of silenced weapons.• Recon: Only engage tangos if fired upon.
To change the RoE, press the Change Rules of Engagement key (F).As you press the key, the RoE indicator in the upper left of thescreen cycles among the three options.
ShootingReticle Now that you know how to equip your weapons, you need to know howto use them. The best place to start is with the reticle. The center ofyour reticle represents the center of your screen and is where your bul-lets hit when you’re 100% accurate. This, however, rarely happens, asthere are a lot of things that influence your accuracy with a weapon.The other pieces of the reticle are 4 lines that move away from andtoward the center of your screen to represent your current accuracy.When you fire a weapon, the bullets hit somewhere within these 4lines. As you move and look around the reticle, lines move away fromthe center of your screen. This is called “reticle bloom.” When youstop, the lines move back toward the center of the screen until they
How to Play 29
Usable Device Area (Activate/Deactivate) This one actually requires a little more explanation. Some missionsrequire you to do things like plant surveillance devices or disarmbombs. This action allows you to perform all these types of actions.To perform these actions, you must press and hold the Action keyuntil they are complete.
• Activate (Default): You or your team activate or plant a device.
Securing Terrorists To perform this action, you must press and hold the Action key untilit is complete.
• Secure (Default): You or your team move to the surrendered ter-rorist and handcuff him.
Escorting Hostages (Follow Me/Stay Here) • Follow Me (Default): You or your team move to the hostage and
tell him/her to follow.
Player Death • Switch to Next Rainbow (Default): You switch to control the next
Rainbow in your team after your current Rainbow dies.
Using Doors/WindowsThe process of using doors requires a little more discussion, as thereare a number of ways to approach it. Remember, unlocking a door doesNOT open it. It simply changes the door’s state from locked to unlocked.There is, however, another way to unlock doors… you can shoot outthe locks! By shooting at the locking mechanism, you cause it to sus-tain damage and eventually it breaks and becomes unlocked. Furthershooting at the door actually opens it if it opens away from you.Besides simply opening and closing a door/window all the way, youcan also open/close them slowly. By pressing the Fluid Open (MouseWheel Up) and Fluid Close (Mouse Wheel Down) keys, you can slowlyopen and close doors and windows. If you press the Fast Fluid(Mouse Wheel Button Down) key at the same time as the Fluid Openor Fluid Close keys you can quickly open and close doors/windows.Finally, there is a much more destructive way to permanently opendoors… explosives. A Breaching Charge, Remote Charge, ClaymoreMine, or Frag Grenade destroys most doors instantly (see DeployingExplosive Charges and Mines, and Throwing Grenades sectionsbelow).
Using LaddersWhen you interact with a ladder, all you initially do is put away yourweapon and grab onto the ladder. To go up or down the ladder, youneed to use the Move Forward and Move Backwards keys. You can
28 How to Play

Weapon AttachmentsYou can customize your weapons by using 1 of 4 weapon attach-ments. Each of the weapon attachments in Raven Shield affects yourweapon in a unique way.
Mini-Scope A Mini-Scope simply changes your default zoom from 1.5x to 3.5x.However, the scope itself takes up considerable screen space on topof the weapon.
Sound Suppressor (Silencer)Sound suppressors are used in conjunction with special subsonicammunition and greatly reduce the sound emitted by a weapon. Thesubsonic ammunition has less power than standard rounds and there-fore has less range and is less lethal. The weight of the suppressoralso slows the reticle recovery time, making it less responsive than anon-suppressed weapon.
High-Capacity MagazinesHigh-Capacity Magazines greatly increase the ammunition capacity ofa weapon, resulting in less frequent reloading. However, theincreased weight of the extra ammunition slows the reticle recoverytime, making it less responsive than the same weapon with a stan-dard magazine.
Thermal Scope Attachment (Sniper Rifles Only)The Thermal Scope Attachment appears on the left side of sniperscopes and allows you to see thermal signatures up to 3 meters throughwalls and other obstacles. To activate it, you must be zoomed to 5x or10x magnification. Press the Secondary Fire/Toggle Weapon Attachmentkey (Left Alt). While in thermal vision mode, you can look throughalmost anything, but can only shoot through doors. To deactivate it, simply hit the Secondary Fire/Toggle Weapon Attachment key again.
Auto-Aim Auto-Aim helps you target quickly by snapping your crosshairs to tangosas they appear. You can toggle through the auto-aim settings by pressingthe Cycle Auto-Aim key (F2): None, Low, Medium, and High. At Lowsetting, Auto-Aim Only locks onto tangos near the center of the screen.At High setting, Auto-Aim locks onto most tangos in the screen.Auto-Aim is a great tool when you first begin to play, but as yourskills increase, you may want to turn it off and take your chancesaiming on your own. Auto-Aim only works against medium to short-range targets. If you want to aim at anything farther, you’ll have to hitit on your own.
How to Play 31
reach the weapon’s best accuracy. The rate at which your reticleexpands and contracts is unique to each weapon. It’s always best towait until the reticle shrinks completely before firing, but sometimesyou just don’t have that luxury… tangos shoot, too.Reducing your stance, standing to crouching and crouching to prone,increases your weapon’s base accuracy. This, however, decreases yourmobility, so be aware.
FiringTo fire a weapon, press the Primary Fire key (Left Mouse Button).The first thing you should notice is that your screen jumps when youfire. This reflects the recoil of the weapon. Each weapon’s recoil isunique. To compensate for this jump and stay on target, you can pullyour mouse down, but this may cause your reticle to bloom if you pulltoo fast.
Rate of Fire (RoF)Not all weapons fire a single round when you press the Primary Firekey. Each weapon in Raven Shield has one or more Rates of Fire(RoF). You can cycle between your weapon’s RoF setting by pressingthe Change Rate of Fire key (B). If the RoF is set to 1, there is nodifference between pressing and holding the fire key; you always firea single bullet or round. If the RoF is 3, you can hold the fire key tofire a burst of 3 rounds, or press and release it to fire 1 or 2 rounds.If the rate of fire is 5, which represents full automatic, you can holdthe fire key as long as you like, and the weapon continues to fireuntil you release or its magazine goes empty. You can still press andrelease the fire key to fire 1 or 2 rounds at a time.
ReloadingWhen your weapon’s magazine goes empty or “dry,” you need toreload it. Use the Reload key (Z) to reload a weapon. Reloading whenthe weapon is completely empty is the most time-consuming reload-ing method, because you must swap magazines and load a round intothe firing chamber by pulling the charging handle.You may also want to reload when your weapon is simply low onammunition or before you enter combat. This method of reload, atactical reload, is much quicker than waiting until a weapon goes dry,because you simply need to swap magazines. Don’t worry if the mag-azine isn’t empty. Your character automatically saves it for later use.
ZoomingAll weapons have a default, concentration-based zoom of 1.5x. Tozoom your weapon, use the Zoom key (Left Shift). To zoom out withyour weapon, simply press the Zoom key again. Sniper rifles have aspecial scope that allows them to zoom to 5x and 10x magnification.
30 How to Play

deployed, a detonator appears in your hand. Move a meter or soaway from the door and then press the Primary Fire key to detonatethe charge.
Remote Charge Remote charges are small explosive devices designed to destroyeverything in a small area. Think of them as extremely powerful fraggrenades that can be remotely detonated. To deploy a remote charge,equip it, look at the ground near you, and press and hold the PrimaryFire key. Once deployed, a detonator appears in your hand. Moveaway from the area and then press the Primary Fire key to detonatethe charge.
Claymore Mine Claymore mines work almost identically to remote charges, exceptthat they focus the destructive effect in the direction you face whendeploying them. Deploy and detonate a claymore the same way as aremote charge, but make sure you’re behind it when it goes off.
Throwing GrenadesGrenades give you a lot of flexibility during a mission. To throw agrenade, equip it and point in the direction that you want to throw.Press the Primary Fire key to throw it overhand or the SecondaryFire/Toggle Weapon Attachment key to throw it underhand.You can also press and hold the Primary Fire or Secondary Fire keysto pull the pin, but not throw it. However, at this point you are com-mitted, as you cannot put the pin back into the grenade. When yourelease the key, you toss the grenade.With practice, you’ll be tossing frags through windows in no time!
Frag Frags are destructive grenades that detonate after a short delay,destroying everything and everyone nearby.
Flashbang Flashbangs are distraction grenades that confuse and blind anyonenearby, while inflicting no damage. Toss these into rooms with hostagesand terrorists to give you an edge over the enemy before entering.
Smoke Smoke grenades detonate shortly after being released and emit alarge cloud of concealing smoke. Use these grenades to cross openareas and to conceal your movements. But beware, thermal visionsees directly through smoke, making you vulnerable to snipers whoare thus equipped.
Tear Gas Tear gas grenades detonate after a short delay and leave a toxic
How to Play 33
Bullet Penetration of DoorsAs stated in the Thermal Scope Attachment section, bullets only pene-trate doors. They do so based on the door material and the bullet’s ener-gy when it reaches the door. Bullets are less lethal when they emergefrom a door, but for large caliber weapons like the M82A1 .50cal sniperrifle, it really doesn’t make much of a difference.
Using Other ItemsPassive ItemsA number of items that you can take on missions do not require youto hold them in order for them to work. These items are called pas-sive items and are listed below:
Defuse Kit This item allows you to activate and deactivate bombs and explosivedevices much faster. It does not help you deploy Claymore Mines,Breaching Charges, and Remote Charges faster.
Electronic KitThis item allows you to place and manipulate electronic devices suchas bugs and security systems much more quickly.
Lockpick Kit This item allows you to unlock doors much more quickly.
Gas Mask This item negates the effects of gas grenades.
Primary Magazines This item provides additional magazines for your primary weapon.
Secondary Magazines This item provides additional magazines for your secondary weapon.
Heartbeat Sensor The heartbeat sensor must be equipped to operate and displays theelectrical signals emitted by beating hearts as pulsating white circles.These circles pulsate at the same rate as the person’s heart. Sincethe sensor cannot tell whether the person is a Rainbow team mem-ber, Terrorist, or Hostage, you’ll have to figure that out by yourself.Here’s a hint: when people get scared, run, and get wounded, theirheart rate increases.
Deploying Explosive Charges and Mines Breaching ChargeBreaching charges are small explosive devices designed to instantlyopen/destroy any door. To deploy a breaching charge, equip it, moveclose to a door, and press and hold the Primary Fire key. Once
32 How to Play

Multiplayer Screen The Multiplayer screen is quiteintimidating the first time you see it,but it’s actually quite simple to use.This screen is broken into threeareas: main buttons, server lists, andfilter/information areas.
Main ButtonsThe main buttons run across the topof the screen and consist of the following options:
• Log In/Log Out: This option allows you to Log In and Log Out atubi.com. When you log in, a window appears in the center of thescreen and has the following options:- Login Name: Your ubi.com account name.- Password: Your ubi.com account password.- Remember Password: Saves your password.- Auto Login (only available if Remember Password is enabled):
Automatically logs you in to ubi.com when you enter theMultiplayer screen.
- World Wide Web: Create Account: Takes you to the Ubi Soft webpage where you can create a free ubi.com account.
• Join: Joins the selected server in the server list.• Join IP: Brings up a window that allows you to enter the IP loca-
tion of a server you wish to join.• Refresh: Refreshes the server list.• Create: Takes you to the Create Server screen (see Create Server
screen section).
Server Lists There are two different types of servers in Raven Shield: Internet and LAN.
Internet ServersInternet servers exist on the Internet. To see these servers, you mustLog in to ubi.com using your account. Once you are logged in, theavailable server list fills up and displays the Internet servers currentlyavailable. The server list displays information regarding each serverand uses the following format:
• Favorite: Server is in your favorites list (see below).• Locked: Server is password protected.• Dedicated: Server is a dedicated server (see Create Server
Screen section).• Name: Name of the server.
Multiplayer 35
cloud of smoke, which causes coughing and blurred vision.These are also good grenades to toss into rooms with terroristsand hostages.
Finishing a Mission: Debriefing Screen A mission ends either when youcomplete all of the mission objec-tives or when you fail one or more ofthem. In both circumstances, you goto the Debriefing screen, which dis-plays the mission objectives andtheir status, your operatives andtheir status/statistics, total team sta-tus, and your campaign statistics.If you complete all of the missionobjectives, you have the followingoptions at the bottom of the screen:
• Go to the Main Menu: Returns you to the Main Menu.• Go to the Options Menu: Allows you to change your options and
then return to the Debriefing screen.• Retry Action: Restarts the current mission.• Go Back to Planning: Restarts the current mission in the Briefing
Room so you can rework your plan.• Accept Mission Outcome: Accepts the mission outcome. If you’re
playing a campaign, it takes you to the Planning Computer for thenext mission. If you’re not in a campaign, it takes you to theCustom Mission screen.
If you fail one or more of the objectives, you get the same options as youdo when you succeed, except for the Accept Mission Outcome option.
MultiplayerDifferences between Single and Multiplayer PlayThe main difference between multiplayer and single-player play isthat in multiplayer, there are one or more other human players play-ing with or against you. Computer-controlled characters are challeng-ing opponents, but other players are another thing entirely. Onceyou’ve mastered the single-player game, sharpen your skills againstliving, breathing opponents for a whole new level of gaming.Unlike single-player games, to play a multiplayer game, you mustfirst join or create a server. Servers exist either on Local AreaNetworks (LAN), if you’re lucky enough to be on one, or on theInternet. To play Raven Shield over the Internet, you must create afree ubi.com account (see Multiplayer screen).
34 Finishing a Mission

Cooperative: In this game type, you cooperate with other players todefeat computer-controlled enemies.
• Mission: Play single-player missions with a friend against comput-er-controlled enemies.
• Terrorist Hunt: Neutralize all the computer-controlled tangos.• Hostage Rescue: Rescue the hostages and escort them to the
extraction zone.
Tech Filter This filter allows you to see onlyservers that meet specified cri-teria in the server list above:
• Unlocked Only: Shows only servers that aren’t password protected.• Favorites Only: Shows only your favorite servers.• Dedicated Servers Only: Shows only dedicated servers.• Servers Not Empty: Shows only servers that have one or more
players on them.• Servers Not Full: Shows only servers that are not completely full.• Responding: Shows only servers that respond when “pinged.”• Same Version: Shows only servers that are running the same ver-
sion of the game as you.• Faster Than: Shows only servers that respond faster than the
specified rate (the lower the ping the better).
Server Info This tab shows you more detailedinformation regarding the select-ed server.
• Players, Kills, Time Played, Ping: Shows all players and theirstatistics.
• Map List/Game Mode: Shows the entire map list and the gametypes associated with each map.
• Server Options: Shows all of the server options.
Create Server Screen This screen allows you to create anew server and consists of threeareas: main buttons, Options tab,and Kit Restriction tab.
Main ButtonsCancel: Exits the screen and returnsyou to the Multiplayer screen.Launch: Launches, starting the server.
Multiplayer 37
• Ping: Ping or response rate of the server.• Game Type: Current game type of the server.• Game Mode: Game mode of the server: Adversarial or Cooperative. • Map: Current map on the server.• Current/Max Players: Current and maximum number of players
allowed on the server.If you click on a server, you select it. If you right-click on a server,you select it and bring up the Server Window. This window containsthree options:
• Add to Favorites: Adds server to your favorites list.• Remove from Favorites: Removes server from your favorites list.• Refresh: Refreshes this server only.
LAN ServersLAN servers are servers that only exist on your Local Area Network(LAN). You do not need an account on ubi.com to play on theseservers, and the server list displays the same information as it doesfor Internet servers.
Filter/Information Areas This area has three tabs, which allow you to filter the servers shownin the server list and to find out more information on the selectedserver: Game Type Filter, Tech Filter, and Server Info.
Game Type Filter The game type filter removesall servers you’re not interest-ed in playing from the server list and is divided by Game Mode:Adversarial and Cooperative.Adversarial: Go head-to-head against other players.
• Survival: Free-for-all, shoot-everyone game, where all you need todo to win is survive.
• Team Survival: Players separate into two teams, where the lastteam standing wins.
• Bomb: Green team must prevent bombs from being detonated,while Red team must detonate bombs.
• Hostage: Green team must recover the computer-controlledhostages and escort them to the extraction zone, while Red teammust prevent them from doing so.
• Pilot: Green team must escort a downed Blackhawk helicopterpilot, played by one of the players on the Green team and armedonly with a secondary weapon, to the extraction zone. Red teammust prevent him from reaching the extraction zone.
36 Multiplayer

• Add/Remove Map to/from Map List: Adds/Removes the selectedmap and the selected game type to/from the map list window.
• Map List Window: Shows the maps assigned to the server withtheir game types.
Game TypeDepending on the selected game mode, this displays the availablegame types.
• Adversarial: Survival, Team Survival, Bomb, Hostage, Pilot.• Cooperative: Mission, Terrorist Hunt, Hostage Rescue.
Death Camera Area• No Death Camera: Does not allow a death camera.• First Person: Allows first-person death camera.• Third Person: Allows third-person death camera.• Free Third Person: Allows free third-person death camera.• Ghost Camera: Allows ghost death camera where you can move
freely on the screen.• Team Only: Allows you to only see via your teammates and auto-
matically disables the Ghost Camera.
Edit Welcome MessageThis button allows you to edit the server welcome message.
Restriction KitThe restriction kit allows you to“outlaw” or restrict certain pieces ofequipment from the game. The leftside of the screen is the Item Classarea and the right side is theIndividual Item area.
Item Class Area• Primary Weapons: These options
display a list of all the individual weapons in the Individual Itemarea.- Sub-Machine Guns.- Shotguns.- Assault Rifles.- Light Machine Guns.- Sniper Rifles.
• Secondary Weapons: These options display a list of all the individ-ual weapons in the Individual Item area.- Pistols.- Machine Pistols.
Multiplayer 39
OptionsGeneral Options (not all options are available for all Game Modes)
• Game Mode (Cooperative, Adversarial): Select the game mode.• Server Name: Enter a server name.• Password: Enter a password if desired. Use the check box next to
password text area to lock the server and use the specified password.• Administrator Password: Enter a password if desired. Use the
check box next to password text area to activate administratormode on this server; if not checked, only the host on non-dedicat-ed servers can use administrator commands.
• Rounds per Match/Mission: The number of rounds in amatch/mission. When a match/mission ends, the map and gametype rotate to the next one in the map list.
• Time per Round: Round time limit.• Time between Rounds: Time limit between rounds.• Number of Players: Maximum number of players.• Bomb Timer: Time limit between bomb activation and detonation.• Number of Terrorists: Maximum number of computer-controlled
terrorists on the map.• Difficulty Level: The difficulty of computer-controlled tangos dur-
ing cooperative play.• Server Location (LAN or Internet): This is where others look to
join your server.• Dedicated Server: When launched the server runs by itself, with-
out forcing you to join the game.• Friendly Fire: Allows teammates to hurt each other.• Teammate Killer Penalty: If you take out a teammate, they can
choose to penalize you and make you a spectator next round.• Allow Radar: Allows players to use teammate radar to help coordi-
nate team play.• Allow Teammate Names: Allows players to see teammate names
when they point at them.• AI Backup: Gives you computer-controlled teammates who follow you.• Force First-Person Weapon: Forces all players to use first-person weapons.• Auto Balance Teams: Automatically assigns players to teams to
balance them.• Rotate Map on Success: Ignores Rounds per Map and only rotates
a map when you successfully complete it.
Map Area• Map Window: Contains a list of all of the available maps.
38 Multiplayer

Teammate Radar Teammate radar displays the relativelocation of your teammates duringteam games. Teammates on yourlevel appear as a dot. Those aboveyou appear as an arrow pointing up,those below you as an arrow pointingdown, and dead/incapacitated team-mates appear as an X.
Communications and the ConsoleCommunications are very importantin multiplayer games: so importantthat Raven Shield has four differentways to communicate with otherplayers. Use the Global Chat key (Y)to send chat messages to everyonein the game or the Team Chat key(U) to send messages only to yourteam. Send pre-recorded voice mes-sages to your team using the Pre-Recorded Voice Message key (V).Finally, you can use the Drawing Tool key (F4) to display a drawingmap. To draw, simply left-click and drag your mouse. You can right-click to place a stamp on the map. Your drawings and stamps remainon the map for approximately 15 seconds and are automaticallytransmitted to your teammates, along with a message telling themyou’ve updated the map.
Using Multiplayer-Only ItemsThere are three items that you can only use in multiplayer games.
False Heartbeat PuckDeploys like a grenade and emits a heartbeat that appears in heart-beat sensors.
Heartbeat Sensor JammerMasks all heartbeat signals within a 10m radius of the bearer fromheartbeat sensors when held.
Stand-Alone Heartbeat Sensor JammerDeploys like a remote charge and masks all heartbeats within a 15-meter area.
Multiplayer 41
• Other Items: These options display a list of all their individualitems in the Individual Item area.- Primary Weapon Attachments.- Secondary Weapon Attachments.- Other Items (i.e., grenades, etc).
Individual Item AreaIn this area you can restrict weapons/items individually or as a groupusing the following options:
• Select All.• Unselect All.• Individual Items.
In-Game Menu By pressing the Multiplayer Menukey (Tab), the multiplayer In-GameMenu appears. In the title bar is thetime remaining until the next roundbegins. Below this is server informa-tion, including Server Mode(Adversarial, Cooperative), ServerName, Server IP and port, MapName, Game Type, Rounds (roundsremaining/rounds per match), and Time per Round (remaining time inthe round/total time of a round).In the center of the screen is the team/player area with team and playerstatistics, including the following: Ready Status, Health Status, PlayerName, Number of Rounds Won/Rounds Played, Kills, Deaths, HitPercentage, Shots Fired, Shots Hit, Who Killed This Player, and Ping.
At the bottom of the screen are 5 buttons:• Select Team: Allows you to select your team for team games.• Server Options: Displays the server options, which are editable by
the server only.• Restriction Kit: Displays the restriction kit, which is editable by
the server only.• Gear Menu: Opens the gear menu, which allows you to change
your operative’s gear.• Ready Button: Tells the server you’re ready to start the round.
40 Multiplayer
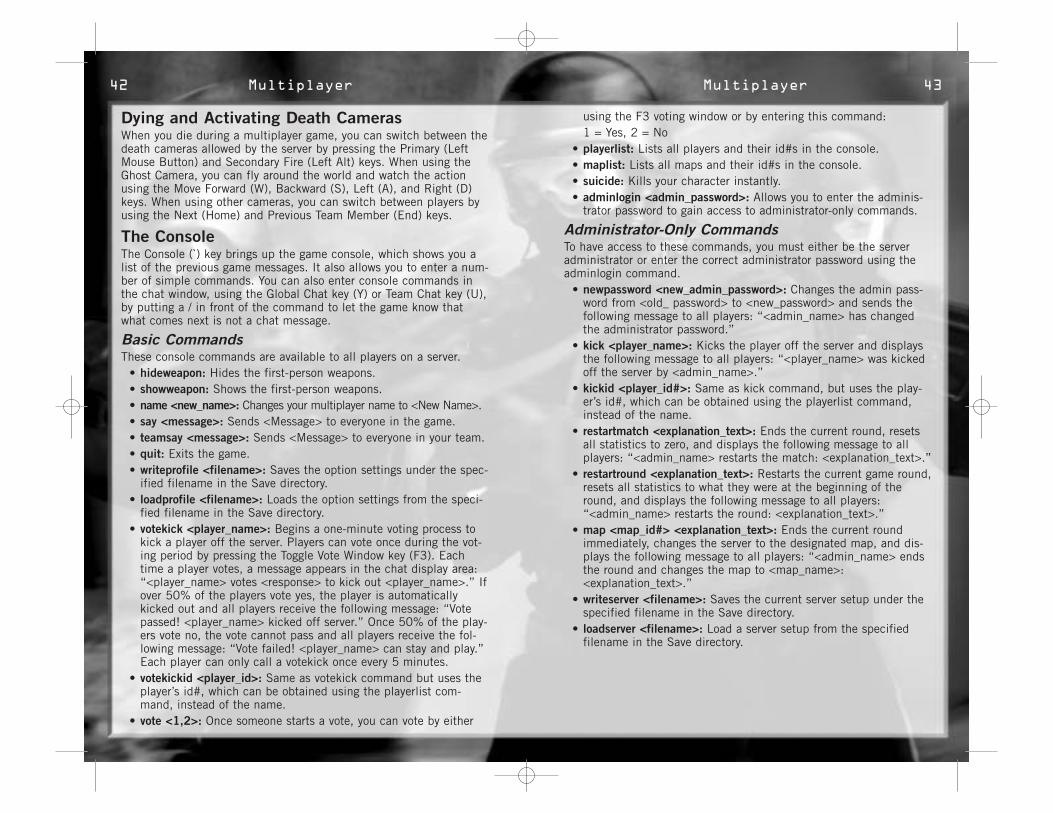
using the F3 voting window or by entering this command:1 = Yes, 2 = No
• playerlist: Lists all players and their id#s in the console.• maplist: Lists all maps and their id#s in the console.• suicide: Kills your character instantly.• adminlogin <admin_password>: Allows you to enter the adminis-
trator password to gain access to administrator-only commands.
Administrator-Only CommandsTo have access to these commands, you must either be the serveradministrator or enter the correct administrator password using theadminlogin command.
• newpassword <new_admin_password>: Changes the admin pass-word from <old_ password> to <new_password> and sends thefollowing message to all players: “<admin_name> has changedthe administrator password.”
• kick <player_name>: Kicks the player off the server and displaysthe following message to all players: “<player_name> was kickedoff the server by <admin_name>.”
• kickid <player_id#>: Same as kick command, but uses the play-er’s id#, which can be obtained using the playerlist command,instead of the name.
• restartmatch <explanation_text>: Ends the current round, resetsall statistics to zero, and displays the following message to allplayers: “<admin_name> restarts the match: <explanation_text>.”
• restartround <explanation_text>: Restarts the current game round,resets all statistics to what they were at the beginning of theround, and displays the following message to all players:“<admin_name> restarts the round: <explanation_text>.”
• map <map_id#> <explanation_text>: Ends the current roundimmediately, changes the server to the designated map, and dis-plays the following message to all players: “<admin_name> endsthe round and changes the map to <map_name>:<explanation_text>.”
• writeserver <filename>: Saves the current server setup under thespecified filename in the Save directory.
• loadserver <filename>: Load a server setup from the specifiedfilename in the Save directory.
Multiplayer 43
Dying and Activating Death CamerasWhen you die during a multiplayer game, you can switch between thedeath cameras allowed by the server by pressing the Primary (LeftMouse Button) and Secondary Fire (Left Alt) keys. When using theGhost Camera, you can fly around the world and watch the actionusing the Move Forward (W), Backward (S), Left (A), and Right (D)keys. When using other cameras, you can switch between players byusing the Next (Home) and Previous Team Member (End) keys.
The ConsoleThe Console (`) key brings up the game console, which shows you alist of the previous game messages. It also allows you to enter a num-ber of simple commands. You can also enter console commands inthe chat window, using the Global Chat key (Y) or Team Chat key (U),by putting a / in front of the command to let the game know thatwhat comes next is not a chat message.
Basic CommandsThese console commands are available to all players on a server.
• hideweapon: Hides the first-person weapons.• showweapon: Shows the first-person weapons.• name <new_name>: Changes your multiplayer name to <New Name>.• say <message>: Sends <Message> to everyone in the game.• teamsay <message>: Sends <Message> to everyone in your team.• quit: Exits the game.• writeprofile <filename>: Saves the option settings under the spec-
ified filename in the Save directory.• loadprofile <filename>: Loads the option settings from the speci-
fied filename in the Save directory.• votekick <player_name>: Begins a one-minute voting process to
kick a player off the server. Players can vote once during the vot-ing period by pressing the Toggle Vote Window key (F3). Eachtime a player votes, a message appears in the chat display area:“<player_name> votes <response> to kick out <player_name>.” Ifover 50% of the players vote yes, the player is automaticallykicked out and all players receive the following message: “Votepassed! <player_name> kicked off server.” Once 50% of the play-ers vote no, the vote cannot pass and all players receive the fol-lowing message: “Vote failed! <player_name> can stay and play.”Each player can only call a votekick once every 5 minutes.
• votekickid <player_id>: Same as votekick command but uses theplayer’s id#, which can be obtained using the playerlist com-mand, instead of the name.
• vote <1,2>: Once someone starts a vote, you can vote by either
42 Multiplayer

TMP 9mm 7x30 magsThe 9mm TMP is a modern compact SMG. It is blowback-operated, with a locked breech design and rotating barrel.The TMP is reported to be a very controllable and comfort-able weapon to fire.
UZI 9mm 7x32 magsThe UZI is manufactured in several countries and is theprimary sub-machine gun of several of the world’s military.The overall ruggedness and relative simplicity of the UZIhas given it a reputation as a very reliable weapon, capa-ble of operating under severe conditions.
CZ-61 7.65mm 9x20 magsThe CZ-61 Skorpion machine pistol is a dual-purposeweapon, intended for both close combat and personaldefense. Its small size makes this weapon very suitable forconcealed carry or for use in confined spaces, such as cars oraircraft. This gun is popular with police, security, and counter-terrorist units, as well as some terrorist organizations.
MTAR-21 Micro 9mm 7x30 magsThe TAR-21 is an extremely modern bullpup design and isoffered in four configurations. The MTAR-21 is speciallyconfigured for commando, airborne, paratrooper, and spe-cial rescue units.
Mac 11/9 9mm 7x32 mags The Mac 11/9 machine pistol was developed around 1970when special forces and police units in the U.S.A. andother countries adopted it. Its high rate of fire and smallsize make it ideal for close combat.
Micro-UZI 9mm 7x32 mags The Micro-UZI was developed as a personal defenseweapon. Police and military of more than 90 countries haveadopted this weapon due to its compact size and reliability.
SR-2 9mm 9x20 mags The SR-2 is a modern machine pistol currently in usewith Special Forces. Its special 9x21mm Gurza ammuni-tion is sufficiently powerful to penetrate most forms ofbody armor.
Equipment 45
EquipmentPrimary WeaponsSub-Machine Guns
MP5A4 9mm 7x30 magsThe preferred sub-machine gun of counter-terrorist operativesaround the world, the 9mm MP5A4 SMG is known for itsreliability and accuracy, even when firing on full automatic.
MP5SD5 9mm 7x30 magsTerrorists throughout the world fear the 9mm MP5SD5SMG. Its integral sound suppressor is so effective that thereport of the bullet is miniscule compared to the click ofthe bolt operating. Rainbow uses the 9mm MP5SD5whenever both accuracy and stealth are essential.
MP5K PDW 9mm 7x30 mags The 9mm MP5K PDW SMG is a compact version of theclassic MP5. Its folding stock and low weight make itan ideal choice when a full rifle or sub-machine gun isunmanageable.
MP5/10A2 10mm 6x30 mags The MP5 10A2 SMG is a basically a MP5 chambered fora 10mm round. The increased stopping power of the heav-ier round is offset by increased recoil.
UMP .45cal 6x25 mags The UMP is a .45cal SMG roughly based on the MP5. Thestopping power of its round comes at the price of anincreased recoil and lower rate of fire.
M12S 9mm 5x40 mags The 9mm M12 SMG is a recoil-operated, select-fireweapon, firing from an open bolt. It has a low rate of firecompared to other SMGs and is a little less accurate, butits small size and weight make up for it.
P90 5.7mm 4x50 mags The 5.7mm P90 SMG is a blowback-operated, select-fireweapon. It is fed from 50-round box magazines located ontop of the weapon and made from translucent polymer. Itwas developed in the late 1980s and may be referred to as aforerunner of the PDW (Personal Defense Weapon) concept.
44 Equipment

FNC 5.56mm 6x30 mags Once called the “Free World's assault rifle,” the FNCincorporates the best ideas and characteristics of theGalil, AK, and FAL. It uses 5.56mm NATO rounds with amagazine capacity of 30 rounds.
Galil ARM 5.56mm 6x30 mags The Galil is basically a recreation of Kalashnikov’s AK-47design, chambered for the NATO 5.56mm cartridge. Amagazine holds 30 rounds, and it has a rate of fire of 650rounds per minute.
M82 5.56mm 6x30 mags The M82 AR is based on the AK/AKM internal design, butchambered in 5.56mm NATO round. It has a polymerframe, a magazine capacity of 30 rounds, and a rate offire of 750 rounds per minute.
AK-47 7.62mm 6x30 mags Its accuracy after the first shot is questionable as itspreads far and wide, but the first shot is reasonably accu-rate. By single- and double-tapping hostiles, you are sureto come out on top. Aim for the chest, and double-tap.This gun is superior to most every other gun for medium-long range.
AK-74 5.45mm 6x30 mags The AK-74 assault rifle comes directly from the AK-47,but is chambered for a 5.45mm round similar to the 5.56NATO round. When compared to the M16, the AK-74shows slightly worse accuracy, but better reliability in bat-tle environments and lower maintenance requirements.
TAR-21 5.56mm 6x30 magsThe TAR-21 is an extremely modern bullpup design and isoffered in four configurations. The TAR-21 is designed asa basic infantry rifle.
Type 97 5.56mm 6x30 mags The Type 97 Assault Rifle entered service with the Chinesemilitary around 1997. This carbine version is specificallydesigned for special forces, police, and vehicle crews.
Equipment 47
Assault RiflesM4 5.56mm 6x30 magsA compact version of the M16 AR, the 5.56mm M4 AR iscommonly used when the firepower of an assault rifle isneeded, but the weight and size are not. It is commonlyused by U.S. and Israeli special forces.
G3A3 7.62mm 6x20 mags The G3A3 is a standard assault rifle. It fires the powerful7.62mm NATO round, making it both accurate and deadly.
G36K 5.56mm 6x30 mags The 5.56mm G36K AR is an extremely modern weapon.Its compact design makes it useful in close quarters,while its 5.56mm round penetrates most body armor.
L85A1 5.56mm 6x30 mags The 5.56mm L85A1 AR is the standard infantry weapon ofthe British Army. Its bullpup design greatly decreases its sizeand increases its usefulness in close-quarter situations.
AUG 5.56mm 6x30 mags The 5.56mm AUG AR is a futuristic-looking assault riflewith a compact bullpup design. It is well suited for mis-sions requiring the maneuverability of a sub-machine guncombined with the punch of an assault rifle.
M16A2 5.56mm 6x30 mags When extra range or firepower is called for, RAINBOWturns to the M16A2. The M16 has proven itself over time,as its 5.56mm round easily penetrates body armor.
M14 7.62mm 6x20 mags The direct descendant of the classic M1 Garand, the M14AR fires a 7.62 round with extreme accuracy. It has beenin use by the U.S. Army since 1957 and is still in use bySpecial Forces today.
FAMAS G2 5.56mm 6x30 mags The FAMAS G2 AR fires the 5.56mm NATO round. Its rateof fire of 950 rounds per minute is the highest amongRainbow’s Assault Rifles.
FAL 7.62mm 6x20 magsThe FAL is one of the most widely used battle rifles of the20th century. Due to its heavy recoil in full-auto mode, it’soften issued in semi-auto. It uses 7.62mm NATO roundswith a magazine capacity of 20 rounds.
46 Equipment

AW Covert 7.62mm 3x10 mags The AW COVERT is a silenced sniper rifle firing the7.62x51mm subsonic round. This round is less powerful thanthe standard 7.62x51mm round, making this rifle slightlyless powerful and accurate than other sniper rifles. Its silenceoffsets its reduced effectiveness.
Dragunov 7.62mm 3x10 mags The Dragunov was designed not as a standard sniper rifle,but as a light support weapon to extend the effective rangeof an infantry squad up to 600 meters. As a sniper rifle,the Dragunov is lightweight, accurate, and capable of semi-auto fire. It is extremely reliable in almost all conditions.
VSS Vintorez 9mm 3x10 magsThe VSS Vintorez (Special Sniper Rifle) was designed forspecial operations in 1987. This rifle has an integratedsound suppressor and uses special subsonic ammo –9mm long cartridges.
Light Machine GunsM60E4 7.62mm 3x100 mags The 7.62mm M60 LMG machine gun was designed in thelate 1940s and its initial design strongly borrows from theGerman MG-42. It uses 100-round belts and has a firerate of 575 rounds per minute.
M249 5.56mm 2x200 magsThe 5.56mm M249 LMG is a light machine gun firing the5.56mm NATO round. It comes with a 200-round boxmagazine. It packs tremendous firepower, but is onlyaccurate from a crouched stationary position. Used thisway, it is an effective covering weapon.
RPD 7.62mm 4x100 mags The 7.62mm RPD LMG is a Russian light machine gunthat dates back to the end of World War II. It fires the7.62x39 mm round from 100-round drum magazines.This weapon is less accurate than either the 5.56mmM249 or the 21E3. It is lighter than either of the othertwo, however, and therefore returns to an accurate stateafter firing more rapidly.
Equipment 49
ShotgunsM1 12g 6+34 shells Whether used for door breaching or highly lethal close quar-ters combat, a good tactical shotgun is an essential part ofall anti-terrorist teams. Rainbow uses the 12g M1, largelybecause of its superb recoil characteristics and reliability.
SPAS-12 12g 8+32 shells The 12g SPAS-12 SG is a dual operation shotgun withan 8-shell capacity. This weapon is ideal for clearing aroom quickly.
USAS-12 12g 2x20 mags The USAS-12 is a fully automatic shotgun based on theM16 design. Due to its weight with 20-round detachabledrum magazines, the USAS-12 is said to be controllablein full-automatic mode.
Sniper RiflesM82A1 .50cal 3x10 mags The M82A1 SR was the first .50cal sniper rifle to achievewidespread use. Its massive length (1.55m) and weight(13.4 kg) make it the largest sniper rifle in Rainbow’sarsenal. Extreme care should be used in employing thisweapon, as its high-powered .50cal M33 round can tearthrough multiple targets just as easily as it can through anengine block.
PSG-1 7.62mm 3x10 mags The PSG-1 is arguably the most accurate semi-automaticsniper rifle off the shelf. A favorite of police forces aroundthe world, the PSG-1 comes standard with a 6x sight andfires the NATO 7.62 round.
WA-2000 .30cal 5x6 mags The shortest sniper rifle used by the Rainbow team, theWA2000’s bullpup design and lightweight make it afavorite of snipers who need to move stealthily into diffi-cult positions. Its powerful .30cal Magnum round hasmore punch than the more common 7.62 NATO round.
SSG-3000 7.62mm 6x5 mags The SSG-300 is a bolt-action sniper rifle, which fires thepowerful 7.62mm NATO round. It is extremely accurateand has a magazine capacity of 5 rounds.
48 Equipment

AP Army 5.7mm 2x20 mags The AP Army was designed as an army pistol with high armor-piercing capabilities. Low recoil and high magazine capacitymakes this handgun a good defensive firearm against per-sonnel in bulletproof jackets or in unarmored vehicles.
P-228 9mm 4x13 mags In addition of being one of RAINBOW’s favorites, it’s alsoa popular law enforcement handgun used by many policedepartments throughout the world.
SPP 9mm 2x30 mags First appearing in 1989, the 9mm SPP Pistol is biggerand heavier than most pistols, but it’s a little more pre-cise. This makes it a great option for Rainbow’s operatives.
Machine PistolsCZ-61 7.65mm 2x20 mags The CZ-61 Skorpion machine pistol is a dual-purposeweapon, intended for both close combat and personaldefense. Its small size makes this weapon very suitablefor concealed carry or for use in confined spaces, such ascars or aircraft. This gun became popular with police,security, and counter-terrorist units, as well as some ter-rorist groups.
Mac 11/9 9mm 4x16 magsThe Mac 11/9 machine pistol was developed around 1970when special forces and police units in U.S.A. and othercountries adopted it. Its high rate of fire and small sizemake it ideal for close combat.
Micro-UZI 9mm 3x20 mags The Micro-UZI was developed as a personal defenseweapon. Police and military of more than 90 countries haveadopted this weapon due to its compact size and reliability.SR-2 9mm 3x20 rounds The SR-2 is a modern machine pistol currently in use withspecial forces. Its special 9x21mm Gurza ammunition issufficiently powerful to penetrate most forms of body armor.
Equipment 51
21E 7.62mm 3x100 magsBased on the G3A3, the 21E light machine gun fires the7.62mm NATO round from a 100-round box magazine.The 21E is more accurate than the M249, but is harder tocontrol when moving around. As with all LMGs, thisweapon is best fired from a stable-firing stance.
23E 5.56mm 2x200 mags23E is similar to 21E in almost every respect except thatit is chambered to take the 5.56mm NATO round. It alsohas a slightly shorter barrel length.
Secondary WeaponsPistols
92FS 9mm 4x15 mags The 9mm 92FS Pistol is Rainbow’s 9mm pistol of choice.Its primary advantages are low recoil and a large magazinecompared to the bulkier .45cal.
USP .40cal 4x13 mags The .40cal USP Pistol is a favorite among those desiring abalance between weapon size and firepower.
Mk23 .45cal 2x12 mags The extreme ruggedness, reliability, and match-gradeaccuracy of the .45cal Mark ACP has made it the handgunof choice for U.S. Special Forces. A specially designedsound and flash suppressor virtually eliminates muzzleflash and provides more than 35 dB of sound reduction. Itis an essential part of any Rainbow mission requiring bothfirepower and discretion.
Desert Eagle .50cal 4x7 mags The .50cal Desert Eagle Pistol is a very powerful handgun.It is capable of punching through body armor, but has alimited 7-round magazine.
Desert Eagle .357cal 4x9 mags The smaller cousin of the .50cal Desert Eagle Pistol, the.357cal Desert Eagle Pistol round packs a punch capableof punching through body armor at close range. It carriesa limited 9-round magazine.
50 Equipment

EAX® ADVANCED HD™ offers dramatically increased 3D audio performance and functionality,delivering stunning positional audio and rich environment effects for PC gaming and can
only be experienced with Creative’s flagship Sound Blaster® Audigy™ sound cards.
Sound Blaster® Audigy™ features 4X more effects processing from therevolutionary Audigy chip and 24-bit multi-channel playback, let-
ting you enjoy realistic in-game EAX® ADVANCED HD™ audio effectswith unprecedented clarity.
To stop terror around the world, from London to the Caribbean to Rio deJaneiro in Tom Clancy’s Rainbow Six 3™: Raven Shield™, you need to equip team
RAINBOW with the best equipment — Sound Blaster® Audigy™, the only EAX® ADVANCEDHD™- capable sound cards on the market!
©2002 Creative Technology Ltd. All rights reserved. Sound Blaster, the Sound Blasterlogo, EAX, and the Creative logo are registered trademarks and Audigy, Sound BlasterAudigy, the Sound Blaster Audigy logo, ADVANCED HD, EAX ADVANCED HD, and theEAX ADVANCED HD logo are trademarks of Creative Technology Ltd. in the UnitedStates and/or other countries. All other logos, brands or product names are trademarksor registered trademarks of their respective holders and are hereby recognized as such.

Editorial CoordinationDidier LordLionel RaynaudMichel PierfitteSophie PendarièsStory EditorAlexis NolentMarketing CanadaBrand ManagerSteve GagnéTrade Marketing CoordinatorDanielle LajoieMarketing EMEAEMEA Marketing DirectorLaurence Buisson-NollentEMEA Senior Marketing GroupManagerLaura HattonEMEA Senior Brand ManagerCedrick DelmasEMEA Brand ManagerAlexis BodardLocal Brand ManagersChristian BornEvelyn de VooghtJavier MontoroJim HillMarcel KeijMichael ThielmannSoren LassStephane CatherineValeria lodesertoVanessa LeclercqVera ShahManufacturing DepartmentAlexandre BolchertLaurent LugbullPierre EscaichMarketing U.S.U.S. Vice-President of MarketingTony KeeU.S. Group Brand ManagerHelene JuguetU.S. Brand ManagersDerek ChanMichael JeffressSean McCannPublic RelationsCassie VogelTiffany SpencerTyrone MillerRED STORM ENTERTAINMENTScript WriterRichard Dansky Game CinematicsProducerHeather MaxwellScriptwriterRichard DanskyLead Artist: Intro/OutroDemond RogersAnimation/Modeling: Intro/OutroJeremy BrownThomas DeVriesJoseph DrustJeff McFaydenPete SekulaSteve Wasaff
Lead Artists: Cut ScenesKristian HawkinsonDion RogersMikey SpanoMichael CosnerRay TylakCinematic Support: Cut Scenes Tim AlexanderYongha HwangKim McLeanSuzanne MeilerJohn MichelLucas SmithEric TerrySpecial Thanks to Red StormEntertainment – All the staff whoparticipated in creating thiswonderful series, for those whohelped us in achieving this new titleand to the RSE Testing Departmentfor play-testing the game!UBI.COMCanadaAlexis RendonDominic LarocheFranc HauselmannGuillaume PlanteKarine MartelLuc BouchardPierre-Luc RigaudPhilippe LalandeScott SchmeisserEuropeDiane PeyredieuMarc HomayounpourSebastien PuelTanguy ImbertU.S.David MacachorJoe ToledoJohn BillingtonKurtis BuckmasterSam CopurTECHNICAL SUPPORTNorth American TechnicalSupport ManagerBrent WilkinsonLead Technical SupportRepresentativeTrent GiardinoTechnical Support RepresentativeBryan MarshallChris CurtisGreg BonifacioHarden ViersJason JenningsJean-Francis TétreaultJesse HaffKirk SanfordMoye Daniel
SPECIAL THANKSAndy MarkelAxelle VernyBenoit FouilletChantal CloutierJenifer GroelingKatrina MedemaMartin CarrierMike PlottsNicolas DavidtsPatrick FilionRich KubiszewskiTom Moser – Navy SEAL consultantTony BurkeVincent PaquetXavier Neal
www.abcgallery.com for the Banklevel paintings
Credits 55
CREATIVE TEAMProducerChadi Lebbos Associate ProducerPatrick NaudSenior ProducerMathieu FerlandLead Game Designer/Manual Writer Michael McCoyGame DesignersDaniel BérubéMaxime BélandLead Programmer Éric BéginProgrammers Alexandre DionneAristomenis KolokathisGuillaume BorgiaJean-François DubéJoel TremblayJohn BennettPatrick GaronRima BrekSerge DoréYannick JolyCollaborating ProgrammersChaouky GrahamHugo AllaireJulien BouvraisIntern ProgrammersCyrille LauzonLysanne MartinSébastien LussierLead Artist/Art Director Carol BertrandArtistsAdrian CheungAnnie RicherAudran GuerardCatherine NolinChristian SiroisDanny DeslongchampsDany MarcouxDavid BlazetichDavid MassicotteGuillaume BlaisGwenael HeliouHugo DesmeulesJean-Philippe RajotteJohn BigorgneKarine FortinNatasha BouchardPatrick DaigleSebastien LaporteSimon MarinofWafaa BenHammouCharacter Artist/Character Concept ArtistArman AkopianLead AnimatorJosef SyAnimators Alexandre VinetJoseph NasrallahMathieu HuetThomas J AndersonLead Level DesignerCarl Lavoie
Level DesignersBenoit RicherÉric PoulinFrançois LaperrièreJason ArsenaultJonathan DumontMartin DufourPhilippe LussierRémi LacosteYann SylvestreAudio Designer Nicholas DuveauQuality AssuranceQA Lead TestersEmmanuel-Yvan OfoéFrançois McCannMarc BrouilletteQA TestersAlexandre MartelAllen TremblayAntoine ThisdaleCharles Drolet-DemersChristian FortierChristian NortonDaniel SarrazinDominic ColabelliEric LaperrièreEric St-JeanFrédéric DufortFrédéric LaporteHanz TaboraJean-François DupuisJimi LangloisLuc PlanteMarc-André DessureaultMarc-André FillionMartin LangloisMartin TavernierMathieu FortinMathieu LachanceNicholas RouthierPatrick SauvageauPhilippe DionRaymond BrunetteRobin Lee GordonSebastien MartelStéphane PinardSylvain BordeleauYan Charron Yannick FrancoeurQA Config TestersDavid LévesqueJason AlleyneData ManagerBruno BellavanceFrancis TremblayLead Localization/IntegrationAlexandre St-LouisTechnical AdvisorMike GrassoPlanning CoordinatorAudrey GoyetteMarketing Research CoordinatorJean-François PoirierStoryboardWayne MurrayMaking Of Director/EditingMiguel Angel MartinMaking Of AssistantAnnemarie Gabrielle
UBI SOFT MONTREALCEO Ubi Soft MontrealMartin TremblayVP Studios Michel CartierVP Content Gregoire GobbiDirector of Animation Studio Gilles MonteilDirector of Game Design/ LevelDesign Studio Maxime BélangerDirector of Graphic StudioJean-Sébastien MorinDirector of Programming Studio Nicolas RiouxDirector of Sound StudioJérémi ValiquetteDirector of Quality AssuranceEric TremblayDirector of Planning Henri LaporteMarketing Research Group ManagerCaroline MartinSound Audio Technical AdvisorSimon PresseySound IntegratorSylvain CôtéSound EngineerOlivier GermainFoley Artist Tchae Maesroch Sound Engine Team (DARE)Alexandre Carlotti Jean-François GuayRichard MaloChristian LachanceStéphane RonseMusicMusic Composed by Bill Brown –Soundelux Design Music GroupWeapon Sound Design and Effects byDaneTracks Inc.Supervising Sound DesignerRichard AdrianSound DesignersAndrew LackeyChristopher AlbaEddie KimAmbiences & SFX EditorAndré ChaputAudio Post-ProductionDaran NadraNicholas GrimwoodUBI SOFT INTERNATIONALPresident & CEO Ubi SoftYves GuillemotInternational Production DirectorChristine Burgess-QuemardEditor-in-ChiefSerge HascoetEditorial Content ManagerTravis Getz
54 Credits

56 Notes


![Welcome [static9.cdn.ubi.com]static9.cdn.ubi.com/customersupportfaqfiles/archived/1351_SH2.pdf · Getting Started SILENT HUNTER II 7 Getting Started 6 by moving the mouse. Whether](https://static.fdocuments.us/doc/165x107/5f5acd81da53783f3c266dc6/welcome-getting-started-silent-hunter-ii-7-getting-started-6-by-moving-the-mouse.jpg)

