Android - Dialog Interaktif
9
Modul Praktikum Pemrograman Android 2015 Setiya Nugroho, M.Eng Page 1 MODUL 7. DIALOG INTERAKTIF 6.1. Tujuan 1. Mengenalkan kepada mahasiswa konsep umum Android 2. Mahasiswa dapat memahami Dialog Interaktif pada Android 3. Mahasiswa dapat m embuat program Toast, Prompt dan Alert D ialog 6.2. DASA R TEORI Pada pertemuan kedua kita akan membuat kotak dialog sebagai sarana interaktif antara aplikasi dengan pengguna. Pada aplikasi ini akan diimplementasikan 3 macam dialog, antara lain : Toast dialog Toast merupakan sebuah class yang digunakan untuk menampilkan pesan/peringatan pada Android (mirip dengan alert box, message box). Prompt dialog Hasil inputan user pada prompt dialog akan ditampilkan pada text view Alert dialog Alert secara bahasa artinya waspada, tanda, selalu siap. Alert dialog biasanya digunakan untuk keluar dari aplikasi. 6.3. PELAKSANA AN PRAKTIKUM 1. Jalankan Eclipse, Kemudian Pilih File > New > Android Application Project. 2. Isikan kotak dialog seperti berikut : Application name : Toast 1 Project name : Toast1 Package name : com.example.toast1 Min SDK version : 8 Target SDK : Android 2.2 Activity Name : MainActivity Layout Name : activity_main
-
Upload
setiya-nugroho -
Category
Documents
-
view
231 -
download
0
Transcript of Android - Dialog Interaktif
7/23/2019 Android - Dialog Interaktif
http://slidepdf.com/reader/full/android-dialog-interaktif 1/8
Modul Praktikum Pemrograman Android 2015
Setiya Nugroho, M.Eng Page 1
MODUL 7.
DIALOG INTERAKTIF
6.1. Tujuan
1. Mengenalkan kepada mahasiswa konsep umum Android
2. Mahasiswa dapat memahami Dialog Interaktif pada Android
3. Mahasiswa dapat membuat program Toast, Prompt dan Alert Dialog
6.2. DASAR TEORI
Pada pertemuan kedua kita akan membuat kotak dialog sebagai sarana interaktif
antara aplikasi dengan pengguna. Pada aplikasi ini akan diimplementasikan 3
macam dialog, antara lain :
Toast dialog
Toast merupakan sebuah class yang digunakan untuk menampilkan
pesan/peringatan pada Android (mirip dengan alert box, message box).
Prompt dialog
Hasil inputan user pada prompt dialog akan ditampilkan pada text view
Alert dialog Alert secara bahasa artinya waspada, tanda, selalu siap. Alert dialog
biasanya digunakan untuk keluar dari aplikasi.
6.3. PELAKSANAAN PRAKTIKUM
1. Jalankan Eclipse, Kemudian Pilih File > New > Android Application Project.
2. Isikan kotak dialog seperti berikut :
Application name : Toast 1
Project name : Toast1
Package name : com.example.toast1
Min SDK version : 8
Target SDK : Android 2.2
Activity Name : MainActivity
Layout Name : activity_main

7/23/2019 Android - Dialog Interaktif
http://slidepdf.com/reader/full/android-dialog-interaktif 2/8
Modul Praktikum Pemrograman Android 2015
Setiya Nugroho, M.Eng Page 2
3. Modifikasi layout di activity_main.xml menjadi seperti dibawah ini :
4. Modifikasi file MainActivity.java seperti dibawah ini :
<LinearLayout xmlns:android="http://schemas.android.com/apk/res/android"
xmlns:tools="http://schemas.android.com/tools"
android:layout_width="match_parent" android:layout_height="match_parent" android:orientation="vertical" >
<EditText android:id="@+id/txt_input" android:layout_width="match_parent" android:layout_height="wrap_content" android:ems="10" > <requestFocus />
</EditText>
<Button
android:id="@+id/btn_tampil" android:layout_width="match_parent" android:layout_height="wrap_content" android:text="Tampil" />
<TextView android:id="@+id/textView1" android:layout_width="wrap_content" android:layout_height="wrap_content" android:layout_gravity="center" android:layout_marginTop="90dp" android:text="Setiya Nugroho, M.Eng" />
<TextView android:id="@+id/textView2" android:layout_width="wrap_content" android:layout_height="wrap_content" android:layout_gravity="center" android:text="Praktikum Mobile Fasilkom Unwidha" />
</LinearLayout>
package com.example.toast1;
import android.os.Bundle;import android.app.Activity;import android.view.View;import android.widget.Button;import android.widget.EditText;import android.widget.Toast;
public class MainActivity extends Activity {private Button btn_tampil;
7/23/2019 Android - Dialog Interaktif
http://slidepdf.com/reader/full/android-dialog-interaktif 3/8
Modul Praktikum Pemrograman Android 2015
Setiya Nugroho, M.Eng Page 3
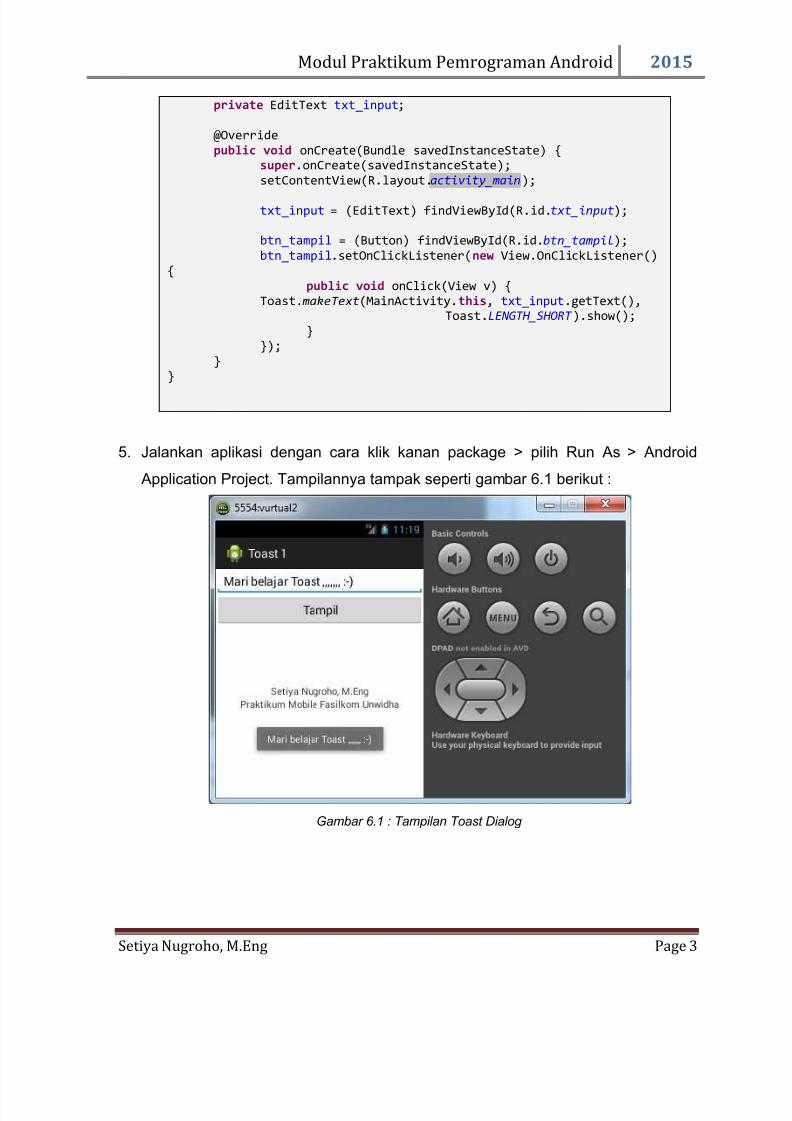
5. Jalankan aplikasi dengan cara klik kanan package > pilih Run As > Android
Application Project. Tampilannya tampak seperti gambar 6.1 berikut :
Gambar 6.1 : Tampilan Toast Dialog
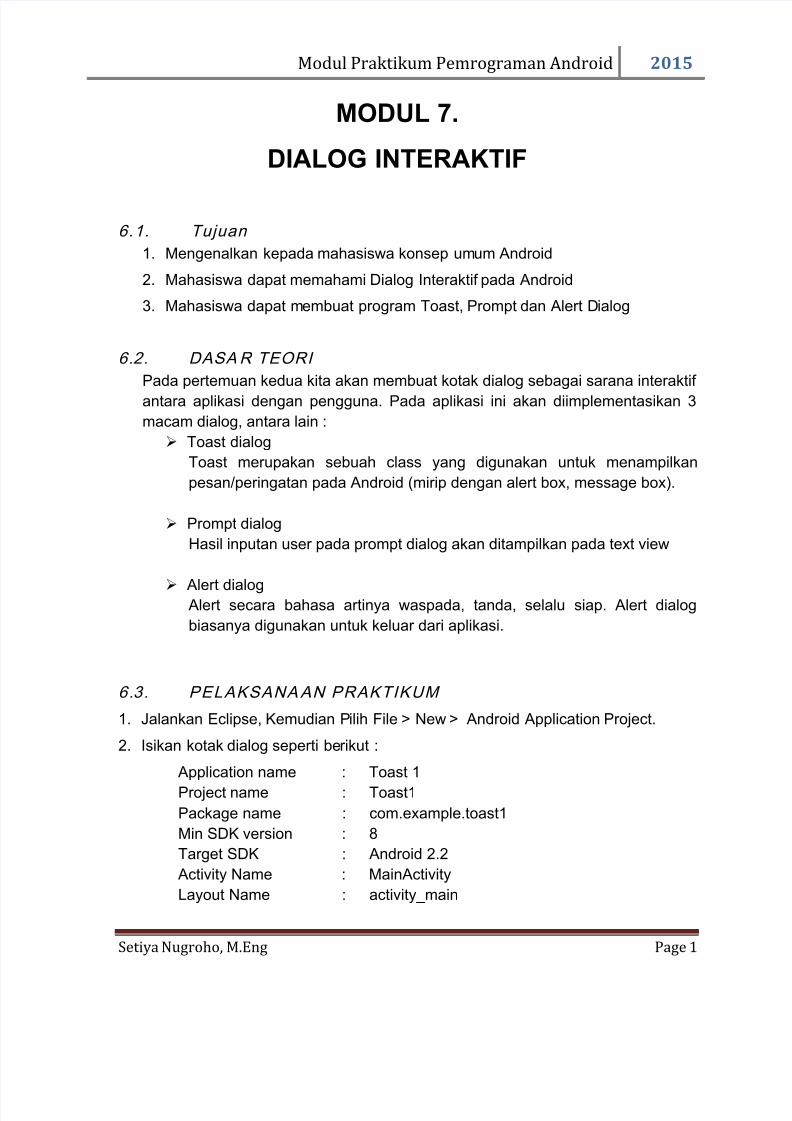
private EditText txt_input;
@Override public void onCreate(Bundle savedInstanceState) {
super.onCreate(savedInstanceState);setContentView(R.layout.activity_main);
txt_input = (EditText) findViewById(R.id.txt_input);
btn_tampil = (Button) findViewById(R.id.btn_tampil);btn_tampil.setOnClickListener(new View.OnClickListener()
{public void onClick(View v) {
Toast. makeText(MainActivity.this, txt_input.getText(),Toast.LENGTH_SHORT ).show();
}});
}}
7/23/2019 Android - Dialog Interaktif
http://slidepdf.com/reader/full/android-dialog-interaktif 4/8
Modul Praktikum Pemrograman Android 2015
Setiya Nugroho, M.Eng Page 4
6.4. Latihan
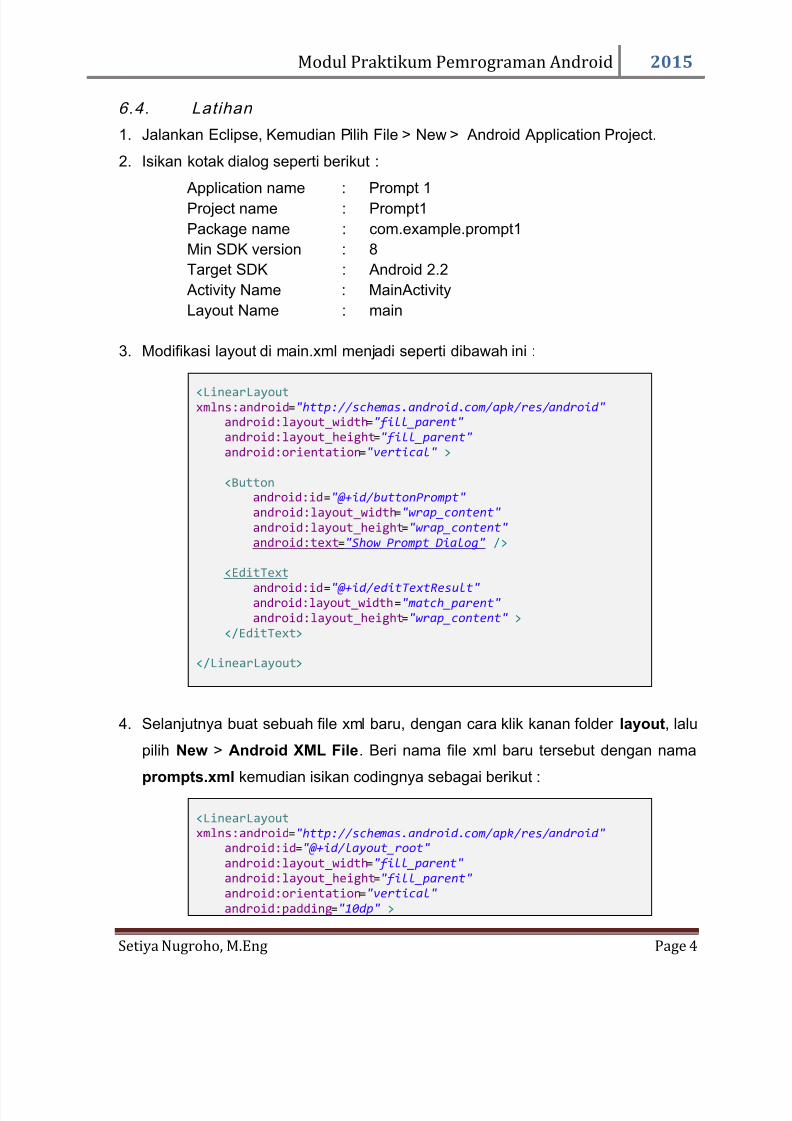
1. Jalankan Eclipse, Kemudian Pilih File > New > Android Application Project.
2. Isikan kotak dialog seperti berikut :
Application name : Prompt 1
Project name : Prompt1
Package name : com.example.prompt1
Min SDK version : 8
Target SDK : Android 2.2
Activity Name : MainActivity
Layout Name : main
3. Modifikasi layout di main.xml menjadi seperti dibawah ini :
4. Selanjutnya buat sebuah file xml baru, dengan cara klik kanan folder layout, lalu
pilih New > Android XML File. Beri nama file xml baru tersebut dengan nama
prompts.xml kemudian isikan codingnya sebagai berikut :
<LinearLayout xmlns:android="http://schemas.android.com/apk/res/android"
android:layout_width="fill_parent" android:layout_height="fill_parent" android:orientation="vertical" >
<Button android:id="@+id/buttonPrompt" android:layout_width="wrap_content" android:layout_height="wrap_content" android:text="Show Prompt Dialog" />
<EditText
android:id="@+id/editTextResult" android:layout_width="match_parent" android:layout_height="wrap_content" >
</EditText>
</LinearLayout>
<LinearLayout xmlns:android="http://schemas.android.com/apk/res/android"
android:id="@+id/layout_root" android:layout_width="fill_parent" android:layout_height="fill_parent" android:orientation="vertical" android:padding="10dp" >

7/23/2019 Android - Dialog Interaktif
http://slidepdf.com/reader/full/android-dialog-interaktif 5/8
Modul Praktikum Pemrograman Android 2015
Setiya Nugroho, M.Eng Page 5
5. Modifikasi file MainActivity.java seperti dibawah ini :
<TextView android:id="@+id/textView1" android:layout_width="wrap_content" android:layout_height="wrap_content" android:text="Type Your Message : "
android:textAppearance="?android:attr/textAppearanceLarge" />
<EditText android:id="@+id/editTextDialogUserInput" android:layout_width="match_parent" android:layout_height="wrap_content" > <requestFocus />
</EditText>
</LinearLayout>
package com.example.prompt2;
import android.app.Activity;import android.app.AlertDialog;import android.content.Context;import android.content.DialogInterface;import android.os.Bundle;import android.view.LayoutInflater;import android.view.View;import android.view.View.OnClickListener;
import android.widget.Button;import android.widget.EditText;
public class MainActivity extends Activity {final Context context = this;private Button button;private EditText result;public void onCreate(Bundle savedInstanceState) {
super.onCreate(savedInstanceState);setContentView(R.layout. main);
// components from main.xml button = (Button) findViewById(R.id.buttonPrompt);
result = (EditText) findViewById(R.id.editTextResult);
// add button listener button.setOnClickListener(new OnClickListener() {
@Override public void onClick(View arg0) {
// get prompts.xml view LayoutInflater li = LayoutInflater. from(context);View promptsView = li.inflate(R.layout. prompts, null);

7/23/2019 Android - Dialog Interaktif
http://slidepdf.com/reader/full/android-dialog-interaktif 6/8
Modul Praktikum Pemrograman Android 2015
Setiya Nugroho, M.Eng Page 6
6. Jalankan aplikasi dengan cara klik kanan package > pilih Run As > Android
Application Project. Tampilannya tampak seperti gambar 6.2 berikut :
Gambar 6.2 : Tampilan Prompt Dialog
AlertDialog.Builder alertDialogBuilder = new AlertDialog.Builder(context);
// set prompts.xml to alertdialog builder alertDialogBuilder.setView(promptsView);
final EditText userInput = (EditText) promptsView.findViewById(R.id.editTextDialogUserInput);
// set dialog message alertDialogBuilder
.setCancelable(false)
.setPositiveButton("OK", new DialogInterface.OnClickListener() {public void onClick(DialogInterface dialog,
int id) {// get user input and set it to result // edit text result.setText(userInput.getText());
}})
.setNegativeButton("Cancel",new DialogInterface.OnClickListener() {public void onClick(DialogInterface dialog, int id) {
dialog.cancel();}
});// create alert dialog
AlertDialog alertDialog = alertDialogBuilder.create();// show it alertDialog.show();
}});
}}

7/23/2019 Android - Dialog Interaktif
http://slidepdf.com/reader/full/android-dialog-interaktif 7/8
Modul Praktikum Pemrograman Android 2015
Setiya Nugroho, M.Eng Page 7
1.5. Tugas
1. Jalankan Eclipse, Kemudian Pilih File > New > Android Application Project.
2. Isikan kotak dialog seperti berikut :
Application name : Alert 3
Project name : Alert3
Package name : com.example.alert3
Min SDK version : 8
Target SDK : Android 2.2
Activity Name : MainActivity
Layout Name : main
3. Modifikasi layout di main.xml menjadi seperti dibawah ini :
4. Modifikasi file MainActivity.java seperti dibawah ini :
<LinearLayout
xmlns:android="http://schemas.android.com/apk/res/android" android:layout_width="fill_parent" android:layout_height="fill_parent" android:orientation="vertical" > <Button
android:id="@+id/buttonAlert" android:layout_width="wrap_content" android:layout_height="wrap_content" android:text="Show Alert Box" />
</LinearLayout>
package com.example.alert3;import android.app.Activity;import android.app.AlertDialog;import android.content.Context;import android.content.DialogInterface;import android.os.Bundle;import android.view.View;import android.view.View.OnClickListener;import android.widget.Button;public class MainActivity extends Activity {
final Context context = this;
private Button button;public void onCreate(Bundle savedInstanceState) {
super.onCreate(savedInstanceState);setContentView(R.layout. main);button = (Button) findViewById(R.id.buttonAlert);// add button listener button.setOnClickListener(new OnClickListener() {
@Override public void onClick(View arg0) {
7/23/2019 Android - Dialog Interaktif
http://slidepdf.com/reader/full/android-dialog-interaktif 8/8
Modul Praktikum Pemrograman Android 2015
Setiya Nugroho, M.Eng Page 8
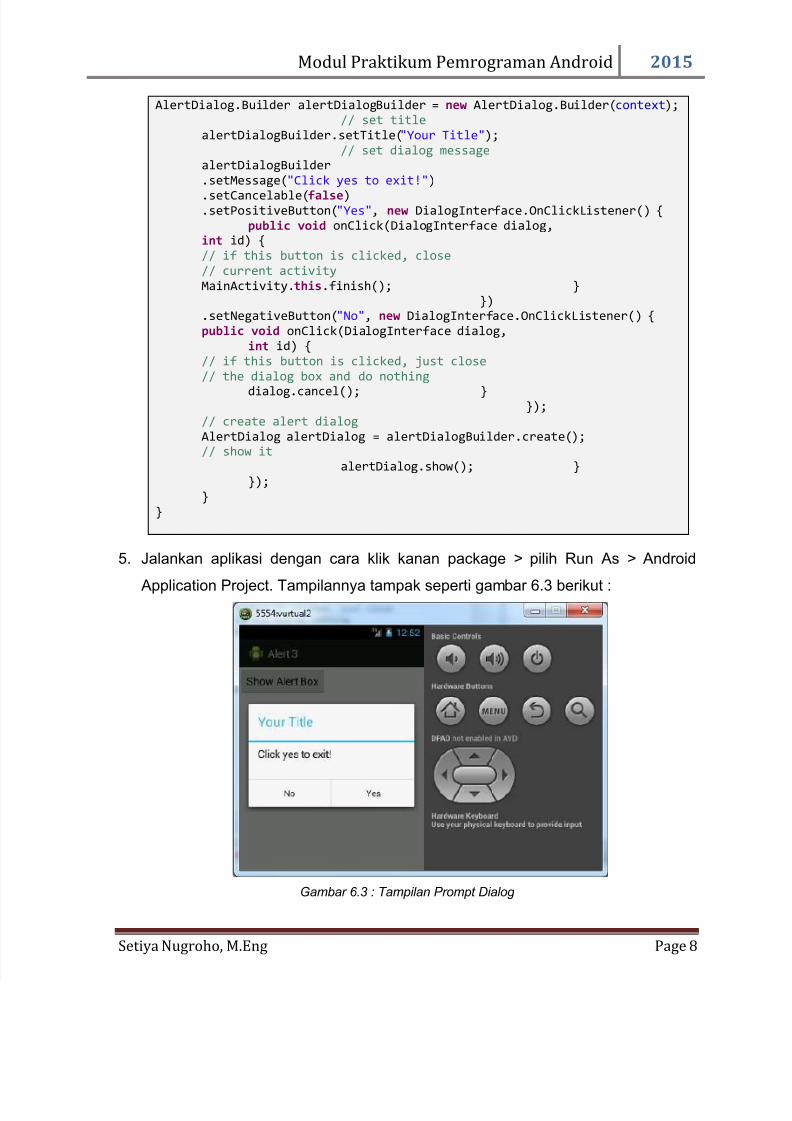
5. Jalankan aplikasi dengan cara klik kanan package > pilih Run As > Android
Application Project. Tampilannya tampak seperti gambar 6.3 berikut :
Gambar 6.3 : Tampilan Prompt Dialog
AlertDialog.Builder alertDialogBuilder = new AlertDialog.Builder(context);// set title
alertDialogBuilder.setTitle("Your Title");// set dialog message
alertDialogBuilder.setMessage("Click yes to exit!")
.setCancelable(false)
.setPositiveButton("Yes", new DialogInterface.OnClickListener() {public void onClick(DialogInterface dialog,
int id) {// if this button is clicked, close // current activity MainActivity.this.finish(); }
}).setNegativeButton("No", new DialogInterface.OnClickListener() {public void onClick(DialogInterface dialog,
int id) {// if this button is clicked, just close // the dialog box and do nothing
dialog.cancel(); }});
// create alert dialog AlertDialog alertDialog = alertDialogBuilder.create();// show it
alertDialog.show(); }});
}}