Alberta Labour Market Link · 1 Alberta Labour Market Link Web-Based Tool for Tacking Turnaround...
13
1 Alberta Labour Market Link Web-Based Tool for Tacking Turnaround and Maintenance Construction Projects Getting Started Guide (October 2009) The following provides a general overview of how to access and use the LML tracking system . . . http://alberta.labourmarketlink.com/
Transcript of Alberta Labour Market Link · 1 Alberta Labour Market Link Web-Based Tool for Tacking Turnaround...

1
Alberta Labour Market Link
Web-Based Tool for Tacking Turnaround and Maintenance Construction Projects
Getting Started Guide (October 2009)
The following provides a general overview of how to access and use the LML tracking system . . .
http://alberta.labourmarketlink.com/
2
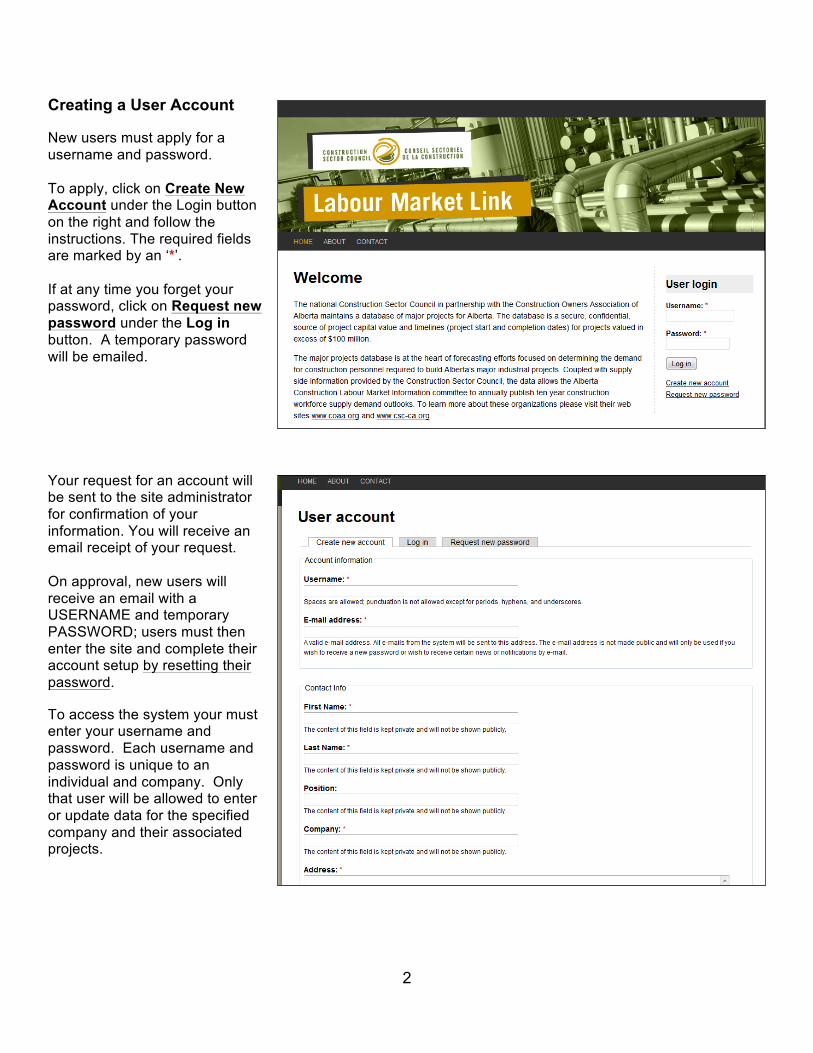
Creating a User Account New users must apply for a username and password. To apply, click on Create New Account under the Login button on the right and follow the instructions. The required fields are marked by an ‘*’. If at any time you forget your password, click on Request new password under the Log in button. A temporary password will be emailed. Your request for an account will be sent to the site administrator for confirmation of your information. You will receive an email receipt of your request. On approval, new users will receive an email with a USERNAME and temporary PASSWORD; users must then enter the site and complete their account setup by resetting their password. To access the system your must enter your username and password. Each username and password is unique to an individual and company. Only that user will be allowed to enter or update data for the specified company and their associated projects.

3
Dashboard Upon entering the model, the first screen to appear is the Dashboard. This is the control center through which users can enter new projects and shutdowns, access their existing projects, add/edit trade requirements data, and generate summary charts of existing project data. Data for ongoing maintenance projects should be entered under the Turnaround / Maintenance section. Entering Project Data Before entering project data, you must select the Turnaround / Maintenance category on the Dashboard screen. Example: select Register a new Turnaround project and the create project information screen will appear indicating the types of data required – fields with a ‘red star’ (*) are mandatory. You will enter data on project name, location, project status, project description (optional), start and end dates, estimated cost, primary contact and an alternate contract (optional). You must first assign a project name and then select the owner name from the pick list.
New users will need to add their Company name by clicking ‘here’ to add a new owner. Once you have added the owner, you will be returned to this page.

4
After entering the project name and owner, you must enter information describing the project.
Select the Project Status from the pick list.
• Announced • Environmental / Regulatory
Approval Applied For • Environmental / Regulatory
Approval Applied Received • Board Approval for Full
Expenditure Received • Construction has Commenced • Construction Completed
Select the Project Type; • Maintenance • On-going maintenance • Turnaround.
Select the Industry Type from the pick list. If you don’t see your industry on the pick list, please contact the system Administrator and it will be added.

5
Select the region where the project is located from the pick list. The province is separated into selected geographic regions, based on Statistics Canada economic regions.
If unknown, select ‘Other’ and add a comment in the project description section.
Enter the estimated cost of the shutdown. Indicate the project value by entering the entire cost, or by selecting dollars (X1), millions or billions.
Note: It is recommended that you enter a Project Value, but this is not a required field for maintenance projects.

6
Enter construction start/end dates (year, month and day) for the shutdown.
The start date should be the date that the project actually begins to use construction labour.
Assign a Primary Contact for each project by selecting from the pick list or click on ‘here’ under the Primary Contact field to enter the new contact information. The primary contact should be the person responsible to update / validate the information and will be the key contact should there be questions by the system administrator.
Users can assign more than one contact by selecting and entering information for a Secondary Contact. It is recommended that you enter a Project Description, but this is not a required field.
Upon completion click ‘Save’ Note: When an owner enters a project, the information is immediately available to the owner for editing and graphing. However, before that information populates the aggregate database, it will be reviewed by the System Administrator for approval to ensure there are no material errors or omissions that would skew the aggregate output.
7
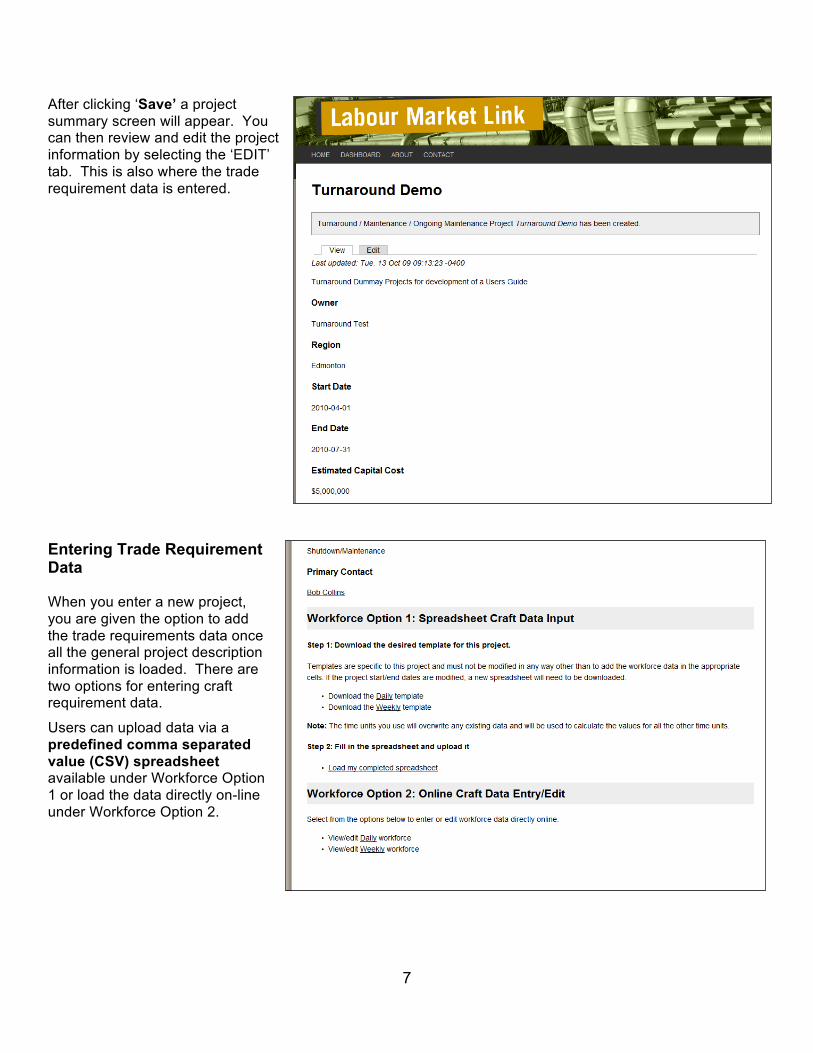
After clicking ‘Save’ a project summary screen will appear. You can then review and edit the project information by selecting the ‘EDIT’ tab. This is also where the trade requirement data is entered.
Entering Trade Requirement Data When you enter a new project, you are given the option to add the trade requirements data once all the general project description information is loaded. There are two options for entering craft requirement data.
Users can upload data via a predefined comma separated value (CSV) spreadsheet available under Workforce Option 1 or load the data directly on-line under Workforce Option 2.
8
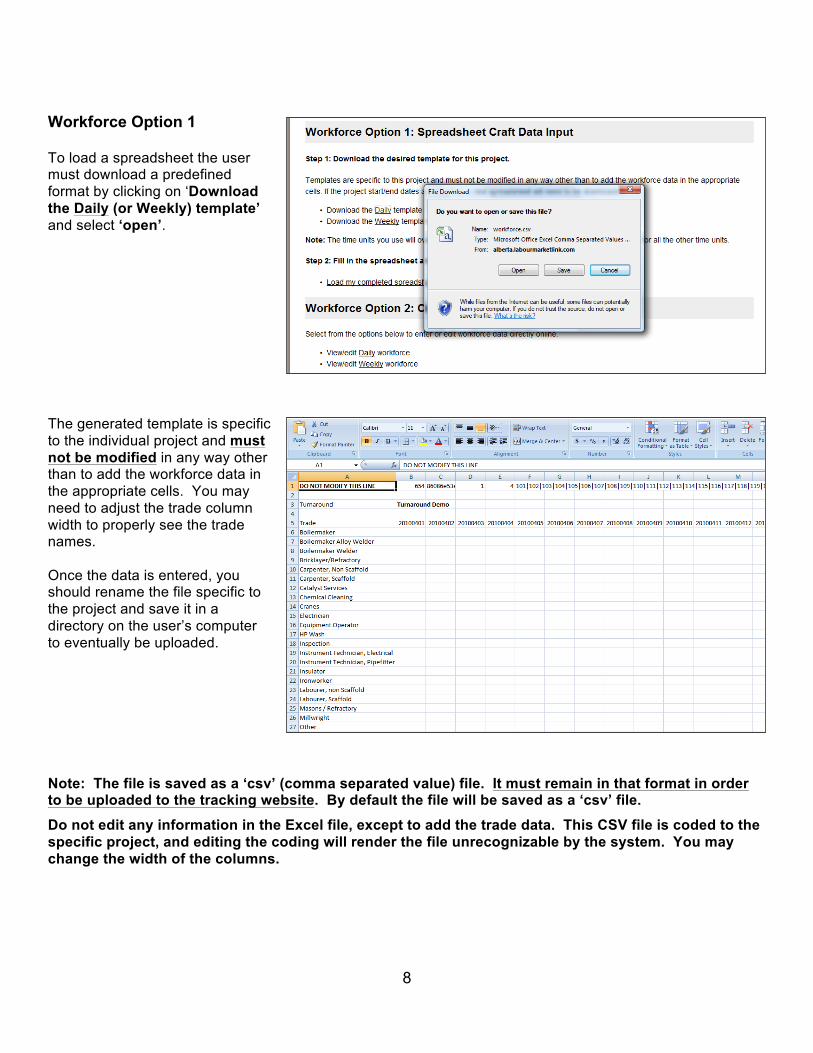
Workforce Option 1 To load a spreadsheet the user must download a predefined format by clicking on ‘Download the Daily (or Weekly) template’ and select ‘open’. The generated template is specific to the individual project and must not be modified in any way other than to add the workforce data in the appropriate cells. You may need to adjust the trade column width to properly see the trade names. Once the data is entered, you should rename the file specific to the project and save it in a directory on the user’s computer to eventually be uploaded. Note: The file is saved as a ‘csv’ (comma separated value) file. It must remain in that format in order to be uploaded to the tracking website. By default the file will be saved as a ‘csv’ file. Do not edit any information in the Excel file, except to add the trade data. This CSV file is coded to the specific project, and editing the coding will render the file unrecognizable by the system. You may change the width of the columns.
9
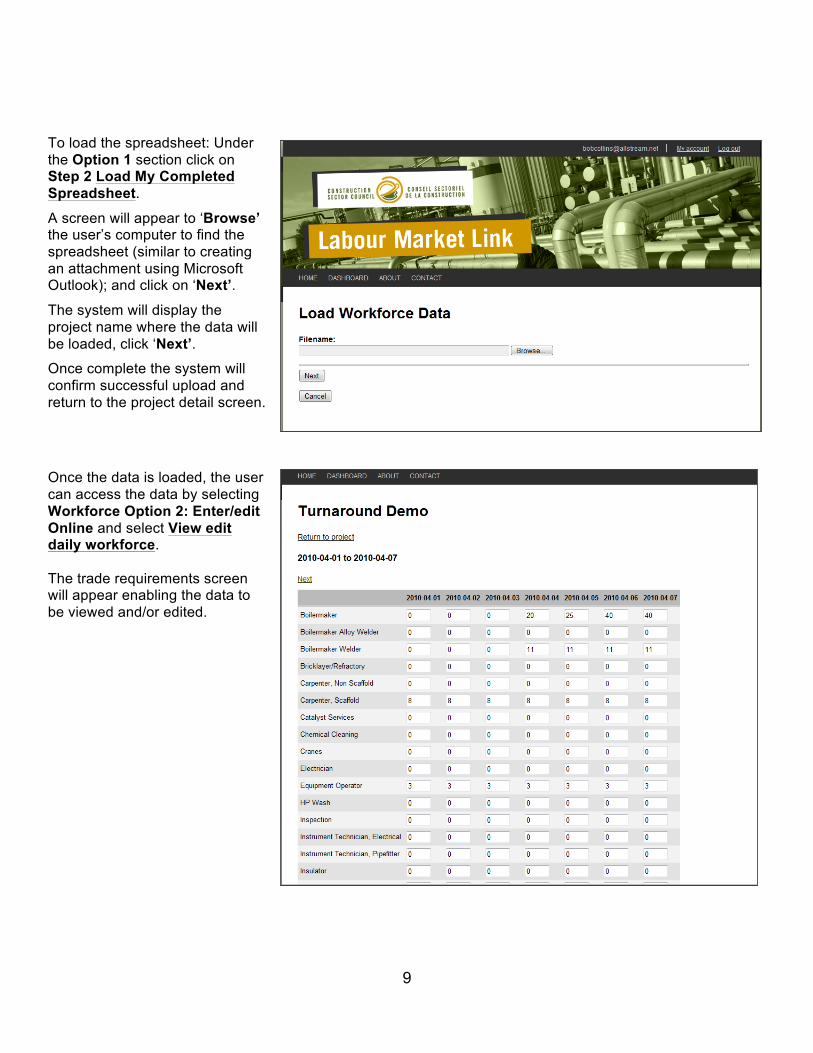
To load the spreadsheet: Under the Option 1 section click on Step 2 Load My Completed Spreadsheet. A screen will appear to ‘Browse’ the user’s computer to find the spreadsheet (similar to creating an attachment using Microsoft Outlook); and click on ‘Next’. The system will display the project name where the data will be loaded, click ‘Next’. Once complete the system will confirm successful upload and return to the project detail screen.
Once the data is loaded, the user can access the data by selecting Workforce Option 2: Enter/edit Online and select View edit daily workforce. The trade requirements screen will appear enabling the data to be viewed and/or edited.

10
Workforce Option 2
Users can directly enter the craft data online by selecting “View edit Daily (or Weekly) workforce” under Workforce Option 2: Enter/edit Online.
Once selected, a data entry template (trades as rows and time period as the columns) will appear with dates matching the start and end dates defined in the project profile. Only seven (7) days will appear on the screen at a time, click ‘next’ to move to the next time period.
Once complete, click on ‘Save Workforce Data’ at the bottom of the page and a screen will appear indicating that the workforce data has been saved.
This process is effective, but is more time consuming because it requires tabbing between the various time unit and trade to enter the trade requirement data.
Accessing the Projects List
To list all the projects for your company go to the Dashboard and click View/edit existing projects (#). Only projects belonging to the owner who is signed into the model will be accessible from the dashboard. The number of projects is indicated in parentheses. You will be able to see… • List of your company projects • Primary contact • Secondary contact (if any) • All users signed up through
your company who have access to those projects and their access rights.

11
To access a project, click on the project name. Labour Demand Graphs To generate labour demand graphs, click on ‘Generate labour demand graphs for Turnaround/Maintenance’ and follow the steps indicated. Note: The system will only return labour demand graphs according to the search protocol you set. The model will NOT produce an output unless there is sufficent project data in the aggregate to ensure that an individual owner, contractor and/or project will not be identified.
12
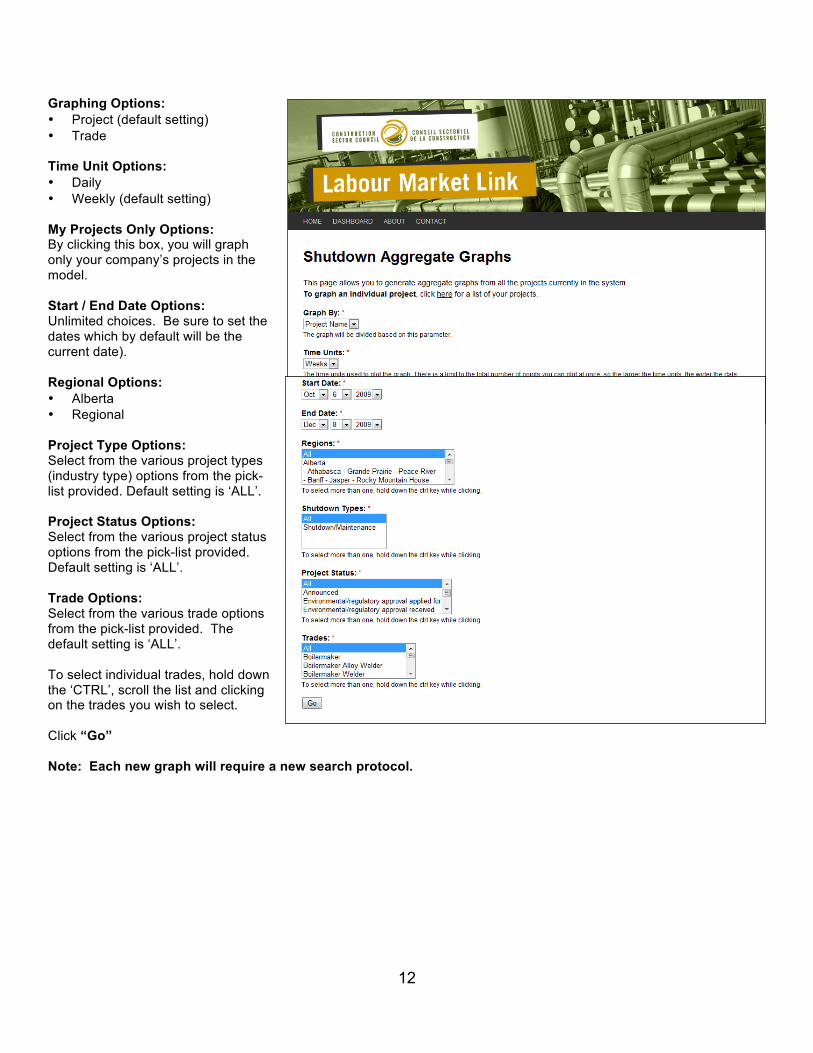
Graphing Options: • Project (default setting) • Trade Time Unit Options: • Daily • Weekly (default setting) My Projects Only Options: By clicking this box, you will graph only your company’s projects in the model. Start / End Date Options: Unlimited choices. Be sure to set the dates which by default will be the current date). Regional Options: • Alberta • Regional Project Type Options: Select from the various project types (industry type) options from the pick-list provided. Default setting is ‘ALL’. Project Status Options: Select from the various project status options from the pick-list provided. Default setting is ‘ALL’. Trade Options: Select from the various trade options from the pick-list provided. The default setting is ‘ALL’. To select individual trades, hold down the ‘CTRL’, scroll the list and clicking on the trades you wish to select. Click “Go” Note: Each new graph will require a new search protocol.

13
Example Graph: Workforce by Trade All graphical information in the model will be available for download in tabular format. The model will enable you to download an Excel CSV file with the graphical information in table format. Note: The system will only return labor demand graphs according to the search protocol as defined by the user. The system will NOT produce an output unless there is sufficent project data in the aggregate to ensure that an individual owner and/or project will not be identified.