After cropping out all of the pieces from GIMP we are...
25
Sea Monkey After cropping out all of the pieces from GIMP we are ready to begin putting the pieces back together in Sea Monkey. If we were to layout all of the pieces on a table we would have graphics that looked like: Sea Monkey Tutorial 1
-
Upload
nguyenkhanh -
Category
Documents
-
view
216 -
download
0
Transcript of After cropping out all of the pieces from GIMP we are...

Sea Monkey After cropping out all of the pieces from GIMP we are ready to begin putting the pieces back together in Sea Monkey. If we were to layout all of the pieces on a table we would have graphics that looked like:
Sea Monkey Tutorial 1

Launch Sea Monkey This screen should be your introductory page when Sea Monkey launches. Sea Monkey is both a browser (the old Netscape Navigator browser) and a HTML editor (old Netscape Composer application.) When Sea Monkey launches you will see the browser as below. We want to begin to work with Composer. Under the File menu, find “New” and then “Composer Page.”
Sea Monkey Tutorial 2
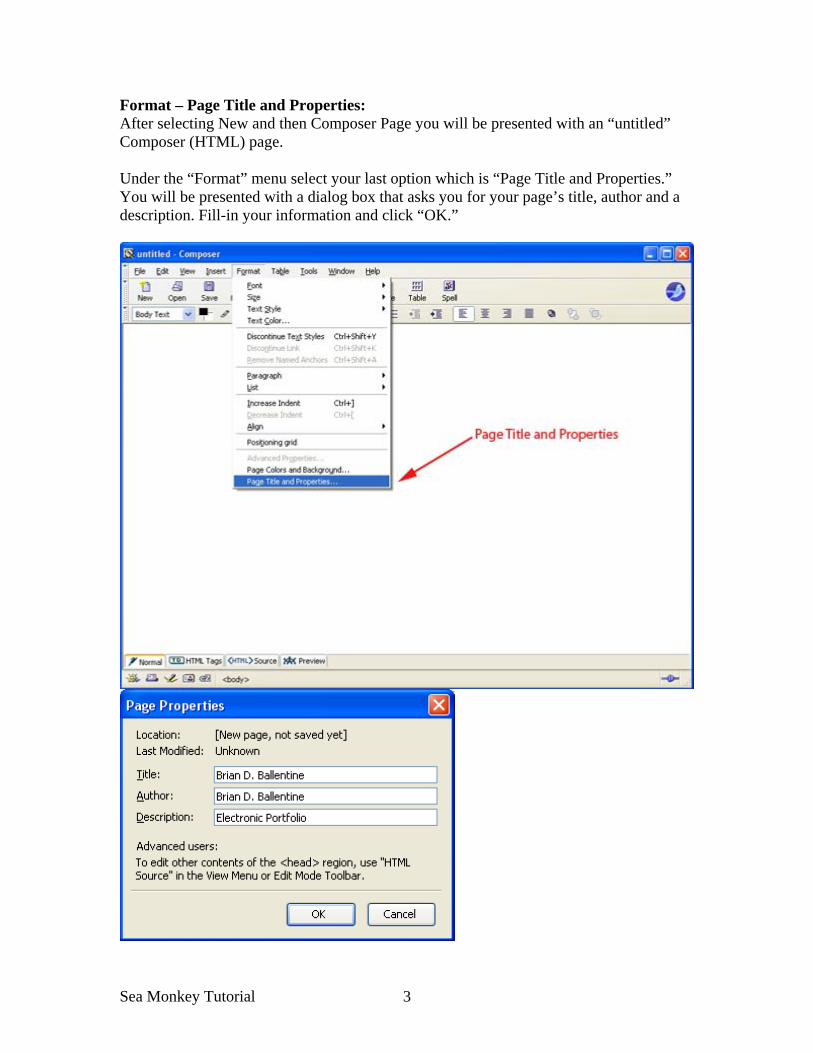
Format – Page Title and Properties: After selecting New and then Composer Page you will be presented with an “untitled” Composer (HTML) page. Under the “Format” menu select your last option which is “Page Title and Properties.” You will be presented with a dialog box that asks you for your page’s title, author and a description. Fill-in your information and click “OK.”
Sea Monkey Tutorial 3

Save the page: Now that we have titled our page we need to save it. Under the “File” menu select “Save.” Make sure you save this file in the SAME DIRECTORY AS YOUR IMAGES FILES/PIECES. This will make life much easier on us in a moment. After you are sure you are in the correct directory, save this page as “index”. Sea Monkey will automatically append the “.html” extension to your file name. When a web browser is pointed at a directory the browser automatically scans for and displays the page saved as “index.” For example, the path: http//:community.wvu.edu/~bdb026/305/portfolio Inside the “portfolio” directory is a page called “index.html” that automatically loads when the browser is pointed at that directory. In other words, the path could also look like: http//:community.wvu.edu/~bdb026/305/portfolio/index.html After saving:
Sea Monkey Tutorial 4

Tables The easiest and most effective way to assemble our pieces (and make sure the pieces stay in place) is to use tables. You may have used tables in applications like Word. In HTML, think of tables as empty containers that you can use to hold content – whether that content happens to be the images you’ve cropped or just some text that you type-in, it doesn’t matter. Under the “Table” menu select “Insert” and then “Table.” You will see the following preferences menu.
All you are doing here is creating a rectangular container to hold the first graphic you cropped out of GIMP which is your name or ‘top’ JPG image. 1 row by 1 column at 800 pixels wide. Enter “0” for the border width and hit “Advance Edit”.
Sea Monkey Tutorial 5

Tables – Advanced Edit screen: After you click “Advanced Edit” you will see the following:
Make sure the cellspacing and cellpadding values are changed to 0 and click “OK.” You will see the “Insert Table” dialog box from the previous page. Click “OK” again.
Sea Monkey Tutorial 6
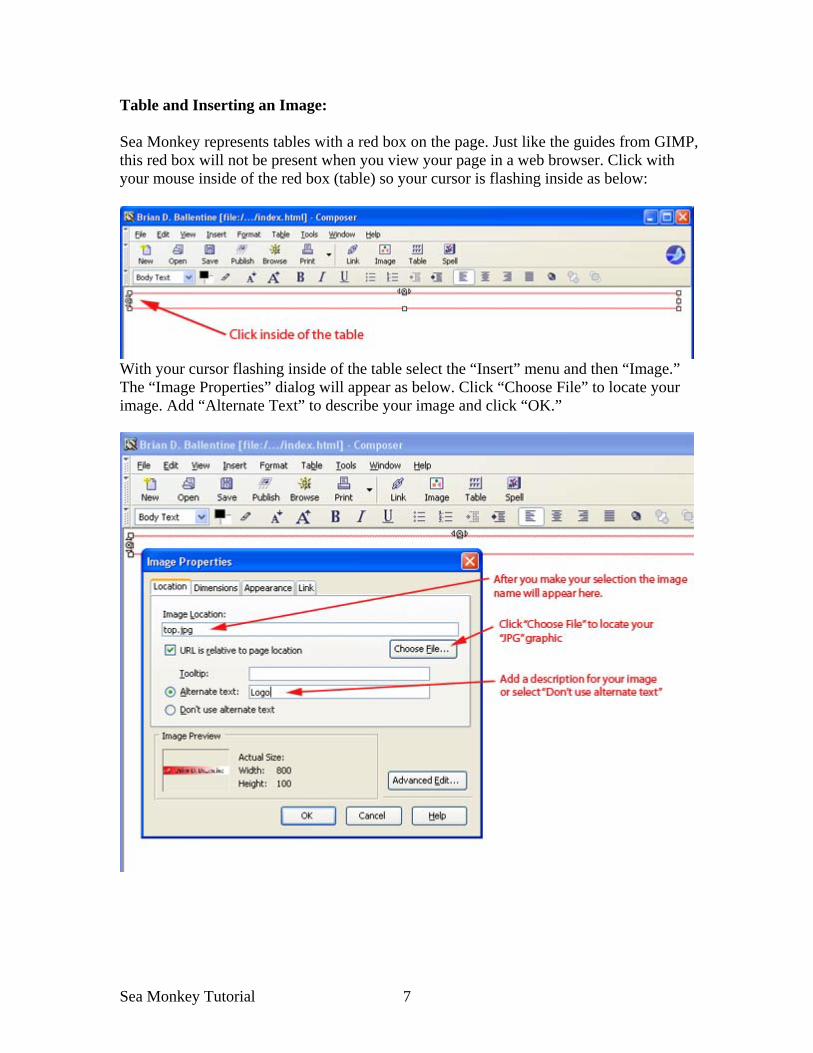
Table and Inserting an Image: Sea Monkey represents tables with a red box on the page. Just like the guides from GIMP, this red box will not be present when you view your page in a web browser. Click with your mouse inside of the red box (table) so your cursor is flashing inside as below:
With your cursor flashing inside of the table select the “Insert” menu and then “Image.” The “Image Properties” dialog will appear as below. Click “Choose File” to locate your image. Add “Alternate Text” to describe your image and click “OK.”
Sea Monkey Tutorial 7
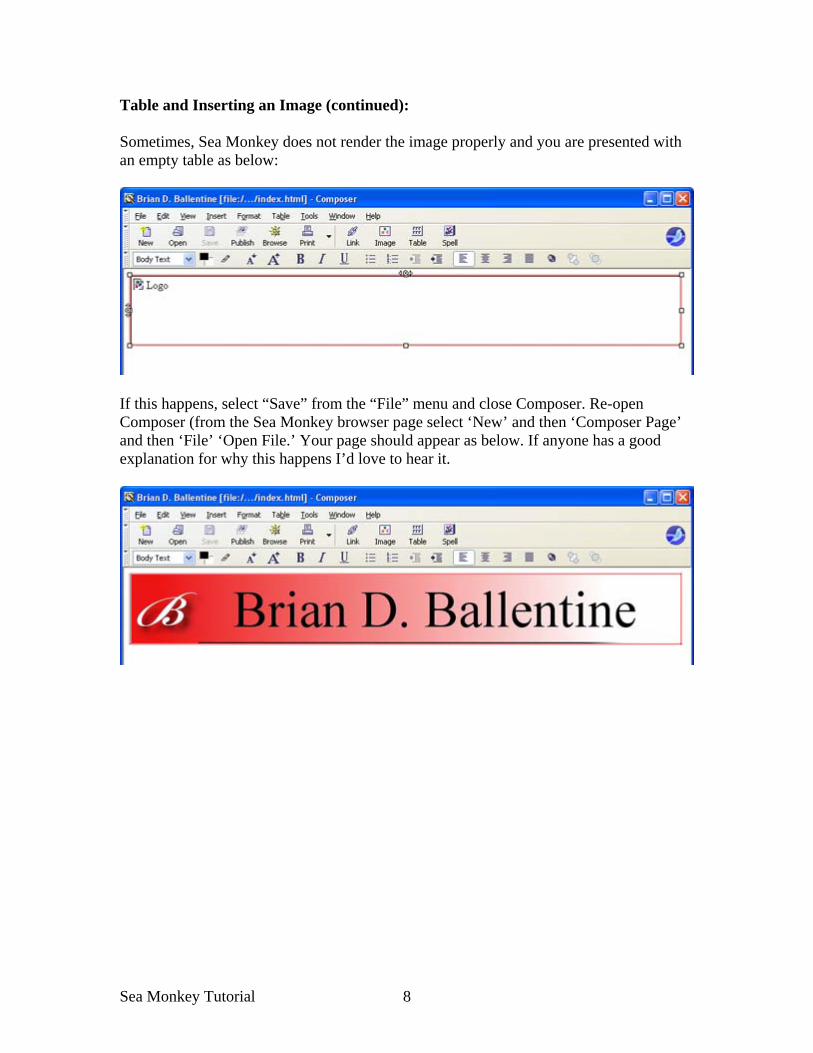
Table and Inserting an Image (continued): Sometimes, Sea Monkey does not render the image properly and you are presented with an empty table as below:
If this happens, select “Save” from the “File” menu and close Composer. Re-open Composer (from the Sea Monkey browser page select ‘New’ and then ‘Composer Page’ and then ‘File’ ‘Open File.’ Your page should appear as below. If anyone has a good explanation for why this happens I’d love to hear it.
Sea Monkey Tutorial 8

Add table #2: Make sure that your cursor is now flashing outside (below) your table and your image. You can do this just by clicking anywhere outside of the image but inside of the HTML page. We need to add our next table. In HTML, tables “stack.” As the cursor is flashing below the first table, when you insert the next table, it will actually appear below the first. So, use the “Table” menu and “Insert” and select “Table.” This time, we want a 1 row but a 2 column table. Everything else will be the same as pages 5 and 6 where you must add “0s” for the table properties. Don’t forget to click on “Advanced Edit.”
Click “OK” after you make changes in the “Advanced Edit” section too (see page 6).
Sea Monkey Tutorial 9
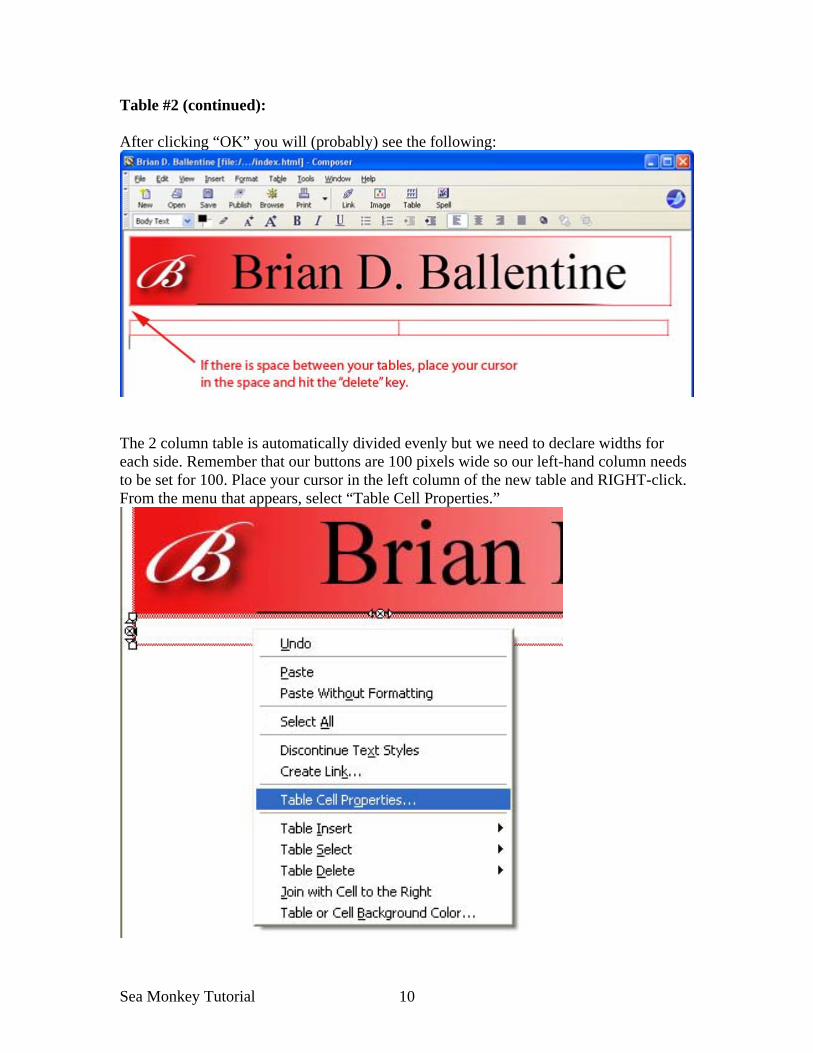
Table #2 (continued): After clicking “OK” you will (probably) see the following:
The 2 column table is automatically divided evenly but we need to declare widths for each side. Remember that our buttons are 100 pixels wide so our left-hand column needs to be set for 100. Place your cursor in the left column of the new table and RIGHT-click. From the menu that appears, select “Table Cell Properties.”
Sea Monkey Tutorial 10
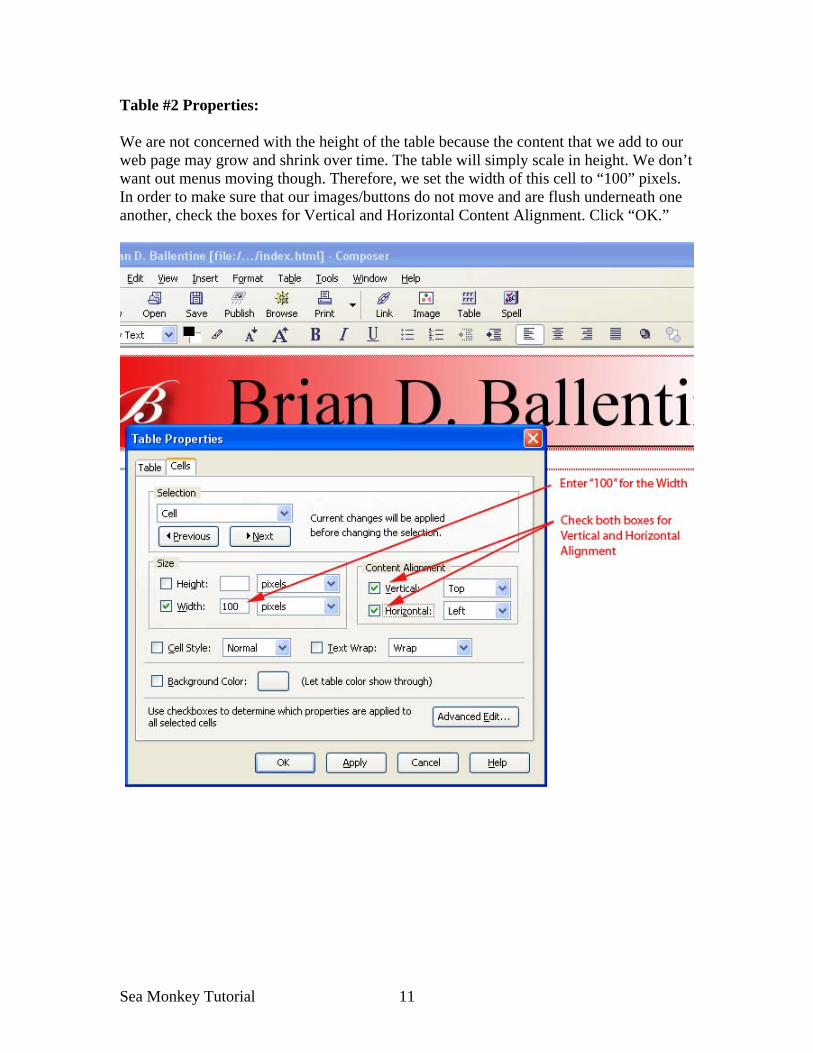
Table #2 Properties: We are not concerned with the height of the table because the content that we add to our web page may grow and shrink over time. The table will simply scale in height. We don’t want out menus moving though. Therefore, we set the width of this cell to “100” pixels. In order to make sure that our images/buttons do not move and are flush underneath one another, check the boxes for Vertical and Horizontal Content Alignment. Click “OK.”
Sea Monkey Tutorial 11
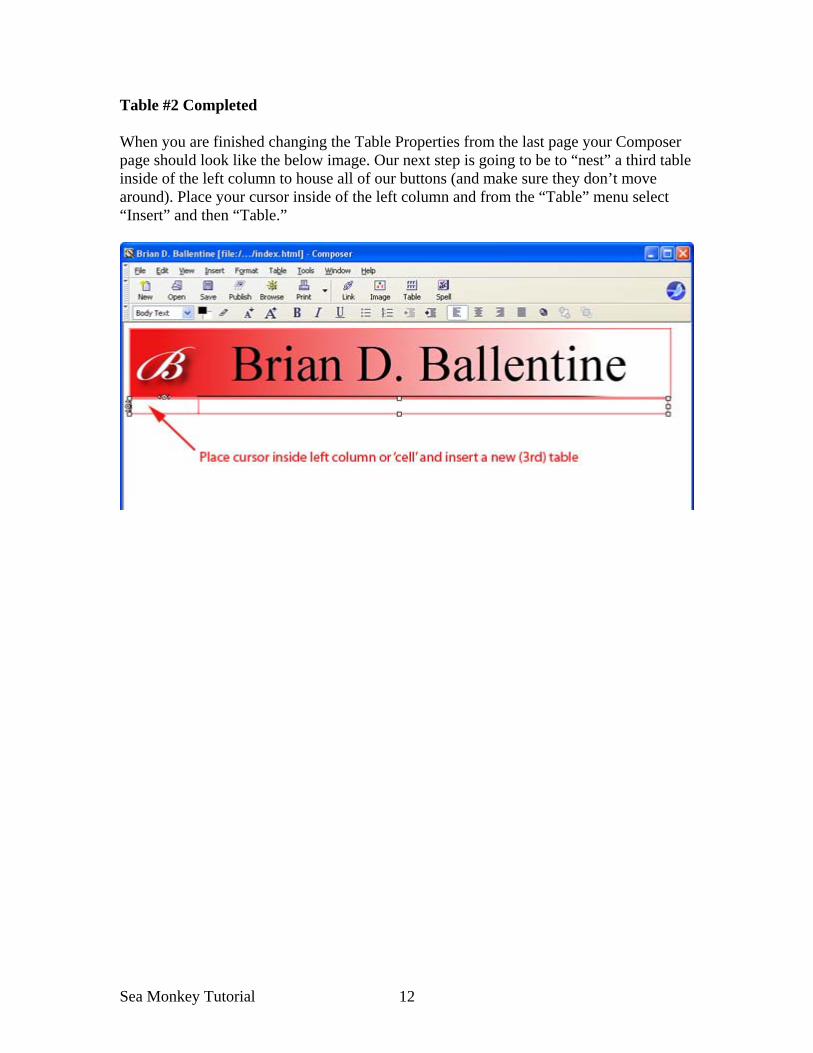
Table #2 Completed When you are finished changing the Table Properties from the last page your Composer page should look like the below image. Our next step is going to be to “nest” a third table inside of the left column to house all of our buttons (and make sure they don’t move around). Place your cursor inside of the left column and from the “Table” menu select “Insert” and then “Table.”
Sea Monkey Tutorial 12
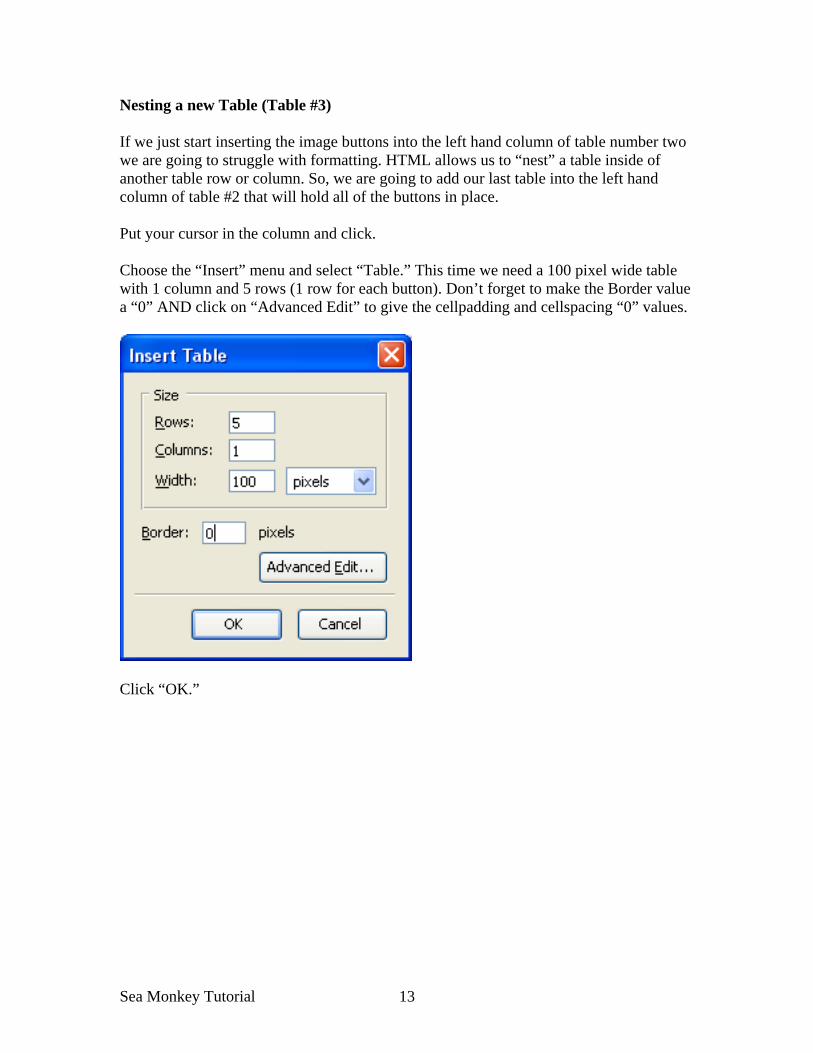
Nesting a new Table (Table #3) If we just start inserting the image buttons into the left hand column of table number two we are going to struggle with formatting. HTML allows us to “nest” a table inside of another table row or column. So, we are going to add our last table into the left hand column of table #2 that will hold all of the buttons in place. Put your cursor in the column and click. Choose the “Insert” menu and select “Table.” This time we need a 100 pixel wide table with 1 column and 5 rows (1 row for each button). Don’t forget to make the Border value a “0” AND click on “Advanced Edit” to give the cellpadding and cellspacing “0” values.
Click “OK.”
Sea Monkey Tutorial 13
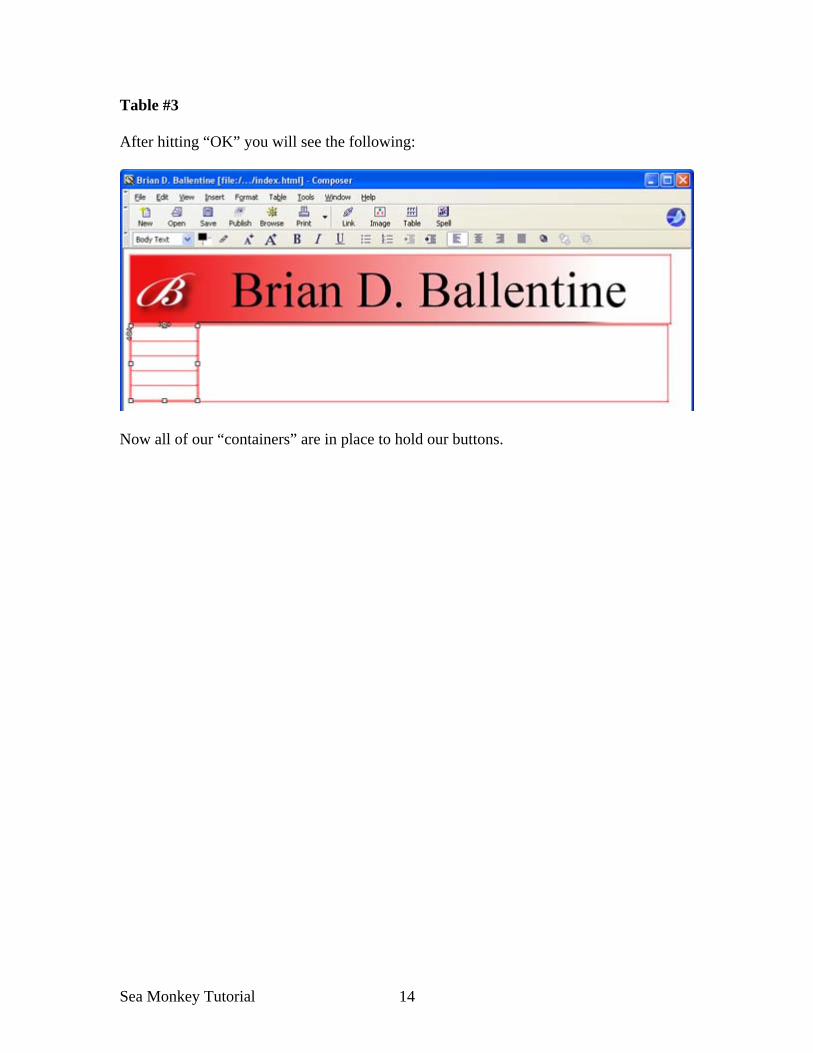
Table #3 After hitting “OK” you will see the following:
Now all of our “containers” are in place to hold our buttons.
Sea Monkey Tutorial 14

Adding the Buttons: Click inside the first row of table #3 and the cursor should flash inside. Inserting these buttons is a little different than just inserting an image in that we will make them live links. Select the “Insert” menu and then select “Image” just as we did on page 7. The image properties dialog box will appear. Find the image for your home button.
Don NOT click “OK” just yet. Instead, click on the “Link” tab.
Sea Monkey Tutorial 15

Adding a Link to your button: Before closing your “Image Properties” dialog box click on the “Link” tab on the far right of the dialog box. Your “home” page is your “index.html” page.
Type in “index.html” and click “OK.” The result is shown below.
Sea Monkey Tutorial 16

Repeat the process for the additional buttons: This tutorial will take you through inserting one more button. Place your cursor in the next row below the “Home” button and click the “Insert” menu and then “Image.”
Before clicking “OK” click on the “Link” tab to create your button’s link.
Sea Monkey Tutorial 17

Button #2 Just as we did on page 16, add a link to your button.
Sea Monkey Tutorial 18
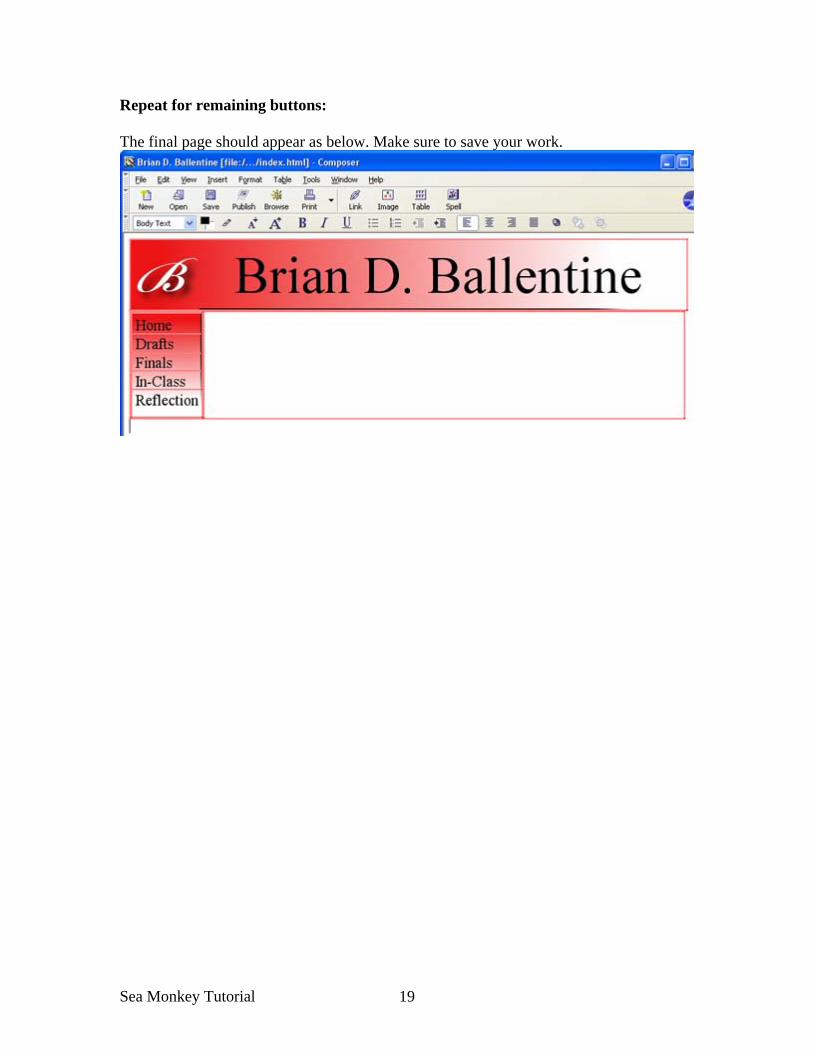
Repeat for remaining buttons: The final page should appear as below. Make sure to save your work.
Sea Monkey Tutorial 19

Save As I saved my HTML page as “index.html” and now I need to create my remaining HTML pages based on the links that I specified with each of my buttons. That is, I need to create pages called drafts.html, finals.html, inclass.html, and reflection.html. We “make” those pages by simply using the Save As function. Under the “File” menu select “Save As” and each time rename the page to one of your needed pages.
Sea Monkey Tutorial 20
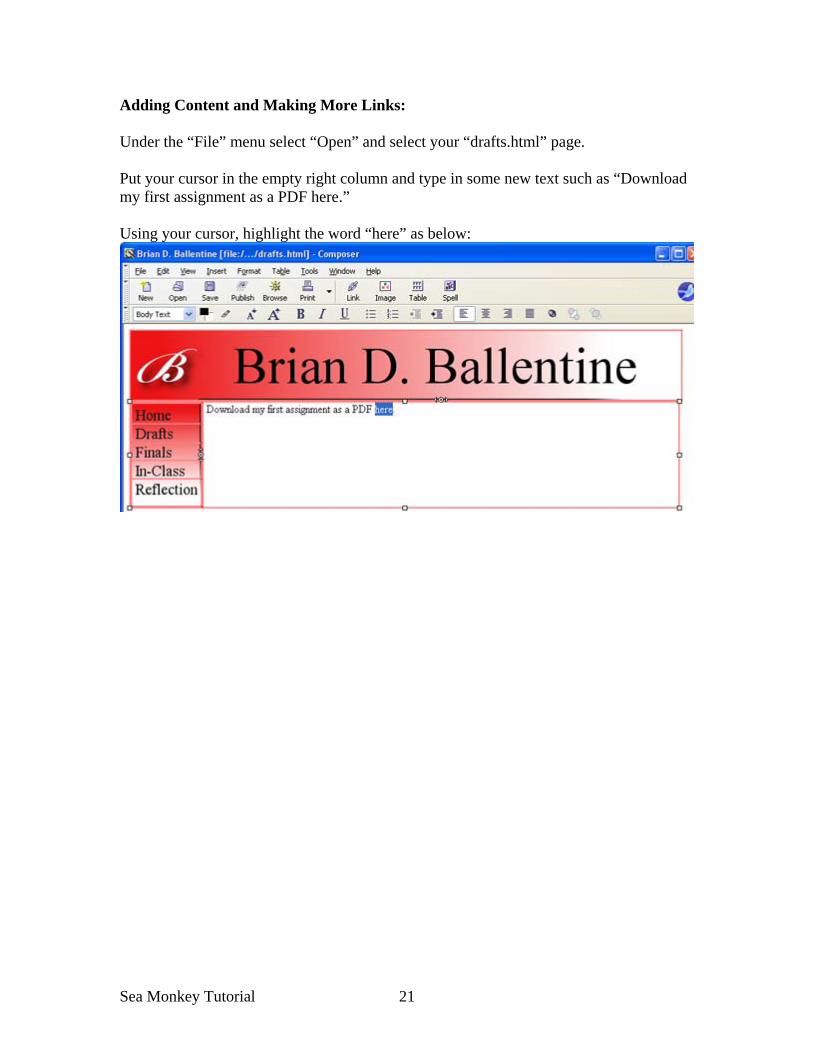
Adding Content and Making More Links: Under the “File” menu select “Open” and select your “drafts.html” page. Put your cursor in the empty right column and type in some new text such as “Download my first assignment as a PDF here.” Using your cursor, highlight the word “here” as below:
Sea Monkey Tutorial 21

Adding Content and Making More Links (continued): Right click on the highlighted area and from the menu select “Create Link.” A dialog box will appear asking you to select the file you wish to link to.
Sea Monkey Tutorial 22
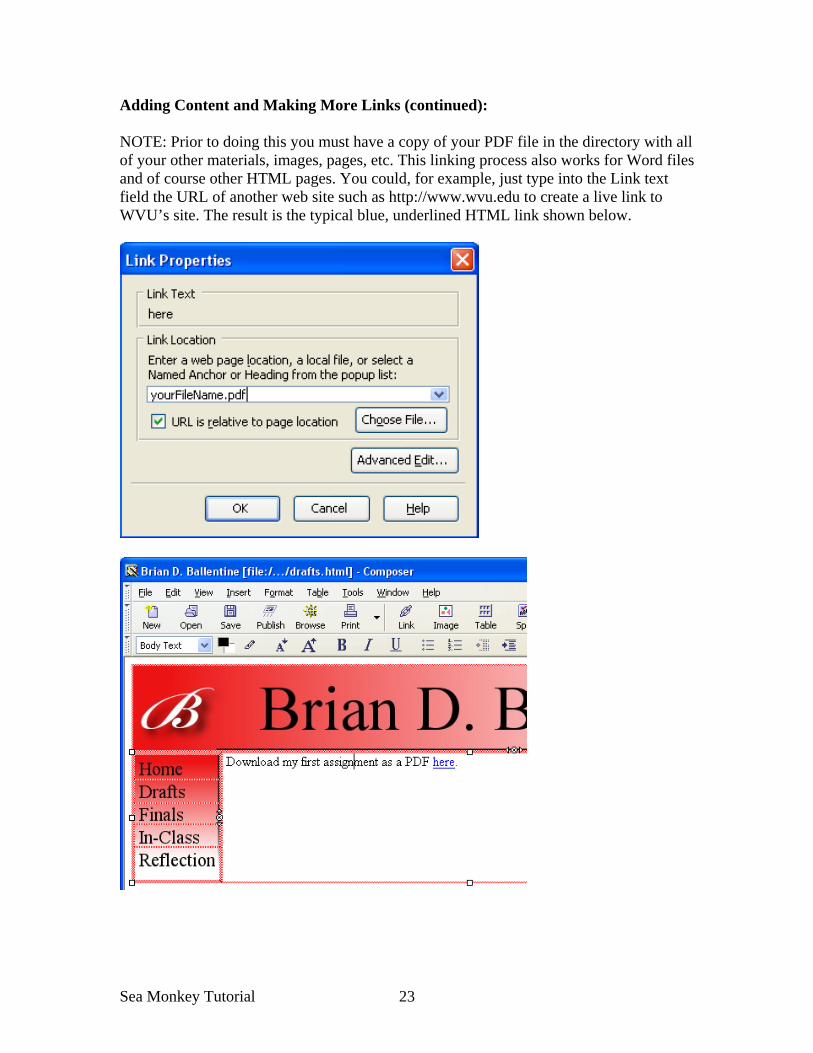
Adding Content and Making More Links (continued): NOTE: Prior to doing this you must have a copy of your PDF file in the directory with all of your other materials, images, pages, etc. This linking process also works for Word files and of course other HTML pages. You could, for example, just type into the Link text field the URL of another web site such as http://www.wvu.edu to create a live link to WVU’s site. The result is the typical blue, underlined HTML link shown below.
Sea Monkey Tutorial 23

Testing! Save everything you have worked on and open your index page if it is not already open. Switch to the browser version of Sea Monkey (or open Firefox or Internet Explorer) and click the “File” menu and select “Open.” Find your index.html page and select it. Once your page is open try clicking on your links to make sure they all work. Screen shot:
Sea Monkey Tutorial 24
Sea Monkey Tutorial 25
FTP (Getting your files online) Directions for hosting your web page with the university are found here: http://oit.wvu.edu/web/community/ Directions for determining your Central ID are here: http://oit.wvu.edu/centralid/ You will need to know your (or register for) a Central ID. The ID will be the last portion of your free web space. E.g., my ID is bdb026 and my URL is: community.wvu.edu/~bdb026 There is free software (SSH Software) available to download to do the actual file transferring. The computers in the White Computer lab as well as our Colson classroom computers all have this software pre-installed. Documentation on how to use that software is here: http://oit.wvu.edu/web/community/ssh-win.php