Adobe photoshop cc on demand 8
28
Working with layers Introduction To be successful with Adobe Photoshop, you need to be in control. You need to control color, to control elements of the design, and you even need to control the order of design ele- ments. If control is what you crave, then layers, more than any other feature, help you achieve that control. Layers give you the ability to separate individual elements of your design, and then control how those elements appear. You can think of layers as a group of transparent sheets stacked on top of each other. Through the creative use of these electronic sheets, you can blend the elements of two or more layers, and create layers to adjust and control contrast, brightness, and color balance. You can even group layers together to help organize and manage your design. Layers are a digital designer's canvas, and they are just as real as a stretched canvas is to a natural media designer. The strokes you apply to a real canvas, using a brush, are equiva- lent to strokes in a Photoshop layer when you use any of the painting tools. The natural artist may use oils or watercolor in the design while the Photoshop artist uses electronic ink. The Layers panel allows you to view the image almost as if you were actually painting or designing with natural media. However, our canvas-the Layers panel-goes far beyond anything possible in the "real" world. In Photoshop, using multiple layers is the way to control the information within a document. There are times when you will create several layers; each layer will contain a sepa- rate aspect of the total design. Having multiple layers allows you to adjust and move each element independently. Eventually, multiple layers may no longer be necessary. However, you might not want to link them together, or even place them within the same folder. Instead, you might want to combine them into a single unit. Once again, Photoshop comes to the rescue by giving you several options for com- bining layers without flattening the entire document. f"'i ••••••••• What You'll Do Understand the Layers Panel Define Layer Designations and Attributes Create a New Layer Select Layers Create a Layer Group Create a Selection from a Layer Create a Layer from a Selection Convert a Background into a Layer Control Image Information Using the Layers Panel Filter and Isolate Layers Move and Copy Layers Duplicate and Delete Layers Use Merge Layer Options link and Unlink Layers Align and Combine Layers Use Smart Guides to Align Layers Work with Layer Blending Modes Set Layer Opacity Work with the Layer Comps Panel Export Layers as Files Set Layers Panel Options 113
-
Upload
kamal-naser -
Category
Education
-
view
172 -
download
0
Transcript of Adobe photoshop cc on demand 8

Working with layers
Introduction
To be successful with Adobe Photoshop, you need to be incontrol. You need to control color, to control elements of thedesign, and you even need to control the order of design ele-ments. If control is what you crave, then layers, more thanany other feature, help you achieve that control. Layers giveyou the ability to separate individual elements of yourdesign, and then control how those elements appear.You canthink of layers as a group of transparent sheets stacked ontop of each other. Through the creative use of these electronicsheets, you can blend the elements of two or more layers,and create layers to adjust and control contrast, brightness,and color balance. You can even group layers together tohelp organize and manage your design.
Layers are a digital designer's canvas, and they are just asreal as a stretched canvas is to a natural media designer. Thestrokes you apply to a real canvas, using a brush, are equiva-lent to strokes in a Photoshop layer when you use any of thepainting tools. The natural artist may use oils or watercolor inthe design while the Photoshop artist uses electronic ink.TheLayers panel allows you to view the image almost as if youwere actually painting or designing with natural media.However, our canvas-the Layers panel-goes far beyondanything possible in the "real" world.
In Photoshop, using multiple layers is the way to controlthe information within a document. There are times whenyou will create several layers; each layer will contain a sepa-rate aspect of the total design. Having multiple layers allowsyou to adjust and move each element independently.Eventually, multiple layers may no longer be necessary.However, you might not want to link them together, or evenplace them within the same folder. Instead, you might wantto combine them into a single unit. Once again, Photoshopcomes to the rescue by giving you several options for com-bining layers without flattening the entire document.
f"'i •••••••••
What You'll Do
Understand the Layers Panel
Define Layer Designationsand Attributes
Create a New Layer
Select Layers
Create a Layer Group
Create a Selection from a Layer
Create a Layer from a Selection
Convert a Background into a Layer
Control Image Information Using theLayers Panel
Filter and Isolate Layers
Move and Copy Layers
Duplicate and Delete Layers
Use Merge Layer Options
link and Unlink Layers
Align and Combine Layers
Use Smart Guides to Align Layers
Work with Layer Blending Modes
Set Layer Opacity
Work with the Layer Comps Panel
Export Layers as Files
Set Layers Panel Options
113

Understanding the Layers Panel
Link Layers. Hold down the Shift key andclick to select two or more layers, and thenclick this button to link the layers.Add Layer Style. Click this button, and thenselect from the available layer styles.Add Layer Mask. Click this button to apply alayer mask to the active layer. Click this asecond time to add a vector mask to theactive layer.Create New Fill or Adjustment Layer. Clickthis button, and then select from the avail-able fill or adjustment layers.Create New Group. Click this button to cre-ate a new group. A group is a folder whereyou can drag, store, and organize layers.Create New Layer. Click this button to cre-ate a new layer in the active document.Delete Layer. Click this button to delete theactive layer.Layers Options. Click this button to access amenu of layer-specific commands.
Layers Options
Opacity
Fill
Add Layer Style Create New Layer
t). CJ ili'i Delete Layer-1-1-Create New Fill or Adjustment Layer Create New Group
With the Layers panel, you can control ele-ments of a Photoshop design by assigningseparate layers to each individual object. Inaddition, Layer effects control the applicationof everything from drop shadows to gradientoverlays, and adjustment layers let you controlcolor overlays and image corrections. Toaccess the Layers panel, select the Layerspanel or, if the Layers panel is not visible, clickthe Window menu, and then click Layers.Layer Filter options. Select this option to findlayers based on filter criteria, such as Kind,Name, Effect, Mode, Attribute, and Color.Blending Modes. Select this option to changehow two or more layers interact or "blend."Opacity. Select a value from 0% to 100%tochange the opacity of the selected layers.Fill. Select a value from 0% to 100%to changethe opacity of the active layer without chang-ing the opacity of any applied layer styles.Lock options. Click the LockTransparent Pixels,Lock Image Pixels, Lock Position, or LockAllbutton for one or more layers.
Layer Filter options
Blending Modes
Lock options
r 1~ ov.rl~ylb..!l _
Background
Add Layer Mask -+----..,
114 Chapter 5

Defining Layer Designations and Attributes
Not only does Photoshop give you the abilityto generate layers, it allows you to generatelayers with different designations. The desig-nation of a layer determines the type of infor-mation the layer contains. For example, a typelayer holds editable text, and a mask layerholds image masks.The ability to control thedesignation of a layer helps to organize thedifferent elements that typically make up aPhotoshop image.
Background. The Background is a unique typeof layer element (technically, it's not called theBackground layer, just the Background).Backgrounds are always positioned at the bot-tom of the layer stack and they cannot bemoved. In addition, the Background does notsupport transparency.
Layer. Clicking the Create New Layer buttoncreates Photoshop layers. New layers arealways inserted directly above the activelayer. All of Photoshop's drawing and shapetools, as well as opacity and fill and blendingmode options, are available to use on layerscreated with this method, except for type.These "traditional" layers can be moved upand down in the layer stack by dragging themwhere you want them.
Type. To create aType layer, select one ofPhotoshop'sType tools, click in the active doc-ument and begin typing. Photoshop automati-cally creates the Type layer directly above theactive layer in the Layers panel.
Mask. Masks are applied to a layer by clickingthe Add Layer Mask button on the Layerspanel. Masks serve a function; they createtransparent areas in the visible image. Usemasks to remove elements of an image with-out physically erasing them.
Vector. Shape layers control vector data bythe use of a vector mask.You can create ashape layer in one of several ways: select thePen tool from the tool box, click Shape fromthe list arrow (located on the Options bar) andbegin drawing, or select any of Photoshop'sshape tools using the Shape option. TheVector layer type provides options for fill andstroke.
Adjustment. Adjustment layers let you controleverything from contrast to color. To create anAdjustment layer, click the Create New Fill orAdjustment Layer button, and then selectfrom the available options. The adjustmentlayer is placed directly above the active layerand controls the information in all the under-lying layers. You can also choose from one ofthe 16 icons in the Adjustments panel.
~IOpacity: [iOO~ElI Normal
lode.:
--- Type<!!> T Snic y
-~rp iil<!!> ~_~"-bu_lb -""-,,,;,- Shape
<!!> [!]s 11composite Mask
<!!> [!J overlay
<!!> I IAliiII $ D levels 1
Layer
-~- Adjustment
Background fil----i-- Background
c- fx.
Chapter 5 Working withLayers 115
Creating a New Layer
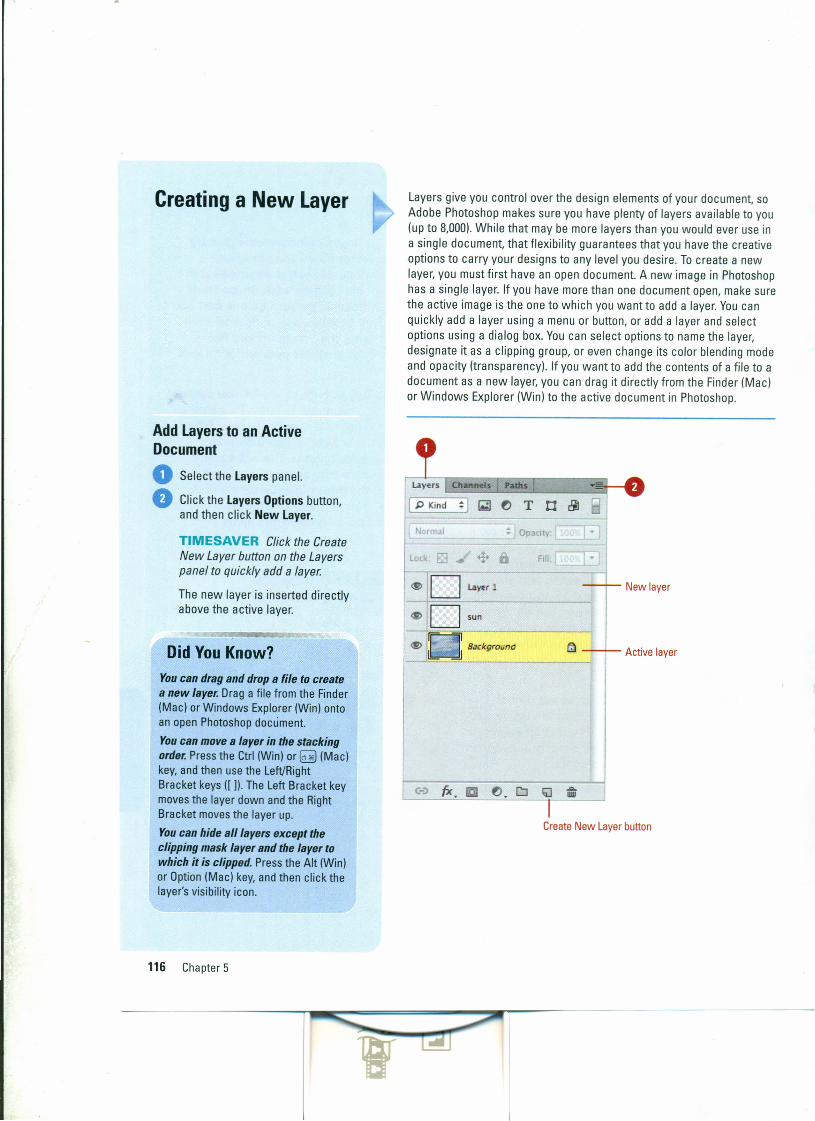
Add Layers to an ActiveDocumento Select the layers panel.
• Click the layers Options button,and then click New layer.
TIMESAVER Click the CreateNew Layer button on the Layerspanel to quickly add a layer.
The new layer is inserted directlyabove the active layer.
Did You Know?You can drag and drop a file to createa new layer. Drag a file from the Finder(Mac) or Windows Explorer (Win) ontoan open Photoshop document.You can move a layer in the stackingorder. Press the Ctrl (Win) or ~ (Mac)key, and then use the Left/RightBracket keys ([ )). The Left Bracket keymoves the layer down and the RightBracket moves the layer up.You can hide all layers except theclipping mask layer and the layer towhich it is clipped. Press the Alt (Win)or Option (Mac) key, and then click thelayer's visibility icon.
116 Chapter 5
Layers give you control over the design elements of your document, soAdobe Photoshop makes sure you have plenty of layers available to you(up to 8,000).While that may be more layers than you would ever use ina single document, that flexibility guarantees that you have the creativeoptions to carry your designs to any level you desire. To create a newlayer, you must first have an open document. A new image in Photoshophas a single layer. If you have more than one document open, make surethe active image is the one to which you want to add a layer. You canquickly add a layer using a menu or button, or add a layer and selectoptions using a dialog box. You can select options to name the layer,designate it as a clipping group, or even change its color blending modeand opacity (transparency). If you want to add the contents of a file to adocument as a new layer, you can drag it directly from the Finder (Mac)or Windows Explorer (Win) to the active document in Photoshop.
..••.uw
New layer\IZ)D Layer
\IZ)~D._sun _
\IZ)[ J Bac/(grolJnd eJ --+- Active layer-----
CreateNew Layerbutton

Add Layers and Select Options
o Select the layers panel.
• Hold down the Alt (Win) or Option(Mac) key, and then click theCreate New layer button to openthe New Layer dialog box.
o Select the layer options you want:
• Name. Enter the name of thelayer into the Name box.
• Use Previous layer to CreateClipping Mask. Select thischeck box to use the imageinformation in the previouslayer to mask the elements ofthe new layer.
• Calor. This option lets youcolor-code your layers. Clickthe Color list arrow, and thenselect from the availablecolors.
• Mode. Click the Mode listarrow, and then select from theavailable blending modes.
• Opacity. This option controlsthe visibility of the new layer.Select a value from 0% to100% .
• Click OK.
Did You Know?Youcan control to which layers theadjustment is applied. To confine theeffects of an adjustment layer to thelayer immediately below, hold downthe Alt (Win) or Option (Mac) key, andthen click on the visible line separatingthe adjustment layer from the nextlower layer.
,..... -11
~lO;JrJTtl.lJl
I Normal ! r Opacity: 110<»' I . ILoci<: •• '*' 6 Fill:~
<11> 0 moonlb dI _
<I> D sun
<11> 0 Background
New Layer
Name: Imoon I ( OK l+-eoUse Previous Layer to Create Clipping Mask [ Cancel 1
Color: [ _x None : 1Mode: [ Normal : 1 Opacity:~%
(No neutral color exists for Normal mode.)
For Your Information
Selecting Layer OptionsWhen you create a new blank layer, the size of the file does notincrease. It's only when you begin painting, or adding information tothe layer that the size of the Photoshop document will begin to grow.For example, creating a blank layer in a document with a file size of10 MB does nothing to increase the size of the file. However, open-ing a 10 MB file, and creating a copy of the original document layer,will create a file size of 20 MB. Layers are great creative tools, butyou only want to use them when you need them. Remember, per-formance is directly related to the size of the active document file,and the bigger the file size, the slower Photoshop performs.
Chapter 5 Working with Layers 117
Selecting Layers
Select Layerso Open a multi-layered document.
o Select multiple layers in the Layerspanel using the following options:
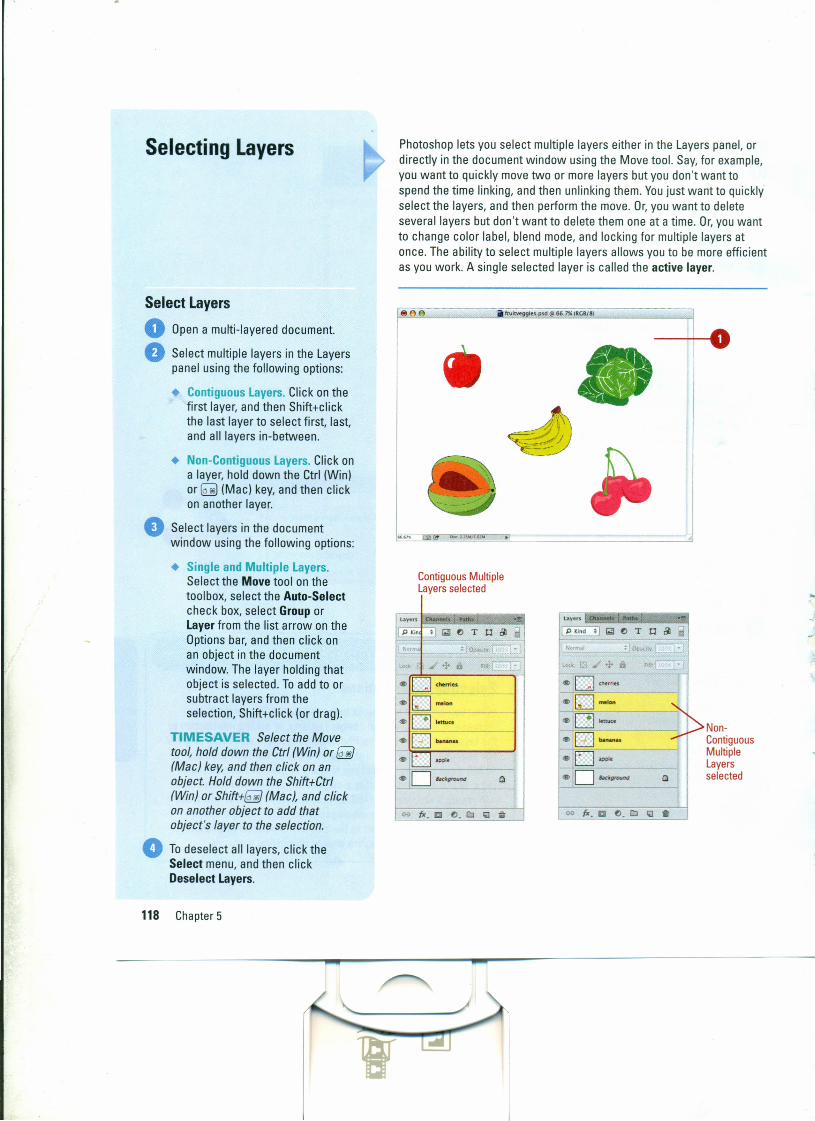
• Contiguous Layers. Click on thefirst layer, and then Shitt-cfickthe last layer to select first, last,and all layers in-between.
• Non-Contiguous Layers. Click ona layer, hold down the Ctrl (Win)or ~ (Mac) key, and then clickon another layer .
•• Select layers in the documentwindow using the following options:
• Single and Multiple Layers.Select the Move tool on thetoolbox, select the Auto-Selectcheck box, select Group orLayer from the list arrow on theOptions bar, and then click onan object in the documentwindow. The layer holding thatobject is selected. To add to orsubtract layers from theselection, Shift-click (or drag).
TIMESAVER Select the Movetool, hold down the Ctrl (Win) or fiiJ(Mac) key, and then click on anobject. Hold down the Shitt-Ctrt(Win) or Shift+fiiJ (Mac), and clickon another object to add thatobject's layer to the selection .
• To deselect all layers, click theSelect menu, and then clickDeselect Layers.
118 Chapter 5
Photoshop lets you select multiple layers either in the Layers panel, ordirectly in the document window using the Move tool. Say, for example,you want to quickly move two or more layers but you don't want tospend the time linking, and then unlinking them. You just want to quicklyselect the layers, and then perform the move. Or, you want to deleteseveral layers but don't want to delete them one at a time. Or, you wantto change color label, blend mode, and locking for multiple layers atonce. The ability to select multiple layers allows you to be more efficientas you work. A single selected layer is called the active layer.
iifruitwggles.psd tt 66.1" (ReS/8)
-~O
cit
..•,
..
Non-ContiguousMultipleLayersselected
Contiguous MultipleLayers selected
u.yers C~nneb '.ath. -15
P "'n , \0,;1 e T n 8l 9--N'}fm ,
p " -L
c _'l' Ii , -
·Ucharries
*~mo •••
<W>~lettuce
---.,0 bAn••,,"
·UUpit'•D IHkground e
-
(x.D tl.CJ IOl~
La~n cu..as Patbs
IP",nd 'I lOll e T
", ,
cS> Uch.rrts
.~lr.tll(..
•0 buwtu
-rr-* D Ioc • .....,.
(x.D tl.CJ IOl
•••••••••

Creating a LayerGroup
Create a Layer Group or NestedLayer Group
o Open a document.o Select the Layers panel.
o If the document contains a layergroup, click the triangle to expandthe group, and then select one ofthe layers within the group tocreate a nested group.
TIMESAVER Tocollapse orexpand all groups, press Ctrl (Win)or~ (Mac), and click a triangle .
• Click the Create New Group buttonon the Layers panel, or pressCtrltG (Win) or ~tG (Mac).
Photoshop creates a layer group.
TIMESAVER Toquickly createa Layer Group, hold down the Shiftkey and click the layers you wantin the group, click the LayersOptions button, and then clickNew Group from Layers.e To add layers to the group, draglayers from the Layers panel ontothe folder icon of the group.
o To remove layers from the group,drag them from the group backinto the Layers panel.
Layer groups help to bring organization to large, multi-layered docu-ments. Photoshop layer groups give you control over all the layerswithin the group at one time. For example, multiple layers within a groupcan all be hidden or locked with one click of a button. In addition, if youclick on the Group name, you can transform or move all the layerobjects within the group as one unit and even add effects and adjust-ments to them. If you remove an item from the group, you also removethe effect or adjustment. To further help organize your Layers panel,Photoshop lets you create nested groups. Nested groups are groupsthat are located within other groups. Layer groups can be nested morethan five levels deep. When you nest groups, you control all of thegroups by clicking on the main group's name, or you can control theindividual groups by selecting the nested group name.
Newgroup
.•....."'" • + 11 "'" +11
• .,.f:) lI'd5 • .• €:) "'d,
• [iblntl • [j!i b.rcll
• [J.il""" • .,. e:t /liated.-CI
• GJ.i ••• , • [J.ilb>nU
• .•. €:) '*-lteC~ca • [j!i ••••
• [j!iblO4 • ~~l
• [j!i I:t.rcl5 • [j!i Ikfd5
• [rilk"" • ~-..06-Okt9f'OU!X' ·O&lc:~(x. a ().D
•• 'Yb lirdt.
• [j!i b.":H• [J.il bcn::l2
• G:Ji bnfl
• [j!i bo:r04• [j!i b.td5•• ~Ord6
•
(x. a ().D <il •
Expandtriangle
Chapter 5 Working with Layers 119
Creating a Selectionfrom a Layer
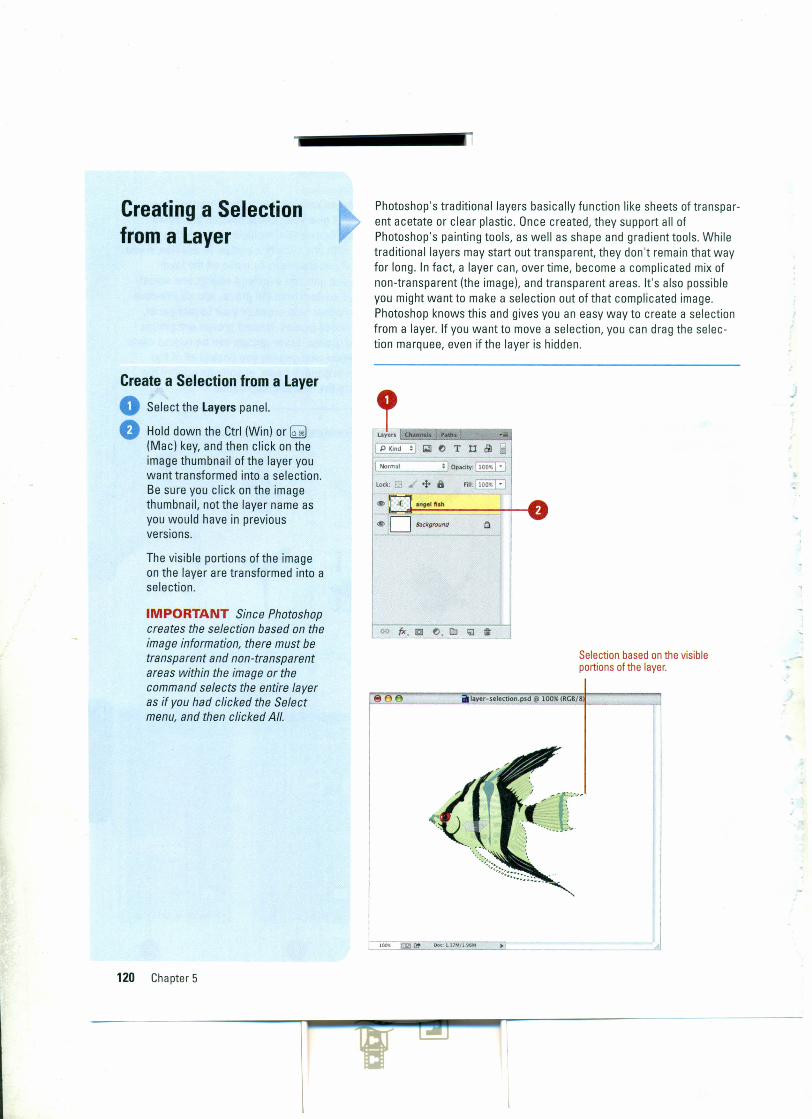
Create a Selection from a Layero Select the Layers panel.o Hold down the Ctrl (Win) or ~
(Mac) key, and then click on theimage thumbnail of the layer youwant transformed into a selection.Be sure you click on the imagethumbnail, not the layer name asyou would have in previousversions.
The visible portions of the imageon the layer are transformed into aselection.
IMPORTANT Since Photoshopcreates the selection based on theimage information, there must betransparent and non-transparentareas within the image or thecommand selects the entire layeras if you had clicked the Selectmenu, and then clicked All.
120 Chapter 5
Photoshop's traditional layers basically function like sheets of transpar-ent acetate or clear plastic. Once created, they support all ofPhotoshop's painting tools, as well as shape and gradient tools. Whiletraditional layers may start out transparent, they don't remain that wayfor long. In fact, a layer can, over time, become a complicated mix ofnon-transparent (the image), and transparent areas. It's also possibleyou might want to make a selection out of that complicated image.Photoshop knows this and gives you an easy way to create a selectionfrom a layer. If you want to move a selection, you can drag the selec-tion marquee, even if the layer is hidden.
I Norma.l : IOpacitY: ~
Lode + a Fi":~
<I> .( angel fish
Selection based on the visibleportions of the layer.
lilyer-selection.psd@ 100% (RCB}8

On the previous page, you learned how to create a selection based onthe image information within a layer. In addition to creating a selectionfrom a layer, Photoshop gives you the ability to instantly create a layerfrom a selection. Creating layers from selections opens up all kinds ofopportunities for generating special effects. For example, you couldselect an object from one layer, and then make a layer with that selec-tion, or you could make a selection of just that portion of an image andthen apply a layer style to the new layer copy. The possibilities are end-less, and part of the fun of using Photoshop lies in exploring thosepossibilities. If you want to move a selection, you can drag the selec-tion marquee, even if the layer is hidden.
Creating a Layer froma Selection
Create a Layer from a Selection
oo
Select the layers panel.
Click on the layer containing theinformation you want to convertinto a layer.
Select an area of the image usingany of Photoshop's selection tools .
Press Ctrl-J (Win) or press ~+J(Mac) to make a copy.
Photoshop converts the selectedarea into a new layer, and placesthat layer directly above the activelayer.
o•
red .nl.p,d@llOO'll(.nl coPy. RGB/8)Did You Know?You can make a copy of all elementswithin a layer. Select the layer in theLayers panel, and then click Ctrl-J(Win), ~+J (Mac). Since there are noselections, Photoshop creates a copyof the entire layer.You can make copies of layer objectswithout a selection. To make a copy ofa layer that contains an object, selectthe layer in the Layers panel, select theMove tool, hold down the Alt (Win) orOption (Mac) key, and then click anddrag (in the document window).
lOO!( . [!!' D;x.: )1)11':1.01"
CopymadefromselectionSelectthe redant
Chapter 5 Working with Layers 121
.....,

Converting aBackground intoa Layer
Convert a Background• Select the Layers panel.o Double-click on the Background to
open the New Layer dialog box.
• You can also click the Layermenu, point to New, and thenclick Layer From Background,or right-click or Control-click(Mac) the Background name,and then click Layer FromBackground.
Rename the layer in the Name box(leave the other options at theirdefault values).
e• Click OK.
The Background is converted intoa traditional layer.
Did You Know?Youcan convert a layer to a smartobject. Select the layer in the Layerspanel, click the Layers Options button,and then click Convert to Smart Object.
122 Chapter 5
The Background layer serves a unique function in Photoshop. Sincesome layout programs do not support Photoshop's multiple layer andtransparency capabilities, a final image must sometimes be convertedinto a background layer by a process called flattening. When an imageis flattened, all of the document's layers are compressed into a singlelayer in the Layers panel. named Background. That means no more lay-ers, no more transparency, and no more control. Background layers area necessary evil because Photoshop does not stand alone, and it'ssometimes necessary to move images from Photoshop into other appli-cations. However, there are times you may start with an image that onlycontains a Background layer (for example, when working with originalimages from a digital camera, scanned images, or images from an onlineservice) and you want to apply transparency, blending modes, or otheradjustments to it that cannot be applied to a Background layer. In thatcase, you will need to convert the Background into a traditional layer.
La)'ers a.-Is ••..•IPKind :1 t;;J f) T
•• Laye.fS ~ •..... ...I P Kind :1 I;;J f) T n /jI IiII Normal -:rOp.City:~
""", f:J.- + 6 FiJl:IIO~I"1
rll -*~~"'mon
,
oe (X. a f).D III a
New layerfromabackground
Cancel
:1: 1 Opacity: 1100 y)"
Norm,,1
Lod<.I':3.+6~·~-, ••-,o-und----rl
Name: lemon
Use Previous layer to Create Clipping Mask
Color: I x None
Mode: ( Normal

Convert a Multi-LayeredDocument into a Backgroundo Select the Layers panel.o Click the Layers Options button,
and then click Flatten Image.
The multi-layered document iscompressed into a single-layerBackground.
Did You Know?You can create a composite image of amulti-layered document without flat-tening the image. Create and select anew layer, and then hold down the Alt(Win) or Option (Mac) key. Now, go tothe Layers panel, click the LayersOptions button, and then click MergeVisible. Photoshop creates a compositeof all the visible layers in the new layer.You now have the control and flexibilityof a multi-layered document, alongwith a separate composite layer.Control gives you the confidence to bemore creative.
See AlsoSee "Using Merge Layer Options" onpage 130 for more information on howto merge two or more layers withoutflattening all the layers.
lode E:3 +6 FitI:~
cS> ~ sO Ievels I
cS> L!l ID 0 Selective Col...
cS> ~ $0 Cotor Balanc...
80Exposure 1
6 separate layers plus the BackgroundcS> ~
cS> rlI 80lnven!
l.i.ye.r5 Chanoels '~ths
I P Kind ;1 1;;\ ~ T
N
Multiple layers compressed into asingle-layer Background
Chapter 5 Working with Layers 123

Controlling ImageInformation Using theLayers Panel
Control Image Informationo Select the Layers panel, and thenuse one of the following options:
• Name Layer. To name a layer,double-click on the layer name,type a name, and then pressEnter (Win) or Return (Mac).
• Colorize Layers. To apply anidentifying color to a layer,right-click the layer, and thenselect a color.
• Filter Layers. To display layersby criteria, click the Filter Typelist arrow, select a filter, andthen specify criteria.
• Show/Hide Layers. To show orhide a layer in the documentwindow, click the Show/Hidebutton (eyeball/box).
• Link Layers. To link two or morelayers, hold the Shift key andclick the layers you want to link,and then click the Link Layersbutton. A link icon appearswhen selected to indicate thelinked layers. You move orresize linked layers as a unit.
• Lock Layers. To lock a layer,click a locking option: LockTransparent Pixels, Lock ImagePixels, Lock Position, and LockAll. A Lock icon appears.
• Stack Layer Order. To changethe position of a layer in thestack, drag the layer up ordown. A dark line appears toindicate the new layer location.
124 Chapter 5
When you work on multi-layered documents, it's important to under-stand the options Photos hop gives you to control image information.Working on a document that contains a lot of layers can be a difficultproposition. Fortunately, Photoshop gives you options to stay in control;everything from naming and colorizing layers to locking pixel informa-tion is available in Photoshop. For example, when linking two layerstogether, you can move or resize the layers at the same time, thus sav-ing valuable time. Or, filter layers by Kind, Name, Effect, Mode,Attribute, or Color to display and work with the layers you want.
Filter options
+ 11t----+~~~:::rt- Lock options~ -..J
Stacking order:the position ofthe layers withinthe panel.
.••..IIW
1.----4-- Lock icon
Link Layersbutton
Layer nameShow/Hideicon

Filtering Layers
Filter Layers in the Layers Panel
o Select the layers panel.
• To turn on layer filtering, drag theOn/Off switch up to the Onposition.
• Click the Filter Type list arrow, andthen select a filter type: Kind,Name, Effect, Mode, Attribute,Calor, or Selected (New!).
• Select the filter options for theselected filter type:
• Kind. Click toggle buttons forpixels, adjustments, type,shape, and smart objects.
• Name. Enter all or part of aname. As you type, layers arefiltered based on the match.
• Effect. Click the list arrow toselect a filter gallery effect.
• Mode. Click the list arrow toselect a blending mode.
• Attribute. Click the list arrow toselect an attribute, such asvisible, locked, linked, clipped,masked, or advanced blending.
• Color. Click the list arrow toselect a label color.o To turn off layer filtering, drag the
On/Off switch down to the Offposition.
If you're working on a document with a lot of layers, it can be difficultto find the layers you want to work on. With filters in the Layers panel,you can display the layers you want by specifying filter criteria. Layerfilters go a long way towards helping you display and organize layers ina complex, multi-layered document. You can filter layers by Kind, Name,Effect (filter), Mode (blending), Attribute, Color (label), or Selected (iso-late) (New!). Each filter type provides additional options for you toselect or enter to apply the criteria you want. For example, the Kind fil-ter type provides toggle buttons to display layers with pixels, adjust-ments, type, shape, and smart objects. When you filter layers, groupsare not shown, only the filtered item. You can enable/disable layer fil-tering by using an On/Off switch. When the switch lights up in red, a fil-ter is applied.
Options vary based on filter type
Filter turned on with a filterapplied (switch in red)
+ 6 Fi I: 1100710 1 • I
~ IDD Levels I
~ IDD Selective Col...
n IDD Co or Balanc ... Filter results
[!;a IDD uposure!
~ IDD lnvert I
Lode
Chapter 5 Working with Layers 125

Isolating layers
Isolate Layers in the LayersPanelo Select the Layers panel.
• Select the layers you want toisolate.
o Click the Select menu, and thenclick Isolate Layers.
Layer filtering is turned on and thefilter type changes to Selected inthe Layers panel.
• To turn off layer filtering, drag theOn/Off switch down to the Offposition.
Did You Know?You can isolate layers in the Layerspanel. Select the layers you want toisolate in the Layers panel, click theFilter Type list arrow, and then clickselect Selected. Drag the On/Offswitch up to the On position to enablethe filter.
See AlsoSee "Filtering Layers" on page 125for more information on working withfilters in the Layers panel.
126 Chapter 5
If you're working on a document with a lot of layers, it can be difficultto work with the ones that you want. With the Isolate Layers command(NewO on the Select menu, you can isolate selected layers in theLayers panel. This creates a filter using the Selected filter type (NewOin the Layers panel. All the other nonselected layers are hidden (filteredout), so they are not in the way. This allows you to focus on and workwith the layers you want. When you're done, you can quickly turn offthe filter to show all the layers again.
Selectedfiltertype
C•••••MIs Paths -=I P Kmd :I I;;J e T C &I
ill
_QCt"frru
~ ~ •••• Ion
<I) [=::J lettuce
•0 ::nasD..~..,D Bockground ~
(X. a ~.CJ Iil ~
INo""./
lo«.~/+iII
Isolatedlayers

Moving and CopyingLayers
Move/Copy Layers BetweenDocuments• Open the documents in which you
want to move layers.o To have more than one documentin view, click the Window menu,point to Arrange, and then clickCascade or Tile.
Click on the document containingthe layer you want to move.
• Drag the layer from the Layerspanel into the window of thedestination document.
• If you prefer copy and paste,you can select the layer, clickthe Edit menu, and then clickCopy in the source, and thenclick the Edit menu, and thenclick Paste, Paste Into, or Pastein Place in the destination.
Photoshop creates a new layerwith a layer copy in the document.
Did You Know?You can control or register the posi-tion of the moved layer. Hold down theShift key while dragging the layer intothe receiving document. The new layeraligns to the center of the document.You can move selected portions of alayer. Select the area you want tomove, click the Move tool, and thendrag the selected area directly fromthe document window into the windowof the receiving document.
Photoshop documents typically contain multiple layers. Controlling lay-ers is an important aspect of design. But what about controlling layersacross multiple documents? For example, you're working on a design,and you need access to some additional image information. The onlyproblem is that the additional information is located in anotherPhotoshop document. Photoshop gives you the ability to move/copylayers between open documents.
dryscapt.pild 5~tl 1"',1\ I
'Y"'::-~':;;;=---+-- Dragmoonlayerhere
Iii•••I!!!!!
Newlayerfromdonordocument
Moonlayer
nn~------~~~~~~~~----~~~~T 0I Nonn~ , I"",,;ty 1
Chapter 5 Working with Layers 127

Duplicating a Layer
Duplicate a Layero Select the Layers panel.
o Select the layer you want toduplicate.•
• Enter a name for the new layer.
o
Click the Layers Options button,and then click Duplicate Layer.
To place the layer in another opendocument, click the Document listarrow, and then select adocument.
o Click OK.
Did You Know?You can duplicate a layer with theCreate New Layer button. Drag thelayer over the Create New Layerbutton and Photoshop creates an exactcopy of the layer and appends theword copy at the end of the originallayer name.
128 Chapter 5
There are times when you will need a copy of a Photoshop layer.Duplicating a layer is a simple process that creates a pixel-to-pixelcopy of the selected layer. Once the copied layer is created, it becomesa separate image within the document. You can then begin to makechanges to the new layer. Duplicating a layer gives you the ability tocontrol each layer separately and to apply nondestructive effects toyour image by making them on a copy of the image instead of theoriginal.
r New L;er... -- 0"XNl ADuplicate laver.~----!---IV
I Delete Layer I! Hldd~I
II New Group...
~1----1I- "=Ii1 L ve
Convert to Smart Object
8 eodlnq Op1onEdr A.r' u' e t
( r te ( p q.., SK ~ Co
l vere eel l ked aver
Merge Visible OXEFlatten lmaqe
Animation OptionsPanelOptions...
I CloseClose Tab Group'---- J
Duplicate: Background
As: Background copy
Destination ----------------"
Oocument: hawaii-heron.tif
IN .• I

Deleting Layers
Delete Layers
o Select the layers panel.o Select the layers you want todelete.
o Click the Delete layer button onthe Layers panel, and then clickYes.
• To delete layers withoutdisplaying the confirmationdialog box, hold down the Alt(Win) or Option (Mac) key, andthen click the Delete layerbutton.
Did You Know?You can delete layers from the Layerspanel by dragging. Click the layers youwant to delete, and then drag them tothe Delete Layer button.You can delete hidden layers from theLayers panel. Select the Layers panel,click the Layers Options button, andthen click Delete Hidden Layers.You can delete empty layers from theLayers panel. Click the File menu, pointto Scripts, and then click Delete AllEmpty Layers.
While Photoshop lets you add layers to a document (up to 8,000), it alsolets you delete layers. Remember that once you've deleted a layer andsaved the document, there is no way to recover the deleted layer.However, while the document is open, there is always the chance ofrecovering the deleted layer through the History panel. You can deleteshown or hidden layers using different commands. If you have someempty layers, you can delete them all at once using the Delete AllEmpty Layers command on the Scripts submenu on the File menu.
(X. a tl. CJ
Selectedlayersareremovedfromthe Layerspanel.
~r;;]
I Non".1
lDd: + a..,E:ii: •....<a> D 8Jcltground
Chapter 5 Working with Layers 129

Using MergeLayer Options
The Merge Down option lets you merge one selected layer into thelayer directly below it in the layer stacking order. Merged layers takeon the characteristics of the layer into which they are being merged.For example, if you merge one layer into another that uses the Darkenblending mode, the two merged layers will both use Darken. Or, if youmerge a layer into the Background layer, the merged layer becomes apart of the Background. The Merge Visible option enables you to mergeall of the layers that have the Show option enabled with just one click.
Merge Down
!0 Select the Layers panel.
0 Select the layers you want to Layers Ch.aDMIs -.merge. I P "nd ~I i;;I e T
0 Click the Layers Options button,and then click Merge Down (for '"" . ••single selection) or Merge Layers eO ri.ht
(for multiple selection).<J'.) [(] middle
The selected layers merge into the$ [] left
next layer down. When you usethe Merge Down command, the •0 Background ~top layer will take on the name andcharacteristics of the bottom layer.
TIMESAVER Press Ctn-E (Win)or~+E (Mac) to merge layers
fx. a t>.C::l I;] ~down. ••
Mergedown
La~ers 1 C•••• n I, '.ths o§i
IP I(jnd ~I;;J t> T n &l 1111 Normill ! I Opadty: IIO~ I ...Ilode t> 6 Fill:~
ernmiddle
e [] 100t
leD S.ckground e
I;] afx. III t>. C::l
Merge Visible
o Select the Layers panel.
o Click the Show option for all layersyou wantto merge.o Click the Layers Options button,and then click Merge Visible.
All layers with the Show optionenabled (not locked) are mergedtogether.
!Layers0-.11 •.•••
Mergevisible
Lilyers Chan , Paths 015
IP "nd ! I ;;J t> T tl &l ElNormal !IOpadty:~
lode 6 Fill:~em d.ht-
o Background e
I--fx ~c;- a t> o I;] •
-rr-<12> [(] middle
e [] 'eft
e 0 ~ckground f}TIMESAVER Press Shift+Ctrl+E(Win) or Shift~+E (Mac) tomerge visible layers. Youcan alsopress Alt (Win) or Option (Mac) tomerge a/l visible layers into a newlayer.
130 Chapter 5
1

Linking and UnlinkingLayers
Link Layers• Open a multi-layered document.
• Select the Layers panel.
Select two or more layers.
Click the Link Layers button,located at the bottom of theLayers panel.
The selected layers are nowlinked. A link icon appears next tothe selected linked layers.
Unlink Layers
• Open' a multi-layered documentthat contains links.
• Select the Layers panel.o Select a layer that contains thelink icon.
TIMESAVER Tounlink severallinked layers, select them beforecontinuing.
• Click the Link Layers button,located at the bottom of the Layerspanel.
TIMESAVER Totemporarilydisable a linked layer, Shift+clickthe link icon. A red X appears.Shift+click the link icon again toenable it.
If you're currently looking at the Layers panel, and wondering wherethe linking button is, don't worry. It's not missing; it's just been moved.Linking multiple layers is a snap. Simply select one or more layers andthen click the Link Layers button at the bottom of the Layers panel. Youcan link two or more layers or groups. Unlike selected multiple layers,linked layers retain their relationship (stay together) until you unlinkthem, which allows you to move or resize the layers as a unit.
Ne
layers ChanDeIs •••••5
c-:>
<e 0 percn
Layers<I> D octopus ee are
•0 b ue tuealinked
.•.0 backd"",
Pc. III O.D ~ ~•
Linkremoved
<I> 0 suhoru---
<SI 0 pe:~ch
·D~<I> 0 b'U:=:-<I> 0 backdrop
ee
Lodt: .+6<8> 0 se.il.~OfSe
·Operch<e 0 octopus
ca> 0 b-ue tuea
~0 badcrop
c-:>
c-:>
ee
oe
t;I) 0 suhorH
•0 perch
•0 octopus
•0 bluetunA
<I> 0 backdrop
c-:>
ee
Chapter 5 Working with Layers 131

Aligning andCombining Layers
Align Layerso Open a document.
o Duplicate or place the images youwant to align on different layers.o To set a reference layer, select thelayer you want, and then click theLock button on the Layers panel.
• If you don't have a lockedlayer, Photoshop will createone for you .
• Select the layers you want to alignin the Layers panel.
o Click the Edit menu, and then clickAuto-Align Layers.
o Click one of the layout alignmentoptions:
Ever wanted to replace or delete parts of an image that have the samebackground or combine images that share overlapping content? InPhotoshop, you can do it with the Auto-Align Layers and Auto-BlendLayers commands. The Auto-Align Layers command automaticallyaligns different layers that contain similar content. One layer isassigned to be the reference layer and all other layers are aligned tothe reference layer in order to match everything up. You can manuallyset the reference layer, or let Photoshop automatically choose it for you.Sometimes when you align images, a visible stitching appears betweenthem. You can use the Auto-Blend Layers command with RGBorgrayscale images to create a smooth appearance between the alignedimages. Auto-Blend Layers uses layer masks to remove content differ-ences between the images.
Originalimage
• Auto. Analyzes the images anduses either the Perspective,Spherical, or Cylindrical layout.
• Perspective. Creates a Normal
stretched or skewed effect on iil:~
the side images. ~ Lok.2
Collage. Retains object shapes "•while aligning layers and ~ 8,Jektpound 6)
matching overlapping content.
• Cylindrical. Reduces a bow-tie Referencelayereffect by displaying images as fx. KI tl.CJ ~ .....•if they were on an unfoldedcylinder.
132 Chapter 5

• Spherical. Transforms imagesspherically using wide fields ofview.
• Reposition. Aligns the layersand matches overlappingcontent.o Select Vignette Removal to
remove unwanted lens vignetteand Geometric Distortion toautomatically correct for fisheyelenses.
o Click OK.o To fine-tune the alignment or maketonal changes, click the Edit menu,and then click Free Transform.
Combine and Blend Layers
ooo Select the Panorama or Stack
Images option .
• Click OK.
Select the layers you want tocombine in the Layers panel.
Click the Edit menu, and then clickAuto-Blend Layers.
Did You Know?You can create an image stack. If youhave images with a similar size, youcan create an image stack. Create adocument with each image as a sepa-rate layer. Select the all the layers, usethe Auto-Align Layers command withthe Auto option, convert the layers toSmart Objects, and then create animage stack. Click the Layer menu,point to Smart Objects, point to StackMode, and then select a stack modefrom the submenu. To remove a stack,click None on the submenu. You canedit an image stack like any otherSmart Object.
AUlo-Allgn layers
Projection
• Auto Perspective
( Cvlindrlcal o Spherical oReposition
lens CorrectionI 0 Vignette Removal
l0Ceomet~lc~~lon
Deltr..uM tht but Pfojtc:tion iWtom.Mkllly.
Warnill9 CIKlIdnol dflKt cam,r, m<ltld:Ul. UM ttM "fl'" ) Scopu :> load Im•• inlo sua..: stnJM IQ pr• ...,.,..ftMUdlla tor Y.g~I' R.tI'IOY~ andlOf CI01lltUit Dinonlofl.
u)'us Ch~ls hths ·Ii
§G(;;]~Ttl.!j
I Norm" .1O•• dty: Ilooor; I ·1l.odc~/+6 FiI:!lo,",I·1<SI> uke2
IJitckground
Images on the selected layers
iliLake2.jpg @25"(RC ..
Auto-Blend Layers
1
- Blend Methodo Panorama
~1
Fixed and blended image
SeamJess Tones and Colors
2SK [It
Chapter 5 Working with Layers 133

Aligning layers withSmart Guides
Use Smart Guides to AlignLayers
o Open or create a multi-layereddocument.•o Select a layer that contains anobject.
Select the Move tool, and drag theobject.
As you move the object, SmartGuides appear to help you alignthe objects. The amount the objectmoves appears as you drag.o Release the mouse and the guidesdisappear.
Did You Know?You can turn Smart Guides on and off.Click the View menu, point to Show,and then click Smart Guides.
134 Chapter 5
Photoshop gives you the ability to use Smart Guides to help alignshapes, slices, and selections as you draw. They appear automaticallyas you draw a shape or create a selection or slice, and then disappearafter the shape is drawn. They enable you to visually align one object toanother with a minimum of effort. Smart Guides are automaticallyturned on by default.
I~UllS. sd @ I ()!I(bo I. bu. ReB/B) •
Smart Guide Object movement amount
'''''
[ Normal ~ I Opacity: IIO~ 1 y I
Lode f:3 +8 Fill 11001\; 1 y 1
[jiP-girlladybugb_~, _
l2J1i boy I.dybug
<t!> D Background t?l
c-;> fx. t). L:J IiJ .•••

Working with LayerBlending Modes
Mix layer Information withBlending Modeso Open a multi-layered document.
Select the Layers panel.
Click the layers you want to adjust;You can apply blending mode toone or more selected layers in theLayers panel.
Since blending modes affect alllayers below the one to which theblending mode is applied, selectthe layer directly above the layeryou want to blend .
• Click the Blending Mode listarrow, and then select a blendingmode.
Photoshop uses the selectedblending mode to visually blendthe image through all the layersbelow the blending mode layer.
If a layer has a Blend-If changeapplied to it from the BlendingOptions in the Layer Style dialogbox, an icon appears on the layerto let you know.
Did You Know?You can control the number of layersto which a blending mode is applied.Hold down the Alt (Win) or Option(Mac) key,and then click on the visibleline separating the adjustment layerfrom the next lower layer.
Layer Blending Modes are one of the most creative areas within theLayers panel. With blending modes, you can instruct Photoshop to mixthe image information between two or more layers. For example, usingthe Multiply blending mode instructs Photoshop to multiply the color ofone layer with that of another layer, resulting in a darker color. Blendingmodes give you control over Photoshop images above and beyond whatyou would expect to find in the "analog" world. Blending mode and opac-ity settings are shown in the Layers panel for hidden layers.
• '*' ill*.snowl.J.,..r
II!!! III•• ~ bao'(J.rd
Thesnowlayerblendedwiththe backyardlayer.
Chapter 5 Working with Layers 135

Setting Layer Opacity
Set Layer Opacity and FillOpacity
o Select the Layers panel.
• Select the layers you want tochange; you can apply opacity toone or more selected layers in theLayers panel.
• To set opacity, enter a percentagevalue in the Opacity box or clickthe list arrow, and then drag theOpacity slider.
TIMESAVER Press 1 to changeopacity to 10%,press 2 to changeto 20% and so on to 9. Press 0 tochange to 100%.Youcan alsoenter a specify value, such as 85.
• To set a fill opacity, enter apercentage value in the Fill Opacitybox or drag the Fill Opacity slider.
Did You Know?You can change the fill value using thekeyboard. Select one or more layers,hold down the Shift key, and then press1 to change the fill to 10%,press 2 tochange to 20% and so on to 9. Press 0to change to 100%.You can also entera specify value, such as 14 or 00 to get0%.
136 Chapter 5
The opacity of a layer determines the transparency of the layer beneathit. A layer with a low opacity percentage appears as nearly transparent,while a layer with a high opacity percentage appears as nearly opaque.You can apply opacity to one or more selected layers, even a hiddenone, in the Layers panel. Opacity and blending mode settings are shownin the Layers panel for hidden layers. You cannot change the opacity ofa background layer or a locked layer. However, you can convert a back-ground layer to a normal layer and then you can apply opacity to it. Inaddition to setting layer opacity, you can also set a fill opacity. Opacityaffects layer styles and blending modes, while fill opacity affects pixelspainted in a layer or shapes drawn on a layer without affecting theopacity applied to any layer effects.
Thesnowlayeropacitysetto showthroughthe backyardlayer.

Working with thelayer Comps Panel
Work with the LayerComps Panel
Open a document.
o Click the Window menu, and thenclick Layer Comps to open theLayer Comps panel.
• Click the Create New Layer Compbutton to create a snapshot of thecurrent state of the image.
• Select check boxes to adjust alayer's visibility, position, orappearance (layer style).
• Click OK.o To create another snapshot of thecurrent state of the image, clickthe Create New Layer Compbutton, and then repeat steps 4and 5 to create as many layercomps as you need.
o Click the left and right arrows tocycle through the current layercomps.
o Click the Update Layer Compbutton to update the selected layercomp to the current state of theimage.
o Click the Layer Comp icon tochange the active image to theselected layer comp state.
G To remove a layer cornp. click theDelete Layer Comp button.
Layer Comps are an image or snapshot of the current state of theLayers panel. When you create a Layer Comp, you're recording layervisibility, a layer's position within the document, and any layer stylesapplied to the image. Making changes to the layers in your documentand then updating the Layer Comps panel creates a new Layer Comp.Any time you want to view a particular Layer Comp, just select it fromthe Layer Comps panel. Layer Comps create different versions of yourdocument and saves them all in one file, giving you different creativeoptions for the same document. In addition, they give you the option ofprinting the same document with different variations, by choosing dif-ferent Layer Comps during printing.
Laver Comps L:=.l..iO;..iiio;;,,44"';;~~ Lsst Document Srare
.••..III
New La er Comp
Name: lEffecls Applied
ApplV to Levers: Visibility
6!l Position
6!l Appearance rt.aver Style)
Comment: Layer Effects Applied
Lave.rComps •Last Document St~t.
~ Eff«u Appl ed
~ Eltects Oiubled
0 ILl :::
Chapter 5 Working with Layers 137
Exporting Layersas Files
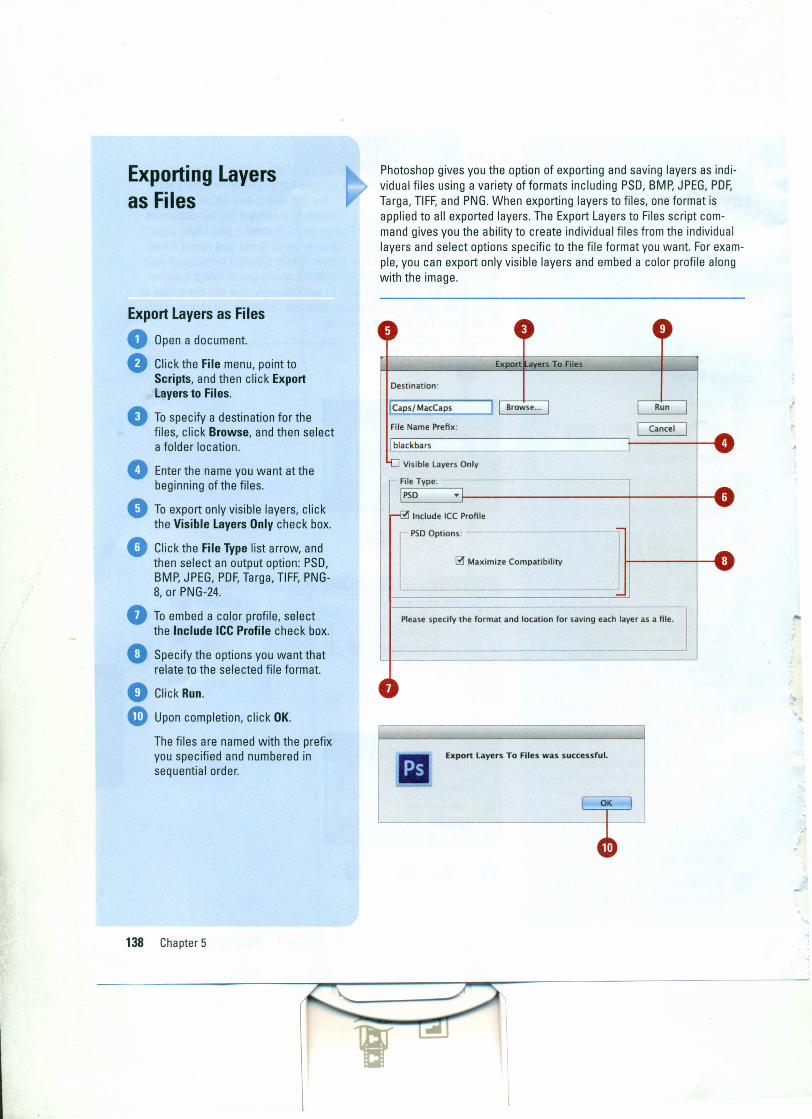
Export layers as Fileso Open a document.
o Click the File menu, point toScripts, and then click Exportlayers to Files.
o To specify a destination for thefiles, click Browse, and then selecta folder location.o Enter the name you want at thebeginning of the files.
• To export only visible layers, clickthe Visible layers Only check box.o Click the File Type list arrow, andthen select an output option: PSD,BMP, JPEG, PDF,Targa, TIFF,PNG-8, or PNG-24.
o To embed a color profile, selectthe Include ICC Profile check box.
o Specify the options you want thatrelate to the selected file format.
Click Run.
G) Upon completion, click OK.
The files are named with the prefixyou specified and numbered insequential order.
138 Chapter 5
Photoshop gives you the option of exporting and saving layers as indi-vidual files using a variety offormats including PSD, BMP,JPEG, PDF,Targa, TIFF,and PNG.When exporting layers to files, one format isapplied to all exported layers. The Export Layers to Files script com-mand gives you the ability to create individual files from the individuallayers and select options specific to the file format you want. For exam-ple, you can export only visible layers and embed a color profile alongwith the image.
~) .Export l.ayers To Files
Destination:
Caps/ MacCaps I I Browse ... I I Run
File Name Prefix: I Cancel I ••blackbars ..,-0 Visible Layers Only
- File Type: •••PSD ..~ Include ICC Profile
"V
r-' PSD Options:
~ Maximize Compatibility ~••Please specify the format and location for saving each layer as a file.
•~
11 Export layers To Files was successful.
I OK I
«~

Copying CSS fromLayers
Copy CSS from Layerso Select the Layers panel.
• Select the layers you want to copythe generated CSS.
Click the Layers menu, and thenclick Copy CSS.
The CSS is copied to theClipboard, where you can paste itinto your HTML editor.
• In your HTML or text editor, openthe document where you want toinsert the CSS code.
• Click to place the insertion pointwhere you want the CSS code.
o Click Edit menu, and then clickPaste.
The CSS code is pasted into thedocument.
If you're creating images and elements, such as button shapes or text,for web pages, you can use the Copy CSS command (New!) on theLayers menu to copy the generated CSS(Cascading Style Sheets) codefrom Photoshop and then paste it in your HTML editor, such as AdobeDreamweaver, or a text editor. This allows you to quickly integrate anduse Photoshop content in your web page design using standard CSScode. For shapes, Copy CSS captures values for size, position, fill color(including gradients), stroke color, and drop shadows. For text, CopyCSS captures values for font family, font size, font weight, line height,underline, strikethrough, superscript, subscript, and text alignment.
Lly.rs ChAnnels Paths .Ji
~r;;)tJTtl,j
I No",," :lopacity:110Ol<I-1
1..d" + 6 Fdl:~
m ··h
~0;:;;:; ~
.angeLfish{background·lmage: ur1("1mageslangel fiSh.png");position: absolute;left: 233px;top: 141pX;width: 317px;helghl: 3OOpx;z~ndex: 2j
}
PastedCSScodefromPhotoshop
Chapter 5 Working with Layers 139

Setting Layers PanelOptions
Set Layers Panel Optionso Select the Layers panel.
• Click the Layers Options button,and then click Panel Options.
o Click a thumbnail size or the Noneoption.
• Click the Layer Bounds or EntireDocument option.o Select the options you want:
• Use Default Masks on FillLayers. Select to automaticallyinsert a mask when creating anew Adjustment layer.
• Expand New Effects. Select ifyou would like to view SmartFilters or Layer Styles in theLayers panel. You can also clickthe triangle next to the SmartFilter or Layer Style icon in theLayers panel.
• Add "copy" to Copied Layersand Groups. Select to add thetext "copy" to copied layers orlayer groups.
o Click OK.
140 Chapter 5
Photoshop doesn't have a lot of options for controlling the Layers panelitself; in fact, there is only one-changing the size of the layer thumb-nail and how it fits within the thumbnail box. You can choose to viewthe layer thumbnail in a small, medium, or large size, or you can selectto have no thumbnail shown at all. When you change the size of thethumbnail, you're instructing Photoshop to spend either more, or less,processing time on the display of the image. The larger the thumbnail,the easier it is to see, but the longer it takes for Photoshop to draw theimage in the Layers panel. If you're experiencing performance issueswith Photoshop, and you're using the large thumbnail size option, youmight consider choosing a smaller thumbnail size.
Loc:" .;. Cl Fill:~
~~ J$~ skyline
<It>. moon
layers Panel 0 tions
Thumbnail Size
ONone
rThumbnail Contents
oLayer Bounds
oEntire Document
--Use Default Masks on Flll Lavers
Expand New Effects
Add "copy" to Copied Laye" and Groups