Adobe Dreamweaver CS4 Troubleshooting · PDF fileAdobe Dreamweaver CS4 Troubleshooting. ... If...
147
Adobe Dreamweaver CS4 Troubleshooting
-
Upload
phungkhanh -
Category
Documents
-
view
229 -
download
1
Transcript of Adobe Dreamweaver CS4 Troubleshooting · PDF fileAdobe Dreamweaver CS4 Troubleshooting. ... If...

Adobe Dreamweaver CS4 Troubleshooting
Last updated 11/5/2015
Legal notices
Legal noticesFor legal notices, see http://help.adobe.com/en_US/legalnotices/index.html.
A note to our customersAdobe provides this searchable PDF of archived technical support documents as a service to our customers who own and continue to enjoy older, unsupported versions of our software products. The information in these documents is not updated, and will become increasingly less accurate as hardware, browsers, and operating systems continue to evolve. Please be aware that these archived documents reflect historical issues and solutions for products that are no longer supported. Adobe does not warrant that the information in this document is accurate.

iii
Last updated 11/5/2015
Contents
Using FileMaker in Dreamweaver via Lasso Studio . . . . . . . . . . . . . . . . . . . . . . . . . . . . . . . . . . . . . . . . . . . . . . . . . . . . . . . . . . . . . . . . . . . . . . .1
Unable to select correct local root folder for a Site in Dreamweaver CS3 and CS4 on Windows Vista SP2 and 7 . . . . . . . . . . . . .2
Unable to paste text from Word 2008 into Dreamweaver CS3 (Mac OS X) . . . . . . . . . . . . . . . . . . . . . . . . . . . . . . . . . . . . . . . . . . . . . . . . .2
Unable to assign keywords in pages created from a template . . . . . . . . . . . . . . . . . . . . . . . . . . . . . . . . . . . . . . . . . . . . . . . . . . . . . . . . . . . .3
Troubleshoot synchronization problems in Dreamweaver CS4 and CS5 . . . . . . . . . . . . . . . . . . . . . . . . . . . . . . . . . . . . . . . . . . . . . . . . . . .4
Troubleshoot JavaScript errors | Dreamweaver CS4, CS5, CS5.5, CS6 . . . . . . . . . . . . . . . . . . . . . . . . . . . . . . . . . . . . . . . . . . . . . . . . . . . . . .5
Troubleshooting synchronization problems in Dreamweaver (Mac OS and Windows) . . . . . . . . . . . . . . . . . . . . . . . . . . . . . . . . . . . 10
Troubleshoot FTP problems | Dreamweaver CS4 and earlier . . . . . . . . . . . . . . . . . . . . . . . . . . . . . . . . . . . . . . . . . . . . . . . . . . . . . . . . . . . . 12
Troubleshoot Dreamweaver on Macintosh OS X . . . . . . . . . . . . . . . . . . . . . . . . . . . . . . . . . . . . . . . . . . . . . . . . . . . . . . . . . . . . . . . . . . . . . . . 22
Understanding the Template Updating option in Dreamweaver 8.0.1-8.0.2 . . . . . . . . . . . . . . . . . . . . . . . . . . . . . . . . . . . . . . . . . . . . . 26
Take advantage of the sample CSS styles in Macromedia Dreamweaver MX 2004 . . . . . . . . . . . . . . . . . . . . . . . . . . . . . . . . . . . . . . . 28
How synchronize works in Dreamweaver 8 . . . . . . . . . . . . . . . . . . . . . . . . . . . . . . . . . . . . . . . . . . . . . . . . . . . . . . . . . . . . . . . . . . . . . . . . . . . . 30
Synchronize and Select Newer options are not working correctly . . . . . . . . . . . . . . . . . . . . . . . . . . . . . . . . . . . . . . . . . . . . . . . . . . . . . . 33
Subversion resources | Dreamweaver CS4, CS5, CS5.5, CS6 . . . . . . . . . . . . . . . . . . . . . . . . . . . . . . . . . . . . . . . . . . . . . . . . . . . . . . . . . . . . . 33
SSH and SSL encryption for FTP connections . . . . . . . . . . . . . . . . . . . . . . . . . . . . . . . . . . . . . . . . . . . . . . . . . . . . . . . . . . . . . . . . . . . . . . . . . . 34
Restore preferences | Dreamweaver CS4, CS5, CS5.5 . . . . . . . . . . . . . . . . . . . . . . . . . . . . . . . . . . . . . . . . . . . . . . . . . . . . . . . . . . . . . . . . . . . 36
Resolved issues with Dreamweaver MX 2004 update (7.0.1) . . . . . . . . . . . . . . . . . . . . . . . . . . . . . . . . . . . . . . . . . . . . . . . . . . . . . . . . . . . . 39
The registration message box continues to appear on launch after registration . . . . . . . . . . . . . . . . . . . . . . . . . . . . . . . . . . . . . . . . . 57
Re-creating the Dreamweaver user configuration folder on Windows . . . . . . . . . . . . . . . . . . . . . . . . . . . . . . . . . . . . . . . . . . . . . . . . . . 58
Protecting PHP server behaviors from SQL injection vulnerability . . . . . . . . . . . . . . . . . . . . . . . . . . . . . . . . . . . . . . . . . . . . . . . . . . . . . . 60
Protecting ColdFusion server behaviors from SQL injection vulnerability . . . . . . . . . . . . . . . . . . . . . . . . . . . . . . . . . . . . . . . . . . . . . . . 63
What can prevent JavaScript control over audio? . . . . . . . . . . . . . . . . . . . . . . . . . . . . . . . . . . . . . . . . . . . . . . . . . . . . . . . . . . . . . . . . . . . . . . 66
Pop-up blocker conflicts (Dreamweaver Developer Toolbox) . . . . . . . . . . . . . . . . . . . . . . . . . . . . . . . . . . . . . . . . . . . . . . . . . . . . . . . . . . . 68
How to pass a user name from a login page . . . . . . . . . . . . . . . . . . . . . . . . . . . . . . . . . . . . . . . . . . . . . . . . . . . . . . . . . . . . . . . . . . . . . . . . . . . 68
New template features in Dreamweaver MX . . . . . . . . . . . . . . . . . . . . . . . . . . . . . . . . . . . . . . . . . . . . . . . . . . . . . . . . . . . . . . . . . . . . . . . . . . . 69
New features of Cascading Style Sheets in Dreamweaver MX . . . . . . . . . . . . . . . . . . . . . . . . . . . . . . . . . . . . . . . . . . . . . . . . . . . . . . . . . . . 76
How to use a MouseOver Event to create an Image Swap Action in a different frame . . . . . . . . . . . . . . . . . . . . . . . . . . . . . . . . . . . . 78
Modified date of local file changes after put . . . . . . . . . . . . . . . . . . . . . . . . . . . . . . . . . . . . . . . . . . . . . . . . . . . . . . . . . . . . . . . . . . . . . . . . . . . 81
"Low on memory" errors when running Dreamweaver . . . . . . . . . . . . . . . . . . . . . . . . . . . . . . . . . . . . . . . . . . . . . . . . . . . . . . . . . . . . . . . . . 82
Keychain contains multiple instances of Dreamweaver CS4 | Mac OS 10.7 Lion . . . . . . . . . . . . . . . . . . . . . . . . . . . . . . . . . . . . . . . . . . 83
JavaScript error and hang when performing Save To Remote Server . . . . . . . . . . . . . . . . . . . . . . . . . . . . . . . . . . . . . . . . . . . . . . . . . . . . 84
Issue when creating a database connection: HTTP Error Code 404 File Not Found (Dreamweaver Developer Toolbox) . . . . 84
Installing Dreamweaver MX / MX 2004 in Safe Mode on Windows . . . . . . . . . . . . . . . . . . . . . . . . . . . . . . . . . . . . . . . . . . . . . . . . . . . . . . 85
How to include the current date in an insert page . . . . . . . . . . . . . . . . . . . . . . . . . . . . . . . . . . . . . . . . . . . . . . . . . . . . . . . . . . . . . . . . . . . . . 86
HTML colors are different from SWF colors . . . . . . . . . . . . . . . . . . . . . . . . . . . . . . . . . . . . . . . . . . . . . . . . . . . . . . . . . . . . . . . . . . . . . . . . . . . . 87
Flash movies won''t play in the document window . . . . . . . . . . . . . . . . . . . . . . . . . . . . . . . . . . . . . . . . . . . . . . . . . . . . . . . . . . . . . . . . . . . . 88
Fehlerbehebung bei Systemfehlern oder Nichtreagieren des Systems für Adobe Dreamweaver CS4 unter Windows XP . . 89
Fehlerbehebung bei Systemfehlern oder Nichtreagieren des Systems für Dreamweaver CS4 unter Mac OS . . . . . . . . . . . . . . 96
Error uploading or downloading files | Dreamweaver . . . . . . . . . . . . . . . . . . . . . . . . . . . . . . . . . . . . . . . . . . . . . . . . . . . . . . . . . . . . . . . . . 102
Error "SVN: #155021. You cannot update this file using Dreamweaver's Subversion integration... " | Dreamweaver CS4 . . 105
Error message using Put or Check-in files: Cannot create directory...it already exists . . . . . . . . . . . . . . . . . . . . . . . . . . . . . . . . . . . . 108

ivDREAMWEAVERContents
Last updated 11/5/2015
Error: "The help system cannot be launched" when you try to open Help | Dreamweaver CS4 | Windows . . . . . . . . . . . . . . . . 108
Error in Firewall Port setting for Dreamweaver 4 . . . . . . . . . . . . . . . . . . . . . . . . . . . . . . . . . . . . . . . . . . . . . . . . . . . . . . . . . . . . . . . . . . . . . . 110
Error "The CSXS extension...BrowserLab_pt2_mxi:MeerMeerDW" failed to install" on Mac OS 10.6.x . . . . . . . . . . . . . . . . . . . . 111
Error calling getTables: an unidentified error has occurred . . . . . . . . . . . . . . . . . . . . . . . . . . . . . . . . . . . . . . . . . . . . . . . . . . . . . . . . . . . . 112
Dreamweaver CS3 and CS4 could not connect to FTP site after Leopard (Mac OS X v10.5) upgrade . . . . . . . . . . . . . . . . . . . . . 112
Dreamweaver 8 for Windows loses FTP login settings . . . . . . . . . . . . . . . . . . . . . . . . . . . . . . . . . . . . . . . . . . . . . . . . . . . . . . . . . . . . . . . . . 113
Dreamweaver 8 crashes while browsing files (Windows Vista) . . . . . . . . . . . . . . . . . . . . . . . . . . . . . . . . . . . . . . . . . . . . . . . . . . . . . . . . . 114
Dreamweaver 4''s compatibility with Mac OS X . . . . . . . . . . . . . . . . . . . . . . . . . . . . . . . . . . . . . . . . . . . . . . . . . . . . . . . . . . . . . . . . . . . . . . . 117
Different redirect pages for each user level (Dreamweaver Developer Toolbox) . . . . . . . . . . . . . . . . . . . . . . . . . . . . . . . . . . . . . . . . 118
Deprecated features in Dreamweaver . . . . . . . . . . . . . . . . . . . . . . . . . . . . . . . . . . . . . . . . . . . . . . . . . . . . . . . . . . . . . . . . . . . . . . . . . . . . . . . . 118
The Date Picker calendar window does not show up (Dreamweaver Developer Toolbox) . . . . . . . . . . . . . . . . . . . . . . . . . . . . . . . 119
Customizing HTML code in Dreamweaver . . . . . . . . . . . . . . . . . . . . . . . . . . . . . . . . . . . . . . . . . . . . . . . . . . . . . . . . . . . . . . . . . . . . . . . . . . . . 119
Create client-side dynamic dependent list boxes . . . . . . . . . . . . . . . . . . . . . . . . . . . . . . . . . . . . . . . . . . . . . . . . . . . . . . . . . . . . . . . . . . . . . 122
Copied text from Microsoft Word may lose some formatting when pasted into Dreamweaver MX 2004 . . . . . . . . . . . . . . . . . 129
Configuring WebDAV in IIS for use with Dreamweaver . . . . . . . . . . . . . . . . . . . . . . . . . . . . . . . . . . . . . . . . . . . . . . . . . . . . . . . . . . . . . . . . 130
Configure Subversion with SSH | Dreamweaver CS4, CS5, CS5.5, CS6 . . . . . . . . . . . . . . . . . . . . . . . . . . . . . . . . . . . . . . . . . . . . . . . . . . 132
How to configure Dreamweaver to access a different FTP port . . . . . . . . . . . . . . . . . . . . . . . . . . . . . . . . . . . . . . . . . . . . . . . . . . . . . . . . 135
Compressed Flash MX SWF file properties are not recognized by Dreamweaver . . . . . . . . . . . . . . . . . . . . . . . . . . . . . . . . . . . . . . . . 136
Color Picker returns incorrect sample color | Dreamweaver CS4 | Mac OS 10.7 Lion . . . . . . . . . . . . . . . . . . . . . . . . . . . . . . . . . . . . . 137
Changes to ASP Command Variables in Dreamweaver 8.0.2 . . . . . . . . . . . . . . . . . . . . . . . . . . . . . . . . . . . . . . . . . . . . . . . . . . . . . . . . . . . 137
The captcha image is not generated on the page (Dreamweaver Developer Toolbox) . . . . . . . . . . . . . . . . . . . . . . . . . . . . . . . . . . 140
Can''t install Dreamweaver 8.0.2 Updater | InstallShield wizard interrupted . . . . . . . . . . . . . . . . . . . . . . . . . . . . . . . . . . . . . . . . . . . . 141
Cannot create queries using Query Builder (Dreamweaver Developer Toolbox) . . . . . . . . . . . . . . . . . . . . . . . . . . . . . . . . . . . . . . . . 141
Assigning behaviors to an image map . . . . . . . . . . . . . . . . . . . . . . . . . . . . . . . . . . . . . . . . . . . . . . . . . . . . . . . . . . . . . . . . . . . . . . . . . . . . . . . . 142
Active content not displayed in browser after converting page in Dreamweaver 8.0.2 . . . . . . . . . . . . . . . . . . . . . . . . . . . . . . . . . . 143
1
Last updated 11/5/2015
Using FileMaker in Dreamweaver via Lasso Studio
IssueFileMaker is not a database supported by Dreamweaver for creating dynamic database-driven web applications (ColdFusion, ASP, ASP.NET, JSP and PHP).
ReasonBecause of problems concerning FileMaker's ODBC connectivity feature, FileMaker is not one of the natively supported databases when it comes to creating dynamic web applications in Dreamweaver. The following databases are natively supported by Dreamweaver:
• Microsoft Access
• Microsoft SQL Server
• MySQL (PHP only)
• Oracle
Databases that are not listed above, such as FileMaker, may work with Dreamweaver, but they have not been tested by Macromedia's engineers and Macromedia does not provide support for those databases.
SolutionIf you would like to use FileMaker as the database for your web application, there is a third-party product available for purchase: the Lasso Studio for Dreamweaver by Blue World. The Lasso Studio installs Lasso objects into Dreamweaver, which facilitate the visual creation of Lasso Dynamic Markup Language (LDML) pages that run on a Lasso web application server. Because Lasso can communicate with FileMaker in the database's native language, FDML (FileMaker Dynamic Markup Language), the ODBC connectivity issue is averted.
Currently, Lasso Studio 5 is only compatible with Dreamweaver 4 and Dreamweaver UltraDev 4. The next version of Lasso Studio (out later in 2002) is slated to support Dreamweaver MX.
Note: Macromedia does not provide technical support for third-party software or extensions, such as Lasso Studio for Dreamweaver. Please contact Blue World if you need assistance.
Additional Information• FileMaker white paper on FileMaker, Dreamweaver UltraDev and JSP

2
Last updated 11/5/2015
Unable to select correct local root folder for a Site in Dreamweaver CS3 and CS4 on Windows Vista SP2 and 7
IssueWhen selecting a local root folder within a Site definition in Dreamweaver CS3 or CS4 on Windows Vista SP2 and 7, the parent folder is returned instead.
Solution
Solution 1: Browse to another folder within the folder you want to select. The file browser is currently returning the parent of the folder you've selected. Select a folder inside the folder you want as the site local or remote root.
1 Click Site > Manage Sites.
2 Select the site you want to modify and click Edit.
3 Select the Local Info category and click the Folder Browse button.
4 Navigate to a child folder of the desired local/network site root and click Select.Example: When selecting C:\inetpub\wwwroot\images, C:\inetpub\wwwroot is ultimately what will be selected.
5 Click OK.
Important: If the problem occurs with your remote site folder, repeat these steps in the Remote Info category.
Solution 2: Manually enter the local site root folder. 1 Click Site > Manage Sites.
2 Select the site you want to modify and click Edit.
3 Select the Local Info category and type the folder path in the Local Root Folder field.
4 Click OK.
Important: If the problem occurs with your remote site folder, repeat these steps for the Remote Folder in the Remote Info category.
Unable to paste text from Word 2008 into Dreamweaver CS3 (Mac OS X)
3
Last updated 11/5/2015
Issue On Mac OS X, when you attempt to copy and paste text from Microsoft Word 2008 to Adobe Dreamweaver CS3, no text appears.
Reason There is a conflict with Microsoft Word 2008 for Macintosh that prevents you from pastingformatted text into Dreamweaver CS3.
Solution Do one of the following:
Solution 1: Upgrade to Dreamweaver CS4. We have compensated for this issue in Dreamweaver CS4. Please visit the Adobe Store for upgrade information.
Solution 2: Paste the text into Dreamweaver without any formatting applied.1 Click Edit > Paste Special.
2 Choose Text Only and click OK.
3 Reapply formatting.
Unable to assign keywords in pages created from a template
Issue Users are unable to add keywords or other meta tags to a page created from a template, whether they use the menu command Insert> Head > Keywords or the Head category, Keyword button of the Object Palette.
Note: This is not an issue for newer versions of Macromedia Dreamweaver. If you are using a template created in an older version of the application, you may need to use the solution listed below. Otherwise, you should have no problems adding meta tags to a page based on a template in newer versions of Dreamweaver.
Reason Both the Keyword button of the Object Palette and the menu command are attempting to insert the code for the keywords in a line of the noneditable <head> section of the HTML.
Note: The <head> section of the HTML in a page created from a template is not editable except for the title information section.
Solution The keywords can be added to the page by manually typing the meta tag and the keywords after the <title> tag in the source code.

4
Last updated 11/5/2015
To add keywords to a page created from a template do the following:
1 Open the HTML source code (Window > HTML).
2 Locate the <title> section that begins with the following comment line:<!--#BeginEditable "doctitle" --> Refer to the following example code:
<html><!--#BeginTemplate "/Templates/myTemplate.dwt" --><head><!--#BeginEditable "doctitle" --><title>Untitled Document</title><!-- #EndEditable --><meta http-equiv="Content-Type" content="text/html;
charset=iso-8859-1"></head><body >
3 Type the following code after the <title> line and before the EndEditable comment line typing your keywords separated by commas between the empty quotes.<meta name="keywords" content=" "> Refer to the following example for correct placement of the line of code.<html><!--#BeginTemplate "/Templates/myTemplate.dwt" --><head><!--#BeginEditable "doctitle
Troubleshoot synchronization problems in Dreamweaver CS4 and CS5
IssueWhen you use Adobe Dreamweaver CS4 and CS5 to synchronize files or upload files to a server, you experience one of the following issues:
• When you put files, Dreamweaver warns you that the remote file has changed on the server: "my_file.htm has changed on the remote server since your last get or put operation. Putting it could overwrite changes to the file. Do you wish to put the file anyway?" However, you are sure that the remote files haven't changed.
• The Synchronize preview dialog box does not correctly list the files that require synchronization.
• The Synchronize preview dialog box says that no synchronization is necessary, but you know that some files have changed.
Note: Synchronization underwent major enhancements in Adobe Dreamweaver 8. The current version of Adobe Dreamweaver CS4 and CS5 uses similar technology.
SolutionComplete one of the following two solutions, depending on how widespread the synchronization problems are.
Solution 1: Delete the specific dwsync.xml files.Perform these steps if only a few of your files have synchronization problems.
1 Close Dreamweaver.
2 In Windows Explorer or Mac Finder, browse to the folder that contains the files with synchronization problems.
3 For each folder containing files with synchronization problems, locate the _notes folder and delete the dwsync.xml file inside it.Note: The dwsync.xml files only reside locally. Dreamweaver never uploads the dwsync.xml files to the server, and there is no reason to upload them to the server.

5
Last updated 11/5/2015
4 Reopen Dreamweaver and verify that the problem is resolved.
Solution 2: Disable the "Maintain synchronization information" setting.Perform these steps if you are experiencing widespread synchronization problems.
Note: Dreamweaver re-creates the synchronization information for your site.
1 Choose Site > Manage Sites, select the site you want to edit, and click Edit.
2 Deselect the Maintain Synchronization Information setting to delete the existing dwsync.xml files. The options vary between CS4 and CS5.
• CS4
a In the Advanced category of the Site Definition dialog box, choose Remote Info and deselect "Maintain synchronization information."
• CS5
b In the Servers category, select the appropriate site and click the Pencil icon.
c Select the Advanced tab and deselect "Maintain synchronization information."
3 Close Dreamweaver.
4 Verify that all of the dwsync.xml files have been deleted from your local root folder and all of its subfolders.Note: The dwsync.xml files are located in the _notes folders that are hidden by default in Dreamweaver. So check for the _notes folders and dwsync.xml files in the Windows Explorer or Macintosh file browsers. The dwsync.xml files only reside locally. Dreamweaver never uploads the dwsync.xml files to the server, and there is no reason to upload them to the server.
5 Reopen Dreamweaver, choose Site > Manage Sites, and edit the same site you selected in step 1.
6 Reselect the Maintain Synchronization Information setting. Refer to step 2 above for option differences between CS4 and CS5.Note:Dreamweaver re-creates the dwsync.xml files as you transfer files to and from the server.
7 Verify that the problem is resolved.
Additional informationWhen you put or get a file in Adobe Dreamweaver CS4 and CS5, Dreamweaver locally stores the remote and local date/time stamps in files called dwsync.xml. These files are located in hidden _notes folders in the same folder as the files being transferred. Occasionally, the dwsync.xml files can become corrupted.
For more information about Dreamweaver synchronize features, select the version below.
• Dreamweaver CS4
• Dreamweaver CS5
More Help topics How synchronization works in Adobe Dreamweaver 8
Troubleshoot JavaScript errors | Dreamweaver CS4, CS5, CS5.5, CS6

6
Last updated 11/5/2015
Identify JavaScript errorsWhen you perform tasks within Dreamweaver, you sometimes encounter a JavaScript error message. These design-time JavaScript errors usually prevent you from implementing a portion of Dreamweaver functionality.
Example: The following JavaScript error message can appear when you save a file:
Another example of a possible JavaScript error: "While executing onLoad in tempURL_afterSave.htm, a JavaScript error occurred."
Important: These pop-up JavaScript errors in Dreamweaver are different from JavaScript runtime errors you encounter when viewing a page in a web browser. JavaScript errors in a web browser indicate a problem with embedded or linked JavaScript in the HTML page. These types of runtime JavaScript errors are beyond the scope of this TechNote. See the Dreamweaver Help files for errors resulting from JavaScript that Dreamweaver generates. Or, see a third-party JavaScript reference for troubleshooting hand-coded JavaScript.
Sometimes, a translator error message accompanies these internal JavaScript errors:
The following translators were not loaded due to errors: ASP.htm: has configuration information that is invalid. ASP.NET.htm: has configuration information that is invalid. ColdFusion.htm: has configuration information that is invalid. PHP_MySQL.htm: has configuration information that is invalid. JSP.htm: has configuration information that is invalid. XSLT.htm: has configuration information that is invalid.
JavaScript errors in DreamweaverDreamweaver uses JavaScript to perform numerous internal actions. Adobe has implemented much of Dreamweaver functionality by using JavaScript files. This heavy use of JavaScript helps to make Dreamweaver easily extensible. Developers only have to have a good knowledge of JavaScript and access to the Dreamweaver API to add to or change the native functionality of Dreamweaver. However, the errors that Dreamweaver generates if it encounters a problem executing some action tend to be JavaScript errors.
JavaScript error troubleshooting tipsJavaScript errors in Dreamweaver usually indicate a conflicting Dreamweaver extension, a conflict with the code on a page or a bad installation of Dreamweaver. Here are a few questions that can help you isolate the problem:
• Does the error occur when using a specific feature? For example, do you see the same error message every time you attempt to create a web photo album? This error can indicate a conflicting extension or a bad installation of Dreamweaver.
• Does the error occur on a specific page or with all pages? If the error doesn't occur with all pages, then you can have a conflict with some code on a particular page.
• Does the error occur in all sites or just one? To test this issue properly, make sure that you test a different site that does not use the same files. If the error only occurs in a certain site, then the issue can be specific to files and code within that site.
• Does the problem persist if you restart Dreamweaver? If the problem does not recur on relaunching Dreamweaver, then it's possible that a JavaScript file loaded incorrectly.
• If using a server behavior, does the problem occur with all databases and tables? If not, then it's possible that you have an issue with the database connection files or with the tables of the database itself.

7
Last updated 11/5/2015
Troubleshooting stepsAfter answering the questions above, follow the steps below to troubleshoot the errors:
1 Check the list of known JavaScript errors.
2 Install the latest update for your version of Dreamweaver.
3 Name objects referenced by JavaScript.
4 Delete the FileCache.dat file.
5 Try a new page.
6 Re-create the site cache.
7 For site-specific errors, try deleting the .dws site cache file.
8 Mac OS users: Check for special characters in paths.
9 Verify that extensions are compatible with your version of Dreamweaver.
10 Disable extensions.
11 Uninstall extensions.
12 Re-create the Dreamweaver user configuration folder.
13 Run Dreamweaver in Selective Startup Mode or Diagnostic Startup Mode.
14 See additional TechNotes.
1. Check the list of known JavaScript errors.Adobe has documented a number of known errors within Dreamweaver and have provided information to assist you in resolving the problem. For a list of known issues, see the Known JavaScript Errors Chart .
2. Install the latest Dreamweaver updates.Updates provide fixes for a number of issues identified within Adobe applications. Download updates from the Adobe Updates page.
3. Verify that any object the JavaScript references is named in the code.For example, if you have a behavior applied to an image, then that image must have a name. Likewise, if the behavior references another image, then that image must also have a name. All object names must be unique and must meet other criteria. Object naming is described in Naming strategies for Dreamweaver and various interpreters (tn_14610).
4. Delete FileCache.dat files from the Dreamweaver user configuration folder.Delete the WinFileCache-7A9586CB.dat, MacFileCache-BFE7CE2E.dat, or FileCache.dat file from the Dreamweaver user configuration folder. Adobe recommends that you delete the FileCache.dat file if you are experiencing a JavaScript error related to "dwscripts. " Also delete the file if you receive a "translators were not loaded" error. The string of characters after "FileCache-" can differ on your machine. The location of the FileCache.dat file depends your operating system and your version of Dreamweaver. On Windows, the Application Data and AppData folders are hidden by default, so verify that your Windows Explorer folder options are set to View Hidden Folders.

8
Last updated 11/5/2015
Note: The [language] folder below is an abbreviation of the language you are currently using. Typically there is only one folder in this location.
• Mac OS: Dreamweaver CS6: /Users/Your User Name/Library/Application Support/Adobe/Dreamweaver CS6/[language]/Configuration Dreamweaver CS5.5: /Users/Your User Name/Library/Application Support/Adobe/Dreamweaver CS5.5/[language]/Configuration Dreamweaver CS5: /Users/Your User Name/Library/Application Support/Adobe/Dreamweaver CS5/[language]/Configuration Dreamweaver CS4: C/Users/Your User Name/Library/Application Support/Adobe/Dreamweaver CS4/[language]/Configuration
• Windows 7 or Windows Vista: Dreamweaver CS6: C:\Users\Your User Name\AppData\Roaming\Adobe\Dreamweaver CS6\[language]\Configuration Dreamweaver CS5.5: C:\Users\Your User Name\AppData\Roaming\Adobe\Dreamweaver CS5.5\[language]\Configuration Dreamweaver CS5: C:\Users\Your User Name\AppData\Roaming\Adobe\Dreamweaver CS5\[language]\Configuration Dreamweaver CS4: C:\Users\Your User Name\AppData\Roaming\Adobe\Dreamweaver CS4\[language]\Configuration
• Windows XP: Dreamweaver CS6: C:\Documents and Settings\Your User Name\Application Data\Adobe\Dreamweaver CS6\[language]\Configuration Dreamweaver CS5.5: C:\Documents and Settings\Your User Name\Application Data\Adobe\Dreamweaver CS5.5\[language]\Configuration Dreamweaver CS5: C:\Documents and Settings\Your User Name\Application Data\Adobe\Dreamweaver CS5\[language]\Configuration Dreamweaver CS4: C:\Documents and Settings\Your User Name\Application Data\Adobe\Dreamweaver CS4\[language]\Configuration
For older versions of Dreamweaver, the configuration paths are as follows:
Dreamweaver CS3 on Windows Vista: C:\Users\[user name]\AppData\Roaming\Adobe\Dreamweaver 9\Configuration
Dreamweaver CS3 on Windows XP: C:\Documents and Settings\[user name]\Application Data\Adobe\Dreamweaver 9\Configuration
Dreamweaver 8 on Windows XP: C:\Documents and Settings\[user name]\Application Data\Macromedia\Dreamweaver 8\Configuration
Dreamweaver 8 on Windows Vista: C:\Users\[user name]\AppData\Roaming\Macromedia\Dreamweaver 8\Configuration
Dreamweaver CS3 on Macintosh: Mac HD/Users/[user]/Library/Application Support/Adobe/Dreamweaver 9/
Dreamweaver 8 on Macintosh: Mac HD/Users/[user]/Library/Application Support/Macromedia/Dreamweaver 8/
5. Try a new page.There can be conflicting code or Dreamweaver behaviors on the page. Try to build a page from scratch with minimal behaviors and other design elements and see if you can reproduce the error. Custom code or modified Dreamweaver code can occasionally cause problems.
6. Re-create the site cache and see if the problem persists.In particular, this step is useful for JavaScript errors related to templates, library items, and uploading files. This step is only available if the site is defined to use a site cache:
1 Within Dreamweaver, open the Site panel by choosing Window > Files.
2 From the Files panel group, click the Options menu in the upper-right corner, and choose Site > Recreate Site Cache.
9
Last updated 11/5/2015
7. For site-specific errors, try deleting the .dws site cache file.If the JavaScript only occurs in one site definition, then delete the site cache file for that site. To delete the cache, choose Site > Advanced > Recreate Site Cache.
8. Mac OS users: Check for special characters in paths.Check for any special characters in the hard drive name, in the path to the Dreamweaver configuration folder, or in the path to your site files. Examples of special characters that can cause conflicts include the following:
~ @ # $ % ^ & * ( ) + | / \ ';
9. Verify that extensions are compatible with your version of Dreamweaver.There can be a conflicting extension installed in Dreamweaver. For example, an extension could have been designed to work with an older version of Dreamweaver. Check the extension developer's website to see if the extension is compatible with your version of Dreamweaver.
There are several JavaScript errors associated with third-party extensions. Adobe recommends searching the Dreamweaver forum. Search using some of the keywords in your JavaScript error message (for example, search using the text of the JS filename).
10. Disable extensions.To manually test for an extension conflict, open the Extension Manager and disable the extensions that you installed in Dreamweaver. If turning off the extensions solves the problems, then turn them back on one-by-one, until you isolate the problematic extension. If you identify a problematic extension, then notify the extension developer.
1 Choose Commands > Manage Extensions.
2 In the Extension Manager, select your version of Dreamweaver from the product list
3 Within the list of installed extensions, set the On/Off checkbox to Off for all Dreamweaver extensions.
11. Uninstall extensions.If the JavaScript error persists after you disable all of the extensions, then uninstall the extensions in the Extension Manager. If you identify a problematic extension, then notify the extension's author.
1 Within the Extension Manager, select each extension.
2 Choose File > Remove Extension.
12. Re-create the Dreamweaver user configuration folder.For Dreamweaver CS4, CS5, CS5.5 or CS6, see Restore preferences | Dreamweaver CS4, CS5, CS5.5, CS6.
For Dreamweaver CS3 on Windows, see "How to re-create the Dreamweaver user configuration folder (CS3 on Windows XP, Vista)" (TechNote kb401118).
On Mac OS
1 Quit Dreamweaver
2 In the Mac Finder, browse to the following folder: /Users/[username]/Library/Application Support/Adobe/Dreamweaver CS4 [or CS5]/[language]/ConfigurationNote: For older versions of Dreamweaver, the paths are as follows:Dreamweaver CS3: Mac HD/Users/[user]/Library/Application Support/Adobe/Dreamweaver 9/ConfigurationDreamweaver 8: Mac HD/Users/[user]/Library/Application Support/Macromedia/Dreamweaver 8/Configuration
3 Rename the folder to "Configuration Old."

10
Last updated 11/5/2015
4 Restart Dreamweaver and see if the problem persists.
13. Run Dreamweaver in Selective Startup Mode.• To start Windows XP in diagnostic mode, see Start Windows in Diagnostic mode (Windows XP) (kb404860) for
details.
• To start Windows Vista/7 in modified mode, see Restart Windows in a modified mode (Windows Vista/7) (kb404913) for details.
14. See additional TechNotes.If the JavaScript errors persist after you follow the suggestions above, then see the following TechNotes for additional troubleshooting suggestions. Uninstalling and reinstalling Dreamweaver, with anti-virus software disabled, is an important test to perform:
• Troubleshooting Dreamweaver for Windows (tn_15481)
Known JavaScript errors and solutions
Troubleshooting synchronization problems in Dreamweaver (Mac OS and Windows)
Issue When using Dreamweaver's synchronize feature or uploading files to a server, the following problems may occur:
• You are putting files and Dreamweaver is warning you that the remote file has changed on the server: "my_file.htm has changed on the remote server since your last get or put operation. Putting it may overwrite changes to the file. Do you wish to put the file anyway?" However, you are sure that the remote files haven't changed.
• The Synchronize preview dialog box is not correctly listing the files that should be synchronized.
• The Synchronize preview dialog box says no synchronization is necessary, but you know some files have changed.
Note: This TechNote only applies to Dreamweaver 8 and later. The synchronize feature was redesigned in Dreamweaver 8, so the troubleshooting steps mentioned here do not apply to Dreamweaver MX 2004 and earlier. (Ref. 202195)
JavaScript Error Solution
"The following JavaScript errors occurred: At line 56 of file "C:\ Program Files\Adobe\Dreamweaver CS4\Configuration\Shared\Common\ Scripts\dwscriptsExtData.js": ReferenceError: dwscripts is not defined."
Remove the WinFileCache-7A9586CB.dat file from the Dreamweaver user configuration folder. If that doesn't solve it, then recreate the Dreamweaver user configuration folder . These suggestions also apply if you are receiving the error message: "The following translators were not loaded due to errors."
While executing DWMenu_File_SaveDocumentToRemoteServer command in menus.xml, the following JavaScript errors occurred: Exception thrown in native function.
See the following TechNote for more information: JavaScript error and hang when performing Save To Remote Server (kb401216)
"While executing applyBehavior in Show Pop-Up Menu.htm, the following JavaScript errors occurred: At line 27 of file "D:\Program Files\Macromedia\DreamweaverMX\Configuration\ Behaviors\Actions\Show Pop-up Menu.js":
The image to which you are applying the behavior is not named, or there is a problem with the object name. For more information, see "Error 'While executing applyBehavior in Show Pop-Up Menu...'" (TechNote tn_16462).
11
Last updated 11/5/2015
Reason In Dreamweaver 8 and later, whenever a user puts or gets a file, Dreamweaver locally stores the remote and local date/time stamps in files called dwsync.xml which are located in hidden _notes folders in the same folder as the files being transferred. Occasionally, the dwsync.xml files can become corrupted.
Solution There are two recommended solutions, depending on how widespread the synchronize problems are.
Only a few files have synchronization problems
If only a few of your files are having synchronize problems, try deleting the specifc dwsync.xml files, instead of recreating all of the synchronization information for your site.
1. Close Dreamweaver.
2. In Windows or Mac Finder, browse to your site's local root folder and browse to the folder that contains the files that are having synchronization problems. For each folder(s) having synchronization problems, locate the _notes folder and delete the dwsync.xml file inside of it. The dwsync.xml files only reside locally. Dreamweaver will never upload the dwsync.xml files to the server, and there is no reason to upload them to the server.
3. Re-open Dreamweaver and see if the problem is resolved.
Several or all files have synchronization problems
If you are experiencing widespread synchronization problems, then it is recommended to temporarily disable the "Maintain synchronization information" setting so that Dreamweaver recreates all of the synchronization information for your site.
1. Temporarily disable the "Maintain synchronization information" option from the Remote Info category of the advanced view of the Site Definition dialog box. This will delete all of the existing dwsync.xml files.
2. Close Dreamweaver.
3. Verify that all of the dwsync.xml files have been deleted from your local root folder and all of its subfolders. The dwsync.xml files are located in the _notes folder which are hidden by default in Dreamweaver, so check for the _notes folders and dwsync.xml files in the Windows or Macintosh file browsers. The dwsync.xml files only reside locally. Dreamweaver will never upload the dwsync.xml files to the server, and there is no reason to upload them to the server.
4. Re-open Dreamweaver and go into the site definition dialog box. Turn "Maintain synchronization information" back on. Dreamweaver will now recreate the dwsync.xml files as you transfer files back-and-forth to and from the server. See if the problem is resolved.
Additional InformationFor more information on Dreamweaver's synchronize feature, please refer to this section of the Dreamweaver documentation: Synchronizing the files on your local and remote sites.
Also, refer to How synchronization works in Dreamweaver 8 (TechNote kb400972).
12
Last updated 11/5/2015
Troubleshoot FTP problems | Dreamweaver CS4 and earlierFile Transport Protocol (FTP) is the most commonly used method for transferring files over the Internet. Many organizations and individuals use FTP to upload and download files to their web server. To transfer via FTP in Dreamweaver, enter your FTP server information in the Remote Info category of the Site Definition dialog box. In the Files panel, click the Connect and Put buttons to upload selected files or folders.
Before reading this TechNote, Adobe recommnends that you read the sections of the Dreamweaver help files related to FTP.
There are many variables involved when troubleshooting FTP issues, so the list of tips and techniques is long. Following are the top five things to try:
• Verify that you have the latest updater for Dreamweaver.
• Try enabling passive FTP.
• Try connecting to your server with different FTP clients.
• Try modifying the Host Directory settings in the site definition.
• Check permissions on the server.
Initial steps and fact gathering
1. Install the latest updater for DreamweaverWhen Adobe releases updaters for Dreamweaver, the updaters usually fix some FTP issues. Download and install the latest updater for your version of Dreamweaver. For Dreamweaver MX 2004, the latest updater is 7.0.1. For Dreamweaver MX, the latest updater is 6.1.
Note: You can check your version of Dreamweaver as follows:
• Windows: Chose Help > About Dreamweaver and then click the credits when they start to scroll.
• Mac OS Choose Dreamweaver > About Dreamweaver and then click the credits when they start to scroll.
2. Make sure that a site has been definedTo use FTP, Dreamweaver needs to know the FTP connection information. So, create a site definition or set up siteless file editing. Dreamweaver requires one of these two to know how to connect to the server. Starting with Dreamweaver MX 2004, you can connect directly to an FTP server without a formal site definition (siteless file editing). However, a site definition provides more functionality within Dreamweaver. Most Dreamweaver users prefer to take advantage of the site definition's additional functionality. Therefore, this TechNote focuses on that method. To learn more about site definitions, see the Dreamweaver online Help for information about setting up a site.

13
Last updated 11/5/2015
3. Use a different option for connecting to the server?The two most common alternatives to FTP are Local/Network and Secure FTP. Using either of these alternatives can provide better performance and stability than FTP. You can also take advantage of some of the other less commonly used remote connection options in Dreamweaver: WebDAV, Visual SourceSafe or RDS. See Help > Using Dreamweaver for more information on these options.
• Local/Network Try using Local/Network to transfer files. If you're in an environment like an office or a school you often have premission to connect to to the server through the Windows or Mac OS file system browsers. In Windows, a network path would look something like \\myserver\myfolder\.
• Secure FTP Secure FTP (SFTP) enables you to encrypt all file transfers and prevent unauthorized access to your data, files, user names and passwords. Secure FTP is a different protocol than FTP. However, they share similar commands and settings. If you are not sure if your server is running SFTP, check with your server administrator. SFTP in general is a more robust protocol, so it may succeed where traditional FTP failings. The SFTP service is included by default on most UNIX servers. On Windows, SFTP is not a built-in service and requires additional software. Even though SFTP is a separate, set up an FTP-like site definition in Dreamweaver and then check the checkbox for Use Secure FTP (see the screen shot ). It's possible for a server to run both FTP and SFTP services at the same time. If your server is only running SFTP, selecdt the Use Secure FTP checkbox. Otherwise Dreamweaver returns an error.
4. Document the exact problemOnce you have determined that the Dreamweaver updater does not solve the problem and you're using an FTP, then troubleshoot the problem. Write down the exact text of any error messages you are seeing.
• Do you get an error message when clicking the Test button in the Site Definition dialog box?
• Do you get an error message when clicking the Connect icon in the Files panel?
• Do you get an error message when trying to upload a file or a folder?
• Did your FTP site definition ever work in Dreamweaver?
• Does the problem happen every time or is it random?
• If you are working in a group environment, do other computers have the same problem?
• What specific FTP server are you connecting to? Examples of specific servers include: Microsoft IIS server, RedHat FTP server, IBM AIX server and Mac OS X Server. Oftentimes, you can get this information from the Dreamweaver FTP log or by connecting via a command line FTP client.
5. Determine whether your FTP site definition ever worked correctly in DreamweaverTwo frequent causes for connection failures are a server that is down or is busy. The diagram below illustrates the major relay points data goes through to complete an FTP transfer:
If you have been able to connect at least once, then it's likely that your FTP settings are correct. When the same settings connect only part of the time, the reason is usually a server is down or is busy. Try connecting at a different time of day, and contact the system administrator for the company hosting your site. If you're receiving an "Internal Data Error" message when trying to connect in Dreamweaver, it's likely that the server is down. A good way to determine if the server is down is to see if you can connect with a different FTP client . If no client can connect, then there's probably something wrong with the server.
14
Last updated 11/5/2015
6. Determine whether other FTP clients function correctly with the serverWhen troubleshooting FTP problems, the number of factors involved makes it important to narrow down the source of the issue. One good test is to connect and transfer with another FTP client. If you experience problems with multiple FTP clients, then it's most likely a server issue, and not a Dreamweaver issue. There are some FTP clients included with the Windows and Mac OS, and there are other FTP clients that are free or shareware. Here are some commonly-used clients:
Windows
• Microsoft's Internet Explorer - Type the ftp server name in the URL field and add ftp:// before the domain name (e.g.ftp://ftp.irs.gov).
• WS_FTP - GUI-based
• CuteFTP - GUI-based
• FileZilla - GUI-based
• Windows command line (Start > Run > in the Open field, type "cmd") - see Using FTP command line tools .
Mac OS
• Safari / Mac Finder - Type the ftp server name in the URL field and add ftp:// before the domain name (e.g.ftp://ftp.irs.gov), or in the Mac Finder, select Go> Connect to Server.
• Fetch - GUI-based
7. Check if the problem exists with a different version of Dreamweaver or ContributeIf you have a prior version of Dreamweaver or Contribute that works with your FTP server, then it's possible you're encountering a product error with Dreamweaver. If you are using the same FTP settings in two different versions of Dreamweaver, then the FTP connection should behave the same. If you do not have FTP problems using Dreamweaver MX, but you do have problems using Dreamweaver MX 2004, try the Server Compatibility settings . Macromedia extensively reworked the FTP engine in Dreamweaver MX 2004. It is much more stable and reliable than earlier Dreamweaver FTP engines. However, there have been some reports where functionality broke in the newer version. Either contact Macromedia technical support or submit a bug report directly. If you are using an earlier version of Dreamweaver, download the trial version of Dreamweaver MX 2004 and see if it works.
Try connecting with Macromedia Contribute. If you do not have Contribute, download the trial version and see if it works with your server. Dreamweaver and Contribute share the same underlying FTP engine, however Dreamweaver and Contribute are on different release cycles, so Contribute may have a bug fix that Dreamweaver does not have yet. If Contribute can connect, this is a good clue for technical support staff.
8. Can anyone in your group get Dreamweaver FTP to work with the server?If you are working in a group environment, do other computers in your group have the same problem? This will help you determine if the problem is specific to your machine or your Dreamweaver settings, or if there's a firewall conflict or something else common to the group. Examples of other things that may be common among computers in a group include:
• a customized operating system ghost image installed by your organization
• a team may all have a conflicting Dreamweaver extension installed
If you have a laptop, can you connect to the FTP server with this machine when you are at home versus in the office? If you can connect at home, that may indicate some kind of firewall or network issue in the office.
15
Last updated 11/5/2015
9. Can you connect to any FTP server from Dreamweaver?In rare instances, Dreamweaver users cannot connect to any FTP server. This indicates a general issue with Dreamweaver connectivity to the Internet. Other symptoms of this problem include a non-functioning Dreamweaver Start Page, and problems activating Dreamweaver over the Internet. See if you can connect to an anonymous FTP server, like the IRS FTP site. To connect to this site in Dreamweaver, use the following site definition settings:
FTP host: ftp.irs.gov Host directory: leave it blank Username: anonymous Password: leave it blank
If you cannot connect to this server, you should investigate if a firewall is preventing Dreamweaver from accessing the Internet, and verify that your machine has Internet connectivity in general.
10. Are you behind a firewall?If you are in a group environment, ask your system administrator what kind of firewall is being used and if any special adjustments need to be made to let applications like Dreamweaver get past the firewall.
If you have a personal firewall installed on your machine, verify that Dreamweaver has permission to access the Internet. Windows XP SP2 has a built-in firewall that blocks Dreamweaver's FTP functionality by default, so you need to add Dreamweaver to the exceptions list. Other examples of personal firewalls include Zone Alarm and Norton Personal Firewall.
Dreamweaver user interface settingsFTP problems can be difficult to diagnose as there are so many factors involved. That said, Dreamweaver does not have an overly complex user interface related to FTP. For reference, here are the two places where FTP settings are located within Dreamweaver:
1 Site-specific settings are found in the Remote Info category of each Site Definition (Site > Manage Sites > select your site > click Edit button > choose Remote Info category):
2 General FTP settings that apply to all of your Dreamweaver Site Definitions are found in Edit > Preferences > Sites:
Dreamweaver user interface settings
1. Try using passive FTPOne of most common solutions to FTP problems is to select the Use Passive FTP checkbox. A common sign that you need to use passive FTP is that Dreamweaver seems to hang when trying to connect to your server. Select this checkbox if your firewall configuration requires use of passive FTP. Passive FTP enables your local software to set up the FTP connection rather than requesting the remote server to set it up. For more information, see What is Passive FTP? (TechNote tn_15220).
Note: Mac OS X users should enable passive FTP if they are unable to see the file listing on the remote server.

16
Last updated 11/5/2015
2. Experiment with Server Compatibility options in the Site Definition dialog box (Dreamweaver MX 2004 v7.0.1 only)If you are having trouble connecting with Dreamweaver MX 2004 version 7.0.1, try adjusting the Server Compatibility settings. Note that these settings do not exist in Dreamweaver MX 2004 version 7.0 or lower. You can check the version by going to Help> About Dreamweaver > and clicking the scrolling credits.
Try the different combinations of checked and unchecked options for "Use FTP performance optimization" and "Use alternative FTP move method", to see if any combination resolves the FTP issue. These settings are particularly helpful for users that did not have FTP problems with earlier versions of Dreamweaver, but do have problems with Dreamweaver MX 2004.
3. Verify FTP host informationYour FTP host is the full Internet name of a computer system, such as ftp.macromedia.com. In the FTP Host field, make sure not to add the ftp:// protocol in front of the host name. Also, try using the IP address (e.g. 10.112.0.54) instead of the domain name (ftp.macromedia.com) if you are having trouble connecting to your server.
4. Change the Host Directory informationWeb server information, such as the login and password, are obtained from the server administrator and entered into the Site Definition dialog box exactly as given, but the Host Directory information needs to be modified sometimes. Try the following approaches to entering Host Directory information when troubleshooting. The approach that will work depends on the server's setup, so try all of them:
• Add a forward slash (/) directly before the Host Directory name, without any spaces (e.g./myfolder).
• If you already had a slash entered before the Host Directory name, remove it. (e.g. myfolder).
• Leave the Host Directory blank.
• Leave the Host Directory blank and append the Host Directory name to the FTP host, preceded by a slash (e.g.ftp.domain.com/hostdir).
• Try adding one of your subfolders to the Host Directory path (e.g. myfolder/mysubfolder/).
• If you are working on a personal website on a UNIX server, your URL may include a tilde. For example,http://www.mysite.com/johndoe/. If you are having FTP trouble with the tilde in the Host Directory, try using the full path, which may look something like/home/username/public_html or/home/username/www. The same is true if your server is using virtual paths. Ask your server administrator if they are using virtual paths and if they can give you the physical path. Try using the physical path in the Host Directory field.
• If your web folder on the remote server is above the root, you may have to precede the Host Directory name with ../ or even ../../ (one set of double dots takes you up one level, two sets take you up two levels, etc.). This type of setup is uncommon.
One good method of troubleshooting Host Directory issues is to try to drag-and-drop a file in the Files panel, instead of using the Put button or synchronizing. See Dragging and dropping files below for more information.
17
Last updated 11/5/2015
5. Disable Upload Design Notes in Site DefinitionSometimes having the Upload Design Notes option checked in the site definition can cause problems. Uncheck this option and see if the problem persists: Site > Manage Sites, select your site, then click Edit > Advanced tab > Design Notes category > uncheck "Upload Design Notes for sharing".
6. Change the site preference optionsIn most cases, users do not need to change the default site preference options (see the image above ). However, when troubleshooting problems with transferring large files, 530 and/or 550 errors, or loss of connection, it is useful to try other Preference settings. To access the Preferences dialog box, choose Edit > Preferences> select Site from the Category column.
The settings relevant to FTP in the site preferences dialog box are:
• FTP connection: ___ and Disconnect After ___ Minutes Idle When troubleshooting, it is best to leave this option unchecked.
• FTP time out When an FTP command is sent to the server, the client expects a confirmation message back, or the command is cancelled. FTP Time Out establishes how long Dreamweaver waits for a response from the server before giving up on a command. Too high a setting causes Dreamweaver to idle and seem 'frozen' if the server doesn't respond. Too low a setting causes commands to abort prematurely. The default setting, 60 seconds, handles most situations properly. If you're having problems connecting, try increasing the FTP Time Out to 120 seconds.
• Firewall Host and Port Most users do not need to modify these fields -- leave the host blank and the port set to 21. If you believe your organization is using a firewall, you will need to get this information from your system administrator.
Once again, most of the time, the defaults in site preferences do not need to be changed.
7. Create a new site definition and transfer new filesA useful troubleshooting step is to create a new Dreamweaver site definition, and work with a new file in the new site definition. Setup the Local Root Folder for the site definition to be the root of your hard disk (e.g. C:\). This will ensure that there are no spaces or special characters in the path to the local root folder. It will also test for a corrupt site definition or files. When following the steps above, Macintosh users may also want to trash their Dreamweaver Preferences file and make sure the name of their hard disk contains no special characters. For more information see How to define a site in Dreamweaver (TechNote tn_14028).
8. Re-create the site cacheIf a new file works in a new site, try re-creating the Dreamweaver site cache in the old site and see if the problem persists: Site > Advanced > Recreate Site Cache. This step is only available if the site was defined to use a site cache. For more information on the site cache, see How does the site cache work? (TechNote tn_16794).
9. Drag and drop files in the Files panelWhen you select a file and click the Put button in the Files panel, Dreamweaver uploads the file to the folder on the FTP server.
18
Last updated 11/5/2015
Dragging and dropping a file can be used to troubleshoot in two cases:
• When a file is not transferring or is uploading to the wrong folder, dragging a file from the the local side of the Files panel to the remote side allows you to choose the folder and may help narrow down whether the Host Directory information is entered correctly.
• When you are unable to connect to the server, leave the Host Directory field blank and drag the file over instead of using the Put button.
Note: Care must be exercised when dragging and dropping. Dropping a file in the wrong directory will cause links to stop working and prevent images on the page from displaying.
10. Check the FTP LogAfter trying to connect or upload, you can check Dreamweaver's FTP log for a record of the session between your computer and the server. Of special note would be any three-digit FTP series code. Please see Checking the FTP log (TechNote tn_14536) for an explanation of the FTP log and a list of FTP series codes. Also note the specific FTP service name and version to which you are attempting to connect.
To view Dreamweaver's FTP Log: choose Site > Advanced> FTP Log.
Note that a completely blank log is a clue in itself. If the log is blank after trying to connect, Dreamweaver's FTP tool is not able to reach the server and cannot send commands to it.
Server issues
1. Check file and folder namesThe following general information about file-naming conventions is useful when troubleshooting problems with transferring particular files or folders:
• Special characters Make sure that folder or file names do not contain spaces or special characters. Special characters include ? * - & ̂ % $ # or any non-alphanumeric character. The underscore character ( _ ) is not considered a special character and is valid in file or folder names.Note: Macintosh users should also check for spaces or special characters in the hard drive name. Depending upon the operating system, name length can be a problem when transferring files or folders. When encountering a problem transferring, try uploading a file or folder with a short name, like test.htm. Finally, the Files panel does not show files on the server whose names start with a period or an underscore. This is done intentionally. If you need to see those files, use a different FTP client .
• Uppercase and lowercase Windows and Macintosh systems are not case sensitive when it comes to file names, but UNIX systems are.Windows and UNIX systems handle the transfer of files as follows:
• Local machine Rename a file locally from example.htm to EXAMPLE.HTM, and you still have only one file, whose name has been changed to uppercase. The reverse, uppercase to lowercase, is also true.
• UNIX server Upload a file named EXAMPLE.HTM to a folder on a UNIX server that already contains a file named example.htm, and the file on the server is not overwritten. You will have two files: example.htm and EXAMPLE.HTM. This is true of lowercase to uppercase, or vice-versa.

19
Last updated 11/5/2015
• Windows server Upload a file named EXAMPLE.HTM to a folder on a Windows server that contains a file named example.htm, and the file on the server will be overwritten with the new one so that you have only one file, named EXAMPLE.HTM. This is true of lowercase to uppercase, or vice-versa.Note: Some UNIX servers are set to convert the names of all uploaded files to lowercase.
2. Check server permissionsA server is a computer that many users share. In order to prevent people from interfering with each other's files, different read, write, and execute permissions are given to every user or group of users for different files and folders. A user or group can also be defined to be the owner of a file, which affects permissions. In addition, different permissions can be set for files or folders.
One possible reason for "access denied" errors (550 errors) is an insufficient set of permissions for your account. Contact the system administrator for the company hosting your site for more information. If you are connecting to a UNIX-based server, you can connect to it with a command line FTP client and run an "ls -l" command to see the permission settings. If you are connecting to a Windows FTP server, you will need to have the server administrator check the permissions for you.
Some FTP servers are setup to give new files certain permissions by default and some Dreamweaver users will need something other than the default settings. If you notice that the files you are uploading have incorrect server permissions, you can install the Set Permissions extension for Dreamweaver (go to the Macromedia Exchange and search the Dreamweaver exchange for "permissions").
3. Use FTP command line toolsIf you are comfortable with a command line interface, it is possible to enter FTP commands directly into the Windows Command Prompt or Macintosh Terminal. Command line FTP clients give you greater control and visibility as to what exactly is happening with an FTP connection. Upon connecting via command line, it will oftentimes give you the name of the specific FTP server running . A list of standard FTP commands that a server will accept can be obtained by typing "help" in the FTP Command line. A good description of standard commands can be found in Command line FTP instructions (TechNote tn_16418) and Checking the FTP log (TechNote tn_14536). There is also a Contribute TechNote about command line, some of which also applies to Dreamweaver: Testing FTP functions using command line (TechNote tn_19496).
4. "Cannot determine the remote server time" errorSometimes, when setting up a site definition, Dreamweaver may throw the following warning message:
Dreamweaver cannot determine the remote server time. The Select Newer and Synchronize commands will not be available.
To get the server's time stamp, Dreamweaver creates and deletes a folder named XYIZNWSK. There may be server permissions problems that don't allow Dreamweaver to create or delete folders. For more information on this issue, see Synchronize and Select Newer options are not working correctly (TechNote tn_14413).
Serv-U FTP Servers can be set to rewrite all files and folders ; including the XYIZNWSK timestamp folder ; to lowercase, which means Dreamweaver can no longer find that particular folder. Unable to find that folder, Dreamweaver refuses to synchronize. Please see RhinoSoft's Knowledge Base article describing how to change this setting.

20
Last updated 11/5/2015
5. Are you using a proxy server that requires a separate login?Dreamweaver supports some FTP proxy servers, but as shown in the Site Preferences dialog box , Dreamweaver does not support proxy servers that require their own set of username and password. The Dreamweaver user interface only has fields for entering the FTP server login information. An example of a proxy server that Dreamweaver does not support is SOCKS.
6. Specific FTP server issues• Macromedia has created a Dreamweaver MX 2004 extension for both Windows and Macintosh that resolves some
FTP conflicts with IBM AIX and OS/400 servers. You should only install this extension if you are connecting to an IBM AIX or OS/400 server. Symptoms of the problem include:
• Access Denied errors when attempting to access files or folders older than the current calendar year.
• "Dreamweaver cannot determine the remote server time" errors and the Synchronize function not working.
• Incorrect information in the Files panel, like extra spaces, junk characters, wrong kind of information in a particular field, etc. (Ref. 169317).
• Dreamweaver MX 2004 has conflicts connecting to older versions of Documentum FTP Services. Documentum FTP Services version 5.2.5 and later have resolved this problem. (Ref. 183536)
• Dreamweaver had problems transferring files to Mac OS X Server v10.2 and v10.1. Apple has resolved this issue with Mac OS X Server v10.3. (Ref. 16762).
7. Contribute FTP Server CheckerThe Macromedia Contribute FTP Server Checker is a useful diagnostic tool for Dreamweaver MX 2004 users as well, because the two applications share very similar FTP engines. The FTP Server checker enables users to diagnose some problems when a connection cannot be established in Contribute using FTP. The application checks the compatibility between the FTP server and Contribute, then generates a report to help identify issues between the server and Contribute. To get more information and download the application, please see FTP Server Checker (TechNote tn_19012). You do not need to have Contribute installed to use this tool. You can send the results of the test to Macromedia if you believe you have found a problem with Dreamweaver.
8. Contribute Network I/O loggingDreamweaver MX 2004 users can install Contribute 3 and utilize its Network I/O logging feature, which allows Contribute to generate log files. These log files include detailed information about Contribute performance. You need to have Contribute 3 installed on your machine in order to generate these logs. A free trial version of Contribute is available for download. For more information on the Network I/O logging feature, see Using Network I/O logging to log operations and identify problems (TechNote tn_19506).
Note: Network I/O logging will not benefit users of Dreamweaver MX and below. The FTP engine changed significantly in Dreamweaver MX 2004 and Contribute 3.
General troubleshooting

21
Last updated 11/5/2015
Verify home router is not causing problemIf you are using Dreamweaver at home or in a small office environment, there may be a conflict between Dreamweaver and your router (if you are using one). As a test, bypass the router by plugging the network cable from your DSL/cable modem directly into your computer, so the router is removed from the equation.
Go through general Windows or Macintosh troubleshooting stepsIf you have determined that the FTP problem is specific to your machine or if you only have one machine to test with, then you may want to pursue some general Windows or Macintosh troubleshooting steps. This is an especially good idea if you are experiencing problems with other Dreamweaver features besides FTP. Here are some general things to try:
• Try running Dreamweaver with a different Windows or Macintosh user account.
• Have Dreamweaver recreate your user configuration folder.
• Uninstall Dreamweaver and reinstall in Safe Mode.
For more general troubleshooting tips, see the following TechNotes:
• Troubleshooting Dreamweaver for Windows (TechNote tn_15481)
• Troubleshooting Dreamweaver on Macintosh OS X (TechNote tn_16471)
Contact Macromedia Technical Support and provide FTP connection informationIf you have determined that the problem you are experiencing is a problem with Dreamweaver, then we would like to hear about it. An example of a problem would be settings that worked fine in Dreamweaver MX, but that do not work in Dreamweaver MX 2004. You can submit a bug report using our Feature Request/Bug Report Form . Or, if you have purchased Dreamweaver, you can also contact Macromedia Technical Support , and see if a support agent can reproduce your problem.
Macromedia is best able to troubleshoot issues when we can connect to the problematic server. If you can provide us with a temporary user account or password, or a test server, that is best. The engineers cannot debug servers behind firewalls.
22
Last updated 11/5/2015
More Help topics What is Passive FTP?
Synchronize and Select Newer options are not working correctly
SSH and SSL encryption for FTP connections
Checking the FTP log
Transfer files through FTP using the command line
Testing FTP functions using the command line
FTP Request for Comments (RFC) 959
Troubleshoot Dreamweaver on Macintosh OS XIntroduction
This TechNote suggests some general troubleshooting techniques for issues or unexpected behavior with Macromedia Dreamweaver MX, Dreamweaver MX 2004 and Dreamweaver 8 running on Apple Macintosh OS X. Answers to common questions and additional information are at the end of the TechNote.
Note: This TechNote includes information specific to Dreamweaver. Users should use this TechNote in conjunction with General Macintosh troubleshooting (TechNote tn_3500), which describes basic troubleshooting steps appropriate for all Macromedia products on Macintosh OS X.
The information is divided into three main sections:
• Collecting information
• Isolating the problem
• Searching for a workaround
Collecting Information
Troubleshooting problems with Dreamweaver is generally easier when complete information and conditions to reproduce the issue are available. Information to help narrow down the problem can be found by answering the questions below.
• Does the computer meet the minimum system requirements for Dreamweaver?
• Are Background Maintenance Tasks run on a regular basis?
• Which applications are executing when the computer starts? (this is covered in the General TechNote )
• Which applications are running before Dreamweaver starts? (this is covered in the General TechNote )
• Is there any way to get detailed reports about crashes? (this is covered in the General TechNote )
Does the computer meet the minimum system requirements for Dreamweaver?
Verify that your system meets the minimum requirements. Running below or without the advertised minimum requirements may cause the software to malfunction.
• Dreamweaver 8: 600 MHz PowerPC G3 and later Macintosh OS X 10.3 and later 256 MB RAM 300 MB available disk space You must have at least 1024 x 768, thousands of colors monitor, although millions of colors is recommended.Note: This product must be activated over the Internet prior to use. Visit the Product Activation Center to learn more about activation.

23
Last updated 11/5/2015
• Dreamweaver MX 2004: 500 MHz Power PC G3 processor Macintosh OS X 10.2.6 and later, 10.3 128 MB computer RAM (256 MB recommended) 275 MB available disk space You must have at least 800 x 600, thousands of colors monitor, although 1024 x 768, millions of colors is recommended.Note: This product must be activated over the Internet or phone prior to use. Visit the Product Activation Center to learn more about activation.
• Dreamweaver MX: A Power Macintosh G3 or better Macintosh OS 9.1 and higher or Macintosh OS X 10.1 and higher 96MB RAM (128 MB recommended) 275 MB of available disk space You must have at least 800 x 600, thousands of colors monitor, although 1024 x 768, millions of colors is recommended.
Note: Unix File System (UFS) is not a supported File system format to use with Dreamweaver on Macintosh OS X 10.x. Use Macintosh OS Extended (Journaled) HFS formatting in your hard disks.
Are Background Maintenance Tasks run on a regular basis?
Some developers report that aberrant behavior is corrected, and application performance improved, when Background Maintenance Tasks have been run. It is recommended these tasks be run on a regular basis. Please refer to the Apple Support Article ID 107388 for more information.
Isolating the problem
After confirming system requirements are met, and information is collected about applications running at the same time as Dreamweaver, isolation of the problem can begin.
• Does the problem happen when Classic mode is not running? (this is covered in the General TechNote )
• Is there a conflict with another application?
• Could the problem be the preferences file?
• Is there a problem with permissions? (this is covered in the General TechNote )
• Corrupt fonts or possible problem with Extensis Suitcase or DiamondSoft Font Reserve (this is covered in the General TechNote )
• New window disappearing on a second monitor?
• Dreamweaver help is not working (this is covered in the General TechNote )
• Where did the sites, or extensions, go when I logged in as a different user? (this is covered in the General TechNote )
• Has the hard drive been checked for corruption?
• Other Macintosh OS X 10.x troubleshooting
• Can you reproduce the problem in Macintosh OS 9? (For Dreamweaver MX only)
Is there a conflict with another application?
Close all other applications and verify that the problem persists when Dreamweaver is the only application running. A list of running applications can be viewed in the Force Quit Applications window by pressing Option-Apple-Escape. For advanced users the ProcessViewer utility (found in /Applications/Utilities) provides some information about currently running applications.
Additional information can be found by running the Unix top utility in the terminal window, which shows the name of the application. For additional information about processes and daemons please see the articles, Mac OS X Server: Processes and Mac OS X: What are all those processes?.
Could the problem be the preferences file?
Because the preferences file for Dreamweaver is generally updated more frequently than other Dreamweaver files, the chances of that file becoming corrupt is greater. To test the Dreamweaver preference file, move or rename the file while Dreamweaver is not running, restart Dreamweaver and try reproducing the issue. Dreamweaver will create a new preferences file that should eliminate issues associated with a corrupt file.
24
Last updated 11/5/2015
Note: Dreamweaver site definitions are stored in the preferences file, so use the export/import functionality built into the Sites dialog box before performing this test. The Dreamweaver Preference file is located in the HD:Users:[username]:Library:Preferences folder, named as follows:
• Dreamweaver 8 Prefs
• Dreamweaver MX 2004 Prefs
• Dreamweaver MX Prefs
New window disappearing on a second monitor?
Several customers have reported issues when opening new files on a second monitor. The new window appears as a small rectangle about five to ten pixels down the side of the second display screen. The workaround is to move the title bar to the first display screen and resize the window by dragging the bottom right corner.
Has the hard drive been checked for corruption?
There are several utilities that examine and repair disk corruption. Knowledge Base document, Mac OS X: About Using Disk Utility and fsck for File System Maintenance describes the use of these utilities. In addition, there are third-party utilities to fix certain types of disk corruption.
Can you reproduce the problem in Macintosh OS 9?
Note: This is a useful step for Dreamweaver MX users, but Dreamweaver 8 and Dreamweaver MX 2004 do not run under classic mode. Dreamweaver 8 and MX 2004 require Macintosh OS X.
Another useful piece of information is whether or not the problem can be reproduced in Macintosh OS 9.x. Please note, this is not the same as running in classic mode. To run the applications in Macintosh OS 9.x you will need to restart the computer. The Apple Knowledge Base document, How to Switch Between Mac OS 9 and Mac OS X, describes switching between Macintosh OS 9.x and Macintosh OS X.
If the problem cannot be reproduced in Macintosh OS 9.x, further investigation should determine if the problem is with the Dreamweaver MX installation by using a new account with admin privileges to see if the problem is reproduced.
Searching for a workaround
Most issues with Dreamweaver can be fixed once the problem has been defined, but some issues may require reinstalling Dreamweaver or disabling a corrupt font.
• How do I uninstall Dreamweaver?
• How do I reinstall Dreamweaver?
• How to disable a font?
How do I uninstall Dreamweaver?
Please refer to Uninstalling Studio 8 applications on Macintosh OS X (TechNote 8f101099) for instructions on Dreamweaver uninstallation. Before uninstalling, make sure to back up important sites and customized settings; see Backing up and restoring Dreamweaver settings (TechNote tn_18736) for details.
How do I reinstall Dreamweaver?
1 Copy the Dreamweaver installer from the CD to the Desktop. (Browse the CD and look for FSCOMMAND > DW_client_installer.
2 Shut down 10.x ( Apple Menu > Shut Down)
3 Turn on the machine and hold down the Shift key to start in Safe Boot (also called Safe Mode).
4 Run the Dreamweaver installer in Safe Mode.

25
Last updated 11/5/2015
5 Restart the machine to log out of Safe Mode.
How to disable a font?
Mac OS X error when launching Fireworks (TechNote tn_16404) describes how to disable fonts. To add or remove Classic Fonts from the Font folder, please see Apple knowledge base document, How to Add or Remove Classic Fonts. Another font resource is the knowledge base document, Font Locations and Their Purposes.
Other Macintosh OS X 10.x Troubleshooting
• Run the Hotfix for Macromedia Installers Please refer to Some applications do not run after upgrading Macintosh OS X versions (ServiceNote tn_18933). Note: This step does not apply to Dreamweaver 8.
• Run Macromedia License Cleaner Please refer to Macromedia License Cleaner. Note: This step does not apply to Dreamweaver 8.
• Disable Start Page Some users have encountered issues where the start page of Dreamweaver causes the application to hog memory or causes launching issues. This issue was first reported on Macintosh OS X 10.3.9. In most cases, turning off the start page would resolve the issue.
1 Go to HD:Users:[username]:Library:Preferences:Dreamweaver 8 Prefs.
2 Open the preference file in Text Edit (Control + Select the preference file and choose Open with > Text Edit).
3 In Text Edit, Choose Edit > Find >Find (Apple Command + F) and look for GENERAL PREFERENCES.
4 Change the line show start page=True to show start page=False.
5 Save the file (File > Save).
6 Test Dreamweaver 8.Note: Deleting or uninstalling/reinstalling Dreamweaver 8 will revert the preference file to its default settings.
• Create a New user account on Macintosh OS X 10.x with Administrator privileges (this is covered in the General TechNote ) 1. Go to Apple menu > System Preferences. 2. Launch Accounts dialogue in the System category. 3. Click the plus (+) button for New User 4. Supply all the fields in the New user dialogue window and make sure you check (select) "Allow user to administer this computer" in the Security tab.Note: If this option is unavailable, you might not be the Administrator of your machine and you may need to ask the Administrator to do this step for you. 5. Log on as the New User account (Apple Menu > Log out as [username]). 6. Test Dreamweaver. Note: If the problem goes away there may be some problem with the original account. You may consider Repairing Disk Permission.
• Repair Mac OS X permissions Permission repair in Mac OS X 10.2 or later means increasing the startup speed, performance and stability of the operating system. It is a good practice to repair permissions periodically. Permissions are privileges given to files, folders, and directory structures in Mac OS X. When files come from another operating system, or are installed without having correct permissions, problems may occur. For additional information about the Repair Disk Utility of Macintosh OS X, visit the Apple knowledge base document Troubleshooting permissions issues in Mac OS X.Note: You may need to verify if you have the latest update for the Operating System. Visit the Apple website to check for the latest update for your Operating System.
Answers to common questions
• If Dreamweaver MX is installed on Macintosh OS 9, will it run on Macintosh OS X?Yes
• If Dreamweaver MX is installed on Macintosh OS X, will it run on Macintosh OS 9?Yes
• How do I enable the root account on Macintosh OS X?Apple describes how to enable root access in the knowledge base document, Enabling and using the "root" user in Mac OS X.
• Where are Dreamweaver Extensions installed?Extensions installed by users are stored in /Users/USERNAME/Library/Application Support/Macromedia Dreamweaver 8/Configuration.
Additional information

26
Last updated 11/5/2015
Below you will find additional troubleshooting TechNotes and links to more resources:
TechNotes on specific Macintosh issues
• General Macintosh Troubleshooting (TechNote tn_3500)
• Known Macintosh conflicts (TechNote tn_15014)
• Memory issues on the Macintosh (TechNote tn_14263)
• FreeHand troubleshooting for the Macintosh (TechNote tn_15821)
• Fireworks MX 2004 is not supported in a UFS formatted hard drive in Macintosh OS X 10.x (TechNote tn_19425)
• Some applications won't run after upgrading to Macintosh OS X version 10.2.8 or to Panther (version 10.3) (ServiceNote tn_18933) - only applies to Dreamweaver MX 2004 users.
• Macromedia License Cleaner - only applies to Dreamweaver MX 2004 users.
• Macintosh OS 9.1 issues (TechNote tn_15072) - only applies to Dreamweaver 4 and Dreamweaver UltraDev 4 users.
TechNotes on Font issues
• How to detect a corrupt font on the Macintosh (TechNote tn_15830)
• Mac OS X error when launching Fireworks MX (TechNote tn_16404)
• Font installation in Macintosh OS X (TechNote tn_15818)
• Font Locations and Their Purposes (Apple Knowledge Base document 106417)
• To Add or Remove Classic Fonts (Apple Knowledge Base document 106417)
Third-party resources
• Mac OS X: Troubleshooting a Startup Issue (Apple Support Article ID 106464)
• Mac OS X: How to Force Background Maintenance Tasks (Logs and Temporary Items) (Apple Support Article ID 107388)
• Common system error messages: what they mean and what might help resolve the problem (Apple Support Article ID 55743)
• Mac OS X 10.2, 10.3: Starting up in Safe Mode (Apple Support Article ID 107393)
• Choosing UFS or Mac OS Extended (HFS Plus) Formatting (Apple Support Article ID 25316)
• Enabling and using the "root" user in Mac OS X (Apple Support Article ID 106290)
• Troubleshooting permissions issues in Mac OS X (Apple Support Article ID 106712)
• Troubleshooting solutions for the Macintosh can be found at the following web site: http://www.macfixit.com
Third party links
Although links to external web sites are provided as a resource, the web sites are not part of Macromedia. Please see the Macromedia policy regarding links to third party web sites in the Legal Notices and Information section. Pages to external web sites will open in a new browser window.
Understanding the Template Updating option in Dreamweaver 8.0.1-8.0.2Description
27
Last updated 11/5/2015
After updating from Dreamweaver 8.0 to either Dreamweaver 8.0.1 or 8.0.2, you will see a new Templates category added to the Site Definition dialog box. This category consists of just one checkbox: "Template Updating: Don't rewrite document relative paths" (shown below):
Why would you want to uncheck the Template Updating checkbox?
By default, the Template Updating checkbox is checked. If your template workflow matches the three-step workflow listed below, you might want to consider unchecking the Template Updating checkbox, otherwise, you should leave it checked. You should consider unchecking the checkbox if your workflow includes all of the following items:
1 You are using a Dreamweaver template (DWT file).
2 The DWT file contains relative paths pointing to server-side include (SSI) files, CSS files, links or images.
3 The SSI files, CSS files, links, or images being pointed to are also located in the Templates folder along with the DWT file. In other words, your Templates folder contains non-template items.
If you are not using Dreamweaver templates, or you only have DWT files in your Templates folder, you can most likely leave this checkbox checked (the default setting).
What changed in Dreamweaver 8.0?
Dreamweaver MX 2004 and Dreamweaver MX would not touch any path that pointed into the Templates folder, inconsistent from how Dreamweaver would deal with any other types of paths in a template. Due to complaints from some Dreamweaver MX 2004 and Dreamweaver MX users regarding this inconsistency, Dreamweaver 8.0 was changed so that it treated paths into the Templates folder just like it treated any other path. This change caused problems for some Dreamweaver users though, who were used to the Dreamweaver MX 2004 behavior.
In Dreamweaver 8.0, new pages created from templates with paths that pointed into the Templates folder, always had the Templates folder added to the path. For example, in Dreamweaver 8.0, the following code in the parent template DWT file in either a non-editable or editable region:
<!--#include -->
would be rewritten to something similar to one of the following paths when a new child page was created from the template:
<!--#include --><!--#include -->
The Dreamweaver 8.0 way of writing paths is problematic if you want the item being linked to, to be relative to the child pages and not to the parent template. For example, each of your template child pages may have its own CSS, SSI or image file. In the sample site below, each department has its own unique SSI file that consists of department-specific content, but the SSI files are all named include.inc.
Since the include files' names are the same for all departments, you may have manually entered the path <!--#include --> in the parent template file.
Note: When entering paths in Dreamweaver templates, it is recommended to browse to the file through the Dreamweaver user interface, so Dreamweaver writes the path for you. Manually entering a path in a Dreamweaver template is not a recommended workflow. However, you may find your setup similar to the one above, and there may not be a better alternative for your project.
28
Last updated 11/5/2015
In the example site above, my_template.dwt has the following path:
<!--#include -->
When you create the child page hr_child_pg.htm from my_template.dwt, the include file path turns into this:
<!--#include -->
Since there isn't an include.inc file in the Templates folder, the page breaks. You can't workaround this problem by placing the include.inc file in the Templates folder, because each include.inc file in the different departments' subfolders actually has different content, even though they all share the same file name. A site root relative path also can't be used because each department's include file has different content -- a site root relative path would just point to one of the include.inc files.
How Dreamweaver MX 2004 and Dreamweaver MX wrote paths
In Dreamweaver MX 2004 (version 7) and Dreamweaver MX (version 6), the following code in the parent template DWT file in either a non-editable or editable region:
<!--#include -->
would remain untouched when a new child page was created from the template:
<!--#include -->
How to get Dreamweaver 8 to leave these paths alone
With the Dreamweaver 8.0.2 or 8.0.1 Updaters, the Template Updating checkbox is checked by default, which means the default behavior is now to leave relative paths alone that point to items located inside the Templates folder, which is the same behavior as Dreamweaver MX 2004 and Dreamweaver MX. If you would prefer to have Dreamweaver 8.0.2 or 8.0.1 treat relative paths that point to items located inside the Templates folder as it would any other path and re-write them, then go into the Site Definition dialog box and uncheck the Template Updating checkbox. That way, Dreamweaver will add the Templates folder to the path, which was the default behavior and only option in Dreamweaver 8.0.
Take advantage of the sample CSS styles in Macromedia Dreamweaver MX 2004Introduction
Macromedia Dreamweaver MX 2004 presents a major leap forward in the CSS rendering and editing capabilities of the Macromedia Dreamweaver web design suite. CSS has now taken center stage for the design aspects of Dreamweaver's WYSIWYG Design view, resulting in more manageable, efficient pages that comply with modern web design technologies and standards.
To help developers new to CSS become acquainted with some of the many advantages of using CSS, Macromedia has included the O'Reilly CSS Reference book in Dreamweaver MX 2004 (Window > Reference) and included several sample CSS stylesheets that you can use to jumpstart the design of your web pages. In addition, Macromedia has also included a sample page design that uses the power of CSS to create a customizeable web page that closely resembles the "Halo" look and feel of Macromedia's own website.
Using the sample CSS Styles
29
Last updated 11/5/2015
The sample styles in Dreamweaver MX 2004 are external stylesheets (meaning, the CSS styles are stored in a separate CSS file) and can be attached to an existing document by following these steps:
1 Open the web document that you wish to apply a sample CSS style to.
2 Click the Attach Style Sheet button in the CSS Styles panel.
3 In the bottom of the Attach External Style Sheet dialog box, click on the sample style sheets link in the "Dreamweaver has sample style sheets to get you started" text.
4 The Sample Style Sheets dialog box will appear, where you can select a CSS style sheet to apply to your page. Click the Preview button to have Dreamweaver temporarily apply the CSS styles in this style sheet to your current document for you to be able to examine the effect of the CSS on your document. This change is only temporary and will not change your document code until you click the OK button. You can click the Browse button at the bottom of the Sample Style Sheets dialog box to select where in your site the CSS file will be saved.
5 Click OK to apply the style sheet or Cancel to cancel this action.
Using the sample "Halo" page designs
In addition to the sample CSS styles, Macromedia Dreamweaver MX 2004 also includes sample pages that fully utilize the abilities of CSS to create pages that resemble the "Halo" look and feel of Macromedia's own pages. Here are the steps needed to create a sample "Halo" page:
1 Choose File > New.
2 From the New Document dialog box, select Page Designs (CSS). A selection of sample page designs will appear in the center window, along with a preview of what the page will look like. There are two"Halo" designs available, and four other CSS-based page designs.
3 Select the desired Halo page layout and click Create.
4 Dreamweaver will now ask you to give the file a name, then ask you where you want to store the CSS files and images used in this page design. Macromedia recommends saving them in a folder that is located under your defined site root so that Dreamweaver can properly generate the references to these files.
5 Dreamweaver will now generate the sample "Halo" page. When previewed in a browser (File > Preview in Browser, or press the F12 key) the page will have many CSS-generated effects similar to the effects found on the Macromedia web site.
Additional information
For more details, please refer to the CSS Topic in the Dreamweaver Developer Center.

30
Last updated 11/5/2015
How synchronize works in Dreamweaver 8For the Dreamweaver 8 release, Adobe did a major redesign of Dreamweaver's synchronize feature. While the synchronize feature worked great for most users, some users were encountering accuracy problems. The new algorithm implemented in Dreamweaver 8 gets used when synchronizing files. But it's also used to determine whether remote files have changed on the server when putting. That way, Dreamweaver can warn you that you could be overwriting changes on the server.
Note: This TechNote only applies to Dreamweaver 8 and later. The synchronize feature was redesigned in Dreamweaver 8, so the information mentioned here does not apply to Dreamweaver MX 2004 and earlier.
How Dreamweaver MX 2004 determines whether a file has changed locally, remotely or bothDreamweaver MX 2004 determined whether a local file is newer than the remote file by figuring out the difference between the time stamp of the local file and of the remote file. Then, it adjusted for the difference in remote server time versus local machine time. This method worked, but there were a few flaws in the system. FTP servers don't return seconds, and when files are from a previous year, don't even return an hour and minute. Also, machine times can drift over time at different rates. So that Dreamweaver MX 2004 knew for certain that the remote and local files were identical, it set the local time stamp to match the remote time stamp after every put or get. This method led to a usability issue, since you now don't really know when a file was last updated locally. Dreamweaver 8 no longer alters the date/time stamp of the local file to match the remote date/time stamp. So, it reflects the local time when the file was last saved.
The dwsync.xml fileWhenever you put or get a file, Dreamweaver 8 now locally stores the remote and local date/time stamps in files called dwsync.xml. These files are in the hidden _notes folder in the same folder as the files being transferred. All files in a folder store their date/time stamp in that folder's dwsync.xml file. Therefore, there is only one dwsync.xml file per folder. If your site has multiple subfolders, then you also have multiple dwsync.xml files and _notes folders one dwsync.xml file and one _notes folder for each subfolder. While the _notes folder is primarily used to hold Design Notes, the dwsync.xml file is not considered a Design Note. The dwsync.xml files only reside locally. Dreamweaver never uploads the dwsync.xml file to the server, and there is no reason to upload it to the server.
New algorithm for determining whether a file has changed locally, remotely, or bothWhen Dreamweaver 8 needs to determine which files to upload to the server or download from the server, it uses the following algorithm:
If the dwsync.xml file exists, and there is an entry for the file in the dwsync.xml file:
Dreamweaver 8 checks to see if there is an entry in the dwsync.xml file for the local file. If so, Dreamweaver sees if the time stamp in dwsync.xml for the local file is different from the current time stamp of the local file. If so, the local file has been altered since the last get or put. Dreamweaver does the same check for the remote file. If the remote file time stamps do not match, the remote file has been changed since the last get or put you did.
If the dwsync.xml file does not exist, or if there is no entry for the file in the dwsync.xml file:

31
Last updated 11/5/2015
If no dwsync.xml file exists and the time stamps are the same, Dreamweaver still assumes that the files are identical. If no dwsync.xml file exists or no entry for that file is in the dwsync.xml file, Dreamweaver falls back to figuring out the newer file using the time stamps and machine time stamp difference. The exception is when the difference in file time stamps is smaller than the difference in machine times. For that scenario, Dreamweaver can't determine with confidence whether the local file or the remote file or both files have changed. This issue was the primary source of problems where Dreamweaver MX 2004 said that the remote file was newer. Therefore, Dreamweaver 8 now leaves it up to you to tell Dreamweaver which file is the correct one or to do a merge of the files.
Dreamweaver 8 synchronize statusesIn Dreamweaver 8, each file evaluated now has a status of "Local Newer," "Remote Newer," "Same," or "Don't know." During synchronize, "Local Newer" files are uploaded, "Remote Newer" files are downloaded and "Same" files are not uploaded or downloaded. Finally, "Don't know" files are reported to you to allow you to merge the files or figure out which file is newer.
Local Newer If the local file has changed and the remote file hasn't changed.
Remote Newer If the remote file has changed and the local file hasn't changed.
Don't Know If both files have changed or if no entry exists for that file.
Same If neither file has changed or no entry exists and the time stamps are the same.
Changes to the Synchronize dialog boxThe Synchronize functionality in Dreamweaver 8 uses the new algorithm for comparing files. Therefore, there is a new category of files to list those in which Dreamweaver cannot determine whether the local or remote file is the newer file. Dreamweaver MX 2004 only listed files it was going to Get, Put, or Delete. Dreamweaver 8 lists all of the files so you get a clear picture of what Dreamweaver is doing. The choices in the Action column are: Put, Get, Resolve, Delete, Ignore, or Synchronized. If the Action is Ignore, the Status column indicates why either "The local and remote version of the file changed since the last synchronization. Please decide whether to put or get this file." or "Not enough information to synchronize".
You have the option of seeing files Dreamweaver thinks are already synchronized or that Dreamweaver would ignore by clicking the "Show all files" checkbox. By default, this is deselected so that Dreamweaver doesn't clutter the dialog box with all of the already synchronized files.
You can make a selection of files and change what Dreamweaver does when you click OK. All of these buttons change the action to be performed but don't perform the action until you click OK. Here's what clicking each of the buttons in the above dialog does:
Mark selected files to get the testing version If you are doing a two-way synchronize, you can choose whether to Get the file by clicking this button. Changes the action to Get.
Mark selected files to put the local version If you are doing a two-way synchronize, you can choose whether to Put the file by clicking this button. Changes the action to Put.
Mark selected files for deletion If you want to delete any file in the list, you can choose to delete files by clicking the Delete button. Deletes the file from both the local and remote side, if necessary. Changes the action to Delete.
Ignore selected files during this synchronization Changes the action to Ignore and the status to "User is ignoring."

32
Last updated 11/5/2015
Mark selected files as already synchronized You can inform Dreamweaver that the selected files are already synchronized. Changes the action to Synchronized and status to "Files are synchronized." Creates entries for the selected files in the dwsync.xml files for those files upon you clicking OK. If you cancel, no changes are made to the xml file. Also note the current local and remote time stamps in the dwsync.xml file.
Compare the testing and local versions of the selected files One new option in Dreamweaver 8 is it allows you to compare the local and remote files. To do this, you select those files to compare and click Compare to launch the integrated file diff tool and passes in the selected files.
There is also a right-click context menu which has options to match the buttons mentioned above:
If you select Synchronize and no synchronization is necessary, Dreamweaver puts up a message stating that. Dreamweaver 8 also allows you to click the Yes button and see the list of files anyway and override whether the synchronization happens:
Maintain Synchronization Information site definition preferenceDreamweaver 8 has a new preference to determine if Dreamweaver should track file time stamps in the dwsync.xml files mentioned above. This preference is enabled by default. But, if you are not interested in using the synchronize feature, consider turning it off to speed up performance. Also turn it off if you don't want to be warned about potentially overwriting changes on the server. If you are experiencing problems with the synchronize feature, temporarily disabling and reenabling this preference clears out Dreamweaver's synchronize information. For more information, see "Troubleshooting synchronization problems in Dreamweaver" (TechNote kb400975 ). The preference is a site-specific preference and is located in the Remote Info category of the site definition dialog box.
A warning appears if you deselect the preference indicating that synchronization is disabled for that site. You aren't warned of potentially overwriting changes on the server.
If the preference is on, Dreamweaver gets the remote file's current time stamp and compare it to the one in the dwsync.xml file. If no dwsync.xml file exists or the remote time stamp isn't in the dwsync.xml file, Dreamweaver doesn't warn you. Dreamweaver only warns if it knows with certainty the remote file has changed since the last synchronization. You are presented with the following dialog and given the choice of comparing the remote file to the local file, putting the local file, or canceling the put operation. Clicking "Compare" downloads the remote file to a temporary file and launches the file diff tool comparing the downloaded temp file to the local file.
Additional informationFor more information on Dreamweaver's synchronize feature, see the following section of the Dreamweaver documentation: Synchronizing the files on your local and remote sites.

33
Last updated 11/5/2015
Synchronize and Select Newer options are not working correctly
Issue Dreamweaver takes a long time to connect and/or timestamp related functions do not work correctly. When you check the site FTP log, you can see that Dreamweaver is failing to create and remove the temporary XYIZNWSK folder (MKD XYIZNWSK and RMD XYIZNWSK). The functions you may be seeing problems with include Select Newer, Synchronize, and the warning when Getting and Putting older versions of files.
Note: This TechNote applies to Dreamweaver MX 2004 and earlier. The Synchronize and Select Newer features were redesigned in Dreamweaver 8 and the XYIZNWSK folder is no longer created by Dreamweaver. For more information, see "How synchronization works in Dreamweaver 8" (TechNote kb400972 ).
Reason You don't have permission to create a directory in the default login directory of the remote server. Dreamweaver MX 2004 and earlier create a temporary directory (XYIZNWSK) and read the server's timestamp to establish the time difference. This allows Dreamweaver to complete functions that involve comparing files' timestamps.
Solution In order for the timestamp-related functions to work correctly in Dreamweaver MX 2004 and earlier, users must have permission (set by the server administrator) to create directories in the default login directory.
Subversion resources | Dreamweaver CS4, CS5, CS5.5, CS6
About SubversionSubversion (SVN) is a revision control system initiated in 2000 by CollabNet, Inc.
Developers use Subversion to maintain current and historical versions of files such as source code, web pages, and documentation. Its goal is to be a mostly compatible successor to the widely used Concurrent Versions System (CVS). For information on using Subversion within Dreamweaver, see the Dreamweaver documentation:
• Use Subversion (SVN) to get and check in files in Dreamweaver CS4
• Use Subversion (SVN) to get and check in files in Dreamweaver CS5
Subversion versions and DreamweaverDreamweaver CS6 and Dreamweaver CS5.5 use the Subversion 1.6.9 client library.
34
Last updated 11/5/2015
Dreamweaver CS5 uses the Subversion 1.6.6 client library. Later versions of the Subversion client library are not backward-compatible. If you update a third-party client application (for example, TortoiseSVN) to work with a later version of Subversion, the updated Subversion application updates local Subversion metadata. Dreamweaver can no longer communicate with Subversion.
You can, however, generally use multiple clients/servers of Subversion successfully as long as they're all the same major.minor version. For example, 1.4.x works with 1.4.x (and 1.4.5 works with 1.4.6), 1.6.x works with 1.6.x (and 1.6.6 works with 1.6.9), and so on. Errors can arise when you update files with a third-party tool that automatically updates your local Subversion meta data to a later version. Then, Dreamweaver becomes incompatible with Subversion.
Dreamweaver CS4 users can use a downgrader extension that restores meta data to the previous version of Subversion. For more information, see Error: "SVN: #155021. You cannot update this file using Dreamweaver's Subversion integration... " | Dreamweaver CS4 (kb406661).
Resources for working with Dreamweaver and SubversionFor basic information on setting up a Dreamweaver site to work with Subversion, see the Dreamweaver documentation referenced above.
The following additional information below can also be useful:
• Connecting to an SVN server (video)
• Configure Subversion with SSH | Dreamweaver CS4, CS5, CS5.5, CS6
• Using Subversion with Dreamweaver CS5 – Part 1: Introducing Subversion
• Using Subversion with Dreamweaver CS5 – Part 2: Configuring Dreamweaver to use Subversion
• Using Subversion with Dreamweaver CS5 – Part 3: Configuring Apache with Subversion support
Errors connecting to Subversion serversThe following errors can occur when attempting to connect to a Subversion server from Dreamweaver. Use the information below to resolve these issues.
• Error: "SVN: #155021. You cannot update this file using Dreamweaver's Subversion integration... " | Dreamweaver CS4 (kb406661)
SSH and SSL encryption for FTP connectionsThis TechNote introduces some of the concepts associated with secure FTP authentication and secure connections. Secure authentication usually involves using an encryption method, such as the Secure Shell protocol (SSH). Although there are currently many kinds of protocols and encryption methods in use, this TechNote focuses on two of the most frequently-requested protocols.
Important: This TechNote will not be beneficial for Dreamweaver MX 2004 customers, as Dreamweaver MX 2004 now includes Secure FTP (SFTP) capabilities, supporting the OpenSSH 3.5p1 protocol to transfer usernames and passwords securely across the network. In addition, SFTP in Dreamweaver MX 2004 encrypts file content during transfers. Unlike Dreamweaver MX's implementation of FTP over SSH, Dreamweaver MX 2004's implementation of SFTP requires no special configuration beyond checking the SFTP option in the site definition dialog box.
Lack of security in FTP transfer

35
Last updated 11/5/2015
The Internet is not a secure environment. Telnet, FTP and e-mail all send your username and password in clear, unencrypted text. When you transfer a file to a remote machine, the information is not sent directly to that machine;it is routed through several machines to get there. Anyone along the route can access what you are sending, including your username and password. If this information falls into the wrong hands, your account and the remote system you have access to may no longer be secure.
Enhancing Macromedia Dreamweaver's FTP client
The Dreamweaver FTP client transfers files using the FTP protocol. Although Dreamweaver MX and earlier do not provide options for secure encryption, third-party software can be used to provide additional security.
Note: If you are unsure about which encryption protocol you should use, contact your Server Administrator or your Internet Service Provider for additional information. Macromedia cannot offer support on the use of third-party products; if you need additional information about your third-party product (beyond what is provided in this TechNote), consult the product's manufacturer, the manufacturer's web site, or the software documentation.
Below you'll find a description of two protocols that offer additional security beyond FTP:
• Secure Socket Layer (SSL)
• The SSL protocol was developed by Netscape to allow the secure transfer of files. If your connection to the remote server requires that you use this protocol, you will not be able to use Dreamweaver's FTP client. You can still use Dreamweaver to create local sites, but will have to transfer those sites to the remote server using a separate client. Two examples of third-party clients using the SSL protocol are:
• Windows: WS_FTP 7.0
• Secure SHell protocol (SSH)
• SSH is a protocol that will allow you to log into other computers across a network and move files or execute commands. Using an SSH client, it is possible to create a secure tunnel that protects Dreamweaver's FTP authentication, making it secure. The following TechNotes outline steps on configuring Dreamweaver for two such SSH protocol clients:
• Windows: Creating an SSH tunnel for secure authentication (Windows) (TechNote tn_16126).
• Macintosh: Creating an SSH tunnel for secure authentication (Macintosh) (TechNote tn_16143).
• Note: When choosing a client, make sure to choose a program that allows port forwarding. Port forwarding must be activated and configured within the chosen client. This feature is crucial to creating SSH tunnels. Please consult the documentation for the SSH client for instructions. Both Putty for Windows and MacSSH for the Macintosh-enable port forwarding.
Additional InformationFor more information about setting up the Dreamweaver FTP client, see Troubleshooting FTP issues in Dreamweaver CS4 (tn_14834).
To learn more about secure authentication and SSH, consult:
• "What is SSH?" published by the Ohio State Department of Mathematics.
• "MacSSH" published by Ohio State Department of Mathematics.
• The PuTTY FAQ.
• SSH: The Secure Shell: The Definitive Guide, by Daniel J. Barrett, Ph. D. and Richard E. Silverman, O'Reilly, 2001.
• The SSH Communications Security Web site. SSH Communications Security is the company that created the SSH Secure Shell technology which provides password and authentication protection for remote logins.
36
Last updated 11/5/2015
Third party links Although links to external websites are provided as a resource, the websites are not part of Macromedia. Please see the Macromedia policy regarding links to third party websites in the Legal Notices and Information section. Pages to external websites will open in a new browser window.
Restore preferences | Dreamweaver CS4, CS5, CS5.5For information on resetting preferences in Dreamweaver CS6 and Dreamweaver CC versions, click here .
Damaged preferences files can cause crashes, errors, and other unexpected behavior in Dreamweaver. Follow the instructions below to restore preferences to the default settings.
Disclaimer: Some of these procedures involve editing the Windows registry. Adobe doesn't provide support for editing the registry, which contains critical system and application information. Make sure to back up the registry before editing it. For more information about the registry, see the Windows documentation or contact Microsoft.
Windows users: Some of the procedure below require you to access hidden folders. By default, Windows does not display hidden folders or files. For instructions on showing these hidden folders, see Show hidden files, folders, and filename extensions | Windows XP, Vista, Windows 7 .
Mac OS 10.7 "Lion" users: Some of the procedure below require you to access your user Library folder. In Mac OS 10.7, Apple has made this folder hidden. For instructions to access your user Library, see Access hidden user library files | Mac OS 10.7 Lion .
Remove existing preferencesTo remove existing preferences, follow the instructions below that are appropriate for your operating system and version of Dreamweaver.
• Mac OS
• Windows 7, Windows Vista
• Windows XP
Remove preferences on Mac OS1 Quit Dreamweaver.
2 In the Finder, navigate to /Users/Your User Name/Library/Application Support/Adobe.
3 Rename the Dreamweaver preferences folder:
• Dreamweaver CS5.5: Rename the Dreamweaver CS5.5 folder to, for example, Old Dreamweaver CS5.5.
• Dreamweaver CS5: Rename the Dreamweaver CS5 folder to, for example, Old Dreamweaver CS5.
• Dreamweaver CS4: Rename the Dreamweaver CS4 folder to, for example, Old Dreamweaver CS4.
4 Navigate to /Users/Your User Name/Library/Preferences.
5 Rename the Dreamweaver preferences file:
• Dreamweaver CS5.5: Rename the Adobe Dreamweaver CS5.5 Prefs file to, for example, Old Adobe Dreamweaver CS5.5 Prefs.
• Dreamweaver CS5: Rename the Adobe Dreamweaver CS5 Prefs file to, for example, Old Adobe Dreamweaver CS5 Prefs.
37
Last updated 11/5/2015
• Dreamweaver CS4: Rename the Adobe Dreamweaver CS4 Prefs file to, for example, Old Adobe Dreamweaver CS4 Prefs.
Remove preferences on Windows 7 or Windows Vista1 Exit Dreamweaver.
2 In Windows Explorer, navigate to C:\Users\Your User Name\AppData\Roaming\Adobe.
3 Rename the Dreamweaver preferences folder:
• Dreamweaver CS5.5: Rename the Dreamweaver CS5.5 folder to, for example, Old Dreamweaver CS5.5.
• Dreamweaver CS5: Rename the Dreamweaver CS5 folder to, for example, Old Dreamweaver CS5.
• Dreamweaver CS4: Rename the Dreamweaver CS4 folder to, for example, Old Dreamweaver CS4.
4 Choose Start, type regedit in the Start Search, and then press Enter.
5 In the left pane of the Registry Editor, navigate to the following key: HKEY_CURRENT_USER\Software\Adobe
6 Remove the Dreamweaver preferences registry entries.
Dreamweaver CS5.5
a Select the Dreamweaver CS5.5 key, then choose File > Export. In the Export Registry File dialog, enter a filename and location, and then click Save.
b Ensure the Dreamweaver CS5.5 key is still selected, and then choose Edit > Delete. In the Confirm Key Delete dialog, click Yes.
Dreamweaver CS5
c Select the Dreamweaver CS5 key, then choose File > Export. In the Export Registry File dialog, enter a filename and location, and then click Save.
d Ensure that the Dreamweaver CS5 key is still selected, and then choose Edit > Delete. In the Confirm Key Delete dialog, click Yes.
Dreamweaver CS4
e Select the Dreamweaver CS4 key, then choose File > Export. In the Export Registry File dialog, enter a filename and location, and then click Save.
f Ensure that the Dreamweaver CS4 key is still selected, and then choose Edit > Delete. In the Confirm Key Delete dialog, click Yes.
7 Exit the Registry Editor.
Remove preferences on Windows XP1 Exit Dreamweaver.
2 In Windows Explorer, navigate to C:\Documents and Settings\Your User Name\Application Data\Adobe.
3 Rename the Dreamweaver preferences folder:
• Dreamweaver CS5.5: Rename the Dreamweaver CS5.5 folder to, for example, Old Dreamweaver CS5.5.
• Dreamweaver CS5: Rename the Dreamweaver CS5 folder to, for example, Old Dreamweaver CS5.
• Dreamweaver CS4: Rename the Dreamweaver CS4 folder to, for example, Old Dreamweaver CS4.
4 Choose Start > Run. Type regedit in the Open text box, and then press Enter or click OK.
5 In the left pane of the Registry Editor, navigate to the following key: HKEY_CURRENT_USER\Software\Adobe
38
Last updated 11/5/2015
6 Remove the Dreamweaver preferences registry entries:
Dreamweaver CS5.5
a Select the Dreamweaver CS5.5 key, then choose File > Export. In the Export Registry File dialog, enter a filename and location, and then click Save.
b Ensure the Dreamweaver CS5.5 key is still selected, and then choose Edit > Delete. In the Confirm Key Delete dialog, click Yes.
Dreamweaver CS5
c Select the Dreamweaver CS5 key, then choose File > Export. In the Export Registry File dialog, enter a filename and location, and then click Save.
d Ensure that the Dreamweaver CS5 key is still selected, and then choose Edit > Delete. In the Confirm Key Delete dialog, click Yes.
Dreamweaver CS4
e Select the Dreamweaver CS4 key, then choose File > Export. In the Export Registry File dialog, enter a filename and location, and then click Save.
f Ensure that the Dreamweaver CS4 key is still selected, and then select Edit > Delete. In the Confirm Key Delete dialog, click Yes.
7 Exit the Registry Editor.
Try to re-create the problemAfter you have removed your existing preferences, restart Dreamweaver. The application creates new preferences files, folders, and registry entries, as applicable, using the default settings.
Then try to re-create the problem that you had before.
If the problem was resolved, then damaged preferences was the cause.
If the problem persists, then the preferences are not the cause and you can replace the original preferences.
To replace the original preferences:
1 Quit Dreamweaver.
2 Delete the new preferences folder and restore the original name of the previous folder.
3 Do one of the following:
• Mac OS: Delete the new preferences file and restore the original name of the previous preferences file.
• Windows: Double-click the registry backup file you created.
More Help topics Troubleshoot system errors and freezes | Adobe software on Mac OS 10.x
Troubleshoot system errors and freezes | Adobe software on Windows
Troubleshoot unexpected behavior that occurs only in a particular user account | Adobe software on Mac OS

39
Last updated 11/5/2015
Troubleshoot unexpected behavior that occurs only in a particular user account | Adobe software on Windows 7 and Vista
Troubleshoot unexpected behavior that occurs only in a particular user account | Adobe software on Windows XP
Resolved issues with Dreamweaver MX 2004 update (7.0.1)The 7.0.1 updater fixes bugs in Macromedia Dreamweaver MX 2004 on both the Macintosh and Windows platforms. Please see the Dreamweaver MX 2004 Release Notes for additional information on the 7.0.1 release and to view an overview of important issues resolved with the Dreamweaver 7.0.1 Update.
Detailed Bug Fix List
The following is a detailed list of issues resolved with this release. Features are listed in alphabetical order.
A | B | C |D | E | F | G |H | I | J |K | L | M |N | O | P |Q | R | S |T | U | V |W | X | Y | Z
A
Accessibility
• JAWS sometimes reads incorrect line or word in Code view. (WIN)
ASP.NET: In-Place Editing
• Unable to edit the content within asp:Panel in Design view. (WIN/MAC)
• Auto Incrementing ID attributes should start with number "1". (WIN/MAC)
• "Vertical," the value set for DataList Repeat Direction property, is misspelled. (WIN/MAC)
ASP.NET: Visualization
• User controls (ASCX) are not rendered on ASPX pages. (WIN/MAC)
• ASP.NET Textboxes with multi-line attribute not rendering as multi-line. (MAC)
• ASP.NET usercontrol translator doesn't allow for root paths; only looks for specific order of attributes. (WIN)
• asp:LinkButton does not render as a link. (WIN)
• asp:DataList in in-place editing mode rendered incorrectly. (WIN/MAC)
• Path to images in UserControl not resolving; shows missing image icon. (WIN)
• asp:panel shows translator code in Design view. (WIN)
• User controls rendering is not refreshed in real-time, only on File > Open. (MAC)
• User control that contains dynamic data doesn't show data. (WIN/MAC)
• Crash when clicking a few times in Design view on page with ASP.NET objects. (WIN/MAC)
• Duplicate <%@ Register>&<MM:PageBind> are created if editing data list in Live Data mode. (WIN/MAC)
ASP.NET: Workflow
• CausesValidation property of the button server controls is missing from the Tag Editor dialogs. (WIN)

40
Last updated 11/5/2015
Asset Panel
• Favorite items aren't indented to indicate when in folders. (MAC)
• Assets panel should list colors used in linked CSS. (WIN/MAC)
• Assets panel doesn't maintain scroll position on manual refresh. (MAC)
B
Basic File Operations
• Specific input tag code is corrupted upon closing and reopening. (MAC)
• Crash when hitting Enter in empty Result panel (Search and Link Checker tabs). (WIN/MAC)
• Crash on load when opening specific ColdFusion file. (WIN/MAC)
• Erratic scrolling of Design view on the Macintosh. (MAC)
• File > New is too slow; new document takes too long to render once Create button is clicked. (WIN/MAC)
• File > Revert removes focus from document; Dreamweaver hangs when hitting tab keys. (WIN)
• File is marked unsaved after saving in Code view and refreshing Design view. (WIN/MAC)
• Crash on exit after creating new document using Ctrl+Shift+N if browser target check errors were highlighted in Code view. (WIN)
• Opening document with certain CSS rules freezes Dreamweaver. (WIN)
• No warning message on saving when the current encoding cannot correctly save all the characters within the document. (WIN)
• Files > Save is disabled after editing outside of Design view because document window loses focus. (MAC)
• Crash on Mac, JavaScript Error on Windows, when saving file with behavior as code-only document and resaving as HTML. (WIN/MAC)
• Crash when opening frameset after a CSS file. (MAC)
Behaviors
• onClick/onMouse type events are omitted from some image behaviors. (WIN/MAC)
• Behavior code gets broken when using server markup. (WIN/MAC)
• Set Nav Bar Image behavior doesn't work. (WIN/MAC)
• Can't re-open Show Pop-up Menu dialog box to edit Pop-up Menu behavior applied to anchor tag. (WIN)
Browser Target Check
• Browser Check incorrectly reports that title attribute of a tag is not supported by Netscape 6. (WIN/MAC)
• Browser Check marks <link> tag as invalid for Opera 7. (WIN/MAC)
• Browser Check gives incorrect report for CSS code without unit of measure. (WIN)
• Browser Check incorrectly reports that CSS property Display:inline is not supported by IE 5.2 Mac. (WIN/MAC)
• Browser Check incorrectly reports that border style values dotted and dashed are not supported in IE Mac 5.2. (WIN)
• Performance: Browser Check uses much more memory than it should. (WIN/MAC)
41
Last updated 11/5/2015
• Browser Check incorrectly reports that the title attribute of the <acronym> tag is not supported in Internet Explorer 6. (WIN/MAC)
• Browser Check incorrectly reports that some attributes are required for <TEXTAREA>, <IMG>, <INPUT> etc. for Netscape Navigator 7. (WIN/MAC)
• Browser Check incorrectly reports that <LEGEND> tag is not supported in Opera 7.0. (WIN/MAC)
• Brower Check incorrectly reports that attribute "for" of label tag is not supported in Opera 7.0. (WIN/MAC)
• Browser Check incorrectly reports that noshade attribute of HR tag is not supported in Opera 7.0. (WIN/MAC)
C
ColdFusion Debugger
• Crashes if trying to edit sites in response to ColdFusion debugger message. (WIN)
Code Editor
• Selection in code moved to wrong place when syncronizing after undo. (WIN/MAC)
• Code View redraws poorly if using scroll wheel with a certain file. (WIN)
• IP in Code View freezes after refreshing if the document is physically saved. (MAC)
• In Code View, caret doesn't show up as you type fast. (WIN)
• Code View Options reset to off. (WIN)
• Crash when clicking in code view for a certain file. (MAC)
Code Hints
• Missing output attribute in <cfcomponent> code hint. (WIN)
• Incorrect order of arguments in Code Hints for StructSort(). (WIN)
• Code Hint for 'ReplaceNoCase' is missing a comma between 'String' and 'Substring1' parameters. (WIN/MAC)
• Using arrow keys while color picker is up draws strange grid over code. (MAC)
• Code hint for the ColdFusion function arrayInsertAt is missing the last argument. (WIN/MAC)
Code Inspector
• In Code Inspector, when accessing Edit menu, either the selection is lost or the tag after IP gets selected. (WIN)
Code Trust
• CFML code contained inside a layer becomes corrupted when moving that layer with the arrows keys. (WIN/MAC)
• cfif code is rewritten when opening a document where the cfif code has no space between the tag name and the attribute. (WIN/MAC)
• Form control names rewritten on drag and drop if name exists twice on page. (WIN/MAC)
• Data from XML file is lost if XML tag contains at least 2047 characters. (WIN/MAC)
• CF server tags get rewritten when applying a style using the PI to content inside the CF server tags. (WIN/MAC)
• Lose line breaks around <td> and <cfif> tags when editing other text on page. (WIN/MAC)
• Inserting script from Assets panel doesn't add proper "type" attribute and value. (WIN)
ColdFusion Rendering
• CF page corrupted on open when file includes encrypted file. (WIN/MAC)
42
Last updated 11/5/2015
ColdFusion Server Model
• When using the ColdFusion server as a testing/remote server, the http request used to obtain meta data from the server contains the password as plain text. (WIN/MAC)
Color Coding
• php5 keywords "private,""public,""protected,""abstract,""interface,""final,""const,""static,""instanceof,""try," and"catch" not recognized by color coding. (WIN/MAC)
• JSP: "session" is not colored as implicit variable. (WIN/MAC)
Commands
• Bottom half of Detailed tab of Clean Up Word HTML dialog is truncated: options missing. (MAC)
CSS Editing
• Creating a style that has a name end with ":" crashes Dreamweaver. (WIN/MAC)
• PI incorrectly applies CSS style to cf tags. (WIN/MAC)
• Content residing in a table inside a <div> tag dissappears when cutting some of the content. (WIN/MAC)
• Dreamweaver doesn't allow duplicating locked styles even though there's an editable region in the head section. (WIN/MAC)
• Crash when adding open modified CSS file as a Design Time Style Sheet (DTSS). (WIN/MAC)
• Enter key does not commit to selected style in the Style dropdown of the PI. (WIN/MAC)
• Previewed style sheet link is added to the code when focus is in <style> in CSS panel. (WIN/MAC)
• CSS creation dialog doesn't default to panel selection or last-selected option. (WIN/MAC)
• Crash when click on style in CSS Styles panel when Style is selected in Head View and doc is open in Split View. (WIN/MAC)
• Multiple classes on a single tag created in some cases. (WIN/MAC)
• CSS autocreation not behaving as expected in some cases. (WIN/MAC)
• Using the CSS PI on certain tag structures can lead to #invalid_attr_id in code. (WIN/MAC)
• Crash after being able to delete locked style sheet and then continuing editing in Manage Styles dialog. (WIN/MAC)
• Text Indent measure pop-up defaults to points instead of pixels. (WIN/MAC)
• Crash when selecting attribute in CSS Properties panel if closing "}" is missing in CSS class. (WIN/MAC)
• Editing/Creating style in CSS file loses current selection (selects entire code view and jumps to top). (WIN/MAC)
• External CSS change no longer renders in html page after opening another page using the same external style sheet. (WIN/MAC)
• Hand coding a CSS @import, forgetting the semicolon (;), and then clicking back into Design view crashes Dreamweaver. (WIN/MAC)
• DW doesn't pick up changes in Code view after Refresh Style List. (WIN/MAC)
• Editing CSS values in relevant CSS panel removes dynamic code from list/menu. (WIN/MAC)
• Dreamweaver doesn't insert "," between CSS shorthand clip values. (WIN/MAC)
• CSS Panel columns don't stick to their designated sizes. (MAC)
• Absolute path does not get converted to siteroot or document relative when document is saved. (WIN/MAC)
• CSS a {float: right;} causes Dreamweaver to crash. (WIN/MAC)
43
Last updated 11/5/2015
• Editing CSS styled text in Contribute that was autocreated with the Dreamweaver PI creates poor code. (WIN)
• Changing the style of this Contribute-created text leaves empty"style" attribute (<p >foo</p>). (WIN)
• Cannot right/ctrl click an image to apply a CSS class. (WIN/MAC)
CSS Property Grid
• Path to background image in an open external CSS file remains absolute after selecting image outside site then saving it in the site. (WIN/MAC)
• Editing external styles from the CSS property grid is slow. (WIN/MAC)
CSS Rendering
• Style sheets imported in <style> tag with media attribute are not filtered properly. (WIN/MAC)
• ColdFusion comments before !Doctype causes Dreamweaver Design view rendering to switch to non-standards compliant mode (Quirks mode). (WIN/MAC)
• Crash when refreshing Design view after changing display property to 'none' for files with tables. (WIN/MAC)
CSS Rule Tracker
• Crash when editing color in CSS Rule inspector when style is defined in a frameset document. (WIN/MAC)
• Crash on opening Tag Inspector/CSS Rule Tracker when a style is selected in CSS Styles Panel. (WIN/MAC)
D
Data Access Objects
• <cfoutput> tags are left behind on page when dynamic data is deleted from Server Behaviors panel. (WIN/MAC)
Data Bindings Panel
• Data Bindings panel is unnecessarily refreshed when typing inside tables. (WIN)
Database Connectivity
• Local JDBC connectivity is broken in Dreamweaver. (MAC)
Document Type
• Dreamweaver doesn't recognize .NET page directive if Page keyword is not explicitly set. (WIN/MAC)
Document Window
• Document switching with keyboard shortcuts fails with text-only based docs (like .css files, .txt files, etc.) (WIN/MAC)
• File > Open replaces new blank documents. (WIN/MAC)
Drag and Drop
• JavaScript errors and crashes due to Dreamweaver frequently running out of resources. (WIN)
Dynamic Text
• Dreamweaver crashes on creating a link from a datasource after following dynamic data instructions to create a recordset. (MAC)
• Dynamic formatting only works correctly for dynamic data generated by Dreamweaver server behaviors. (WIN/MAC)

44
Last updated 11/5/2015
E
E-Licensing
• The Start page is not taking advantage of the deferred e-license check; startup is still slow. (WIN)
• Splash screen still indicates old serial number after transfering license and re-activating with another serial number; (cache is not refreshed). (WIN)
Edit Options
• Dreamweaver performs unnecessary site cache check when pasting text under certain cases. (WIN/MAC)
• Slow typing performance for documents that contain tables with a large number of rows. (MAC)
• An absolutely-positioned CSS layer that contains a table can sometimes disappear from Design view when content within the table is cut to the clipboard. (WIN/MAC)
• Highlighting text within a table and then applying bold causes a "offsetsToNode" JavaScript error. (WIN)
• Deleting a close comment tag in an include file causes parts of the document to not be rendered in Design View. (WIN/MAC)
• When using Split view mode, typing in Code view renders delayed results in Design view. (MAC)
• When resizing table cells, rendering performance is slow. (WIN/MAC)
• Table columns in Design view never render less than 4 pixels wide. (WIN)
• Performing a particular edit in Design view causes an<img> not to render in Design view, though still in code; crash on selecting <img> in Code View. (WIN)
• Backspacing edits involving <p> and <br> tags cause Dreamweaver to throw assertions in certain cases. (WIN)
Encoding
• Setting default encoding does not appy to files without a meta tag. (WIN/MAC)
• Curly apostrophes render as black squares in Design view and Code view for Latin documents. (MAC)
Extensibility
• The Dreamweaver tree control outputs an incorrect number of selected items. (MAC)
• The JavaScript Tree Control does not allow the user to select multiple items in a list menu. (MAC)
• Multiple selections on a MM:TREECONTROL JavaScript control do not work correctly. (WIN)
• Site information is stored in the wrong location within the registry. (WIN)
• The menu items for "New Optional Region" and "New Repeating Region" share the same ID name which produces invalid XML. (WIN)
• Site list dropdown does not refresh correctly when using the API call dw.loadSiteFromPrefs(). (WIN/MAC)
Extensible Menus
• The API call dw.createDocument() causes a crash when called from within menus.xml. (WIN/MAC)
External Editor
• External editors defined in the Preferences dialog box do not appear in the "Open with" file context menu. (WIN/MAC)
F
45
Last updated 11/5/2015
Find/Replace
• Performing a site-wide find and replace operation for an image tag within an include file causes an infinite loop. (WIN/MAC)
• In certain files that use server side includes, Dreamweaver crashes when performing a specific tag string replacement across all files in a site. (WIN)
• The Find and Replace dialog box defaults to search in Design view ("Text") rather than Code view ("Source Code") for XML files. (WIN/MAC)
• Dreamweaver performs slowly when searching for text in large XML files such as menus.xml. (WIN)
• In certain types of UTF-8 documents, "Find" fails to detect cases that it should find. (MAC)
• Find and Replace dialog box fails to remember that source code was previously searched. (MAC)
• Find and Replace search method needs enhancement. (WIN/MAC)
• After doing a "Match Whole Word" search, that option becomes grayed out in the Find dialog box. (WIN/MAC)
• Searching for the string <input name="Update" type="submit" id="Update" value="Update" /> causes Dreamweaver to crash. (WIN/MAC)
• When peforming a search in a document and then switching to another document, Dreamweaver does not find the search item in current document. (WIN/MAC)
• Find/Replace dialog box does not obtain focus on "Command+F" in Code view in certain cases. (MAC)
• Appending a search string in the Find dialog box by pasting and then executing the search causes Dreamweaver to search for what's in the clipboard instead of the appended string. (WIN)
• "Find All" results should set focus to the Document window. (WIN/MAC)
• Crash when stripping unballanced <tr> tag using "Find and Replace". (WIN)
• "Find Selection" missing from Code context menus; find context menu items missing keyboard accelerators. (WIN/MAC)
Flash Elements
• Dreamweaver crashes when selecting a flashlet in a particular file. (WIN/MAC)
Flash Objects
• The "Get more styles" button in the Flash Buttons dialog box attempts to load a page that does not exist. (WIN/MAC)
• Dreamweaver crashes or suffers performance problems when applying certain fonts to Flash text. (MAC)
Forms
• When using an image form field, rendering glitches appear when clicking the mouse in Design view or using the arrow keys. (MAC)
Frames
• Dreamweaver crashes when editing CSS for a frameset in Code view. (WIN/MAC)
File Transfer Protocol (FTP)
• Unable to connect to certain types of FTP servers. (WIN)
• Cannot display folder contents or delete remote folder using the FTP server WAR-FTPD 1.67-05. (WIN/MAC)
• Unable to delete or overwrite files and folders using Yahoo's FTP servers. (WIN/MAC)
46
Last updated 11/5/2015
• While connecting to servers, the message "Server not responding" appears instead of "Waiting for Server..." (WIN/MAC)
• When connecting to a remote server, the File view is automatically switched from remote to local. (WIN/MAC)
• The menu item "FTP Log" under the Advanced Site menu is always disabled. (WIN/MAC)
• Unable to connect to FTP servers (such as Netware) that use a"\\" in directory path. (WIN/MAC)
G
H
Head Content
• Dreamweaver crashes on Mac and produces JavaScript error on Windows when changing the href attribute in a link tag in the<head> of the document. (WIN/MAC)
Headless Fireworks
• Dreamweaver crashes when copying an image that is relatively positioned inside of a <div> tag. (WIN/MAC)
• Dreamweaver crashes when editing and image in Dreamweaver after resizing the image in Fireworks. (MAC)
• Crop does not work after cropping more than once (uncropped image displays in crop size). (WIN/MAC)
Help
• Pressing the "Help" button in the "Export Template Data as XML" dialog box does not link to the proper help page. (WIN)
• TrioMotors sample application "insert.sql" file requires UNIX style line breaks for Mac OSX support. (MAC)
I
Imagemaps
• In XHTML documents, changing the image map attribute "name" to"id" prevents hot spots from rendering in Design view. (WIN/MAC)
• Dreamweaver crashes when making multiple, quick edits to image maps. (WIN/MAC)
• Deleting a hotspot, selecting Edit > Undo, and again deleting the hotspot causes Dreamweaver to crash. (WIN/MAC)
Import DTD and Schema
• Dreamweaver produces an http error 405 while attempting to import certain types of XML schemas into the Tag library. (MAC)
Import Office
• Copying text from Excel into Dreamweaver produces broken CSS references. (WIN/MAC)
• In certain cases, copying a list from Microsoft Word into Dreamweaver fails to assign a CSS class reference that links to the generated style rule. (WIN)
• Copying and pasting a "" symbol from Microsoft Word inserts "™" instead of the trademark symbol. (WIN/MAC)

47
Last updated 11/5/2015
• When a curly apostrophe is copied from a Word document and pasted in Dreamweaver, the curly apostrophe changes into a straight or vertical apostrophe instead. (WIN/MAC)
• Bullet item with non-default borders are put in separate list when pasting formatted Office bulleted lists. (WIN)
Installer
• Installer closes Safari without permission/warning. (MAC)
• Installer is installing files from old HTML-based Start page. (WIN/MAC)
• Dreamweaver 7.01 updater is not updating the WebDAV version of Dreamweaver MX 2004. (WIN/MAC)
J
Java Bean Support
• Dreamweaver crashes while introspecting a bean class that extends a class included in Java SDK. (MAC)
JavaScript
• Netscape JavaScript Interpreter change list needs updating. (WIN/MAC)
K
Keyboard Shortcuts
• Restoring Macromedia standard keyboard set doesn't restore properly (missing 16 accelerators). (WIN/MAC)
• Snippet keyboard shortcut creation fails if snippets id tag is missing in menus.xml. (WIN/MAC)
L
Layers
• Dreamweaver crashes on making all layers in a document invisible. (WIN)
Libraries
• Double-clicking images with CSS class defined in Library item causes Dreamweaver to crash. (WIN/MAC)
• Dreamweaver crashes when trying to create a Library item with rollback image. (WIN/MAC)
• Detaching a Library item deletes the entire Library item if the first line of code in the Library item is a link to a stylesheet. (WIN)
• Dreamweaver crashes when updating Library items. (WIN)
Link Management
• Building Site Map dialog box comes up when opening CSS file from Styles panel if Files panel shows Map view. (WIN/MAC)
• Links with values from database are updated when moving/copying files in the Files panel; filed name becomes invalid (WIN/MAC)
Lists
• When creating a nested list, adding items to the inner list doesn't work; erroneous items and extra items occur in the outer list. Also, Dreamweaver renders incorrectly in some cases. (WIN/MAC)

48
Last updated 11/5/2015
Live Data
• 2-byte characters are garbled in UTF-8 page in Live Data view on ASP.NET server. (WIN/MAC)
• When a Live Data error is encountered and the More Information button is clicked, Dreamweaver directs to a TechNote in the UltraDev support center. (WIN/MAC)
• After doing Live Data view in siteless RDS connection, temp files remain on remote server. (WIN/MAC)
• Dreamweaver crashes when dragging & droping ASP.NET object into form in Live Data view. (WIN/MAC)
• Dreamweaver crashes when a column is selected in a table containing dynamic data while attempting to view Live Data. (WIN/MAC)
• JavaScript Error occurs when clicking on Live Data view icon; error occurs when switching between two documents where the original document is in Live Data view. (WIN/MAC)
Log-in Server Behavior(s)
• Username field, Password field, and Password column in Log In User dialog box still show default value even if all fields have been modified (PHP only). (WIN/MAC)
M
Macintosh Issues
• Cannot get to Unix directories like /usr from Dreamweaver Open/Save file dialogs. (MAC)
• When doing local development with mysql and php, specifying http://localhost/~foo/bar for the url prefix of your testing server instead of http://127.0.0.1/~foo/ bar, causes all database functionality to cease. (MAC)
Multiple Users Configuration
• 7.0.1 updater does not force Dreamweaver to update to newer menus.xml; new functionality will be missing as a result. (WIN/MAC)
N
New Document Dialog Box
• Preview does not show if CSS Page Designs are selected. (MAC)
O
Other
• File is not marked as saved if modified in Code view and saved without hitting F5 to refresh files beforehand. (WIN/MAC)
• On machine with Simplified Chinese IME: hitting backspace key causes junk characters in Dreamweaver Code view while inputing Simplified Chinese characters. (WIN)
• Typing is very slow in files with CSS styles when CSS panel is open. (MAC)
• Text from web pages are not pasted correctly: apostrophe's not encoded; inappropriate spaces prior to puncuation marks; spaces between numbers and letters, etc. (WIN)
• Improved error/crash reporting. (WIN/MAC)

49
Last updated 11/5/2015
• When clicking back into Dreamweaver from another program, Dreamweaver appears in focus (active) when it actually is not. (MAC)
• Dreamweaver crashes when indenting ASP.NET datalist that contains dynamic text. (WIN/MAC)
• Copyright on splash screen says 2003, not 2004. (WIN/MAC)
• In Dreamweaver.exe Properties dialog says copyright 2003, not 2004. (WIN/MAC)
• Copyright 2003 is listed in scrolling text on splash screen, not 2004. (WIN/MAC)
P
Panels
• Application panel flickers when moving cursor between Application label and the Databases tab; Bindings panel content also disappears. (WIN)
• Width of window in expanded File panel difficult to adjust. (MAC)
• When Expand/Collapse button on Files panel is used, Files panel always rejoins with Assets panel, even if Files and Assets panels have been separated. (MAC)
• Files panel doesn't auto-refresh and resets columns repeatedly after manual refresh. (MAC)
• After ungrouping and expanding Files panel, other docked panels disappear. (MAC)
• Expanded Files panel changes middle divider position after expanding/collapsing the panel or quitting and restarting Dreamweaver. (WIN/MAC)
• Expanding/restoring Files panel loses category name and tab index of the panel group. (MAC)
• Files panel size changes when collapsing and re-expanding the panel or quitting and relaunching DW. (MAC)
• After opening and closing a .ASPX page and changing a Text Box, resizing a panel results in a JavaScript error. (WIN)
Performance
• Dreamweaver slow to start. (WIN/MAC)
• Switching between documents is very slow. (MAC)
• Applying bold to text is slow. (MAC)
• Performance of Code view scrolling is not optimal. (MAC)
• Deleting characters on pages with Server Model defined is too slow. (WIN/MAC)
• Opening document with tables and lists is very slow. (MAC)
• Copy/Paste of a table with list items is very slow. (WIN/MAC)
• Getting files from remote server is very slow. (WIN/MAC)
• Switching between documents in different sites is slow if Assets panel is open. (MAC)
• Opening 20 files is very slow. (WIN/MAC)
• Increased Pagination on pages with Server Model defined results in slow selection in those pages. (WIN/MAC)
• Opening CSS file is slow. (MAC)
• Typing over selected text in a very large file is slow. (WIN/MAC)
• Inserting a table into a table cell is slow on Cold Fusion page. (MAC)
50
Last updated 11/5/2015
• Slow performance when expanding a folder in the local view of the Files panel if the folder contains many files. (MAC)
• Slow performance when cutting the text in a table with a great deal of text. (WIN/MAC)
• Slow performance when deleting a table column with multiple cells. (WIN/MAC)
• Slow performance when switching between two files that use a great deal of CSS. (WIN/MAC)
• Texts are measured too often, causing slow performance. (WIN/MAC)
• Typing high-ascii characters is slower in Split view than in Design view. (MAC)
• Slow performance when typing characters and deleting them in Design view. (WIN/MAC)
• Slow Pagination performance when opening a file in Design view. (WIN/MAC)
• Slow performance when previewing a temp file with a great deal of CSS and templates in browser. (MAC)
• Slow performance when performing Find and Replace using tag names via source. (MAC)
PHP
• PHP code is rewritten after pasting the code in a new document, and then saving the document. (WIN/MAC)
• JavaScript error occurs while copying a recordset and pasting it in a PHP page. (WIN)
• .php5 extension is not supported by Dreamweaver; Dreamweaver unable to open a PHP5 document. (WIN/MAC)
Preview in Browser
• Internet Explorer crashes when choosing Print menu after pressing F12 to Preview in Browser. (WIN)
• Performing Preview in Browser with Safari opens new browser window for each different page if using temp file. (MAC)
Pop-up Menu
• JavaScript error occurs when adding pop-up menu if there is a HTML comment before the <HEAD> tag. (WIN/MAC)
Preferences
• Setting up proportional font to a large size (36, 48, ...) makes some dialog boxes extremely tall. (WIN/MAC)
• The text "Column:" is missing in the Code Format category in the Preferences dialog box. (WIN)
• The default browser setting for target browser check should be IE5/NN6. (WIN/MAC)
• Dreamweaver crashes when closing Preferences, Site Wide Reports, or Configure Server dialog box if right-clicking on OK button. (MAC)
Property Inspectors
• Class button appears in the ASP objects Property inspector if the Property inspector is reduced or extended. (WIN/MAC)
• Unable to edit ID attribute of link tag via Link Property inspector. (WIN/MAC)
• In non-standards compliant mode (Quirks mode), Dreamweaver and browsers display nested table's differently: font size, color, etc. (WIN/MAC)
• JavaScript error occurs if asp:dropdownlist does not have closing tag; unable to bind dynamic data to asp:dropdownlist. (WIN/MAC)
• "Class" label in List/Menu and Named Anchor Property inspector is cut-off. (MAC)
• Clicking in Alt field does not select existing text. (WIN/MAC)
51
Last updated 11/5/2015
• ASP.NET Property inspector pop-up menu is case sensitive and unable to make selection if attribute value is using a different case. (WIN/MAC)
• Property inspector for invalid markup should not have class pop-up menu. (WIN/MAC)
• Cannot unbold the selection if the selection contains an empty table cell. (WIN/MAC)
• Class pop-up menu appears occasionally in Frames Property inspector and causes a crash when selecting anything in the pop-up menus. (WIN)
• CSS changes made via Property inspector get paginated twice. (WIN/MAC)
• Class pop-up menu in Image map Property inspector does not show current style selection. (WIN/MAC)
Q
Quick Tag Editor
• Quick Tag Editor code hint comes up slow taking about 5 seconds although Preferences are set for 0 second delay. (WIN/MAC)
R
RDS Support
• Menu does not appear after right-clicking on a file in the File panel if the site is a Contribute site using RDS. (WIN)
Recordsets
• In PHP server model, complex recordset information is lost in simple view. (WIN)
• Unable to change recordset name using find/replace if Code view is in focus. (MAC)
• .NET page directive is rewritten when creating dataset if the directive is not default directive. (WIN/MAC)
Rendering
• CSS renders incorrectly with table row selected if the<BODY> tag is redefined to have a font other than Times New Roman. (WIN)
• Dreamweaver does not render the document correctly in Design view if the document contains a single large table. (MAC)
S
Selection
• Eventual crash after selecting words inside a table cell, mousing over the table columns header until the red lines appears, and then editing. (WIN/MAC)
• JavaScript error occurs when indented text is selected and mouse is right-clicked to apply outdent. (WIN)
Server Behaviors
• Dreamweaver stops responding when dynamic list/menu dialog box is launched. (WIN)
• Space is missing in "User Log In Form" error message. (WIN/MAC)
• A javascript error is thrown when going from Code view to Design view on a Cold Fusion page. (WIN/MAC)
52
Last updated 11/5/2015
• Server Behavior panel scrolls to top when selecting server behavior and mouse pointer or context menu is not next to selected item. (WIN)
• Copy/paste keyboard shortcuts don't work in application panels. (WIN)
• The DataSet server behavior corrupts a non-string parameter on re-entry. (WIN/MAC)
• DataSet server behavior adds spaces to parameter values. (WIN/MAC)
• Error message for server behavior contains "%s". (WIN/MAC)
• After using wizard to create an update form, editing a dynamic list/menu corrupts the update form server behavior codes. (WIN/MAC)
• Dynamic Checkbox server behavior gives JavaScript error when the checkbox has no id attribute. (WIN/MAC)
• Dreamweaver crashes after adding recordset to page with wrong server model. (MAC)
• JavaScript error occurs, then Dreamweaver crashes when Server Behaviors panel and Bindings panel are detached from each other and regrouped again. (MAC)
Server Model Extensibility
• Turkish ASP pages have incorrect CODEPAGE attribute. (WIN/MAC)
Server Side Includes
• Server-Side include content is not displayed in browser when previewing a file. (WIN/MAC)
Site Management
• Dreamweaver crashes when Files panel is expanded or collapsed while Dreamweaver is processing the Select Checked Out Files command. (MAC)
• Dreamweaver crashes when collapsing or expanding folders in Files panel using arrow keys. (MAC)
• "@@@@!!@@@@" appears in Files Panel when clicking Cancel button in the Status dialog box after expanding all folders using Option + Arrow keys. (MAC)
• Dreamweaver crashes when Files panel is expanded or collapsed while Dreamweaver is copying files on Remote Site. (MAC)
• Keyboard accelerators do not work correctly in Site Synchronize preview panel. (WIN)
• Filenames do not appear in alphabetical order after sorting by Type. (WIN/MAC)
• Crash after collapsing Files panel when some columns are hidden. (MAC)
• Dreamweaver does not default to Local site when creating new site. (WIN/MAC)
• Folders don't expand when moving the cursor over a folder with link dragger in a Files panel where Desktop/Computer is selected. (MAC)
• Dreamweaver crashes when clicking on folder expander on FTP server after renaming file if filename is editable. (MAC)
• Can't get files and open folders on some FTP servers. (WIN/MAC)
• Cannot dismiss "Confirm File Delete" dialog using 'Return' keys. (MAC)
• Files dropdown shrinks when switching from site to Computer drive. (MAC)
• Files Panel retrieves directory info twice. (MAC)
• "Access denied" error continues to display when Dreamweaver can't put MMHTTPDB.asp to server. (WIN)
• Select Recently Modified command is slow. (MAC)
• When Notes column in Files panel is set to 'Show', 'Modified Date' is displayed under Type column. (WIN/MAC)
53
Last updated 11/5/2015
• Some site columns disappear after switching back and forth from expanded mode. (MAC)
• Expanded site window will not come into focus on startup when clicking on it - covered by Start page. (MAC)
• After opening an image file by right-clicking the file and selecting "Open in Fireworks," trying to right-click and select"Open" on an HTML file launches Fireworks. (WIN)
• Expanded Files panel doesn't refresh file list automatically when adding or deleting file in Finder. (MAC)
• Initial width of last column in Files Panel is too small. (MAC)
• Middle splitter doesn't resize accordingly when increasing and decreasing the size of the expanded Files panel. (MAC)
• Expanded Files does not take focus properly when using F8. (MAC)
• Dreamweaver crashes while creating site cache when root folder contains corrupted .swf file. (WIN)
• Local Files panel doesn't refresh after checking out file. (WIN)
• Files panel doesn't scroll when dragging file/folder from local to remote site or vice versa. (MAC)
• Dreamweaver doesn't update links in external CSS file when moving CSS file to another folder. (WIN/MAC)
• Remote site files are sorted in wrong order (Windows sorting style). (MAC)
• + icon appears when dragging file from Local to white area in Remote panel. (WIN/MAC)
• Files panel needs to be refreshed in order to see all files after Synchronize. (WIN/MAC)
• Files panel doesn't auto refresh after copying & pasting a file when the site root folder is on the Desktop. (WIN/MAC)
• Scrolling with mouse wheel doesn't work properly in expanded Files panel. (MAC)
• Confirm File/Folder Move on Server requires preference. (WIN/MAC)
• Can't rename new folder after creating 2nd new folder in 2nd level subfolder. (MAC)
• Modified column in Files panel is empty if Checked Out column is set to "Hide". (WIN)
• Dreamweaver crasheds when dragging and dropping folder in Files panel when all subfolders are collapsed and last item in site root is a folder. (MAC)
• Files panel shows "@@@@!!@@@@" after moving folders in Files panel. (MAC)
• Cannot cancel out of a site synchronize or reshesh on some FTP servers. (WIN/MAC)
Site Map
• Switching between Sites splits collapsed Files panel. (WIN)
• Dreamweaver crashes when clicking on + button in Site Map aftercreating link to existing file. (WIN/MAC)
Site Setup Wizard
• Dreamweaver crashes on closing Site Setup Wizard with small right thumb button of Microsoft Intellimouse Explorer. (WIN)
• Manage sites dialog box becomes disabled when you click on New and then click somewhere else in the dialog box. (WIN)
Site-wide Reports
• Dreamweaver crashes when double-clicking on Result in Results panel after closing document and editing new document. (WIN/MAC)
• Jumping to Line loses track after editing document. (WIN/MAC)

54
Last updated 11/5/2015
• Recently Modified dialog is out of date. (WIN/MAC)
• Dreamweaver crashes on typing when the focus is on dropdown in Site report: Recently Modified dialog box. (WIN)
• Find Untitled Documents reports Library files as Untitled documents. (WIN)
• Stop button in Results panel can't stop the process when running Sitewide Reports. (WIN)
Siteless File Editing
• Removing RDS connection to localhost in Edit Sites dialog deletes files. (WIN)
• Dreamweaver crashes on accessing dropdown menu in Save to Remote Server dialog box. (WIN/MAC)
• "Putting dependent files" status message comes up every time when saving file to RDS server. (WIN/MAC)
• Cannot delete/rename files after renaming folder on RDS server. (WIN/MAC)
• Dreamweaver doesn't save file to server. (MAC)
• Dreamweaver can't open file after importing Siteless connection. (WIN/MAC)
Snippets
• Keyboard shortcut for Code Snippet doesn't work after the snippet is renamed. (WIN)
• Once original snippet folder is renamed, the folder cannot be changed back to its original name. (WIN/MAC)
• DW crashes when a newly-created snippet/folder is in rename mode and clicking on the "Name" header. (MAC)
Spell Checker
• "Programme" should be in the British-English spelling dictionary. (WIN)
• Macromedia spelling dictionary doesn't work. (WIN)
• Spell checker doesn't work in UTF-8 files. (WIN/MAC)
T
Tables
• Dreamweaver crashes on switching from Code view to Design view when table column is selected. (MAC)
• Intermittent crash while trying to resize table after switching between Code view and Design view. (WIN)
• Can't tab to the next cell when insertion point is next to a nested table (blockquote is added instead). (WIN/MAC)
• After inserting table, table header bar stays visible longer than it is supposed to. (WIN/MAC)
• Can't Ctrl/Option +click to avoid table insert dialog. (WIN/MAC)
• Performance issue when dragging and dropping movie object from the Files panel. (WIN)
• Error in TableCommands.js, "TBL_HDR has no properties" when hitting Enter in Insert Table dialog box before dialog has loaded. (WIN)
• Insertion point and selection feedback is wrong for multiple tables, possible crash. (WIN/MAC)
• Scrolling and deferred edits can be slow in nested tables. (MAC)
Tag Chooser
• Tag Chooser Inserts wrong code for ASP.NET control. (WIN/MAC)
Tag Editor (Tags Dialogs)
• Tag Editor/Form objects dialog shows empty. (WIN/MAC)
55
Last updated 11/5/2015
• ASP.NET checkboxes grayed out until checked. (WIN/MAC)
Tag Inspector
• Dreamweaver crashes when trying to collapse/expand Tag inspector panel group. (MAC)
• Tag panel minimum size is too large. (WIN)
• CSS Properties Grid appears inactive when new rule is created. (WIN/MAC)
Tag Library Editor
• Code hints still showing attribute after deleting tag attribute in tag inspector. (MAC)
Tag Selector
• Setting CLASS or ID from context menu doesn't update Tag selector. (WIN)
• Tag selector doesn't work in Code view without showing Design view first. (WIN/MAC)
• Unable to assign CLASS and ID in Code view using the Tag Selector. (WIN/MAC)
• Dreamweaver crashes intermittently when editing using Tag Selector in Code view. (WIN/MAC)
• Dreamweaver crashes when using Key Pad in Tag inspector with Num Lock off. (WIN)
Templates
• Dreamweaver crashes on deleting locked imported style or style sheet via CSS Styles panel when Code view is in focus. (WIN/MAC)
• Can't create repeating or optional region around a list item with an editable region. (WIN/MAC)
• Error on Template updates with large sites. (MAC)
• Locked by template warning shows when updating Template instance with unsynchronized changes. (WIN/MAC)
• Nested Template icon indistinguishable from Make Template icon. (WIN/MAC)
• Special character deleted from include tag when creating new document from Template. (WIN/MAC)
• Dreamweaver crashes when trying to edit locked styles with Relevant CSS. (WIN/MAC)
• Dreamweaver crashes when typing Escape in Update Pages dialog box when text in dialog box is selected. (MAC)
• Dreamweaver crashes on drag & drop of file or folder from Files panel to locked region in Code view. (WIN/MAC)
• Not all pages get updated when saving a Template & updating on prompt. (WIN)
• Dreamweaver crashes or returns error message when creating editable region after selecting a form with the Tag Selector. (WIN/MAC)
Third Party Extensions
• Submenus appear grayed out. (MAC)
Timeline
• Dreamweaver crashes when changing order of animated layers multiple times in Layers panel. (WIN/MAC)
• Dreamweaver crashes when changing animated layer tag using context menu. (WIN/MAC)
Toolbar
• Code/Split/Design buttons are truncated. (MAC)
U
56
Last updated 11/5/2015
Unspecified
• Dreamweaver crashes when pasting styled text using keyboard shortcut with Tag Inspector collapsed. (MAC)
User Interface
• Pasting into text field inputs formatted text instead of plain text. (MAC)
• Dreamweaver is slow to quit. (WIN/MAC)
• File > New command is slow to display New Document Dialog. (MAC)
• Deleting entire table cell contents causes rendering lag. (WIN/MAC)
• Asset panel does not show correct icons for locked items. (MAC)
• Maximizing document window does not respect Apple's Dock. (MAC)
• Expanded Files panel will come to front when Document is selected using Macintosh Expos. (MAC)
• Maximizing a document will expand behind panels if a panel is larger than default. (MAC)
UTF-8
• Characters without glyphs in any font don't render. (WIN)
• Can only add/remove byte order mark on first save. (WIN/MAC)
V
Validator
• Validation won't start properly using Results panel on Macintosh. (MAC)
• Validating against XHTML Transitional shows errors regarding HTML3.2. (WIN/MAC)
W
WebDAV
• Error when connecting using WebDAV; must refresh to see remote files. (WIN/MAC)
• Dreamweaver crashes or gives error message when switching from Testing view to Remote view in WebDAV site. (WIN/MAC)
Workspace
• Toolbar rendered too far right on startup. (WIN)
• New document placed behind Property inspector when Property inspector is at top of screen. (MAC)
• Maximizing document does not respect Panels on Macintosh. (MAC)
• Application switch to Dreamweaver using mouse changes insertion point. (MAC)
• New document displayed on wrong monitor with dual monitor setup. (MAC)
• New documents get smaller when tiling instead of wrapping around. (MAC)
• CMD+W closes Site panel. (MAC)
• Maximizing Document window does not overlap expanded Files panel. (MAC)
X

57
Last updated 11/5/2015
XHTML
• Element incorrectly added to image links in XHTML Strict documents. (WIN/MAC)
XML
• Not all errors shown when validating unterminated XML declaration. (MAC)
Y
Z
The registration message box continues to appear on launch after registrationIssueIn Dreamweaver 3 on Windows 2000 or Windows NT, a message box appears on every launch prompting the user to register. This prompt repeatedly appears on launch although Dreamweaver 3 has been registered or the user has clicked "Don't Remind Me."
Note:This situation does not occur in Dreamweaver 4.
ReasonOn Windows 2000 and Windows NT, only the Administrator or users with certain permissions can install applications. If an administrator installs the application and then another non-administrative user launches the application, the prompt to register can appear on every launch.
Solutions One of the following two solutions may solve the problem:

58
Last updated 11/5/2015
Re-creating the Dreamweaver user configuration folder on Windows If Dreamweaver starts behaving unpredictably, this can be an indication that the Dreamweaver user configuration folder has become corrupt. Dreamweaver (version MX and later) allows multiple users to log in to a machine and customize Dreamweaver to their liking. For example, each user can have different snippets, menu options, extensions, spelling dictionaries, etc. These customizations are saved in each user's configuration folder in Windows. To test for a corrupt user configuration folder, try the following:
1 Exit from Dreamweaver if necessary.
2 Open Windows Explorer by right-clicking the main Start button and selecting Explore.
Installer disables the registration message box Whoever installed the application must log in, launch Dreamweaver and click "Don't Remind Me" on the registration message box. The user may then be able to log in and run the application without the appearance of the prompt.
User reinstalls Dreamweaver3
1
Uninstall Dreamweaver 3 using Add/Remove programs. (Start this process by choosing Start > Settings > Control Panel> Add/Remove programs. Select Dreamweaver 3 and then click Change/Remove.)
Note: Uninstalling Dreamweaver 3 will clear all your Site Definition information. After reinstalling the program, you will have to reenter the Site Definition information to redefine all your sites. Write down all Site Definition information;including all FTP information for each site;before uninstalling Dreamweaver 3.
2
Reinstall Dreamweaver 3 under an Administrative login or as a user with permissions. The login must be the same login that will be used to run the application after installation.
3
Launch Dreamweaver 3 (using the same login that was used to reinstall the application).
4
Click an option on the registration message box. Clicking "Don't Remind Me" will prevent the appearance of the registration message box the next time that Dreamweaver launches.

59
Last updated 11/5/2015
3 In Windows Explorer, browse to the following folder (this example assumes Dreamweaver 8): C:\Documents and Settings\[username]\Application Data\Macromedia\Dreamweaver 8Note: To see this folder, you may need to make the following change in Windows Explorer: Tools > Folder Options > View > Advanced Settings section> Files and Folders section > Hidden Files and Folders > turn on "Show hidden files and folders".
4 Re-name this folder to an arbitrary name, such as "OLD Dreamweaver 8." Once the user configuration folder has been renamed, Dreamweaver will no longer be able to find it and Dreamweaver will automatically create a new user configuration folder with the default settings.
5 Launch Dreamweaver and see if the problem still occurs.
6 If the problem is resolved after re-creating the user configuration folder, you can delete your old user configuration folder, but save any files you may have customized and try to transfer them over to the newly created user configuration folder. See Backing up and restoring Dreamweaver settings (TechNote 18736). Note that these customized files may be the source of the problem. If the problem is reintroduced after copying old files back in, go through steps 1-5 again to get a clean user configuration folder, then transfer customized files one at a time, testing for the problem after each file is transferred, to identify the problem file.Note: If you have Dreamweaver extensions installed, it is not recommended to move existing user configuration subfolders back into the new user configuration folder since extensions can write files to various subfolders in the Dreamweaver user configuration folder. Instead, extension users should start from the new user configuration folder and reinstall extensions using the Extension Manager installer one at a time. Test each extension individually after installing it, so that you can identify any problematic extensions.
Optional step
If the steps above don't solve the problem, then go back through the steps above again, but insert the following step after step4:
WARNING: If you edit the Windows Registry incorrectly, you can cause serious problems that may require you to reinstall your operating system. Adobe does not guarantee that problems that you cause by editing the registry incorrectly can be resolved. Edit the registry at your own risk.
? Backup the Dreamweaver user configuration registry key, delete it, and then restart Dreamweaver to see if it fixes the problem. To do this choose Start button > Run > type in "regedit". In the Registry Editor, find the following key (this example uses Dreamweaver 8):HKEY_CURRENT_USER\Software\Macromedia\Dreamweaver 8 Select the Dreamweaver 8 folder and choose File > Export (so that it is backed up), and then delete it (Edit > Delete).
Additional Information If this TechNote doesn't resolve the problem, then here are some additional TechNotes that may help:
• Troubleshooting Dreamweaver for Windows (TechNote 15481)
• Troubleshooting JavaScript errors in Dreamweaver (TechNote 19105)
• Uninstalling Studio 8 applications on Windows (TechNote 4e7826b7)
• Uninstalling Dreamweaver MX & MX 2004 on Windows (TechNote 362d7b81)
• Installing Studio 8 products in Selective Startup mode on Windows XP (TechNote d2b5934d)
• Installing Dreamweaver MX & MX 2004 in Safe Mode on Windows (TechNote 362eefb2)
• Dreamweaver crashes when performing a task related to site definitions (TechNote 5989f7f4)
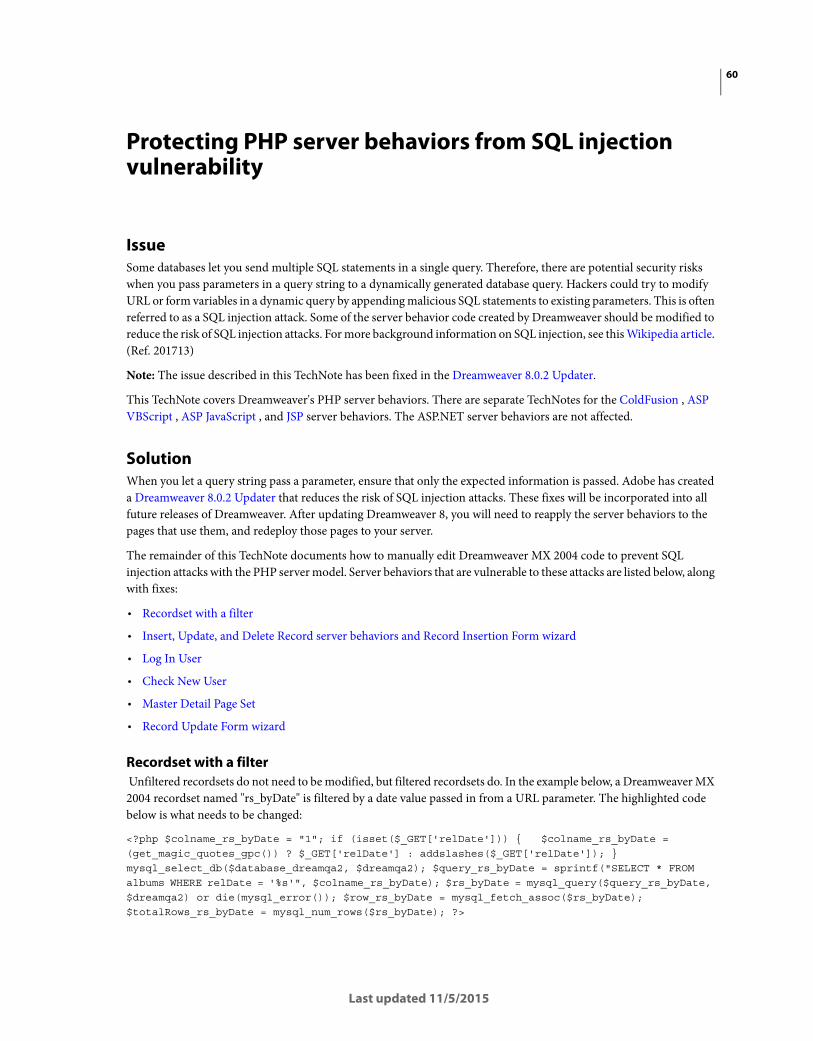
60
Last updated 11/5/2015
Protecting PHP server behaviors from SQL injection vulnerability
IssueSome databases let you send multiple SQL statements in a single query. Therefore, there are potential security risks when you pass parameters in a query string to a dynamically generated database query. Hackers could try to modify URL or form variables in a dynamic query by appending malicious SQL statements to existing parameters. This is often referred to as a SQL injection attack. Some of the server behavior code created by Dreamweaver should be modified to reduce the risk of SQL injection attacks. For more background information on SQL injection, see this Wikipedia article. (Ref. 201713)
Note: The issue described in this TechNote has been fixed in the Dreamweaver 8.0.2 Updater.
This TechNote covers Dreamweaver's PHP server behaviors. There are separate TechNotes for the ColdFusion , ASP VBScript , ASP JavaScript , and JSP server behaviors. The ASP.NET server behaviors are not affected.
SolutionWhen you let a query string pass a parameter, ensure that only the expected information is passed. Adobe has created a Dreamweaver 8.0.2 Updater that reduces the risk of SQL injection attacks. These fixes will be incorporated into all future releases of Dreamweaver. After updating Dreamweaver 8, you will need to reapply the server behaviors to the pages that use them, and redeploy those pages to your server.
The remainder of this TechNote documents how to manually edit Dreamweaver MX 2004 code to prevent SQL injection attacks with the PHP server model. Server behaviors that are vulnerable to these attacks are listed below, along with fixes:
• Recordset with a filter
• Insert, Update, and Delete Record server behaviors and Record Insertion Form wizard
• Log In User
• Check New User
• Master Detail Page Set
• Record Update Form wizard
Recordset with a filter Unfiltered recordsets do not need to be modified, but filtered recordsets do. In the example below, a Dreamweaver MX 2004 recordset named "rs_byDate" is filtered by a date value passed in from a URL parameter. The highlighted code below is what needs to be changed:
<?php $colname_rs_byDate = "1"; if (isset($_GET['relDate'])) { $colname_rs_byDate = (get_magic_quotes_gpc()) ? $_GET['relDate'] : addslashes($_GET['relDate']); } mysql_select_db($database_dreamqa2, $dreamqa2); $query_rs_byDate = sprintf("SELECT * FROM albums WHERE relDate = '%s'", $colname_rs_byDate); $rs_byDate = mysql_query($query_rs_byDate, $dreamqa2) or die(mysql_error()); $row_rs_byDate = mysql_fetch_assoc($rs_byDate); $totalRows_rs_byDate = mysql_num_rows($rs_byDate); ?>

61
Last updated 11/5/2015
To protect the recordset from SQL injection attacks, a custom GetSQLValueString() function should be created near the top of the page. This function verifies the data type of the query parameter. Once the function has been created, then update the recordset code to use the GetSQLValueString() function.
1 Go to the second line in code view, right after the include file for the connection, and add the GetSQLValueString() function to the beginning of the code as follows:
<?php if (!function_exists("GetSQLValueString")) { function GetSQLValueString($theValue, $theType, $theDefinedValue = "", $theNotDefinedValue = "") { $theValue = get_magic_quotes_gpc() ? stripslashes($theValue) : $theValue; $theValue = function_exists("mysql_real_escape_string") ? mysql_real_escape_string($theValue) : mysql_escape_string($theValue); switch ($theType) { case "text": $theValue = ($theValue != "") ? "'" . $theValue . "'" : "NULL"; break; case "long": case "int": $theValue = ($theValue != "") ? intval($theValue) : "NULL"; break; case "double": $theValue = ($theValue != "") ? "'" . doubleval($theValue) . "'" : "NULL"; break; case "date": $theValue = ($theValue != "") ? "'" . $theValue . "'" : "NULL"; break; case "defined": $theValue = ($theValue != "") ? $theDefinedValue : $theNotDefinedValue; break; } return $theValue; } } ?>
2 Remove the magic quotes code so that backslashes are not incorrectly added to GET and POST data when magic quotes are turned off on the PHP server. Original code:
$colname_rs_byDate = (get_magic_quotes_gpc()) ? $_GET['relDate'] : addslashes($_GET['relDate']);
Modified code:
$colname_rs_byDate = $_GET['relDate'];
3 Update the recordset code to create a SQL string using the GetSQLValueString() function created above. Update the value of the variable $query_rs_byDate: Original code:
$query_rs_byDate = sprintf("SELECT * FROM albums WHERE relDate = '%s'", $colname_rs_byDate);
Modified secured code:
$query_rs_byDate = sprintf("SELECT * FROM albums WHERE relDate = %s", GetSQLValueString($colname_rs_byDate, "date"));
Insert, Update, and Delete Record server behaviors and Record Insertion Form wizard The Insert, Update, and Delete Record server behaviors and Record Insertion Form wizard already use the GetSQLValueString() function, so they need to be refined to prevent SQL injections. The only changes needed are in the GetSQLValueString() function.
Here is the original code. The line to change is highlighted in yellow:
if (!function_exists("GetSQLValueString")) { function GetSQLValueString($theValue, $theType, $theDefinedValue = "", $theNotDefinedValue = "") {$theValue = (!get_magic_quotes_gpc()) ? addslashes($theValue) : $theValue; switch ($theType) { case "text": $theValue = ($theValue != "") ? "'" . $theValue . "'" : "NULL"; break; case "long": case "int": $theValue = ($theValue != "") ? intval($theValue) : "NULL"; break; case "double": $theValue = ($theValue != "") ? "'" . doubleval($theValue) . "'" : "NULL"; break; case "date": $theValue = ($theValue != "") ? "'" . $theValue . "'" : "NULL"; break; case "defined": $theValue = ($theValue != "") ? $theDefinedValue : $theNotDefinedValue; break; } return $theValue; } }
Update the definition of the variable $theValue: Original code:

62
Last updated 11/5/2015
$theValue = (!get_magic_quotes_gpc()) ? addslashes($theValue) : $theValue;
Modified secured code:
$theValue = get_magic_quotes_gpc() ? stripslashes($theValue) : $theValue; $theValue = function_exists("mysql_real_escape_string") ? mysql_real_escape_string($theValue) : mysql_escape_string($theValue);
Log In User server behavior Here are the steps to fix the Log In User server behavior:
1 Create a GetSQLValueString() function as described in Recordset with a filter above.
2 Modify the code that constructs the login SQL query. Original code:$LoginRS__query=sprintf("SELECT username, password FROM login WHERE username='%s' AND password='%s'", get_magic_quotes_gpc() ? $loginUsername : addslashes($loginUsername), get_magic_quotes_gpc() ? $password : addslashes($password));
Modified secured code:
$LoginRS__query=sprintf("SELECT username, password FROM login WHERE username=%s AND password=%s", GetSQLValueString($loginUsername, "text"), GetSQLValueString($password, "text"));
Check New User server behavior The Check New User server behavior requires that an Insert Record server behavior be added to the page first. The GetSQLValuesString() function is included with the Insert Record server behavior. All that needs to be done is to update the GetSQLValuesString() to better handle SQL Injection and update the Check New User server behavior to use this function when a parameter is passed in.
1 Change the first line in the function to update the GetSQLValuesString() function as described in Update the definition of the variable $theValue .
2 Modify the code to construct the login SQL query to use the GetSQLValuesString() to pass in parameters. Toward the top of the page, locate the code in the section starting with // *** Redirect if username exists. Original code:
$LoginRS__query = "SELECT username FROM login WHERE username='" . $loginUsername . "'"
Modified secured code:
$LoginRS__query = sprintf("SELECT username FROM login WHERE username=%s", GetSQLValueString($loginUsername, "text"));
Master Detail Page SetFor the Master Detail Page Set application object, the changes are mainly in the recordset that Dreamweaver creates for the Detail Page. If you don't have a filtered recordset in the Master Page, then no changes need to be made to the Master Page. If you have a filtered recordset, then see recordset with a filter to update the recordset code.
Dreamweaver creates a filtered recordset in the Detail Page, so that recordset code needs to be updated to use a GetSQLValueString() function to pass in parameters and sprintf() to construct the SQL string.
1 Create the GetSQLValueString() function as described in Recordset with a filter above.
2 Update the variable declaration code and construct the SQL query using the GetSQLValuesString() function. Original code:$recordID = $_GET['recordID']; $query_DetailRS1 = "SELECT * FROM albums WHERE ID = $recordID";

63
Last updated 11/5/2015
Modified secured code:
$colname_DetailRS1 = "-1"; if (isset($_GET['recordID'])) { $colname_DetailRS1 = (get_magic_quotes_gpc()) ? $_GET['recordID'] : addslashes($_GET['recordID']); } $query_DetailRS1 = sprintf("SELECT * FROM albums WHERE ID = %s", GetSQLValueString($colname_DetailRS1, "int"));
Record Update Form wizard1 Update the definition of the variable $theValue as described in Insert, Update, and Delete Record server behaviors
and Record Insertion Form wizard .
2 Update the code for the Recordset which is required for the Record Update Form as described in step 2 of Recordset with a filter .
Additional InformationPlease refer to the following article for more information about SQL injection: Wikipedia article on SQL injection.
Adobe Security Bulletin: APSB 06-07 Dreamweaver Server Behavior SQL Injection vulnerability.
Protecting ColdFusion server behaviors from SQL injection vulnerability
IssueSome databases let you send multiple SQL statements in a single query. Because of this, there are potential security risks when you pass parameters in a query string to a dynamically generated database query. Hackers might try to modify URL or form variables in a dynamic query by appending malicious SQL statements to existing parameters. This is often referred to as a SQL injection attack. Some of the server behavior code created by Dreamweaver should be modified to reduce the risk of SQL injection attacks. For more background information on SQL injection, see this Wikipedia article. (Ref. 201713)
Note: The issue described in this TechNote has been fixed in the Dreamweaver 8.0.2 Updater.
This TechNote covers Dreamweaver's ColdFusion server behaviors. There are separate TechNotes for the PHP , ASP VBScript , ASP JavaScript , and JSP server behaviors. The ASP.NET server behaviors are not affected.
SolutionWhen you let a query string pass a parameter, ensure that only the expected information is passed. Adobe has created a Dreamweaver 8.0.2 Updater that reduces the risk of SQL injection attacks. These fixes will be incorporated into all future releases of Dreamweaver. After updating Dreamweaver 8, you will need to reapply the server behaviors to the pages that use them, and redeploy those pages to your server.
The remainder of this TechNote documents how to manually editDreamweaver MX 2004 code to prevent SQL injection attacks with the ColdFusion server model. Server behaviors that are vulnerable to these attacks are listed below, along with the fixes:
• Recordset with a filter
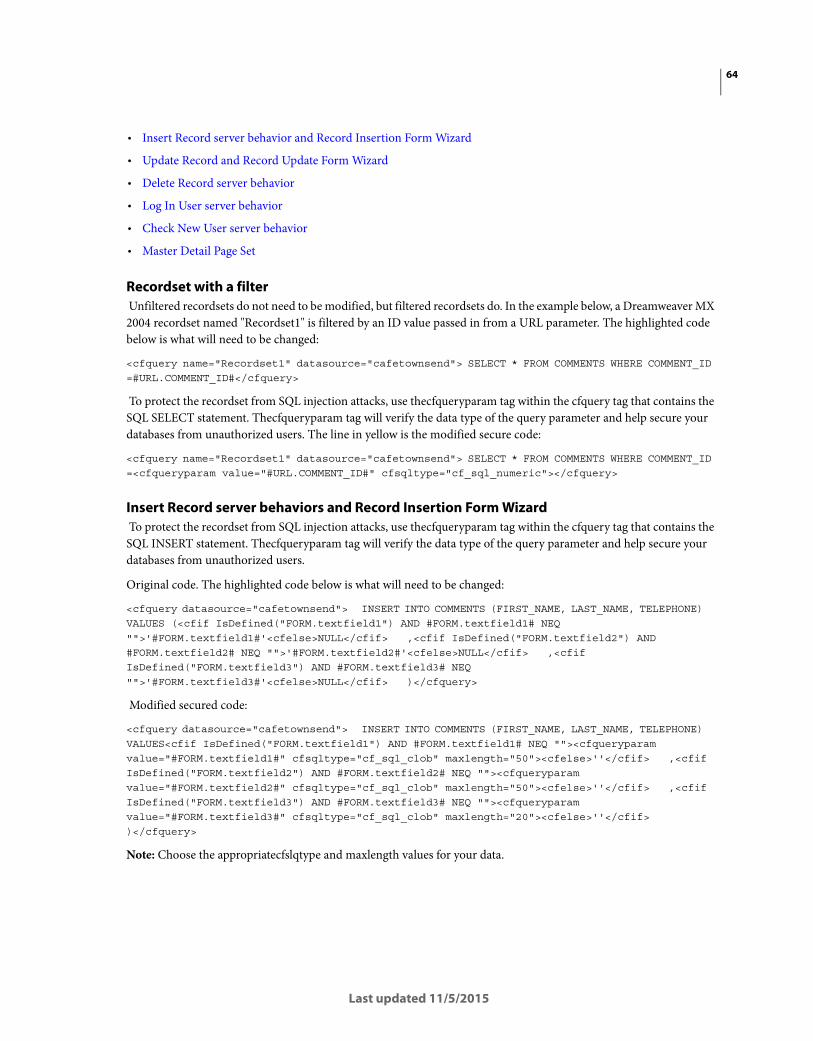
64
Last updated 11/5/2015
• Insert Record server behavior and Record Insertion Form Wizard
• Update Record and Record Update Form Wizard
• Delete Record server behavior
• Log In User server behavior
• Check New User server behavior
• Master Detail Page Set
Recordset with a filter Unfiltered recordsets do not need to be modified, but filtered recordsets do. In the example below, a Dreamweaver MX 2004 recordset named "Recordset1" is filtered by an ID value passed in from a URL parameter. The highlighted code below is what will need to be changed:
<cfquery name="Recordset1" datasource="cafetownsend"> SELECT * FROM COMMENTS WHERE COMMENT_ID =#URL.COMMENT_ID#</cfquery>
To protect the recordset from SQL injection attacks, use thecfqueryparam tag within the cfquery tag that contains the SQL SELECT statement. Thecfqueryparam tag will verify the data type of the query parameter and help secure your databases from unauthorized users. The line in yellow is the modified secure code:
<cfquery name="Recordset1" datasource="cafetownsend"> SELECT * FROM COMMENTS WHERE COMMENT_ID =<cfqueryparam value="#URL.COMMENT_ID#" cfsqltype="cf_sql_numeric"></cfquery>
Insert Record server behaviors and Record Insertion Form Wizard To protect the recordset from SQL injection attacks, use thecfqueryparam tag within the cfquery tag that contains the SQL INSERT statement. Thecfqueryparam tag will verify the data type of the query parameter and help secure your databases from unauthorized users.
Original code. The highlighted code below is what will need to be changed:
<cfquery datasource="cafetownsend"> INSERT INTO COMMENTS (FIRST_NAME, LAST_NAME, TELEPHONE) VALUES (<cfif IsDefined("FORM.textfield1") AND #FORM.textfield1# NEQ "">'#FORM.textfield1#'<cfelse>NULL</cfif> ,<cfif IsDefined("FORM.textfield2") AND #FORM.textfield2# NEQ "">'#FORM.textfield2#'<cfelse>NULL</cfif> ,<cfif IsDefined("FORM.textfield3") AND #FORM.textfield3# NEQ "">'#FORM.textfield3#'<cfelse>NULL</cfif> )</cfquery>
Modified secured code:
<cfquery datasource="cafetownsend"> INSERT INTO COMMENTS (FIRST_NAME, LAST_NAME, TELEPHONE) VALUES<cfif IsDefined("FORM.textfield1") AND #FORM.textfield1# NEQ ""><cfqueryparam value="#FORM.textfield1#" cfsqltype="cf_sql_clob" maxlength="50"><cfelse>''</cfif> ,<cfif IsDefined("FORM.textfield2") AND #FORM.textfield2# NEQ ""><cfqueryparam value="#FORM.textfield2#" cfsqltype="cf_sql_clob" maxlength="50"><cfelse>''</cfif> ,<cfif IsDefined("FORM.textfield3") AND #FORM.textfield3# NEQ ""><cfqueryparam value="#FORM.textfield3#" cfsqltype="cf_sql_clob" maxlength="20"><cfelse>''</cfif> )</cfquery>
Note: Choose the appropriatecfslqtype and maxlength values for your data.
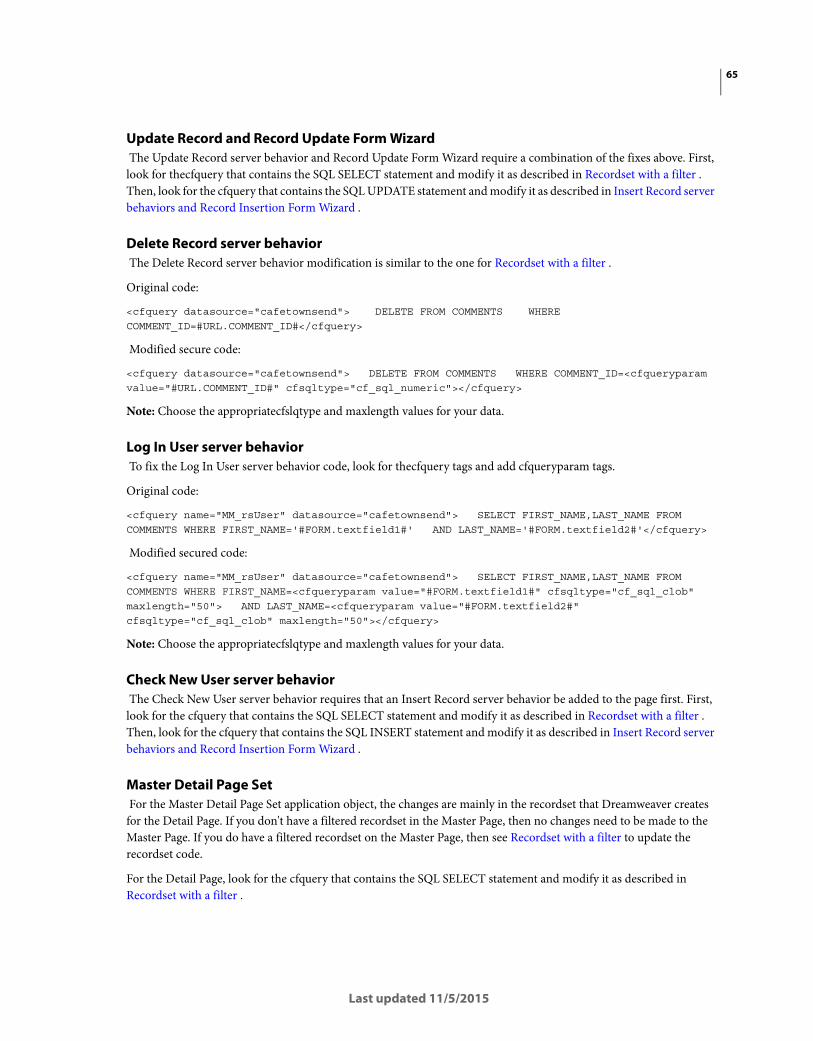
65
Last updated 11/5/2015
Update Record and Record Update Form Wizard The Update Record server behavior and Record Update Form Wizard require a combination of the fixes above. First, look for thecfquery that contains the SQL SELECT statement and modify it as described in Recordset with a filter . Then, look for the cfquery that contains the SQL UPDATE statement and modify it as described in Insert Record server behaviors and Record Insertion Form Wizard .
Delete Record server behavior The Delete Record server behavior modification is similar to the one for Recordset with a filter .
Original code:
<cfquery datasource="cafetownsend"> DELETE FROM COMMENTS WHERE COMMENT_ID=#URL.COMMENT_ID#</cfquery>
Modified secure code:
<cfquery datasource="cafetownsend"> DELETE FROM COMMENTS WHERE COMMENT_ID=<cfqueryparam value="#URL.COMMENT_ID#" cfsqltype="cf_sql_numeric"></cfquery>
Note: Choose the appropriatecfslqtype and maxlength values for your data.
Log In User server behavior To fix the Log In User server behavior code, look for thecfquery tags and add cfqueryparam tags.
Original code:
<cfquery name="MM_rsUser" datasource="cafetownsend"> SELECT FIRST_NAME,LAST_NAME FROM COMMENTS WHERE FIRST_NAME='#FORM.textfield1#' AND LAST_NAME='#FORM.textfield2#'</cfquery>
Modified secured code:
<cfquery name="MM_rsUser" datasource="cafetownsend"> SELECT FIRST_NAME,LAST_NAME FROM COMMENTS WHERE FIRST_NAME=<cfqueryparam value="#FORM.textfield1#" cfsqltype="cf_sql_clob" maxlength="50"> AND LAST_NAME=<cfqueryparam value="#FORM.textfield2#" cfsqltype="cf_sql_clob" maxlength="50"></cfquery>
Note: Choose the appropriatecfslqtype and maxlength values for your data.
Check New User server behavior The Check New User server behavior requires that an Insert Record server behavior be added to the page first. First, look for the cfquery that contains the SQL SELECT statement and modify it as described in Recordset with a filter . Then, look for the cfquery that contains the SQL INSERT statement and modify it as described in Insert Record server behaviors and Record Insertion Form Wizard .
Master Detail Page Set For the Master Detail Page Set application object, the changes are mainly in the recordset that Dreamweaver creates for the Detail Page. If you don't have a filtered recordset in the Master Page, then no changes need to be made to the Master Page. If you do have a filtered recordset on the Master Page, then see Recordset with a filter to update the recordset code.
For the Detail Page, look for the cfquery that contains the SQL SELECT statement and modify it as described in Recordset with a filter .

66
Last updated 11/5/2015
Additional InformationAdobe recommends that you use the cfqueryparam tag within every cfquery tag, to help secure your databases from unauthorized users. For more information, see Security Bulletin ASB99-04, "Multiple SQL Statements in Dynamic Queries" and Accessing and Retrieving Data in ColdFusion MX Developers Guide.
• ColdFusion MX 7 LiveDocs: Enhancing security with cfqueryparam and cfqueryparam tag description.
• Securing Database Access Using the cfqueryparam Tag (ColdFusion Developer Center Article by Dave Watts)
• Adobe Security Bulletin: APSB 06-07 Dreamweaver Server Behavior SQL Injection vulnerability
What can prevent JavaScript control over audio?SummaryNot all browsers will let JavaScript control audio. You might consider interactive audio to be a nice addition for those visitors whose browsers support it, but be sure to provide visual feedback too. If you need interactive audio across a range of browsers, then putting the interactivity and audio in Flash or Shockwave is the standard solution.
(This TechNote adds to previous interactive audio information in documents such as Dreamweaver 2.0's Troubleshooting the Control Sound Behavior Functionality . It includes information on the differences in default audio behaviors introduced in Dreamweaver 3.0) How do various browsers trigger audio files? The simplest method is to just EMBED an audio file. It will start when the page loads, and will use whatever audio player the browser prefers. You won't be able to trigger the audio by a mouseover or other JavaScript event, and will need to use an audio format which most browsers support, but a simple EMBED is the standard method of including audio when the page loads.
Some browsers let JavaScript trigger audio, while others do not:
67
Last updated 11/5/2015
How do Dreamweaver's various sound behaviors work? The Control Sound Behavior in Dreamweaver 1 and 2 attempted to play audio in browsers which supported it. If a browser did not support script control over audio, then no sound would be heard.
The Play Sound Behavior in Dreamweaver 3.0 takes a different tack. If the script cannot determine that the browser has a controllable audio player, it will open the sound as a new page in the window. This means that you will always get the sound, but may lose the content.
(Note that this behavior was current in the default behavior set of Dreamweaver 3.0, at the time of this writing in February 2000. It's quite possible that a newer Play Sound Behavior may replace this original one. The upcoming Dreamweaver Behavior Exchange would be the place to find updated behaviors and other extensions for Dreamweaver.)
Netscape browsers The Netscape 3.0 browsers on PowerMac and Windows 95 introduced LiveConnect, which uses Java to have JavaScript and Netscape Plugins talk together. Not all plugins are LiveConnect-aware.
Netscape's default LiveAudio plugin can be controlled by JavaScript. Shockwave and Flash can be controlled by JavaScript. Beatnik and RealPlayer can be controlled by JavaScript. QuickTime 4.1 can be controlled by JavaScript, while earlier versions cannot. These various players may have slightly different JavaScript commands exposed.
Because of the way EMBED tags work -- you specify the MIME type, and the browser chooses an appropriate player -- you cannot predict what type of player will render your audio file. This means that JavaScript may or may not be able to control an audio file in any particular Netscape browser.
Generally, a stock Netscape 3+ browser on a Java-enabled PowerMac or Win32 will let JavaScript control audio through the default LiveAudio Player. If someone installed an older QuickTime plugin then they may not be able to hear audio under JavaScript control. With other customizations they may or may not be able to hear audio under JavaScript control.
Microsoft browsers The Microsoft 3.0 browsers on Win95 introduced ActiveX Scripting, where JScript could address certain ActiveX Controls, and VBScript could catch events from ActiveX Controls.
The OBJECT tag for ActiveX Controls lets you specify a particular media player. If you're just using an EMBED tag then this does not specify a particular media player. In the latter case, it's possible that a particular browser may be set up to use an unusual media player which does not have script control over audio.
The Microsoft browsers for Macintosh do not offer any means for scripts and plugins to communicate. (At time of writing, February 2000, IE5/Mac is in beta and does not seem to reverse this trend.)
Generally, IE/Win32 browsers let JavaScript control audio. IE/Mac browsers do not let JavaScript control audio.
Other browsers or platforms Other browsers (such as iCab or Opera) and other computer platforms (such as Windows 3.1), and other delivery devices (such as PDAs or web phones) tend not to support advanced abilities such as page scripts controlling media players.
If you're designing for a particular device in the future you might wish to investigate its abilities, but generally JavaScript control over audio is available to Java-enabled Netscape 3+ browsers on PowerMac or Win32, and to ActiveX-enabled Microsoft 3+ browsers on Win95 or better.
68
Last updated 11/5/2015
If you'd like to have the DW3 Play Sound Behavior act more like the DW2 Control Sound Behavior, and to just fail silently on browsers without a controllable audio player, then you might consider removing the final line in that behavior: "else window.location=sndFile;". This is the line that triggers the redirect to a new window with just the sound.
Another approach would be to rewrite the JavaScript to open a new window that plays the sound, rather than to play the sound in the current window.
If making such manual edits to behaviors, then it is good to check that your edits are still there before delivering the files, because Dreamweaver can automatically fix damaged behaviors. Alternately, you could make the changes in the master "PlaySound.js" file itself in your Configuration / Behaviors / Actions folder.
Summary The audio control behaviors changed between Dreamweaver 2 and 3, and may change after Dreamweaver 3.0 as well. If you'd rather not have the page play an audio file full-screen, then a small edit to the behavior could attain the goal today, without needing to wait for a new behavior.
Pop-up blocker conflicts (Dreamweaver Developer Toolbox)
Issue When trying to work with Query Builder, only a browser window opens with this message: "To help protect your security, Internet Explorer has restricted this file from showing active content that could access your computer. Click here for options ...", but none of the user interface is displayed.
Reason You have a pop-up blocker, either the browser default, or a third-party application (e.g. the Microsoft Internet Explorer Pop-up Blocker available in SP2, the Mozilla Firefox one or the pop-up blocker in the Google Toolbar).
Solution Disable the pop-up blocker or simply configure it to allow pop-ups for the page containing Query Builder, on a temporary or permanent basis.
To disable the Internet Explorer default pop-up blocker, simply open the Tools menu>Pop-up Blocker >Turn Off Pop-up Blocker.
How to pass a user name from a login page When using Dreamweaver's Log In User server behavior, you may want to use the user name on the very next page (the "redirect page") or on other pages in your web application. Some reasons you may want to pass the user name onto other pages include:
• You want to greet the user after logging in. For example: "Hello John!"
• You want to filter a recordset based on the user name in order to personalize the page.

69
Last updated 11/5/2015
• You want to insert the user name into a form field to be used for inserting, updating or deleting a record.
The Log In User server behavior automatically generates a session variable consisting of the user name for the user when they log in successfully. The session variable for the user name is labeled "MM_Username".
Note: A second session variable is also automatically generated containing the user's authorization level, should you need to use this information on other pages. This session variable is named "MM_UserAuthorization".
Defining the MM_Username session variable as a data source for your pages
To utilize the MM_Username session variable on the pages in your site, open the login page in Dreamweaver. Open the Bindings panel. Click the plus (+) button and choose Session Variable from the pop-up menu. In the dialog box that pops up, enter "MM_Username" (without the quotes) in the name field. Click OK. Expand the Session icon that appears in the Bindings panel. The newly defined data source should appear, with a yellow lightning bolt icon next to it.
Using the MM_Username session variable in your pages:
• Displaying the user name on successive pages: To display the user name on any of the successive pages, open thepage where you want to display the user name. Open the Bindings panel and drag the MM_Username sessionvariable on the page in Design view. This will cause the session variable contents to be written to this page.
• Filtering a recordset based on the user name: Open the page where you want to create the filtered recordset. Tofilter a recordset based on the session variable, go into the simple view of the Recordset dialog box, and set the filter to:"[myUsernameField] = Session Variable MM_Username", where"[myUsernameField]" is the name of thedatabase field holding the user names. The advanced view of the Recordset dialog box should be used if you arefiltering on multiple variables or if you need to use a more complex SQL statement.
• Setting a form field's value equal to the user name: Open the page that contains the form. To set a form field's value equal to the session variable, select the text field form element on the page. Go to the Property inspector > click theAttributes tab in the upper left corner > click the plus (+) button > choose "value" from the drop-down menu > click the yellow lightning bolt icon > choose the MM_Username sessionvariable.
Additional information
If you would like to pass form data other than the user name from your login page, please refer to How do I create a session variable? (TechNote 14791) for detailed information on creating session variables.
For an explanation of why session variables should be used to pass form data from a login page to successive pages, please refer to: How to pass form data from an insert, update or delete page (TechNote 15239). Though the TechNote discusses the insert, update and delete server behaviors, the mechanics are similar for the Log In User server behavior.
New template features in Dreamweaver MX Macromedia Dreamweaver MX introduced many new features for templates. With these new features, you can create templates that allow a great deal of control over page editing. With the advent of optional regions, repeat regions and nested templates, you can create complex, almost dynamic pages.
This TechNote will review the template features introduced in Dreamweaver MX.
Nested Templates
Nested templates are essentially templates within templates. This feature allows different levels of control on pages created from these templates.
The benefits of nested templates

70
Last updated 11/5/2015
Nested templates can help developers in a number of ways, but the common thread among all uses is to provide two differing levels of control and editability. A common scenario in which nested templates is useful is for a website that has a single overall appearance (the company logo and contact information, for example). But the website also has sections that use a distinct appearance. For the separate sections of your web site, you can make nested templates that will have common elements and layout features for that section.
This helps you as a developer because if you need to change your address or logo, you need to merely change it in the parent template file and it will automatically update all the pages. If your Products section develops a new look, however, you simply have to update the nested template (otherwise known as the child template), and those changes will only propagate through the Products pages.
How to create nested templates
Note: This topic is described in greater detail in Creating a nested template in Dreamweaver MX (TechNote 16282). This section just provides an overview of the method used for creating nested templates.
1 Create a normal template, the same as in previous versions of Dreamweaver. This template will act as the parent template. There must be at least one editable region in the template.
2 Make a page from this template. As usual, you will only be able to add new content to the editable area(s). The rest of the page will be locked. This template will now act as the nested;or child;template. Add content to the editable area(s). You can add images, text or any other web element.
3 In this second template, add a new editable area within the existing editable area. This will convert the page from an instance of a template into a nested template.
4 Save this file as a template.
To see the differences between the two templates, make a page based on this nested template. As expected, you will only be able to edit the content defined as editable regions in the nested template. When you make a change to the nested template, only pages based on the nested template will update. When you make a change to the original template, any pages based on the parent template;including the nested template itself;will update. Since the nested template is updated by changes in the parent template, all pages based on the nested template will update, too.
Note: An example of the template attributes discussed below can be found in the example code provided at the bottom of this page. All code examples in this TechNote are taken from this sample file.
Repeat Regions
The template repeat regions feature allows developers to create a template without knowing how many instances of a certain element will be needed. This allows developers to control the appearance of a specific element, yet the template users can freely repeat that specific element, changing the content in the element as appropriate.
The benefits of repeat regions
Developers are most likely to use repeating regions in conjunction with tables. If your template contains a table, you can set a row or group of rows to be a repeating region. You might then define an editable region within the repeating region (so in the example of a table, at least one table cell will contain an editable region). When a user makes a page based on that template, the user will be able to add a new row or group of rows, adding distinct content into the editable table cells. The template itself will have only one row (or group of rows), yet pages based on the template can have as many rows as is needed to display the information. The template user can add and subtract rows and move the rows up and down within the repeating rows. This is a good way to give developers flexibility for expanding pages as the site grows without disturbing the underlying templates.
71
Last updated 11/5/2015
This is such a popular way of using a repeat region that Dreamweaver has a template object called Repeating Table. This object allows you to set up the table and repeat region within the same dialog box.
How to create repeating regions
Note: This topic is described in greater detail in the help documentation. This section just provides an overview of the method used for creating repeating regions.
1 Open or create a new template.
2 Choose the content that you want to repeat. This can be a bunch of text, an image, etc.
3 Choose Insert > Template Objects > Repeating Region.
4 Name the repeat region with a name that does not include spaces or unusual characters, and click OK.
5 Optional: Select content within the newly defined repeat region and make it editable by choosing Insert > Template Objects > Editable Objects.
6 Save the template file.
7 Create a new file from this template, and note that the content is available. As shown in the image above, there will be a plus and minus icon to allow you to add and remove an instance of the repeat region, and the up and down arrow icons allow you to resort the regions.
Remember that depending on how you define the repeating regions, you may not really need the repeating region. An example of a situation in which a repeating region is uniquely suited is if you insert an image, and make it a repeat region but not editable. In a document based on this template, the image object can be repeated as necessary simply with a click of the plus icon.
How to create repeating tables
Note: This topic is described in greater detail in the help documentation. This section just provides an overview of the method used for creating repeating tables. It is also important to note that the repeating table is merely a specialized use of a repeating region.
1 Open or create a new template.
2 Choose Insert > Template Objects > Repeating Table.
3 Within the Repeating Table dialog box, enter the settings you want for your table, then specify which row should be repeated. The Ending Row setting will help determine how many rows will be repeated, and must also be filled. If you want only the first row to be repeated, you would enter 1 in both the Starting and Ending Row text boxes.
4 Click OK. Each of the cells in the row will automatically be defined as editable, which means template users will be able to add content into each of those cells.
Optional Regions/Template Parameters
Optional regions are just that: optional. Optional regions define content or editable regions that can be turned on or off (be visible or not).
The benefits of optional regions
The usage of optional regions can range from simple to complex, and more complex usages will require forethought and scripting capabilities.

72
Last updated 11/5/2015
A simple use of an optional region is to allow content to either be visible or not in a page based on the template. The content defined as an optional region is added in the template. A template user who makes a template with an optional region can then decide whether or not to retain the optional region. If the user turns the optional region off, the content defined as the optional region will no longer appear on the page. This may be useful in a situation where the template developer wants to control the placement and appearance of a bit of content, yet the developer also wants template users to choose whether or not to use that bit of content.
More complex usages of optional regions allow parameters to determine whether or not the optional region will appear. So, instead of the template user choosing to toggle the optional region, the optional region will toggle on or off in reaction to a parameter.
Creating alternate table row colors is an example of a more complex usage of optional regions. If you have a repeating table (such as the one discussed and displayed above), the developer is unable to change the appearance of the table rows since they are locked down by the template. Dreamweaver can keep track of the number of rows in a table, however. You can therefore set up an parameter within the template that tracks the number of rows. The optional region can be defined to toggle on or off in response to the row number.
How to create and implement optional regions
Note: This topic is described in greater detail in the help documentation. This section just provides an overview of the method used for creating and implementing optional regions. This section will also give some general information about creating and using template parameters, but it is beyond the scope of this TechNote to give precise instructions for creating template parameters.
Create the optional region in the template file:
1 Open or create a new template file.
2 Add some content (text or a graphic, for example) to the template page and select it.
3 Choose Insert > Template Objects > Optional Region.Note: If you want the template users to be able to add or edit the content contained within the optional region, choose Editable Optional Region. Doing so will add a region next to the content you have added (not surrounding the content).
4 The New Optional Region dialog box contains two tabs: Basic and Advanced. To create a simple optional region;an optional region that template users can toggle themselves;enter a name for the region in the Basic tab and click OK.
5 Save the template.
Toggle the optional region in a file based on the template file:
1 Create a new file from the template.
2 Choose Modify > Template Properties.
3 The optional region you defined above is listed in the Template Properties dialog box. Select the name of the optional region. By default, the optional region will be set to show, so the value for the optional region is True.
4 Turn off the optional region by clicking the Show<OptionalRegionName> option. Choose OK.
You can create template parameters manually in the code of the template file, but template parameters are also created automatically when you create an optional region as described above. In any case, all template parameters must be written in the head of the document and must follow the syntax shown below (replace <custom> with customized values).
<!-- TemplateParam name="<custom>" type="<custom>" value="<custom>" -->
When you create an optional region using the method described above, the template parameter is written specifically as follows:
<!-- TemplateParam name="<custom>" type="boolean" value="true" -->

73
Last updated 11/5/2015
While in the template file, you can create an optional region that uses a template parameter by using the Advanced tab of the New Optional Region dialog box:
• Use Parameter: You can create an optional region that uses a pre-existing template parameter IF the template parameter is a boolean type with a value of either true or false. Any parameters that meet that specification will be available in this pop-up menu.
• Enter Expression: Essentially, once you have created a template parameter, the parameter can be used as would any other parameter in JavaScript. In fact, template expressions are based on JavaScript coding rules, so the syntax is identical to JavaScript coding. You can use mathematical functions to add, subtract, multiply or divide parameters to added complexity.
You can also create an optional region that uses a template parameter directly within the code. How you code these regions depends on where in the code you are using them.
• A region that uses a template parameter can be expressed as a variable. This is the more flexible choice since it can be used to replace a value of a tag's attribute, and it can also be used as a placeholder for the content. You use the syntax below if expressing the parameter as a variable (replace <parameter> with the name of a defined template parameter):
@@("<parameter>")@@
• A region that uses a template parameter can be expressed as a tag. The Template Expression tag is set off as an HTML comment, but it otherwise acts as a tag in that it has a single attribute and a value. This method can not be used to replace a value of a tag's attribute, since it is a tag itself. The Template Expression tag is coded as below (replace <parameter> with the name of a defined template parameter):
<!-- TemplateExpr expr="<parameter>" -->
In both cases, Dreamweaver recognizes the code and will replace the code with the value of the parameter in any page based on this template. To get a sense of how they differ, though, the following examples highlight how to use them.
Example 1: In this example, either method of hand coding an optional region (highlighted in red) will work, because the code is not used to replace the value of a tag's attribute. In both cases, Dreamweaver will see this code in any page based on this template, and will replace the code with the actual defined value (the value will be editable for template users by modifying template properties):
• Works:<title>@@("title")@@</title>
• Works:<title><!-- TemplateExpr expr="title" --></title>
Example 2: In this example, the method of hand coding that uses a Template Expression tag is incorrect, because the code IS used to replace the value of tag's attribute. For the first method, though, Dreamweaver will see this code in any page based on this template, and will replace the code with the actual defined value (the value will be editable for template users by modifying template properties). For both methods, the code that attempts to describe the parameter is highlighted in red:
• Works:<table border=@@("border")@@ cellpadding=3 cellspacing=0>
• Does not work:<table border=<!-- TemplateExpr expr="border" --> cellpadding=3 cellspacing=0>
Editable Attributes
Sometimes you want to allow your template users to adjust some specific aspects of the page, but not have access to all of the code for the element. Editable attributes can be the answer for this. Editable attributes allow the template users to change specific attributes of a tag, without having access to the tag itself.

74
Last updated 11/5/2015
Note: Editable attributes are a specialized use of an optional region. Essentially, adding an editable attribute is the same as defining that tag's attribute as an optional region. This feature creates a template parameter, for which the template creator can define a default value, and the template users can modify the parameter value as they would modify any other optional region's parameter value.
The benefits of editable attributes
In HTML, attributes are details assigned to tags. For example, a table tag may have a bgcolor attribute, which defines the background color of the table. Typically, if a template developer wanted template users to be able to modify things like the background color of a table, the developer would have to allow the entire table to be editable (so in the case of a table, the table would actually have to be added into an editable region). By using an editable attribute, however, the developer can add the table, set only table cells to be editable regions, and define the background color;the bgcolor attribute;to be an editable attribute. In a page based on such a template, the user will not be able to modify the table itself, but can change the bgcolor attribute and add or edit any content in editable regions within the cells of the table.
How to create editable attributes
Editable attributes are defined by the template developer.
1 Open or create a new template file.
2 Add content to the page. For example, for the table example, insert a table on the page. Whatever you add to your page, it has to be contained in a tag (so text itself wouldn't work, but text contained in a paragraph tag would).
3 Select the tag whose attribute you want to enable. In the case of the table, select the table and define a background color for it. You can also skip this step and type the name of the attribute in step 5, but that requires knowing the name of the attribute.
4 With the object still selected, choose Modify > Templates> Make Attribute Editable. The Editable Tag Attributes dialog box appears:
5 Choose the attribute you wish to make editable from the Attributes pop-up menu. If you did not already set the attribute in step 2, click the Add button and type the name of a valid attribute. Important: The attribute must be a valid attribute for the tag.
6 Check the Make Attribute Editable option.
7 Type a name for this editable attribute. Dreamweaver will provide one automatically, but it is wise to type a name that you know will be unique. Remember, the template users will have to recognize this name from a list when choosing to define this attribute.
8 If you choose to make editable an attribute that was already defined, then Dreamweaver should choose the Type setting for you. If you added an attribute name in step 5, then you will have to choose the appropriate type from the pop-up menu. Verify this setting is correct for the data, since template users will have different methods of choosing their value depending on this setting. The choices are:
• Text: This is appropriate for a value that requires text. An example is the align attribute for a table tag. The template user will get a text box in which to enter the replacement text.
• URL: This is appropriate for describing the path to a file. An example is the source (src) attribute for an image (img) tag. The template user will get a text box as well as a folder icon to allow them to browse to the file.
• Color: This is appropriate for setting a color. An example is the background color (bgcolor) for a table tag. The template user will get a text box as well as a color picker to choose the color.

75
Last updated 11/5/2015
• True/False: This is appropriate for an attribute that toggles on or off. An example is the nowrap attribute for a table cell tag. The template user will get a pop-up menu from which to choose either true or false.
• Number: This is appropriate for an attribute that requires a number. An example is the width value for a table tag. The template user will get a text box in which to enter the replacement number.
9 Define a default value for the attribute.
10 Click OK.
11 Create a new page from this template, and choose Modify > Template Properties. A list of editable attributes will be listed in the dialog box. Optional regions are also in this dialog box. Select the attribute you want to edit and set the value in the dialog. Click OK and the new value will be set on the page.
Additional template features
Removing Template Regions
To remove an editable area or other template region, highlight the region in question and choose Modify > Templates > Remove Template Markup.
Check Template Syntax
Another feature in Dreamweaver is the ability to verify that your template code is correct. With the added complexity and hand coding needed for some template expressions and parameters, there is a bigger opportunity for coding errors. Using the Check Template Syntax Command will help you debug your code.
This feature can only be used in the actual template file. Choose Modify > Templates > Check Template Syntax.
Example code
This example code contains editable regions within a repeat region. To use the example code, follow these instructions:
1 In Dreamweaver, create a new HTML Template (File > New > Template Page > HTML Template).
2 Save this file as a template within a defined site by choosing File > Save as Template, choosing the site from the Site list, and naming the file.
3 Within the browser window, select the example code from below and choose Edit > Copy.
4 Switch back to the template file in Dreamweaver.
5 Select all code in the template file (switch to Code View, and choose Edit > Select All) and paste the copied code by choosing Edit > Paste.
6 Save the template by choosing File > Save.
7 Make a page based on this template by choosing File > New> Templates, and selecting the template from the appropriate site. To use the repeating region feature, choose Modify > Templates > Repeating Entries, and add a new entry. These colors can be modified within the instance of the template by choosing Modify > Template Properties.
The template contains:
• an editable attribute.
• expressions
• editable regions
• repeat region
• Template parameters
76
Last updated 11/5/2015
<html> <head> <title><!-- TemplateExpr expr="title" --></title> <meta http-equiv="Content-Type" content="text/html; charset=iso-8859-1"> <meta name="" content="This example is based an a template created by Wanda Huang.">
<!-- TemplateParam name="title" type="text" value="Using Repeat Region Variables in Expressions" --> <!-- TemplateParam name="border" type="number" value="1" --> <!-- TemplateParam name="evenColor" type="color" value="FFFFFF" --> <!-- TemplateParam name="oddColor" type="color" value="#CCCCCC" --> </head> <body text="#000000"> <table border=@@("border")@@ cellpadding=3 cellspacing=0> <tr> <th >Name</th> <th>email address</th> <th>phone</th> </tr> <!-- TemplateBeginRepeat name="Parent" --> <tr > <TD><!-- TemplateExpr expr="_index+1" --></TD> <TD><!-- TemplateBeginEditable name="email" -->email<!-- TemplateEndEditable --><br> </TD> <TD><!-- TemplateBeginEditable name="phone" -->phone<!-- TemplateEndEditable --></TD> </tr> <!-- TemplateEndRepeat --> </table> </body> </html>
Additional information For more information about the new Dreamweaver MX template features, check the Using Templates section of the Dreamweaver Support Center.
For more information about creating nested templates, seeCreating a nested template in Dreamweaver MX (TechNote 16282).
New features of Cascading Style Sheets in Dreamweaver MX
The Dreamweaver MX interface incorporates additional CSS editing options. Dreamweaver MX Cascading Style Sheets (CSS) are easier to use, and comply to World Wide Web Consortium (W3C) standards. This TechNote introduces some of the new CSS editing options in Dreamweaver MX.
Note: The Dreamweaver MX Design view renders CSS according to the standards set by the W3C. The W3C CSS Test Suite was used for testing and development.
Update: Dreamweaver MX 2004's implementation of CSS is more advanced than Dreamweaver MX. See the Developer Center article Designing with CSS Part 1: Understanding CSS Design Concepts for information specific to that version.
CSS in the Dreamweaver MX interface
CSS styles applied to text are reflected in both the CSS Styles panel and the Property inspector. Additionally, styles can be applied from either panel, or from the Text menu (Text > Style submenu).
Styles with block-level elements, and most inline-level elements applied in Dreamweaver MX are rendered correctly in the design window. The asterisk, used in earlier versions of the Dreamweaver CSS wizard to indicate styles that rendered only in the browser, is no longer needed. CSS constructs will now render in the design environment.
Dreamweaver MX CSS Styles panel
In the default Dreamweaver MX workspace layout, the CSS Styles panel is located on the Design tab, grouped with the HTML Styles and Behaviors panels. As with any MX panel, it may be ungrouped and floated in the workspace, or regrouped with other panels to accommodate workflow. To access the CSS panel when collapsed or ungrouped, choose Window > CSS Styles, or Shift + F11. There are two option modes: Apply and Edit Styles. When in the Edit mode the CSS window is split vertically.
To see the different modes move the mouse over the image below.
77
• The Apply Styles mode displays custom styles, linked and embedded, and provides the ability to apply them to yourpage.
• The Edit Styles mode displays all styles, linked and embedded, and the properties of each. It also provides easy accessfor editing styles.
CSS Styles contextual menu
Each mode has the same contextual right-click menu (Windows), Control-click on Macintosh.
Applying a style from the CSS Styles panel.
1 Select the text to which you wish to apply a style.
2 Click the style displayed in the Apply Styles mode.
Editing a style from the CSS Styles panel.
MX Property inspector
The Property inspector now has the ability of formatting text with CSS. CSS attributes are also displayed in the Property inspector. To access the Property inspector choose Window > Properties or Control + F3 (Macintosh). Use the image below to toggle the CSS and HTML options by clicking on the letter A (CSS/HTML toggle button) or the Font list drop-down menu.
• Change the property's context from HTML <font> tags to CSS.
• The Property inspectordisplays the CSS style attributes for the text selected.
• Use the drop-down Style list to assign styles.
Note: Do not edit the style from here. Edits made with the Property inspector will generate HTML <font> tags.
CSS wizard changes
The Box category properties default to auto-complete all values at once. To set the Box attributes differently, deselect the Same for All option and set them individually.
Design Time Style Sheets
Last updated 11/5/2015
• To open the style definition panel and make changes, double-click (Windows) or Control-click (Macintosh) on the style or CSS file you wish to edit.
• Choose an individual CSS style from the CSS Styles panel. Click the Edit button (shown below) and make changesas desired.
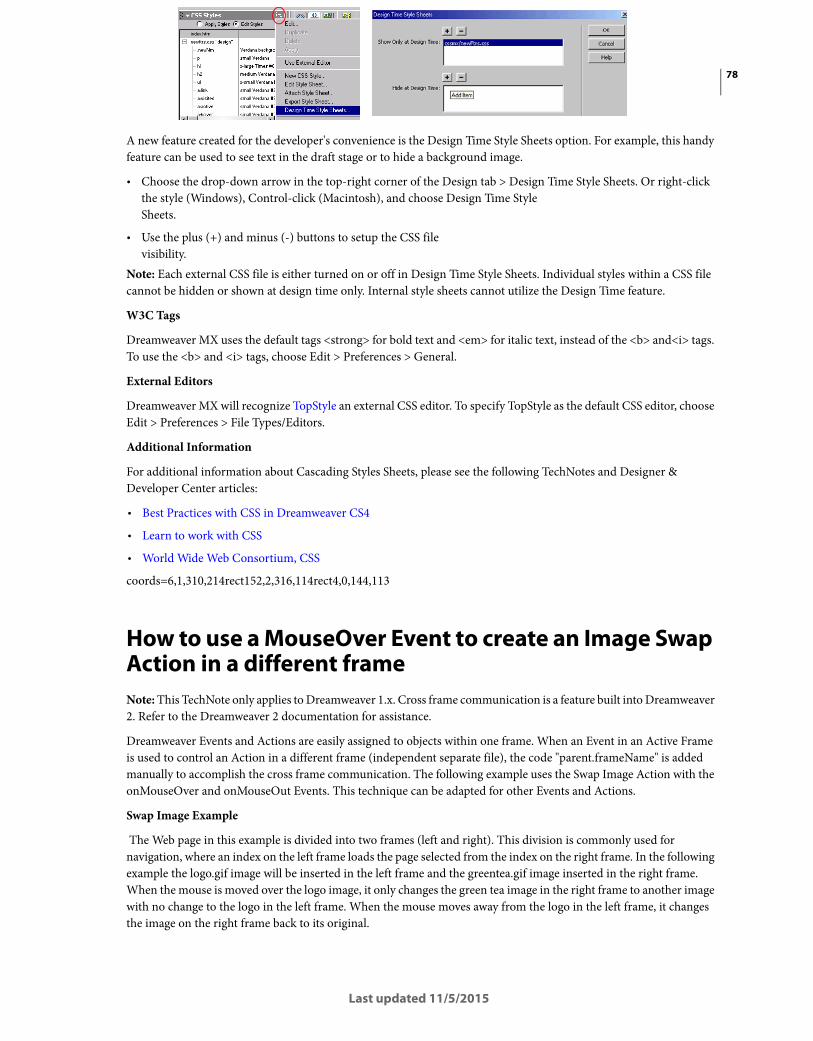
78
Last updated 11/5/2015
Note: Each external CSS file is either turned on or off in Design Time Style Sheets. Individual styles within a CSS file cannot be hidden or shown at design time only. Internal style sheets cannot utilize the Design Time feature.
W3C Tags
Dreamweaver MX uses the default tags <strong> for bold text and <em> for italic text, instead of the <b> and<i> tags. To use the <b> and <i> tags, choose Edit > Preferences > General.
External Editors
Dreamweaver MX will recognize TopStyle an external CSS editor. To specify TopStyle as the default CSS editor, choose Edit > Preferences > File Types/Editors.
Additional Information
For additional information about Cascading Styles Sheets, please see the following TechNotes and Designer & Developer Center articles:
• Best Practices with CSS in Dreamweaver CS4
• Learn to work with CSS
• World Wide Web Consortium, CSS
coords=6,1,310,214rect152,2,316,114rect4,0,144,113
How to use a MouseOver Event to create an Image Swap Action in a different frameNote: This TechNote only applies to Dreamweaver 1.x. Cross frame communication is a feature built into Dreamweaver 2. Refer to the Dreamweaver 2 documentation for assistance.
Dreamweaver Events and Actions are easily assigned to objects within one frame. When an Event in an Active Frame is used to control an Action in a different frame (independent separate file), the code "parent.frameName" is added manually to accomplish the cross frame communication. The following example uses the Swap Image Action with the onMouseOver and onMouseOut Events. This technique can be adapted for other Events and Actions.
Swap Image Example
The Web page in this example is divided into two frames (left and right). This division is commonly used for navigation, where an index on the left frame loads the page selected from the index on the right frame. In the following example the logo.gif image will be inserted in the left frame and the greentea.gif image inserted in the right frame. When the mouse is moved over the logo image, it only changes the green tea image in the right frame to another image with no change to the logo in the left frame. When the mouse moves away from the logo in the left frame, it changes the image on the right frame back to its original.
A new feature created for the developer's convenience is the Design Time Style Sheets option. For example, this handy feature can be used to see text in the draft stage or to hide a background image.
• Choose the drop-down arrow in the top-right corner of the Design tab > Design Time Style Sheets. Or right-clickthe style (Windows), Control-click (Macintosh), and choose Design Time StyleSheets.
• Use the plus (+) and minus (-) buttons to setup the CSS filevisibility.

79
Last updated 11/5/2015
To use an event to create an action in another frame do the following:
1 Choose File>New and choose View>Frame Borders. Choose Window > Frames. This shows the Frame inspector Window.
2 Move the mouse to the left frame border and hold down Alt (Windows) or Option (Macintosh) and drag the border to the right to create two frames equal in size. (In this example the width of the frames can be any size.)
3 Click the mouse in the left frame in the Frame Inspector window. Choose Window>Properties and name the frame"pNav."
4 Click the mouse in the right frame in the Frame inspector window. In the Frame Properties window name the frame"pBody."
5 Choose File>Save Frameset and enter a filename. Use the file name "example.htm". Click Save.
6 Choose File>Save All. This opens the save dialog prompting to save the new documents created by the two frames.Note: Dreamweaver always defaults to the right frame first.
7 Name the right frame file "rightbody.htm" and name the left frame file "leftnav.htm".
8 Click the left frame in the main window and insert logo.gif image. This image is located in the Dreamweaver>Configuration>Template folder.
9 Choose Window>Properties and name the image"myLogo".
10 Click the right frame in the main window and insert the greentea.gif image. This image is located in the Dreamweaver>Configuration>Templates>Frames folder.
11 Choose Window>Properties and name the image"myTea".
12 Choose File>Save All. This saves the frameset file and the separate files for the left and right frames.
13 Select the green tea image. Choose Window>Behaviors to open the Behaviors dialog box. Leave the Browser version set to 4.0 Browsers.
14 Access the Events pop-up menu by clicking the plus button. Select onMouseOver from the pop-up menu. Click OK on the dialog reminder about the anchor.
15 In the Actions pop-up menu select Swap Image. Select the logo.gif for the source image. Leave Preload images checked.Note: The anchor tags for the Preload Image Behavior appear in the window.
16 Select onMouseOut from the Events pop-up menu. Select Swap Image from the Action menu. Select the greentea.gif for the source image.
17 Open the HTML source window for the right frame. Cut the code for the anchor tag but DO NOT include the reference for the green tea image (img href="../greentea.tif).Note: This leaves an </a> tag in the main window of the right frame. Delete the extra </a> in the right frame.Code Example

80
Last updated 11/5/2015
<a href="#" onMouseOver="MM_swapImage
('document.myTea','document.myTea','
../logo.gif','MM_swapImage1')" onMouseOut="MM_swapImage
('document.myTea','document.myTea','
../greentea.gif','MM_swapImage2')">
18 Open the HTML source window for the left frame. Paste the code for the anchor tag in front of the <img src> tag for the logo.gif. Make sure the </a> tag is at the end of the code for the logo image.Note: An </a> anchor (to close the <a href> tag) needs to be added manually for the left frame and the </a> deleted from the right frame code.
19 If the left frame does not contain the JavaScript code between the <head> and </head> tags for preloading and swapping images, open the right frame and copy the code. Paste the code between the <head> and </head> tags of the left frame.Note: Only the required JavaScript functions need to be copied. In this example with a new created document, copy all the JavaScript functions.
Start copying the following section:
<script >
<!--function MM_preloadImages()> Including the section:<function MM_swapImage()>
end with the section:</script>
20 When using the Preload Image behavior also cut the JavaScript code between the <body> and </body> tags from the right frame and paste between the <body> and </body> tags in the left frame. Code Example<<!-- #BeginBehavior MM_swapImage2 -->
<script language='JavaScript'>
<!--MM_preloadImages('../greentea.gif');//-->
</script>
<!-- #EndBehavior MM_swapImage2 -->
<!-- #BeginBehavior MM_swapImage1 -->
<script language='JavaScript'>
<!--MM_preloadImages('../logo.gif');//-->
</script>
<!-- #EndBehavior MM_swapImage1 -->>
21 Open the HTML source window of the left frame and type in"parent.pBody." in front of each"document.myTea" in the code of the anchor tag for the image. The reference to "document.myTea" occurs four times. The mouse event can then correctly reference the targeted frame window within a frameset.Code Example

81
Last updated 11/5/2015
<a href="#"
onMouseOver="MM_swapImage
('parent.pBody.document.myTea',
'parent.pBody.document.myTea','
../logo.gif','MM_swapImage1')"
onMouseOut="MM_swapImage
('parent.pBody.document.myTea',
'parent.pBody.document.myTea','
../greentea.gif','MM_swapImage2')">
<img href="../logo.gif"
name="mLogo"></img></a>
22 Choose File>Save All and Press F12 to view results in browser.
Modified date of local file changes after put
Issue After uploading a file to the remote server, the modified date for the local file changes in the Files panel to match the modified date of the file uploaded to the server.
Note: This TechNote applies to Dreamweaver MX 2004 and earlier. The timestamp-related features were redesigned in Dreamweaver 8. The local file's timestamp is no longer changed when putting files. For more information, see "How synchronization works in Dreamweaver 8" (TechNote kb400972 ).
Reason This change in the modified date for the local file is necessary for the Synchronize command in Dreamweaver MX 2004 and earlier. Making this change to the local file's modified date is necessary so thatduring the synchronization process, Dreamweaver MX 2004 and earlier can determine whether a local file has been updated since it was last transferred to the server.
Additional Information For more information about Dreamweaver MX 2004 and earlier synchronization issues, see "Synchronize and Select Newer options are not working correctly" (TechNote tn_14413 ). The Site Management and Collaboration chapter in the manual, Using Dreamweaver, has additional information about synchronizing local and remote files.
82
Last updated 11/5/2015
"Low on memory" errors when running Dreamweaver
Issue When running Adobe Dreamweaver on Windows, the following error occurs: "Your system is low on memory, Please save your documents, then free up memory by closing some document or other applications." One thing that some users reporting this problem have in common is that they are running Windows systems with 2GB of RAM. (Ref. 223385)
Reason There are two reasons that Adobe is aware of that can cause this problem:
• This problem usually occurs when the currently allocated amount of virtual memory is manually set at a value lower than the recommended amount of virtual memory. This can occur when you add real memory to your system and you don't manually increase the currently allocated amount of virtual memory.
• One user has reported that this problem was fixed when there was a file path that exceeded 255 characters and shortening the file path fixed the problem.
Solution Make sure that the currently allocated amount of virtual memory on your system is set to a value at least the same as the recommended amount of virtual memory. The recommended amount of virtual memory is based on the amount of real memory of your system. Virtual memory is a system to extend the amount of real memory, so it will always be larger than the real amount of memory you have.
Setting the amount of virtual memory allocated on Windows XP:
1 Go to the Start Menu > Settings > Control Panel > System.
2 In the System Properties dialog box, select the Advanced Tab. In the Advanced tab, go to the Performance section and click the Settings button.
3 In the Performance Options dialog box, click the Advanced tab, go down to the Virtual Memory Section and click the Change button.
4 In the Virtual Memory dialog box, if you have the Custom Size option chosen, verify that the Initial Size matches the Recommended Size at the bottom. In other words, the Currently Allocated Size should match the Recommended Size. You will need to restart your system after changing the Initial Size.
Setting the amount of virtual memory allocated on Windows Vista:
1 Choose Start > Control Panel.

83
Last updated 11/5/2015
2 Choose Classic View in the left pane.
3 Double click System.
4 Click the Advanced System Settings link to open the System Properties dialog box.
5 Click the Advanced tab, then click the Settings button in the Performance section.
6 In the Performance Options dialog box, click the Advanced tab, go down to the Virtual Memory Section and click the Change button.
7 In the Virtual Memory dialog box, if you have the Custom Size option chosen, verify that the Initial Size matches the Recommended Size at the bottom. In other words, the Currently Allocated Size should match the Recommended Size. You will need to restart your system after changing the Initial Size. You can also instead try using the option: "Automatically manage paging file size for all drives".
Check for file paths longer than 255 characters
Check your files for any file paths that exceed 255 characters and shorten the file paths if you see any.
Keychain contains multiple instances of Dreamweaver CS4 | Mac OS 10.7 Lion
IssueAfter you use Adobe Dreamweaver CS4 on Mac OS 10.7 Lion, there are multiple entries for the application in Keychain Access.
SolutionThis issue is a known issue with Mac OS 10.7. There is no negative impact to having multiple keychain entries for Dreamweaver, so you can safely ignore this unexpected behavior.
Additional informationThis issue does not occur with Dreamweaver CS5 or CS5.5. Your Mac OS keychain is used to securely store the user name and password for each of your Dreamweaver sites.
84
Last updated 11/5/2015
JavaScript error and hang when performing Save To Remote Server
Issue When selecting File > Save To Remote Server, the following JavaScript error occurs in Dreamweaver:
While executing DWMenu_File_SaveDocumentToRemoteServer command in menus.xml, the following JavaScript error(s) occurred:
Exception thrown in native function.
After clicking the OK button, Dreamweaver hangs. The only way to exit from Dreamweaver is to force quit. This issue only occurs with Windows XP, and does not occur on Windows Vista. (Ref. 225886)
Reason This error occurs when you have Internet Explorer 7 installed on Windows XP.
Solution There are two recommended solutions:
• Use an alternative method of saving files to the server. For example, use the Put button or Check-In button in the Files panel to upload files to the server.
• Uninstall Internet Explorer 7 which will rollback your system to Internet Explorer 6.
Additional Information For more information on other JavaScript errors, see Troubleshooting JavaScript errors in Dreamweaver (TechNote tn_19105 )
Issue when creating a database connection: HTTP Error Code 404 File Not Found (Dreamweaver Developer Toolbox)
Issue When I try to create a new Dreamweaver database connection, I get an error message saying : HTTP Error Code 404 File Not Found
85
Last updated 11/5/2015
Reason There are several possible causes for which this can happen:
1 The testing server is not setup right in the Dreamweaver site definition. Dreamweaver attempts to upload some files on the testing server into the folder you pointed into the site definition and then it tries to call them with an HTTP call using the URL base you provided. If the paths are not configured correctly, you will receive this error.
2 The web server is not up and running on the testing server machine.
3 The proxy server as it is configured in thebrowser,is used even for local addresses like localhost, the testing server where you want to connect.
4 Your browser is set to "Work Offline".
Solution There are several solutions you can attempt:
1 Go into your site definition from Dreamweaver and recheck all the choosen paths (both folders and URLs).
2 Check the web server status, you may even restart it to be sure.
3 You should change your proxy server configurations in thebrowser to bypass local addresses like localhost.
Installing Dreamweaver MX / MX 2004 in Safe Mode on Windows If you are experiencing crashes, errors or other unexpected behavior with Dreamweaver MX 2004 or Dreamweaver MX, reinstall it with all other applications and background processes turned off to ensure nothing is conflicting with the Dreamweaver installer, like anti-virus software. Before installing Dreamweaver in Safe Mode, perform a complete uninstall as described in Uninstalling Dreamweaver MX / MX 2004 on Windows (TechNote 362d7b81).
Note: Dreamweaver 8 uses Windows Installer packages (MSI). Therefore, you cannot install Dreamweaver 8 in Safe Mode, because Safe Mode disables the Windows Installer service. For more details on diagnostic installations of Dreamweaver 8, see Installing Studio 8 products in Selective Startup mode on Windows XP (TechNote d2b5934d).
Installing Dreamweaver MX & MX 2004 in Safe Mode
1 Copy the Dreamweaver installer from the installation CD onto the Windows desktop. This is necessary because the CD-ROM drive will be disabled in Safe Mode. If you downloaded the application, make sure the installer is fully downloaded and available on your hard drive.
a In Windows, browse the MX or MX 2004 CD and go to the FSCOMMAND folder.
b Copy DW_Client_Installer.exe from the FSCOMMAND folder to the Windows desktop.
2 Reboot the computer system in Safe Mode. Here are the instructions for Windows XP, 2000, 98, ME, 95:
a Restart the computer.
b When the computer begins to boot back up, start tapping the F8 key. For Windows 98 and ME, the Ctrl key also works.
c When the Windows startup menu appears, select Safe Mode.
3 Log in using the Windows administrator account or a user account with administrator privileges.
86
Last updated 11/5/2015
4 Exit from all applications that may be open. Disable any virus protection software if Safe Mode did not already disable it.
5 Run the installer you copied to the desktop in step 1.
6 When installation is complete, delete the installation files copied from the installation CD.
7 Restart the computer in normal mode.
8 Launch Dreamweaver.
Additional Information Here are some related TechNotes:
• Uninstalling Dreamweaver MX & MX 2004 on Windows (TechNote 362d7b81)
• Troubleshooting Dreamweaver for Windows (TechNote 15481)
• Installing Studio 8 products in Selective Startup mode on Windows XP (TechNote d2b5934d)
• Dreamweaver crashes when performing a task related to site definitions (TechNote 5989f7f4)
• Uninstalling Studio 8 applications on Windows (TechNote 4e7826b7)
How to include the current date in an insert page There are different ways to include the current date in a newly inserted record. This TechNote describes two options:
1 Using hidden fields with ColdFusion, PHP, ASP, ASP.NET or JSP code.
2 Setting the default value for the database field equal to the current date.
Hidden form fields
One approach to this task is to setup a hidden field (Insert> Form > Hidden Field). Once the hidden field has been added, select the yellow icon that represents the hidden field and go to the Property inspector. In the Value field, enter the appropriate code for the date function:
• ASP: <%= Date() %>
• JSP: <%= new java.util.Date() %>
• ColdFusion: #Now()#
If you want to give the end user the option to change the date to something other than today's date, then use a regular text field instead of a hidden field.
When filling out the Insert Record server behavior dialog box, map the hidden form field to the date field in the database and set the data type to either "Date" or "MS Access Date".
Note: The date being inserted will be the date on the application server. Keep this in mind if users are in different time zones.
Setting the default value in the database

87
Last updated 11/5/2015
Another approach to this task is to set the default value of the database's date field to the current system date. Most, if not all, databases will have a "default value" option for database fields. One advantage to using this approach is that you do not have to worry about the date format being sent from the web page. Here is how to set the default value to today's date in Microsoft Access 2000:
1 Open the database in Microsoft Access.
2 Open the database table in Design view, and select the date field.
3 Go to the General tab in the bottom section of the window and type "Date()" (no quotes) in the Default Value field.
4 Save and close the database, and go back to Dreamweaver to finish the insert page.
5 When filling out the Insert Record server behavior dialog box in Dreamweaver, you will not map a form field to the date field in the database. The database will automatically fill in the current date when a new record is created.
Please refer to the Microsoft Access documentation for further detail on setting default values. If you are not using Access, please refer to your database documentation for instructions on how to set the default date value.
Note: The date being inserted will be the date on the database server. Keep this in mind if users are in different time zones.
Additional information
For more information on how to use the Insert Record server behavior, please see Building an insert record page block by block.
HTML colors are different from SWF colorsIf you set a SWF file's background color to the same background color as an HTML page, the colors don't always match on all machines. In particular, you're more likely to see a slight difference on 16-bit monitors, set to display at "thousands of colors." That's because a 16-bit monitor can't display as many colors as other monitors, and different renderers can round colors in different ways.
Monitors set to "hundreds of colors" have a wider range than those set to "thousands." Although a 16-bit display can show more simultaneous colors, the palletized image can choose from a wider range of colors.
The math shows why: 32-bit monitors and 8-bit palettes both use a full byte of information for the red, green, and blue channels. That's 256 possible values for each of three colors. But a 16-bit monitor has only 2 bytes of info per pixel, and it gives about 5 bits to each channel. Therefore, it can only display 32 different red values, 32 different green values, and 32 different blue values. Each channel can display only one-eighth of the colors seen on other displays.
When a color is shown on a 16-bit display, most of the time it is rounded to the nearest permitted color. Different renderers in a browser can round colors in different ways. That's why a SWF file's color and HTML color can have the same definition, but look different from each other on different machines.
Possible solutions
• Try making designs that don't require absolute color fidelity across all machines.
• Use "herringbone" and other patterns to hide edges.
• Consider putting more of the page's content inside the SWF file.
88
Last updated 11/5/2015
• On Windows versions of Internet Explorer, you can set thewmode attribute to hide an unused SWF file's background.
None of thesesolutions are entirely satisfactory, but it can be difficult to expect all devices to render all colors identically.
Do "Web-safe colors" matter?
Not really, not in this case. Web-safe colors describe how a browser sets the computer's palette at a depth of "hundreds of colors." but these color-cube values can still shift on a monitor set to "thousands of colors." The Web-safe color discussions are a bit different from these 16-bit rounding discussions.
To summarize, a monitor set to display "thousands of colors" can only show a fraction of the colors seen on other monitors. Different renderers inside a browser round colors in different ways.
Flash movies won''t play in the document windowIssueAfter clicking the play button (on the Properties inspector) for a selected Flash movie object, the movie won't play in the Dreamweaver 3 document window.
ReasonDreamweaver 3 cannot find the Macromedia Flash Player (referred to as the Flash plugin in Dreamweaver 3) to display the movie (an SWF file) in the document window. You may not have installed the Flash Player in the Netscape Communicator Plugins folder.
SolutionYour computer system must have the Flash Player for the Netscape browser installed in order to play a Flash movie in Dreamweaver 3. You do not have to have the Netscape browser itself on your system; however, you do need to install the Flash Player for the Netscape browser.
Installing the Flash Player for the Netscape browser
Note:These instructions are intended for Dreamweaver 3 users only. Dreamweaver 4 installs the Flash 5 plugin into its own Plugins folder by default, thus avoiding this Dreamweaver 3 issue.
Download the Flash Player from http://www.macromedia.com/downloads/.
The Flash Player can also be installed from the Dreamweaver 3 installation CD, as follows:
1
Navigate to Other Macromedia Software > Flash Player > Netscape > flash32.EXE.
2
Double-click on the flash32.EXE file to launch the installer.
3
Follow the instructions to install the Flash Player.

89
Last updated 11/5/2015
Fehlerbehebung bei Systemfehlern oder Nichtreagieren des Systems für Adobe Dreamweaver CS4 unter Windows XPDeutsch | English | Français
Inhalt
• Vorbereitungsmaßnahmen
• Grundlegende Fehlerbehebung
• Fortgeschrittene Fehlerbehebung
• Fehlerbehebung für Experten
Dieses Dokument bietet Hilfe zur Lösung von Systemfehlern, die bei Verwendung von Adobe Dreamweaver CS4 unter Windows XP auftreten. Systemfehler können an verschiedenen Merkmalen erkannt werden. Dazu gehören beispielsweise:
• Leeres oder flackerndes Dialogfeld
• Nicht reagierender Cursor oder Bildschirm
• Blauer Bildschirm
• Unerwarteter Neustart
• Eine der folgenden Fehlermeldungen: "Diese Anwendung wird aufgrund eines ungültigen Vorgangs geschlossen. Wenden Sie sich an den Hersteller, wenn das Problem weiterhin besteht." "Dreamweaver verursachte eine allgemeine Schutzverletzung im Modul index.html." "Dreamweaver verursachte einen Fehler durch eine ungültige Seite im Modul index.html." "Anwendungsfehler." "Unbehandelte Ausnahme. Die Anwendung wird beendet." "Ungültiger Befehl." "Segmentladefehler in index.html." "Dreamweaver hat ein Problem erkannt und muss beendet werden." "Schwerer Systemfehler." Ein Abbruchfehler
Systemfehler können durch viele verschiedene Faktoren verursacht werden, beispielsweise Konflikte zwischen Gerätetreibern, Anwendungen, Betriebssystemeinstellungen, Hardware und beschädigten Elementen in bestimmten Dateien. Obwohl ein Systemfehler nur bei Verwendung von Dreamweaver auftritt, muss Dreamweaver nicht unbedingt die Ursache des Fehlers sein, sondern ist möglicherweise die einzige Anwendung, die über ausreichend Speicher oder Prozessorzyklen verfügt, um den Fehler zu erkennen.
Vorbereitungsmaßnahmen
Führen Sie die Aufgaben in der angegebenen Reihenfolge aus. Notieren Sie sich die durchgeführten Aufgaben und deren Ergebnisse, einschließlich Fehler und anderer Probleme. Wenn Sie sich an den technischen Support von Adobe wenden, können Ihnen die Mitarbeiter durch diese Informationen bessere Unterstützung bieten.
Hinweis: Die Vorgehensweisen in diesem Dokument basieren auf der Standardoberfläche von Windows XP. Bei einer angepassten Oberfläche kann in einigen Fällen eine andere Vorgehensweise erforderlich sein. Ein häufiger Unterschied ist beispielsweise die Navigation vom Startmenü zur Systemsteuerung. Sie können die Systemsteuerung über "Start" > "Einstellungen" > "Systemsteuerung" statt über "Start" > "Systemsteuerung" aufrufen. Außerdem wird bei den Vorgehensweisen in diesem Dokument davon ausgegangen, dass Sie die klassische Ansicht der Systemsteuerung verwenden: Um die Systemsteuerung in der klassischen Ansicht anzuzeigen, klicken Sie in der Navigationsleiste der Systemsteuerung im linken Bereich des Fensters auf "Zur klassischen Ansicht wechseln".
Bei einigen dieser Vorgehensweisen müssen Sie versteckte Dateien, versteckte Ordner und Dateien mit vollständigem Namen einschließlich Erweiterung (wie "Beispiel-Dateiname.ini") anzeigen. Standardmäßig werden in Windows Explorer keine versteckten Dateien, Ordner und bekannten Dateinamen-Erweiterungen angezeigt.

90
Last updated 11/5/2015
Siehe "Anzeigen von versteckten Dateien, versteckten Ordnern und der Dateiendungen im Windows Explorer (Windows XP)" (TechNote kb404856_ger_DE) für nähere Angaben.
Grundlegende Fehlerbehebung
Mit den im folgenden Abschnitt beschriebenen Schritten können Sie häufige Systemfehler beheben. Bevor Sie die Schritte durchführen, sichern Sie alle persönlichen Dateien (beispielsweise von Ihnen erstellte PSD-Dateien). Nachdem ein Systemfehler aufgetreten ist, starten Sie den Computer erneut, um den Speicher zu aktualisieren. Andernfalls kann der Fehler sich verschlimmern.
1. Vergewissern Sie sich, dass das System die Mindestanforderungen für Dreamweaver erfüllt.
Damit Dreamweaver ordnungsgemäß auf einem System ausgeführt werden kann, muss es folgende Anforderungen erfüllen:
• 1GHz Prozessor oder schneller
• Microsoft Windows XP mit Service Pack 2 (Service Pack 3 empfohlen)
• 512 MB RAM
• 1 GB verfügbarer Festplattenspeicher für die Installation; zusätzlicher freier Speicherplatz während Installation erforderlich (keine Installation auf Flash-Speichermedien möglich)
• 1280 x 800 Punkt Monitorauflösung mit 16-Bit-Grafikkarte
• DVD-ROM-Laufwerk Breitband-Internetverbindung für Online-Dienste erforderlich
Jeweils aktuelle Systemanforderungen finden Sie auf der Adobe Dreamweaver CS4-Website für Systemanforderungen.
Hinweis: Um festzustellen, wie viel RAM installiert ist, wählen Sie "Start" > "Systemsteuerung" > "System". Die Größe des RAM-Speichers wird im Dialogfeld "Systemeigenschaften" unten links auf der Registerkarte "Allgemein" angezeigt.
2. Installieren Sie den neuesten Dreamweaver Updater, sofern verfügbar.
Wenn ein Updater für Ihre Dreamweaver-Version verfügbar ist, installieren Sie ihn, um zu sehen, ob das Problem dadurch gelöst wird.
3. Installieren Sie die neueste Version von Dreamweaver.
Die neueste Version von Dreamweaver bietet möglicherweise mehr Kompatibilität mit dem Betriebssystem und den Treibern. Stellen Sie vor dem Installieren eines Updates oder Upgrades sicher, dass die Systemanforderungen erfüllt sind.
Das kostenlose Dreamweaver CS4-Update kann auf der Adobe-Website unter www.adobe.com/support/downloads_de heruntergeladen werden. Viele Probleme können möglicherweise durch ein Upgrade gelöst werden. (Vor einem Upgrade sollten Sie die in diesem Dokument beschriebenen Schritte ausführen.) Sie können Upgrades bei einem von Adobe autorisierten Händler und bei Adobe direkt erwerben:
• Einen autorisierten Händler finden Sie auf der Adobe-Website unter http://partners.adobe.com/resellerfinder/na/findreseller.jsp_de. Wählen Sie im Menü oben auf der Seite Ihr Land bzw. Ihre Region.
• Um ein Upgrade direkt bei Adobe zu erwerben, besuchen Sie den Adobe Store unter http://store.adobe.com/store_de und wählen Sie im Menü oben auf der Seite Ihr Land bzw. Ihre Region.
• Weitere Informationen zum Adobe-Kundendienst in Ihrer Region erhalten Sie auf der Adobe-Website unter www.adobe.de. Wählen Sie im Menü oben auf der Seite Ihre Region und klicken Sie auf "Kontakt".
4. Installieren Sie aktuelle Windows-Service Packs und andere Updates.
91
Last updated 11/5/2015
Siehe "Installation der neuesten Windows Service Packs und weiteren Updates (Windows XP)" (TechNote kb404859_ger_DE) für nähere Angaben.
5. Erstellen Sie die Dreamweaver-Voreinstellungsdatei erneut.
Dadurch vermeiden Sie Probleme, die durch beschädigte Voreinstellungsdateien verursacht werden.
Hinweis:Bei dieser Lösung erstellt Dreamweaver einen neuen Voreinstellungsordner und alle benutzerdefinierten Einstellungen in der aktuellen Voreinstellungsdatei gehen verloren. Ihr Voreinstellungsordner bleibt jedoch erhalten, indem Sie ihn in Schritt 2 umbenennen. Wenn Sie feststellen, dass das Problem nicht von den Voreinstellungsdateien verursacht wird, können Sie Ihre Einstellungen durch Ausführen der nachstehenden Anweisungen wiederherstellen.
Haftungsausschluss: Bei diesem Vorgang bearbeiten Sie die Windows-Registrierung. Adobe bietet keinen Support für die Bearbeitung der Registrierung, die wichtige System- und Anwendungsdaten enthält. Erstellen Sie eine Sicherungskopie der Registrierung, bevor Sie sie bearbeiten. Weitere Informationen zur Registrierung erhalten Sie in der Windows-Dokumentation oder bei Microsoft.
Neuerstellen der Dreamweaver-Voreinstellungsdatei:
1 Beenden Sie Dreamweaver.
2 Benennen Sie den Konfigurationsordner im Ordner "\Dokumente und Einstellungen\[Benutzer]\Anwendungsdaten\Adobe\Dreamweaver CS4\(Installationssprache)\" um (beispielsweise in "Konfiguration alt").
3 Wählen Sie "Start" > "Ausführen", geben Sie "regedig" ein und klicken Sie auf "OK".
4 Suchen Sie folgenden Ordner: "HKEY_CURRENT_USER\Software\Adobe\Dreamweaver CS4". Löschen Sie den gesamten Dreamweaver CS4-Ordner und schließen Sie den Registrierungs-Editor.
5 Starten Sie Dreamweaver. Dreamweaver erstellt eine neue Voreinstellungsdatei.
Bleibt das Problem bestehen, wird es nicht durch die Voreinstellungsdatei verursacht. Um die benutzerdefinierten Einstellungen wiederherzustellen, löschen Sie die neue Voreinstellungsdatei und benennen die alte Voreinstellungsdatei wieder mit dem ursprünglichen Namen.
6. Führen Sie Dreamweaver im vereinfachten Modus aus.
Einige Anwendungen oder Dienste führen zu Systemfehlern oder zum Nichtreagieren des Systems, wenn sie zusammen mit Dreamweaver ausgeführt werden. Dienste sind spezielle Programme, die Funktionen zur Unterstützung anderer Programme ausführen. Deaktivieren Sie vor dem Start von Dreamweaver alle Dienste und alle anderen Anwendungen einschließlich der Systemstartelemente (Elemente, die automatisch mit Windows gestartet werden).
Informationen zum Deaktivieren von Systemstartelemente und Diensten finden Sie unter "Deaktivierung der Systemstarteinträge und -dienste (Windows XP)" (TechNote kb404984_ger_DE).
So stellen Sie fest, von welchem Systemstartelement das Problem verursacht wurde:
Die Suche nach dem Systemstartelement, von dem das Problem verursacht wurde, kann ein mühevoller Vorgang sein. Nachdem Sie festgestellt haben, dass das Problem von Systemstartelementen verursacht wird, teilen Sie die Liste der Elemente in zwei Hälften. Testen Sie jede Listenhälfte, um zu ermitteln, ob sie das problematische Systemstartelement enthält. Halbieren Sie die Liste weiter, bis Sie herausgefunden haben, welche Systemstartelemente das Problem verursachen. Testen Sie alle Teile der Liste. Mehrere Systemstartelemente können das gleiche Verhalten aufweisen.
1 Versuchen Sie, das Problem mit allen deaktivierten Elementen zu reproduzieren. Wenn das Problem nicht auftritt, setzen Sie den Test mit dem nächsten Abschnitt fort. Aktivieren Sie die Systemstartelemente erneut, nachdem Sie alle Schritte ausgeführt haben.
2 Stellen Sie die Hälfte der deaktivierten Elemente wieder her.

92
Last updated 11/5/2015
3 Versuchen Sie, das Problem erneut hervorzurufen.
• Wenn das Problem auftritt, teilen Sie die Systemstartelemente in Hälften auf und ermitteln, von welcher Hälfte das Problem verursacht wird.
• Wenn das Problem nicht auftritt, aktivieren Sie die Hälfte der verbleibenden Systemstartelemente. Halbieren Sie die Liste weiter, bis Sie herausgefunden haben, welches Systemstartelement das Problem verursacht.
4 Sobald Sie das problematische Systemstartelement isoliert haben, erkundigen Sie sich beim Hersteller des Systemstartelements nach Updates oder Konfigurationsinformationen.
So aktivieren Sie Systemstartelemente und -dienste erneut:
1 Wählen Sie "Start" > "Ausführen", geben Sie den Befehl msconfig ein und klicken Sie auf "OK".
2 Wählen Sie auf der Registerkarte "Allgemein" die Option "Normaler Systemstart", klicken Sie auf "OK" und starten Sie den Rechner erneut.
Hinweis:Wenn die Registerkarte "Dienste" oder "Systemstart" deaktivierte Elemente enthalten hat, müssen sie diese erneut deaktivieren.
7. Installieren Sie Dreamweaver vom Desktop.
Einige Systemkomponenten wie Gerätetreiber und Virenschutz-Dienstprogramme können zu Konflikten mit dem Installationsprogramm von Dreamweaver von führen. In diesem Fall ist die Installation unvollständig oder schlägt fehl. Um diese Konflikte zu vermeiden, installieren Sie Dreamweaver vom Desktop.
1 Weitere Informationen zur Installation vom Desktop finden Sie unter "Install Adobe Creative Suite 4 or point products from the desktop (Windows XP, Windows Vista)" (TechNote kb403963).
2 Öffnen Sie den Dreamweaver-Ordner auf dem Desktop.
3 Doppelklicken Sie auf die Datei "Setup.exe" und folgen Sie den Anweisungen auf dem Bildschirm.
8. Deaktivieren Sie die Startseite von Dreamweaver.
Haftungsausschluss: Bei diesem Vorgang bearbeiten Sie die Windows-Registrierung. Adobe bietet keinen Support für die Bearbeitung der Registrierung, die wichtige System- und Anwendungsdaten enthält. Erstellen Sie eine Sicherungskopie der Registrierung, bevor Sie sie bearbeiten. Weitere Informationen zur Registrierung erhalten Sie in der Windows-Dokumentation oder bei Microsoft.
1 Wählen Sie "Start" > "Ausführen", geben Sie regedit ein und klicken Sie auf "OK".
2 Suchen Sie den Ordner: "HKEY_CURRENT_USER\Software\Adobe\Dreamweaver CS4\General Preferences"
3 Klicken Sie mit der rechten Maustaste auf "Startseite anzeigen" und wählen Sie "Ändern".
4 Ändern Sie das Feld "Value Data" von "TRUE" in "FALSE".
5 Klicken Sie auf "OK" und beenden Sie den Registrierungseditor.
6 Starten Sie Dreamweaver erneut, um zu sehen, ob das Problem fortbesteht.
9. Initialisieren Sie den lokalen WWW-Publishingdienst.
Wenn Websites definiert oder bearbeitet werden, kontrolliert Dreamweaver, ob ein lokaler Webserver zur Verfügung steht. Wenn der lokale Webserver nicht richtig konfiguriert ist, kann Dreamweaver fehlschlagen. ZoneAlarm und vergleichbare Anwendungen können zu diesem Problem ebenfalls beitragen. Wenn der Webserver oder einer seiner abhängigen Dienste versucht, beim Booten der Arbeitsstation vor ZoneAlarm zu starten, kann der Webserver fehlerhaft laufen.

93
Last updated 11/5/2015
So stellen Sie fest, ob die Konfiguration des lokalen Webservers das Problem verursacht:
1 Wählen Sie "Start" > "Einstellungen" > "Systemsteuerung" > "Verwaltung" > "Dienste", um den Dienst-Manager zu öffnen.
2 Suchen Sie den WWW-Publishingdienst (normalerweise am Ende der Liste) und zeigen Sie die Kategorie "Status" des Dienstes an.
3 Der Status des Dienstes sollte "Gestartet" sein. Wenn Sie feststellen, dass der Status für den WWW-Publishingdienst "Wird gestartet" ist, ist der Dienst möglicherweise nicht vollständig initialisiert.
4 Klicken Sie mit der rechten Maustaste auf den WWW-Publishingdienst und wählen Sie "Neu starten" für den Dienst und alle davon abhängigen Komponenten.
Wenn Sie den WWW-Publishingdienst nicht finden, müssen Sie den Internet-Datenserver installieren. Möglicherweise ist der Internet-Datenserver in Ihrer Version von Windows XP nicht enthalten.
Installation des Internet-Datenservers unter Windows XP:
1 Wählen Sie "Start" > "Einstellungen"> "Systemsteuerung".
2 Doppelklicken Sie auf "Software".
3 Klicken Sie links im Fenster auf "Windows-Komponenten hinzufügen/entfernen".
4 Aktivieren Sie das Kontrollkästchen "Internetinformationsdienste".
5 Klicken Sie auf "OK". Die Funktion wird installiert.
10. Beheben Sie Fehler bei Zusatzmodulen von Drittanbietern.
Entfernen Sie Zusatzmodule von Drittanbietern aus dem Dreamweaver-Ordner für Zusatzmodule (Plug-Ins) und starten Sie Dreamweaver erneut. Wenn das Problem erneut auftritt, verschieben Sie die Zusatzmodule wieder in den Dreamweaver-Ordner für Zusatzmodule und gehen zum nächsten Abschnitt dieses Dokuments: Fortgeschrittene Fehlerbehebung. Wenn das Problem nicht auftritt, stellen Sie fest, welche Zusatzmodule für das Problem verantwortlich sind, und beheben Sie das Problem.
So stellen Sie die verantwortlichen Zusatzmodule fest und beheben das Problem:
1 Verschieben Sie das Zusatzmodul eines Drittherstellers wieder in folgenden Dreamweaver-Ordner für Zusatzmodule: "Programme\Adobe\Adobe Dreamweaver CS4\plug-ins".
2 Starten Sie Dreamweaver erneut und versuchen Sie, das Problem zu reproduzieren.
3 Wenn das Problem nicht auftritt, beginnen Sie wieder bei Schritt 1. Andernfalls wenden Sie sich an den Entwickler des zuletzt verschobenen Zusatzmoduls und erkundigen sich nach einem Update.
Fortgeschrittene Fehlerbehebung
Wenn sich das Problem durch die Schritte im vorhergehenden Abschnitt nicht lösen lässt, versuchen Sie, den Fehler mit den folgenden Aufgaben für fortgeschrittene Fehlerbehebung zu berichtigen.
11. Installieren Sie Dreamweaver im vereinfachten Modus erneut.
Software und Dienste, die automatisch mit Windows geladen werden (beispielsweise Virenschutz-Dienstprogramme), können zu Konflikten mit dem Installationsprogramm von Dreamweaver und zu Problemen in Dreamweaver führen. Um solche Konflikte zu vermeiden, installieren Sie Dreamweaver erneut, während Windows im vereinfachten Modus ausgeführt wird. Wenn das Problem dadurch nicht gelöst wird, installieren Sie Dreamweaver auf einem anderen Rechner oder einer anderen Festplatte und versuchen Sie, das Programm auszuführen. [Hinweis: Diese Schritte können je nach BIOS leicht abweichen.]
94
Last updated 11/5/2015
Starten von Windows XP im vereinfachten Modus:
1 Legen Sie den Dreamweaver-Datenträger in das Laufwerk ein.
2 Kopieren Sie den Ordner "Dreamweaver CS4" vom Dreamweaver-Datenträger auf das Desktop.
3 Verschieben Sie alle persönlichen Dateien aus dem Ordner "Dreamweaver" und dessen Unterordnern.
4 Wählen Sie "Start" > "Systemsteuerung" > "Software".
5 Wählen Sie "Adobe Dreamweaver CS4" und klicken Sie auf "Entfernen". Folgen Sie den Anweisungen auf dem Bildschirm, um Dreamweaver zu entfernen.
6 Wählen Sie "Start" > "Ausführen".
7 Geben Sie im Textfeld "Öffnen" den Befehl "msconfig" ein und drücken Sie die Eingabetaste.
8 Klicken Sie auf der Registerkarte "Systemstart" auf "Alle deaktivieren".
9 Aktivieren Sie auf der Registerkarte "Dienste" die Option "Alle Microsoft-Dienste ausblenden", klicken Sie auf "Alle deaktivieren" und anschließend auf "OK".
10 Klicken Sie im Dialogfeld "Systemkonfiguration" auf "Neu starten".Hinweis: Beim Neustart werden Sie darauf hingewiesen, dass im Systemkonfigurationsprogramm Änderungen an den Windows-Startoptionen vorgenommen wurden. Klicken Sie auf "OK" und, wenn das Systemkonfigurationsprogramm angezeigt wird, auf "Abbrechen".
11 Starten Sie das Installationsprogramm von Dreamweaver im Dreamweaver CS4-Ordner und folgen Sie den Anweisungen auf dem Bildschirm.
So aktivieren Sie Systemstartelemente und -dienste erneut:
1 Wählen Sie "Start" > "Ausführen", geben Sie "msconfig" ein und klicken Sie auf "OK".
2 Wählen Sie auf der Registerkarte "Allgemein" die Option "Normaler Systemstart", klicken Sie auf "OK" und starten Sie den Rechner erneut.
12. Führen Sie Dreamweaver mit einem neuen Benutzerkonto aus.
Richten Sie ein neues Benutzerkonto ein, das über die gleichen Berechtigungen wie das Benutzerkonto verfügt, das Sie beim Auftreten des Problems verwendet haben. Wenn das Problem nicht auftritt, ist das ursprüngliche Benutzerkonto möglicherweise beschädigt. Anweisungen zum Einrichten eines neuen Benutzerkontos erhalten Sie in der Windows-Hilfe unter "So fügen Sie einem Computer einen neuen Benutzer hinzu" oder von dem für Sie zuständigen Systemadministrator.
13. Aktualisieren Sie den Grafikkartentreiber.
Viele Hersteller von Grafikkarten aktualisieren ihre Softwaretreiber häufig. Wenn Sie den Grafikkartentreiber länger nicht mehr aktualisiert haben, erkundigen Sie sich bei dem Hersteller der Karte nach einem aktuellen Treiber oder laden Sie ihn von der Website des Herstellers herunter. (Um den Hersteller der Grafikkarte zu ermitteln, zeigen Sie die Eigenschaften der Karte im Geräte-Manager an.) Oft können Sie feststellen, ob der Kartentreiber veraltet ist, indem Sie die Farbtiefe und Auflösung der Karte ändern oder die Hardwarebeschleunigung für Grafiken deaktivieren.
Informationen zum Ändern der Farbtiefe und Auflösung finden Sie unter "Ändern der Farbtiefe und Auflösung (Windows XP)” (TechNote kb404862_ger_DE).
Informationen zum Deaktivieren der Grafikkartenbeschleunigung finden Sie unter "Ausschalten der Grafik-Hardware-Beschleunigung (Windows XP)" (TechNote kb404863_ger_DE).
14. Überprüfen Sie, ob andere Gerätetreiber mit Windows XP kompatibel sind.
Siehe "Stellen Sie sicher, dass die Gerätetreiber kompatibel sind zu Windows XP" (TechNote kb404864_ger_DE) für nähere Angaben.
95
Last updated 11/5/2015
15. Suchen Sie nach problematischen Schriftarten.
Siehe "Reduzieren der Anzahl von aktiven Schriften (Windows XP)" (TechNote kb404867_ger_DE) für nähere Angaben.
16. Optimieren Sie die Verwendung von temporären Dateien in Windows XP.
Windows und Anwendungen speichern Arbeitsdaten in temporären Dateien (.tmp), die auf der Festplatte erstellt werden. Eine übermäßige Anzahl oder veraltete temporäre Dateien können die Leistung von Windows oder Anwendungen beeinträchtigen.
Siehe "Löschen von temporären Dateien mithilfe der Festplattenbereinigungsprogramms (Windows XP)" (TechNote kb404871_ger_DE) für nähere Angaben.
17. Legen Sie für die virtuelle Speicherauslagerungsdatei die Standardgröße fest.
Siehe "Einstellen der Größe der Auslagerungsdatei des Virtuellen Speichers auf die Standardgröße (Windows XP)" (TechNote kb404877_ger_DE) für nähere Angaben.
18. Reparieren und defragmentieren Sie Festplatten.
Siehe "Reparatur und Defragmentierung der Festplatten (Windows XP)" (TechNote kb404981_ger_DE) für nähere Angaben.
19. Führen Sie eine Virenprüfung auf dem System durch.
Verwenden Sie eine aktuelle Antivirensoftware (wie Symantec Norton AntiVirus oder McAfee VirusScan), um das System auf Viren zu prüfen. Viren können Software beschädigen und Systemfehler verursachen. Weitere Informationen finden Sie in der Dokumentation zur Antivirensoftware.
20. Suchen Sie die Datei, die das Problem verursacht.
Wenn in einer Fehlermeldung angegeben wird, welche Datei den Fehler verursacht hat, installieren Sie die dazugehörige Anwendung erneut. Wenn die Datei beschädigt ist und zu Problemen in Dreamweaver führt, kann dies durch erneutes Installieren der dazugehörigen Anwendung behoben werden.
Wenn in einer Fehlermeldung eine Windows-Datei angegeben wird, wenden Sie sich an Microsoft, um die Datei zu ersetzen.
Fehlerbehebung für Experten
Wenn sich das Problem durch die Schritte im vorhergehenden Abschnitt nicht lösen lässt, probieren Sie Folgendes:
21. Installieren Sie Adobe Dreamweaver CS4 auf einem anderen Computer.
Versuchen Sie, Adobe Dreamweaver CS4 auf einem anderen Rechner zu installieren, um festzustellen, ob das Problem durch Ihren Computer verursacht wird. Wenn das Problem auf einem anderen Computer nicht besteht, wenden Sie sich an den technischen Support von Adobe.
22. Besuchen Sie die Online-Foren von Adobe.
Besuchen Sie die Online-Foren, um festzustellen, ob das Problem auch bei anderen Adobe-Benutzern aufgetreten ist. Wenn das gleiche Problem bei anderen Benutzern aufgetreten ist, kann es möglicherweise vom technischen Support von Adobe reproduziert und untersucht werden.
23. Wenden Sie sich an den technischen Support von Adobe.
Wenn durch die beschriebenen Schritte der Fehler oder das Nichtreagieren von Adobe Dreamweaver CS4 nicht behoben werden konnte, wenden Sie sich an den technischen Support von Adobe. Die Support-Optionen finden Sie auf der Adobe-Website unter Support.

96
Last updated 11/5/2015
Fehlerbehebung bei Systemfehlern oder Nichtreagieren des Systems für Dreamweaver CS4 unter Mac OSDeutsch | English | Français
Inhalt
• Grundlegende Fehlerbehebung
• Fortgeschrittene Fehlerbehebung
• Fehlerbehebung fr Experten
Dieses Dokument bietet Hilfe zur Lsung von Systemfehlern, die bei der Verwendung von Adobe Dreamweaver CS4 auf Mac OS auftreten. Systemfehler knnen an verschiedenen Merkmalen erkannt werden. Dazu gehren beispielsweise:
• Leeres oder flackerndes Dialogfeld
• Nicht reagierender Cursor oder Bildschirm
• Fehlermeldung wie "Die Anwendung Adobe Dreamweaver wurde unerwartet beendet. Das System und andere Programme sind davon nicht betroffen."
Systemfehler knnen durch verschiedene Faktoren verursacht werden, beispielsweise Konflikte zwischen Gertetreibern, Software und Hardware, sowie beschdigte Elemente in bestimmten Dateien. Obwohl ein Systemfehler eventuell nur bei Verwendung von Dreamweaver auftritt, muss Dreamweaver nicht unbedingt die Ursache des Fehlers sein, sondern ist mglicherweise die einzige Anwendung, die ber ausreichend Speicher oder Prozessorzyklen verfgt, um den Fehler aufzudecken.
Fhren Sie die Aufgaben in der angegebenen Reihenfolge aus. Zeichnen Sie die durchgefhrten Aufgaben und deren Ergebnisse auf, einschlielich Fehler oder fehlerhaftes Verhalten. Wenn Sie sich an den technischen Support von Adobe wenden, knnen Ihnen die Mitarbeiter durch diese Informationen bessere Untersttzung bieten.
Grundlegende Fehlerbehebung
Mit den im folgenden Abschnitt beschriebenen Schritten knnen Sie hufige Systemfehler beheben. Bevor Sie die jeweiligen Schritte durchfhren, sichern Sie alle persnlichen Dateien. Nachdem ein Systemfehler aufgetreten ist, starten Sie den Computer erneut, um den Speicher zu aktualisieren. Andernfalls kann der Fehler sich verschlimmern.
1. Vergewissern Sie sich, dass das System die Mindestanforderungen fr Adobe Dreamweaver CS4 erfllt.
Dreamweaver CS4 wird mglicherweise nicht ordnungsgem auf einem System ausgefhrt, das nicht die folgenden Anforderungen erfllt:
• PowerPC G5- oder Multicore-Intel-Prozessor
• Mac OS X v10.4.1110.5.4
• 512 MB RAM
• 1,8 GB verfgbarer Festplattenspeicher fr die Installation (zustzlicher freier Speicherplatz whrend Installation erforderlich)
• Bildschirmauflsung 1280 x 800 mit16-Bit-Grafikkarte
Hinweis:Den installierten RAM knnen Sie feststellen, indem Sie aus dem Apple-Men die Option "ber diesen Mac" auswhlen. Der Wert fr den Speicher gibt die Gre des installierten RAM an.
2. berprfen Sie das Format Ihrer Festplatte.
97
Last updated 11/5/2015
Dreamweaver wurde nicht fr Festplatten entwickelt oder getestet, die mit UFS oder mit Dateisystemen formatiert wurden, bei den die Gro- und Kleinschreibung bercksichtigt werden muss. Auerdem untersttzt Dreamweaver die Verwendung lokaler oder Remote-Ordner (lokal oder ber ein Netzwerk) nicht, die sich auf einer UFS-Partition oder in einem Dateisystem befinden, bei dem die Gro- und Kleinschreibung beachtet werden muss. Um festzustellen, ob Ihre Festplatte mit einem solchen Dateisystem formatiert ist, whlen Sie unter der Macintosh-Festplatte die Option "Informationen" und berprfen den Wert fr die Eigenschaft "Format". Verwenden Sie das Format "Mac OS Extended (Journaled)-HFA" fr Ihre Festplatten.
3. Melden Sie sich als Benutzer mit Administratorzugriffsrechten an.
Ohne Administratorzugriffsrechte kann Dreamweaver mglicherweise auf einige erforderliche Dateien nicht zugreifen. Um festzustellen, ob der Fehler durch nicht ausreichende Rechte verursacht wird, melden Sie sich als Benutzer mit Zugriffsrechten an und versuchen, den Fehler erneut hervorzurufen. Wenn der Fehler nicht mehr auftritt, waren fr das zuvor verwendete Konto keine ausreichenden Zugriffsrechte vorhanden. Wenden Sie sich an Ihren Systemadministrator, um die erforderlichen Zugriffsrechte zu erhalten.
Siehe "Anmeldung mit einen Benutzer mit administrativen Rechten (Mac OS X)" (TechNote kb404926_ger_DE) fr nhere Angaben.
4. Installieren Sie die neueste Version von Dreamweaver CS4.
Ihr Betriebssystem und Ihre Hardwaretreiber sind eventuell besser mit der neuesten Version von Dreamweaver CS4 kompatibel als mit frheren. Stellen Sie vor dem Installieren eines Updates sicher, dass die Systemanforderungen erfllt sind.
Kostenlose Updates fr Dreamweaver finden Sie auf der Website von Adobe unter www.adobe.com/downloads/updates.
5. Installieren Sie alle aktuellen Mac OS X-Updates.
Updates des Mac OS X-Betriebssystems verbessern dessen Leistung und die Kompatibilitt mit Anwendungen. Sie erhalten Mac OS X-Updates von der Apple-Website unter www.apple.com/downloads/macosx/ oder indem Sie aus dem Apple-Men die Option "Software-Aktualisierung" auswhlen. Wenn Sie Hilfe zur Installation von Updates bentigen, wenden Sie sich an den technischen Support von Apple.
Wichtig: berprfen Sie vor der Installation eines System-Updates, ob die Systemanforderungen fr Dreamweaver CS4 (und eventuelle Drittanbieter-Software oder -Hardware, die Sie mit Dreamweaver verwenden) erfllt sind, um die Kompatibilitt sicherzustellen. Wenn das Update nicht aufgefhrt ist, wenden Sie sich an Adobe oder den Hersteller Ihrer Drittanbieter-Software bzw. -Hardware.
6. Erstellen Sie die Dreamweaver-Voreinstellungsdatei erneut.
Durch Neuerstellen der Dreamweaver-Voreinstellungsdatei knnen Sie Probleme ausschlieen, die durch eine beschdigte Voreinstellungsdatei verursacht werden.
Hinweis: Durch erneute Erstellung der Dreamweaver-Voreinstellungsdatei werden die Einstellungen auf die Standardwerte zurckgesetzt.
Erneutes Erstellen der Dreamweaver-Voreinstellungsdatei
1 Beenden Sie Dreamweaver.
2 Ziehen Sie die Voreinstellungsdatei fr Adobe Dreamweaver CS4 aus dem Ordner "/Benutzer/[Benutzername]/Library/Preferences" zum Papierkorb.
3 Starten Sie Dreamweaver neu.

98
Last updated 11/5/2015
Wenn der Fehler nach dem erneuten Erstellen der Dreamweaver-Voreinstellungsdatei weiterhin auftritt, wird der Fehler nicht durch die Voreinstellungsdateien verursacht. Zum Wiederherstellen von benutzerdefinierten Einstellungen ziehen Sie die in Schritt 2 verschobene Datei zurck an den ursprnglichen Speicherort, und klicken Sie auf "Ersetzen", wenn folgende Warnung angezeigt wird: "An diesem Ort existiert bereits ein Objekt mit dem Namen '[Dateiname]'. Mchten Sie es durch das Objekt ersetzen, das Sie bewegen?"
7. Erstellen Sie den Ordner mit der Dreamweaver-Benutzerkonfiguration neu.
Durch Neuerstellen des Ordners mit der Benutzerkonfiguration schlieen Sie Probleme aus, die durch eine fehlerhafte Konfiguration entstehen knnten.
Hinweis: Durch erneute Erstellung des Ordners mit der Dreamweaver-Benutzerkonfiguration werden die Einstellungen auf die Standardwerte zurckgesetzt.
Erneutes Erstellen des Ordners mit der Dreamweaver-Benutzerkonfiguration
1 Beenden Sie Dreamweaver.
2 Benennen Sie den Ordner "Benutzer/<Benutzername>/Library/Application Support/Adobe/Dreamweaver CS4/de_DE/Configuration" in "Konfiguration alt"um.
Hinweis: Die Pfade fr die verschiedenen Sprachversionen von Dreamweaver enthalten unterschiedliche Sprachcodes (z.B. en_GB, fr_FR, en_US).
3 Starten Sie Dreamweaver. Dreamweaver erstellt einen neuen Konfigurationsordner.
Bleibt das Problem bestehen, wird es nicht durch die Dreamweaver-Benutzerkonfigurationsdateien verursacht. Um benutzerdefinierte Einstellungen wiederherzustellen, beenden Sie Dreamweaver, lschen den neuen Benutzerkonfigurationsordner und geben dem ursprnglichen Ordner wieder seinen ursprnglichen Namen.
8. Erstellen Sie die Dreamweaver-Site-Voreinstellungen erneut.
Durch erneutes Erstellen der Dreamweaver-Site-Voreinstellungen schlieen Sie Probleme aus, die durch eine beschdigte Site-Voreinstellungsdatei verursacht werden knnen.
Hinweis: Durch Neuerstellen der Dreamweaver-Site-Voreinstellungen werden alle Site-Definitionen entfernt.
Erneutes Erstellen der Dreamweaver-Site-Voreinstellungsdatei
1 Beenden Sie Dreamweaver.
2 Benennen Sie die Datei "Benutzer/<Benutzername>/Library/Application Support/Adobe/Common/10/Sites/Site Prefs" in "Site Prefs alt" um.
3 Starten Sie Dreamweaver. Dreamweaver erstellt eine neue Site-Voreinstellungsdatei.
Bleibt das Problem bestehen, wird es nicht durch die Dreamweaver-Site-Voreinstellungsdatei verursacht. Um die Site-Definitionen wiederherzustellen, beenden Sie Dreamweaver, lschen die neue Site-Voreinstellungsdatei und geben der ursprnglichen Site-Voreinstellungsdatei wieder ihren ursprnglichen Namen.
9. Deaktivieren oder entfernen Sie die Systemerweiterungen mithilfe von "Erweiterungen Ein/Aus".
Durch Deaktivieren der Systemerweiterungen knnen Sie Probleme ausschlieen, die durch eine beschdigte oder inkompatible Systemerweiterung entstehen knnen.
1 Whlen Sie in Dreamweaver "Befehle" > "Erweiterungen verwalten".
2 Whlen Sie in "Erweiterungen Ein/Aus" Ihre Version von Dreamweaver aus der Produktliste.
3 Deaktivieren Sie in der Liste der installierten Systemerweiterungen die Kontrollkstchen fr alle Dreamweaver-Erweiterungen.
99
Last updated 11/5/2015
Wenn das Problem dadurch behoben wird, aktivieren Sie der Reihe nach je eine Systemerweiterung, um herauszufinden, welche davon das Problem verursacht. Wenn Sie eine Systemerweiterung finden, die Probleme verursacht, entfernen Sie sie und benachrichtigen den zustndigen Entwickler.
Entfernen einer Systemerweiterung
1 Whlen Sie in "Erweiterungen Ein/Aus" die fragliche Systemerweiterung aus.
2 Whlen Sie "Ablage" > "Erweiterung entfernen".
10. berprfen Sie die DVD und das DVD-ROM-Laufwerk.
In einigen Fllen kann Staub oder Schmutz auf der DVD die Installation beeintrchtigen und verhindern, dass das Laufwerk den Datentrger erkennt. Untersuchen Sie die CD oder DVD der Anwendung auf Schmutz, Staub und Fingerabdrcke. Wischen Sie sanft die Unterseite der DVD von innen nach auen mit einem weichen, flusenfreien Tuch ab.
berprfen Sie, ob das CD-ROM- oder DVD-ROM-Laufwerk andere CDs oder DVDs lesen kann. Falls nicht, untersuchen Sie den Caddie oder die Schublade auf Staub und subern Sie sie mit einem flusenfreien Tuch. Wenn das Laufwerk weiterhin keine CDs oder DVDs lesen kann, wenden Sie sich an den Hersteller des Laufwerks oder an Apple Computer.
11. Aktualisieren Sie den Grafikkartentreiber.
Viele Hersteller von Grafikkarten aktualisieren ihre Softwaretreiber hufig. Wenn Sie den Grafikkartentreiber lnger nicht mehr aktualisiert haben, erkundigen Sie sich bei dem Hersteller der Karte nach einem aktualisierten Treiber oder laden Sie ihn von der Website des Herstellers herunter.
12. Fhren Sie Dreamweaver mit deaktivierten Startobjekten fr das Benutzerkonto aus.
Um nicht bentigte Erweiterungen im Ordner "Startobjekte" des Benutzerkontos zu deaktivieren, drcken Sie beim Neustart des Rechners die Umschalttaste. Dadurch werden Anwendungen deaktiviert, die sich im Ordner "Startobjekte" befinden.
13. Fhren Sie nur Dreamweaver und keine weiteren Anwendungen aus.
Um den verfgbaren RAM optimal zu nutzen und einen mglichen Konflikt mit Dreamweaver zu verhindern, schlieen Sie alle Anwendungen und starten Dreamweaver neu.
Wenn die Anwendungen nicht ordnungsgem geschlossen werden knnen, erzwingen Sie ein Schlieen.
So erzwingen Sie ein Schlieen von geffneten Anwendungen:
1 Whlen Sie aus dem Apple-Men die Option "Sofort beenden".
2 Whlen Sie im Dialogfeld "Programme sofort beenden" eine Anwendung und klicken Sie anschlieend auf "Sofort beenden".Hinweis:Whlen Sie nicht den Finder, da es sich um die Mac OS-Basiskomponente handelt.
3 Klicken Sie erneut auf "Sofort beenden", wenn Mac OS die Warnung "Mchten Sie [Anwendung] sofort beenden?" anzeigt.
4 Starten Sie Dreamweaver neu, versuchen Sie das Problem erneut hervorzurufen und gehen Sie wie folgt vor:
• Wenn der Fehler nicht auftritt, ist ein Konflikt zwischen der in Schritt 2 ausgewhlten Anwendung und Dreamweaver vorhanden.
• Wenn der Fehler auftritt, wiederholen Sie Schritte 3 und 4 oder fahren nach Schlieen aller geffneten Anwendungen mit der nchsten Aufgabe fort.
14. Installieren Sie Dreamweaver vom Desktop.
100
Last updated 11/5/2015
Einige Systemkomponenten wie Gertetreiber und Virenschutz-Dienstprogramme knnen zu Konflikten mit dem Installationsprogramm von Dreamweaver fhren. In diesem Fall ist die Installation unvollstndig oder schlgt fehl. Um diese Konflikte zu vermeiden, installieren Sie Dreamweaver vom Desktop.
1 Kopieren Sie den Ordner Adobe Dreamweaver CS4 von der Dreamweaver CS4 DVD-ROM auf das Desktop.
2 ffnen Sie den Ordner Adobe Dreamweaver CS4 auf dem Desktop.
3 Doppelklicken Sie auf die Setup-Datei und folgen Sie den Anweisungen auf dem Bildschirm.
15. Fhren Sie die Adobe-Anwendung mit einem neuen Benutzerkonto aus.
Siehe "Run the Adobe application from within a new user account (Mac OS X)" (TechNote kb404927_ger_DE) fr nhere Angaben.
16. Stellen Sie Softwarekonflikte mithilfe des Dienstprogramms Konsole fest.
Wenn Dreamweaver durch den Fehler nicht mehr reagiert, knnen Sie mithilfe des Dienstprogramms Konsole die den Konflikt verursachende Software ermitteln.
So stellen Sie Softwarekonflikte mithilfe des Dienstprogramms Konsole in Mac OS X fest:
1 Whlen Sie "Gehe zu" > "Programme", ffnen Sie den Ordner Dienstprogramme und doppelklicken Sie auf "Konsole".
2 Whlen Sie "Darstellung" > "Protokollliste einblenden".
3 ffnen Sie "~/Library/Logs", indem Sie auf das Dreieck links neben der Zeile klicken.
4 ffnen Sie CrashReporter, indem Sie auf das Dreieck links neben der Zeile klicken.
5 Whlen Sie "Adobe Dreamweaver CS4.crash.log".
6 Starten Sie Dreamweaver erneut und versuchen Sie, das Problem hervorzurufen. Wenn das Problem auftritt, fhren Sie eine erneute Installation oder Aktualisierung der Software durch, die im Crash-Protokoll angegeben wird.
Fortgeschrittene Fehlerbehebung
Wenn sich das Problem durch die Schritte im vorhergehenden Abschnitt nicht lsen lsst, versuchen Sie, den Fehler mit den folgenden Aufgaben fr fortgeschrittene Fehlerbehebung zu berichtigen.
17. Installieren Sie Dreamweaver CS4 erneut.
Eine fehlerhafte Installation kann bei der Arbeit in Dreamweaver zu Fehlern fhren. Durch eine erneute Installation von Dreamweaver knnen Sie diese Fehler beheben.
So installieren Sie Dreamweaver neu:
1 Verschieben Sie alle persnlichen Dateien aus dem Ordner Dreamweaver CS4 auf der Festplatte in einen anderen Ordner.
2 Erzwingen Sie das Schlieen aller geffneten Anwendungen wie unter Aufgabe 13 (oben) beschrieben.
3 Doppelklicken Sie auf den Kurzbefehl "Dreamweaver CS4 deinstallieren" im Ordner Adobe Dreamweaver CS4 auf der Festplatte.
4 Folgen Sie den Anweisungen auf dem Bildschirm, um Dreamweaver zu deinstallieren.
5 Installieren Sie Dreamweaver CS4 von der Produkt-DVD erneut.
Hinweis: Wenn Sie Dreamweaver zuvor aktualisiert haben, wiederholen Sie dies nach der erneuten Dreamweaver-Installation.
18. Reparieren Sie die Volume-Zugriffsrechte durch Ausfhren des Festplatten-Dienstprogramms.
101
Last updated 11/5/2015
Wenn Sie sich an einem Konto mit den Zugriffsrechten des Administrators anmelden, aber Dreamweaver nicht installieren oder ausfhren knnen, wurden Ihre Volume-Zugriffsrechte mglicherweise gendert.
Siehe "Reparatur der Volumenzugriffsrechte durch Ausfhren des Festplattendienstprogramms (Mac OS X)" (TechNote kb404928_ger_DE) fr nhere Angaben.
19. Fhren Sie eine Fehlerbehebung der Schriftarten durch.
Ein Systemfehler kann auftreten, wenn Dreamweaver auf eine beschdigte Schriftart zugreift. Sie knnen die Schriftarten wie folgt testen, um festzustellen, ob diese den Fehler verursachen.
Siehe "Fehlersuche bei Schriftarten (Mac OS X)" (TechNote kb405153_ger_DE) fr nhere Angaben.
20. Optimieren Sie Festplatten.
Wenn die Festplatte stark fragmentiert ist, knnen Installations- oder Anwendungsfehler auftreten. Durch Optimieren der Festplatte werden Dateien neu angeordnet, um die zuknftige Fragmentierung gering zu halten. Auerdem werden fragmentierte Dateien zu einzelnen, durchgehenden Blcken zusammengefhrt, wodurch der Zugriff des Installationsprogramms auf den Festplattenspeicher vereinfacht wird.
Verwenden Sie ein Dienstprogramm zur Festplattenoptimierung, wie Symantec Norton Utilities, um die einzelnen Festplatten zu optimieren (defragmentieren). Anweisungen zur Verwendung des Dienstprogramms erhalten Sie in der Dokumentation zum Dienstprogramm.
21. berprfen Sie die Festplatten.
Siehe "Defragmentierung und Fehlerberprfung der Festplatte (Mac OS X)" (TechNote kb404929_ger_DE) fr nhere Angaben.
Fehlerbehebung fr Experten
Wenn sich das Problem durch die Aufgaben im vorhergehenden Abschnitt nicht lsen lsst, knnen Sie es mglicherweise beheben, indem Sie die Festplatte neu formatieren oder feststellen, ob ein Hardwarekonflikt mit Dreamweaver vorhanden ist.
Haftungsausschluss:Adobe bietet keinen Hardware-Support und nimmt die folgenden Vorgehensweisen nur zur zustzlichen Information auf. Weitere Angaben erhalten Sie vom Hersteller der Hardware oder einem autorisierten Hndler. Wenn Sie die Fehlerbehebung bei Hardwareproblemen selbst durchfhren, kann dies zum Erlschen der Garantie fr den Rechner fhren.
Hinweis: Schalten Sie den Rechner und alle Peripheriegerte aus und ziehen Sie die Stecker ab, bevor Sie Hardware entfernen oder die Anordnung ndern.
22. Verwenden Sie die Aktivitts-Anzeige, um laufende Prozesse, welche viele Systemressourcen in Anspruch nehmen, zu identifizieren und zu beenden.
Siehe "Verwenden Sie den Activity Monitor um laufende Prozesse, welche viele Systemressourcen in Anspruch nehmen, zu identifizieren und zu beenden (Mac OS X)" (TechNote kb404933_ger_DE) fr nhere Angaben.
23. Installieren Sie die Systemsoftware erneut.
Siehe "Neuinstallation der System-Software (Mac OS X)" (TechNote kb404937_ger_DE) fr nhere Angaben.
24. Fhren Sie die Installation auf einer anderen Festplatte durch und geben Sie diese als Startlaufwerk an.
Installieren Sie die Systemsoftware auf einer anderen Festplatte (nicht auf einer anderen Partition der gleichen Festplatte) und geben Sie anschlieend diese Festplatte als Startlaufwerk an. Installieren Sie anschlieend Dreamweaver auf der neuen Festplatte.

102
Last updated 11/5/2015
So legen Sie das Startlaufwerk fest:
1 Whlen Sie aus dem Apple-Men die Option "Systemeinstellungen".
2 Whlen Sie "Startvolume".
3 Whlen Sie das Laufwerk, auf dem Sie die Systemsoftware erneut installiert haben.
4 Starten Sie den Computer neu.
25. berprfen Sie die PCI- oder PCX-Karten auf Beschdigung.
Beschdigte oder nicht kompatible PCI- oder PCX-Karten knnen zu Systemfehlern fhren. Um PCI- oder PCX-Karten zu berprfen, schalten Sie den Computer aus, entfernen alle Prozessorbeschleunigerkarten, Videokarten oder anderen installierten Erweiterungskarten und starten den Computer neu.
26. Trennen Sie alle Peripheriegerte.
Trennen Sie die Peripheriegerte nacheinander. Peripheriegerte sind beispielsweise Gerte, die ber FireWire, USB, Serial ATA, IDE oder SCSI verbunden sind. Wenn bei getrenntem externen Gert der Fehler nicht auftritt, ist das Gert, das Kabel oder die Verbindung mglicherweise fehlerhaft. Wenden Sie sich an den Hersteller des Gerts, um eine Anleitung zur Fehlerbehebung fr das Gert zu erhalten.
27. berprfen Sie die RAM-DIMMs auf Fehler.
Siehe "berprfung der RAM DIMMs" (TechNote kb404980_ger_DE) fr nhere Angaben.
28. Fhren Sie Dreamweaver auf einer anderen Festplatte oder einem anderen Computer aus.
Versuchen Sie den Fehler zu beheben, indem Sie Dreamweaver von einer anderen auf dem gleichen Computer installierten Festplatte oder von der gleichen auf einem anderen Computer installierten Festplatte installieren oder ausfhren. Wenn der Fehler nicht mehr auftritt, kann die zuvor verwendete Festplatte oder Hauptplatine die Ursache sein. Wenn Sie fr den Vorgang Hilfe bentigen, wenden Sie sich an den Hersteller.
Error uploading or downloading files | Dreamweaver
IssueWhen you try to upload (put) to or download (get) from your web server using Adobe Dreamweaver, the process fails with an error. The Background File Activity window may say "File activity incomplete" or you may encounter a different error indicating that the attempted action failed to complete successfully.
SolutionsYou should try the following solutions in order:
Solution 1: Verify that you can connect to your web server Solution 2: Verify the root directory setting in Dreamweaver Solution 3: Move or delete any symbolic links from corresponding directories on your server (Dreamweaver CS5.5 only) Solution 4: Use Passive FTP (FTP and FTPS/FTPeS only) Solution 5: Use an alternate client Solution 6: Try additional Site settings options (FTP and FTPS/FTPeS only)

103
Last updated 11/5/2015
Solution 1: Verify that you can connect to your web serverIf you are unable to successfully connect to your web server, then you will not be able to upload files to or download files from your server.
For most connection types, you can use Dreamweaver to test your connection. To do so, open your server's settings in the Dreamweaver Site Setup dialog box, and then click Test.
If Dreamweaver cannot successfully connect to your server, then it's likely that your server settings are missing or incorrect. See the Dreamweaver documentation to step through the site setup process and verify your settings. (If you are using Dreamweaver CS4 or earlier, consult the Dreamweaver CS4 site setup documentation.)
Solution 2: Verify the root directory setting in DreamweaverFor FTP, SFTP, and FTPS/FTPeS connections, you are able to specify a root directory for each server in the Site Setup dialog box. Most web servers require that you specify the root directory in order to upload or download files
The root directory is the folder path on the web server where your index (e.g. index.html, index.php, etc.) and other publicly available files and folders are stored. Generally, this path should be relative to the root of the web server (i.e. it should start with a forward slash). For example:
• /wwwroot
• /inetpub/wwwroot
• /www/users/USERNAME/wwwroot
• /public_html
• /usr/home/USERNAME/public_html
• /www/users/USERNAME/public_html
Sometimes, however, the root directory can be the actual domain name of the website. This is often the case for users who own their own domain names. For example, a site called www.mywebsite.com might have a root directory of mywebsite.com/ (with no forward slash at the start).
The exact name and location of the root directory varies from web hosting company to web hosting company. If you're having trouble determining what your root directory is, contact your web hosting company for help.
Solution 3: Move or delete any symbolic links from corresponding directories on your server (Dreamweaver CS5.5 only) If you are using Dreamweaver CS5.5, then the reason for upload/download failure may be caused by the existence of a symbolic link (sometimes called a symlink or soft link) in the same folder to which you are trying to upload. Symbolic links are effectively shortcuts or aliases that point to a file existing in another location, but can be used as though the file exists in that location. Dreamweaver CS5.5 misinterprets these symbolic links as though they were directories, and because they cannot be properly enumerated, any attempt to upload or download files in the same directory as the symbolic link will fail.
You may be encountering this issue if the FTP Log in Dreamweaver shows an error similar to the following:"An FTP error occurred – cannot put ‘/index.html’. Access Denied."
To identify a symbolic link, look in the Dreamweaver FTP Log (Window > Results > FTP Log) for a line that appears similar to the following: < lrwxr-xr-x 1 username users 66 Jun 30 18:20 webformmailer.php -> /usr/www/stats/mailer.php

104
Last updated 11/5/2015
There are two things here that tell us that this is a symobilc link. The first letter is an l (as in lrwxr-xr-x), which indicates that it is a symbolic link. The second is that the file name that would appear in the local or remote Files panel within Dreamweaver (in this case, webformmailer.php), is pointing to (->) a file in a different location (in this case, /usr/www/stats/mailer.php).
In the case of the above example, to resolve the issue, you would locate the symbolic link called webformmailer.php in the Dreamweaver Files panel, and then delete it. If you needed to use this file for some component of your website, you would then also copy the mailer.php file from its location in /usr/www/stats/ to the desired directory.
Solution 4: Use Passive FTP (FTP and FTPS/FTPeS only)Some firewall or other security software on your computer may be preventing Dreamweaver from uploading or downloading files.
In most situations, you can configure your security software to allow network communication between Dreamweaver and your web server (both "in" and "out') and this will resolve the issue. This is a better and more recommended method for solving this issue.
If you're not familiar with configuring your security software, or as a quicker method for resolving the issue, enable Passive FTP in Dreamweaver. To do so, select Use Passive FTP in the Site Setup dialog box options. For Dreamweaver CS5 and later, this option appears under the Basic tab's More Options section (at the bottom of the window that appears after you select a server for editing).
See the Dreamweaver documentation to step through the site setup process and locate the Passive FTP option. (If you are using Dreamweaver CS4 or earlier, consult the Dreamweaver CS4 site setup documentation.)
Solution 5: Use an alternate clientIf you are able to connect to your server in Dreamweaver, but are unable to upload or download, then connect to your server using an alternate client and then try to upload or download the same file(s).
For example, if you connect to your server via FTP or FTPS/FTPeS, then use an FTP client like FileZilla or CyberDuck. If you are using SFTP, then use a client such as PSFTP (PuTTY). For WebDAV connections, try a client like DAV Explorer, Goliath, or CyberDuck.
If you are not successful when using an alternate client, contact your web hosting company, network administrator, or IT department for additional assistance. Your server may be experiencing temporary problems, your account may not be configured correctly, the access permission settings on your server may need to be changed, or there may be another problem that needs to be addressed with your server or your computer/network configuration.
Solution 6: Try additional Site settings options (FTP and FTPS/FTPeS only)Some web servers are not compatible with the default settings in Dreamweaver. The best way to determine which settings to use is to check the documentation provided by your web hosting company, or contact them to inquire about these settings.
Alternatively, you can use a process of elimination to determine which settings are most compatible with your server. To do so, try the following:
1 Open your server settings in the Site Setup dialog box. (See the Dreamweaver documentation to step through the user interface. If you are using Dreamweaver CS4 or earlier, consult the Dreamweaver CS4 site setup documentation.)
2 On the Basics tab of the server's editing mode, expand the More Options section at the bottom.

105
Last updated 11/5/2015
3 Check or uncheck one option listed. For example, uncheck Use FTP Performance Optimization.NOTE: Use Proxy
is a setting that is specific to your computer's network connection, and is not related to your web server. Only check Use Proxy if you normally need to use a proxy server to connect to the Internet, or to connect to certain types of network resources. Check with your network administrator or IT department if you are not sure if you need to use a proxy.
4 Try to upload or download the same files again.
5 Repeat these steps until you have resolved your issue, or until you have tried each combination of options.
Additional informationSFTP is also called FTP over SSH. FTPS is also called FTP over SSL/TLS with Implicit Encryption. FTPeS is also called FTP over SSL/TLS with Explicit Encryption.
Error "SVN: #155021. You cannot update this file using Dreamweaver's Subversion integration... " |
the Additional Languages section at the bottom of this document.
Dreamweaver CS4Issue
When you connect to a Subversion server in Dreamweaver CS4, you receive the following error message:
SVN: #155021. You cannot update this file using Dreamweaver's Subversion integration because a newer Subversion client application on your machine has made updates to the file's Subversion meta data. For more information on this issue, see http://www.adobe.com/go/dw_svn_en.
The error message also appears inside a modal dialog or the background file transfer log.
SolutionRun the Dreamweaver extension conversion script.To restore Subversion 1.4.5 client library compatibility, run the conversion script, which has been wrapped into a Dreamweaver extension.The extension triggers a Python script, so make sure that you have the Python script interpreter installed on your local computer. For additional information, see Install Python on Windows , below.
Note: Python is installed as part of the default installation on Mac OS X.
Important: You can still change your site within Dreamweaver. This problem only occurs when you try to sync your site using the Subversion server. The issue doesn't affect other users on your machine as the change to the metadata is local to your machine. However, Dreamweaver can't interact with the server until you run the conversion script.
1 Quit Dreamweaver.
2 Download the Adobe Dreamweaver extension (English).Note: Additional languages are available for download in
106
Last updated 11/5/2015
3 Launch the Adobe Extension Manager CS4.NOTE: On Windows Vista and Windows 7, it is necessary to run the Extension Manager "as an administrator" to successfully complete the remaining steps. To do so, right-click the Adobe Extension Manager CS4 icon and choose Run As Administrator.
4 Click Install.
5 Select the downloaded extension and click Open. The installed extension appears in Extension Manager CS4 as follows:
6 Quit the Extension Manager.
7 Launch Adobe Dreamweaver.
8 Click Commands > Subversion Compatibility
9 Click OK to convert your site. You see the following message when the conversion script has completed successfully:
10 Refresh your site.
Note: You can run the script any time. If you touched your local site with another Subversion client program again, repeat steps 8-10.
Additional InformationSubversion development offers a script that converts the site's Subversion version meta data to 1.4.x, which is compatible with Dreamweaver.
Install Python in WindowsIn Windows, install it before running Subversion conversion.
Download Python.
1 Run the installer and follow onscreen instructions.
2 Restart your computer.
3 Work through the solution above.
Installed files
The extension uses a Python script Subversion provides to convert your local site's meta data. (For more information, see http://subversion.tigris.org/faq.html#working-copy-format-change.) Extension Manager installs two files within your user folder. The first is the Python script (change-svn-wc-format.py). The other file is the extension's code, which is used to run the script directly from within Dreamweaver (DWSVNConvert.htm). After running the extension, an output file is also created, which contains conversion log messages (change-svn-wc-format.output.txt). In the event a problem occurs during conversion, errors are recorded in the output file.
The extension gets installed into the home directory in the following locations:
• On Windows: Documents and Settings/<username>/Application Data/Adobe/DreamweaverCS4/en_US/Configuration/commands/DWSVNConvert
• On Mac OS: <username>/Library/Application Support/Adobe/DreamweaverCS4/en_US/Configuration/commands/DWSVNConvert

107
Last updated 11/5/2015
Windows path system and Python The Python script doesn't run properly without having the PATH variable set on Windows which the Python installer doesn't set. To change this variable, edit the Environment Variables in Windows.
1 Open Windows system properties.
2 In the Advanced tab, click Environment Variables
3 In System Variables, add the path where you installed Python to the Path variable (for example, "C:\Python25"). Add a semicolon to the path if none exists (for example, ";C\Python25").
Additional Languages• Brazilian Portuguese
• Chinese Simplified
• Chinese Traditional
• Czech
• Dutch
• French
• German
• Italian
• Japanese
• Korean
• Polish
• Russian
• Spanish
• Swedish
• Turkish
Additional informationUsing Adobe Dreamweaver and another Subversion client on the same computer can prevent your site from interacting with the Subversion server.
Third-party client software can update your local site's Subversion meta data to a newer client version, which is unsupported by Adobe Dreamweaver CS4.
Third-party Subversion clients can include:
• TortoiseSVN
• SmartSVN
• Subclipse
You can find additional clients at Apache Subversion.
Example

108
Last updated 11/5/2015
You're using Adobe Dreamweaver CS4, which supports the Subversion client libs 1.4.5. And you're using TortoiseSVN (1.5.x), which is supporting client version 1.5, on the same computer. Once you touch your local site using TortoiseSVN (for example, submit a file), the local Subversion meta data of your site is converted to version 1.5. Because of this conversion, Dreamweaver can no longer interact with the Subversion server. The newer Subversion client format is not backwards compatible with the 1.4 format supported by Dreamweaver.
Error message using Put or Check-in files: Cannot create directory...it already exists
Issue It is not possible to transfer files that reside more than two directories deep from the Root folder. When attempting to do so, the following error message appears: "Cannot create directory example/subexample/subsubexample because it already exists."
Reason The Web host is using WU-FTPD v2.6. Many users may have been using Dreamweaver without these errors, but may start getting these errors due to an incompatibility when Web hosts and ISPs upgrade to WU-FTPD v2.6. There may be other FTP server software packages that yield the same or similar error messages.
Solution Open the Site FTP log and read the login information. In Windows, this is done by choosing FTP log from the Site menu in the site files window. On Macintosh, choose FTP log from the Site menu to access the login information. On many servers, including WU-FTPD, this log will identify which FTP server software is being used by the Web host or ISP. If it is WU-FTPD v2.6, Dreamweaver 1 and 2 cannot be used to transfer files more than two directories deep.
Workarounds:• Use a directory structure that doesn't have files more than two directories deep. For example, use: ROOT:
Images/Subimages/phoo.gif In place of this structure: ROOT: Images/Subimages/Subsubimages/phoo.gif
• Use an external program to transfer files which are more than two directories deep.
Note: Upgrading to Dreamweaver 3.0 will alleviate this problem.
Error: "The help system cannot be launched" when you try to open Help | Dreamweaver CS4 | Windows
109
Last updated 11/5/2015
IssueWhen you try to open the Help in Adobe Dreamweaver CS4 on Windows, the application returns the error "The help system cannot be launched because the help folder is missing. Please install the help folder or reinstall Dreamweaver."
ReasonThe Windows registry entries that store settings for the Hypertext Transfer Protocol (HTTP) are missing or damaged.
SolutionLog on to your computer as an administrator. Then do one or both of the following solutions.
Solution 1: Set your preferred web browser as the system default.To set a system default web browser on Windows 7/Vista:
1 Close all applications.
2 Choose Start > Control Panel.
3 Do one of following:
• If the Control Panel is in a Control Panel Home or Category view, then click Programs. On the next screen, click Default Programs.
• If the Control Panel is in Classic View, then double-click Default Programs.
4 Select Set Program Access And Computer Defaults.
5 In the Choose A Configuration list, click Custom.
6 Under Choose A Default Web Browser, select Internet Explorer, Firefox, Google Chrome, or Opera.
7 Click OK.
To set a system default web browser on Windows XP:
1 Close all applications.
2 Choose Start > Control Panel (or Start > Settings > Control Panel).
3 Double-click Add Or Remove Programs.
4 On the left-hand pane of Add Or Remove Programs, select Set Program Access And Defaults.
5 In the Choose A Configuration list, click Custom.
6 Under Choose A Default Web Browser, select Internet Explorer, Firefox, Google Chrome, Opera, or Safari.
7 Click OK.
Solution 2: Re-create the HTTP key in the Windows registry.Disclaimer: The steps in this solution require you to modify the Windows registry. The registry contains system-related information that is critical to your computer and applications. Before modifying the registry, always make a backup copy of it. Adobe doesn't provide support for problems that arise from improperly modifying the registry. For information about the Windows registry, see the documentation in Windows or contact Microsoft Technical Support or your computer's manufacturer.
1 Close all applications.

110
Last updated 11/5/2015
2 Do one of the following:
• Windows 7/Vista: Choose Start > All Programs > Accessories. Then right-click on Command Prompt and choose Run As Administrator.
• Windows XP: Choose Start > All Programs > Accessories > Command Prompt.
3 In the Command Prompt window, type the following command exactly as it appears and then press Enter:reg export HKCR\http "%userprofile%\AdobeHelpBackup.reg"Note: Command Prompt may return the error "The system was unable to find the specified registry key or value." This is an expected message if the HTTP key is missing from the Windows registry. If this error appears, then go to Step 6; otherwise, proceed to Step 5.
4 Type the following command exactly as it appears and then press Enter:reg delete HKCR\http /f
5 Type one of the following commands exactly as it appears and then press Enter (type the command that corresponds with the browser in which you would like to view the Dreamweaver CS4 Help):Note: If you choose a browser other than Internet Explorer, then that browser must be installed before you type the command.
• Internet Explorerreg add HKCR\http\shell\open\command /ve /f /d "\"%programfiles%\Internet Explorer\iexplore.exe\" "\"%1\""
• Firefoxreg copy HKCR\FirefoxURL\shell HKCR\http\shell /s /f
• Operareg copy HKCR\Opera.HTML\shell HKCR\http\shell /s /f
• Safarireg copy HKCR\SafariURL\shell HKCR\http\shell /s /f
• Google Chromereg copy HKCR\ChromeHTML\shell HKCR\http\shell /s /f
6 Close the Command Prompt window.
Error in Firewall Port setting for Dreamweaver 4
Issue In Dreamweaver 4, the Firewall Port setting in Preferences can allow or prevent a connection although the Use Firewall (in Preferences) option is not checked in the Site Definition dialog box.
Reason This is an error in version 4 of Dreamweaver.
Solution Set the Firewall Port value properly in Preferences, even if you have not selected the Use Firewall (in Preferences) option in the Site Definition dialog box, as follows:
1 Choose Edit > Preferences.
2 Select the Site category in the Site Definition dialog box.
3 Set Firewall Port to the correct value. In most cases, a value of 21 will be correct and will allow a connection.

111
Last updated 11/5/2015
Additional Information For more details on FTP, firewalls, and connection problems, consult:
• Setting up Dreamweaver's FTP connection (Technote 14787)
• Troubleshooting FTP issues (Technote 14834)
• What is Passive FTP? (TechNote 15220)
Error "The CSXS extension...BrowserLab_pt2_mxi:MeerMeerDW" failed to install" on Mac OS 10.6.x
IssueWhen you install BrowserLab Extensions for Dreamweaver CS4 on Mac OS 10.6.x, the following error occurs:
The CSXS extension "Macintosh HD:Users:(user):Library:Caches:TemporaryItems:BrowserLab_pt2_mxi:MeerMeerDW" failed to install.
The XML parser reported an error of "/Users/(user)/Library/Application Support/Adobe/CS4ServiceManger/extensions/ConnectNow/1/META-INF/manifest.xml" (cvc-complex-type.3.2.2: Attribute 'xsl:noNamespaceSchemaLocation' is not allowed to appear in element 'ExtensionManifest'.).
Solution• If you are installing BrowserLab extensions in Mac OS 10.6.x for the first time:
1 Install Dreamweaver CS4.
Install the Extension Manager CS4 2.1 patch and CSI 1.0.2 patch.
2 Follow the prompts to install Browser Lab Extensions.
• If you received an error when trying to install additional BrowserLab extensions:
1 Start the Activity Monitor (Applications/Utilities/Activity Monitor.app).
2 Select the CS4ServiceManager process and click Quit Process.
3 Rename ~/Library/Application Support/Adobe/CS4ServiceManager to ~/Library/Application Support/Adobe/CS4ServiceManager_bkp.
4 Reinstall the BrowserLab extension.

112
Last updated 11/5/2015
Error calling getTables: an unidentified error has occurred
IssueWhen expanding the Tables tree in the Database Items section of UltraDev's advanced recordset dialog box, the error "Error calling getTables: an unidentified error has occurred." is generated.
Or, an "Unable to retrieve table from this connection, click on the 'Define...' button to test this connection." error is generated when using the simple recordset dialog when selecting a connection from the Connections pop up menu.
ReasonThese errors occur even when the connection test within UltraDev's Modify Connection dialog box is successful. This is an OLEDB provider issue which is specific to OLEDB connections using Microsoft SQL Server version 6.5. This is not an issue when using other versions of Microsoft SQL Server, or when using ODBC connections with Microsoft SQL Server 6.5.
SolutionThe work around is to use ODBC connections instead of OLEDB connections when connecting to a Microsoft SQL Server 6.5 database. See Using ADO Connections in UltraDev (TechNote 14577) for more information on connection strings within UltraDev.
Dreamweaver CS3 and CS4 could not connect to FTP site after Leopard (Mac OS X v10.5) upgrade
Issue After you upgrade a Mac OS X system from Tiger (Mac OS X v10.4) to Leopard (Mac OS X v10.5), or after you perform a clean install of Leopard (Mac OS X v10.5), Adobe Dreamweaver fails to connect to some FTP sites.
Details The sites defined in Dreamweaver use domain names for the FTP host attribute.
Reason The Dreamweaver Engineering team is currently investigating this issue.
113
Last updated 11/5/2015
Solution Do one or more of the following solutions:
Solution 1: Update to the latest dot release of Mac OS X v10.5. Download the latest dot releases from the Apple website.
Solution 2: Use the IP address of the FTP host instead of the domain name.
Additional Information Currently, this error has only been reported in Adobe Dreamweaver CS3 and CS4 (Ref. 229582).
Dreamweaver 8 for Windows loses FTP login settingsIssue
Some Windows users are reporting that their FTP usernames and passwords in their Dreamweaver site definitions are deleted when they close and re-open Dreamweaver 8 or when they reboot their machine. This issue does not occur in earlier versions of Dreamweaver. (Ref. 205051, 210466)
Reason
There are two known causes for this issue:
• The most common cause is that Internet Explorer 7 (IE 7) is installed on the same machine as Dreamweaver 8.
• A less likely cause is that the following registry key is missing or is empty:HKEY_CURRENT_USER\Software\Microsoft\Windows\CurrentVersion\ Explorer\User Shell Folders\AppData
Solution
If you have Internet Explorer 7 installed
If you have Internet Explorer 7 installed, then installing theDreamweaver 8.0.2 Updater should resolve this issue. Before installing the Dreamweaver 8.0.2 Updater, it is recommended to check the Dreamweaver 8 Emerging Issues TechNote for changes that may affect your workflow, particularly if you create server-side pages (ASP, PHP, ColdFusion, etc.) or insert Flash content.
Note: After you install the Dreamweaver 8.0.2 Updater, verify that the updater successfully installed. Some users think they have installed 8.0.2, when in fact the updater installation didn't take. In Dreamweaver, go to Help > About Dreamweaver > and click the scrolling text to reveal the version number. It should say Dreamweaver 8.0.2. If it still says Dreamweaver 8.0 or 8.0.1, please see Can't install Dreamweaver 8 updaters for Windows after canceling updater installer (TechNote 785362aa).
Note: Internet Explorer 7 was released after Dreamweaver 8 and therefore was not tested with Dreamweaver 8 and earlier.
If you do not have Internet Explorer 7 installed or if the Dreamweaver 8.0.2 Updater doesn't solve the problem
If you didn't have Internet Explorer 7 at the time this problem occurred, then install the Dreamweaver 8.0.2 Updater as described above, and then perform the following steps if you are comfortable editing the Windows Registry.
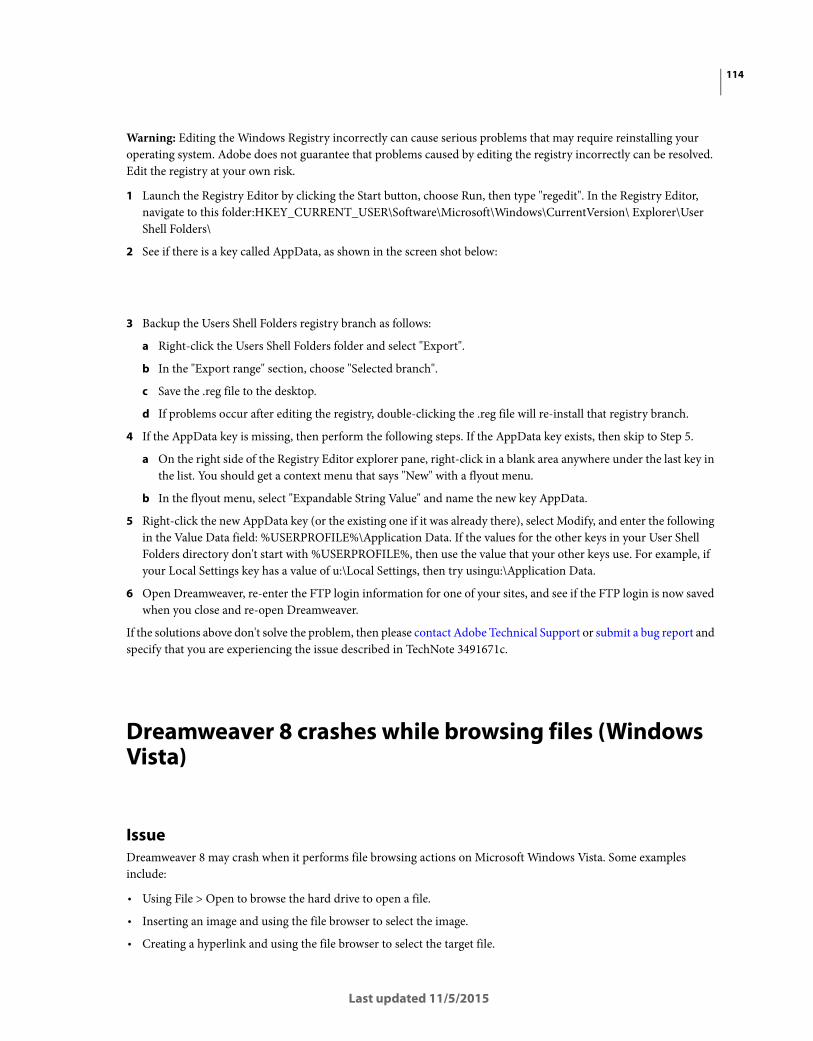
114
Last updated 11/5/2015
Warning: Editing the Windows Registry incorrectly can cause serious problems that may require reinstalling your operating system. Adobe does not guarantee that problems caused by editing the registry incorrectly can be resolved. Edit the registry at your own risk.
1 Launch the Registry Editor by clicking the Start button, choose Run, then type "regedit". In the Registry Editor, navigate to this folder:HKEY_CURRENT_USER\Software\Microsoft\Windows\CurrentVersion\ Explorer\User Shell Folders\
2 See if there is a key called AppData, as shown in the screen shot below:
3 Backup the Users Shell Folders registry branch as follows:
a Right-click the Users Shell Folders folder and select "Export".
b In the "Export range" section, choose "Selected branch".
c Save the .reg file to the desktop.
d If problems occur after editing the registry, double-clicking the .reg file will re-install that registry branch.
4 If the AppData key is missing, then perform the following steps. If the AppData key exists, then skip to Step 5.
a On the right side of the Registry Editor explorer pane, right-click in a blank area anywhere under the last key in the list. You should get a context menu that says "New" with a flyout menu.
b In the flyout menu, select "Expandable String Value" and name the new key AppData.
5 Right-click the new AppData key (or the existing one if it was already there), select Modify, and enter the following in the Value Data field: %USERPROFILE%\Application Data. If the values for the other keys in your User Shell Folders directory don't start with %USERPROFILE%, then use the value that your other keys use. For example, if your Local Settings key has a value of u:\Local Settings, then try usingu:\Application Data.
6 Open Dreamweaver, re-enter the FTP login information for one of your sites, and see if the FTP login is now saved when you close and re-open Dreamweaver.
If the solutions above don't solve the problem, then please contact Adobe Technical Support or submit a bug report and specify that you are experiencing the issue described in TechNote 3491671c.
Dreamweaver 8 crashes while browsing files (Windows Vista)
IssueDreamweaver 8 may crash when it performs file browsing actions on Microsoft Windows Vista. Some examples include:
• Using File > Open to browse the hard drive to open a file.
• Inserting an image and using the file browser to select the image.
• Creating a hyperlink and using the file browser to select the target file.
115
Last updated 11/5/2015
• Creating a site definition and using the file browser to select the local root folder or remote folder.
Additional reported behavior includes:
• Crash occurs when a file browsing dialog appears.
• Crash occurs when browsing two or more folders away.
• Crash occurs after inserting four images.
• Crash occurs when you leave the file browsing dialog box open for a period of time.
ReasonThe problem appears to be a conflict between Dreamweaver 8 and the Groove component of Microsoft Office 2007 on Microsoft Windows Vista. Microsoft Office Groove 2007 is only bundled with MS Office Ultimate 2007 and Microsoft Office Enterprise 2007.
SolutionComplete one or more of the following solutions:
Solution 1: Upgrade to Dreamweaver CS4.This issue has been resolved in Dreamweaver CS3. Upgrading to Dreamweave CS3 and above will resolve this issue. Please visit the Adobe Store for purchase information. For additional information on Vista support, see our PDF on How Adobe Products Support Vista.
Solution 2: Uninstall Microsoft Grove 2007.Uninstalling Microsoft Grove 2007 will remove the feature from your system. If you require MS Grove 2007 please refer to another solution.
1 Choose Start > Control Panel.
2 Double-click Programs And Features and select Microsoft Office Ultimate 2007.Note: Choose Classic View in the left pane if Programs And Features is not available.
3 Click Change.
4 Select Add Or Remove Features from the Office setup wizard.
5 Click the drop-down menu next to Microsoft Office Groove and select Not Available.
6 Follow the on screen prompts to uninstall Groove 2007.
Solution 3: Use the Open button instead of double-clicking folders and files while browsing.Using the Open button instead of double-clicking the folders and files should prevent the issue from occurring. If your issue is not resolved please proceed to the next solution.
Solution 4: Manually enter the path into the dialog.Type the file path manually into the dialog or copy and paste it from Windows Explorer address bar.
Solution 5: Create a new site definition from a new local root folder after rebooting.1 Reboot the computer.
2 Create a new local root folder for the site.
116
Last updated 11/5/2015
3 Create a new site definition directing to the new local root folder.
Solution 6: Delete the _notes folder from the site.1 Browse to the local root folder for the site using Windows Explorer.
2 Delete the _notes folder.
3 Choose Site > Advanced > recreate Site Cache from Dreamweaver.
Solution 7: Disable visual themes in Microsoft Windows Vista.1 Browse to the Dreamweaver.exe executable in Windows Explorer. \Program Files\Macromedia\Dreamweaver 8\
2 Right-click Dreamweaver.exe and select Properties.
3 Select the Compatibility tab and check Disable Visual Themes.Note: All other checkboxes should be unchecked
4 Click OK and see if the crashes stop.
Solution 8: Create a new local administrator account.Please contact network administrators for assistance creating administrative accounts within a domain. If possible create a new local administrative account using the steps below. Microsoft Windows Vista Home users will need to create a new administrative account using the Users application within the Control Panel.
1 Right click My Computer and click Manage.
2 Expand Administrative Tools > Local Users and Groups > Users.
3 Right click Users and select New User.
4 In the New User dialog box, type Administrator in the Description field, complete the remaining fields.
5 Uncheck User Must Change Password At Next Login and check Password Never Expires, and then click Close.
6 Right-click the newly created user and select Properties.
7 Select the Member Of tab and click the Add button.
8 Type Administrators in the "Enter the object names to select" field, and click OK.
9 Click OK to close the User Properties window.
10 Log off of the current user and log into the newly created Administrator account.
Solution 9: Disable Windows Aero and run using the Windows Vista Basic color scheme.Disable Aero to determine if it is causing the issue.
To disable Aero:
1 Choose Start > Control Panel.
2 Double-click Personalization and select Window Color And Appearance.Note: Choose Classic View in the left pane if Personalization is not available.
3 Click Open Classic Appearance Properties For More Color Options.
4 Select Windows Vista Basic and click OK.
To re-enable Aero after testing:
1 Choose Start > Control Panel.
2 Double-click Personalization and select Window Color And Appearance.Note: Choose Classic View in the left pane if Personalization is not available.

117
Last updated 11/5/2015
3 Choose Windows Aero from the Color Scheme menu and click OK.
Solution 10: Running Dreamweaver in Windows XP Compatibility mode.
1 Navigate to \Program Files\Macromedia\Dreamweaver 8\ in Windows Explorer
2 Right-click on the Dreamweaver.exe file and select Properties.
3 Click the Compatibility tab.
4 Click Run This Program In Compatibility Mode For: and select Windows XP (Service Pack 2) from the drop-down.
5 Select Run This Program As An Administrator.
Solution 11: Temporarily disable User Account Control (UAC).
The Vista User Account Control (UAC) feature can help prevent unauthorized changes to your computer. Microsoft recommends that you leave UAC turned on to help protect your computer. Re-enable UAC after testing.
To disable UAC:
1 Choose Start > Control Panel.
2 Choose User Accounts.Note: Choose Classic View in the left pane if User Accounts is not available.
3 Click Turn User Account Control On Or Off.
4 Deselect Use User Account Control (UAC) To Help Protect Your Computer and click OK.
5 Reboot the computer.
Additional InformationFor information on other Vista related issues, see "Dreamweaver 8 issues on Windows Vista" (TechNote kb400787).
Please refer to How Adobe Products Support Vista for more information on Adobe product support for Vista,
Dreamweaver 4''s compatibility with Mac OS XDreamweaver 4 and Mac OS X Interoperability
As the next generation Macintosh operating system, Mac OS X combines the power and openness of UNIX with the legendary ease of use and broad applications base of Macintosh. Apple built its landmark operating system”dubbed Darwin”upon a stable, open-source, UNIX-based foundation. Darwin features true memory protection, preemptive multitasking and "symmetric multiprocessing" for those using the dual processor Power Mac G4.
Led by Kevin Lynch, a team of Macromedia executives successfully presented our Mac OS X projects under development at the Macworld Expo in early 2001. While we cannot announce the exact dates for the rollout of our Mac OS X optimized products, we can confirm our commitment to the Macintosh platform and its next-generation operating system.
An additional feature of Mac OS X is its ability to run some applications in "classic mode." This mode essentially allows users to run some of their existing programs in an environment similar to the prior Macintosh user interface. After extensive testing, we have determined that Dreamweaver 4 operates in the Mac OS X's classic mode without any new problems.
118
Last updated 11/5/2015
Different redirect pages for each user level (Dreamweaver Developer Toolbox)
Issue When trying to access a page that is protected by the Restrict Access To Page server behavior for a particular level, I get redirected to the default login successful page, instead of the page I was trying to access. I thought that the page the user tried to access will be passed to the login page as an URL parameter.
Reason In Adobe Dreamweaver Developer Toolbox, each user level has its own redirect pages defined in the Developer ToolboxControl Panel: a redirect page when the login is successful and one for failure. When a page that has the Restrict Access to Page server behavior applied for a certain user level is accessed by a user with a different access level, it will be taken to the login page, and if he logs in correctly, he will be redirected to its default login successful page. If the user has the correct access level, he will be redirected to the desired page.
Solution Define the desired pages in the Developer Toolbox Control Panel for each user level used in the database. Also, when applying the Restrict Access to Page server behavior, specify the exact level that is allowed access. All other users that do not have the correct level, will not be able to access it, even if they log in correctly. Also, concerning the matter of the page on which access was attempted at first, it is not passed as an URL parameter, but as a session variable. After login, the redirect is done automatically to the desired page, if all data match (username, password and access level).
Deprecated features in Dreamweaver
Dreamweaver - Deprecated FeaturesThere are many features in Dreamweaver that require significant resources to maintain release to release, but aren't being used with significant frequency. Correspondingly, we've recently made some difficult decisions as a tradeoff between continuing to support infrequently used features vs. developing new features to both streamline key web design and development workflows and support newer technologies and development models.
This document serves as an archive of links to a list of deprecated features in Dreamweaver. The deprecated features are listed at the bottom of the Help system's "What's New" section.
Dreamweaver CS4 deprecated features
Dreamweaver CS5 deprecated features
Although we understand that deprecating features impacts those of you who rely on them, we want to be as clear as possible as to their status so that you can plan for alternate workflows and development approaches within Dreamweaver.
- The Adobe Dreamweaver Team

119
Last updated 11/5/2015
The Date Picker calendar window does not show up (Dreamweaver Developer Toolbox)
Issue After enhancing a standard text field with the Date Picker widget, when I press the button in the browser the calendar window does not show up. On a simple page containing only the enhanced text field it works.
Reason This happens because elements on the page containing the Date Picker enhanced text field use z-index as method of establishing element depth. The calendar window which is displayed when the button is pressed does not use z-index and therefore is not visible (it is positioned below the other page elements).
Solution In order to display the Date Picker interface, you have two options:
1 Remove the z-index options in the page.
2 Set the z-index value for the layer containing the Date Picker to 0.
Customizing HTML code in Dreamweaver The SourceFormat.txt file in Dreamweavers Configuration folder can be used to customize some of the HTML formatting created by Dreamweaver. This changes how the HTML appears in the HTML Source window.
Customizing the HTML code is done by one of two methods: 1) entering new information in the HTML Format dialog box in Dreamweaver, which updates the SourceFormat.txt file or 2) editing the SourceFormat.txt file itself.
Method one: entering new information in the HTML Format dialog box To enter new information in the HTML Format dialog box, open Dreamweaver and choose Edit > Preferences > HTML Format. The HTML formatting items listed in the HTML Format dialog box are those items that can be changed inDreamweaver.
The settings in the above HTML Format dialog box apply to the following section of the SourceFormat.txt file:

120
Last updated 11/5/2015
<!-- options INDENTION : indention options
ENABLE - allows indention
INDENT - columns per indention
TABS - columns per tab character
USE - TABS or SPACES for indention
ACTIVE - active indention groups (IGROUP)
LINES : end-of-line options
AUTOWRAP - enable automatic line wrapping
BREAK - CRLF, CR, LF
COLUMN - auto wrap lines after column
OMIT : element omission options
OPTIONS - options
ELEMENT : element options
CASE - "UPPER" or "lower" case
ALWAYS - always use preferred element case (instead of
original case)
ATTRIBUTE : attribute options
CASE - "UPPER" or "lower" case
ALWAYS - always use preferred element case (instead of
original case)
--><? options><indention enable indent="2" tabs="4" use="spaces" active="1,2,3"><
The SourceFormat.txt settings define the following HTML :
Indentation defines the setting for indent and tab sizes and whether to use spaces or tabs or these parameters.
Lines defines the autowrap, column length and break style.
Omit has been reserved for future use.
Element defines upper or lower case for the Element and "always" refers to when to use the custom case setting.
Attribute defines upper or lower case for the Attribute and "always" refers to when to use the custom case setting.
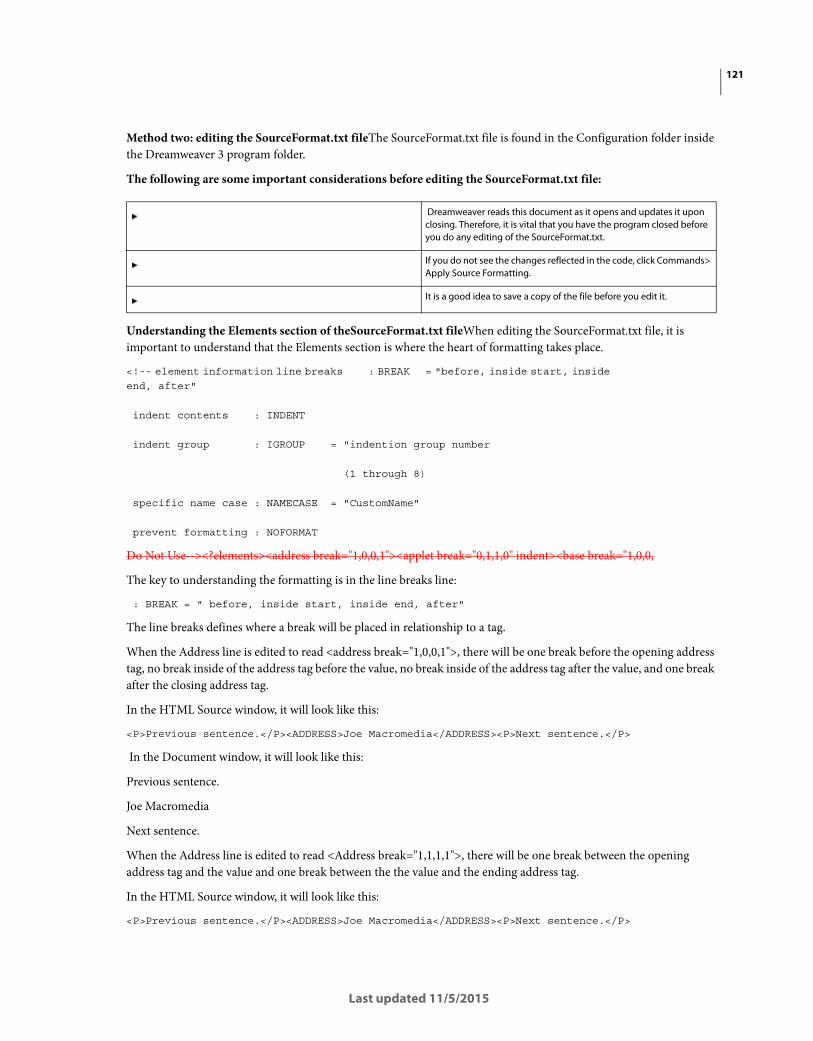
121
Last updated 11/5/2015
Method two: editing the SourceFormat.txt fileThe SourceFormat.txt file is found in the Configuration folder inside the Dreamweaver 3 program folder.
The following are some important considerations before editing the SourceFormat.txt file:
Understanding the Elements section of theSourceFormat.txt fileWhen editing the SourceFormat.txt file, it is important to understand that the Elements section is where the heart of formatting takes place.
<!-- element information line breaks : BREAK = "before, inside start, inside end, after"
indent contents : INDENT
indent group : IGROUP = "indention group number
(1 through 8)
specific name case : NAMECASE = "CustomName"
prevent formatting : NOFORMAT
Do Not Use--><?elements><address break="1,0,0,1"><applet break="0,1,1,0" indent><base break="1,0,0,
The key to understanding the formatting is in the line breaks line:
: BREAK = " before, inside start, inside end, after"
The line breaks defines where a break will be placed in relationship to a tag.
When the Address line is edited to read <address break="1,0,0,1">, there will be one break before the opening address tag, no break inside of the address tag before the value, no break inside of the address tag after the value, and one break after the closing address tag.
In the HTML Source window, it will look like this:
<P>Previous sentence.</P><ADDRESS>Joe Macromedia</ADDRESS><P>Next sentence.</P>
In the Document window, it will look like this:
Previous sentence.
Joe Macromedia
Next sentence.
When the Address line is edited to read <Address break="1,1,1,1">, there will be one break between the opening address tag and the value and one break between the the value and the ending address tag.
In the HTML Source window, it will look like this:
<P>Previous sentence.</P><ADDRESS>Joe Macromedia</ADDRESS><P>Next sentence.</P>
Dreamweaver reads this document as it opens and updates it upon closing. Therefore, it is vital that you have the program closed before you do any editing of the SourceFormat.txt.
If you do not see the changes reflected in the code, click Commands> Apply Source Formatting.
It is a good idea to save a copy of the file before you edit it.

122
Last updated 11/5/2015
Since altering the HTML source formatting only affects the HTML source code, the text in the Document window will appear the same as it did in the previous example.
Note:Remember to select Commands > Apply Source Formatting when you reopen Dreamweaver!
If we want to put a space between the surrounding tags and indent the value, the line will read:<Address break="2,1,1,2" indent>
In the HTML Source window, it will look like this:
<P>Previous sentence.<P><ADDRESS>
Joe Macromedia
</ADDRESS>
<P>Next sentence.<P>
Note:The value of this indent is set in the Option indentation line and can be modified from the Preferences menu.
Understanding the IGROUPSsection of theSourceFormat.txt file The IGROUP parameter is for enabling groups of tags to be defined by the Options settings.By default, IGROUP 1 groups Table rows and columns and IGROUP 2 groups Frames and Frameset tags.
To enable an IGROUP, you would simply put its number in the "active=" parameter of the Indentation Option. (Notice that checking 'Table Rows and Columns' and 'Frames and Framesets' in the Preferences will add '1' and '2' respectively to the "active=" parameter.)
You can easily create your own IGROUP. At the end of any tag definition, enter "indent" (this is necessary to enable the IGROUP settings) and then "IGROUP= #" (1-8). Then put that number in the "active=" parameter in the Options settings.
To put the Address tag into its own IGROUP, the line would look like this:
<Address break="2,1,1,2 indent igroup="3">
In the Options indentation line, it would read 'active="1,2,3" '
Note:In order for the IGROUP to be active, the second break number, the "inside start" number, must be greater than '0'. IGROUPs will only indent if the value has its own line.
Additional informationFor more information, read Editing the HTML source formatting profile in the Dreamweaver Help Pages.
Create client-side dynamic dependent list boxes
Introduction
Dreamweaver UltraDev is no longer supported, and the Dreamweaver UltraDev support center will no longer be actively updated. The functionality available in Dreamweaver UltraDev is available in Dreamweaver, beginning with Dreamweaver MX. Accordingly, we are moving pertinent content to the Dreamweaver support center. Please refer to the Dreamweaver version of this technote: Creating client-side dynamic dependent list boxes in ASP (TechNote 19117).

123
Last updated 11/5/2015
Client-side dynamic dependent list boxes allow a "child" list box to refresh when a selection is made in a "parent" list box, without having to return to the server. Most dynamic dependent list box models return to the server to requery the dependent list box's recordset. The model described in this TechNote passes dependent list box data to the browser in an array. It uses JavaScript to extract the appropriate values from the array and refresh the "child" list box in the client's browser.
The advantage to this approach is immediate page response; the user does not have to wait for the new page to be delivered from the remote server. The disadvantage is all the data for the dynamic dependent list box is sent to the client as text, thus increasing the size of the requested page. An evaluation must be made whether the increased page size warrants saving return trips to the server. If the amount of data required for the dynamic dependent list box is not significant, page size remains relatively small.
Multiple dynamic dependent list boxes can be added to a page. The extra steps to do this are documented at the end of this TechNote.
The model described here has a "parent" list box created normally in UltraDev. It can be either dynamic or static. The model also has a "child" dynamic dependent list box created in UltraDev as a normal List/Menu object. The "child" dynamic dependent list box is made dynamic on the client side with the addition of the code presented here.
Building the page
1 Add the "parent" list box to the page. Add either hard coded or dynamic Item Labels and Values to it.
2 Add the "child" list box to the page. Do not add any Item Labels or Values to it.
3 Create a recordset for the child list box, which must include fields for its Item Labels, Values, and the relationship to the parent list box as explained in Relating the list boxes .
4 Copy the appropriate VBScript or JavaScript code and paste into the page's HTML code window just above the closing head tag.
5 Change the object names in the pasted code as explained in Object names .
6 Add the Call JavaScript behavior(s) as explained in Final changes .
7 Apply the code to view dynamic listboxes in Netscape 4 as explained in Netscape 4 Modification .
8 If errors occur when viewing the page, or the dependent list box does not function correctly, check Troubleshooting .
9 To add more than one dynamic dependent list box to a page, follow the instructions in Multiple dynamic dependent list boxes on one page .
Relating the list boxes
When defining the relationship between the parent and child list boxes, two rules apply.
• The Value of the parent list box is used to filter the data used to populate the child list box.
• A field in the child list box's recordset must correspond to the Value in the parent list box (the "relation").
The following example shows a parent list box populated with two Item Labels;Colors and Shapes;with their corresponding values. The child list box is populated in the client browser from a recordset with three fields. The Relation field identifies the relationship with the Value of the parent list box. The Item Label field will be displayed in the child list box. The Value field is returned to the server corresponding to the item label selected by the user.
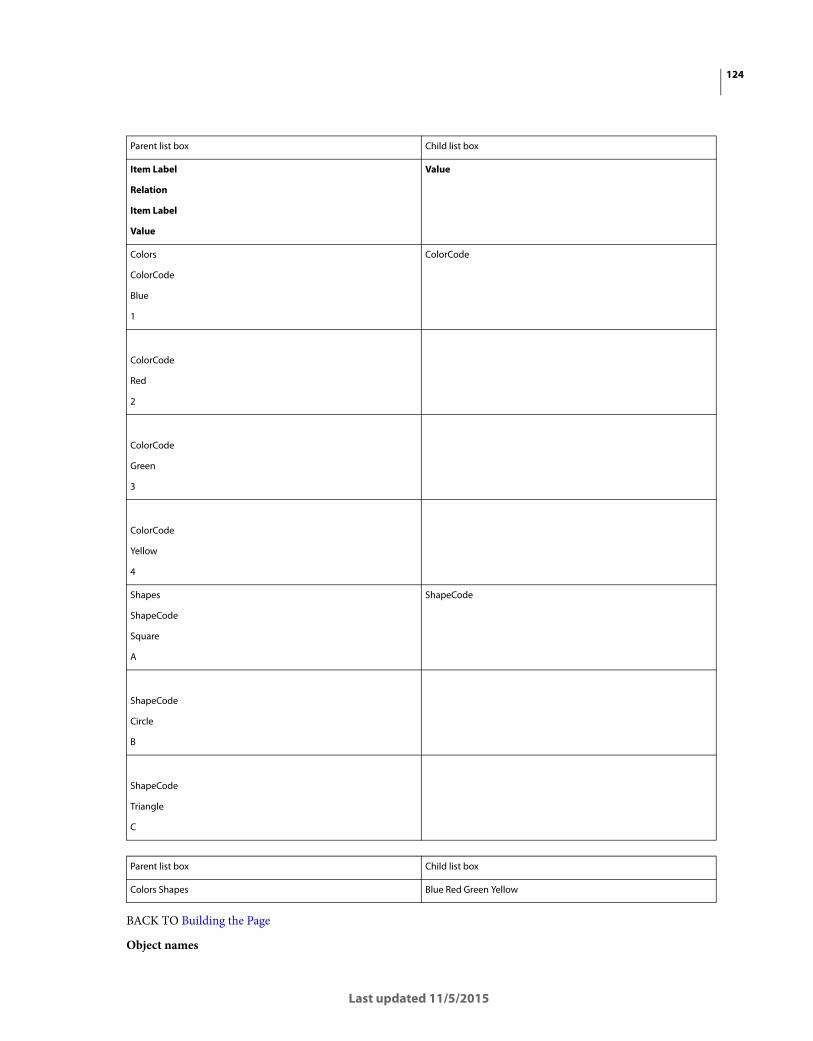
124
Last updated 11/5/2015
BACK TO Building the Page
Object names
Parent list box Child list box
Item Label
Relation
Item Label
Value
Value
Colors
ColorCode
Blue
1
ColorCode
ColorCode
Red
2
ColorCode
Green
3
ColorCode
Yellow
4
Shapes
ShapeCode
Square
A
ShapeCode
ShapeCode
Circle
B
ShapeCode
Triangle
C
Parent list box Child list box
Colors Shapes Blue Red Green Yellow

125
Last updated 11/5/2015
The code provided in this TechNote uses the following object names which must be renamed to the corresponding object names from your page.
Note: By naming your objects with the above names, only "Relation", "Label", and "Value" (and possibly form2) need to be changed in the provided code.
BACK TO Building the Page
Client-side dynamic dependent list box code - VBScript
Client-side dynamic dependent list box code This code creates the array for the client side from the recordset rsList2. It also includes the functions called when the first list box is changed. setDynaList() controls the functions. clearDynaList() clears existing elements from selList2. populateDynaList() adds elements to selList2 based on the value selected in selList1.
The client-side dynamic dependent list box code is available for VBScript (this code) or JavaScript server-side scripting languages in ASP pages.
Code insertion location
Insert the code provided in the head section of the page, right above the closing head tag. Make sure the first two lines and last two lines are not contained within any other open and closed script tags, or a nesting error will occur.
Replace the eight object names in red with your object names. Make sure to leave the quotation marks in the code.
selList1 Name of the parent list box, defined in UltraDev.
form1 Form name containing the selList1 object.
selList2 Name of the child list box populated by this code on the client side after making a selection in selList1.
form2 Form name containing the selList2 object (usually the same form selList1 uses).
rsList2 Recordset used to populate the child list box, selList2, from an array on the client side.
"Relation" Field name from rsList2 used to define the relationship with selList1.
"Label" Field name from rsList2 used to fill the Item Label column of selList2.
"Value" Field name from rsList2 used to fill the Value column of selList2.
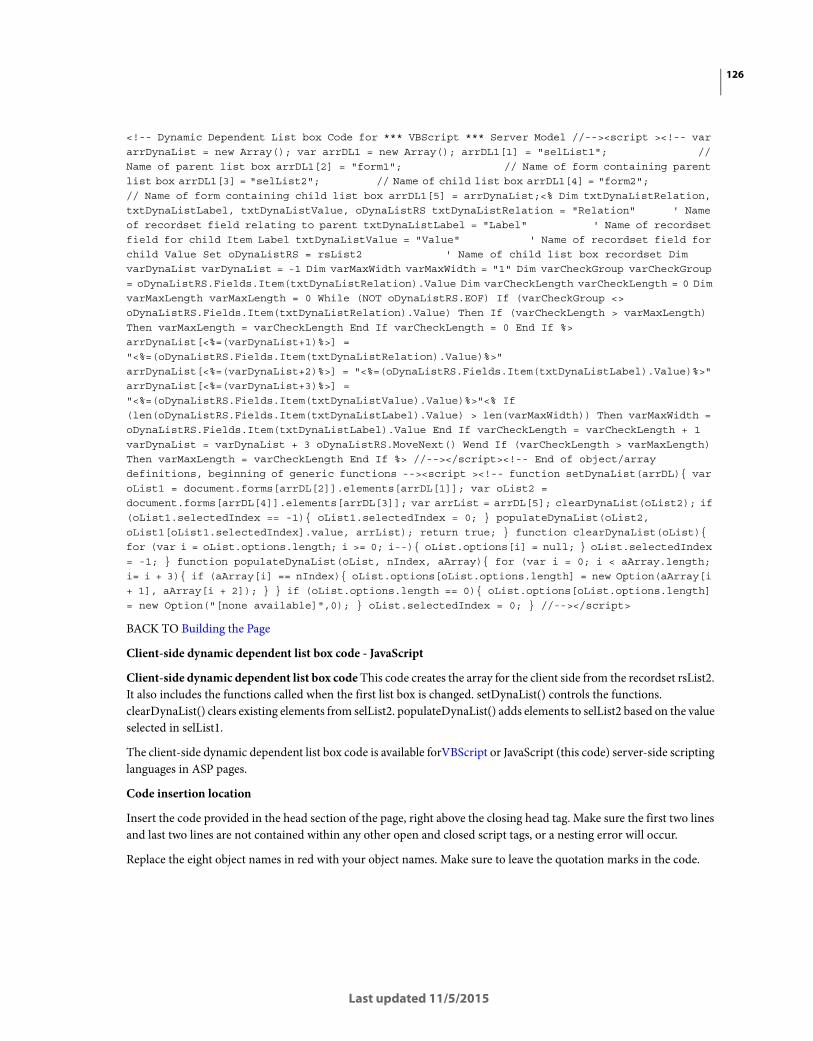
126
Last updated 11/5/2015
<!-- Dynamic Dependent List box Code for *** VBScript *** Server Model //--><script ><!-- var arrDynaList = new Array(); var arrDL1 = new Array(); arrDL1[1] = "selList1"; // Name of parent list box arrDL1[2] = "form1"; // Name of form containing parent list box arrDL1[3] = "selList2"; // Name of child list box arrDL1[4] = "form2"; // Name of form containing child list box arrDL1[5] = arrDynaList;<% Dim txtDynaListRelation, txtDynaListLabel, txtDynaListValue, oDynaListRS txtDynaListRelation = "Relation" ' Name of recordset field relating to parent txtDynaListLabel = "Label" ' Name of recordset field for child Item Label txtDynaListValue = "Value" ' Name of recordset field for child Value Set oDynaListRS = rsList2 ' Name of child list box recordset Dim varDynaList varDynaList = -1 Dim varMaxWidth varMaxWidth = "1" Dim varCheckGroup varCheckGroup = oDynaListRS.Fields.Item(txtDynaListRelation).Value Dim varCheckLength varCheckLength = 0 Dim varMaxLength varMaxLength = 0 While (NOT oDynaListRS.EOF) If (varCheckGroup <> oDynaListRS.Fields.Item(txtDynaListRelation).Value) Then If (varCheckLength > varMaxLength) Then varMaxLength = varCheckLength End If varCheckLength = 0 End If %> arrDynaList[<%=(varDynaList+1)%>] = "<%=(oDynaListRS.Fields.Item(txtDynaListRelation).Value)%>" arrDynaList[<%=(varDynaList+2)%>] = "<%=(oDynaListRS.Fields.Item(txtDynaListLabel).Value)%>" arrDynaList[<%=(varDynaList+3)%>] = "<%=(oDynaListRS.Fields.Item(txtDynaListValue).Value)%>"<% If (len(oDynaListRS.Fields.Item(txtDynaListLabel).Value) > len(varMaxWidth)) Then varMaxWidth = oDynaListRS.Fields.Item(txtDynaListLabel).Value End If varCheckLength = varCheckLength + 1 varDynaList = varDynaList + 3 oDynaListRS.MoveNext() Wend If (varCheckLength > varMaxLength) Then varMaxLength = varCheckLength End If %> //--></script><!-- End of object/array definitions, beginning of generic functions --><script ><!-- function setDynaList(arrDL){ var oList1 = document.forms[arrDL[2]].elements[arrDL[1]]; var oList2 = document.forms[arrDL[4]].elements[arrDL[3]]; var arrList = arrDL[5]; clearDynaList(oList2); if (oList1.selectedIndex == -1){ oList1.selectedIndex = 0; } populateDynaList(oList2, oList1[oList1.selectedIndex].value, arrList); return true; } function clearDynaList(oList){ for (var i = oList.options.length; i >= 0; i--){ oList.options[i] = null; } oList.selectedIndex = -1; } function populateDynaList(oList, nIndex, aArray){ for (var i = 0; i < aArray.length; i= i + 3){ if (aArray[i] == nIndex){ oList.options[oList.options.length] = new Option(aArray[i + 1], aArray[i + 2]); } } if (oList.options.length == 0){ oList.options[oList.options.length] = new Option("[none available]",0); } oList.selectedIndex = 0; } //--></script>
BACK TO Building the Page
Client-side dynamic dependent list box code - JavaScript
Client-side dynamic dependent list box code This code creates the array for the client side from the recordset rsList2. It also includes the functions called when the first list box is changed. setDynaList() controls the functions. clearDynaList() clears existing elements from selList2. populateDynaList() adds elements to selList2 based on the value selected in selList1.
The client-side dynamic dependent list box code is available forVBScript or JavaScript (this code) server-side scripting languages in ASP pages.
Code insertion location
Insert the code provided in the head section of the page, right above the closing head tag. Make sure the first two lines and last two lines are not contained within any other open and closed script tags, or a nesting error will occur.
Replace the eight object names in red with your object names. Make sure to leave the quotation marks in the code.

127
Last updated 11/5/2015
<!-- Dynamic Dependent List box Code for *** JavaScript *** Server Model //--><script ><!-- var arrDynaList = new Array(); var arrDL1 = new Array(); arrDL1[1] = "selList1"; // Name of parent list box arrDL1[2] = "form1"; // Name of form containing parent list box arrDL1[3] = "selList2"; // Name of child list box arrDL1[4] = "form2"; // Name of form containing child list box arrDL1[5] = arrDynaList;<% var txtDynaListRelation, txtDynaListLabel, txtDynaListValue, oDynaListRS; txtDynaListRelation = "Relation" // Name of recordset field relating to parent txtDynaListLabel = "Label" // Name of recordset field for child Item Label txtDynaListValue = "Value" // Name of recordset field for child Value oDynaListRS = rsList2 // Name of child list box recordset var varDynaList = -1; var varMaxWidth = "1"; var varCheckGroup = oDynaListRS.Fields.Item(txtDynaListRelation).Value; var varCheckLength = 0; var varMaxLength = 0; while (!oDynaListRS.EOF){ if (varCheckGroup != oDynaListRS.Fields.Item(txtDynaListRelation).Value) { varMaxLength = Math.max(varCheckLength, varMaxLength) varCheckLength = 0; } %> arrDynaList[<%=(varDynaList+1)%>] = "<%=(oDynaListRS.Fields.Item(txtDynaListRelation).Value)%>"; arrDynaList[<%=(varDynaList+2)%>] = "<%=(oDynaListRS.Fields.Item(txtDynaListLabel).Value)%>"; arrDynaList[<%=(varDynaList+3)%>] = "<%=(oDynaListRS.Fields.Item(txtDynaListValue).Value)%>";<% if (oDynaListRS.Fields.Item(txtDynaListLabel).Value.length > varMaxWidth.length) { varMaxWidth = oDynaListRS.Fields.Item(txtDynaListLabel).Value; } varCheckLength = varCheckLength + 1; varDynaList = varDynaList + 3; oDynaListRS.MoveNext(); } varMaxLength = Math.max(varCheckLength, varMaxLength) %> //--></script><!-- End of object/array definitions, beginning of generic functions --><script ><!-- function setDynaList(arrDL){ var oList1 = document.forms[arrDL[2]].elements[arrDL[1]] var oList2 = document.forms[arrDL[4]].elements[arrDL[3]] var arrList = arrDL[5] clearDynaList(oList2); if (oList1.selectedIndex == -1){ oList1.selectedIndex = 0; } populateDynaList(oList2, oList1[oList1.selectedIndex].value, arrList); return true; } function clearDynaList(oList){ for (var i = oList.options.length; i >= 0; i--){ oList.options[i] = null; } oList.selectedIndex = -1; } function populateDynaList(oList, nIndex, aArray){ for (var i = 0; i < aArray.length; i= i + 3){ if (aArray[i] == nIndex){ oList.options[oList.options.length] = new Option(aArray[i + 1], aArray[i + 2]); } } if (oList.options.length == 0){ oList.options[oList.options.length] = new Option("[none available]",0); } oList.selectedIndex = 0; } //--></script>
BACK TO Building the Page
Final changes
After inserting the code into your page and renaming the objects to your object names, only one or two more changes are needed.
1 Select the selList1 list box object. From the Behaviors panel, add the Call JavaScript behavior. Enter setDynaList(arrDL1) (capitalization counts!) in the Call JavaScript dialog box. Make sure the action is added to the onChange event for the list box. This causes the child list box contents to update when a change is made in the parent list box.
2 Select the body tag in the lower left border of the page. From the Behavior inspector, add the Call JavaScript behavior. EntersetDynaList(arrDL1) (capitalization counts!) in the Call JavaScript dialog box. Make sure the action is added to the onLoad event. This step is optional. It will initialize selList2 when the page loads on the basis of the default value for selList1.
BACK TO Building the Page
Netscape 4 Modification

128
Last updated 11/5/2015
An extra modification is needed for Netscape 4 browsers to properly view the dynamic listbox. If the dynamically populated listbox does not have any initial values, Netscape 4 will not resize the listbox to accommodate the dynamically populated contents. The listbox is essentially unusable. To remedy the situation, this modification will initially populate the listbox with the widest item label and the largest number of item labels from your child listbox recordset groups. As long as you call thesetDynaList function from the onLoad event, these initial values will not be displayed.
Note: The "largest number of item labels" means the number of items in the largest Relation group. In the above color/shape example, this value is 4, because there are four ColorCodes. To insure the correct maximum is calculated, the recordset must be sorted by Relation (you can add secondary sorts as well, for example by Label).
In the source code, the HTML for the child listbox will appear as follows (with your name if you used a different name):
<select name="selList2"></select>
Replace the code for the child listbox with the following if you are using the VBScript server model:
<select name="selList2"><% Dim varLoopCounter For varLoopCounter = 1 TO varMaxLength %><option value = "<%=varMaxWidth%>"><%=varMaxWidth%></option><% Next %></select>
Replace the code for the child listbox with the following if you are using the JavaScript server model:
<select name="selList2"><% for (varLoopCounter = 1; varLoopCounter <= varMaxLength; varLoopCounter++){ %><option value = "<%=varMaxWidth%>"><%=varMaxWidth%></option><% } %></select>
BACK TO Building the Page
Troubleshooting
• Verify the object names have been changed correctly as explained in Object names . This is the most common problem encountered.
• Verify the "relation" field in the child list box recordset corresponds to the parent list box's Value as explained in Relating the list boxes .
• Verify the correct code has been inserted for your server-side scripting language, VBScript or JavaScript.
• Try rebuilding the page from scratch, or building a simple test page.
BACK TO Building the Page
Multiple dynamic dependent list boxes on one page
The provided code can easily be enhanced to accommodate more than one dynamic dependent list box on a page. The functions are generic, so no modifications are needed for the functions section of code. Follow these steps to add another dynamic dependent list box.
1 Copy the top half of the code down to the following line:<!-- End of object/array definitions, beginning of generic functions -->
2 Paste the code segment into a text editor to perform the following modifications.
3 In the same manner as explained above for the first set of list boxes, rename the objects in the code to correspond to your object names.
4 Rename the following objects. As long as they do not conflict with other object names in the page, and changes are made consistently to all references in the code, the new names are not so important. Use a Find/Replace function to ensure all instances are changed correctly.

129
Last updated 11/5/2015
Note: For a third pair of dynamic dependent list boxes, use names such as "arrDynaList3", and so forth and so on.
5 Add new Call JavaScript behaviors to the new parent list box's onChange event and to the body's onLoad event. This time, use the new array name as the parameter in the function call. For example,setDynaList(arrDL2) .
You may also want to add setDynaList(arrDL2) to the onChange event of another list box, if you now have a grandparent/parent/child relationship.
6 Check the source code of any multiple onLoad and onChange JavaScript calls. Starting with the top level list box and working down, make sure the functions execute in the proper order.<select onChange="setDynaList(arrDL1);setDynaList(arrDL2)" name="selList1">
Copied text from Microsoft Word may lose some formatting when pasted into Dreamweaver MX 2004
Issue Dreamweaver MX 2004 includes powerful new features for importing and converting Microsoft Office documents. One way to include text from a Microsoft Word document into your Dreamweaver document is to copy a section of formatted text in your Word document, then use Dreamweaver's Edit > Paste Formatted command to paste the text into a Dreamweaver document. Dreamweaver MX 2004 will automatically try to maintain any formatting in the pasted text in this manner.
On occasion, however, some sections of pasted text (most notably the last line or paragraph) do not maintain their formatting. For example, here is a Microsoft Word document with some text formatting:
And here is how it is displayed after being pasted into Dreamweaver MX 2004:
Note the loss of alignment on the red and blue lines. Colors and fonts may be lost as well in some situations.
Original Name New Name
arrDynaList arrDynaList2
arrDL1 arrDL2
txtDynaListRelation txtDynaListRelation2
txtDynaListLabel txtDynaListLabel2
txtDynaListValue txtDynaListValue2
oDynaListRS oDynaListRS2
varDynaList varDynaList2

130
Last updated 11/5/2015
Reason Microsoft Word marks the end of every paragraph, and that paragraph's associated formatting, with a hidden paragraph mark. If you do not include this paragraph mark when you copy the text, the formatting associated with that paragraph will not transfer correctly.
Solution When copying text from Microsoft Word, make sure to include the last paragraph marker. You can view these hidden markers by doing the following:
1 In Microsoft Word, click on Tools and select Options.
2 Select the View tab.
3 In the Formatting marks category, enable the Paragraph marks option.
4 Click OK.
Alternatively, you can click on the paragraph mark icon in the Word toolbar, circled in red in the following image. With paragraph marks displayed, your Microsoft Word document will display hidden characters.
When copying text, be sure to include the final paragraph mark as illustrated above. You can now successfully copy the text and paste it into Dreamweaver using Edit > Paste Formatted.
Configuring WebDAV in IIS for use with Dreamweaver Original doc (PDF)
There are different ways to set up Web-based Distributed Authoring and Versioning (WebDAV) for sharing files over the Internet. This TechNote describes one method that allows a website authoring team to modify live files on an IIS-hosted website using WebDAV in Dreamweaver. To achieve this functionality, this method uses duplicate websites running on different ports in Microsoft's Internet Information Services (IIS) server, both pointing to the same set of files on the web server.
Prerequisites:
In order to get the most out of this TechNote, developers must have an understanding of IIS, and must know how to define a folder as a website in IIS. We recommend the IIS help files. This setup applies to IIS version 5 or higher, which includes support for WebDAV.Why configure duplicate websites running on different ports?
If you follow the steps in the IIS help documentation for "Creating a Publishing Directory" using WebDAV, you will create a physical directory on the server, link that physical directory to an IIS virtual directory, and grant limited access permissions (Read, Write, and Browsing) for the virtual directory. The IIS help documents also state that the WebDAV directories should have anonymous access turned off. The problem here is that only the authoring team (assuming they have the necessary Windows permissions) will be able to view the website. In other words, the Internet public will not be able to view the website, since anonymous access is turned off. A server administrator could transfer the files from the "locked down" WebDAV directory to an "open" public website directory, but that would introduce an additional administrative step into the website publishing process. Creating duplicate IIS websites running on different ports makes web publishing a one-step process in Dreamweaver.Defining and configuring two IIS website instances
131
Last updated 11/5/2015
For the configuration method explained in this TechNote, it is necessary to define two separate websites in IIS pointing to the same folder on the server (in this example,c:\inetpub\wwwroot). One website will handle normal Internet traffic (read-only), and the other website will be dedicated to handling WebDAV requests (read, write, file management, file locking, etc.).
Note: The instructions for configuring the websites in IIS are provided as a courtesy to customers, but Macromedia does not accept responsibility for ensuring such configurations function as expected. This is one of many possible configurations, and customers are encouraged to use any other configuration that works for them.Website 1: Setting up a website for normal browser (HTTP) requests.
1. Define a new website in IIS which uses port 80.
2. Use restricted permissions for the Home Directory. For example, allow "Read" access and set "Execute Permissions" to "Scripts Only".
3. Allow Anonymous access. Allowing Integrated Windows authentication is optional. See the IIS help files for more information on Integrated Windows authentication.
Website 2: Setting up a second IIS website devoted to handling WebDAV requests.
1. Define a second site in IIS, pointing to the same folder but using a port number other than 80. In this example, port 81 is used.
2. Allow most or all permissions for the Home Directory and set "Execute Permissions" to "Scripts only".
3. Disable the ASP script server, the ColdFusion script server or other script server you may be using. You do this by clicking the "Configuration..." button in the screen shot above and removing the appropriate DLL. This will prevent IIS from sending the server-side script to the application server for processing. Someone editing a ColdFusion page would want to see the pre-processed ColdFusion code, not the resultant post-processed HTML code.
4. Because the WebDAV site is much more permissive, do not allow Anonymous access. Use Basic authentication.
Note: Basic authentication sends passwords over the network in an unencrypted form, however the Basic authentication checkbox must be checked in order for WebDAV to work in Dreamweaver. Microsoft Internet Explorer (version 2.0 and later) is the only WebDAV client that supports Integrated Windows authentication (user names and passwords are hashed before being sent across the network). WebDAV in Dreamweaver will continue to work if you check the "Integrated Windows authentication" checkbox in addition to Basic authentication. This setup would allow Dreamweaver connections to use Basic authentication and Internet Explorer connections to use Integrated Windows authentication. Microsoft recommends turning on Basic authentication only if you encrypt passwords through Secure Sockets Layer (SSL). Dreamweaver 8 now supports WebDAV over SSL.
Define the site in Dreamweaver
1. In Dreamweaver, open the Site Definition dialog box and select the Remote Info category. Set the Access drop-down menu to WebDAV. In the WebDAV Connection dialog box, append port 81 to the server name in the URL. Enter the username and password that allows you to log into the WebDAV site using IIS Basic authentication.
2.
If you are using a testing server for this Dreamweaver site, set the Access for the testing server to WebDAV and fill out the WebDAV Connection dialog box the same as above.Important: Note that the last field of the Testing Server dialog box, URL Prefix, should be set to the regular URL (do not add port 81).
Note: WebDAV is only available as a Testing Server Access choice if the Remote Info category uses WebDAV as the access choice.
132
Last updated 11/5/2015
Note: Configuring an Apache web server site to handle both browser traffic and WebDAV requests also requires a setup procedure which is a bit more painstaking. For more information about this Apache-specific process, please review mod_dav Installation and Configuration at www.webdav.org.
Watch the demonstration below of the steps to configure WebDAV in IIS for use with Dreamweaver.
Additional Information
For more information on IIS and WebDAV, please refer to:
* IIS help documentation. If IIS is installed on your machine, you can access the help files at: http://localhost/iisHelp. * WWW authentication methods with Microsoft Internet Information Server (TechNote 19078) * www.webdav.org * Troubleshooting WebDAV Connections (TechNote 15167) * Check In/Check Out may not work properly on WebDAV (TechNote 15537)
Third party links
Although links to external websites are provided as a resource, the websites are not part of Macromedia. Please see Macromedia's policy regarding links to third party websites in the Legal Notices and Information section. Pages to external websites will open in a new browser window.
Configure Subversion with SSH | Dreamweaver CS4, CS5, CS5.5, CS6
Configure password-less SSH accessBefore you configure Subversion or Dreamweaver for SVN+SSH, create an RSA key pair and configure the public key on the server. This public/private key pair is used to authenticate with the server, instead of storing and passing your password in plain text. (It is possible to configure SSH without using key pairs; however, Adobe doesn't recommend doing so because of the lack of security.)
To configure the RSA keys, create the private/public RSA key pair on the client computer,. Put the public key on the server, and then authorize the key on the server. Adobe also recommends testing the SSH connection afterward to verify that it is configured correctly.
Note: Access to the client computer (that is, the one from which you connect) is required to complete these steps. These steps also require access to the server (for example, directly or via SSH/FTP). On Windows, you need access to an SSH client (for example, TortoiseSVN) and an RSA key generator application (for example PuTTYgen). Mac OS comes with an SSH client and a key generator.
Create RSA keys on Mac OSComplete these steps on the client computer:
1 Open a Terminal window.
2 Input the following command and then press Enter:ssh-keygen -t rsa
3 When prompted to save the key, press Enter to select the default location.
4 (Optional) Type a passphrase for the key, then press Return/Enter. If you typed a passphrase, then type it again to confirm and press Return/Enter.
133
Last updated 11/5/2015
5 A confirmation message appears showing that the private and public keys were saved, including their save location and names.
6 To copy the public key to the server, input a command like the following, substituting the appropriate AccountName and ServerName:scp .ssh/id_rsa.pub AccountName@ServerName:~/temp_rsa.pub
7 Connect to the server via SSH. Input a command like the following, substituting the appropriate AccountName and ServerName:ssh -l AccountName@ServerName
8 Type your password when prompted to log in.Note: If you can log in without being prompted for your password, then your computer/login has already been authorized on the server. Skip the next section and go directly to Test the SSH connection , below.
9 Proceed to Configure the key on the server .
Create RSA keys on WindowsComplete these steps on the client computer:
1 Open your RSA key generator application (for example, PuTTYgen).
2 Generate an RSA key pair.
3 Save the private key and the public key. The remaining steps assume that you used the names private_key and public_key, respectively.
4 Put your public_key in ~/ using the name temp_rsa.pub on your server (for example, directly or via SSH/FTP).
5 Connect to the server via SSH. Assuming that you're using TortoiseSVN, input a command like the following, substituting the appropriate AccountName and ServerName:tortoiseplink AccountName@ServerName
6 Type your password when prompted to log in.Note: If you can log in without being prompted for your password, then your computer/login has already been authorized on the server. Skip the next section and go directly to Test the SSH connection , below.
7 Proceed to Configure the key on the server .
Configure the key on the serverOn the server (for example, directly or via SSH/FTP), complete the following steps:
1 Verify that the .ssh folder exists on the server. Input the following command and then press Enter:ls -al ~/.ssh
2 Do one of the following:
• If the results of the ls command indicate that the folder does not exist, then create it and then authorize the key on the server. Input the following commands, and press Enter after each one:mkdir ~/.ssh mv ~/temp_rsa.pub ~/.ssh/authorized_keys
• If the folder exists, then add the key to the server's authorization list. Input the following commands, and press Enter after each one:cat ~/.ssh/authorized_keys ~/temp_rsa.pub > temp_keys mv temp_keys ~/.ssh/authorized_keys
Test the SSH connectionOnce you have completed the steps above, test to make sure you can connect to your server via SSH without being prompted for a password.
If you can connect but are still being prompted for a password, repeat the applicable server-side steps above. Consider starting over by creating a key pair on the client, and then repeating the remaining steps.

134
Last updated 11/5/2015
Note: When generating keys, be sure to specify the correct number of bits for your server. 2048 bits is fairly common. However, check with your web host if you are not certain.
If you still can't connect without being prompted for a password, see the OpenSSH FAQ or your web host for additional assistance.
Configure Subversion to use SSHTo configure Subversion to use SSH, add the path to your SSH client and your login information to the Subversion config file.
Note: This information assumes that Windows users are using TortoiseSVN, and that Mac users are using the Mac OS SSH client.
Locations of Subversion config fileTo complete these steps, first open the Subversion configuration file for editing. The config file is in one of the following folders:
• Windows 7 and Vista C:\Users\Your User Name\AppData\Roaming\Subversion\config
• Windows XP C:\Documents and Settings\Your User Name\Application Data\Subversion\config
• Mac OS X /Users/Your User Name/.subversion/config
Configure Subversion for Mac OS1 In the Terminal, locate the .subversion folder in your user folder as mentioned above. (Choose Go > Go To Folder
in Finder, or use a command like ls -al ~/.subversion in Terminal.)
2 The path to SSH is usually "/usr/bin/ssh". If you are not sure, enter which ssh into Terminal.
3 Open the Subversion config file for editing with a text editor (for example, nano, pico, and so on). For example, enter nano ~/.subversion/config into Terminal.
4 Enter the following within the tunnels section (underneath [tunnels]):ssh = $SVN_SSH /usr/bin/sshNote: To use key-based authentication, add -i PathToKey. E.g. ssh = $SVN_SSH /usr/bin/ssh -i PathToKey Alternatively, you can enter the user name and password into this path by adding -l UserName -pw Password. This method is insecure and, therefore, Adobe doesn't recommend it.
5 Save and close the config file.
Configure Subversion for Windows1 In Windows Explorer, locate the Subversion folder in your user folder as mentioned above.
2 Open the file into a plain-text editor, like Notepad.
3 In the [tunnels] section, specify where ssh client exists. This location depends on where you installed it. Open the file and enter the following within the tunnels section (underneath [tunnels]):ssh = $SVN_SSH C:/PathToSSHClient/tortoiseplink.exeNote: To use key-based authentication, add -i PathToKey. E.g. ssh = $SVN_SSH C:/PathToSSHClient/tortoiseplink.exe -i PathToKey Alternatively, you can enter the user name and password into this path by adding -l UserName -pw Password. This mthod is insecure and, therefore, Adobe doesn't recommend it.
4 Save and close the config file.

135
Last updated 11/5/2015
Set your site to use Subversion with SSH1 Open your Dreamweaver site definition, and then choose Version Control from the category list.
2 Select Subversion from the Access menu.
3 Select SVN+SSH for the Protocol.
4 Enter your server address in the Server Address field.
5 Unless included with in your server address, enter your repository path in the Repository Path field.
6 Dreamweaver CS4 only:
a If your server does not use the default SSH port (22), then select Non Default and then enter the Server Port.
b Enter the Username and Password. Leave these fields empty for anonymous login.Note: The user name and password are NOT taken from Dreamweaver. The only way to send user is to enter AccountName@ServerName in the server name field.
7 Press the Test button to test the connection.
8 Close the Site Definition dialog box.
9 In the Files panel, choose Local view or Repository view.
10 Right-click (Windows) or CTRL+click (Mac OS) on the root folder to display the menu.
11 Select Version Control > Get Latest Versions to update the file list.
More Help topics Subversion resources | Dreamweaver CS4, CS5
How to configure Dreamweaver to access a different FTP portPort 21: the default setting Because most Web servers set aside Port 21 to receive connections from FTP clients, Dreamweaver is also configured to access Port 21 to upload files.
Choosing another port for FTP access Sometimes, however, server administrators change the port setting of 21 to another port to prevent unauthorized FTP access. In those situations, Dreamweaver can be set to access a different port by adding the port number to the end of the FTP host name, as outlined below:
Configuring Dreamweaver to access an FTP port other than Port 21
1 Dreamweaver 2, 3 or 4: In the Site or Document window, choose Site > Define Sites.
Dreamweaver 1: In the Site window, click the Remote Site pop-up menu and select Edit Sites. Then go to step 4.
2 Click Edit (or New for a new site).
136
Last updated 11/5/2015
Additional informationFor more information about setting up a remote site, see the Site Management and Collaboration chapter in the manual, Using Dreamweaver. For Dreamweaver 3, see the Site Management chapter.
For more information about FTP issues, consult Setting up Dreamweaver's FTP connection (TechNote 14787).
Compressed Flash MX SWF file properties are not recognized by Dreamweaver
IssueDreamweaver cannot determine URLs and movie properties such as size in SWF files published from Flash MX with "SWF Compression" turned on. As a result, movies default to a size of 32 x 32, and link management for URLs referenced in the movie is not available.
Note: This is no longer an issue in Dreamweaver MX. To download the trial of Dreamweaver MX, please see the Macromedia Dreamweaver MX product website.
Reason A new feature of Flash MX is the ability to compress SWF files. This option is turned on by default. However, when compressed SWF files are inserted into Dreamweaver, movie properties are not properly discovered and are inaccurately inserted into the HTML and reported in the Property Inspector.
Solution Export SWF files from Flash MX without compression enabled. This option is available on the Flash tab of the Flash Publish settings dialog (File > Publish Settings) or in the Export Flash Player dialog box that appears when a movie is exported (File > Export Movie).
Note: In Dreamweaver 4, users can see URLs referenced with a GoToURL action in a Flash movie by viewing the page containing the Flash movie in Site Map view. To see the URLs, do the following:
1 Launch the Site Map view.
• On Windows, choose Site > Site Map while in the Document Window, or Window > Site Map while in the Site Window.
3 Select the Remote Info (Dreamweaver 4) or Web Server Info (Dreamweaver 3) from the Category list.
4 Add a colon and the port number to the end of the FTP host name in the FTP Host text box. The FTP host name will appear similarly to the following examples:
www.myhost.com:80
123.456.789.012:80
137
Last updated 11/5/2015
• On Macintosh, choose Window > Site Map while in either the Document Window or the Site Window.
1 The Site Map can only be shown if there is a home page defined for the site. You will only see the file containing the Flash movie if it is linked to from the defined home page.
2 Make sure that you can view both dependent and hidden files.
• On Windows, choose View > Show Files Marked as Hidden and View > Show Dependent Files while in the Site Window. A checkmark indicates these options have been set.
• On Macintosh, choose Site > Site Map View > Show Files Marked as Hidden, and Site > Site Map View > Show Dependent Files while in the Site Window. A checkmark indicates these options have been set.
Color Picker returns incorrect sample color | Dreamweaver CS4 | Mac OS 10.7 Lion
IssueWhen you use the Color Picker in Adobe Dreamweaver CS4 to sample a color, the color returned is different than the color you tried to sample. You are using Mac OS 10.7 Lion.
SolutionUse another method to choose a color, such as by entering the hexadecimal or RGB value directly.
Additional informationThis issue is a known issue with Mac OS 10.7. This issue does not occur in Dreamweaver CS5 or CS5.5.
Changes to ASP Command Variables in Dreamweaver 8.0.2In the Dreamweaver 8.0.2 Updater, changes were made to the ASP code Dreamweaver generates, in order to prevent SQL injection attacks. One specific change that might be confusing are the changes to the ASP Command server behaviors. When you fill out the Command dialog box, Dreamweaver 8.0.2 now asks you to provide the Type and Size for the variables without any hinting or drop-down menus, so you have to know what to type in these text fields. Screen shots below show the difference between the dialog boxes in Dreamweaver 8.0.2 and Dreamweaver MX 2004 7.0.1. Notice the extra columns for Type and Size in the 8.0.2 Variables section.
Dreamweaver 8.0.2 ASP VBScript Insert Command
Dreamweaver MX 2004 7.0.1 ASP VBScript Insert Command
Why do you need to specify Type and Size now?
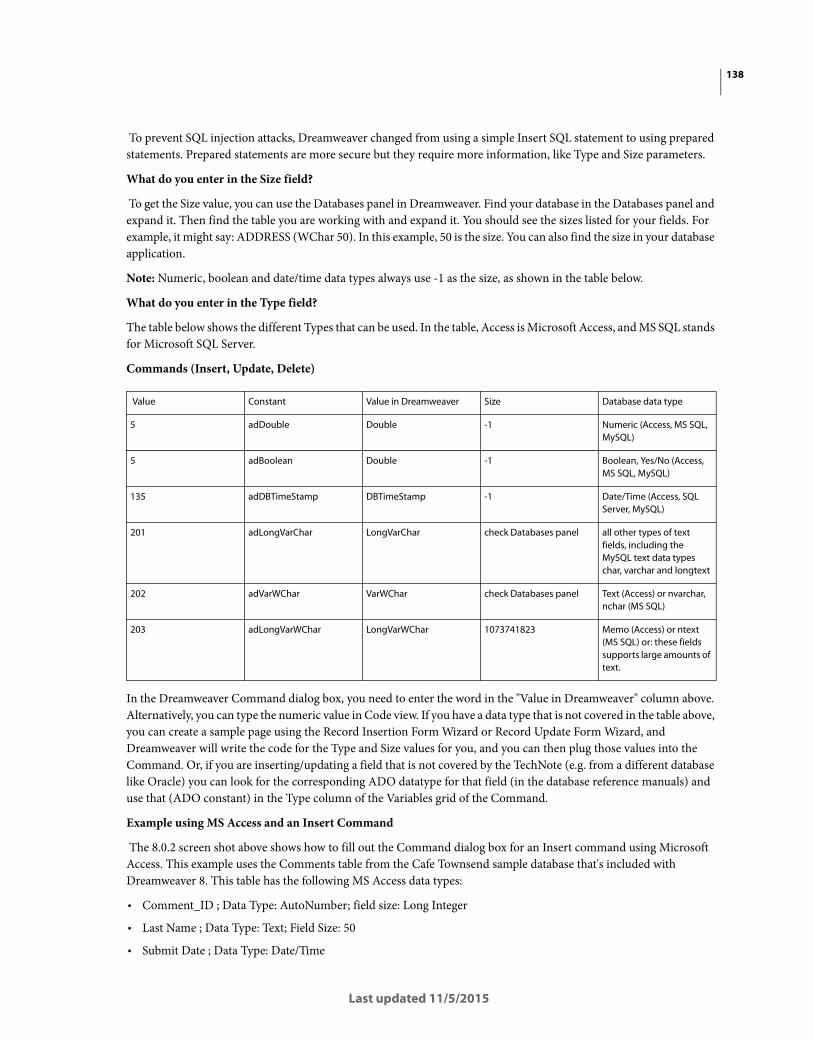
138
Last updated 11/5/2015
To prevent SQL injection attacks, Dreamweaver changed from using a simple Insert SQL statement to using prepared statements. Prepared statements are more secure but they require more information, like Type and Size parameters.
What do you enter in the Size field?
To get the Size value, you can use the Databases panel in Dreamweaver. Find your database in the Databases panel and expand it. Then find the table you are working with and expand it. You should see the sizes listed for your fields. For example, it might say: ADDRESS (WChar 50). In this example, 50 is the size. You can also find the size in your database application.
Note: Numeric, boolean and date/time data types always use -1 as the size, as shown in the table below.
What do you enter in the Type field?
The table below shows the different Types that can be used. In the table, Access is Microsoft Access, and MS SQL stands for Microsoft SQL Server.
Commands (Insert, Update, Delete)
In the Dreamweaver Command dialog box, you need to enter the word in the "Value in Dreamweaver" column above. Alternatively, you can type the numeric value in Code view. If you have a data type that is not covered in the table above, you can create a sample page using the Record Insertion Form Wizard or Record Update Form Wizard, and Dreamweaver will write the code for the Type and Size values for you, and you can then plug those values into the Command. Or, if you are inserting/updating a field that is not covered by the TechNote (e.g. from a different database like Oracle) you can look for the corresponding ADO datatype for that field (in the database reference manuals) and use that (ADO constant) in the Type column of the Variables grid of the Command.
Example using MS Access and an Insert Command
The 8.0.2 screen shot above shows how to fill out the Command dialog box for an Insert command using Microsoft Access. This example uses the Comments table from the Cafe Townsend sample database that's included with Dreamweaver 8. This table has the following MS Access data types:
• Comment_ID ; Data Type: AutoNumber; field size: Long Integer
• Last Name ; Data Type: Text; Field Size: 50
• Submit Date ; Data Type: Date/Time
Value Constant Value in Dreamweaver Size Database data type
5 adDouble Double -1 Numeric (Access, MS SQL, MySQL)
5 adBoolean Double -1 Boolean, Yes/No (Access, MS SQL, MySQL)
135 adDBTimeStamp DBTimeStamp -1 Date/Time (Access, SQL Server, MySQL)
201 adLongVarChar LongVarChar check Databases panel all other types of text fields, including the MySQL text data types char, varchar and longtext
202 adVarWChar VarWChar check Databases panel Text (Access) or nvarchar, nchar (MS SQL)
203 adLongVarWChar LongVarWChar 1073741823 Memo (Access) or ntext (MS SQL) or: these fields supports large amounts of text.
139
Last updated 11/5/2015
• Comments ; Data Type: Memo
• Answered ; Data Type: Yes/No
Here is the resulting code:
<% Set Command1 = Server.CreateObject ("ADODB.Command") Command1.ActiveConnection = MM_cafetownsend_STRING Command1.CommandText = "INSERT INTO COMMENTS (COMMENT_ID, LAST_NAME, SUBMIT_DATE, COMMENTS, ANSWERED)
VALUES (?, ?, ?, ?, ?) " Command1.Parameters.Append Command1.CreateParameter("varCommentID", 5, 1, -1, MM_IIF
(Request.QueryString("txtCommentID"), Request.QueryString("txtCommentID"), Command1__varCommentID & "")) Command1.Parameters.Append Command1.CreateParameter("varLastName", 202, 1, 50, MM_IIF
(Request.QueryString("txtLastName"), Request.QueryString("txtLastName"), Command1__varLastName & "")) Command1.Parameters.Append Command1.CreateParameter("varSubmitDate", 135, 1, -1, MM_IIF
(Request.QueryString("txtSubmitDate"), Request.QueryString("txtSubmitDate"), Command1__varSubmitDate & "")) Command1.Parameters.Append Command1.CreateParameter("varComments", 203, 1, 1073741823, MM_IIF
(Request.QueryString("txtComments"), Request.QueryString("txtComments"), Command1__varComments & "")) Command1.Parameters.Append Command1.CreateParameter("varAnswered", 5, 1, -1, MM_IIF
(Request.QueryString("cbxAnswered"), Request.QueryString("cbxAnswered"), Command1
Example using Microsoft SQL Server and an Insert Command
The 8.0.2 screen shot below shows how to fill out the Command dialog box for an Insert command using Microsoft SQL Server. This example uses the Employees table from the Northwind sample database that's included with SQL Server. This table has the following SQL Server data types:
• LastName ; Data Type: nvarchar; size: 20
• FirstName ; Data Type: nvarchar; size: 10
• BirthDate ; Data Type: datetime
• Notes ; Data Type: ntext; size: 16
• ReportsTo ; Data Type: int; size: 4
Here is the resulting code:

140
Last updated 11/5/2015
<% Set Command1 = Server.CreateObject ("ADODB.Command") Command1.ActiveConnection = MM_sqlServ_ts2000adv_northwind_STRING Command1.CommandText = "INSERT INTO dbo.Employees (LastName, FirstName, BirthDate, Notes, ReportsTo)
VALUES (?, ?, ?, ?, ?) " Command1.Parameters.Append Command1.CreateParameter("varLastName", 202, 1, 20, MM_IIF
(Request.QueryString("txtLastName"), Request.QueryString("txtLastName"), Command1__varLastName & "")) Command1.Parameters.Append Command1.CreateParameter("varFirstName", 202, 1, 10, MM_IIF
(Request.QueryString("txtFirstName"), Request.QueryString("txtFirstName"), Command1__varFirstName & "")) Command1.Parameters.Append Command1.CreateParameter("varBirthDate", 135, 1, -1, MM_IIF
(Request.QueryString("txtBirthDate"), Request.QueryString("txtBirthDate"), Command1__varBirthDate & "")) Command1.Parameters.Append Command1.CreateParameter("varNotes", 203, 1, 1073741823, MM_IIF
(Request.QueryString("txtNotes"), Request.QueryString("txtNotes"), Command1__varNotes & "")) Command1.Parameters.Append Command1.CreateParameter("varReportsTo", 5, 1, -1, MM_IIF
(Request.QueryString("txtReportsTo"), Request.QueryString("txtReportsTo"), Command1
Additional Information
For more informationabout the changes in Dreamweaver 8.0.2, see Protecting ASP VBScript server behaviors from SQL injection vulnerability (TechNote 57ae79b2).
For more information on Types, see MSDN ADO 2.8 API Reference ADO Enumerated Constants - DataTypeEnum and http://www.carlprothman.net/Default.aspx?tabid=97.
The captcha image is not generated on the page (Dreamweaver Developer Toolbox)
Issue When previewing a page with the Capthca wizard applied, instead of the image I get an error message:
Cannot write in captcha folder
Reason This happens because the temporary folder where the captcha images are stored until display does not allow the user running the web server to write files to
Solution To solve this problem you mustgrantwritepermissionstothe user as which the web server is running for the <site_root>\common\lib\captcha\temp folder. This will allow the creation and storage of the temporary captcha images.

141
Last updated 11/5/2015
Can''t install Dreamweaver 8.0.2 Updater | InstallShield wizard interrupted
IssueInstalling the Dreamweaver 8.0.2 Updater fails on certain Windows systems. The 8.0.2 Updater installer starts, but then stops with the following InstallShield wizard error message:
"The wizard was interrupted before Macromedia Dreamweaver 8.0.2 Updater could be completely installed. Your system has not been modified. To complete installation at another time, please run setup again."
Then a second error message sometimes appears:
"The exception unknown software exception (0xc0000005) occurred in the application at location 0x009441902. Click on OK to terminate the program Click on CANCEL to debug the program."
Note: It's possible that you don't get the error messages above when installing the Dreamweaver 8.0.2 Updater. However, if after updating, the Dreamweaver version still says 8.0 or 8.0.1, you could have previously canceled an updater installer. To resolve this issue, uninstall and then reinstall Dreamweaver 8 or Studio 8. (Ref. 211853)
SolutionThere is an InstallShield .exe wrapper around the actual Dreamweaver 8.0.2 Updater installer which is an MSP file. If you have trouble with the standard Dreamweaver 8.0.2 Updater installer and its InstallShield wrapper, download the unwrapped MSP file for Dreamweaver 8.0.2 and run that. Once you download the MSP file to your hard drive, double-click it and see if Dreamweaver 8.0.2 installs successfully.
Note: After you install the Dreamweaver 8.0.2 Updater, verify that the updater successfully installed. Some users think they have installed 8.0.2, when in fact the updater installation didn't take. In Dreamweaver, go to Help > About Dreamweaver > and click the scrolling text to reveal the version number. It should say Dreamweaver 8.0.2. If it still says Dreamweaver 8.0 or 8.0.1, uninstall and then reinstall Dreamweaver 8 or Studio 8 to resolve the issue.
Additional informationSome Windows systems have a conflict with the InstallShield install wizard in Dreamweaver 8.0.2.
Cannot create queries using Query Builder (Dreamweaver Developer Toolbox)
Issue When I try to create my first query with Query Builder I get an error message: There have been some problems connection to your database. [...] Please see the manual for possible reasons and solutions.
142
Last updated 11/5/2015
Reason This error occurs because one of the following:
1 The database connection does not exist, or an error occurred connecting to the database.
2 The user which connects to the database does not have permissions to create new tables.
3 The user which connects to the database does not have permissions to insert data into a table.
4 You have a ColdFusion data source configured to use a MySQL database through a JDBC connector. The connector version is 3.0.6 or higher. Starting with the 3.0.6 version the connector no longer allows creating tables or altering their contents.
Solution To solve this problem, try one of the following:
• First make sure that the database connection exists and the web server can actually connect to the database.
• Check that the user name used in the database connection has permissions to create tables and insert data into them. If it does not have them, consult your database server documentation to find out how to grant these permissions.
• If in case four, you must use a different type of connection, or a JDBC prior to version 3.0.6.
Assigning behaviors to an image map In Dreamweaver 3, assigning a behavior to an image map is straightforward: select the appropriate hotspot and assign a new behavior with the plus key of the Behaviors inspector.
However, in Dreamweaver 2, the procedure requires using a dummy image to generate the JavaScript and editing the HTML source to reassign the code. The instructions below outline this procedure step by step. Once again, this only applies to Dreamweaver 2.
To edit the HTML source code in Dreamweaver 2, do the following:
1 Insert an image in the Document window. This image will serve as a dummy in the document and will be deleted after completion of the task.
2 Assign a null link to the image by selecting it and entering a pound (#) sign into the Link field of the Property inspector.
3 Select the anchor tag of this dummy image and assign the desired behavior to it. (A quick way to select the anchor tag of an image is to select the image then click the <a> tag displayed in the bottom left corner of the Document window.)
4 With the anchor tag of the dummy image selected, open the HTML inspector (F10).
5 Find the behavorial JavaScript within the highlighted HTML. The code below is an example of the JavaScript section in a sample document.
<a href="#" >
<img href="/support/dreamweaver/ts/documents/assets/Creation.JPG" name="creation
6 Copy the JavaScript that represents the mouse events. In this example, copy the red color code. This Javascript activates the Swap Image behavior using the onMouseOver event.
143
Last updated 11/5/2015
7 Locate the map tag in the HTML source code that is referenced by the "usemap" attribute of the final destination image. You can find the "usemap" attribute within the destination image tag.
<img href="/support/dreamweaver/ts/documents/assets/myImage.JPG"
></img>
8 Paste the code inside the area tag for this image map.<map name="myName"><area shape="rect" coords="5,4,153,43" href="#" tar ></map>
9 Delete the dummy image created in step 1.
Active content not displayed in browser after converting page in Dreamweaver 8.0.2
IssueIn Dreamweaver 8.0.2, after creating a new page with active content (for example, Flash Player content) or after converting an existing page with active content, the active content does not display when the page is uploaded to the server and viewed in a web browser. This problem is page-specific (browse to the sample "fixed" page on the Developer Center and verify that it works as expected, with no gray border around the Flash movie).
(Ref. 20777)
ReasonThe most likely reason the active content isn't being displayed is because the Scripts folder (and the JavaScript files inside) automatically created at the root level of your site by Dreamweaver 8.0.2 hasn't been uploaded to the server. For more information on the Scripts folder and the accompanying JavaScript files, see Converting Active Content with the Dreamweaver 8.0.2 Updater (TechNote 2f98fbe7).
SolutionUpload the Scripts folder to the server, as described in both the Dreamweaver help system and in Converting Active Content with the Dreamweaver 8.0.2 Updater (TechNote 2f98fbe7):
"Dreamweaver creates this external file (AC_RunActiveContent.js), and places it in a new folder (called Scripts, placed at the root of your site) when you save the updated file. It is extremely important that you upload the AC_RunActiveContent.js file when you upload the updated page, either manually or by clicking Yes in the Dependent Files dialog box."
Additional InformationOther causes have similar symptoms. If this TechNote does not resolve your issue, check the following TechNotes:
• Active content JavaScript file not created for existing files that already have active content reference (TechNote 35ae3721)
• Adobe active content JavaScript fix fails in some installations of Internet Explorer (TechNote 4f91f9b8)