Administration Server Installation Guide - Oracle · Administration Server Installation Guide 2-1...
64
Oracle ® Entitlements Server Release 3 (10.1.4.3) Administration Server Installation Guide September 2008
Transcript of Administration Server Installation Guide - Oracle · Administration Server Installation Guide 2-1...

Oracle ® Entitlements Server Release 3 (10.1.4.3)
Administration Server Installation Guide
September 2008

Administration Server Installation Guide, Oracle ® Entitlements Server Release 3 (10.1.4.3)
Copyright © 2007, 2008, Oracle and/or its affiliates. All rights reserved.
This software and related documentation are provided under a license agreement containing restrictions on use and disclosure and are protected by intellectual property laws. Except as expressly permitted in your license agreement or allowed by law, you may not use, copy, reproduce, translate, broadcast, modify, license, transmit, distribute, exhibit, perform, publish, or display any part, in any form, or by any means. Reverse engineering, disassembly, or decompilation of this software, unless required by law for interoperability, is prohibited.
The information contained herein is subject to change without notice and is not warranted to be error-free. If you find any errors, please report them to us in writing.
If this software or related documentation is delivered to the U.S. Government or anyone licensing it on behalf of the U.S. Government, the following notice is applicable:
U.S. GOVERNMENT RIGHTS Programs, software, databases, and related documentation and technical data delivered to U.S. Government customers are "commercial computer software" or "commercial technical data" pursuant to the applicable Federal Acquisition Regulation and agency-specific supplemental regulations. As such, the use, duplication, disclosure, modification, and adaptation shall be subject to the restrictions and license terms set forth in the applicable Government contract, and, to the extent applicable by the terms of the Government contract, the additional rights set forth in FAR 52.227-19, Commercial Computer Software License (December 2007). Oracle USA, Inc., 500 Oracle Parkway, Redwood City, CA 94065.
This software is developed for general use in a variety of information management applications. It is not developed or intended for use in any inherently dangerous applications, including applications which may create a risk of personal injury. If you use this software in dangerous applications, then you shall be responsible to take all appropriate fail-safe, backup, redundancy, and other measures to ensure the safe use of this software. Oracle Corporation and its affiliates disclaim any liability for any damages caused by use of this software in dangerous applications.
Oracle is a registered trademark of Oracle Corporation and/or its affiliates. Other names may be trademarks of their respective owners.
This software and documentation may provide access to or information on content, products and services from third parties. Oracle Corporation and its affiliates are not responsible for and expressly disclaim all warranties of any kind with respect to third-party content, products, and services. Oracle Corporation and its affiliates will not be responsible for any loss, costs, or damages incurred due to your access to or use of third-party content, products, or services.
Contents
1. IntroductionDocument Scope and Audience . . . . . . . . . . . . . . . . . . . . . . . . . . . . . . . . . . . . . . . . . . . . . 1-1
Guide to this Document . . . . . . . . . . . . . . . . . . . . . . . . . . . . . . . . . . . . . . . . . . . . . . . . . . . 1-1
Related Documentation . . . . . . . . . . . . . . . . . . . . . . . . . . . . . . . . . . . . . . . . . . . . . . . . . . . 1-2
2. Preparing for InstallationInstallation Overview. . . . . . . . . . . . . . . . . . . . . . . . . . . . . . . . . . . . . . . . . . . . . . . . . . . . . 2-1
Requirements . . . . . . . . . . . . . . . . . . . . . . . . . . . . . . . . . . . . . . . . . . . . . . . . . . . . . . . . . . . 2-1
3. Database SetupOverview . . . . . . . . . . . . . . . . . . . . . . . . . . . . . . . . . . . . . . . . . . . . . . . . . . . . . . . . . . . . . . 3-1
Running the Database Configuration Tool . . . . . . . . . . . . . . . . . . . . . . . . . . . . . . . . . . . . 3-1
4. InstallationInstallation Steps . . . . . . . . . . . . . . . . . . . . . . . . . . . . . . . . . . . . . . . . . . . . . . . . . . . . . . . . 4-1
Upgrading from Earlier Versions. . . . . . . . . . . . . . . . . . . . . . . . . . . . . . . . . . . . . . . . . . . . 4-4
5. Post-Installation TasksInstalling the Policy Database Schema . . . . . . . . . . . . . . . . . . . . . . . . . . . . . . . . . . . . . . . 5-1
Starting Administration Server Processes . . . . . . . . . . . . . . . . . . . . . . . . . . . . . . . . . . . . . 5-2
Stopping Administration Server Processes . . . . . . . . . . . . . . . . . . . . . . . . . . . . . . . . . . . . 5-4
Starting the Administration Tools . . . . . . . . . . . . . . . . . . . . . . . . . . . . . . . . . . . . . . . . . . . 5-4
iii
Appendix A: Generating a Verbose Installation Log ........... A-1
Appendix B: Changing the Administrator Password ..........B-1
Appendix C: Uninstalling the Administration Server..........C-1
Appendix D: Oracle Installation and Administration..........D-1
Appendix E: Sybase Installation and Administration ......... E-1
Appendix F: Manual Database Setup Steps ....................... F-1
iv
C H A P T E R 1
Introduction
This section describes the contents and organization of this guide.
Note: Oracle Entitlements Server was previously known as BEA Aqualogic Enterprise Security. Some items, such as schema objects, paths, and so on may still use the term “ALES."
“Document Scope and Audience” on page 1-1
“Guide to this Document” on page 1-1
“Related Documentation” on page 1-2
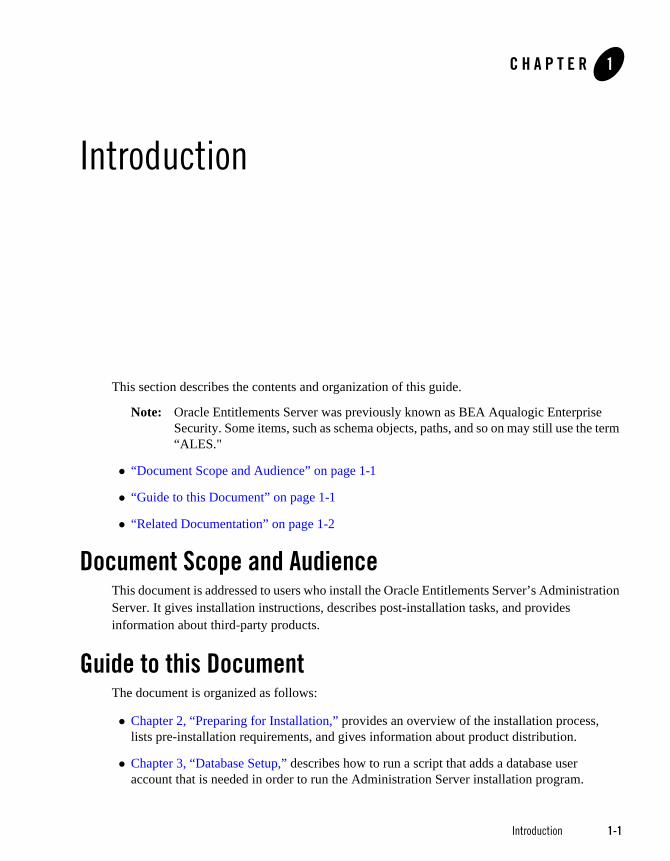
Document Scope and AudienceThis document is addressed to users who install the Oracle Entitlements Server’s Administration Server. It gives installation instructions, describes post-installation tasks, and provides information about third-party products.
Guide to this DocumentThe document is organized as follows:
Chapter 2, “Preparing for Installation,” provides an overview of the installation process, lists pre-installation requirements, and gives information about product distribution.
Chapter 3, “Database Setup,” describes how to run a script that adds a database user account that is needed in order to run the Administration Server installation program.
Introduction 1-1
In t roduct ion
Chapter 4, “Installation,” provides detailed installation instructions.
Chapter 5, “Post-Installation Tasks,” describes how to install the database schema, start/stop processes, and launch the administration consoles.
“Appendix A: Generating a Verbose Installation Log,” indicates how to generate a log that captures detailed installation events.
“Appendix B: Changing the Administrator Password,” describes how to change the administrator’s password.
“Appendix C: Uninstalling the Administration Server,” describes how to remove the Administration Server.
“Appendix D: Oracle Installation and Administration,” provides information and guidelines for installing, configuring, and managing an Oracle database server.
“Appendix E: Sybase Installation and Administration,” provides information and guidelines for installing, configuring, and managing a Sybase database server.
Related DocumentationFor information about other aspects of Oracle Entitlements Server, see the following documents:
Getting Started with Oracle Entitlements Server—Provides a number of tutorials that show how to use the Entitlements Administration Application to secure application resources.
Introduction—Provides overview, conceptual, and architectural information about the Oracle Entitlements Server.
Securing OES Production Environments—Contains information about security practices that should be considered when moving OES from a development to a production system.
SSM Installation and Configuration Guide—Describes how to install and configure Security Services Modules.
Policy Managers Guide—Defines the security policy model and describes how to generate, import and export policy data.
Programming Security for Java Applications—Describes how to implement security in Java applications. It includes descriptions of the security service API and programming instructions.
Developing Security Providers—Provides security vendors and security and application developers with the information needed to develop custom security providers.
1-2 Introduction
Rela ted Documentat ion
Java API—Java API documentation (Javadocs).
Security Service Provider Interfaces—SSPI documentation (Javadocs).
BLM API—Business Logic Manager (BLM) API documentation (Javadocs).
Introduction 1-3

In t roduct ion
1-4 Introduction

C H A P T E R 2
Preparing for Installation
This section covers the following topics:
“Installation Overview” on page 2-1
“Requirements” on page 2-1
Installation OverviewThe Administration Server runs in an application server host (WebLogic Server, Apache Tomcat, or Websphere) and provides several administrative utilities, including the Administration Console, the Entitlements Administration Application, a Service Control Manager, a Security Service Module, and the Business Logic Manager (BLM).
The major tasks involved in installing the Administration Server are:
1. Installing the application server (not covered in this document).
2. Installing and configuring the database server (see appendixes for database specific information).
3. Installing the Administration Server.
RequirementsNote: The Administration Server must have a static IP address. The IP address is used by the
Security Service Modules and Service Control Manager for connectivity.
Administration Server Installation Guide 2-1
Prepar ing fo r Ins ta l la t ion
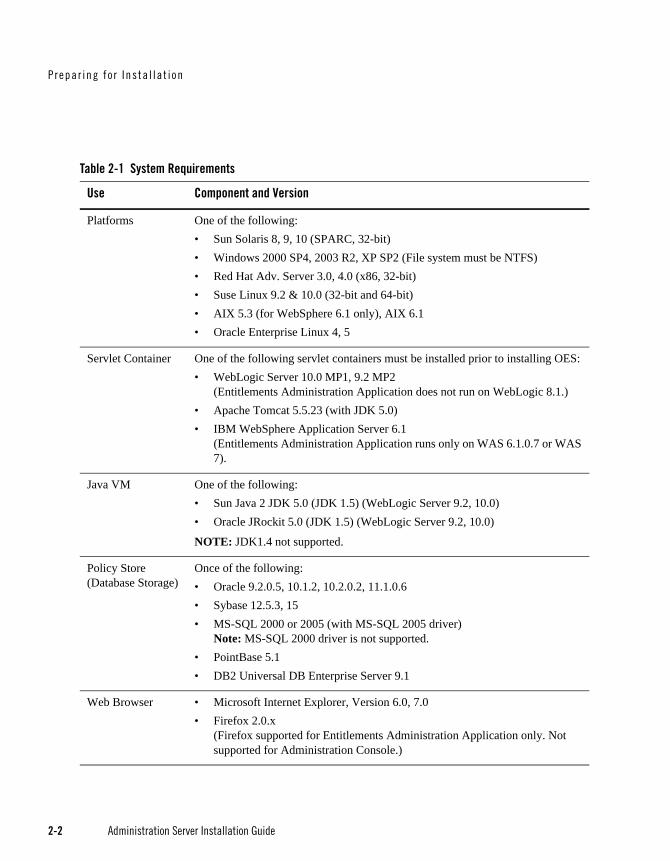
Table 2-1 System Requirements
Use Component and Version
Platforms One of the following:• Sun Solaris 8, 9, 10 (SPARC, 32-bit)• Windows 2000 SP4, 2003 R2, XP SP2 (File system must be NTFS)• Red Hat Adv. Server 3.0, 4.0 (x86, 32-bit)• Suse Linux 9.2 & 10.0 (32-bit and 64-bit)• AIX 5.3 (for WebSphere 6.1 only), AIX 6.1• Oracle Enterprise Linux 4, 5
Servlet Container One of the following servlet containers must be installed prior to installing OES:• WebLogic Server 10.0 MP1, 9.2 MP2
(Entitlements Administration Application does not run on WebLogic 8.1.)• Apache Tomcat 5.5.23 (with JDK 5.0)• IBM WebSphere Application Server 6.1
(Entitlements Administration Application runs only on WAS 6.1.0.7 or WAS 7).
Java VM One of the following:• Sun Java 2 JDK 5.0 (JDK 1.5) (WebLogic Server 9.2, 10.0)• Oracle JRockit 5.0 (JDK 1.5) (WebLogic Server 9.2, 10.0)
NOTE: JDK1.4 not supported.
Policy Store (Database Storage)
Once of the following:• Oracle 9.2.0.5, 10.1.2, 10.2.0.2, 11.1.0.6• Sybase 12.5.3, 15• MS-SQL 2000 or 2005 (with MS-SQL 2005 driver)
Note: MS-SQL 2000 driver is not supported.• PointBase 5.1• DB2 Universal DB Enterprise Server 9.1
Web Browser • Microsoft Internet Explorer, Version 6.0, 7.0• Firefox 2.0.x
(Firefox supported for Entitlements Administration Application only. Not supported for Administration Console.)
2-2 Administration Server Installation Guide
Requi rements
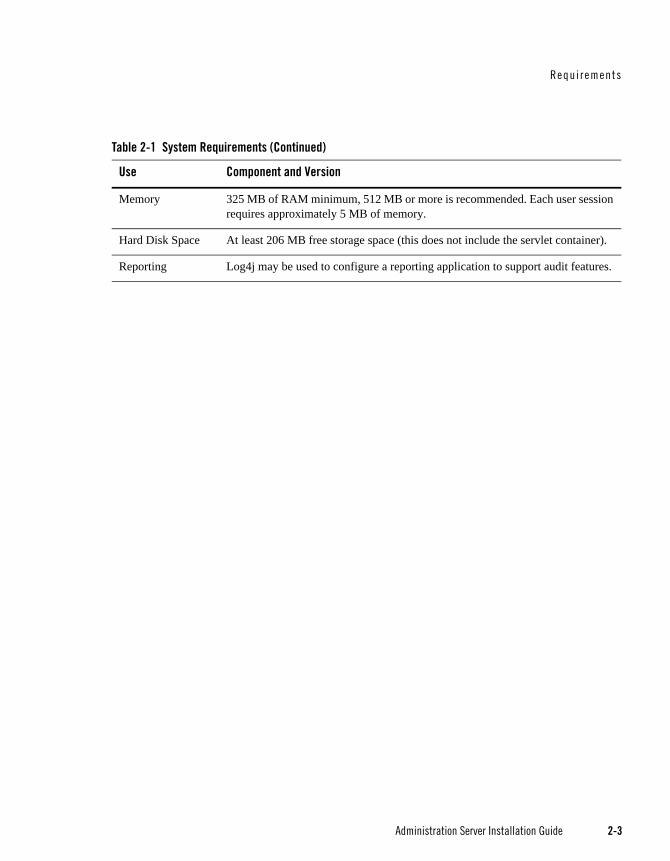
Memory 325 MB of RAM minimum, 512 MB or more is recommended. Each user session requires approximately 5 MB of memory.
Hard Disk Space At least 206 MB free storage space (this does not include the servlet container).
Reporting Log4j may be used to configure a reporting application to support audit features.
Table 2-1 System Requirements (Continued)
Use Component and Version
Administration Server Installation Guide 2-3

Prepar ing fo r Ins ta l la t ion
2-4 Administration Server Installation Guide

C H A P T E R 3
Database Setup
It has the following topics:
“Overview” on page 3-1
“Running the Database Configuration Tool” on page 3-1
OverviewIn order to run the installation program, you must first run the script that adds a user account to the database. This account is used during installation.
NOTE: It is also possible to perform the database setup steps manually. For instructions, see “Appendix F: Manual Database Setup Steps”.
Running the Database Configuration Tool1. Unzip the file.
The script file name is OES10gR3_DBConfigTool_win32.zip (Windows) or OES10gR3_DBConfigTool_unix.zip (UNIX and Linux).
2. Open DBConfig.bat|sh in an editor and set the following properties:
– JAVA-HOME — fully-qualified path to a JDK.
– INSTALL_HOME — fully-qualified path to the directory where you unzipped the script file.
Administration Server Installation Guide 3-1

Database Se tup
– DB_JDBC_DRIVER_LOC — For Pointbase and MSSQL, fully-qualified path to the JDBC driver. (This is not required for Oracle or Sybase databases.)
– Examples:
(Pointbase) C:\bea\weblogic92\common\eval\pointbase\lib\pbclient.jar
(MS-SQL) C:\Program Files\Microsoft SQL Server 2005 JDBC Driver\sqljdbc_1.2\enu\sqljdbc.jar
3. Enter dbconfig.bat or dbconfig.sh on a command line. The program issues a number of prompts to answer.
4. Respond to the prompts as described in the table below:
Prompt Description
Please input DB type<oracle|sybase|mssql|pointbase>
Enter one of the database names listed.
Please input JDBC URL Enter the JDBC URL for the database server.
Oracle — jdbc:oracle:thin:@<server>:<port>:<sid> Sybase — jdbc:sybase:Tds:<server>:<port> Sql Server — jdbc:sqlserver://<server>:<port> Pointbase — jdbc:pointbase:server://<server>/ales
<server> — name or IP address of database machine <port> — port where the database listener is running <sid> — SID for Oracle database
Please input JDBC Driver Enter the JDBC driver used to connect to the database. This entry varies by database type:
Oracle — oracle.jdbc.driver.OracleDriver Sybase — com.sybase.jdbc3.jdbc.SybDriver Sql — com.microsoft.sqlserver.jdbc.SQLServerDriver Pointbase — com.pointbase.jdbc.jdbcUniversalDriver
Please input new database user name Enter a username for the account being created.
Please input new database user password
Enter a password for the new user.
Please input database admin username (not required for Pointbase)
Enter the database administrator user name.
3-2 Administration Server Installation Guide
Runn ing the Database Conf igu rat ion Too l
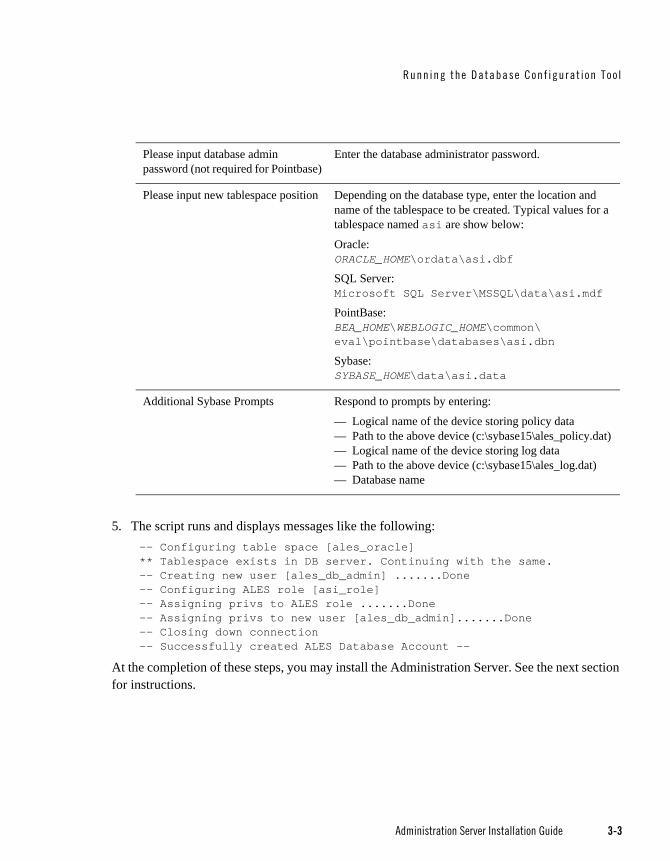
5. The script runs and displays messages like the following: -- Configuring table space [ales_oracle] ** Tablespace exists in DB server. Continuing with the same. -- Creating new user [ales_db_admin] .......Done -- Configuring ALES role [asi_role] -- Assigning privs to ALES role .......Done -- Assigning privs to new user [ales_db_admin].......Done -- Closing down connection -- Successfully created ALES Database Account --
At the completion of these steps, you may install the Administration Server. See the next section for instructions.
Please input database admin password (not required for Pointbase)
Enter the database administrator password.
Please input new tablespace position Depending on the database type, enter the location and name of the tablespace to be created. Typical values for a tablespace named asi are show below:
Oracle: ORACLE_HOME\ordata\asi.dbf
SQL Server: Microsoft SQL Server\MSSQL\data\asi.mdf
PointBase: BEA_HOME\WEBLOGIC_HOME\common\ eval\pointbase\databases\asi.dbn
Sybase: SYBASE_HOME\data\asi.data
Additional Sybase Prompts Respond to prompts by entering:
— Logical name of the device storing policy data — Path to the above device (c:\sybase15\ales_policy.dat) — Logical name of the device storing log data — Path to the above device (c:\sybase15\ales_log.dat) — Database name
Administration Server Installation Guide 3-3

Database Se tup
3-4 Administration Server Installation Guide

C H A P T E R 4
Installation
This chapter contains the following sections:
“Installation Steps” on page 4-1
“Upgrading from Earlier Versions” on page 4-4
Installation StepsTo install the Administration Server:
1. Shut down any processes on the machine.
2. Unzip the installation ZIP file.
The file name is OES10gR3_admin_win32.zip (Windows), OES10gR3_admin_solaris32.zip (UNIX), or OES10gR3_admin_linux.zip (Linux).
3. Launch the install using one of the options described in Table 4-1.
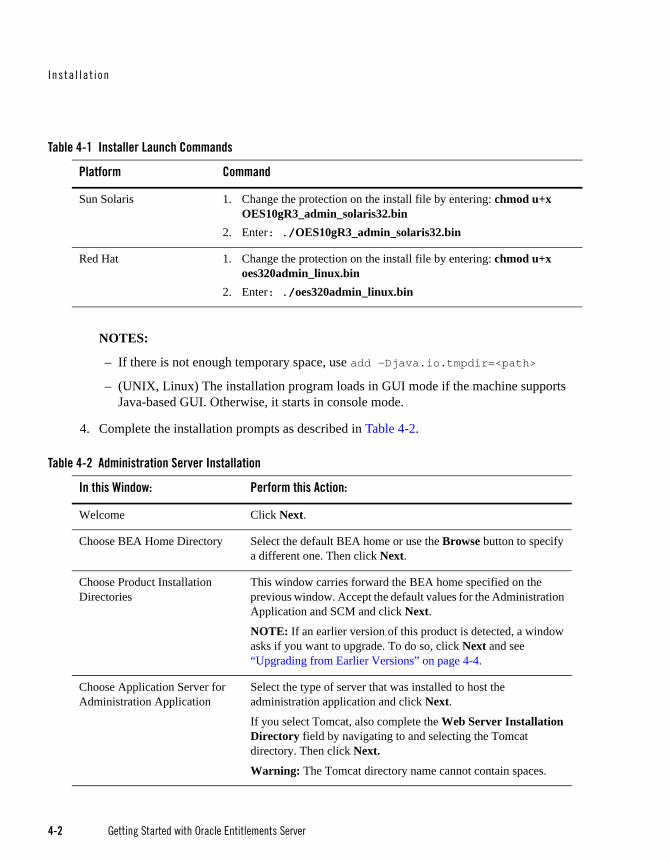
Table 4-1 Installer Launch Commands
Platform Command
Windows Start OES10gR3_admin_win32.exe
Getting Started with Oracle Entitlements Server 4-1
Ins ta l la t i on
NOTES:
– If there is not enough temporary space, use add –Djava.io.tmpdir=<path>
– (UNIX, Linux) The installation program loads in GUI mode if the machine supports Java-based GUI. Otherwise, it starts in console mode.
4. Complete the installation prompts as described in Table 4-2.
Sun Solaris 1. Change the protection on the install file by entering: chmod u+x OES10gR3_admin_solaris32.bin
2. Enter: ./OES10gR3_admin_solaris32.bin
Red Hat 1. Change the protection on the install file by entering: chmod u+x oes320admin_linux.bin
2. Enter: ./oes320admin_linux.bin
Table 4-1 Installer Launch Commands
Platform Command
Table 4-2 Administration Server Installation
In this Window: Perform this Action:
Welcome Click Next.
Choose BEA Home Directory Select the default BEA home or use the Browse button to specify a different one. Then click Next.
Choose Product Installation Directories
This window carries forward the BEA home specified on the previous window. Accept the default values for the Administration Application and SCM and click Next.
NOTE: If an earlier version of this product is detected, a window asks if you want to upgrade. To do so, click Next and see “Upgrading from Earlier Versions” on page 4-4.
Choose Application Server for Administration Application
Select the type of server that was installed to host the administration application and click Next.
If you select Tomcat, also complete the Web Server Installation Directory field by navigating to and selecting the Tomcat directory. Then click Next.
Warning: The Tomcat directory name cannot contain spaces.
4-2 Getting Started with Oracle Entitlements Server

Ins ta l la t i on S teps
Choose Network Interfaces Select the IP address checkbox used to listen for requests to distribute policy and configuration data and click Next.
Notes:• IPV6 is not supported.• For machines with multiple network cards, select an internal
address to avoid exposing the SCM through a public address.
Configure Administration Application
HTTP Port (7000)—HTTP port for the application server’s (WebLogic or Tomcat) administration console.
SSL Port (7010)—HTTPS port for the Administration Server.
WARNING: The port specified must be the first of four consecutive ports reserved for use by the Administration Server. Failure to reserve these ports will prevent necessary component connections.
CA Duration—Years the certificate remains in effect.
Configure Database Connection Database client—Select the type from the dropdown list.
JDBC URL—Replace the bracketed values. These vary by database type:
<SERVER>—name/IP address of the database machine <PORT>—port number where the database listener is running <INSTANCE>—instance name to connect to on <server> <SID>—database SID of database
JDBC driver—Accept the default
Driver location—If required, browse to and select the directory.
Login ID—user created using the database setup script described in “Database Setup” on page 3-1.
Password and Confirm Password—user password.
Install Database Schema—Accept the default to install the schema unless you are installing the server as a failover server.
When you click Next, the JDBC connection is tested. If unsuccessful, you are re-prompted for the information.
Table 4-2 Administration Server Installation (Continued)
In this Window: Perform this Action:
Getting Started with Oracle Entitlements Server 4-3

Ins ta l la t i on
5. If the installer detects a previous version of the server, it disables the Install Database Schema checkbox and a window asks if you want to run the upgrade wizard. See “Upgrading from Earlier Versions” on page 4-4 for instructions.
6. On the Installation Complete window, click Done. If you selected to install the schema, a script will perform the following actions:
– Create database tables and out-of-box objects
– Load objects for starting the Administration Server.
– Start the SCM and Administration Server
– Load the administration policy
When the script completes, you may open the administration tools (see “Starting the Administration Tools” on page 5-4).
Note: If you did not install the schema and need to do so separately, see “Installing the Policy Database Schema” on page 5-1.
Upgrading from Earlier VersionsIf the installer detects a previous version of the server, it disables the Install Database Schema checkbox and a window asks if you want to run the upgrade wizard.
Note: The upgrade wizard launches only when installing in GUI mode. To invoke it manually, run upgrade_ales_schema.bat|sh in BEA_HOME/ales32-admin/upgrade.
Key Protection Password Selection
Generate Random Password—select to randomly generate key passwords for Administration Server components.
Advanced Password Configuration—select this option if you want to specify these passwords. Then supply the passwords as prompted.
These options are equally secure. The only reason for specifying your own passwords is that they are required to decrypt SCM and SSM cache files, which may be useful for debugging.
Choose JDK The installation auto-selects a JDK. Accept this value or specify a different one.
Table 4-2 Administration Server Installation (Continued)
In this Window: Perform this Action:
4-4 Getting Started with Oracle Entitlements Server
Upgrading f rom Ear l i e r Ve rs i ons
To upgrade, run the wizard to completion. After the wizard finishes, start the Administration Server and execute a script that adds policies to the database, as follows:
1. When you see the Run Upgrade Wizard checkbox on the installation window, select it and click Done. This launches the wizard.
2. On the initial window, click Next. A window displays status messages and then closes when the upgrade completes.
3. Start the Administration Server.
4. Run upgrade_policies.bat|sh located in BEA_HOME/ales32-admin/upgrade.
Notes:
Upgrade the Administration Server before upgrading SSMs.
SSMs on other machines can remain running while the server is upgraded. They will also continue operating as expected with the upgraded Administration Server.
For earlier versions of this product, you must have administrative access to the directories containing the existing Administration Server files.
Note that during a schema upgrade we remove the database generated system constraint names to have the database recreate the names. During upgrade, please ensure that the new names also get replicated to the secondary database if there is a setup with database replication.
Getting Started with Oracle Entitlements Server 4-5

Ins ta l la t i on
4-6 Getting Started with Oracle Entitlements Server
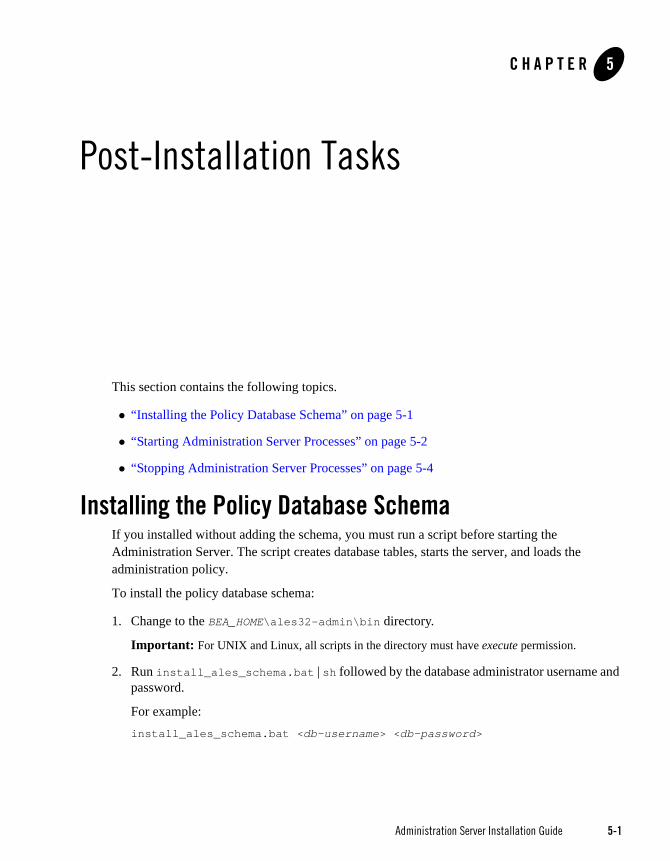
C H A P T E R 5
Post-Installation Tasks
This section contains the following topics.
“Installing the Policy Database Schema” on page 5-1
“Starting Administration Server Processes” on page 5-2
“Stopping Administration Server Processes” on page 5-4
Installing the Policy Database SchemaIf you installed without adding the schema, you must run a script before starting the Administration Server. The script creates database tables, starts the server, and loads the administration policy.
To install the policy database schema:
1. Change to the BEA_HOME\ales32-admin\bin directory.
Important: For UNIX and Linux, all scripts in the directory must have execute permission.
2. Run install_ales_schema.bat | sh followed by the database administrator username and password.
For example: install_ales_schema.bat <db-username> <db-password>
Administration Server Installation Guide 5-1

Post- Insta l la t ion Tasks
Starting Administration Server ProcessesHow Administration Server processes run depends on the platform:
On Windows, the Administration Server and SCM are installed as services with a default startup type of manual. To configure the services for automatic startup, use the Windows Services applet.
On UNIX, the Administration Server and SCM are registered with the UNIX init subsystem and not configured to start automatically. To configure them for automatic startup, the system administrator must link it into the correct init runlevel, as shown below.
To start the Administration Server and SCM, use the methods described in Table 5-1:
5-2 Administration Server Installation Guide
Star t ing Admin is t rat ion Serve r P rocesses
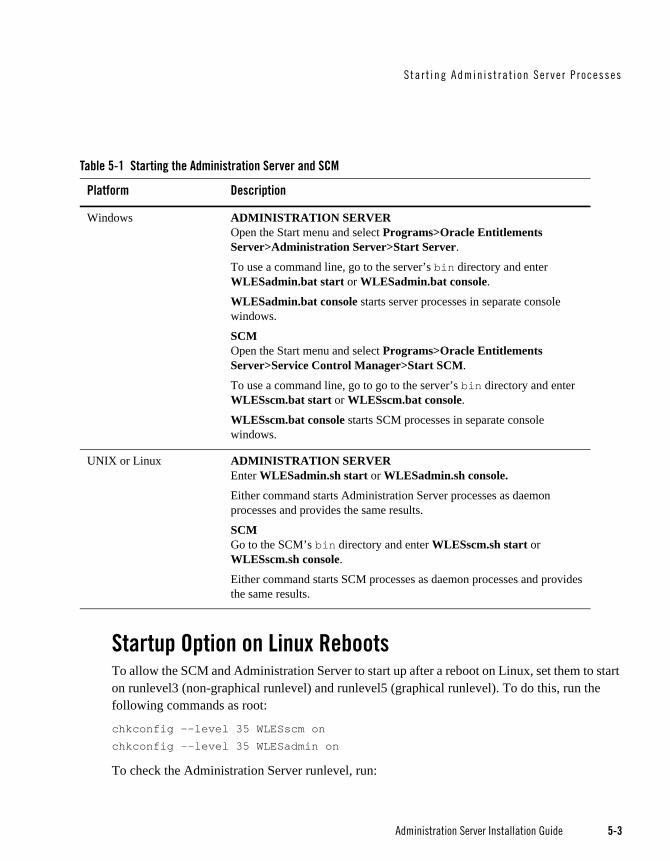
Startup Option on Linux RebootsTo allow the SCM and Administration Server to start up after a reboot on Linux, set them to start on runlevel3 (non-graphical runlevel) and runlevel5 (graphical runlevel). To do this, run the following commands as root:
chkconfig --level 35 WLESscm on chkconfig --level 35 WLESadmin on
To check the Administration Server runlevel, run:
Table 5-1 Starting the Administration Server and SCM
Platform Description
Windows ADMINISTRATION SERVER Open the Start menu and select Programs>Oracle Entitlements Server>Administration Server>Start Server.
To use a command line, go to the server’s bin directory and enter WLESadmin.bat start or WLESadmin.bat console.
WLESadmin.bat console starts server processes in separate console windows.
SCM Open the Start menu and select Programs>Oracle Entitlements Server>Service Control Manager>Start SCM.
To use a command line, go to go to the server’s bin directory and enter WLESscm.bat start or WLESscm.bat console.
WLESscm.bat console starts SCM processes in separate console windows.
UNIX or Linux ADMINISTRATION SERVER Enter WLESadmin.sh start or WLESadmin.sh console.
Either command starts Administration Server processes as daemon processes and provides the same results.
SCM Go to the SCM’s bin directory and enter WLESscm.sh start or WLESscm.sh console.
Either command starts SCM processes as daemon processes and provides the same results.
Administration Server Installation Guide 5-3
Post- Insta l la t ion Tasks
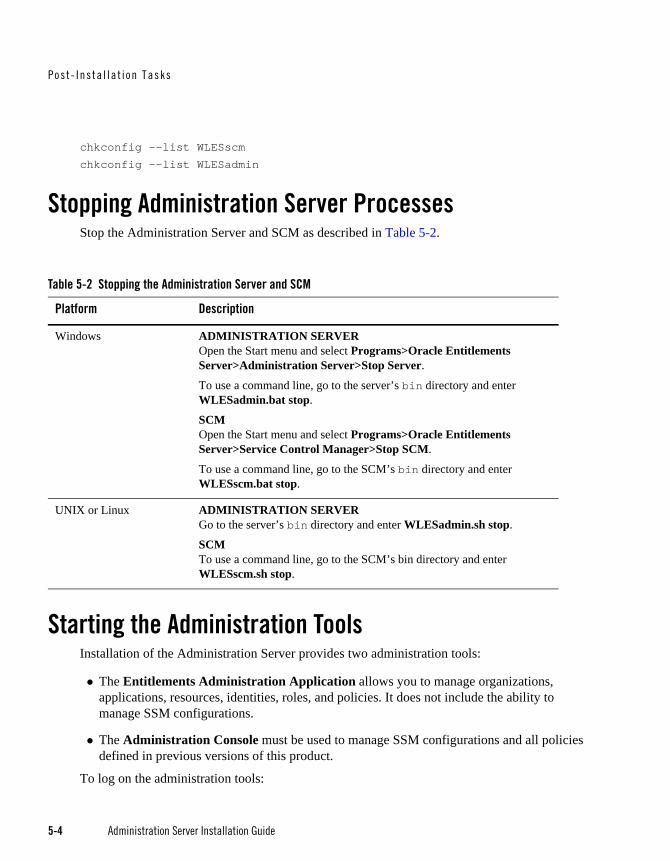
chkconfig --list WLESscm chkconfig --list WLESadmin
Stopping Administration Server ProcessesStop the Administration Server and SCM as described in Table 5-2.
Starting the Administration ToolsInstallation of the Administration Server provides two administration tools:
The Entitlements Administration Application allows you to manage organizations, applications, resources, identities, roles, and policies. It does not include the ability to manage SSM configurations.
The Administration Console must be used to manage SSM configurations and all policies defined in previous versions of this product.
To log on the administration tools:
Table 5-2 Stopping the Administration Server and SCM
Platform Description
Windows ADMINISTRATION SERVER Open the Start menu and select Programs>Oracle Entitlements Server>Administration Server>Stop Server.
To use a command line, go to the server’s bin directory and enter WLESadmin.bat stop.
SCM Open the Start menu and select Programs>Oracle Entitlements Server>Service Control Manager>Stop SCM.
To use a command line, go to the SCM’s bin directory and enter WLESscm.bat stop.
UNIX or Linux ADMINISTRATION SERVER Go to the server’s bin directory and enter WLESadmin.sh stop.
SCM To use a command line, go to the SCM’s bin directory and enter WLESscm.sh stop.
5-4 Administration Server Installation Guide
Star t ing the Admin is t ra t i on Too ls
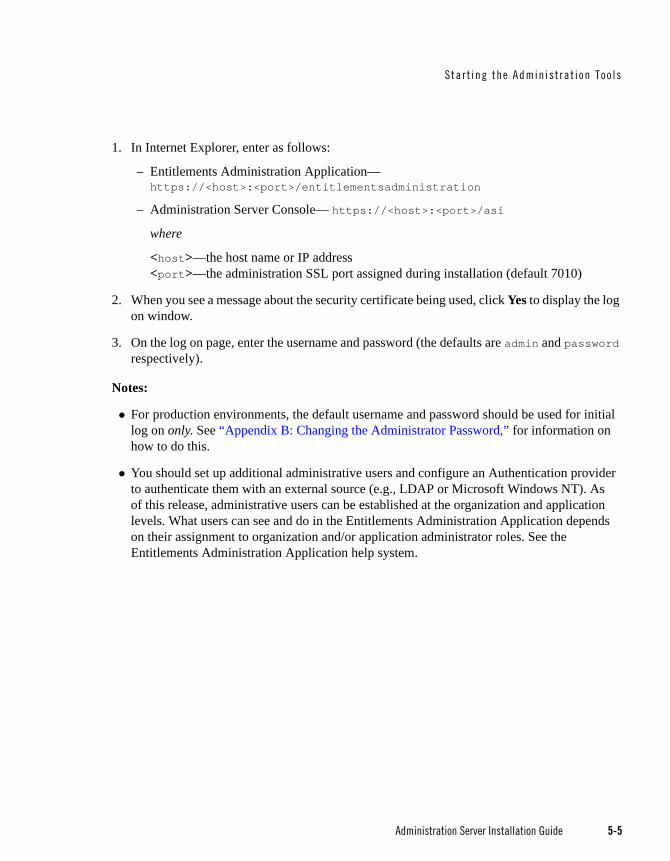
1. In Internet Explorer, enter as follows:
– Entitlements Administration Application—https://<host>:<port>/entitlementsadministration
– Administration Server Console— https://<host>:<port>/asi
where
<host>—the host name or IP address <port>—the administration SSL port assigned during installation (default 7010)
2. When you see a message about the security certificate being used, click Yes to display the log on window.
3. On the log on page, enter the username and password (the defaults are admin and password respectively).
Notes:
For production environments, the default username and password should be used for initial log on only. See “Appendix B: Changing the Administrator Password,” for information on how to do this.
You should set up additional administrative users and configure an Authentication provider to authenticate them with an external source (e.g., LDAP or Microsoft Windows NT). As of this release, administrative users can be established at the organization and application levels. What users can see and do in the Entitlements Administration Application depends on their assignment to organization and/or application administrator roles. See the Entitlements Administration Application help system.
Administration Server Installation Guide 5-5

Post- Insta l la t ion Tasks
5-6 Administration Server Installation Guide

A
Appendix A: Generating a Verbose Installation Log
If you start the installation process from the command line, you can specify the -log option to generate a verbose installation log. This log contains messages about events that occur during the installation, including informational, warning, error, and fatal messages. This can be especially useful for silent installations.
Note: Unless the log contains a ‘fatal’ error, the installation completed successfully.
InstructionsTo create a verbose log file during installation, use the following command lines or scripts:
For Windows:
oes32admin_win32.exe -log=D:\bea\logs\oes_install.log -log_priority=debug
For UNIX:
oes32admin_solaris32.bin -log=/bea/logs/oes_install.log -log_priority=debug
For Linux:
oes32admin_rhas3_IA32.bin -log=/bea/logs/oes_install.log -log_priority=debug
Note: The -log parameter is optional. By default, the installation log is put in the log directory where you install the Administration Server. If for some reason, the installer fails, use this switch to generate a more detailed log: -log_priority=debug.
Administration Server Installation Guide A-1

Append ix A : Generat ing a Verbose Insta l la t ion Log
The path must be the full path to a file name. If the file does not exist, all folders in the path must exist before you execute the command or the installation program does not create the log file.
A-2 Administration Server Installation Guide
B
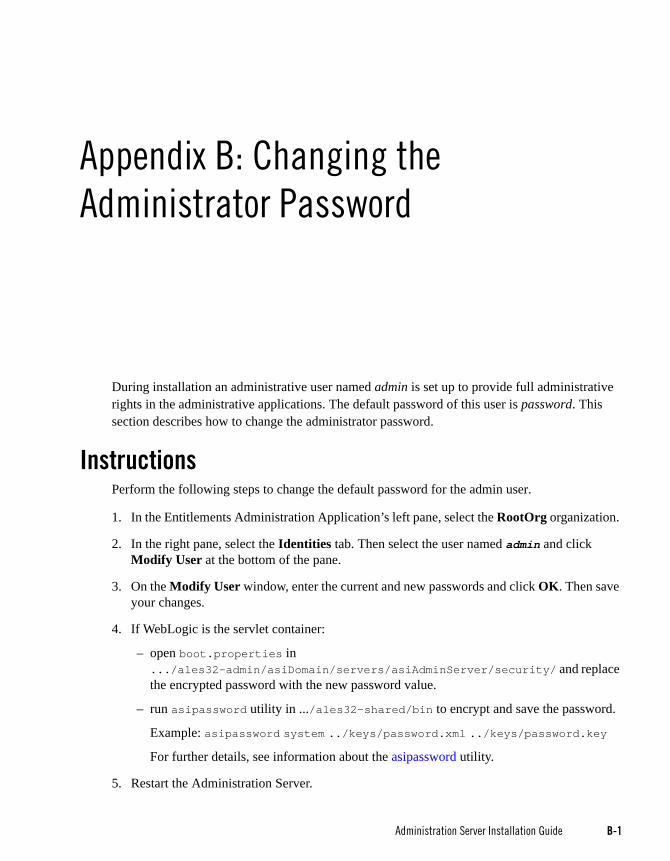
Appendix B: Changing the Administrator Password
During installation an administrative user named admin is set up to provide full administrative rights in the administrative applications. The default password of this user is password. This section describes how to change the administrator password.
InstructionsPerform the following steps to change the default password for the admin user.
1. In the Entitlements Administration Application’s left pane, select the RootOrg organization.
2. In the right pane, select the Identities tab. Then select the user named admin and click Modify User at the bottom of the pane.
3. On the Modify User window, enter the current and new passwords and click OK. Then save your changes.
4. If WebLogic is the servlet container:
– open boot.properties in .../ales32-admin/asiDomain/servers/asiAdminServer/security/ and replace the encrypted password with the new password value.
– run asipassword utility in .../ales32-shared/bin to encrypt and save the password.
Example: asipassword system ../keys/password.xml ../keys/password.key
For further details, see information about the asipassword utility.
5. Restart the Administration Server.
Administration Server Installation Guide B-1

Append ix B : Changing the Admin is t ra to r Password
B-2 Administration Server Installation Guide
C
Appendix C: Uninstalling the Administration Server
This section describes how to uninstall the Administration Server from Windows, UNIX, and Linux:
Note: To save existing policy and configuration data, you must export it. See Importing and Exporting Policy in the Policy Managers Guide.
Uninstallation on WindowsTo uninstall the Administration Server, do the following:
1. Shut down any running Administration Server processes.
2. From the Start menu, select Programs > Oracle Entitlements Server > Uninstall Oracle Entitlements Server.
3. On the Welcome window, click Next.
4. On the Choose Components window, be sure the checkboxes are selected and click Next.
5. On the Uninstall Options window, select the components to remove and click Next.
Note: If the directories contain user generated files that you want to save (for example, files in the /log or /ssl directories), do not delete the directories.
6. On the final window, note the details provided about the removal process and click Done.
7. (Windows) Open the Control Panel > Add or Remove Programs and uninstall "Oracle Entitlements Server Administration Console".
Administration Server Installation Guide C-1

Append ix C : Un insta l l i ng the Admin is t ra t i on Serve r
Uninstallation on UNIX or LinuxTo uninstall the Administration Server:
1. Log in to the machine.
2. Shut down any servers and services that are running.
3. Open a command shell and go to the directory where you installed the product, for example:
BEA_HOME/ales32-admin/uninstall
4. At the command prompt, type uninstall.sh.
The Uninstaller - Administration Server window appears and the uninstall process begins.
Note: If the system supports a graphical user interface, the uninstall program runs in graphical mode. Otherwise, it runs in console mode.
5. Respond to the prompts to uninstall the product.
C-2 Administration Server Installation Guide
D
Appendix D: Oracle Installation and Administration
This section provides information and guidelines about installing, configuring, and managing an Oracle database server to use with the Administration Server. This must be performed before installing the Administration Server.
To perform these steps, you must be a database administrator with permission to create a new instance.
Overview of the Oracle Client/Server ArchitectureEach Oracle service is identified by a global database name and an Oracle system identifier referred to as the SID (see Figure D-1). The Oracle global database name is the full name of a database that uniquely differentiates it from other databases in a network domain. One global database name can represent several database instances. The global database name is also known as the service name. The SID distinguishes the database instance from other instances on the same machine.
Administration Server Installation Guide D-1

Append ix D : Orac le I ns ta l la t i on and Admin is t rat ion
Figure D-1 Oracle Database Setup
An Oracle instance is a running Oracle database made up of memory structures and background processes. Each instance is associated with an SID. With the Oracle Parallel Server, multiple instances can exist on different machines for a single database.
The policy database is a set of database schemas in which all data is stored. A database schema is a collection of objects associated with a particular schema name. The objects include tables, views, domains, constraints, assertions, privileges, and so on.
A datafile is an Oracle term for a file that contains the contents of logical database structures, such as tables and indexes. One or more datafiles form a logical unit of storage called a tablespace. A datafile is associated with only one tablespace and only one database.
A tablespace is a logical portion of a database used to allocate storage for table and index data. Each tablespace corresponds to one or more physical datafiles. Every Oracle database has a
System Schema
Database Schema
Database SchemaContaining Temporary Files
Database SchemaContaining Rollback Data
Database SchemaContaining Policy
SYSTEM TablespaceDatabase Instance
Another Tablespace
Data Tablespace
Temporary Tablespace
Rollback Tablespace
Oracle Database Service
System
Users
RBS
TEMP
Tablespaces
Each tablespaceis composed of oneor more files
In Oracle 9i and later,a service can be spreadover multiple machines
(Optional)
(Optional)
(Optional)
(Optional)
(Required)Datafiles
Datafiles
Datafiles
Datafiles
D-2 Administration Server Installation Guide

tablespace called SYSTEM and may have additional tablespaces. A tablespace is used to group related logical structures. The database username or user ID is a login that is given permission by the database administrator to access a specific database instance. This user is also called the schema owner, that is, the owner of the schema objects such as tables, views and triggers that are created.
Oracle Database System RequirementsTable D-1, “Oracle Setup Requirements,” on page D-3 describes the minimum system requirements for Oracle database server.
Installing and Configuring the Oracle DatabaseThis section provides additional instructions for installing and configuring an Oracle database for use with the Administration Server.
“Installing the Oracle Database” on page D-4—Use this procedure to install the Oracle database software and create and configure a database instance.
Table D-1 Oracle Setup Requirements
Requirement Description
Software version Oracle database server:• Version 9i Release 2 (9.2.x)• Version 10g Release 1 (10.1.2, 10.2.0.2, 11.1.0.6)
Server platform Any platform supported by Oracle.
Memory As required by Oracle server installation (64 MB minimum).
Disk space for the starter database
As required by Oracle server installation, plus space required to store policy data; 500 MB recommended.
Disk space for Oracle software
Refer to the installation guide for the Oracle Database Server.
Disk space for policy database
Minimum of one tablespace with 250 MB of free space is required.
Administration Server Installation Guide D-3

Append ix D : Orac le I ns ta l la t i on and Admin is t rat ion
“Configuring the Oracle Database Listener for Remote Connections” on page D-7—Use this procedure to install the Administration Server on a machine that is remote to the Oracle database machine.
“Creating an Oracle Database Instance” on page D-8—If the Oracle database software is already installed, use this procedure to create additional database instances.
Installing the Oracle DatabaseThis section provides recommendations for installing the Oracle database and creating a database instance. The Oracle installation program automatically starts the Database Configuration Assistant, which is used to create a database instance. If the database is already installed, skip this procedure and go to “Creating an Oracle Database Instance” on page D-8.
To install the Oracle database and create a database instance, perform these steps:
1. When the Oracle Universal installer runs, select the install options as specified in Table D-2. For other installer options, accept the default settings or modify as desired.
Table D-2 Recommended Selections in the Oracle Universal Installer
Installer Option Recommended Selections
Available Products Oracle 9i Database 9.2.x
Version 10g Release 1 (10.1.2, 10.2.0.2, 11.1.0.6)
Installation Types Enterprise Edition
Database Configuration General Purpose
Oracle MTS Recovery Service Configuration Port Number
Accept the default setting.
Global Database Name (For Oracle 10g only)
The full Oracle database name that distinguishes the database from any other databases in a network domain, for example asi.ales, where asi is the database name and ales is the domain.
D-4 Administration Server Installation Guide
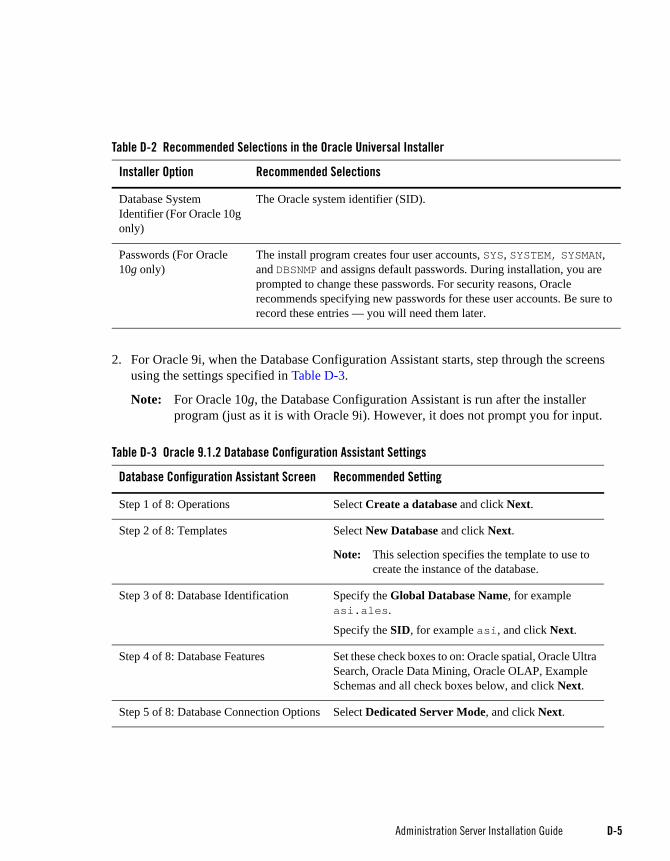
2. For Oracle 9i, when the Database Configuration Assistant starts, step through the screens using the settings specified in Table D-3.
Note: For Oracle 10g, the Database Configuration Assistant is run after the installer program (just as it is with Oracle 9i). However, it does not prompt you for input.
Database System Identifier (For Oracle 10g only)
The Oracle system identifier (SID).
Passwords (For Oracle 10g only)
The install program creates four user accounts, SYS, SYSTEM, SYSMAN, and DBSNMP and assigns default passwords. During installation, you are prompted to change these passwords. For security reasons, Oracle recommends specifying new passwords for these user accounts. Be sure to record these entries — you will need them later.
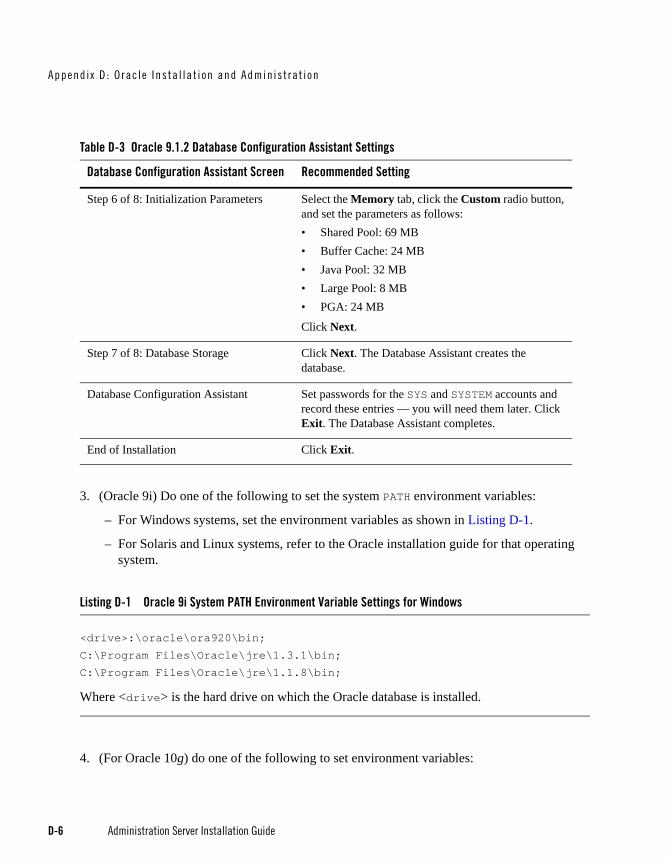
Table D-3 Oracle 9.1.2 Database Configuration Assistant Settings
Database Configuration Assistant Screen Recommended Setting
Step 1 of 8: Operations Select Create a database and click Next.
Step 2 of 8: Templates Select New Database and click Next.
Note: This selection specifies the template to use to create the instance of the database.
Step 3 of 8: Database Identification Specify the Global Database Name, for example asi.ales.
Specify the SID, for example asi, and click Next.
Step 4 of 8: Database Features Set these check boxes to on: Oracle spatial, Oracle Ultra Search, Oracle Data Mining, Oracle OLAP, Example Schemas and all check boxes below, and click Next.
Step 5 of 8: Database Connection Options Select Dedicated Server Mode, and click Next.
Table D-2 Recommended Selections in the Oracle Universal Installer
Installer Option Recommended Selections
Administration Server Installation Guide D-5
Append ix D : Orac le I ns ta l la t i on and Admin is t rat ion
3. (Oracle 9i) Do one of the following to set the system PATH environment variables:
– For Windows systems, set the environment variables as shown in Listing D-1.
– For Solaris and Linux systems, refer to the Oracle installation guide for that operating system.
Listing D-1 Oracle 9i System PATH Environment Variable Settings for Windows
<drive>:\oracle\ora920\bin; C:\Program Files\Oracle\jre\1.3.1\bin; C:\Program Files\Oracle\jre\1.1.8\bin;
Where <drive> is the hard drive on which the Oracle database is installed.
4. (For Oracle 10g) do one of the following to set environment variables:
Step 6 of 8: Initialization Parameters Select the Memory tab, click the Custom radio button, and set the parameters as follows: • Shared Pool: 69 MB• Buffer Cache: 24 MB• Java Pool: 32 MB• Large Pool: 8 MB• PGA: 24 MB
Click Next.
Step 7 of 8: Database Storage Click Next. The Database Assistant creates the database.
Database Configuration Assistant Set passwords for the SYS and SYSTEM accounts and record these entries — you will need them later. Click Exit. The Database Assistant completes.
End of Installation Click Exit.
Table D-3 Oracle 9.1.2 Database Configuration Assistant Settings
Database Configuration Assistant Screen Recommended Setting
D-6 Administration Server Installation Guide
– On Microsoft Windows, the installer program automatically sets the environment variables.
– On Solaris or Linux, refer to the Oracle installation guide for that operating system.
5. To allow remote connections to the database instance, proceed to “Configuring the Oracle Database Listener for Remote Connections” on page D-7.
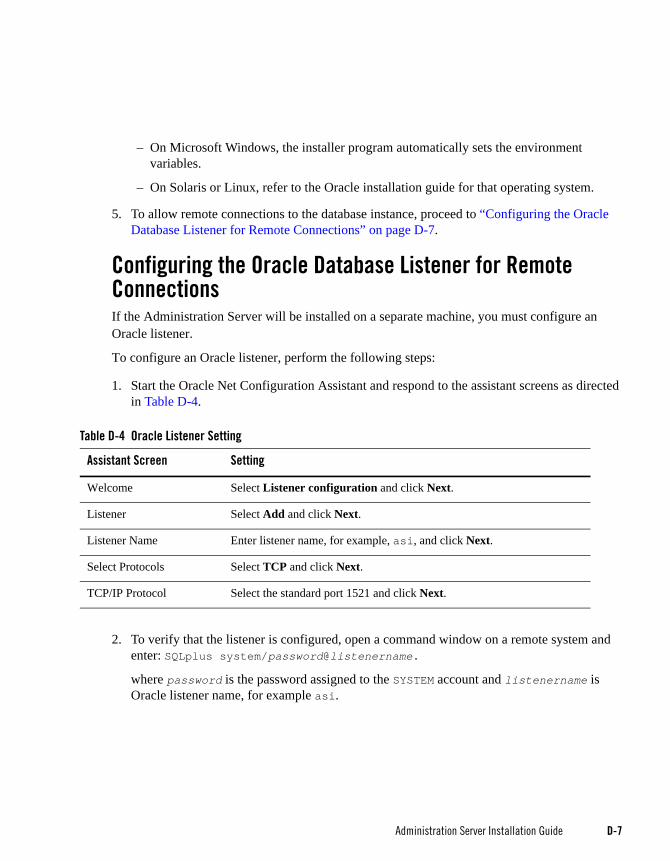
Configuring the Oracle Database Listener for Remote ConnectionsIf the Administration Server will be installed on a separate machine, you must configure an Oracle listener.
To configure an Oracle listener, perform the following steps:
1. Start the Oracle Net Configuration Assistant and respond to the assistant screens as directed in Table D-4.
2. To verify that the listener is configured, open a command window on a remote system and enter: SQLplus system/password@listenername.
where password is the password assigned to the SYSTEM account and listenername is Oracle listener name, for example asi.
Table D-4 Oracle Listener Setting
Assistant Screen Setting
Welcome Select Listener configuration and click Next.
Listener Select Add and click Next.
Listener Name Enter listener name, for example, asi, and click Next.
Select Protocols Select TCP and click Next.
TCP/IP Protocol Select the standard port 1521 and click Next.
Administration Server Installation Guide D-7

Append ix D : Orac le I ns ta l la t i on and Admin is t rat ion
Creating an Oracle Database InstanceThis section provides guidance on how to create and configure additional database instances after the Oracle database software is installed. For detailed instructions, consult the Oracle documentation.
1. To start the Oracle Database Configuration Assistant, click Start>Programs>Oracle-<OraHome>Configuration and Migration Tools>Database Configuration Assistant, where OraHome indicates the version of the software. The Database Configuration Assistant starts.
2. Step through the screens and select settings as specified in Table D-3.
Administering an Oracle Policy DatabaseThis section covers the following topics:
“Using the Database Administration Utilities with Oracle” on page D-8
“Backing Up an Oracle Database” on page D-9
Using the Database Administration Utilities with OracleTable D-5 describes the batch and shell files provided for database administration. The files are located in the <BEA_HOME>\ales32-admin\bin directory.
Table D-5 Oracle Database Administration Utilities
File Name Used to:
policyexporter.bat policyexporter.sh
Exports policy data. See the Policy Managers Guide for information on how to export policy. The dbtype is the type of database, Sybase or Oracle.
install_ales_schema.bat install_ales_schema.sh
Installs the policy database schema. See “Installing the Policy Database Schema” on page 5-1 for information on how to install the database schema.
uninstall_ales_schema.bat uninstall_ales_schema.sh
Uninstall the policy database schema from the database server. The parameters for this script are the same as the install_ales_schema script.
D-8 Administration Server Installation Guide
Backing Up an Oracle DatabaseThe policy database should be backed up at regular intervals and before uninstalling or re-installing the policy database. If necessary, contact a database or system administrator to assist with this process.
For Oracle database backup instructions, see the Oracle Backup and Recovery Guide.
Administration Server Installation Guide D-9
Append ix D : Orac le I ns ta l la t i on and Admin is t rat ion
D-10 Administration Server Installation Guide
E
Appendix E: Sybase Installation and Administration
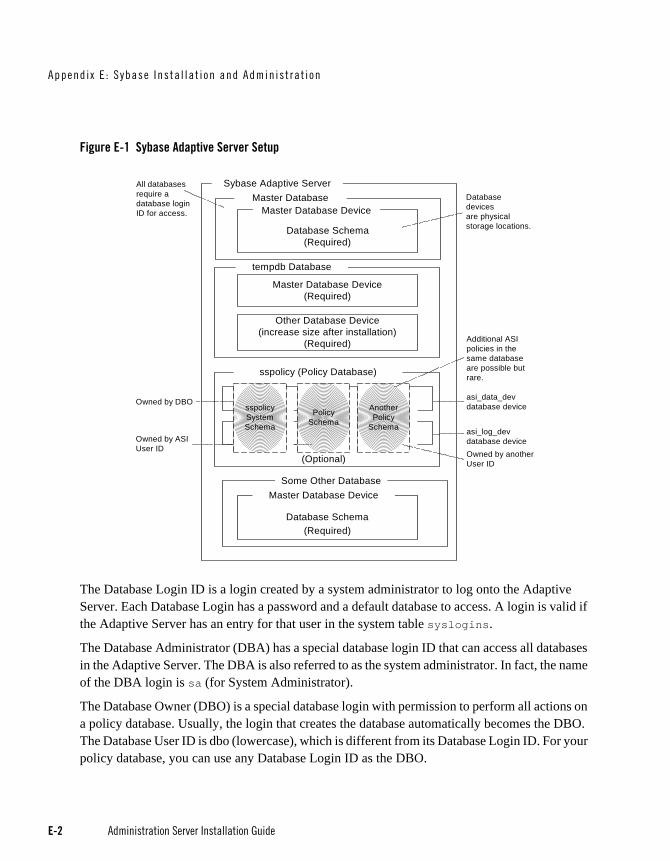
Overview of the Sybase Client/Server ArchitectureThe Sybase Adaptive Server is the server in the Sybase client/server architecture (see Figure E-1). It manages multiple databases and multiple users, keeps track of the actual location of data on disks, maintains mapping of logical data description to physical data storage, and maintains data and procedure caches in memory.
The policy database is a set of database schemas in which all data are stored. The Sybase database contains a set of related data tables and other database objects organized and presented to serve a specific purpose.
A database device is a Sybase term that represents the portion of a device (a portion of a hard drive, such as a partition) that is dedicated to holding database data. When creating the database device, you can choose either a raw partition or an existing file system. Choosing a raw partition can increase the performance of the database server.
Administration Server Installation Guide E-1
Append i x E : Sybase Ins ta l la t i on and Admin is t rat i on
Figure E-1 Sybase Adaptive Server Setup
The Database Login ID is a login created by a system administrator to log onto the Adaptive Server. Each Database Login has a password and a default database to access. A login is valid if the Adaptive Server has an entry for that user in the system table syslogins.
The Database Administrator (DBA) has a special database login ID that can access all databases in the Adaptive Server. The DBA is also referred to as the system administrator. In fact, the name of the DBA login is sa (for System Administrator).
The Database Owner (DBO) is a special database login with permission to perform all actions on a policy database. Usually, the login that creates the database automatically becomes the DBO. The Database User ID is dbo (lowercase), which is different from its Database Login ID. For your policy database, you can use any Database Login ID as the DBO.
Database Schema
Master Database Device(Required)
Database Schema
Additional ASIpolicies in thesame databaseare possible butrare.
Databasedevicesare physicalstorage locations.
Master Database DeviceMaster Database
sspolicy (Policy Database)
tempdb Database
Sybase Adaptive ServerAll databasesrequire adatabase loginID for access.
asi_data_devdatabase device
PolicySchema
AnotherPolicy
Schema
Other Database Device(increase size after installation)
(Required)
Owned by ASIUser ID
Owned by DBO
Master Database Device
Owned by anotherUser ID
asi_log_devdatabase device
(Required)
(Required)
Some Other Database
(Optional)
sspolicySystemSchema
E-2 Administration Server Installation Guide
The Database User ID pertains to one specific database and is a login given permission by the DBO or DBA (system administrator) to access that one database. In most cases, the database user ID is the same as the Database Login ID. However, in some cases, they may be different, as with the special dbo user ID.
A database schema is a collection of objects associated with a particular schema name. The objects include tables, views, domains, constraints, assertions, privileges, and so on.
The policy owner is a Database User ID that controls the set of database schema in the database. It is recommended that you not use dbo as a policy owner because it requires special administration. The security architecture allows multiple policy owners in its database, each owning a policy different from the other policies.
Sybase Database System RequirementsTable E-1 describes the minimum requirements for the system on which the Sybase Adaptive Server is installed.
Installing the Sybase DatabaseThis section provides recommendations for installing and configuring the Sybase database. If the database is already installed, you can skip this procedure and go to “Creating Sybase Database Devices” on page E-4.
Table E-1 Sybase Database Minimum Requirements
Requirement Description
Software Version Sybase Adaptive Server Enterprise 12.5.3.
Server Platform Any platform supported by Sybase.
Memory As required by Sybase server installation (42 MB minimum).
Disk space for the database As required by Sybase server installation.
Disk space for Sybase software
Refer to the Sybase installation guide for details.
Policy database disk space A minimum of two database devices is required, each having 250 MB.
Required Sybase page size 8K page size required for schema.
Administration Server Installation Guide E-3

Append i x E : Sybase Ins ta l la t i on and Admin is t rat i on
To install the Sybase Adaptive Server, perform these steps:
1. Install the Sybase Adaptive Server database software following the installation instructions in the Sybase Adaptive Server Enterprise Installation Guide. When the Sybase Installer displays the Configure New Server screen, select the Configure New Adaptive Server and Configure New XP Server checkboxes and proceed with the installation.
2. When the final installer screen appears, select the Yes, restart my computer radio button and click Finish.
Note: By default SYBASE names the database server based on your machine name.
3. After the machine restarts, start the SYBASE Server (Sybase SQLServer) manually.
Creating Sybase Database DevicesThe policy database requires at least two database devices, each having at least 250 MB of free space. The first device stores policy data and the other stores the transaction log. These must be created before creating and configuring the policy database.
Note: For better performance, a raw partition is recommended as the best configuration for the database device. Sufficient disk space must be allocated to ensure that the database meets performance requirements.
To Create Sybase Database devices on the Windows platform, perform the following steps:
1. To start the Sybase Central tool, click Start>Programs>Sybase>Sybase Central Java Edition. The Sybase Central tool opens.
2. Click Tools, select Connect and log in as user sa (no password required). The Sybase Central screen appears as shown in Figure E-2.
Note: By default, user sa does not have a password.
E-4 Administration Server Installation Guide

Figure E-2 Sybase Central
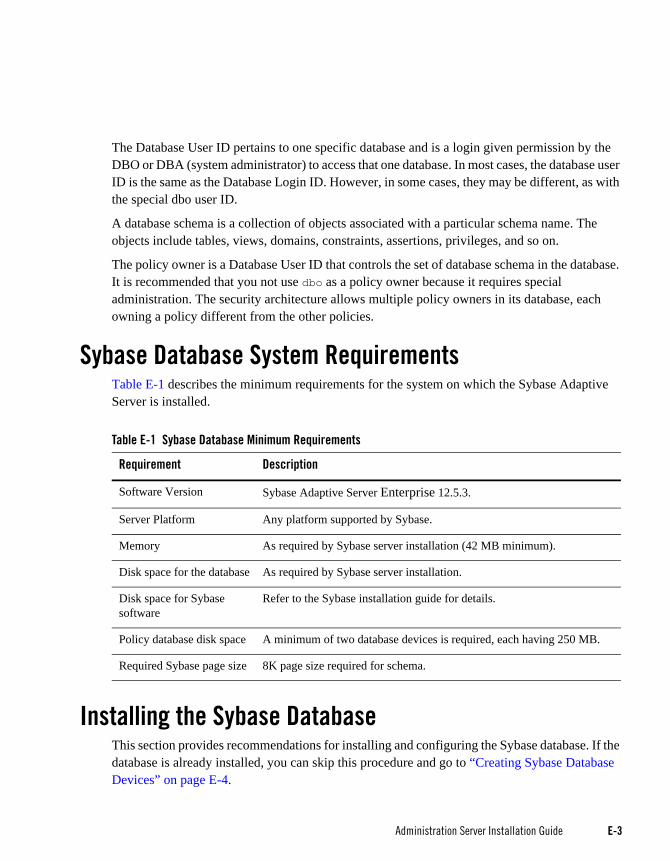
3. Expand the Sybase Database server node in the left pane (shown as WAILEE in Figure E-2) and click Database Devices. Add Device Database appears in the right pane (see Figure E-3).
Administration Server Installation Guide E-5
Append i x E : Sybase Ins ta l la t i on and Admin is t rat i on
Figure E-3 Add Database Device Screen
4. Double click Add Database Devices. The Specify the Name and Path screen appears (see Figure E-4).
E-6 Administration Server Installation Guide

Figure E-4 Database Device Name and Path Screen
5. Specify the path (for example C:\Sybase\data\asi_data_dev.dat) and the device name (for example asi_data_dev) and click Next. The Add Database Device - Advanced Options screen appears (see Figure E-5).
Administration Server Installation Guide E-7

Append i x E : Sybase Ins ta l la t i on and Admin is t rat i on
Figure E-5 Sybase Add Database Device - Advanced Options Screen
6. Set the Device number to 2, Size to 250 MB, select Check here to utilize... checkbox, and click Finish.
7. To add database device asi_log_dev, repeat steps 4 to 6, but set the database device name to asi_log_dev instead of asi_data_dev, and click Finish.
Note: For instructions for creating Sybase database devices on Solaris and Linux, the Sybase documentation.
E-8 Administration Server Installation Guide

Administering the Sybase Policy DatabaseTable E-2 lists and describes the batch and shell files provided for database administration. The files are located in the BEA_HOME\ales32-admin\bin directory.
Backing Up a Sybase DatabaseThe policy database should be backed up at regular intervals and before uninstalling or re-installing the policy database. If necessary, contact a database or system administrator to assist with this process.
Use your established backup procedure or follow these steps:
1. Login to the Sybase database server as the system administrator, database operator, or database owner.
Note: The database owner is not the same as the policy owner.
2. Backup the transaction log using the dump transaction command.
3. Backup the database by using the dump database command.
Note: See the Sybase documentation for further information on using these commands.
Table E-2 Database Administration Utilities
File Name Used to:
policyexporter.bat
policyexporter.sh
Exports policy data. See the Policy Managers Guide for information on how to export policy. The dbtype is the type of database, Sybase or Oracle.
install_ales_schema.bat
install_ales_schema.sh
Installs the policy database schema. See “Installing the Policy Database Schema” on page 5-1 for information on how to install the database schema.
uninstall_ales_schema.bat
uninstall_ales_schema.sh
Uninstall the policy database schema from the database server. The parameters for this script are the same as the install_ales_schema script.
Administration Server Installation Guide E-9

Append i x E : Sybase Ins ta l la t i on and Admin is t rat i on
E-10 Administration Server Installation Guide
F
Appendix F: Manual Database Setup Steps
OverviewBefore running the installation program, you must create a policy database and administrative user. If you choose not to accomplish this using the DBConfig tool, you may do so manually. This appendix describes the manual steps in the following sections:
“Oracle” on page F-1
“Sybase” on page F-2
“Microsoft SQL Server” on page F-4
“PointBase 5.1” on page F-7
“DB2 Universal DB Enterprise Server 9.1” on page F-8
Oracle1. Login to the Oracle database server as a database administrator by entering:
sqlplus dba/password@ASERVER
where:
dba — username to access the database password — database administrator password ASERVER — name of the Oracle service (as defined in tnsnames.ora).
2. To create the policy database, enter the following commands at the SQL> prompt:
Administration Server Installation Guide E-1

Append ix F : Manual Database Setup Steps
SQL>connect sys as sysdba SQL>create tablespace DATA datafile ‘C:/Oracle/oradata/ASI/data.dbf’ size 10M autoextend on next 1M MAXSIZE 250M;
3. To create a ASI role, enter:
SQL> create role asi_role; SQL> grant create session to asi_role; SQL> grant create table to asi_role; SQL> grant create sequence to asi_role; SQL> grant create trigger to asi_role;
where asi_role is the new role.
This automatically uses the default tablespaces generated when Oracle was installed, but you can specify and use any tablespaces.
4. To create the ALES administrative user, enter:
SQL> create user username identified by password SQL> default tablespace DATA quota unlimited on DATA;
where:
username — username of the new ALES administrative user password — password to assign to the new user account unlimited — size of the tablespace (shown here as set to unlimited).
5. To grant the ASI role with the necessary privileges to the ALES administrative user, enter:
conn sys as sysdba; grant asi_role to username; commit;
In this case, you grant SELECT permission to the new administrative user. The Oracle database server does not allow you to grant the permission to the asi_role. This dynamic view is used to check whether one of the tables is currently being accessed. Therefore, the SELECT permission is required.
6. Exit SQLplus.
After performing these steps, the Administration Server may be installed as described in “Installation” on page 4-1.
SybaseTo install the Administration Server with Sybase, you must first create the policy database and a ALES administrative user account.
E-2 Administration Server Installation Guide

Note: It is strongly recommended that you not use the dbo of the policy database as the policy owner. This requires additional database configuration beyond the scope of this guide.
Please refer to “Creating Sybase Database Devices” on page E-4 if you have not already created the required database devices asi_data_dev and asi_log_dev as shown in this section.
To set up a policy database and the ALES administrative user, perform these steps:
1. Log in as the System Administrator.
2. At the command prompt, enter: isql -Usa -S server_name
where server_name is the database server name.
3. Enter the following commands:
1>use master 2>go 1>create database database_name on asi_data_dev = 250 log on asi_log_dev = 250 2>go
where
database_name — name of the new database asi_data_dev — data device name asi_log_dev — log device name
Note: You may use a larger minimum database size if needed.
4. To set the database options, type the following commands at the isql command prompt:
1>use master 2>go 1>sp_dboption sspolicy, "select into/bulkcopy", true 2>go 1>sp_dboption sspolicy, "abort tran on log full", true 2>go 1>sp_dboption sspolicy, "trunc log on chkpt", true 2>go 1>sp_dboption sspolicy, "trunc. log on chkpt.", true 2>go
Note: For development databases, set the trunc log on chkpt option to false if periodic dump transactions are not required. For production databases, set this option to true to back up and truncate the database and transaction logs.
5. To create the ASI Database Login ID, enter the following at the isql command prompt:
Administration Server Installation Guide E-3
Append ix F : Manual Database Setup Steps
1>use master 2>go 1>sp_addlogin asi, password, database_name, null, "asi login" 2>go
where:
password — ALES administrative user password, at least six alphanumeric characters or other characters allowed by Sybase
database_name — name of the Oracle Entitlements Server database. If an asi login already exists, use the sp_modifylogin command to set its default database to database_name.
6. To create the ALES administrative user, enter the following at the isql command prompt:
1>use sspolicy 2>go 1>sp_adduser asi 2>go
7. To grant permissions to the ALES administrative user, enter the following at the isql command prompt:
1>use sspolicy 2>go 1>grant all to asi 2>go
After performing these steps, the Administration Server may be installed as described in “Installation” on page 4-1.
Microsoft SQL ServerTo install the Administration Server with Microsoft SQL Server, first create the policy database and a ALES administrative user account. This section describes how to do this.
Note: Microsoft SQL Server JDBC drivers are not shipped with OES. OES uses the MSSQL 2005 JDBC driver for connectivity to both MSSQL 2000 and MSSQL 2005. You can find this driver on the Microsoft download site.
Perform the following steps:
1. From the Window’s Start menu, select Programs>Microsoft SQL Server>Enterprise Manager.
2. On the File menu, select Action>New Database. Then enter the new database name and a collation name that creates the database in case-sensitive mode.
E-4 Administration Server Installation Guide

Figure 5-1 shows that a database named asiadmin has been created.
Figure 5-1 Adding a Microsoft SQL Database
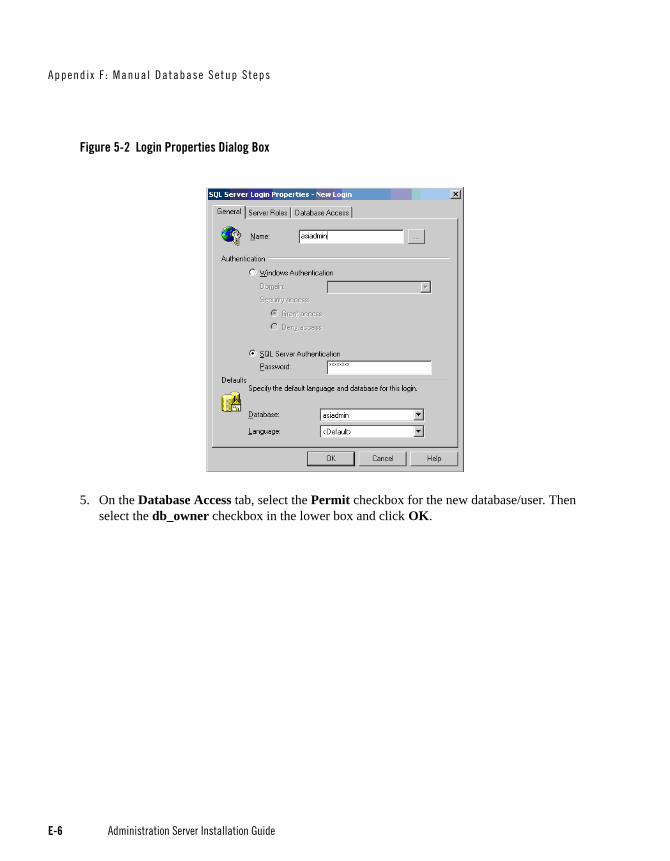
3. In the Enterprise Manager left pane, right-click Logins and select New Login. This opens the the Login Properties dialog box.
4. In the Name field, enter a name for the new ALES administrative user. Then select the SQL Server Authentication radio button and enter the desired password. Finally, select the new database from the Database dropdown field.
Administration Server Installation Guide E-5
Append ix F : Manual Database Setup Steps
Figure 5-2 Login Properties Dialog Box
5. On the Database Access tab, select the Permit checkbox for the new database/user. Then select the db_owner checkbox in the lower box and click OK.
E-6 Administration Server Installation Guide
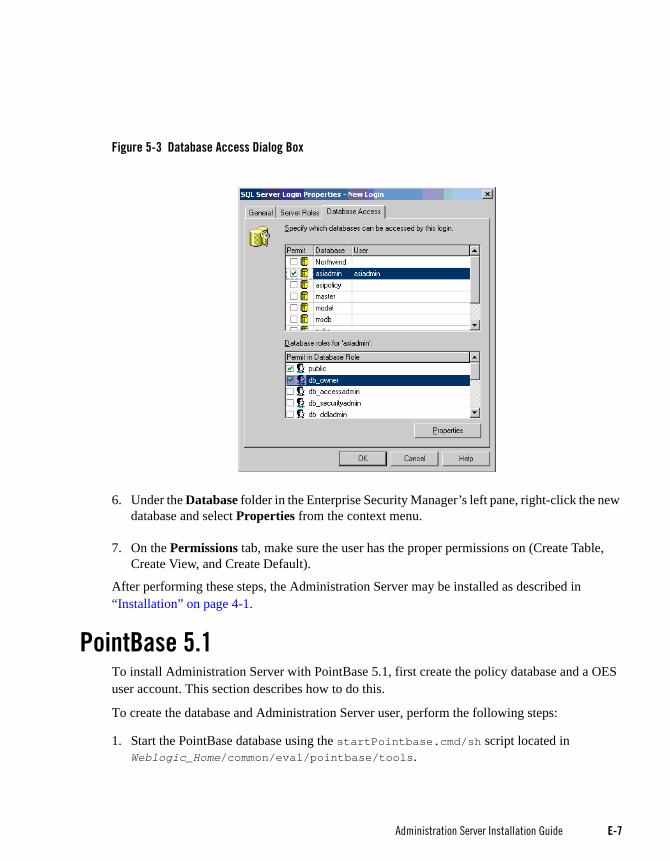
Figure 5-3 Database Access Dialog Box
6. Under the Database folder in the Enterprise Security Manager’s left pane, right-click the new database and select Properties from the context menu.
7. On the Permissions tab, make sure the user has the proper permissions on (Create Table, Create View, and Create Default).
After performing these steps, the Administration Server may be installed as described in “Installation” on page 4-1.
PointBase 5.1To install Administration Server with PointBase 5.1, first create the policy database and a OES user account. This section describes how to do this.
To create the database and Administration Server user, perform the following steps:
1. Start the PointBase database using the startPointbase.cmd/sh script located in Weblogic_Home/common/eval/pointbase/tools.
Administration Server Installation Guide E-7
Append ix F : Manual Database Setup Steps
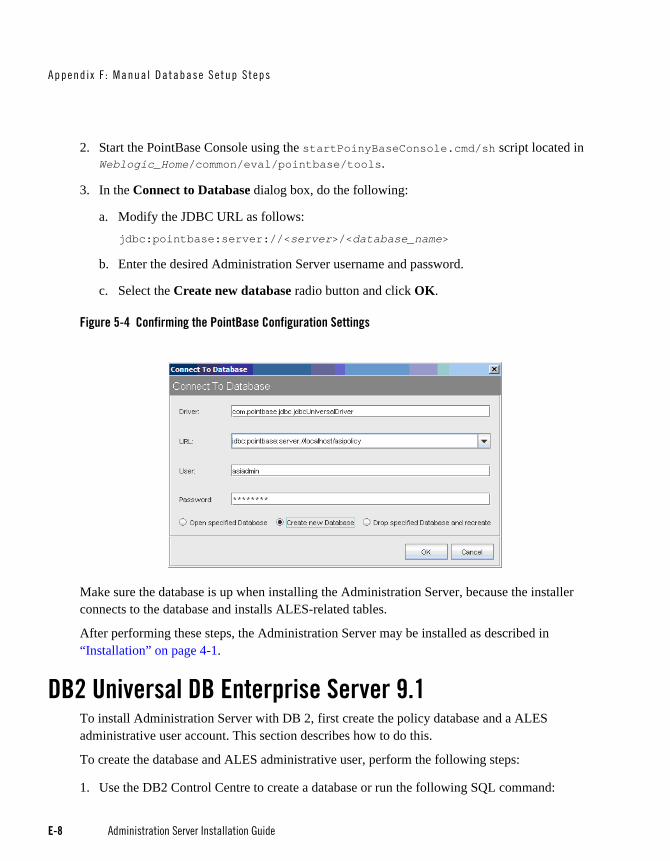
2. Start the PointBase Console using the startPoinyBaseConsole.cmd/sh script located in Weblogic_Home/common/eval/pointbase/tools.
3. In the Connect to Database dialog box, do the following:
a. Modify the JDBC URL as follows:jdbc:pointbase:server://<server>/<database_name>
b. Enter the desired Administration Server username and password.
c. Select the Create new database radio button and click OK.
Figure 5-4 Confirming the PointBase Configuration Settings
Make sure the database is up when installing the Administration Server, because the installer connects to the database and installs ALES-related tables.
After performing these steps, the Administration Server may be installed as described in “Installation” on page 4-1.
DB2 Universal DB Enterprise Server 9.1To install Administration Server with DB 2, first create the policy database and a ALES administrative user account. This section describes how to do this.
To create the database and ALES administrative user, perform the following steps:
1. Use the DB2 Control Centre to create a database or run the following SQL command:
E-8 Administration Server Installation Guide

CREATE DATABASE ALES AUTOMATIC STORAGE YES ON 'D:\' DBPATH ON 'D:\' USING CODESET GBK TERRITORY CN COLLATE USING SYSTEM PAGESIZE 16384;
Notes:
– Specify the path information appropriate to your environment. the PAGESIZE must be 16384 or greater.
2. Increase the database configuration parameter (applheapsz) to allow a larger application heap (from 256 to 512). The step also can be done by DB2 Control Centre.
3. Create a new user for the database. This user must be based on a system account. On Windows, for example, the Windows user is selected when creating the new database user.
Note: The password of the system account must satisfy DB2 requirements (such as a combination of numbers and letters) or creation of the DB user will fail.
After performing these steps, the Administration Server may be installed as described in “Installation” on page 4-1.
Administration Server Installation Guide E-9

Append ix F : Manual Database Setup Steps
E-10 Administration Server Installation Guide