Admin Training Guide-4-8 - S2 Security Corporation · S2 NetBox Basic End-User Admin Training S2...
47
S2 NetBox Basic End-User Admin Training S2 Security 4/8/16 S2 Security 1 S2 NetBox v4.8 Basic End-User Admin Training
Transcript of Admin Training Guide-4-8 - S2 Security Corporation · S2 NetBox Basic End-User Admin Training S2...

S2NetBox BasicEnd-UserAdminTraining S2Security
4/8/16 S2Security 1
AllRightsReserved
S2NetBoxv4.8
BasicEnd-UserAdminTraining

S2NetBox BasicEnd-UserAdminTraining S2Security
4/8/16 S2Security 2
AllRightsReserved
TableofContents
Introduction...........................................................................................................................................3LogintoyourNetBoxSystem......................................................................................................................3
PersonRecords.....................................................................................................................................5AccessingPersonRecords...........................................................................................................................5ContentofaPersonRecord.........................................................................................................................7EditingaPersonRecord.............................................................................................................................11AddingaNewPersonRecord....................................................................................................................12AssigningUser-RolesandPermissions................................................................................................13DeleteaPersonRecord...............................................................................................................................14
IssuingAccessCards/Credentials.................................................................................................15IssueCredentials...........................................................................................................................................15ChangetheStatusofanAccessCard.......................................................................................................19TemporaryAccessCards............................................................................................................................20AssigningandRemovingAccessLevels.................................................................................................22CancelanAccessCard.................................................................................................................................24
Badging..................................................................................................................................................25UploadaPhotoIDLayout...........................................................................................................................25CapturingIDBadgePhotos........................................................................................................................27AttachinganIDPhototoaPersonrecord............................................................................................29PrintinganIDBadge....................................................................................................................................31
Reporting..............................................................................................................................................32RunanAccessLevelReport......................................................................................................................32RunaCredentialAuditReport.................................................................................................................34RunaPhotoIDRequestReport...............................................................................................................37RunaRosterReport.....................................................................................................................................39
ScheduledActions..............................................................................................................................42WhatisaScheduledAction?.....................................................................................................................42CreatingaScheduledAction.....................................................................................................................43

S2NetBox BasicEnd-UserAdminTraining S2Security
4/8/16 S2Security 3
AllRightsReserved
Introduction
LogintoyourNetBoxSystem
Follow this procedure in order to log into your NetBox controller.
Step Action Screenshot1 Open a web
browser.
2 EntertheIPaddressorURLofyoursystemintotheAddressbarandpresstheEnterkey.Note:TheIPaddressorURLforyoursystemwillbespecificforyourorganization.ThedefaultIPaddressofanyS2NetBoxcontrolleris192.168.0.250
3 Enterausernameandpassword.Note:Thedefaultusernameforyourcontrollerisadminandthedefaultpasswordisalsoadmin.
4 ClicktheArrowicon.

S2NetBox BasicEnd-UserAdminTraining S2Security
4/8/16 S2Security 4
AllRightsReserved
YouarenowloggedintotheNetBoxController.
NetBoxControllerDefaultHomePage

S2NetBox BasicEnd-UserAdminTraining S2Security
4/8/16 S2Security 5
AllRightsReserved
PersonRecords
AccessingPersonRecords
In order for an S2 controller to recognize an individual, they must have a person record stored on the controller. This record holds personal information about that particular person and as well as what they have access to. Follow this procedure to find and display an individual Person Record.
Step Action Screenshot1 Click the
Administration top-level control.
2 ClickPeopleSearch.
3 Enterthelastnameof
thepersonwhoserecordyouarelookingfor.Note:Youcanalsosearchbyanyoftheotherfieldsonthispage.
4 ClickSearch.

S2NetBox BasicEnd-UserAdminTraining S2Security
4/8/16 S2Security 6
AllRightsReserved
Step Action Screenshot5 Ifyoursearchyields
multipleresults,selectthecorrectperson.Otherwise,ifyoursearchonlyreturnsoneperson,theirpersonrecordwillautomaticallyDisplay.
PersonRecord

S2NetBox BasicEnd-UserAdminTraining S2Security
4/8/16 S2Security 7
AllRightsReserved
ContentofaPersonRecord
The first part of the Person record contains the person’s name, ID photo, ID number and the date the record was created. An optional expiration date can be set if required. The last time the record was modified and the person who modified the record are also displayed.

S2NetBox BasicEnd-UserAdminTraining S2Security
4/8/16 S2Security 8
AllRightsReserved
The Access Control tab contains information on any access cards the individual has been issued as well as what their level of access is.
ThePhotoIDtabiswhereyougotoimportanIDphotoandattachittothePersonrecord.

S2NetBox BasicEnd-UserAdminTraining S2Security
4/8/16 S2Security 9
AllRightsReserved
The User-Defined tab is configured upon system set-up to meet any special needs of your organization.
TheContacttabcontainstheindividual’scontactinformation.
TheOtherContacttabhasadditionalspaceformoretelephonenumbers.

S2NetBox BasicEnd-UserAdminTraining S2Security
4/8/16 S2Security 10
AllRightsReserved
The Vehicle tab contains information regarding the individual’s automobile.
TheLogintabcontainstheindividual’saccountlogininfo.
ThePartitionstabdisplayswhatpartitionstheindividualisvisiblein.
TheRecentActivitytabshowsalistoftheActivityLogentriestheindividualhasgenerated.

S2NetBox BasicEnd-UserAdminTraining S2Security
4/8/16 S2Security 11
AllRightsReserved
EditingaPersonRecord
To edit a person record start by accessing the record you need wish to change; then simply enter the new information in the appropriate field(s). Make sure to click to Save button at the bottom of the page to save your changes.

S2NetBox BasicEnd-UserAdminTraining S2Security
4/8/16 S2Security 12
AllRightsReserved
AddingaNewPersonRecord
Follow this procedure in order to create a new Person record.
Step Action Screenshot1 Click the
Administration top-level control.
2 ClickPeopleAdd.
3 Enterallinformation
requiredbyyourorganization.
4 ClickSave.
5 ThenewPersonrecord
hasbeencreated.

S2NetBox BasicEnd-UserAdminTraining S2Security
4/8/16 S2Security 13
AllRightsReserved
AssigningUser-RolesandPermissions
When creating or editing Person records you may be asked to assign a user-role or permission to a specific user. Follow this procedure to assign a user-role or permission.
Step Action Screenshot1 Look up the Person
record for the person you wish to assign a user role.
2 ClickLogin.
3 Enterausernameand
password.
4 Re-enterthepassword.
5 Selecttheappropriate
userroleorpermissionfromthedropdownmenu.
6 ClickSave.

S2NetBox BasicEnd-UserAdminTraining S2Security
4/8/16 S2Security 14
AllRightsReserved
DeleteaPersonRecord
Follow this procedure in order to delete a Person record.
Step Action Screenshot1 Click the
Administration top-level control.
2 ClickPeopleSearch.
3 Enterthelastnameof
thepersonwhoserecordyouarelookingfor.Note:Youcanalsosearchbyanyoftheotherfieldsonthispage.
4 ClickSearch.

S2NetBox BasicEnd-UserAdminTraining S2Security
4/8/16 S2Security 15
AllRightsReserved
5 Ifyoursearchyieldsmultipleresults,selectthecorrectperson.Otherwise,ifyoursearchonlyreturnsoneperson,theirpersonrecordwillautomaticallyDisplay.
6 ScrolltothebottomofthepageandclickDelete.
7 ClickYes.
8 ThePersonrecordis
nowdeleted.
IssuingAccessCards/Credentials
IssueCredentials
Follow this procedure in order to issue a new access card or other credential.
Step Action Screenshot1 Access the Person
record for the person you wish to issue a credential
2 ClickAccessControl.

S2NetBox BasicEnd-UserAdminTraining S2Security
4/8/16 S2Security 16
AllRightsReserved
Step Action Screenshot3 ClickAddNew
Credential.
4 EntertheHotStamp
numberofthecredentialyouareissuing.TheHotStampnumberistypicallyprintedontheaccesscredential.
5 SelectthecorrectCredentialFormatfromthedropdownmenu.Note:ThecorrectchoiceofCredentialFormatwillvarybyorganization.OncetheHotStampnumberandCardFormatareenteredcorrectly,theEncodedNumberfieldwillauto-populate.
6 Ifyourorganizationisequippedwithanenrollmentreaderthereisanalternativemethodtoentertherequiredinformation.StatbyclickingRead.

S2NetBox BasicEnd-UserAdminTraining S2Security
4/8/16 S2Security 17
AllRightsReserved
Step Action Screenshot7 Selecttheappropriate
EnrollmentReaderfromthedropdownmenu;thenclickGo.Note:Youmustnowpresenttheaccesscredentialtotheenrollmentreader.
8 Allrequiredfieldsshouldnowbeentered.Note:Youhavetheoptionofenteringanexpirationdatefortheaccesscredential.
9 Next,makesurethatthestatusdropdownmenuissettoActive.
10 ClickSave.

S2NetBox BasicEnd-UserAdminTraining S2Security
4/8/16 S2Security 18
AllRightsReserved
Step Action Screenshot11 Theaccesscredential
isnowactiveandreadyforuse.

S2NetBox BasicEnd-UserAdminTraining S2Security
4/8/16 S2Security 19
AllRightsReserved
ChangetheStatusofanAccessCard
The need may arise to change the status of someone’s access credential, such as in the case of a lost or damaged access card. Follow this procedure in order to change the status of an access card.
Step Action Screenshot1 Access the Person
record for the person whose access card you wish to edit.
2 ClickAccessControl.
3 Selectthenewstatus
fromthedropdownmenu.Note:Somepeoplehavemultipleaccesscards.Makesureyouselectthecorrectcard.
4 ClickSave.
5 Thecardstatusisnow
updated.

S2NetBox BasicEnd-UserAdminTraining S2Security
4/8/16 S2Security 20
AllRightsReserved
TemporaryAccessCards
Followthisproceduretoissueandmanageatemporaryaccesscard.
Step Action Screenshot1 To Issue a Temporary
Access Card: Access the Person record for the person you wish to issue a temporary access card.
2 ClickAccessControl.
3 ClickIssueTemporary
Credential.
4 Selecttheappropriate
EnrollmentReaderfromthedropdownmenu;thenclickGo.Note:Youmustnowpresentthetemporaryaccesscredentialtotheenrollmentreader.
5 Allrequiredfieldsshouldnowbeentered.Note:Anexpirationdateisautomaticallyentered.
6 Next,makesurethatthestatusdropdownmenuissettoTemporary.

S2NetBox BasicEnd-UserAdminTraining S2Security
4/8/16 S2Security 21
AllRightsReserved
Step Action Screenshot7 ClickSave.The
temporaryaccesscardisnowreadytouse.
1 ToExtenda
TemporaryAccessCard:Ifatemporaryaccesscardexpires,butstillneedstobeused,itmaybeextended,dependingontheend-user’ssystemrules.ClickExtendTemporaryCredentialandre-scanthetemporaryaccesscardattheselectedenrollmentreader.
2 ClickSave.
1 ToReturnaTemporaryAccessCard:ClickReturnTemporaryCredential.
2 ClickSave.

S2NetBox BasicEnd-UserAdminTraining S2Security
4/8/16 S2Security 22
AllRightsReserved
AssigningandRemovingAccessLevels
The need may arise to add or remove access levels from a person’s record, such as when a person’s job changes. Follow this procedure in order to change a person’s access level.
Step Action Screenshot1 Access the Person
record for the person whose access levels you wish to change.
2 ClickAccessControl.
3 Toaddanaccesslevel,
selecttheappropriateaccesslevelfromtheAvailablelist.
4 Clicktheright-arrow
button.
5 ClickSave.

S2NetBox BasicEnd-UserAdminTraining S2Security
4/8/16 S2Security 23
AllRightsReserved
Step Action Screenshot6 Toremoveanaccess
level,selecttheappropriateaccesslevelfromtheSelectedlist.
7 Clicktheleft-arrow
button.
8 ClickSave.

S2NetBox BasicEnd-UserAdminTraining S2Security
4/8/16 S2Security 24
AllRightsReserved
CancelanAccessCard
If you need to cancel an access card (because someone is leaving the company, or is transferred to another facility, for example) follow this procedure.
Step Action Screenshot1 Access the Person
record for the person whose Access credential you wish to cancel.
2 ClickAccessControl.
3 Clickthe“-“iconnext
totheaccesscredentialtobecanceled.
4 ClickYes.
5 Theaccesscardhas
beencanceled.

S2NetBox BasicEnd-UserAdminTraining S2Security
4/8/16 S2Security 25
AllRightsReserved
Badging
UploadaPhotoIDLayout
The design of an ID badge is contained in a special layout file that has a .DGN file extension. The layout file is required for printing ID badges. Follow this procedure in order to upload an ID layout file into your NetBox system.
Step Action Screenshot1 Click the
Administration top-level control.
2 ClickUtility.
3 ClickPhotoIDLayout
Upload.

S2NetBox BasicEnd-UserAdminTraining S2Security
4/8/16 S2Security 26
AllRightsReserved
Step Action Screenshot4 ClickChooseFile.
5 Selectthefileyouwish
toupload;thenclickChoose.
6 ClickSave.
7 Thenewlayoutfileis
uploaded.

S2NetBox BasicEnd-UserAdminTraining S2Security
4/8/16 S2Security 27
AllRightsReserved
CapturingIDBadgePhotos
Your NetBox system may be equipped with a peripheral digital camera capable of taking ID photos. If so, follow this procedure in order to take an ID badge photograph.
Step Action Screenshot1 Access the Person
record for the person you want to photograph for an ID badge.
2 ClickPhotoID.
3 ClickPhotoID.
4 ClickCaptureImage.

S2NetBox BasicEnd-UserAdminTraining S2Security
4/8/16 S2Security 28
AllRightsReserved
Step Action Screenshot5 Ifprompted,selectthe
appropriatecapturedevice.Note:ThecorrectcapturedeviceistypicallyacameralinkedtotheEPIsoftwaredriversasdepictedhere.
6 ClickOK.
7 Composeyour
photographandclickTakePicture.
8 ClickSaveImage.

S2NetBox BasicEnd-UserAdminTraining S2Security
4/8/16 S2Security 29
AllRightsReserved
AttachinganIDPhototoaPersonrecord
Follow this procedure in order to upload an existing ID photo and attach it to a person record.
Step Action Screenshot1 Access the Person
record you want to add an ID photo to.
2 ClickthePhotoIDtab.
3 ClickAttachIDPhoto.
4 ClickChooseFile.
5 Browsetoandselect
thepicturefileyouwishtouse.
6 ClickOK.

S2NetBox BasicEnd-UserAdminTraining S2Security
4/8/16 S2Security 30
AllRightsReserved
Step Action Screenshot7 TheIDphotoisnow
attachedtothePersonrecord.
8 UsetheChangeor
DeletebuttonstochangeordeletetheIDphoto.

S2NetBox BasicEnd-UserAdminTraining S2Security
4/8/16 S2Security 31
AllRightsReserved
PrintinganIDBadge
Follow this procedure to print an ID badge.
Step Action Screenshot1 Look up the Person
record for the person you want to print an ID badge for.
2 ClickPhotoID.
3 ClickPhotoID.
4 ClickPrintPhotoID.
5 Selecttheappropriate
printerandclickOK.

S2NetBox BasicEnd-UserAdminTraining S2Security
4/8/16 S2Security 32
AllRightsReserved
Reporting
RunanAccessLevelReport
An Access Level report gives you information about the different access levels that are set up in your system. Follow this procedure to run an Access Level report.
Step Action Screenshot1 Click the
Administration top-level control.
2 ClickReports.
3 ClickPeople.
4 ClickAccessLevels.

S2NetBox BasicEnd-UserAdminTraining S2Security
4/8/16 S2Security 33
AllRightsReserved
SampleAccessLevelReport

S2NetBox BasicEnd-UserAdminTraining S2Security
4/8/16 S2Security 34
AllRightsReserved
RunaCredentialAuditReport
A Credential Audit report returns information regarding access cards that have been set up in your system. Follow this procedure to run a Credential Audit report.
Step Action Screenshot1 Click the
Administration top-level control.
2 ClickReports.
3 ClickPeople.
4 ClickCredentialAudit.

S2NetBox BasicEnd-UserAdminTraining S2Security
4/8/16 S2Security 35
AllRightsReserved
Step Action Screenshot5 Selecttheaccesscard
statusyouareinterestedinfromAvailablelist.Note:YoucanchoosemorethanonestatusbyholdingdowneithertheControlkey(PC)ortheCommandkey(Mac)
6 ClicktheRight-Arrowbuttontoaddtheselectedcardstatus(orstatuses)totheSelectedlist.
7 Optionally,youcan
limityourreporttoonlycredentialsthathavenotbeenusedforacertainnumberofdays,bytypinganumberintotheappropriatetextentryfield.
8 Youcanalsochoosetohaveyourreportspanallpartitionsinyoursystembyclickingtheappropriatecheckbox.

S2NetBox BasicEnd-UserAdminTraining S2Security
4/8/16 S2Security 36
AllRightsReserved
Step Action Screenshot9 ClickGo.
SampleCredentialAuditReport

S2NetBox BasicEnd-UserAdminTraining S2Security
4/8/16 S2Security 37
AllRightsReserved
RunaPhotoIDRequestReport
A Photo ID Request report is useful to the person responsible for creating photo ID badges. It displays all of the requests for photo ID badges that need to be created. Follow this procedure in order to run a Photo ID Request report.
Step Action Screenshot1 Click the
Administration top-level control.
2 ClickReports.
3 ClickPeople.
4 ClickPhotoID
Requests.

S2NetBox BasicEnd-UserAdminTraining S2Security
4/8/16 S2Security 38
AllRightsReserved
SamplePhotoIDRequestReport

S2NetBox BasicEnd-UserAdminTraining S2Security
4/8/16 S2Security 39
AllRightsReserved
RunaRosterReport
A Roster report gives a list of all people currently in your system. Follow this procedure in order to run a Roster report.
Step Action Screenshot1 Click the
Administration top-level control.
2 ClickReports.
3 ClickPeople.

S2NetBox BasicEnd-UserAdminTraining S2Security
4/8/16 S2Security 40
AllRightsReserved
Step Action Screenshot4 ClickRoster.
5 Ifdesired,clickthe
checkboxtoshowpeoplethatarebuiltintootherpartitionsthatarevisibletoyourpartition.
6 ClickGo.

S2NetBox BasicEnd-UserAdminTraining S2Security
4/8/16 S2Security 41
AllRightsReserved
SampleRosterReport

S2NetBox BasicEnd-UserAdminTraining S2Security
4/8/16 S2Security 42
AllRightsReserved
ScheduledActions
WhatisaScheduledAction?
A scheduled action is a planned temporary override of the normal access control schedule. For example, a scheduled action can be created that will lock a portal for a future period time when it would normally be unlocked. A scheduled action could also be created that will grant access to an elevator that is usually restricted from public access. Scheduled actions can be created for a number of different resources including:
• Portals • Portal Groups • Elevator Floors • Floor Groups • Inputs • Outputs
Scheduled actions can be created for portals, portal groups, elevator floors, floor groups, inputs and outputs.

S2NetBox BasicEnd-UserAdminTraining S2Security
4/8/16 S2Security 43
AllRightsReserved
CreatingaScheduledAction
Follow this procedure in order to create a scheduled action.
Step Action Screenshot1 Log into your S2
NetBox controller and click the Configuration top-level control.
2 ClickScheduledAction.
3 Clickthearrownextto
thedesiredtypeofresource.

S2NetBox BasicEnd-UserAdminTraining S2Security
4/8/16 S2Security 44
AllRightsReserved
Step Action Screenshot4 Clickthe“+”iconto
selectaspecificresource.Note:Resourcesthatalreadyhavescheduledactionscreatedwillalreadybelisted.
5 Selectthedesired
resourcefromthedropdownmenu.

S2NetBox BasicEnd-UserAdminTraining S2Security
4/8/16 S2Security 45
AllRightsReserved
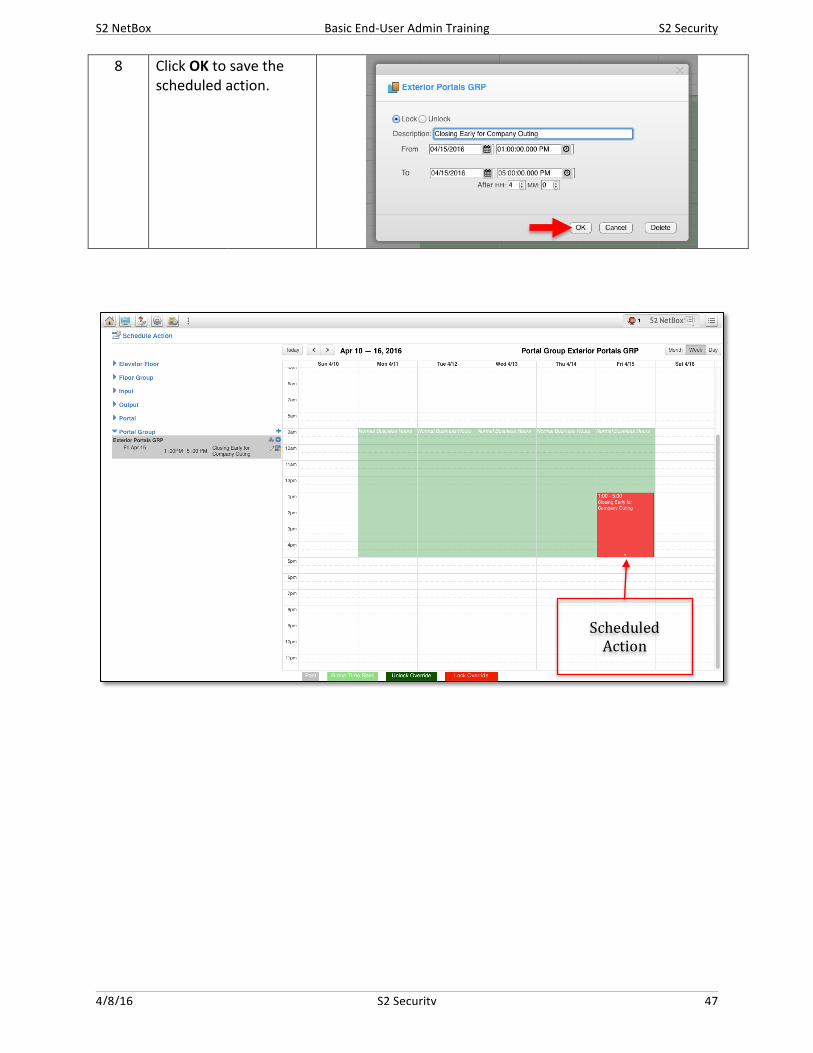
TheCalendarnowshowstheschedulefortheselectedresource.Inthisexample,thelightgreenrepresentstheunlocktimespecfortheselectedportalgroup.
SelectedResources
ResourceSchedule

S2NetBox BasicEnd-UserAdminTraining S2Security
4/8/16 S2Security 46
AllRightsReserved
6 Clickanddragwiththemousetohighlightthetimeyouwanttooverridetheregularschedule.
7 Apop-upwindowwill
appear.Noticethatthelock/unlockstateofthescheduledactionbeingcreateddefaultstotheoppositeofthenormalschedule,andthetimeofthescheduledactioncorrespondstothedateandtimeselectedonthecalendar.Youcanenteradescriptionormanuallyadjustthetimingofthescheduledactionsusingthefieldsinthispop-upwindow.
Note:Youcanalsocallupthispop-upwindowandmanuallycreateascheduledactionbyclickingtheblue“+”icon.
S2NetBox BasicEnd-UserAdminTraining S2Security
4/8/16 S2Security 47
AllRightsReserved
8 ClickOKtosavethescheduledaction.
ScheduledAction