
AD FS Version 2.0 Setup for SAML SSO Configuration · PDF fileContents Introduction...
18
AD FS Version 2.0 Setup for SAML SSO Configuration Example Contents Introduction Prerequisites Requirements Components Used Configure Download AD FS Version 2.0 Identity Provider (IdP) Metadata Download Collaboration Server (SP) Metadata CUCM IM and Presence Service Unity Connection Cisco Prime Collaboration Provisioning Add CUCM as Relying Party Trust Add CUCM IM and Presence as Relying Party Trust Add UCXN as Relying Party Trust Add Cisco Prime Collaboration Provisioning as Relying Party Trust Verify Troubleshoot Introduction This document describes how to configure Active Directory Federation Service (AD FS) Version 2.0 in order to enable Security Assertion Markup Language (SAML) Single Sign-on (SSO) for Cisco Collaboration products like Cisco Unified Communications Manager (CUCM), Cisco Unity Connection (UCXN), CUCM IM and Presence, and Cisco Prime Collaboration. Prerequisites Requirements AD FS Version 2.0 must be installed and tested. Caution: This installation guide is based on a lab setup and AD FS Version 2.0 is assumed to be used only for SAML SSO with Cisco Collaboration products. In case it is used by other business-critical applications, then necessary customization must be done as per official Microsoft Documentation. Components Used The information in this document is based on these software and hardware versions:
Transcript of AD FS Version 2.0 Setup for SAML SSO Configuration · PDF fileContents Introduction...
AD FS Version 2.0 Setup for SAML SSOConfiguration Example Contents
IntroductionPrerequisitesRequirementsComponents UsedConfigureDownload AD FS Version 2.0 Identity Provider (IdP) MetadataDownload Collaboration Server (SP) MetadataCUCM IM and Presence ServiceUnity ConnectionCisco Prime Collaboration ProvisioningAdd CUCM as Relying Party TrustAdd CUCM IM and Presence as Relying Party TrustAdd UCXN as Relying Party TrustAdd Cisco Prime Collaboration Provisioning as Relying Party TrustVerifyTroubleshoot
Introduction
This document describes how to configure Active Directory Federation Service (AD FS) Version2.0 in order to enable Security Assertion Markup Language (SAML) Single Sign-on (SSO) forCisco Collaboration products like Cisco Unified Communications Manager (CUCM), Cisco UnityConnection (UCXN), CUCM IM and Presence, and Cisco Prime Collaboration.
Prerequisites
Requirements
AD FS Version 2.0 must be installed and tested.
Caution: This installation guide is based on a lab setup and AD FS Version 2.0 is assumedto be used only for SAML SSO with Cisco Collaboration products. In case it is used by otherbusiness-critical applications, then necessary customization must be done as per officialMicrosoft Documentation.
Components Used
The information in this document is based on these software and hardware versions:

AD FS Version 2.0●
Microsoft Internet Explorer 10●
CUCM Version 10.5●
Cisco IM and Presence Server Version 10.5●
UCXN Version 10.5●
Cisco Prime Collaboration Provisioning 10.5●
The information in this document was created from the devices in a specific lab environment. All ofthe devices used in this document started with a cleared (default) configuration. If your network islive, make sure that you understand the potential impact of any command.
Configure
Download AD FS Version 2.0 Identity Provider (IdP) Metadata
In order to download IdP metadata, run this link on you browser: https://<FQDN ofADFS>/FederationMetadata/2007-06/FederationMetadata.xml.
Download Collaboration Server (SP) Metadata
CUCM IM and Presence Service
Open a web browser, log into CUCM as administrator, and navigate to System > SAML SingleSign On.
Unity Connection
Open a web browser, log into UCXN as administrator, and navigate to System Settings > SAMLSingle Sign On.
Cisco Prime Collaboration Provisioning
Open a web browser, log into Prime Collaboration Assurance as globaladmin, and navigate toAdministration > System Setup > Single Sign On.
Add CUCM as Relying Party Trust
Log into the AD FS server and launch AD FS Version 2.0 from the Microsoft WindowsPrograms menu.
1.
Select Add Relying Party Trust.2.

Click Start.3.

Select the Import data about the relying party from a file option, choose theSPMetadata_CUCM.xml metadata file that you downloaded from CUCM earlier, and clickNext.
4.

Enter Display name and click Next.5.

Choose Permit all users to access this relying party and click Next.6.

Select Open the Edit Claim Rules dialog for thee relying party trust when the wizardcloses and click Close.
7.

Click Add Rule.8.

Click Next with default Claim rule template set to Send LDAP Attributes as Claims.9.

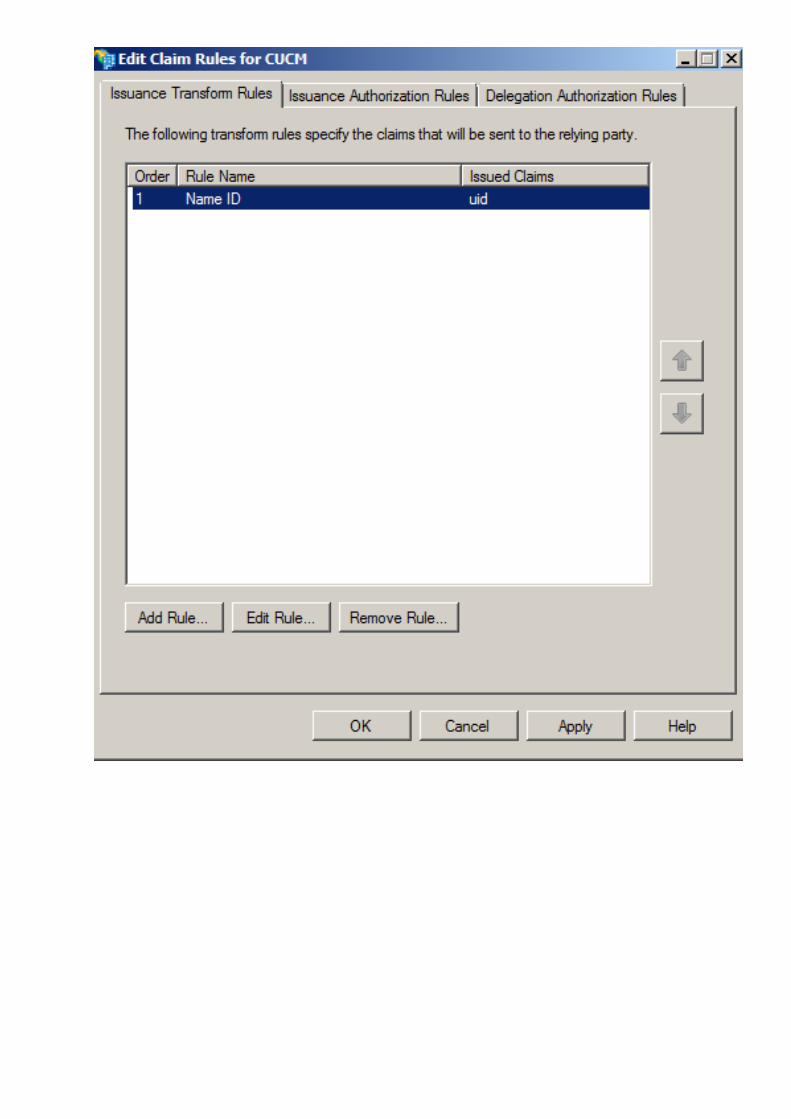
In Configure Rule, enter the Claim rule name, select Active Directory as the Attributestore, configure LDAP Attribute and Outgoing Claim Type as shown in this image, andclick Finish.
Note:- The Lightweight Directory Access Protocol (LDAP) attribute should match the DirectorySync attribute on CUCM.- “uid” should be in lower case.
10.

Click Add Rule, select Send Claims Using a Custom Rule as the claim rule template, andclick Next.
11.
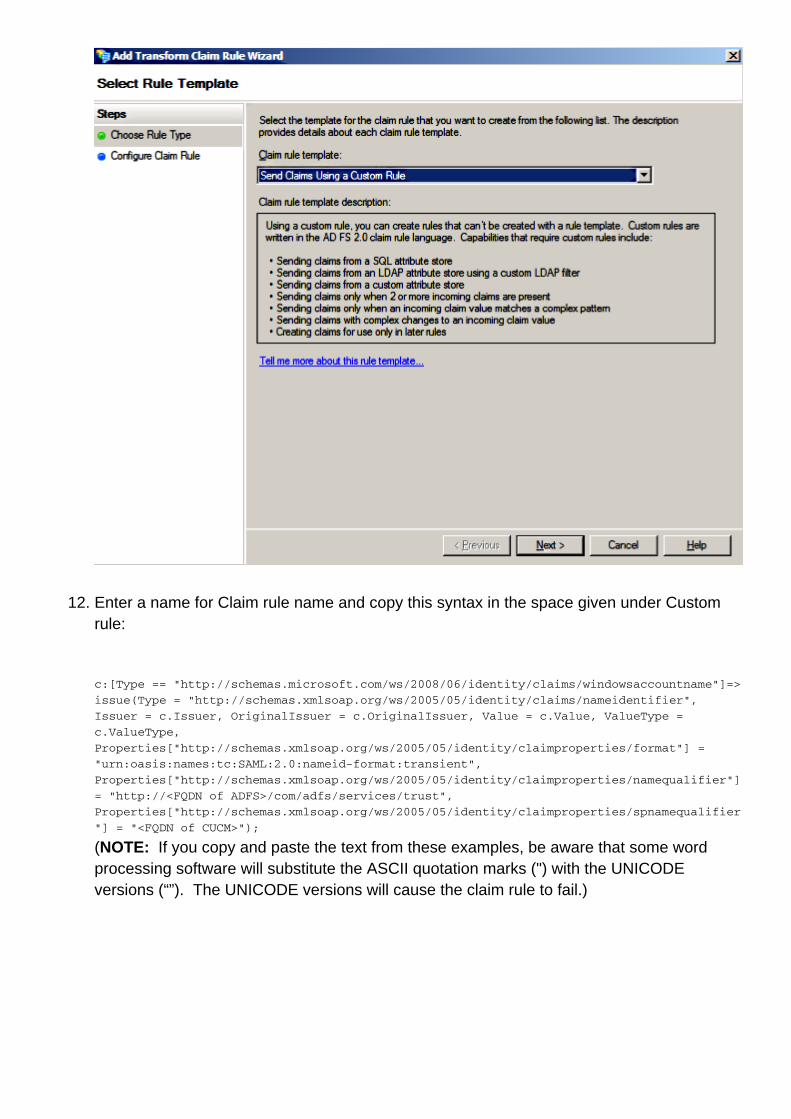
Enter a name for Claim rule name and copy this syntax in the space given under Customrule:
c:[Type == "http://schemas.microsoft.com/ws/2008/06/identity/claims/windowsaccountname"]=>
issue(Type = "http://schemas.xmlsoap.org/ws/2005/05/identity/claims/nameidentifier",
Issuer = c.Issuer, OriginalIssuer = c.OriginalIssuer, Value = c.Value, ValueType =
c.ValueType,
Properties["http://schemas.xmlsoap.org/ws/2005/05/identity/claimproperties/format"] =
"urn:oasis:names:tc:SAML:2.0:nameid-format:transient",
Properties["http://schemas.xmlsoap.org/ws/2005/05/identity/claimproperties/namequalifier"]
= "http://<FQDN of ADFS>/com/adfs/services/trust",
Properties["http://schemas.xmlsoap.org/ws/2005/05/identity/claimproperties/spnamequalifier
"] = "<FQDN of CUCM>");
(NOTE: If you copy and paste the text from these examples, be aware that some wordprocessing software will substitute the ASCII quotation marks (") with the UNICODEversions (“”). The UNICODE versions will cause the claim rule to fail.)
12.

Note: - CUCM and ADFS Fully Qualified Domain Name (FQDN) is prepopulated with the labCUCM and AD FS in this example and must be modified to match your environment.- FQDN of CUCM/ADFS are case-sensitive and must match with the metadata files.
Click Finish.13.
Click Apply and then OK.14.
Restart the AD FS Version 2.0 service from Services.msc.15.
Add CUCM IM and Presence as Relying Party Trust
Repeat Steps 1 to 11 as described for Add CUCM as Relying Party Trust and proceed toStep 2.
1.
Enter a name for Claim rule name and copy this syntax in the space given under Customrule:
c:[Type == "http://schemas.microsoft.com/ws/2008/06/identity/claims/windowsaccountname"]=>
issue(Type = "http://schemas.xmlsoap.org/ws/2005/05/identity/claims/nameidentifier", Issuer
= c.Issuer, OriginalIssuer = c.OriginalIssuer, Value = c.Value, ValueType = c.ValueType,
2.
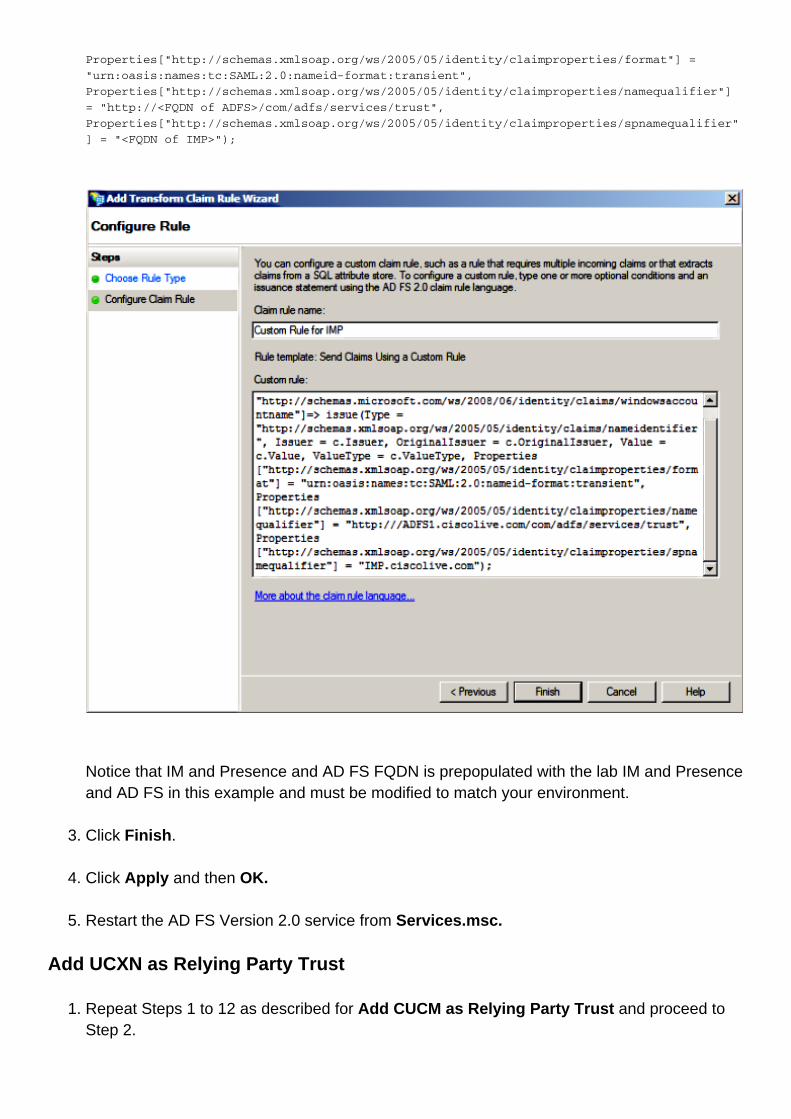
Properties["http://schemas.xmlsoap.org/ws/2005/05/identity/claimproperties/format"] =
"urn:oasis:names:tc:SAML:2.0:nameid-format:transient",
Properties["http://schemas.xmlsoap.org/ws/2005/05/identity/claimproperties/namequalifier"]
= "http://<FQDN of ADFS>/com/adfs/services/trust",
Properties["http://schemas.xmlsoap.org/ws/2005/05/identity/claimproperties/spnamequalifier"
] = "<FQDN of IMP>");
Notice that IM and Presence and AD FS FQDN is prepopulated with the lab IM and Presenceand AD FS in this example and must be modified to match your environment.
Click Finish.3.
Click Apply and then OK.4.
Restart the AD FS Version 2.0 service from Services.msc.5.
Add UCXN as Relying Party Trust
Repeat Steps 1 to 12 as described for Add CUCM as Relying Party Trust and proceed toStep 2.
1.

Enter a name for Claim rule name and copy this syntax in the space given under Customrule:
c:[Type == "http://schemas.microsoft.com/ws/2008/06/identity/claims/windowsaccountname"]=>
issue(Type = "http://schemas.xmlsoap.org/ws/2005/05/identity/claims/nameidentifier", Issuer
= c.Issuer, OriginalIssuer = c.OriginalIssuer, Value = c.Value, ValueType = c.ValueType,
Properties["http://schemas.xmlsoap.org/ws/2005/05/identity/claimproperties/format"] =
"urn:oasis:names:tc:SAML:2.0:nameid-format:transient",
Properties["http://schemas.xmlsoap.org/ws/2005/05/identity/claimproperties/namequalifier"]
= "http://<FQDN of ADFS>/com/adfs/services/trust",
Properties["http://schemas.xmlsoap.org/ws/2005/05/identity/claimproperties/spnamequalifier"
] = "<FQDN of UCXN>");
Notice that UCXN and AD FS FQDN is prepopulated with the lab UCXN and ADFS in thisexample and must be modified to match your environment.
2.
Click Finish.3.
Click Apply and then OK.4.
Restart the AD FS Version 2.0 service from Services.msc.5.

Add Cisco Prime Collaboration Provisioning as Relying Party Trust
Repeat Steps 1 to 12 as described for Add CUCM as Relying Party Trust and proceed toStep 2.
1.
Enter a name for Claim rule name and copy this syntax in the space given under Customrule:
c:[Type == "http://schemas.microsoft.com/ws/2008/06/identity/claims/windowsaccountname"]=>
issue(Type = "http://schemas.xmlsoap.org/ws/2005/05/identity/claims/nameidentifier", Issuer
= c.Issuer, OriginalIssuer = c.OriginalIssuer, Value = c.Value, ValueType = c.ValueType,
Properties["http://schemas.xmlsoap.org/ws/2005/05/identity/claimproperties/format"] =
"urn:oasis:names:tc:SAML:2.0:nameid-format:transient",
Properties["http://schemas.xmlsoap.org/ws/2005/05/identity/claimproperties/namequalifier"]
= "http://<FQDN of ADFS>/com/adfs/services/trust",
Properties["http://schemas.xmlsoap.org/ws/2005/05/identity/claimproperties/spnamequalifier"
] = "<FQDN of PCP>");
Notice that Prime Provisioning and AD FS FQDN is prepopulated with the lab PrimeCollaboration Provisioning (PCP) and AD FS from this example and must be modified tomatch your environment.
2.

Click Finish.3.
Click Apply and then OK.4.
Restart the AD FS Version 2.0 service from Services.msc.5.
Once you set up AD FS Version 2.0, proceed to enable SAML SSO on Cisco Collaborationproducts.
Verify
There is currently no verification procedure available for this configuration.
Troubleshoot
AD FS logs diagnostic data to the system Event Log. From Server Manager on the AD FS serveropen Diagnostics -> Event Viewer -> Applications and Services -> AD FS 2.0 -> Admin
Look for errors logged for AD FS activity


![[MS-ADFSOD]: Active Directory Federation Services (AD FS ... · Active Directory Federation Services (AD FS) farm: A collection of AD FS servers that is typically maintained by an](https://static.fdocuments.us/doc/165x107/5e876e6364143003c0063feb/ms-adfsod-active-directory-federation-services-ad-fs-active-directory-federation.jpg)


