Access XP Laminate Reference Chart (Quickstudy: Computer)
6
BarCharts, Inc. ® WORLD’S #1 QUICK REFERENCE SOFTWARE GUIDE New Features in Access XP 1 Access XP (also known as Access 2002 and Access 10) offers many new features over Access 2000. Some of the new and improved features are: • Application Recovery, a feature in all Office XP products, allows the application to be ended when it is unresponsive (crashed) using Start, Programs, Office Tools, Microsoft Office Application Recovery. If the application crashes, this feature automatically appears, giving the option to save the document and restart Access, then reopen the document. Either method preserves any workbooks that were open, and optionally alerts either IT or Microsoft of the crash. • A new file format that supports future enhancements without requiring the data format to change, as well as faster processing of large databases. It also can use the existing Access 2000 file format natively, allowing both programs to use the same database file. • Multiple levels of undo and redo are available in most design views. • A table is created that lists any conversion errors when previous versions are upgraded to Access XP, making it simpler to correct those errors. • PivotTable and PivotChart views are available, making it easier to analyze data for complex patterns. This is similar to the capabilities Excel has had for several versions. • Reports, forms, tables, and queries can be exported in XML format, making them easy to view with a standard browser. • Forms and reports can be saved as Data Access Pages, making it simple to convert existing databases to Web-based solutions. • The SQL Server 2000 Desktop Edition is included with Access XP, allowing database solutions to be designed with the eventual implementation using SQL Server as the back end without any modifications. • The Linked Table wizard makes it easy to seamlessly access data stored in SQL 7.0 and SQL 2000 databases. • SQL Server stored procedures can easily be created using Access’s query designer. This is especially useful for designing stored procedures that perform updates, deletes, etc. (similar to the action queries that Access supports). • Many updates and new features have been made that make it simpler for developers to programmatically manipulate data, manage passwords, integrate with Web servers, etc. Refer to the Access 2002 Product Guide for more information on these features. Contents Pg. 1 Main Window, New Features, Getting Help Pg. 2 Terminology, Database Objects, Database Toolbar, Standard Toolbar Icons, Creating a Database Pg. 3 Creating a Database, Creating Tables, Table Design Toolbar: Unique Icons, Data Types Pg. 4 Data Types, Common Field Properties, Primary Keys, Creating Queries Pg. 5 Creating Queries, Query Design Toolbar: Icons, Query Design, Specify Criteria Pg. 6 Specify Criteria, Table & Query Datasheet Toolbar: Unique Icons, Record Navigation Icons, Common Keyboard Shortcuts, Application Management, Viewing & Positioning Toolbars Describing database creation and the creation/use of tables and queries. Access XP offers an extensive help system that can be displayed by clicking the icon on the Standard Toolbar. To use the Ask a Question feature: • Enter the question in the Type a question for help field (on the right side of the menu bar) and press <Enter>. • A window containing the results is displayed. Click the hyperlink for the desired article, and the help window for that topic will be displayed. This window contains two panes. The left pane lists additional topics within the help system that may be relevant to the question that was posed. The right pane of the window contains the contents of the selected topic. • To display the contents of additional topics, click the desired topic in the left pane of the window. To display an index of the online help system: • Click the icon, select Microsoft Access Help from the Help menu, or press the F1 key, and the help window will be displayed. • Click the Index tab located at the top of the left pane of the window. • Choose a keyword from the keyword list or enter a word or phrase in the Type Keywords field. Once the word or phrase has been entered, click the Search button. • A list of topics that contain the word or phrase is listed in the bottom portion of the left pane of the window. • To display the contents of a topic, click the desired topic in the bottom portion of the left pane, and the contents will be displayed in the right pane of the window. Access XP provides a fast and convenient way to access the most up-to-date help information for Access XP on the Internet. To display the Internet help: Select Office on the Web from the Help menu. The default Internet browser that is defined within the operating system will be launched and an Internet connection established. Once the Microsoft site is accessed, the Office XP Assistance Center (help) page will be displayed. Getting Help 1. Menu Bar. The menus available in Access XP are displayed in this area. 2. Toolbars. Each toolbar provides fast access to many of the features and functions of Access XP. The toolbars can be customized. 3. Shortcut Bar. When a database is open, the Shortcut bar is displayed in this area of the window. The Shortcut bar provides quick access to the tables, queries, forms, pages, macros and modules which are defined within a database. To access the objects of a desired type, click the object type name, and the items available are displayed in the right pane of the window. Main Window 4. Objects. The objects of a selected type in a database are displayed in this pane of the window. To display an object, double-click the item. 5. Status Bar. The current status of Access XP is displayed here. In the main database window, the status will typically be “Ready.” Instructions and other information may appear in this area in other views. 6. Database Toolbar. The tools available in the database window are displayed here. These include preview, design mode, new database object, delete, view by large icon, view by small icons, view as list and view details. 7. Ask a Question. Provides quick and easy access to the Help system. 1 2 3 5 7 6 4
-
Upload
john-hales -
Category
Documents
-
view
212 -
download
0
Transcript of Access XP Laminate Reference Chart (Quickstudy: Computer)

BarCharts, Inc.® WORLD’S #1 QUICK REFERENCE SOFTWARE GUIDE
New Features in Access XP
1
Access XP (also known as Access 2002 and Access 10) offers many new featuresover Access 2000. Some of the new and improved features are:• Application Recovery, a feature in all Office XP products, allows the application
to be ended when it is unresponsive (crashed) using Start, Programs, Office Tools,Microsoft Office Application Recovery. If the application crashes, this featureautomatically appears, giving the option to save the document and restart Access,then reopen the document. Either method preserves any workbooks that were open,and optionally alerts either IT or Microsoft of the crash.
• A new file format that supports future enhancements without requiring the dataformat to change, as well as faster processing of large databases. It also can use theexisting Access 2000 file format natively, allowing both programs to use the samedatabase file.
• Multiple levels of undo and redo are available in most design views.• A table is created that lists any conversion errors when previous versions are
upgraded to Access XP, making it simpler to correct those errors.• PivotTable and PivotChart views are available, making it easier to analyze data for
complex patterns. This is similar to the capabilities Excel has had for several versions.• Reports, forms, tables, and queries can be exported in XML format, making
them easy to view with a standard browser.• Forms and reports can be saved as Data Access Pages, making it simple to
convert existing databases to Web-based solutions.• The SQL Server 2000 Desktop Edition is included with Access XP, allowing
database solutions to be designed with the eventual implementation using SQLServer as the back end without any modifications.• The Linked Table wizard makes it easy to seamlessly access data stored in
SQL 7.0 and SQL 2000 databases.• SQL Server stored procedures can easily be created using Access’s query
designer. This is especially useful for designing stored procedures that performupdates, deletes, etc. (similar to the action queries that Access supports).
• Many updates and new features have been made that make it simpler for developersto programmatically manipulate data, manage passwords, integrate with Web servers,etc. Refer to the Access 2002 Product Guide for more information on these features.
ContentsPg. 1 Main Window, New Features, Getting HelpPg. 2 Terminology, Database Objects, Database Toolbar, Standard Toolbar Icons,
Creating a DatabasePg. 3 Creating a Database, Creating Tables, Table Design Toolbar: Unique Icons,
Data Types
Pg. 4 Data Types, Common Field Properties, Primary Keys, Creating QueriesPg. 5 Creating Queries, Query Design Toolbar: Icons, Query Design, Specify CriteriaPg. 6 Specify Criteria, Table & Query Datasheet Toolbar: Unique Icons, Record
Navigation Icons, Common Keyboard Shortcuts, Application Management,Viewing & Positioning Toolbars
Describing database creation and the creation/use of tables and queries.
Access XP offers an extensive help system that can be displayed by clicking theicon on the Standard Toolbar.
To use the Ask a Question feature:• Enter the question in the Type a question for help field (on the right side of the
menu bar) and press <Enter>.• A window containing the results is displayed. Click the hyperlink for the
desired article, and the help window for that topic will be displayed. Thiswindow contains two panes. The left pane lists additional topics within the helpsystem that may be relevant to the question that was posed. The right pane ofthe window contains the contents of the selected topic.
• To display the contents of additional topics, click the desired topic in the leftpane of the window.
To display an index of the online help system:• Click the icon, select Microsoft Access Help from the Help menu, or press
the F1 key, and the help window will be displayed.• Click the Index tab located at the top of the left pane of the window.• Choose a keyword from the keyword list or enter a word or phrase in the Type
Keywords field. Once the word or phrase has been entered, click the Search button.• A list of topics that contain the word or phrase is listed in the bottom portion
of the left pane of the window.• To display the contents of a topic, click the desired topic in the bottom portion of
the left pane, and the contents will be displayed in the right pane of the window.Access XP provides a fast and convenient way to access the most up-to-date helpinformation for Access XP on the Internet.
To display the Internet help:Select Office on the Web from the Help menu.The default Internet browser that is defined within the operating system will belaunched and an Internet connection established. Once the Microsoft site isaccessed, the Office XP Assistance Center (help) page will be displayed.
Getting Help
1. Menu Bar. The menusavailable in Access XP aredisplayed in this area.
2. Toolbars. Each toolbarprovides fast access to manyof the features and functionsof Access XP. The toolbarscan be customized.
3. Shortcut Bar. When adatabase is open, theShortcut bar is displayed inthis area of the window. TheShortcut bar provides quickaccess to the tables, queries,forms, pages, macros andmodules which are definedwithin a database. To accessthe objects of a desired type,click the object type name,and the items available aredisplayed in the right pane ofthe window.
Main Window4. Objects. The objects of a
selected type in a database aredisplayed in this pane of thewindow. To display an object,double-click the item.
5. Status Bar. The current statusof Access XP is displayed here.In the main database window,the status will typically be“Ready.” Instructions and otherinformation may appear in thisarea in other views.
6. Database Toolbar. The toolsavailable in the database windoware displayed here. These includepreview, design mode, newdatabase object, delete, view bylarge icon, view by small icons,view as list and view details.
7. Ask a Question. Providesquick and easy access to theHelp system.
1
2
3
5
7
6
4

Database. A database is a collection of related objects designed to be used together(for inventory management, scheduling, managing a list of recipes, etc.). In itssimplest form, it is a basic structure of tables and fields where information canbe organized and stored. Once the information is entered into a database, it canbe analyzed, printed, sorted and retrieved. Access 2002 is a software applicationthat assists in the creation and maintenance of databases.
Drop Down Menu. A menu of choices that appears in dialog boxes and next to someicons; accessed by clicking the downward facing triangle as shown here .
Flat File Database. A database format that does not allow elated tables to be usedtogether. Very few database applications are flat file anymore; most flat filestyle databases are created in other applications, such as a spreadsheet, a textdocument, etc. instead of the format Access uses.
Foreign Key. A field in a table that references an indexed field (usually theprimary key) of another table.
Hyperlink. Text that is linked to additional information such as anotherpresentation, Office XP document or Internet Web site.
Primary Key. A field that uniquely identifies each record. No two records canhave the same primary key. They are often numbers, such as social securitynumbers, UPC codes, etc.
Relational Database. A style of database that allows for defining relationshipsbetween information contained in multiple tables. This feature allows forextensive information manipulation, smaller databases and fewer data entryerrors (due to decreased duplication of information). Access XP is arelational database application.
Relationship. Link between two tables; for example a table with itemnumbers and descriptions and a table with sales of that item.
ScreenTip. Text that appears when an icon, hyperlink, etc. is pointed at,but not clicked. The text “Save,” in the example at right.
Toolbar. A toolbar is a bar located under the main Menu Bar that provides quickaccess to common features of Access XP.
Access XP Terminology
Unlike the other applications in the Office XP suite, Access XP (like all previousversions of Access) creates a database file on the disk as soon as the database iscreated. When the application is started, the New Database Task Pane is displayed,allowing both blank and wizard-assisted databases to be created.
New Database Task PaneThe New Database Task Pane allows existing databases to be opened, and createseither a blank or a database with necessary tables,queries, forms, and reports for a given predefinedscenario.
Creating a blank database:• In the New Database Task Pane, select Blank
Database under the New heading.• Select the desired location and file name for the file
and click the Create button.• The main database window is displayed. Follow the
instructions in this chart to create any necessarytables and queries.
Using the Wizards to create a database:Access has many predefined databases and others areavailable on Microsoft’s Web site. These wizards willhelp create a database with all necessary objects. Theycan be modified as needed after the wizard finishes.
2 A
Creating a DatabaseThe Database toolbar is automatically displayed when a database is opened. It isthe view illustrated on the first page of this chart.The following describes the icons on the Database toolbar (when either the Tablesor Queries tab is selected):
Open. Opens the selected Table or Query object in datasheet view,allowing data to be viewed and usually edited.
Design. Opens the selected Table or Query object in design view,allowing the table or query design to be viewed and modified.
New. Opens a dialog that prompts for the method desired to create a newtable (design or datasheet view or using the New Table, Import Table, or LinkTable wizard) or Query (design view or Simple Query, Crosstab Query, FindDuplicates Query, or Find Unmatched Query Wizard) object desired.
Delete. Deletes the selected Table or Query object.
Large Icons. Displays the icons representing the objects and the tabs usinglarge icons.
Small Icons. Displays the icons representing the objects and the tabs usingsmall icons in multiple columns.
List. Displays the icons representing the objects and the tabs using smallicons in a single column (this is the view illustrated on Page 1).
Details. Displays the icons representing the objects and the tabs using smallicons in a single column (like List view) with the following addedinformation: description, date & time of last modification, date & time ofcreation and type of object.
Database Toolbar
Databases are made up of objects. These are illustrated on the front cover of thischart. The following is a brief description of objects available in Access XP:
Tables. Stores data in a table in rows and columns very similar to a spreadsheet.
Queries. Locates and displays information based on user-defined criteria.
Forms. Allows information from a table to be displayed in a user-defined format.
Reports. Compiles, displays and prints information compiled by a query.
Macros. Simple way to automate many tasks; can be used with forms,reports, and modules.
Modules. For more information on Visual Basic see our Quick Study®
Visual Basic guide.
Database Objects
The icons that vary from view to view will be described in their respectivesections elsewhere in this chart. The following describes the common iconsavailable in most Access views:
View. Toggles between available views. For tables, Datasheet, Design,PivotTable, and PivotChart views are available; for queries, Datasheet,Design, SQL, PivotTable, and PivotChart views are available.Save. Saves the currently displayed object. When entering and modifyingdata, it is automatically saved when leaving the current record.Search. Allows searching for files that meet specified conditions (ex.containing a certain phrase) in specified locations and of specified types.Print. Prints the current object (all of the records) to the printer used last (orthe default if one hasn’t been used yet). The printer will be displayed inparenthesis in the ScreenTip. Not available in Design view.Print Preview. Displays how the current object will look when printed onthe screen. Useful in determining the number of pages that will be used. Notavailable in Design view.Spelling. Opens the spelling checker. Not available in Design view.Cut. Removes the currently selected text or record(s) from the table (indatasheet view) or removes the criteria or field(s) from the table or query (indesign view) and places it/them on the clipboard for pasting.Copy. Copies the currently selected text or record(s) from the table (inDatasheet view) or copies the criteria or field(s) from the table or query (inDesign view) and places it/them on the clipboard for pasting.Paste. Places the contents of the clipboard into the current field or record(in Datasheet view) or places the criteria or field in the table or querydefinition (in Design view). If one or more records are pasted, they areadded to the end of the table.
Undo. Reverses the last action (typing, formatting, deletion, etc.).Remembers the last 99 actions. Multiple items can be undone in order byrepeatedly clicking this button. Be careful: multiple changes to a record canbe undone when a record is undone with a single click of this button. Thestandard drop down of Undo actions is only available in Design view.Redo. Undoes the last Undo. Remembers the last 99 Undo actions.Multiple items can be redone in order by selecting them from the dropdown menu (only in Design view). Not available in Datasheet view.
Database Window. Displays the main database window (illustrated on the frontcover) where any object type may be created, renamed, deleted, opened, etc.
New Object. Creates a new object, including query, table, form, orreport. The AutoForm and AutoReport features will build a form or report(respectively) based on the current table. All other choices create a new,empty object of the type selected.
Microsoft Access Help. Opens Access Help.
Standard Toolbar Icons

3A
Table Design Toolbar: Unique Icons
Insert Rows. Inserts a new row for a new field below the selected field.
Delete Rows Deletes the selected field(s).
Using Design View
To create a new field, name it and select the appropriate data type. Optionally, adescription may be entered for the field to describe its purpose, its role inrelationships with other tables, expected data, etc.
To create a table in Design view:• In the main database window, click the Create table in Design view link.• Enter a name for each field (up to 64 characters long), select a data type for
each field, and optionally enter a description for each field.
• When finished, click the icon to save it and remain in Design view or the
icon to save it and begin entering data.
To edit a table’s design:• In the main database window, select the desired table, then click the
button.• Make all desired modifications.
• When finished, click the icon to save it and remain in Design view or the
icon to save it and enter or edit data.
Creating a Database continuedOther templates are available from Microsoft’s Web site, but these are predefinedtemplates with sample data, not wizards that prompt for design elements.
Using a Wizard to create a new database:
• Click the General Templates link under New from Template in the NewDatabase Task Pane, and the Templates dialog box will open.
• Select the Databases tab and the figure shown above will appear.• Select the desired purpose for the database from the list and click OK.• Modify the design of the tables and queries as described in this chart.
Data TypesPurpose
Fixed length text and numbers not used in calculations, suchas names, phone numbers, and zip codes. 1-255 characters.Variable length text and numbers, such as notes on acustomer. Up to 65,535 characters.Whole numbers from 0-255. Used for small values, suchas number purchased or as a key for small sets of data,such as days of the week.-32,768 to +32,767 with 0 digits to the right of the decimal.Numbers from -2,147,483,648 to + 2,147,483,647 with 0digits to the right of the decimal. Commonly used whenlinking fields.Numbers from –3.40282338 to –1.401298–45 for negativenumbers and from +1.401298–45 to +3.40282338 for positivenumbers with 7 digits of precision to the right of the decimalin scientific notation.Numbers from –1.79769313486231308 to–4.94065645841247–324 for negative numbers and from+4.94065645841247–324 to +1.79769313486231308 forpositive numbers with 7 digits of precision to the right of thedecimal in scientific notation.Stores numbers from -1028 to +1028 with up to 28 digits tothe right of the decimal.
Data Type
Text
Memo
Number
Subtype
Byte
IntegerLong Integer
Single
Double
Decimal
The most common icons used in Table Design view (in addition to the standardicons already described) are:
Primary Key. Sets the primary key to the selected field.
Indexes. Opens a dialog box where indexes can be created and modified,including sort order, making the index the primary key, forcing all records inthe field to be unique, and ignoring (in the index) NULL (blank) values.
Tables are the key to storing information. Proper table design is beyond the scopeof this chart, but the mechanics of how to do so are described here.
Using a WizardMany sample tables come with Access. These can be used as the basis for tables
necessary for many purposes. A primary key will always be set or createdwhen using the wizard (though it can be deleted later if not needed).
To create a table using a wizard:• In the main database window, double click Create table by using wizard.• The Table Wizard will appear. Select either the Business or the Personal radio
buttons to choose tables designed for either home or business use.• Select the desired table from the list and the fields that may be appropriate for
that type of table will be listed in the middle pane. Select the desired fields andclick the button to add them to fields in the new table.
• Optionally: Select a field in the Fields in my new table pane and click theRename Field button to select a different name for the field. Rename the fieldas desired and click OK.
• Click the Next button.• Enter the name for the new table in the What do you want to name your new
table? field.• To have Access select the field to be used to uniquely identify each row, select
the Yes, set a primary key for me radio button; to manually set the primary key,choose the No, I’ll set the primary key radio button.
• Click the Next button.• If No, I’ll set the primary key was selected, select the key and type of data and
click Next.• If the wizard detects (based on field names) a relationship to another table, it
will be listed here; other relationships can also be manually configured as well.To configure the relationship, click the Relationships button and select howthey are related. When finished, click Next.
• To further modify the table’s design, click Modify the table design, otherwiseselect either Enter data directly into the table or Enter data into the table usinga form the wizard creates for me and click Finish.
Creating Tables
Table Design Toolbar: Unique Icons

4A
There are, for most data types, the additional properties listed below. Whilethey vary from data type to data type, each data type has its owncombination of properties. The common ones are:
Common Field Properties
PurposeFor text, the maximum number of characters allowed;for numbers, the number type (byte, integer, etc.).For text, force to upper or lower case, require aminimum number of characters, etc. For numbers, thedisplay of the numbers (scientific notation, currency,percent, etc.). For date/time, the format of the dateand/or time (formats are defined in the RegionalSettings control panel). For yes/no, whether to displayyes/no, true/false, or on/off. For numbers and date/time,custom formats can be defined.The number of digits that will be displayed to the rightof the decimal point. Caution: The actual value will beused in all calculations involving the field, not thenumber of digits displayed.Often used with text fields to format the display of datafor specific purposes, such as Zip codes, phone numbers,social security numbers and passwords. Can also be usedwith date/time fields to format dates and times.The value automatically placed in the field for all new(but not existing) records. For example, the currentdate, a common title or an area code.Used as the field (column) heading in datasheet viewfor queries and tables and as the default label for a fieldon a form. The default is the field name.Data which is required to be entered in the field when a newrecord is created or an existing record is edited. Data iscommonly required for things like names, phone numbersand so on.An index makes data retrieval and relationships to othertables faster and more efficient. Creating indexes on otherfields “with few, often repeated values [such as 6] or infrequently used field” generally decreases performance.Three settings are available: No [no index for the field; thedefault], Yes (Duplicates OK) [the field is indexed, butthere may be more than 1 record with the same value,such as for a last name], and Yes (No Duplicates) [thefield is indexed; no 2 records can have the same value inthe field, such as employee ID number or social securitynumber]. The primary key is always Yes (No Duplicates).
PropertyField Size
Format
Decimal Places
Input Mask
Default Value
Caption
Required
Indexed
Primary Keys
Most tables have a primary key. It uniquely identifies each record in a table.The primary key is often a field with “ID” in the field name and is often anAutoNumber field. For example, in the figure above, the Products tablecontains all the information about each product. Each product has a productID associated with it that is the primary key for that table. The Orders tablecontains the “header” information for an invoice - who it was sold to, whereto ship it, PO number, etc. The Order Details table lists each item ordered,how much it costs, any discount, etc. In this example, the Orders table islinked to the Order Details table by OrderID. OrderID is the primary key inthe Orders table and a foreign key in the Order Details table. Likewise,ProductID is the primary key in the Products table and a foreign key in theOrder Details table. Referencing ID fields in other tables reduces errors andmakes data entry faster. All but the simplest of databases should have tableswith primary keys defined; they are very useful when creating queries.
Data Types continuedData TypeDate/Time
Currency
AutoNumber
Yes/No
OLE Object
Hyperlink
Lookup Wizard
Queries make databases useful. Data is stored in tables and is just that – raw data.Queries turn the raw data from the tables into useful information. Queries takethe form of questions you need answered (such as “What are the names andphone numbers of everyone in the marketing department?” or “What are the topselling products?”). Most queries are created in Design View, but a query thatreturns all the records for selected fields and a query that generates summary data(such as total units sold or average selling price) have been automated in wizards.A few complex tasks can also be accomplished with specialized wizards.
Creating a Query Using a WizardThe Simple Query Wizard is the wizard that appears when Create query by usingwizard is selected in the main database window. The other queries that wizardscan be used to create are available by clicking the button and selectingfrom the list. They are : Crosstab Query Wizard (used to analyze sales by month,for example), Find Duplicate Query Wizard (useful in finding duplicate records,such as phone numbers, especially when data from multiple sources are mergedtogether), and Find Unmatched Query Wizard (used to find items in one tablethat don’t have matching entries in another, for example orders without anassociated customer). These wizards are beyond the scope of this chart.
To use the Simple Query Wizard:• In the main database window, click the Create query by using wizard link.• Select the table or query that contains the desired fields from the drop down
menu. Select the desired fields and click the button to add them to theSelected fields pane. Optionally, repeat this step for any additional tables orqueries desired.
• Click the Next button.• Optionally: If any of the selected fields are numeric, the next step will
prompt for summary or detailed output. Detail will show all records, butonly those fields selected. If Summary is selected, click the SummaryOptions button to display another dialog box. In the Summary optionsdialog box, all numeric fields will be displayed and you will be promptedfor which calculations (sum, average, minimum, or maximum) should beperformed. Check the appropriate boxes for the appropriate fields andclick OK. Click the Next button.
• Enter a name for the query then click the Finish button to complete thewizard and open the query.
Creating Queries
Tip: When choosing a number type, the simplest type that will meet therequirements, will be processed faster in calculations and won’t take asmuch space to store in the database. The number formats are listed in thetable above from simplest/smallest to most complex/largest.
PurposeDates (from 100-9999 A.D.) and times.
Used for financial and other mathematical calculations with 1-4
characters after the decimal point. Faster than single or double
data types if 1-4 decimal places needed as fixed-point math used
instead of floating point math. Accurate to 15 characters to the left
of the decimal and 4 after it.
Unique, sequential number, typically incremented by 1 for each new
record. Used often in relationships between tables.
Simplest data type; can contain only yes or no, true or false, on or
off, or checked or unchecked data.
Data linked from another application (up to 1 GB in size), such as
a picture, Word document, etc.
Link to a URL (on the Internet, for example) or a UNC path
(location on the network).
Creates a combo (drop down) menu used to select data from
another table. Typically, text data (such as customer names) is
displayed in the list, but the underlying primary key for the record
(ex. customer ID) is stored in this table, not the longer textual form.

5
Query Design
Most queries are not designed to return a subset of the fields for all records,but rather to answer one or more questions. The questions are asked byspecifying criteria. In the figure shown to the top left, the criteria limits theresults to orders in the 1st quarter of 2001 for product 153200 and to thoseorders for product 124856 for more than 15 units each.Notes:• Criteria may not be specified for the * field (as it represents all fields).• Dates must be surrounded by the # symbol if the data type of the field is
Date/Time.• Numbers are entered as is, without any symbols around them.• Text is entered in quotation marks.
AND vs. ORAll criteria specified on the same row is ANDed together (all conditions mustbe met); criteria on different rows is ORed. In other words, all the criteria onrow 1 (Between #1/1/2001# And #3/31/01# AND ProductID=153200) mustbe met OR all the criteria on row 2 (ProductID=124856 AND Quantity > 15)must be met, etc. Within a given field, the AND and OR operators may bespecified as well, though typically multiple rows are used instead. This is auseful shortcut, however, when all the criteria in all other fields is the same.
Specify Criteria
Using Design ViewDesign view allows you great control over the design of a query. There are
many advanced capabilities offered; the most common will be described
here. Design view also allows criteria to be specified, which is the most
important reason for queries.
1.*. Represents all fields in the table.
2.Table Name. Name of the table.
3.Relationship Lines. Denote the relationships between the fields in the
table. In the screenshot, OrderID in the Orders table is related to OrderID
in the Order Details table and ProductID in the Order Details table is
related to ProductID in the Products table.
4.Tables in the query. This area shows all the tables involved in the query.
5.Field List. Displays a list of fields in the table.
6.QBE Grid. The QBE (Query By Example) Grid displays all of the fields
in the query and any criteria that have been set.
7.Sort direction. Can be Ascending (A-Z), Descending (Z-A), or blank
(not sorted). If multiple fields are sorted, they are sorted in the order listed
in the QBE grid from left to right.
8.Show. If checked, the field is in the output of the query; if not, it is only
for specifying criteria. By default, all new fields are checked when added
to the QBE Grid.
9.Criteria. All criteria specified on the same row is ANDed together (all
conditions must be met); criteria on different rows is ORed. In other
words, all the criteria on row 1 must be met OR all the criteria on row 2,
etc. May not be specified for the * field (as it represents all fields).
The icons that are available in Query Design view (in addition to the
standard icons already described) are:
Query Type The default type is a Select Query, which means that data may
be viewed (and in some cases, modifications made), but no bulk changes to
data are made. Action Queries, of which there are 4 (Delete, Update, Append,
and Make Table) change underlying data. The first 2 delete or update records
that meet the criteria, respectively. An Append Query appends records that
meet the criteria to another table (optionally in another database). The Make
Table Query copies those records that meet the criteria into another table.
Tip: Always execute any action query as a select query first to verify the
correct records are selected. The results of an action query can’t be undone.Run Executes the query.Show Table Allows additional tables and/or queries to be added to the query.Totals Allows fields to be totaled and grouped. Many statistical optionsare available.
Top Values Displays either all records that meet the criteria, or thetop 5, 25, or 100 records, or the top 5% or top 25% of records thatmeet the criteria.
Query Design Toolbar: Unique Icons
To create a functioning query, several steps must be followed in order. They are:1.Add one or more tables to the query.2. If multiple tables are used, specify any relationships between the fields (if
necessary).3.Add the fields to the query grid to add them to the output of the query.4.Optionally, specify any desired criteria.
To create a query in Design view:• In the main database window, click the Create query in Design view link.• In the Show Table dialog box, select the desired table(s) and/or query(ies)
to be the source of data for the new query and click the Add button.• Click the Close button to close the show table design dialog box.• Create any necessary query and/or table relationships, add the desired
fields and enter any necessary criteria.• When finished, click the icon to save it and remain in Design view or
the icon to view the results of the query.
To edit a query’s design:• In the main database window, select the desired query then click the
button.• Make all desired modifications.• When finished, click the icon to save it and remain in Design view or
the icon to view the results of the query.
Adding/Removing Tables
To add a table or query to a query:• Click the button to display the Show Table dialog box.• Select the desired table(s) and/or query(ies) to be an additional source of
data for the new query and click the Add button.• Click the Close button.
To delete a table or query from a query:• Select the Title bar of the desired table and press the <Delete> key.
Relating tablesAs shown and described in the Primary Keys section of this chart, tables areoften related to each other. For the query to return valid results, the relationshipbetween the tables must be specified. If the related fields have the same name in
each table, relationship lines between the fields will automatically be created.If they are named differently, the relationship must be manually specified.
To manually relate two fields:• Select the related field in one table and drag it to the associated field in
the second table.
To delete a relationship between two fields:• Select the relationship line “making thicker” and press the <Delete> key.
Adding Fields to the QBE grid:• Select one or more fields from the field list (to select multiple fields, use
the <CTRL> key while clicking on fields).• Drag them to the QBE grid. Fields will be inserted at the position of the cursor
when the mouse button is released; any existing fields will be shifted right.
Creating Queries continued
4
321
7 8 9
6
5
6
visit us at quickstudy.com
Author: John HalesLayout: Dominic Thompson
Screen representationsmay vary depending on theversion of the softwareinstalled. This guide isbased on the softwareversion shipping at the timeof publication and isaccurate to that version.For specific changes to asoftware application, seethe Read-Me file providedwith the softwareapplication. Screenrepresentations appearcourtesy of MicrosoftCorporation, Redmond,Washington.
© 2002 BarCharts,Inc. Boca Raton, FLJune 2002
When entering data into a table or query, the following keyboard shortcuts cangreatly speed up the process:• <ESC>: Using it once undoes any change to a field, twice undoes all changes
to the record.• <CTRL>+Semicolon (;): Inserts the current date.• <CTRL>+<SHIFT>+Colon (:): Inserts the current time.• <CTRL>+<ALT>+<SPACE>: Enters the field’s default value (if specified
[in design view for the table for that field]).• <CTRL>+Apostrophe (‘): Copies the same value for field from previous record.• <CTRL>+Plus (+): Adds a new record (at the end of the table).• <CTRL>+Minus (-): Deletes current record.
ToolbarsAccess XP provides the ability to customize the features and functions thatappear in the toolbars.
To customize a toolbar:• Select Toolbars from the View menu and a submenu will be displayed. From
the submenu, select Customize.• Click the Commands tab.• Click the menu name to which the command will be added in the Categories
pane of the window.• Locate the command you wish to add in the Commands pane of the window.
To view a description of the command click the Description button.• Drag the desired button from the right-hand (Commands) pane to the desired
location on any toolbar.• Follow the steps outlined above to add additional commands to toolbars.• Once all the desired commands have been added, click the Close button.
To view ScreenTips:• Point at (but do not click) any toolbar button and the name of the button will
be displayed. This works also for comments and hyperlinks. ScreenTips looklike this:
Application Management
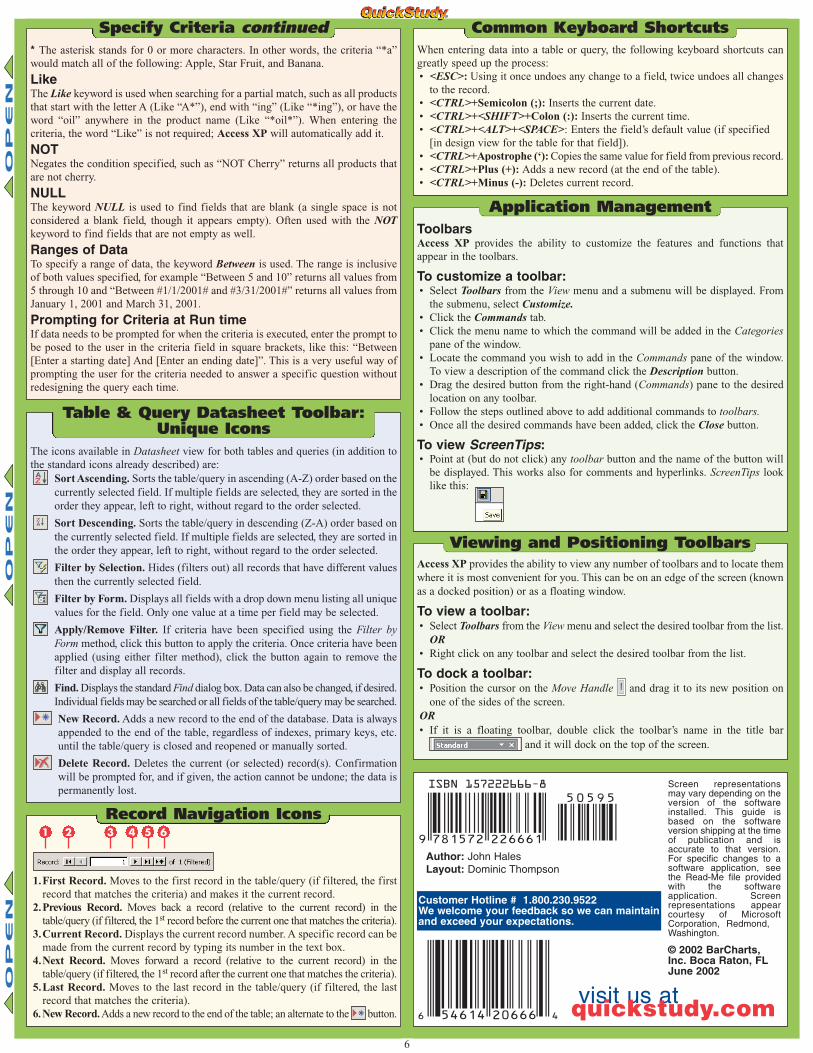
1.First Record. Moves to the first record in the table/query (if filtered, the firstrecord that matches the criteria) and makes it the current record.
2.Previous Record. Moves back a record (relative to the current record) in thetable/query (if filtered, the 1st record before the current one that matches the criteria).
3.Current Record. Displays the current record number. A specific record can bemade from the current record by typing its number in the text box.
4.Next Record. Moves forward a record (relative to the current record) in thetable/query (if filtered, the 1st record after the current one that matches the criteria).
5.Last Record. Moves to the last record in the table/query (if filtered, the lastrecord that matches the criteria).
6. New Record. Adds a new record to the end of the table; an alternate to the button.
Record Navigation Icons
The icons available in Datasheet view for both tables and queries (in addition tothe standard icons already described) are:
Sort Ascending. Sorts the table/query in ascending (A-Z) order based on thecurrently selected field. If multiple fields are selected, they are sorted in theorder they appear, left to right, without regard to the order selected.
Sort Descending. Sorts the table/query in descending (Z-A) order based onthe currently selected field. If multiple fields are selected, they are sorted inthe order they appear, left to right, without regard to the order selected.
Filter by Selection. Hides (filters out) all records that have different valuesthen the currently selected field.
Filter by Form. Displays all fields with a drop down menu listing all uniquevalues for the field. Only one value at a time per field may be selected.
Apply/Remove Filter. If criteria have been specified using the Filter byForm method, click this button to apply the criteria. Once criteria have beenapplied (using either filter method), click the button again to remove thefilter and display all records.
Find. Displays the standard Find dialog box. Data can also be changed, if desired.Individual fields may be searched or all fields of the table/query may be searched.
New Record. Adds a new record to the end of the database. Data is alwaysappended to the end of the table, regardless of indexes, primary keys, etc.until the table/query is closed and reopened or manually sorted.
Delete Record. Deletes the current (or selected) record(s). Confirmationwill be prompted for, and if given, the action cannot be undone; the data ispermanently lost.
Table & Query Datasheet Toolbar:Unique Icons
* The asterisk stands for 0 or more characters. In other words, the criteria “*a”would match all of the following: Apple, Star Fruit, and Banana.
LikeThe Like keyword is used when searching for a partial match, such as all productsthat start with the letter A (Like “A*”), end with “ing” (Like “*ing”), or have theword “oil” anywhere in the product name (Like “*oil*”). When entering thecriteria, the word “Like” is not required; Access XP will automatically add it.
NOTNegates the condition specified, such as “NOT Cherry” returns all products thatare not cherry.
NULLThe keyword NULL is used to find fields that are blank (a single space is notconsidered a blank field, though it appears empty). Often used with the NOTkeyword to find fields that are not empty as well.
Ranges of DataTo specify a range of data, the keyword Between is used. The range is inclusiveof both values specified, for example “Between 5 and 10” returns all values from5 through 10 and “Between #1/1/2001# and #3/31/2001#” returns all values fromJanuary 1, 2001 and March 31, 2001.
Prompting for Criteria at Run timeIf data needs to be prompted for when the criteria is executed, enter the prompt tobe posed to the user in the criteria field in square brackets, like this: “Between[Enter a starting date] And [Enter an ending date]”. This is a very useful way ofprompting the user for the criteria needed to answer a specific question withoutredesigning the query each time.
Common Keyboard ShortcutsSpecify Criteria continued
1 62 3 4 5
Access XP provides the ability to view any number of toolbars and to locate themwhere it is most convenient for you. This can be on an edge of the screen (knownas a docked position) or as a floating window.
To view a toolbar:• Select Toolbars from the View menu and select the desired toolbar from the list.
OR• Right click on any toolbar and select the desired toolbar from the list.
To dock a toolbar:• Position the cursor on the Move Handle and drag it to its new position on
one of the sides of the screen.OR• If it is a floating toolbar, double click the toolbar’s name in the title bar
and it will dock on the top of the screen.
Viewing and Positioning Toolbars
Customer Hotline # 1.800.230.9522We welcome your feedback so we can maintainand exceed your expectations.