A Step-by-Step Tutorial
17
My First Website Understanding HTML 5 A Step-by-Step Tutorial Name:__________________________________________________________ Class: __________________________________________________________ Date:___________________________________________________________
Transcript of A Step-by-Step Tutorial
My First Website
Understanding HTML 5
A Step-by-Step Tutorial
Name:__________________________________________________________
Class: __________________________________________________________
Date:___________________________________________________________

Written by A. Bloom
2

Written by A. Bloom
3
I. HTML Lesson 1: The Basics.
1. Create a folder and name it Practice. This is where you will save all of your HTML
documents.
2. Open Notepad on your computer: StartAll Programs Accessories Notepad.
3. Type the following exactly how you see it below:
<!DOCTYPE html> <html> <body> </body> </html> Please Note: <!DOCTYPE html> is the declaration that lets the Web browser know which version of HTML it is using.
4. You are now going to add the <head> and <title> element to your page. Right under the
<html> tag, type the following: <head> <title>My First Web Page</title> </head> You should have something that looks like this:

Written by A. Bloom
4
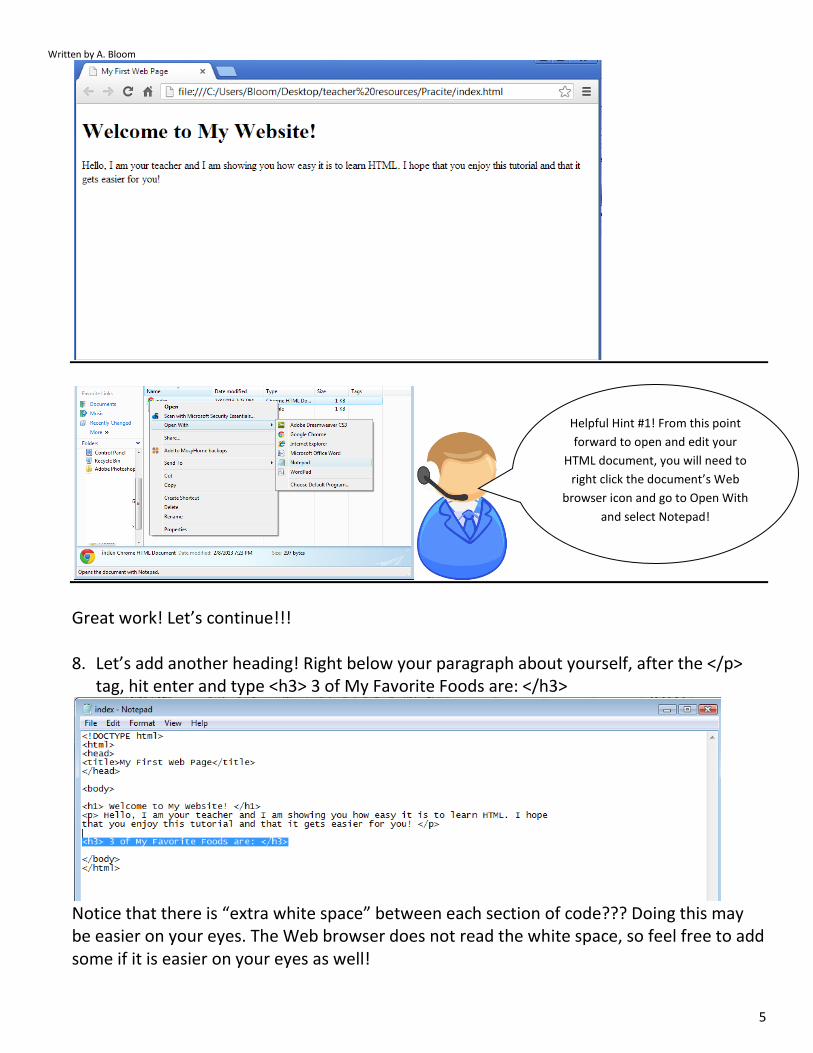
5. Let’s add some text to the code and test it out! The information in between the <body> tags is what displays on a Web browser. Right after the <body> tag, type:
<h1> Welcome to My Website! </h1> <p> Please type a paragraph about yourself here. </p> The <h1> </h1> tags indicate that the text is to be a heading. <h1> is the largest size and <h6> is the smallest. These tags are to be used for headings and not to make paragraph font larger! You may see something like this:
Let’s save our code in Notepad and take a look! 6. Click File Save As. Save the document as index.html, select the folder you created
named “Practice” and click save. Please note: you need to type the file extension .html in order to make this work. Saving this document as index indicates that it is the home page.
7. To view your newly made Web page, double click the index icon in your folder. It will
now open in your Web browser. Example:
Written by A. Bloom
5
Great work! Let’s continue!!! 8. Let’s add another heading! Right below your paragraph about yourself, after the </p>
tag, hit enter and type <h3> 3 of My Favorite Foods are: </h3>
Notice that there is “extra white space” between each section of code??? Doing this may be easier on your eyes. The Web browser does not read the white space, so feel free to add some if it is easier on your eyes as well!
Helpful Hint #1! From this point
forward to open and edit your
HTML document, you will need to
right click the document’s Web
browser icon and go to Open With
and select Notepad!

Written by A. Bloom
6
9. You are now going to create an ordered list. After the </h3> tag, hit enter and type: <ol> <li> list a favorite food </li> <li> list a favorite food </li> <li> list a favorite food </li> </ol> ****Please list your own favorite food where indicated! **** 10. Save your document (CTRL S or File Save). Refresh or open it back up in your Web
browser to see how it looks!
You may now see something like this:
11. Let’s go back and add a Horizontal Line after the Welcome to My Website heading.
After the </h1> tag hit enter and type <hr>. Click save and refresh your browser. What does it do?
That’s right- it adds a line under the heading of your Webpage! 12. You are doing terrific. Let’s add one more paragraph of information. Under your
ordered list, at the end of the </ol> tag hit enter and type: <br>
Tip #2: You do not need to close Notepad to view
your HTML document in a Web browser! You can
have both files open at the same time and after
each save click the refresh button on your Web
browser!

Written by A. Bloom
7
<p> Type a paragraph about what you want to be when you get older </p> <br>
13. The last piece of information that we will add on our homepage is an Unordered List of
our favorite colors. After the <br> tag, hit enter and type: <h3> 3 of My Favorite Colors are: </h3> <ul> <li> Type your favorite color here </li> <li> Type your favorite color here </li> <li> Type your favorite color here </li> </ul> Click Save and refresh your Web browser to view your Website.
Helpful hint #3! Did You Know that not all tags need a
closing tag? Tags like <hr> (horizontal rule) and <br>
(break) have no other set of instructions and only
require one set of tags.

Written by A. Bloom
8
Lesson 1 Review
Find the missing code. Please fill in the blanks with the correct opening or closing HTML tags
below.
1.
<!DOCTYPE html> <html> <body> </body> </____ > 2.
<h3> 3 of My Favorite Colors are: <___> <ul> <li> Type your favorite color here </li> <li> Type your favorite color here </li> <__> Type your favorite color here </li> </ul> 3.
<br> <__> Type a paragraph about what you want to be when you get older </p>
_____ out of 4
_____ out of 5
_____ out of 4

Written by A. Bloom
9
<br> 4.
<____> <____ >My First Web Page</title> </head>
II. HTML Lesson 2: Attributes and Formatting
1. Open (if needed) your index.html document by right clicking the icon and going to
open with Notepad.
2. You are first going to add Metadata within the <head> elements. A Meta Tags are
keywords and descriptions that briefly describe the Website that you are creating to a
Web browser or search engine. It can also provide information such as the copyright
year and designer/developer of the Website. This information is not viewed on your
Website.
_____ out of 8
Total: _____ out of 21
Attributes are special codes in HTML that allow you to
add special features such as a hyperlink, Meta Tag,
image or style sheet.

Written by A. Bloom
10
First, we will enter Meta Tags for ‘keyword’ searches for search engines. After the </title> tag
in your html document, hit enter to start a new line and type:
<meta name="keywords" content="about me, student, HTML, learning">
3. When you are done typing the Meta Tag keyword attribute, hit enter. You are now
going to add the Website description to the head element. Type:
<meta name="description" content="This Website is how I am going to learn HTML.">
4. Save your HTML document by clicking File Save or by pressing CTRL and S on the
keyboard.
5. Adding a comment. A comment can be used in your HTML code for you to add any
additional information, or reminders to yourself. This is NOT viewed in the Web browser
and can only be viewed in the code.
After your last Meta Tag, type:
<!-- This is a comment and I am learning HTML -->
Example:
Notice how each
keyword is
separated by a
comma???

Written by A. Bloom
11
6. Formatting text in HTML. Bold, Italics, Superscript and Subscript are just a few examples of
formatting text in HTML. For this tutorial you will learn how to apply a few of the basics.
Create a new paragraph at the end of your ‘unordered list’ by creating a new line and
typing:
<p> I am now going to show you that I learned how to make <b> text bold </b> and <i> text
italic </i> by learning HTML at my school! I can even <sub> subscript text </sub> and <sup>
superscript text </sup> as well! </p>
Remember! You will need
opening <> and closing </> tags
for formatting text as well!

Written by A. Bloom
12
7. Save your HTML document and open up your ‘index.html’ in your Web browser.
Remember, unless you uploaded your Web site to a hosting Web server they cannot be
viewed by others!
Lesson 2 Review
1. Practice! Change the title {<title> My First Web page </title> to Your Name’s Website.
Example: <title> Jan Doe’s Website </title>
2. Add one of the following formatting HTML code to the first paragraph where you typed
about yourself. Make sure these tags are inside the opening and closing paragraph tags.
Opening Tag Closing Tag What it does
<mark> </mark> Highlights text
<blockquote> </blockquote> Indents and styles the text like you are quoting from an outside source.
<del> </del> Represents text that has been deleted- shown as strikethrough.
_____ out of 5

Written by A. Bloom
13
<ins> </ins> Represents text that has been inserted- shown as underlined.
3. What is missing from the following code?
<!DOCTYPE html>
<html>
<head>
<title>________________________</title>
<meta name="keywords" content="about me, student, HTML, learning">
<meta name="description" content="This Website is how I am going to learn HTML.">
<!-- This is a comment and I am learning HTML -->
______________________
<body>
<h1> Welcome to My Website! </h1>
<hr>
<p> <ins> Hello, I am your teacher and I am showing you how easy it is to learn HTML. I hope
that you enjoy this tutorial and that it gets easier for you! </ins>_________
<_______>
<_______>
Total: _____ out of 20
_____ out of 10
_____ out of 5

Written by A. Bloom
14
III. HTML Lesson 3: Hyperlinks, images and Design
Congratulations on your accomplishments! Now that you have a decent understanding of
how html works, let’s learn how to add hyperlinks and images.
1. Inserting a hyperlink. The code for inserting a hyperlink looks like this: <a href=”url”>Link text</a> So, let’s add this to our Webpage!
2. Open up your Webpage in Notepad. 3. After your last paragraph (the one where you learned how to add attributes to your
text), type the following code: <p> One of my favorite search engines is <a href=”http://www.google.com”>Google!</a> I use it to search everything.</p>
4. Great job! Let’s learn how to add a simple graphic. In your folder for your Website there
is a clipart image called Smile.png. You will now add this image to your Webpage.
5. Anywhere in your html document, insert the following code: <img src="Smile.png" alt="Smiles"> Save your index.html file and open it up in your Web browser. Notice how the image is extremely large?
The image tag is an empty tag and
uses the scr (source) attribute to
call upon the image.

Written by A. Bloom
15
6. We are now going to resize the image height and width by adding these attributes: width="200" height="200" to the end of your image code. Your code should now look like this: <img src="Smile.png" alt="Smiles" width="200" height="200">
7. Adding color to your text.
8. For this next part, I invite you to go to http://html-color-codes.info/ to view the
hexadecimal values for each color. Pick one that you would like to use while you are there!
9. Under your first heading (<h1> Welcome to my Website </h1>) and the font color tags
like as follows: <h1> <FONT COLOR="E01ED6"> Welcome to My Website! </FONT> </h1> Replace my example E01ED6 with the color of your choice! Your first heading now has color! On Your Own
Complete the next 3 assignments on your own. Each task is worth 10 pts. 1. Change the other two headings to a color of your choice. {Hint: the headings are the 3 of
my favorite…..}
2. Add another hyperlink on your Web page. Create a new paragraph discussing what your
favorite Website is and include a link to it!
3. Go to http://cooltext.com/ and design your name as an image. Make any changes that
you see fit. Once you are happy with your name logo, right click it and save it to your
“practice” folder. Add it to the body of your Webpage. Make sure you are typing in the
Please note that typically color changes are made
best through CSS coding. Before we begin our
lesson on CSS, we can change text color the good
ole fashion way.
Colors in html are referred to by their
hexadecimal notation. This 6 number
sequence is a combination of red, greens
and blues and their various hues.

Written by A. Bloom
16
correct file extension when adding in your code. You may also want to rename your
name logo so it is easier for you to refer to.

Written by A. Bloom
17
Let’s learn how to format some of your text. In order for text to center correctly in the newer versions of HTML, it is suggested to use CSS. Cascading Style Sheets, or CSS, is the way to apply style to your Web site. For larger sites you typically would create an external CSS Style and apply it to your entire sight. But that’s a different tutorial for another day! For now, we will apply a simple CSS!