
A guide to Eclipse and the R plug-in...
41
A guide to Eclipse and the R plug-in StatET Longhow Lam Version 23-May-2010
Transcript of A guide to Eclipse and the R plug-in...
A guide to Eclipse and the R plug-in StatET
Longhow Lam
Version 23-May-2010
Contents
1. Introduction 51.1. Acknowledgments . . . . . . . . . . . . . . . . . . . . . . . . . . . . . . . 61.2. Obtaining and installing the software . . . . . . . . . . . . . . . . . . . . 6
1.2.1. The Eclipse system . . . . . . . . . . . . . . . . . . . . . . . . . . 61.2.2. The StatET plug-in . . . . . . . . . . . . . . . . . . . . . . . . . . 6
2. The basics of the Eclipse Environment 92.1. The Workbench and Perspectives . . . . . . . . . . . . . . . . . . . . . . 92.2. Projects in Eclipse . . . . . . . . . . . . . . . . . . . . . . . . . . . . . . 10
2.2.1. Creating a project . . . . . . . . . . . . . . . . . . . . . . . . . . 102.2.2. Adding new resources to a project . . . . . . . . . . . . . . . . . . 112.2.3. Adding existing resources to a project . . . . . . . . . . . . . . . 122.2.4. Adding Folders to a project . . . . . . . . . . . . . . . . . . . . . 122.2.5. Adding Linked Resources . . . . . . . . . . . . . . . . . . . . . . . 13
2.3. Working with text files . . . . . . . . . . . . . . . . . . . . . . . . . . . . 132.3.1. Line numbers, Quick diff and Word completion . . . . . . . . . . 142.3.2. The History of a file . . . . . . . . . . . . . . . . . . . . . . . . . 142.3.3. Comparing files . . . . . . . . . . . . . . . . . . . . . . . . . . . . 152.3.4. Bookmarks and task tags . . . . . . . . . . . . . . . . . . . . . . . 152.3.5. Text/Code folding . . . . . . . . . . . . . . . . . . . . . . . . . . 17
2.4. Searching for text . . . . . . . . . . . . . . . . . . . . . . . . . . . . . . . 182.4.1. A single file . . . . . . . . . . . . . . . . . . . . . . . . . . . . . . 182.4.2. Multiple files . . . . . . . . . . . . . . . . . . . . . . . . . . . . . 19
2.5. Eclipse preferences . . . . . . . . . . . . . . . . . . . . . . . . . . . . . . 20
3. The StatET plug-in 223.1. Configuring R . . . . . . . . . . . . . . . . . . . . . . . . . . . . . . . . . 223.2. The new R Console in Eclipse . . . . . . . . . . . . . . . . . . . . . . . . 23
3.2.1. Running R code . . . . . . . . . . . . . . . . . . . . . . . . . . . . 253.3. The Cmd History and Queue views . . . . . . . . . . . . . . . . . . . . . 273.4. The Object Browser . . . . . . . . . . . . . . . . . . . . . . . . . . . . . 273.5. The Outline view . . . . . . . . . . . . . . . . . . . . . . . . . . . . . . . 283.6. The StatET preferences and their corresponding features . . . . . . . . . 29
3.6.1. Code templates . . . . . . . . . . . . . . . . . . . . . . . . . . . . 293.6.2. Code generation . . . . . . . . . . . . . . . . . . . . . . . . . . . . 303.6.3. Syntax coloring . . . . . . . . . . . . . . . . . . . . . . . . . . . . 30
1
3.6.4. R Code formatting . . . . . . . . . . . . . . . . . . . . . . . . . . 323.6.5. R Editing Options . . . . . . . . . . . . . . . . . . . . . . . . . . 333.6.6. Some StatET shortcuts . . . . . . . . . . . . . . . . . . . . . . . . 33
3.7. Writing R help files . . . . . . . . . . . . . . . . . . . . . . . . . . . . . . 333.8. R CMD tools . . . . . . . . . . . . . . . . . . . . . . . . . . . . . . . . . 35
3.8.1. Converting Rd files . . . . . . . . . . . . . . . . . . . . . . . . . . 353.8.2. Building an R package . . . . . . . . . . . . . . . . . . . . . . . . 37
Appendices 37
A. Some Eclipse variables 38
Bibliography 38
Index 39
2
List of Figures
1.1. The Eclipse workbench. . . . . . . . . . . . . . . . . . . . . . . . . . . . 71.2. The install dialog with the StatET libraries to install. . . . . . . . . . . . 81.3. The eclipse installation details. . . . . . . . . . . . . . . . . . . . . . . . 8
2.1. A group of tabs that can be customized. . . . . . . . . . . . . . . . . . . 92.2. The available perspectives in the Eclipse workbench. . . . . . . . . . . . 102.3. The available project types in the Eclipse. . . . . . . . . . . . . . . . . . 102.4. The new project in the navigator view. . . . . . . . . . . . . . . . . . . . 112.5. Folders in a project. . . . . . . . . . . . . . . . . . . . . . . . . . . . . . 122.6. Linked resources in a project. . . . . . . . . . . . . . . . . . . . . . . . . 132.7. A tab group with different text editors. . . . . . . . . . . . . . . . . . . . 142.8. Multiple text files visible. . . . . . . . . . . . . . . . . . . . . . . . . . . . 142.9. The gutter with line numbers and ‘Quick Diff’ . . . . . . . . . . . . . . . 152.10. The history view that lists all the versions . . . . . . . . . . . . . . . . . 152.11. The Compare Editor allowing the user to browse through changes between
versions . . . . . . . . . . . . . . . . . . . . . . . . . . . . . . . . . . . . 162.12. Bookmarks in a text file . . . . . . . . . . . . . . . . . . . . . . . . . . . 162.13. Tasks in a text file help you to remember to finish uncompleted tasks . . 172.14. Code in a folding area and code that is collapsed. . . . . . . . . . . . . . 172.15. The Find / Replace dialog . . . . . . . . . . . . . . . . . . . . . . . . . . 182.16. The search dialog allows the user to search in multiple files . . . . . . . . 192.17. The search view that displays locations of the search string. . . . . . . . 202.18. The preferences dialog. . . . . . . . . . . . . . . . . . . . . . . . . . . . . 20
3.1. Setting up an R environment . . . . . . . . . . . . . . . . . . . . . . . . 223.2. Adding an R Environment . . . . . . . . . . . . . . . . . . . . . . . . . . 233.3. The run dialog to configure the internal R console. . . . . . . . . . . . . . 243.4. The ‘Run As’ button menu high-lighted on the toolbar. . . . . . . . . . . 253.5. The R console inside Eclipse, with an extra line to enter R statements. . 253.6. Little R button on the Eclipse toolbar. . . . . . . . . . . . . . . . . . . . 253.7. Run function definition. Place the cursor in a function definition and use
Ctrl+r, Ctrl+F . . . . . . . . . . . . . . . . . . . . . . . . . . . . . . . . 263.8. The History view with previously entered or submitted statements. . . . 273.9. The Queue view displaying statements that are waiting to be executed. . 283.10. The object browser. . . . . . . . . . . . . . . . . . . . . . . . . . . . . . . 283.11. The outline view. . . . . . . . . . . . . . . . . . . . . . . . . . . . . . . . 29
3
3.12. The available code templates. . . . . . . . . . . . . . . . . . . . . . . . . 303.13. Inserting a new code template . . . . . . . . . . . . . . . . . . . . . . . . 313.14. The preferences dialog for setting syntax coloring . . . . . . . . . . . . . 313.15. The preferences dialog for setting syntax coloring . . . . . . . . . . . . . 323.16. A project consisting of R help files. . . . . . . . . . . . . . . . . . . . . . 353.17. The External Tools dialog to set R command tools. . . . . . . . . . . . . 363.18. Quick link on the toolbar to external tools. . . . . . . . . . . . . . . . . . 363.19. Building an R package from the external tools. . . . . . . . . . . . . . . . 37
4
1. Introduction
The open source data analysis system R has gained a lot of attention, not only becauseit is freely available. It has proven to be an effective tool for data manipulation, dataanalysis, creating graphs and developing new (statistical) methods. R has welcomedmany new users (from other systems) over the last years. This guide will not explainhow to use R. See the R manuals [1] or the introduction to R document [2] that can bedownloaded from www.splusbook.com for a detailed introduction to the R system. Thepurpose of this guide is to introduce the Eclipse Platform and the plug-in StatET for Rusers.
The base R system does contain an editor for writing R code. However, users will soonfind out the limited capabilities of the internal editor. In principle any text editor canbe used to write R programs (scripts). However, this document describes Eclipse for thefollowing reasons:
• Like R, Eclipse is open source. It is freely available from www.eclipse.org.
• Although it is free, Eclipse does contain many features that a good editor shouldhave.
• It is more than a text editor, it is an environment that allows you to easily maintainmultiple R scripts in the form of projects.
In addition, the Eclipse Platform is an open environment that can be extended. Itallows users to write so called plug-ins. Such a plug-in can customize the Eclipse envi-ronment for a certain programming language or for a certain task. The plug-in ‘StatET’for R, created by Stephan Wahlbrink (www.walware.de/goto/statet) adds the followingfeatures:
• Run R code ‘in Eclipse’ by sending it to the R GUI or in a special R consile in theEclipse environment.
• Syntax coloring of R key words.
• Browsing for R objects in a dedicated Object Browser.
• Insert predefined blocks of R code (templates).
• Supports writing R documentation files (*.Rd files) and Sweave files.
• Run R CMD tools from Eclipse.
5
CHAPTER 1. INTRODUCTION 1.1. ACKNOWLEDGMENTS
The remainder of this guide will first describe the basics of Eclipse and then the featuresof the StatET plug in.
1.1. Acknowledgments
I want to thank Stephan Wahlbrink for giving me Eclipse tips and tricks, descriptionsof his StatET plug-in and for giving me feedback on this document.
1.2. Obtaining and installing the software
1.2.1. The Eclipse system
Eclipse is a Java program, so it needs the Java Runtime Environment (JRE) to run.You need JRE version 1.4 or above, which can be downloaded from http://java.sun.com.The Eclipse platform can be downloaded from the website www.eclipse.org, the latestversion of the StatET works with Eclipse version 3.5.1. For windows, take some time todownload the 200 MB zip file. The installation is straight forward no installation wizardhas to be run. Since Eclipse does not alter the Windows registery just unzip the zip fileto any location you want, for example to C:/Program Files/Eclipse.
Run Eclipse by starting eclipse.exe. During the start Eclipse will ask the user to choosea workspace folder. This folder is the default location that Eclipse will use will to storeprojects, see section 2.2.1.
1.2.2. The StatET plug-in
The StatET plug-in can be installed from within Eclipse.
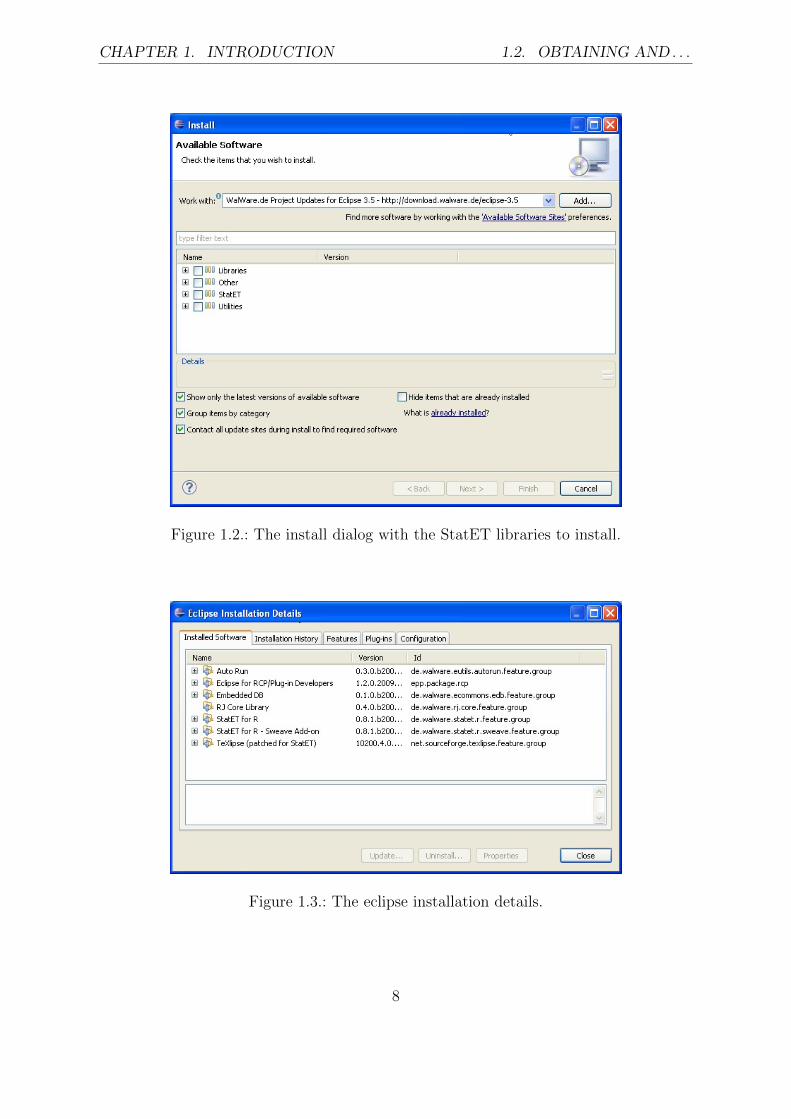
• Go the ‘Help’ menu, then select ‘Install New Software...’.
• In the ‘Install’ dialog type in ’http://download.walware.de/eclipse-3.5’ in the ‘Workwith’ field.
• In the lower part of the ‘Install’ dialog you will see the libararies that need to beinstalled. Select them all and click Next or Finish. Eclipse will now install theStatET plug-in.
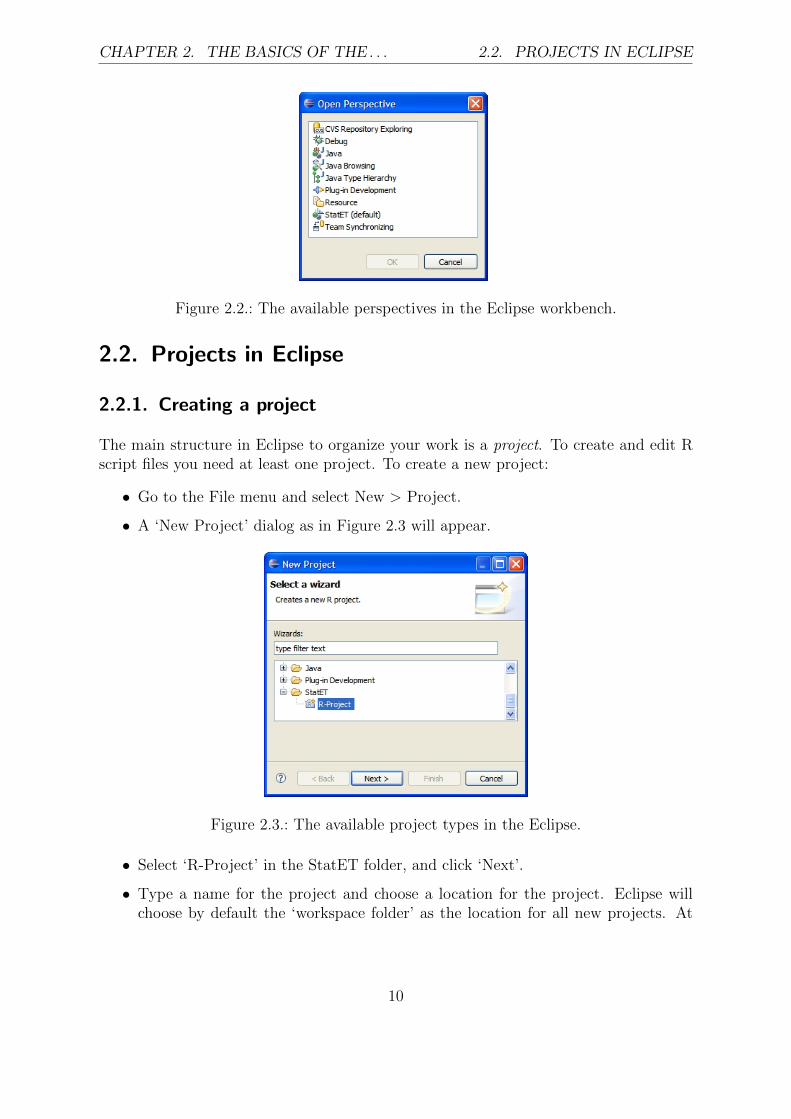
After the plug-in is installed Eclipse must be restarted. One way to see if the plug-inis installed is to go to the ‘Help’ menu and select ‘About Eclipse’ then click the button‘Installation details’ and a list with all the plug-ins will appear as in Figure 1.3.
6
CHAPTER 1. INTRODUCTION 1.2. OBTAINING AND . . .
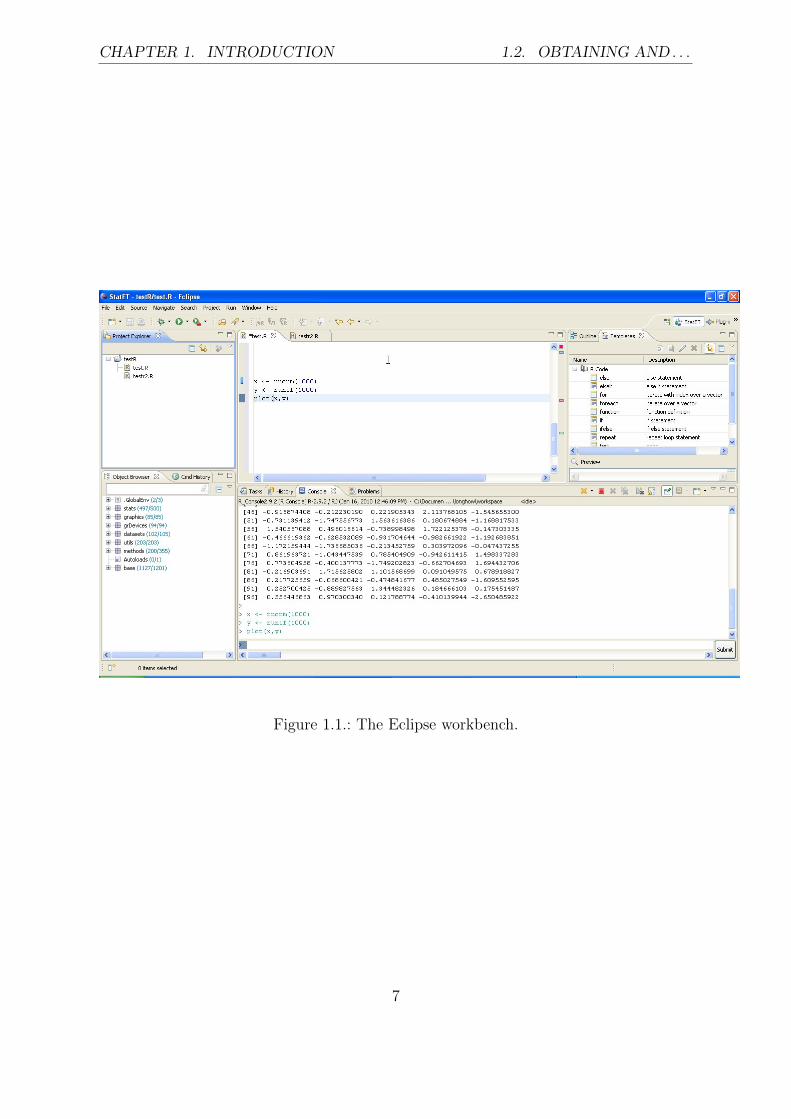
Figure 1.1.: The Eclipse workbench.
7
CHAPTER 1. INTRODUCTION 1.2. OBTAINING AND . . .
Figure 1.2.: The install dialog with the StatET libraries to install.
Figure 1.3.: The eclipse installation details.
8

2. The basics of the EclipseEnvironment
Before explaining the specific R features provided by the StatET plug-in, a few basicEclipse features are explained. You will find these features very handy, not only fordeveloping R programs. For a complete description of all the features of Eclipse, see theonline Eclipse documentation [3].
2.1. The Workbench and Perspectives
The term workbench in Eclipse refers to the development environment on the desktop.It contains different windows, editors and views which are categorized in tab groups, asdisplayed in Figure 1.2.1. The views that are organized by tab groups are not staticthey can be dragged to different locations to suit your preferred layout. Select a tab anddrag it to some other location.
Figure 2.1.: A group of tabs that can be customized.
A workbench contains one or more perspectives. A perspective is a set of views andlayout of tab groups, it is designed to facilitate the user to do a specific task. Forexample, the Java perspective helps the user write Java code by displaying certain viewsthat are useful while editing Java code.
When the StatET plug-in is installed then the StatET perspective is available withinthe Eclipse workbench. To open this perspective: Go to the ‘Window’ menu and select‘Open perspective’. A list of perspective (as in Figure 2.1 ) will appear when ‘Other’ isselected. Now select ‘StatET’.
9
CHAPTER 2. THE BASICS OF THE . . . 2.2. PROJECTS IN ECLIPSE
Figure 2.2.: The available perspectives in the Eclipse workbench.
2.2. Projects in Eclipse
2.2.1. Creating a project
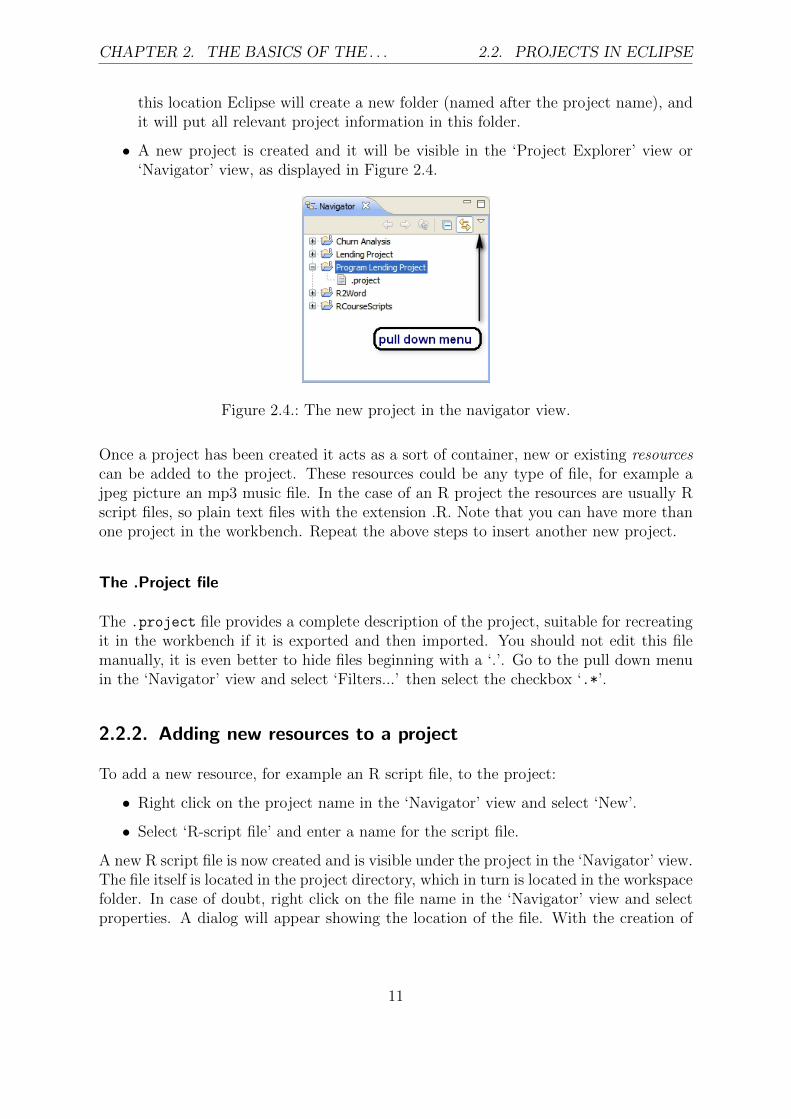
The main structure in Eclipse to organize your work is a project. To create and edit Rscript files you need at least one project. To create a new project:
• Go to the File menu and select New > Project.
• A ‘New Project’ dialog as in Figure 2.3 will appear.
Figure 2.3.: The available project types in the Eclipse.
• Select ‘R-Project’ in the StatET folder, and click ‘Next’.
• Type a name for the project and choose a location for the project. Eclipse willchoose by default the ‘workspace folder’ as the location for all new projects. At
10
CHAPTER 2. THE BASICS OF THE . . . 2.2. PROJECTS IN ECLIPSE
this location Eclipse will create a new folder (named after the project name), andit will put all relevant project information in this folder.
• A new project is created and it will be visible in the ‘Project Explorer’ view or‘Navigator’ view, as displayed in Figure 2.4.
Figure 2.4.: The new project in the navigator view.
Once a project has been created it acts as a sort of container, new or existing resourcescan be added to the project. These resources could be any type of file, for example ajpeg picture an mp3 music file. In the case of an R project the resources are usually Rscript files, so plain text files with the extension .R. Note that you can have more thanone project in the workbench. Repeat the above steps to insert another new project.
The .Project file
The .project file provides a complete description of the project, suitable for recreatingit in the workbench if it is exported and then imported. You should not edit this filemanually, it is even better to hide files beginning with a ‘.’. Go to the pull down menuin the ‘Navigator’ view and select ‘Filters...’ then select the checkbox ‘.*’.
2.2.2. Adding new resources to a project
To add a new resource, for example an R script file, to the project:
• Right click on the project name in the ‘Navigator’ view and select ‘New’.
• Select ‘R-script file’ and enter a name for the script file.
A new R script file is now created and is visible under the project in the ‘Navigator’ view.The file itself is located in the project directory, which in turn is located in the workspacefolder. In case of doubt, right click on the file name in the ‘Navigator’ view and selectproperties. A dialog will appear showing the location of the file. With the creation of
11
CHAPTER 2. THE BASICS OF THE . . . 2.2. PROJECTS IN ECLIPSE
a new R script file the StatET plug-in has put some comments at the beginning of thefile. In Section 3.6.2 we’ll explain how to modify these comments.
2.2.3. Adding existing resources to a project
To add an existing file (an R script file for example) to a project:
• Right click on the project name in the ‘Navigator’ view and select ‘Import...’.
• In the dialog that appears, select ‘File System’ and click ‘Next’.
• Browse to the directory with the file(s), and select the file(s) you want to add.
The file(s) will now appear in the project in the ‘Navigator’ view. It is important torealize that the files you have added are copied from their original location to the projectdirectory. Any change you will make to the file in the project will not change the originalfile but will change the file in the project directory.
Another way to import a resource into a project is by means of drag and drop. Froma Windows explorer window, files can be dragged and dropped into a project in the‘Navigator’ view in Eclipse.
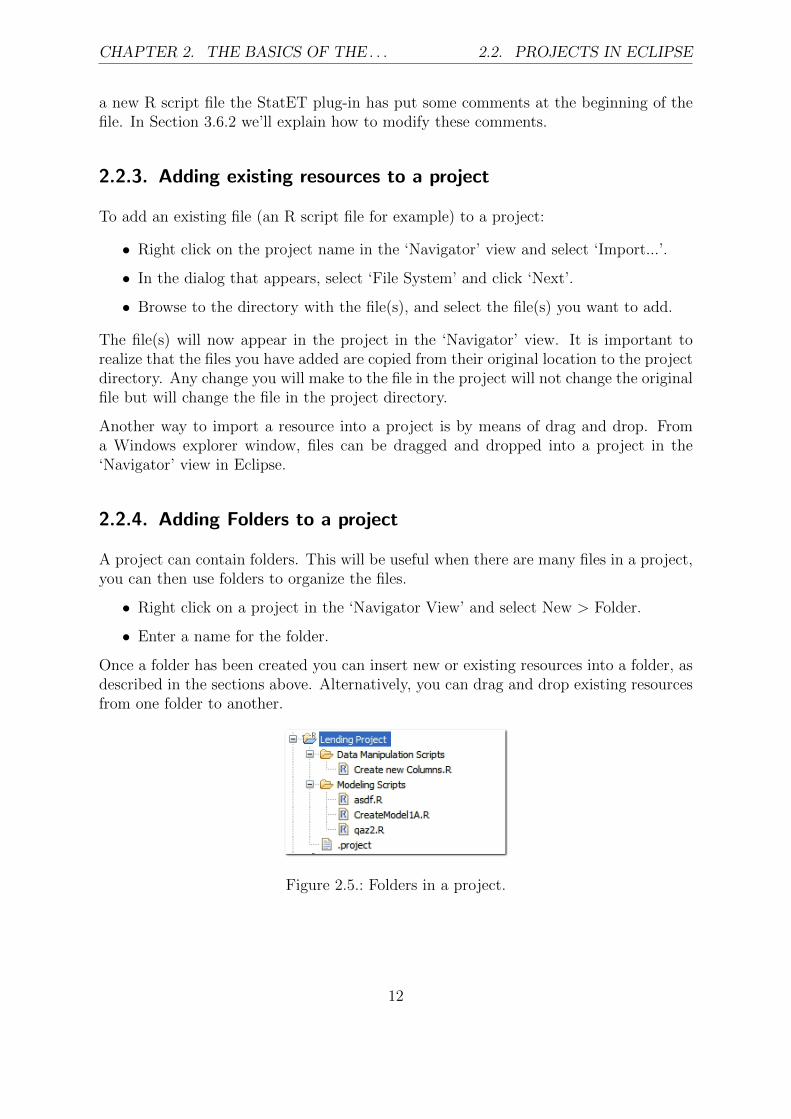
2.2.4. Adding Folders to a project
A project can contain folders. This will be useful when there are many files in a project,you can then use folders to organize the files.
• Right click on a project in the ‘Navigator View’ and select New > Folder.
• Enter a name for the folder.
Once a folder has been created you can insert new or existing resources into a folder, asdescribed in the sections above. Alternatively, you can drag and drop existing resourcesfrom one folder to another.
Figure 2.5.: Folders in a project.
12

CHAPTER 2. THE BASICS OF THE . . . 2.3. WORKING WITH TEXT FILES
2.2.5. Adding Linked Resources
Eclipse allows you to add so called linked resources. In the project a link to an existingfile can be created as follows:
• Right click on the project name in the ‘Navigator’ view.
• Select ‘New > File’, a ‘New File’ dialog will appear.
• Click on the ‘Advanced’ button and check the ‘Link to file in file system’ checkbox.
• Browse to the file you want to link and click ‘Finish’.
In the project an icon will appear with a small arrow, indicating that this is a linkedresource, see Figure 2.6. Double click on the icon to open the file. Any change you willmake will be applied to the file that you are linked to.
Figure 2.6.: Linked resources in a project.
Note that also folders and complete projects can be created as linked resources in asimilar way.
2.3. Working with text files
To open a file in a project, double click on its name in the ‘Navigator’ view. Each typeof file in the project can be associated with a different type of editor. R script files (*.R)are opened by default in an ‘R script editor’ in the workbench, and R documentationfiles (*.Rd) are opened with the ‘R Documentation editor’. Right-click on the file nameand select ‘Open With’ to open the file with another editor. This could be an externaleditor, in which case the file is opened outside the Eclipse workbench.
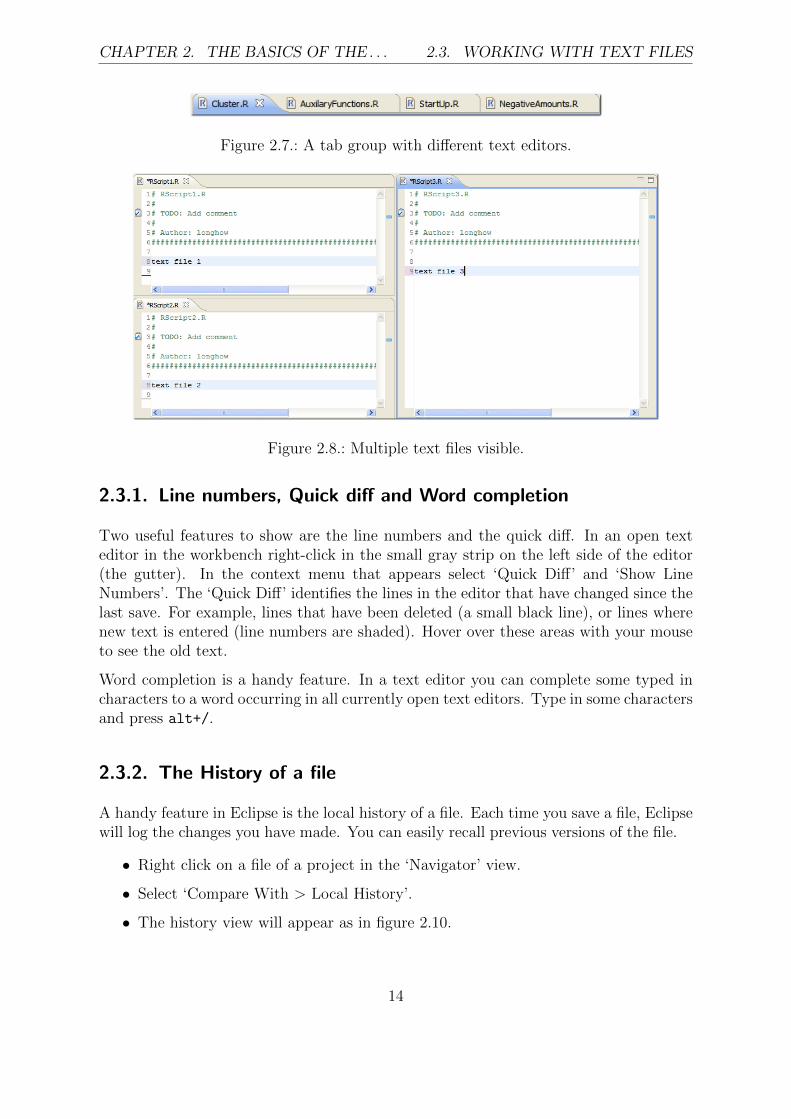
In the Eclipse environment you can open multiple (text) files, by default these (text)files are organized as different tabs on one tab group like Figure 2.7. In this setting onlyone text file is open and visible. You may want to view two or more (text) files at thesame time, then drag a tab outside its tab group. You could create a setting like inFigure 2.8.
13
CHAPTER 2. THE BASICS OF THE . . . 2.3. WORKING WITH TEXT FILES
Figure 2.7.: A tab group with different text editors.
Figure 2.8.: Multiple text files visible.
2.3.1. Line numbers, Quick diff and Word completion
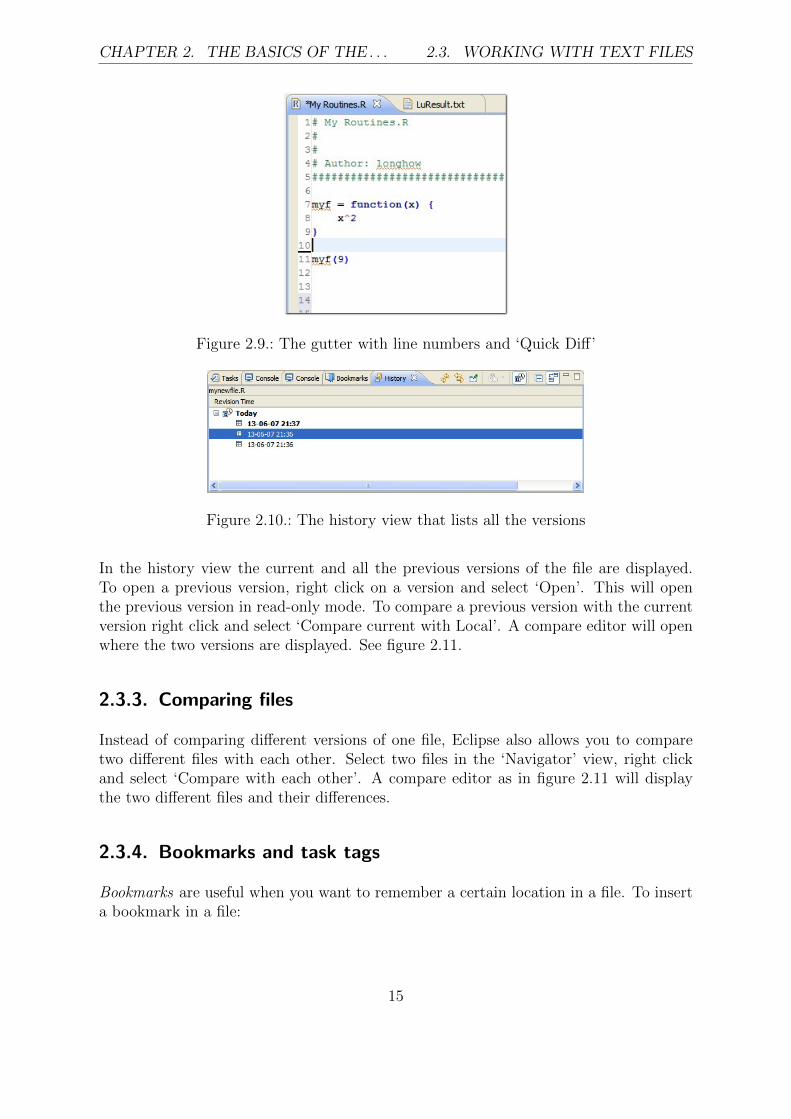
Two useful features to show are the line numbers and the quick diff. In an open texteditor in the workbench right-click in the small gray strip on the left side of the editor(the gutter). In the context menu that appears select ‘Quick Diff’ and ‘Show LineNumbers’. The ‘Quick Diff’ identifies the lines in the editor that have changed since thelast save. For example, lines that have been deleted (a small black line), or lines wherenew text is entered (line numbers are shaded). Hover over these areas with your mouseto see the old text.
Word completion is a handy feature. In a text editor you can complete some typed incharacters to a word occurring in all currently open text editors. Type in some charactersand press alt+/.
2.3.2. The History of a file
A handy feature in Eclipse is the local history of a file. Each time you save a file, Eclipsewill log the changes you have made. You can easily recall previous versions of the file.
• Right click on a file of a project in the ‘Navigator’ view.
• Select ‘Compare With > Local History’.
• The history view will appear as in figure 2.10.
14
CHAPTER 2. THE BASICS OF THE . . . 2.3. WORKING WITH TEXT FILES
Figure 2.9.: The gutter with line numbers and ‘Quick Diff’
Figure 2.10.: The history view that lists all the versions
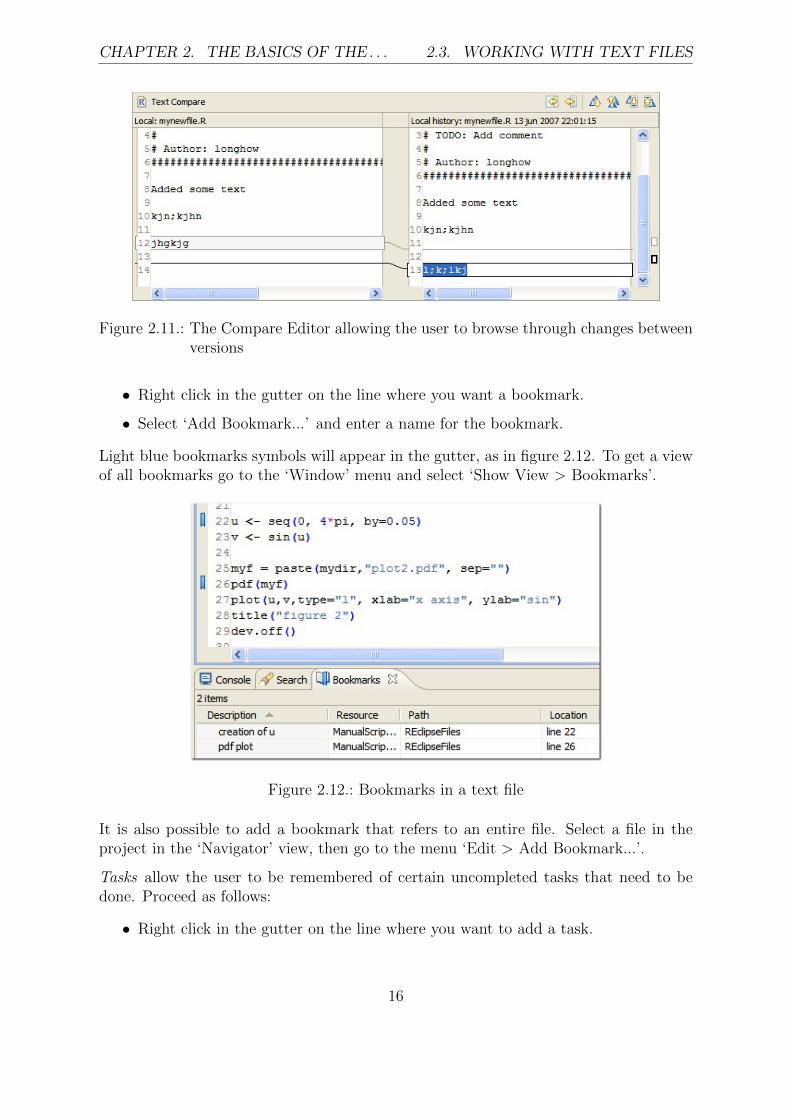
In the history view the current and all the previous versions of the file are displayed.To open a previous version, right click on a version and select ‘Open’. This will openthe previous version in read-only mode. To compare a previous version with the currentversion right click and select ‘Compare current with Local’. A compare editor will openwhere the two versions are displayed. See figure 2.11.
2.3.3. Comparing files
Instead of comparing different versions of one file, Eclipse also allows you to comparetwo different files with each other. Select two files in the ‘Navigator’ view, right clickand select ‘Compare with each other’. A compare editor as in figure 2.11 will displaythe two different files and their differences.
2.3.4. Bookmarks and task tags
Bookmarks are useful when you want to remember a certain location in a file. To inserta bookmark in a file:
15
CHAPTER 2. THE BASICS OF THE . . . 2.3. WORKING WITH TEXT FILES
Figure 2.11.: The Compare Editor allowing the user to browse through changes betweenversions
• Right click in the gutter on the line where you want a bookmark.
• Select ‘Add Bookmark...’ and enter a name for the bookmark.
Light blue bookmarks symbols will appear in the gutter, as in figure 2.12. To get a viewof all bookmarks go to the ‘Window’ menu and select ‘Show View > Bookmarks’.
Figure 2.12.: Bookmarks in a text file
It is also possible to add a bookmark that refers to an entire file. Select a file in theproject in the ‘Navigator’ view, then go to the menu ‘Edit > Add Bookmark...’.
Tasks allow the user to be remembered of certain uncompleted tasks that need to bedone. Proceed as follows:
• Right click in the gutter on the line where you want to add a task.
16
CHAPTER 2. THE BASICS OF THE . . . 2.3. WORKING WITH TEXT FILES
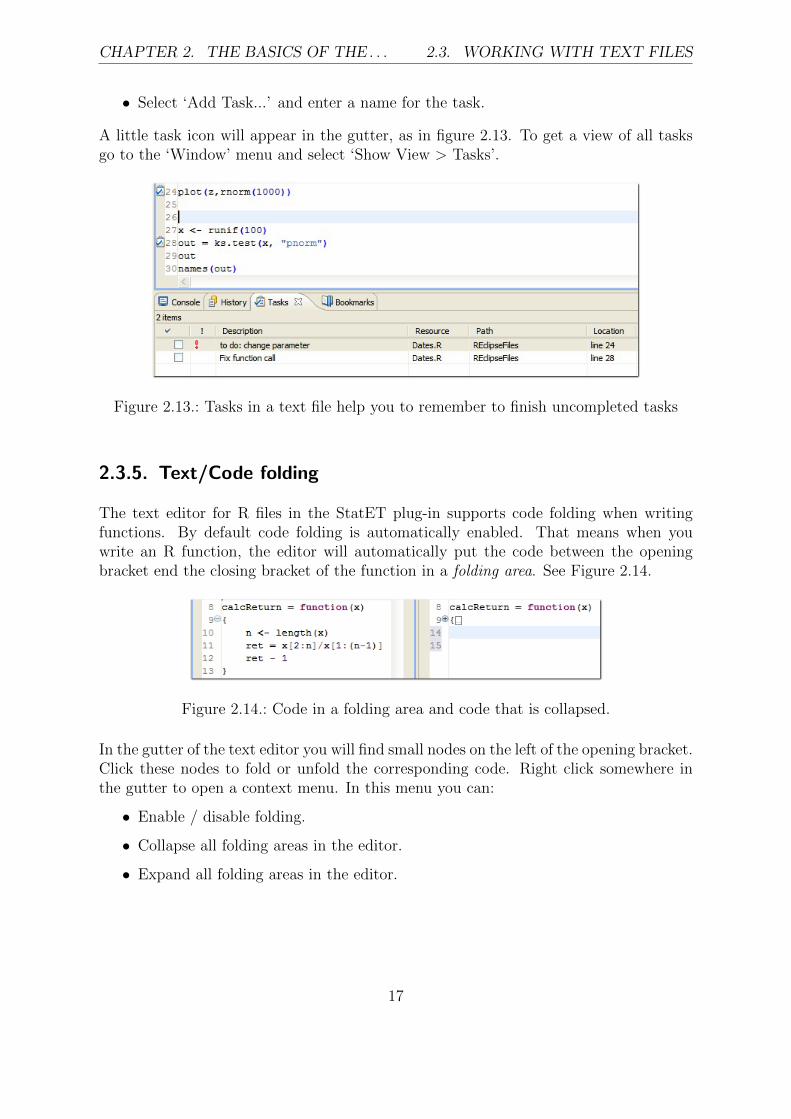
• Select ‘Add Task...’ and enter a name for the task.
A little task icon will appear in the gutter, as in figure 2.13. To get a view of all tasksgo to the ‘Window’ menu and select ‘Show View > Tasks’.
Figure 2.13.: Tasks in a text file help you to remember to finish uncompleted tasks
2.3.5. Text/Code folding
The text editor for R files in the StatET plug-in supports code folding when writingfunctions. By default code folding is automatically enabled. That means when youwrite an R function, the editor will automatically put the code between the openingbracket end the closing bracket of the function in a folding area. See Figure 2.14.
Figure 2.14.: Code in a folding area and code that is collapsed.
In the gutter of the text editor you will find small nodes on the left of the opening bracket.Click these nodes to fold or unfold the corresponding code. Right click somewhere inthe gutter to open a context menu. In this menu you can:
• Enable / disable folding.
• Collapse all folding areas in the editor.
• Expand all folding areas in the editor.
17

CHAPTER 2. THE BASICS OF THE . . . 2.4. SEARCHING FOR TEXT
2.4. Searching for text
2.4.1. A single file
To search for a text in an open file in the editor, press ctrl-F. A ‘Find/Replace’ dialogas in figure 2.15 will appear.
Figure 2.15.: The Find / Replace dialog
Type a search string and click ‘Find’. Unselect ‘Whole Word’ to search for the searchstring as part of a larger string. So searching for ‘tan’ will also find rectangle. Eclipseallows you to specify search strings using regular expressions. With regular expressionsyou can formulate advanced search strings. It is beyond the scope of this document toexplain regular expressions in detail. Just a few examples.
• Select the ‘Regular expressions’ checkbox. And enter a regular expression.
• gr[ae]y will find the words grey and gray but not groy.
• gr.y will find any single character, so gray, groy and gr5y.
• gr.*y will find gray, graaxsdy or gry.
• The expression [0-9]+ will find any number, so 458, tr5w and 786jhf.
An alternative to searching for strings in an editor is the Incremental Find and theReverse Incremental Find. With the editor in focus:
• Press ctrl-J, you will enter the incremental find mode.
• This is indicated in the status bar at the bottom of the Eclipse window.
18
CHAPTER 2. THE BASICS OF THE . . . 2.4. SEARCHING FOR TEXT
• Type in some characters, Eclipse will try to find these characters.
If the characters are found these characters are highlighted in the text editor, otherwisethe status bar will display ‘Not found’. Press ctrl-J to move forward from the currentcursor position and try to find the characters again. Use ctrl-shift-J to search upwardsin the text.
2.4.2. Multiple files
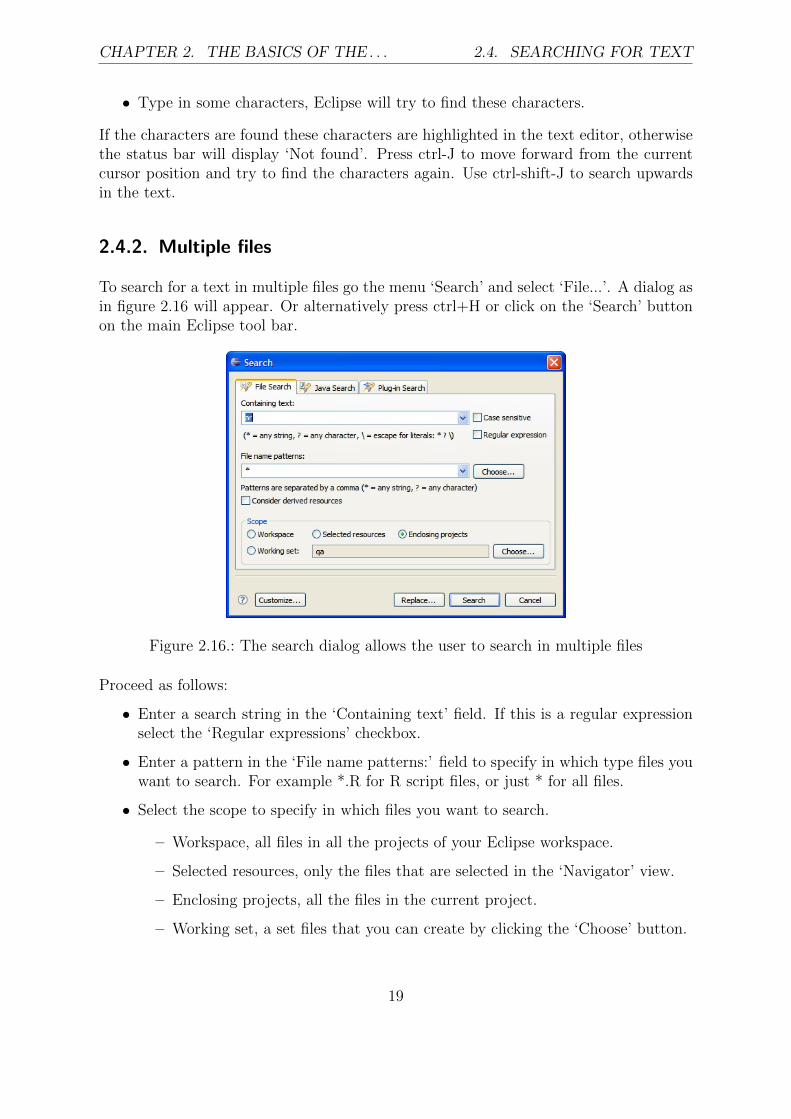
To search for a text in multiple files go the menu ‘Search’ and select ‘File...’. A dialog asin figure 2.16 will appear. Or alternatively press ctrl+H or click on the ‘Search’ buttonon the main Eclipse tool bar.
Figure 2.16.: The search dialog allows the user to search in multiple files
Proceed as follows:
• Enter a search string in the ‘Containing text’ field. If this is a regular expressionselect the ‘Regular expressions’ checkbox.
• Enter a pattern in the ‘File name patterns:’ field to specify in which type files youwant to search. For example *.R for R script files, or just * for all files.
• Select the scope to specify in which files you want to search.
– Workspace, all files in all the projects of your Eclipse workspace.
– Selected resources, only the files that are selected in the ‘Navigator’ view.
– Enclosing projects, all the files in the current project.
– Working set, a set files that you can create by clicking the ‘Choose’ button.
19
CHAPTER 2. THE BASICS OF THE . . . 2.5. ECLIPSE PREFERENCES
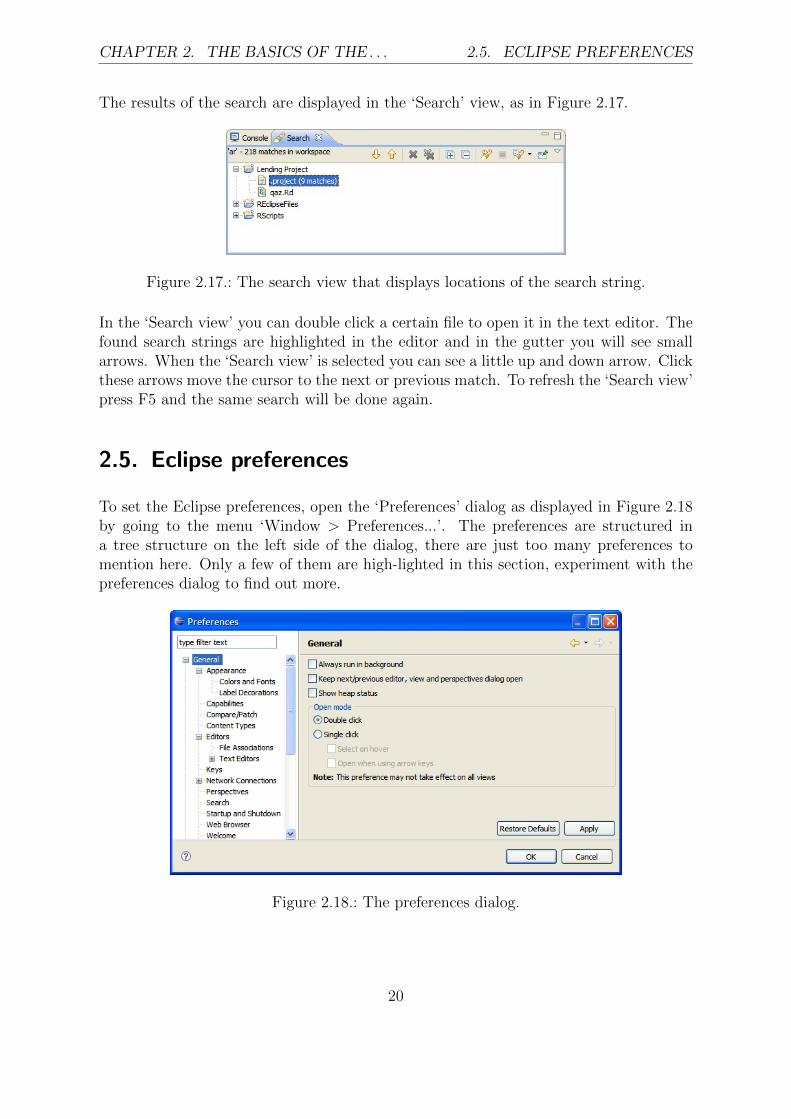
The results of the search are displayed in the ‘Search’ view, as in Figure 2.17.
Figure 2.17.: The search view that displays locations of the search string.
In the ‘Search view’ you can double click a certain file to open it in the text editor. Thefound search strings are highlighted in the editor and in the gutter you will see smallarrows. When the ‘Search view’ is selected you can see a little up and down arrow. Clickthese arrows move the cursor to the next or previous match. To refresh the ‘Search view’press F5 and the same search will be done again.
2.5. Eclipse preferences
To set the Eclipse preferences, open the ‘Preferences’ dialog as displayed in Figure 2.18by going to the menu ‘Window > Preferences...’. The preferences are structured ina tree structure on the left side of the dialog, there are just too many preferences tomention here. Only a few of them are high-lighted in this section, experiment with thepreferences dialog to find out more.
Figure 2.18.: The preferences dialog.
20

CHAPTER 2. THE BASICS OF THE . . . 2.5. ECLIPSE PREFERENCES
Appearance
Unfold ‘General’ in the preferences tree and select ‘Appearance’, here you can set thecolors and fonts for the different elements of eclipse. For example the colors and fontsused in the text file compare environment.
Shortcut keys
In Eclipse many keys are already assigned to a certain task or command. In the prefer-ences dialog unfold ‘General’ in the tree and select ‘Keys’. Then in the dialog select acommand to change or set the key binding. For example, if you are used to F3 in SAS,set key binding for the command ‘Run Selection/Current Line in R’ code to F3. As ashortcut to the shortcut keys press Ctrl+Shift+L anywhere in the workbench. Eclipsewill display a pop up window with a list of all active shortcut keys.
The local history
The settings for the ‘Local History’ can be found under the General > Workspace set-tings. You can increase the low values. For example, set ’Days to keep files’ to 365, the‘Entries per File’ to 10,000 and ‘Maximum file size’ to 10. These new settings should beenough to track a complete year of changes.
Auto Run
The left hand side of the preferences dialog shows the main categories, you can find‘Auto Run’ under the ‘Run/Debug’ folder. The ‘Auto Run’ preference enables you tostart certain tools at start up. For example if you want to automatically start the Rconsole you should check the check box ‘Enable run at startup of:’.
21

3. The StatET plug-in
3.1. Configuring R
If you want to run R code in an R console inside Eclipse or you want to run the R CMDtools, then you need to set up an R environment first. To set up an R environmentgo to the menu ‘Window > Preferences...’, the ‘Preferences’ dialog will appear. Onthe left hand side of the dialog unfold ‘StatEt’, then unfold ‘Run Debug’ and select ’REnvironments’. You will see a dialog as in Figure 3.1.
Figure 3.1.: Setting up an R environment
Perform the following steps:
• Click Add, a dialog appears as in Figure 3.2 where you can enter a name for thespecific R configuration, for example: R-2.11.
22
CHAPTER 3. THE STATET PLUG-IN 3.2. THE NEW R CONSOLE IN . . .
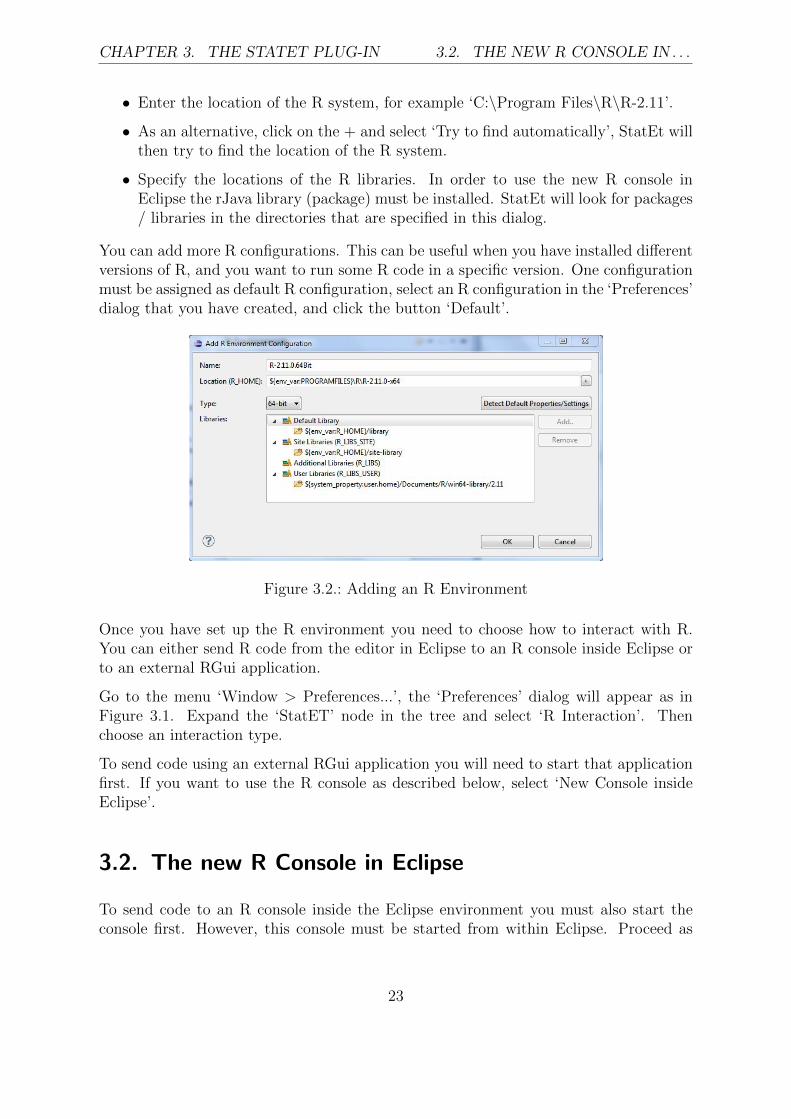
• Enter the location of the R system, for example ‘C:\Program Files\R\R-2.11’.
• As an alternative, click on the + and select ‘Try to find automatically’, StatEt willthen try to find the location of the R system.
• Specify the locations of the R libraries. In order to use the new R console inEclipse the rJava library (package) must be installed. StatEt will look for packages/ libraries in the directories that are specified in this dialog.
You can add more R configurations. This can be useful when you have installed differentversions of R, and you want to run some R code in a specific version. One configurationmust be assigned as default R configuration, select an R configuration in the ‘Preferences’dialog that you have created, and click the button ‘Default’.
Figure 3.2.: Adding an R Environment
Once you have set up the R environment you need to choose how to interact with R.You can either send R code from the editor in Eclipse to an R console inside Eclipse orto an external RGui application.
Go to the menu ‘Window > Preferences...’, the ‘Preferences’ dialog will appear as inFigure 3.1. Expand the ‘StatET’ node in the tree and select ‘R Interaction’. Thenchoose an interaction type.
To send code using an external RGui application you will need to start that applicationfirst. If you want to use the R console as described below, select ‘New Console insideEclipse’.
3.2. The new R Console in Eclipse
To send code to an R console inside the Eclipse environment you must also start theconsole first. However, this console must be started from within Eclipse. Proceed as
23

CHAPTER 3. THE STATET PLUG-IN 3.2. THE NEW R CONSOLE IN . . .
follows:
• Go to the menu ‘Run > Run Configurations...’. A dialog as in Figure 3.3 willappear.
• In the run dialog select ‘R Console’ and click the ‘New launch configuration’ button.
• Enter a name for the configuration, for example ‘R Console A’. Note that it ispossible to create multiple R consoles.
• In the ‘main’ tab you can specify the working directory. You can leave it blankthen the R system will choose the default working directory. Or you could entervariables like ${project path}. Then in this case the working directory for the Rsession will be set to the selected project in the ‘Navigator’ view. The Appendixlists Eclipse variables that you can use.
• In the ‘main’ tab you can also specify R start up options. For example, --silentcauses R to start up without printing start up messages.
• Go to the ‘R Config’ tab and select an R configuration.
Figure 3.3.: The run dialog to configure the internal R console.
Now click on ‘Apply’ to save the configuration and click on ‘Run’ to run the R console.A view as in Figure 3.5 will be visible. Note that sometimes you may not run the Rconsole, the ‘Run’ button is grayed. This can happen for example when no project isselected but you have set R to start with ${project path} as the working directory.
Once the R Console has been setup, the next time you start Eclipse it can be ran againfrom the ‘Run As’ button menu on the main toolbar of Eclipse as high lighted in Figure
24
CHAPTER 3. THE STATET PLUG-IN 3.2. THE NEW R CONSOLE IN . . .
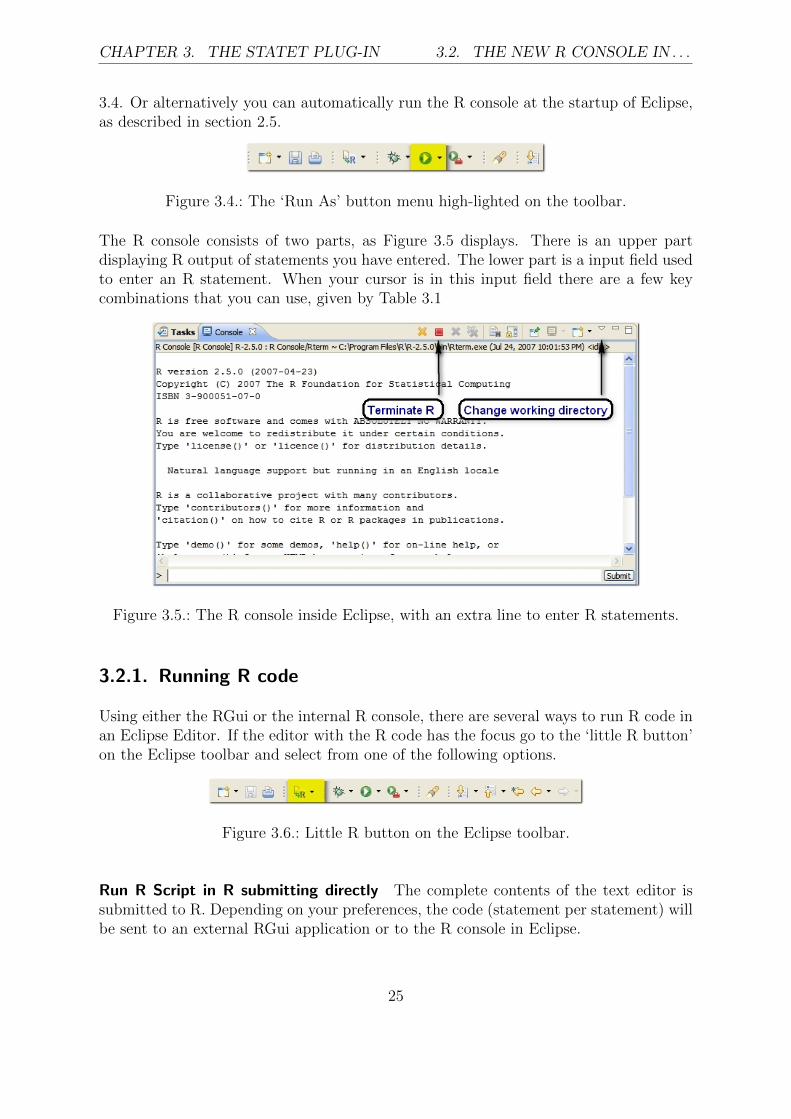
3.4. Or alternatively you can automatically run the R console at the startup of Eclipse,as described in section 2.5.
Figure 3.4.: The ‘Run As’ button menu high-lighted on the toolbar.
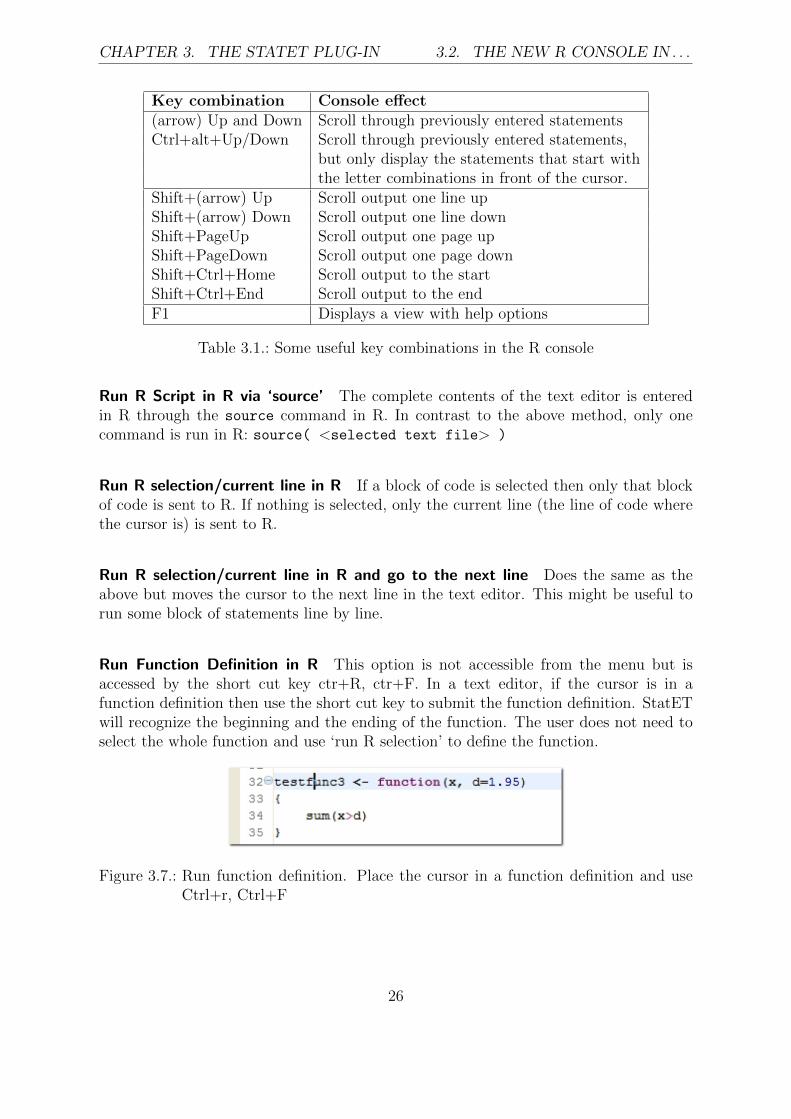
The R console consists of two parts, as Figure 3.5 displays. There is an upper partdisplaying R output of statements you have entered. The lower part is a input field usedto enter an R statement. When your cursor is in this input field there are a few keycombinations that you can use, given by Table 3.1
Figure 3.5.: The R console inside Eclipse, with an extra line to enter R statements.
3.2.1. Running R code
Using either the RGui or the internal R console, there are several ways to run R code inan Eclipse Editor. If the editor with the R code has the focus go to the ‘little R button’on the Eclipse toolbar and select from one of the following options.
Figure 3.6.: Little R button on the Eclipse toolbar.
Run R Script in R submitting directly The complete contents of the text editor issubmitted to R. Depending on your preferences, the code (statement per statement) willbe sent to an external RGui application or to the R console in Eclipse.
25
CHAPTER 3. THE STATET PLUG-IN 3.2. THE NEW R CONSOLE IN . . .
Key combination Console effect(arrow) Up and Down Scroll through previously entered statementsCtrl+alt+Up/Down Scroll through previously entered statements,
but only display the statements that start withthe letter combinations in front of the cursor.
Shift+(arrow) Up Scroll output one line upShift+(arrow) Down Scroll output one line downShift+PageUp Scroll output one page upShift+PageDown Scroll output one page downShift+Ctrl+Home Scroll output to the startShift+Ctrl+End Scroll output to the endF1 Displays a view with help options
Table 3.1.: Some useful key combinations in the R console
Run R Script in R via ‘source’ The complete contents of the text editor is enteredin R through the source command in R. In contrast to the above method, only onecommand is run in R: source( <selected text file> )
Run R selection/current line in R If a block of code is selected then only that blockof code is sent to R. If nothing is selected, only the current line (the line of code wherethe cursor is) is sent to R.
Run R selection/current line in R and go to the next line Does the same as theabove but moves the cursor to the next line in the text editor. This might be useful torun some block of statements line by line.
Run Function Definition in R This option is not accessible from the menu but isaccessed by the short cut key ctr+R, ctr+F. In a text editor, if the cursor is in afunction definition then use the short cut key to submit the function definition. StatETwill recognize the beginning and the ending of the function. The user does not need toselect the whole function and use ‘run R selection’ to define the function.
Figure 3.7.: Run function definition. Place the cursor in a function definition and useCtrl+r, Ctrl+F
26
CHAPTER 3. THE STATET PLUG-IN 3.3. THE CMD HISTORY AND . . .
For convenience, the above ways to run R code can be accessed by short cut keys asdescribed in Section 2.5.
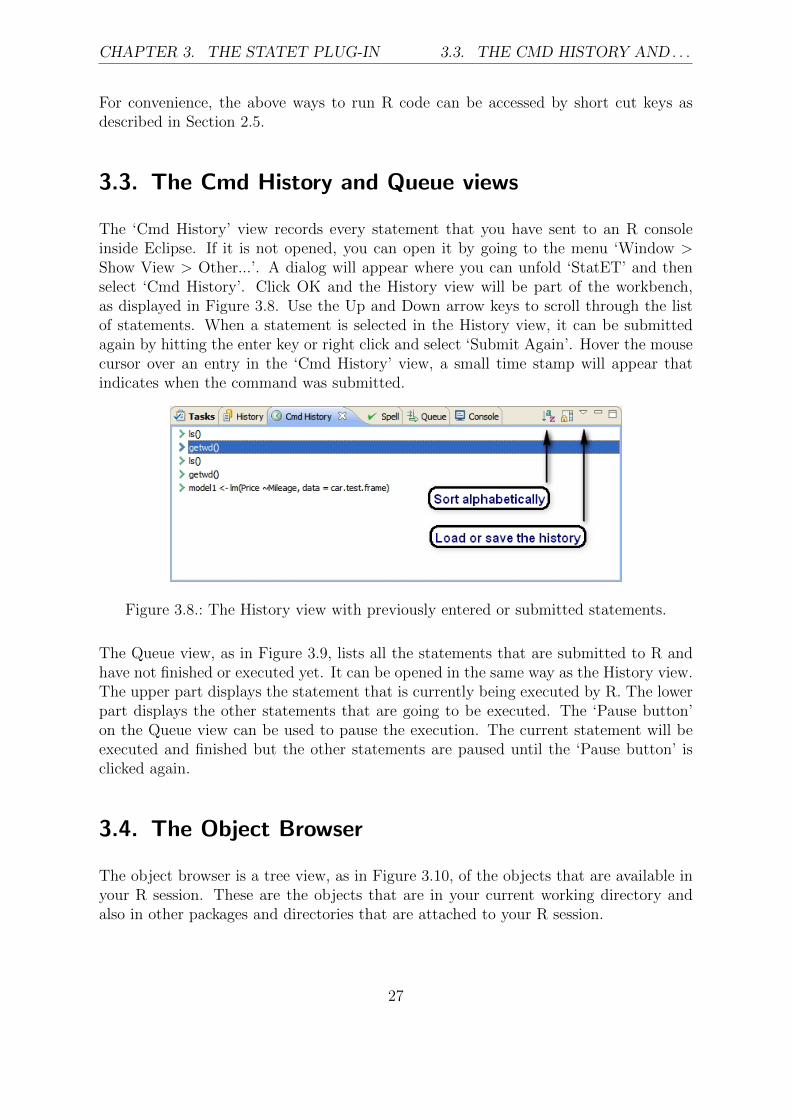
3.3. The Cmd History and Queue views
The ‘Cmd History’ view records every statement that you have sent to an R consoleinside Eclipse. If it is not opened, you can open it by going to the menu ‘Window >Show View > Other...’. A dialog will appear where you can unfold ‘StatET’ and thenselect ‘Cmd History’. Click OK and the History view will be part of the workbench,as displayed in Figure 3.8. Use the Up and Down arrow keys to scroll through the listof statements. When a statement is selected in the History view, it can be submittedagain by hitting the enter key or right click and select ‘Submit Again’. Hover the mousecursor over an entry in the ‘Cmd History’ view, a small time stamp will appear thatindicates when the command was submitted.
Figure 3.8.: The History view with previously entered or submitted statements.
The Queue view, as in Figure 3.9, lists all the statements that are submitted to R andhave not finished or executed yet. It can be opened in the same way as the History view.The upper part displays the statement that is currently being executed by R. The lowerpart displays the other statements that are going to be executed. The ‘Pause button’on the Queue view can be used to pause the execution. The current statement will beexecuted and finished but the other statements are paused until the ‘Pause button’ isclicked again.
3.4. The Object Browser
The object browser is a tree view, as in Figure 3.10, of the objects that are available inyour R session. These are the objects that are in your current working directory andalso in other packages and directories that are attached to your R session.
27

CHAPTER 3. THE STATET PLUG-IN 3.5. THE OUTLINE VIEW
Figure 3.9.: The Queue view displaying statements that are waiting to be executed.
Figure 3.10.: The object browser.
The object browser has a handy feature that allows the user to easily locate objects. Inthe edit field of the object browser type for example the letter ’a’, the object browserwill now only show objects starting with letter a.
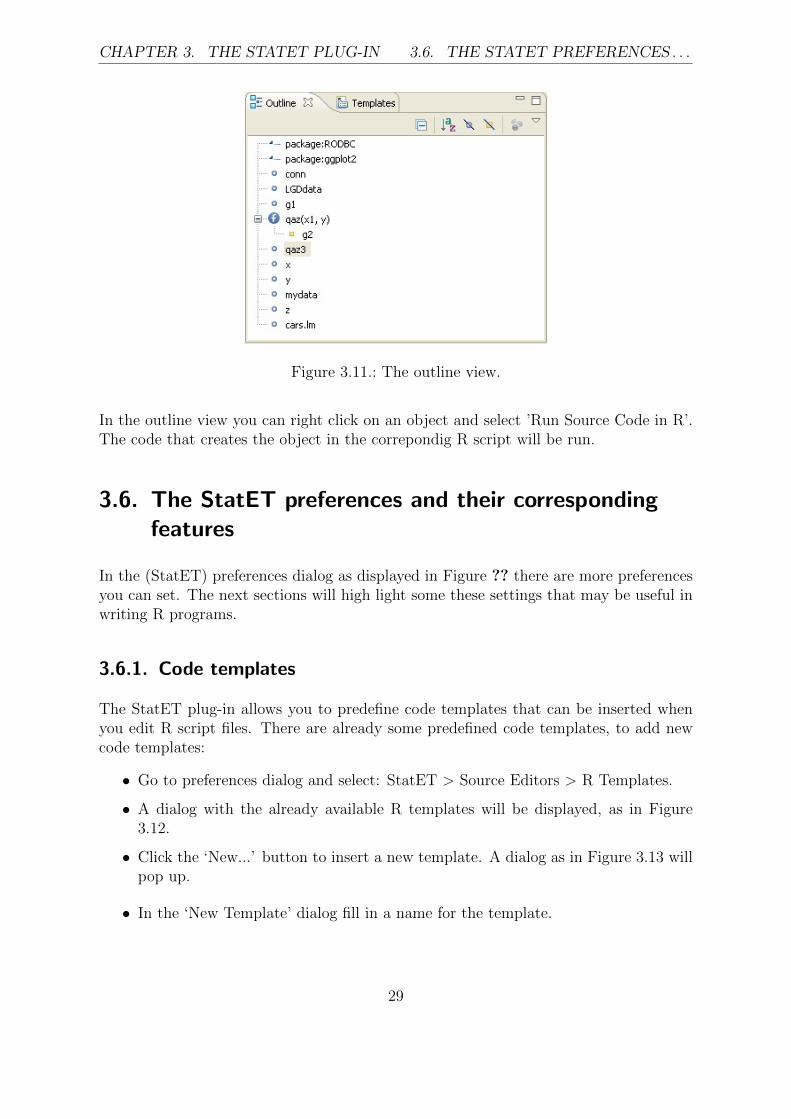
3.5. The Outline view
The outline view is a convenient way to show the ’structure’ of the active R script file.The outline view displays the objects and library attachments that are defined in theactive R script file. See Figure 3.11, where you can see an example outline view. Thecorresponding R script has two library statements, a function defined and some otherobjects.
28
CHAPTER 3. THE STATET PLUG-IN 3.6. THE STATET PREFERENCES . . .
Figure 3.11.: The outline view.
In the outline view you can right click on an object and select ’Run Source Code in R’.The code that creates the object in the correpondig R script will be run.
3.6. The StatET preferences and their correspondingfeatures
In the (StatET) preferences dialog as displayed in Figure ?? there are more preferencesyou can set. The next sections will high light some these settings that may be useful inwriting R programs.
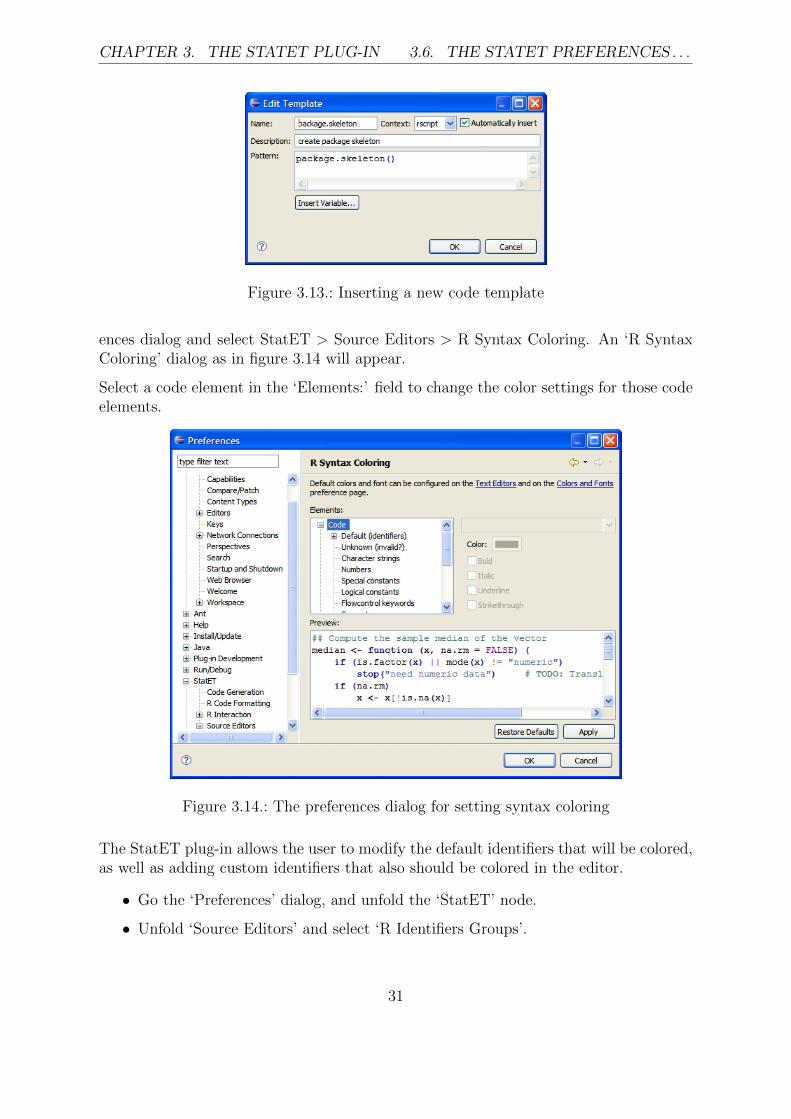
3.6.1. Code templates
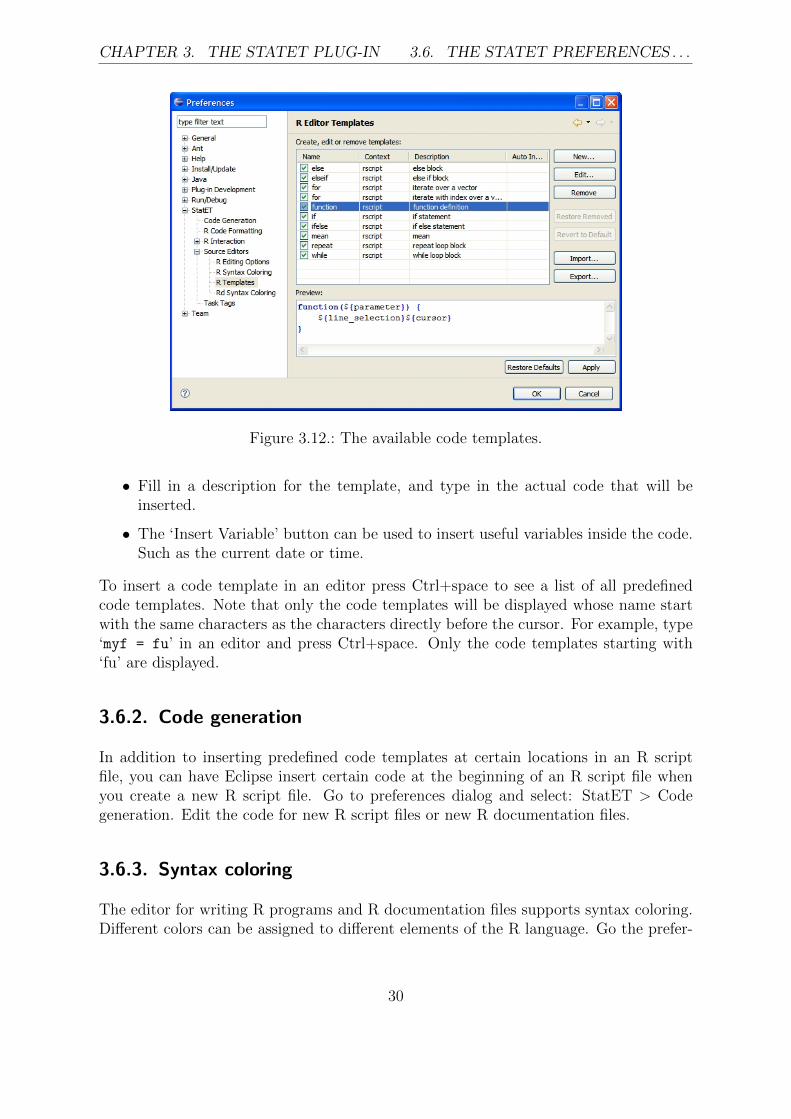
The StatET plug-in allows you to predefine code templates that can be inserted whenyou edit R script files. There are already some predefined code templates, to add newcode templates:
• Go to preferences dialog and select: StatET > Source Editors > R Templates.
• A dialog with the already available R templates will be displayed, as in Figure3.12.
• Click the ‘New...’ button to insert a new template. A dialog as in Figure 3.13 willpop up.
• In the ‘New Template’ dialog fill in a name for the template.
29
CHAPTER 3. THE STATET PLUG-IN 3.6. THE STATET PREFERENCES . . .
Figure 3.12.: The available code templates.
• Fill in a description for the template, and type in the actual code that will beinserted.
• The ‘Insert Variable’ button can be used to insert useful variables inside the code.Such as the current date or time.
To insert a code template in an editor press Ctrl+space to see a list of all predefinedcode templates. Note that only the code templates will be displayed whose name startwith the same characters as the characters directly before the cursor. For example, type‘myf = fu’ in an editor and press Ctrl+space. Only the code templates starting with‘fu’ are displayed.
3.6.2. Code generation
In addition to inserting predefined code templates at certain locations in an R scriptfile, you can have Eclipse insert certain code at the beginning of an R script file whenyou create a new R script file. Go to preferences dialog and select: StatET > Codegeneration. Edit the code for new R script files or new R documentation files.
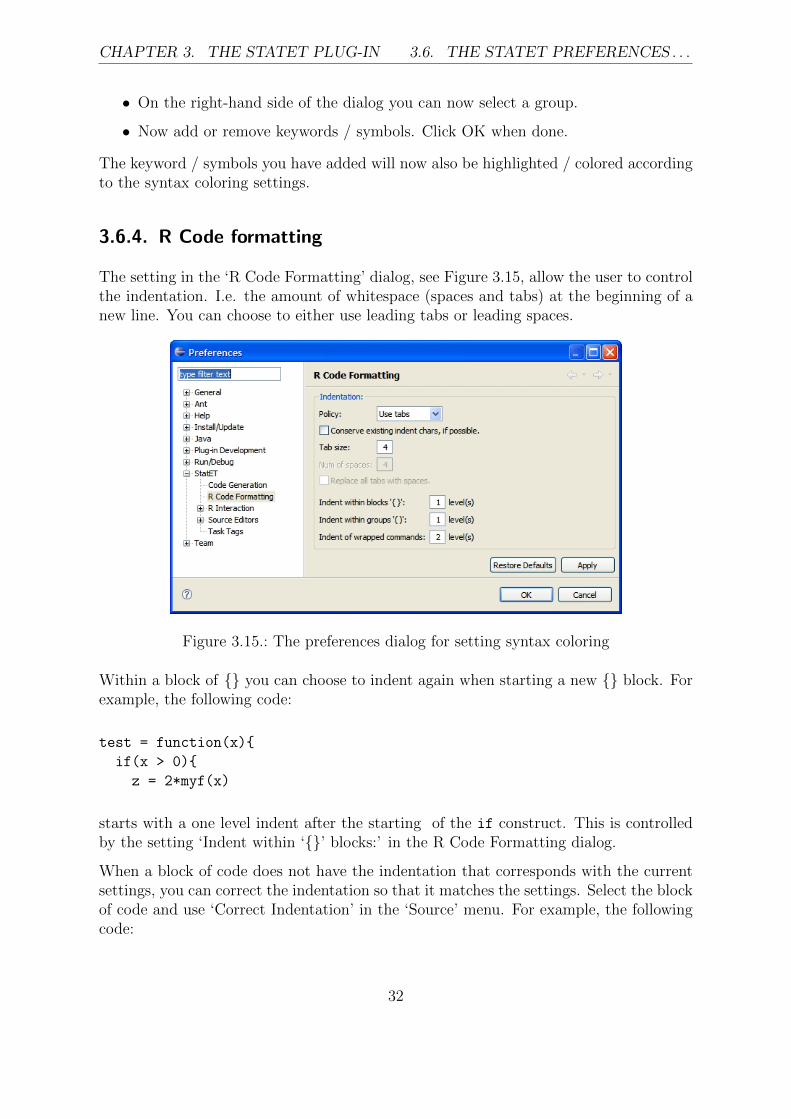
3.6.3. Syntax coloring
The editor for writing R programs and R documentation files supports syntax coloring.Different colors can be assigned to different elements of the R language. Go the prefer-
30
CHAPTER 3. THE STATET PLUG-IN 3.6. THE STATET PREFERENCES . . .
Figure 3.13.: Inserting a new code template
ences dialog and select StatET > Source Editors > R Syntax Coloring. An ‘R SyntaxColoring’ dialog as in figure 3.14 will appear.
Select a code element in the ‘Elements:’ field to change the color settings for those codeelements.
Figure 3.14.: The preferences dialog for setting syntax coloring
The StatET plug-in allows the user to modify the default identifiers that will be colored,as well as adding custom identifiers that also should be colored in the editor.
• Go the ‘Preferences’ dialog, and unfold the ‘StatET’ node.
• Unfold ‘Source Editors’ and select ‘R Identifiers Groups’.
31
CHAPTER 3. THE STATET PLUG-IN 3.6. THE STATET PREFERENCES . . .
• On the right-hand side of the dialog you can now select a group.
• Now add or remove keywords / symbols. Click OK when done.
The keyword / symbols you have added will now also be highlighted / colored accordingto the syntax coloring settings.
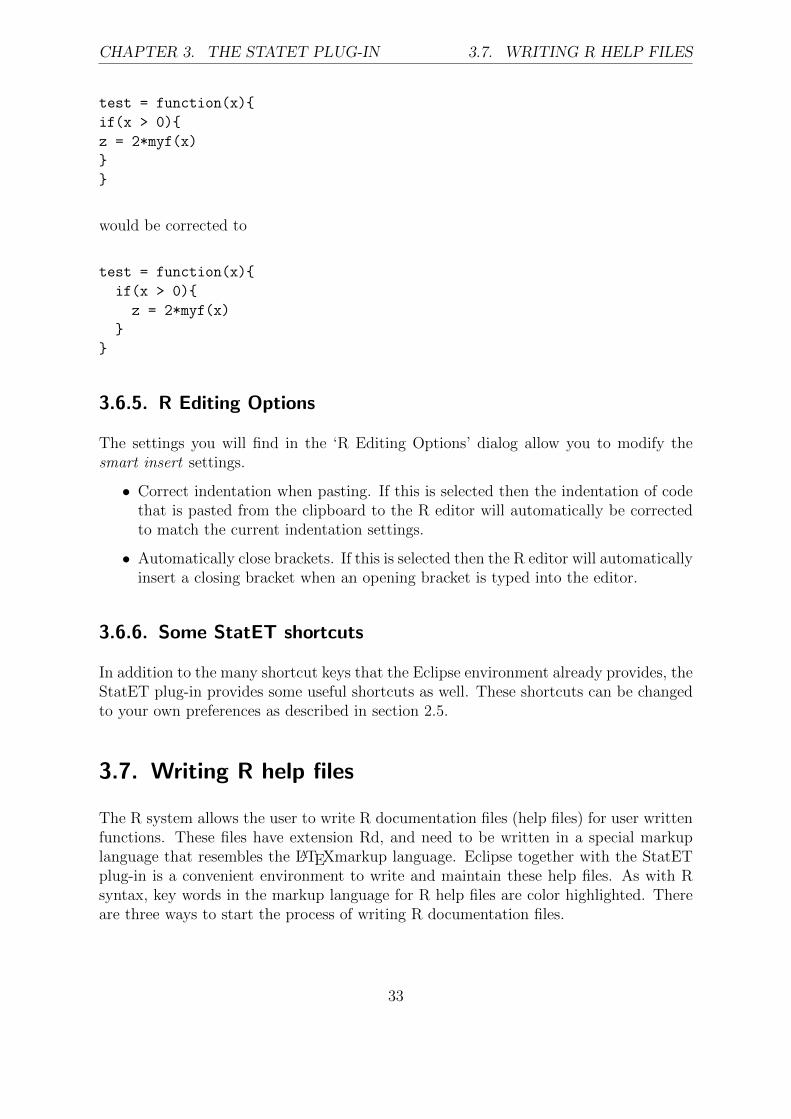
3.6.4. R Code formatting
The setting in the ‘R Code Formatting’ dialog, see Figure 3.15, allow the user to controlthe indentation. I.e. the amount of whitespace (spaces and tabs) at the beginning of anew line. You can choose to either use leading tabs or leading spaces.
Figure 3.15.: The preferences dialog for setting syntax coloring
Within a block of {} you can choose to indent again when starting a new {} block. Forexample, the following code:
test = function(x){
if(x > 0){
z = 2*myf(x)
starts with a one level indent after the starting of the if construct. This is controlledby the setting ‘Indent within ‘{}’ blocks:’ in the R Code Formatting dialog.
When a block of code does not have the indentation that corresponds with the currentsettings, you can correct the indentation so that it matches the settings. Select the blockof code and use ‘Correct Indentation’ in the ‘Source’ menu. For example, the followingcode:
32
CHAPTER 3. THE STATET PLUG-IN 3.7. WRITING R HELP FILES
test = function(x){
if(x > 0){
z = 2*myf(x)
}
}
would be corrected to
test = function(x){
if(x > 0){
z = 2*myf(x)
}
}
3.6.5. R Editing Options
The settings you will find in the ‘R Editing Options’ dialog allow you to modify thesmart insert settings.
• Correct indentation when pasting. If this is selected then the indentation of codethat is pasted from the clipboard to the R editor will automatically be correctedto match the current indentation settings.
• Automatically close brackets. If this is selected then the R editor will automaticallyinsert a closing bracket when an opening bracket is typed into the editor.
3.6.6. Some StatET shortcuts
In addition to the many shortcut keys that the Eclipse environment already provides, theStatET plug-in provides some useful shortcuts as well. These shortcuts can be changedto your own preferences as described in section 2.5.
3.7. Writing R help files
The R system allows the user to write R documentation files (help files) for user writtenfunctions. These files have extension Rd, and need to be written in a special markuplanguage that resembles the LATEXmarkup language. Eclipse together with the StatETplug-in is a convenient environment to write and maintain these help files. As with Rsyntax, key words in the markup language for R help files are color highlighted. Thereare three ways to start the process of writing R documentation files.
33
CHAPTER 3. THE STATET PLUG-IN 3.7. WRITING R HELP FILES
Key combination meaningCtrl+R, S Run R code via sourceCtrl+R, ctr+D Run R code by submitting it directlyCtrl+R, 1 If a word is selected in the editor, run help(’selected word ’)Ctrl+Shift+# Add documentation comment. These are double # in
front of each selected lineCtrl+Shift+C Toggle comment. place or remove single comment symbols #.(Shift)+tab Shift a selected block of text to the right or to the left.Alt+Shift+Up Select enclosing elementAlt+Shift+Left Select previous elementAlt+Shift+Right Select next elementAlt+Shift+Down Restore last selection
Table 3.2.: Some useful StatET shortcuts
Start from a new file
• Right click on a project in the ‘Navigator view’.
• Select New > Other > StatET > R Documentation file.
• Choose a name for the help file.
The new Rd file will appear in the project and is visible in the text editor.
The prompt function in R
If you have an R function, the prompt function in R can generate a template R docu-mentation file from the function. Submit the following R commands:
myrdfile = "Myfunc.Rd"
prompt(myf,myrdfile)
Then R will create the Rd file ‘myfunc.Rd’. In Eclipse, right click on a project and select‘Import...’ to import the Rd file into the project for further editing.
The package.skeleton function in R
When you create an R package (see for example [2]) with multiple functions, then the Rfunction package.skeleton creates a skeleton for the R package. Among other things,this skeleton contains a directory with template Rd files for each function in the package.You can then import these Rd files in Eclipse for further editing and maintenance. Seefor example Figure 3.16.
34

CHAPTER 3. THE STATET PLUG-IN 3.8. R CMD TOOLS
Figure 3.16.: A project consisting of R help files.
3.8. R CMD tools
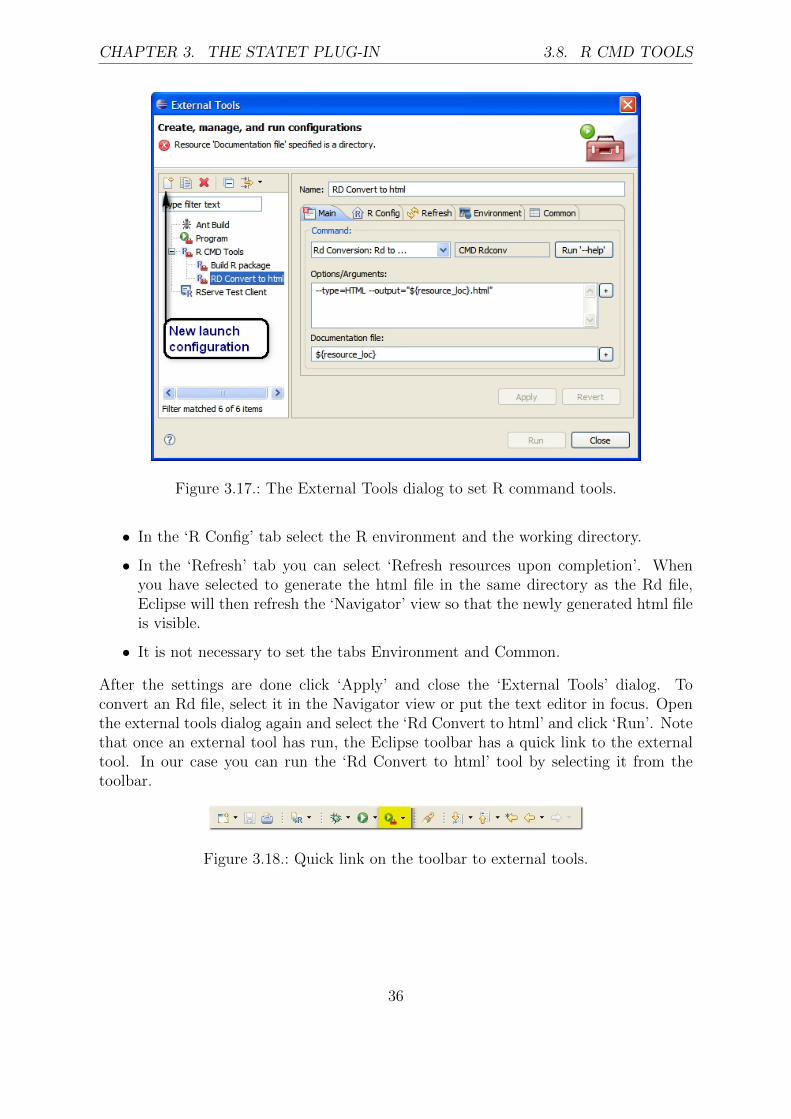
From within Eclipse you can run R command tools, the StatET plug-in has a customized‘External Tools’ dialog to configure R command tools. Go to the menu ‘Run > ExternalTools > Open External Tools Dialog...’, a dialog as in Figure 3.17 will appear. The nextsub sections give some examples on how to configure and run these tools.
3.8.1. Converting Rd files
R documentation files can be converted to LATEXor HTML by running the tool RcmdRdconv.
• Select ‘R CMD Tools’ in the External Tools dialog and click ‘New Launch Config-uration’ button.
• Then on the right-hand side of the dialog, enter a name for this configuration. Forexample, ‘Rd Convert to html’.
• Select the specific R command, in this case ‘Rd Conversion: Rd to ...’.
• In the Option/Argument field enter:
--type=HTML --output="${resource_loc}.html"
The type argument specifies the conversion to html, the output argument specifiesthe location and name of the html file. In this case, we took the eclipse variable$resource loc. But to make sure the R command tool does not overwrite theoriginal Rd file, an extra ‘.html’ is placed after the name. If there are spaces inthe name you must enclose the name with double quotes.
35
CHAPTER 3. THE STATET PLUG-IN 3.8. R CMD TOOLS
Figure 3.17.: The External Tools dialog to set R command tools.
• In the ‘R Config’ tab select the R environment and the working directory.
• In the ‘Refresh’ tab you can select ‘Refresh resources upon completion’. Whenyou have selected to generate the html file in the same directory as the Rd file,Eclipse will then refresh the ‘Navigator’ view so that the newly generated html fileis visible.
• It is not necessary to set the tabs Environment and Common.
After the settings are done click ‘Apply’ and close the ‘External Tools’ dialog. Toconvert an Rd file, select it in the Navigator view or put the text editor in focus. Openthe external tools dialog again and select the ‘Rd Convert to html’ and click ‘Run’. Notethat once an external tool has run, the Eclipse toolbar has a quick link to the externaltool. In our case you can run the ‘Rd Convert to html’ tool by selecting it from thetoolbar.
Figure 3.18.: Quick link on the toolbar to external tools.
36

CHAPTER 3. THE STATET PLUG-IN 3.8. R CMD TOOLS
3.8.2. Building an R package
Assuming that R and the necessary tools for building an R package are installed, theStatET plug-in can be configured to build an R package from within Eclipse. Proceedas follows:
• Open the External Tools dialog, and click the ‘New launch configuration’ button.
• Enter a name for this tool, say ‘Build R Package’.
• Select the command ‘Add-on Packages: Build’.
• The R CMD Build tool can be run with specific options. These options are enteredin the ‘Options/Argument:’ field. For example, to build a pre-compiled binarypackage, enter the option --binary.
• Specify the package directory. This should be the directory containing the neces-sary ingredients to build an R package, so for example the ‘DESCRIPTION’ file,the sub directories: ‘data’, ‘man’ and ‘R’. If these ingredients are imported in anEclipse project you can set the package directory to ${project loc}.
• In the ‘R Config’ tab select a working directory. If you fill in for example ${project loc}then the resulting R package will be created in the directory of the project.
Figure 3.19.: Building an R package from the external tools.
37

A. Some Eclipse variables
This appendix lists some of the Eclipse variables that you can use in the ‘Run’ and‘External Tools’ dialogs. The following text is taken verbatim from the Eclipse helpfile.
From the Eclipse help
Let’s assume your Eclipse workspace directory is c:\eclipse\workspace and you havetwo projects, MyProject1 and MyProject2. The first project, MyProject1, is locatedinside the workspace directory, the second project, MyProject2, is located outside theworkspace directory at c:\projects\MyProject2. Lets look at how the variable ex-amples below will be expanded when an external tool is run, if the resource /MyPro-ject2/MyFolder/MyFile.txt is selected.
Variable Examples Expanded Results${workspace loc} c:\eclipse\workspace${workspace loc:/MyProject1/MyFile.txt} c:\eclipse\workspace\MyProject\MyFile.txt${workspace loc:/MyProject2/MyFile.txt} c:\projects\MyProject2\MyFile.txt${project loc} c:\projects\MyProject2${project loc:/MyProject1/MyFile.txt} c:\eclipse\workspace\MyProject${container loc} c:\projects\MyProject2\MyFolder${resource loc} c:\projects\MyProject2\MyFile.txt${project path} /MyProject2${container path} /MyProject2/MyFolder${resource path} /MyProject2/MyFolder/MyFile.txt${project name} MyProject2${container name} MyFolder${resource name} MyFile.txt${build type} none
38
Bibliography
[1] R Development Core Team, R: A Language and Environment for Statistical Com-puting. R Foundation for Statistical Computing, Vienna, Austria, 2006. ISBN 3-900051-07-0.
[2] Longhow Lam, An introduction to R. www.splusbook.com, 2007.
[3] IBM Corporation and others, The Eclipse documentation.http://www.eclipse.org/documentation, 2007.
39
Index
.project file, 11
Auto Run, 21Automatically start R console, 21
bookmarks, 15
closing bracket, 33code folding, 17code formatting, 32
External Tools, 35
Find, incremental, 18Folders in a project, 12
gutter, 14
history view, 27
indentation, 32
keyword highlighting, 30
linked resources, 13
navigator, 11
perspective, 9preferences, 20project, 10
queue view, 27
R Command Tools, 35resources, 11Run function definition in R, 26
Search view, 20search view, 20shortcuts, 21, 33
smart insert, 33syntax coloring, 30
tasks, 16text folding, 17
word completion, 14workbench, 9workspace folder, 6
40