Appliance Quick Start Guide v7 - Load Balancing...Appliance Quick ...

Appliance descriptionA
2
3
4
10
6
7
12
11
9
8
A
5
1
1 Auto-off light(depending on model)
2 Burst of steam andvertical steam button
3 Spray button4 Variable steam control
with Auto Steam and Self Clean Function
5 Temperature control dial
6 Water filling inlet7 Spray nozzle8 Soleplate9 Water tank with maximum
water level indicator10 Thermostat light11 Cord support12 Cord
NOT DZ1500 1103899603 6/03/06 16:21 Page 1

IMPORTANT SAFETY INSTRUCTIONS
When using your iron, basic safety precautions should always befollowed,including the following:
Read all instructions before using the iron.
• Use iron only for its intended use.
• To protect against a risk of electric shock, do not immerse the ironin water or other liquids.
• The iron should always be turned to Minimum (Min) before plugging or unplugging from outlet. Never yank cord to disconnectfrom outlet, instead grasp plug and pull to disconnect.
• Do not allow cord to touch hot surfaces. Let iron cool completely before putting away.
• Loop cord loosely around iron when storing. Always disconnectiron from electrical outlet when filling iron with water, emptyingiron or when not in use.
• Do not operate iron with a damaged cord or if the iron has been dropped or damaged. To avoid the risk of electric shock, do not disassemble the iron, ship it to the nearest authorized RowentaAppliance Service Center for examination and repair. Incorrect reassembly can cause a risk of electric shock when the iron is used.
• This product is not intended for use by children. Close supervisionis required when product is used near children. Do not leave ironunattended while plugged in or on an ironing board. Do not directsteam at people, animals or iron clothes while they are being worn.
• Burns can occur from touching hot metal parts, hot water orsteam. Use caution when you turn a steam iron upside down theremay be hot water in the reservoir.
• The use of accessory attachments is not recommended by RowentaAppliance Company and may result in fire, electric shock or personalinjury.
SPECIAL INSTRUCTIONS
1. This is either a 1600/1700 watt appliance (check the appliance forthe wattage marking stamped on the heel).To avoid an overload, donot operate another high wattage appliance on the same circuit.
2. If an extension cord is absolutely necessary, the marked electricalrating of the extension cord should be at least as great as the electrical rating of the appliance. Cords rated for less amperagemay overheat. Care should be taken to arrange the cord so that itcannot be pulled or tripped over.
3. Your Rowenta appliance is intended for household use only.
SAVE THESE INSTRUCTIONS
NOT DZ1500 1103899603 6/03/06 16:21 Page 2
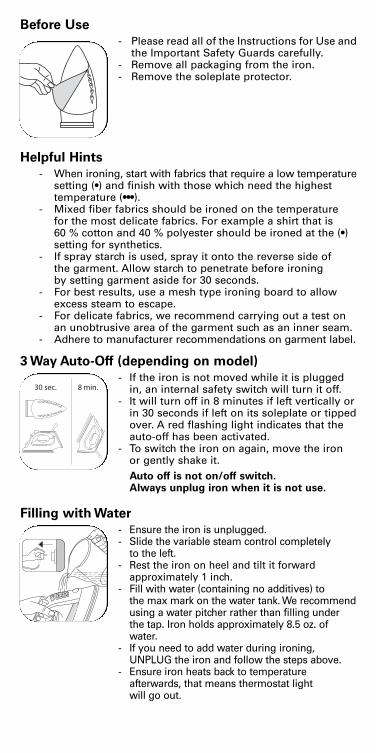
Before Use
- Please read all of the Instructions for Use andthe Important Safety Guards carefully.
- Remove all packaging from the iron.- Remove the soleplate protector.
Helpful Hints
- When ironing, start with fabrics that require a low temperaturesetting (•) and finish with those which need the highest temperature (•••).
- Mixed fiber fabrics should be ironed on the temperaturefor the most delicate fabrics. For example a shirt that is 60 % cotton and 40 % polyester should be ironed at the (•)setting for synthetics.
- If spray starch is used, spray it onto the reverse side of the garment. Allow starch to penetrate before ironing by setting garment aside for 30 seconds.
- For best results, use a mesh type ironing board to allowexcess steam to escape.
- For delicate fabrics, we recommend carrying out a test onan unobtrusive area of the garment such as an inner seam.
- Adhere to manufacturer recommendations on garment label.
3 Way Auto-Off (depending on model)
- If the iron is not moved while it is pluggedin, an internal safety switch will turn it off.
- It will turn off in 8 minutes if left vertically orin 30 seconds if left on its soleplate or tippedover. A red flashing light indicates that theauto-off has been activated.
- To switch the iron on again, move the ironor gently shake it. Auto off is not on/off switch.Always unplug iron when it is not use.
Filling with Water
- Ensure the iron is unplugged. - Slide the variable steam control completely
to the left.- Rest the iron on heel and tilt it forward
approximately 1 inch.- Fill with water (containing no additives) to
the max mark on the water tank. We recommendusing a water pitcher rather than filling underthe tap. Iron holds approximately 8.5 oz. ofwater.
- If you need to add water during ironing,UNPLUG the iron and follow the steps above.
- Ensure iron heats back to temperature afterwards, that means thermostat light will go out.
NOT DZ1500 1103899603 6/03/06 16:21 Page 3

Water Recommendations
Tap waterRowenta irons are designed to be used with REGULAR TAPWATER (up to 12 grains of hardness). If your water is harderthan this, Rowenta recommends mixing half tap water with half distilled water which reduces the hardness; or just use inexpensive bottled spring water. Never use 100% distilled water since this can cause the iron to spit and leak.
Softened waterThere are many types of household water softeners and the water from many of them is perfectly acceptable for use in an iron. However, some types of softeners, particularly those that use chemicals such as salt, can cause the iron to leak or spit during use. If you experience this type of problem, we recommend that you try using inexpensive bottled spring water or untreated tap water. Never use 100% pure distilled water.
Once you have changed water it will take several uses to correct the problem. Rowenta recommends trying the steam function for the first time on an old towel or cloth to avoid damaging your clothes.
Iron and other impuritiesIf your water supply contains large amounts of iron or organic matter, these minerals can collect inside the iron and eventuallyappear as brown stains. If you experience these problems Rowenta recommends using inexpensive bottled spring water. Never use 100% pure distilled water
Always remember:Battery water and water containing additives (such as starch, perfume or fabric conditioner) may not be used. Such additivescan affect the properties of the steam and, at high temperatures,can form deposits in the steam chamber, which will mark the laundry when they are emitted through the steam vents. For this reason descaling liquids should not be used.
Selecting the Temperature
- Set the temperature control dial according tothe fabric you are ironing. Check the garmentslabel for appropriate setting.We recommend using the chart below as aguide.
Light will be on as iron is heating. When light goes out iron is readyto use. When heating a cold iron, please allow thermostat to cycletwice before use (thermostat light will go on and off twice).
Ironing label Fabric
Synthetic fibres e.g.viscose, polyester
silk, wool
cotton, linen
Temperature control
NOT DZ1500 1103899603 6/03/06 16:21 Page 4

Steam Ironing
WARNING !• Never iron or steam clothes while they are being worn.• Before ironing for the first time fill iron and allow to heat.• The iron should be allowed to emit steam for 1 to 2 minutes
while pressing the burst of steam button a few times toremove any impurities.This should also be done if iron is notused regularly.
• It is normal for a small amount of smoke and a light odor to be produced the first time it is used.This will quickly disappear.
• Particles may emit from iron during first use.They are notharmful and should disappear after the iron has been used.
Steam is only produced when the temperature dial is set to theshaded area (after •• setting).
Burst of steam
- This feature is ideal for removing stubborn wrinkles or pressing in sharp creases in hori-zontal use. When the temperature control is set to the steam zone (after ••) the burst of steam can be used by pressing the burst of steam button. Leave an interval of 4 seconds between bursts.
Vertical Steam
- The iron can also be used vertically. - This is especially useful for getting creases
out of hanging clothes, curtains, tapestries, etc.- To steam vertically, press the burst of steam
button while holding iron in the upright position.
Warning! Never iron clothes while they are being worn.
Dry Ironing
- To iron without steam, slide the variablesteam control lever to the position.
- We recommend dry ironing with an empty tank.
- Set the temperature for the type of material tobe ironed (•, •• or •••).
Auto Steam
- For steam output to be automatically adjusted to the soleplate temperature, turn the steam control to the position.
NOT DZ1500 1103899603 6/03/06 16:21 Page 5

Spray Setting
- This feature is ideal for stubborn wrinkles or set in creases.
- Ensure there is water in the tank then press the spray button.
- Do not spray silk.
Anti-Drip System
- In order to produce steam, all irons require a high tempera-ture. If the soleplate is not hot enough some of the water willnot turn to steam and can spit or leak from the soleplate. The Anti-Drip system automatically switches off the steam when ironing at low temperatures to prevent spitting.
Anti-Calc System
- Minerals in water can build up in the steam chamber. The Anti-Calc system contains a special material that neutralizes the harmful minerals. This system is designed to extend and maintain the high steam performance of the iron. The cartridge is not replacable.
Self Clean
Warning! Do not use descaling agents.They can damage the lining of the steam chamber.
This feature allows loose mineral deposits and other impuritiesto be flushed from the soleplate.Self Clean should be carried out occasionally and at least once a month.
- Fill the iron with tap water to the max markon the water tank.
- Be sure that variable steam lever is set to mminimum.
- Stand the iron onheel and plug in.` - Set thermostat to ••• setting.
- Once heated, unplug iron.- Hold iron horizontally over the sink with
the soleplate pointing away from body.- Move the variable steam lever completely to
the right and hold in the self clean position for one minute.
Warning! Doing this will cause steam and hot water to be ejected from the soleplate.Take all proper precautions and hold iron away from body.
- Move the iron gently back and forth and side to side until allwater has run through plate.
- Carefully wipe all water and material from the soleplate with an old towel, as the water and minerals can stain the sole-plate (although this has no effect on glide or performance).
ANTICALC ANTI DRIP
NOT DZ1500 1103899603 6/03/06 16:21 Page 6

Warning! Iron and soleplate may still be very hot. Exercise care while wiping.
- Place iron on heel and leave to cool.
Before using iron after self cleaning, test steam and burst of steam on an old towel or cloth than can be discarded.
Vapodur Valve
To ensure the iron continues to steam efficiently, open andclose the valve a few times after each use. This is done bymoving the variable steam control lever left to right a fewtimes.
After Ironing
1. Turn the temperature dial to the min setting. Slide the steamlever to the no steam position .
2. Unplug the appliance.3. Place the iron on its heel and allow to cool completely.4. Empty water from the appliance before storing.
We recommend emptying the iron when not in use.5. To protect the soleplate, we recommend storing iron on its
heel.
Cleaning and Maintenance
When cold and unplugged, the iron can be cleaned with a damp cloth and wiped dry.
Never use household cleaners or solvents.
Cleaning the soleplateRowenta soleplates have excellent non-stick properties and can be wiped clean when cold.- In normal use a draggy coating may build up on the soleplate
(starch, detergent build-up, burnt synthetic fibers).This can easily removed by using the Rowenta Soleplate Kit or a quality hot iron soleplate cleaner available at most stores. The Rowenta kit is also available through our website: www.rowentausa.com.
- To prevent scratching of the soleplate, do not iron over sharp objects (zippers, etc.). Do not place the iron on rough surfaces,e.g. metal iron support, which may scratch the soleplate.
NOT DZ1500 1103899603 6/03/06 16:21 Page 7

Troubleshooting
Issues
Not properly pluggedin.
The temperature control is set too low.
Auto-off has engaged (depending on model).
There is insufficientwater in the tank.
Iron is not set to asteam setting.
The Anti-drip functionis active.
Water may need to bechanged due to hard-ness or organic matter.
Garment has not beenrinsed sufficiently.
Over use of burst button.
Distilled or softenedwater being used.
Overfilled.
Auto-off has engaged.(depending on model).
Starch use.
Burnt material.Ironing at too hightemperature.
Priming may be necessary on first use.
Check that iron is plugged correctly.
Set the temperature control to ahigher temperature.
Move iron or shake it gently toreactivate.
Fill the water tank.
See section called “SteamIroning”.
Wait for the soleplate to reach thecorrect temperature.
See section “Water recommenda-tions”. Switch to spring water ormix tap water with distilled water.
Ensure garments are rinsed tho-roughly to remove any detergentdesposits or chemicals on newgarments.
Allow more time between eachburst.
See section “Water recommenda-tions”. Switch to spring water ormix tap water with distilled water.
Do not fill past max line on tank.Be sure to close the cover at filling inlet, depending on model.
Move iron or shake gently toreactivate.
Spray reverse side of fabric andallow starch to penetrate.
Be sure to set temperature according to fabric being ironed.
Fill with water.Hold cold iron horizontally.Place finger over the spray nozzleto create a vacuum.Press the spray button 4 to 5times.Remove finger from nozzle, pressspray button a few more times.
Possible causes Solutions
Iron does notheat.
Not enoughsteam.
Iron is emitting abrown or whitesubstance.
Iron is leaking.
The Auto-off lightis flashing.
Build up on thesoleplate.
Spray functiondoes not work.
If troubleshooting does not assist, before consulting the retailerregarding their return / exchange policy, please telephone consumer service at: 781-396-0600.
NOT DZ1500 1103899603 6/03/06 16:21 Page 8

All Rowenta products are warranted for 1 year from dateof purchase against defects in material and workmanship.During this period, any Rowenta product that, uponinspection by Rowenta, is proved defective, will be repairedor replaced, at Rowenta's option, without charge to thecustomer. If a replacement product is sent, it will carry theremaining warranty of the original product. This warrantydoes not apply to any defect arising from a buyer's oruser's misuse of the product, negligence, failure to followRowenta's instructions, use on current or voltage otherthan stamped on the product or alteration or repair notauthorized by Rowenta. Repair or disassembly by anyoneother than a Rowenta authorized service center will voidthe warranty. THE WARRANTIES SET FORTH HEREIN AREEXCLUSIVE AND NO OTHER WARRANTIES, EXPRESSOR IMPLIED, INCLUDING BUT NOT LIMITED TO ANYWARRANTY OF MERCHANTABILITY OR FITNESS FOR APARTICULAR PURPOSE OR USE, ARE MADE BY ROWENTAOR ARE AUTHORIZED TO BE MADE WITH RESPECT TOTHE PRODUCT. Some states do not allow limitation onhow long an implied warranty lasts or do not allow theexclusion of incidental or consequential damages, so theabove limitations may not apply to you. This warrantygives you specific legal rights, and you may also haveother rights, which vary from state to state. If you believeyour product is defective, bring the product (or send it,postage prepaid) along with proof of purchase to the nearestauthorized Rowenta Service Center (see below). If yousend the product, please include a letter explaining thenature of the claimed defect.
In the interest of improving products, Rowenta reserves the rightto change specifications without prior notice.
LIMITED WARRANTY
NOT DZ1500 1103899603 6/03/06 16:21 Page 9

Rowenta196 Boston AvenueMedford, MA 02155Tel. : (781) 396-0600www.rowentausa.comOFFICE LOCATION ONLY.To service product see service center information below.
If your appliance needs service, ship the product to your nearestregional service center. Be sure to put your name on the outside of shipping box (no P.O. boxes please). If in warranty, Rowenta willrepair or replace product at their discretion. If the product is out ofwarranty you will be advised of the cost of repair before any workbegins.
Our main service centers are listed below :
Turnpike Appliance Authorized Appliance3495A Lawson Blvd. 1644 West Ogden Ave.Oceanside, NY 11572 Downers Grove, IL 60515
516-483-5596 630-852-1550
Service center information is subject to change. Please visit ourwebsite at www.rowentausa.com or call our service centerinformation line at 781-306-4620. The information line providescurrent service center information and listings in California.
Rowenta Werke GmbH, 63016 Offenbach am Main
NOT DZ1500 1103899603 6/03/06 16:21 Page 10

Appliance descriptionA
2
3
4
10
6
7
12
11
9
8
A
5
1
1 Indicator luminoso(Según modelo)
2 Pulsador de golpe devapor extralargo
3 Pulsador Pulverizador4 Control de vapor ajustable
Sistema de autolimpieza5 Regulador de temperatura6 Orificio de llenado
con tapa
7 Pulverizador8 Suela de acero inoxidable
(precisión, aerodeslizanteo láser, según modelo)
9 Depósito de agua transparente
10 Luz piloto11 Protector de cable flexible12 Cable de alimentación
NOT DZ1500 1103899603 6/03/06 16:21 Page 11

INSTRUCCIONES IMPORTANTES DE SEGURIDAD
Mientras utiliza la plancha, debe seguir siempre unas precauciones de seguridad básicas, entre las que figuran las siguientes:Lea todas las instrucciones antes de utilizar la plancha.• Utilice la plancha sólo para el uso al que está destinada.• Para protegerse del riesgo de una descarga eléctrica, no sumerja laplancha en agua ni otros líquidos.• Antes de enchufar o desenchufar la plancha, deberá estar siempre ajustada en la posición MIN. No de tirones del cable para desenchu-farlo, en vez de ello sujételo por el enchufe y tire de él para sacarlo dela toma de corriente de la pared.• No permita que el cable entre en contacto con superficies calientes.Deje enfriar la plancha completamente antes de guardarla. Enrolle elcable sin apretarlo alrededor de la plancha para guardarla.• Desenchufe siempre la plancha de la toma de corriente cuando lavaya a llenar de agua, vaciarla o si no va a utilizarla.• No utilice la plancha si tiene el cable dañado o si se le ha caído oestropeado. Para evitar el riesgo de una descarga eléctrica, no desmon-te la plancha; envíela al Servicio Técnico de Electrodomésticos Rowentamás cercano para revisarla y repararla. Un montaje incorrecto de laplancha puede provocar un riesgo de descarga eléctrica al utilizarla.• Es necesario vigilar a los niños cuando vayan a utilizar cualquier electrodoméstico que se encuentre a su alcance. No deje sin supervi-sar la plancha mientras esté enchufada o sobre una tabla de planchar.• Puede quemarse al tocar las partes metálicas, el agua o el vaporcaliente. Tenga cuidado al colocar una plancha de vapor en posición vertical, pues puede haber agua caliente en su depósito.• El uso de accesorios de conexión no está recomendado porRowenta Appliance Company, ya que podrían provocar un incendio,descargas eléctricas o lesiones.
INSTRUCCIONES ESPECIALES
1. Este electrodoméstico puede ser de 1600 o 1700 W de potencia.Para evitar una sobrecarga, no utilice otro aparato de alto consumo en el mismo circuito eléctrico (referirse a la potencia indicada en elaparato).2. En el caso de que sea absolutamente necesario un cable de prolonga-ción, los valores nominales eléctricos marcados en el cable de prolon-gación deberán ser al menos tan altos como los valores nominales eléctricos del electrodoméstico. Los cables con una intensidad nominalmás baja se pueden calentar en exceso. Debe tener cuidado al colocarel cable para evitar tropiezos o tirones.3. Su electrodoméstico Rowenta está destinado a uso doméstico o profesional.
CONSERVE ESTAS INSTRUCCIONES
NOT DZ1500 1103899603 6/03/06 16:21 Page 12

Antes de la utilización- Le rogamos que lea atentamente las instrucciones de
uso y las Instrucciones importantes de seguridad.- Retire todo el embalaje de la plancha.- Retire el protector transparente de la suela.- La primera vez que utilice la plancha, es normal que
se produzca un poco de humo. Éste desaparecerárápidamente.
- Se pueden desprender partículas de la plancha durantela primera utilización. No son perjudiciales y deberándesaparecer cuando la plancha haya expulsado vapor.
Consejos Útiles - Cuando planche, comience por prendas que necesiten bajas temperatu-
ras de planchado (•) y finalice con aquellas que precisan temperaturasmás elevadas (•••).
- Las prendas de tejidos mixtos deberán plancharse a la temperaturaadecuada al tejido más delicado. Por ejemplo, una camisa que sea60% algodón y 40% poliéster deberá plancharse en (•) la temperaturapara prendas sintéticas.
- Si utiliza un spray de almidón, utilícelo sobre el reverso de la prenda.Deje que el almidón penetre antes del planchado poniendo la prenda a un lado durante 30 segundos.
- Para obtener mejores resultados, utilice una tabla de planchar de tiporejilla para que el exceso de vapor pueda salir.
- Para tejidos delicados, recomendamos que realice una prueba en unazona de la prenda que no se vea, como por ejemplo una costura interior.
- Acuda a las recomendaciones del fabricante en la etiqueta de la prenda.
Desconexión automaticá de 3 posiciones (dependiendo del modelo)
- Si se utiliza la plancha mientras está enchufada, uninterruptor interno de seguridad la desconectará.
- La desconexión se producirá a los 8 minutos si se dejala plancha en posición vertical, o a los 30 segundos sise deja sobre su suela o volcada.
- Un indicador luminoso intermitente de color rojoindica que la desconexión automática se ha activa-do. Para volver a conectar la plancha, muévala osacúdala suavemente.La desconexión automática no es un interruptorON/OFF.
Desenchufe siempre la plancha cuandono vaya a uti-lizarla.
Llenado con agua - Asegúrese de que la plancha esté desenchufada.- Mueva el control ajustable de vapor totalmente a la
izquierda.- Coloque la plancha sobre su talón e inclínela hacia
delante aproximadamente un centímetro y medio. Si laplancha está equipada con una entrada cubierta para elagua, abra la entrada deslizando la cubierta hacia abajo.
- Mantenga el electrodoméstico en posición vertical,de modo que el orificio de llenado quede horizontal.
- Llene el depósito de agua (que no contenga aditi-vos) hasta la marca de nivel MAX.
- Si necesita añadir agua durante el planchado:DESENCHUFE la plancha y repita los pasos anteriores.
- Asegúrese de que la plancha se vuelve a calentar acontinuación, esto significa que se apagará la luz deltermostato.
NOT DZ1500 1103899603 6/03/06 16:21 Page 13

Agua utilizada en las plancha Rowenta
Agua corrienteLas planchas Rowenta están fabricadas para ser utilizadas con AGUA COR-RIENTE (hasta 12 granos de dureza). im n max Clean Self Si el agua que uti-liza es más dura que ésta, Rowenta recomienda mezclar agua semicorrientecon agua semidestilada, para reducir la dureza; o, si no, utilizar agua demanantial embotellada barata. No utilice nunca agua 100% destilada, yaque puede hacer que la plancha expulse o derrame agua.Agua desendurecidaHay muchos tipos de productos para ablandar el agua del hogar y éstaes perfectamente adecuada para usar en una plancha. No obstante,algunos tipos de ablandadores, especialmente los que utilizan productosquímicos como la sal, pueden provocar que la plancha derrame o expulseagua mientras se está utilizando. Si se le presenta este tipo de problema,le recomendamos que intente utilizar agua de manantial embotellada oagua corriente sin tratar.No utilice nunca agua destilada 100% pura.Una vez que haya cambiado el agua, tendrá que usarla varias veces hastacorregir el problema. Rowenta recomienda utilizar la función de vapor laprimera vez sobre una toalla o prenda vieja, para evitar que estropee susprendas.Hierro y otras impurezasSi el agua que utiliza contiene grandes cantidades de hierro o materiasorgánicas, estos minerales pueden acumularse dentro de la plancha y,con el tiempo, aparecerán en forma de manchas oscuras. Si se lepresentaran estos problemas, Rowenta le recomienda utilizar agua demanantial embotellada barata.No utilice nunca agua destilada 100% pura.Recuerde siempre :El agua de baterías y el agua que contiene aditivos (por ejemplo almidón,perfumes o suavizantes) no se pueden utilizar. Dichos aditivos puedenafectar a las propiedades del vapor y, a alta temperatura, pueden formardepósitos en la cámara de vapor, que marcarán la colada cuando salganexpulsados por los orificios de vapor.Por este motivo, no se deben utilizar líquidos desincrustantes.
Selección de la temperatura
- Ajuste el regulador de temperatura según el tipo detejido que esté planchando.
- Recomendamos que utilice como guía la tabla quefigura a continuación.
Para impedir que se produzca una desconexión automática mientras la plancha seestá calentando, manténgala siempre en posición vertical sobre su zócalo.Empiece con una temperatura baja y vaya graduando hasta llegar a una tempera-tura alta. Para tejidos delicados, recomendamos hacer una prueba sobre una partediscreta de la prenda (una costura interior). La plancha sólo produce vapor con eltermostato en la zona roja algodón / lino.
Etiqueta paralavado Tejido
Sintéticos :viscosa, poliéster
seda, lana
algodón, lino
Ajuste de temperatura
NOT DZ1500 1103899603 6/03/06 16:21 Page 14

Planchado con vapor
¡PRECAUCIÓN!
• Nunca planche o pase vapor a prendas mientras las lleve puestas.
• Antes de planchar por primera vez, llene la plancha con agua y esperea que se caliente.
• Deje que la plancha expulse vapor durante 1 o 2 minutos presionandoel botón de chorro de vapor unas cuantas veces para eliminar las impu-rezas. Esto deberá realizarse siempre que la plancha no se utilice conregularidad.
El vapor sólo se produce cuando el control de temperatura está ajustado en la zona sombreada (tras la posición •• de temperatura).
Chorro de vapor
- Esta función es ideal para eliminar arrugas persisten-tes o para planchar pliegues agudos horizontalmente.Cuando el control de la temperatura está ajustado enla zona vapor (tras ••) el chorro de vapor puede utili-zarse presionando el botón chorro de vapor. Deje unintervalo de 4 segundos entre los chorros de vapor.
Vapor en positión vertical
- La plancha también se puede utilizar en posiciónvertical.
- Esto es especialmente útil para eliminar arrugas deprendas colgadas, cortinas, tapices, etc.
- Para vaporizar en posición vertical, presione elbotón del golpe de vapor mientras sujeta la planchaen posición vertical.
Advertencia: No planche nunca prendas que lleve puestas.
Planchado en seco
- Para planchar sin vapor, Gire la perilla de control a la posición de vapor variable .
- Recomendamos que planche con el depósito vacío.- Ajuste la temperatura para el tipo de material que
vaya a planchar (•, •• o •••).
Función de vapor
- Para que la salida de vapor se ajuste automáticamente a la temperatura de la suela,ponga el control de vapor en la posición .
NOT DZ1500 1103899603 6/03/06 16:21 Page 15

Ajuste del Spray (Difusor de agua)
- Esta función es ideal para las arrugas persistentes o los pliegues.
- Asegúrese de que haya agua en el depósito antesde presionar el botón.
- No difumine agua sobre seda.
Sistema Antigoteo- Para producir vapor, todas las planchas necesitan una temperatura alta.
Si la suela no está lo bastante caliente, parte del agua no se convertiráen vapor y no podrá salir ni ser expulsada por la suela. El nuevo sistema antigoteo reduce automáticamente el flujo de vaporcuando se plancha a temperaturas bajas, para evitar el goteo.
Sistema Antical- Los minerales que contiene el agua se pueden acumular en la
cámara de vapor. El sistema antical contiene un material especial que neutraliza los minerales perjudiciales. Este sistema está diseñado para prolongar y mantener un alto rendimiento del vapor en la plancha. El cartucho no es reemplazable.
Auto limpieza
¡Precaución! No utilice productos de descalcificación. Pueden dañar elrecubrimiento de la cámara de vapor.
Esta característica permite que los restos minerales y otras impurezas se eliminen a través de la suela de la plancha.La auto limpieza deberá realizarse ocasionalmente y como mínimo una vez al mes.
- Llene la plancha con agua del grifo hasta la marcadel depósito de agua.
- Asegúrese de que La perilla de vapor variable estáajustada al mínimo
- Coloque la plancha sobre su talón y enchúfela.- Ajuste el termostato en la posición •••.- Cuando la plancha se caliente, desenchúfela.- Sujete la plancha horizontalmente sobre el fregade-
ro con la suela dirigida alejada del cuerpo.- Gire la palanca de vapor variable por completo
hacia la derecha y mantenga la posición de auto lim-pieza durante un minuto.
Precaución: Al realizar esta operación se expulsará vapor y agua calientepor la suela de la plancha.Tome las precauciones adecuadas y mantengala plancha alejada del cuerpo.
- Mueva la plancha con cuidado hacia delante adelante y, hacia atrás y hacia los lados hasta que haya salido toda el agua.
- Limpie con cuidado toda el agua y los materiales de la suela de la plancha con una toalla vieja, ya que el agua y los minerales pueden manchar la suela (aunque esto no afecta el deslizamientoen la utilización.)
ANTICALC ANTI DRIP
NOT DZ1500 1103899603 6/03/06 16:21 Page 16

Precaución: La plancha y la suela de la plancha pueden estar todavía muycalientes. Límpielas con cuidado.
- Coloque la plancha sobre su soporte y déjela enfriar.
Antes de utilizar la plancha después de la auto limpieza, compruebe el vaporo el chorro de vapor sobre una toalla vieja o una prenda que no utilice.
Válvula Vapodur
Para asegurar que la plancha produce vapor de forma eficaz, abra y cierrela válvula unas cuantas veces después de cada uso. Esto se hace girandola perilla de control de vapor variable de derecha a izquierda varias veces.
Después del planchado
1. Coloque el control de temperatura en la posición de mínimo. Gire el control vapor a la posición sin vapor.
2. Desenchufe el aparato.3. Coloque la plancha sobre su soporte y deje que se enfríe por completo.4. Vacíe el agua de la plancha antes de guardarlo.
Recomendamos vaciar el depósito cuando no utilice la plancha.5. Para proteger la suela de la plancha, recomendamos que guarde la plan-
cha sobre su soporte
Limpieza y mantenimiento
Una vez fría y desenchufada, la plancha se puede limpiar con un pañohúmedo y luego secarla.
No emplee nunca disolventes ni limpiadores del hogar.
Guarde la plancha sobre su zócalo (en posición vertical) con el control devapor en la posición MIN.
Limpieza de la suelaLas suelas de Rowenta tienen unas excelentes propiedades antiadherentesy se pueden limpiar con facilidad estando frías.
- En condiciones de uso normal, se puede formar un recubrimientoque ofrece cierta resistencia en la suela (almidón, detergente incru-staciones, fibras sintéticas quemadas). Todo esto se puede eliminarfácilmente utilizando el Kit de Limpieza de Suelas Rowenta o un limpiador debuena calidad para suelas de planchas en caliente, disponible en lamayoría de las tiendas.El kit Rowenta también está disponible en nuestro sitio web:www.rowentausa.com
- Para evitar que la suela de la plancha se raye, no pase la planchasobre objetos afilados (cremalleras, etc.). No utilice limpiadores delhogar ni paños de limpieza abrasivos.
NOT DZ1500 1103899603 6/03/06 16:21 Page 17

Localización y solución de problemas con la plancha
Problemas
No está enchufada correctamente.
El control de temperatura seencuentra muy bajo.
El Auto-apagado se ha activado (dependiendo delmodelo).
No hay agua suficiente en eldepósito.
La plancha no está en laposición vapor.
La función anti-goteo estáactiva.
Quizá necesite cambiar elagua debido a su dureza omateria orgánica.
No ha enjuagado la prendacorrectamente.
Sobre utilización del botónde chorro de vapor.
Está utilizando agua destilada o blanda.
Sobrecarga de agua.
Auto-apagado se ha activado (dependiendo del modelo).
Utilización de almidón.
Material quemado. Planchaa. La máxima temperatura.
Puede ser necesario la descalcificación en la primera utilización.
Compruebe que la plancha estáenchufada correctamente.
Coloque el control de temperatura enuna temperatura más elevada.
Mueva la plancha o agítela con suavidad para reactivarla.
Llene el depósito de agua.
Ver sección llamada “Planchado convapor”.
Espere a que la suela de la planchaalcance la temperatura correcta.
Ver sección “Recomendaciones sobreel agua”. Cambie a agua de manantialo mezcle agua del grifo con aguadestilada.Asegúrese de que las prendas estánbien aclaradas enjuagadas correcta-mente para eliminar los restos dedetergente o los productos químicosde las prendas nuevas. Deje pasar más tiempo entre las presiones en el botón chorro devapor.Ver la sección “Recomendacionessobre el agua”. Cambie a agua demanantial o mezcle agua del grifo con agua destilada.
No llene el depósito por encima de laseñal de máximo. Asegúrese de cerrarla cubierta de la entrada de agua.
Mueva la plancha o agítela con suavidad para reactivarla.
Difumine el almidón en el reverso dela prenda y deje que penetre.
Asegúrese de ajustar la temperaturasegún el tejido que vaya a planchar.
Llene con agua. Mantenga la planchafría horizontal. Coloque el dedo sobrela boquilla del spray para crear vacío.Presione el botón spray 4 o 5 veces.Retire el dedo de la boquilla, presioneel botón spray varias veces más.
Causas posibles Soluciones
La plancha no calienta.
No hay suficientevapor.
La plancha expulsauna sustancia marróno blanca.
La plancha desprendeagua
El indicador Auto-apa-gado se ilumina.
Acumulaciones en lasuela de la plancha.
La función Spray nofunciona
Si este procedimiento de localización y eliminación de problemasno sirve de ayuda, antes de consultar al proveedor sobre las condiciones de envío / cambio, le rogamos que se dirija al servicio de atención al consumidor: 781-396-0600.
NOT DZ1500 1103899603 6/03/06 16:21 Page 18

Este producto Rowenta esta garantizado contra defectos demateriales y mano de obra durante los 12 meses posteriore ala fecha de compra. Durante este período, cualquier productoRowenta adquirido por el comprador original, y que habiendosido inspeccionado por Rowenta, se demostrará que estádefectuoso, será reparado o sustituido, a criterio de Rowenta,sin costes para el propietario. Si se envía un producto derepuesto, obtendrá la garantía restante del producto original.Esta garantía no es aplicable a ningún defecto causado por unuso indebido del producto por parte del comprador o elusuario, daños deliberados al producto, negligencia, omisiónde las instrucciones de Rowenta, uso de una corriente otensión distintas de las indicadas en la placa del producto,deterioro normal por el uso, o modificación o reparación noautorizadas por Rowenta. La reparación o desmontaje realizapor alguien que no pertenezca a un servicio técnico autorizadode Rowenta inval idará la garant ía . LAS GARANTÍASESTIPULADAS DE AHORA EN ADELANTE SON EXCLUSIVAS, YNINGUNA OTRA GARANTÍA, EXPRESA O IMPLÍCITA,INCLUYENDO, SIN LIMITACIÓN, CUALQUIER GARANTÍA DECOMERCIABILIDAD O IDONEIDAD PARA UNA FINALIDAD OUSO DETERMINADOS, SERÁ EXTENDIDA POR ROWENTA NITENDRÁ AUTORIZACIÓN PARA SER EXTENDIDA CONRESPECTO A SUS PRODUCTOS. LA ÚNICA OBLIGACIÓN DEROWENTA EN EL CASO DE UN PRODUCTO DEFECTUOSOSERÁ LA REPARACIÓN O SUSTITUCIÓN, BAJO EL CRITERIOÚNICO DE ROWENTA, DEL PRODUCTO DEFECTUOSO. ENNINGÚN CASO ROWENTA SERÁ RESPONSABLE DE NINGUNAPÉRDIDA NI DAÑOS INDIRECTOS, ESPECIALES, ACCIDENTALESO CAUSADOS (INCLUYENDO PERO SIN LIMITARSE A LAINTERRUPCIÓN DE NEGOCIOS O LA PÉRDIDA DE NEGOCIOSO BENEFICIOS) COMO CONSECUENCIA DEL USO INDEBIDO OLA INCAPACIDAD PARA UTILIZAR EL PRODUCTO, CUALQUIERINFRACCIÓN DE LA GARANTÍA O CUALQUIER DEFECTO DELPRODUCTO, INCLUSO AUNQUE ROWENTA HAYA SIDOADVERTIDA DE LA POSIBILIDAD DE DICHAS PÉRDIDAS ODAÑOS POTENCIALES. Si cree que su producto estádefectuoso, llévelo (o envíelo, a portes pagados) junto con unaprueba de compra, al Servicio Técnico autorizado de Rowentamás cercano (ver abajo). Si envía el producto, le rogamos queadjunte una carta explicando la naturaleza del defecto objetode la reclamación.
Para mejorar los productos, Rowenta se reserva el derecho acambiar las especificaciones sin previo aviso.
GARANTÍA LIMITADA
NOT DZ1500 1103899603 6/03/06 16:21 Page 19

Rowenta196 Boston Avenue Tel.: (781)396-0600Medford, MA 02155 U.S.A. www.rowentausa.comSITUACIÓN DE LAS OFICINAS, ÚNICAMENTE.
Si su electrodoméstico requiere servicio técnico,envíe el producto al servicio técnico regional quetenga más cerca. Asegúrese de poner su nombre enel exterior del embalaje (no ponga apartado de cor-reos, por favor). Si el producto está en garantía,Rowenta reparará o sustituirá el producto según sucriterio. Si el producto no está en garantía, se lecomunicará el coste de la reparación antes de iniciarcualquier trabajo.
Nuestros principales servicios técnicos son los siguientes:
Turnpike Appliance Authorized Appliance3495A Lawson Blvd. 1644 West Ogden Ave.Oceanside, NY 11572 Downers Grove, IL 60515
516-483-5596 630-852-1550
La información de los servicios técnicos está sujeta a cambios. Le rogamos que visite nuestro sitio webwww.rowentausa.com o llame a nuestra línea de informa-ción sobre asistencia técnica al 781-306-4620. La línea deinformación ofrece información actualizada de los serviciostécnicos y listados de los mismos en California.
Rowenta Werke GmbH, 63016 Offenbach am Main 1103
8996
03
NOT DZ1500 1103899603 6/03/06 16:21 Page 20