
7 Free Knitted Glove and Mitten Patterns
21
7 FREE Knitting Patterns for Fingerless Gloves, Knit Mittens, and Other Glove Knitting Patterns
-
Upload
rena-vergou -
Category
Documents
-
view
18 -
download
0
description
Knitted Glove and Mitten Patterns
Transcript of 7 Free Knitted Glove and Mitten Patterns
7 free Knitting Patterns forFingerless
Gloves, Knit Mittens, and Other Glove
Knitting Patterns
©Interweave | Not to be reprinted | All rights reserved | www.knittingdaily.com 2
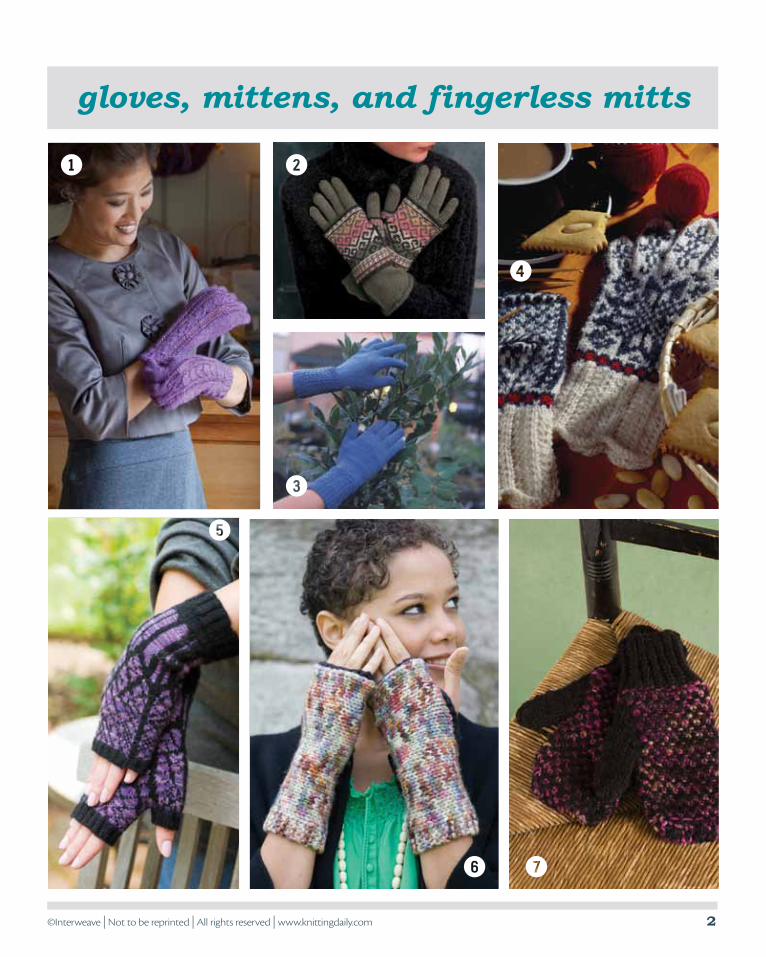
gloves, mittens, and fingerless mitts
1 2
3
4
5
6 7
©Interweave | Not to be reprinted | All rights reserved | www.knittingdaily.com 3
7 Free KNIttINg PAtterNs
For FINgerless gloves, KNIt
MItteNs, ANd other glove
KNIttINg PAtterNs
A Knitting Daily eBook edited by Kathleen Cubley
e d I t o r I A l s t A F F
edItor, KNIttINg dAIlY Kathleen Cubley
C r e A t I v e s e r v I C e s
desIgNer Charlene tiedemannPhotogrAPhY As Credited
IllustrAtIoN gayle Ford
Projects and information are for inspiration and personal use only. Interweave Knits and Knitting Daily do not recommend, approve, or endorse any of the advertisers, products, services, or views advertised in this publication. Nor does Knits or Knitting Daily evaluate the advertisers’ claims in any way. You should, therefore, use your own judgment in evalu ating the advertisers, products, services, and views advertised in Knits or Knitting Daily.
1 Lace and Twist Gloves silka Burgoyne . . . . . . . . . . . . . . . . . . . . . . . . . . . . . . . . . . . . . . . . . . . . . . . . . . . . . . . . . . . . . page 4
2 Layered Turkish Gloves Mari lynn Patrick . . . . . . . . . . . . . . . . . . . . . . . . . . . . . . . . . . . . . . . . . . . . . . . . . . . . . . . . . PAge 6
3 Uncommon Gardening Gloves donna druchunas. . . . . . . . . . . . . . . . . . . . . . . . . . . . . . . . . . . . . . . . . . . . . . . . . . . . . . . . . PAge 9
4 Two-Color Norwegian Gloves Nancy Bush . . . . . . . . . . . . . . . . . . . . . . . . . . . . . . . . . . . . . . . . . . . . . . . . . . . . . . . . . . . . . . PAge 11
5 Winter Twilight Mitts laura rintala . . . . . . . . . . . . . . . . . . . . . . . . . . . . . . . . . . . . . . . . . . . . . . . . . . . . . . . . . . . . . PAge 14
6 Motley Mitts lisa shroyer . . . . . . . . . . . . . . . . . . . . . . . . . . . . . . . . . . . . . . . . . . . . . . . . . . . . . . . . . . . . . . PAge 16
7 Mittens, Interrupted eunny Jang . . . . . . . . . . . . . . . . . . . . . . . . . . . . . . . . . . . . . . . . . . . . . . . . . . . . . . . . . . . . . . . PAge 17
Glossary . . . . . . . . . . . . . . . . . . . . . . . . . . . . . . . . . . . . . . . . . . . . . . . . . . . . . . . . . . . . . . . . PAge 19
Knitted gloves and mittens are so special; they’re at once utilitarian and extravagant.
here at Knitting Daily, we want your hands to be warm and toasty, so we’ve gathered 7 Free Knitting Patterns for Fingerless Gloves, Knit Mittens, and Other Glove Knitting Patterns for you.
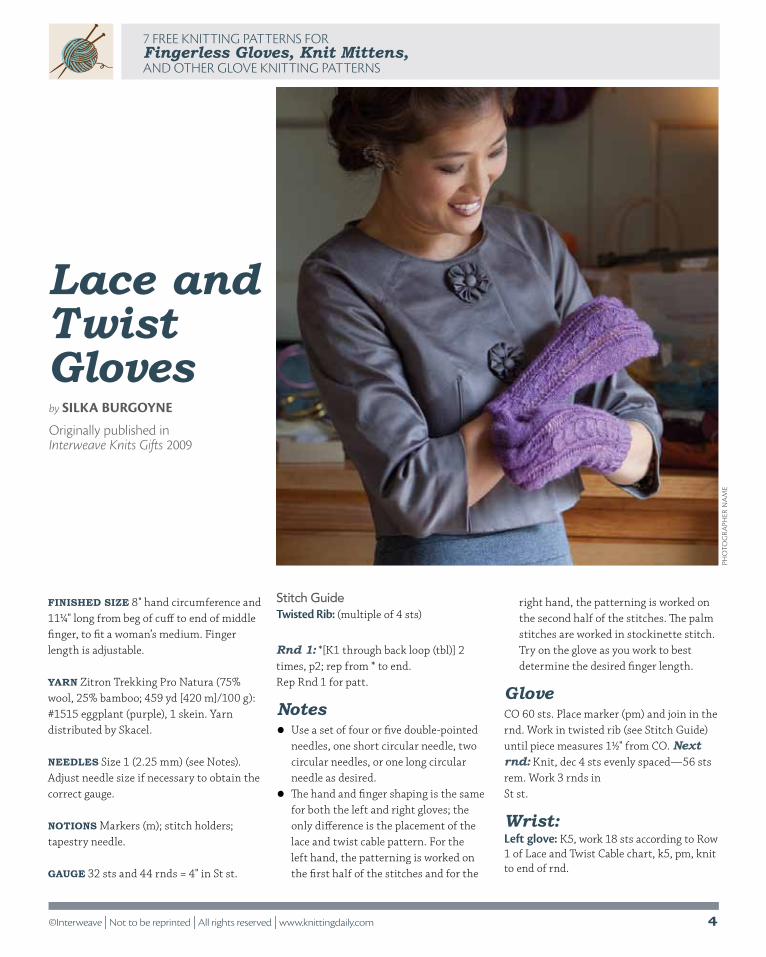
Lace and Twist Gloves by silka Borgoyne are worked in a beautiful lace and twist cable pattern. Features like twisted rib, shaped fingers, and a wool/bamboo yarn make these gloves a perfect luxurious gift.
Layered Turkish Gloves by Mari lynn Patrick is actually a pattern for two pairs of gloves: solid color undergloves and turkish patterned over-gloves. they’re also designed to be worn on either hand. Fun!
Uncommon Gardening Gloves by donna druchunas were invented out of necessity. donna couldn’t find a pair of gardening gloves that fit comfortably, so she designed her own! these gloves are equally at home in the garden and the tea shoppe, too.
Two Color Norwegian Gloves by Nancy Bush were inspired by a pair with similar patterning in the vesterheim Norwegian-American Museum’s textile collection.
Motley Mitts by lisa shroyer are a celebration of the knit stitch. the fabric is shaped into a subtle hourglass with short-rows, which folds over the hand and wrist and is seamed up one side, creating a tailored fit.
Winter Twilight Mitts by laura rintala
were inspired by a purple overcast sky showing through the black silhouettes of winter trees. Knit in cashmere, both the knitting and wearing is sheer indulgence.
Mittens, Interrupted, by eunny Jang pair a dark solid with a bright variegated yarn, worked in a woven-look slip-stitch pattern. this is some truly simple knitting: there are only two pattern rows and no hand shaping.
We hope you’ll enjoy making knitted gloves and mittens!
Kathleen Cubleyeditor, KnittingDaily.com
7 Free Knitting Patterns for Fingerless Gloves, Knit Mittens,
and Other Glove Knitting Patterns
©Interweave | Not to be reprinted | All rights reserved | www.knittingdaily.com 4
7 Free KNIttINg PAtterNs For Fingerless Gloves, Knit Mittens, ANd other glove KNIttINg PAtterNs
by Silka Burgoyne
originally published in Interweave Knits Gifts 2009
Finished size 8" hand circumference and 11¼" long from beg of cuff to end of middle finger, to fit a woman’s medium. Finger length is adjustable.
Yarn Zitron Trekking Pro Natura (75% wool, 25% bamboo; 459 yd [420 m]/100 g): #1515 eggplant (purple), 1 skein. Yarn distributed by Skacel.
needles Size 1 (2.25 mm) (see Notes). Adjust needle size if necessary to obtain the correct gauge.
notions Markers (m); stitch holders; tapestry needle.
GauGe 32 sts and 44 rnds = 4" in St st.
PHO
TOG
RAPH
ER N
AM
E
Stitch Guide Twisted Rib: (multiple of 4 sts)
Rnd 1: *[K1 through back loop (tbl)] 2 times, p2; rep from * to end.Rep Rnd 1 for patt.
Notes• Use a set of four or five double-pointed
needles, one short circular needle, two circular needles, or one long circular needle as desired.
• The hand and finger shaping is the same for both the left and right gloves; the only difference is the placement of the lace and twist cable pattern. For the left hand, the patterning is worked on the first half of the stitches and for the
right hand, the patterning is worked on the second half of the stitches. The palm stitches are worked in stockinette stitch. Try on the glove as you work to best determine the desired finger length.
GloveCO 60 sts. Place marker (pm) and join in the rnd. Work in twisted rib (see Stitch Guide) until piece measures 1½" from CO. Next rnd: Knit, dec 4 sts evenly spaced—56 sts rem. Work 3 rnds in St st.
Wrist:Left glove: K5, work 18 sts according to Row 1 of Lace and Twist Cable chart, k5, pm, knit to end of rnd.
Lace and Twist Gloves

©Interweave | Not to be reprinted | All rights reserved | www.knittingdaily.com 5
7 Free KNIttINg PAtterNs For Fingerless Gloves, Knit Mittens, ANd other glove KNIttINg PAtterNs
Right glove: K28, pm, k5, work 18 sts according to Row 1 of Lace and Twist Cable chart, k5.Both gloves: Cont in patt through Row 8 of chart, then work Rows 1–8 four more times—40 rnds in charted patt; piece measures about 5½" from CO. Shape hand: *K4, M1R (see Glossary), work in patt to 4 sts before m, M1L (see Glossary), k4; rep from * once more—4 sts inc’d. Work 3 rnds even in patt. Rep last 4 rnds once more—64 sts. Shape thumb gusset and hand:Rnd 1: M1R, work in patt to end of rnd, M1L—66 sts.Rnd 2 and all even rnds: Work even in patt.Rnd 3: K1, M1R, work in patt to last st, M1L, k1—68 sts.Rnd 5: K2, M1R, work in patt to last 2 sts, M1L, k2—70 sts.Rnd 7: K3, M1R, work in patt to last 3 sts, M1L, k3—72 sts.Rnd 9: K4, M1R, work in patt to last 4 sts, M1L, k4—74 sts.Rnd 11: K5, M1R, work in patt to last 5 sts, M1L, k5—76 sts.Rnd 13: K6, M1R, k2, M1R, work in patt to last 8 sts, M1L, k2, M1L, k6—80 sts.Rnd 15: K7, M1R, work in patt to last 7 sts, M1L, k7—82 sts.Rnd 17: K10, M1R, work in patt to last 10 sts, M1L, k10—84 sts.
Rnd 18: Work even in patt.Thumb: K10, place next 64 sts on holder for fingers (keeping m in place), k10—20 sts for thumb. Work even in St st until thumb measures 1½" from end of gusset, or ¼" less than desired total length. Shape thumb: *[K1, ssk] 2 times, k1, k2tog, k1; rep from * once more—14 sts rem. Work 1 rnd even. Cut yarn, leaving a 6" tail. Thread tail onto tapestry needle and draw through rem sts. Pull tight to gather sts and fasten off on WS. Fingers: Place 64 held sts onto needle.Rnd 1: Pick up and knit 1 st at base of thumb, work in patt to end of rnd, pick up and knit 1 st at base of thumb, pm and join in the rnd—66 sts.Rnd 2: Ssk, work in patt to last 2 sts, k2tog—64 sts rem.Rnd 3: K2, M1R, work in patt to 4 sts before m, M1L, k4, sl m, k4, M1R, work in patt to last 2 sts, M1L, k2—68 sts.Rnds 4–6: Work even in patt.
Rnd 7: K4, M1R, work in patt to last 4 sts, M1L, k4—70 sts.Rnd 8: Knit.Divide for fingers: K27, place next 16 sts on holder for pinky finger, k27—54 sts rem. Knit 2 rnds. Index finger: K9, place next 36 sts on holder, k9—18 sts. Work even in St st until finger measures 2", or ¼" less than desired total length. Dec rnd: *K1,
ssk, k1, k2tog, k2tog, k1; rep from * once more—12 sts rem. Knit 1 rnd. Cut yarn, leaving a 6" tail. Thread tail onto tapestry needle and draw through rem sts. Pull tight to gather sts and fasten off on WS. Middle finger: Place 9 sts from beg of holder and 9 sts from end of holder onto needle—18 sts total. Next rnd: Pick up and knit 1 st between index finger and middle finger, k18, pick up and knit 1 st between middle finger and index finger—20 sts. Pm and join in the rnd. Dec rnd: Ssk, k16, k2tog—18 sts rem. Finish as for index finger, working until finger measures 2¼". Ring finger: Place 18 sts from holder onto needle. Pick up and knit 1 st between middle finger and ring finger, k18, pick up and knit 1 st between ring finger and middle finger—20 sts. Pm and join in the rnd. Dec rnd: Ssk, k16, k2tog—18 sts rem. Finish as for index finger, working until finger measures 2". Pinky finger: Place 16 pinky sts from holder onto needle. Pick up and knit 1 st between hand and pinky finger, k16, pick up and knit 1 st between pinky finger and hand—18 sts. Pm and join in the rnd. Dec rnd: Ssk, k14, k2tog—16 sts rem. Work in St st until finger measures 1¼", or ¼" less than desired total length. Dec rnd: *K1, ssk, ssk, k2tog, k1; rep from * once more—10 sts rem. Knit 1 rnd. Cut yarn, leaving a 6" tail. Thread tail onto tapestry needle and draw through rem sts. Pull tight to gather sts and fasten off on WS.
FinishingWith yarn threaded on a tapestry needle, sew any gaps between fingers closed. Weave in loose ends.
Silka Burgoyne is an IT professional who tries to squeeze in knitting time. She blogs at http://silkieknit.blogspot.com.7
5
3
1
Lace and Twist Cable
knit
purl
yo
k2tog
pattern repeat
sl 3 pwise, k1f&b, k2, pass the 3 sl sts over the 4 sts
knit
purl
yo
k2tog
pattern repeat
sl 3 pwise, k1f&b, k2, pass the 3 sl sts over the 4 sts
knit
purl
yo
k2tog
pattern repeat
sl 3 pwise, k1f&b, k2, pass the 3 sl sts over the 4 sts
©Interweave | Not to be reprinted | All rights reserved | www.knittingdaily.com 6
7 Free KNIttINg PAtterNs For Fingerless Gloves, Knit Mittens, ANd other glove KNIttINg PAtterNs
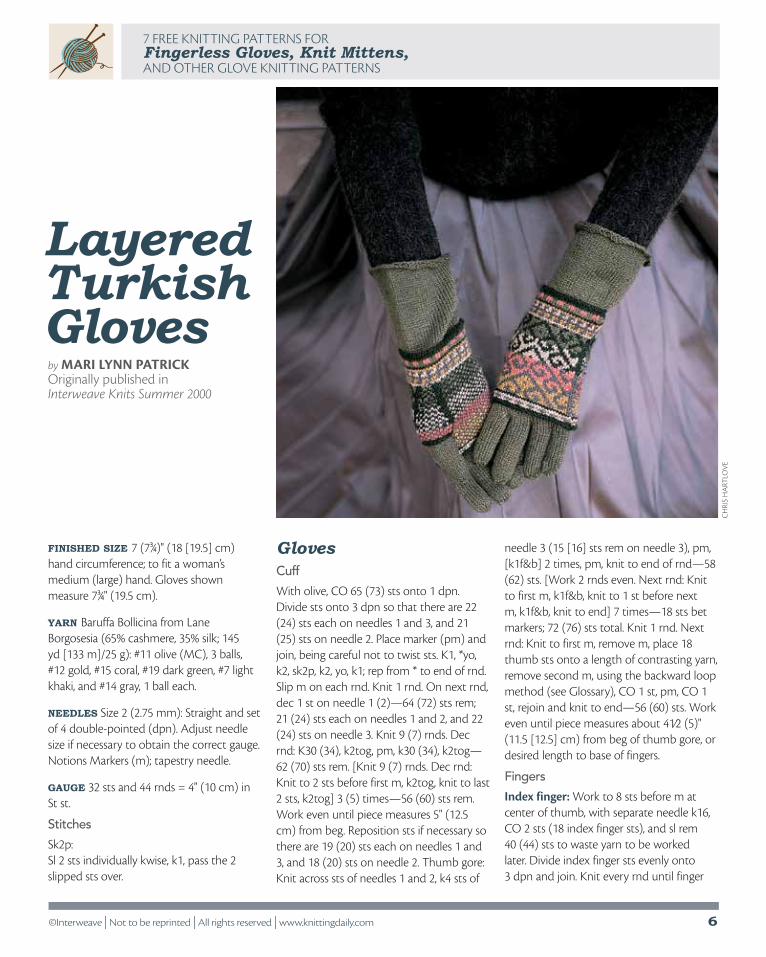
Layered Turkish Gloves
Finished size 7 (73⁄4)" (18 [19.5] cm) hand circumference; to fit a woman’s medium (large) hand. gloves shown measure 73⁄4" (19.5 cm).
Yarn Baruffa Bollicina from lane Borgosesia (65% cashmere, 35% silk; 145 yd [133 m]/25 g): #11 olive (MC), 3 balls, #12 gold, #15 coral, #19 dark green, #7 light khaki, and #14 gray, 1 ball each.
needles size 2 (2.75 mm): straight and set of 4 double-pointed (dpn). Adjust needle size if necessary to obtain the correct gauge.Notions Markers (m); tapestry needle.
GauGe 32 sts and 44 rnds = 4" (10 cm) in st st.
Stitches
sk2p:sl 2 sts individually kwise, k1, pass the 2 slipped sts over.
by Mari lynn Patrickoriginally published in Interweave Knits Summer 2000
CH
Ris
HA
RTlO
vE
GlovesCuff
With olive, Co 65 (73) sts onto 1 dpn. divide sts onto 3 dpn so that there are 22 (24) sts each on needles 1 and 3, and 21 (25) sts on needle 2. Place marker (pm) and join, being careful not to twist sts. K1, *yo, k2, sk2p, k2, yo, k1; rep from * to end of rnd. slip m on each rnd. Knit 1 rnd. on next rnd, dec 1 st on needle 1 (2)—64 (72) sts rem; 21 (24) sts each on needles 1 and 2, and 22 (24) sts on needle 3. Knit 9 (7) rnds. dec rnd: K30 (34), k2tog, pm, k30 (34), k2tog—62 (70) sts rem. [Knit 9 (7) rnds. dec rnd: Knit to 2 sts before first m, k2tog, knit to last 2 sts, k2tog] 3 (5) times—56 (60) sts rem. Work even until piece measures 5" (12.5 cm) from beg. reposition sts if necessary so there are 19 (20) sts each on needles 1 and 3, and 18 (20) sts on needle 2. thumb gore: Knit across sts of needles 1 and 2, k4 sts of
needle 3 (15 [16] sts rem on needle 3), pm, [k1f&b] 2 times, pm, knit to end of rnd—58 (62) sts. [Work 2 rnds even. Next rnd: Knit to first m, k1f&b, knit to 1 st before next m, k1f&b, knit to end] 7 times—18 sts bet markers; 72 (76) sts total. Knit 1 rnd. Next rnd: Knit to first m, remove m, place 18 thumb sts onto a length of contrasting yarn, remove second m, using the backward loop method (see glossary), Co 1 st, pm, Co 1 st, rejoin and knit to end—56 (60) sts. Work even until piece measures about 41⁄2 (5)" (11.5 [12.5] cm) from beg of thumb gore, or desired length to base of fingers.
Fingers
Index finger: Work to 8 sts before m at center of thumb, with separate needle k16, Co 2 sts (18 index finger sts), and sl rem 40 (44) sts to waste yarn to be worked later. divide index finger sts evenly onto 3 dpn and join. Knit every rnd until finger
©Interweave | Not to be reprinted | All rights reserved | www.knittingdaily.com 7
7 Free KNIttINg PAtterNs For Fingerless Gloves, Knit Mittens, ANd other glove KNIttINg PAtterNs
2
2
2
2
2
2
2
2
2
2
2
2
2
2
2
2
55
53
51
49
47
45
43
41
39
37
35
33
31
29
27
25
23
21
19
17
15
13
11
9
7
5
3
1
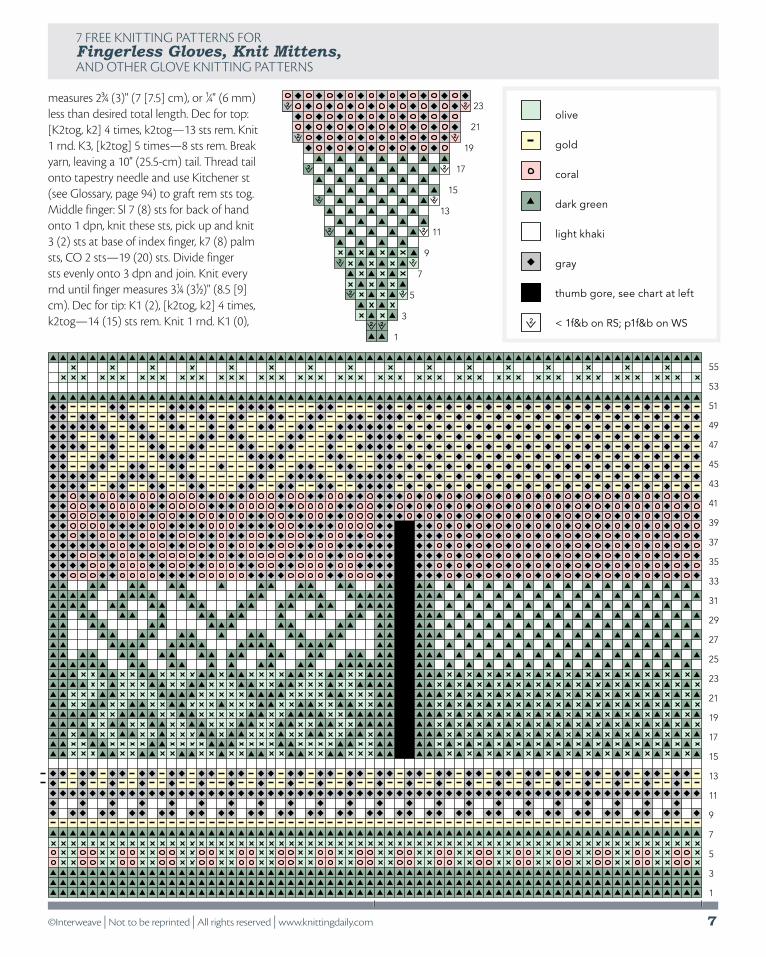
measures 23⁄4 (3)" (7 [7.5] cm), or 1⁄4" (6 mm) less than desired total length. dec for top: [K2tog, k2] 4 times, k2tog—13 sts rem. Knit 1 rnd. K3, [k2tog] 5 times—8 sts rem. Break yarn, leaving a 10" (25.5-cm) tail. thread tail onto tapestry needle and use Kitchener st (see glossary, page 94) to graft rem sts tog. Middle finger: sl 7 (8) sts for back of hand onto 1 dpn, knit these sts, pick up and knit 3 (2) sts at base of index finger, k7 (8) palm sts, Co 2 sts—19 (20) sts. divide finger sts evenly onto 3 dpn and join. Knit every rnd until finger measures 31⁄4 (31⁄2)" (8.5 [9] cm). dec for tip: K1 (2), [k2tog, k2] 4 times, k2tog—14 (15) sts rem. Knit 1 rnd. K1 (0), 2
2
2
2
2
2
2
2
2
2
2
2
2
2
2
2
olive
gold
coral
dark green
light khaki
gray
thumb gore, see chart at left
< 1f&b on RS; p1f&b on WS
23
21
19
17
15
13
11
9
7
5
3
1
©Interweave | Not to be reprinted | All rights reserved | www.knittingdaily.com 8
7 Free KNIttINg PAtterNs For Fingerless Gloves, Knit Mittens, ANd other glove KNIttINg PAtterNs
[k2tog, k1] 4 (5) times, k1 (0)—10 sts rem. graft as for index finger. ring finger: sl 7 (8) sts from back of hand onto 1 dpn, knit these sts, pick up and knit 2 sts at base of middle finger, k7 palm sts, Co 2 sts—18 (19) sts. divide finger sts evenly onto 3 dpn and join. Knit every rnd until finger measures 3 (31⁄4)" (7.5 [8.5] cm) from beg. dec for top: K0 (1), [k2tog, k2] 4 times, k2tog—13 (14) sts rem. Knit 1 rnd. K3 (2), [k2tog] 5 (6) times—8 sts rem. graft as for index finger. little finger: sl 6 sts from back of hand onto 1 dpn, knit these sts, pick up and knit 2 sts at base of ring finger, k6 (7) palm sts—14 (15) sts. divide finger sts evenly onto 3 dpn and join. Knit every rnd until finger measures 21⁄4 (21⁄2)" (5.5 [6.5] cm) from beg. dec for tip: K1 (2), [k2tog, k2] 3 times, k1—11 (12) sts rem. Knit 1 rnd. [K2tog, k1] 3 (4) times, k2 (0)—8 sts rem. graft as for other fingers.
Thumb
Place 18 held thumb sts onto 2 dpn.Rnd 1: K18, with 3rd dpn, pick up and
knit 8 sts at base of Co sts—26 sts. Place m and join.
Rnd 2: Knit.Rnd 3: K18, k2, ssk, k2tog, k2—24 sts rem.Rnd 4: K18, k1, ssk, k2tog, k1—22 sts rem.Rnd 5: K18, ssk, k2tog—20 sts rem.Arrange sts evenly on 3 dpn and knit every
rnd until thumb measures 21⁄2" (6.5 cm). dec for tip: [K2, k2tog] 5 times—15 sts rem. Knit 1 rnd. [K2tog, k1] 5 times—10 sts. graft as for other fingers.
Over-GlovesNote: the over-gloves are worked back and forth on straight needles in st st colorwork.
Left Over-Glove
With dark green and straight needles, Co
68 sts. Knit 2 rows. Next row: (Ws) K1 (edge st), purl to last st, k1 (edge st). Knitting the edge sts every row and beg with row 1 as indicated for left glove, work center 66 sts according to over-glove chart through row 14. thumb gore: (row 15 of chart): K1, work 29 sts as charted for palm, pm, work 2 sts according to row 15 of thumb gore chart, pm, work to end of rnd according to over-glove chart, k1. on row 16 of charts, cont as established to m, sl m, [p1f&b] 2 times, sl m, work to end. Cont working as charted, inc 1 st inside thumb gore markers as shown on thumb gore chart through row 38—18 thumb gore sts. on row 39 of chart, work to 18 thumb gore sts, sl these sts onto contrasting yarn (remove markers), using the backward loop method (see glossary, page 93), Co 2 sts over gap, work in patt to end—68 sts. Cont as charted through row 55. With dark green, knit 1 (Ws) row. Bo all sts kwise.
Right Over-Glove
Work as for left over-glove, but beg chart as indicated for right glove so that palm and back-of-hand patts mirror left over-glove.
FinishingBlock lightly. With yarn threaded on a tapestry needle, sew side seam. thumb trim: sl 18 held thumb sts onto 2 dpn, with a third dpn, pick up and knit 6 sts at base of Co sts—24 sts. Join. Purl 1 rnd. Bo all sts pwise. Weave in loose ends. YMari lynn Patrick has been working in the handknitting business for twenty-seven years.
Mari lynn Patrick has been working in the handknitting business for over thirty years.
©Interweave | Not to be reprinted | All rights reserved | www.knittingdaily.com 9
7 Free KNIttINg PAtterNs For Fingerless Gloves, Knit Mittens, ANd other glove KNIttINg PAtterNs
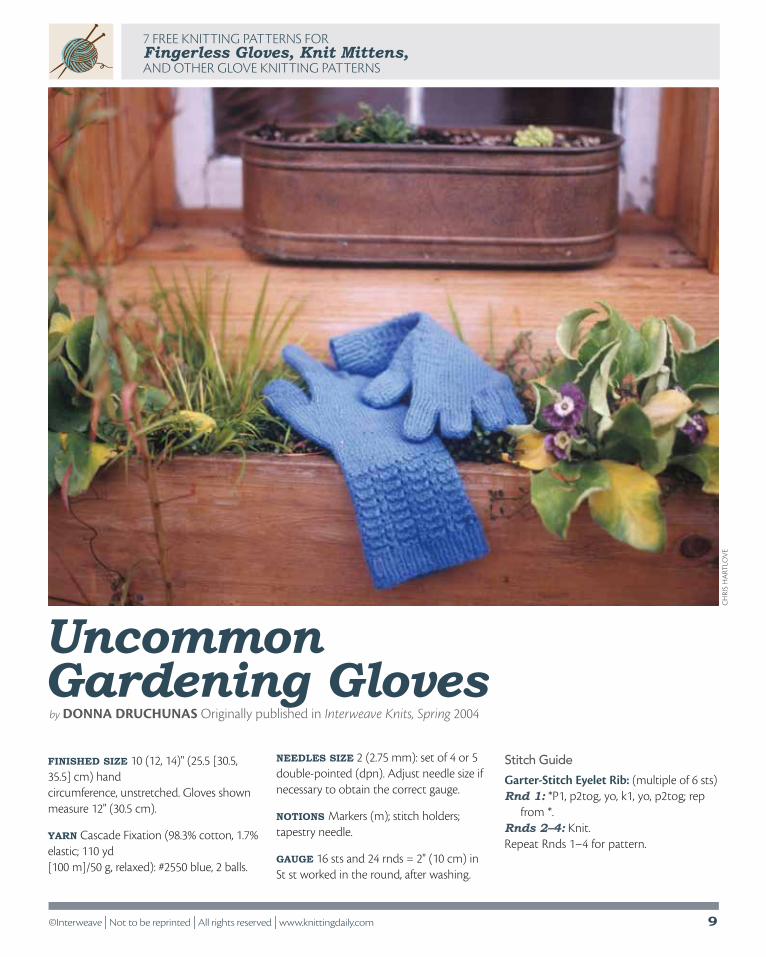
Finished size 10 (12, 14)" (25.5 [30.5, 35.5] cm) hand circumference, unstretched. gloves shown measure 12" (30.5 cm).
Yarn Cascade Fixation (98.3% cotton, 1.7% elastic; 110 yd [100 m]/50 g, relaxed): #2550 blue, 2 balls.
CH
Ris
HA
RTlO
vE
Uncommon Gardening Gloves by Donna DruchunaS originally published in Interweave Knits, Spring 2004
needles size 2 (2.75 mm): set of 4 or 5 double-pointed (dpn). Adjust needle size if necessary to obtain the correct gauge.
notions Markers (m); stitch holders; tapestry needle.
GauGe 16 sts and 24 rnds = 2" (10 cm) in st st worked in the round, after washing.
Stitch Guide
Garter-Stitch Eyelet Rib: (multiple of 6 sts)Rnd 1: *P1, p2tog, yo, k1, yo, p2tog; rep
from *.Rnds 2–4: Knit.repeat rnds 1–4 for pattern.

©Interweave | Not to be reprinted | All rights reserved | www.knittingdaily.com 10
7 Free KNIttINg PAtterNs For Fingerless Gloves, Knit Mittens, ANd other glove KNIttINg PAtterNs
Right GloveCuff: Co 42 (48, 54) sts. Place marker (pm) and join, being careful not to twist sts. Work k1, p1 ribbing until piece measures 1" (2.5 cm) from beg. Beg with rnd 1, work garter-stitch eyelet rib until piece measures 4" (10 cm) from beg, and at the same time, on last rep of rnd 2 of patt, dec 2 (dec 0, inc 2) sts evenly spaced—40 (48, 56) sts. Wrist: Change to st st and work even for 1" (2.5 cm). Thumb gusset: K2, pm, M1 (see glossary), k1, M1, pm, knit to end—3 gusset sts. Knit 2 rnds even. Inc rnd: Knit to m, sl m, M1, knit to next m, M1, sl m, knit to end—2 sts inc’d. Knit 2 rnds even. Inc 2 gusset sts in this manner every 3 rnds until there are 15 (17, 19) gusset sts bet markers. Knit 2 rnds even. Next rnd: Knit to gusset, remove marker, place gusset sts on holder, remove marker, use the backward loop method (see glossary) to Co 1 st over gap, knit to end of rnd—40 (48, 56) sts. hand: Work even in st st until section above eyelet rib measures 41⁄4 (41⁄2, 43⁄4)" (11 [11.5, 12] cm). little finger: K24 (29, 34), place next 32 (38, 44) sts on holder to work later, use backward loop method to Co 2 sts over gap, join, knit to end of rnd—10 (12, 14) little finger sts. Work even until finger measures 13⁄4 (2, 21⁄4)" (4.5 [5, 5.5] cm), or until finger is just shy of desired length. dec rnd: *K2tog; rep from *—5 (6, 7) sts rem. Break yarn, thread tail through rem sts, pull tight, and fasten off. Upper hand: Place 32 (38, 44) held sts on needles. Join yarn and pick up and knit 2 sts along base of Co sts at side of little finger—34 (40, 46) sts. Join and work in the rnd until piece measures 1⁄4" (6 mm) from joining rnd. Ring finger: Place first and last 6 (7, 8) sts on needles and rem 22 (26, 30) sts on holder. Co 1 st over gap, join, and knit to end of rnd—13 (15, 17) sts for ring finger. Work even until finger measures 2 (21⁄4, 21⁄2)" (5 [5.5, 6.5] cm) from beg, or just shy of
desired length. Dec rnd: *K2tog; rep from *, knitting last st of rnd tog with first st of next rnd—6 (7, 8) sts rem. Break yarn, thread tail through rem sts, pull tight, and fasten off. Middle finger: Place first and last 5 (6, 7) sts on needles, leaving rem 12 (14, 16) sts on holder. Co 2 st over gap, pick up and knit 1 st along Co edge of ring finger, join, and knit to end of rnd—13 (15, 17) sts for middle finger. Work even until finger measures 21⁄2 (23⁄4, 3)" (6.5 [7, 7.5] cm) from beg, or just shy of desired length. dec and fasten off as for ring finger. Index finger: Place rem sts on needles. Pick up and knit 1 st along Co edge of middle finger, join, and knit to end of rnd—13 (15, 17) sts for index finger. Work as for ring finger. Thumb: Place 15 (17, 19) held gusset sts on needles, pick up and knit 1 st along Co edge between thumb and hand, join, and knit to end of rnd—16 (18, 20) sts for thumb. Work even until thumb measures 11⁄2 (13⁄4, 2)" (3.8 [4.5, 5] cm), or just shy of desired length. dec rnd: *K2tog; rep from *—8 (9, 10) sts rem. For largest size only: Knit the next 2 sts tog (first 2 sts of next rnd)—8 (9, 9) sts rem. Fasten off as for ring finger.
Left Glove
Work as for right glove, but reverse shaping and begin thumb gusset as foll: Knit to last 3 sts, pm, M1, k1, M1, pm, k2.
FinishingWeave in loose ends. Wash in warm water to relax elastic. If desired, apply puffy paint in a dot or stripe pattern on fingers and palms for a non-slip surface, following the manufacturer’s instructions. use a blow-dryer to puff the paint instead of an iron.
Donna DruchunaS is a freelance knitter and writer.
©Interweave | Not to be reprinted | All rights reserved | www.knittingdaily.com 11
7 Free KNIttINg PAtterNs For Fingerless Gloves, Knit Mittens, ANd other glove KNIttINg PAtterNs
JOE
COC
A
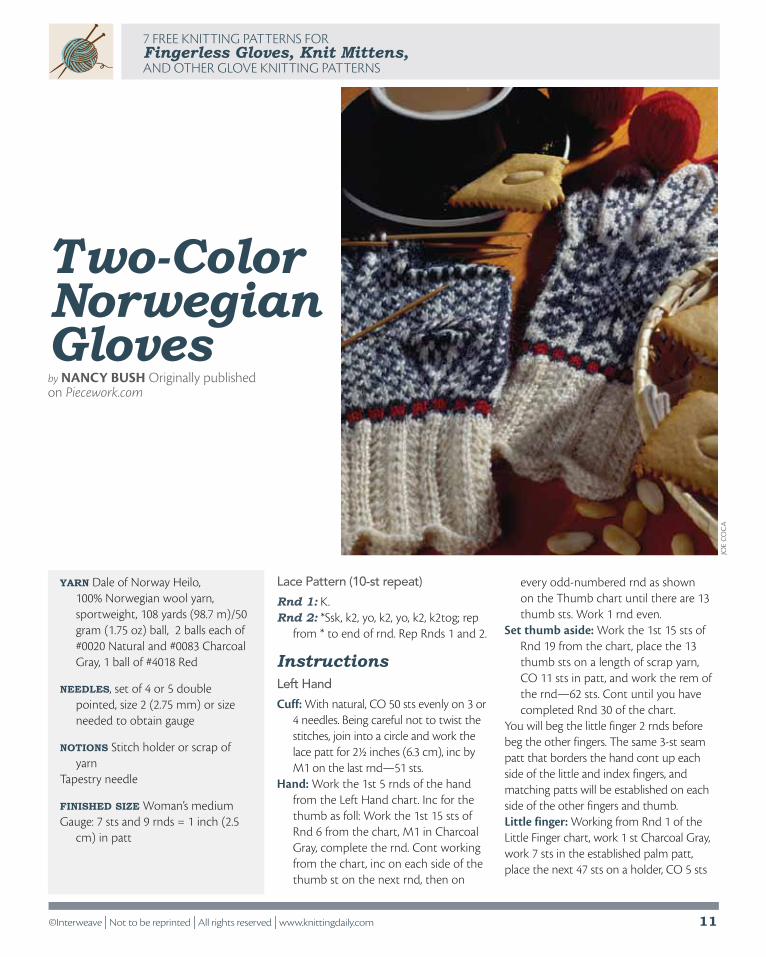
Yarn dale of Norway heilo, 100% Norwegian wool yarn, sportweight, 108 yards (98.7 m)/50 gram (1.75 oz) ball, 2 balls each of #0020 Natural and #0083 Charcoal gray, 1 ball of #4018 red
needles, set of 4 or 5 double pointed, size 2 (2.75 mm) or size needed to obtain gauge
notions stitch holder or scrap of yarn
tapestry needle
Finished size Woman’s mediumgauge: 7 sts and 9 rnds = 1 inch (2.5
cm) in patt
Two-Color Norwegian Gloves by nancy BuSh originally published on Piecework.com
Lace Pattern (10-st repeat)
Rnd 1: K.Rnd 2: *ssk, k2, yo, k2, yo, k2, k2tog; rep
from * to end of rnd. rep rnds 1 and 2.
InstructionsLeft Hand
Cuff: With natural, Co 50 sts evenly on 3 or 4 needles. Being careful not to twist the stitches, join into a circle and work the lace patt for 2½ inches (6.3 cm), inc by M1 on the last rnd—51 sts.
Hand: Work the 1st 5 rnds of the hand from the left hand chart. Inc for the thumb as foll: Work the 1st 15 sts of rnd 6 from the chart, M1 in Charcoal gray, complete the rnd. Cont working from the chart, inc on each side of the thumb st on the next rnd, then on
every odd-numbered rnd as shown on the thumb chart until there are 13 thumb sts. Work 1 rnd even.
Set thumb aside: Work the 1st 15 sts of rnd 19 from the chart, place the 13 thumb sts on a length of scrap yarn, Co 11 sts in patt, and work the rem of the rnd—62 sts. Cont until you have completed rnd 30 of the chart.
You will beg the little finger 2 rnds before beg the other fingers. the same 3-st seam patt that borders the hand cont up each side of the little and index fingers, and matching patts will be established on each side of the other fingers and thumb.Little finger: Working from rnd 1 of the little Finger chart, work 1 st Charcoal gray, work 7 sts in the established palm patt, place the next 47 sts on a holder, Co 5 sts
©Interweave | Not to be reprinted | All rights reserved | www.knittingdaily.com 12
7 Free KNIttINg PAtterNs For Fingerless Gloves, Knit Mittens, ANd other glove KNIttINg PAtterNs
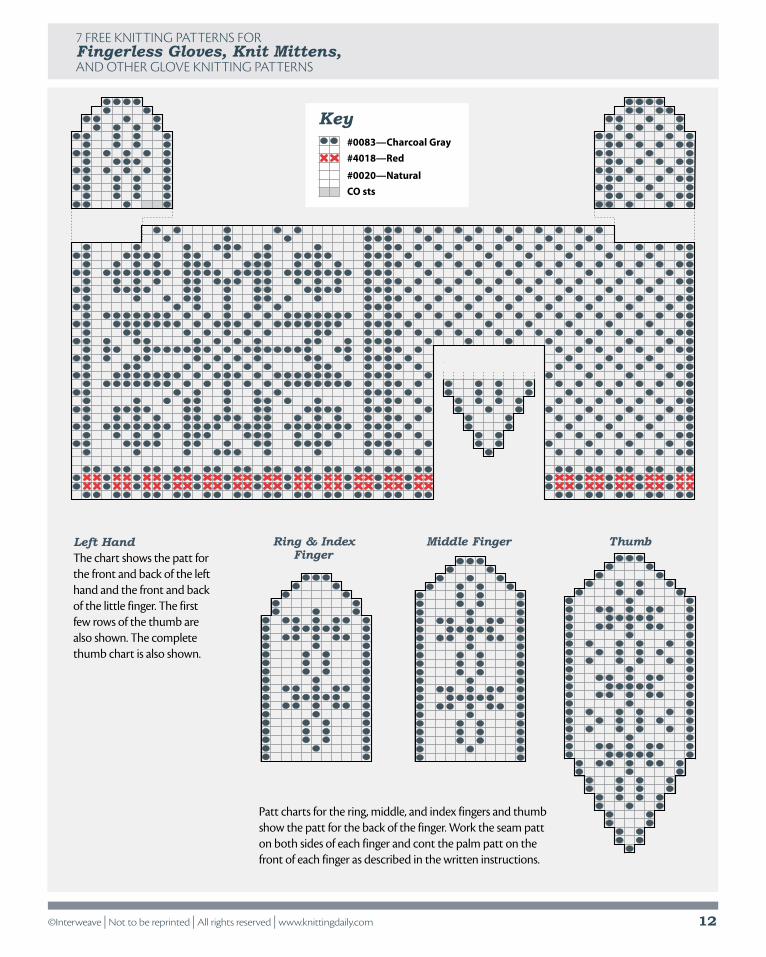
Patt charts for the ring, middle, and index fingers and thumb show the patt for the back of the finger. Work the seam patt on both sides of each finger and cont the palm patt on the front of each finger as described in the written instructions.
Middle Finger ThumbRing & Index Finger
Left HandThe chart shows the patt for the front and back of the left hand and the front and back of the little finger. The first few rows of the thumb are also shown. The complete thumb chart is also shown.
#0083—Charcoal Gray#4018—Red
#0020—NaturalCO sts
Key
©Interweave | Not to be reprinted | All rights reserved | www.knittingdaily.com 13
7 Free KNIttINg PAtterNs For Fingerless Gloves, Knit Mittens, ANd other glove KNIttINg PAtterNs
as foll: 3 Charcoal gray, 2 Natural, then work the rem 7 sts in patt for the back of the finger: 1 Natural, 1 Charcoal gray, 3 Natural, 2 Charcoal gray—20 sts. divide the sts onto 3 needles and, working in the rnd, cont foll the little Finger chart until you have completed rnd 9. Working in patt, dec for the tip of the finger as foll,Rnd 10: K1, ssk, k3, k2tog, k3, ssk, k3,
k2tog, k2—16 sts.Rnd 11: Work even as charted.Rnd 12: K1, ssk, k1, k2tog, k3, ssk, k1,
k2tog, k2—12 sts.Rnd 13: With Charcoal gray only, k1, sl
2, k1, p2sso, k3, sl 2, k1, p2sso, k2—8 sts.Break the yarn, thread it through the rem
sts, and draw them up snugly.Ring finger: transfer the sts on the
holder set aside for the other fingers to 3 or 4 needles. Beg at the Co seam sts of the little finger, pick up and k 3 Charcoal gray sts from the Co seam sts and 1 Natural from between the Co sts and the palm sts.
Work rnd 31 from the chart. When you reach the little finger on the back of the hand, pick up and k 1 Natural from the Co st—52 sts.
Work rnd 32 from the chart, keeping the 3-st seam patt opposite the little-finger seam patt.
to beg the ring finger, work the 3 seam sts, then 8 sts in the palm patt, place the next 33 sts on a holder, Co 5 sts: l in the palm patt, the next 3 in the seam patt, and the last in the back finger patt. Work the next 7 sts from the back of the hand and l st picked up in the prev rnd in the back finger patt—24 sts. Cont knitting in the
rnd, maintaining the seam and palm patts and foll the chart for the back of the finger. shape the top of the finger as shown on the chart, using the same decs as for the little finger.
When the ring finger is complete, work the middle and then the index fingers in the same manner, setting up the sts so that there are 3 seam sts on each side, 9 sts on the palm side, and 9 sts on the back of each finger—24 sts for each finger.
Thumb: transfer the 13 sts at the thumbhole to a needle. Attach Natural and pick up and k the middle of the 3 seam sts from the hand. Pick up and k 11 sts from the sts Co for the thumbhole: 1 Charcoal gray, 9 in palm patt, 1 Charcoal gray, then pick up and k 1 more st from the hand in Natural—26 sts. divide these sts onto 3 needles and work in the rnd, maintaining the palm, seam, and back thumb patts. shape the top of the thumb as shown on the chart.
turn the glove inside out and darn in the loose ends, closing any gaps that occur near the base of the fingers.
Right Glove
reverse the placement of the thumb and fingers.
Finishing
lay the finished gloves flat and pat them into shape. Cover them with a damp towel and lightly steam-press.
nancy BuSh, a member of PieceWork magazine’s editorial advisory panel, teaches knit-ting workshops nationwide and is the author of numerous books.
©Interweave | Not to be reprinted | All rights reserved | www.knittingdaily.com 14
7 Free KNIttINg PAtterNs For Fingerless Gloves, Knit Mittens, ANd other glove KNIttINg PAtterNs
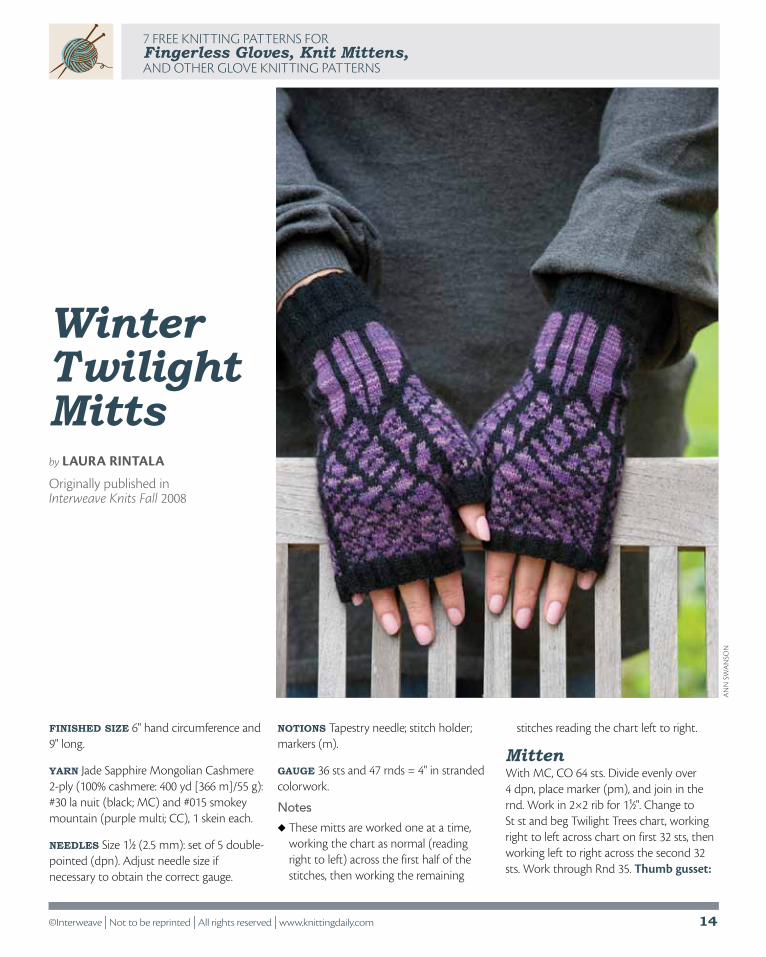
by laura rintala
originally published in Interweave Knits Fall 2008
Finished size 6" hand circumference and 9" long.
Yarn Jade sapphire Mongolian Cashmere 2-ply (100% cashmere: 400 yd [366 m]/55 g): #30 la nuit (black; MC) and #015 smokey mountain (purple multi; CC), 1 skein each.
needles size 11⁄2 (2.5 mm): set of 5 double-pointed (dpn). Adjust needle size if necessary to obtain the correct gauge.
notions tapestry needle; stitch holder; markers (m).
GauGe 36 sts and 47 rnds = 4" in stranded colorwork.
Notes
u these mitts are worked one at a time, working the chart as normal (reading right to left) across the first half of the stitches, then working the remaining
stitches reading the chart left to right.
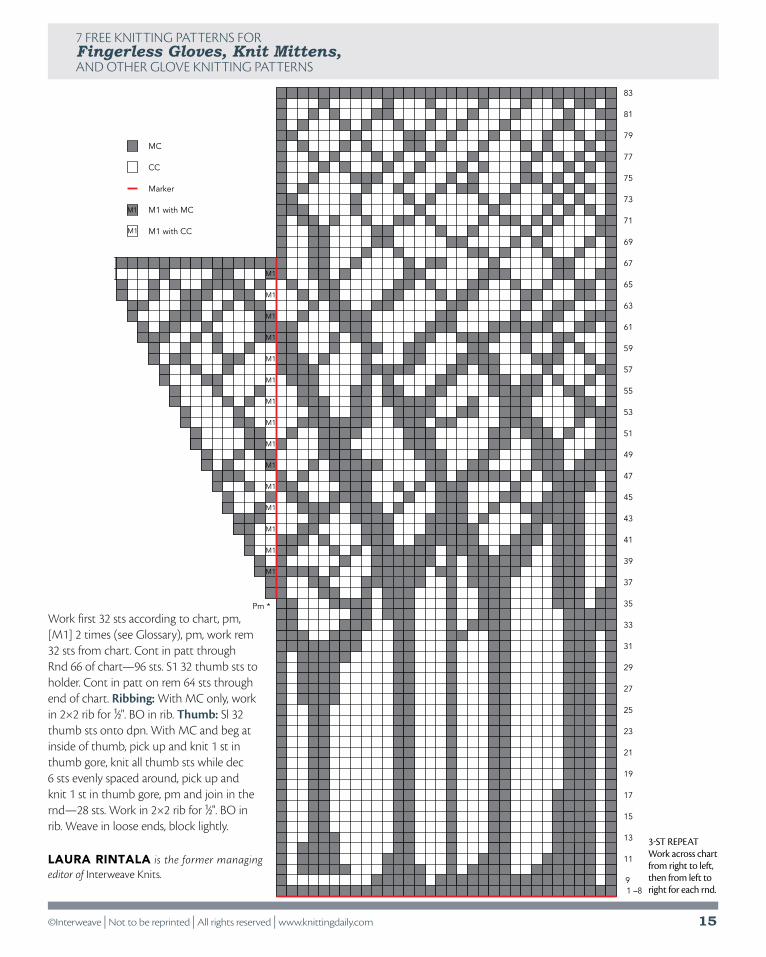
MittenWith MC, Co 64 sts. divide evenly over 4 dpn, place marker (pm), and join in the rnd. Work in 2×2 rib for 11⁄2". Change to st st and beg twilight trees chart, working right to left across chart on first 32 sts, then working left to right across the second 32 sts. Work through rnd 35. Thumb gusset:
Winter Twilight Mitts
AN
N s
wA
NsO
N
©Interweave | Not to be reprinted | All rights reserved | www.knittingdaily.com 15
7 Free KNIttINg PAtterNs For Fingerless Gloves, Knit Mittens, ANd other glove KNIttINg PAtterNs
3-st repeatWork across chart from right to left,then from left to right for each rnd.
MC
CC
M1 with MC
Marker
M1 with CC
Pm *
M1
M1
65
63
61
59
57
55
53
51
49
47
45
43
41
39
37
35
33
31
29
27
25
23
21
19
17
15
13
11
9
83
81
79
77
75
73
71
69
67
1 –8
M1
M1
M1
M1
M1
M1
M1
M1
M1
M1
M1
M1
M1
M1
M1
3-sT rePeaTWork across chart from right to left, then from left to right for each rnd.
Work first 32 sts according to chart, pm, [M1] 2 times (see glossary), pm, work rem 32 sts from chart. Cont in patt through rnd 66 of chart—96 sts. s1 32 thumb sts to holder. Cont in patt on rem 64 sts through end of chart. Ribbing: With MC only, work in 2×2 rib for 1⁄2". Bo in rib. Thumb: sl 32 thumb sts onto dpn. With MC and beg at inside of thumb, pick up and knit 1 st in thumb gore, knit all thumb sts while dec 6 sts evenly spaced around, pick up and knit 1 st in thumb gore, pm and join in the rnd—28 sts. Work in 2×2 rib for 1⁄2". Bo in rib. Weave in loose ends, block lightly.
laura rintala is the former managing editor of Interweave Knits.
©Interweave | Not to be reprinted | All rights reserved | www.knittingdaily.com 16
7 Free KNIttINg PAtterNs For Fingerless Gloves, Knit Mittens, ANd other glove KNIttINg PAtterNs
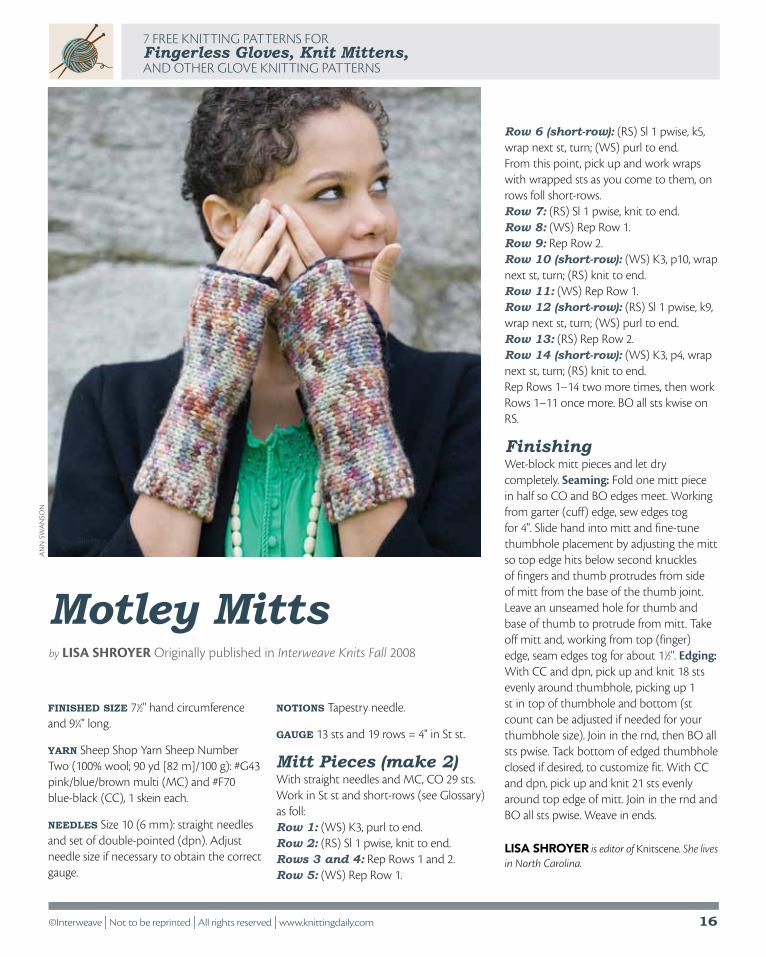
Finished size 71⁄2" hand circumference and 91⁄4" long.
Yarn sheep shop Yarn sheep Number two (100% wool; 90 yd [82 m]/100 g): #g43 pink/blue/brown multi (MC) and #F70 blue-black (CC), 1 skein each.
needles size 10 (6 mm): straight needles and set of double-pointed (dpn). Adjust needle size if necessary to obtain the correct gauge.
notions tapestry needle.
GauGe 13 sts and 19 rows = 4" in st st.
Mitt Pieces (make 2)With straight needles and MC, Co 29 sts. Work in st st and short-rows (see glossary) as foll:Row 1: (Ws) K3, purl to end.Row 2: (rs) sl 1 pwise, knit to end.Rows 3 and 4: rep rows 1 and 2.Row 5: (Ws) rep row 1.
Row 6 (short-row): (rs) sl 1 pwise, k5, wrap next st, turn; (Ws) purl to end.From this point, pick up and work wraps with wrapped sts as you come to them, on rows foll short-rows. Row 7: (rs) sl 1 pwise, knit to end.Row 8: (Ws) rep row 1.Row 9: rep row 2.Row 10 (short-row): (Ws) K3, p10, wrap next st, turn; (rs) knit to end.Row 11: (Ws) rep row 1.Row 12 (short-row): (rs) sl 1 pwise, k9, wrap next st, turn; (Ws) purl to end.Row 13: (rs) rep row 2.Row 14 (short-row): (Ws) K3, p4, wrap next st, turn; (rs) knit to end.rep rows 1–14 two more times, then work rows 1–11 once more. Bo all sts kwise on rs.
FinishingWet-block mitt pieces and let dry completely. Seaming: Fold one mitt piece in half so Co and Bo edges meet. Working from garter (cuff) edge, sew edges tog for 4". slide hand into mitt and fine-tune thumbhole placement by adjusting the mitt so top edge hits below second knuckles of fingers and thumb protrudes from side of mitt from the base of the thumb joint. leave an unseamed hole for thumb and base of thumb to protrude from mitt. take off mitt and, working from top (finger) edge, seam edges tog for about 11⁄2". Edging: With CC and dpn, pick up and knit 18 sts evenly around thumbhole, picking up 1 st in top of thumbhole and bottom (st count can be adjusted if needed for your thumbhole size). Join in the rnd, then Bo all sts pwise. tack bottom of edged thumbhole closed if desired, to customize fit. With CC and dpn, pick up and knit 21 sts evenly around top edge of mitt. Join in the rnd and Bo all sts pwise. Weave in ends.
liSa Shroyer is editor of Knitscene. She lives in North Carolina.
Motley Mittsby liSa Shroyer originally published in Interweave Knits Fall 2008
AN
N s
wA
NsO
N
©Interweave | Not to be reprinted | All rights reserved | www.knittingdaily.com 17
7 Free KNIttINg PAtterNs For Fingerless Gloves, Knit Mittens, ANd other glove KNIttINg PAtterNs
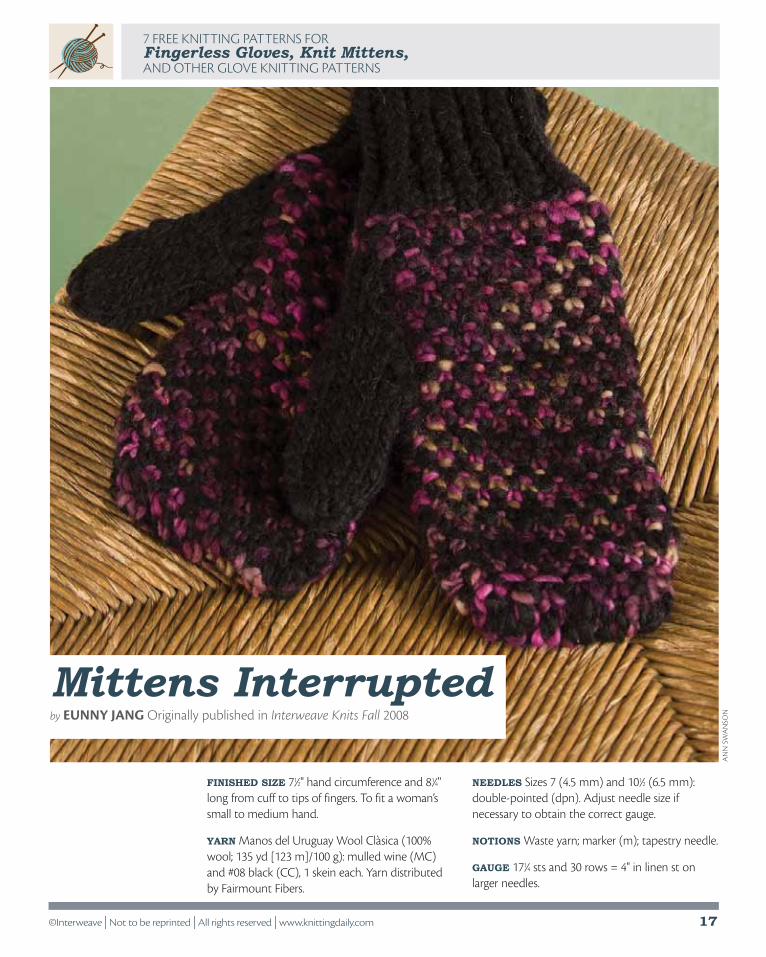
Finished size 71⁄2" hand circumference and 81⁄4" long from cuff to tips of fingers. to fit a woman’s small to medium hand.
Yarn Manos del uruguay Wool Clàsica (100% wool; 135 yd [123 m]/100 g): mulled wine (MC) and #08 black (CC), 1 skein each. Yarn distributed by Fairmount Fibers.
needles sizes 7 (4.5 mm) and 101⁄2 (6.5 mm): double-pointed (dpn). Adjust needle size if necessary to obtain the correct gauge.
notions Waste yarn; marker (m); tapestry needle.
GauGe 171⁄4 sts and 30 rows = 4" in linen st on larger needles.
Mittens InterruptedA
NN
sw
AN
sONby eunny Jang originally published in Interweave Knits Fall 2008
©Interweave | Not to be reprinted | All rights reserved | www.knittingdaily.com 18
7 Free KNIttINg PAtterNs For Fingerless Gloves, Knit Mittens, ANd other glove KNIttINg PAtterNs
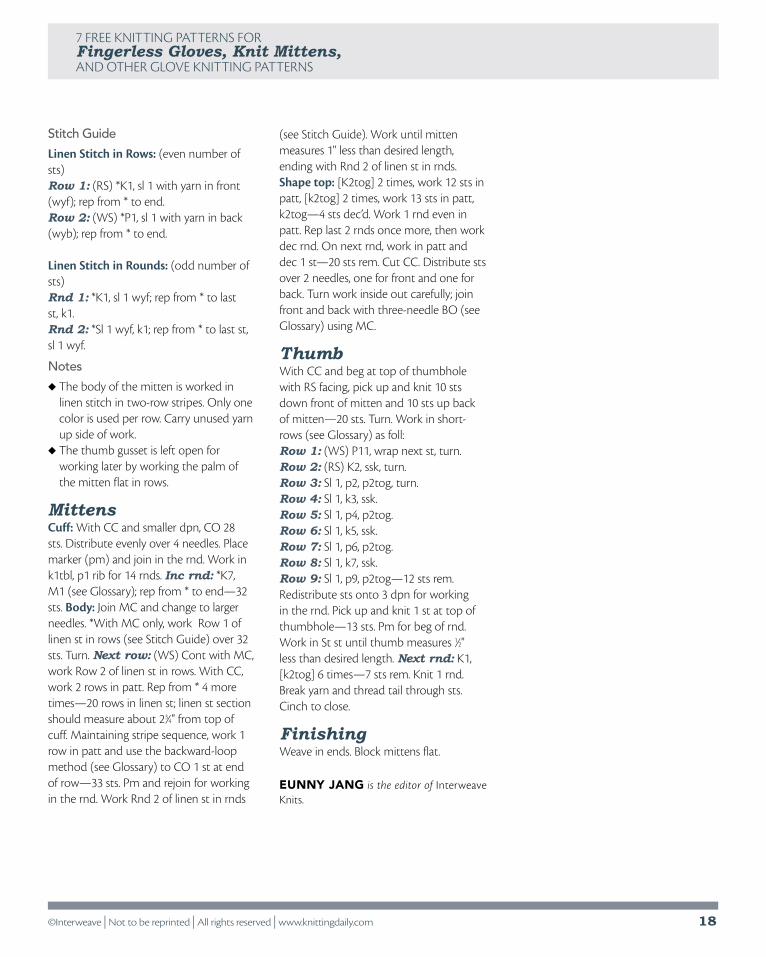
Stitch Guide
Linen Stitch in Rows: (even number of sts)Row 1: (rs) *K1, sl 1 with yarn in front (wyf); rep from * to end.Row 2: (Ws) *P1, sl 1 with yarn in back (wyb); rep from * to end.
Linen Stitch in Rounds: (odd number of sts)Rnd 1: *K1, sl 1 wyf; rep from * to last st, k1.Rnd 2: *sl 1 wyf, k1; rep from * to last st, sl 1 wyf.
Notes
u the body of the mitten is worked in linen stitch in two-row stripes. only one color is used per row. Carry unused yarn up side of work.
u the thumb gusset is left open for working later by working the palm of the mitten flat in rows.
MittensCuff: With CC and smaller dpn, Co 28 sts. distribute evenly over 4 needles. Place marker (pm) and join in the rnd. Work in k1tbl, p1 rib for 14 rnds. Inc rnd: *K7, M1 (see glossary); rep from * to end—32 sts. Body: Join MC and change to larger needles. *With MC only, work row 1 of linen st in rows (see stitch guide) over 32 sts. turn. Next row: (Ws) Cont with MC, work row 2 of linen st in rows. With CC, work 2 rows in patt. rep from * 4 more times—20 rows in linen st; linen st section should measure about 23⁄4" from top of cuff. Maintaining stripe sequence, work 1 row in patt and use the backward-loop method (see glossary) to Co 1 st at end of row—33 sts. Pm and rejoin for working in the rnd. Work rnd 2 of linen st in rnds
(see stitch guide). Work until mitten measures 1" less than desired length, ending with rnd 2 of linen st in rnds. Shape top: [K2tog] 2 times, work 12 sts in patt, [k2tog] 2 times, work 13 sts in patt, k2tog—4 sts dec’d. Work 1 rnd even in patt. rep last 2 rnds once more, then work dec rnd. on next rnd, work in patt and dec 1 st—20 sts rem. Cut CC. distribute sts over 2 needles, one for front and one for back. turn work inside out carefully; join front and back with three-needle Bo (see glossary) using MC.
ThumbWith CC and beg at top of thumbhole with rs facing, pick up and knit 10 sts down front of mitten and 10 sts up back of mitten—20 sts. turn. Work in short-rows (see glossary) as foll:Row 1: (Ws) P11, wrap next st, turn. Row 2: (rs) K2, ssk, turn.Row 3: sl 1, p2, p2tog, turn.Row 4: sl 1, k3, ssk.Row 5: sl 1, p4, p2tog.Row 6: sl 1, k5, ssk.Row 7: sl 1, p6, p2tog.Row 8: sl 1, k7, ssk.Row 9: sl 1, p9, p2tog—12 sts rem.redistribute sts onto 3 dpn for working in the rnd. Pick up and knit 1 st at top of thumbhole—13 sts. Pm for beg of rnd. Work in st st until thumb measures 1⁄2" less than desired length. Next rnd: K1, [k2tog] 6 times—7 sts rem. Knit 1 rnd. Break yarn and thread tail through sts. Cinch to close.
FinishingWeave in ends. Block mittens flat.
eunny Jang is the editor of Interweave Knits.
©Interweave | Not to be reprinted | All rights reserved | www.knittingdaily.com 19
7 Free KNIttINg PAtterNs For Fingerless Gloves, Knit Mittens, ANd other glove KNIttINg PAtterNs
glossary
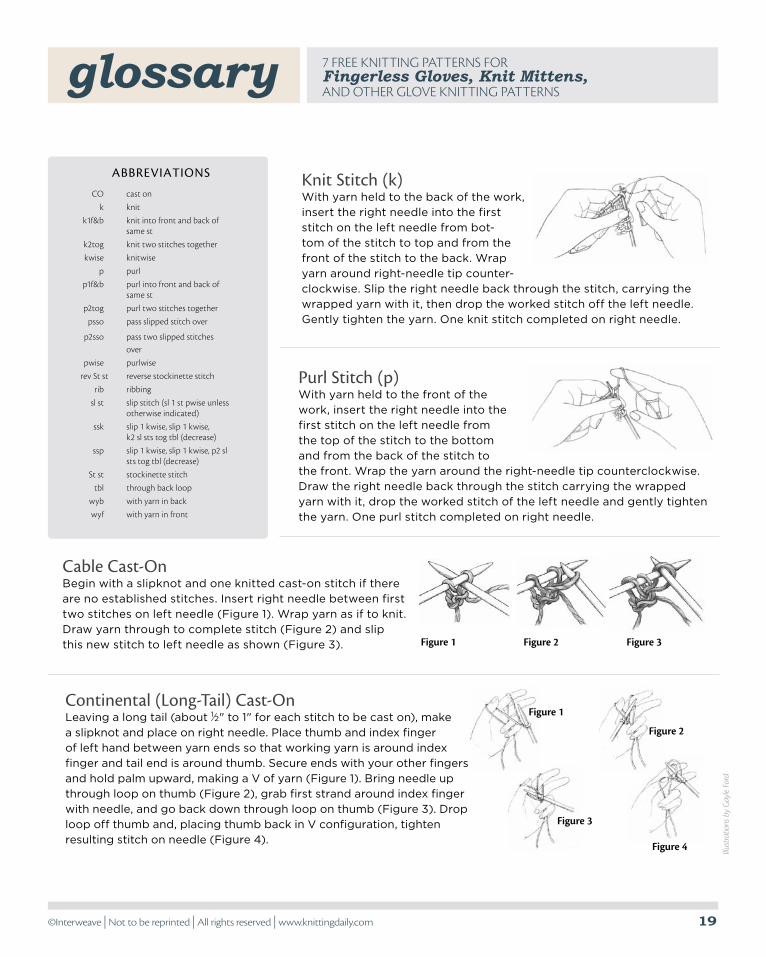
Knit Stitch (k)With yarn held to the back of the work, insert the right needle into the first stitch on the left needle from bot-tom of the stitch to top and from the front of the stitch to the back. Wrap yarn around right-needle tip counter-clockwise. Slip the right needle back through the stitch, carrying the wrapped yarn with it, then drop the worked stitch off the left needle. Gently tighten the yarn. One knit stitch completed on right needle.
Purl Stitch (p)With yarn held to the front of the work, insert the right needle into the first stitch on the left needle from the top of the stitch to the bottom and from the back of the stitch to the front. Wrap the yarn around the right-needle tip counterclockwise. Draw the right needle back through the stitch carrying the wrapped yarn with it, drop the worked stitch of the left needle and gently tighten the yarn. One purl stitch completed on right needle.
Cable Cast-OnBegin with a slipknot and one knitted cast-on stitch if there are no established stitches. Insert right needle be tween first two stitches on left needle (Figure 1). Wrap yarn as if to knit. Draw yarn through to complete stitch (Figure 2) and slip this new stitch to left needle as shown (Figure 3). Figure 2Figure 1 Figure 3
Continental (Long-Tail) Cast-OnLeaving a long tail (about 1⁄2" to 1" for each stitch to be cast on), make a slipknot and place on right needle. Place thumb and index finger of left hand between yarn ends so that working yarn is around index finger and tail end is around thumb. Secure ends with your other fingers and hold palm upward, making a V of yarn (Figure 1). Bring needle up through loop on thumb (Figure 2), grab first strand around index finger with needle, and go back down through loop on thumb (Figure 3). Drop loop off thumb and, placing thumb back in V configuration, tighten resulting stitch on needle (Figure 4).
Figure 3
Figure 1
Co cast on
k knit
k1f&b knit into front and back of same st
k2tog knit two stitches together
kwise knitwise
p purl
p1f&b purl into front and back of same st
p2tog purl two stitches together
psso pass slipped stitch over
p2sso pass two slipped stitches over
pwise purlwise
rev st st reverse stockinette stitch
rib ribbing
sl st slip stitch (sl 1 st pwise unless otherwise indicated)
ssk slip 1 kwise, slip 1 kwise, k2 sl sts tog tbl (decrease)
ssp slip 1 kwise, slip 1 kwise, p2 sl sts tog tbl (decrease)
st st stockinette stitch
tbl through back loop
wyb with yarn in back
wyf with yarn in front
AbbreviATiOnS
Figure 2
Figure 4 Illustr
atio
ns b
y G
ayle
Ford

©Interweave | Not to be reprinted | All rights reserved | www.knittingdaily.com 20
7 Free KNIttINg PAtterNs For Fingerless Gloves, Knit Mittens, ANd other glove KNIttINg PAtterNs
glossary
Short-rows: Wrapping a StitchWork to turn point, slip next stitch purlwise to right needle. Bring yarn to front (Figure 1). Slip same stitch back to left needle (Figure 2). Turn work and bring yarn in position for next stitch, wrapping the stitch as you do so. Note: Hide wraps in a knit stitch when right side of piece is worked in a knit stitch. Leave wrap if the purl stitch shows on right side. Hide wraps as follows: Knit stitch: On right side, work to just before wrapped stitch. Insert right needle from front, under the wrap from bottom up, and then into wrapped stitch as usual. Knit them together, making sure new stitch comes out under wrap. Purl stitch: On wrong side, work to just before wrapped stitch. Insert right needle from back, under wrap from bottom up, and put on left needle. Purl them together. Figure 2
Figure 1
Purl 2 together (p2tog)Purl two stitches together as if they were a single stitch.
Knit 2 together (k2tog)Knit two stitches together as if they were a single stitch.
backward-Loop Cast-On*Loop working yarn and place it on needle backward so that it doesn’t unwind. Repeat from *.
Standard bind-Off (bO)Knit the first stitch, *knit the next stitch (2 stitches on right needle), insert left needle tip into first stitch on right needle (Figure 1) and lift this stitch up and over the second stitch (Figure 2) and off the needle (Figure 3). Repeat from * for the desired number of stitches.
Figure 3Figure 2Figure 1
Left Slant (M1L) With left needle tip, lift strand between needles from front to back (Figure 1). Knit lifted loop through the back (Figure 2).
Figure 1 Figure 2
raised (M1) increases
Right Slant (M1R) With left needle tip, lift strand between needles from back to front (Figure 1). Knit lifted loop through the front (Figure 2).
Figure 1 Figure 2
Slip two stitches knitwise one at a time (Figure 1). Insert point of left needle into front of two slipped stitch es and knit them together through back loops with right needle (Figure 2).
Figure 2Figure 1
Ssk Decrease
Illustr
atio
ns b
y G
ayle
Ford
Place stitches to be joined onto two separate needles. Hold them with right sides of knitting facing together. Insert a third needle into first stitch on each of the other two needles and knit them together as one stitch. *Knit next stitch on each needle the same way. Pass first stitch over second stitch. Repeat from * until one stitch remains on third needle. Cut yarn and pull tail through last stitch.
Three-needle bind-Off

©Interweave | Not to be reprinted | All rights reserved | www.knittingdaily.com 21
7 Free KNIttINg PAtterNs For Fingerless Gloves, Knit Mittens, ANd other glove KNIttINg PAtterNs
glossary
Crochet GaugeTo check gauge, chain 30 to 40 stitches using recom-mended hook size. Work in pattern stitch until piece measures at least 4" (10 cm) from foundation chain. Lay swatch on flat surface. Place a ruler over swatch and count number of stitches across and number of rows down (including fractions of stitches and rows) in 4" (10 cm). Repeat two or three times on different areas of swatch to confirm measurements. If you have more stitches and rows than called for in instructions, use a larger hook; if you have fewer, use a smaller hook. Repeat until gauge is correct.
Slip Stitch Crochet (sl st)insert hook into stitch, yarn over hook and draw loop through stitch and loop on hook.
Crochet Chain (ch) Make a slipknot on hook. Yarn over hook and draw it through loop of slipknot. repeat, drawing yarn through the last loop formed.
Single Crochet (sc)Insert hook into a stitch, yarn over hook and draw a loop through stitch, yarn over hook (Figure 1) and draw it through both loops on hook (Figure 2).
Figure 1 Figure 2
Illustr
atio
ns b
y G
ayle
Ford
i-CordWith double-pointed needle, cast on desired number of stitches. *Without turning the needle, slide the stitches to other end of the needle, pull the yarn around the back, and knit the stitches as usual; repeat from * for desired length.
French KnotBring needle out of knitted background from back to front, wrap yarn around needle one to three times, and use thumb to hold in place while pulling needle through wraps into background a short distance from where it came out.
Twisted CordCut several lengths of yarn about five times the desired finished cord length. Fold the strands in half to form two equal groups. Anchor the strands at the fold by looping them over a doorknob. Holding one group in each hand, twist each group tightly in a clockwise direction until they begin to kink. Put both groups in one hand, then release them, allowing them to twist around each other counter-clockwise. Smooth out the twists so that they are uniform along the length of the cord. Knot the ends.
Figure 1
Figure 2
Kitchener StitchStep 1: Bring threaded needle
through front stitch as if to purl and leave stitch on needle.
Step 2: Bring threaded needle through back stitch as if to knit and leave stitch on needle.
Step 3: Bring threaded needle through same front stitch as if to knit and slip this stitch off needle. Bring threaded needle through next front stitch as if to purl and leave stitch on needle.
Step 4: Bring threaded needle through first back stitch as if to purl (as illustrated), slip this stitch off, bring needle through next back stitch as if to knit, leave this stitch on needle.
Repeat Steps 3 and 4 until no stitches remain on needles.