6900-192-001 Little Therm - Whitehall · PDF fileIf the blue tab was up, put the white tab up...
15
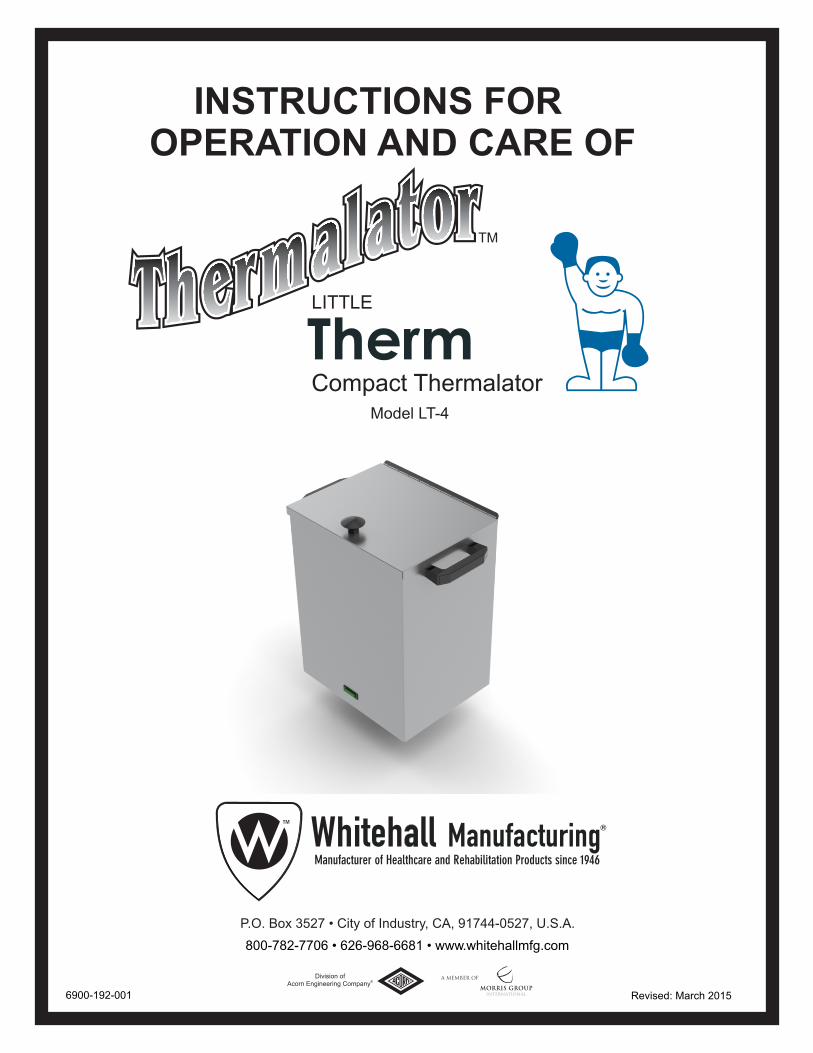
6900-192-001 Therm INSTRUCTIONS FOR OPERATION AND CARE OF LITTLE Compact Thermalator Model LT-4 800-782-7706 • 626-968-6681 • www.whitehallmfg.com P.O. Box 3527 • City of Industry, CA, 91744-0527, U.S.A. Division of ® Acorn Engineering Company Revised: March 2015
-
Upload
hoangtuyen -
Category
Documents
-
view
214 -
download
1
Transcript of 6900-192-001 Little Therm - Whitehall · PDF fileIf the blue tab was up, put the white tab up...
6900-192-001
Therm
INSTRUCTIONS FOROPERATION AND CARE OF
LITTLE
Compact ThermalatorModel LT-4
800-782-7706 • 626-968-6681 • www.whitehallmfg.com
P.O. Box 3527 • City of Industry, CA, 91744-0527, U.S.A.
Division of®Acorn Engineering Company
Revised: March 2015

WHITEHALL MANUFACTURING • P.O. BOX 3527 • City of Industry, CA 91744-0527 U.S.APhone (800) 782-7706 • (626) 968-6681 • Fax (626) 855-4862 • Web: www.whitehallmfg.com
a
CAUTION
DANGER
AVANT DE CONNECTER,LIRE LES INSTRUCTIONS
! !BEFORE CONNECTING,READ INSTRUCTIONS
Grounding reliability can only be achieved when the equipment is connected to an equivalent receptacle marked “Hospital Only” or “Hospital Grade”.
Medical Equipment:With respect to electric shock, fire and mechanical hazards only in accordance with UL 60601-1 and CSA C22.2 No. 601.1
La mise à terre ne fonctionne de facon efficace que si l’ équipment est connecté à une prise marquee “Hopital Seulement” ou “Categorie Hopital”.
Équipement Médical:Concernant les risques de chocs électriques de feu et autres dangers mecaniques seulement conformément a UL 60601-1 et a CSA C22.2 No. 601.1
WARNING
Risk of explosion if used in the presence of flammable anesthetics
l REPLACE fuse as marked
l Outer Surface is Hot
l AVOID Prolonged skin contact.
l AVOID resting objects on or against the tank.
Risque d’ explosion si utilisé en présence d’ anesthisques inflammables
l REMPLACER les fusibles tel qu’ indiqué
l La surface extérieure est chaude
l ÉVITER tout contact prolongé avec la peau.
l ÉVITER de deposer des objets sur le reservoir ou de les appuyercontre celui-ci.
l RETIRER tout emballage, accessoire et feuillet se trouvant à l'intérieur de votre nouvel appareil avant de l'utiliser.
EFFECTUER LA MISE À LA TERRE de votre appareil DE FAÇON APPROPRIÉE. Brancher l'appareil dans une prise à disjoncteur différentiel de fuite à la terre (DDFT), ce qui offre une protection au cas où l'eau et la paraffine entreraient en contact avec l'électricité. Si l'appareil n'est pas bien mis à la terre, cela augmente les RISQUES DE DÉCHARGES ÉLECTRIQUES !
l Afin de protéger le patient, vérfier réguliérement la température de l'eau decet appareil de chauffage. La température de l'eau ne doit pas dépasser 74 OC (165 OF) utiliser suffisamment de serviettes ou de tissus éponge. Ajouter des couches supplémentaires si la chaleur est trop intense pour le patient. Ne pas utiliser avec des baumes ou des liniments sur des patients ayant une mauvaise circulation ou une peau sensible. Ni sur un patient couché sur un dispositif chauffant.
Remarque: Les nourrissons et les patients àgés nécessitent des soins spéciaux.
l
FOR PROFESSIONAL USE ONLY POUR USAGE PROFESSIONEL SUELEMENT
ATTENTION
DANGER
AVERTISSMENT
l PROPERLY GROUND your unit. Plug unit into a Ground Fault Circuit Interrupter (GFCI) receptacle for safety. Failure to properly ground unit can increase the risk of ELECTRICAL SHOCK HAZARD!
l REMOVE all packaging, accessories and literature from inside of unit prior to using.
l For patient protection, periodically check the water temperature of this heating unit. The water temperature should not exceed 165ºF (74ºC). Use adequate toweling or terry cover, add extra towel layers if heat is too intense for patient. Do not use with balms or liniments on patients with poor circulation or sensitive skin nor with patients lying on heat pack.
Note: Infants and elderly patients require special care.
Introduction ........................................................................................................... 2
Model Descriptions ............................................................................................... 2
Operating Skills and Training ................................................................................ 3
Inspecting the Thermalator ................................................................................... 3
Setting Up ............................................................................................................. 3
Filling Your Unit ..................................................................................................... 4
Emptying ............................................................................................... Your Unit 5
Using the Thermal Pack .................................................................................... 6-8
Using the Wire Rack .............................................................................................
Maintenance ......................................................................................................... 9
Cleaning and Sanitizing ........................................................................................ 9
Storage .................................................................................................................
Troubleshooting .................................................................................................. 10
Repair of Unit ...................................................................................................... 10
Parts Diagram and Parts List .............................................................................. 11
Schematic and Accessories ................................................................................ 12
9
WHITEHALL MANUFACTURING • P.O. BOX 3527 • City of Industry, CA 91744-0527 U.S.APhone (800) 782-7706 • (626) 968-6681 • Fax (626) 855-4862 • Web: www.whitehallmfg.com
1
Instructions for Operation and Care of Little Therm Compact Thermalator
8
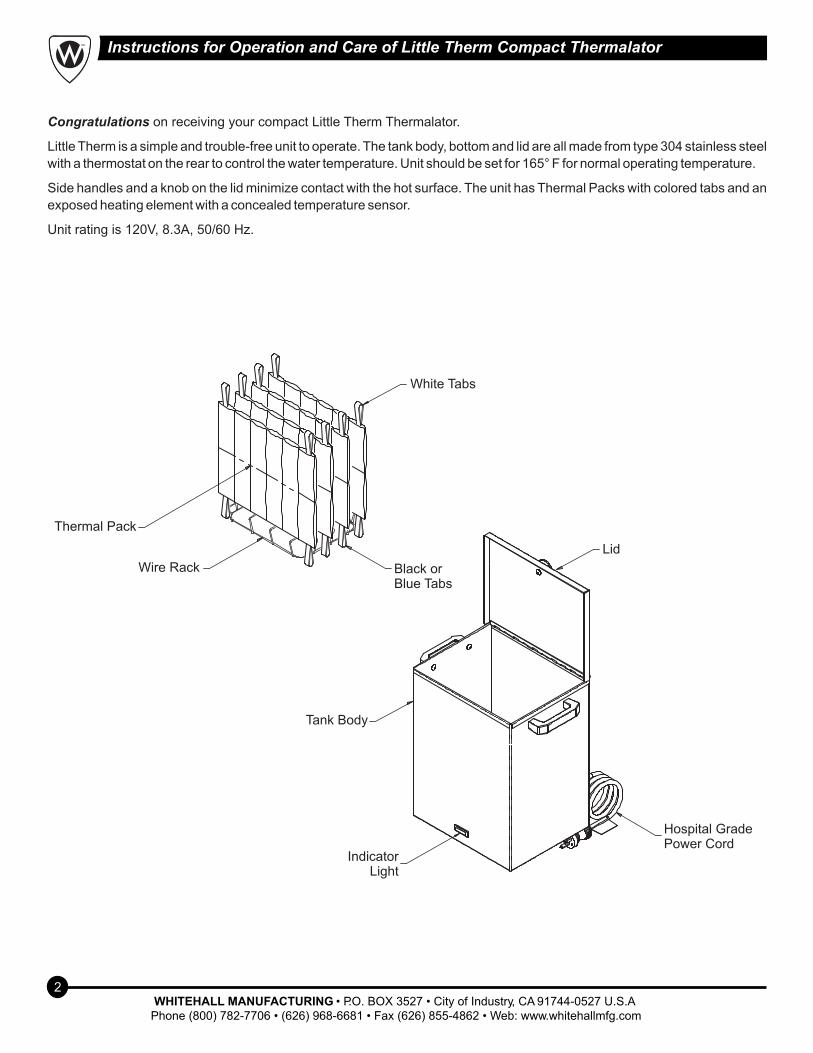
Congratulations on receiving your compact Little Therm Thermalator.
Little Therm is a simple and trouble-free unit to operate. The tank body, bottom and lid are all made from type 304 stainless steel
with a thermostat on the rear to control the water temperature. Unit should be set for 165° F for normal operating temperature.
Side handles and a knob on the lid minimize contact with the hot surface. The unit has Thermal Packs with colored tabs and an
exposed heating element with a concealed temperature sensor.
Unit rating is 120V, 8.3A, 50/60 Hz.
White Tabs
Thermal Pack
Wire Rack Black or Blue Tabs
Lid
Indicator Light
Hospital Grade Power Cord
Tank Body
WHITEHALL MANUFACTURING • P.O. BOX 3527 • City of Industry, CA 91744-0527 U.S.APhone (800) 782-7706 • (626) 968-6681 • Fax (626) 855-4862 • Web: www.whitehallmfg.com
Instructions for Operation and Care of Little Therm Compact Thermalator
2

WHITEHALL MANUFACTURING • P.O. BOX 3527 • City of Industry, CA 91744-0527 U.S.APhone (800) 782-7706 • (626) 968-6681 • Fax (626) 855-4862 • Web: www.whitehallmfg.com
3
Instructions for Operation and Care of Little Therm Compact Thermalator
1 Thermalator Model LT-44 Thermal Packs (4 Standard)1 Wire Rack - Small, Vinyl Coated1 Rack Adapter 1 Thermostat Knob1 Warranty Registration Card1 Instructions for Operation and Care
If you are missing anything, please call the phone number listed on the back page.
Remove all the shipping material. Remove Thermal Packs and wire rack from inside the tank. Remove all packaging from inside the tank, especially from under the heating element inside the tank. Clean the unit thoroughly before using.
Place the Thermalator at a convenient level, such as on a table or a scratch resistant counter top. Before moving the Thermalator, unplug and cool the unit. Only move the unit to empty or fill it. Always use the handles. The unit may be hot to the touch.
Before the first use, you must condition each Thermal Pack.
1- Take the Thermal Pack by the corner loops - one white and one blue or black - so the sections are horizontal.
2- Gently shake the pack back and forth to evenly distribute the filler material.
SETTING UP1. Your new Thermalator includes the following:
2. Unpacking your Thermalator
3. Device Placement
Shake to distribute the dry material
4. Pre-Soaking Thermal Packs
TRAINING
Operator trainees need to:
Ÿ be trained in occupational therapy protocols.
Ÿ read and understand this manual.
Skills:
Operators using the Thermalator need a working knowledge of occupational therapy procedures.
WARNING!
Only trained personnel to operate the Thermalator.Untrained operators can cause injury or be injured.
WARNING!
OPERATOR SKILLS AND TRAINING
INSPECTING THE THERMALATOR
Inspection Checklist
Is the Thermalator free of excessive wear?
Is a properly-grounded and voltage-matched receptacle available?
Is the outlet equipped with a functioning GFI?
Ÿ
Ÿ
Ÿ
This Whitehall product has been carefully packaged at the factory to minimize the possibility of damage during shipping.
— Inspect the packaging for external signs of damage.
— Inspect the contents for damage.If there is visible damage to the instrument upon receipt, inform the shipping company and Whitehall immediately.
WARNING!
Do not attempt to operate this equipment if there is evidence of shipping damage or you suspect the unit is damaged. Damaged equipment may present additional hazards to you. Contact Whitehall technical support for advice before attempting to plug in and operate damaged equipment.
WARNING!

Instructions for Operation and Care of Little Therm Compact Thermalator
WHITEHALL MANUFACTURING • P.O. BOX 3527 • City of Industry, CA 91744-0527 U.S.APhone (800) 782-7706 • (626) 968-6681 • Fax (626) 855-4862 • Web: www.whitehallmfg.com
4
3/4
FILLING YOUR UNIT
3- Place the Thermal Packs in a large pan to pre soak (use plastic, stainless steel or enamel-ware, DO NOT use aluminum). You may use the Thermalator (without heat) for pre soaking.
Place the Thermal Pack in the pan or unit with sections as illustrated.
4- Fill the container with enough tap water to completely cover the Thermal Packs.
5- Soak the packs for 24 hours minimum, more is recommended.
6- Return the packs to upright position. (If the unit was used, change the water.) The packs are now ready for heating.
•
Turn the packs to upright as shown
Make sure the unit is unplugged and all packaging has been removed.
Fill unit about 3/4 full with tap water.
1 2
Place the wire rack inside the unit. Be careful of the heating element.
Put the Pre-Soaked Thermal Packs on the wire rack. Place all the blue or white tabs up.
3 4
Instructions for Operation and Care of Little Therm Compact Thermalator
WHITEHALL MANUFACTURING • P.O. BOX 3527 • City of Industry, CA 91744-0527 U.S.APhone (800) 782-7706 • (626) 968-6681 • Fax (626) 855-4862 • Web: www.whitehallmfg.com
5
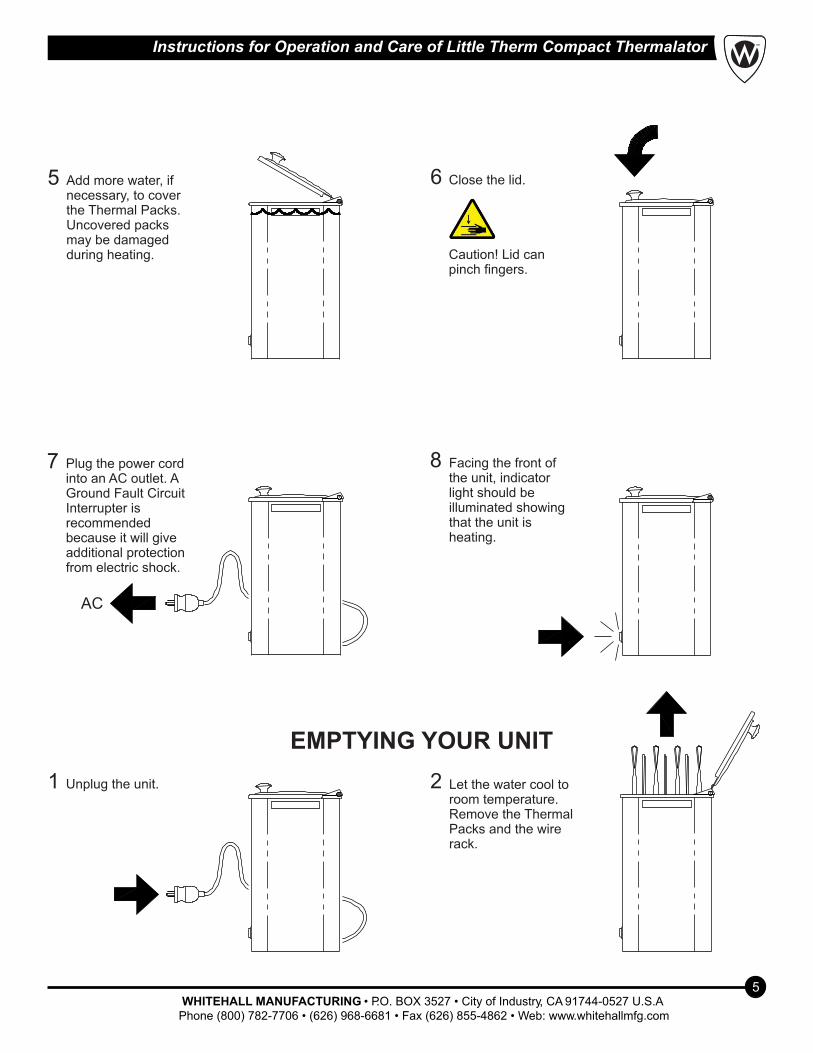
Plug the power cord into an AC outlet. A Ground Fault Circuit Interrupter is recommended because it will give additional protection from electric shock.
7 Facing the front of the unit, indicator light should be illuminated showing that the unit is heating.
8
EMPTYING YOUR UNIT
Unplug the unit.1
AC
Add more water, if necessary, to cover the Thermal Packs. Uncovered packs may be damaged during heating.
Close the lid.5 6
Caution! Lid can pinch fingers.
Let the water cool to room temperature. Remove the Thermal Packs and the wire rack.
2

Instructions for Operation and Care of Little Therm Compact Thermalator
WHITEHALL MANUFACTURING • P.O. BOX 3527 • City of Industry, CA 91744-0527 U.S.APhone (800) 782-7706 • (626) 968-6681 • Fax (626) 855-4862 • Web: www.whitehallmfg.com
6
USING THE THERMAL PACK
Wrap the pack in a Thermal Pack Cover or 5 to 6 layers of terry toweling.
3 Put the wrapped pack on the area to be treated for a pre-set treatment time.
4
Open the lid.1 Using tongs, carefully remove the Thermal Pack.
Caution: the Thermal Pack can cause skin burns.
2
1- For each use:
Pick up the unit by the handles and pour out into a sink or floor drain.
3
WARNING!
Use the Thermalator only as directed in this manual. Any other use can cause injury.
WARNING!

Instructions for Operation and Care of Little Therm Compact Thermalator
WHITEHALL MANUFACTURING • P.O. BOX 3527 • City of Industry, CA 91744-0527 U.S.APhone (800) 782-7706 • (626) 968-6681 • Fax (626) 855-4862 • Web: www.whitehallmfg.com
7
Return the pack to the Thermalator.
If the blue tab was up, put the white tab up now. Work your way from first to last, reversing tabs each time.
7 Close the lid. The Thermal Pack will be reheated within 15 minutes and ready for use.
8
Add more water, if necessary, to cover the Thermal Packs. Uncovered packs may be damaged during heating.
1 Place all the blue tabs in the same reference (either all up or all down) to start the day.
2
Remove the Thermal Pack from the patient.
5 Remove the Thermal Pack Cover or toweling. Hang Cover or toweling to dry or launder.
6
2- Daily use:BLUE

WHITEHALL MANUFACTURING • P.O. BOX 3527 • City of Industry, CA 91744-0527 U.S.APhone (800) 782-7706 • (626) 968-6681 • Fax (626) 855-4862 • Web: www.whitehallmfg.com
8
Instructions for Operation and Care of Little Therm Compact Thermalator
SmallRackAdapter (Optional)
Your Little Therm uses many different sizes of Thermal Packs. For Half, Cervical or Myofacial sizes, a small rack adapter is provided. For Standard, Knee/Shoulder, 10" x 18" and 10" x 24" sizes, use only the stainless steel wire rack provided.
USING THE WIRE RACK
CervicalMyofacial
Knee/Shoulder10" x 18"10" x 24"
Half Standard
The water temperature for normal operating conditions is about 165°F (74°C). The thermostat is very sensitive; even a small adjustment can raise or lower the temperature several degrees.
To adjust the temperature, you need a Thermometer capable of 180° F (83° C).
The thermostat has an adjustable temperature range of 65°F (18°C) to 175°F (79°C) ±5°F (-15°C).
3- Periodic use:
Facing the back of the unit, find the metal temperature stem between the 2 screws in the lower middle of the unit. Attach knob.
5 Using the knob, turn clockwise to increase the temperature. Allow the temperature to stabilize, and measure the water temperature with the thermometer.
CAUTION: Sensitive thermostat - a small adjustment changes several degrees. Temperature range of 65°F (18°C) to 175°F (79°C) ±5°F (-15°C).
6
TEMPERATURE

WHITEHALL MANUFACTURING • P.O. BOX 3527 • City of Industry, CA 91744-0527 U.S.APhone (800) 782-7706 • (626) 968-6681 • Fax (626) 855-4862 • Web: www.whitehallmfg.com
Instructions for Operation and Care of Little Therm Compact Thermalator
CLEANING AND SANITIZING
MAINTENANCE
9
The Little Therm design is nearly maintenance-free. It
should, under most conditions, give many years of
reliable service. Clean and replace the Thermal Packs
as described below.
1. Routine Maintenance (As Needed)
Ÿ See Cleaning and Sanitizing
Ÿ Always keep the Thermal Packs under water.
Replace any water that has evaporated.
Ÿ Destroy or discard any contaminated Thermal Packs.
2. Monthly Maintenance
Ÿ See Cleaning and Sanitizing
Ÿ Clean wire rack and insert using mild soap. Rinse
thoroughly with clean tap water. Dry with soft cloth.
Ÿ Scrub your Thermal Packs with warm soap and
water.
Ÿ Keep the pH (a measure of acidity of the water)
between 7.4 and 7.8 to reduce the scaling and
residue build-up.
3. Yearly Maintenance
Ÿ Replace worn out Thermal Packs. When The packs
begin to wear out, the non-toxic filler oozes through
the fabric and seams. The individual cells seem
empty. These packs don't hold the heat. Throw away
worn Thermal Packs.
Ÿ Have a professional electrician thoroughly check the
following:
1- Test for leakage current, dielectric strength, and
receptacle polarity and ground. If you need test
need test details, call the number listed on the
back page.
2- Check the power cord and plug. They should be
free of cuts, abrasion and other damage. Replace
the power cord assembly if it is damaged. Use
only factory replacement parts.
3- Remove the cover and check all electrical
components and connections. Replace any parts
that are in questionable condition. Use only
factory authorized replacement parts.
STORAGE1. Storing the Little Therm
Ÿ See Cleaning and Sanitizing
Ÿ Place the Little Therm upright in a dry area away from
any chemicals.
2. Storing the Thermal Packs
Ÿ Scrub your Thermal Packs with warm soap and
water.
Ÿ Moist and Cold
1- Put the moist Thermal Pack in a plastic bag.
2- Seal the bag.
3- Store the bag in the freezer (recommended) or
refrigerator.
Ÿ Dry
1- Air dry the Thermal Pack completely in a well
ventilated area. The filler will become hard and
caked. This doesn't hurt the bags; more Pre- Soaking
time is then necessary.
2- Store in a dry area away from any chemicals.
Cleaning of the tanks can best be accomplished with a
very mild, non-scratching household cleaner and a very
low abrasion plastic scouring pad lightly applied. On a
stainless steel tank, never use a metal scouring pad as it
is too abrasive and may leave carbon metal deposits on
the stainless, which will rust.
Again, disinfection and sterilizing procedures are
different from facility to facility, and we have found that
alcohol is still the best (but expensive) cleaning and
sterilizing solution. Bleaches and iodine should not be
used.
Use of bleach or iodine will result in pin holes in the
stainless steel tank which will leak and void the warranty.

Instructions for Operation and Care of Little Therm Compact Thermalator
WHITEHALL MANUFACTURING • P.O. BOX 3527 • City of Industry, CA 91744-0527 U.S.APhone (800) 782-7706 • (626) 968-6681 • Fax (626) 855-4862 • Web: www.whitehallmfg.com
10
REPAIR OF UNIT
It may be necessary or you may desire to return the Little Therm unit for service. In that case, we would appreciate you
contacting Whitehall Manufacturing directly. We will make arrangements for the unit to be returned to our production location.
When the unit is received by us, an estimate of repairs will be made and you will be contacted. Please- we appreciate
warranty repair or any other repair be arranged directly with Whitehall Manufacturing. If you are not satisfied with our
service, then and only then, contact your dealer.
TROUBLESHOOTING
Remove the ferrous metal item from the unit -usually a staple, paper clip, safety pin, etc. Clean thoroughly.
Contact with ferrous metalRust in unit
Adjust the thermostatThe thermostat is set too low
The thermostat is broken
There is a power failure
Thermal Packs too cool
Replace the thermostat
Check the circuit and turn on the breaker
Replace the thermostat The thermostat is brokenThermal Packs too hot and then too cool
Adjust the thermostat The thermostat is set too high
The thermostat is broken
Thermal Packs too hot
Replace the thermostat
Replace the Thermal Packs
Drain, clean and refill
The Thermo Packs are worn out (seeping)
Too long between cleaning
Water is cloudy
Adjust the thermostat
Replace the thermostat
Replace the heating element
Circuit breaker is off
Thermostat is not working
Heating element is burned out
Water doesn't get hot, even though unit is plugged in
Problem Cause Solution

WHITEHALL MANUFACTURING • P.O. BOX 3527 • City of Industry, CA 91744-0527 U.S.APhone (800) 782-7706 • (626) 968-6681 • Fax (626) 855-4862 • Web: www.whitehallmfg.com
11
Instructions for Operation and Care of Little Therm Compact Thermalator
ITEM # PART # DESCRIPTION
1
2
3
4
5 0710-232-000 Fuse Holder Assembly
6 6900-136-000 Fuse, 1/4” x 1-1/4”, 15A, Time Delay, Ceramic
7 6903-153-000 Operating Thermostat
8 6900-140-000 Knob
9
10 6503-111-199 Hold Down Plate for 1
11
12
13 6750-011-199 Bottom Cover
14 6750-012-000 Button Bumper (Foot)
15 0116-011-000 #10-32 x 5/16” S/S Phil Hd Screw
16 6505-056-000 Power Cord
6505-546-000 Snap-In Power Outlet 10A/15A 250VAC
6900-135-000 Indicator Light (Green), 125 VAC
6505-500-000 Heating Element 1000W 120V Tubular w/ Washers & Nuts
0710-446-000 1/2" Disc Thermostat, Manual Reset
6900-102-000 Clamp- Steel Cable
/2" Disc Thermostat
0302-011-000 #6-32 UNC Stainless Steel Hex Nut
0322-003-000 #6 Plated Star Lock Washer (External)
3 2 14
11
12
9
4
8 1 5
6
7
13
15
10
16
Instructions for Operation and Care of Little Therm Compact Thermalator
WHITEHALL MANUFACTURING • P.O. BOX 3527 • City of Industry, CA 91744-0527 U.S.APhone (800) 782-7706 • (626) 968-6681 • Fax (626) 855-4862 • Web: www.whitehallmfg.com
12
Whitehall Part # Description
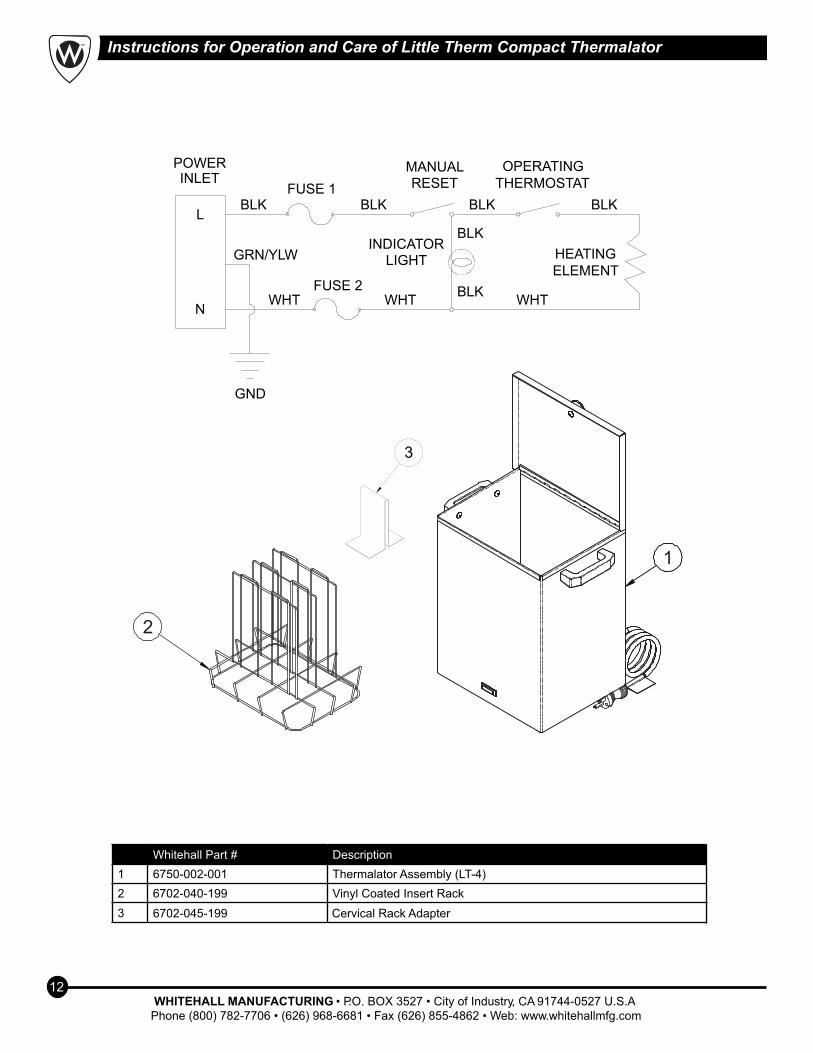
1 6750-002-001 Thermalator Assembly (LT-4)
2 6702-040-199 Vinyl Coated Insert Rack
OPERATINGTHERMOSTAT
HEATINGELEMENT
FUSE 1
GND
INLET
L
N
INDICATORLIGHT
MANUALRESET
POWER
FUSE 2
BLK BLK BLK
BLKWHT WHT
GRN/YLW
BLK
BLK
WHT
2
1
3 6702-045-199 Cervical Rack Adapter
3
Mailing Address:
P.O. Box 3527 • City of Industry, CA 91744-0527 U.S.A
Physical Address:
15125 Proctor Avenue • City of Industry, CA 91746 U.S.A
Phone 800-782-7706 • 626-968-6681
Fax 626-855-4862
Web: www.whitehallmfg.com
E-mail: [email protected]
Whitehall Manufacturing Company warrants that its products are free from defects in material or workmanship under normal use and service for a period of one year from date of shipment. Whitehall's liability under this warranty shall be discharged solely by replacement or repair of defective material, provided Whitehall is notified in writing within one year from date of shipment, F.O.B. Industry, California.
This warranty does not cover installation or labor charges, and does not apply to materials which have been damaged by other causes such as mishandling or improper care or abnormal use. The repair or replacement of the defective materials shall constitute the sole remedy of the Buyer and the sole remedy of Whitehall under this warranty. Whitehall shall not be liable under any circumstances for incidental, consequential or direct charges caused by defects in the materials, or any delay in the repair or replacement thereof. This warranty is in lieu of all other warranties expressed or implied. Product maintenance instructions are issued with each fixture, and disregard or non-compliance with these instructions will constitute an abnormal use condition and void the warranty. Stainless steel must be protected on jobsites during construction and must be properly maintained after the water has been introduced into the fixture, or Whitehall's limited warranty is void. If you have any questions or require technical assistance, please call 800-743-8219.
NOTICE TO KEEP ORIGINAL PACKAGING- Regarding warranty claims: customer must retain original packaging for one year upon receipt of product. If packaging is discarded, it is the customer's responsibility to provide adequate packaging. Any shipping claims that are a direct result of customer-provided packaging materials will be handled by the shipper.
MANUFACTURER'S WARRANTY
Member of