5 - Electron Microscopy
16
Electron microscopy I. L. Chrystie The aim of this chapter is to provide a detailed methodology of some of the basic electron microscopic (EM) techniques currently used in virology. It does not, however, cover opera- tion of the electron microscope or of other equipment for which the manufacturers' instructions would be more appropriate. The chapter is subdivided into four sections: a general introduction (detailing necessary equipment, safety precautions, etc); negative staining procedures; thin sectioning proce- dures; and briefly scanning EM. Following a brief discussion of the principles, each techni- que is given in sufficient detail to be followed as a recipe. Modifications are included within the methodology or in a following paragraph. However, it is not intended to be a comprehen- sive text and readers are directed to the biblio- graphy for more complex techniques. Finally, it must be stated that the total novice should ensure that they receive their initial instruction from a competent electron microscopist, ideally on a recognized academic or manu- facturer-run course. Safety Most of the chemicals used in EM are hazar- dous and should be handled with appropriate precautions. All fixatives are poisonous by ingestion, inhalation or contact, and some are volatile, especially osmium tetroxide (OsO4) and acro- lein. Many are flammable. The majority of resins are thought to cause dermatological problems and some are known carcinogens. Virology Methods Manual ISBN 0-12-465330-8 When mixed with solvents (e.g. during infiltra- tion procedures) they are absorbed into the skin much faster. Solvents are flammable and propylene oxide is carcinogenic. Some buffers are poisonous (veronal contains barbiturate and cacodylate contains arsenic). Stains con- tain heavy metals Which are cumulative poisons and uranyl salts are radioactive as well as toxic. Sensible precautions involve: adequate storage (small amounts, safety containers, labeling); appropriate personal protection (laboratory coat, gloves, safety goggles); appropriate containment (fume cupboards, working over absorbent paper); spark and flame free environment; spillage protocols; correct (and legal!) disposal procedures. In addition to the above it must be remem- bered that viruses are potentially pathogenic and must be handled accordingly. Basic equipment The size, equipment and organization of an EM unit will naturally vary according to the service requirements. However, there are some basic requirements which need to be considered. At least three separate rooms will be required, a microscope room, a pre- paration room, and a photographic dark room. An additional room for ultrathin sectioning has considerable advantages. Necessary equip- ment includes a ~ume hood (for resins, sol- vents, etc.), a safety cabinet (for handling of infectious material), a vacuum evaporation Copyright 9 1996 Academic Press Ltd All rights of reproduction in any form reserved
-
Upload
tamda-shitake -
Category
Documents
-
view
36 -
download
0
description
m
Transcript of 5 - Electron Microscopy

Electron microscopy
I. L. Chrystie
The aim of this chapter is to provide a detailed methodology of some of the basic electron microscopic (EM) techniques currently used in virology. It does not, however, cover opera- tion of the electron microscope or of other equipment for which the manufacturers' instructions would be more appropriate. The chapter is subdivided into four sections: a general introduction (detailing necessary equipment, safety precautions, etc); negative staining procedures; thin sectioning proce- dures; and briefly scanning EM. Following a brief discussion of the principles, each techni- que is given in sufficient detail to be followed as a recipe. Modifications are included within the methodology or in a following paragraph. However, it is not intended to be a comprehen- sive text and readers are directed to the biblio- graphy for more complex techniques. Finally, it must be stated that the total novice should ensure that they receive their initial instruction from a competent electron microscopist, ideally on a recognized academic or manu- facturer-run course.
Safety Most of the chemicals used in EM are hazar- dous and should be handled with appropriate precautions.
All fixatives are poisonous by ingestion, inhalation or contact, and some are volatile, especially osmium tetroxide (OsO4) and acro- lein. Many are flammable. The majority of resins are thought to cause dermatological problems and some are known carcinogens.
Virology Methods Manual ISBN 0-12-465330-8
When mixed with solvents (e.g. during infiltra- tion procedures) they are absorbed into the skin much faster. Solvents are flammable and propylene oxide is carcinogenic. Some buffers are poisonous (veronal contains barbiturate and cacodylate contains arsenic). Stains con- tain heavy metals Which are cumulative poisons and uranyl salts are radioactive as well as toxic.
Sensible precautions involve: adequate storage (small amounts, safety containers, labeling); appropriate personal protection (laboratory coat, gloves, safety goggles); appropriate containment (fume cupboards, working over absorbent paper); spark and flame free environment; spillage protocols; correct (and legal!) disposal procedures.
In addition to the above it must be remem- bered that viruses are potentially pathogenic and must be handled accordingly.
Basic equipment The size, equipment and organization of an EM unit will naturally vary according to the service requirements. However, there are some basic requirements which need to be considered. At least three separate rooms will be required, a microscope room, a pre- paration room, and a photographic dark room. An additional room for ultrathin sectioning has considerable advantages. Necessary equip- ment includes a ~ume hood (for resins, sol- vents, etc.), a safety cabinet (for handling of infectious material), a vacuum evaporation
Copyright �9 1996 Academic Press Ltd All rights of reproduction in any form reserved

Viro logy methods manual
unit (for preparation of carbon-coated grids), a bench and ultracentrifuge, 30-90~ oven (for curing blocks), glass knifemaker, an ultrami- crotome, a sonicator (for cleaning EM parts),
an enlarger, and a photographic processor. Some companies provide 'starter kits' of che- micals and/or basic equipment such as grids and tweezers.
92 Chapter 5

Negative staining
Negative staining Principles Simplicity and rapidity, coupled with high res- olution, have ensured that the negative stain- ing technique is of major importance in virus morphology and diagnosis.
Virus particles do not scatter electrons to any appreciable extent and thus are not vis- ible in the electron microscope. Negative stains provide an electron opaque back- ground against which particles can be visual- ized. The penetration of the stain into the virus reveals its morphology. Negative stains must contain an electron dense element (a heavy metal), be water soluble, and, on drying, must form a non-crystalline sheet. Ideally they should not react with virus particles. Table 5.1 lists a number of commonly used negative stains.
Support films Plastic films tend to decompose under the electron beam and move somewhat when irra-
diated. Carbon films are more rigid but very fragile. Carbon coating of plastic films pro- vides an ideal compromise for all but very high resolution work, for which carbon films are to be preferred. Specialist literature should be consulted for methods of produc- tion of carbon films, carbon/carbon-platinum films for cryo EM, and holey carbon films.
Preparation of carbon- coated, plastic films
1. Clean a microscope slide with detergent, rinse with distilled water (dH20), and dry.
2. Place the slide in a solution of plastic. Suitable plastics include Formvar (0.1-0.5% in chloroform); Butvar (0.2- 0.4% in chloroform), pioloform (0.3- 1% in chloroform) and collodion (0.5- 1.5% in amyl acetate).
3. Remove the slide and allow it to drain vertically until all the solvent has evaporated.
Table 5.1. Negative stains commonly used in routine electron microscopy of viruses.
Stain* Conc. pH Comments
Phosphotungstic acid 1-3% 5.0-8.0
Uranyl acetate 1.0-2.0% 4.4 Uranyl formate 1.0-2.0% 4.4 Uranyl nitrate 0.5-1.0% 4.4
Uranyl oxalate 0.5-1.0% 5.0-7.0
Ammonium molybdate 1-4% 6.0-8.0
Sodium silicotungstate
Methylamine tungstate
2-4% 5.0-8.0
1.0-2.0% 6.0-8.0
Stain most commonly used by animal virologists. Can tolerate relatively high concentrations of salts in the virus suspension. Has detrimental effect on some viruses (Fig. 5.1).
pH can only be altered over very narrow range. Sensitive to salts in virus suspension. Often preferable to use two-step staining technique.
Useful for negative staining of whole cell preparations and osmotically sensitive structures (Figure 5.2). Adjust pH with ammonium hydroxide.
Low buffering capacity
* All stains will benefit from the addition of bacitracin (0.1%) as a wetting agent to aid spreading.
Electron microscopy 93
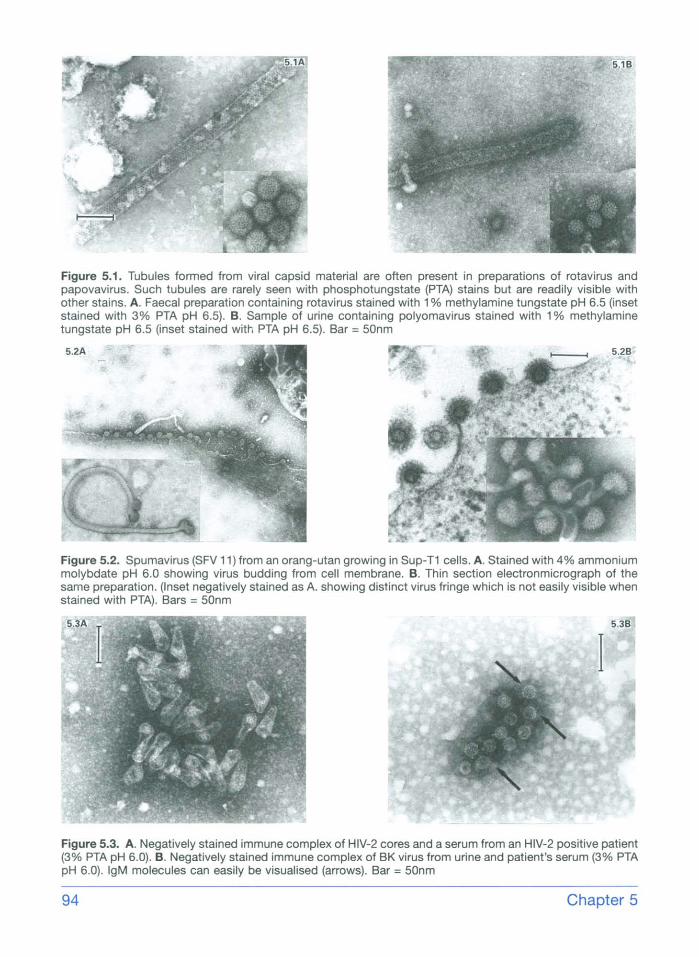
Figure 5.1. Tubules formed from viral capsid material are often present in preparations of rotavirus and papovavirus. Such tubules are rarely seen with phosphotungstate (PTA) stains but are readily visible with other stains. A. Faecal preparation containing rotavirus stained with 1% methylamine tungstate pH 6.5 (inset stained with 3% PTA pH 6.5). B. Sample of urine containing polyomavirus stained with 1% methylamine tungstate pH 6.5 (inset stained with PTA pH 6.5). Bar = 50nm
Figure 5.2. Spumavirus (SFV 11) from an orang-utan growing in Sup-T1 cells. A. Stained with 4% ammonium molybdate pH 6.0 showing virus budding from cell membrane. B. Thin section electronmicrograph of the same preparation. (Inset negatively stained as A. showing distinct virus fringe which is not easily visible when stained with PTA). Bars = 50nm
Figure 5.3. A. Negatively stained immune complex of HIV-2 cores and a serum from an HIV-2 positive patient (3% PTA pH 6.0). B. Negatively stained immune complex of BK virus from urine and patient's serum (3% PTA pH 6.0). IgM molecules can easily be visualised (arrows). Bar = 50nm
94 Chapter 5

Negative staining
4. Score a rectangle in the film along one surface about 5 mm in from the edge and insert the slide, scored side uppermost, into a dish of dH20 at a shallow angle. The film should float on the surface of the water. Breathing on the film may facilitate release.
5. Place grids on the film. Opinion varies as to whether grids should be matt or shiny side down. The author's personal opinion is that it does not matter.
6. Cover the film and grids with a square of filter paper. When the paper is fully wetted remove it gently. The film, plus grids, should remain attached to the filter paper, which should be allowed to dry, grids uppermost, at room temperature.
7. When dry, the coated grids, on the filter paper, are placed into a suitable vacuum coating apparatus, and a thin film of carbon is evaporated onto the grids. No further details are given as different machines vary and all that is necessary is to follow the manufacturer's instructions. The thickness of the carbon film may be estimated by observing its deposition on a thickness indicator (a piece of white porcelain with a drop of vacuum oil on it). The carbon is only visible on the porcelain - not the oil.
8. The grids are then ready for use.
Carbon films are notoriously hydrophobic. This can be reduced by subjecting the films to ion bombardment in a glow-discharge apparatus (see manufacturer's instructions), by exposing to UV light for 30 min, or by treating with 1% Alcian blue for 5 min. The use of wetting agents (e.g. bacitracin)in stains/ buffers is also recommended.
The plastic film often sticks to the glass surface, its release can be facilitated by abrading the glass with scouring powder while cleaning or by polishing the glass with a small amount of detergent rather
than washing and rinsing. Alternatively, freshly cleaved mica can be used instead of glass.
As an alternative to casting films on a solid surface, collodion films may be cast directly on the surface of the water by allowing one drop of the plastic in amyl acetate (which floats on water) to drop onto the surface. Once the solvent has evaporated the grids may be placed on the resultant film.
Negative staining methods The more frequently used techniques are described below. Specialist literature should be consulted for such methods as the nega- tive staining carbon film technique developed by Horne and Pasquali-Ronchetti (in which suitable virus preparations are simultaneously crystallized and negatively stained), shadow- ing, and low temperature techniques such as freeze drying, freeze etching, and examination of viruses frozen in thin layers of ice.
One step method
This is the simplest and most widely used method.
1. Using fine, clean forceps and fine- bore pipettes, mix equal amounts (approximately 25 #1) of virus suspension and negative stain on a glass slide or a waxed surface.
2. Place a drop on a coated EM grid or flo&t grid on surface of stain/virus drop.
3. After a few seconds remove the bulk of the fluid with the edge of a strip of filter paper. The longer the grid is in contact with the suspension the more virus will be absorbed. However, the
Electron microscopy 95
Viro logy me thods manual
need for any greater sensitivity must be balanced against any deleterious effects of the stain on the virus.
4. Air dry the grid. 5. Examine in the EM: an initial
examination will indicate if more/less stain is required.
Two step method
Some specimens contain high salt concentra- tions which are likely to mask virus particles. In addition longer adsorption times might be necessary (e.g. with low virus concentrations).
1. Apply virus suspension alone to the coated grid or float grid on a drop of virus suspension for from a few seconds to several hours (use a humidified chamber for adsorption times greater than 1 min).
2. Wash the grid gently with one or more drops of distilled water.
3. Add a drop of the negative stain. Penetration of stain into virus can be controlled by varying the staining time.
4. Remove the bulk of the fluid with the edge of a piece of filter paper.
5. Air dry the grid and examine in the EM.
Agar technique
This is another technique for either removing unwanted salts or increasing the adsorption of virus particles to the grid.
microtitre plate which can be sealed, stored, and wells cut off as required.
2. Slightly dry the agar/agarose block (15 rain in air) and place a drop of virus suspension onto the solidified agar or agarose.
3. Invert a coated grid on top of the drop. (Some workers recommend placing the grid under the sample, coated side uppermost.)
4. When the drop has been absorbed by the agar (up to 60 rain), remove the grid.
5. Wash, stain, and examine as above.
Pseudo-replica technique
Yet another technique for reducing the effects of salt or improving virus adsorption.
1. Prepare 1% agar or agarose on a glass side.
2. Cut out a 1 c m 2 block, and dry slightly (15 rain).
3. Place a drop of virus suspension on the block and allow to dry.
4. Flood the block with 0.5% formvar in ethylene dichloride or chloroform and allow to dry. Any other suitable plastic may be used (see Support films, page 93).
5. Trim the block slightly to facilitate release of the film and float the film (which now contains the virus particles) onto a suitable negative stain.
6. Pick up the film with a bare copper grid or place the grid onto the film and pick up both with filter paper.
7. Air dry the grid and examine in the EM.
1. Prepare 1% agar in dH20 on a glass slide. Agarose is equally useful. Gels can also be prepared in a disposable
96 Chapter 5
Negative staining
Airfuge Beckman Instruments Inc. produce a rotor (the EM-90) for use in their Airfuge centrifuge. This rotor is specifically designed for sedimenting virus particles onto coated grids for subse- quent examination by EM. Sensitivity may be increased by up to 1000-fold over the usual 1- step technique, although cellular debris can be a problem with some clinical samples. In addi- tion the rotor must be scrupulously washed after use to avoid contamination. This is of particular importance if the rotor is used for diagnostic purposes. The manufacturer pro- vides excellent instructions.
however the hazards associated with spraying pathogenic organisms must not be underestimated.
4. Count the virus particles and latex particles per unit area. Counts may be performed either directly in the microscope or on electron micrographs. Measurements should be taken from different parts of the grid and from more than one grid.
5. Determine virus concentration by the following equation
concentration of virus =
.concentration of latex x virus count latex count
Particle counting
A reasonably accurate determination of numbers of virus particles per unit volume requires a preparation of polystyrene latex particles of known size and concentration (commercially available).
1. Dilute a commercial preparation of latex particles to a concentration of approx 108 particles per millilitre.
2. Mix the virus preparation with an equal volume of latex particles.
3. Carry out a standard negative staining procedure. Some workers recommend the use of spraying procedures,
Table 5.2.
Calibration The importance of an accurately calibrated EM cannot be overstated. One cannot accept the figures quoted by the manufacturer, and indi- viduals are encouraged to treat calibration as a routine procedure.
Some commercially available calibration specimens are listed in Table 5.2.
Preparative techniques To be detected by negative staining electron microscopy, the concentration of virus par- ticles must be over 106 per ml. Also, non-viral debris must not obscure the virus particles.
Method Comments
Diffraction grating replicas
Polystyrene latex particles
Holey single crystal gold film
Negatively stained catalase crystals . , . .
Most useful have 2160 lines mm-1 and are cross-hatched. Useful up to 50-100,000x magnification.
Particles of certified diameter within the range of 20-1000 nm are available. A statistically significant number of particles should be measured.
Can be usefully employed up to 900,000x.
Lattice plane spacings of 8.75 nm and 6.85 nm are clearly visible.
Electron microscopy 97

Virology methods manual
However the major advantage of negative staining EM in the clinical environment is its rapidity, thus any preparative techniques used need to be considered in this light. Specimens may be examined:
Directly, if virus is present in relatively high concentration and is unlikely to be significantly obscured by debris. Such specimens include preparations from vesicular lesions and faecal specimens.
After concentration, if virus is present in low amounts. Such specimens include urine, blood, and CSF. Concentrative methods include ultracentrifugation (100,000 g for 30 min) and Lyphogel.
After semi-purification, if virus is likely to be obscured by non-viral material in the speci- men. Such specimens include faecal samples (especially when looking for the smaller viruses), and biopsy specimens. Techniques involve clarification by low speed centrifuga- tion (5000 g for 10 min) followed by uitracen- trifugation of the resultant supernatant.
Preparation of clinical specimens Vesicular lesions
Dry vesicular fluid or scrapings from vesicles onto the centre of a microscope slide. Transport to the EM laboratory in a sealed container.
Resuspend the material in a drop of sterile distilled water.
Negatively stain and examine.
Viruses detected include herpes simplex and varicella zoster, molluscum contagiosum, and, rarely, Coxsackie virus (hand, foot, and mouth lesions).
Faeces
Resuspend faecal sample in dH20 to 10% (the specimen may be examined at this stage with only a slight reduction in sensitivity).
Centrifuge at 5000 g for 15 min.
Centrifuge the supernatant at 100,000+ g for 60 min. Alternative concentration techniques include the use of Lyphogel and precipitation with ammonium sulphate.
Resuspend the pellet in a drop of single distilled water (sufficient to form an opalescent suspension).
Negatively stain and examine.
Viruses detected include: rotavirus, adenovirus, calicivirus, astrovirus, an assortment of small smooth round viruses (SSRV) and small round structured viruses (SRSV, including Norwalk virus), coronavirus-like particles, and reovirus.
Respiratory secretions
Some authors have described techniques for examining respiratory secretions for such viruses as influenza, parainfluenza, adeno- virus, and respiratory syncytial virus. However such specimens are not examined by EM in the majority of laboratories.
Serum, urine, CSF
Centrifuge at -> 100,000 g for 60 min.
Resuspend the pellet, negatively stain, and examine.
98 Chapter 5
Hepatitis B virus and human parvovirus may be detected in serum. Cytomegalovirus and BK virus (papovavirus) may be detected in urine.
Biopsy specimens
Grind the sample in single distilled water, or disrupt by freezing and thawing. Either use the sample directly or following a brief clarification at 5000 g.
Negatively stain and examine.
Papillomavirus or molluscum contagiosum may be detected in skin lesions. Herpes virus has been detected in brain biopsy samples from patients with suspected herpes encephalitis.
Cell culture
Centrifuge cells plus culture fluid at _> 100,000 g for 60 min.
Resuspend the pellet in dH20 (the osmotic shock releases the virus from the cells).
Negatively stain and examine.
Used to confirm cytopathic effect in cell culture. Routine screening of uninoculated cell cultures will often identify adventitious virions (paramyxovirus, foamy virus, polyomavirus), especially in simian cultures. Mycoplasma may also be detected.
Electron microscopy
Negative staining
Immune electron microscopy Immune electron microscopy ( IEM)is the visualization of the reaction between an anti- gen, usually a virus, and an antibody, and may be used to detect either component of this reaction. Thus the technique has been used to detect serological responses to such viruses as Norwalk virus; has assisted in the identification of rubella virus; and has been used diagnostically to identify hepatitis B virus infection and viruses associated with diarrhoea. The technique is also used routinely by some workers to serotype such viruses as rotaviruses, enteroviruses and adenoviruses. (See Fig. 5.3. for examples of use)
Classical technique
Mix equal volumes of virus and antiserum.
Incubate at 37~ for 60 min, then at 4~ overnight (although clumping can often be visualized after 15-30 min at 37~
Centrifuge at 20,000 g for 60 min, resuspend the pellet in single distilled water, stain and examine.
Clumping of virus particles indicates a positive result. However, some virus particles may clump naturally and care must be taken in interpretation. Concentrations of virus and antiserum may need to be modified as too little antibody and clumping will not occur; too much and virus particles will be obscured by the antibody.
Direct examination of clumping is often possible using the one or two step techniques, in addition, the agar technique (above) can be employed.
Clumps may also be picked up with protein A-coated grids (see below).
99
Viro logy me thods manual
Serum in agar
This technique is a modification of the agar technique described above.
Add antibody to molten agar or agarose (at approx. 40~ Antibody concentration will need to be determined for each batch.
Add to disposable microtitre plates and seal (can be stored for several months at 4~
Cut off the required number of wells and place a drop of virus preparation on agar surface.
Continue as for agar technique, page 96. Clumping of virus denotes a positive result.
Solid phase IEM (SPIEM)
The attachment of antibody molecules to EM support films, and the use of such antibody- coated films to trap virus particles, was a logical development of solid phase enzyme immunoassays.
Float a coated grid on a drop of Staphylococcus aureus protein A in PBS for 30 min at RT (0.25-2 mg ml-1 is normally adequate).
Wash in 5 drops of PBS.
Float grid on a drop of antiserum in PBS for 30 min. The technique can be started at this point but with less sensitivity. Time may be increased (although some have suggested that 5 min is adequate).
Wash as before (some workers recommend adding 0.1-1% bovine serum albumin and/or gelatine to the wash at this stage).
Grids may be dried and stored at this stage for later use.
Place grid on a drop of the specimen for a further 30 min. Time may be increased to overnight for more sensitivity.
Wash as before (final wash in dH 20)"
Stain and examine. A positive result is indicated by a higher number of virus particles attached to the grid compared with suitable controls.
The grid can be floated on a second antibody before staining (SPIEM with decoration). A positive result to the second antibody is indicated by a halo around each virus particle.
Colloidal gold enhancement of IEM techniques
Identification of the immune reaction can be enhanced by labeling antibody molecules with electron dense markers. Such markers include ferritin or colloidal gold (which is avail- able in a variety of well defined sizes). Although the primary antibody may be labeled, it is more usual, and more efficient, for a secondary anti- immunoglobulin to be labeled. Alternatively a cell wall component of S. aureus, protein A, which reacts with the Fc part of IgG, may be labeled. Colloidal-gold-labeled antisera (GLA) or protein A (PAG) may be used in the various protocols described above to enhance the visualization of the virus/antibody reaction.
With the classical technique add GLA or PAG to reaction mixture for 10 min to 1 h after initial incubation, then proceed with the centrifugation or agar technique.
With SPIEM use GLA as secondary antibody.
100 Chap te r 5

Thin sect ion techn iques
Thin section techniques While negative staining techniques provide the resolution necessary to study viral morphol- ogy, the many interactions between viruses and cells (adsorption, uptake, morphogen- esis, release) are best studied by thin section methods. In addition, viruses which do not demonstrate a well defined structure by nega- tive staining are often more readily studied in thin section (for example rubella virus or the Retroviridae). The following basic methodology should prove adequate for most situations. Not included are techniques involving ultra- thin cryosections.
Sample preparation Tissue samples should be immersed in fixative and chopped with a scalpel or razor blade into cubes approximately 1 mm thick. Cell suspen- sions should be centrifuged gently (500 g for 10 min). The resultant pellet, if handled care- fully, may be teased into 1 mm 3 'blocks' and treated as tissue. (Fixation will stabilize the cell pellet, especially if there was protein in the tissue culture medium.) Small pellets can be retained in centrifuge tubes and embedded in situ. A suitable cell pellet can also be formed with a haematocrit centrifuge.
Fixation, dehydration and embedding
Carry out primary fixation in 2.5% glutaraldehyde in phosphate buffer (pH 7.2) for 60 min.
Wash in PBS (three washes of 10 min each) and then post fix in 1% osmium tetroxide in PBS for 60 min.
Wash with three changes of dH20 (10 min each).
Dehydrate in an ethanol series of 50%, 75%, 95%, 100%, 100%, each stage for 15 min.
Following 10 min in propylene oxide, infiltrate with resin/propylene oxide mixtures of 1:1 for 1 h followed by three changes in neat resin for 1 h each. Note that a variable speed rotator assists greatly in infiltration of specimi~ns with resin. Blocks of tissue will sink when fully impregnated.
Place in capsules/trays with fresh resin, label.
Polymerize at 60 ~ for 24 h.
Trim block and cut sections.
Modifications to the above procedure
A variety of fixative formulations have been employed. For example some workers recommend the use of 0.2 M cacodylate buffer for glutaraldehyde fixation and 0.2 M cacodylate, s-collidine, or veronal acetate buffers may be used with OsO4. Other commonly used primary fixatives include glutaraldehyde/ formaldehyde, glutaraldehyde/ formaldehyde/acrolein, and glutaraldehyde/osmium tetroxide mixtures.
Treatment of tissue with 1% tannic acid in cacodylate buffer for 15-45 min prior to postfixation can both improve fixation quality and enhance electron contrast, especially of viral surface projections. The use of phosphate buffers is not recommended for this procedure and tissues should be washed (2 x 30 min)in cacodylate buffer prior to tannic acid treatment. A post treatment wash in 1%
Electron m i c roscopy 101

Virology methods manual
sodium sulphate (5 min)is often employed. Tannic acid treatment may also be employed post-OsO4 fixation.
Tissue may be stained with 0.5% uranyl acetate prior to dehydration (from 15 min to several hours) or with 2% uranyl acetate in the first (50% ethanol) dehydration step from 15 min to 1 h.
Dehydration may also be carried out by using acetone or by immersing the samples in 2,2-dimethoxypropane (DMP) for 2 x 15 min. (But note that block staining with uranyl acetate cannot be used with DMR)
Infiltration times may be shortened with the use of low viscosity resins. For example, infiltration with Spurr's resin may be accomplished within 30 min and the resin will cure in 2-8 h at 70~
Sectioning A full description of sectioning techniques is outside the remit of this chapter, indeed, the methodology can only really be learnt from an experienced microscopist. Briefly, the cured resin block is trimmed to reveal the embedded sample. Semi-thin sections are cut to establish specimen orientation and mor- phology, and the block re-trimmed as neces- sary (to a surface area of approximately 1 mm2). Ultrathin sections are cut with dia- mond, sapphire, or glass knives, and the sec- tions are stained and examined.
Staining Contrast is enhanced by staining sections. The commonest staining protocols utilize double staining with a uranyl salt followed by a lead salt. Staining is best performed on drops of stain placed on dental wax or parafilm in a small petri dish. Placing several NaOH pellets in the dish will ensure a CO2-free environment
which will avoid contamination of lead stains. A suitable schedule follows:
Filter or centrifuge all stains before use.
Place grid (with sections) face down on a drop of 1% uranyl acetate in single distilled water for 2 min.
Wash with 20 drops of single distilled water (boiled to remove C02).
Place grid face down on a drop of lead citrate (e.g. Reynold's) for 4-6 min. Dilution of the stain may be necessary to avoid overstaining.
Wash with 20 drops of boiled single distilled water. A first wash in 0.02 N NaOH assists in preventing contamination.
A double lead staining protocol of lead citrate (up to 10 min), uranyl acetate (up to 60 min), lead citrate (up to 30 min) has been recommended for poorly staining sections.
Immune EM As with negative staining techniques, the visualization of the immune reaction is widely used for the detection of virus particles and antigens, and is of particular use in determin- ing stages of viral morphogenesis. Both gold and ferritin labeled markers may be employed. In addition, enzyme labeled markers may be detected by visualizing the reaction product. There are two basic techniques, labeling either before or after embedding procedures.
Labeling prior to embedding
Surface antigens may be labeled prior to fixa- tion and embedding (although a brief, mild fixation may assist in stabilizing antigens). The
102 Chapter 5

Thin section techniques
following protocol is for cells in suspension tissue culture.
Prefix in 0.5% glutaraldehyde for 5- 10 min (not essential).
Wash cells in PBS.
Add a suitable dilution of primary antibody in PBS for 30 min.
Wash three times in PBS.
Add a suitable dilution of gold-labeled conjugate for 30 min. Gold labeled protein A can be used.
Wash in PBS.
Fix and embed as described above.
Post embedding labeling
Internal antigens are best detected by staining sections. However fixation and embedding techniques must be adjusted to retain antige- nicity. The following technique is recom- mended.
Prepare formaldehyde freshly from paraformaldehyde.
Fix in 3% formaldehyde/0.1% glutaraldehyde in PBS for 30 min.
Wash in PBS.
Embed in LR White resin. Infiltration
schedule is: 75% ethanol/resin 3:1, 60 min; 100% resin, 60 min; 100% resin, 12h.
Polymerize at 55~ for 24 h.
Cut sections. Collect on carbon coated plastic films (nickel grids are recommended).
Float on a drop of 1% BSA in PBS (PBSA) for 2 h to overnight (1% non-fat dried milk or 1% bacitracin in PBS may be used).
Float on a drop of antibody in PBSA for 2h.
Float on PBSA for 10 min (x3).
Float on PAG for 1 h (GLA may also be used).
Wash with PBSA (x3) then dH20.
Stain with uranyl acetate and lead citrate and examine. Note that post-fixation with 2.5% glutaraldehyde, washing with dH20, and staining with 1.8% uranyl acetate containing 0.2% methylcellulose has also been recommended. Note also that, for visualization of gold particles, overstaining at this stage must be avoided.
Lowicryl resins may also be used. Their advan- tage is that tissues may be embedded at low temperatures ( - 30~
Electron microscopy 103
Viro logy me thods manual
Photography Photographic techniques are an essential aspect of EM. Although specific details are impossible to give, the following general recommendations should be considered.
Micrograph quality is a function of: negative size (the larger the negative, the less the enlar- gement required), emulsion type (must be fine grain and provide sufficient contrast), develop- ment (timing and temperature are vital for con- sistency), fixation and washing (if not
performed correctly negatives will deterio- rate), and enlargement procedures (the use of a point light source, condenser enlarger and glossy paper will increase print contrast). The use of poly-contrast paper, coupled with a print processor is most useful, however many electron microscopists prefer hand-produced prints, especially for publication purposes. The production of prints by non-electron micros- copists should be discouraged.
104 Chapter 5

Scanning EM (SEM)
Scan n ing EM (S EM) Although available for some time, SEM has only recently been recognized as an effective technique for visualizing viruses budding from cell membranes. Of the many methods pub- lished, the following has produced some excellent results.
The technique requires the use of poly-L- lysine coated coverslips. These are prepared by floating coverslips on poly-L- lysine (1 mg m1-1 in dH20) for 10 min and air drying.
Pellet ceils gently (500 g for 5-10 min), resuspend in a small volume of medium.
Flood a poly-L-lysine coated coverslip with cells, leave for 5 min (note that cells may be grown on coverslips and fixed in situ).
Fix in 2.5% glutaraldehyde in isotonic cacodylate buffer (pH 7.4) for 1 h at 37~ and overnight at 4~
Processing is best performed in a
continuous flow apparatus to avoid drying artifacts.
Wash in PBS.
Post-fix in 1% Os04 in isotonic cacodylate buffer (pH 7.4) for 1 h. Treatment with 1-5% tannic acid in dH20 for 30 min followed by a further post- fixation in 1% Os04 for 30 miri has also been recommended.
Dehydrate rapidly in ethanol (25%, 50%, 75 %, 100 %, 100 %; 1-2 min each stage).
Critical point dry in CO2 following the manufacturer's instructions. Air drying has been used but with considerable shrinkage.
Mount coverslip on a specimen stub.
Sputter coat with gold/palladium (5 nm) (again following the manufacturer's instructions).
Examine.
Electron m ic roscopy 105
Virology methods manual
Bibliography Madeley CR, Field AM (1988) Virus Morphology (2nd
Ed.) Churchill Livingstone. Nermut MV, Steven AC (Eds.) (1987) Animal Virus
Structure, Elsevier Science, New York. Doane FW, Anderson N (1987) Electron Microscopy
in Diagnostic Virology. A Practical Guide and Atlas. Cambridge University Press.
Hayat MA (Ed.) Principles and Techniques of Elec- tron Microscopy. Van Nostrand Reinhold.
Glauert AM (Ed.) Practical Methods in Electron Microscopy, Volume 3 part 1: Fixation, Dehydra- tion and Embedding of Biological Specimens (Giauert AM); Part 2: Ultramicrotomy (Reid N);
Volume 5: Staining Methods for Sectioned Mat- erial (Lewis PR and Knight DP); Volume 6 part 1: Autoradiography and Immunochemistry (Williams MA); Volume 10: Low Temperature Methods in Biological Electronmicroscopy (Robards AW and Sletyr UB); Volume 13: Sectioning and Cryosec- tioning for Electron Microscopy (Reid N and Beesley JE). American Elsevier Publishing Com- pany, New York, USA.
Bozzola JJ, Russell LD (1992) Electron Microscopy: principles and techniques for biologists. Jones and Barttell, Boston, USA.
106 Chapter 5


![Ultrafast transmission electron microscopy using a laser ...transmission electron microscopy [4], scanning electron microscopy [5], x-ray diffraction [6], scanning tunneling and atomic](https://static.fdocuments.us/doc/165x107/607eb1335ce8082131294459/ultrafast-transmission-electron-microscopy-using-a-laser-transmission-electron.jpg)


