4 Burner Hotplate Barbeque Operating Instructions Product ...
20
Questions, problems, missing parts? Before returning to the retailer, please call your Barbeques Galore customer service department at 1800 978 555 for after sales service and support. • This instruction manual contains important information necessary for the proper assembly and safe use of the appliance. • Read and follow all warnings and instructions before assembling and using the appliance. • Keep this manual for future reference. FOR OUTDOOR USE ONLY. NOT FOR COMMERCIAL USE. Part Number: 19000791A0 4 Burner Hotplate Barbeque Operating Instructions Product Code: G4NEX Model Number: 720-0786D (See also Assembly Instructions Manual)
Transcript of 4 Burner Hotplate Barbeque Operating Instructions Product ...

Questions, problems, missing parts? Before returning to the retailer, please call your Barbeques
Galore customer service department at 1800 978 555 for after sales service and support.
• This instruction manual contains important information necessary for the
proper assembly and safe use of the appliance.
• Read and follow all warnings and instructions before assembling and
using the appliance.
• Keep this manual for future reference.
FOR OUTDOOR USE ONLY. NOT FOR COMMERCIAL USE.
Part Number: 19000791A0
4 Burner Hotplate Barbeque
Operating Instructions
Product Code: G4NEX
Model Number: 720-0786D(See also Assembly Instructions
Manual)
Care and Maintenance . . . . . . . . . . . . . . . . . . . 12
Troubleshooting . . . . . . . . . . . . . . . . . . . . . . . . 13
Ordering Parts . . . . . . . . . . . . . . . . . . . . . . . . . 14
Cooking Chart . . . . . . . . . . . . . . . . . . . . . . . 15
Recipe Suggestion . . . . . . . . . . . . . . . . . . 17
Warranty And Consumer Guarantee . . . . . . . . 18
Exploded View . . . . . . . . . . . . . . . . . . . . . . . . . 19
Parts List . . . . . . . . . . . . . . . . . . . . . . . . . . . . . . 20
Safety Instruction . . . . . . . . . . . . . . . . . . . . . . . . 3
Gas Hook–Up . . . . . . . . . . . . . . . . . . . . . . . . . . . 8
Installer Final Check List. . . . . . . . . . . . . . . . . . . 8
Leak Testing . . . . . . . . . . . . . . . . . . . . . . . . . . . . 9
Seasoning Your Hotplate . . . . . . . . . . . . . . . . . .10
Operation Instruction . . . . . . . . . . . . . . . . . . . . . 10
Lighting Instruction . . . . . . . . . . . . . . . . . . . . . . 10
Component Identification . . . . . . . . . . . . . . . . . 11
Table of Contents
2

Failure to comply with these instructions could result in a fire or explosion that could
cause serious bodily injury, death, or property damage.
Your barbeque will be very hot. Never lean over the cooking area while using your
barbeque. Do not touch cooking surfaces, firebox or any other parts while the barbeque is
in operation, or until the barbeque has cooled down after use.
DANGER
If you smell gas:
• Shut off gas to the appliance.
• Extinguish any open flame.
• If odour continues, keep away from the
appliance and immediately call your
gas supplier or your fire department.
WARNING
1. Do not store or use gasoline or other
flammable liquids or vapours in the
vicinity of this or any other appliance.
2. An LP cylinder not connected for use
with the appliance shall not be stored in
the vicinity of this or any other
appliance.
DANGER
1. Remove all packaging, including straps, before using the hotplate barbeque.
2. Never operate this appliance unattended.
3. Never operate this appliance within 3.05 m / 10 ft. of any structure, combustible material or
other gas cylinder.
4. Never operate this appliance within 7.62 m / 25 ft. of any flammable liquid.
5. Do not fill cooking vessels used beyond the maximum fill line.
6. Heated liquids remain at scalding temperatures long after the cooking process. Never
touch cooking appliance until liquids have cooled to 46 ºC / 115 ºF or less.
7. This appliance is not intended for and should never be used as a heater.
8. If a fire should occur, keep away from the appliance and immediately call your fire
department. Do not attempt to extinguish an oil or grease fire with water.
Safety Instruction
3

CAUTION: Beware of Flashback
CERTIFIED IN ACCORDANCE WITH AS 5263.0-2013 &
AS/NZS 5263.1.7-2016; Australian Standard® Domestic
Outdoor Gas Barbecues.
THIS APPLIANCE IS FOR OUTDOOR USE ONLY.
WARNING
Do not try lighting this appliance without reading the
“LIGHTING INSTRUCTIONS” section of this manual.CAUTION: Spiders and small insects occasionally
spin webs or make nests in the
burner tubes during transit and
warehousing. These webs can lead
to gas flow obstruction, which could
result in a fire in and around burner
tubes. This type of fire is known as
“FLASH-BACK” and can cause serious damage to your
barbeque and create an unsafe operating condition for the
user.
Although an obstructed burner tube is not the only cause of
“FLASH-BACK”, it is the most common cause.
To reduce the chance of “FLASH-BACK”, you must clean
the burner tubes before assembling your barbeque, and at
least once a month in late summer or early fall when
spiders are most active. Also perform this burner tube
cleaning procedure if your barbeque has not been used for
an extended period of time. A clogged tube can be lead to
a fire beneath the barbeque.
Installation Codes
This installation must conform with all local codes and
ordinances and the installation must conform with code AS
5601/AG 601.
Correct LP Gas Tank Use
LP gas barbeque models are designed for use with a
standard 9 kg LP gas cylinder (gas cylinder not supplied).
Never connect your gas barbeque to an LP gas cylinder
that exceeds this capacity.
NOTE: The normal flow of gas through the regulator and
hose assembly can create a humming noise. A low volume
of noise is perfectly normal and will not interfere with
operation of the barbeque.
Visually check the burner flames prior to each use. The
flames should look like this picture, with flame size each at
2.54 cm / 1 inch in height. If they do not, refer to the burner
maintenace part of this manual.
4

305 mm
/ 12 in.
47
0 m
m
/ 18
.5 in
.
• DO NOT install this unit into combustible enclosures.
Minimum clearance from sides and back of unit to
combustible construction, 91.44 cm / 36 in. from sides
and 91.44 cm / 36 in. from back.
• DO NOT use this appliance under overhead combustible
surfaces. This outdoor cooking gas appliance is not
intended to be installed in or on recreational vehicles
and/or boats.
• LP gas cylinders must be stored outdoors in a
well-ventilated area and out of reach of children.
Disconnected LP gas cylinders must not be stored in a
building, garage or any other enclosed area.
• DO NOT obstruct the flow of ventilation air around the
firebox. Only use the regulator and the hose assembly
supplied with your gas barbeque. Replacement
regulators and hose assemblies must be those specified
in this manual.
• The regulator and hose assembly must be inspected
before each use of the barbeque. If there is excessive
abrasion or wear or if the hose is cut, it must be
replaced prior to the barbeque being put into operation.
The replacement hose assembly shall be that specified
by the manufacturer.
• Only the pressure regulator and hose assembly supplied
with this outdoor cooking gas appliance must be used.
Never substitute other types of regulator. Contact
customer service for manufacturer specified
replacement parts.
• This outdoor cooking gas appliance is equipped with a
pressure regulator compliant with standard
AS 4621-2004.
• Do not use charcoal or briquettes of any kind in the
barbeque.
• The barbeque is designed for optimum performance
without the use of charcoal or briquettes. Do not place
charcoal or briquettes on the flame tamer as this will
block off the air for the burners. Adding charcoal or
briquettes will damage ignition components and knobs,
and void the warranty.
• Keep the back and side cart free and clear from debris.
• Keep any electrical supply cord, or the rotisserie motor
cord away from the heated areas of the barbeque.
• Never use the barbeque in extremely windy conditions.
If located in a consistently windy area (oceanfront,
mountaintop, etc.) a windbreak will be required. Always
adhere to the specified clearance.
• Never use a dented or rusty propane cylinder.
• Keep any electrical supply cord and the fuel supply hose
away from any heated surface.
• While lighting, keep your face and hands as far away
from the barbeque as possible. Tie back long hair and
loose clothing.
• Burner adjustment should only be performed after the
burners have cooled.
WARNING
Your barbeque will get very hot. Never lean over the
cooking area while using your barbeque. Do not touch
cooking surfaces, housing, lid or any other barbeque parts
while the barbeque is in operation, or until the gas
barbeque has cooled down after use.
Failure to comply with these instructions may result in
serious bodily injury.
5
LP-Gas Supply System
• If the information is not followed
exactly, a fire resulting in death
or serious injury could occur.
• A 9 kg gas cylinder of approximately
305 mm / 12 in diameter by
470 mm / 18.5 in high is the maximum size LP gas
cylinder to use.
• Ensure that a 100% propane (LPG) refillable gas
cylinder currently certified to Australian Standard
AS2030.1:2009 is used. Do not use disposable gas
cylinders.
• The gas cylinder supply system must be arranged for
vapour withdrawal.
• The LP gas cylinder used must have a collar to protect
the valve.
• Place dust cap on cylinder valve outlet whenever the
cylinder is not in use. Only install the type of dust cap on
the cylinder valve outlet that is provided with the cylinder
valve. Other types of cap or plugs may result in leakage
of propane.
• Never connect an unregulated LP gas cylinder to your
gas barbeque.
• This outdoor cooking gas appliance is equipped with a
high capacity hose/regulator assembly for connection to
a standard 9 kg liquid propane cylinder.
• Have your LP gas cylinder filled by a reputable propane
gas dealer and visually inspected and checked at each
filling.
• Do not store a spare LP gas cylinder under or near this
appliance.
• Never fill the cylinder beyond 80 percent capacity.
• Do not spray aerosols in the vicinity of this appliance
while it is in operation.
• Do not use or store flammable materials in or near this
appliance .
• Do not place articles on or against this appliance.
• Do not modify this appliance.
• Always keep LP gas cylinders in an upright position.
• Do not store or use gasoline or other flammable vapours
and liquids in the vicinity of this or any other appliance.
• Storage of an outdoor cooking gas appliance indoors is
permissible only if the cylinder is disconnected and
removed from the outdoor cooking gas appliance.
• When your gas barbeque is not in use the gas must be
turned off at LP gas cylinder.
Proper Placement And Clearance Of barbeque
• Never use your gas barbeque in a garage, porch, shed,
breezeway or any other enclosed area. Your gas
barbeque is to be used outdoors only.

WARNING
Keep a spray bottle of soapy water near the gas supply
valve and check the connections before each use.
DO NOT USE ALUMINUM FOIL TO LINE THE COOKING
RACKS OR FIREBOX BASE.
This can severely upset combustion airflow or trap
excessive heat in the control area.
SAFETY PRACTICES TO AVOID PERSONAL INJURY
When properly cared for your barbeque will provide safe,
reliable service for many years. However, extreme care must
be used as the barbeque produces intense heat that can
increase accident potential. When using this appliance basic
safety practices must be followed, including the following:
Do not repair or replace any part of the barbeque unless
specifically recommended in this manual. All other service
should be referred to a qualified technician.
This barbeque is not intended to be installed in or on
recreational vehicles or boats.
Children or the infirm should not be left alone or unattended
in an area where the barbeque is being used. Do not allow
them to sit, stand or play in or around the barbeque at any
time.
Do not store items of interest to children around or below the
barbeque.
Do not permit clothing, pot holders or other flammable
materials to come in contact with or too close to any
barbeque, hot plate, burner, or hot surface until it has cooled.
The fabric could ignite and cause personal injury.
For personal safety, wear proper apparel. Loose fitting
garments or sleeves should never be worn while using this
appliance. Some synthetic fabrics are highly flammable and
should not be worn while cooking.
Only special types of glass, heat-proof glass ceramic,
earthenware, or other glazed utensils are suitable for
barbeque use. These materials may break with sudden
temperature changes. Use only on low or medium heat
settings in accordance with the manufacturer’s guidelines.
Do not heat unopened food containers. A build-up of
pressure may cause the containers to burst.
When lighting a burner, pay close attention to what you are
doing. Make certain you are aware of which burner you are
lighting so your body and clothing remain clear of open
flames.
WARNING
This outdoor cooking gas appliance is not intended to be
installed in or on boats, or other recreational vehicles.
When using the barbeque, do not touch the cooking surfaces,
flame tamer or immediate surroundings as these areas
become extremely hot and could cause burns. Use only dry
potholders. Moist or damp potholders on hot surfaces may
cause steam burns. Do not use a towel or bulky cloth in
place or potholders. Do not allow potholders to touch hot
portions of the barbeque.
Grease is flammable. Let hot grease cool to room
temperature before attempting to handle it. Do not allow
grease deposits to collect in the grease tray at the bottom of
the barbeque’s firebox. Clean the grease tray after each use.
Do not use aluminum foil to line the hotplate or firebox base.
This can severely upset combustion air flow or trap
excessive heat in the control area.
For proper lighting and performance of the burners keep the
burner ports clean. It is necessary to clean them periodically
for optimum performance. The burners will only operate in
one position and must be mounted correctly for safe
operation.
Clean the barbeque with caution. To avoid steam burns, do
not use a wet sponge or cloth to clean the barbeque while it
is hot. Some cleaners produce toxic fumes or can ignite if
applied to a hot surface.
Turn off barbeque controls and make certain the barbeque is
cool before using any type of aerosol cleaner on or around
the barbeque. The chemical that produces the spraying
action could, in the presence of heat, ignite or cause metal
parts to corrode.
Do not operate the barbeque under unprotected combustible
constructions. Use only in well ventilated areas. Do not use
in buildings, garages, sheds, breezeways or other such
enclosed areas.
Keep the area surrounding the barbeque free from
combustible materials including, fluids, trash, and vapours
such as gasoline or charcoal lighter fluid. Do not obstruct the
flow of combustion and ventilation air.
NEVER CONNECT AN UNREGULATED GAS SUPPLY
LINE TO THE APPLIANCE. USE THE REGULATOR/HOSE
ASSEMBLY SUPPLIED.
This is a liquid propane configured barbeque. Do not attempt
to use a natural gas supply with this barbeque.
Gas consumption (per hour) of this gas barbeque:
Main burner (each) 16.00 MJ/h
Total 64.00 MJ/h
6
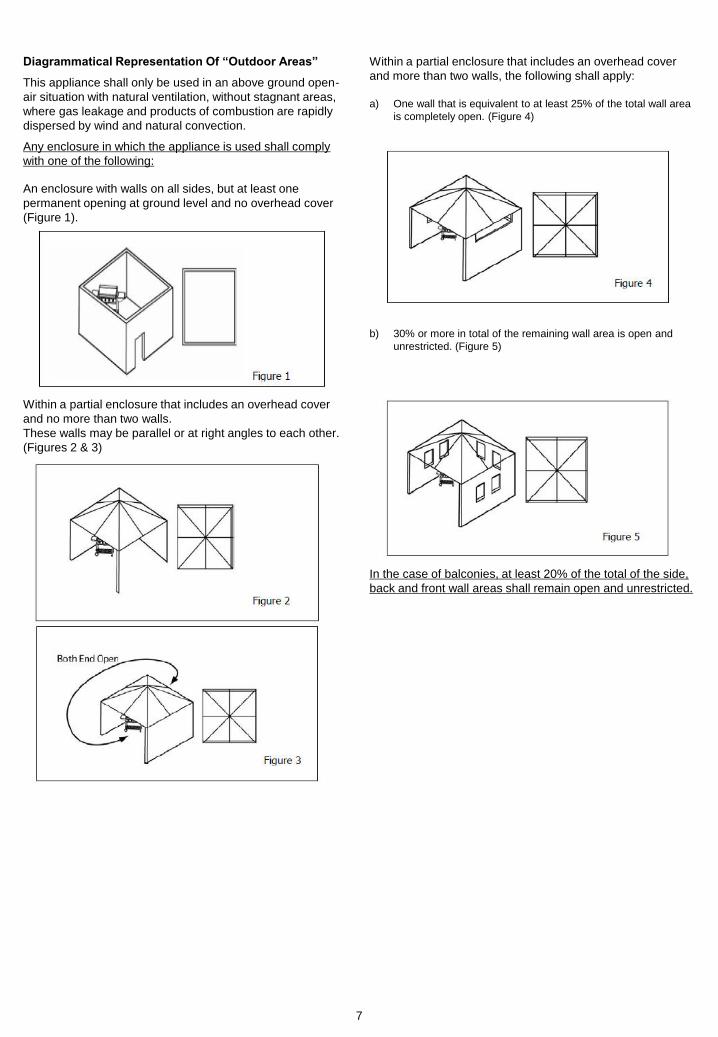
Within a partial enclosure that includes an overhead cover
and more than two walls, the following shall apply:
a) One wall that is equivalent to at least 25% of the total wall area
is completely open. (Figure 4)
b) 30% or more in total of the remaining wall area is open and
unrestricted. (Figure 5)
In the case of balconies, at least 20% of the total of the side,
back and front wall areas shall remain open and unrestricted.
Diagrammatical Representation Of “Outdoor Areas”
This appliance shall only be used in an above ground open-
air situation with natural ventilation, without stagnant areas,
where gas leakage and products of combustion are rapidly
dispersed by wind and natural convection.
Any enclosure in which the appliance is used shall comply
with one of the following:
An enclosure with walls on all sides, but at least one
permanent opening at ground level and no overhead cover
(Figure 1).
Within a partial enclosure that includes an overhead cover
and no more than two walls.
These walls may be parallel or at right angles to each other.
(Figures 2 & 3)
7
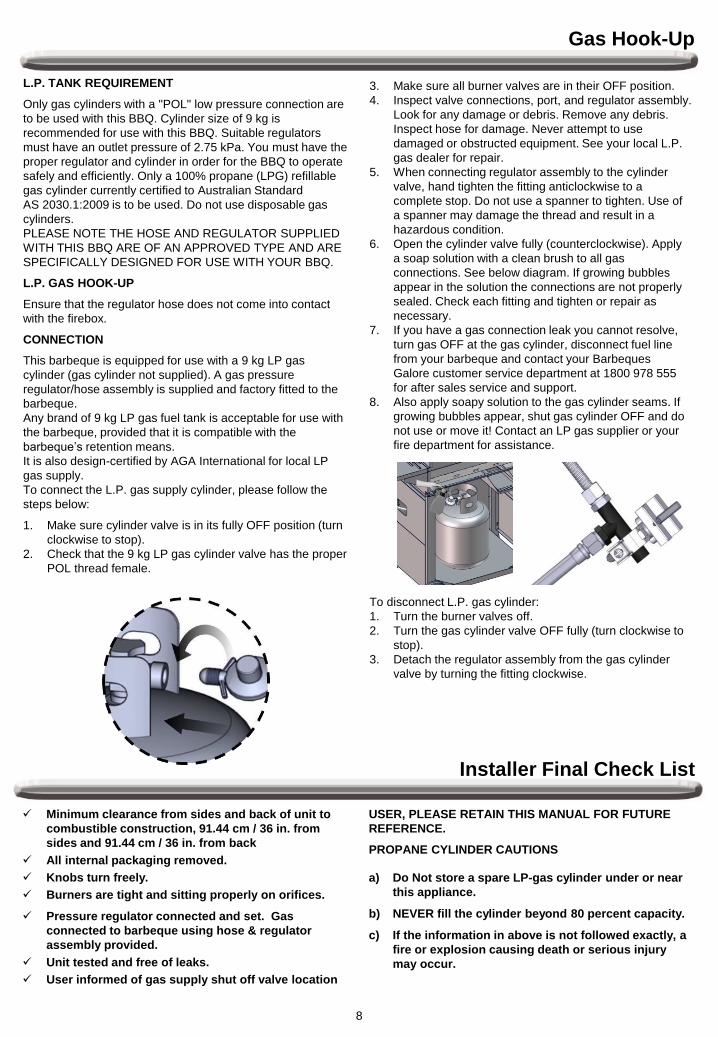
L.P. TANK REQUIREMENT
Only gas cylinders with a "POL" low pressure connection are
to be used with this BBQ. Cylinder size of 9 kg is
recommended for use with this BBQ. Suitable regulators
must have an outlet pressure of 2.75 kPa. You must have the
proper regulator and cylinder in order for the BBQ to operate
safely and efficiently. Only a 100% propane (LPG) refillable
gas cylinder currently certified to Australian Standard
AS 2030.1:2009 is to be used. Do not use disposable gas
cylinders.
PLEASE NOTE THE HOSE AND REGULATOR SUPPLIED
WITH THIS BBQ ARE OF AN APPROVED TYPE AND ARE
SPECIFICALLY DESIGNED FOR USE WITH YOUR BBQ.
L.P. GAS HOOK-UP
Ensure that the regulator hose does not come into contact
with the firebox.
CONNECTION
This barbeque is equipped for use with a 9 kg LP gas
cylinder (gas cylinder not supplied). A gas pressure
regulator/hose assembly is supplied and factory fitted to the
barbeque.
Any brand of 9 kg LP gas fuel tank is acceptable for use with
the barbeque, provided that it is compatible with the
barbeque’s retention means.
It is also design-certified by AGA International for local LP
gas supply.
To connect the L.P. gas supply cylinder, please follow the
steps below:
1. Make sure cylinder valve is in its fully OFF position (turn
clockwise to stop).
2. Check that the 9 kg LP gas cylinder valve has the proper
POL thread female.
3. Make sure all burner valves are in their OFF position.
4. Inspect valve connections, port, and regulator assembly.
Look for any damage or debris. Remove any debris.
Inspect hose for damage. Never attempt to use
damaged or obstructed equipment. See your local L.P.
gas dealer for repair.
5. When connecting regulator assembly to the cylinder
valve, hand tighten the fitting anticlockwise to a
complete stop. Do not use a spanner to tighten. Use of
a spanner may damage the thread and result in a
hazardous condition.
6. Open the cylinder valve fully (counterclockwise). Apply
a soap solution with a clean brush to all gas
connections. See below diagram. If growing bubbles
appear in the solution the connections are not properly
sealed. Check each fitting and tighten or repair as
necessary.
7. If you have a gas connection leak you cannot resolve,
turn gas OFF at the gas cylinder, disconnect fuel line
from your barbeque and contact your Barbeques
Galore customer service department at 1800 978 555
for after sales service and support.
8. Also apply soapy solution to the gas cylinder seams. If
growing bubbles appear, shut gas cylinder OFF and do
not use or move it! Contact an LP gas supplier or your
fire department for assistance.
To disconnect L.P. gas cylinder:
1. Turn the burner valves off.
2. Turn the gas cylinder valve OFF fully (turn clockwise to
stop).
3. Detach the regulator assembly from the gas cylinder
valve by turning the fitting clockwise.
Installer Final Check List
USER, PLEASE RETAIN THIS MANUAL FOR FUTURE
REFERENCE.
PROPANE CYLINDER CAUTIONS
a) Do Not store a spare LP-gas cylinder under or near
this appliance.
b) NEVER fill the cylinder beyond 80 percent capacity.
c) If the information in above is not followed exactly, a
fire or explosion causing death or serious injury
may occur.
✓ Minimum clearance from sides and back of unit to
combustible construction, 91.44 cm / 36 in. from
sides and 91.44 cm / 36 in. from back
✓ All internal packaging removed.
✓ Knobs turn freely.
✓ Burners are tight and sitting properly on orifices.
✓ Pressure regulator connected and set. Gas
connected to barbeque using hose & regulator
assembly provided.
✓ Unit tested and free of leaks.
✓ User informed of gas supply shut off valve location
Gas Hook-Up
8

GENERAL
Although all gas connections on the barbeque are leak tested
at the factory prior to shipment, a complete gas leak test
check must be performed at the installation site due to
possible mishandling in shipment, or excessive pressure
unknowingly being applied to the unit. Periodically check the
whole system for leaks following the procedures listed
below. If the smell of gas is detected at anytime, you
should immediately shut down gas supply at the cylinder
supply valve, then check the entire system for leaks.
BEFORE TESTING
Make sure that all packing material is removed from the
barbeque including tie-down straps and protective coatings.
DO NOT SMOKE WHILE LEAK TESTING.
NEVER PERFORM LEAK TEST WITH AN OPEN FLAME.
Make a soap solution of one part liquid detergent and one
part water. You will need a spray bottle, brush, or rag to
apply the solution to the fittings. For the initial leak test, make
sure the L.P. cylinder is full (to 80% capacity).
TO TEST
1. Make sure the control valves are in the “○” (OFF)
position, and turn on the gas supply.
2. Check all connections from the L.P. gas regulator and
supply valve up to and including the connection to the
manifold pipe assembly (the pipe that goes to the
burners). Soap bubbles will appear where a leak is
present.
3. If a leak is present, immediately turn off the gas supply
and tighten the leaky fittings.
4. Turn the gas back on and recheck.
5. Should the gas continue to leak from any of the fittings,
turn off the gas supply and contact your nearest
Barbeques Galore store on 1800 978 555 for after sales
service and support.
Only those parts recommended by the manufacturer should
be used on the barbeque.
Substitution will void the warranty. Do not use the barbeque
until all connections have been checked and do not leak.
GAS FLOW CHECK
Each burner is tested and adjusted at the factory prior to
shipment; however, variations in the local gas supply may
make it necessary to adjust the burners. The flames of the
burners should be visually checked.
Flames should be blue and stable with no yellow tips,
excessive noise or lifting. If any of these conditions exist,
check to see if the air shutter or burner ports are blocked by
dirt, debris, spider webs, etc. If you have any questions
regarding flame stability, please contact your local
Barbeques Galore store on 1800 978 555 for after sales
service and support.
ALWAYS CHECK FOR LEAKS AFTER EVERY L.P. GAS
CYLINDER CHANGE
Check all gas supply fittings for leaks before each use.
It is handy to keep a spray bottle of soapy water near
the shut-off valve of the gas supply line. Spray all the
fittings. Bubbles indicate leaks.
CAUTIONS
Place dust cap on cylinder valve outlet when the
cylinder is not in use. Only install the type of dust
cap on the cylinder valve outlet that is provided
with the cylinder valve. Other types of caps or
plugs may result in leakage of propane.
The gas must be turned off at the cylinder supply
valve when the unit is not in use.
If the appliance is stored indoors the cylinder
must be disconnected and removed from the
appliance. Cylinders must be stored outdoors in
a well-ventilated area out of the reach of children.
Leak Testing
9

GENERAL USE OF THE BARBEQUE
Each main burner is rated at 16.00 MJ/h. The main burners
encompass the entire cooking area. The knobs are located
on the center portion of the control panel. Each knob is
labeled on the control panel.
DO NOT LEAVE THE BARBEQUE UNATTENDED
WHILE COOKING.
WARNING: IMPORTANT!
BEFORE LIGHTING
Inspect the gas supply hose prior to turning the gas “ON”. If
there is evidence of cuts, wear, or abrasion, it must be
replaced prior to use. Do not use the barbeque if the odour
of gas is present. Only the pressure regulator and hose
assembly supplied with the unit should be used.
Never substitute regulators and hose assembly for those
supplied with the barbeque. If a replacement is necessary,
contact the manufacturer for proper replacement. The
replacement must be that specified in the manual.
TO LIGHT A BURNER
Make sure all knobs are off then turn on the gas supply from
the LP (Liquid Propane) gas cylinder. Always keep your
face and body as far from the barbeque as possible when
lighting.
To light a burner, push and turn that burner control knob
to , at the same time, press and hold in the electronic
ignition button to light the burner. Once the burner is lit,
release the electronic ignition button and knob. If the burner
does not light, turn the knob clockwise to OFF. Wait 5
minutes for any excess gas to dissipate and then retry.
WARNING
Always keep your face and body as far away from the
burner as possible when lighting.
Each burner is adjusted prior to shipment;
however, variations in the local gas supply may
make minor adjustments necessary.
Keep a spray bottle of soapy water near the gas
supply valve and check the connections before
each use.
Do not attempt to light the barbeque if odour of
gas is present. Contact your Barbeques Galore
nearest store on 1800 978 555 for after sales
service and support.
Operating Instructions
Lighting Instructions
10
USING THE BARBEQUE
Cooking requires high heat for proper browning. Most foods
are cooked at the “ ” heat setting for the entire cooking
time. However, when cooking large pieces of meat or
poultry, it may be necessary to turn the heat to the lower
setting after the initial browning. This allows the food to
cook through without burning the outside. Foods cooked for
a long time or foods basted with a sugary marinade may
need the lower heat setting near the end of the cooking time.
Seasoning Your Hotplate
IMPORTANCE OF HOTPLATE SEASONING
It is very important to maintain a seasoned hotplate surface
in order to maintain optimum performance and long life of
the unit. Seasoning your hotplate serves two purposes:
a)It prevents rust and corrosion.
b)It creates a permanent non-stick cooking surface.
Seasoning is a process that continuously improves
throughout the life of your hotplate. Proper care and
maintenance as well as seasoning after each use will result
in a better cooking experience.
FIRST TIME USE
Your hotplate comes pre-seasoned with a coating of
cooking oil to prevent corrosion and damage during the
shipping process. Before using your hotplate for the first
time, wash the top and insides of the hotplate surface with
hot, soapy water. Never use soap on your hotplate AFTER
FIRST USE. Rinse and dry completely then continue to
seasoning steps.
SEASONING YOUR HOTPLATE
1. Thoroughly clean off food residue.
2. Evenly apply a generous amount of cooking oil (flax
seed, olive, vegetable, etc.) to the hot hotplate surface.
3. Using a paper towel, carefully spread cooking oil to
entire hotplate surface.
4. Allow hotplate to cool completely before storing in a
cool, dry place.
AFTER EACH USE
To clean your hotplate following each use, gently scrape
any remaining food residue with a spatula and wipe with a
towel. To remove stuck food, pour hot water onto hotplate
surface to loosen residue or use ¼ cup of table salt to act
as an abrasive. Next, follow steps for “SEASONING YOUR
HOTPLATE”.

Main Burners
Control Knob, Label
Component Identification
11
Push In
2
3
Match Light
1. If the burner will not light after several attempts
then the burner can be match lit. Before using the
match, turn the knobs clockwise to OFF and allow 5
minutes for any accumulated gas to dissipate.
2. Clip a match on one end of the lighting rod.
3. Light match.
4. Hold lighting rod. From under the barbeque, insert
lighted match right next to the burner ports on the
designated burner.
5. Push in and turn the designated control knob
anticlockwise to .
6. Burner should ignite immediately.
NOTE: Once lit, burners can be adjusted between
HIGH and LOW settings as desired.
OFF
HIGH
LOW
Push In
2
3

CAUTION
1. Keep outdoor cooking gas appliance area clear and
free from combustible materials, gasoline and other
flammable vapours and liquids.
2. Do not obstruct the flow of combustible and ventilation
air.
3. Keep the ventilation openings of the cylinder enclosure
free and clear from debris.
Warning: If you wish to replace main burner, we
strongly recommend that you hire a professionally
trained technician to replace it. Please understand that
we will not be responsible for any liability, personal
injury, or property damage resulting from an
improperly assembled burner.
HOW TO REMOVE MAIN BURNER
Remove the main burner “R” pin on the back wall of fire box
by using needle nose pliers. Use a Phillips head screwdriver
to remove burner pin screw, then remove the burner on the
front wall of fire box, as shown below.
HOW TO REPLACE MAIN BURNER
Secure the burner pin screw. Insert the burner onto the orifice,
as shown below.
Make sure burner opening is engaged onto the orifice.
Secure the main burner on the back wall of fire box with “R”
pin.
HOTPLATE SURFACE
To clean your hotplate following each use, gently scrape any
remaining food residue with a spatula and wipe with a towel.
To remove stuck food, pour hot water onto hotplate surface to
loosen residue or use ¼ cup of table salt to act as an
abrasive. Next, follow steps for “SEASONING YOUR
HOTPLATE” on page 10.
BURNERS
Extreme care should be taken when moving a burner as it
must be correctly centered on the orifice before any attempt
is made to relight the barbeque. Frequency of cleaning will
depend on how often you use the barbeque.
BURNER CLEANING
Ensure the gas supply is off and the knobs are in the “○”
position. Make sure the appliance is cool. Clean the exterior
of the burner with a wire brush. Clear stubborn scale with a
metal scraper. Clear any clogged ports with a straightened
paper clip. Never use a wooden toothpick as it may break off
and clog the port. Please note if insects or other obstructions
are blocking the flow of gas through the burner, and if so you
will need to contact your Barbeques Galore local store on
1800 978 555 for after sales service and support.
GREASE CUP CLEANING
The grease cup should be emptied after each use and
washed with a mild detergent and warm water solution.
Check the grease cup frequently, do not allow excess grease
to accumulate and overflow out of the grease cup.
Care and Maintenance
12
†3M is a registered trademark of 3M Company.
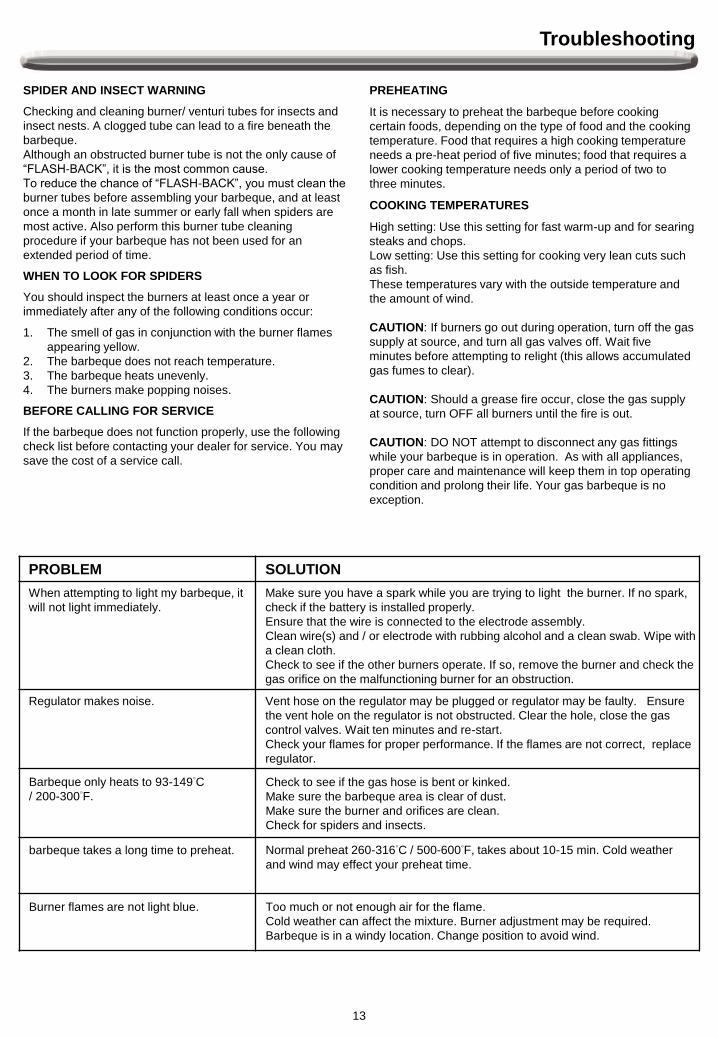
SPIDER AND INSECT WARNING
Checking and cleaning burner/ venturi tubes for insects and
insect nests. A clogged tube can lead to a fire beneath the
barbeque.
Although an obstructed burner tube is not the only cause of
“FLASH-BACK”, it is the most common cause.
To reduce the chance of “FLASH-BACK”, you must clean the
burner tubes before assembling your barbeque, and at least
once a month in late summer or early fall when spiders are
most active. Also perform this burner tube cleaning
procedure if your barbeque has not been used for an
extended period of time.
WHEN TO LOOK FOR SPIDERS
You should inspect the burners at least once a year or
immediately after any of the following conditions occur:
1. The smell of gas in conjunction with the burner flames
appearing yellow.
2. The barbeque does not reach temperature.
3. The barbeque heats unevenly.
4. The burners make popping noises.
BEFORE CALLING FOR SERVICE
If the barbeque does not function properly, use the following
check list before contacting your dealer for service. You may
save the cost of a service call.
PREHEATING
It is necessary to preheat the barbeque before cooking
certain foods, depending on the type of food and the cooking
temperature. Food that requires a high cooking temperature
needs a pre-heat period of five minutes; food that requires a
lower cooking temperature needs only a period of two to
three minutes.
COOKING TEMPERATURES
High setting: Use this setting for fast warm-up and for searing
steaks and chops.
Low setting: Use this setting for cooking very lean cuts such
as fish.
These temperatures vary with the outside temperature and
the amount of wind.
CAUTION: If burners go out during operation, turn off the gas
supply at source, and turn all gas valves off. Wait five
minutes before attempting to relight (this allows accumulated
gas fumes to clear).
CAUTION: Should a grease fire occur, close the gas supply
at source, turn OFF all burners until the fire is out.
CAUTION: DO NOT attempt to disconnect any gas fittings
while your barbeque is in operation. As with all appliances,
proper care and maintenance will keep them in top operating
condition and prolong their life. Your gas barbeque is no
exception.
PROBLEM SOLUTION
When attempting to light my barbeque, it
will not light immediately.
Make sure you have a spark while you are trying to light the burner. If no spark,
check if the battery is installed properly.
Ensure that the wire is connected to the electrode assembly.
Clean wire(s) and / or electrode with rubbing alcohol and a clean swab. Wipe with
a clean cloth.
Check to see if the other burners operate. If so, remove the burner and check the
gas orifice on the malfunctioning burner for an obstruction.
Regulator makes noise. Vent hose on the regulator may be plugged or regulator may be faulty. Ensure
the vent hole on the regulator is not obstructed. Clear the hole, close the gas
control valves. Wait ten minutes and re-start.
Check your flames for proper performance. If the flames are not correct, replace
regulator.
Barbeque only heats to 93-149°C/ 200-300°F.
Check to see if the gas hose is bent or kinked.
Make sure the barbeque area is clear of dust.
Make sure the burner and orifices are clean.
Check for spiders and insects.
barbeque takes a long time to preheat. Normal preheat 260-316°C / 500-600°F, takes about 10-15 min. Cold weather
and wind may effect your preheat time.
Burner flames are not light blue. Too much or not enough air for the flame.
Cold weather can affect the mixture. Burner adjustment may be required.
Barbeque is in a windy location. Change position to avoid wind.
Troubleshooting
13

HOW TO ORDER REPLACEMENT PARTS
To make sure you obtain the correct replacement part (s) for
your gas barbeque, please refer to the parts list on page 20.
The following information is required to assure getting the
correct part. Please note the shipping cost for the delivery of
any replacement parts will be on yourself.
• Gas barbeque model number (see data sticker on
barbeque).
• Part number of replacement part needed.
• Description of replacement part needed.
• Quantity of parts needed.
To obtain replacement parts, contact your Barbeques
Galore local store on 1800 978 555 for after sales
service and support.
IMPORTANT
Use only factory authorised parts. The use of any part
that is not factory authorised can be dangerous. This
will also void your warranty.
Keep the assembly and operating instruction manuals
for convenient referral, and for replacement parts
ordering.
The doneness of meat, whether rare, medium, or well done,
is affected to a large degree by the thickness of the cut.
Expert chefs say it is impossible to have a rare doneness
with a thin cut of meat.
The cooking time is affected by the kind of meat, the size and
shape of the cut, the temperature of the meat when cooking
begins, and the degree of doneness desired.
When defrosting meats it is recommended that it be done
overnight in the refrigerator as opposed to a microwave. This
in general yields a juicier cut of meat.
Use a spatula instead of tongs or a fork to turn the meat, as
a spatula will not puncture the meat and let the juices run out.
To get the juiciest meats, add seasoning or salt after the
cooking is finished on each side and turn the meat only once
(juices are lost when the meat is turned several times). Turn
the meat just after the juices begin to bubble to the surface.
Trim any excess fat from the meat before cooking. To
prevent steaks or chops from curling during cooking, slit the
fat around the edges at 51mm / 2-in. intervals.
DO NOT LEAVE THE BARBEQUE UNATTENDED WHILE
COOKING.
Ordering Parts
Barbeque Hints
14

FOODWEIGHT OR
THICKNESS
HEAT
SETTING
APPROXIMATE
TIME
SPECIAL INSTRUCTIONS
AND TIPS
VegetablesSlice. Dot with butter or margarine. Wrap in
heavy -duty foil. Cook, turning occasionally.
Fresh Beets
Carrots
Turnips
Medium 12 to 20 minutesCook, turning once. Brush occasionally with
melted butter or margarine.
Onion1.3mm / 1/2 in.
slicesMedium 8 to 20 minutes
Season with Italian dressing, butter, or
margarine.
Potatoes Sweet
White
Whole
170 to 226g
/ 6 to 8 oz
Medium
High
40 to 60 minutes
45 to 60 minutes
Wrap individually in heavy - duty foil. Cook,
rotating occasionally.
Frozen Asparagus
Peas Green beans
Sprouts
Medium 15 to 30 minutes
Dot with butter or margarine.
Wrap in heavy -duty foil. Cook, turning
occasionally.
French fries Medium 15 to 30 minutesPlace in aluminum foil pan.
Cook, stirring occasionally
Beef
Hamburgers
1-2 cm
/ 1/2 - 3/4 in.Medium 10 to 18 minutes
Cook, turning once when juices rise to the
surfaces.
Do not leave hamburgers unattended since a
flare-up could occur quickly. Cook to internal
temperature of 160 degrees
Tenderloin High 8 to 15 minutes
Steak
Rare2.5 cm / 1 in. High 8 to 14 minutes
Trim edges. Cook, turning onceSteak
Medium
1.3 cm / 1/2 in.
2.5 cm / 1 in.
2.5 - 3.8 cm
/ 1-1/2 in.
High
Medium
to High
11 to 18 minutes
12 to 22 minutes
16 to 27 minutes
Steak
Well – done
2.5 cm / 1 in.
2.5 - 3.8 cm
/ 1-1/2 in.
Medium
Medium
18 to 30 minutes
16 to 35 minutes
Lamb Chops
Rare
2.5 cm / 1 in.
2.5 - 3.8 cm
/ 1-1/2 in.
Medium
to
High
10 to 15 minutes
14 to 18 minutes
Trim edges. Cook, turning once.
Lamb Chops
Medium
2.5 cm / 1 in.
2.5 - 3.8 cm
/ 1-1/2 in.
Medium
to
High
13 to 20 minutes
18 to 25 minutes
Pork Chops
Medium2.5 cm / 1 in. Medium 20 to 30 minutes
Trim edges. Cook, turning once. Cook to
desired doneness.
Pork Chops
Well –done
2.5 - 3.8 cm
/ 1-1/2 in.Medium 30 to 40 minutes
Cooking Chart
15
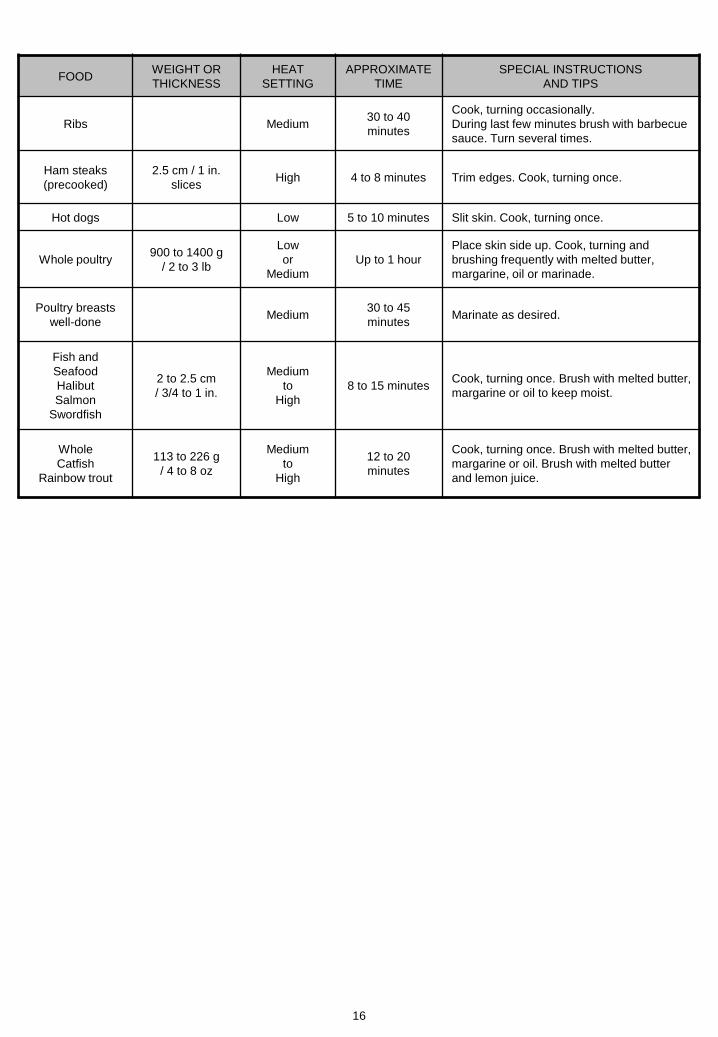
FOODWEIGHT OR
THICKNESS
HEAT
SETTING
APPROXIMATE
TIME
SPECIAL INSTRUCTIONS
AND TIPS
Ribs Medium30 to 40
minutes
Cook, turning occasionally.
During last few minutes brush with barbecue
sauce. Turn several times.
Ham steaks
(precooked)
2.5 cm / 1 in.
slicesHigh 4 to 8 minutes Trim edges. Cook, turning once.
Hot dogs Low 5 to 10 minutes Slit skin. Cook, turning once.
Whole poultry900 to 1400 g
/ 2 to 3 lb
Low
or
Medium
Up to 1 hour
Place skin side up. Cook, turning and
brushing frequently with melted butter,
margarine, oil or marinade.
Poultry breasts
well-doneMedium
30 to 45
minutesMarinate as desired.
Fish and
Seafood
Halibut
Salmon
Swordfish
2 to 2.5 cm
/ 3/4 to 1 in.
Medium
to
High
8 to 15 minutesCook, turning once. Brush with melted butter,
margarine or oil to keep moist.
Whole
Catfish
Rainbow trout
113 to 226 g
/ 4 to 8 oz
Medium
to
High
12 to 20
minutes
Cook, turning once. Brush with melted butter,
margarine or oil. Brush with melted butter
and lemon juice.
16

BBQ SALMON
2 large salmon steaks2 tbs. OilSalt & pepper50 g thin bacon slices2 tbs. Butter1 tbs. Lemon juiceSpring of parsleyLemon wedges
Preheat the BBQ. Brush the steaks with
oil and season with salt and pepper.
Place on BBQ and cook for 10 minutes,
turning steaks over halfway cooking
time.
Meanwhile, fry the bacon in a pan on
the side burner. Drain on paper towels.
Melt the butter in a small saucepan
taking care not to discolour it. Arrange
the fish and bacon on serving plates.
Pour the butter over and sprinkle with
lemon juice. Garnish with parsley
springs and lemon wedges. Serve with
boiled potatoes tossed in butter and
sprinkled with chopped parsley and a
crisp lettuce salad.
Note: Substitute catfish, halibut or cod
for salmon.
CHILI CORN
6 medium ears corn, husked3 tbs. Butter or margarine, meltedDash ground cuminDash ground coriander
Place each corn on a heavy-duty foil. In
a bowl, combine remaining ingredients.
Mix well. Brush 1-1/2 tsp. Butter
mixture over each ear. Close foil and
fold up ends to seal. Place on barbeque.
Cook, turning packets occasionally 10
to 12 minutes or until cooked through.
TANGY SEAFOOD KEBABS
1 lb. Large prawns, shelled & deveined350 g sea scallops2/3 cup chili sauce¼ cup cider vinegar
butter and sprinkled with chopped
parsley and a crisp lettuce salad
In medium bowl, combine prawns and
scallops. In small bowl combine chili
sauce and next six ingredients. Pour
over seafood. Toss to coat. Cover,
refrigerate 2 hours.
3 tbs. chopped parsley
1 tbs. vegetable oil
1 tbs. Worcestershire sauce½ tsp. prepared horseradish1 clove garlic, minced
1 550 g Can pineapple chunks in juice,
drained half hour before cooking.
Turn the burner to high. Drain seafood
reserving marinade. On each of twelve
250 cm skewers, thread 2 shrimps and
2 scallops, alternating with pineapple
chunks. Place skewers on hotplate.
Cook 7-10 minutes, often basting and
turning.
PORK CHOPS
4 Pork chops
Marinade1 large onion2 tbs. lemon juice or vinegar2 tbs. oil½ tsp. powdered mustard2 tsp. Worcestershire sauce ½ tsp. freshly ground black pepper1 tsp. sugar½ tsp. paprika1 clove garlic
Peel, grate onion, and add rest of the
ingredients except the pork chops. Mix
well. Pour over chops and marinate one
hour in a cool place. Turn the BBQ on
high. Heat 10 minutes.
BBQ the chops brushing with the
marinade occasionally. Serve with
mixed salad, dressed with vinaigrette
flavored with fresh dill.
BARBECUED LONDON BROIL
4 to 6 servings
¾ cup Italian dressing1 tsp. Worcestershire sauce1 tsp. dry mustard¼ tsp. thyme, crushed1 medium onion, sliced500 g flank steak, scored2 tbs. butter, melted
Combine first 4 ingredients, add onion
and marinade flank steak with it.
Refrigerate at least 4 hours or overnight.
Remove steak and cook on your
preheated BBQ. Cook 5 to 7 minutes
on each side basting frequently with the
marinade. In the meantime sauté
onions from the marinade in butter in a
skillet on your side burner for 3 minutes.
To serve, slice steak diagonally into
thin slices, sprinkle onions over top.
Garnish with vegetable kabobs.
VEGETABLE KEBABS
3 medium-sized zucchini
12 cherry tomatoes12 fresh mushroomsGrated Parmesan cheese
Parboil whole zucchini 5 minutes on
your side burner or until just tender.
Drain and cut into 15 mm slices.
Thread zucchini, tomatoes and
mushrooms alternately on each of six
skewers. Brush with marinade made of
Italian dressing, Worcestershire sauce,
mustard and thyme. Cook 5 to 7
minutes turning and basting
occasionally. Sprinkle liberally with
Parmesan cheese.
FAJITAS
700 g flank steak or boned chicken
breasts
2 tbs. oil
½ cup limejuice
½ tsp. salt
½ tsp. celery salt
¼ tsp. garlic powder
½ tsp. pepper
¼ tsp. oregano
¼ tsp. cumin
Flour tortillas lemon
Pound flank steak to 7 mm thickness or
flatten chicken breasts. Mix oil, lime
juice and seasonings in a zip lock bag.
Add meat and shake bag to coat the
meat. Refrigerate overnight or at least 6
to 8 hours. Wrap tortillas in foil.
Remove meat from marinade. Cook on
a preheated hotplate for 5 to 8 minutes
on each side. While meat is cooking,
heat tortillas on hotplate. Slice meat
across grain in thin slices. Place on hot
platter. Squeeze lemon juice over.
Wrap meat and any of the following
toppings in tortillas: chopped tomatoes,
guacamole, sour cream, taco sauce.
Recipe Suggestions
17
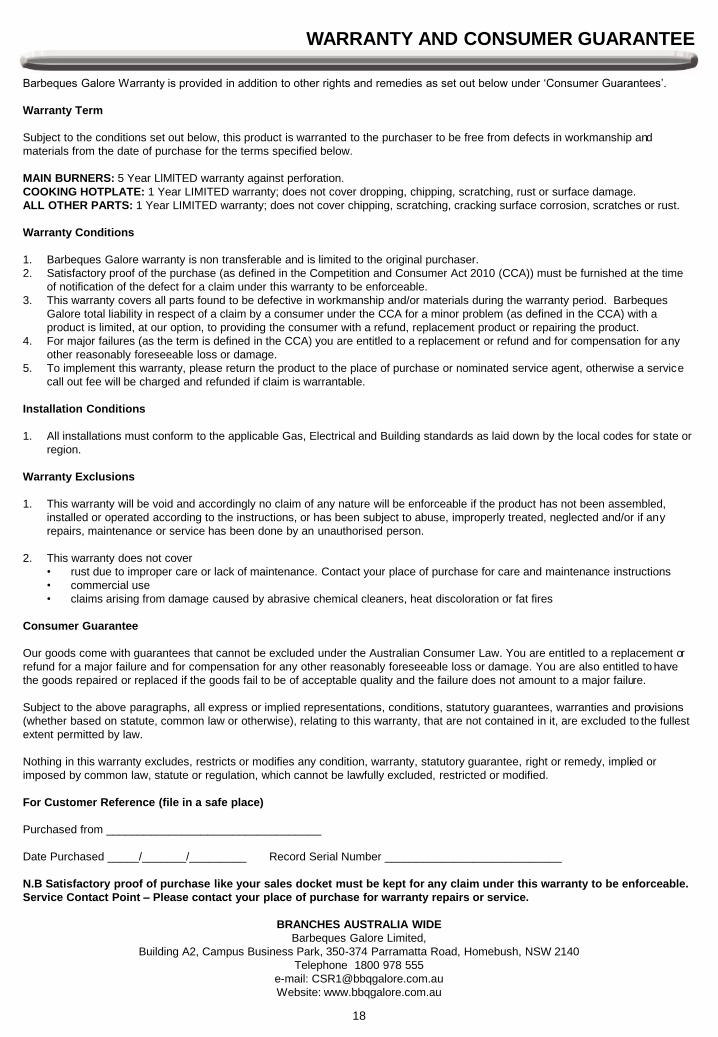
Barbeques Galore Warranty is provided in addition to other rights and remedies as set out below under ‘Consumer Guarantees’.
Warranty Term
Subject to the conditions set out below, this product is warranted to the purchaser to be free from defects in workmanship and
materials from the date of purchase for the terms specified below.
MAIN BURNERS: 5 Year LlMlTED warranty against perforation.
COOKING HOTPLATE: 1 Year LIMITED warranty; does not cover dropping, chipping, scratching, rust or surface damage.
ALL OTHER PARTS: 1 Year LIMITED warranty; does not cover chipping, scratching, cracking surface corrosion, scratches or rust.
Warranty Conditions
1. Barbeques Galore warranty is non transferable and is limited to the original purchaser.
2. Satisfactory proof of the purchase (as defined in the Competition and Consumer Act 2010 (CCA)) must be furnished at the time
of notification of the defect for a claim under this warranty to be enforceable.
3. This warranty covers all parts found to be defective in workmanship and/or materials during the warranty period. Barbeques
Galore total liability in respect of a claim by a consumer under the CCA for a minor problem (as defined in the CCA) with a
product is limited, at our option, to providing the consumer with a refund, replacement product or repairing the product.
4. For major failures (as the term is defined in the CCA) you are entitled to a replacement or refund and for compensation for any
other reasonably foreseeable loss or damage.
5. To implement this warranty, please return the product to the place of purchase or nominated service agent, otherwise a service
call out fee will be charged and refunded if claim is warrantable.
Installation Conditions
1. All installations must conform to the applicable Gas, Electrical and Building standards as laid down by the local codes for state or
region.
Warranty Exclusions
1. This warranty will be void and accordingly no claim of any nature will be enforceable if the product has not been assembled,
installed or operated according to the instructions, or has been subject to abuse, improperly treated, neglected and/or if any
repairs, maintenance or service has been done by an unauthorised person.
2. This warranty does not cover
• rust due to improper care or lack of maintenance. Contact your place of purchase for care and maintenance instructions
• commercial use
• claims arising from damage caused by abrasive chemical cleaners, heat discoloration or fat fires
Consumer Guarantee
Our goods come with guarantees that cannot be excluded under the Australian Consumer Law. You are entitled to a replacement or
refund for a major failure and for compensation for any other reasonably foreseeable loss or damage. You are also entitled to have
the goods repaired or replaced if the goods fail to be of acceptable quality and the failure does not amount to a major failure.
Subject to the above paragraphs, all express or implied representations, conditions, statutory guarantees, warranties and provisions
(whether based on statute, common law or otherwise), relating to this warranty, that are not contained in it, are excluded to the fullest
extent permitted by law.
Nothing in this warranty excludes, restricts or modifies any condition, warranty, statutory guarantee, right or remedy, implied or
imposed by common law, statute or regulation, which cannot be lawfully excluded, restricted or modified.
For Customer Reference (file in a safe place)
Purchased from __________________________________
Date Purchased _____/_______/_________ Record Serial Number ____________________________
N.B Satisfactory proof of purchase like your sales docket must be kept for any claim under this warranty to be enforceable.
Service Contact Point – Please contact your place of purchase for warranty repairs or service.
BRANCHES AUSTRALIA WIDE
Barbeques Galore Limited,
Building A2, Campus Business Park, 350-374 Parramatta Road, Homebush, NSW 2140
Telephone 1800 978 555
e-mail: [email protected]
Website: www.bbqgalore.com.au
WARRANTY AND CONSUMER GUARANTEE
18

19
Exploded View

20
Parts List
No. Part (Description) QTY IN BARBEQUE PART NUMBER QTY IN SPARE PARTS PACK
1 Griddle 1 NX720-0786D01 1
2 Flame channel 3 NX720-0786D02 3
3 Burner pin assembly 4 NX720-0786D03 4
4 Burner 4 NX720-0786D04 4
5 Burner igniter wire A 1 NX720-0786D05 1
6 Burner igniter wire B 1 NX720-0786D06 1
7 Burner igniter wire C 1 NX720-0786D07 1
8 Burner igniter wire D 1 NX720-0786D08 1
9 Grease box 1 NX720-0786D09 1
10 Firebox assembly 1 No replacable 0
11 Side shelf bracket 2 NX720-0786D10 2
12 Side handle 1 NX720-0786D11 1
13 Side shelf 2 NX720-0786D12 2
14 Gas valve 4 NX720-0786D13 4
15 Manifold 1 NX720-0786D14 1
16 LP Regulator 1 NX720-0958N20 1
17 Igniter module 1 NX720-0786D16 1
18 Igniter module heat shield bracket 1 NX720-0786D17 1
19 Control panel 1 NX720-0786D18 1
20 Bezel 4 NX720-0786D19 4
21 Control knob 4 NX720-0786D20 4
22 Cylinder fixing line 1 NX720-0786D21 1
23 Regulator hose buckle 1 NX720-0786D22 1
24 Cylinder hanger 1 NX720-0786D23 1
25 Left cart leg assembly 1 NX720-0786D24 1
26 Pin combination 4 NX720-0786D25 4
27 Cylinder hanging connecting knob 3 NX720-0786D26 3
28 Warming rack 1 NX720-0786D27 1
29 Warming rack, pivot leg bracket 1 NX720-0786D28 1
30 Frame bottom panel 1 NX720-0786D29 1
31 Right cart leg assembly 1 NX720-0786D30 1
32 Lighting rod 1 NX720-0958N53 1
33 Swivel caster with brake 2 NX720-0786D32 2
34 Caster 2 NX720-0786D33 2
35 Hardware pack 1 NX720-0786D34 1