351.183 CCTV Security 4 Cam Wireless NVR kit. User...
32
351.183 CCTV Security 4 Cam Wireless NVR kit. User Manual User Manual Handleiding Betriebsanleitung V1.0
Transcript of 351.183 CCTV Security 4 Cam Wireless NVR kit. User...

351.183 CCTV Security 4 Cam Wireless NVR kit. User Manual
User Manual
Handleiding
Betriebsanleitung
V1.0

1. Statement
Thanks for purchasing our products, please contact us for any question or requirement.
This manual is meant for the wireless network video recorder kit.
2. Safety Cautions
1. Please do not put any container with liquid on the device(like vase with water).
2. Please put the device at a ventilated place and prevent clogging the ventilation hole.
3. Please check the power voltage, to avoid any damage to device caused by wrong
voltage.
4. The NVR should work under the technical standard temperature and humidity.
5. Please place the device horizontally and keep it away from sharp pounding
environment.
6. Moisture and dust on the unit may cause short circuit, for long-term use, please
remove the dust on the unit, connector by brush periodically.
7. Battery replacement yourself is not suggested, since incorrectly operation may cause
burst. Please contact professional person for battery replacement.
8. Please install the device according to safety norms, you could take the national or
local standard as reference.
3. Package Inspection
Please check the device and all accessories according to packing list. Please contact
the distributor timely in case of any damage or lack of accessory.

4. Connection Diagram
5. Antenna Direction
Point the antenna of both camera and NVR upwards

6. Hard Drive Installation
Pre-installed 1TB HDD
7. Rear Panel Description
8. Turn on/off
Make sure the access AC voltage is stable during NVR configuration and use., then
apply power to boot up the device, the [POWER] indicator will be on. When entering the
system, it’s a normal status if the status indicator flashes.

9. Product Features & Specification
Features
4CH real-time 720P wireless P2P NVR kit.
2.4GHz wireless transmission technology.
SSID technology guarantees the safety of use.
Auto code-matching realizes convenient real P2P application.
Support HD 720P wireless IP camera.
Motion detection, email alerts.
Multiple simultaneous viewing by web browser or smartphone.
Reserved Ethernet ports for wired IP camera connection.
NVR Specification
Operating System Embedded Linux OS
Main Chip Hi3520
Audio / Video Input 4 channel bandwidth 20Mbps
Audio / Video Output HDMI 1024*768, 1336*768, 1440*900, 1920*1080
Audio / Video Output VGA 1024*768, 1336*768, 1440*900, 1920*1080
Video Playback 4channel synchro playback D1/960H/720P optional
Recoding Mode Auto/Manual/Motion Detection/Alarm
Playback Mode Multiple slow/fast playback, realtime, routine, event
Backup Mode Support HDD, USB flash driver, E-cloud storage & backup
HDD Type 1*SATA, Max.4TB
External Interface 4*LAN port (1* adaptable RJ45 10M/100M WAN port, 3* reserved LAN port for wired IP camera)
Network Protocol Upnp(play & plug), SMTP(email service), PPPoE(dial-up), DHCP(automatically obtain an IP address), etc.
Power Supply DC 12V/2A
Power Consumption <= 5W
Working Environment Temperature -10°--50°, Humidity 10%--90%
Weight 1kg

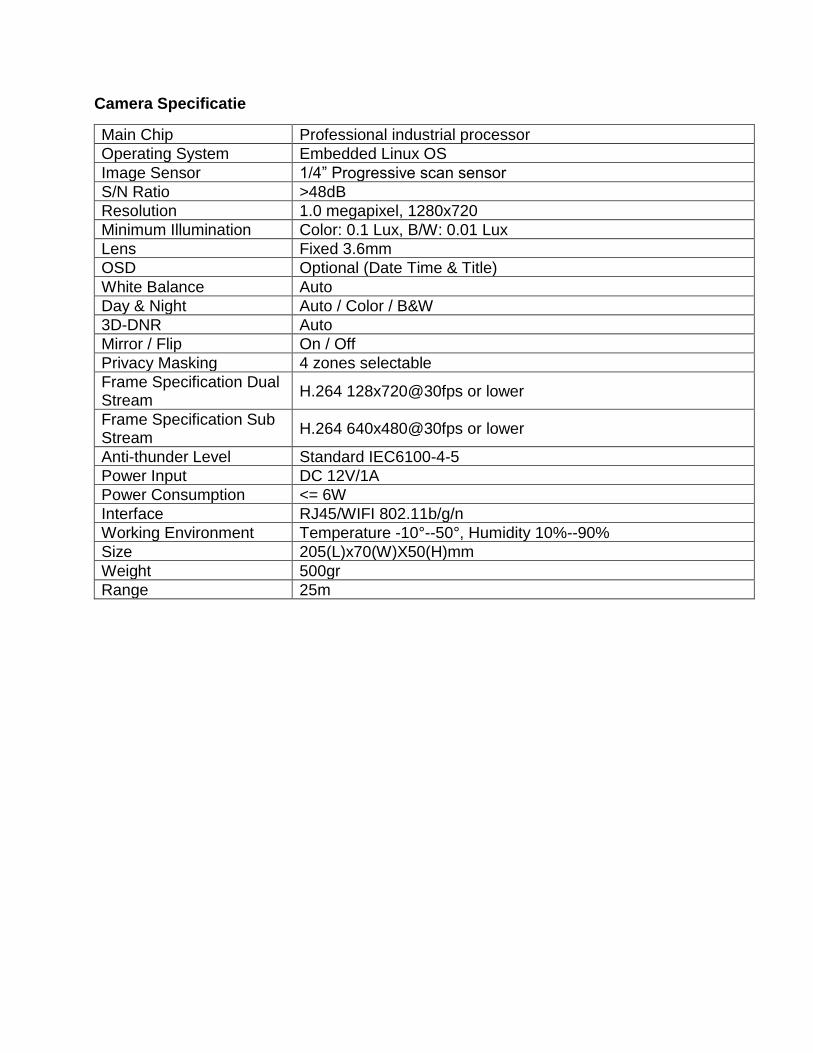
Camera Specification
Main Chip Professional industrial processor
Operating System Embedded Linux OS
Image Sensor 1/4” Progressive scan sensor
S/N Ratio >48dB
Resolution 1.0 megapixel, 1280x720
Minimum Illumination Color: 0.1 Lux, B/W: 0.01 Lux
Lens Fixed 3.6mm
OSD Optional (Date Time & Title)
White Balance Auto
Day & Night Auto / Color / B&W
3D-DNR Auto
Mirror / Flip On / Off
Privacy Masking 4 zones selectable
Frame Specification Dual Stream
H.264 128x720@30fps or lower
Frame Specification Sub Stream
H.264 640x480@30fps or lower
Anti-thunder Level Standard IEC6100-4-5
Power Input DC 12V/1A
Power Consumption <= 6W
Interface RJ45/WIFI 802.11b/g/n
Working Environment Temperature -10°--50°, Humidity 10%--90%
Size 205(L)x70(W)X50(H)mm
Weight 500gr
Range 25m

Software operation
1. Add Camera Note: Since IP cameras in NVR kit have been matched code by factory there is no need to add again. If you need to match code, please connect wireless IP camera to any of NVR LAN port and apply power, but make sure there is some channel available for camera. Steps: Right click mouse to get main menu, go to→System Setup→Channel Setup, click“ quick adding”, then it pops up “video manage” Two ways to add IP camera to NVR “Code Add” and “Auto Add”. Code add: the camera transmits video images to NVR by wifi, IP is 17.20.14.X. Auto add: the camera transmits video images to NVR by network cable, IP is 172.25.123.X.
2. Video Playback Step: Right click mouse to get main menu, go to: →Video playblack→Channel No.→Record mode →Search time (input beginning time and ending time)→click Search. Recording will come out, drag time bar→click Playback to start. Playback icon introduction:
playback previous frame
playback next frame
play
pause
fast forward x2, x4, x8

3. Video Backup Step: Right click mouse to get main menu, go to →Video backup→Channel No.→Record mode→Search time (input start time and end time)→click Search, recording will come out, then choose video→click Video backup
Support max 32GB USB-stick, recording will be stored every one hour.
4. Video Detection Step 1: Right click mouse to get main menu, go to→System setup→Record setup→ choose Motion→choose All→choose Copy to→click OK to save setting. Step 2: Choose Video detection→set sensitivity as required→choose motion→set Alarm, Bizzar or Email as required→click Copy to→click OK to save setting.

5. Generate Esee ID To generate Esee ID, the device must be connected with network and IP address should be valid in LAN. Right click mouse to get main menu, go to→System setup→Network setup. If Esee is familiar with LAN, then no need to choose DHCP which could help to get IP address automatically, but input IP address and DNS address by manually . The video recorder will generate ID via network and show the ID in menu.
If Esee is not familiar with LAN, or the video recorder is in independent network, then please choose DHCP to get available IP address. The video recorder will generate Esee ID via network automatically after it gets IP address.
6. Access in LAN Step 1: Right click mouse to get main menu, go to System setup→Network setup→ check video recorder IP address. Step 2: Access by computer in LAN, input video recorder IP address and port(no need if the port is 80) in IE browser or other browser, then it will access LAN login webpage, input Esee name and password to log in.

Step 3: Video monitoring in LAN will be obtainable when login succeed. Make sure video recorder and computer are in same network segment
7. Access in WAN Step 1: Right click mouse to get main menu, go to→System setup→Network setup →check video recorder IP address. Step 2: Access by computer in WAN, input www.e-seenet.com in IE browser or other browser. Then it will access login webpage, input ID, Esee name and password to login. Step 3: Remote video monitoring will be obtainable when login succeed. To ensure smooth remote video, the bandwidth of each channel should be 30KByte/s or above at least.
8. Android Mobile Phone Application Installation Step 1: Go to www.e-seenet.com, click Help→Software download→Android mobile application, click download to save in computer→copy it to mobile and install. Step 2: Use mobile phone to scan QR code directly, enter download page and download the application to mobile phone, then install. If mobile phone doesn’t

support QR code scan, please input www.e-seenet.com/help/download.php in mobille browser, enter download page to download and install.
9. iPhone / Android Application Installation Step 1: Go to APP store Step 2: Search Eseenet Step 3: Input Apple ID password Step 4: Click download
Packing List 1 NVR 1 pcs 2 IP camera 4 pcs 3 USB mouse 1 pcs 4 1m network cable (for IP camera code match) 1 pcs 5 DC 12V/2A power adaptor (for NVR) 1 pcs 6 DC 12V/1A power adaptor (for IP camera) 4 pcs 7 Esee Manual 1 pcs 8 Screw bag (for HDD) 1 pcs 9 Screw bag (for IP camera) 4 pcs

1. Introductie
Bedankt voor de aankoop van dit product, neem gerust contact met ons op voor vragen
of opmerkingen.
Deze handleiding is voor: de draadloze netwerk DVR kit.
2. Veiligheid Voorzorgsmaatregelen
1. Bescherm het toestel tegen water, plaats AUB geen voorwerp met vloeistof op het
apparaat liggen (zoals een vaas met water).
2. Plaats het apparaat op een goed geventileerde plaats en zorg r voor dar de
ventilatieopening niet afgesloten wordt.
3. Controleer de voedingsspanning, om schade aan het apparaat, veroorzaakt door
verkeerde spanning te voorkomen.
4. De NVR alleen gebruiken bij de juiste norm qua temperatuur en vochtigheid.
5. Plaats het apparaat horizontaal en houd deze weg van scherpe voorwerpen in de
omgeving.
6. Vocht en stof in het toestel kan problemen veroorzaken, verwijder stof op de
behuizing, connectoren regelmatig.
7. Batterij vervangen door de gebruiker zelf wordt niet aanbevolen, aangezien verkeerd
gebruik tot barsten kan leiden. Neem contact op met een deskundige voor het
vervangen van de batterij.
8. Installeer a.u.b. het apparaat volgens de veiligheidsnormen
3. Verpakking controleren
Kijk of het apparaat en alle accessoires volgens opgave aanwezig is. Neem contact op
met de distributeur in geval van schade of het ontbreken van de accessoires.

4. Aansluitschema
5. Antenne Richting
Richt de antenne van zowel de camera als NVR omhoog

6. Harde schijf installatie
Voor geïnstalleerde 1TB HDD
7. Achterpaneel Beschrijving
8. Schakel aan / uit
Zorg ervoor dat uit toegang heeft tot een stabiele netspanning gedurende configuratie
en gebruik. Dan de stroom aansluiten op het apparaat om op te starten, de [POWER]
indicator gaat branden. Wanneer het systeem opstart is het een normaal dat de
statusindicator knippert.

9. Product Kenmerken en specificaties
Kenmerken
4CH realtime 720P draadloze P2P NVR kit.
2,4 GHz draadloze transmissie technologie.
SSID-technologie staat garant voor de veiligheid van het gebruik.
Automatische code-matching realiseert gebruikersvriendelijke P2P-atoepassing.
Ondersteuning HD 720P draadloze IP camera.
Bewegingsdetectie, e-mail alerts.
Meerdere beelden gelijktijdig bekijken met de webbrowser of smartphone.
Ethernet-poorten voor bedrade IP-camera-aansluiting.
NVR Specificatie
Operating System Embedded Linux OS
Main Chip Hi3520
Audio / Video Input 4 channel bandwidth 20Mbps
Audio / Video Output HDMI 1024*768, 1336*768, 1440*900, 1920*1080
Audio / Video Output VGA 1024*768, 1336*768, 1440*900, 1920*1080
Video Playback 4channel synchro playback D1/960H/720P optional
Recoding Mode Auto/Manual/Motion Detection/Alarm
Playback Mode Multiple slow/fast playback, realtime, routine, event
Backup Mode Support HDD, USB flash driver, E-cloud storage & backup
HDD Type 1*SATA, Max.4TB
External Interface 4*LAN port (1* adaptable RJ45 10M/100M WAN port, 3* reserved LAN port for wired IP camera)
Network Protocol Upnp(play & plug), SMTP(email service), PPPoE(dial-up), DHCP(automatically obtain an IP address), etc.
Power Supply DC 12V/2A
Power Consumption <= 5W
Working Environment Temperature -10°--50°, Humidity 10%--90%
Weight 1kg
Camera Specificatie
Main Chip Professional industrial processor
Operating System Embedded Linux OS
Image Sensor 1/4” Progressive scan sensor
S/N Ratio >48dB
Resolution 1.0 megapixel, 1280x720
Minimum Illumination Color: 0.1 Lux, B/W: 0.01 Lux
Lens Fixed 3.6mm
OSD Optional (Date Time & Title)
White Balance Auto
Day & Night Auto / Color / B&W
3D-DNR Auto
Mirror / Flip On / Off
Privacy Masking 4 zones selectable
Frame Specification Dual Stream
H.264 128x720@30fps or lower
Frame Specification Sub Stream
H.264 640x480@30fps or lower
Anti-thunder Level Standard IEC6100-4-5
Power Input DC 12V/1A
Power Consumption <= 6W
Interface RJ45/WIFI 802.11b/g/n
Working Environment Temperature -10°--50°, Humidity 10%--90%
Size 205(L)x70(W)X50(H)mm
Weight 500gr
Range 25m

Software
1. Camera toevoegen
Let op: Omdat IP-camera's in de NVR-kit zijn vooringesteld, is het niet nodig om deze
toe te voegen. Als u de code nodig hebt om in te voeren, sluit u de draadloze IP-camera
aan op 1 van de NVR LAN-poorten en schakel de stroom in, maar zorg ervoor dat er
een kanaal beschikbaar voor de camera.
Stappen: Klik op de rechtermuisknop om naar het hoofdmenu te gaan, ga naar System
Setup → Channel Setup →,klik "quick add", dan verschijnt ‘’video manage "
Er zijn twee manieren om IP-camera toe te voegen aan NVR "Code Add" en "Auto Add".
Code Add: de camera zendt videobeelden naar de NVR door middel van wifi, IP is
17.20.14.X.
Auto Add: De camera zendt videobeelden naar de NVR door middel van een
netwerkkabel, IP is 172.25.123.X.
2. Video afspelen
Stap: Klik op de rechtermuisknop om naar het hoofdmenu te gaan, ga naar:
→ Video playblack → Channel No. →Record mode → Search time (voer begin en
eindtijd in) → klik op ‘’Search’’. Opname zal tevoorschijn komen, sleep tijdbalk → klik op
‘’Playback’’ om te starten.
Playback icon introduction:
Afspelen voorgaand frame
Afspelen volgend frame
Afspelen
Pauze
Snel voorwaarts x2, x4, x8

3. Video Backup Stap: Klik op de rechtermuisknop op de muis om naar het hoofdmenu te gaan, ga naar:
→ Video back-up → Channel No. →Record mode → Search time (voer start en eindtijd
in) → klik op Search, opname zal tevoorschijn komen, kies video → klik Video back-up
Ondersteund maximaal 32GB USB-stick, opname wordt ieder uur worden opgeslagen.
4. Video Detectie Stap 1: Klik op de rechtermuisknop om naar het hoofdmenu te gaan, ga naar: →System setup → Record setup →kies → Motion → kies All → kies Copy to → klik op OK om de instelling op te slaan. Stap 2: Kies Video detection → set sensitivity zoals vereist → kies motion → zet Alarm, Buzzer of E-mail, zoals vereist → klik op Copy to → klik op OK om de instelling op te slaan.

5. Genereer Esee ID Om Esee ID te genereren, moet het apparaat aangesloten worden op het netwerk en
het IP-adres moet geldig zijn in de LAN.
Klik op de rechtermuisknop om naar het hoofdmenu te gaan, ga naar:
System setup → Network setup. Als Eseer bekend is in het LAN, dan is er geen
noodzaak om DHCP te kiezen, IP adres wordt automatisch verkregen, U kunt ook het
IP-adres en DNS-adres handmatig invoeren. De video recorder zal het ID genereren via
het netwerk en toont de ID in het menu.
Als de gebruiker niet bekend is in het LAN, of de video recorder ligt in onafhankelijk
netwerk, dan kunt u DHCP kiezen om automatisch IP-adres te krijgen. De videorecorder
genereerd het Esee ID automatisch via het netwerk na het krijgen van het IP adres.
6. Toegang in LAN
Stap 1: Klik met de rechtermuisknop de muis naar het hoofdmenu, ga naar:
System setup → Network setup →check videorecorder IP-adres.
Stap 2: Toegang via de computer in LAN, invoer videorecorder IP-adres en de poort
(geen invoeren als de poort 80 is) in IE-browser of een andere browser, dan zal het
programma openen
LAN login webpagina, gebruikersnaam en wachtwoord invoeren om in te loggen.

Stap 3: Video bewaking in LAN zal beschikbaar zijn bij succesvol inloggen
Zorg ervoor dat de videorecorder en de computer zich in hetzelfde netwerk bevindt.
7. Toegang in WAN
Stap 1: Klik met de rechtermuisknop om naar het hoofdmenu te gaan, ga naar:
System setup → Network setup → check video recorder IP adres.
Stap 2: Toegang via de computer in de WAN, voer www.e-seenet.com in IE browser of
een andere browser. Dan krijgt u toegang tot de login webpagina, voer ID,
gebruikersnaam en wachtwoord in om in te loggen.
Stap 3: Remote video monitoring zal beschikbaar zijn bij succesvol inloggen.
Om een vloeinde video te garanderen, moet de bandbreedte van elk kanaal
30KByte/s of hoger zijn.
8. Android mobiele telefoon applicatie installeren
Stap 1: Ga naar www.e-seenet.com, klik op Help → Software Download → Android
mobile application. Klik op download om deze op te slaan op u computer → kopieer het
naar uw mobiel en installeer deze vanaf uw mobiel.

Stap 2: Gebruik de mobiele telefoon om de QR code te scannen, ga naar de
downloadpagina en download de applicatie naar de mobiele telefoon, dan installeren.
Als de mobiele telefoon QR code scannen niet ondersteund wordt, ga dan naar www.e-
seenet.com/help/download.php in uw browser, ga naar download pagina om de app te
downloaden en te installeren.
9. iPhone / Android Applicatie Installatie Stap 1: Ga naar APP store Stap 2: Zoek Eseenet Stap 3: Voer Apple ID in en paswoord Stap 4: Klik op download
Inhoud Doos 1 NVR 1 stuks 2 IP camera 4 stuks 3 USB mouse 1 stuks 4 1m network cable (for IP camera code match) 1 stuks 5 DC 12V/2A netadapter (voor NVR) 1 stuks 6 DC 12V/1A netadapter (voor IP camera) 4 stuks 7 Esee gebruiksaanwijzing 1 stuks

8 Schroeven (voor HDD) 1 stuks 9 Schroeven (voor IP camera) 4 stuks 1. Erklärung
Vielen Dank für den Kauf dieses Produkt, bitte kontaktieren Sie uns wen fragen oder
Anforderungen entstehen.
Diese Betriebsanleitung ist bestimmt für das drahtlose DVR-Kit.
2. Sicherheit Vorsichtshinweise
1. Bitte setzen Sie keine Behälter mit Flüssigkeiten auf dem Gerät (Vase mit Wasser).
2. Bitte stellen Sie das Gerät an einem gut belüfteten Ort um ein Verstopfen der
Lüftungsöffnung zu verhindern.
3. Überprüfen Sie bitte die Stromzufuhr um Schäden an Gerät durch falsche Spannung
zu vermeiden.
4. Der NVR sollte im Rahmen der technischen Standard Temperatur und Luftfeuchtigkeit
arbeiten.
5. Bitte stellen Sie das Gerät horizontal und halten Sie es von scharfen Gegenständen
entfernt
6. Feuchtigkeit Staub auf das Gehäuse kann Schaden verursachen, bei langfristige
Nutzung, entfernen Sie bitte den Staub auf das Gehäuse und, Stecker regelmäßig.
7. Batteriewechsel durch den Benutzer selbst wird nicht vorgeschlagen. Bitte wenden
Sie sich professionelle Person für den Batteriewechsel.
8. Installieren Sie das Gerät nach den Sicherheitsnormen.
3. Paket Inspektion
Bitte überprüfen Sie das Gerät und alle Zubehörteile. Bitte kontaktieren Sie den Händler, rechtzeitig im Falle von Schäden oder das Fehlen von Zubehör.

4. Anschlussdiagramm
5. Antennenrichtung Richten Sie die Antenne sowohl Kamera und NVR nach oben

6. Installation von Festplatte
Vorinstallierte 1TB HDD
7. Beschreibung der Rückseite
8. Ein- / Ausschalten
Stellen Sie sicher dass der Wechselspannung Zugang stabil ist wahrend Konfiguration
und Benutzung. Stromkabel anließen um der NVR zu starten, die [POWER] Anzeige
leuchtet. Wenn das System hochkommt ist es normal wenn die Statusanzeige blinkt.

9. Produkteigenschaften und Spezifikation
Eigenschaften 4CH real-time 720P drahtlose P2P NVR-Kit. 2,4 GHz Wireless-Übertragungstechnik. SSID-Technologie gewährleistet die Sicherheit der Anwendung. Auto-Code-Matching ermöglicht bequeme P2P-Anwendung. Unterstützung HD 720P drahtlose IP-Kamera. Bewegungserkennung, E-Mail Alerts. Mehrere gleichzeitige Bilder auf Web-Browser oder Smartphone. Ethernet-Ports für verdrahtete IP-Kamera-Anschluss.
NVR Spezifikation
Operating System Embedded Linux OS
Main Chip Hi3520
Audio / Video Input 4 channel bandwidth 20Mbps
Audio / Video Output HDMI 1024*768, 1336*768, 1440*900, 1920*1080
Audio / Video Output VGA 1024*768, 1336*768, 1440*900, 1920*1080
Video Playback 4channel synchro playback D1/960H/720P optional
Recoding Mode Auto/Manual/Motion Detection/Alarm
Playback Mode Multiple slow/fast playback, realtime, routine, event
Backup Mode Support HDD, USB flash driver, E-cloud storage & backup
HDD Type 1*SATA, Max.4TB
External Interface 4*LAN port (1* adaptable RJ45 10M/100M WAN port, 3* reserved LAN port for wired IP camera)
Network Protocol Upnp(play & plug), SMTP(email service), PPPoE(dial-up), DHCP(automatically obtain an IP address), etc.
Power Supply DC 12V/2A
Power Consumption <= 5W
Working Environment Temperature -10°--50°, Humidity 10%--90%
Weight 1kg

Camera Spezifikation
Main Chip Professional industrial processor
Operating System Embedded Linux OS
Image Sensor 1/4” Progressive scan sensor
S/N Ratio >48dB
Resolution 1.0 megapixel, 1280x720
Minimum Illumination Color: 0.1 Lux, B/W: 0.01 Lux
Lens Fixed 3.6mm
OSD Optional (Date Time & Title)
White Balance Auto
Day & Night Auto / Color / B&W
3D-DNR Auto
Mirror / Flip On / Off
Privacy Masking 4 zones selectable
Frame Specification Dual Stream
H.264 128x720@30fps or lower
Frame Specification Sub Stream
H.264 640x480@30fps or lower
Anti-thunder Level Standard IEC6100-4-5
Power Input DC 12V/1A
Power Consumption <= 6W
Interface RJ45/WIFI 802.11b/g/n
Working Environment Temperature -10°--50°, Humidity 10%--90%
Size 205(L)x70(W)X50(H)mm
Weight 500gr
Range 25m

Softwarebedienung
1. Hinzufügen Kamera
Da die IP-Kameras im NVR-Kit voreingestellt sind gibt es nicht die Notwendigkeit die
hinzu zufügen. Wenn Sie den Code abstimmen müssen, schließen Sie bitte dass
drahtlose IP-Kamera über einem LAN-Anschluss am NVR an und schalte den Strom ein,
stellen Sie sicher, es gibt Kanäle für Kamera erhältlich.
Schritte: Klicken Sie mit der rechten Maus auf Hauptmenü zu gelangen, gehen Sie auf:
System-Setup → Channel Setup →,klicken Sie auf "Quick Adding", dann kommt "Video
manage" vor.
Es gibt zwei Möglichkeiten IP-Kameras an zu schließen, "Code Add" und "Auto Add".
Code add: Die Kamera überträgt Videobilder über Wifi bis zur NVR, IP ist 17.20.14.X.
Auto Add: Die Kamera überträgt Videobilder über Netzwerkkabel bis zur NVR, die IP ist
172.25.123.X.
2. Video- Playback
Schritt: Rechtsklick der Maus zu Main menu zu gelangen, gehen Sie zu:
→ Video- playblack → Channel No →Record mode → Search time (Eingabe
Anfangszeit und Endzeit) → klicken Sie auf Search, Aufzeichnung kommt vor, ziehen
Sie Zeitleiste → Klicken Sie auf die Playback um sie zu starten.
Playback Einführung:
Abspielen letzter Frame
Abspielen nächster Frame
Abspielen
Pause
Schnell vorwärts x2, x4, x8

3. Video Backup Schritt: Rechtsklick der Maus zu Hauptmenü zu gelangen, gehen Sie zu:
→ Video Backup → Channel No → Record mode → Search time (Eingabe Startzeit und
Endzeit) → klicken Sie auf Search, Aufzeichnung kommt vor, dann wählen Sie Video →
Klicken Sie auf Video-Backup
Unterstützung max 32GB USB-stick, wird die Aufnahme jede Stunde gespeichert
werden.
4. VideoDetektion Schritt 1: Rechtsklick der Maus zu Hauptmenü zu gelangen, gehen Sie zu:
System setup → Nehmen Sie Record Setup → wählen Sie Motion → wählen Sie All →
wählen Sie Copy to → Klicken Sie auf OK, um die Einstellung zu speichern.
Schritt 2: Wählen Sie Video detection → eingestellt sensitivity nach Ihren Bedürfnissen
→ wählen Sie motion → Set Alarm, Buzzer oder per E-Mail nach Ihren Bedürfnissen →
klicken Sie Copy to, um → Klicken Sie auf OK, um die Einstellung zu speichern.

5. Generieren Esee ID
Um Esee ID zu generieren, muss das Gerät mit Netzwerk verbunden werden und IP-
Adresse sollte in LAN gültig sein.
Rechtsklick der Maus zu Hauptmenü zu gelangen, gehen Sie zu:
System Setup → Netzwerk Setup→Wenn Benutzer mit LAN vertraut ist, dann keine
Notwendigkeit DHCP zu wählen, die IP Adresse wird automatisch erhalten.
Ist gibt auch de Möglichkeit die IP-Adresse und DNS-Adresse manuell ein zu geben.
Das Video Recorder ID wird über das Netzwerk generiert und zeigen die ID im Menü
Wenn Benutzer ist nicht im LAN vertraut oder der Videorecorder ist in unabhängige
Netzwerk, dann wählen Sie bitte DHCP um eine verfügbare IP-Adresse zu bekommen.
Der Videorecorder Esee ID wird über das Netzwerk automatisch generiert, nachdem
bekommt sie eine IP Adresse.
6. Zugang im LAN
Schritt 1: Rechtsklick der Maus zu Hauptmenü zu gelangen, gehen Sie zu:
System setup → Network setup →Check Videorekorder IP-Adresse.
Schritt 2: Anfahrt mit dem Computer im LAN, Eingabevideo IP-Adresse und Port (keine
Eingabe wenn der Port ist 80) im IE-Browser oder einem anderen Browser, dann wird
erscheint der LAN-Login Homepage, geben Sie Ihre Benutzernamen und Passwort ein
um ein zu loggen.

Schritt 3: Videoüberwachung im LAN wird erhältlich sein, wenn erfolgreich eingeloggt.
Achten Sie darauf, Videorecorder und Computer sind im gleichen Netzwerk.
7. Zugang im WAN
Schritt 1: Rechtsklick der Maus zu Hauptmenü zu gelangen, gehen Sie zu:
→ System Setup → Network Setup → Check Videorekorder IP-Adresse.
Schritt 2: Zugang mit dem Computer im WAN, Eingabe www.e-seenet.com in IE-
Browser oder anderer Browser. Sie erhalten Zugang zur Login Webseite, geben Sie Ihre
Benutzernamen und Passwort ein um ein zu loggen
Schritt 3: Remote-Video-Überwachung wird erhältlich sein, wenn anmelden erfolgreich
verlaufen ist.
Um eine reibungslose Videofern gewährleisten, sollte die Bandbreite jedes Kanals sein
30kByte / s oder darüber sein.
8. Android Mobile Phone Applikation Installation
Schritt 1: Gehen Sie zu www.e-seenet.com, klicken Sie auf Help → Software-Download
→ Android mobile application, klicken Sie auf Download, um das Programm zu
speichern → kopieren Sie sie auf Handy und installieren Sie.

Schritt 2: Mit Handy QR-Code scannen, gehen Sie zur Download-Seite und laden Sie
die Anwendung auf das Handy herunter, dann installieren. Wenn Ihr Handy denn QR-
code nicht unterstützt dan geben Sie bitte:
www.e-seenet.com/help/download.php ein in Ihren Browser, gehen Sie zu Download-
Seite und laden Sie die Anwendung auf das Handy herunter, dann installieren.
9. iPhone / Android Applikation Installation
Schritt 1: zum App store
Schritt 2: Suchen Eseenet
Schritt 3: Eingabe Apple ID Passwort
Schritt 4: Klicken Sie auf Download
Inhalt Karton 1 NVR 1 Stück 2 IP-Kamera 4 Stück 3 USB-Maus 1 Stück 4 1 m Netzwerkkabel (für die IP-Kamera-Code Spiel) 1 Stück 5 DC 12V / 2A Netzteil (für NVR) 1 Stück 6 DC 12V / 1A Netzteil (für die IP-Kamera) 4 Stück 7 Benutzerhandbuch 1 Stück 8 Schrauben (für HDD) 1 Stück 9 Schrauben (für IP-Kamera) 4 Stück

– Declaration of Conformity
Manufacturer: TRONIOS BV
Bedrijvenpark Twente 415
7602 KM – ALMELO
+31(0)546589299
+31(0)546589298
The Netherlands
Product number: 351.183
Product Description: 4 Cam Wireless NVR kit
Trade Name: FENTON
Regulatory Requirement: EN60950-1:2006+A11:2009+A1:2010+A12:2011+A2:2013
EN62311:2008
EN301489-1 V1.9.2
EN301489-17 V2.2.1
EN62311:2008
EN300328 V1.8.1
EN 60065:2002+A11:2008+A12:2011+A1:2006+A2:2010
EN62479:2010
I hereby declare that the product meets the requirements stated in Directives 2014/35/EU and 2014/30/EU and conforms
to the above mentioned Declarations.
Almelo,
31-05-2017
Name : M. Velders
Signature : 2200