
30HP Super Duty Vacuum System - go.sonnysdirect.com
33
30HP Super Duty Vacuum System Owner’s Manual Sonny's Enterprises, LLC. 5605 Hiatus Road Tamarac, Florida 33321
Transcript of 30HP Super Duty Vacuum System - go.sonnysdirect.com

30HP Super Duty Vacuum System
Owner’s Manual
Sonny's Enterprises, LLC. 5605 Hiatus Road
Tamarac, Florida 33321

30HP Super Duty Vacuum System – Owner’s Manual
© SONNY’S The CarWash Factory SonnysDirect.com This document is confidential and proprietary to SONNY’S and cannot be used, disclosed or duplicated without prior written consent. Content, prices and availability subject to change without notice.
OwnersManual_Vacuum_30HP_Super_Duty_v1
Page 2 of 33
Table of Contents SAFETY REQUIREMENTS.......................................................................................................... 3
INTRODUCTION .......................................................................................................................... 5
30HP Product Specifications ..................................................................................................... 6
30HP Product Features .............................................................................................................. 7
Optional Equipment ................................................................................................................... 8
INSTALLATION ........................................................................................................................... 9 Utilities Requirements ............................................................................................................... 9
Electric ...................................................................................................................................... 9 Plumbing ................................................................................................................................. 10 Mechanical .............................................................................................................................. 11
Vacuum Installation Instructions .............................................................................................. 12
GENERAL OPERATION ............................................................................................................ 21
PREVENTIVE MAINTENANCE ................................................................................................. 22 DAILY ...................................................................................................................................... 22 WEEKLY MAINTENANCE ...................................................................................................... 24 SEMI-ANNUALLY ................................................................................................................... 27 ANNUALLY ............................................................................................................................. 27
Do’s and Don’t’s ....................................................................................................................... 28
VACUUM COMPONENTS ......................................................................................................... 29
Installing A Water Separator To Your Vacuum System ........................................................... 29
Vacuum Filter Separator Tank ................................................................................................. 30
Turbine Replacement Program ............................................................................................... 31
WARRANTY ............................................................................................................................... 32
CONTACT US ............................................................................................................................ 33

30HP Super Duty Vacuum System – Owner’s Manual
© SONNY’S The CarWash Factory SonnysDirect.com This document is confidential and proprietary to SONNY’S and cannot be used, disclosed or duplicated without prior written consent. Content, prices and availability subject to change without notice.
OwnersManual_Vacuum_30HP_Super_Duty_v1
Page 3 of 33
SAFETY REQUIREMENTS **WARNING**
• All employees must be thoroughly trained in safe operation and standard maintenance practices. All employees must review this entire manual monthly.
• Do not enter the wash tunnel when the equipment is operating. Death or dismemberment may occur.
• Do not wear loose fitting clothing or jewelry around moving equipment. Do not allow any part of your body or other objects (including ladders, hoses or tools) to come in contact with moving equipment. Entanglement may result causing death or dismemberment.
• Do not leave a ladder or any other items such as wash down hoses or tools in the wash tunnel while equipment is running. Vehicle damage and injury, including death, can occur.
• Always exercise caution when walking (never run) through the wash tunnel as there may be slippery conditions. Be careful so you do not bump into or trip over equipment.
• Only those employees specifically instructed and trained by the location management are permitted to enter the wash tunnel to perform inspections or maintenance. At least two qualified maintenance people must be present when performing equipment repairs or preventive maintenance.
• Do not perform any maintenance or work on equipment unless you first perform Lock-Out Safety Precautions. All electrically powered equipment must have manually operated disconnects capable of being locked in the “OFF” position. Equipment that has been “locked out” for any reason must be restarted only by the person who performed the “lock out” operation.
• When working on any equipment that is higher than your shoulders, always use a fiberglass ladder that is in good condition.
• Do not attempt to repair or adjust any pressurized liquid or pneumatic part, hose, pipe or fitting while that equipment is in operation.
• Electrical connections and repairs must be performed by a Licensed Electrician Only.
• Emergency “STOP” buttons must be well marked and their location and proper use reviewed with all personnel. Any activated “STOP” button must be reset only by the person who activated it. Clear the wash tunnel of any people, ladders, hoses, tools and other loose items before restarting the equipment. An audible device must sound to warn people that the equipment is starting.

30HP Super Duty Vacuum System – Owner’s Manual
© SONNY’S The CarWash Factory SonnysDirect.com This document is confidential and proprietary to SONNY’S and cannot be used, disclosed or duplicated without prior written consent. Content, prices and availability subject to change without notice.
OwnersManual_Vacuum_30HP_Super_Duty_v1
Page 4 of 33
• Do not operate any piece of equipment that requires safety covers with those covers removed or improperly installed. Do not operate any piece of equipment if any component of that piece is suspected to be defective or malfunctioning.
• Store all cleaning and washing solutions and oils in a well-ventilated area. Clean up fluid spills immediately to prevent hazardous safety conditions. Be certain to follow all safety procedures on SDS Sheets for each chemical product used.
• All hydraulic and electric systems in the wash tunnel equipped with a torque relief or overload should be checked and set at the minimum amount that will allow for proper functionality under normal washing conditions.
• No unauthorized people should ever be permitted in the wash tunnel or near the equipment at any time.
! ! CAUTION ! ! When a piece of equipment must be in operation during inspection or maintenance, one qualified technician must stay at the power disconnect switch while another qualified technician performs the inspection or maintenance.

30HP Super Duty Vacuum System – Owner’s Manual
© SONNY’S The CarWash Factory SonnysDirect.com This document is confidential and proprietary to SONNY’S and cannot be used, disclosed or duplicated without prior written consent. Content, prices and availability subject to change without notice.
OwnersManual_Vacuum_30HP_Super_Duty_v1
Page 5 of 33
INTRODUCTION This Manual contains information that is vital to the successful installation, operation and maintenance of your Sonny’s vehicle washing equipment. Please read, and understand, the full contents of this manual before installation and operation of the equipment. Keep this booklet in a location where it may be used for ongoing reference. Should you have any questions on the operation or servicing of this equipment please contact:
TECHNICAL SERVICES DEPT. SONNY’S ENTERPRISES INC.
5605 Hiatus Road TAMARAC, FLORIDA 33321
TELEPHONE: 800-327-8723 FAX: 800-495-4049
THANK YOU FOR YOUR CONFIDENCE IN SONNY’S!

30HP Super Duty Vacuum System – Owner’s Manual
© SONNY’S The CarWash Factory SonnysDirect.com This document is confidential and proprietary to SONNY’S and cannot be used, disclosed or duplicated without prior written consent. Content, prices and availability subject to change without notice.
OwnersManual_Vacuum_30HP_Super_Duty_v1
Page 6 of 33
30HP Product Specifications ➢ Capable of handling a minimum of 12 vacuum hose drops, up to a maximum of 14
drops
➢ Assembly total weight is 965 lbs
➢ 9000 square inches of filter area through 10 bags
➢ 7 impellers.
➢ 6 inch standard inlet and outlet connections
For parts and accessories information, please refer to our catalog or visit our website at SonnysDirect.com.

30HP Super Duty Vacuum System – Owner’s Manual
© SONNY’S The CarWash Factory SonnysDirect.com This document is confidential and proprietary to SONNY’S and cannot be used, disclosed or duplicated without prior written consent. Content, prices and availability subject to change without notice.
OwnersManual_Vacuum_30HP_Super_Duty_v1
Page 7 of 33
30HP Product Features
➢ Producer shaft bearings easily accessible for routine maintenance
➢ Snap-in filter bags have positive connections to the separator tank
➢ Filter bags will not mildew or rot
➢ Oversized dirt bucket is easy to remove, empty, and replace
➢ Electric motor and vacuum producer are direct coupled for efficient operation
➢ Shaft rotation arrows are part of the producer housing casting, not removable decals
➢ Precision factory impeller balancing and assembly assures efficient operation
➢ Stainless steel separator with adjustable latches and rubber gaskets for tight seal
➢ Wet separator tank available
➢ Silencer included - exhaust muffler helps reduce noise

30HP Super Duty Vacuum System – Owner’s Manual
© SONNY’S The CarWash Factory SonnysDirect.com This document is confidential and proprietary to SONNY’S and cannot be used, disclosed or duplicated without prior written consent. Content, prices and availability subject to change without notice.
OwnersManual_Vacuum_30HP_Super_Duty_v1
Page 8 of 33
Optional Equipment
Sonny’s Cyclone Separator – creates a cyclonic effect which forces larger debris to the bottom of the separator, preventing clogged lines. Uses an easy twist and clean filter. Sonny’s recommends using the Cyclone Separator in addition to the included standard debris separator.
Connector Cuffs - thread onto the end of vacuum hoses, for easy attachment. Claw Vacuum Tool – combines the utility of both a crevice tool and claw in one attachment, with no loss of suction.
Vacuum Booms - provide customers with an inviting free vacuum area that doesn't require a lot of staff, or effort, to keep ready to serve the next customer. The boom design keeps hoses securely off the ground providing better access to both sides of the vehicle and reducing wear and tear. Choose from different boom styles, canopy colors, drop kits, attachments, and piping.

30HP Super Duty Vacuum System – Owner’s Manual
© SONNY’S The CarWash Factory SonnysDirect.com This document is confidential and proprietary to SONNY’S and cannot be used, disclosed or duplicated without prior written consent. Content, prices and availability subject to change without notice.
OwnersManual_Vacuum_30HP_Super_Duty_v1
Page 9 of 33
INSTALLATION Utilities Requirements
Utilities interconnection and the materials required for interconnection to Sonny’s equipment are the responsibility of the customer.
Perform all trades work to all applicable local and national codes.
Electric The Customer’s Electrician is responsible for:
• Providing materials and installing single phase vacuum start-stop stations as required by the Customer that will provide power to the vacuum motor starter coil.
• Providing materials and installing single phase power through the Customer supplied Start/Stop stations to the vacuum motor starter coil.
• Properly sized interconnecting wiring from the 3-phase circuit breaker and motor starter to the 30HP, vacuum motor for 230V or 460V power source.
• The Customer’s Electrician is to provide materials and install 3-phase power (230V or 460V) to the 30HP electric motor on the vacuum assembly through a properly sized 3-pole circuit breaker and motor starter with 3 thermal overloads. The use of copper wire is recommended. Earth grounding of the vacuum assembly is required.
• Overload protectors must be installed.
NOTE: Be certain the electric motor is properly wired for the supply voltage! Check motor name plate for voltage, phase and frequency before wiring. After wiring the motor, check for proper rotation as stamped on the vacuum producer end castings. Never operate the vacuum producer in the wrong direction. Technical Disclaimer
• Although building codes have been considered in developing all drawings, verification of site-specific conditions and compliance with federal, state and local building codes is the exclusive responsibility of the customer and/or architect and engineer.
30HP Super Duty Vacuum System – Owner’s Manual
© SONNY’S The CarWash Factory SonnysDirect.com This document is confidential and proprietary to SONNY’S and cannot be used, disclosed or duplicated without prior written consent. Content, prices and availability subject to change without notice.
OwnersManual_Vacuum_30HP_Super_Duty_v1
Page 10 of 33
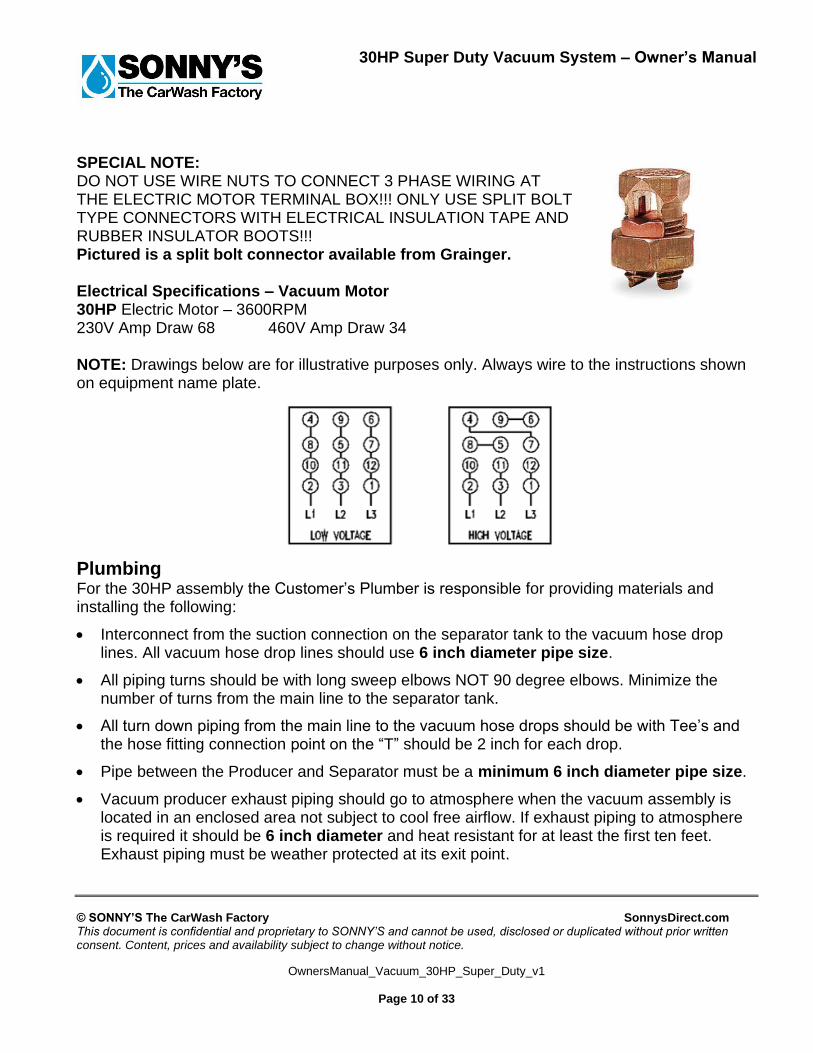
SPECIAL NOTE: DO NOT USE WIRE NUTS TO CONNECT 3 PHASE WIRING AT THE ELECTRIC MOTOR TERMINAL BOX!!! ONLY USE SPLIT BOLT TYPE CONNECTORS WITH ELECTRICAL INSULATION TAPE AND RUBBER INSULATOR BOOTS!!! Pictured is a split bolt connector available from Grainger. Electrical Specifications – Vacuum Motor 30HP Electric Motor – 3600RPM 230V Amp Draw 68 460V Amp Draw 34 NOTE: Drawings below are for illustrative purposes only. Always wire to the instructions shown on equipment name plate.
Plumbing For the 30HP assembly the Customer’s Plumber is responsible for providing materials and installing the following:
• Interconnect from the suction connection on the separator tank to the vacuum hose drop lines. All vacuum hose drop lines should use 6 inch diameter pipe size.
• All piping turns should be with long sweep elbows NOT 90 degree elbows. Minimize the number of turns from the main line to the separator tank.
• All turn down piping from the main line to the vacuum hose drops should be with Tee’s and the hose fitting connection point on the “T” should be 2 inch for each drop.
• Pipe between the Producer and Separator must be a minimum 6 inch diameter pipe size.
• Vacuum producer exhaust piping should go to atmosphere when the vacuum assembly is located in an enclosed area not subject to cool free airflow. If exhaust piping to atmosphere is required it should be 6 inch diameter and heat resistant for at least the first ten feet. Exhaust piping must be weather protected at its exit point.

30HP Super Duty Vacuum System – Owner’s Manual
© SONNY’S The CarWash Factory SonnysDirect.com This document is confidential and proprietary to SONNY’S and cannot be used, disclosed or duplicated without prior written consent. Content, prices and availability subject to change without notice.
OwnersManual_Vacuum_30HP_Super_Duty_v1
Page 11 of 33
Mechanical
• Make sure there is adequate clear space around the vacuum assembly to allow free air flow and maintenance access. Do not locate the vacuum assembly in an area where customers may have direct access.
• For best results the 30HP vacuum assembly should be installed as close as possible to the vacuum hose drops.
• The exhaust muffler is to be installed with the connectors provided on the producer exhaust pipe located on the producer toward the electric motor.

30HP Super Duty Vacuum System – Owner’s Manual
© SONNY’S The CarWash Factory SonnysDirect.com This document is confidential and proprietary to SONNY’S and cannot be used, disclosed or duplicated without prior written consent. Content, prices and availability subject to change without notice.
OwnersManual_Vacuum_30HP_Super_Duty_v1
Page 12 of 33
Vacuum Installation Instructions The turbine and the motor are independent of each other and are connected by a super-duty coupler.
1. First, inspect the vacuum producer for any damage during shipping and handling.
2. Attach the rubber vibration isolators to the bottom of the base. There should be one nut on the top of the floor plate, and two underneath on the threaded stud, as shown here:
3. Place the assembled frame in the area planned for final connections. For the 30HP assembly the inlet fitting from the vacuum hose drops should face the direction of the hose drops.

30HP Super Duty Vacuum System – Owner’s Manual
© SONNY’S The CarWash Factory SonnysDirect.com This document is confidential and proprietary to SONNY’S and cannot be used, disclosed or duplicated without prior written consent. Content, prices and availability subject to change without notice.
OwnersManual_Vacuum_30HP_Super_Duty_v1
Page 13 of 33
4. Using a ¾” wrench, loosen the top nut on the three rubber feet. This will give you some room to adjust the frame, so that it is level.
5. To adjust the level of the frame, use a ¾” wrench to turn and raise the top nut of the two under the frame, which will allow you to slightly adjust the level, as needed. The lower nut of the two under the frame should not be loosened.
6. Use a Level to check in 3 different planes on the frame, as shown below. Adjust the height by turning the three top nuts under the frame, as needed. Depending on how level your surface is, you may end up with a small gap (about ½” or so) between the two lower nuts, under the frame.

30HP Super Duty Vacuum System – Owner’s Manual
© SONNY’S The CarWash Factory SonnysDirect.com This document is confidential and proprietary to SONNY’S and cannot be used, disclosed or duplicated without prior written consent. Content, prices and availability subject to change without notice.
OwnersManual_Vacuum_30HP_Super_Duty_v1
Page 14 of 33
7. Once the unit is in place and leveled, tighten the three top nuts on the feet to 55 ft-lbs. to prevent the nuts from loosening during operation.
8. Do not tighten the nuts on the anchors for the isolators.
9. Remove the Coupler Guard from the frame.
10. Couplers have been pre-installed at the factory; 1-5/8in Coupler for the Motor and 1-1/2in for the Turbine.
11. Coupling Locking Collar should be loosely placed on the turbine shaft.
12. Alignment Procedure:
a. Align the teeth on the two couplers with each other.

30HP Super Duty Vacuum System – Owner’s Manual
© SONNY’S The CarWash Factory SonnysDirect.com This document is confidential and proprietary to SONNY’S and cannot be used, disclosed or duplicated without prior written consent. Content, prices and availability subject to change without notice.
OwnersManual_Vacuum_30HP_Super_Duty_v1
Page 15 of 33
b. Using the provided shims, check for axial and angular misalignment between the two shafts at every tooth of the coupler. The 0.060 shim combined with the 0.010 shim should be able to slide between each tooth pairing, but the 0.075 shim combined with the 0.010 should NOT be able to slide in. This will ensure the gap is within tolerance. (0.070”- 0.085”)

30HP Super Duty Vacuum System – Owner’s Manual
© SONNY’S The CarWash Factory SonnysDirect.com This document is confidential and proprietary to SONNY’S and cannot be used, disclosed or duplicated without prior written consent. Content, prices and availability subject to change without notice.
OwnersManual_Vacuum_30HP_Super_Duty_v1
Page 16 of 33
c. Using a straight edge and feeler gauge, check for parallel misalignment in both the vertical direction and horizontal direction. To check vertical misalignment, place a straight edge on the flat spot across a tooth on the turbine side coupler (See picture below). Using feeler gauge, measure gap between straight edge and flat spot on corresponding motor coupler tooth as shown below.
d. The above procedure for parallel misalignment MUST be repeated to check for horizontal misalignment.

30HP Super Duty Vacuum System – Owner’s Manual
© SONNY’S The CarWash Factory SonnysDirect.com This document is confidential and proprietary to SONNY’S and cannot be used, disclosed or duplicated without prior written consent. Content, prices and availability subject to change without notice.
OwnersManual_Vacuum_30HP_Super_Duty_v1
Page 17 of 33
e. To ensure proper alignment, feeler gauge that fits in the gap created by the straight edge should be less than 0.010” thick.
f. If vacuum producer does not pass the above checks for misalignment. It MUST be aligned prior to starting up the vacuum turbine.
g. To adjust alignment, loosen the 4 bolts at the motor base.
i. For parallel misalignment in the vertical direction: Add / Remove shims under the motor base.
ii. For parallel misalignment in the horizontal direction: Shift the motor slightly using a rubber mallet.
iii. For angular misalignment: Add / Remove shims from only the front two holes, or back two holes, depending on which direction motor must be tilted.
h. Once properly aligned, tighten motor base bolts to 57 ft-lbs.
i. Check alignment again using steps b through e.
13. Make electrical connections to the motor (must be performed by a licensed electrician). Turn vacuum ON and OFF to create a short cycle of operation. Check for motor rotation during this test cycle. Motor rotation MUST match as shown by the arrow on the turbine housing. If the motor is initially running in the wrong direction, it MUST be corrected by a licensed electrician.

30HP Super Duty Vacuum System – Owner’s Manual
© SONNY’S The CarWash Factory SonnysDirect.com This document is confidential and proprietary to SONNY’S and cannot be used, disclosed or duplicated without prior written consent. Content, prices and availability subject to change without notice.
OwnersManual_Vacuum_30HP_Super_Duty_v1
Page 18 of 33
14. Coupler Locking Collar Installation
Once alignment has been confirmed to be within tolerances, proceed with installing the red flexible coupler insert (included).
a. Wrap the provided red flexible insert around the couplers. Ensure it fully closes the loop around the couplers. (Part # 10013337)
b. Groove on the flexible coupler insert should point away from rotation of turbine, as shown below. Turbine rotation is marked on the housing.

30HP Super Duty Vacuum System – Owner’s Manual
© SONNY’S The CarWash Factory SonnysDirect.com This document is confidential and proprietary to SONNY’S and cannot be used, disclosed or duplicated without prior written consent. Content, prices and availability subject to change without notice.
OwnersManual_Vacuum_30HP_Super_Duty_v1
Page 19 of 33
c. Slide Coupler Locking Collar over flexible insert. Ensure the pins inside locking collar line up with the grooves on the flexible insert.
d. Rotate Locking Collar opposite to turbine rotation as shown below, making sure the pins on the collar slide onto the grooves of the flexible insert. This step is critical to make sure cover and insert do not fall off.
30HP Super Duty Vacuum System – Owner’s Manual
© SONNY’S The CarWash Factory SonnysDirect.com This document is confidential and proprietary to SONNY’S and cannot be used, disclosed or duplicated without prior written consent. Content, prices and availability subject to change without notice.
OwnersManual_Vacuum_30HP_Super_Duty_v1
Page 20 of 33
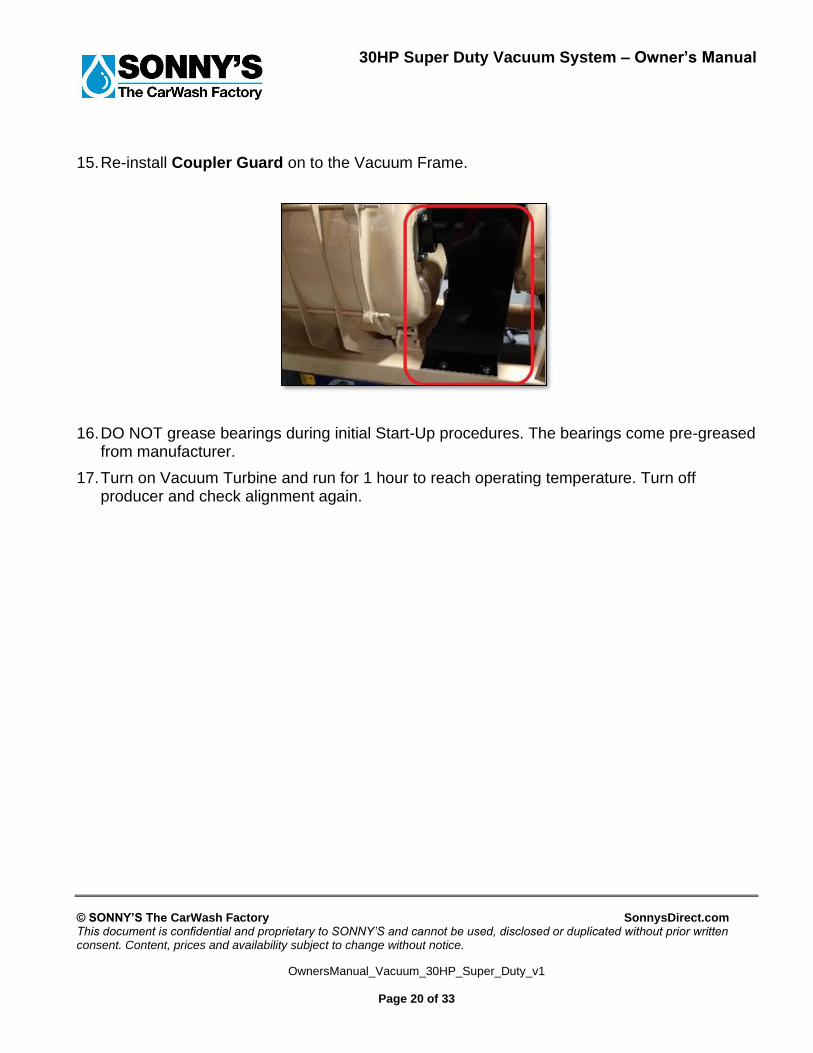
15. Re-install Coupler Guard on to the Vacuum Frame.
16. DO NOT grease bearings during initial Start-Up procedures. The bearings come pre-greased from manufacturer.
17. Turn on Vacuum Turbine and run for 1 hour to reach operating temperature. Turn off producer and check alignment again.

30HP Super Duty Vacuum System – Owner’s Manual
© SONNY’S The CarWash Factory SonnysDirect.com This document is confidential and proprietary to SONNY’S and cannot be used, disclosed or duplicated without prior written consent. Content, prices and availability subject to change without notice.
OwnersManual_Vacuum_30HP_Super_Duty_v1
Page 21 of 33
GENERAL OPERATION • When the Start/Stop control is activated the producer motor starts and reaches full speed in
approximately 3 seconds.
• When the producer motor is at full speed all vacuum hose drops may be used.
• De-activating the Start/Stop control will stop the producer motor and cause vacuum operation to cease.
• Before beginning daily operation be certain that the dirt canister is empty.
• Double check that the dirt canister door and the filter bag access door are firmly secured before starting the vacuum.
• If air leaks are heard around the vacuum assembly when the vacuum reaches full speed, turn the vacuum off and adjust the dirt canister door and filter bag access door for proper fit against the rubber seals.
• Continuous vacuuming of wet substances without the optional wet separator tank may cause permanent damage to the vacuum filter bags, impellers, and electric motor. NEVER WASH THE FILTER BAGS !!!
• Unused vacuum hose drops must be firmly closed off at the vacuum tool mouth in order that in-use vacuum hose drops operate efficiently.
• Do not operate the vacuum with the dirt canister door or the filter bag access door open or not firmly sealed and closed !!!

30HP Super Duty Vacuum System – Owner’s Manual
© SONNY’S The CarWash Factory SonnysDirect.com This document is confidential and proprietary to SONNY’S and cannot be used, disclosed or duplicated without prior written consent. Content, prices and availability subject to change without notice.
OwnersManual_Vacuum_30HP_Super_Duty_v1
Page 22 of 33
PREVENTIVE MAINTENANCE
FOR THE FIRST MONTH OF OPERATION CHECK ALL HARDWARE AND FITTINGS FOR TIGHTNESS EACH WEEK!
DAILY Empty collected trash from the dirt canister.
• Turn power off to the vacuum. Open the latches for the dirt canister access door (bottom door).
• Remove and empty the dirt canister. Clean the compartment around the canister. Replace the empty canister in the storage compartment against the alignment flange.
• Check the black rubber seal around the door. Check for any cracks, leaks or tears in the seal. If the seal is damaged, a replacement can be ordered.
• Close the access door. Press the center of the door before fastening the latches to assure a proper door gasket seal.
• Turn on the vacuum. Listen for any leaks around the door gasket. Re-seal if necessary.
• Clean the mesh filter located inside the separator. Do not remove the filter. Instead, wipe the filter down from inside the upper access door, where the filter bags are located.

30HP Super Duty Vacuum System – Owner’s Manual
© SONNY’S The CarWash Factory SonnysDirect.com This document is confidential and proprietary to SONNY’S and cannot be used, disclosed or duplicated without prior written consent. Content, prices and availability subject to change without notice.
OwnersManual_Vacuum_30HP_Super_Duty_v1
Page 23 of 33
Clean the filter bags.
• Turn power off to the vacuum. Open the latches for the filter bags access door (top door).
• Manually shake the filter bags behind the upper door on the separator tank.
• Inspect filter bags for any damage, tearing or wetness, replacing damaged bags.
• Inspect filter bags for proper seating. If a bag is not properly seated, it may pop out of place, leading to dirt clogging the system. It is therefore extremely important to ensure that the filter bags are correctly seated in place. Details for replacing a filter bag are on the following page.
Example of an un-seated filter bag.
• Close the access door. Press the center of the door before fastening the latches to assure a proper door gasket seal.
• Turn on the vacuum. Listen for any leaks around the door gasket. Re-seal if necessary.
• Inspect vacuum hoses and tools for cuts, excessive wear, or trash blockage. Replace as necessary.
• Turn the vacuum on and check all hose drops for proper operation.

30HP Super Duty Vacuum System – Owner’s Manual
© SONNY’S The CarWash Factory SonnysDirect.com This document is confidential and proprietary to SONNY’S and cannot be used, disclosed or duplicated without prior written consent. Content, prices and availability subject to change without notice.
OwnersManual_Vacuum_30HP_Super_Duty_v1
Page 24 of 33
WEEKLY MAINTENANCE
• Inspect all filter bags for wetness or tears. Replace as necessary.
• To replace a filter bag, hold the ring at the bottom of the bag, then tuck the bag material down into the ring.
• With the bag material tucked inside, bend and fold the ring into a horseshoe shape, as shown below.
• Hold the ring between thumb and forefinger and place it inside of the bag opening.

30HP Super Duty Vacuum System – Owner’s Manual
© SONNY’S The CarWash Factory SonnysDirect.com This document is confidential and proprietary to SONNY’S and cannot be used, disclosed or duplicated without prior written consent. Content, prices and availability subject to change without notice.
OwnersManual_Vacuum_30HP_Super_Duty_v1
Page 25 of 33
• Release the ring into its natural round shape. You should hear it click in place, inside of the opening.
• Once snapped in place, the ring should fit tight inside of the opening. Test by pulling up on the bag. The bag should remain tightly attached inside of the hole when you pull up on it.
• Wrap the Velcro straps located on the top of the bag around the bar on the inside top of the vacuum separator.

30HP Super Duty Vacuum System – Owner’s Manual
© SONNY’S The CarWash Factory SonnysDirect.com This document is confidential and proprietary to SONNY’S and cannot be used, disclosed or duplicated without prior written consent. Content, prices and availability subject to change without notice.
OwnersManual_Vacuum_30HP_Super_Duty_v1
Page 26 of 33
WEEKLY MAINTENANCE (Continued)
• Check vacuum piping for pinhole leaks, cracks, or loose fittings.
• Inspect dirt canister and filter access door gaskets for cuts, excessive wear, or leaks. Replace as necessary.
• Clean the separator tank and producer housings.
• Grease impeller shaft bearings weekly. For each bearing, use one pump of grease only (Mobil Polyrex EP2 – Part #10012823). This will provide the recommended grease to the bearings without over greasing them. DO NOT OVER GREASE! (Note: A temperature rise after lubrication, sometimes 30°F (17°C), is normal. Bearings should operate at temperatures less than 200°F (94°C) and should not exceed 250° (121°C) for intermittent operation.)
• Inspect the motor for damage or corrosion.
MONTHLY
1. Inspect all hardware for tightness.
2. Inspect Atra-flex coupler set screws for tightness.
3. Inspect Atra-flex plastic element for damage. Replace as needed.
Note: Do not tighten the nut that is attached to the anchors. The nut should be loose or taken off.

30HP Super Duty Vacuum System – Owner’s Manual
© SONNY’S The CarWash Factory SonnysDirect.com This document is confidential and proprietary to SONNY’S and cannot be used, disclosed or duplicated without prior written consent. Content, prices and availability subject to change without notice.
OwnersManual_Vacuum_30HP_Super_Duty_v1
Page 27 of 33
SEMI-ANNUALLY For Older Motors:
1. Lubrication: Re-lubricate the 2 motor bearings by removing the seal plate then cleaning and refilling the bearing and bracket cavity with the recommended grease. Sonny’s recommends Mobil Polyrex EM (Part #40012549) grease for the motor ball bearings. Replace one pipe plug on each motor end bracket with a grease fitting. Remove the other plug for grease relief. Be sure fittings are clean and free from dirt. Using a low pressure grease gun, pump in 1-2 pumps of grease until new grease appears at the grease relief hole. After re-lubricating, allow motor to run for 10 minutes before replacing pipe plugs in end bracket.
For New Motors:
2. All new motors come with permanently lubricated bearings that do not require greasing.
ANNUALLY
1. Have an electrician inspect the amperage draw from the motor.

30HP Super Duty Vacuum System – Owner’s Manual
© SONNY’S The CarWash Factory SonnysDirect.com This document is confidential and proprietary to SONNY’S and cannot be used, disclosed or duplicated without prior written consent. Content, prices and availability subject to change without notice.
OwnersManual_Vacuum_30HP_Super_Duty_v1
Page 28 of 33
Do’s and Don’t’s
DO
• Check motor rotation direction before connecting the coupler whenever motor wiring is worked on
• Use minimum 6-inch diameter pipe between Producer and Separator
• Make sure Producer is level during installation
• Clean Separator filters daily
• Grease turbine bearings weekly
DON’T
• Tighten producer to the floor (nuts should not be tightened on floor anchors)
• Run the producer without checking motor rotation direction
• Run the producer with the coupler guard removed
• Run vacuum system with damaged filter bags
• Wash the filter bags with water
• Over-grease turbine bearings

30HP Super Duty Vacuum System – Owner’s Manual
© SONNY’S The CarWash Factory SonnysDirect.com This document is confidential and proprietary to SONNY’S and cannot be used, disclosed or duplicated without prior written consent. Content, prices and availability subject to change without notice.
OwnersManual_Vacuum_30HP_Super_Duty_v1
Page 29 of 33
VACUUM COMPONENTS There are 7 diffuser plates in the 30HP VAC (they protrude from the turbine).
Installing A Water Separator To Your Vacuum System
When using the stainless steel Water Separator, it is installed inline between the Primary Vacuum Separator and the Vacuum Drop Manifold.
To Vacuum Drop Manifold
Primary Vacuum Separator Part # 20016298
Turbine and Motor Part # 20018388
Water Separator
Part # 20016086

30HP Super Duty Vacuum System – Owner’s Manual
© SONNY’S The CarWash Factory SonnysDirect.com This document is confidential and proprietary to SONNY’S and cannot be used, disclosed or duplicated without prior written consent. Content, prices and availability subject to change without notice.
OwnersManual_Vacuum_30HP_Super_Duty_v1
Page 30 of 33
Vacuum Filter Separator Tank
6” Pipe Connections (To Producer)
Poly Tanks 11.5 Gallon (SCW115)
Vacuum Door Gasket
Door Latch
6” Pipe Connections (To Booms)
Vacuum Filter Bags 6” D x 32” L (V1008)
30HP Super Duty Vacuum System – Owner’s Manual
© SONNY’S The CarWash Factory SonnysDirect.com This document is confidential and proprietary to SONNY’S and cannot be used, disclosed or duplicated without prior written consent. Content, prices and availability subject to change without notice.
OwnersManual_Vacuum_30HP_Super_Duty_v1
Page 31 of 33
Turbine Replacement Program Can’t live without your Vacuum? Of course not! Sonny’s Turbine Replacement Program keeps you running, and it’s quick & easy!
• Disconnect and reinstall your turbine only once
• Reduce downtime – no waiting for repair
How does it work? We will send you a factory reconditioned turbine that matches your existing turbine’s horsepower. Turbines are in stock and ready to go. When you order the replacement turbine, you will receive a credit for the value of your old turbine and this credit will be issued towards the replacement charge.
• You do not need to return the old turbine; it can be disposed of.
• All freight charges are the responsibility of the customer.
Contact Sonny’s Customer Service at 1-800-327-8723 x 200 or visit SonnysDirect.com for more information.

30HP Super Duty Vacuum System – Owner’s Manual
© SONNY’S The CarWash Factory SonnysDirect.com This document is confidential and proprietary to SONNY’S and cannot be used, disclosed or duplicated without prior written consent. Content, prices and availability subject to change without notice.
OwnersManual_Vacuum_30HP_Super_Duty_v1
Page 32 of 33
WARRANTY
SONNY’S ENTERPRISES, INC.
FACTORY LIMITED
LIFETIME WARRANTY Equipment manufactured by SONNY’S ENTERPRISES, INC. is warranted to be free from defect in material and workmanship. Welded metal framework and other non-moving, non-wearable fabricated metal components manufactured by Sonny’s are warranted for the life of the equipment to the original purchaser. Fabricated metal wearable surface and moving components manufactured by Sonny’s are warranted for a period of one (1) year to the original purchaser of the equipment. All components assembled to Sonny’s equipment that are manufactured by others are warranted by the appropriate manufacturer and subject to that manufacturer’s limited warranty. Contact Sonny’s for the specific information on other component manufacturer’s warranty terms. All new cloth shipped with new Sonny’s equipment is warranted for a period of one (1) year or 80,000, whichever occurs first. This warranty is not assignable or transferable. The warranty period begins the first day following installation or 30 days from the original invoice date, whichever occurs first. The Seller’s liability shall be limited to repair or replacement of materials found to be defective within the warranty period. In the event of repair or replacement this limited warranty is noncumulative. The Purchaser must supply the Seller with immediate written notice when any defects are found. The Seller shall have the option of requiring the return of defective material to establish the Purchaser’s claim. Neither labor nor transportation charges are included in this warranty. Transportation damage claims are to be submitted to the carrier of the damaged materials. This warranty is based upon the Purchaser’s reasonable care and maintenance of the warranted equipment. It does not apply to any equipment which has been subject to misuse, including neglect, accident or exposure to harsh chemicals or chemicals that react violently with: water, organic acids (e.g. acetic acid), inorganic acids (e.g. hydrofluoric acid), oxidizing agents (e.g. peroxides), and metals (e.g. aluminum). Chemicals corrosive to: aluminum alloys, carbon steel, and other metals. Nor does it apply to any equipment which has been repaired or altered by anyone not so authorized by Sonny’s. Further, the equipment must be properly installed with proper accuracy of all specified plumbing, electrical, and mechanical requirements. This warranty does not apply to normal wear and tear or routine maintenance components. EXCEPT AS EXPRESSLY STATED HEREIN, SONNY’S SHALL NOT BE LIABLE FOR DAMAGES OF ANY KIND IN CONNECTION WITH THE PURCHASE, MAINTENANCE, OR USE OF THIS EQUIPMENT INCLUDING LOSS OF PROFITS AND ALL CLAIMS FOR CONSEQUENTIAL DAMAGES. THE LIMITED WARRANTY EXPRESSED HEREIN IS IN LIEU OF ALL OTHER WARRANTIES EXPRESSED OR IMPLIED. SONNY’S NEITHER ASSUMES NOR AUTHORIZES ANY PERSON TO ASSUME FOR IT ANY OTHER OBLIGATION OR LIABILITY IN CONNECTION HEREWITH.

30HP Super Duty Vacuum System – Owner’s Manual
© SONNY’S The CarWash Factory SonnysDirect.com This document is confidential and proprietary to SONNY’S and cannot be used, disclosed or duplicated without prior written consent. Content, prices and availability subject to change without notice.
OwnersManual_Vacuum_30HP_Super_Duty_v1
Page 33 of 33
CONTACT US
SONNY’S ENTERPRISES, INC. Business Hours Office: Monday – Friday 8:00 AM – 5:30 PM ET Customer Service: Monday – Friday 8:00 AM – 8:00 PM ET FOR TECHNICAL SUPPORT: Phone: 1-800-327-8723 EXT 234 Email: [email protected] 24/7 EMERGENCY SUPPORT AVAILABLE FOR PARTS: Phone: 1-800-327-8723 EXT 200 Email: [email protected] FOR EQUIPMENT SALES: Phone: 1-800-327-8723 Option 3 Email: [email protected]