25.4cc Petrol Chain Saw - Coreservice
30
SKU: 23253 25.4cc Petrol Chain Saw WHAT'S IN THE BOX If you do not have all these items, please contact: www.coreservice.co.uk Hotline: +44 01904 947568 Email [email protected] Original User’s Instructions PLEASE KEEP THESE INSTRUCTIONS FOR FURTHER REFERENCE Chain saw x 1 Bar cover x 1 Fuel bottle x 1 Hex key x 1 Screw driver x 1 Socket wrench/ slotted screw drive x 1 Oregon chain x 1 Oregon bar x 1 Brake cover x 1
Transcript of 25.4cc Petrol Chain Saw - Coreservice

SKU: 23253
25.4cc Petrol Chain Saw
WHAT'S IN THE BOX
If you do not have all these items, please contact:www.coreservice.co.uk
Hotline: +44 01904 947568Email [email protected]
Original User’s Instructions
PLEASE KEEP THESE INSTRUCTIONS FOR FURTHER REFERENCE
Chain saw x 1
Bar cover x 1
Fuel bottle x 1
Hex key x 1
Screw driver x 1
Socket wrench/ slotted screw drive x 1
Oregon chain x 1
Oregon bar x 1Brake cover x 1

2
SPECIFICATION
Technical Data
Model CS2500A-3
Type of the engine RY1E34FC
Displacement 25.4cm3
Power 0.7kW
Max.engine speed 11000min
Idling speed 3300±300
Max.chain speed 21m/s
Volumes of oil tank 160cm3
Volumes of fuel tank 230cm3
Net weight 3.8kg
Oil ratio 40(fuel):1(oil)
Cutting length 200mm (10”),
Chain pitch 9,525mm (0,375’’)
Gauge of chain 1,27mm (0,05’’)
Type of chain Oregon 91P040X
Type of guide bar Oregon 100SDEA041
Sprocket (number of teeth x pitch) 6 Teeth x 9,525
Carburetor MC14B/HLIC
Spark plug L8RTF/LD NHSP
Sound Pressure Uncertain K
LpA: 99 dB(A)Uncertain K=3 dB(A)
Sound power LwA : 110,4 dB(A) K= 3 dB(A)
Guaranteed power level LwA : 113dB(A) (2000/14/EC)
Value of vibration Front handle 9,0 m/s²Rear handle: 8,5 m/s²K=1,5m/s²

3
EXPLANATIONS AND SYMBOLS, CAUTIONS AND WARNINGS
Explanations of symbols
Before any use, refer to the corresponding paragraph in the manual.
This symbol, before a safety comment, indicates a precaution, a warning or a danger. Ignoring this warning can lead to an accident for yourself or for others. To limit the risk of injury, fire, or electrocution, always apply the recommendations indicated.
Conforms to European Standards.
The exhaust gas is poisonous and asphyxiating. If inhaled, it may even be lethal. Do not operate the enginein closed or poorly-ventilated places.
Petrol and petrol vapours are extremely flammable.
DO NOT touch to prevent burns.
Wear hearing protection and eye protection (PPE) when using the device.
Wear dust protection.
Wear robust footwear when using the device.
Wear protective gloves when using the device.

4
113Guaranteed sound power level data (113dB), in accordance with Directive 2000/14/EC.
Beware of kickback (recoil).
Avoid contact with the tip of the guide bar (chain return point). This will result in kickback of the chainsaw.
DO NOT hold the saw with one hand.
Hold the saw frmly with both hands. Place your right hand on the rear handle and your left hand on the front handle.
DO NOT start or use the equipment close to people (especially children) or animals. During operation, it is recommended that a minimum distance of 10 metres from other people is maintained.
A product placed on the United Kingdom market meets the UKCA Marking requirements.

5
HEALTH AND SAFETY
GENERAL SAFETY WARNINGSSafety Warnings
WARNING! Read all safety warnings and instructions. Failure to follow the warnings and instructions may result
in electric shock, fire and/or serious injury.
WARNING! Read all safety warnings and instructions designated by the symbol.
Save all warnings and instructions for future reference.
• Always ensure anyone intending to operate this chainsaw is fully conversant with the contents of this assembly manual prior to assembling, maintaining or operating the chainsaw.
• Perform assembly operations as described in this manual. Failure to observe this warning may lead to serious injury, death, or damage to the chainsaw.
• Always take care when removing the packaging, to prevent damage to you or to the chainsaw.
IMPORTANT! Before assembling the chainsaw, check all the parts indicated in the manual are in the box. Inspect all the parts for signs of damage. Do not assemble the chainsaw if you observe any damaged components.
GENERAL SAFETY• The chain is designed exclusively for sawing wood. You may only fell trees if you have received the appropriate
training. The manufacturer cannot be held liable for damage

6
caused by improper or incorrect usage. PLEASE NOTE: Our equipment has not been designed for use in commercial, trade or industrial applications. Our warranty will be voided if the machine is used in commercial, trade or industrial businesses or for the equivalent purposes.
PREPARATION• DO NOT operate a chainsaw with one hand! Serious injury to the
operator, helpers, or bystanders may result from one-handed operation. A chainsaw is intended for two-handed use only.
• DO NOT use the saw if you are tired, ill or under the influence of alcohol and/or drugs, or medication.
• Use safety footwear, snug-fitting clothing, and protective gloves, as well as eye, hearing and head protection devices (PPE).
• Use caution when handling fuel. Move the chainsaw at least 10 feet (3m) away from the fuelling point before starting the engine.
• DO NOT allow other persons to be near when starting or cutting with the chainsaw. Keep bystanders and animals away from the work area.
• DO NOT start cutting until you have a clear work area, secure footing, and a planned retreat path from falling trees or branches.
OPERATION• Keep all parts of your body away from the saw’s chain when the
engine is running.• Before you start the engine, make sure that the chain is not in
contact with anything.• Carry the chainsaw with the engine stopped, the chain bar and
saw chain facing rearwards, and with the exhaust away from your body.
• NEVER use a chainsaw which is damaged, incorrectly set,

7
incomplete or loosely assembled. Make sure that the chain rotation stops when the chain brake is applied.
• Shut off the engine before setting the chainsaw down.• Use extreme caution when cutting small bushes and saplings;
slender material may catch in the saw chain and be whipped towards you or pull you off balance.
• When cutting a limb that is under tension, be alert for spring back so that you will not be struck when the tension in the wood fibres are released.
• Keep the handles dry, clean, and free of oil or fuel mixture.• Operate the chainsaw only in well-ventilated areas.• DO NOT operate a chainsaw from up in a tree unless you have
been specifcally trained to do so.• All chainsaw servicing, other than the items listed in the
user manual safety and maintenance instructions, should be performed by competent chainsaw service personnel.
• When transporting your chainsaw, use the appropriate chain bar cover.
• DO NOT operate your chainsaw near or around flammable liquids or gases, whether inside or outdoors. An explosion and/or fire may result.
• DO NOT fill the fuel tank, oil reservoir or lubricate whilst the engine of the chainsaw is running.
• USE THE CORRECT TOOL: Cut wood ONLY. Do not use the chainsaw for purposes for which it was not intended. For example, do not use the chainsaw for cutting plastic, masonry or building materials.
• The engine will create toxic exhaust fumes as soon as the engine is started. Never work in enclosed areas or in areas with poor ventilation.
• NOTE: The chainsaw is designed for noncommercial, occasional use and for general work, such as stump grubbing, and cutting

8
firewood, etc. It is not designed for lengthy use. If it is used for a lengthy
period, the vibrations it causes in the hands of the user may result in circulation problems (white finger syndrome).
• The chain is designed exclusively for sawing wood. You may only fell trees if you have received the appropriate
training. The manufacturer cannot be held liable for damage caused by improper or incorrect usage.
• PLEASE NOTE: Our equipment has not been designed for use in commercial, trade or industrial applications. Our warranty will be voided if the machine is used in commercial, trade or industrial businesses or for the equivalent purposes.
KICKBACKKickback may occur when the nose or tip of the chain bar touches an object, or when the wood closes in and pinches the saw chain in the cut. If the bar tip contacts, it may cause an extremely fast reverse reaction, kicking the chain bar up and back towards the operator.Pinching the saw chain along the top of the chain bar may push the chain bar rapidly back towards the operator. Either of these reactions may cause you to lose control of the saw, which could result in serious personal injury. Do not rely exclusively upon the safety devices built into your saw. As a chainsaw user, you should take several steps to keep your cutting jobs free from accident or injury.• NOTE: With a basic understanding of kickback, you can reduce
or eliminate the element of surprise. Sudden, unexpected action contributes to accidents.• Keep a good firm grip on the saw with both hands: the right
hand on the rear handle, and the left hand on the front handle, when the engine is running. Use a firm grip with thumbs and fngers encircling the chainsaw handles. A firm grip will help you

9
reduce kickback and maintain control of the saw. Never let go of the chainsaw when it is running.
• Make sure that the area in which you are cutting is free from obstructions. Do not let the nose of the chain bar contact a log, branch, or any other obstruction which could be hit while you are operating the saw.
• Cut at high engine speeds.• DO NOT overreach or cut above shoulder height.• Follow the manufacturer’s sharpening and maintenance
instructions for the saw chain.• Only use replacement bars and chains specifed by the
manufacturer or the exact equivalent.• PINCHING the saw chain along the BOTTOM of the cutting
(chain) bar may PULL the saw forward away from the operator.• PINCHING the saw chain along the TOP of the cutting (chain)
bar may PUSH the chain bar rapidly back towards the operator.• Any of these reactions may cause you to lose control of the saw,
which could result in serious personal injury.Beware of the following: Rotary recoil. A = Recoil direction. B = Recoil reaction zone. Impact/jamming recoil and pulling reactions: When cutting from under an object (see Pic. D) using the top of the chain, the object may pinch the chain and cause either a forward force on the chainsaw or a rearward force on the object (see Pic. C).When cutting from the top surface of an object (Pic. E) using the bottom of the chain, the object may pinch the chain and cause either a rearward force on the chainsaw or a forward force on the object.
A B
A A
C
DE
10
MAINTENANCE AND STORAGE• Keep all nuts, bolts and screws tight, to be sure the equipment
is in safe working condition.• Never store the equipment with petrol in the tank inside a
building where fumes can reach an open flame or spark.• Allow the engine to cool before storing in any enclosure.• To reduce the fire hazard, keep the engine, silencer and petrol
storage area free of hedge trimmings, leaves, or excessive grease.
• Replace worn or damaged parts for safety.• If the fuel tank has to be drained, this should be done outdoors.NOTE: Dispose of soiled maintenance material and operating materials at the appropriate collection point.Recycle packaging material, metal and plastics. Do not dispose of with domestic, household waste.mproper or incorrect usage. PLASE NOTE:

11
COMONENT LIST
2
3
4
5
1
7
6
6 5
1. Chain brake2. Handle3. Safety trigger lock4. Starter5. Oil tank6. Fuel tank7. Oregon chain saw8. Prime bulb9. Top handle
10. Ail filter cover
Not all the accessories illustrated or described are included in standard delivery.
8
10
9

12
Ou ASSEMBLY AND USE
INTENDED USE a. Assembly of the chain guide
IMPORTANT: The machine must not be started during assembly. Wear protective gloves when handling the blade.
1) Pull the guard toward the front handle to check that the chain brake is not engaged.2) Loosen the nuts and remove the chain cover.3) Attach the bracket to the rear of the engine assembly with a screw.4) Install the guide and mount the chain on the pinion and guide in the direction shown in the diagram.5) Loosen the nuts and remove the chain cover.6) Install the guide and mount the chain on the pinion and guide in the direction shown in the diagram.
7) Adjust the chain tensioning nut in the lower hole of the guide. Then install the chain and secure the mounting nut.
8) Adjust the chain tension by turning the tension screw until the straps touch just the bottom side of the bar.

13
9) Tighten the nuts and check if the chain is rotated correctly and tight.
While lifting the chain guide, turn the content screw to apply correct tension to the chain. Then lock the crankcase nuts.Rotate the chain with your hand to check that it is turning without excessive resistance and that it is properly tightened. Repeat the installation if the chain is not tight.
b. Adjusting the chain tensionThe tool motor must be switched off before adjusting the chain tension.
Make sure that the chain is inside the groove of the guide. Hold the guide by its tip. Adjust the tension of the chain with the tension adjustment screw until the chain teeth touch the bottom of the guide.
Turn the chain tension adjustment screw clockwise until the chain is tight. Do not stretch the chain too much. Check the tension of the chain and check if the casing is properly tightened. If this is not the case, please repeat the procedure.
1. FILLING THE FUEL TANK
WARNING: When filling the tank: The chainsaw must always be stopped and
cooled. Never smoke during refueling. It must not have
flames or sparks near the fuel. Before refueling, allow the chainsaw to cool
completely. Do not attempt to refuel when the engine is hot.
If fuel has been spilled, immediately stop refueling and do not start the engine. Clean up the spill and fill the machine in another location
Never fill the fuel tank to the flange; there is a risk of overflow.
Do not refuel in a closed and unventilated area.
The fuel used for this tool is a mixture of unleaded gasoline and registered engine lubricant. When mixing gasoline with oil, use only gasoline that does not contain ethanol or methanol.Unleaded gasoline is a quality gasoline type. This will help to avoid damaging the fuel lines of the engine and other engine parts.

14
The recommended mixing ratio is 40:1 (make sure the mixing ratio is correct before filling the product.
a. Mixing∫ Mix in a clean, empty container (supplied).∫ Pour the oil into the container.∫ Pour the fuel into the tank. Mix the mixture long enough (more than one minute) to get a good combination.
b. Filling the fuel tank∫ Unscrew the fuel tank cap and remove it.∫ Fill the tank slowly with the mixture. Do not exceed the maximum capacity (fill to 80% of its capacity preferably).∫ Replace the cap on the fuel tank and tighten it∫ Wipe any spillage around the unit if necessary
Note: To avoid damage and accidents, DO NOT USE OTHER MIXTURES AND OTHER TYPES OF OIL / PETROL
c. Storage of fuelThe fuel must be kept in a clean and safe container and always closed.
If you are not using the product for a long time, remove the fuel mixture and add it to a container.
Do not leave the fuel for a long time in the product. The fuel may clog the carburetor and the engine will not operate properly.
d. Disposal of fuelWhen the fuel is no longer used or worn, please dispose of it in an authorized location. Check local laws regarding disposal of fuels
2. USEBefore using the chainsaw, inspect the work area. This must be cleared. Remove any branches, obstacles and other items that may cause damage during cutting.The unit should always be filled with fuel and useful. Check the level of filling and refill when necessary.

15
1. Starting the enginea. Press the priming pump continuously until the fuel enters the pump. Set the switch to position I.
b. Pull the starter chock nob. The starter will close and the throttle will be moved to the starting position
Hold the chainsaw firmly against the ground. Put the chainsaw:∫ Either on the left side of your body holding the handle firmly with your left hand. Use your right hand to pull the starter rope∫ Either on the right side of your body holding the handle firmly with your right hand.
Use your left hand to pull on the starter rope.In both cases, the saw must remain away from the operator's body.
16
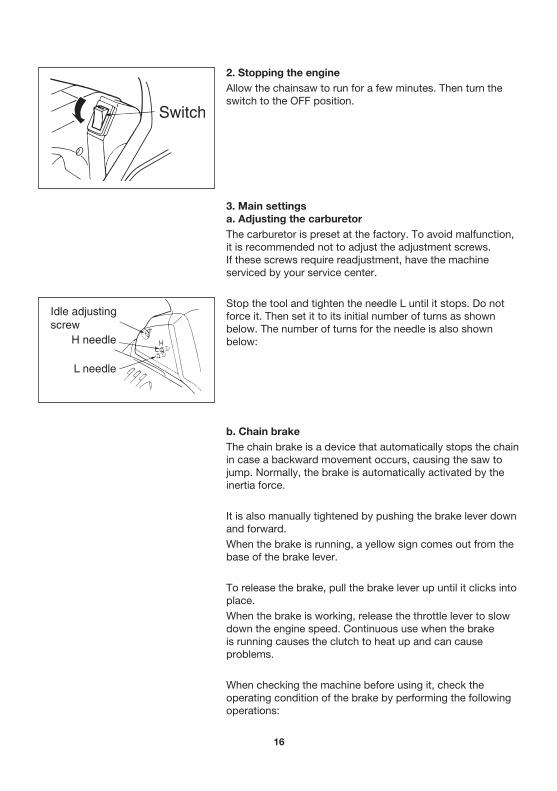
2. Stopping the engineAllow the chainsaw to run for a few minutes. Then turn the switch to the OFF position.
3. Main settingsa. Adjusting the carburetorThe carburetor is preset at the factory. To avoid malfunction, it is recommended not to adjust the adjustment screws. If these screws require readjustment, have the machine serviced by your service center.
Stop the tool and tighten the needle L until it stops. Do not force it. Then set it to its initial number of turns as shown below. The number of turns for the needle is also shown below:
b. Chain brakeThe chain brake is a device that automatically stops the chain in case a backward movement occurs, causing the saw to jump. Normally, the brake is automatically activated by the inertia force.
It is also manually tightened by pushing the brake lever down and forward.When the brake is running, a yellow sign comes out from the base of the brake lever.
To release the brake, pull the brake lever up until it clicks into place.When the brake is working, release the throttle lever to slow down the engine speed. Continuous use when the brake is running causes the clutch to heat up and can cause problems.
When checking the machine before using it, check the operating condition of the brake by performing the following operations:
17
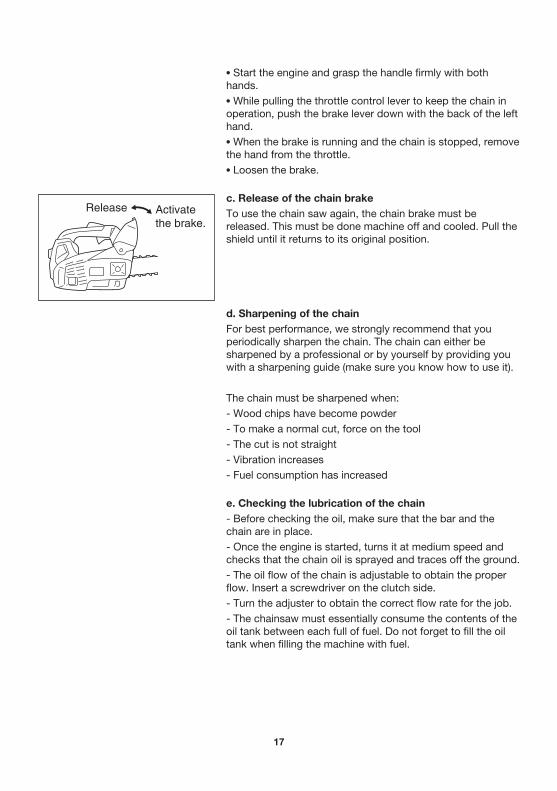
∫ Start the engine and grasp the handle firmly with both hands.∫ While pulling the throttle control lever to keep the chain in operation, push the brake lever down with the back of the left hand.∫ When the brake is running and the chain is stopped, remove the hand from the throttle.∫ Loosen the brake.
c. Release of the chain brakeTo use the chain saw again, the chain brake must be released. This must be done machine off and cooled. Pull the shield until it returns to its original position.
d. Sharpening of the chainFor best performance, we strongly recommend that you periodically sharpen the chain. The chain can either be sharpened by a professional or by yourself by providing you with a sharpening guide (make sure you know how to use it).
The chain must be sharpened when:- Wood chips have become powder- To make a normal cut, force on the tool- The cut is not straight- Vibration increases- Fuel consumption has increased
e. Checking the lubrication of the chain- Before checking the oil, make sure that the bar and the chain are in place.- Once the engine is started, turns it at medium speed and checks that the chain oil is sprayed and traces off the ground.- The oil flow of the chain is adjustable to obtain the proper flow. Insert a screwdriver on the clutch side.- Turn the adjuster to obtain the correct flow rate for the job.- The chainsaw must essentially consume the contents of the oil tank between each full of fuel. Do not forget to fill the oil tank when filling the machine with fuel.

18
4. Work with wire and harness
NOTE: It is necessary to have a complete training before working at high. It is strongly recommended that only experienced and trained persons carry out work at high. Know all emergency procedures to be carried out.
These instructions are examples of good practice. Follow and abide by local laws and regulations as well.
It is also recommended that the operator who is going to work at height be assisted by another person.
It is compulsory with techniques of climbing and working position. Be equipped with complete equipment including harnesses, ropes, strops, snap hooks and other equipment that allows them to maintain and maintain the saw by adopting secure positions.
a. Using the Chainsaw in the TreeAn analysis of accidents with chainsaws during tree pruning shows that the main cause is an inadequate use of the one-hand chainsaw. In a large majority of accidents, operators do not seek to adopt a safe working position that allows them to hold with both hands. This results in an increased risk of injury due to:- The absence of a firm grasp of the chainsaw in case of rebound- A lack of control of the chainsaw, which is more likely to come into contact with the climbing ropes and with the operator's body (especially the hand and the left arm) and- Loss of control due to unsafe working position, resulting in contact with the chain saw (unexpected movement during operation of the chain saw).
b. Safe positioning for two-hand operationIn order to allow operators to hold the chain saw with both hands, it is generally recommended that they aim for a safe working position when operating the chain saw:- At the hip, when cutting horizontal sections, and- At the level of solar plexus, when cutting vertical sections.
When operators work near vertical trunks with low lateral

19
forces on their working position, good support may be sufficient to maintain a safe working position. However, as operators move away from the trunk, they will need to take steps to suppress or neutralize increasing lateral forces, for example by redirecting the main rope through an additional anchor point or using an adjustable strap directly from the harness Has an additional anchor point.
The obtaining of a good support to the working position can be favored by the use of a foot stirrup created by an endless sling.
c. Starting the saw in the treeWhen starting the saw in the shaft, the operator should:- Apply the chain brake before starting, and- Hold the saw on the left side, either on the right side before starting:∫ On the left side, hold the saw with your left hand on the front handle while holding the saw away from the body while pulling the starter rope with your right hand, or∫ On the right side, hold the saw with your right hand on one of the two handles while holding the saw away from the body while pulling the starter rope with your left hand.- The chain brake should always be engaged before lowering a running saw to its stroke. - Operators should always check that the saw has sufficient fuel before undertaking critical cuts.
d. Using the chain saw with one handOperators should not use chain saws to prune single-handed trees when they are in an unstable working position and prefer hand saws when cutting wood of small diameter at the ends of the branches.
Only chainsaws should be used for tree pruning with one hand when:- Operators cannot maintain a working position allowing them to use both hands- They need to maintain their working position, allowing them to use both hands- The saw is used in full extension, perpendicular to the body of the operator and separated from it.
20
Operators should:- Never cut with the rebound area at the end of the chain saw chain guide- Never hold and cut sections or- Never try to catch sections when they fall.
e. Release of a jammed sawIf the saw gets stuck during cutting, the operators should:- Saw the saw and attach it securely to the cutting foot of the shaft (ie trunk side) or has a separate chord from the tool- Pull the saw of the cluster while the branch is lifted, if necessary,- If necessary, use a hand saw or a second chainsaw to release the chain saw.
5. Cutting workThe tool should only be used to cut trees. Do not use it for other applications.Do not attempt to remove the chainsaw when it is stuck during operation. Stop the machine and remove the wedge blade with a wedge.Stick your feet well, keep a good balance and do not climb on the tree trunk.
Try not to work on a slope. However, if you have to work on a slope, always stand higher than the tree trunk.
Before bending a branch or trunk in bending, observe the direction of bending and finish the cut opposite the bending side to prevent the chain guide from getting stuck in the cut.
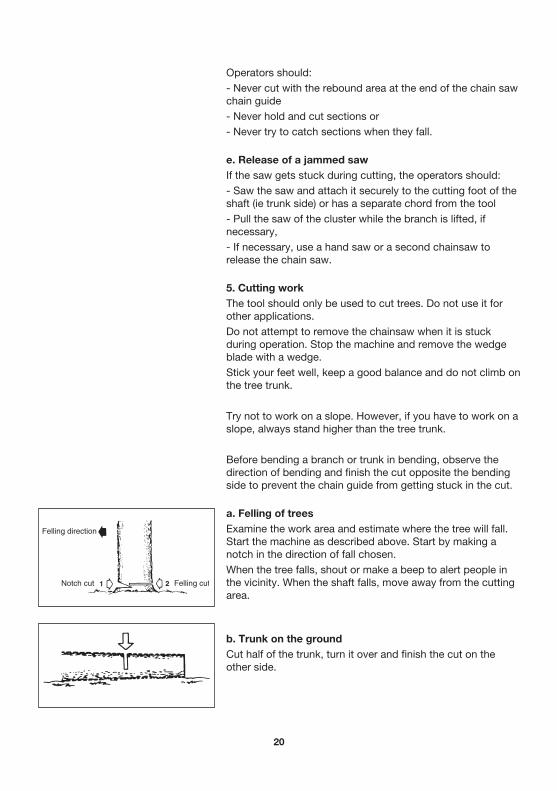
a. Felling of treesExamine the work area and estimate where the tree will fall. Start the machine as described above. Start by making a notch in the direction of fall chosen.When the tree falls, shout or make a beep to alert people in the vicinity. When the shaft falls, move away from the cutting area.
b. Trunk on the groundCut half of the trunk, turn it over and finish the cut on the other side.

21
c. Trunk in elevationBegin by cutting a first part from below and then from above. Then, on the second part, repeat this operation.
f. Pruning of a felled treeObserve first the direction of flexion of the branch. Make a first notch on the side in flexion and finish the cut on the opposite side.
g. Pruning a treeBegin pruning by nicking the tree from below and then finish at the top.
22
MAINTENANCE AND STORAGE
1. MaintenanceBefore any maintenance work, the machine must be switched off and completely cooled.Perform the maintenance work according to the instructions below and perform them regularly. A clean, well-maintained machine increases its standard of living and efficiency. On the contrary, a machine maintained can cause damage, accidents and render the tool inoperable in the short term.Any other maintenance, modification or repair work must be carried out by a qualified professional.Do not immerse the tool in water or any other liquid.
a. After each use- Clean the engine block louvers with a blower.- Check the chain brake if it is working properly.- Clean the plastic parts before wiping with a damp cloth.- Check the use of the chain guide- Check the auto lubrication circuit if it is obstructed or not.- Check sprocket condition- Clean the cylinder fins with a compressor
b. Cleaning the air filterUse a compressor to blow dust and chips.
To clean the filter foam: open the air filter, remove the foam. Clean this foam with gasoline, wring out and dry. Replace the foam in the air filter and reassemble as described in the diagram.
After 10 uses, replace the foam with a new one.
c. Cleaning the oil inletDisassemble the chain guide and the chain hood and check that the oil supply is clean. If dirty, remove dirt with a clean compressor or cloth.
23
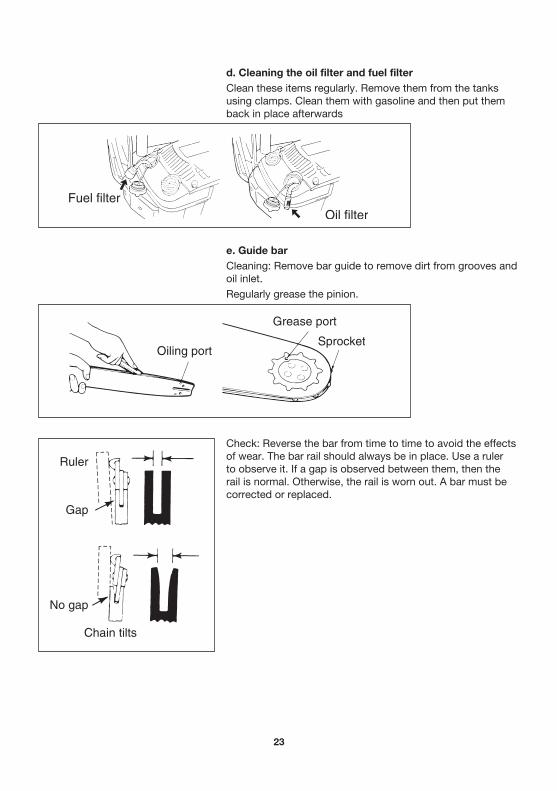
d. Cleaning the oil filter and fuel filterClean these items regularly. Remove them from the tanks using clamps. Clean them with gasoline and then put them back in place afterwards
e. Guide barCleaning: Remove bar guide to remove dirt from grooves and oil inlet.Regularly grease the pinion.
Check: Reverse the bar from time to time to avoid the effects of wear. The bar rail should always be in place. Use a ruler to observe it. If a gap is observed between them, then the rail is normal. Otherwise, the rail is worn out. A bar must be corrected or replaced.

24
f. SprocketCheck the sprocket on signs of wear. If wearing is important, replace it with a new one. Do not install a chain on a worn or damaged sprocket. Do not install a worn chain on a pinion.
g. Spark plugClean the electrodes with a wire brush and set the gap to 0.6mm if necessary.
h. chain sawCheck each time the cutter and cutting angles are as shown below.
i. Sharpening of the chainFor best performance, we strongly recommend that you periodically sharpen the chain. The chain can either be sharpened by a professional or by yourself by providing you with a sharpening guide (make sure you know how to use it).
The chain must be sharpened when:- Wood chips have become powder- To perform a normal cut, force on the tool#- The cut is not straight- Vibration increase- Fuel consumption has increased- Sharpening method:

25
The chain saw must be switched off and locked before sharpening. Use a round file or sharpening device (see in store).Place the file on the tooth and push straight. Shift with the same movement.After sharpening all teeth, check if the teeth are sharp.
2. STORAGEWhen storing, the tool must be turned off, cooled, emptied of fuel and thoroughly cleaned.Store the tool in a dry, clean place, preferably in its packaging, and out of the reach of children. Store all accessories and other items with the tool
MAINTAINANCE AND STORAGELIST OF VULNERABLE PARTS
Description Models or specificationSpark plug L8RTF/LDGuide bar 100SDEA041Saw chain 91P040X

26
TROUBLE SHOOTING
Use this section to help you to try and solve any problems you may have
Fault Possible Cause Solution
Unit won’t start or starts but will not run
1. Incorrect starting procedures
2. Incorrect carburetor mixture adjustment setting
3. Fouled spark plug
4. Fuel filter blocked
5. Chain brake is engaged
1. Follow instructions in the user guide or refer to the starting procedure check list on page 18
2. Have carburetor adjusted by an authorised service centre
3. Clean/gap or replace plug
4. Replace fuel filter
5. Pull chain brake in disengage position
Unit starts but engine has low power
1. Incorrect lever position on choke
2. Dirty air filter
3. Incorrect carburetor mixture adjustment setting
1. Move to RUN position
2. Remove, clean and reinstall filter
3. Have carburetor adjusted by an authorised service centre
Engine hesitates 1. Incorrect carburetor mixture adjustment setting
1. Have carburetor adjusted by an authorised service centre
No power under load 1. Incorrectly gapped spark plug 1. Clean/gap or replace plug
Runs erratically 1. Incorrect carburetor mixture adjustment setting
1. Have carburetor adjusted by an authorised service centre
Smokes excessively 1. Incorrect fuel mixture 1. Use properly mixed fuel (40:1 mix)
Poor performance when operated
1. Blunt chain
2. Loose chain
1. Sharpen or replace the chain
2. Tension the chain
Engine dies 1. Empty petrol tank
2. Fuel filter in the wrong position in the tank
1. Fill up the petrol tank
2. Completely fill the petrol tank or reposition the fuel filter in the petrol tank
Insufficient chain lubrication (the cutter rail and chain get hot)
1. Empty oil tank for the chain
2. Oil lubrication opening blocked
1. Top up the oil tank for the chain
2. Clean the oil lubrication hole in the cutter bar Clean the groove in the cutter bar

27
NOTE: IF YOU EXPERIENCE A PROBLEM WITH YOUR PRODUCT, PLEASE DO NOT ATTEMPT TO OPEN OR REPAIR THE HPRODUCT YOURSELF. DOING SO MAY VOID THE WARRANTY AND COULD CAUSE DAMAGE OR PERSONAL INJURY. IF THE PROBLEM STILL PERSISTS, PLEASE CONTACT US BY REFERRING TO THE SERVICE & SUPPORT INFORMATION ON THE FOLLOWING PAGE.

28
DECLARATION OF CONFORMITY / PERFORMANCE
Product Code: 23253/CS2500A-3Product Description: Hawksmoor 25.4cc 34cm Top Handle Petrol Chainsaw
1. Toolstation Limited, Express Park, Bristol Road, Bridgwater, Somerset TA6 4RN
This declaration of conformity is issued under the sole responsibility of Toolstation
2. Object of the declaration
The object of the declaration described above is in conformity with the relevant Community harmonization legislation:Supply of Machinery (Safety) Regulations 20082006/42/ECElectromagnetic Compatibility Regulations 20162014/30/EUThe Restriction of the Use of Certain Hazardous Substances in Electrical and Electronic Equipment Regulations 20122011/65/EU&(EU)2015/863Noise Emission in the Environment by Equipment for use Outdoors Regulations 20012000/14/EC amended by 2005/88/EC:- Conformity Assessment Procedure as per Annex V- Measured Sound Power Level 110.4 dB(A)- Declared Guaranteed Sound Power Level 113 dB(A)
3. References to the relevant standards used (or references to the specifications in relation to which conformity is declared:BS EN ISO 11681-2, BS EN ISO 14982
4. Additional information:Signed for and on behalf of Toolstation Limited

29
ENVIRONMENTAL INFORMATION
When your product comes to the end of its life or you choose to update or upgrade it by replacing it, please do not dispose of it with your normal household waste. Please recycle where facilities exist. When you need to dispose of this product, check with your retailer or local authority for suitable options. Regulations encourage the recycling of Waste from Electrical and Electronic Equipment (DIRECTIVE 2012/19/EU OF THE EUROPEAN PARLIAMENT AND OF THE COUNCIL of 4 July 2012 on waste electrical and electronic equipment (WEEE)).

30
GUARANTEE
Toolstation products deliver reliable service for normal, household use in domestic settings. All Toolstation products are individually tested before leaving the factory.If you are a consumer and you experience a problem with your Toolstation product, which is found to be defective due to faulty materials or workmanship within the Guarantee Period, this Toolstation Guarantee will cover repair or - at the discretion of Toolstation – replacement with a functionally equivalent Toolstation product.Your product is under guarantee for 2 year from the date of purchase or the date of delivery of the product, if later.
The guarantee is subject to the following provisions:
- The guarantee does not cover accidental damage, misuse, cabinet parts, knobs, or consumable items.
- The product must be correctly installed and operated in accordance with the instructions contained in this manual.
- It must be used solely for domestic purpose.
- The guarantee will be retendered invalid if the product is re-sold or has been damaged by inexpert repair.
- Specifications are subject to change without notice.
- The manufacturer disclaims any liability for the incidental or consequential damages.
- The guarantee is in addition to, and does not diminish your statutory or legal rights.
CUSTOMER SUPPORT
www.coreservice.co.ukCall us +44 01904 947568Email: [email protected]
Made in China