2017 Camp Science Experiment - Facilitator Guide
17
2017 Camp Science Experiment - Facilitator Guide Solar Science: The Great American Eclipse (ACTIVITY 1) OBJECTIVE: ILLUSTRATE THE DIMENSIONS OF THE SUN On Monday, August 21 st , 2017, West Virginia youth will be treated with a historic solar eclipse of up to 90% coverage of the Sun by the Moon. Nicknamed “The Great American Eclipse”, this solar eclipse is likely the only one they will see during their childhood (the next will be in 2024) and provides a timely hook to engage youth in STEM literacy. To prepare and excite youth for the upcoming eclipse, the 2017 Camp Science Experiment focuses on different characteristics of the sun including its relative size compared to the earth, distances within the solar system, and why eclipses (both solar and lunar) occur. In this activity, youth will create a pinhole viewer and use simple math to calculate the diameter of the sun. From there, youth can make comparisons between the sun’s dimensions and other celestial bodies like the earth. Conversion to more common units like miles or football fields, make the vast size of the sun easier to comprehend. Youth who participate in this activity will receive a pair of safe-viewing “eclipse glasses”, which were provided in the Camp Science Experiment County Kit. It is important to remind youth to only observe the eclipse with the proper eye protection. Activity 1 – Solar Size The sun may only take up a small portion of the entire sky, but how big is the sun? All energy on our planet comes from it, so it must be pretty big! This experiment will help you find the answer. Safety: Youth should never look directly at the Sun. Not even through the pinhole created in this activity. Staring at the Sun will cause permanent eye damage! Experiment Management: Time: 30 minutes Group Size: 2-4 Grade Levels: 3 rd -12 th This activity can be presented as a one day class, assembly, or Free Time activity. *Important Note: It must be a sunny day, preferably between 10:00 AM and 2:00 PM Materials: Provided in Kit: • Cardboard squares (2 pieces per group) • Aluminum foil (small piece per group) • Paperclip (1 per group) • Copies of paper ruler (1 per group) • Copies of the youth worksheet (1 per group) Provided by County: • Scissors (share among groups) • Tape (share among groups) • Pencil (1 per group) • Calculator (optional), youth can also use the calculator on their phone if they have one
Transcript of 2017 Camp Science Experiment - Facilitator Guide

2017 Camp Science Experiment - Facilitator Guide Solar Science: The Great American Eclipse (ACTIVITY 1)
OBJECTIVE: ILLUSTRATE THE DIMENSIONS OF THE SUN
On Monday, August 21st, 2017, West Virginia youth will be treated with a historic solar eclipse of up to 90% coverage of the Sun by the Moon. Nicknamed “The Great American Eclipse”, this solar eclipse is likely the only one they will see during their childhood (the next will be in 2024) and provides a timely hook to engage youth in STEM literacy.
To prepare and excite youth for the upcoming eclipse, the 2017 Camp Science Experiment focuses on different characteristics of the sun including its relative size compared to the earth, distances within the solar system, and why eclipses (both solar and lunar) occur. In this activity, youth will create a pinhole viewer and use simple math to calculate the diameter of the sun. From there, youth can make comparisons between the sun’s dimensions and other celestial bodies like the earth. Conversion to more common units like miles or football fields, make the vast size of the sun easier to comprehend.
Youth who participate in this activity will receive a pair of safe-viewing “eclipse glasses”, which were provided in the Camp Science Experiment County Kit. It is important to remind youth to only observe the eclipse with the proper eye protection.
Activity 1 – Solar Size The sun may only take up a small portion of the entire sky, but how big is the sun? All energy on our planet comes from it, so it must be pretty big! This experiment will help you find the answer. Safety: Youth should never look directly at the Sun. Not even through the pinhole created in this activity. Staring at the Sun will cause permanent eye damage! Experiment Management: Time: 30 minutes Group Size: 2-4 Grade Levels: 3rd -12th This activity can be presented as a one day class, assembly, or Free Time activity.
*Important Note: It must be a sunny day, preferably between 10:00 AM and 2:00 PM
Materials: Provided in Kit:
• Cardboard squares (2 pieces per group) • Aluminum foil (small piece per group) • Paperclip (1 per group) • Copies of paper ruler (1 per group) • Copies of the youth worksheet (1 per group)
Provided by County: • Scissors (share among groups) • Tape (share among groups) • Pencil (1 per group) • Calculator (optional), youth can also use the
calculator on their phone if they have one

Vocabulary: • Diameter - a straight line passing from side to side through the center of a body or figure, especially a
circle or sphere • Circumference - the outer boundary, especially of a circular area; perimeter
Getting Started:
1. Ask the youth to hypothesize how large the diameter of the sun is. Have them guess how many earths fit across it.
2. Pass out supplies and youth worksheets (optional).
Here Comes the Sun: Building the Pinhole Viewer
1. Cut a small square out of the center of the cardboard.
Instructor’s Note: The opening does not need to be a perfect square, we just need an opening for sunlight.
2. Place a small piece of aluminum foil, over the opening and tape it at the edges.
Instructor’s Note: The aluminum does not need to be a square, it just needs to completely cover the opening.
3. Make a small pinhole in the middle of the aluminum foil using one end of an unfolded paperclip or thumbtack.
4. Hold the viewer toward the sun so sunlight passes through the hole in the foil and is projected onto the second piece of cardboard. Try to make the distance between the viewer and paper as large as possible, yet still measurable with your ruler (as close to 30cm, 300mm, as possible). This will make measuring more accurate.
Instructor’s Note: A sheet of paper will work in place of a second piece of cardboard as long as you can set it down on a flat surface. You can adjust the size of the pinhole in order to get a better projected image.
5. Outline the image on the paper cast by the sun with a pencil, then measure its diameter (length from side-to-side) in millimeters.
6. Measure the distance from the foil hole to the image cast on the cardboard or paper in millimeters.
Instructor’s Note: The sun image will be very small, thus millimeters is the preferred unit for steps 5 and 6. Make sure youth use the same unit for both steps. Mixing units (i.e. mm/cm, or mm/inches) will not work.
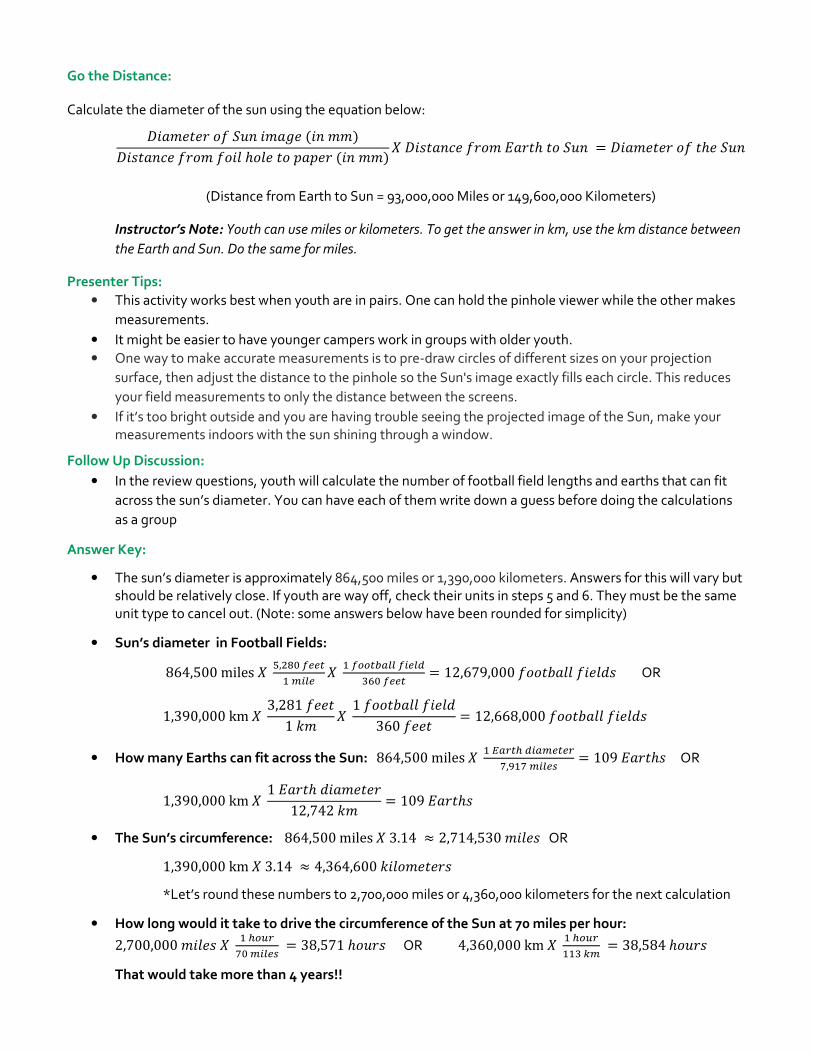
Go the Distance:
Calculate the diameter of the sun using the equation below:
!"#$%&%')*+,-"$#.%("-$$)!"1&#-2%*')$*)"3ℎ)3%&)5#5%'("-$$)6!"1&#-2%*')$7#'&ℎ&)+,- = !"#$%&%')*&ℎ%+,-
(Distance from Earth to Sun = 93,000,000 Miles or 149,600,000 Kilometers)
Instructor’s Note: Youth can use miles or kilometers. To get the answer in km, use the km distance between the Earth and Sun. Do the same for miles.
Presenter Tips: • This activity works best when youth are in pairs. One can hold the pinhole viewer while the other makes
measurements. • It might be easier to have younger campers work in groups with older youth. • One way to make accurate measurements is to pre-draw circles of different sizes on your projection
surface, then adjust the distance to the pinhole so the Sun's image exactly fills each circle. This reduces your field measurements to only the distance between the screens.
• If it’s too bright outside and you are having trouble seeing the projected image of the Sun, make your measurements indoors with the sun shining through a window.
Follow Up Discussion: • In the review questions, youth will calculate the number of football field lengths and earths that can fit
across the sun’s diameter. You can have each of them write down a guess before doing the calculations as a group
Answer Key:
• The sun’s diameter is approximately 864,500 miles or 1,390,000 kilometers. Answers for this will vary but should be relatively close. If youth are way off, check their units in steps 5 and 6. They must be the same unit type to cancel out. (Note: some answers below have been rounded for simplicity)
• Sun’s diameter in Football Fields:
864,500miles6 D,EFGHIIJKLMNI 6 KHOOJPQNNHMINRSTGHIIJ = 12,679,000*))&Y#33*"%3Z1 OR
1,390,000km6 3,281*%%&1]$ 6 1*))&Y#33*"%3Z360*%%& = 12,668,000*))&Y#33*"%3Z1
• How many Earths can fit across the Sun: 864,500miles6 K^Q_J`RMQLIJI_a,bKaLMNIc = 1097#'&ℎ1 OR
1,390,000km6 17#'&ℎZ"#$%&%'12,742]$ = 1097#'&ℎ1
• The Sun’s circumference: 864,500miles63.14 ≈ 2,714,530$"3%1 OR
1,390,000km63.14 ≈ 4,364,600]"3)$%&%'1
*Let’s round these numbers to 2,700,000 miles or 4,360,000 kilometers for the next calculation
• How long would it take to drive the circumference of the Sun at 70 miles per hour:
2,700,000$"3%16 K`Of_aGLMNIc = 38,571ℎ),'1 OR 4,360,000km6 K`Of_KKSgL = 38,584ℎ),'1
That would take more than 4 years!!
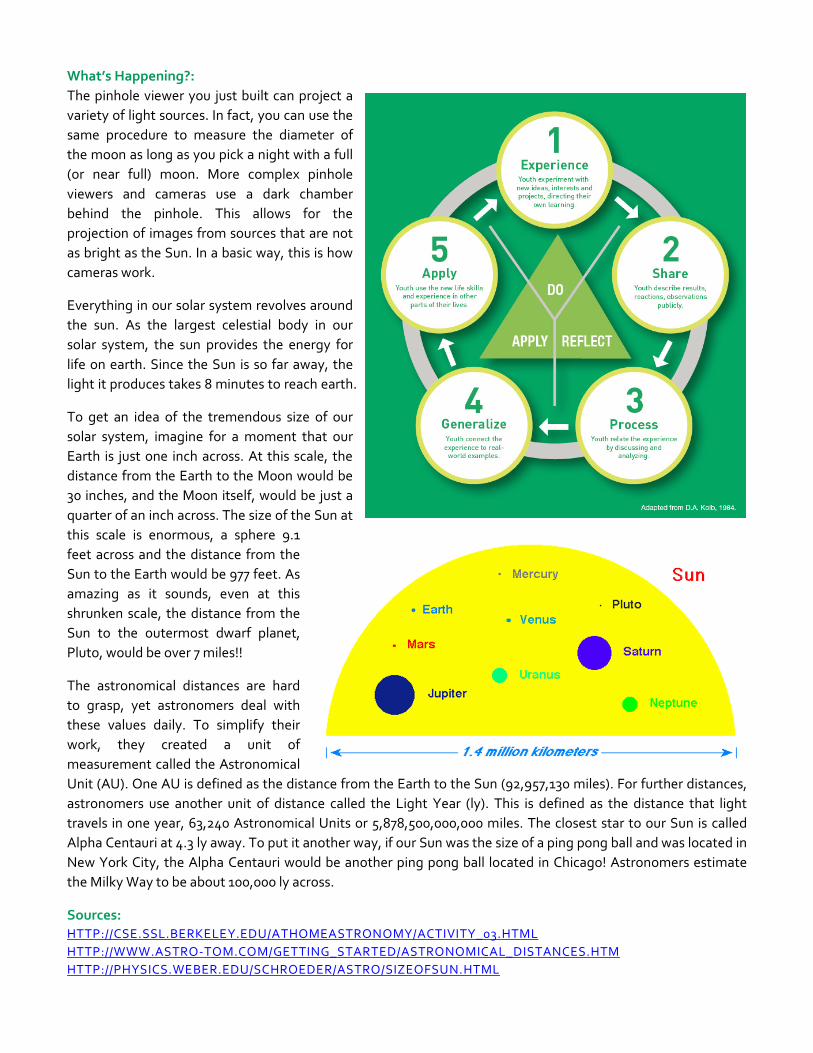
What’s Happening?: The pinhole viewer you just built can project a variety of light sources. In fact, you can use the same procedure to measure the diameter of the moon as long as you pick a night with a full (or near full) moon. More complex pinhole viewers and cameras use a dark chamber behind the pinhole. This allows for the projection of images from sources that are not as bright as the Sun. In a basic way, this is how cameras work.
Everything in our solar system revolves around the sun. As the largest celestial body in our solar system, the sun provides the energy for life on earth. Since the Sun is so far away, the light it produces takes 8 minutes to reach earth.
To get an idea of the tremendous size of our solar system, imagine for a moment that our Earth is just one inch across. At this scale, the distance from the Earth to the Moon would be 30 inches, and the Moon itself, would be just a quarter of an inch across. The size of the Sun at this scale is enormous, a sphere 9.1 feet across and the distance from the Sun to the Earth would be 977 feet. As amazing as it sounds, even at this shrunken scale, the distance from the Sun to the outermost dwarf planet, Pluto, would be over 7 miles!!
The astronomical distances are hard to grasp, yet astronomers deal with these values daily. To simplify their work, they created a unit of measurement called the Astronomical Unit (AU). One AU is defined as the distance from the Earth to the Sun (92,957,130 miles). For further distances, astronomers use another unit of distance called the Light Year (ly). This is defined as the distance that light travels in one year, 63,240 Astronomical Units or 5,878,500,000,000 miles. The closest star to our Sun is called Alpha Centauri at 4.3 ly away. To put it another way, if our Sun was the size of a ping pong ball and was located in New York City, the Alpha Centauri would be another ping pong ball located in Chicago! Astronomers estimate the Milky Way to be about 100,000 ly across.
Sources: HTTP://CSE.SSL.BERKELEY.EDU/ATHOMEASTRONOMY/ACTIVITY_03.HTML HTTP://WWW.ASTRO-TOM.COM/GETTING_STARTED/ASTRONOMICAL_DISTANCES.HTM HTTP://PHYSICS.WEBER.EDU/SCHROEDER/ASTRO/SIZEOFSUN.HTML
2017 Camp Science Experiment -Youth Worksheet Solar Science: The Great American Eclipse (ACTIVITY 1)
OBJECTIVE: ILLUSTRATE DIMENSIONS OF THE SUN
The sun may only take up a small portion of the entire sky, but how big is the sun? All the energy on our planet comes from it, so it must be pretty big! This experiment will help you find the answer.
Background: On Monday, August 21st, 2017, West Virginians will be treated with a historic solar eclipse nicknamed “The Great American Eclipse” because observers across the entire continental United States have the opportunity to view it. The next comparable eclipse won’t happen until 2024!
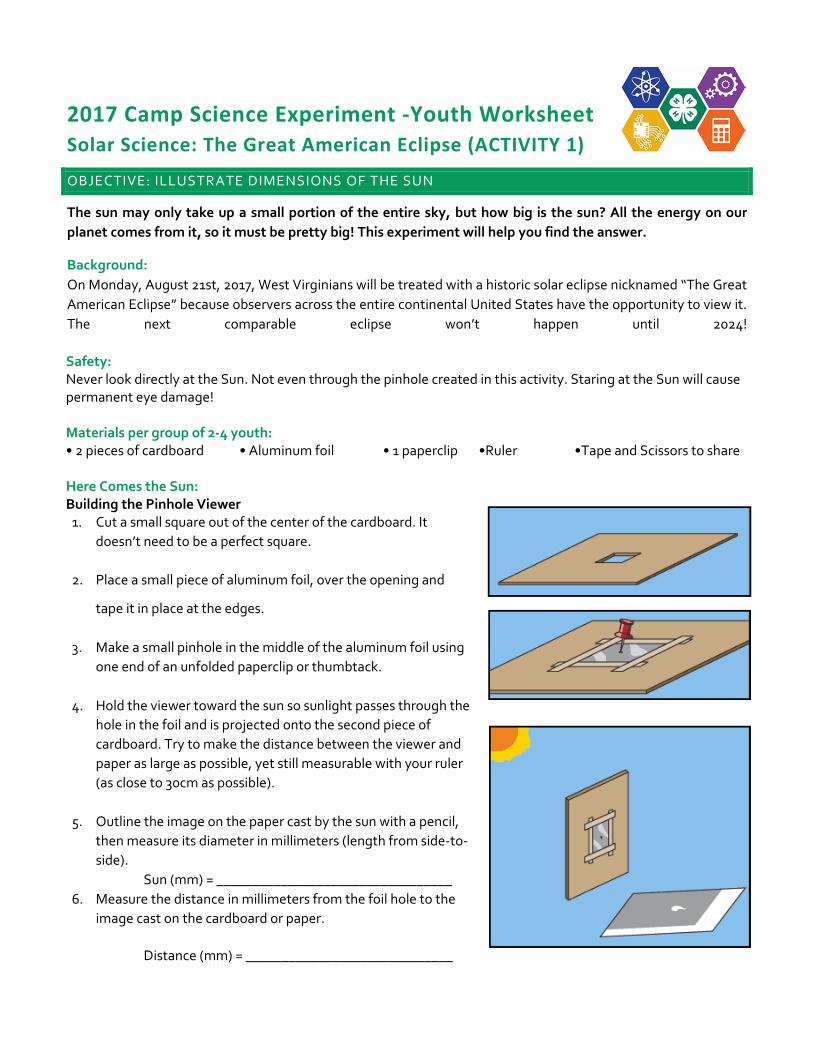
Safety: Never look directly at the Sun. Not even through the pinhole created in this activity. Staring at the Sun will cause permanent eye damage! Materials per group of 2-4 youth: • 2 pieces of cardboard • Aluminum foil • 1 paperclip •Ruler •Tape and Scissors to share Here Comes the Sun: Building the Pinhole Viewer
1. Cut a small square out of the center of the cardboard. It doesn’t need to be a perfect square.
2. Place a small piece of aluminum foil, over the opening and
tape it in place at the edges.
3. Make a small pinhole in the middle of the aluminum foil using one end of an unfolded paperclip or thumbtack.
4. Hold the viewer toward the sun so sunlight passes through the hole in the foil and is projected onto the second piece of cardboard. Try to make the distance between the viewer and paper as large as possible, yet still measurable with your ruler (as close to 30cm as possible).
5. Outline the image on the paper cast by the sun with a pencil, then measure its diameter in millimeters (length from side-to-side).
Sun (mm) = _________________________________ 6. Measure the distance in millimeters from the foil hole to the
image cast on the cardboard or paper. Distance (mm) = _____________________________

Go the Distance:
1. Calculate the diameter of the sun using the equation below. If you have a cell phone, you can use its calculator.
!"#$%&%')*+,-"$#.%("-$$)!"1&#-2%*')$*)"3ℎ)3%&)5#5%'("-$$)6!"1&#-2%*')$7#'&ℎ&)+,- = !"#$%&%')*&ℎ%+,-
The distance from Earth to Sun = 93,000,000 Miles or 149,600,000 Kilometers Note: You can use miles or kilometers. To get the answer in km, use the km distance between the Earth and Sun. Do the same for miles.
2. If a football field is 360 feet long and there are 5,280 feet in a mile (if you used kilometers, there are 3,281 feet in a km), how many football fields can fit across the diameter of the sun?
3. How many Earths would it take to stretch across the diameter of the sun? (earth’s diameter = 7,917 miles or 12,742 km)
4. Multiply the sun’s diameter by h (3.14). This will give you its circumference, which is the total distance around the outside of the Sun.
5. How long would it take you to drive around the sun if you were going 70 miles per hour (113 km/hr)?
Did you know? The Sun’s volume is so big, 1.3 million Earths can fit inside it!

0
1
2
3
4
5
6
7
8
9
10
11
12
cmin
1
0
2
3
4
5
6
7
8
9
1011
1213
1415
1617
1819
2021
2223
2425
2627
2829
30
Printable-Ruler.netClick, Print, Rule!
Ruler 12in/30cmUS LetterTransparent
Printable-Ruler.net


2017 Camp Science Experiment - Facilitator Guide Solar Science: The Great American Eclipse (ACTIVITY 2)
OBJECTIVE: ILLUSTRATE THE RELATIVE SIZE OF THE SOLAR SYSTEM
On Monday, August 21st, 2017, West Virginia youth will be treated with a historic solar eclipse of up to 90% coverage of the Sun by the Moon. Nicknamed “The Great American Eclipse”, this solar eclipse is likely the only one they will see during their childhood (the next will be in 2024) and provides a timely hook to engage youth in STEM literacy.
To prepare and excite youth for the upcoming eclipse, the 2017 Camp Science Experiment focuses on different characteristics of the sun including its relative size compared to the earth, distances within the solar system, and why eclipses (both solar and lunar) occur. In this activity, youth will compare the relative size of the Solar System.
Youth who participate in this activity will receive a pair of safe-viewing “eclipse glasses”, which were provided in the Camp Science Experiment County Kit. It is important to remind youth to only observe the eclipse with the proper eye protection.
Activity 2 – Solar System in Your Pocket Students will build a quick model of the solar system by folding a piece of register tape. The relative distances between the orbits of the planets will be illustrated. Experiment Management: Time: 15 minutes Group Size: 1-2 Grade Levels: 3rd-12th This activity can be presented as a one day class, assembly, or Free Time activity. Materials: Provided in Kit:
• Register Tape (1 per person/group) Provided by County:
• Pencil (1 per person/group)
Getting Started: • Cut or rip 1 meter strips of register tape (about the length of your arms outstretched), one per youth • If you are doing this activity with a large group, you can pre-cut the strips of register tape.
Doing the Activity
1. If time allows, have participants predict where the planets go on one side of the paper strip. You may need to list the planet names and order first. Say: “First, let’s predict! On one side of the register tape, lightly draw two dots, one on each end, right at the edge. Label one “Sun” and the other “Pluto and the Kuiper Belt”. Now, predict where the placement of the planets and proto-planets in between. Where do you think they go?”
2. Once they have predicted, turn the tape over and have the participants create their own pocket Solar system
models.
Lead youth through the following steps:
A. Once again, draw 2 objects on each end of the tape, one large and one small, right at the edge. Label the large one Sun and the small one Pluto/Kuiper Belt. Even though Pluto has been reclassified as a dwarf planet it serves as a useful reference point here. We can use it as the first example of such a dwarf planet ever found.

B. Fold the tape in half, crease it, and unfold. A planet goes there! You can ask for guesses as to which of the planets might be at this halfway point. Draw and label the planet Uranus.
C. Fold the tape back in half, then in half again. If there are mixed ages, give those with some knowledge of fractions the opportunity to show off by asking “What is half of a half?" Unfold and lay flat. Planets go in each of these creases! Ask for guesses again. Then draw and label Saturn at the 1/4 mark and Neptune at the 3/4 mark (Saturn closer to the Sun and Neptune closer to Pluto).
D. No need to fold up the whole tape again. Just fold the Sun edge up to meet Saturn. What planet goes in that crease? Jupiter is at the 1/8 mark! Draw and label Jupiter.
E. Fold the Sun out to meet Jupiter to mark the 1/16th spot. A planet does not go here, but you can draw lots of little dots and label them the Asteroid Belt!
F. At this point, things start getting a little crowded and folding is tough to get precise distances, so fold the remaining 1/16th in half and crease at the 1/32nd spot. Place a small dot for the Earth just inside this fold (closer to the Sun) and a small dot for Mars just outside the fold (closer to the Asteroid Belt) and label them.
G. Place small dot for Mercury and then Venus, between the Earth and Sun, pretty much dividing the space into thirds and label them as Mercury closest to the Sun and Venus closest to the Earth.

Go the Distance:
At the end of the discussion, be sure to have everyone put their names on their tapes and fold them up to put it in their pockets. But before you put them away, here are some questions you might ask to get participants thinking about insights they can get from building this model.
• Are there any surprises? Look how empty the outer solar system is: there is a reason they call it space! And how crowded the inner solar system is (relatively speaking).
• Do you know anything about the physical properties of the ones that are spread out versus the ones that are crowded in close to the Sun? All the inner ones are small and rocky and the outer ones are gassy giants (except small, icy Pluto).
• Given this spacing, why do you think little, rocky Venus can outshine giant Jupiter in the night sky? Both are covered with highly reflective clouds, and although it is much smaller, Venus is also much, much closer.
• Discuss the ways in which this Pocket Solar system is a good model for the real solar system and a not so good model. Examples of ways in which the model is not accurate include:
o The sizes of the planets are not to scale; o We ran out of room for the inner planets; o The planets never appear in a straight line in order out from the Sun. The planets orbit in a circle this far
from the Sun and would be somewhere along the circle. Take it Further:
Make a human solar system with relative distances using a 200 foot measuring tape (AU stands for Astronomical Units).
AU ft. Sun 0 0
Mercury 0.4 2
Venus 0.7 3.5
Earth 1 5
Mars 1.5 7.5
Asteroid Belt/Ceres 3 15
Jupiter 5.2 26
Saturn 9.5 47.5
Uranus 19.2 96
Neptune 30.1 150.5
Pluto/Kuiper Belt 39.5 197.5 Sources:
Originally developed by Amie Gallagher (Raritan Valley Community College).
Adapted by Suzanne Gurton and Anna Hurst, of the Astronomical Society of the Pacific for Astronomy from the Ground Up. Modified for Skynet Junior Scholars.


2017 Camp Science Experiment - Facilitator Guide Solar Science: The Great American Eclipse (ACTIVITY 3)
OBJECTIVE: ILLUSTRATE THE INTERACTIONS AND SIZES OF THE SUN, EARTH, AND MOON
On Monday, August 21st, 2017, West Virginia youth will be treated with a historic solar eclipse of up to 90% coverage of the Sun by the Moon. Nicknamed “The Great American Eclipse”, this solar eclipse is likely the only one they will see during their childhood (the next will be in 2024) and provides a timely hook to engage youth in STEM literacy.
To prepare and excite youth for the upcoming eclipse, the 2017 Camp Science Experiment focuses on different characteristics of the sun including its relative size compared to the earth, distances within the solar system, and why eclipses (both solar and lunar) occur. This activity will focus on the relative distances and celestial interactions
between the Sun, Earth, and Moon. After completing this activity, youth will have a better idea of the sun’s size as well as a conceptual understanding of lunar and solar eclipses.
Youth who participate in this activity will receive a pair of safe-viewing “eclipse glasses”, which were provided in the Camp Science Experiment County Kit. It is important to remind youth to only observe the eclipse with the proper eye protection. Activity 3 – Solar and Lunar Eclipses Humans have travelled from the earth to the moon, but how far is that? The sun is much further from the earth than the moon, but how much further? Experiment Management: Time: 30 minutes Group Size: 1-2 Grade Levels: K-8th This activity can be presented as a one day class, assembly, or Free Time activity.
Materials:
Provided in Kit:
• Copies of the Youth Worksheet (1 per group) • Paper fasteners/brads (2 per group)
*Instructor’s Note: Glue sticks are recommended for quicker drying
Provided by County:
• Scissors (share among groups) • Tape, Glue, or Glue Sticks (share among
groups) • Crayons or markers (optional)
Take It Further Activity
• 1 piece of string (1 per class) • Sidewalk chalk (1 per class) • Measuring tape (1 per class) • Play-doh (2 containers per group or as a class)

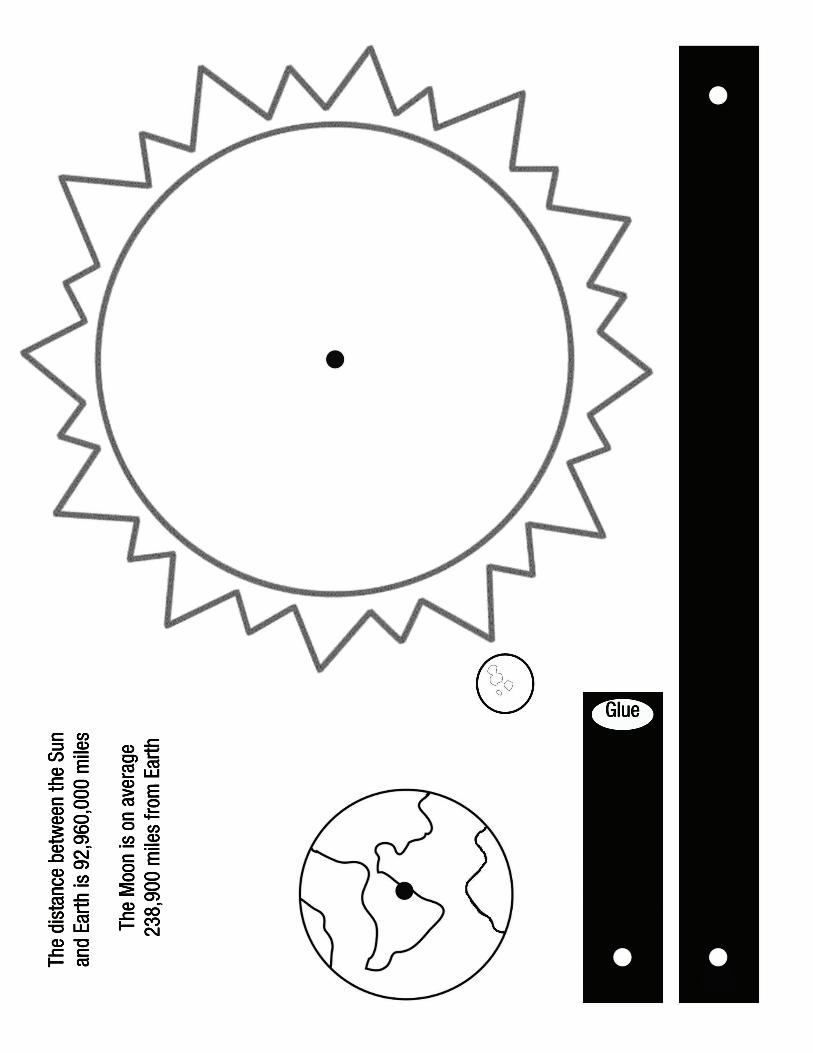
Building the Sun, Earth, Moon Model: 1. Have youth color the page (optional).
2. Cut out the three celestial bodies and two black space lengths (these represent the distance between the Sun-Earth and Earth-Moon).
3. Glue the moon to the shorter length and attach where it says “Glue”.
4. Carefully, punch holes through the dots in the sun, the earth, and the two black space lengths.
5. Line up the holes from one end of the longer black space length with the hole in the sun. Fit a paper fastener/brad through the two holes and bend the prongs to hold the two together.
6. Line up the other end of the longer black space length with the hole of the shorter length and the Earth’s hole. Use the paper fastener to connect all three together, with the earth on top
7. Make sure that the moon can rotate around the earth and that the earth can rotate around the sun.
Guide youth through the following activities… Say: “An eclipse takes place when a planet or moon passes between another planet, moon or the sun. There
are two kinds of eclipses. One is an eclipse of the moon. The other is an eclipse of the sun. Use you model to represent each type of eclipse.”
Have youth hold up their models when they think they have the right orientation.
Take this opportunity to talk about the differences between solar and lunar eclipses: • What are solar and lunar eclipses? • If the Earth and Moon are so much smaller than the Sun, how can each block it out entirely? • Which is more common, and why? • Why should you not look at the eclipse without proper eye protection?
What Is a Lunar Eclipse? The moon orbits, or goes around, Earth. Earth orbits, or goes around, the sun. Once in a while, Earth lines up directly between the sun and the moon. When this happens, Earth blocks the light from the sun to the moon. Earth's shadow then falls on the moon. This is an eclipse of the moon. It is called a lunar eclipse. During a lunar eclipse, we can see Earth’s shadow on the moon. When Earth completely blocks the sunlight, the moon looks red or orange.
Did You Know?: It is believed that lunar eclipses taught people that Earth is round. A long time ago, people thought that Earth was flat. Then they saw Earth’s shadow on the moon. They learned that Earth is round.
What Is a Solar Eclipse? Sometimes when the moon orbits Earth, it lines up directly between the sun and Earth. When this happens, the moon blocks the light of the sun. This causes an eclipse of the sun, or a solar eclipse. During a solar eclipse, the moon casts shadows onto Earth causing the daylight to grow dim. Our next solar eclipse is on Monday August 21st. West Virginia will see up to 90% coverage of the Sun by the Moon.
Did You Know?: You should NEVER look directly at the sun, not even during an eclipse when the moon blocks the sunlight! A solar eclipse is exciting, but looking at the sun is dangerous and can damage your eyes.
Take It Further: A. Sizing Up the Moon
The Earth’s diameter, its distance from side to side, is 12,742 kilometers or 7,917 miles. The Moon has approximately 1/4th Earth's diameter, 1/50th Earth's volume, and 1/80th Earth's mass. The Moon’s diameter is 3,476 kilometers or 2, 160 miles. Have youth complete the following activity as a class demonstration to 1) predict the size of the Earth and Moon and 2) make an accurate model of the Earth and Moon. Prediction:
1. Have youth divide one container of play-doh into two pieces to make a scale model of the Earth and the Moon. Say: “Mold one piece of play-doh into a model of the Earth. Mold the other piece of play-doh into a model of the moon. You should use all of the play-doh and your two models should represent your predictions about the scale of the size of the Moon to the size of Earth.”
2. Have youth predict the distance between the Earth and Moon Say: “Once you have made your two models, place the Earth model on a scrap piece of paper. Then place your Moon model the distance you predict it should be away from the Earth model.”
3. Follow-Up Questions: a. How did you choose the sizes for your Earth and Moon models? b. How did you choose the distance between your Earth and Moon models?
Create a more accurate model of the Earth and Moon:
1. Have youth open the second container of play-doh and divide the container into 50 roughly equal pieces. 2. Youth should set one of the “average” pieces of play-doh to the side. Ask: “How many pieces of play-doh
are left?” 3. Have youth take the remaining 49 pieces of play-doh and squish them back together into one ball. The
small “average” 1/50 piece of play-doh represents the Moon and the large ball represents the Earth. 4. Have youth place the second, more accurate Earth model next to their prediction model of Earth. Youth
usually assume the Moon is much larger than it is. This is due to the fact that the Moon looks very large in the sky because it is much closer to Earth than the Sun is.
5. Now let’s measure an accurate distance. With a measuring tape, measure 60” away from the Earth and place your second, accurate (1/50) Moon model.
6. Follow-Up Questions: a. How did the actual scale size of the Earth and Moon compare to your predicted sizes of the Earth
and Moon? b. How did the actual scale distance between the Earth and Moon compare to your predicted distance
between the Earth and Moon?
B. Sizing Up the Sun Now that we know the comparative sizes of the Earth and Moon, what about the Sun at this scale? Create an accurate model of the Sun:
1. Keep the second, accurate models of the Earth and Moon. Put away your prediction models. 2. With your measuring tape, cut a piece of string 9’ feet in length.

3. Take youth, the piece of string, and chalk outside to a large driveway or parking lot that you can draw on with chalk. Make sure it is a safe location, free from busy traffic.
4. Have one youth hold one end of the string. Have another youth take the other end of the string and walk away from the youth until the rope is held tight.
5. The second youth should bend down to put a mark on the ground with the chalk and start walking in a circle while the first youth stands in place. Have the second youth mark the ground with the chalk while they walk in the circle to create a large chalk ring.
6. Follow-Up Comments: a. The circle that you have drawn on the ground represents the size of the Sun as compared to your model
of Earth. The Sun is much bigger than the Earth and Moon. Its diameter, the distance from side to side, is approximately 1,391,400 kilometers or 864,576 miles across. Thus, the Earth has approximately 1/109th the Sun’s diameter.
b. What about the distance? The distance between the Sun and Earth is nearly 93 million miles. At our model scale, if you were to accurately mark the distance between your chalk Sun model and your play-doh Earth model, you would have to measure out 1,934 ft. or approximately the distance of 6 and a half football fields!
Presenter Tips:
• Printing the youth worksheet on cardstock will make the model easier to manipulate.
More Information on Eclipses:
A total solar eclipse happens when the moon is able to cover the entire sun. Then the daytime can look as dark as night! Total solar eclipses happen roughly once every 18 months. A partial solar eclipse, when the moon doesn’t completely cover the sun, happens roughly every 6 months somewhere on earth. Solar eclipses only last a few minutes.
During a lunar eclipse, the moon can appear orange because Earth’s atmosphere absorbs some colors when sunlight bends toward the moon. This bending of light also causes sunsets to appear orange or red. A lunar eclipse can last for a few hours. At least two lunar eclipses happen every year. Although a solar eclipse can only be observed from certain locations of the earth during the event, a lunar eclipse can be observed from anywhere on earth at night. Sources: HTTPS://SPACEPLACE.NASA.GOV/ECLIPSES/EN/HTTPS://SPACEPLACE.NASA.GOV/ECLIPSES/EN/HTTPS://SPACEPLACE.NASA.GOV/ECLIPSES/EN/HTTPS://SPACEPLACE.NASA.GOV/ECLIPSES/EN/
HTTPS://WWW.NASA.GOV/AUDIENCE/FORSTUDENTS/KHTTPS://WWW.NASA.GOV/AUDIENCE/FORSTUDENTS/KHTTPS://WWW.NASA.GOV/AUDIENCE/FORSTUDENTS/KHTTPS://WWW.NASA.GOV/AUDIENCE/FORSTUDENTS/K----4/STORIES/NASA4/STORIES/NASA4/STORIES/NASA4/STORIES/NASA----KNOWS/WHATKNOWS/WHATKNOWS/WHATKNOWS/WHAT----ISISISIS----ANANANAN----ECLIPSEECLIPSEECLIPSEECLIPSE----K4K4K4K4
The Take It Further activity, “Sizing up the Moon”, was originally developed by Dennis Schatz (Pacific Science Center) for Family ASTRO. Adapted by Anna Hurst for Astronomy from the Ground Up, a program of the Astronomical Society of the Pacific, and modified slightly by the Skynet Junior Scholar program.


![Tabletop Exercise Facilitator Handbook Template · Web viewFOR OFFICIAL USE ONLYAbout this Facilitator Guide FACILITATOR HANDBOOK [Exercise Name]Facilitator Handbook FACILITATOR HANDBOOK](https://static.fdocuments.us/doc/165x107/5ae2303b7f8b9a0d7d8bfd35/tabletop-exercise-facilitator-handbook-viewfor-official-use-onlyabout-this-facilitator.jpg)