2011 CPR & FiRst Aid UPdAtE Instructor resource · LIFesavInG soCIety i 2011 CPR UPdAtEs •...
46
2011 CPR & FIRST AID UPDATE INSTRUCTOR RESOURCE
Transcript of 2011 CPR & FiRst Aid UPdAtE Instructor resource · LIFesavInG soCIety i 2011 CPR UPdAtEs •...
2011 CPR & FiRst Aid UPdAtE
Instructor resource
2011 CPR UPdate InstRUCtoR ResoURCe
Published by the Lifesaving society. First Printing, June 2011.
Copyright 2011 by the Royal Life saving society Canada. Reproduction, by any
means, of materials contained in this book is prohibited unless authorized by the
publisher. Requests should be directed to the Lifesaving society’s Québec Branch
(see back cover for address).
the Lifesaving society is Canada’s lifeguarding expert. the society works to prevent
drowning and water-related injury through its training programs, Water smart® public
education initiatives, water-incident research, aquatic safety management services,
and lifesaving sport.
annually, well over 700,000 Canadians participate in the society’s swimming,
lifesaving, lifeguard, and leadership training programs. the society sets the standard
for aquatic safety in Canada and certifies Canada’s national Lifeguards.
the society is an independent, charitable organization educating Canadian lifesavers
since the first Lifesaving society Bronze Medallion award was earned in 1896.
the society represents Canada internationally as an active member of the royal
Life saving society and the International Life saving Federation. the society is
the Canadian governing body for lifesaving sport - a sport recognized by the
International olympic Committee and the Commonwealth Games Federation.
® Water smart, swim for Life, swim to survive, and Lifesaving society are registered trademarks of the
Royal Life saving society Canada. trademarks other than those owned by the Lifesaving society used in
this document belong to their registered owners.
2011 cPr & fIrst AId uPdAte
Instructor resource

iLIFesavInG soCIety 2011 CPR UPdAtEs • instRUCtoR REsoURCE
almost 500 Canadians die every year in water-related incidents. Most of these are preventable and occur in unsupervised settings, which is why more Canadians need the basic swimming and lifesaving skills to save themselves in an aquatic emergency.
the Lifesaving society has a long and proud history of teaching swimming and lifesaving to Canadians.
We trace our roots to the late 19th century in London, england where we began as the swim-mers’ Life saving society. In 1894, arthur Lewis Cochrane brought the lifesaving skills he learned in his homeland to Canada. and he passed them along to students at Upper Canada College in toronto, ontario. In June 1896, 18 of his students were the first recipients of our distinguished Bronze Medallion award. Under the patronage of King edward vII in 1904, we became the Royal Life saving society.
In the 1950s, we were the first Canadian organization to adopt mouth-to-mouth as the methods of choice over manual methods of artificial respiration. We started our first CPR train-ing program in the 1960s. In the 1980s, we initiated a project to design an economical CPR training manikin (aCtaR 911™), and we launched our Water smart® drowning prevention campaign.
In the 1990s, the society introduced innovative new programs including Boat operator accredited training, the Junior Lifeguard Club and the Canadian swim Patrol Program, and we launched our aquatic safety Management service. We expanded our First aid training programs and completely revamped the Bronze medal and the national Lifeguard training program to suit the needs of the new century.
In 2001, we defined the Canadian swim to survive® standard and subsequently launched our swim to survive program to teach Canadians the minimum essential skills they need to survive an unexpected fall into deep water. our learn-to swim program – swim for Life® – is our latest drowning prevention initiative.
today, we are known to Canadians simply as the Lifesaving society, a national volunteer organization and registered charity. and while we’ve expanded our strengths over the past century to include research and public education, we haven’t forgotten the ideals that formed the foundation of our organization.
the Lifesaving society has always been – and will continue to be – Canada’s lifeguarding experts.
Canada’s lifeguardingexperts
– saving lives for over 100 years.
oCtoBER 2011

iiLIFesavInG soCIety 2011 CPR UPdAtEs • instRUCtoR REsoURCE
Canada’s lifeguarding experts i
Introduction 1
summaries of Changes 3
effective CPR 4Hands-only™ CPRa-B-C versus C-a-Bthe eMs & aed Callthe Breathing checkResuscitation & drowning
Universal aed 8Universal aed trainingComponents of an aedaed operating PrinciplesPad Placement
obstructed airway 11severe Consciousairway Clearing techniquesConscious to UnconsciousUnwitnessed Unconscious Choking
First aid update 14Patient Positioningtreatment of sever Bleedingnon-traumatic Chest PainanaphylaxisHpothermiaHeat Related InjuryJellyfish stingsnakebitesdrowning definitions
CPR Levels & Content Change 17
award Guide Pages 19
Heath Care Provider 37
Contents
oCtoBER 2011
1LIFesavInG soCIety 2011 CPR UPdAtEs • instRUCtoR REsoURCE
introduction
oVERViEWIn october 2010, the “2010 International Consensus on Cardiopulmonary Resuscitation and emergency Cardiac Care science with treatment Recommendations” was published by the International Liaison Committee on Resuscitation (ILCoR). the ILCoR Guidelines document in conjunction with the american Heart association “2010 aHa Guidelines for CPR and eCC” presents the latest treatment recommendations for CPR, eCC and First aid.
these recommendations and guidelines are based on a comprehensive, international evaluation of the best research available. In Canada and around the world, the ILCoR Guidelines are used by organizations such as the Lifesaving society to review and revise the standards and techniques for resuscitation and first aid skills within our programs.
during late 2010 and early 2011, the Lifesaving society worked with the Canadian Red Cross, st. John ambulance service and Canadian ski Patrol to decide how the new guidelines will be implemented in Canada. this package explains the guideline changes and how they will be interpreted and used in Lifesaving society training programs.
Changes resulting from the 2010 ILCoR Guidelines continue the process of simplifying and making CPR training easier to learn and perform. Most of the changes are relatively minor to the way a skill is performed or taught. some changes are based on research that demonstrated the change would improve the medical outcomes for victims.
LiFEsAVinG soCiEtY PRoGRAMsas of 2011, the new CPR standards will be available for release to Lifesaving society instructors, affiliates, aquatic professionals, first aiders and the Canadian public. the society standards and training materials apply the latest international science and research from the 2010 ILCoR Guidelines of the International Liaison Committee on Resuscitation.
By early 2012; all Lifesaving society programs and training will be delivered using the new standards. Updated literature and training will be in place to ensure that Canadians will have access to CPR training that applies the latest research and is designed to improve survival and enhance the effectiveness of the Canadian Chain of survival.
the Lifesaving society has implemented a simple, convenient, flexible and innovative process to update all of our literature, instructors and affiliate members who deliver CPR training in communities across the country. the result will be leading edge support for professional CPR training and public education at Lifesaving society member facilities such as aquatic centre’s throughout Canada.
oCtoBER 2011

2LIFesavInG soCIety 2011 CPR UPdAtEs • instRUCtoR REsoURCE oCtoBER 2011
3LIFesavInG soCIety 2011 CPR UPdAtEs • instRUCtoR REsoURCE
summaries of Changes
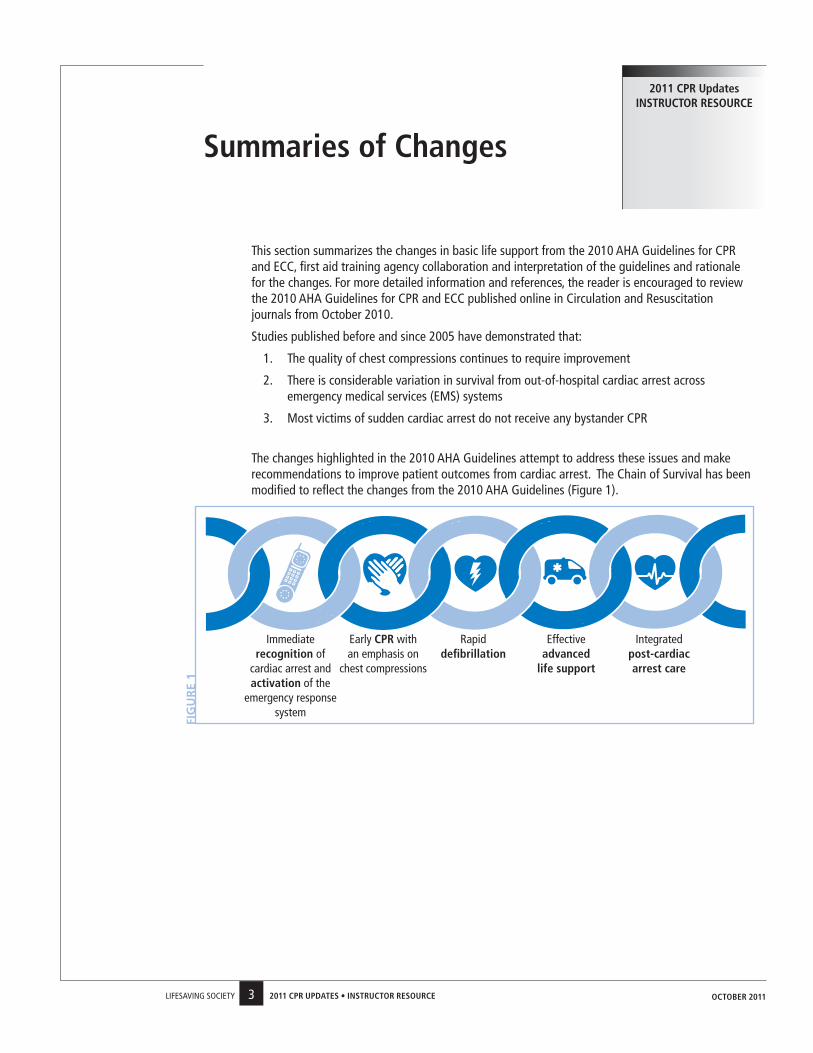
this section summarizes the changes in basic life support from the 2010 aHa Guidelines for CPR and eCC, first aid training agency collaboration and interpretation of the guidelines and rationale for the changes. For more detailed information and references, the reader is encouraged to review the 2010 aHa Guidelines for CPR and eCC published online in Circulation and Resuscitation journals from october 2010.
studies published before and since 2005 have demonstrated that:
1. the quality of chest compressions continues to require improvement
2. there is considerable variation in survival from out-of-hospital cardiac arrest across emergency medical services (eMs) systems
3. Most victims of sudden cardiac arrest do not receive any bystander CPR
the changes highlighted in the 2010 aHa Guidelines attempt to address these issues and make recommendations to improve patient outcomes from cardiac arrest. the Chain of survival has been modified to reflect the changes from the 2010 aHa Guidelines (Figure 1).
2011 CPR Updates instRUCtoR REsoURCE
Immediate recognition of
cardiac arrest and activation of the
emergency response system
early CPR with an emphasis on
chest compressions
Rapid defibrillation
effective advanced
life support
Integrated post-cardiac arrest care
FIG
UR
E 1
oCtoBER 2011

4LIFesavInG soCIety 2011 CPR UPdAtEs • instRUCtoR REsoURCE
Hands-only™ CPR there has been a lot of media surrounding compression-only CPR and resulting questions as to the application of this skill in society programs. It is important to note that:
• If a bystander is not trained in CPR, eMs dispatchers will direct them to provide Hands-only™ (compression-only) CPR for the adult victim who suddenly collapses.
○ discomfort with the application of rescue breaths was the primary reason cited for lay rescuers not providing resuscitation.
• trained rescuers will continue to provide rescue breaths along with compressions when performing CPR (30:2).
○ Hands-only™ CPR can be taught as a knowledge item as it would be appropriate for trained rescuers if they do not have access to a pocket mask and are uncomfortable with direct mouth to mouth contact.
○ It is important to note that candidates must perform rescue breaths as per the standard in order to be certified in the level being taught.
a-B-C veRsUs C-a-B overview as with Hands-only CPR, there has been a lot of media surrounding the new Compression-airway
–Breathing (C-a-B) approach to CPR.
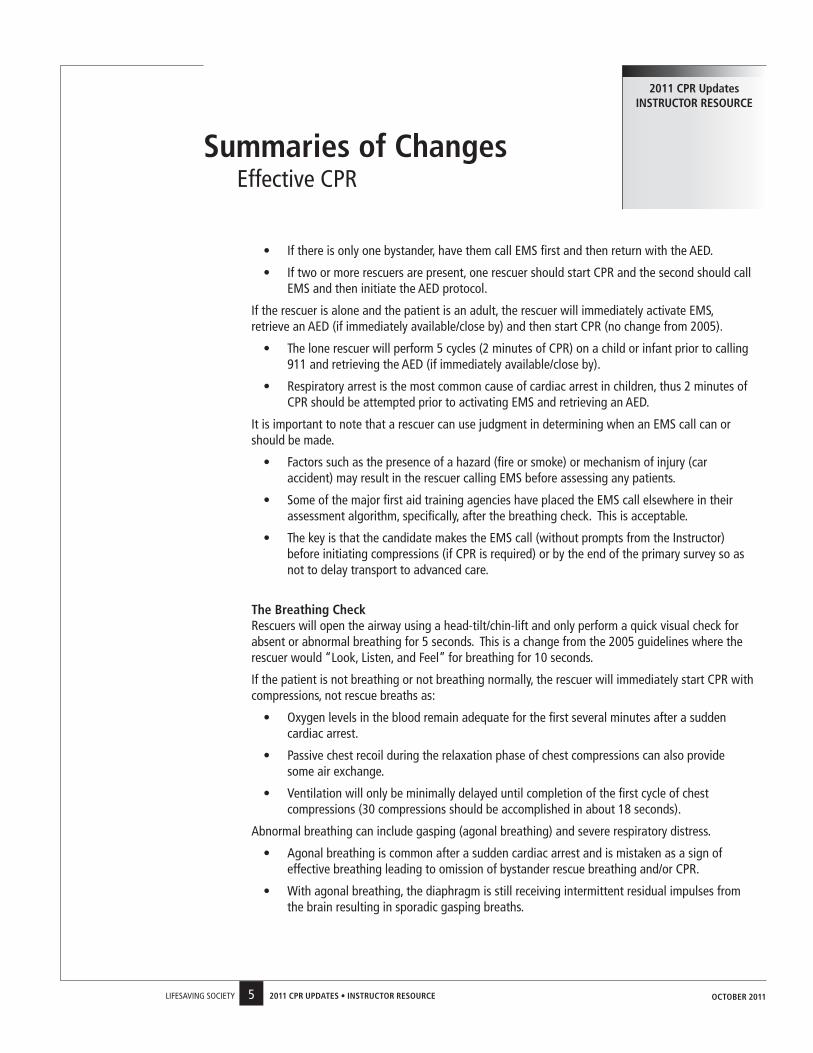
It is important to note that the a-B-C (airway-Breathing-Circulation) algorithm is still used to assess a patient and the C-a-B (Compression-airway-Breathing) algorithm is a treatment sequence for a person who is not breathing or breathing normally.
the steps in treating an unresponsive patient are as follows (reference Figure 2):
1. Check for danger.
2. determine unresponsiveness (tap or pinch and shout).
3. If bystander(s) are available, have them activate eMs and retrieve an aed.
4. open the airway using a head-tilt/chin-lift.
5. Perform a quick visual check for absent or abnormal (agonal, gasping, severe respiratory distress) Breathing for 5 seconds.
6. the rescuer will treat absent or abnormal breathing as a sign of no Circulation and immediately start CPR with compressions (30:2).
7. the rescuer will apply an aed as soon as it becomes available.
8. the rescuer will only reassess a-B-Cs if the patient shows signs of life.
the EMs & AEd Call after determining responsiveness, the trained rescuer will send one bystander to active eMs and a
second bystander (if available) to find an aed.
• this will ensure that the aed arrives quickly as the first bystander can be on the phone with the eMs dispatcher for several minutes.
summaries of Changeseffective CPR
2011 CPR Updates instRUCtoR REsoURCE
oCtoBER 2011
5LIFesavInG soCIety 2011 CPR UPdAtEs • instRUCtoR REsoURCE
• If there is only one bystander, have them call eMs first and then return with the aed.
• If two or more rescuers are present, one rescuer should start CPR and the second should call eMs and then initiate the aed protocol.
If the rescuer is alone and the patient is an adult, the rescuer will immediately activate eMs, retrieve an aed (if immediately available/close by) and then start CPR (no change from 2005).
• the lone rescuer will perform 5 cycles (2 minutes of CPR) on a child or infant prior to calling 911 and retrieving the aed (if immediately available/close by).
• Respiratory arrest is the most common cause of cardiac arrest in children, thus 2 minutes of CPR should be attempted prior to activating eMs and retrieving an aed.
It is important to note that a rescuer can use judgment in determining when an eMs call can or should be made.
• Factors such as the presence of a hazard (fire or smoke) or mechanism of injury (car accident) may result in the rescuer calling eMs before assessing any patients.
• some of the major first aid training agencies have placed the eMs call elsewhere in their assessment algorithm, specifically, after the breathing check. this is acceptable.
• the key is that the candidate makes the eMs call (without prompts from the Instructor) before initiating compressions (if CPR is required) or by the end of the primary survey so as not to delay transport to advanced care.
the Breathing Check Rescuers will open the airway using a head-tilt/chin-lift and only perform a quick visual check for
absent or abnormal breathing for 5 seconds. this is a change from the 2005 guidelines where the rescuer would “Look, Listen, and Feel” for breathing for 10 seconds.
If the patient is not breathing or not breathing normally, the rescuer will immediately start CPR with compressions, not rescue breaths as:
• oxygen levels in the blood remain adequate for the first several minutes after a sudden cardiac arrest.
• Passive chest recoil during the relaxation phase of chest compressions can also provide some air exchange.
• ventilation will only be minimally delayed until completion of the first cycle of chest compressions (30 compressions should be accomplished in about 18 seconds).
abnormal breathing can include gasping (agonal breathing) and severe respiratory distress.
• agonal breathing is common after a sudden cardiac arrest and is mistaken as a sign of effective breathing leading to omission of bystander rescue breathing and/or CPR.
• With agonal breathing, the diaphragm is still receiving intermittent residual impulses from the brain resulting in sporadic gasping breaths.
summaries of Changeseffective CPR
2011 CPR Updates instRUCtoR REsoURCE
oCtoBER 2011
6LIFesavInG soCIety 2011 CPR UPdAtEs • instRUCtoR REsoURCE
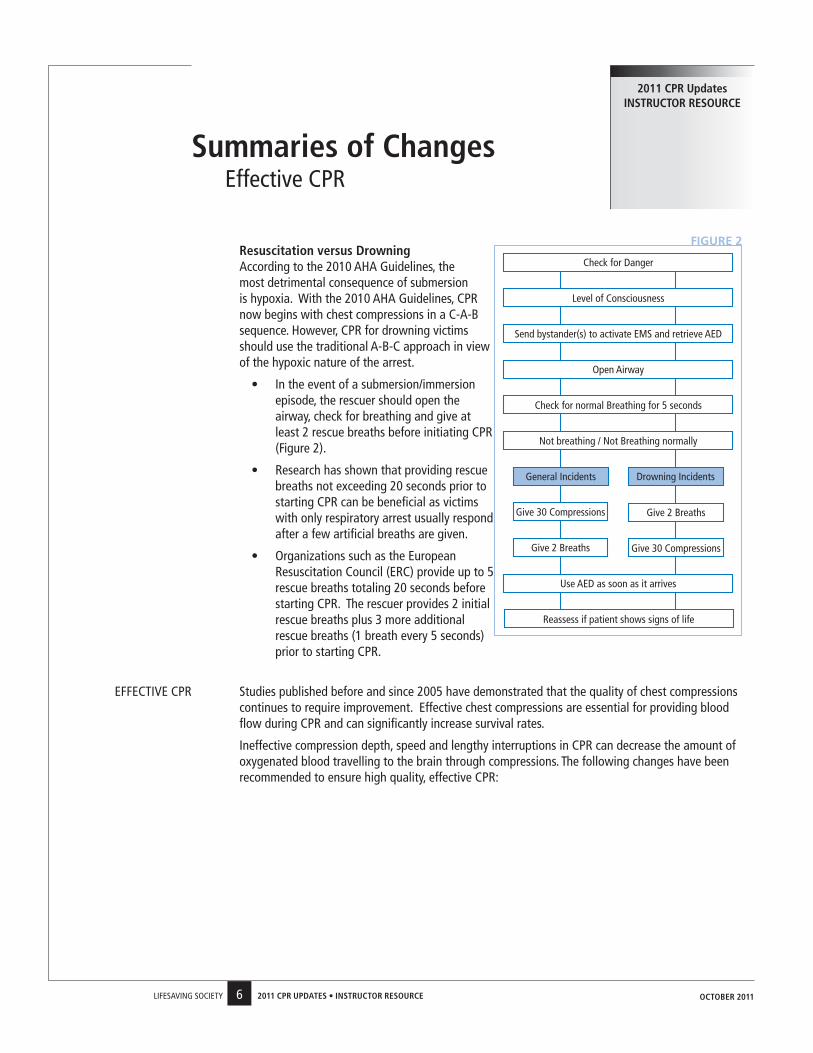
Resuscitation versus drowning according to the 2010 aHa Guidelines, the
most detrimental consequence of submersion is hypoxia. With the 2010 aHa Guidelines, CPR now begins with chest compressions in a C-a-B sequence. However, CPR for drowning victims should use the traditional a-B-C approach in view of the hypoxic nature of the arrest.
• In the event of a submersion/immersion episode, the rescuer should open the airway, check for breathing and give at least 2 rescue breaths before initiating CPR (Figure 2).
• Research has shown that providing rescue breaths not exceeding 20 seconds prior to starting CPR can be beneficial as victims with only respiratory arrest usually respond after a few artificial breaths are given.
• organizations such as the european Resuscitation Council (eRC) provide up to 5 rescue breaths totaling 20 seconds before starting CPR. the rescuer provides 2 initial rescue breaths plus 3 more additional rescue breaths (1 breath every 5 seconds) prior to starting CPR.
eFFeCtIve CPR studies published before and since 2005 have demonstrated that the quality of chest compressions continues to require improvement. effective chest compressions are essential for providing blood flow during CPR and can significantly increase survival rates.
Ineffective compression depth, speed and lengthy interruptions in CPR can decrease the amount of oxygenated blood travelling to the brain through compressions. the following changes have been recommended to ensure high quality, effective CPR:
summaries of Changeseffective CPR
2011 CPR Updates instRUCtoR REsoURCE
FIGURE 2
oCtoBER 2011
Check for danger
Level of Consciousness
send bystander(s) to activate eMs and retrieve aed
open airway
Reassess if patient shows signs of life
Use aed as soon as it arrives
General Incidents drowning Incidents
Give 30 Compressions Give 2 Breaths
not breathing / not Breathing normally
Check for normal Breathing for 5 seconds
Give 2 Breaths Give 30 Compressions
7LIFesavInG soCIety 2011 CPR UPdAtEs • instRUCtoR REsoURCE
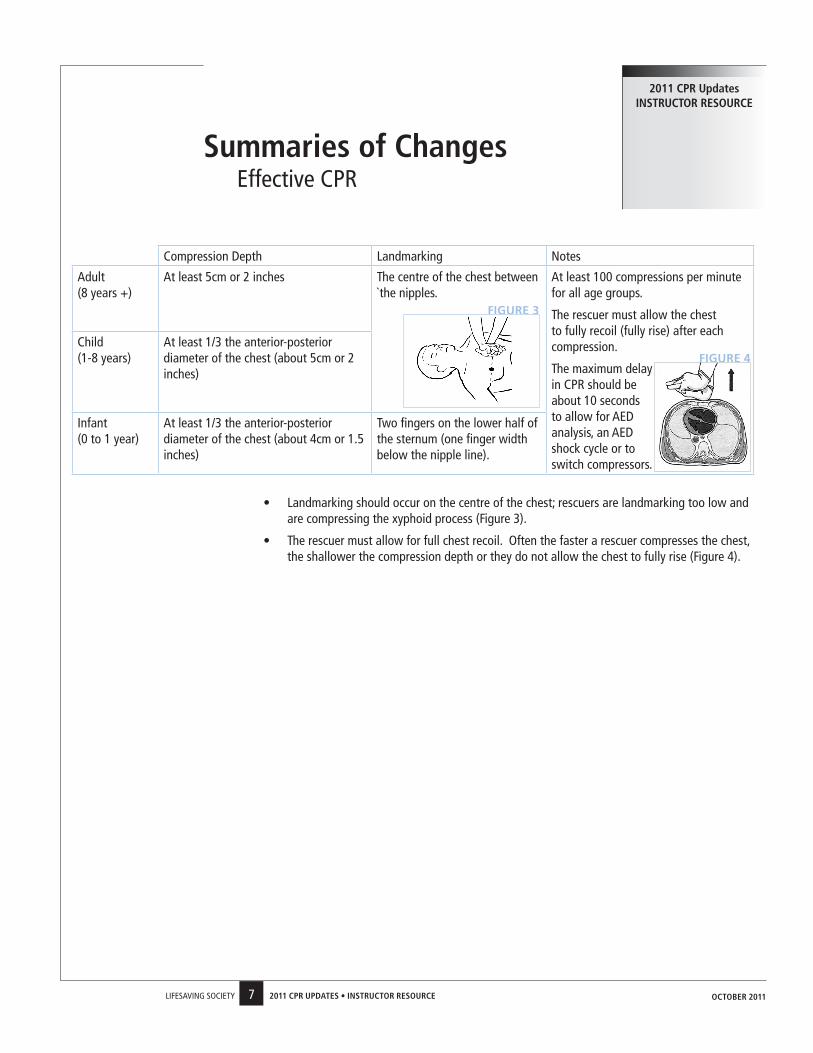
Compression depth Landmarking notes
adult (8 years +)
at least 5cm or 2 inches the centre of the chest between `the nipples.
at least 100 compressions per minute for all age groups.
the rescuer must allow the chest to fully recoil (fully rise) after each compression.
the maximum delay in CPR should be about 10 seconds to allow for aed analysis, an aed shock cycle or to switch compressors.
Child (1-8 years)
at least 1/3 the anterior-posterior diameter of the chest (about 5cm or 2 inches)
Infant (0 to 1 year)
at least 1/3 the anterior-posterior diameter of the chest (about 4cm or 1.5 inches)
two fingers on the lower half of the sternum (one finger width below the nipple line).
• Landmarking should occur on the centre of the chest; rescuers are landmarking too low and are compressing the xyphoid process (Figure 3).
• the rescuer must allow for full chest recoil. often the faster a rescuer compresses the chest, the shallower the compression depth or they do not allow the chest to fully rise (Figure 4).
summaries of Changeseffective CPR
2011 CPR Updates instRUCtoR REsoURCE
FIGURE 3
FIGURE 4
oCtoBER 2011
8LIFesavInG soCIety 2011 CPR UPdAtEs • instRUCtoR REsoURCE
Implementation of aed training In 2005, the Lifesaving society only required rescuers to have a bystander try to obtain an aed along with an aed trained operator. any practical aed training was offered through separate aed courses and provided as needed throughout the various Branches.
as per the recommendations from the 2010 aHa guidelines, the Lifesaving society will now have practical aed applications equivalent to Public access defibrillation level training as part of our CPR and First aid programs. It is important to note that all Bronze medal programs contain CPR content and as such aed knowledge must be taught and aed use be demonstrated by the Lifesaving Instructor within these levels. In order to receive CPR certification, Bronze candidates must demonstrate practical aed applications. It is the responsibility of each Branch to determine who can certify Bronze candidates in CPR/aed (e.g. a Lifesaving Instructor who is also certified as a CPR or First aid Instructor, etc).
the “10 Minute Window” to give the victim the best chance of survival,
activation of eMs, provision of CPR and operation of an aed must occur within the first moments of a cardiac arrest.
For every minute that passes between collapse and defibrillation, survival rates decrease by 7% to 10%.
even minimal training has been shown to improve survival rates, thus, practical training opportunities will be made available to the lay rescuer.
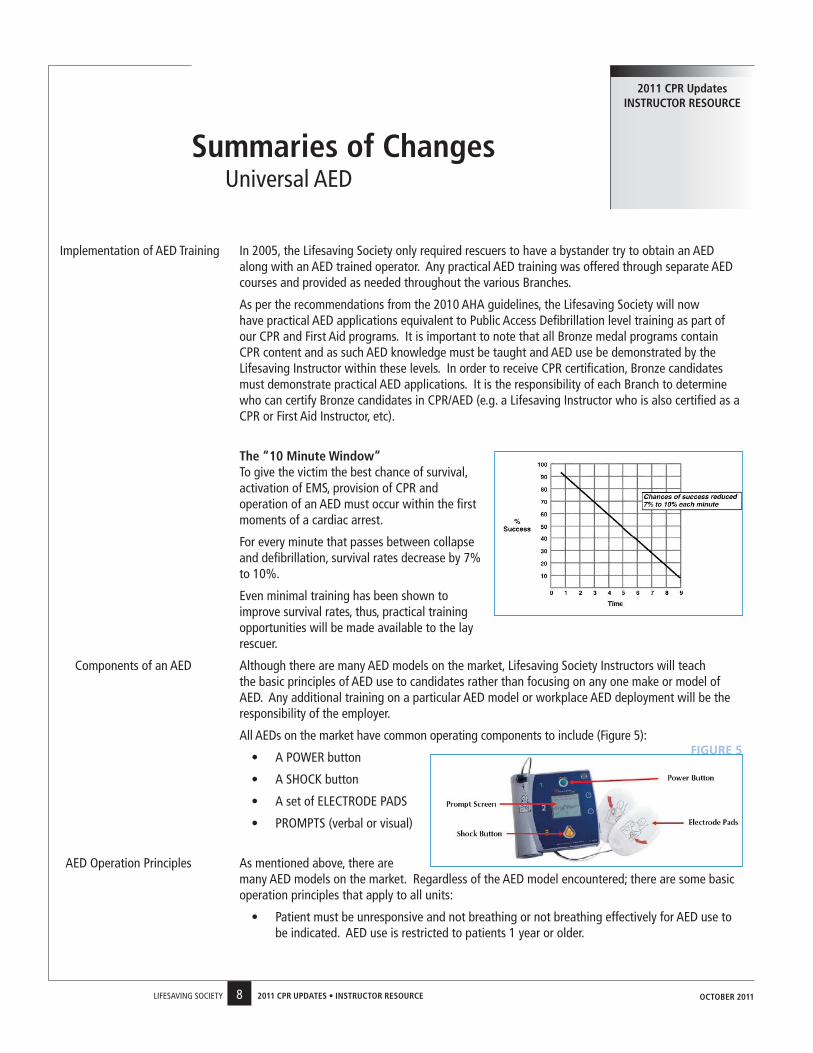
Components of an aed although there are many aed models on the market, Lifesaving society Instructors will teach the basic principles of aed use to candidates rather than focusing on any one make or model of aed. any additional training on a particular aed model or workplace aed deployment will be the responsibility of the employer.
all aeds on the market have common operating components to include (Figure 5):
• a PoWeR button
• a sHoCK button
• a set of eLeCtRode Pads
• PRoMPts (verbal or visual)
aed operation Principles as mentioned above, there are many aed models on the market. Regardless of the aed model encountered; there are some basic operation principles that apply to all units:
• Patient must be unresponsive and not breathing or not breathing effectively for aed use to be indicated. aed use is restricted to patients 1 year or older.
summaries of ChangesUniversal aed
2011 CPR Updates instRUCtoR REsoURCE
FIGURE 5
oCtoBER 2011
9LIFesavInG soCIety 2011 CPR UPdAtEs • instRUCtoR REsoURCE
• the first thing a rescuer should do is turn on the PoWeR button.
○ the unit will PRoMPt the rescuer on how to use that particular model of aed, so listen carefully to the instructions.
• the eLeCtRode pads must be properly applied. the rescuer can only apply the pads once, so it is important to put them on correct the first time.
○ all clothing on the upper body must be removed for visual landmarking and pad application.
○ shave chest where the pads need to go so that the pads stick to the skin not the hair.
○ Wipe off water or sweat before putting on the pads to ensure good contact.
○ do not apply pads over medication patches (remove the patch and dry skin).
○ do not apply pads over pacemakers; pads must be positioned at least 1 inch away from the pacemaker.
○ adult electrode pads can be used on children, but child pads can not be used on adults.
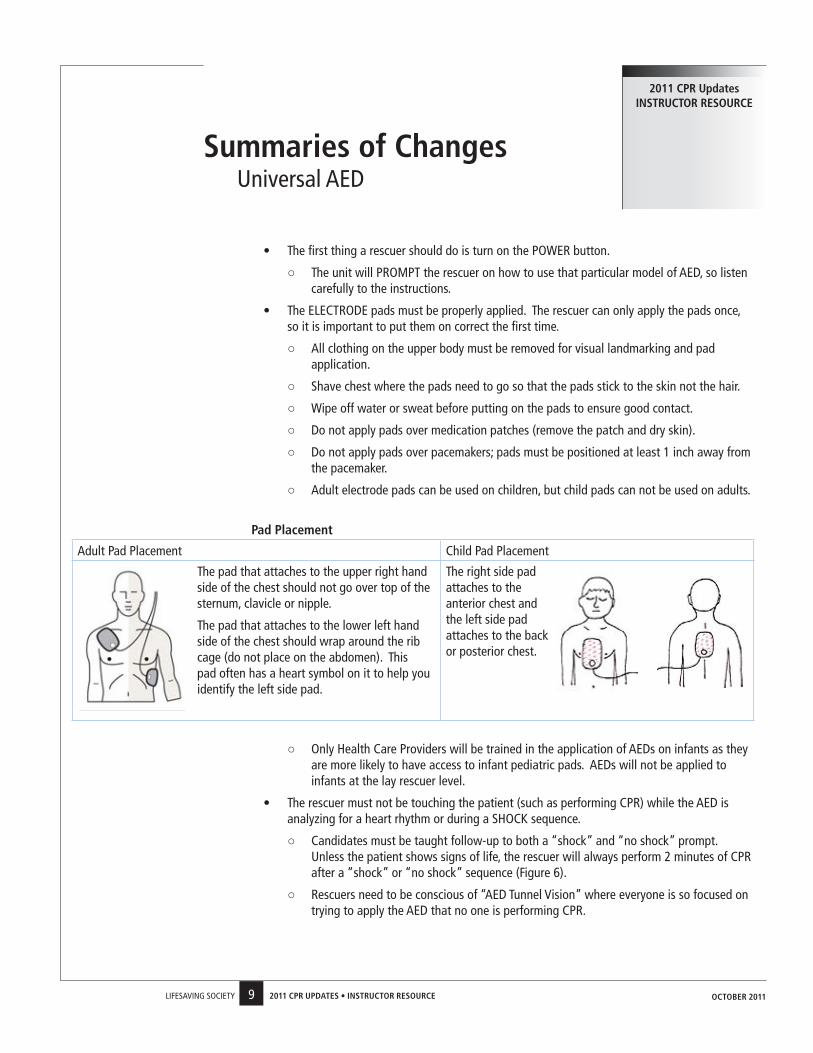
Pad Placement
adult Pad Placement Child Pad Placement
the pad that attaches to the upper right hand side of the chest should not go over top of the sternum, clavicle or nipple.
the pad that attaches to the lower left hand side of the chest should wrap around the rib cage (do not place on the abdomen). this pad often has a heart symbol on it to help you identify the left side pad.
the right side pad attaches to the anterior chest and the left side pad attaches to the back or posterior chest.
○ only Health Care Providers will be trained in the application of aeds on infants as they are more likely to have access to infant pediatric pads. aeds will not be applied to infants at the lay rescuer level.
• the rescuer must not be touching the patient (such as performing CPR) while the aed is analyzing for a heart rhythm or during a sHoCK sequence.
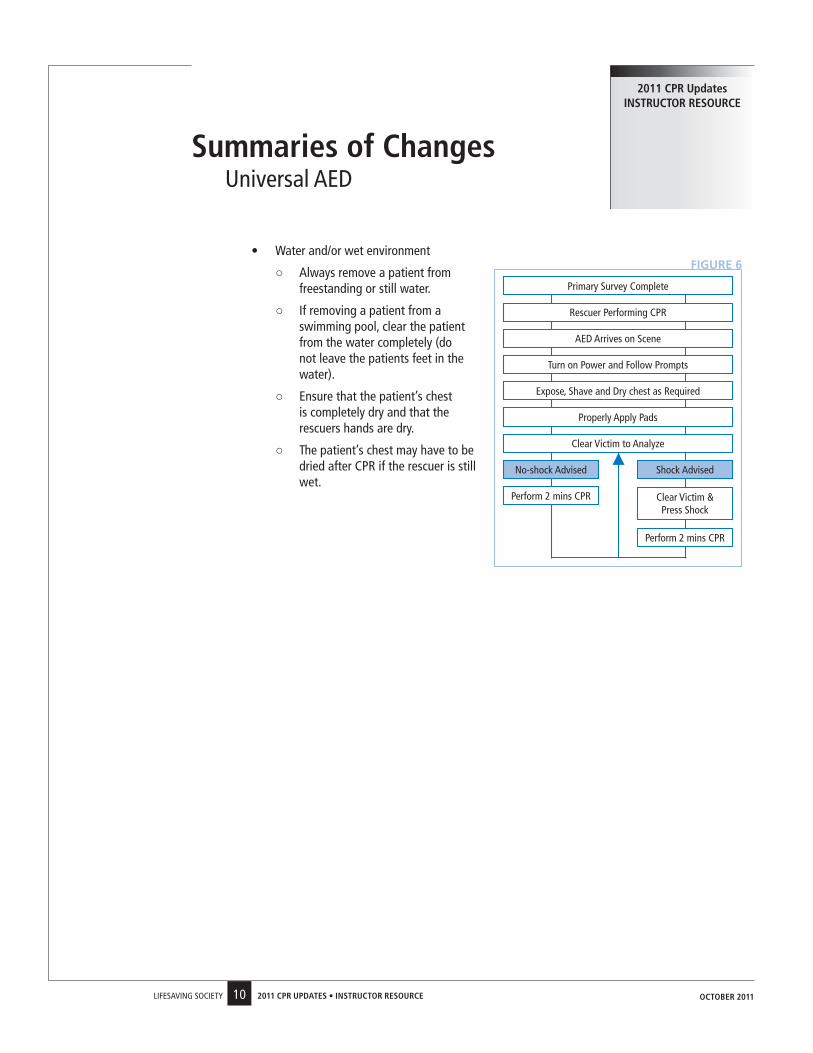
○ Candidates must be taught follow-up to both a “shock” and “no shock” prompt. Unless the patient shows signs of life, the rescuer will always perform 2 minutes of CPR after a “shock” or “no shock” sequence (Figure 6).
○ Rescuers need to be conscious of “aed tunnel vision” where everyone is so focused on trying to apply the aed that no one is performing CPR.
summaries of ChangesUniversal aed
2011 CPR Updates instRUCtoR REsoURCE
oCtoBER 2011
10LIFesavInG soCIety 2011 CPR UPdAtEs • instRUCtoR REsoURCE
• Water and/or wet environment
○ always remove a patient from freestanding or still water.
○ If removing a patient from a swimming pool, clear the patient from the water completely (do not leave the patients feet in the water).
○ ensure that the patient’s chest is completely dry and that the rescuers hands are dry.
○ the patient’s chest may have to be dried after CPR if the rescuer is still wet.
summaries of ChangesUniversal aed
2011 CPR Updates instRUCtoR REsoURCE
FIGURE 6
oCtoBER 2011
Primary survey Complete
Rescuer Performing CPR
aed arrives on scene
turn on Power and Follow Prompts
no-shock advised shock advised
Perform 2 mins CPR Clear victim & Press shock
Properly apply Pads
expose, shave and dry chest as Required
Perform 2 mins CPR
Clear victim to analyze

11LIFesavInG soCIety 2011 CPR UPdAtEs • instRUCtoR REsoURCE
severe Conscious the 2010 aHa guidelines state…”chest thrusts, back slaps and abdominal thrusts are feasible and effective for relieving severe foreign body airway obstruction (FBao)… for simplicity in training it is recommended that abdominal thrusts be applied in rapid sequence until the obstruction is relieved. If abdominal thrusts are not effective, the rescuer may consider chest thrusts.”
When the major training agencies met in november 2010, it was agreed that rescuers should be taught all three procedures as:
• all three techniques were found to be effective for relieving an obstructed airway and rescuers should have multiple techniques available to them in the event that one procedure does not work.
• People naturally want to “slap” choking victims on the back, so they should be taught how to perform the skill properly.
• It is not possible to simulate in a classroom setting, the proper depth and pressure (or escalating pressure) required for effective abdominal thrusts (both back blows and chest thrusts can be performed on a manikin).
the major training agencies originally agreed that rescuers would be taught an alternating 5 abdominal thrust and 5 back blow procedure for the adult/child conscious severe obstructed airway, however, there was a shift in the final application of the procedure and as such each agency adopted a slightly different protocol. For example:
• the Canadian Red Cross and st. John ambulance is alternating 5 back blows and 5 abdominal thrusts until the obstruction is cleared (or patient become unresponsive).
• the Heart & stroke Foundation of Canada is maintaining the stand-alone abdominal thrusts until the obstruction is cleared (or patient become unresponsive).
since each province has different legislative requirements (for example, ontario must follow st. John ambulance and Quebec must follow the Heart & stroke Foundation of Canada), the Lifesaving society will not identify in the Must sees which technique to use.
the Lifesaving society standard for dealing with a severe conscious airway obstruction (adult/child) is to clear the airway. the following notes have been provided in the draft award Guide pages:
• the rescuer should clear the airway using either abdominal thrusts, back blows or chest thrusts. Where possible, the rescuer should start with abdominal thrusts.
• If the first technique does not work (for example after 5 attempts), then another should be selected.
• It is important to note that the procedure for a mild obstruction and a severe conscious airway obstruction in an infant and pregnant/obese patient has not changed.
It is the responsibility of each Branch to determine which procedure they will implement based on legislative requirements and in turn educate their Instructors accordingly. Where possible, rescuers should start with abdominal thrusts as required by the Heart & stroke Foundation of Canada, but
summaries of Changesobstructed airway
2011 CPR Updates instRUCtoR REsoURCE
oCtoBER 2011
12LIFesavInG soCIety 2011 CPR UPdAtEs • instRUCtoR REsoURCE
implement an alternating procedure to provide some consistency with the other agencies.
For example, the BC & yukon Branch has adopted the following procedures:
• alternating 5 abdominal thrusts and 5 back blows for adults and children
• alternating 5 chest thrusts and 5 back blows (if possible) for obese or pregnant patients
• alternating 5 back blows and 5 chest thrusts and for infants (as per the 2005 Guidelines)
Perhaps the best way to understand the severe conscious airway obstruction standard is to compare it to the spinal skill/rescue test items. the standard for treating a spinal injury is to immobilize the patient. the rescuer can select from three different procedures (to include the vice grip, the Canadian roll and the modified) in order to meet the standard. although the vice grip is most commonly used, all are acceptable and a candidate can not be failed if they select one of the other immobilization techniques.
similarly, a candidate can not be failed if they have been taught a different severe conscious airway obstruction procedure (to include abdominal thrusts, back blows and chest thrusts in any order) provided they meet the standard which is to clear the airway.
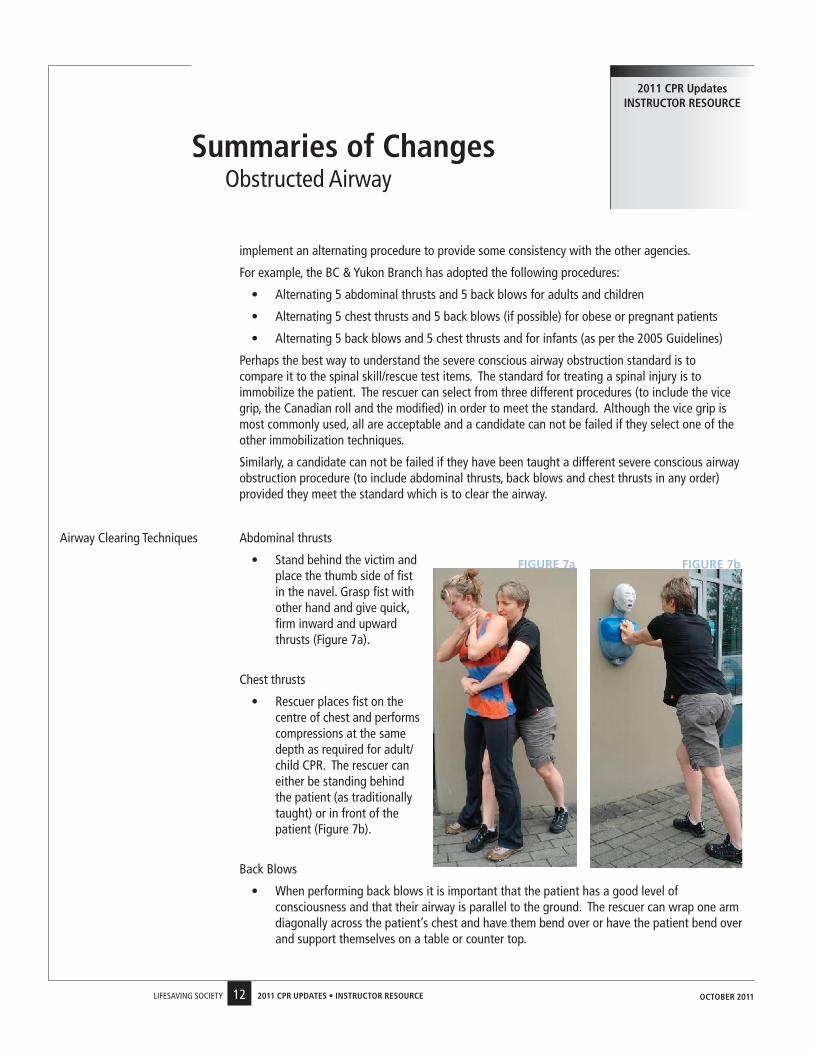
airway Clearing techniques abdominal thrusts
• stand behind the victim and place the thumb side of fist in the navel. Grasp fist with other hand and give quick, firm inward and upward thrusts (Figure 7a).
Chest thrusts
• Rescuer places fist on the centre of chest and performs compressions at the same depth as required for adult/child CPR. the rescuer can either be standing behind the patient (as traditionally taught) or in front of the patient (Figure 7b).
Back Blows
• When performing back blows it is important that the patient has a good level of consciousness and that their airway is parallel to the ground. the rescuer can wrap one arm diagonally across the patient’s chest and have them bend over or have the patient bend over and support themselves on a table or counter top.
summaries of Changesobstructed airway
2011 CPR Updates instRUCtoR REsoURCE
oCtoBER 2011
FIGURE 7a FIGURE 7b
13LIFesavInG soCIety 2011 CPR UPdAtEs • instRUCtoR REsoURCE
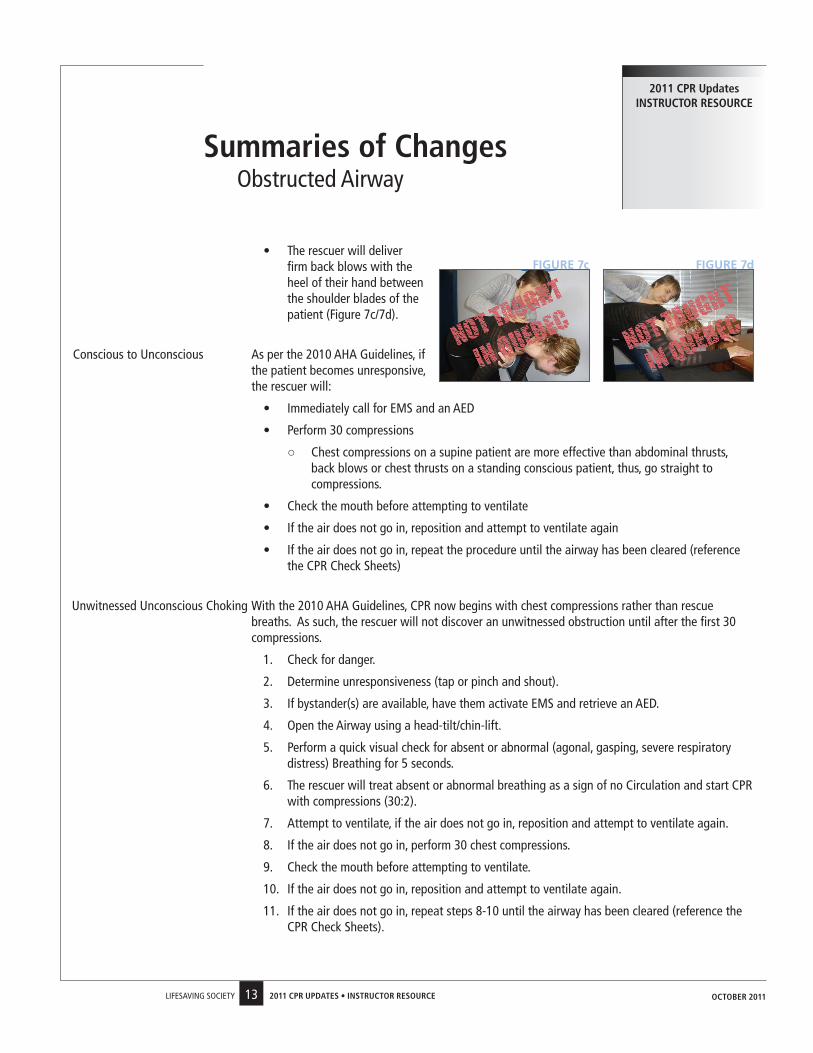
• the rescuer will deliver firm back blows with the heel of their hand between the shoulder blades of the patient (Figure 7c/7d).
Conscious to Unconscious as per the 2010 aHa Guidelines, if the patient becomes unresponsive, the rescuer will:
• Immediately call for eMs and an aed
• Perform 30 compressions
○ Chest compressions on a supine patient are more effective than abdominal thrusts, back blows or chest thrusts on a standing conscious patient, thus, go straight to compressions.
• Check the mouth before attempting to ventilate
• If the air does not go in, reposition and attempt to ventilate again
• If the air does not go in, repeat the procedure until the airway has been cleared (reference the CPR Check sheets)
Unwitnessed Unconscious Choking With the 2010 aHa Guidelines, CPR now begins with chest compressions rather than rescue breaths. as such, the rescuer will not discover an unwitnessed obstruction until after the first 30 compressions.
1. Check for danger.
2. determine unresponsiveness (tap or pinch and shout).
3. If bystander(s) are available, have them activate eMs and retrieve an aed.
4. open the airway using a head-tilt/chin-lift.
5. Perform a quick visual check for absent or abnormal (agonal, gasping, severe respiratory distress) Breathing for 5 seconds.
6. the rescuer will treat absent or abnormal breathing as a sign of no Circulation and start CPR with compressions (30:2).
7. attempt to ventilate, if the air does not go in, reposition and attempt to ventilate again.
8. If the air does not go in, perform 30 chest compressions.
9. Check the mouth before attempting to ventilate.
10. If the air does not go in, reposition and attempt to ventilate again.
11. If the air does not go in, repeat steps 8-10 until the airway has been cleared (reference the CPR Check sheets).
summaries of Changesobstructed airway
2011 CPR Updates instRUCtoR REsoURCE
oCtoBER 2011
FIGURE 7c FIGURE 7d
14LIFesavInG soCIety 2011 CPR UPdAtEs • instRUCtoR REsoURCE
In addition to the resuscitation recommendations, the 2010 aHa Guidelines have published treatment recommendations as released by ILCoR and the International First aid science advisory Board on First aid.
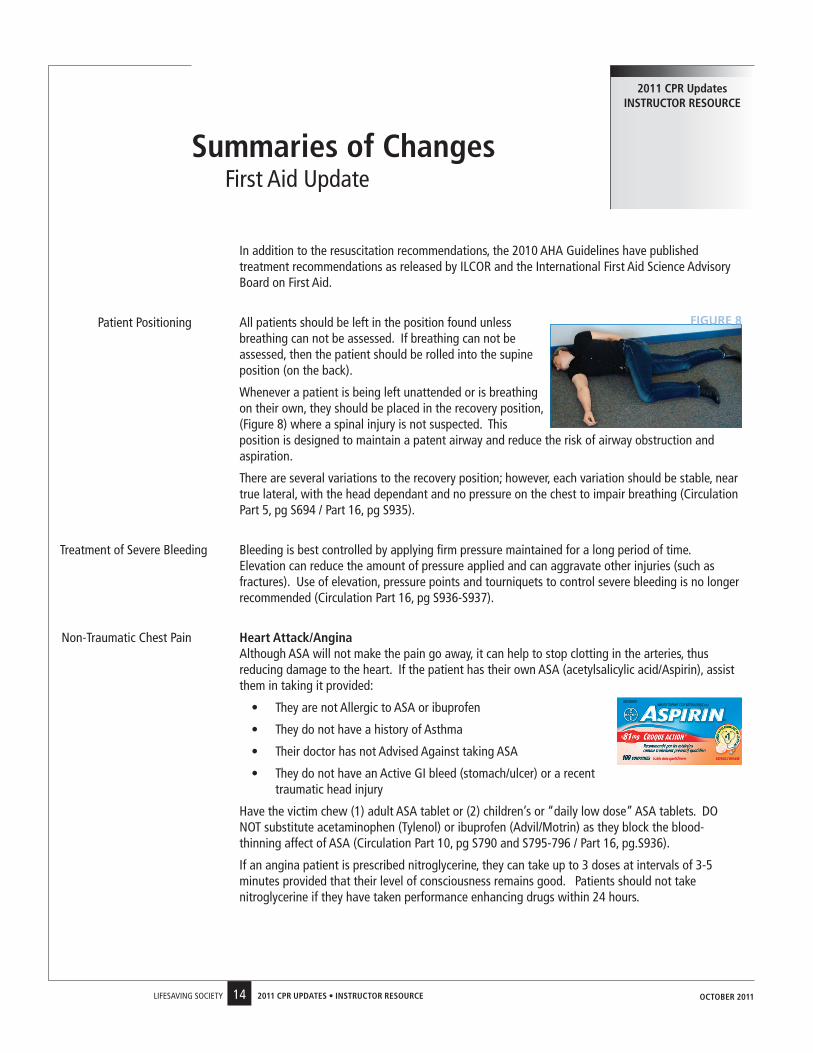
Patient Positioning all patients should be left in the position found unless breathing can not be assessed. If breathing can not be assessed, then the patient should be rolled into the supine position (on the back).
Whenever a patient is being left unattended or is breathing on their own, they should be placed in the recovery position, (Figure 8) where a spinal injury is not suspected. this position is designed to maintain a patent airway and reduce the risk of airway obstruction and aspiration.
there are several variations to the recovery position; however, each variation should be stable, near true lateral, with the head dependant and no pressure on the chest to impair breathing (Circulation Part 5, pg s694 / Part 16, pg s935).
treatment of severe Bleeding Bleeding is best controlled by applying firm pressure maintained for a long period of time. elevation can reduce the amount of pressure applied and can aggravate other injuries (such as fractures). Use of elevation, pressure points and tourniquets to control severe bleeding is no longer recommended (Circulation Part 16, pg s936-s937).
non-traumatic Chest Pain Heart Attack/Angina although asa will not make the pain go away, it can help to stop clotting in the arteries, thus
reducing damage to the heart. If the patient has their own asa (acetylsalicylic acid/aspirin), assist them in taking it provided:
• they are not allergic to asa or ibuprofen
• they do not have a history of asthma
• their doctor has not advised against taking asa
• they do not have an active GI bleed (stomach/ulcer) or a recent traumatic head injury
Have the victim chew (1) adult asa tablet or (2) children’s or “daily low dose” asa tablets. do not substitute acetaminophen (tylenol) or ibuprofen (advil/Motrin) as they block the blood-thinning affect of asa (Circulation Part 10, pg s790 and s795-796 / Part 16, pg.s936).
If an angina patient is prescribed nitroglycerine, they can take up to 3 doses at intervals of 3-5 minutes provided that their level of consciousness remains good. Patients should not take nitroglycerine if they have taken performance enhancing drugs within 24 hours.
summaries of ChangesFirst aid Update
2011 CPR Updates instRUCtoR REsoURCE
oCtoBER 2011
FIGURE 8
15LIFesavInG soCIety 2011 CPR UPdAtEs • instRUCtoR REsoURCE
anaphylaxis It is important that rescuers continue to be taught the signs and symptoms of anaphylaxis and how to assist in the administration of epinephrine if a patient is unable to do so (Circulation Part 12, pg s832 / Part 16, pg.s936).
signs & symptoms
• Generalized itching
• Blotchy, raised, red bumps on the skin (hives)
• Wheezing; difficulty breathing
• swelling – including throat, tongue, and face
• dizziness, light headedness
• stomach cramps, vomiting, diarrhea
• decreased LoC or unconsciousness
treatment
Before administering an epiPen epinephrine auto-injector, you must ensure that:
• the Primary survey has been completed (aBCs) and that eMs has been activated.
• only the patient’s epiPen is used. do not administer another person’s pen.
• the auto-injector can not be used regardless of the expiry date if the epinephrine solution is discoloured and/or has a precipitate.
• Ice should not be placed on the injection site after the use of an auto-injector as this can inhibit the dispersal of epinephrine into the blood stream.
○ Remove the blue safety cap from the epiPen®.
○ Press the orange tip of the pen into outer thigh of the patient until there is a “click”.
○ Hold the pen in place for 10 seconds
○ Massage injection site for quick dispersal of medication.
○ dispose of the needle in the carry case or sharps container.
summaries of ChangesFirst aid Update
2011 CPR Updates instRUCtoR REsoURCE
oCtoBER 2011
Allergic ReactionNormal Appearance
Protective cap covering exposed needle
16LIFesavInG soCIety 2011 CPR UPdAtEs • instRUCtoR REsoURCE
summaries of ChangesFirst aid Update
2011 CPR Updates instRUCtoR REsoURCE
Hypothermia If a hypothermic patient does not have effective breathing in the initial 5 second assessment, CPR should be initiated immediately.
In a hypothermic patient, assessments of breathing and/or pulse are difficult because heart rate and breathing may be very slow. In the past, it was not unusual to assess breathing and/or pulse for up to 1 minute. slow breathing and/or pulse is criteria for CPR as an insufficient amount of oxygen is being circulated around the body (Circulation Part 5, pg s696 / Part 12, pg s845-s846).
Heat Related Injury electrolyte drinks (sport drinks) can be used in the treatment of heat exhaustion due to the amount of salts and sugars contained within sports drinks (in a medium that is not as likely to result in vomiting).
For alert victims of suspected heat stroke, immersion in cold water is the initial recommended treatment. If the patient has a decreased level of consciousness, the application of wet towels, dousing with water, sponging, etc. would be appropriate (Circulation Part 16, pg s939-s940).
Jellyfish stings to inactivate venom load, tropical jellyfish stings should be liberally washed with vinegar as soon as possible for at least 30 seconds. after the nematocysts are removed or deactivated, immersion in hot water (as tolerated) for about 20 minutes is most effective for treating the pain (Circulation Part 16, pg s938-939).
snakebites do not apply suction as first aid for snakebites. the initial treatment for all snake bites includes direct pressure applied by hand above and below the bite. apply a pressure bandage along the entire length of the extremity; this is an effective and safe way to slow the dissemination of venom by slowing lymph flow. Bandaging with a compression bandage should be snug/loose enough to allow for one finger to slip under the bandaging (Circulation Part 16, pg s938).
drowning definitions the World Health organization (WHo) adopted new drowning definitions in 2002 to include both cases of fatal and nonfatal drowning as per the Utstein Report.
• drowning is the process of experiencing respiratory impairment from submersion or immersion in liquid. drowning used to refer only to death by drowning, but now applies to all individuals who have survived a submersion/immersion incident. this term eliminates all previous terms to include dry drowning, wet drowning, near drowning and secondary drowning.
○ no Morbidity occurs when the victim has survived the submersion/immersion episode with good cerebral performance.
○ Morbidity occurs when the victim has survived the submersion/immersion episode with poor cerebral performance (to include moderately disabled, severely disabled, vegetative state/coma and brain death).
• death by drowning occurs when the victim has succumbed to a submersion/immersion episode.
When teaching drowning physiology, nLs Instructors should focus on the progression of drowning (what occurs in the panic stage, breath holding stage and terminal gasp stage), the signs and symptoms of someone who has experienced a submersion/immersion episode and the treatment (both conscious and unresponsive) of a drowning patient.
oCtoBER 2011
17LIFesavInG soCIety 2011 CPR UPdAtEs • instRUCtoR REsoURCE
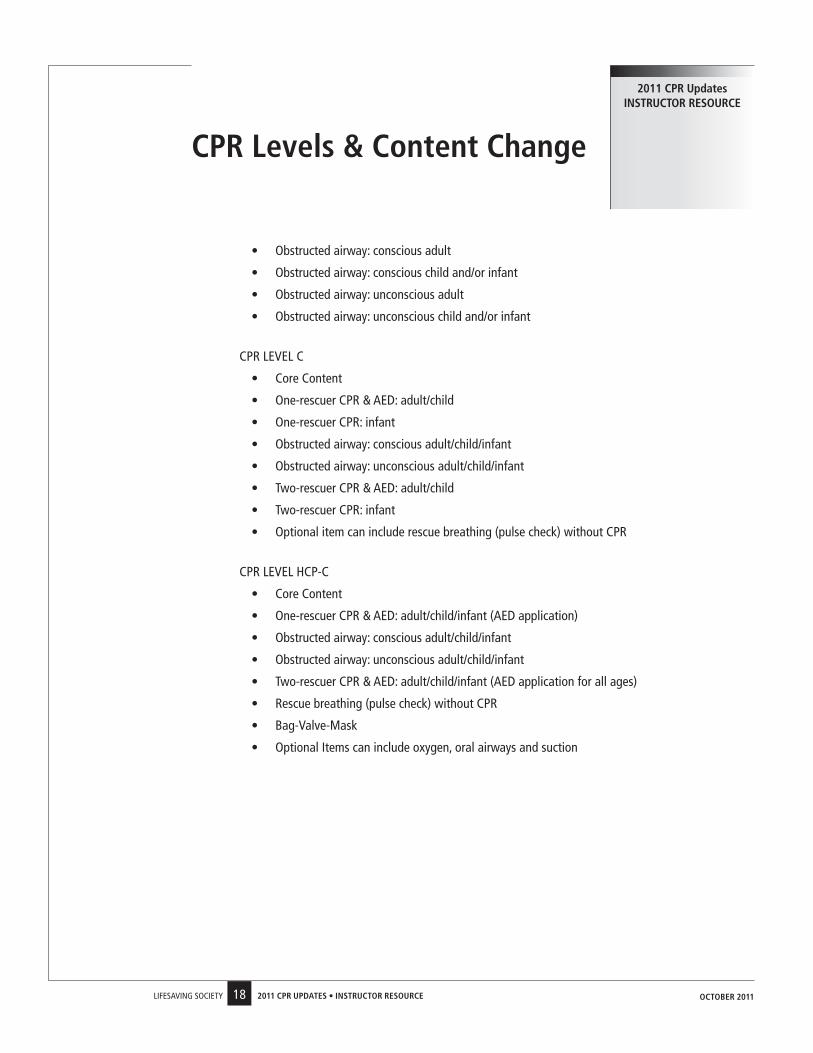
this section highlights the 2010 CPR levels and required content for lay rescuer and health care provider programs. It is important to note that the Core Content will be taught in all levels of CPR and will include the new information from the 2010 aHa Guidelines.
a review of content has resulted in a change in CPR equivalency within the Bronze programs to match the required content of the 2010 revisions.
• Bronze star (no longer includes CPR-a as choking is not part of the content)
• Bronze Medallion includes CPR-a (most agencies no longer have a CPR-B certification, so Bronze Medallion will now include CPR-a)
• Bronze Cross includes CPR-C (no change)
• emergency First aid includes CPR-a (no change)
• standard First aid includes CPR-C (no change)
CoRE ContEnt (taught in all levels of CPR including HCP)• Risk Factors
• Legal implications of CPR/aed use
• anatomy and physiology of the cardio-respiratory system
• the Chain of survival
• self Protection
• activating eMs
• assessment
• Care of an unconscious patient
• aed introduction (knowledge component - CFaM page 80-83)
• Heart attack and stroke (recognition and treatment)
• Critical incident stress
CPR LEVEL A• Core Content
• one-rescuer CPR & aed: adult
• obstructed airway: conscious adult
• obstructed airway: unconscious adult
CPR LeveL B
• Core Content
• one-rescuer CPR & aed: adult
• one-rescuer CPR & aed: child and/or infant (aed not applied to infants)
CPR Levels & Content Change
2011 CPR Updates instRUCtoR REsoURCE
oCtoBER 2011
18LIFesavInG soCIety 2011 CPR UPdAtEs • instRUCtoR REsoURCE
• obstructed airway: conscious adult
• obstructed airway: conscious child and/or infant
• obstructed airway: unconscious adult
• obstructed airway: unconscious child and/or infant
CPR LeveL C
• Core Content
• one-rescuer CPR & aed: adult/child
• one-rescuer CPR: infant
• obstructed airway: conscious adult/child/infant
• obstructed airway: unconscious adult/child/infant
• two-rescuer CPR & aed: adult/child
• two-rescuer CPR: infant
• optional item can include rescue breathing (pulse check) without CPR
CPR LeveL HCP-C
• Core Content
• one-rescuer CPR & aed: adult/child/infant (aed application)
• obstructed airway: conscious adult/child/infant
• obstructed airway: unconscious adult/child/infant
• two-rescuer CPR & aed: adult/child/infant (aed application for all ages)
• Rescue breathing (pulse check) without CPR
• Bag-valve-Mask
• optional Items can include oxygen, oral airways and suction
CPR Levels & Content Change
2011 CPR Updates instRUCtoR REsoURCE
oCtoBER 2011
19LIFesavInG soCIety 2011 CPR UPdAtEs • instRUCtoR REsoURCE
notes
Must see
Purpose
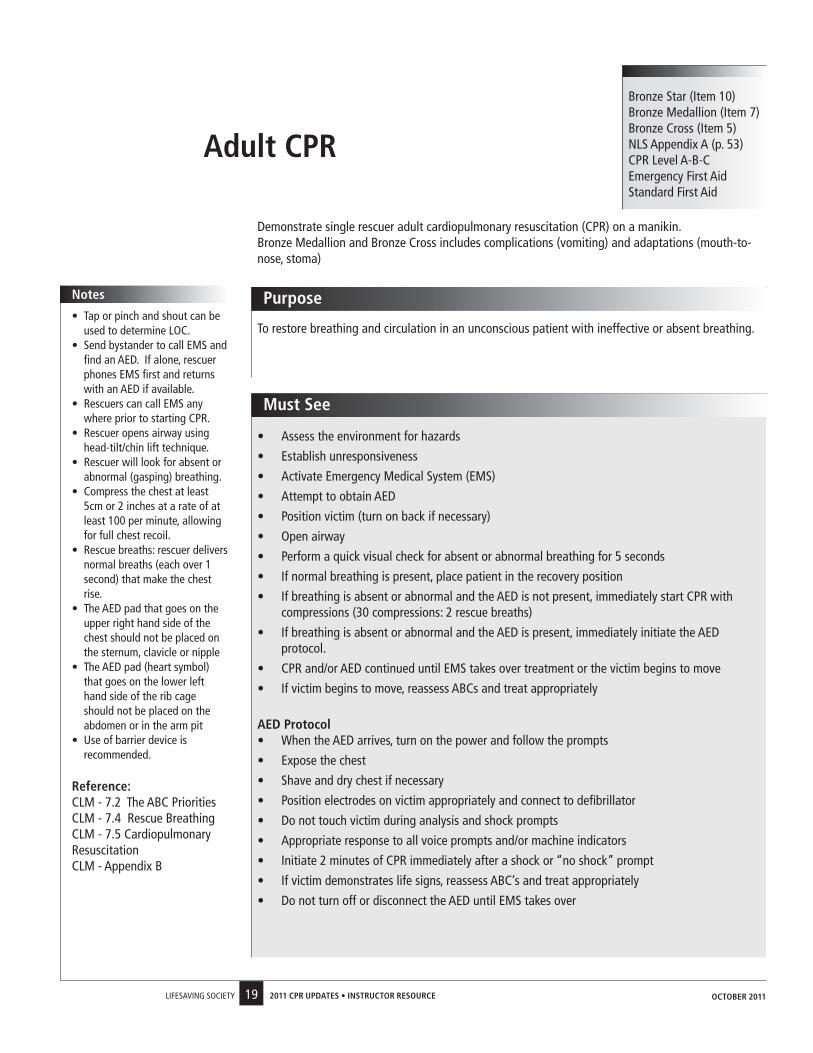
Adult CPR
demonstrate single rescuer adult cardiopulmonary resuscitation (CPR) on a manikin.Bronze Medallion and Bronze Cross includes complications (vomiting) and adaptations (mouth-to-nose, stoma)
Bronze star (Item 10)Bronze Medallion (Item 7)Bronze Cross (Item 5)nLs appendix a (p. 53)CPR Level a-B-Cemergency First aidstandard First aid
to restore breathing and circulation in an unconscious patient with ineffective or absent breathing.
• assess the environment for hazards
• establish unresponsiveness
• activate emergency Medical system (eMs)
• attempt to obtain aed
• Position victim (turn on back if necessary)
• open airway
• Perform a quick visual check for absent or abnormal breathing for 5 seconds
• If normal breathing is present, place patient in the recovery position
• If breathing is absent or abnormal and the aed is not present, immediately start CPR with compressions (30 compressions: 2 rescue breaths)
• If breathing is absent or abnormal and the aed is present, immediately initiate the aed protocol.
• CPR and/or aed continued until eMs takes over treatment or the victim begins to move
• If victim begins to move, reassess aBCs and treat appropriately
AEd Protocol• When the aed arrives, turn on the power and follow the prompts
• expose the chest
• shave and dry chest if necessary
• Position electrodes on victim appropriately and connect to defibrillator
• do not touch victim during analysis and shock prompts
• appropriate response to all voice prompts and/or machine indicators
• Initiate 2 minutes of CPR immediately after a shock or “no shock” prompt
• If victim demonstrates life signs, reassess aBC’s and treat appropriately
• do not turn off or disconnect the aed until eMs takes over
• tap or pinch and shout can be used to determine LoC.
• send bystander to call eMs and find an aed. If alone, rescuer phones eMs first and returns with an aed if available.
• Rescuers can call eMs any where prior to starting CPR.
• Rescuer opens airway using head-tilt/chin lift technique.
• Rescuer will look for absent or abnormal (gasping) breathing.
• Compress the chest at least 5cm or 2 inches at a rate of at least 100 per minute, allowing for full chest recoil.
• Rescue breaths: rescuer delivers normal breaths (each over 1 second) that make the chest rise.
• the aed pad that goes on the upper right hand side of the chest should not be placed on the sternum, clavicle or nipple
• the aed pad (heart symbol) that goes on the lower left hand side of the rib cage should not be placed on the abdomen or in the arm pit
• Use of barrier device is recommended.
Reference: CLM - 7.2 the aBC PrioritiesCLM - 7.4 Rescue BreathingCLM - 7.5 Cardiopulmonary ResuscitationCLM - appendix B
oCtoBER 2011
20LIFesavInG soCIety 2011 CPR UPdAtEs • instRUCtoR REsoURCE
notes
Must see
Purpose
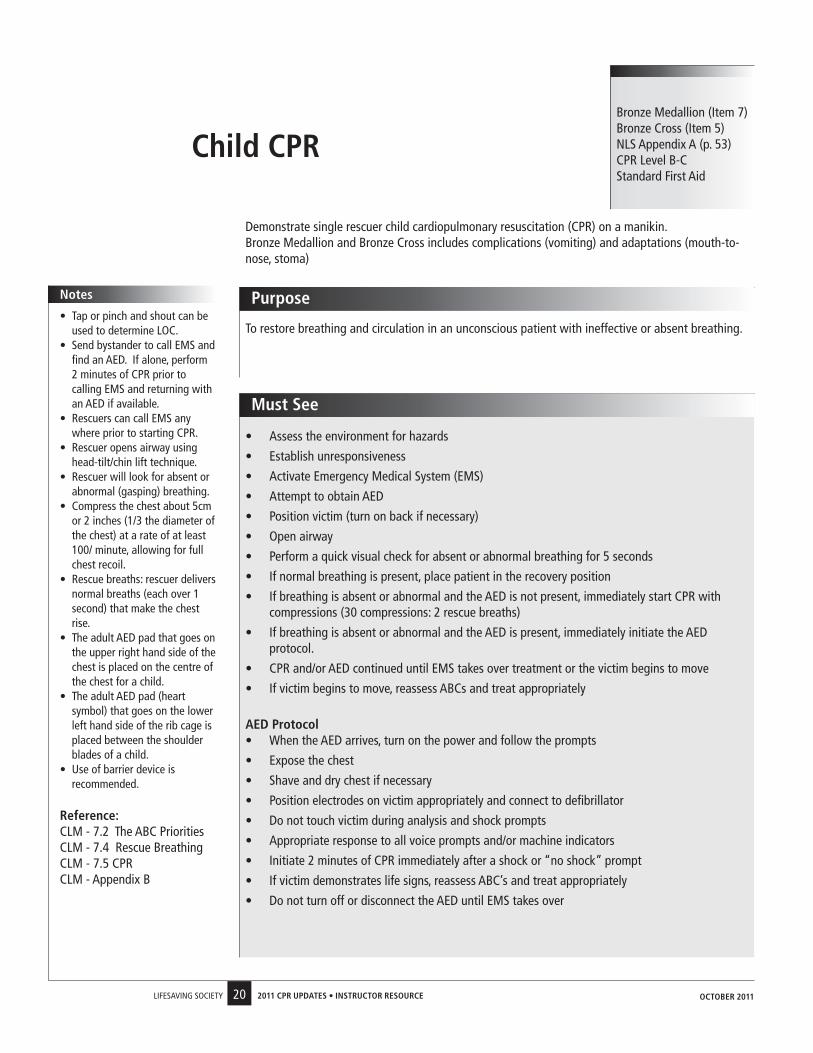
Child CPR
demonstrate single rescuer child cardiopulmonary resuscitation (CPR) on a manikin.Bronze Medallion and Bronze Cross includes complications (vomiting) and adaptations (mouth-to-nose, stoma)
Bronze Medallion (Item 7)Bronze Cross (Item 5)nLs appendix a (p. 53)CPR Level B-Cstandard First aid
to restore breathing and circulation in an unconscious patient with ineffective or absent breathing.• tap or pinch and shout can be
used to determine LoC.• send bystander to call eMs and
find an aed. If alone, perform 2 minutes of CPR prior to calling eMs and returning with an aed if available.
• Rescuers can call eMs any where prior to starting CPR.
• Rescuer opens airway using head-tilt/chin lift technique.
• Rescuer will look for absent or abnormal (gasping) breathing.
• Compress the chest about 5cm or 2 inches (1/3 the diameter of the chest) at a rate of at least 100/ minute, allowing for full chest recoil.
• Rescue breaths: rescuer delivers normal breaths (each over 1 second) that make the chest rise.
• the adult aed pad that goes on the upper right hand side of the chest is placed on the centre of the chest for a child.
• the adult aed pad (heart symbol) that goes on the lower left hand side of the rib cage is placed between the shoulder blades of a child.
• Use of barrier device is recommended.
Reference: CLM - 7.2 the aBC PrioritiesCLM - 7.4 Rescue BreathingCLM - 7.5 CPRCLM - appendix B
• assess the environment for hazards
• establish unresponsiveness
• activate emergency Medical system (eMs)
• attempt to obtain aed
• Position victim (turn on back if necessary)
• open airway
• Perform a quick visual check for absent or abnormal breathing for 5 seconds
• If normal breathing is present, place patient in the recovery position
• If breathing is absent or abnormal and the aed is not present, immediately start CPR with compressions (30 compressions: 2 rescue breaths)
• If breathing is absent or abnormal and the aed is present, immediately initiate the aed protocol.
• CPR and/or aed continued until eMs takes over treatment or the victim begins to move
• If victim begins to move, reassess aBCs and treat appropriately
AEd Protocol• When the aed arrives, turn on the power and follow the prompts
• expose the chest
• shave and dry chest if necessary
• Position electrodes on victim appropriately and connect to defibrillator
• do not touch victim during analysis and shock prompts
• appropriate response to all voice prompts and/or machine indicators
• Initiate 2 minutes of CPR immediately after a shock or “no shock” prompt
• If victim demonstrates life signs, reassess aBC’s and treat appropriately
• do not turn off or disconnect the aed until eMs takes over
oCtoBER 2011
21LIFesavInG soCIety 2011 CPR UPdAtEs • instRUCtoR REsoURCE
notes
Must see
Purpose
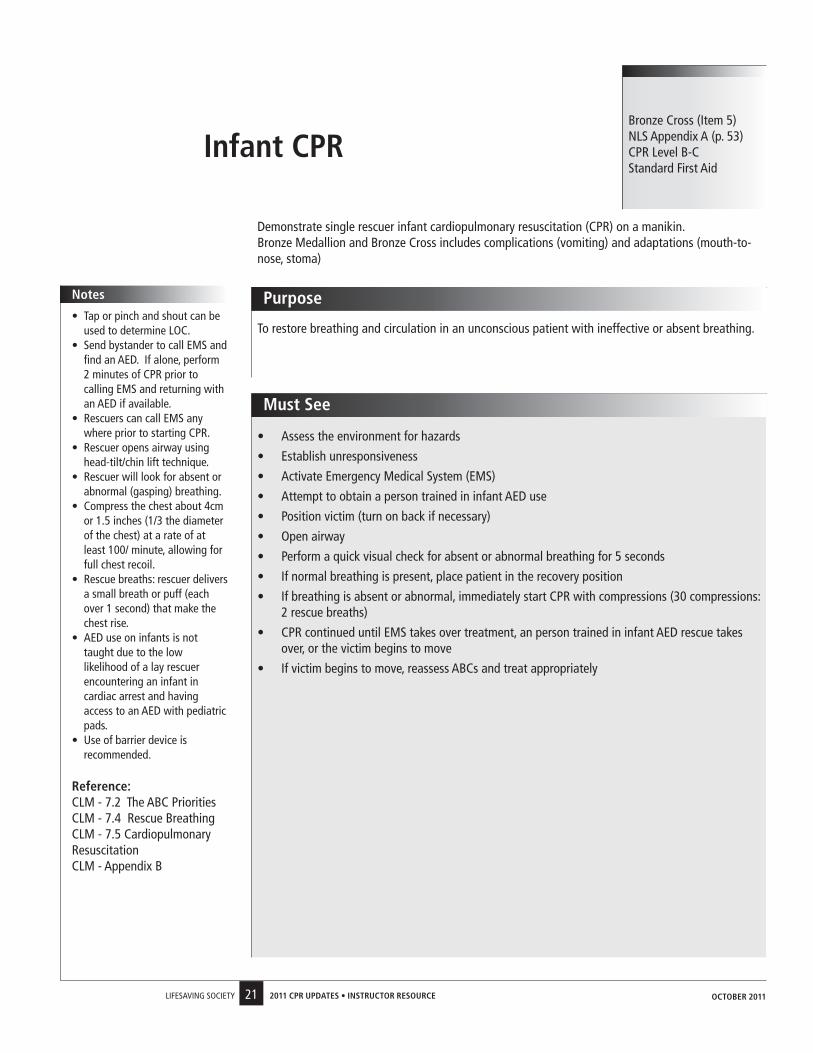
infant CPR
demonstrate single rescuer infant cardiopulmonary resuscitation (CPR) on a manikin.Bronze Medallion and Bronze Cross includes complications (vomiting) and adaptations (mouth-to-nose, stoma)
Bronze Cross (Item 5)nLs appendix a (p. 53)CPR Level B-Cstandard First aid
to restore breathing and circulation in an unconscious patient with ineffective or absent breathing.
• assess the environment for hazards
• establish unresponsiveness
• activate emergency Medical system (eMs)
• attempt to obtain a person trained in infant aed use
• Position victim (turn on back if necessary)
• open airway
• Perform a quick visual check for absent or abnormal breathing for 5 seconds
• If normal breathing is present, place patient in the recovery position
• If breathing is absent or abnormal, immediately start CPR with compressions (30 compressions: 2 rescue breaths)
• CPR continued until eMs takes over treatment, an person trained in infant aed rescue takes over, or the victim begins to move
• If victim begins to move, reassess aBCs and treat appropriately
• tap or pinch and shout can be used to determine LoC.
• send bystander to call eMs and find an aed. If alone, perform 2 minutes of CPR prior to calling eMs and returning with an aed if available.
• Rescuers can call eMs any where prior to starting CPR.
• Rescuer opens airway using head-tilt/chin lift technique.
• Rescuer will look for absent or abnormal (gasping) breathing.
• Compress the chest about 4cm or 1.5 inches (1/3 the diameter of the chest) at a rate of at least 100/ minute, allowing for full chest recoil.
• Rescue breaths: rescuer delivers a small breath or puff (each over 1 second) that make the chest rise.
• aed use on infants is not taught due to the low likelihood of a lay rescuer encountering an infant in cardiac arrest and having access to an aed with pediatric pads.
• Use of barrier device is recommended.
Reference: CLM - 7.2 the aBC PrioritiesCLM - 7.4 Rescue BreathingCLM - 7.5 Cardiopulmonary ResuscitationCLM - appendix B
oCtoBER 2011
22LIFesavInG soCIety 2011 CPR UPdAtEs • instRUCtoR REsoURCE
notes
Must see
Purpose
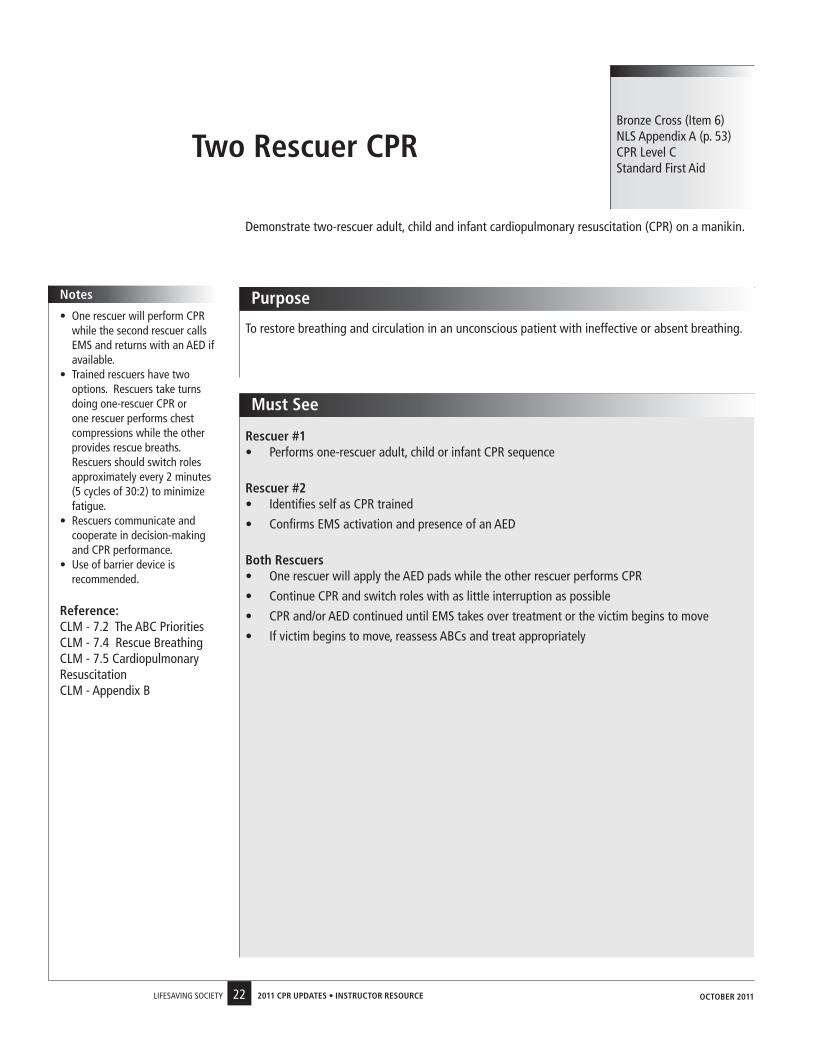
two Rescuer CPR
demonstrate two-rescuer adult, child and infant cardiopulmonary resuscitation (CPR) on a manikin.
Bronze Cross (Item 6)nLs appendix a (p. 53)CPR Level Cstandard First aid
to restore breathing and circulation in an unconscious patient with ineffective or absent breathing.• one rescuer will perform CPR
while the second rescuer calls eMs and returns with an aed if available.
• trained rescuers have two options. Rescuers take turns doing one-rescuer CPR or one rescuer performs chest compressions while the other provides rescue breaths. Rescuers should switch roles approximately every 2 minutes (5 cycles of 30:2) to minimize fatigue.
• Rescuers communicate and cooperate in decision-making and CPR performance.
• Use of barrier device is recommended.
Reference: CLM - 7.2 the aBC PrioritiesCLM - 7.4 Rescue BreathingCLM - 7.5 Cardiopulmonary ResuscitationCLM - appendix B
Rescuer #1• Performs one-rescuer adult, child or infant CPR sequence
Rescuer #2• Identifies self as CPR trained
• Confirms eMs activation and presence of an aed
Both Rescuers• one rescuer will apply the aed pads while the other rescuer performs CPR
• Continue CPR and switch roles with as little interruption as possible
• CPR and/or aed continued until eMs takes over treatment or the victim begins to move
• If victim begins to move, reassess aBCs and treat appropriately
oCtoBER 2011
23LIFesavInG soCIety 2011 CPR UPdAtEs • instRUCtoR REsoURCE
notes
Must see
Purpose
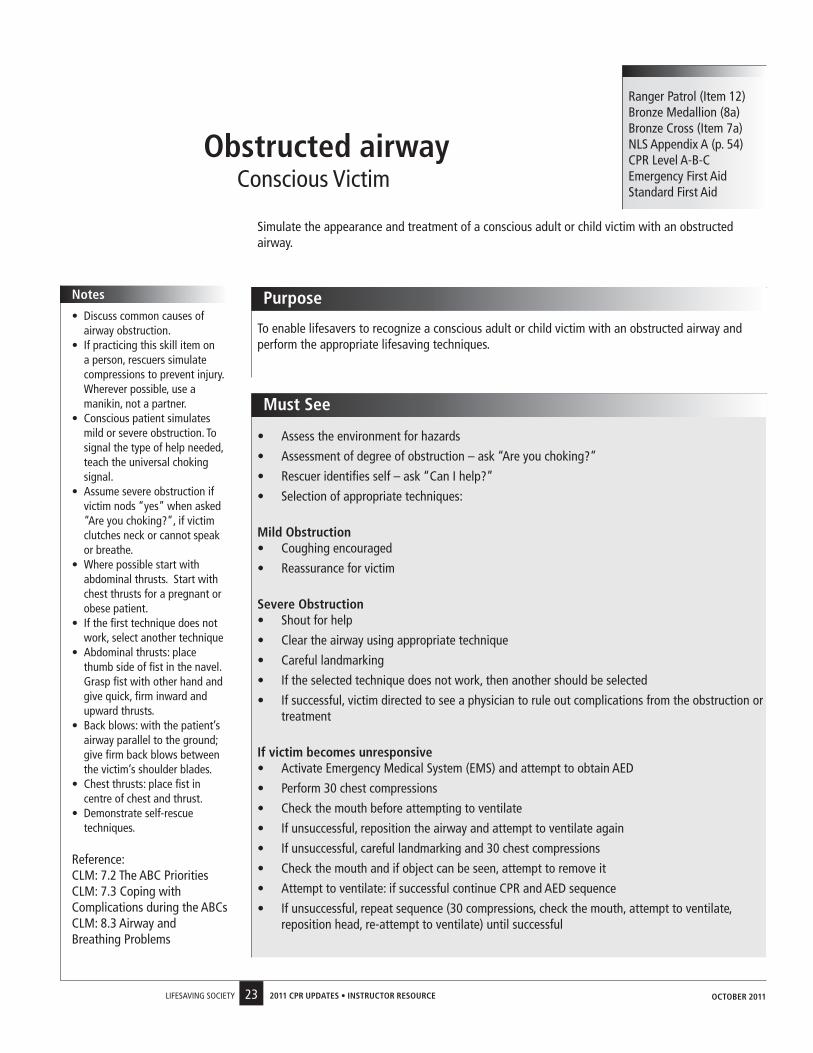
obstructed airwayConscious victim
simulate the appearance and treatment of a conscious adult or child victim with an obstructed airway.
Ranger Patrol (Item 12)Bronze Medallion (8a)Bronze Cross (Item 7a)nLs appendix a (p. 54)CPR Level a-B-Cemergency First aidstandard First aid
to enable lifesavers to recognize a conscious adult or child victim with an obstructed airway and perform the appropriate lifesaving techniques.
• assess the environment for hazards
• assessment of degree of obstruction – ask “are you choking?”
• Rescuer identifies self – ask “Can I help?”
• selection of appropriate techniques:
Mild obstruction • Coughing encouraged
• Reassurance for victim
severe obstruction• shout for help
• Clear the airway using appropriate technique
• Careful landmarking
• If the selected technique does not work, then another should be selected
• If successful, victim directed to see a physician to rule out complications from the obstruction or treatment
if victim becomes unresponsive• activate emergency Medical system (eMs) and attempt to obtain aed
• Perform 30 chest compressions
• Check the mouth before attempting to ventilate
• If unsuccessful, reposition the airway and attempt to ventilate again
• If unsuccessful, careful landmarking and 30 chest compressions
• Check the mouth and if object can be seen, attempt to remove it
• attempt to ventilate: if successful continue CPR and aed sequence
• If unsuccessful, repeat sequence (30 compressions, check the mouth, attempt to ventilate, reposition head, re-attempt to ventilate) until successful
• discuss common causes of airway obstruction.
• If practicing this skill item on a person, rescuers simulate compressions to prevent injury. Wherever possible, use a manikin, not a partner.
• Conscious patient simulates mild or severe obstruction. to signal the type of help needed, teach the universal choking signal.
• assume severe obstruction if victim nods “yes” when asked “are you choking?”, if victim clutches neck or cannot speak or breathe.
• Where possible start with abdominal thrusts. start with chest thrusts for a pregnant or obese patient.
• If the first technique does not work, select another technique
• abdominal thrusts: place thumb side of fist in the navel. Grasp fist with other hand and give quick, firm inward and upward thrusts.
• Back blows: with the patient’s airway parallel to the ground; give firm back blows between the victim’s shoulder blades.
• Chest thrusts: place fist in centre of chest and thrust.
• demonstrate self-rescue techniques.
Reference:CLM: 7.2 the aBC PrioritiesCLM: 7.3 Coping with Complications during the aBCsCLM: 8.3 airway and Breathing Problems
oCtoBER 2011
24LIFesavInG soCIety 2011 CPR UPdAtEs • instRUCtoR REsoURCE
notes
Must see
Purpose
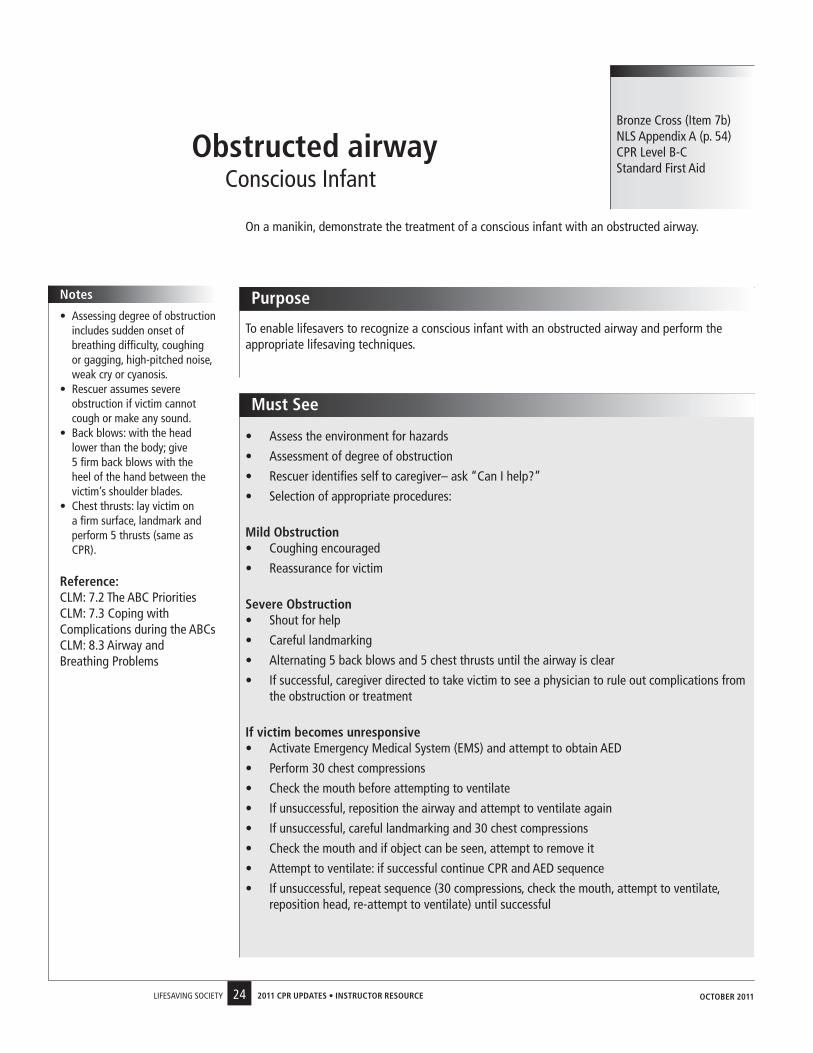
obstructed airwayConscious Infant
on a manikin, demonstrate the treatment of a conscious infant with an obstructed airway.
Bronze Cross (Item 7b)nLs appendix a (p. 54)CPR Level B-Cstandard First aid
to enable lifesavers to recognize a conscious infant with an obstructed airway and perform the appropriate lifesaving techniques.
• assessing degree of obstruction includes sudden onset of breathing difficulty, coughing or gagging, high-pitched noise, weak cry or cyanosis.
• Rescuer assumes severe obstruction if victim cannot cough or make any sound.
• Back blows: with the head lower than the body; give 5 firm back blows with the heel of the hand between the victim’s shoulder blades.
• Chest thrusts: lay victim on a firm surface, landmark and perform 5 thrusts (same as CPR).
Reference:CLM: 7.2 the aBC PrioritiesCLM: 7.3 Coping with Complications during the aBCsCLM: 8.3 airway and Breathing Problems
• assess the environment for hazards
• assessment of degree of obstruction
• Rescuer identifies self to caregiver– ask “Can I help?”
• selection of appropriate procedures:
Mild obstruction • Coughing encouraged
• Reassurance for victim
severe obstruction• shout for help
• Careful landmarking
• alternating 5 back blows and 5 chest thrusts until the airway is clear
• If successful, caregiver directed to take victim to see a physician to rule out complications from the obstruction or treatment
if victim becomes unresponsive• activate emergency Medical system (eMs) and attempt to obtain aed
• Perform 30 chest compressions
• Check the mouth before attempting to ventilate
• If unsuccessful, reposition the airway and attempt to ventilate again
• If unsuccessful, careful landmarking and 30 chest compressions
• Check the mouth and if object can be seen, attempt to remove it
• attempt to ventilate: if successful continue CPR and aed sequence
• If unsuccessful, repeat sequence (30 compressions, check the mouth, attempt to ventilate, reposition head, re-attempt to ventilate) until successful
oCtoBER 2011
25LIFesavInG soCIety 2011 CPR UPdAtEs • instRUCtoR REsoURCE
notes
Must see
Purpose
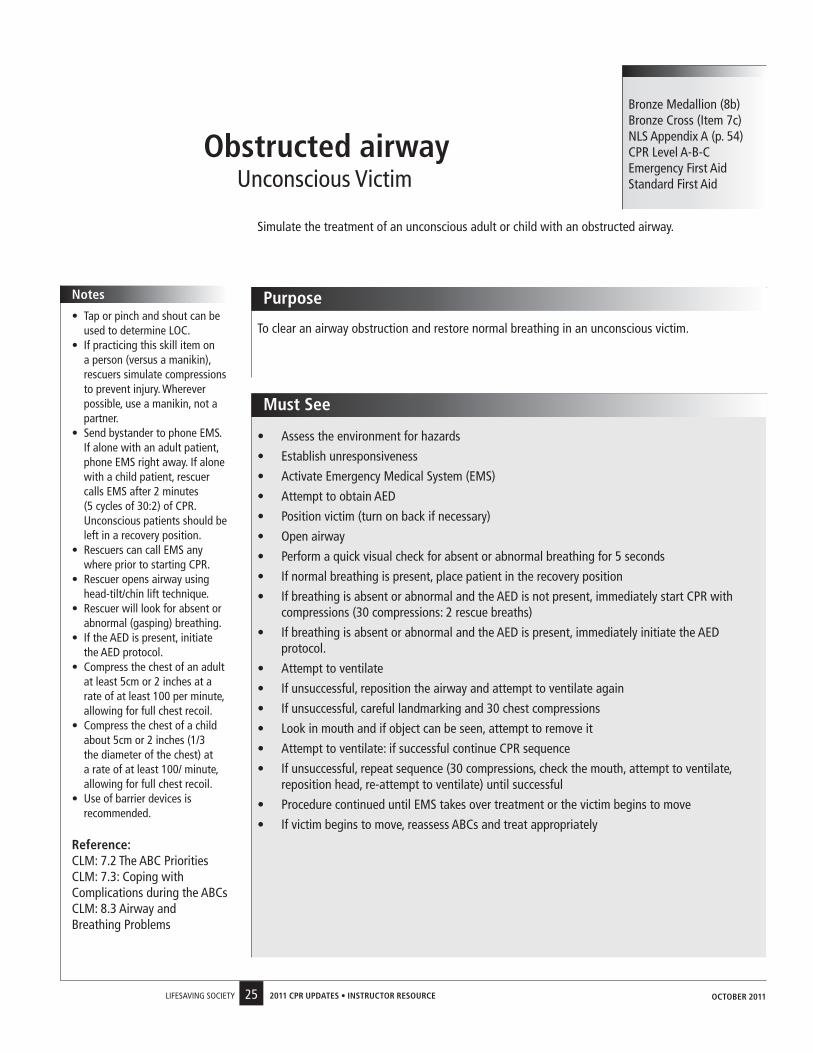
obstructed airwayUnconscious victim
simulate the treatment of an unconscious adult or child with an obstructed airway.
Bronze Medallion (8b)Bronze Cross (Item 7c)nLs appendix a (p. 54)CPR Level a-B-Cemergency First aidstandard First aid
to clear an airway obstruction and restore normal breathing in an unconscious victim.
• assess the environment for hazards
• establish unresponsiveness
• activate emergency Medical system (eMs)
• attempt to obtain aed
• Position victim (turn on back if necessary)
• open airway
• Perform a quick visual check for absent or abnormal breathing for 5 seconds
• If normal breathing is present, place patient in the recovery position
• If breathing is absent or abnormal and the aed is not present, immediately start CPR with compressions (30 compressions: 2 rescue breaths)
• If breathing is absent or abnormal and the aed is present, immediately initiate the aed protocol.
• attempt to ventilate
• If unsuccessful, reposition the airway and attempt to ventilate again
• If unsuccessful, careful landmarking and 30 chest compressions
• Look in mouth and if object can be seen, attempt to remove it
• attempt to ventilate: if successful continue CPR sequence
• If unsuccessful, repeat sequence (30 compressions, check the mouth, attempt to ventilate, reposition head, re-attempt to ventilate) until successful
• Procedure continued until eMs takes over treatment or the victim begins to move
• If victim begins to move, reassess aBCs and treat appropriately
• tap or pinch and shout can be used to determine LoC.
• If practicing this skill item on a person (versus a manikin), rescuers simulate compressions to prevent injury. Wherever possible, use a manikin, not a partner.
• send bystander to phone eMs. If alone with an adult patient, phone eMs right away. If alone with a child patient, rescuer calls eMs after 2 minutes (5 cycles of 30:2) of CPR. Unconscious patients should be left in a recovery position.
• Rescuers can call eMs any where prior to starting CPR.
• Rescuer opens airway using head-tilt/chin lift technique.
• Rescuer will look for absent or abnormal (gasping) breathing.
• If the aed is present, initiate the aed protocol.
• Compress the chest of an adult at least 5cm or 2 inches at a rate of at least 100 per minute, allowing for full chest recoil.
• Compress the chest of a child about 5cm or 2 inches (1/3 the diameter of the chest) at a rate of at least 100/ minute, allowing for full chest recoil.
• Use of barrier devices is recommended.
Reference:CLM: 7.2 the aBC PrioritiesCLM: 7.3: Coping with Complications during the aBCsCLM: 8.3 airway and Breathing Problems
oCtoBER 2011
26LIFesavInG soCIety 2011 CPR UPdAtEs • instRUCtoR REsoURCE
notes
Must see
Purpose
obstructed airwayUnconscious Infant
simulate the treatment of an unconscious infant with an obstructed airway.
Bronze Cross (Item 7c)nLs appendix a (p. 54)CPR Level B-Cstandard First aid
to clear an airway obstruction and restore normal breathing in an unconscious victim.• tap or pinch and shout can be
used to determine LoC.• this skill item should be
performed on a manikin.• send bystander to phone eMs.
If alone with an infant, rescuer calls eMs after 2 minutes (5 cycles of 30:2) of CPR. Unconscious patients should be left in a recovery position.
• Rescuers can call eMs any where prior to starting CPR.
• Rescuer opens airway using head-tilt/chin lift technique.
• Rescuer will look for absent or abnormal (gasping) breathing.
• Compress the chest of a infant about 4cm or 1.5 inches (1/3 the diameter of the chest) at a rate of at least 100/ minute, allowing for full chest recoil.
• Use of barrier devices is recommended.
Reference:CLM: 7.2 the aBC PrioritiesCLM: 7.3: Coping with Complications during the aBCsCLM: 8.3 airway and Breathing Problems
• assess the environment for hazards
• establish unresponsiveness
• activate emergency Medical system (eMs)
• attempt to obtain a person trained in infant aed use
• Position victim (turn on back if necessary)
• open airway
• Perform a quick visual check for absent or abnormal breathing for 5 seconds
• If normal breathing is present, place patient in the recovery position
• If breathing is absent or abnormal, immediately start CPR with compressions (30 compressions: 2 rescue breaths)
• attempt to ventilate
• If unsuccessful, reposition the airway and attempt to ventilate again
• If unsuccessful, careful landmarking and 30 chest compressions
• Look in mouth and if object can be seen, attempt to remove it
• attempt to ventilate: if successful continue CPR sequence
• If unsuccessful, repeat sequence (30 compressions, check the mouth, attempt to ventilate, reposition head, re-attempt to ventilate) until successful
• CPR continued until eMs takes over treatment, an person trained in infant aed rescue takes over, or the victim begins to move
• If victim begins to move, reassess aBCs and treat appropriately
oCtoBER 2011
27LIFesavInG soCIety 2011 CPR UPdAtEs • instRUCtoR REsoURCE
notes
Must see
Purpose
Primary AssessmentHazards & aBCs
demonstrate a primary assessment including hazards and aBCs on an unconscious, breathing victim.
Ranger PatrolFirst aid (Item 10)
to assess an unconscious breathing victim with respect to hazards and aBCs.
• assessment of environment for hazards
• establish unresponsiveness
• activate emergency Medical system
• attempt to obtain aed
• Position victim (turn if necessary)
• open airway
• Perform a quick visual check for absent or abnormal breathing for 5 seconds
• Recovery position
• victim is classified as an adult. send bystander to call eMs and find an aed. If alone, rescuer phones eMs first and returns with an aed if available.
• to establish level of consciousness, rescuer may pinch the shoulder and ask “are you oK?” other techniques are acceptable.
• If the victim is on their side or front, the rescuer may have to roll them to their back to assess for breathing.
• Rescuer opens airway using head-tilt/chin lift technique.
• Rescuer will look for absent or abnormal (gasping) breathing.
• see suggested learning activities p. 69, 70.
Reference:CLM Chapter 6.4 Conduct the Primary assessment
oCtoBER 2011
28LIFesavInG soCIety 2011 CPR UPdAtEs • instRUCtoR REsoURCE
notes
Must see
Purpose
Rescue non-breathing victim in deep water
Perform a rescue of an unconscious, non-breathing victim in deep water. Return with the victim to the beach, dock or poolside. Untrained bystanders assist in victim removal. Rescuer performs appropriate follow-up procedures, including treatment for shock.
Bronze starRecognition & Rescue(Item 17)
to prepare for the prevention of loss of life in an aquatic emergency with minimum risk to the rescuer.
• victim should be near the surface and may be face-up or face-down.
• Realistic situations and victim simulation will assist in accurate recognition and appropriate rescue response.
• aids (preferably not kickboards) available should be realistic & appropriate to an unsupervised environment.
• Rescuers are not required to perform unassisted removals. Bystanders can be trained or untrained.
• Rescuers can call eMs any where prior to starting CPR.
• Rescuer opens airway using head-tilt/chin lift technique.
• Rescuer will look for absent or abnormal (gasping) breathing.
• due to the hypoxic nature of drowning, the rescuer will provide two rescue breaths (but no more than 5) prior to starting compressions (CPR).
• additional rescue breaths may be appropriate under some circumstances (long shallow water caries or delayed/difficult removals).
• Use of barrier devices is recommended.
Reference:CLM: 4 the Rescue of othersCLM: 7.2 the aBC PrioritiesCLM: 7.4 Rescue BreathingCLM: 7.5 Cardiopulmonary ResuscitationCLM: appendix a & B
• Quick, accurate recognition
• Personal safety maintained throughout
• appropriate assessment of situation
• Call for help
• appropriate choice and use of rescue aid
• appropriate entry and efficient approach
• victim secured at nearest point of safety
• appropriate care of victim and follow-up
• visual contact and constructive communication throughout
• appropriate use of and clear direction of bystanders
• activate emergency Medical system (eMs)
• attempt to obtain aed
• open airway
• Perform a quick visual check for absent or abnormal breathing for 5 seconds
• If breathing is absent or abnormal and the aed is not present, immediately provide two rescue breaths and start compressions (CPR)
• If breathing is absent or abnormal and the aed is present, immediately initiate the aed protocol
• CPR and/or aed continued until eMs takes over treatment or the victim begins to move
• If victim begins to move, reassess aBCs and treat appropriately
oCtoBER 2011
29LIFesavInG soCIety 2011 CPR UPdAtEs • instRUCtoR REsoURCE
notes
Must see
Purpose
Rescue 2
Perform a rescue of a non-breathing victim located in deep water, 5m from a point of safety. the situation involves an unsupervised environment and is designed to emphasize victim care, removals with bystander assistance, and follow-up including contact with eMs.
Bronze MedallionRecognition & Rescue(Item 14)
to prevent loss of life in an aquatic emergency with minimum risk to the rescuer.
• Quick, accurate recognition
• appropriate assessment of situation - call for help
• appropriate choice and use of rescue aid
• safe and effective entry, approach (maintaining visual contact), reverse and ready, and carry for the circumstances
• victim secured at nearest point of safety
• safe and effective removal with bystander assistance
• activate emergency Medical system (eMs)
• attempt to obtain aed
• open airway
• Perform a quick visual check for absent or abnormal breathing for 5 seconds
• If breathing is absent or abnormal and the aed is not present, immediately provide two rescue breaths and start compressions (CPR)
• If breathing is absent or abnormal and the aed is present, immediately initiate the aed protocol
• CPR and/or aed continued until eMs takes over treatment or the victim begins to move
• If victim begins to move, reassess aBCs and treat appropriately
• effective use and direction of bystanders where appropriate
• effective use of barrier devices where appropriate
• appropriate care of victim throughout including constructive communication
• Lowest risk rescue possible under the circumstances and concern for personal safety throughout
• victim may be located at or just below the surface.
• Realistic victim simulation will assist in accurate rescuer recognition and appropriate response.
• Rescue breathing is initiated as soon as the candidate can effectively deal with vomiting. Rescue breathing in deep water is not expected.
• Rescuers are not required to perform unassisted removals. Bystanders can be trained or untrained.
• Rescuers can call eMs any where prior to starting CPR.
• Rescuer opens airway using head-tilt/chin lift technique.
• Rescuer will look for absent or abnormal (gasping) breathing.
• due to the hypoxic nature of drowning, the rescuer will provide two rescue breaths (but no more than 5) prior to starting compressions (CPR).
• additional rescue breaths may be appropriate under some circumstances (long shallow water caries or delayed/difficult removals)
• Basic understanding of critical incident stress.
Reference:CLM: 4 the Rescue of othersCLM: 7.2 the aBC PrioritiesCLM: 7.4 Rescue BreathingCLM: 7.5 CPRCLM: appendix a and B
oCtoBER 2011
30LIFesavInG soCIety 2011 CPR UPdAtEs • instRUCtoR REsoURCE
notes
Must see
Purpose
Rescue 2
Perform a rescue of a submerged, non-breathing victim. the situation is designed to emphasize victim care, removal, and follow-up including contact with eMs.
Bronze CrossRecognition & RescueItem 13
to prevent the loss of life in an aquatic emergency with minimum risk to the rescuer. to provide care until relief of responsibility is obtained.
• Realistic victim simulation will assist in accurate rescuer recognition and appropriate response.
• victim is located at a maximum depth of 3m.
• Rescue breathing is initiated as soon as the candidate can effectively deal with vomiting. Rescue breathing in deep water is not expected.
• Rescuers are not required to perform unassisted removals. Bystanders can be trained or untrained.
• Rescuers can call eMs any where prior to starting CPR.
• Rescuer opens airway using head-tilt/chin lift technique.
• Rescuer will look for absent or abnormal (gasping) breathing.
• due to the hypoxic nature of drowning, the rescuer will provide two rescue breaths (but no more than 5) prior to starting compressions (CPR).
• additional rescue breaths may be appropriate under some circumstances (long shallow water caries or delayed/difficult removals)
• Basic understanding of critical incident stress.
Reference:CLM: 4 the Rescue of othersCLM: 7.2 the aBC PrioritiesCLM: 7.4 Rescue BreathingCLM: 7.5 CPRCLM: appendix a and B
• Quick, accurate recognition
• appropriate assessment of situation - call for help
• appropriate choice and use of aid
• safe and effective entry, approach (maintaining visual contact), reverse and ready, and carry
• Protection of airway during ascent and thereafter
• victim secured at the nearest point of safety
• safe and effective removal with bystander assistance
• activate emergency Medical system (eMs)
• attempt to obtain aed
• open airway
• Perform a quick visual check for absent or abnormal breathing for 5 seconds
• If breathing is absent or abnormal and the aed is not present, immediately provide two rescue breaths and start compressions (CPR)
• If breathing is absent or abnormal and the aed is present, immediately initiate the aed protocol
• CPR and/or aed continued until eMs takes over treatment or the victim begins to move
• If victim begins to move, reassess aBCs and treat appropriately
• effective use and direction of bystanders where appropriate
• effective use of barrier devices where appropriate
• appropriate care of victim throughout including constructive communication
• Lowest risk rescue possible under the circumstances and concern for personal safety throughout
oCtoBER 2011
31LIFesavInG soCIety 2011 CPR UPdAtEs • instRUCtoR REsoURCE
notes
Must see
Purpose
Management of submerged non-breathing victim
demonstrate effective management of a submerged, non-breathing victim.
national LifeguardCore (Item 3b)
to demonstrate effective individual skills in the management of a submerged non-breathing victim.
• Quick entry and descent
• Rapid ascent
• secure hold on victim during ascent
• Protection of airway during ascent and thereafter
• Quickest route to point where rescue breathing and CPR may be effectively initiated and complications dealt with (side of pool, shallow water, rescue craft)
• safe and effective removal with lifeguard or bystander assistance
• activate emergency Medical system (eMs)
• attempt to obtain aed
• open airway
• Perform a quick visual check for absent or abnormal breathing for 5 seconds
• If breathing is absent or abnormal and the aed is not present, immediately provide two rescue breaths and start compressions (CPR)
• If breathing is absent or abnormal and the aed is present, immediately initiate the aed protocol
• ability to deal with complications (vomiting, obstructed airway) at any point in performance
• CPR and/or aed continued until eMs takes over treatment or the victim begins to move
• If victim begins to move, reassess aBCs and treat appropriately
• effective use of barrier devices where appropriate
• appropriate and effective direction of bystanders where appropriate
• emphasis is on the candidate’s individual skill ability rather than a team response.
• Item is performed without an aid.
• Reference appendix a for CPR Must sees.
• Rescuers are not required to perform unassisted removals.
• Rescuers can call eMs any where prior to starting CPR.
• Rescuer opens airway using head-tilt/chin lift technique.
• Rescuer will look for absent or abnormal (gasping) breathing.
• Rescue breathing is initiated as soon as the candidate can effectively deal with vomiting. Rescue breathing in deep water is not expected.
• due to the hypoxic nature of drowning, the rescuer will provide two rescue breaths (but no more than 5) prior to starting compressions (CPR).
• additional rescue breaths may be appropriate under some circumstances (long shallow water caries or delayed/difficult removals)
• victim condition may include any combination of airway obstruction or vomiting
Reference:CLM: 4 the Rescue of othersCLM: 7 Lifesaving PrioritiesCLM: 7.4 Rescue Breathing
oCtoBER 2011
32LIFesavInG soCIety 2011 CPR UPdAtEs • instRUCtoR REsoURCE
notes
Must see
Purpose
Management of spinal- injured victim
demonstrate effective management of a victim with a suspected spinal injury.
national LifeguardCore (Item 3c)
to demonstrate effective individual skills in the management of a breathing or non-breathing victim with a spinal injury.
• emphasis is on individual skill rather than a team response (lifeguards act as back-up). each candidate must be evaluated on all Must sees.
• types of spinal injuries can include cervical and lumbar.
• victims are located in deep or shallow water, on land, or walking. deep water victims are removed from shallow water where possible.
• victim condition may include any combination of breathing, ineffective or absent breathing, airway obstruction or vomiting
• Initially open the airway with a jaw thrust. If the jaw thrust does not work, reposition with a head-tilt/chin lift.
• Rescuer will look for absent or abnormal (gasping) breathing.
• Rescue breathing is initiated as soon as the candidate can effectively deal with vomiting. deep water rescue breathing is not expected.
• If the victim is rescued from the water and is not breathing or breathing normally, the rescuer will provide two rescue breaths (but no more than 5) prior to starting compressions (CPR).
• additional rescue breaths may be appropriate under some circumstances (long shallow water caries or delayed/difficult removals)
• the chest strap must be removed for aed use.
• aim for prompt removal and preparation for transport.
• Quick, accurate recognition and appropriate entry
• smooth rollover performed if necessary
• Immobilization of the spine during rollover and throughout (to extent possible)
• victim assessment: level of consciousness and aBCs
• activate emergency Medical system (eMs)
• attempt to obtain aed
• ability to deal with complications (vomiting, obstructed airway)
• effective use of barrier devices where appropriate
• stabilization with a spineboard or other appropriate device (in-water victim only)
• Preparation for transportation and removal (in-water victim only)
• safe removal from water where possible (in-water victim only)
• secondary assessment where feasible
• appropriate and effective direction of bystanders where applicable
if victim is unresponsive and breathing is absent or abnormal (reference appendix a for CPR Must sees)• open airway
• Perform a quick visual check for absent or abnormal breathing for 5 seconds
• If breathing is absent or abnormal and the aed is not present, immediately provide two rescue breaths and start compressions (CPR)
• If breathing is absent or abnormal and the aed is present, immediately initiate the aed protocol
• Movement of victim minimized throughout
Reference:alert: 3 aquatic emergencies: Recognition and Interventionalert: 4 Management of spinal injuriesCLM: 5.10 Rescue Procedures for spinal Injuries
oCtoBER 2011
33LIFesavInG soCIety 2011 CPR UPdAtEs • instRUCtoR REsoURCE
notes
Must see
Purpose
spinal injury
as a member of a team, perform a rescue of a victim with a suspected spinal injury who is located in a catch basin, wave pool, channel, stairs or who has fallen from a height.
national LifeguardWaterpark option(Item 8)
to recover and immobilize a spinal-injured victim in a difficult location.
• Quick, accurate recognition and appropriate entry
• smooth rollover performed if necessary
• Immobilization of the spine during rollover and throughout (to extent possible)
• victim assessment: level of consciousness and aBCs
• activate emergency Medical system (eMs)
• attempt to obtain aed
• ability to deal with complications (vomiting, obstructed airway)
• effective use of barrier devices where appropriate
• stabilization with a spineboard or other appropriate device (in-water victim only)
• Preparation for transportation and removal (in-water victim only)
• safe removal from water where possible (in-water victim only)
• secondary assessment where feasible
• appropriate and effective direction of bystanders where applicable
• treatment for shock
if victim is unresponsive and breathing is absent or abnormal (reference appendix a for CPR Must sees)• open airway
• Perform a quick visual check for absent or abnormal breathing for 5 seconds
• If breathing is absent or abnormal and the aed is not present, immediately provide two rescue breaths and start compressions (CPR)
• If breathing is absent or abnormal and the aed is present, immediately initiate the aed protocol
• Movement of victim minimized throughout
• Candidates respond as part of a team (which may vary in number). each individual’s performance is evaluated, not the team performance.
• Use a manikin to practice recovery of victim in a flume.
• victim can be conscious or unconscious, breathing or not breathing, etc.
• Initially open the airway with a jaw thrust. If the jaw thrust does not work, reposition with a head-tilt/chin lift.
• Rescuer will look for absent or abnormal (gasping) breathing.
• Rescue breathing is initiated as soon as the candidate can effectively deal with vomiting. deep water rescue breathing is not expected.
• If the victim is rescued from the water and is not breathing or breathing normally, the rescuer will provide two rescue breaths (but no more than 5) prior to starting compressions (CPR).
• additional rescue breaths may be appropriate under some circumstances (long shallow water caries or delayed/difficult removals)
• the chest strap must be removed for aed use.
• aim for prompt removal and preparation for transport.
• a run-out channel may be at the bottom of a high-speed slide.
Reference:alert: 3 aquatic emergencies: Recognition and Interventionalert: 4 Management of spinal injuriesCLM: 5.10 Rescue Procedures for spinal Injuries
oCtoBER 2011

34LIFesavInG soCIety 2011 CPR UPdAtEs • instRUCtoR REsoURCE
to ensure accurate and consistent delivery of the first aid recommendations across the country, please amend the following in the identified award Guides.
sWIM PatRoL aWaRd GUIde
• Rookie Patrol Item 13 – Care for bleeding
○ Remove (strike out) the following Must see(s)
� elevation if appropriate
• Ranger Patrol Item 11 – shock
○ Remove (strike out) the following Must see(s)
� semi-prone position (unless injury dictates otherwise)
○ Replace the Must see(s) with
� Recovery position (unless injury dictates otherwise)
○ Recommend adding the following note(s)
� Recovery position is used for all victims who have normal breathing and a spinal injury is not suspected. this position is designed to maintain a patent airway and reduce the risk of airway obstruction and aspiration.
• star Patrol Item 13 – Respiratory emergencies
○ Recommend adding the following note(s)
� Rescuers should know how to assist with auto-injectors including how to administer if the patient is unable to do so.
BRonZe MedaLs aWaRd GUIde
• Bronze Medallion Item 9a (shock) and Item 9d (stroke &tIa)
○ Recommend adding the following note(s)
� Recovery position is used for all victims who have normal breathing and a spinal injury is not suspected. this position is designed to maintain a patent airway and reduce the risk of airway obstruction and aspiration.
• Bronze Medallion Item 9b – Circulatory emergencies: heart attack or angina
○ Recommend adding the following note(s)
� a patient suffering from chest pain can chew one adult or two children asa. the victim must have their own asa, no history of an aspirin allergy or asthma and no signs of a recent or active GI bleed.
• Bronze Medallion Item 9c – Circulatory emergencies: external bleeding
○ Remove (strike out) the following Must see(s)
� elevation of injury where possible
AWARd GUidEFIRst aId aMendMents
2011 CPR Updates instRUCtoR REsoURCE
oCtoBER 2011

35LIFesavInG soCIety 2011 CPR UPdAtEs • instRUCtoR REsoURCE
• Bronze Cross Item 8 – Hypothermia
○ Recommend adding the following note(s)
� If no normal breathing is present after 5 seconds, the rescuer must immediately initiate rescue breaths (if victim was submerged) and/or CPR.
nLs aWaRd GUIde
• appendix a – Respiratory distress (p. 55)
○ Recommend adding the following note(s) to anaphylaxis
� Rescuers should know how to assist with auto-injectors including how to administer if the patient is unable to do so.
• appendix a – shock (p. 56) and appendix a – stroke/tIa (p. 56)
○ Recommend adding the following note(s)
� Recovery position is used for all victims who have normal breathing and a spinal injury is not suspected. this position is designed to maintain a patent airway and reduce the risk of airway obstruction and aspiration.
• appendix a – external bleeding (p. 56)
○ Remove (strike out) the following Must see(s)
� elevation of injury where possible
• appendix a – Heart attack or angina (p. 56)
○ Recommend adding the following note(s) to Heart attack or angina
� a patient suffering from chest pain can chew one adult or two children asa.
� the victim must have their own asa, no history of an aspirin allergy or asthma and no signs of a recent or active GI bleed.
• appendix a – Heat and cold (p. 56)
○ Recommend adding the following note(s) for cold
� If no normal breathing is present after 5 seconds, the rescuer must immediately initiate rescue breaths (if victim was submerged) and/or CPR.
○ Recommend adding the following note(s) for heat
• electrolyte drinks (sport drinks) can be used in the treatment of heat exhaustion.
• Immersion in cold water is the initial recommended treatment for conscious victims suffering from heat stroke.
• appendix a – Poisoning (p. 59)
○ Recommend adding the following note(s)
� tropical jellyfish stings should be liberally washed with vinegar as soon as possible for at least 30 seconds. after the nematocysts are removed or deactivated, immerse in hot water (as tolerated) for about 20 minutes.
AWARd GUidEFIRst aId aMendMents
2011 CPR Updates instRUCtoR REsoURCE
oCtoBER 2011
36LIFesavInG soCIety 2011 CPR UPdAtEs • instRUCtoR REsoURCE
FIRst aId aWaRd GUIde
• First aid award Guides are Branch specific. It is the responsibility of each Branch to ensure that the resuscitation and first aid recommendations are written into Branch First aid award Guides and resources as they apply to the CPR/HCP, emergency First aid, standard First aid and aquatic emergency Care programs.
AWARd GUidEFIRst aId aMendMents
2011 CPR Updates instRUCtoR REsoURCE
oCtoBER 2011
37LIFesavInG soCIety 2011 CPR UPdAtEs • instRUCtoR REsoURCE
all resuscitation recommendations as outlined in this document are to be applied to the Health Care Provider (HCP) level. the most significant change from 2005 to 2010 for Health Care Providers is a shift in focus to a teamwork approach (Circulation Part 1, pg s643). HCP training should focus on building the team as each member arrives or delegating roles if multiple rescuers are present. this better reflects real life applications in ambulance or hospital settings.
similar to the lay rescuer, it is important to note that an HCP trained person can use judgment in determining when an eMs or “back-up” call can or should be made.
• Factors such as the presence of a hazard (fire or smoke) or mechanism of injury (car accident) may result in the rescuer calling eMs before assessing any patients.
• the HCP trained person can assess both breathing and pulse prior to the eMs or “back-up” call so that they can request equipment specific to the treatment of the patient (such as an aed or B-v-M).
• some of the major first aid training agencies have placed the eMs or “back-up” call elsewhere in their assessment algorithm. this is acceptable.
• the key is that the candidate makes the eMs or “back-up” call (without prompts from the Instructor) before initiating compressions (if CPR is required) or by the end of the primary survey so as not to delay treatment or transport.
In addition, it is recommended that Health Care Providers:
• Be able to customize treatments to a specific mechanism of injury where appropriate (such as a-B-C for the drowning patient).
• Be trained to apply the aed on infants as they have a higher likelihood of encountering an infant in cardiac arrest and having access to an aed with pediatric pads (Circulation Part 6, pg s711).
• no longer be trained in the use of cricoid pressure due to the inability of being able to properly teach it in a classroom setting and as such the improper application in the field (Circulation Part 1, pg s645).
• to facilitate delivery of ventilations with a Bag-valve-Mask, oral airways can be used in unconscious patients with no cough or gag reflex. oral airways should only be inserted by persons trained in their use (note that some provincial legislation does not allow use of airways or oxygen).
as per the 2005 Guidelines, it is recommended that:
• If a pulse is present, but normal breathing is not detected, the rescuer will initiate rescue breathing. the rescuer must assess a pulse every two minutes for this patient.
○ the rescue breath ratio will be 1 breath every 5-6 seconds (every 5 seconds recommended) for an adult.
○ the rescue breath ratio will be 1 breath every 3-5 seconds (every 3 seconds recommended) for a child/infant.
• It is recommended that the lone rescuer not use a Bag-valve-Mask, the 2 person Bag-valve-Mask technique is preferred.
○ the 2 person Bag-valve-Mask technique ensures a good airway, a proper seal of the mask and helps to decrease the risk of gastric distension.
Health Care ProviderUpdate
2011 CPR Updates instRUCtoR REsoURCE
oCtoBER 2011
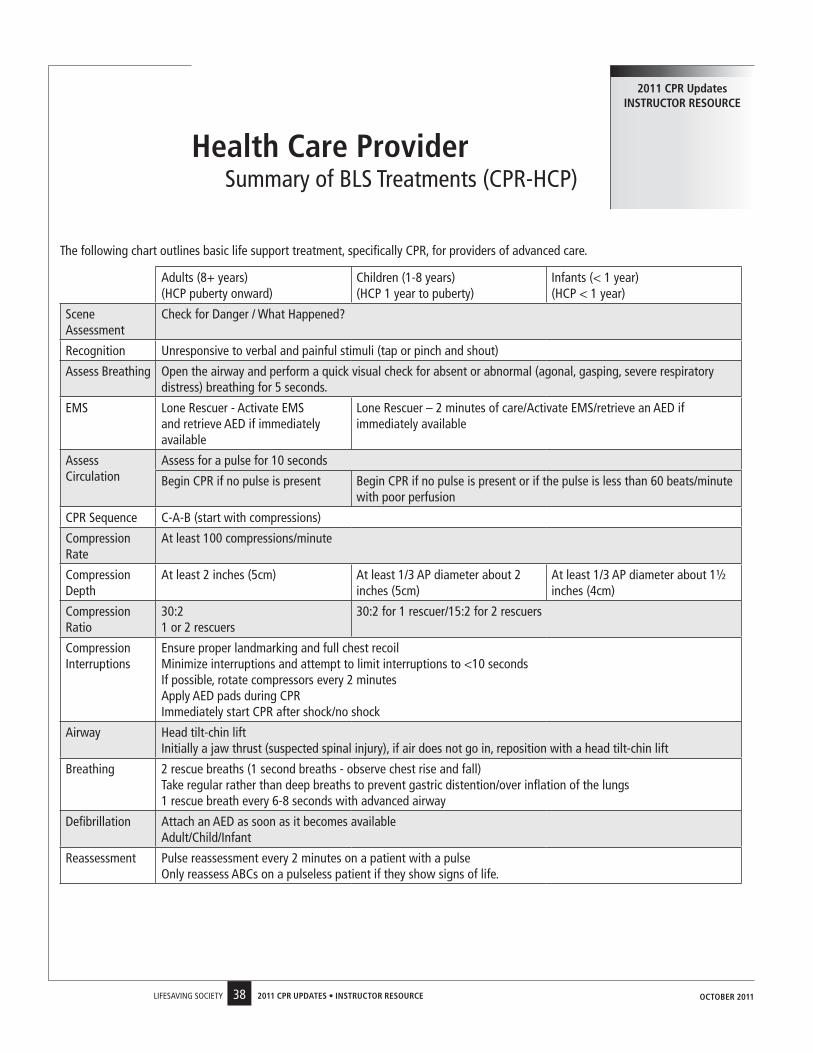
38LIFesavInG soCIety 2011 CPR UPdAtEs • instRUCtoR REsoURCE
Health Care Providersummary of BLs treatments (CPR-HCP)
2011 CPR Updates instRUCtoR REsoURCE
the following chart outlines basic life support treatment, specifically CPR, for providers of advanced care.
adults (8+ years) (HCP puberty onward)
Children (1-8 years) (HCP 1 year to puberty)
Infants (< 1 year) (HCP < 1 year)
scene assessment
Check for danger / What Happened?
Recognition Unresponsive to verbal and painful stimuli (tap or pinch and shout)
assess Breathing open the airway and perform a quick visual check for absent or abnormal (agonal, gasping, severe respiratory distress) breathing for 5 seconds.
eMs Lone Rescuer - activate eMs and retrieve aed if immediately available
Lone Rescuer – 2 minutes of care/activate eMs/retrieve an aed if immediately available
assess Circulation
assess for a pulse for 10 seconds
Begin CPR if no pulse is present Begin CPR if no pulse is present or if the pulse is less than 60 beats/minute with poor perfusion
CPR sequence C-a-B (start with compressions)
Compression Rate
at least 100 compressions/minute
Compression depth
at least 2 inches (5cm) at least 1/3 aP diameter about 2 inches (5cm)
at least 1/3 aP diameter about 1½ inches (4cm)
Compression Ratio
30:2 1 or 2 rescuers
30:2 for 1 rescuer/15:2 for 2 rescuers
Compression Interruptions
ensure proper landmarking and full chest recoil Minimize interruptions and attempt to limit interruptions to <10 seconds If possible, rotate compressors every 2 minutes apply aed pads during CPR Immediately start CPR after shock/no shock
airway Head tilt-chin lift Initially a jaw thrust (suspected spinal injury), if air does not go in, reposition with a head tilt-chin lift
Breathing 2 rescue breaths (1 second breaths - observe chest rise and fall) take regular rather than deep breaths to prevent gastric distention/over inflation of the lungs 1 rescue breath every 6-8 seconds with advanced airway
defibrillation attach an aed as soon as it becomes available adult/Child/Infant
Reassessment Pulse reassessment every 2 minutes on a patient with a pulse only reassess aBCs on a pulseless patient if they show signs of life.
oCtoBER 2011
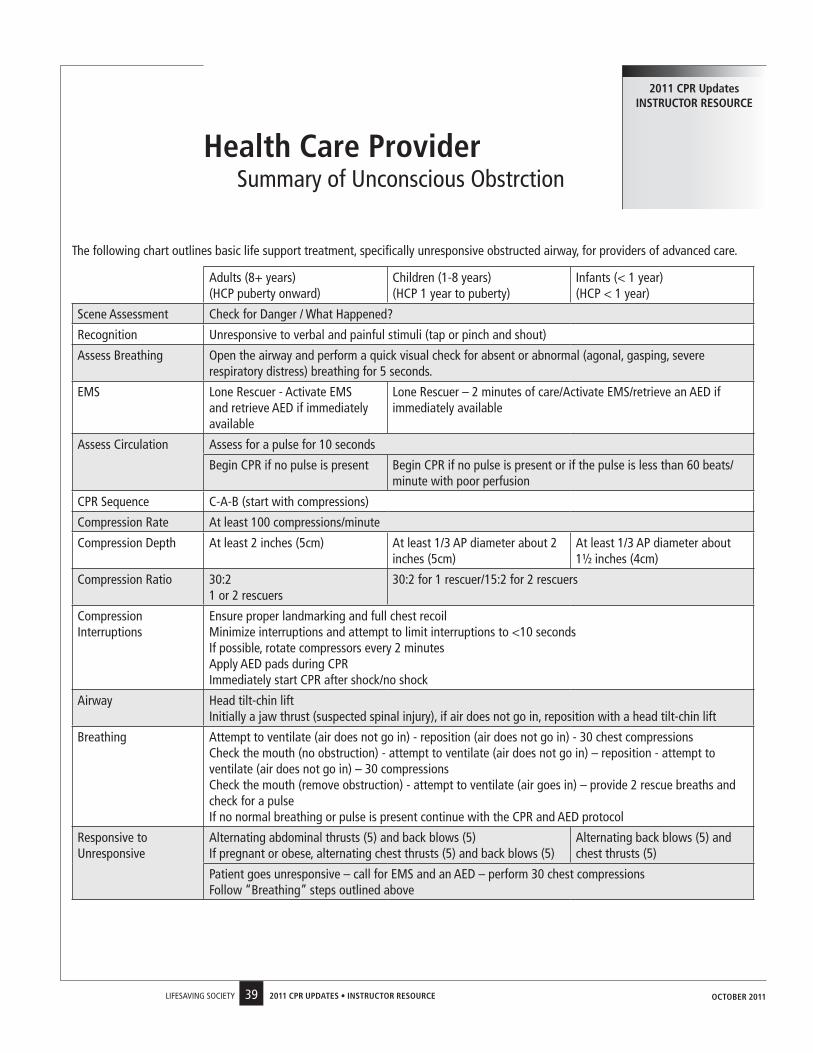
39LIFesavInG soCIety 2011 CPR UPdAtEs • instRUCtoR REsoURCE
Health Care Providersummary of Unconscious obstrction
2011 CPR Updates instRUCtoR REsoURCE
the following chart outlines basic life support treatment, specifically unresponsive obstructed airway, for providers of advanced care.
adults (8+ years) (HCP puberty onward)
Children (1-8 years) (HCP 1 year to puberty)
Infants (< 1 year) (HCP < 1 year)
scene assessment Check for danger / What Happened?
Recognition Unresponsive to verbal and painful stimuli (tap or pinch and shout)
assess Breathing open the airway and perform a quick visual check for absent or abnormal (agonal, gasping, severe respiratory distress) breathing for 5 seconds.
eMs Lone Rescuer - activate eMs and retrieve aed if immediately available
Lone Rescuer – 2 minutes of care/activate eMs/retrieve an aed if immediately available
assess Circulation assess for a pulse for 10 seconds
Begin CPR if no pulse is present Begin CPR if no pulse is present or if the pulse is less than 60 beats/minute with poor perfusion
CPR sequence C-a-B (start with compressions)
Compression Rate at least 100 compressions/minute
Compression depth at least 2 inches (5cm) at least 1/3 aP diameter about 2 inches (5cm)
at least 1/3 aP diameter about 1½ inches (4cm)
Compression Ratio 30:2 1 or 2 rescuers
30:2 for 1 rescuer/15:2 for 2 rescuers
Compression Interruptions
ensure proper landmarking and full chest recoil Minimize interruptions and attempt to limit interruptions to <10 seconds If possible, rotate compressors every 2 minutes apply aed pads during CPR Immediately start CPR after shock/no shock
airway Head tilt-chin lift Initially a jaw thrust (suspected spinal injury), if air does not go in, reposition with a head tilt-chin lift
Breathing attempt to ventilate (air does not go in) - reposition (air does not go in) - 30 chest compressions Check the mouth (no obstruction) - attempt to ventilate (air does not go in) – reposition - attempt to ventilate (air does not go in) – 30 compressions Check the mouth (remove obstruction) - attempt to ventilate (air goes in) – provide 2 rescue breaths and check for a pulse If no normal breathing or pulse is present continue with the CPR and aed protocol
Responsive to Unresponsive
alternating abdominal thrusts (5) and back blows (5) If pregnant or obese, alternating chest thrusts (5) and back blows (5)
alternating back blows (5) and chest thrusts (5)
Patient goes unresponsive – call for eMs and an aed – perform 30 chest compressions Follow “Breathing” steps outlined above
oCtoBER 2011
Publications of the Lifesaving Society are available from any Branch office. Inquiries from outside Canada should be directed to the National Office.
Alberta & Northwest Territories Branch11759 Groat RoadEdmonton, Alberta T5M 3K6Telephone: (780) 415-1755Fax: (780) 427-9334E-mail: [email protected]: www.lifesaving.org
British Columbia & Yukon Branch112 - 3989 Henning DriveBurnaby, British Columbia V5C 6N5Telephone: (604) 299-5450Fax: (604) 299-5795E-mail: [email protected]: www.lifesaving.bc.ca
Manitoba Branch504-138 Portage Avenue EastWinnipeg, Manitoba R3C 0A1Telephone: (204) 956-2124Fax: (204) 944-8546E-mail: [email protected]: www.lifesaving.mb.ca
National Office287 McArthur AvenueOttawa, Ontario K1L 6P3Telephone: (613) 746-5694Fax: (613) 746-9929E-mail: [email protected]: www.lifesaving.ca
New Brunswick Branch55 Whiting Road, Unit 34Fredericton, New Brunswick E3B 5Y5Telephone: (506) 455-5762Fax: (506) 450-7946E-mail: [email protected]: www.lifesavingnb.ca
Newfoundland & Labrador BranchP.O. Box 8065, Station “A”St. John’s, Newfoundland A1B 3M9Telephone: (709) 576-1953Fax: (709) 738-1475E-mail: [email protected]: www.lifesavingnl.ca
Nova Scotia Branch5516 Spring Garden Road, 4th FloorHalifax, Nova Scotia B3J 1G6Telephone: (902) 425-5450Fax: (902) 425-5606E-mail: [email protected]: www.lifesavingsociety.ns.ca
Ontario Branch400 Consumers RoadToronto, Ontario M2J 1P8Telephone: (416) 490-8844Fax: (416) 490-8766E-mail: [email protected]: www.lifesavingsociety.com
Prince Edward Island BranchP.O. Box 2411Charlottetown, Prince Edward Island C1A 8C1Telephone: (902) 368-7757Fax: (902) 368-1593E-mail: [email protected]: www.lifesavingpei.ca
Quebec Branch4545 Pierre de Coubertin AvenueP.O. Box 1000, Station “M”Montreal, Quebec H1V 3R2Telephone: (514) 252-3100 or 1-800-265-3093Fax: (514) 254-6232E-mail: [email protected]: www.lifesaving.qc.ca
Saskatchewan Branch2224 Smith StreetRegina, Saskatchewan S4P 2P4Telephone: (306) 780-9255Fax: (306) 780-9498E-mail: [email protected]: www.lifesavingsociety.sk.ca
Branches.indd 1 3/28/2011 11:17:46 AM